
cricutmaker
Cricut.com/setup maker 3
Go to cricut.com/setup and get the Design Space installed on your PC.
10 posts
Don't wanna be here? Send us removal request.
Last Seen Blogs


sleeplessnightsdontmeanathing
Wake Up & Be Awesome

engagethehappy
Engage the Happy Drive

toolonely1
meh

jualvitaminkuching
Untitled
Text
How to Pair Cricut Maker to Phone and Computer: Full Guide
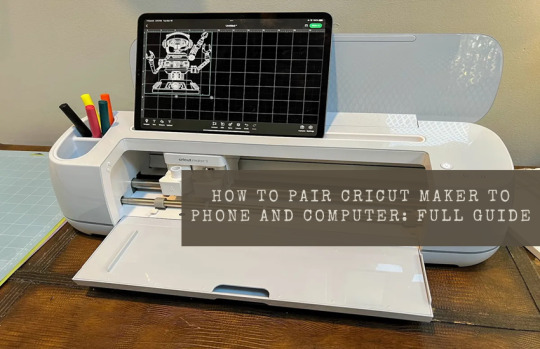
Every crafter will agree that the Cricut Maker Setup is one of the smartest and favorite models among cutting machines. This Cricut machine can cut 300+ materials such as vinyl, iron-on, cardstock, and more. It can also cut, write, foil, and score different materials. To start with this Cricut cutting machine, one must know how to pair Cricut Maker with a computer and smartphone.
Crafters have two options for pairing both devices: Bluetooth and USB cable. However, it is their call to decide in which mode to connect their Cricut machine to a computer and mobile devices. Also, to begin any projects, all users must download the Cricut software and connect it to their device.
If you cover the entire blog from top to bottom, you will quickly learn how to set up and pair this Cricut machine with devices.
How to Setup Cricut Maker on a Computer?
Before getting started with how to pair Cricut Maker, all the users need to set up their Cricut product on a computer. To properly end the setup process, they need to go through the below-shared steps:
Lay the first stone of the setup process by unpacking your Cricut machine & switching it on.
After doing that, connect both devices via USB cable or Bluetooth.
Next, visit cricut.com/setup and install the Design Space app on your computer.
Then, create your Cricut ID or sign in with the login details.
Now, follow the instructions appearing in your front on the screen.
Finally, you will be called for a test cut after completing the setup process.
How to Pair Cricut Maker to Windows and Mac?
Below are some tips and instructions for pairing this Cricut product with Windows and Mac systems.
Windows
In addition to this blog section, look at the steps below and learn about setting up both devices.
Go ahead with the process by checking that your Maker machine is within 10-15 feet of your computer.
Now, tick the Settings icon and land on the Windows Settings tab.
Following this, choose Devices and check that the Bluetooth is on.
After that, hit Add Bluetooth or other device that appears at the top of the screen.
Next, click the Bluetooth button under the Add a device tab.
A window will appear at this point. Click on your Cricut model.
Finally, your Maker and Windows pairing process will come to an end.
Mac
This section explains how to pair Cricut Maker with a Mac system.
Make the first move by ensuring that your Cricut cutting machine is on.
Afterward, check that it is under the range of 10-15 ft of your Mac system.
Next, open the Apple menu, choose System Preferences, and click the Bluetooth icon.
Check that your Bluetooth is on, and select your Cricut model from the list.
After a few minutes, your device’s pairing process will end.
How to Pair Cricut Maker to Phone (Android/iOS)?
Further referring to the blog, let’s discuss the process that will help the user pair smartphones with this Cricut product.
Android
Take the first step and ensure that your Cricut machine is on and positioned within 10-15 ft of your mobile device.
After that, scroll down your phone’s home screen and hold on to the Bluetooth icon for a few seconds.
Now, turn on your device’s Bluetooth and let it scan for the machine for a few minutes.
Next, choose your model name, and the pairing process between your Android and Maker will end.
iOS
To get things moving, check that your Cricut Maker is on and within 10-15 feet of your iOS device.
Go to the Settings tab and activate your device’s Bluetooth feature.
After activating the Bluetooth, a list of available devices will be shared in front of you.
Select your model name from the list at this point, and both of your devices will be paired successfully.
By paying special attention to these steps, the user can swiftly pair up their respective smartphones with the Cricut Maker machine. Moreover, they need to be very cautious so they don’t make any mistakes during the process.
Frequently Asked Questions
How to Setup My Cricut Maker on a Smartphone?
With the help of the below steps, you can effortlessly set up a Maker machine with smartphones:
Begin the process by plugging the machine and turning on its power.
After that, pair your smartphone with the Cricut machine via Bluetooth.
Install the Design Space app on your device and create your account.
Next, go to the Menu section and tick the Cricut Machine Setup option.
Following this, choose your machine name from the list and follow the steps to finish the setup.
Finally, when informed of the test cut, you will know about the setup completion.
How to Connect Cricut Maker to Devices via USB Cable?
To connect the Cricut cutting machine with devices via a USB cord, the user needs to follow these steps:
First, unpack your Cricut product and USB cable very carefully.
Following this, switch on your machine and put one cord into the machine port.
Afterward, insert another end of the cable into the device and let it connect with each other.
Now, the Cricut Maker will turn on and be ready for cutting purposes.
How Do I Pair My Cricut Maker With iOS via Bluetooth?
With the help of these steps, you can effortlessly connect the Cricut product with iOS devices:
Check that your Cricut machine is enabled and place it under your device’s 10-15 ft range.
Next, go to the Settings tab and turn on your device’s Bluetooth.
After a few seconds, a list of devices will be shared on your phone screen.
Tap the model name, and the pairing process will end after a few seconds.
For More Information Visit: www.cricut.com setup login
Cricut Design Space Download
Cricut setup on computer
Source: How to Pair Cricut Maker
#how to pair cricut maker#cricut maker setup#cricut design space app#cricut design space login#cricut design space download#Cricut setup on computer#cricut machine setup#how to setup cricut maker
3 notes
·
View notes
Text
7 Cricut Maker 3 Leather Projects to Enhance Your Style

Hey, are you looking for some unique Cricut Maker 3 leather projects? Look no further than this guide! In this post, I am going to tell you the best DIY projects that you can create with leather. About 3 weeks ago, I finished my Cricut leather projects. I have aimed to make a few projects so that I could write this blog diligently. But do you know what was the most difficult part of this project? Cutting intricate designs on leather. Yes, it might not be easy to cut, but they require patience during both cutting and weeding such designs.
Without any further delay, let’s get straight into this blog to find out the most amazing ideas for creating leather Cricut projects.
1. Bracelets
Do you love bracelets? If so, you must give it a shot! When I was looking for ideas for Cricut Maker 3 leather projects, it had been on my mind for a long time. Finally, I gave it a try and saw how beautiful it looked. If you have any friends you want to give this bracelet to, it would be great!
2. Hair Accessories
Do you want something for your hair? You might wonder what I can make for my hair or other beauty stuff. Well, this leather accessory is also made with leather. As you can see, it might look a little tedious, but it is a piece of cake. Start diving into your Crafting journey and create what you need the most.
I gave it a flower shape, and if you are a little bit familiar with Cricut Maker 3 Setup, then it is a breeze for Maker 3 to cut such designs.
3. Earrings
I love leather earrings, as they enhance my beauty and are easy to create. Beginners who are looking for the best Cricut Maker 3 leather projects should try them out! Why? Because they are really easy to make. I also wanted to make them a little unique, so I added some glittery effects. This is what I needed, and hence, I made them.
4. Keychains
If you want personalized keychains, then here I have something for you! Whether you are a novice crafter or a pro, this keychain is easy to make. All I did was add some texts with different font styles to my Design Space.
Finally, after finishing my design, I started my Cricut Maker 3 and cut all the words Daddy and Daniel to make keychains. I handed it to my dad, my brother, and my dinner.
5. Crossbody Bag
Today, everyone wants to use a body bag, and what if you have a personalized one? Sounds like a great idea, no? I created this simple bag for myself as I am not much into personalized stuff. But you can have one if you want. The process of making this bag is easier, and you will need iron-on vinyl to make such a beautiful crossbody bag.
6. Monogram Keyring
Looking for super easy-to-make Cricut Maker 3 leather projects? Here is the monogram keyring that is most widely useful, and it would be great if you could give it a shot! This is a great beginner project, and any beginner should try to make something unique. I also used paint to color it to make it look stunning! Lastly, you can see the result in the picture, like how elegant it looks.
7. Cord Organizers
Every one of us uses earphones or a charger, but sometimes managing those clumsy wires is boring and tedious. So, I decided to create something that could organize my cords or wires. Here, you go with leather cord organizers, which I created using my Cricut. There are many cuts that I had to make, and I preferred my Cricut Maker to cut them as they are faster and provide precise cuts, making them look professional rather than handmade.
FAQs
Can I cut leather with Cricut Maker 3?
Yes, leather can be easily cut with Cricut Maker 3. It can also cut other materials such as fabric, paper, and balsa wood without any problem. In order to cut the leather, you have to use a knife blade, and the thickness of the leather should be up to 2.4 mm or 3/32 mm thick. However, you have to use a clean cutting mat with a sharp blue edge for better results.
What are the essential Cricut tools for cutting leather?
There are some common tools that you can use to cut leather. They are as follows:
Utility knife: This sharp knife is considered a versatile tool for cutting your leather.
Rotary cutter: This is a tool that comes with a wheel-shaped blade. Ideal for long and straight cuts.
Leather shears: A kind of specialized scissors idea for cutting thick and tough leather.
Round knife: It is a popular tool that is most widely used for cutting leather.
How thick can I cut leather with Cricut Maker 3?
If you want to cut the leather on Cricut Maker 3, you can cut up to 7 oz thick. The best thing about the Maker 3 machine is that it cuts anything precisely. In addition, cutting the leather is a breeze. You will also have to use a knife blade for all these leather Cricut projects.
Wrapping Up
As you went through the 7 Cricut Maker 3 leather projects, you might have found them easy to make. The best thing about these leather projects is that they are beginner-friendly. So, you will not need to worry about the complexity of the projects; just turn on the Cricut Maker 3 and prepare the leather that you want to cut. After cutting, the result will be fantastic and will stand out!
For more information and visit: www.cricut.com/setup login
cricut.com/create
Cricut Design Space App
Source: Cricut Maker 3 Leather Projects
#Cricut Maker 3 leather projects#leather Cricut projects#cricut design space download#Cricut maker setup#cricut maker 3 setup#Cricut Design Space Login#Cricut Design Space App#Cricut New Machine Setup
2 notes
·
View notes
Text
How to Make a Cake Topper With Cricut: Ultimate Tutorial
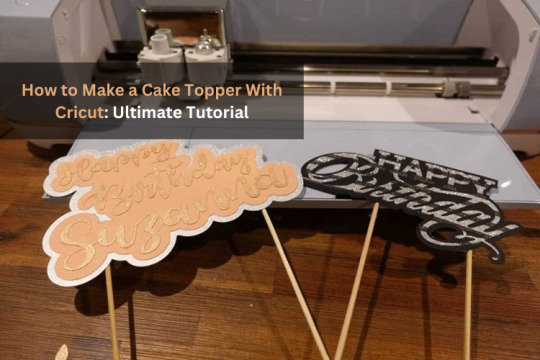
Hey, crafters fam! Are you here to learn how to make a cake topper with Cricut? Then, I’ve got you! Actually, my mom is going to turn 40 this year, and I am very excited about her upcoming birthday. Just like every year, I love to make her day special.
Also, I created a cake topper using my Cricut machine setup, which I will share a bit later in this blog. The materials and machine I used to make this birthday cake topper are already mentioned in this blog. Through this guide, even a beginner can create cake toppers. Yes, you heard that right! This is going to be really easy.
By the end of this blog, you will be able to understand how to create a cake topper design on Design Space and finally cut it on stickers. So, let’s check out this blog to learn more!
Materials and Tools Required for a Cricut Cake Topper
So, what items will you need before moving to how to make a cake topper with Cricut? Well, there is a small number of tools or machines you will be required that I have already mentioned below:
Cricut Cutting Machine
Fine Point Blade
Cardstock (30 x 30 cm in two shades of blue 185gsm and an A4 glitter cardstock 250gs, or choose whatever you like)
Double Sided Tape or Glue
A Cake Pop Stick or a Wooden Skewer
Glue Gun
The image below might help you gather the essential supplies:
How to Make a Cake Topper With Cricut Machine?
Below, I am discussing the simple steps to create a birthday cake topper. Ensure you follow each step carefully. Let’s start by creating a Design on Cricut software.
Step 1: Create a Design on the Cricut App
Before I start, let me tell you that the design is really simple. It does not include complex designs or shapes; there will be only text. Now, let’s start!
First, open the Design Space and then go to the Canvas.
After that, you have to click on the Text tool from the toolbar on the left side.
Type your text as I have typed: Happy 40th Birthday.
Then, choose the font you like. (I have used a Timberlyfont).
Okay, so now we have added our texts here. Let’s ungroup it to remove the gaps between the letters.
Step 2: Group and Ungroup Your Text
Select the whole text and then right-click > Ungroup.
In the picture below, I have shifted the letters H, B, and 4 slightly to the right side by simply dragging them using my mouse cursor.
Similarly, you will need to arrange the texts as shown in the picture below because we want them as one single piece.
After removing the gaps, you need to group all of them.
To group the texts, right-click > Group. Repeat the steps for each word separately.
By now, I have almost taught you how to make a cake topper with Cricut software. Now, let’s add the offset to the topper.
Step 3: Add the Offset to Your Cake Topper
I am adding three colors of cardstock to this topper, so I will need two offsets to create three layers.
I also added the color with the Color Swatch from the upper left toolbar.
First, you should ensure that you add the first offset and then the second one. Then, add 0.4cm once again for the distance as the main base of the topper design.
Step 4: Cut and Assemble Your Cricut Cake Topper
Now, hit the Make It button on your Design Space and then click the Continue button to navigate to the mat window to get the Material Settings window. After that, you will need to select cardstock. Then, follow the steps shown on your display and cut the materials accordingly.
Don’t forget to press the C button on your cutting machine. Assemble all the layers together using double-sided tape. Then, use a glue gun to stick the wooden Skewer.
Here you go! Finally, you’ve made it! YAY!!!!!
Final Words
In this detailed tutorial, I’ve discussed how to make a cake topper with Cricut. I started with the list of materials needed to make this cake topper. Afterward, I explained every step in detail, such as creating your design on Cricut Design Space app grouping and ungrouping the texts so that you can manipulate them. Then, I showed them how to add the offset and cut design using a Cricut machine. I believe all the steps will be helpful for beginner crafters to make their first cake topper.
FAQs
What are the best materials for making a Cake topper with Cricut?
In my opinion, there are a few materials that you can try to make your Cricut birthday cake topper. These materials are acrylic and cardstock. There are other materials as well, but I find them most suitable for my cake toppers. Until now, I have made cake toppers using cardstock and acrylic only. The final result was just amazing. So, you can go for it without a second thought.
Which Cricut font should I choose to make a cake topper?
I’d love to answer this question. Well, if you are looking for a beautiful font that suits your cake topper, then you should choose a ‘Script Font’ or a ‘Serif Font.’ These fonts are thicker, which looks great on your cake topper. So, choose fonts that are a bit thicker so that they look wonderful.
Which Cricut machine should I use for cake toppers?
In order to make an elegant cake topper that attracts everyone’s attention. You can use any Cricut cutting machine model. Yes, creating a Cricut birthday cake topper is a piece of cake. Thus, everyone can create it in a few simple steps. You can even create it on your smallest machine, called Cricut Joy.
For more information visit: Cricut.com/setup
design.cricut.com
cricut maker setup
Source: how to make a cake topper with Cricut
#Cricut birthday cake topper#cricut design space software#cricut machine setup#www.cricut.com/setup login#cricut.com/create#cricut software app#Cricut Design Space Software
0 notes
Text
What Can I Do With a Cricut Maker 3: Explore 6 Projects
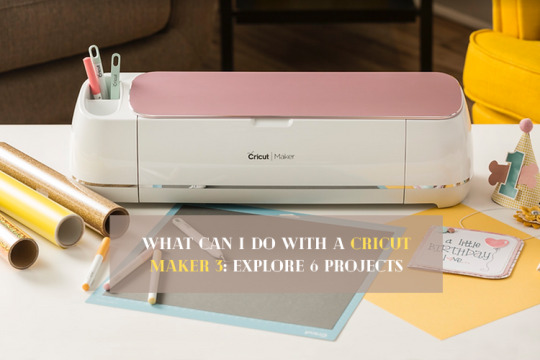
Recently, I received a command on one of my previous blogs. In this, someone asked, “What can I do with a Cricut Maker 3?” After reading the comment, I wondered whether I had written something on it before. After extensive research, I found out that it still needed to be written, so I finally came up with this blog.
But before writing this post, I discussed it with my friend Jack, who is also a Cricut Maker 3 user. I asked him the same question I got in my comment. He advised me on a few Cricut Maker 3 project ideas that we can create using the Maker 3.
So, are you excited to explore these Cricut Maker 3 projects? Get into this blog and start searching for the idea that you like. I have mentioned the top 6 projects in this blog. Let’s delve into it to learn more.
1. Large Vinyl Decals
Cricut Maker can easily help you get large-size decals. Let me tell you when I made this. I made this up on my friend Andy’s request. He recently bought his new home and wanted to do something for his wall.
He asked me, “What can I do with a Cricut Maker 3? Is there anything that you can advise me on? “As a beginner crafter, he needed something extraordinary, so he helped me make these wall decals. They look stunning! No?
2. Personalized Vinyl Decals
Yes, you can also make personalized decals on Maker 3, as it is capable of making decals easily by cutting the material precisely. So, here is what you have to do: just install Cricut Design Space on your PC and start creating or editing the design on your Design Space app.
Then, just wait for a while; you have to perform the on-screen steps to choose the material. Finally, just cut the material as per your requirements on Cricut. Then, you are ready to go!
3. Thank You Cards
Who doesn’t love the thank you message? So do I. Cricut Maker can cut a wide range of materials with different thicknesses. However, before making these cards, I was lost in my thoughts and thinking - what can I do with a Cricut Maker 3?
Thanks to my friends, who recently gifted me a platinum necklace. Since she doesn’t live here, I had to send her a thank you message to her. Hence, I created this beautiful card using my Maker 3. Can you see those green color cards inside those cutouts? That is nothing but an insert card. It also adds a creative touch to my crafts.
4. Full-Color Stickers
A colorful sticker always looks amazing on a diary or journal. Doesn’t it? Look at those colorful stickers in the picture above. I made those using a Print Then Cut feature, which is easily possible with your Cricut Maker 3. Yes, if you still want to know what I can do with a Cricut Maker 3. Then look no further than such projects. Just use the simple paper and print your images using a compatible printer. Then, set up the materials on Cricut and start cutting it.
5. Personalized Mug
Vinyl-based projects are my favorite, as they look fantastic when made. I made this mug as my first project on my Cricut Maker 3 last January, and today, I finally got a chance to mention it in this blog. I hope it will help you find the answer to your question: What can I do with a Cricut Maker 3?
But do you think only Cricut Maker 3 is enough for this project? The answer is No! You will also need a Mug Press to transfer the vinyl on your mug. However, Maker 3 is for cutting your design, not to transfer it to the mug.
6. Custom Shirts
What about this vinyl shirt? Look at those intricate designs I made on Design Space. Isn’t that enticing? To me, it is wonderful! Try this and make it for your loved ones or yourself. You can create custom shirts in a few simple steps. You will need to create a design on Design Space and then send the command to your Cricut Maker to cut the vinyl. Lastly, I hope you find a satisfactory answer to the question: what can I do with a Cricut Maker 3?
Final Words
In this blog, you will find 6 Cricut Maker 3 projects that you need to make using a Maker 3 cutting machine. This robust machine has a versatile feature that lets you cut 300+ materials quickly without interruption. The precision and quality it offers for your project are just amazing. From large-size wall decals to personalized shirts, I have included many projects in this blog.
FAQs
Should I really buy a Cricut Maker 3?
Yes, you can buy a Cricut Maker cutting machine if you want to make projects that give you amazing results. If your crafting needs are high, then you must get this machine. This die-cutting machine can cut a variety of materials easily in a few minutes. Also, if you are a series crafter, you must try this machine. In my experience, it has been a worthwhile investment until now.
Can I print images using my Cricut Maker 3?
Cricut cutting machines are not made to print any images. They look quite similar, but instead of using ink cartridges to print, they have a built-in blade housing that cuts the materials. The capabilities of cutting the materials for Cricut Maker 3 are high, and you get very precise cuts.
Can I use regular paper in Cricut Maker 3?
Be it delicate paper or cardstock, you can easily cut them on your Cricut Maker 3 machine. However, you can make several exciting projects using this paper or cardstock, such as cards, home decor, gift tags, 3D boxes, banners, party decorations, flowers, and so much more.
For more information visit: cricut.com/setup
Set Up Cricut Maker
Cricut Design Space software
cricut new product setup
Source: What Can I Do With a Cricut Maker 3
#what can I do with a cricut maker 3#cricut maker 3 projects#cricut maker 3 project ideas#cricut maker 3 setup#cricut maker setup#cricut maker 3#cricut design space#cricut design space software#cricut machine set up
1 note
·
View note
Text
Instant & Crazy Cricut New Year Projects for DIYers
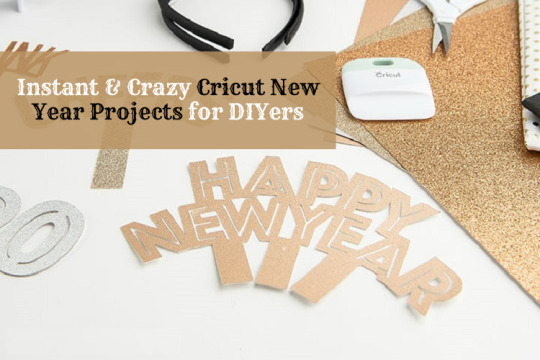
Are you all ready to welcome 2024 with some of the crazy Cricut New Year projects? I know we haven't celebrated Christmas yet, but I am already looking forward to New Year's Eve. I am Archie Andrews, a High School craft teacher and a passionate DIYer. Ever since I bought my Cricut machine, it has not only helped me unleash my creativity but made a special bond with my students.
No doubt, it was a tough road for me to understand the craft machines, but I never left any chance and grabbed info from different sources. As time flew, I soon became an expert and made numerous kinds of projects for various occasions. Inside this blog, I have made a list of Cricut ideas for New Year that you can use for the 31st night.
Photo Booth Props
One of the most demanding Cricut New Year projects that you will personally love to make is the photo booth props. They are widely used by everyone while capturing the moment and making it for a lifetime. Photo booth props are available in various sizes, shapes as well and packs. Apart from that, they can be easily made out of cutting machines and tools.
New Year Bar Cart
Is it fair to welcome 2024 without a bottle of champagne or shots? No, right, then unbox your bar cart and fill it with all kinds of drinks for your guests. You can decorate the cart by hanging a small garland around its corner and decorate it by placing small disco balls or flowers across the cart. You can decorate the cart by using a craft machine and other necessary supplies.
Garland
Equally important, other Cricut ideas for New Year Eve that you can use this year are flower garlands. They will give a personal touch to your party area and make it look more pleasant. However, you can make the garland in different shapes, sizes, or patterns as per your choice. To make your work more simple, you can use your craft machine and other supplies.
T-Shirt
Thank your guests for attending your party by giving them a return gift. It's evident that they are going to love it and will never forget you. Amongst so many Cricut New Year projects, designing t-shirts is everyone's favorite project that they can create with a craft machine. For making the t-shirt, all you will need is a craft machine & its supplies.
Banner
Furthermore, decorate your house by hanging a Happy New Year banner on your wall or near the chimney area. The banner will not only add vibes to the environment but also fill energy inside your guests. You can make this DIY project with your craft machine and other tools. Other than that, you can keep the banner safe and reuse it for next year.
Wine Glasses
Make your guests feel special by serving them the drinks in glass etched wine glasses. The glasses will increase your class among them and make you look more creative as compared to others. Apart from that, you can also give glasses as a token of love and appreciation to your guests. Moreover, you need to have specific items that will help you create one of these Cricut New Year projects.
Party Hats
Are you planning to host a theme New Year party this year? If yes, then you shouldn't miss to add party hats. Make your guests wear the hats, and let them enjoy the party without any tension or fear. You can easily make the hats by using your craft machine and other tools.
New Year Card
On the contrary, one of the easy DIY crafts that can be made within a few minutes is greeting cards. You can make different types of cards out of your craft machine in sizes, shapes, and colors. Other than that, you can also write a small message for your loved one and share your feelings.
Tote Bags
Equally important, tote bags are used by everyone on a regular basis for shopping or going to the office. You can make tote bags and give them to your friends so that they can carry their items in one place without having any mess. To make this DIY craft, you need to use a craft machine, Design Space, and other supplies.
Shoes
Summing up the list of Cricut New Year projects, if you have a friend who loves to collect shoes, then you can give them a pair of customized shoes. It's crystal clear that they are going to love the shoes and won't forget how much they matter to you in your life. To make such shoes, you need to use the Cricut machine and other supplies.
Did you find something interesting that you are planning to make this year? If yes, then I wish you all the luck and make the best craft that you can make out of this craft machine.
For more information visit: Cricut.com setup mac
Cricut maker 3 setup
Cricut new product setup
Cricut Design Space software
Source: Cricut New Year Projects
#cricut new year projects#Cricut Maker Setup#cricut design space#cricut new product setup#Cricut Design Space software#Cricut.com setup mac#install cricut design space app
0 notes
Text
How to Make Christmas Cards With Cricut Maker? [Beginner's Guide]
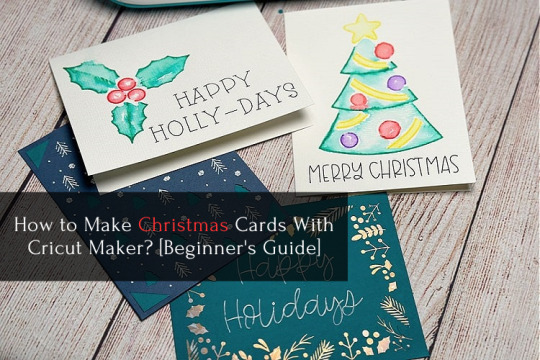
Well, Thanksgiving is over, but Christmas is in full effect! If you are also excited about Christmas, then you can learn how to make Christmas cards with Cricut with me. Creating handmade cards for various occasions is an old tradition that everyone loves to follow. But this year, I decided to come out of my shell and try to make cards out of my craft machine. Greetings! To all my enthusiastic DIYers, I am Stephan, an investor and part-time crafter.
Being an owner of a Cricut machine, I’ve made tons of projects that not only upgraded my crafting skills but also helped me in starting my own business. As a business person, I made and sold various kinds of Xmas cards in all these years. But this year, I am going to design not only for business but also for my loved ones.
What Supplies Are Needed to Make Cricut Christmas Cards?
Being an expert in creating customized cards, I must make you aware of every detail that comes under how to make Christmas cards with Cricut. All DIYers must come across the supplies that will play a vital role in transforming their idea into reality. To ease your work, I have made a list of the supplies that will be required while forming the card for this festival.
Cricut machine
StandardGrip cutting mat
Cricut Scoring Wheel/Scoring Stylus
Cardstock
Cricut Pen
Scraper Tool
Tape
After discovering the final list of materials, let’s come directly to the point and come across the most critical part. While going through the coming section of the blog, you will get to learn about the complete guide to designing a personalized Christmas card this year.
How to Make Christmas Cards With Cricut?
Equally important, this segment is going to play an essential role for each of you. As a blogger, I guide you to go through the content mentioned here very carefully. For a better understanding of how to make Christmas cards with Cricut, have a look at the below-shared details.
Step 1: Cricut Design Space Sign-In & Draw Design
Initiate the process of creating a customized card by signing into the Cricut app.
After the app is open, press the Upload icon given under the Menu panel.
Following this, click Browse and upload your image from your system folder.
Now, press the Insert Image button and tick the Ungroup icon given under the Layers panel.
Next, I will select the design and then choose the Draw option appearing under the Linetype layer.
Further, I can also change the color of the design by choosing the color from the color tab.
Afterward, I am going to select the fold line and change it to the Score line from the Linetype box.
Now, I will choose the whole card and then press the Attach option visible at the bottom of the screen.
Next, I will head upto the Make It option to take a step towards the next step.
Step 2: Insert Cricut Mat & Cut Material
On the new project page, I am going to hit the Continue button and then load my material into the machine.
After doing this, I will place my cardstock into a StandardGrip cutting mat using a scraper tool.
Next, I am going to insert the mat into the machine and then add the scoring wheel and fine point pen into both Clamps.
After the cutting and drawing process comes to an end, I am going to unload the mat and shape my card.
Step 3: Design Your Merry Christmas Card
In this last step of how to make Christmas cards with Cricut, I will gently fold the card from the score line area.
Now, I will use my scraper tool and press the fold area for the crisp fold line area.
Next, I can also add the message inside the card or slip the card inside the envelope.
Are you on board for designing handmade Christmas cards this year? If you’ve made up your mind, then I wish you luck and pay special attention while forming it with this crafting machine.
Frequently Asked Questions
Can I Make Business by Selling My Custom-Made Christmas Cards?
It doesn’t matter whether you are a beginner or a professional crafter; you can surely start your business by selling customized Christmas cards. However, to make your identity in the business, you need to know about your customer’s needs and how to access the craft machine. Besides, you should also buy the tools that will help you in forming the craft as per your choice.
Is It Necessary to Use Design Space While Making Cards?
Yes, all DIYers need to get Design Space on their respective devices. It is a digital app that works together with the cutting machine and helps the crafters draw designs by using images, fonts, and ready-to-use projects. Without the app, the user won’t be able to turn their DIY idea into reality. Apart from that, Design Space keeps adding new features, allowing you to improve your crafting skills.
How Can I Make My Christmas Cards With My Cricut Machine?
Get to know about how you can make Xmas cards with your craft machine:
First, you need to open the Cricut app and log in with your Cricut ID & password.
Second, start creating your design by using the tools given under the Menu bar.
After making the design, make the relevant changes and press the Make It option.
Next, insert your material and start your craft machine by pressing the Go button.
After the process is complete, unload your card and properly fold it.
Finally, gift it to your friends or family members as a Christmas gift.
For more information visit: Cricut.com setup mac
cricut new product setup
Cricut Design Space Software
www.cricut.com/setup login
cricut explore air 2 setup
Source: How to Make Christmas Cards With Cricut Maker
#how to make christmas cards with cricut#Cricut Maker Setup#Cricut Machine Setup#cricut design space download#cricut machine set up#Cricut Design Space Software#how to setup cricut maker 3#cricut maker 3 setup#Cricut Design Space software
0 notes
Text
Best Halloween Cricut Designs You Should Try in 2023

Halloween is not too far away now. We know how Cricut is best for us for making thousands of creative crafts. Hence, there are unlimited possibilities to make pretty Cricut Halloween designs for 2023. We will try our best to provide you with a list of the best Halloween Cricut designs that will make your Halloween amazing. So, try to be with us till the end of this blog and learn all the spooky designs we have collected for you.
Before we move to the designs, you should collect all the necessary Cricut items that will be used throughout the procedure. Those include a powerful Cricut machine, HTV, Cricut heat press, and Cricut mat. Besides, you will have an idea from our blog post for all the items you may require. Let’s dig in.
1. Dollar Tree Halloween Book

Ensure the pages are stuck together. You need to recreate the book pages with scary pictures on them, like a skeleton and bats or ghosts on cardstock, and then stick them to the middle pages of your Dollar Tree book. Now, you can use it to decorate your Halloween place and freak out everyone.
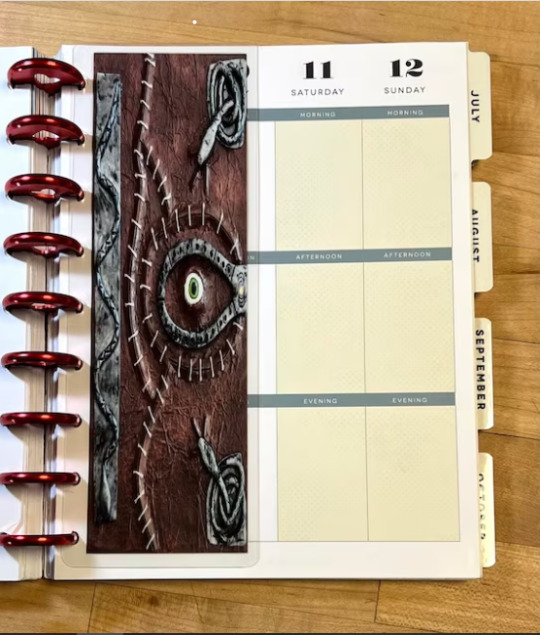
2. Hocus Pocus Spell Book Bookmark
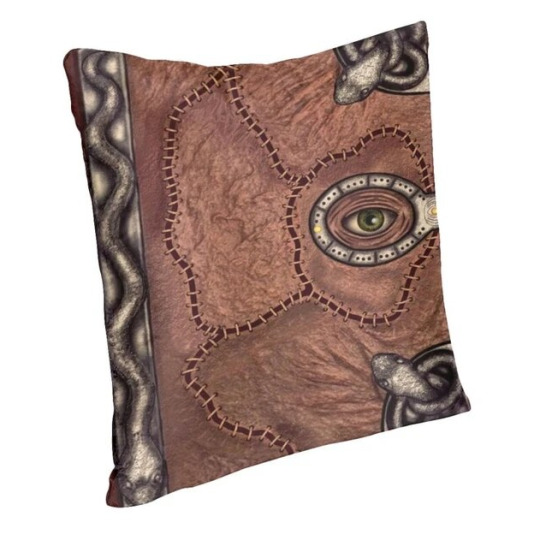
3. Hocus Pocus Spell Pillow
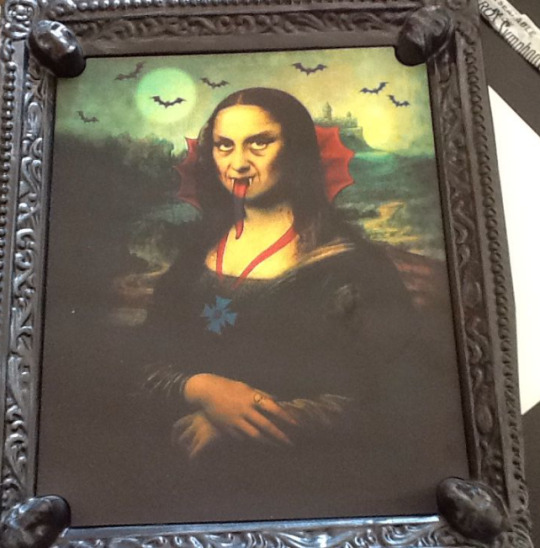
4. Gothic Mona Lisa Frame
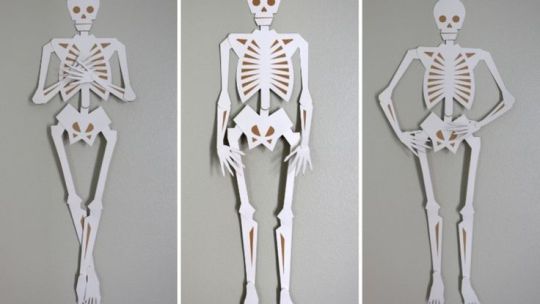
5. Large Skeleton Sign
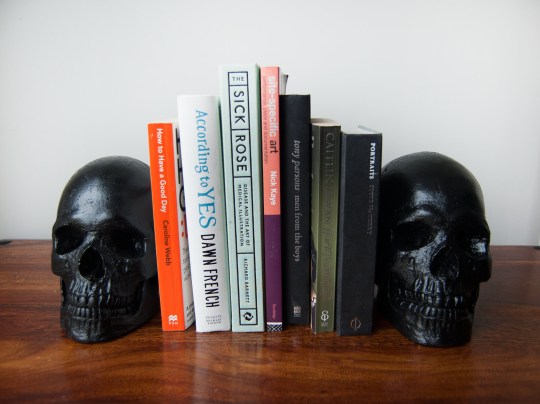
6. Bookends With Skull
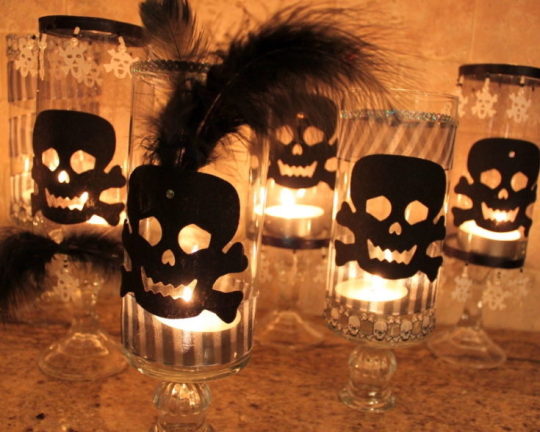
7. Halloween Candle Holder
Conclusion
We all have seen some of the best Halloween Cricut designs to try in 2023. Now, you all might get an idea to design some of the best crafts using your Cricut and Dollar Tree items. We have shared some unique designs to try out. You can also use products from some source and start making projects for Halloween Eve.
The Halloween Cricut design should be spooky and mysterious. If you manage that, your projects are going to be really better than it seems. So, get ready with all your items and start making a fun Cricut Halloween design.
For more information visit: www.cricut.com/setup login
cricut.com/setup maker 3
Cricut Maker Setup
cricut new product setup
Cricut Design Space download
Source: Halloween Cricut Designs
0 notes
Text
How to Use a Cricut Maker? [A Beginner’s Guide]
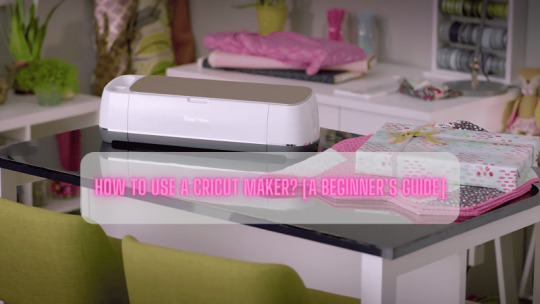
Crafters and DIYers widely use Cricut’s products to showcase their creativity. The reason why users like Cricut machines is because they offer cutting-edge machines that cut with high precision. Even though there are various Cricut models available in the market, Cricut Maker is the latest version of the Cricut models. It offers a wide range of adaptive tools and faster performance that complete the crafting tasks quickly. Also, the machine is so simple that a newbie can easily use it without someone’s help. Since Cricut Maker can offer more than you expect, it is the first choice for every crafter.
Most beginners require an easy tutorial so that they can get started with the machine quickly. Thus, the blog is dedicated to teaching you the proper use of Cricut Maker with a step-by-step guide. Let us start with the features of the machine.
Key Features of Cricut Maker
Coming to the feature of Maker, crafters can cut soft materials or hard materials easily with precision. However, the materials that you can cut on Maker are fabric, paper, chipboard, leather, vinyl, and balsa wood.
Here are the significant features of Maker you must know:
Compared to its predecessor, it is faster and more powerful.
It can cut more than 300 materials at 10x speed.
For charging the tablet, you will get an additional USB port in Maker.
Materials You Can Cut With Cricut Maker
There are a massive number of materials available that you can use with Maker cutting machines. The Maker can easily cut both software and more rigid materials in one go.
Here are the materials that you can cut with Cricut Maker:
Iron-On Vinyl
Removable Vinyl
Aluminium Foil
Glitter Cardstock
Cardstock
Washi Tape
Faux Leather
Craft Foam
Butcher Paper
Chalkboard Vinyl
Magnetic Sheet
How to Use a Cricut Maker?
Before using a Maker device, you first need to set it up with your computer or phone. However, the setup process is quite simple, making it easy for beginners to setup quickly. For this, you will need to download the Cricut app, i.e., Design Space, to your system. Let us start with the first method to setup Maker.
Step 1: Setting up Cricut Maker
To setup the device, go to cricut.com/setup. Then, download and install Cricut Design Space on your PC. The app is compatible with Windows, Mac, Android, and iOS, so you can easily install it on computers as well as mobile devices.
Step 2: Updating the Firmware
When you unbox the new Cricut Maker machine, the first thing you should do is update the firmware. The process is exactly the same as the above Cricut setup.
To update the firmware, you must connect your device via USB or Bluetooth:
Now, visit the official website of Cricut.
From there, you need to download the Design Space app.
After downloading the app, you need to create a Cricut ID.
Afterward, you can complete the Cricut setup.
Further, the Cricut app will detect the Cricut Maker and ensure the firmware update.
On-screen, you will also find the list of firmware versions.
Next, hit the Update button.
After this, the firmware will be updated.
Step 3: Choosing Compatible Tools
Cricut Maker uses a special type of blade for cutting, engraving, and embossing the materials. In addition, the cutting blades compatible with other Cricut machines may not be compatible with Maker. Therefore, as a user, you must select apt tools for making a Cricut project.
Step 4: Cutting Your First Designs
Once you have selected the suitable tool for your Cricut Maker, then you must proceed with loading the materials into the machine. Then, take off the cutting mat and place it into the Maker machine. After this, you have to locate the materials on the mat and stick them together so that the material will not slip during cuts.
Further, load the mat and materials into the Maker machine. Finally, the machine will make cuts according to the instructions you have given. Ensure you have attached the correct tools.
Step 5: Weeding the Extra Materials
This step is essential when you have finished the cutting. After cutting the designs, there is a lot of debris and leftovers stuck to the mat that need to be removed. Plus, you must remove the extra materials from your design using a weeding tool. Users also prefer using Cricut BrightPad to get clear visibility of fine cuts.
Conclusion
Now, it’s easy to bring your creativity to reality with this complete guide. This blog explored the features and materials that are compatible with the Cricut Maker. Also, we discussed things like how to use a Cricut Maker for beginners. Aside from usage, the Cricut setup process is a necessary step to get started. On top of that, we also talked about compatible tools and weeding methods for designs. So start making your new designs today and move forward in your crafting career!
FAQs
Can I engrave glasses with Cricut Maker?
Unfortunately, Cricut has not developed any such tool that can engrave the glasses. Since it is not designed to engrave the glass, engraving is not possible on the glass materials. Besides, users can use the Maker to create the stencil and etch the glass. However, you can use the etching tool to etch the glasses.
Is the Cricut Maker machine for beginners?
The Maker machine is a user-friendly device that is simple to use for every beginner. Even though the mechanism looks complex, its overall design will help you operate it easily on your first go. Besides, the machine uses the Design Space app, which has a straightforward interface, allowing you to design anything effortlessly.
Should I buy Cricut Maker?
For avid crafters, the Maker series is the best device for getting faster speed and precise cuts. Whether it is custom quilts or card making, the Maker can handle them effortlessly. Plus, the cutting materials capability is also high, which makes it a versatile machine among all Cricut machines.
For more information visit: Cricut.com setup mac
Cricut Machine Setup
install cricut design space app
cricut explore air 2 setup
#how to use a cricut maker#Cricut Maker#cricut maker setup#Cricut.com/setup#Cricut.com setup mac#install cricut design space app#install Cricut Explore Air 2#Cricut.com setup
1 note
·
View note
Text
Learn How to Make Cupcake Toppers With Cricut!
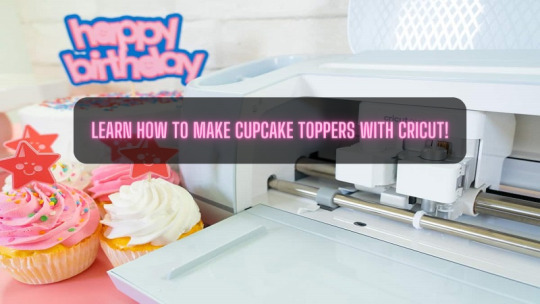
Finishing a meal with dessert gives the guests a different level of satisfaction. However, it becomes much more special when they are baked personally. If you love hosting parties for various occasions, then DIY decorations must be on your list. If you are fresher in the crafting industry, then coming across how to make cupcake toppers with Cricut is very important. Per the crafters, this is one of the simplest do-it-yourself crafts completed within a few minutes. In this post, you will learn how to create this custom project.
Step 1: Create a Design in the Cricut App
Commence the process by going to Design Space software and opening a New Project.
On the new canvas, press the Text tool and type down your respective text.
Now, select the text and choose the font from the drop-box menu.
Next, you need to ungroup the word and move each letter to make it touch with another one.
After that, weld down the respective letters to give them a single shape.
Followed by that, add an offset cut and do the necessary editing on the text.
Once the modification completes, tick the Apply box and move further to the next step.
It’s completely up to you to change the design color to represent the paper choices. By choosing more than one color, the user won’t get confused between the papers.
Step 2: Cutting Cupcake Toppers With the Machine
Besides completing Step 1, select Make It and choose the mat option.
Now, you must ensure the mat size is correct and compatible with Cricut.
Under the Project Copies dialog box, increase the copies by pressing the downward arrow.
Once the copies are final, tick the Apply button, and the design duplicates will be complete.
In addition, choose the material and place it on the purchased cutting mat.
After inserting the mat into the machine, press the Start button to begin cutting.
Once the cutting process gets complete, start removing the glitter paper by peeling off the mat from the paper.
Choose the same method and spatula tool to remove the rest of the letters from the mat.
Take the scraper tool and remove any leftover paper from the used mat.
Next, insert the second selected material and start the cutting process.
Lastly, use a method to remove the paper from the LighGrip cutting mat.
Step 3: Forming Custom Cupcake Toppers
Take the glue gun and fill it completely with strong adhesive glue to stick both the cardstock.
After sticking the cardstock, let it dry and avoid flipping over the paper.
Again apply hot glue in the middle of the paper and stick the skewers or toothpick in the center.
On the other hand, you can also add a hot glue extra dot on the top of the stick.
Following this, remove any hot glue strings within one go before it gets dried up.
Let the glue dry up completely before placing it on the cupcake.
Wait for a few minutes and place the prepared topper on the cupcake.
Bravo! You have successfully created your customized cupcake topper.
To become an expert in creating this DIY project, every crafter must follow the same method very seriously. You shouldn’t skip any of them; otherwise, you won’t get the desired result.
Conclusion
In brief, to this blog, you must have learned how to make cupcake toppers with Cricut. It can be expected that each one of the users will follow all the steps mentioned in this process. Moreover, they must also hold all the supplies beside them during the decorative item designing process. It can be anticipated by the users that they will take this blog seriously and follow all the instructions mentioned in the earlier sections of the blog. In case you have any queries, then study the following FAQs.
FAQs
Which Cardstock Should I Use to Design Cupcake Topper?
Per the crafters, brand-smooth, solid cardstock is the best for the cupcake topper. However, you must choose the materials after confirming their thickness and quality. The thick or lightweight cardstock should be 65 lb & heavyweight cardstock should be 110 lb. The crafter’s creativity skills also shine up when mixing two cardstock textures to add dimension to the respective crafts.
What are the Best Materials to Create Personal Cupcake Toppers?
Apart from the earlier shared materials, the professional DIYer can create these dessert toppers by choosing the following material. However, all crafters must use all the supplies systematically without wasting them.
Scrapbook Paper
Buttons
Photograph
Chocolate
Fondant
Plastic
Googly Eyes
Apart from that, all these materials should be of top-class quality and must be involved in the design.
How to Can I Custom Cupcake Topper for Events?
Follow the steps to create custom cupcake toppers for different events:
Open the Cricut app and draw the design of your choice using various tools.
Choose the material type and insert the decided material into the cutting machine.
After the cutting process, remove the design from the mat and stick it with glue.
After the glue dries up, place the topper on your dessert.
For more information visit: Cricut.com setup mac
Cricut Explore Air 2 Setup
Cricut machine set up
Cricut Maker Setup
#Cricut.com setup mac#How to Make Cupcake Toppers With Cricut#Cricut Maker Setup#Cricut.com setup windows#install cricut design space app#cricut explore air 2 setup
1 note
·
View note
Text
Best Cricut Machines You Should Buy in 2023?

Do you want to buy the Cricut cutting machine, or are you still deciding which one to buy? Don't worry; you are not alone - many people share this question: "What is the best Cricut machine?" This blog post is here to provide the answer to your question.
Today, many options are available when it comes to Cricut cutting machines. Crafters and DIY enthusiasts enjoy making their designs using these machines. It allows them to complete their task 10 times faster than the traditional methods. Crafters prefer the Cricut machine as it provides professional cutting and finishing. Therefore, we have created this blog to give you an overview of various Cricut machines. Also, we'll delve into the pros and cons of various types of cutting machines.
What is a Cricut and What Does it Do?
A Cricut is a famous brand that makes cutting machines to cut and draw on materials like paper, vinyl, and cardstock. Some of them can also cut tough materials, such as leather, fabric, wood, board, etc. You can simply consider a Cricut device like a printer. However, it doesn't print anything but can cut designs onto desirable materials using a movable blade.
In terms of quality, we must say the best Cricut machine must be capable of cutting anything precisely. Hence, this is the perfect choice for making personalized crafts, including T-shirts, custom wall art, and party decor.
Different Types of Cricut Cutting Machines
Currently, there are five different Cricut cutting machines: Explore Air 2, Explore 3, Maker, Maker 3, and Cricut Joy. All of them are electric craft machines and quite similar in terms of features. However, each machine comes with a unique feature, making it perfect for different purposes.
The Cricut Explore is the mid-level option and is still considered the best Cricut machine. Whereas the Cricut Maker 3 is the upgraded version of the Explore series and has the ability to cut a range of materials with different types of tools. In comparison, the Joy machine is the smallest model. Due to this, Joy is portable and easy to set up and use. Further, in June 2021, Cricut launched the two latest machines in their lineup: Cricut Explore 3 and Maker 3.
Regarding Cricut Maker 3, it is the best-selling machine in the maker series and has ten times the cutting force. Moreover, crafters consider Maker 3 as the best Cricut machine.
1. Cricut Explore Series
Now, let us have a look at the overview of exploring a series of machines. The Explore machine is the best Cricut machine for you if you want to cut materials such as vinyl, iron-on crafts, and greeting cards
Cricut Explore Air 2
The Explore Air 2 is one of the best-selling machines, and its size is perfect for both novice and professional crafters. The machine uses cutting mats, having sizes of 12" x 12" or 12" x 24". The cutting mat size is perfect for creating iron-on decals for T-shirts, 3D projects, and large vinyl decals. All these features make Cricut Explore Air 2 the best Cricut machine for 2023.
Moreover, the Cricut Explore Air 2 has a Fine-Point blade. It can cut over 100 materials, like vinyl, paper, and cardstock. In addition to this, you can cut even more materials by swapping out the Fine Point Blade for the Bonded Fabric Blade and the Deep Point Blade.
Pros:
It can cut, foil, score, and write
Works with 100+ different materials
Bluetooth available
Print then Cut feature
Free Cricut app
Cons:
Not suitable for Adaptive system, meaning you can’t use Rotary and Knife Blades, as well as Scoring Wheels
A Cricut mat is needed
Not work with Cricut Smart Materials like Vinyl
The maximum cutting length (23″ on a 24″ mat)
It is not portable
Cricut Explore 3
The Cricut Explore 3 was introduced in June 2021 in the Explore series. Due to its powerful motor, it can cut 2x faster. Plus, it is designed for cutting Smart Materials without a mat.
It is a full-size machine that can cut 100 materials such as cardstock, glitter paper, iron-on-vinyl, and vinyl. Also, it works with 6 tools: the Fine Point Blade, Scoring Stylus, Foil Transfer, and the Deep Point Blade, enabling you to cut a wide range of materials. It even allows you to cut leather and fabric.
Pros:
It can cut, foil, score, and write
Work with 100+ materials
Bluetooth available
Can cut with 2x speed than its predecessor when using Smart Materials
Print then Cut feature
Free Design Space app
Compatible with cutting without a mat.
Cons:
Not suitable for Adaptive system, meaning you can’t use Rotary Blade, Knife Blade, Scoring Wheels
It is also not portable
2. Cricut Maker Series
These Maker series models are the most powerful cutting devices. They allow you to create any project virtually.
Cricut Maker
The Cricut Maker comes under a commercial-grade machine that can deliver a professional level of quality. This is the most versatile cutting machine in full size. It can cut 300+ materials, such as acrylic, leather, felt, plastic, fabric, wood, and more. Besides cutting and writing, it can do more than this. The versatile feature of the Maker machine is compatible with the Adaptive Tool System, which includes the knife blade, engraving tip, foiling tip, rotary cutter, and debossing tool.
Pros:
It can cut, foil, score, engrave, deboss, write, and more.
It is compatible with 300+ materials
Bluetooth available
Can cut with 10x cutting force
Adaptive Tool System: You can use Rotary Blade, Knife Blade, and Scoring Wheels.
Print then Cut feature
Free Design Space app
Cons:
You will need a cutting mat, and you can’t use it with Smart Materials like Vinyl.
It provides a maximum cutting length of 23″ on a 24″ mat.
It is also not portable.
Cricut Maker 3
This is the upgraded version of the Cricut Maker series, and it was released in June 2021. This is the best machine anyone can have. So, if you are looking for the best Cricut machine with ultimate commercial-grade performance, then you must go for Cricut Maker 3.
This Maker 3 cutting device is compatible with 13 tools for cutting as well as with Smart Materials so that you can cut a long project up to 12 ft without the need for a mat.
Pros :
It can cut, foil, score, engrave, deboss, write, and more.
It is compatible with 300+ materials
Bluetooth available
Can cut with 10x cutting force
Adaptive Tool System, meaning you can use Rotary Blade, Knife Blade, and Scoring Wheels.
Print then Cut feature
Free Cricut software
Cons:
It is the most expensive machine.
Not portable
3. Cricut Joy
The Cricut Joy is the newest model. Its small and compact design makes it portable. Hence, it will occupy less space. Moreover, it can cut 50+ materials, including adhesive vinyl and paper. Plus, you can cut thick faux leather sheets. The maximum width for cutting a design is 4.5". Hence, it's a great mini tool that can make sticker sheets, greeting cards, and other small projects.
Overall, the Cricut Joy is the best Cricut machine for beginners.
Pros:
It can cut and writes
It is compatible with 20+ materials
Bluetooth available
Portable
It can be cut without a mat by using Smart Materials
Cons:
It has a maximum cut width of 4.5.”
It is not compatible with adaptive Tool Systems and the Print then Cut projects.
Conclusion
Cricut releases the best Cricut machine, but it also depends on your usage. You will find five types of Cricut cutting machines that we have already discussed in this blog. Plus, we have shared the pros and cons of using that particular machine. In contrast, you should buy Cricut Joy if you are a beginner. It will be pocket-friendly and won't occupy much space. And, if you only want to make crafts with paper and vinyl, then go for Explore 3. Also, you can consider Maker 3 if you are a creative crafter.
Source: https://cricutapp.wordpress.com/2023/08/29/best-cricut-machines/
For More information Visit: Cricut New Machine Setup
Cricut.com setup mac
Cricut Maker Setup
install cricut design space app
Cricut Machine Set up
#Cricut New Machine Setup#Best Cricut Machines#cricut maker setup#design.cricut.com/setup#cricut explore air 2 setup#Cricut.com setup mac#Cricut.com setup#cricut design space download#cricut setup
2 notes
·
View notes