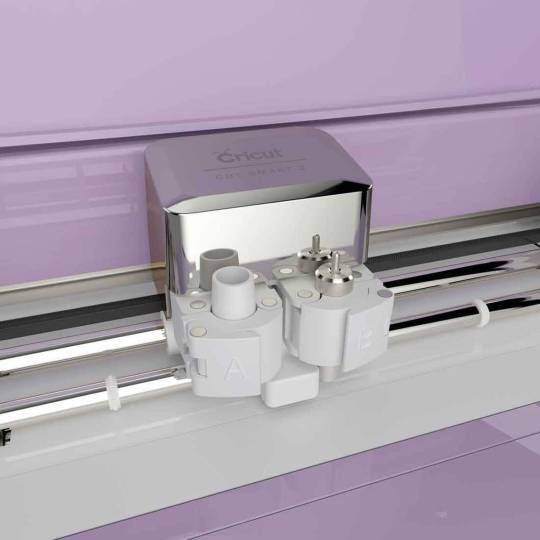
#www.cricut.com/setup
Text
Cricut Design Space Login - Cricut Setup
With an intention to make the Cricut app run on PCs & mobiles, all the DIYers need to know the basic system requirements. Each OS comes with its separate requirements, which should be fulfilled to support the app. Once the app satisfies the requirements, it will start running on the devices without any technical glitches. However, to get the app on the devices, they need to open cricut.com/setup.
Visit - design.cricut.com
www.cricut.com/setup
Cricut Design Space
cricut.com/setup windows
#cricut.com/setup#design.cricut.com#cricut crafts#cricut explore air 2#cricut design space login#cricut new machine setup#www.cricut.com/setup#Cricut Design Space#cricut.com/setup windows#Cricut.com setup mac#Cricut setup#Cricut.com setup download#Cricut.com sign in#cricut.com/setup pc#Setup Cricut.com#Cricut Design Space Login
2 notes
·
View notes
Text
Cricut login design space
Unleash your creativity with Cricut machines for custom projects. Whether you're crafting for fun or small business, Cricut's versatile machines and Design Space offer endless possibilities. Visit cricut.com/setup to download and install the Cricut software and access a wide range of free and subscription-based designs. From customizing materials to crafting various projects, Cricut makes creativity easy and enjoyable.
#Cricut.com/setup#design.cricut.com#www.cricut.com/setup#Cricut Design Space#cricut.com/setup windows#Cricut.com setup mac#Cricut setup#Cricut.com setup download#Cricut.com sign in
2 notes
·
View notes
Text
Top 5 Cricut Beginner Projects to Get Started
Buying a Cricut machine for the first time, and if you are a beginner, the device can be intimidating by its features and looks. It can also seem like a complicated machine, with many blades, mats, materials, and tools. So, choosing your first project can be challenging given the wide range of Cricut machine's abilities. As you might already know, Cricut machines are cutting devices, and its high-end models can cut more than 300 materials. This blog contains curations of Cricut beginner projects to help you understand and work smoothly with the machine.
1. Custom Phone Case
If you want to make your mobile's trendiest new phone case, it is possible with your Cricut machine. You can mainly use the Explore machine for creating this project. It is because, along with Design Space, select your respective smartphone model from the iPhone and Android phones list. You can make a perfect Cricut phone case in just a few minutes.
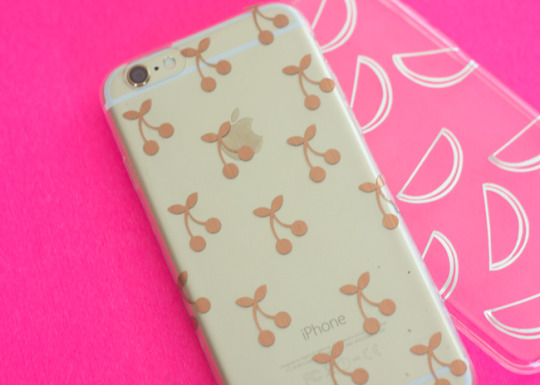
Further, the supplies you need for creating a personalized phone case are an Explore or Maker machine. You also need a clear phone case, foil adhesive vinyl, or standard permanent vinyl. Also, you need Transfer tape and the respective designs you want to cut on the material.
2. Cute Face Mug
It is one of the easiest Cricut beginner projects. You just need to cut some vinyl material and stick it on a mug with a clean surface. You can select super cute designs from the official Design Store or create your design. You can choose some cute doodles you or your kids like. And you can make various faces and expressions, even using animals such as a kitty, puppy, or unicorn.
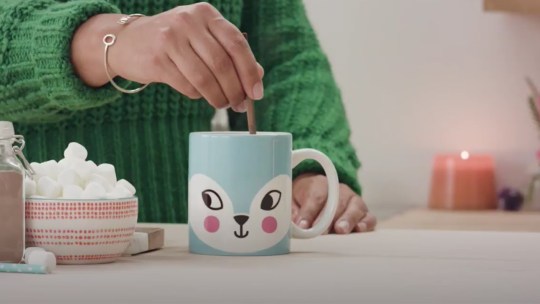
Further, the supplies you need for this project are a sheet of vinyl, a Cricut Machine, and a weeding tool. Plus, you need Transfer tape to transfer the design onto the surface of the mug.
3. Greeting Cards
You can make a set of greeting cards with your new Cricut machine as your first project. To do this project, all you need to do is cut two types or colors of cardstock, fold them, and put them together. Creating a set of greeting cards is very simple and quick, and you will also have cards with fancy patterned looks.

Further, all the standard cards are 5 x 7 inches, so you can keep them in envelopes and mail them easily. So, you need a standard cardstock, A Fine-point blade, a Cricut Joy, or Explore. Plus, the design of your greeting card. Additionally, you don't have to score or glue the end products. That is why it is the easiest of all Cricut beginner projects.
4. Wall Decals
The wall decals are another set of great projects to begin your Cricut crafting journey. You can add inspirational quotes or simple messages in your living room or bedroom. For this project, it is better to use regular permanent vinyl. However, you can also use colored vinyl to create a pop-up look.

Further, this project requires a Cricut machine, permanent vinyl, and an SVG design file. Additionally, you need to measure your space and cut the quote of your choice. After missing, clean the wall, free it from dirt, and then apply the design.
5. Coasters
Another way to decorate your coffee or personal table is by adding personalized coasters. Making coasters is easy and takes less time. It also needs less materials to make it. All you need to create a coaster is first to decide on the design you can easily peel off from the material. In addition, you need permanent vinyl and cut the design on it using your Cricut Maker or Joy.
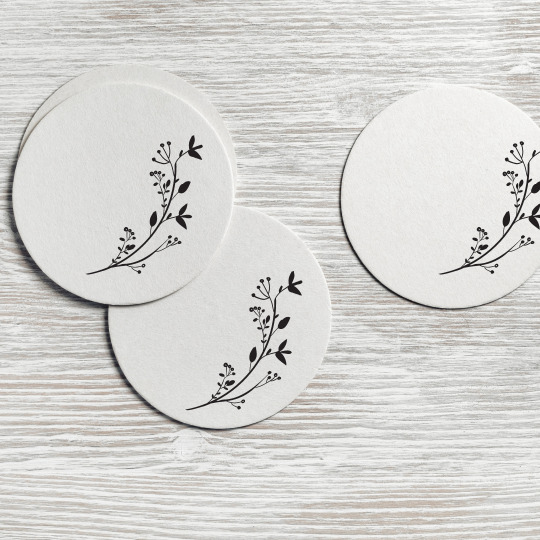
Further, using permanent vinyl to make coasters assures you of longer life and won't quickly come off from the coaster.
Conclusion
Using a Cricut machine is easy once you get comfortable with the materials, tools, and Design Space. To get comfortable as a fresh user, you must pick up projects that read to you the fundamental aspects of working with a Cricut machine. This blog will be an easy guide and Cricut beginner projects to help you in the initial stages of working with the device. In addition, you need to pick a project with fewer materials, simple steps, and less time to complete. Once you master the basic techniques, you can create complex designs and projects.
FAQs
What is the helpful advice on Cricut beginner projects?
Some important suggestions are to pay attention to instructions and get suitable materials/supplies and tools for your project. Additionally, if you are in doubt, test it first. As a beginner, you need to accept that you will make certain mistakes, and that's Okay. And your aim should always be learning and on the process and less on perfection.
What should ideally be the first Cricut project for a beginner?
Ideally, Card making is the first project new users should try with their Cricut machines. It is because you can make your cards for any situation. You can use your machine to cut the design on your cardstock and remove all the extra materials. Now; you will have your first Cricut project.
Do you need a computer to work with Cricut machine?
No, you don't need a computer to work with Maker. It is because you can use Cricut Maker with your Android or iPhone. But you can only do some things you want with a mobile. So, to use the machine's full potential, connecting it to the computer is a must.
#Cricut Beginner Projects#Top 5 Cricut Beginner Projects to Get Started#Cricut.com/setup#www.cricut.com/setup
2 notes
·
View notes
Text
How To Use Cricut Transfer Paper On Vinyl? [Step By Step Guide]
If you usually make Cricut or Silhouette projects, you will have to use transfer paper once in a while. Cricut transfer paper eases the process of getting the design from backing paper and transfer it to final project. If you don’t know how to use Cricut transfer paper on vinyl, this guide is for you. The cut vinyl appears as a big sticker that you need to remove from the backing paper and attach to your project. However, the vinyl is very thin and difficult to transfer using your hands. Plus, it gets more difficult with complicated designs.
Hence, if you are starting to make vinyl craft stickers, transfer paper will be useful for you. We will reveal the use of transfer paper with vinyl. The process is simple- cutting and weeding the vinyl, transferring the vinyl to the transfer paper, and then transferring the design onto the final project.
There are many vinyl projects to create. You can increase your business with a Cricut machine, permanent vinyl, and good-quality transfer tape. If you haven’t used transfer paper on vinyl, read this blog that describes a step-by-step guide.
What Is A Cricut Transfer Paper?
Cricut transfer paper looks like a paper roll or A4 sheet pack. You can also say transfer paper as transfer tape. You can print on transfer paper via an inkjet printer. For instance, printing a design onto a shirt. Transfer paper is sticky and transfers vinyl to the final material and can work on various materials such as mugs, glasses, cups, etc. It is a good tool to transfer the vinyl decal to the material you need to personalize.
Cricut transfer tape has two sides. The bottom side is the paper backing that you need to remove, and the sticky upper side is composed of a plastic film. The top sticky side is attached to the top of the vinyl. Crafters use mugs, cups, and tumblers using adhesive vinyl. However, if you are working with heat transfer vinyl, you won’t need transfer paper. For the vinyl projects that have to be frequently washed, such as cups and mugs, you should use permanent adhesive vinyl.
What Are The Types Of Transfer Tape?
Transfer paper is available as a regular and strong grip. The standard transfer paper is used for most projects and has a strong grip on glitter vinyl, as you need extra strength to grip the surface. If you have an issue lifting the vinyl from the backing sheet, use a strong grip transfer tape.
How To Use Cricut Transfer Paper On Vinyl?
First, cut the design from adhesive vinyl with your Cricut machine. After that, weed the excess vinyl in and around the design. When you only have the design you need to transfer, you need to peel off the transfer tape.
Follow the steps to use transfer tape on vinyl:
First, cut the transfer tape a little larger than your design. Before you get rid of transfer tape you should use it several times. Hence, take a little larger transfer tape for your project for proper adhesiveness.

Then, peel back the backing paper. Keep the paper backing to use later to stick to the transfer tape.
Place the transfer paper on your design and burn it down. You can use a scraper or an old gift card or a credit card.

You can either turn the piece, take off the backing paper, or lift the transfer tape. You need to fix the design on the tape.

Now your design is on the tape, and you can move it to your project.

Then, press the vinyl down and burnish it once again.
After that, peel back the transfer tape. Make sure that your project surface is stuck properly to vinyl. Remove the tape and burnish it a little more if it is still lifting.

What Kinds Of Projects Can You Make With Permanent Vinyl?
You can make many projects using permanent vinyl and transfer paper. You can put the design prints on glass, plastic, ceramic, or acrylic surfaces. It means that you can transfer designs on wine glasses, notebooks, flower vases, and many more.
FAQs
Why Use Cricut Transfer Paper For Vinyl?
Cricut transfer paper or tape is generally used to transfer the vinyl with designs to materials such as water bottles, mugs, and tumblers.
Do I Need To Mirror Vinyl While Using Transfer Paper?
In the case of permanent vinyl, there is no need to mirror the design on the Cricut Design Space. The design mirroring is necessary in the case of heat transfer vinyl.
Can I Use Any Type Of Vinyl With Transfer Tape?
The answer is no; you cannot use any type of vinyl with transfer tape. For heavy vinyl, such as glitter, you must use a high-tack transfer tape. But for standard vinyl like holographic, you should use a medium tack transfer tape.
Is Cricut Transfer Tape Reusable?
Yes, Cricut transfer tape is reusable. Once you finish the project, put a Teflon sheet or parchment paper on the transfer tape and save it to use later. Next time you can use it if it has enough adhesion for the transfer.
Which Side Of The Vinyl Should I Put On Transfer Tape?
The shiniest or top side of the vinyl should be put on the transfer tape. On the other hand, the sticky side of the transfer tape should stick to the top of the vinyl.
design cricut.com download
design.cricut.com/setup
#cricut.com design space#cricut.com setup mac#cricut.com setup download#design.cricut.com/setup#design cricut.com download#cricut setup#Cricut.com/setup#www.cricut.com/setup
1 note
·
View note
Text
Cricut Ideas: Get Inspired To Make Best Craft Projects
Looking for inspiration to start your projects using the Cricut cutting machines and devices? Then look no further; you are at the right place. This blog is hand-crafted to give you the best money-making Cricut Ideas. Every Cricut cutting machine and device can give you the best professional-looking results in no time.
Here, we have provided the steps to get started with the Cricut Ideas. Then you get to know what you can create with various Cricut machines, presses, and tools. So, keep reading to find out everything about Cricut ideas and much more.
Cricut Ideas: How To Get Started?
Before you look into all the Cricut Ideas, I have broken down the whole process of creation into a few simple steps. These steps are basic and will act as a mini guide before you embark on your journey of creating and selling crafts using your Cricut machines.
Step One:
If you have not yet purchased your Cricut cutting machine, then the first thing you need to do is get one. You can either buy it from famous stores like Walmart, or you can get it from famous online websites, including Amazon and Cricut’s very own online shop. I would recommend you do thorough research on the features that are offered by the machine you are opting for. Make sure that it matches your requirements. You can also buy important tools and add-on devices like a knife blade, heat press, scoring tools, and rotary blades.
Step Two:
Download the Cricut Design Space application on your system or mobile device. It has a library with many pre-designed projects, images, graphics, and fonts. It will not only inspire you to create beyond any limits but also save your time. Once you have your own Cricut ID and login credentials, you can join various Cricut communities on the app that will help you further.
Step Three:
Start creating your projects for yourself and selling your craftsmanship to earn some extra cash. You can host a sale in your backyard and really create a small business overnight. The Cricut machines are user-friendly and quick machines that can help you personalize stuff for your clients. Make sure to take as many pictures as possible to post your work online to gain popularity and a good client base.
Cricut Ideas: For Beginners
Here are some interesting Cricut ideas that you can get inspired from:
Make Greeting Cards/Invitation Cards/Drawn Cards/ Welcome Cards etc.
To make cards, be they real-life-looking drawn cards, invitation cards, adhesive vinyl cards, welcome cards, birthday cards, customized cards, or cards for any occasion, you will either need a Cricut Maker, Explore, or Joy machine. You can sell it to people who are looking for personalized gifts cards options. By adding a scoring stylus or wheel, you can customize the envelopes to go along with the cards. Cricut also has its own range of colorful pens that can be used to add beautiful aesthetics to your cards.
Create A Personalised Vase
Flowers are everyone’s favorite; people gift them to each other normally as well as on special occasions. A great companion of flowers is a beautiful vase. You can actually brighten up any corner of your home or workplace with a customized vase. You can use fonts, graphics, and designs that are already pre-made in your Cricut Design Space Application. Then cut them out using Cricut cutting machines. You will need adhesive vinyl as a base material to cut out designs that can easily stick to the surface of the vase.
Personalize Storage And Boxes To Organize
One of the best among all Cricut ideas is using your Cricut cutting machine to declutter and organize your home, craft room, workspace, or kitchen. You can organize many areas of your home by making stylish labels from adhesive vinyl. All you will have to do is cut the labels and, with the help of a tool, transfer them to your carts, boxes, bags, etc. For creating small labels, I would highly recommend the Cricut Joy machine. You can get many beautiful fonts on the Cricut Design Space application.
Make Customized Mugs
The best way to create customized mugs is by combining the technologies of your Cricut cutting machine, Cricut Mug Press, and Cricut Design Space. You can create a beautiful collection of mugs or sell customized mugs. The mug making is one of the best among all the Cricut ideas, as they are high-in-demand products. You can work with infusible inks or heat transfer vinyl.
Visit: cricut.com/setup
learn cricut.com/setup
cricut setup
www.cricut.com learn
Source: https://learn-cricut.com/cricut-ideas/
3 notes
·
View notes
Text
Discover 5 Best Printer for Cricut Projects in 2024
Searching for the best printer for Cricut projects? If so, look no further; I can help you with that! The only reason we need a printer for crafts is because we want to make some stickers, for which we need to use a Print Then Cut feature. I don’t know whether you have heard this term before, but some Cricut machines come with this new feature that makes creating a project that requires printed images. Cricut then cuts those printed images accordingly.
There are many printers in the marketplace, but which one is better? Well, this is what I will tell you in this blog. I know it can be daunting for many novice crafters when they start making their first project using a printer and Cricut machine. But you don’t have to worry at all, as I am with you in finding the best printers for Cricut users. Let’s get started!
1. Canon PIXMA TS9521C Printer
If you are looking for the best printer for Cricut projects, look no further than this Canon PIXMA TS9521C printer. This model has a big printer size and is also heavy compared to other branded printers, making it the perfect choice for your crafts. If you want something that prints high-quality images in no time, then the Canon PIXMA TS9521C printer is the perfect choice for you!
There are many pros and cons of using this printer. So, let’s get into it.
Pros:
Cons:
2. Epson EcoTank Printer
If you still couldn’t find the best printer for Cricut projects, chillax! So, what I think is that it is the perfect choice for those who are into everyday printing. Not only that, it can also be suitable for those who want the best sublimation printer. However, the one thing that you need to know is that this printer will use only sublimation ink. Besides, you can’t use any other inks that you use for other printers. So, what are the pros and cons? Let’s know it further!
Pros:
Cons:
3. Canon TS6420 Printer
If you trust the Canon brand, you can use the Canon TS6420 printing device. Also, it is the best printer for Cricut projects, with top-notch features and great quality. It can also help you explore the Print Then Cut feature. So, without wasting much time, you will need to know the pros and cons of using a Canon TS6420 printer; let’s explore:
Pros:
Cons:
4. HP Envy 6455E Printer
The HP Envy 6455E printer is the best printer for Cricut projects. Since it is a mid-range printer, it has satisfied many crafters. So, whether it is about price or quality, this Envy model will provide everything you need to try the Print Then Cut feature. You have to try this model for better quality, especially if you are looking for something in the mid-range.
Pros:
Cons:
5. Canon PIXMA TS3320
Last but not least, this is what I am using currently; it has done a lot of things for me. So, I bought this along with my Cricut Maker 3 machine last year. The sole purpose of buying this machine was to explore the Print Then Cut feature. I had never tried this before, so I wanted to give it a try! Now, it was a great experience. Besides, do you know what the best part was and what its pros were? So, let’s dig into it:
Pros:
Cons:
FAQs
Question 1: What should I check before buying a printer for Cricut?
Answer: Before buying a printer or any machine, you must check its system requirements. Once you are sure about it, then there are other factors you have to check.
Here are the factors you need to check before buying a printer for Cricut:
Question 2: What type of printer do I need for Cricut?
Answer: Many printers are available in the marketplace that you can use to create unique crafts with Cricut. They must meet some criteria, such as the type of paper they can print, the print quality, and more. Whether you want to create stickers or decals, this printer will help you stand out!
Below, I have mentioned some printers that you can use for your DIY projects:
Question 3: Should I choose a laser or inkjet printer for Cricut?
Answer: Although inkjet printers are a better option for many crafters, the laser printer has its own place for crafting. It is because, with a laser printer, you can have a high volume of coloring book pages, planner pages, and foiling craft paper that would be better suited for a laser printer. Hence, you can choose a printer that suits your needs and create your stickers or anything hassle-free.
Visit: install cricut design space app
cricut.com/setup
www.cricut.com setup login
Source: https://cricutdesignappspace.wordpress.com/2024/05/10/discover-5-best-printer-for-cricut-projects-in-2024/
#www.cricut.com setup login#www.cricut.com/setup#www.cricut.com/setup login#cricut.com/setup app#cricut explore air 2#cricut.com/setup#cricut new machine setup#cricut design space#cricut maker 3#cricut.com/setup windows#cricut.com/setup mac#cricut.com/setup login#cricut.com setup mac#cricut create connect to computer#cricut.com setup download#cricut setup download#cricut setup#setting up my cricut maker#setting up your cricut maker#cricut setup on computer#cricut design space download#cricut design space app#cricut design space login#cricut new product setup#cricut new product device
0 notes
Text
How to Connect Cricut to MacBook: A Complete Guide
Do you want to connect your Cricut machine to your MacBook? If yes, then this blog will help you understand the connection between Cricut and Macbook. It’s not only about you; almost everyone who is starting with a Cricut machine finds the setup procedure difficult. Therefore, be with me and learn how to connect Cricut to MacBook here.
Before that, you need to understand that Cricut Design Space is an intuitive Cricut software that you need to set up on your device to connect your Cricut product. To get this software, you need to download and install it on your device. Then, you will be ready to set up your Cricut machine for a MacBook.
What Do You Need to Get Started?
To get started with the Cricut connection to MacBook, you need to keep a few things in mind. Look at the steps below to learn the necessary requirements.
Now, you are ready to start the Cricut setup on your MacBook. Let’s check the steps.
How to Connect Cricut to MacBook?
As you know, Cricut machines are compatible with Windows and Mac computers; you can set it up easily on any of your devices. Here, you’ll learn how to connect it to a Mac device. Look at the steps below.
Step 1: Connect Cricut to a MacBook via Bluetooth
Your first step should be to connect your Cricut to a MacBook using a suitable method. I’m choosing the Bluetooth connection method, which is the best wireless connection.
Finally, your pairing process will be finished. You have learned one step towards how to connect Cricut to MacBook.
Step 2: Download Cricut Design Space
In the second step of connecting Cricut to a MacBook, you need to download and install the Cricut Design app on your device. Look at the steps given below to install the Cricut software.
Finally, you have learned how to install Cricut Design Space and how to connect Cricut to MacBook. Now, you can start project-making with your amazing Cricut machine.
FAQs
How Do I Setup Cricut Machine on My Phone?
To set up a Cricut product on a phone, follow these steps.
How to Connect Cricut Maker to Mac?
Follow these steps to learn how to connect Cricut to MacBook:
Why Am I Unable to Run Cricut Design Space on My Mac?
This problem is common, and everyone might have experienced it. This issue may arise when your app is not updated or there are some issues with the device you’re installing. Hence, if you get such issues, immediately try updating your app. Otherwise, you can also uninstall it and then install it back.
Visit: install cricut design space app
www.cricut.com setup login
Source: https://explorenewmachine.com/how-to-connect-cricut-to-macbook-a-complete-guide/
#cricut.com/setup mac#cricut.com/create#cricut.com/setup#cricut.com sign in#cricut.com design space#cricut setup#cricut explore air 2#cricut#install cricut design space#cricut design space#install cricut design space app#cricut design space login#cricut design space app#www.cricut.com setup login#www.cricut.com/setup#www.cricut.com/setup login#install cricut explore air 2#cricut new machine setup#cricut software app#cricut create connect to computer#setting up your cricut maker#cricut setup for pc#cricut setup explore air 2 setup
0 notes
Text
How to Connect Cricut to iPad: Two Methods Explained!
As you know, Cricut machines are amazing. You can use them to create thousands of creative stuff like tote bags, keychains, cards, stickers, decals, etc. If I tell you about my crafting journey, it's too long. I started when I was a teenager just for a hobby, but I didn't realize when it would become my business. Well, if I share my story, this blog isn't enough. So, let's discuss the matter we are here for. I know you want a little clarity on how to connect Cricut to iPad. Don't worry; I'll share everything with you to make your work easier.
My blog is dedicated to iPad users who are struggling with their Cricut machines and want to learn how to connect them to an iPad. Let me walk you through this guide and teach you the process.
Introduction to Cricut Design Space
Before we move forward to learn how to connect Cricut to iPad, let's learn about its special software and its excellent features. This application or software is designed for Cricut users to create creative designs. Also, you get multiple features in this software, including different fonts, texts, templates, and designs; you'll be able to design anything you want. To get this software or application, you need to install it from Cricut's official website.
How to Download Cricut Design Space on iPad?
If you want to download and install the Cricut Design app on your iPad device, follow the steps below.
That's it for the Cricut Design Space download on an iPad. Now, let's check its connection process.
How to Connect Cricut to iPad via Bluetooth and USB?
Here comes the final step, which is to connect your Cricut to an iPad. To do this, you'll need to use the Bluetooth pairing option. Go through the steps below to learn the connection process.
Method 1: Using a USB Cable
If you want to connect your Cricut to a wired connection like USB, you need to follow the steps below. A wired connection is helpful in many ways and can be set up hassle-free.
That's how to connect Cricut to iPad with USB. After this, you can utilize your Cricut to create anything.
Method 2: With Bluetooth
Check the steps below to learn Cricut setup on iPad via Bluetooth. This wireless connection is amazing and will work best for you.
That's how to connect Cricut to iPad via Bluetooth. If you want, you can go for a wired connection such as USB.
FAQs
Why Does My iPad Need to Download the Cricut App?
There are certain minimum system requirements you need to check before you download the Cricut app on your iPad. For instance, your iPad version should be 11 or the latest. Also, your internet connection should be strong and within 2-3 Mbps to download and upload. If everything meets, you can connect Cricut to iPad.
How Do I Connect Cricut to My Computer?
To connect your Cricut machine to a computer, follow these steps:
What to Do When My Cricut Is Not Connecting to My iPad?
When your Cricut is not connecting to your iPad it can happen when your Cricut or iPad device is not connected to the power supply. If you're using a USB cable, your cable may be loose, and if you're using a Bluetooth connection, maybe your device's Bluetooth option is not ON.
Visit: www.cricut.com/setup login
install cricut design space app
Source: https://setupcricutoncomputer.wordpress.com/2024/04/06/how-to-connect-cricut-to-ipad-two-methods-explained/
#www.cricut.com/setup login#www.cricut.com/setup#install cricut design space app#install cricut explore air 2#cricut design space#cricut maker bundle#cricut new machine setup#cricut.com/setup#cricut explore 3#cricut.com/setup login#cricut create connect to computer#cricut new product setup#cricut new product device#cricut install setup#connecting cricut maker to computer#cricut setup create account#cricut cutting machine setup#cricut setup on computer#setting up new cricut maker#cricut setup log in#cricut account setup#cricut printer setup#www.cricut.com setup login
0 notes
Text
How to Use Infusible Ink Pens With Cricut: A Complete Guide
Cricut infusible ink pens and markers are just awesome. I use them to create my iron-on projects like custom T-shirts for myself and my sweet little child. Well, you can make multiple things with these Cricut products. It’s very easy to use and gives a well-finished project in the end. Its color never fades and always provides shiny, vibrant, and colorful crafts. If you are also a crafter and want to learn how to use infusible ink pens with Cricut, then stay with me till the end of this blog to learn in depth.
I have done dozens of iron-on projects with my tiny Cricut Joy machine and infusible ink. The ink is so permanent that it won’t fade after washing. I am really excited to share my way of using infusible ink pens and creating lovely projects.
In this blog, you will get everything about Cricut’s infusible products, like how to use them, what type of projects you can make with them, and even some of my tips. So, let’s get started to learn everything.
What Are Infusible Ink Pens and Markers?
Basically, Cricut’s infusible ink pens and markers are simple pens with infusible ink intended to make various heat projects such as designing aT-shirt, tote bag, or any apparel where ink is necessary.
These products can be easily loaded into the clamp of your Cricut machine and draw your favorite designs. You can draw it with your hands, too.
How Do Cricut Infusible Ink Products Work?
Before learning how to use infusible ink pens with Cricut, you should know how it works. Infusible ink works on the principle of sublimation. It sounds a bit complex, but it’s so simple. When you use the infusible ink or marker on a paper, it’s in a solid state, which is its original state.
But, the moment you apply heat to it, it gets transformed into gas. During this process, it infuses your material, and when you remove the heat, it cools down again. And then, after cooling, it will again become solid.
One thing to note here is that these products only work on specific materials, such as poly-based materials, polyester fabric, coasters, and mugs with a poly-coated ceramic coating.
So, if you want to make such projects, Cricut infusible ink pens and markers will be a must-have. Luckily, these amazing accessories are compatible with all types of Cricut machines, including Cricut Maker, Explore, and Cricut Joy.
How to Use Infusible Ink Pens With Cricut Machine?
Here comes the final part of the blog, which I was excited about. You already understand why we use it. And now, you are going to learn the exact procedure through the steps that I am sharing with you now. Before moving to the final steps, let’s see the materials you will need while making your project.
Step 1: Tools and Supplies Required
Here are some of the essential materials and tools you will need for your project.
When you are done with all the materials, it’s time to start the project. So, let’s start the step-by-step guide and learn how to use infusible ink pens with Cricut.
Step 2: Create Your Design
In the first step, you need to put a sheet of laser copy on your cutting mat and then put it into the Cricut machine.
Now, move to your Design Space and choose the size of your design to fit onto your blank. After that, adjust your Linetype to draw and select a Cricut infusible pen or marker. Don’t forget to mirror the design before the cutting procedure.
Step 3: Load Infusible Ink Pens
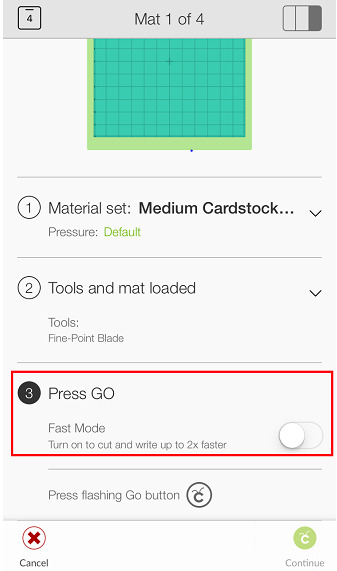
Now, select your material. In the case of an older Cricut machine, set the Smart Set Dial to Custom. Once done, put your infusible Cricut pen or marker into Clamp A and then hit the Go button to load different colors.
Step 4: Unload the Cricut Cutting Mat
When your design is ready, you can unload your mat and then take out the design from the mat.
When your design is ready, you are ready to apply heat to your apparel using the Cricut EasyPress mat. To get started, first place the sheet of cardstock inside your apparel blank to keep it protected from wrinkles and damage.
Moreover, use a fresh and clean lint roller to remove the lint from the surface of your apparel blank. It will also remove the fiber particles to create a perfect apparel for heat transfer.
Step 5: Preheat Your T-shirt
Then, cover your apparel with the butcher paper. In the next step, you need to preheat your apparel to remove unwanted moisture from it. Also, you need to check the Cricut Heat Guide from time to time to follow the instructions correctly. Apply the heat with a light pressure.
After that, take off the butcher paper and let the apparel cool down. Now, put the design pieces on your apparel facing down. Then, apply the tape on each corner of your design with a Heat Resistant Tape, which will keep your design free from moving.
Step 6: Apply Heat to the Design
Next, put the butcher paper on top of your design. Afterward, select the correct temperature and time settings for your project from the Cricut Heat Guide. Once set, apply heat with the optimum pressure, and when you hear a beep sound, lift away the press and slowly remove the butcher paper.
In the end, let your project cool completely and enjoy it. Finally, you learned how to use infusible ink pens with Cricut, and hopefully, you will try it on your own.
Conclusion
The process was extremely easy, wasn’t it? All you need to do is to gather some accessories and get started with the project. I used an example of a T-shirt, but you can make use of any apparel like a tote bag or anything where ink pens can be used. You can make beautiful creations with your Cricut infusible ink pens and an EasyPress machine. So, get ready to create something and use the Design Space software to make things beautiful and unique.
Visit: cricut.com/setup
design.cricut.com/setup
install cricut design space app
cricut.com setup mac
www.cricut.com/setup login
Source: https://cricuthelp.wordpress.com/2024/02/21/how-to-use-infusible-ink-pens-with-cricut-a-complete-guide/
#cricut.com/setup#www.cricut.com/setup login#www.cricut.com/setup#cricut design space download#cricut project ideas#cricut explore air 2#cricut software app#cricut new machine setup#install cricut design space app#install cricut explore air 2#cricut new product setup#setting up your cricut maker#cricut create connect to computer
0 notes
Text
install cricut design space app
Crafting has been a favorite activity for people of any gender or age group. Cricut machines are the most advanced and versatile tools to create DIY crafts for business as well as daily use. For new crafters, it is necessary to have in-depth knowledge about the Cricut machine to get started with their crafting journey. In order to begin using a Cricut product, it is required to download Cricut Design Space and set up the machine. Here, learn all you need to know about Cricut create account, Cricut setup on computer, and many other important topics.
#install cricut design space app#www.cricut.com/setup#cricut setup#cricut.com/setup#cricut.com sign in#cricut.com/create#cricut.com design space
1 note
·
View note
Text
How to Slice with Cricut? [A Complete Guide]
Do you know about the Slice tool in Cricut Design Space? If yes, have you ever used it to cut out letters or images? Well, that is what we are going to cover in this blog post. The Slice tool helps us create new cut paths where two images overlap. In simple words, you can easily split two overlapped images into multiple pieces. It’s exactly like cutting one image from another.
Also, there are some tips and tricks that you must know about, and we will discuss them later in this blog. With this amazing tool, you can also split text and images by another shape. Once you learn how to Slice with Cricut Design Space, you’ll love trying it again and again for different projects.
What Can You Do with the Slice Tool?
Once you start using the Slice tool, you will be amazed to know how much it can do. This Slice function is essentially helpful for those who want to cut out shapes and text from more extensive background shapes.
Plus, it can be used to copy or trim the unwanted features of shapes or images. With this Slice tool, you can easily:
Punch out the shapes and text from shapes.
Create new and custom shapes from two standard shapes.
Crop and remove the unwanted features of an image.
Cut the image into several pieces and keep them separate into different layers.
Modify the ready-made image using the Cricut library.
Easy Guide: How to Slice with Cricut?
Slice is one the best tools that anyone would like to use. The tool is super easy to use and gives the best result for your gift tags and other Cricut projects. Below, we will learn to use the Slice tool to Slice two images.
Step 1: Add Any Two Single-Layered Images to Your Canvas
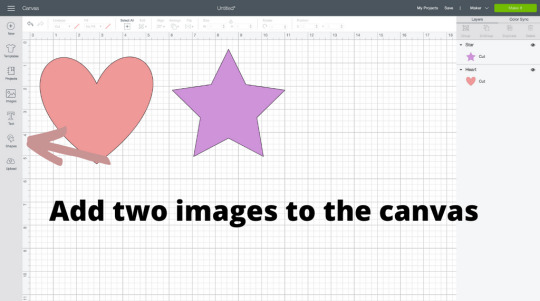
The first thing you have to do is to add two images to your canvas. Make sure images are single-layered. You can Slice at least two images at a time. As you can see, the layer panel is on the right side of the canvas (see the image above). There are two layers for each picture.
Below is an example of an image that is multi-layered. All these different colors belong to different layers. On the right-hand side, you can find the layers divided according to different colors.

Step 2: Overlap Both Images

Now, it’s time to overlap our images. All you need to do is place one image over another. Refer to the picture given above for better understanding. However, there is no exact location to place the star, and it depends on where you want it to cut out.
Step 3: Highlight Both Images

To highlight both images, you need to click and drag the images simply. You can also click on both images at a time while pressing the Command button on your Mac or shift on your windows computer. You will notice the bounding box around these images. Hence, when you finally select them, the Slice tool will be activated.
If you are using a phone or tablet, select both images by tapping on it and dragging a selection box around both layers. Next, click on the Actions button to check the availability of the Slice option.
Step 4: Press the Slice Button
Finally, hit the Slice button on the lower right-hand side corner.
Step 5: See the Result

After hitting the Slice button, it seems like nothing has happened. However, when you drag those stars away, you will find two different stars. After that, you will find the three different layers on the layer panel.
Tips and Tricks for Using the Slice Tool
Now, you have learned how to Slice with Cricut. Let’s now focus on a few tips and tricks that you can keep in mind when using the Slice tool.
You can work on two layers at a time while using the Slice with images. Don’t select more than two layers. Otherwise, the button will be grayed out, meaning you can’t use the Slice function anymore.
Slice works only with overlapped images. So, ensure your images are overlapping.
In case you are working on grouped images, then make sure the other images are hidden. However, slicing a multi-layered group requires you to ungroup the other layers. As a result, you will be able to activate the Slice tool.
Final Words
Finally, we learned how to Slice with Cricut Design Space. The Slice tool is the best tool that anyone can use on the Cricut app. If you want to explore the tools deeply, then this guide is for you. The blog explains the possibilities with the Slice tool. Next, we learned to Slice two images using the Slice tool. The step-by-step instructions given in this write-up are apt for beginner crafters who want to use the Slice tool for the first time.
FAQs
Question 1: How do I use the Slice tool on Cricut?
Answer: To learn how to use the Slice tool on Cricut, follow the steps mentioned below:
Launch the Cricut software on your device.
Go to the Shapes optionfrom the toolbar given on the right side.
Choose any shape, e.g., a circle.
After that, duplicate the circle by clicking on the + sign a duplicate icon.
Next, select the Shape by dragging the mouse icon over the shapes.
After selection, you will notice the two layers.
Then, hit the Slice button.
Finally, you will find several pieces with different layers.
Question 2: How can I Slice letters in Cricut?
Answer: Slicing the letters or text is simple with the given instructions below:
Firstly, choose the shapes and add them to your canvas.
Secondly, overlap the images.
Select the two images.
Then select the Slice button.
Once the images are sliced, you will get the separate images in your layer panels.
This Slice tool allows you to slice only two images at a time.
Question 3: Can Cricut cut out words?
Answer: Here’s how to cut out the words/letters:
You just need to select one letter and the image.
After that, hit the Slice button.
Next, delete all the letters of your slice result.
Then, choose the image part of your slice result and another letter.
Then, you need to slice again.
Repeat the process until your words/letters are cut out.
#www.cricut.com/setup#www.cricut.com/setup login#design.cricut.com#cricut new machine setup#cricut explore air 2#cricut design space login#cricut.com/setup#cricut crafts#How to slice with Cricut
0 notes
Text
How to Slice in Cricut Design Space: A Comprehensive Guide
Are you ready to learn about Slice features in Cricut Design Space? I am your guide in learning how to Slice in Cricut Design Space. Keep reading this post as an ultimate guide to learning about this amazing tool within Cricut’s software. Basically, this tool is used for overlapping images while working in the Cricut Design app. Have you ever used it?
Regardless of whether you have used it or not, I am going to tell you how to use it in this blog. With the help of this feature, you can create many DIY projects of your choice. It’s my personal favorite tool when it comes to making something creative. Although it’s a great tool to cut shapes and texts, it can still frustrate you if you are a beginner. But don’t worry; I will cover everything about the Slice feature in Design Space.
What Does a Slice Tool Do?
Slice is a great tool in Cricut Design Space that lets you cut images from another image. You will get this option at the bottom side of the Layers panel, along with the other tools. Basically, the Slice tool separates two overlapping images into splitting pieces. If you want to create something unique with less effort, the Slice tool is here to help you create new shapes from the normal ones.
How to Slice in Cricut Design Space?
As you already know what a Slice tool is, it’s time to learn how to use it in the Cricut software. When you know this, you are all set to use this amazing tool on your canvas. Let’s check the steps here.
Step 1: Adjust Two Images Overlapping Each Other
To start the project, you need to click and drag your images to make them overlap each other. If the images are not overlapping, your project won’t be made.
Step 2: Select Both Layers
When you are working with images, you can work with only two layers at the same time. You will see a gray bounding box after selecting both the layers. In the Layers panel, you will see both the layers highlighted.
Step 3: Click on the Slice Button
Now, you should click on the Layers panel at the bottom if you are working on a computer. And if you’re working on an iOS and Android device, click on the Actions menu.
Step 4: Check Your Results
At last, split the layers to check the new shapes. Then, you can adjust your layers separately and also delete layers if you don’t want them.
How to Slice Text in Cricut Design Space?
If you’re wondering how to Slice in Cricut Design Space to add text to it, I am showing an example here. Here, I am using a rectangle shape with a small circle to embed the word “Congrats.” So, here are the steps you will need to follow.
In the first step, create a new project. After that, add your shapes and text box to the Design Space app.
I am starting with the small circle in the center of the rectangle gift tag to make a hole where I can tie a ribbon.

Then, you will need to drag that circle on the rectangle at the center.
Now, select both layers, tap on the Align option, and align to the center vertically.
Next, click on the Slice option with both the layers selected.
In the Layers panel, you will see the Slice Result on the right-hand side of the screen.
You need to repeat this step with the “Congrats” word. Drag your text on the rectangle, select both layers, and align it to the center vertically.
Then, click on Slice, keeping both the layers selected.
Finally, you will see the Slice Result on the Layers Panel on the screen.

Note: You can Slice two layers at the same time. So, in this project, you need to make the tag in two steps. In the first step, Slice your circle and then Slice the text word.

Conclusion
You have finally learned how to Slice in Cricut Design Space and make a lovely project. Slicing is a good tool to make new shapes and create text projects. I have used this tool to create many of my projects. You can try it too with my guide. You need to remember that you can only use two layers at the same time in the Design Space canvas. So, maybe you need to create the projects in pieces, but it’s completely fine.
FAQs
Why Can’t I Slice in Cricut Design Space?
Design Space allows you only to use two layers at the same time. So, if you are not aware of this thing and you use more than two, the Slice option may not work for you. If that’s the case with you, immediately ungroup your layers, and the Slice option will be activated once again.
How Do I Unlock the Slice Option?
To unlock the Slice option, you will need to head to the Slice settings. When you are on the settings option, right-click on the Slice and select Slice Settings. Then, move to the General tab in the dialog box and ensure that you uncheck the Locked checkbox.
How to Slice in Cricut Design Space on Android?
If you use the Cricut software on an Android smartphone, you will have to find the Slice option under the Actions menu. Hence, first, you need to click on the Actions button and then search for the Slice option. Once you get that option, the process will be as usual: Slice an image or text.
#cricut design space login#Cricut Design Space#cricut design space app#cricut design space download#cricut design space for mac#cricut design space setup#cricut.com/setup#www.cricut.com/setup#www.cricut.com/setup login#why can’t i slice in cricut design space#how to slice text in cricut design space#How to Slice in Cricut Design Space
0 notes
Text
How to Use Cricut Explore Air 2? [Stepwise Guide]
After researching for about 2 hours and clearing all my doubts and queries, I decided to add Cricut Explore Air 2 to my craft room. Since I have heard so much about this machine, I’m curious to learn more about how to use Cricut Explore Air 2 and its basic concepts. As a proud member of the Cricut Explore family, this ultimate machine is a dream tool for all crafters. It can cut 100+ materials with incredible precision and accuracy.
Apart from that, this Cricut product also comes with various supplies and bundles, allowing crafters to make unlimited DIY projects on their own. Through this machine, I can also start my own business and turn my crafting hobby into a profession. In this blog, I am going to help you by sharing the basic features of Explore Air 2 and other relevant content.
What Are the Salient Features of Cricut Explore Air 2?
Before paying particular attention to how to use Cricut Explore Air 2, I am going to pay special attention to this machine’s foremost features. After coming across the features, you will have a complete idea about what Explore Air 2 is and its importance. As an expert, I will advise you to study the below particulars:
As compared to other models, the design of this machine is relatively smooth, sleek, elegant, and cool. It weighs around 21 pounds, is 22.17 long, and comes in different colors. Some of its famous colors include Black, Blue, Lilac, Mint, Peacock and many more.
Apart from that, this Cricut product supports three different kinds of blades, which include the Premium Fine Point blade, Deep Point blade, and Bonded Fabric blade. Now, each blade cuts specific material and needs to be used with its Housing only.
Furthermore, this craft machine is compatible with the Design Space app and comes with a built-in Bluetooth feature. With wireless technology, it will get more simple for me to transfer the projects during the test cut process.
After learning about the primary features of this craft machine, it’s time to take a step forward and come across how you can use Cricut Explore Air 2. I will teach you how easy it is to create any customized project from this craft machine.
Easy Guide: How to Use Cricut Explore Air 2?
As an expert, I advise you to focus on this part of the blog since it’s going to be beneficial for you. I am aware that this Cricut product makes various projects for multiple purposes. Here, you will learn to use the Explore Air 2 machine to design a customized cake topper.
Step 1: Cricut Design Space Login and Draw a Design
Now, press the Text icon, type Madly in Love, and change the color, fonts, and size as per your choice. Afterward, I am going to select the Ungroup option given under the Layers panel.
Step 2: Select the Material and Start Cutting
Following the completion of the cutting process, I am going to unload the cutting mat from my Cricut product. Next, I will pop out the design from the mat using the spatula tool and remove the extra material from the Madly in Love design.
Step 3: Stick a Toothpick & Show Your Final Design

As a result of this blog, you are well aware of the concepts of this machine. I wish you all the best, and start getting more creative by discovering your inner skills.
Visit: Cricut Design Space
install cricut design space app
Cricut Design Studio
Source: how to use Cricut Explore Air 2
#how to use Cricut Explore Air 2#Cricut Design Studio#install cricut design space app#cricut.com/setup#cricut explore air 2#cricut new machine setup#design.cricut.com#www.cricut.com/setup
0 notes
Text
How to Make Decals With Cricut? [A Complete Guide]

Crafting with Cricut is something everyone loves. Whether you are new to Cricut or you are a long-time crafter, making decals/stickers is likely to be on your to-make craft list. Considering this, I am going to share how to make decals with Cricut in this post. Therefore, if you own a Cricut cutting machine, you can get started with the process explained here. Also, I want to share everything about how I made it and how easy the process is.
I love to personalize my belongings, and that is why I tried out some amazing decals. Last time, I made beautiful decals for my laptop. And you know what? Plus, the project turned out to be ultimate in just a few simple steps. Are you excited to make the one with your Explore 3 machine? Here, I will discuss all the supplies and the step-by-step process I performed.
Initially, let’s begin with the needed supplies.
Supplies Needed to Make Cricut Decals
The first thing to consider is the supplies and materials needed for the project. Since I had used Cricut Explore 3, I will mention the machine below. But you can use any one of the Cricut machines to get started. Moreover, find below the supplies you will require to make decals with your Cricut machine.
Cricut Explore 3 machine
A laptop or PC
Material Trimmer
Smart Vinyl, red
Transfer Tape
Accessories
Once you have all these supplies, you can go ahead with the process of making them. After all, I am going to explain all the steps thoroughly.
Easy Guide: How to Make Decals with Cricut?
I had used a guitar headstock design in my last guitar. However, you can get started with images in the Design Space or start with a blank canvas. If you choose the latter process, you will need to start from scratch. Moreover, if you want to decorate the wall, you can perform the same steps for how to make wall decals with Cricut. Now, let’s make the decals.
Step 1: Go to Cricut Design Space
Initially, launch the Cricut Design Space on your system. You can open it on your Windows or Mac computers.
Firstly, launch Design Space on your Windows/Mac computer.
Then, open your project in Design Space.
After that, select the Customize option.
Step 2: Enter the Text
In the second step, you can type in the text you want. Here is how you can type in the text for your decal.
Move to Name.
Next, double-click on Name.
Finally, type in the text you want to show on your Cricut decal.
Note: If you want to find the recently used colors, you will need to tap on the color swatches. It will save you time while making it easy to find the colors.
Step 3: Change the Text Color
Cricut Design Space allows crafters to change the text color. Thus, if you want to change the color of your text, you can do it based on your preferences. In my decor project, I changed the font to red so that it would all cut the same red vinyl piece.
Step 4: Preview Your Design
If you are happy with the color and design’s layout, click on Make It and proceed. Here are the steps to preview your design.
Firstly, click on Make It. You can find it in the top-right corners.
When the Design Space asks you to load the material, select Without Mat.
Hit Continue, then.
Finally, you will see the Review Artwork screen.
After previewing your design, click Continue if the design layout is good.
Step 5: Cut and Weed Your Design
Now, go ahead with the next steps of how to make decals with Cricut. It is the cutting and “weeding” process. Please note that it is one of the most important steps of making decals with Cricut.
First, Set Base Material.
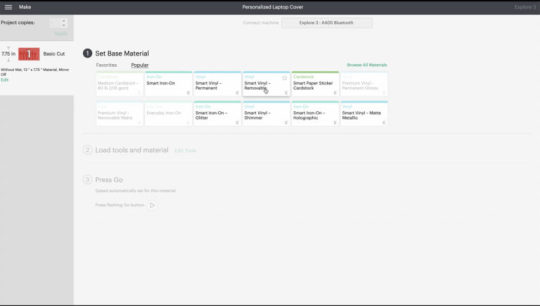
Now, the software will start to send the info from Design Space to the Cricut machine
Afterward, perform all the prompts to continue to cut your design.
After the design is cut, unload your material and remove the excess vinyl from the images.
The process of removing excessive vinyl from around the images is known as weeding. Don’t forget to do it after the cutting process.
Step 6: Apply the Transfer Tape
After you cut and weed the design, the next step is to apply transfer tape. This plastic film makes the vinyl decals apply easily. Make sure to apply the transfer tape to the front of your design.
I performed these steps, and the efforts turned out vibrant decals for my laptop. Do you want to know how to make car decals with Cricut? You can perform the same steps and return with a perfect car decal.
Conclusion
Beginners, as well as experienced crafters, can create a wide variety of decals using different materials. It will add personalization and make the belongings look elegant. The project is excellent for a beginner crafter and fun for long-time crafters. Start making them by learning how to make decals with Cricut. You can use any of the machines, Cricut Joy, Maker, or Explore, to get started. Create your designs/fonts and take your creativity to the next level. Crafting becomes joyous with Cricut, supplies, and a thorough process.
Frequently Asked Questions
Q.1 How Can I Cut a Vinyl Decal With the Cricut Machine?
Cutting a vinyl decal is one of the essential steps of making a decal. Here are steps that you can follow to cut Vinyl decals with your Cricut machine.
First, select your Cricut machine.
Next, choose the material you want to cut.
After that, press the arrow button on your machine.
Lastly, tap on the Cricut button to start cutting.
Q.2 How Do You Make Custom Decals With a Cricut Machine?
Custom decals are an excellent way of adding the ultimate statement to personal items. Do you need to learn how to make decals with Cricut? You can create them effortlessly with your favorite Cricut machine. Here are a few steps to follow.
First, go to Cricut Design Space.
Next, select Customize.
Thereafter, type your text and change the text color.
After that, Set the Base Material.
Now, follow all the prompts to cut.
Lastly, apply transfer tape to your design.
Q.3 How Can I Create Window Decals Using Cricut Machine?
The Cricut machine plays a pivotal role in making a wide variety of decals. Therefore, choose your favorite machine to make window decals. Perform the below-mentioned steps.
Firstly, open the project in Design Space.
After that, resize your project.
Then, tap on Make it.
Select the appropriate cut setting.
Remove excess materials from the design.
At last, apply the transfer tape.
Visit: https://cricuts-mart.com/
install cricut design space app
cricut.com/setup
www.cricut.com/setup login
Source: https://cricuts-mart.com/how-to-make-decals-with-cricut-a-complete-guide
#cricut new machine setup#cricut#cricut setup#cricut.com/setup#cricut explore air 2#cricut design space login#design.cricut.com#www.cricut.com/setup login#www.cricut.com/setup#How to Make Decals With Cricut#install cricut design space app
0 notes
Text
Cricut Setup on Computer: A Guide for Windows and Mac
A few days back, my friend called me who had just bought a new Cricut machine. Her name is Ria, and she was a little anxious about setting up her new Cricut machine for the first time. Since I’m a Cricut user and a professional DIYer, I helped her with the Cricut setup on computer. Just like my friend, there are many users out there who are conscious about their Cricut setup. Hence, I’m writing this blog to tell you everything that I told my friend to help her.
I share my best crafts with my readers, and it makes me happy. When I get queries on my social media accounts, I get excited to answer each one of them. And the best type of answer is writing a blog. Here, you will get to know everything about a Cricut machine setup on a Windows and Mac computer. So, let’s start here!
Minimum System Requirements for Cricut Machine Setup
The first thing you all keep in mind is that your Cricut machine runs with a special software called Cricut Design Space. You’ll have to install this software on your computer in order to use your Cricut and design anything you want.
Moreover, when you’re installing the Cricut software, you have to ensure that your system is compatible with it. Below, I’m mentioning some minimum system requirements that your system should have. Only you can proceed with the Cricut setup on computer.
For Windows
For Mac
When you know about the minimum system requirements, the Cricut setup on a PC becomes easier.
Download & Install Cricut Design Space on a Computer
Before getting ahead with the Cricut setup on computer, let’s learn to download and install the Cricut app. Check out the procedures below.
Windows
Explore the steps below to download and install the Cricut software on your Windows computer. Check them out here.
Finally, your Windows PC has the Cricut Design software to start designing with your machine.
Mac
Check the steps below to learn how to download the Cricut Design Space on a Mac computer. Then, you can proceed with the Cricut setup on computer.
Now, you can enjoy the Cricut Design Space software to start creating your unique designs and beautiful projects.
Cricut Setup on Computer (Windows and Mac)
Here is the final part: Cricut setup for beginners. Check the steps below to setup your Cricut machine on your computer.
Windows
After checking the minimum system requirements for Windows PC, you can finally move ahead to setup your Cricut on Windows. I’m using the Bluetooth connection to connect the devices together. Check the steps below.
That’s it for your Cricut setup on a Windows computer. Now, let’s explore the steps for a Mac computer.
Mac
After looking at the Cricut setup on Windows, it’s time to check the steps involved in setup on a Mac computer. Check the steps below.
These are the simplified steps for the Cricut setup on a computer. Now, you’re good to go with your Cricut machine and create anything you want.
FAQs
How Do I Setup My Cricut on Mobile Devices?
Connecting Cricut to mobile devices is a simple process; check here:
Is Cricut Machine Compatible With Windows 10?
Yes, the Cricut machine is compatible with Windows 10 and all the latest versions. You can get the Cricut app on a Windows 10 PC and go ahead with the designing process such as uploading the designs or creating unique projects and much more.
Do I Have to Pay for Cricut Design Space?
Absolutely not. This software is from Cricut, which is completely free for beginners as well as existing users. You can get this software from Cricut’s official website for free. In the free version, you’ll get unlimited things to explore, such as a design library, free templates, texts, fonts, and many more. However, there is a subscription plan known as Cricut Access that you can consider if you want premium features for professional crafting.
Visit: install cricut design space app
cricut create connect to computer
Source: https://desincricut.wordpress.com/2024/04/24/cricut-setup-on-computer-a-guide-for-windows-and-mac/
#install cricut design space app#cricut create connect to computer#cricut.com setup download#cricut.com/setup#cricut.com sign in#cricut.com/create#cricut.com/register#cricut.com design space#www.cricut.com/setup#www.cricut.com/setup login#cricut.com setup mac#design.cricut.com/setup#install cricut design space#cricut new product setup#cricut new product device
0 notes
Text
How to Setup Cricut Maker 3: All Devices Are Covered!
Cricut machines are versatile and have been hitting the market for a long time. I have also been a Cricut user for the last three years, and it has been wonderful for me. I love creating my favorite crafts, all thanks to my Cricut Maker 3 machine. Well, I’m a Cricut expert and a professional crafter. I also have my own online craft business. Over time, I changed my priorities and became a full-time blogger and a YouTuber. Now, I teach my readers everything that I have learned till now. In this blog, I’m going to teach you how to setup Cricut Maker 3.
Since Cricut Maker 3 is one of the smart cutting machines in Cricut’s lineup, I am excited to tell you about its setup procedure. All Cricut users must read this blog carefully to explore something new they don’t know. So, let’s get started with the blog now!
What Comes Inside the Cricut Maker 3 Box?
Like all the electric machines, Cricut Maker 3 also comes with its tools and accessories. You’ll have all of this inside the box. So, let’s see what you’ll get inside the box.
Using all these Cricut accessories, you can get started with your Cricut cutting machine. Note that this machine doesn’t come with Cricut mats, pens, and cutting blades, unlike the first Cricut Maker. However, this new version is even more efficient than the previous one.
How to Setup Cricut Maker 3 on Computer (Windows/Mac)?
If you want to set up your Cricut on a computer, look at the steps below to complete the process.
That’s how you can setup a Cricut machine on your desktop either Windows or Mac. Let’s move ahead with the procedures for mobile devices.
How to Setup Cricut Maker 3 on Mobile (Android/iOS)?
If you want to setup your Maker 3 machine on a smartphone, like iOS or Android, you’ll have to follow the steps mentioned below.
That’s how to setup Cricut Maker 3 on your mobile device. Now that you know how to set up your machine, you can move forward with the project.
How to Download Cricut Design Space on Your Device?
As you know, you’ll need to download and install the Cricut Design app on your device. It is crucial to install this software as it will help you access your Cricut machine freely. Cricut allows you to setup the Cricut software on any device, whether desktop or mobile. So, let’s move ahead with the procedure here.
For Windows/Mac
For a desktop like Windows or Mac computers, check the steps below.
That’s how one can install the Cricut app on their computer. Finally, you’ve learned how to setup Cricut Maker 3 on your device.
For iOS/Android
If you’re a smartphone user, you can use the following steps to get the Cricut Design Space software on it.
That’s how you can download the Cricut software on your phone and start using it to make crafts.
FAQs
How to Set up Cricut Maker 3 Bluetooth?
Here are the steps to setup the Cricut product using Bluetooth:
How to Connect My Cricut Maker 3 to Mac via Bluetooth?
To connect your Cricut product to Mac via Bluetooth, use these steps:
How Do I Setup Cricut Maker 3 on My iPad?
Check these steps to setup your machine on an iPad:
Visit: cricut.com/setup
Visit: https://cricricutdesigncut.wordpress.com/2024/05/06/how-to-setup-cricut-maker-3-all-devices-are-covered/
#design space setup#digital design#cricut.com/setup#www.cricut.com/setup#www.cricut.com/setup login#install cricut exlore air 2#install cricut explore air 2#install cricut design space app#install cricut air 2 setup#cricut setup#cricut setup explore air 2 setup#cricut setup explore air 2#cricut setup explore air 2#design space cricut#cricut#design.cricut.com#design.cricut.com/setup#cricut design space setup#cricut design space login#cricut design space download#cricut design space for mac#cricut design space app
0 notes
Last Seen Blogs

reddensoft
Reddensoft

elxineas1
𝐁𝐄𝐋𝐋𝐉𝐄-𝐂𝐇𝐀𝐍

transferalfloof
big (w)oof

23maibroken
broken 💔

michaeldavis3489
Untitled