
mycricutdesign
Willam Wilsond
Hey there, I’m William. I’m a web developer living in San Diego California. I am a fan of DIY, web development, and design. With an intention to make the Cricut app run on PCs & mobiles, all the DIYers need to know the basic system requirements. Each OS comes with its separate requirements, which should be fulfilled to support the app. Once the app satisfies the requirements, it will start running on the devices without any technical glitches. However, to get the app on the devices, they need to open Cricut.com/setup.
17 posts
Don't wanna be here? Send us removal request.
Last Seen Blogs

insomniculosus
I'm too young to feel this old

caixxa
hey ho let's go

tenellin
There Were Trees, Then, Everywhere


yanderemommabean
Yandere Scenarios For Your Enjoyment
Text

Cricut machines are quite versatile tools for DIY enthusiasts and crafters. They’ve gained popularity for their ability to precisely cut various materials like paper, vinyl, fabric, and even wood, allowing users to create personalized crafts, decorations, and gifts with ease. The accompanying app simplifies the design process, making it accessible to a wide range of users, from beginners to experienced creators. Whether it’s custom cards, apparel embellishments, or home décor, Cricut.com/setup offers a platform for endless creativity.
#Cricut brand#design.cricut.com#design.cricut.com/setup#cricut.com/setup pc#cricut.com/setup windows#cricut.com/setup#cricut explore air 2#cricut design space#cricut explore 3#www.cricut.com setup login#cricut.com/setup mac
0 notes
Text
How to Connect Cricut Explore Air 2 Bluetooth: Full Guide
How do you connect Cricut Explore Air 2 Bluetooth? Is this what you want to learn? Don’t worry! I am with you! I understand how difficult it is for a beginner to connect your Cricut. You all might not understand properly what to do and what not to do. But there is nothing to worry about when you have a crafting expert like me😅. Yes, you heard that right!
I have been crafting for years using my Cricut. Luckily, I have all models of Cricut machines, including the latest Cricut Joy Xtra. So, I have been used to setting up the machine and establishing connections with various computers and phones.
So, if you want to learn how to connect Cricut Explore Air 2 to computer, look no further than this guide. In this post, I will explain everything that a beginner needs to understand. So, let’s start without any delay.
Connect Cricut Explore Air 2 Bluetooth on Windows
Almost everyone uses Windows computers. The connection method is the same as connecting any other device to your computer. Here are the easy steps to connect your Cricut to a computer on Windows:
Start with switching on your Cricut machine.
Then, place it somewhere at a distance of 10 - 15 feet from the PC.
Next, you have to proceed to the Start menu.
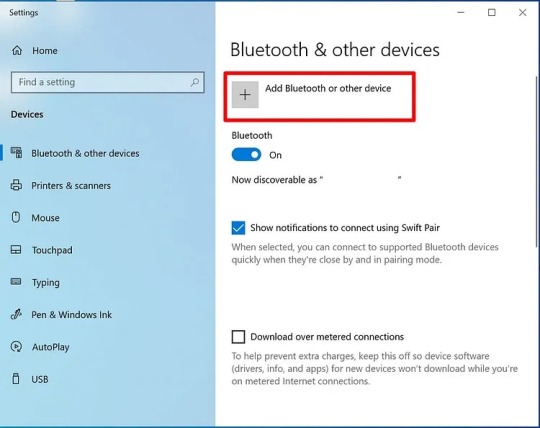
Also, select a gear icon called Settings.
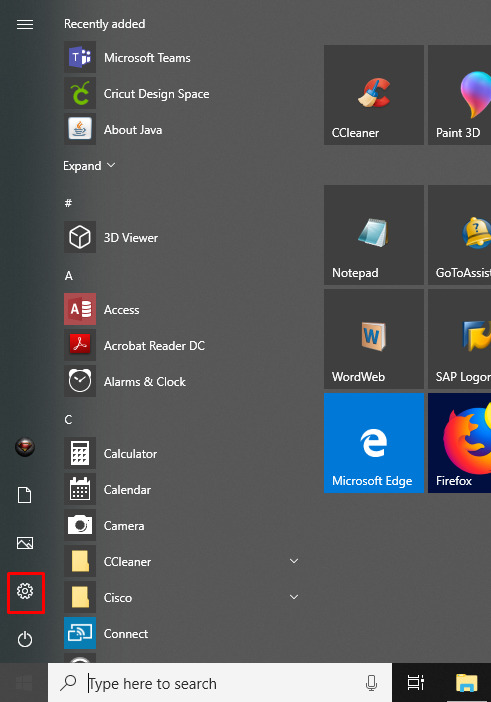
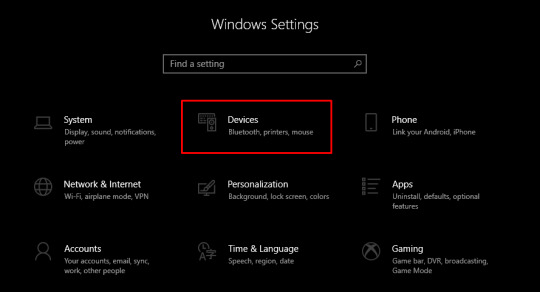
After that, you need to select Devices.
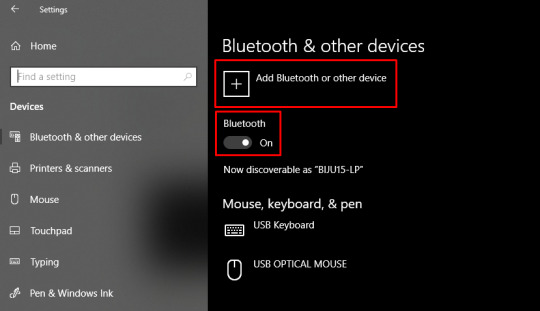
Now, ensure you have switched on the Bluetooth.
Afterward, hit the Add Bluetooth or other device option.
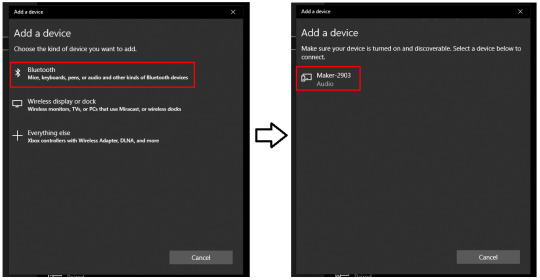
Therefore, you would want to tap Bluetooth and proceed to the next steps so that your machine is visible on the list.
Once you can find it in your list, click on the Cricut machine that you want to connect to and proceed.
Eventually, your Cricut machine pairing is done here.
Connect Cricut Explore Air 2 Bluetooth on Mac
To connect your Cricut Explore Air 2 to your Mac, you should use Bluetooth. However, you also need to place the Cricut and computer within a range of 10-15 feet.
Here are the easy steps to connect your Cricut to a computer on Mac:
Under the Apple menu, you will see an option: System Preferences. Click on it.
Then, you have to look for the Bluetooth on your Mac.
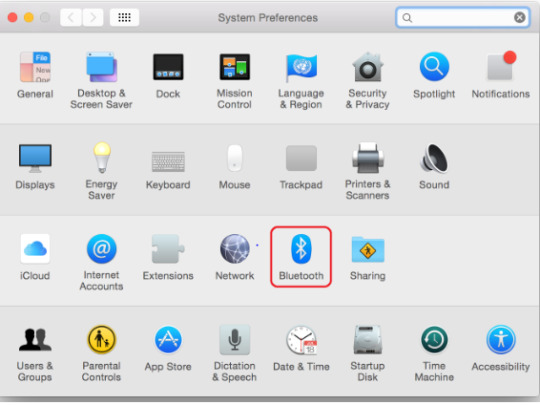
And then turn on the Bluetooth if it is off.
After that, let your Mac search for your Cricut machine model.
Once detected, click on it to pair.
Finally, your Cricut machine is connected to your Mac.
Connect Cricut Explore Air 2 Bluetooth on Android
If you are an Android user, I’ve got your back! Whether you are a Samsung or Real me user or others, you can quickly connect Cricut to a range of devices.
Here are the easy steps to connect your Cricut to a computer on Android:
First thing, you have to power on your Cricut product.
Then, make sure you have positioned your Cricut near your device. The distance should be at most 15 feet.
Afterward, you have to open your Settings to your phone.
Next, you will need to head to the Bluetooth option.
Here, you should turn on the Bluetooth if it is off.
When done, choose the Bluetooth module that is visible on the available list.

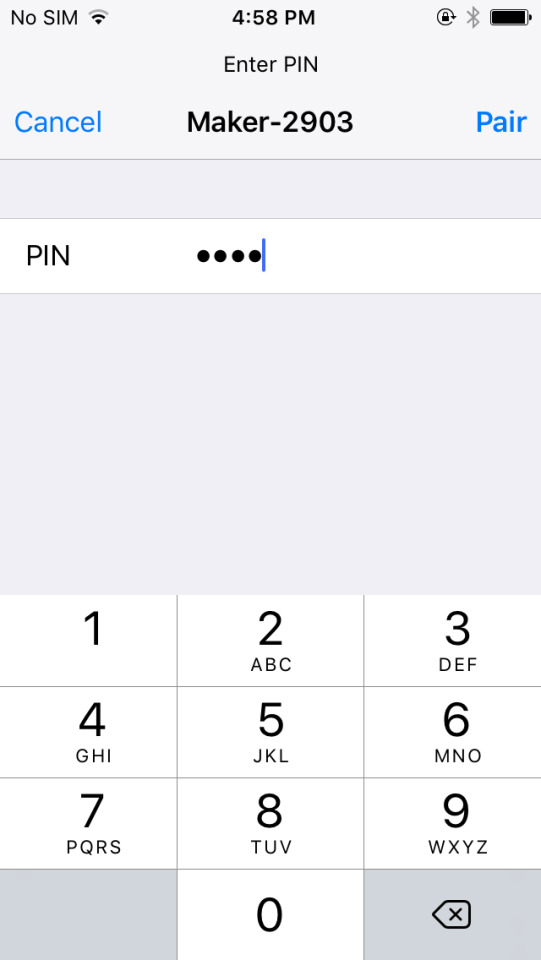
If you move to a screen where it asks for four digits of PIN, enter 0000.
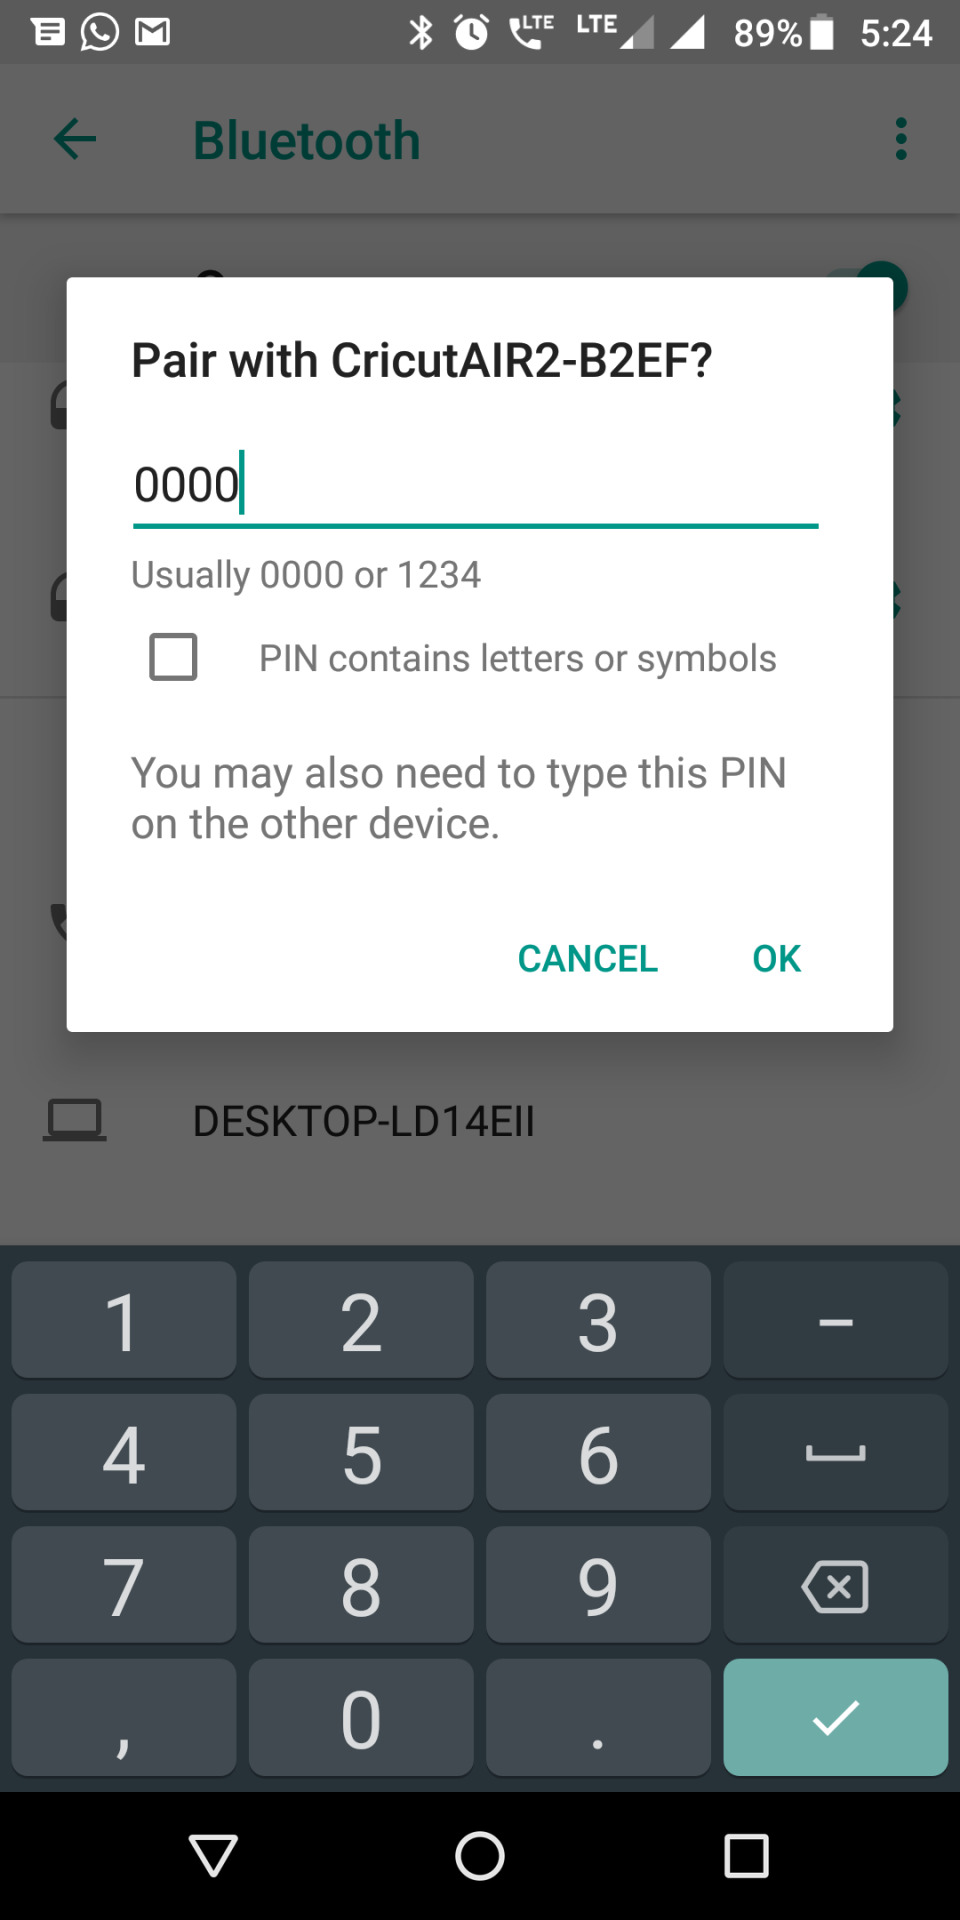
Lastly, your pairing procedure will be done.
Connect Cricut Explore Air 2 Bluetooth on iOS
IPhone or iPad users with the latest operating system can easily connect their Cricut machine to their device. The steps are easy and beginner-friendly. Let’s delve into it!
Here are the easy steps to connect your Cricut to a computer on iOS:
Once your phone and Cricut are near each other, move to the next step.
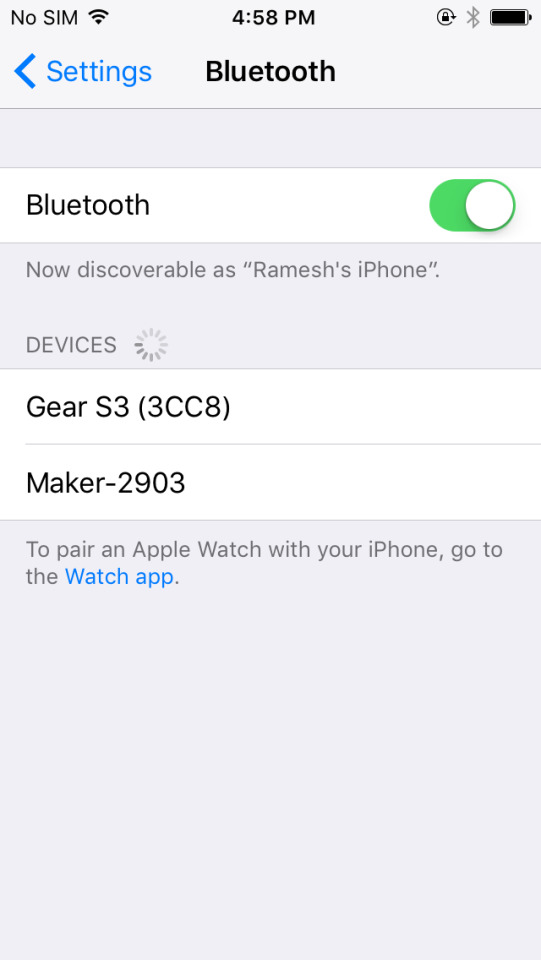
You need to navigate to your iOS Settings.
Now, enable your Bluetooth.
Then, wait and see if your iPhone/iPad detects your Cricut machine.
After that, when you have found your machine on the list, you will want to select it to pair.
If asked to enter the four-digit PIN, enter 0000.
Finally, you click on the Pair button to complete the Cricut connection.
FAQs
Question 1: What do I need to connect my Cricut Explore Air 2?
Answer: You will need to meet the basic requirements before connecting your Cricut to your device. So, in order to connect your Cricut Explore Air 2 to your compatible device, you will need the following items:
Cricut machine
Cricut ID
Materials for a test cut
Computer, laptop, tablet, or smartphone
Cricut Design Space
Power cord
USB cord
Internet connection
Question 2: What are the system requirements for connecting Cricut on a PC?
Answer: In the system requirements for connecting your Cricut to your PC, you will need to ensure the following requirements:
OS: Windows 8 or later
RAM: 4GB
50MB free disk space
Display: Minimum 1024px x 768px screen resolution
Browsers: Mozilla Firefox, Microsoft Edge, or Google Chrome
CPU: Intel Core series or equivalent AMD processor
Connectivity options: USB port or Bluetooth connection
Question 3: How to connect Cricut Explore Air 2 to Chromebook?
Answer: Yes, you can. Most Chromebooks can download Android apps via the Google Play Store. However, some apps may work differently on Chromebooks than they do on Android devices. For example, if your Chromebook doesn’t have a touchscreen, the app may work if you use mouse clicks instead.
0 notes
Text
How to Download Cricut App on Computer: Ultimate Guide
Are you a craft lover who wants to know everything about how to download Cricut app? If yes, then my friend, you have reached the right place. It's been a long time since I used Cricut machines, and I have completed uncountable DIY projects with them. It wasn't a smooth path for me as I had to start out with a basic understanding of Cricut, its model, and the software.
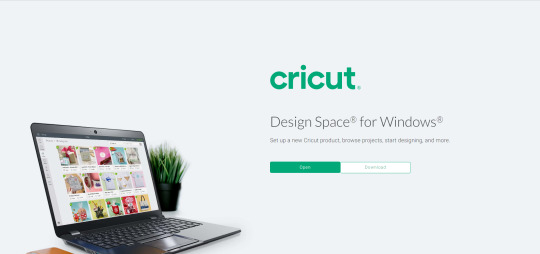
Cricut Design Space, or Cricut software, is a fully-featured digital app that connects to the Cricut machine and allows you to discover your creative sides. It doesn't matter whether your DIY idea is simple or complex; you can easily give them a digital form with the help of software. Also, the Cricut software runs not only on smartphones but also on computers. Today, I will share the process for getting the Cricut Design app on your respective PC.
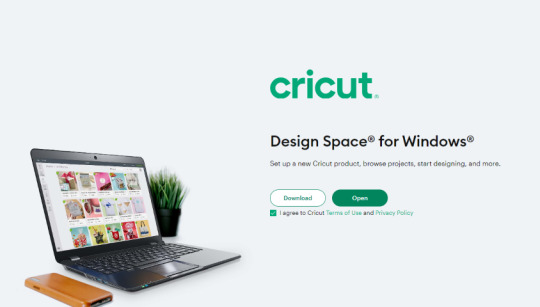
Download Cricut App on Your Windows PC
As said in the opening paragraph of the guide, the Cricut Design app is compatible with all computer systems. Take the reference of the coming steps to learn about the process that revolves around downloading the Design Space on your Windows device:
Start the process by switching on your computer and opening your search engine.
Now, visit Cricut Design Space's official portal and click the Terms & Conditions checkbox.
After clicking the checkbox, press the Download option to start the download process.

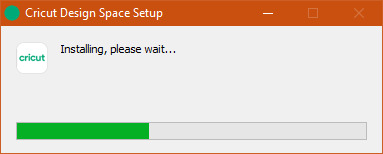
Then, wait for a few minutes and double-click the downloaded file available on the Downloads folder.
Further, a window will ask whether you trust the application; click the I Trust the Application box.
Next, you will see a setup window showing the progress of the Cricut app installation.
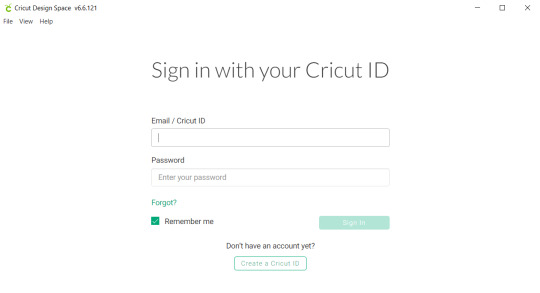
After this, open the Cricut Design Space on your computer's Home screen.
If you already have a Cricut account, sign in to your account by entering the Cricut ID and password.
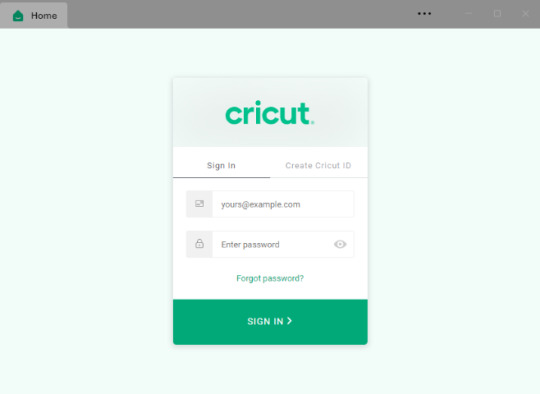
On the other hand, create your account by submitting the necessary details.
Conclude the app download on your Windows by adding the app to the taskbar and creating new projects.
Since you have collected details about how to get Design Space on Windows, let's move on to discussing the method for installing the software on the Mac system.
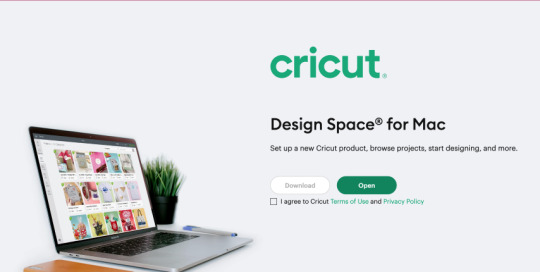
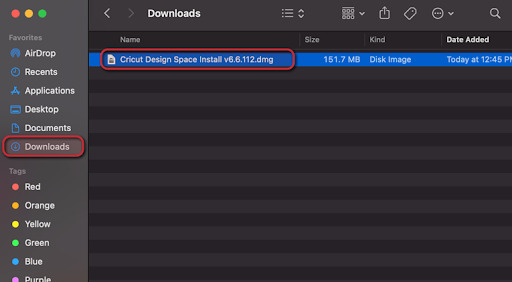
Download Cricut App on Your Mac Computer
In addition to the guide, you can also take a look at the technique below, which will allow you to install the Cricut software on your Mac computer.
Ensure your Mac system is on and go to your device's web browser.
After reaching there, open design.cricut.com and then select the Download box.

Now, choose the section where you want to drop your Design Space file and click the Save button.

When the file is successfully downloaded, visit the Downloads folder and open the downloaded file.
Following this, transfer the Cricut app icon to the Applications folder.
At this time, launch the app by double-clicking the Design Space.

Now, press the Open option to continue with the Cricut software installation process.
Afterward, you are guided to sign in to your Cricut Design app by entering your Cricut ID and password.

Ultimately, you can now proceed toward the final step of creating new designs on the Design Space canvas.
Following the above-said method will make it much simpler for you to download Cricut app on your Mac system. Also, take a look at the forthcoming section and learn how you can create your account.
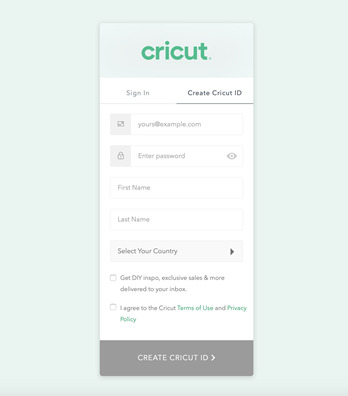
Create a Cricut Design Space Account
Explore this section of the blog, and you will get to learn about the steps needed to be taken to create your account on the Cricut Design app:
After installing the app on your device, tick the Create Cricut ID box.
Now, enter the asked details such as first name, last name, personal ID & region inside the specific field.

Also, tick the Terms & Conditions checkbox and then hit the Create Cricut ID box.
Ultimately, you will receive your Cricut login credentials at your email address.
The earlier methods will allow you to get this free-of-cost digital software on your respective computer system. However, you are advised to be very careful while downloading the app and not to skip any step; otherwise, you might face errors while opening it on your device.
Conclusion
In conclusion, Cricut Design Space is one of the vital tools when it comes to creating crafts. Without this software, you won't be able to operate the cutting machine and make virtual designs. Along with this free application, you will also get a Cricut Access plan. It is a monthly/ yearly paid plan in which you will get thousands of images, fonts, and pre-made projects.
#Download Cricut App#Cricut Design Space Login#cricut design space download#cricut design space app#cricut design space setup#cricut design space for mac
0 notes
Text
How to Connect Cricut to Computer Bluetooth: Ultimate Guide
Isn’t it fun to create something with a brand-new Cricut machine? Of course, it is. I like my Cricut machine, and I am really happy writing this blog for you all. If you’re a crazy crafter like me, you should know how to connect a Cricut machine to your computer to get started with the machine. I always use a Bluetooth connection to set up my Cricut machine. Let me teach you how to connect Cricut to computer Bluetooth.
Cricut machines are incredible when it comes to quality. It is enriched with many advanced features that all crafters need. Therefore, it can be a little complicated to set it up at first. In my crafting journey, I have helped many users create DIY projects, and I feel that I should also create related content for their connections. So, let’s continue with the blog.
How to Connect Cricut to Computer Bluetooth (Windows)?
If you want to connect your Cricut product to a computer’s Bluetooth on Windows, the steps are given below. Let’s check them.
In the first step, go to the Start menu on your Windows PC and click on the Settings option.
Then, hit the Bluetooth option and turn it on.
After that, select the Add Bluetooth or other device option.
Now, select the Bluetooth option and allow your PC to find your machine.
Once you see your Cricut machine’s name on the screen, click on it.
In the last step, both devices are connected via Bluetooth connection.
Finally, you learned how to connect Cricut to computer Bluetooth wirelessly. Well, you can connect both of your devices via a USB connection. And I assume you know how to connect Cricut to computer with USB. Hence, using a USB connection would also be a good alternative.
How to Connect Cricut to Computer Bluetooth (Mac)?
As you already know, setting up a Cricut product via Bluetooth involves connecting it to a compatible device. Here, let’s discuss Cricut’s Bluetooth connection setup on a Mac.
Initially, open the Apple menu and move to the System Preferences.
After that, select the Bluetooth option.
Also, ensure that the Bluetooth connection is ON and select your Cricut model from the list.
If you need to enter the password, put “0000” into the given box.
Finally, the Bluetooth connection process between Cricut and Mac computer is complete.
That’s all for Cricut Bluetooth connection on a Mac. Now, you can start using your Cricut machine with Cricut Design Space. Do you know how to get the Cricut software? If not, I’ll tell you all the steps to get it on your system.
How to Download Cricut Design Space on Desktop?
Once you have learned how to connect Cricut to computer Bluetooth, it’s time to cover the procedure to install Cricut’s software on your computer. Check out the steps below.
For Windows
As a Windows user, you can easily get the Cricut app on your computer. Let’s break down the steps for installing it on Windows.
First, navigate to Cricut’s website on your computer.
Then, search for the Cricut Design Space and hit the Download button to get this software.
After that, the download will start, and your browser will show it.

Now, jump to the Downloads location.
In the following screen, open the file by double-clicking on it.
And then allow the installation to finish.
Next, hit the Cricut ID and password option.
Lastly, select the New Machine setup option to finish the connection process.
These are the final steps to get the Cricut software on a Windows PC. Now, you can use your software to create anything you want.
For Mac
When you’re a Mac user, the steps are slightly different than those for a Windows PC. Check the steps below to learn how to install the Cricut Design app.
To start, navigate to an internet browser and visit Cricut’s official website.
Then, locate the Cricut Design Space and hit the Download option next to it.

After that, allow the system to download your file.
Once the file is downloaded, open it under the Downloads location.
Next, slowly drag the Cricut icon to the Applications folder to start the installation of the Cricut software.
Also, open your Cricut Design app from the Applications folder.

When your app opens, sign in to your Cricut Design Space account.
Finally, you can connect with your Cricut and start making beautiful designs and projects.
That’s it for downloading and installing the Cricut app on a Mac computer. Now, you’re good to go to use your software and machine to start crafting.
Conclusion
Finally, I showed you how to connect Cricut to computer Bluetooth and how to get Cricut Design Space on your system. Hopefully, you understand it, and you’ll also make an effort to connect your Cricut machine to your computer. A Bluetooth connection is excellent for wireless connections, and it helps you work at your convenience. Therefore, if you’re planning to set up your Cricut machine, this blog will be helpful.
#How to connect cricut to computer with usb#How to connect cricut to computer bluetooth wirelessly#How to connect Cricut to computer Bluetooth
0 notes
Text
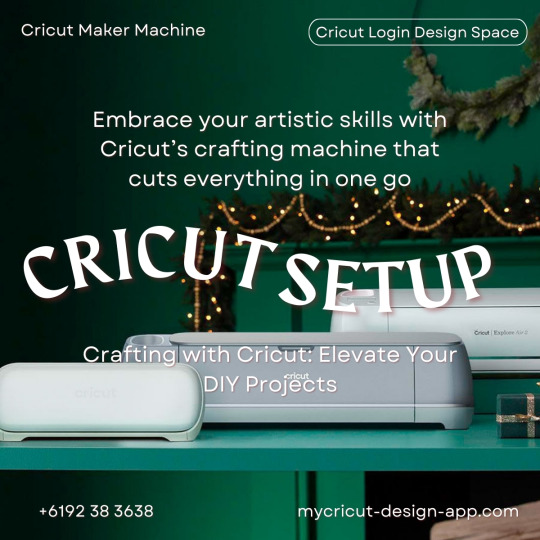
Embrace your artistic skills with Cricut’s crafting machine that cuts everything in one go. With intricate, precise cuts, you will add a professional touch to your crafts. Stop waiting and begin Cricut machine setup by simply navigating to cricut.com/setup. On this site, you have only to follow the steps provided on the screen and use the machine to create something amazing!
#cricut setup#cricut explore air 2#cricut software#cricut.com setup download#cricut.com/setup windows#cricut.com design space#cricut.com/create#cricut.com/setup#cricut.com sign in#cricut.com/register#cricut design space#cricut accessories#cricut design space download#design.cricut.com/setup
0 notes
Text
How to Set Up Cricut Mug Press: A Complete Guide
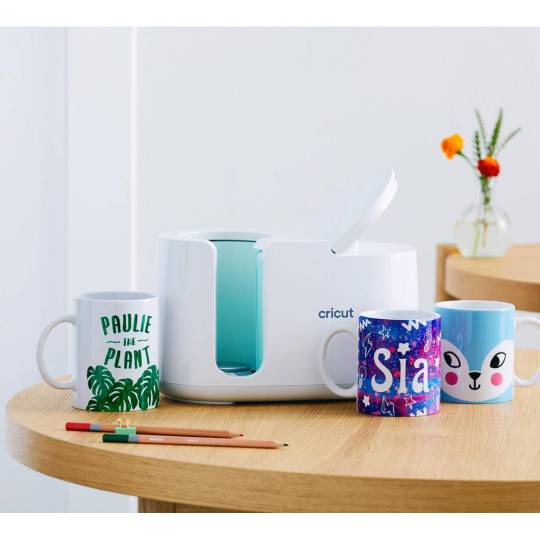
All users who intend to create designs need to get the Cricut Design Space app on their devices. Besides that, users must buy this Cricut Mug Press and bundle before making any mugs. Give me a golden chance to inspire you to set up Cricut Mug Press on your device.
How to Set Up Cricut Mug Press on a Computer?
Before getting a personalized mug, all the users must set up their respective Mug Press successfully. For a successful setup, you need to follow the steps given below:
First, turn on your computer and open the web browser (Google Chrome, Safari, or other).
Second, visit the Cricut setup official page and download the Design Space app for your system.

Third, sign in by entering your Cricut ID and password, or create your Cricut ID by entering your first name, last name, personal email address, or country.
After creating your account, go to the Cricut setup page, choose Heat Press, and then select the Cricut Mug Press option.
Next, switch on your machine and plug it into the nearby wall outlet.
Afterward, unwrap the USB cable and put it inside both devices properly.
Following this, go through the Terms & Conditions and press the Activate option.
Lastly, select the Get Started option, and you are all set to create your first project on this Cricut Heat Press model.
Users can quickly learn how to set up Cricut Mug Press using the above steps. After the successful setup, they will be able to make a variety of mugs for various purposes.
How to Use Cricut Mug Press for the First Time?
With the help of the below steps, users can make various mugs with the snap of their fingers. Get to know about the steps needed to be taken while using this press for making do-it-yourself mugs:
Begin by opening Cricut Design Space and creating a design using the mug template.
After making the design, cover your Cricut cutting mat with an infusible ink sheet.
While placing the sheet, don’t forget to keep the shiny side downward and the color side upward.
Next, take your Cricut transfer tape and cover your entire mug with the tape to avoid any wrinkles or bubbles.
Following this, switch on your machine and pre-heat it by pressing the power button.
When your machine is completely pre-heated, the power button will turn green, indicating that you should load the mug.
Now, place the mug inside the empty area and close it with the handle on the right side of the press.
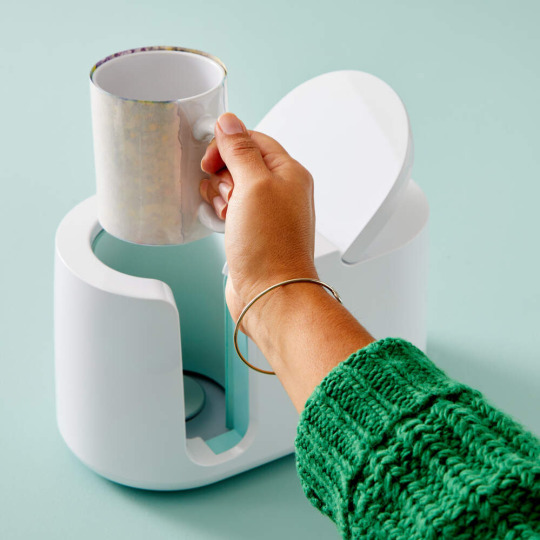
At this point, you need to wait till the machine is transferring the design to the mug.
When the mug has cooled, carefully peel off the design, ensuring that it doesn’t get spoiled.
Finally, your first-ever customized mug is ready to be given as a gift to someone special.
Since we’ve collected the majority of details regarding how to set up Cricut Mug Press and how to utilize it, it’s time to learn a little bit more about this Cricut Heat Press extra feature.
How to Change My Cricut Mug Press Temperature?
In case you want to change the temperature settings of your Cricut Mug Press while making any mug, then have a look at the steps given below:
Initiate the process by entering the Temperature Setting mode, whether your machine is switched on or off.
After doing that, hold on to the power button for 10 seconds, and you will hear the chimes sound with all the LEDs flashing continuously.
Following this, you will notice that the power button will turn orange during the Temperature Settings mode.
Now, you will get to see three different LED rows showing the current setting.
Next, you need to push the power button to select the setting that you want during the process.
At this point, you will hear a chime sound, and the LED display and power button will start flashing together.
After a few minutes, your press will automatically turn off, and new settings will activate when the Cricut Mug Press turns on.
In conclusion, with the how to set up Cricut Mug Press blog, you can now make tons of personalized mugs on your own.
#HOW TO SET UP CRICUT MUG PRESS#HOW TO SET UP CRICUT MACHINE#HOW TO SET UP CRICUT#CRICUT MUG PRESS SETUP#CRICUT MUG PRESS LOGIN#CRICUT MUG PRESS
0 notes
Text
How to Setup Cricut on a Computer and Smartphone?
The day I got my new Cricut Maker machine, I was blown away by its setup. At first, I didn’t understand how to setup Cricut. In order to seek assistance, I contacted a friend of mine, Jennifer, who is a professional crafter.
Back then, I was a beginner, so she helped me with many things. Whether it was Cricut’s setup or the right way to purchase materials for Cricut, she was always there for me. But not everyone can be as lucky as me. So, I decided to share it through this blog.
I am optimistic about the importance of this write-up as it might help newbie crafters who just want to get started with their new Cricut. Don’t worry – this setup will be helpful for all platforms, such as Windows, Mac, Android, or iOS Devices. Are you ready to setup your Cricut? Let’s get started!
What Do You Need to Setup Your Cricut Machine?
If you want to know how to setup your Cricut, ensure you have the following to begin the Cricut setup:
Cricut with everything in the box
Design Space
An internet connection
Power cord
USB cable
A desktop computer, laptop computer, tablet, or smartphone
Cricut ID
Material for a test cut
So, the accessories mentioned above are essential if you want a guide for Cricut machine setup.
How to Setup Cricut on Your Windows/Mac Computers?
So, while setting up your Cricut cutting machine, carefully follow a few steps. Let me walk you through the steps I have provided below so that you can set your Cricut Explore, Maker, Joy, or more:
First, open an internet browser (Chrome or Firefox) and type cricut.com/setup.
Next, you have to download and install your Cricut Design app on your Windows/Mac.
Afterward, you will need to rely on the prompts shown on display to install the app.
On the upcoming screen, you need to select your Cricut machine.
Then, you need to plug in your Cricut machine using a power cable.
After that, press the power button on the Cricut.
You will have to proceed as per the steps given to connect your computer to your Cricut cutting machine using Bluetooth.
Once it is connected via Bluetooth, the Cricut software will start updating your machine.
Lastly, you will be asked to register your machine. You might need to create a Cricut account and register the machine.
How to Setup Cricut on an Android/iOS Smartphone?
Now, let’s delve into another Cricut setup for your mobile device. As of now, Cricut supports only two operating systems, such as Android and iOS.
Here are simplified ways for your Cricut machine setup:
First, you will have to connect the machine to the power source.
Afterward, you need to pair the Android or iOS phone with your Cricut machine using Bluetooth.
Once you have paired with the mobile device, you will need to download the app:
Go to the Google Play Store on Android and look for Cricut Design Space.
Then, click on the Install tab to download the Cricut Design app.
To download the Design Space app on iOS, you should navigate to the Apple Store and search for Cricut Design Space. Hit the Get button.
After installing the Cricut app, you should move ahead on the app to create your Cricut Account.
After that, sign in to your Cricut account as per the instructions given on the screen.
Finally, your Cricut setup ends here.
Finally, I have taught you how to setup Cricut as easily as possible. Now, you can easily set up all your Cricut models, such as Maker, Explore, Joy, and Venture. So, what are you worrying about? Start setting up your new Cricut today hassle-free!
FAQs
Question 1: How can Bluetooth connect your Cricut to a Windows computer?
Answer: Follow the instructions given below to connect your Cricut via Bluetooth on a Windows computer:
First, navigate to the Start button and then select Settings.
After that, you have to select the Devices option.
Now, you need to ensure that the Bluetooth is on.
Then, you will need to click on Add Bluetooth or other device.
Wait for a while until your computer detects your Cricut.
Once detected, you have to click on it to pair.
Finally, you have to enter the PIN – 0000 if asked.
Question 2: How do I setup my Cricut to my Mac computer via Bluetooth?
Answer: Follow the instructions given below to connect your Cricut via Bluetooth on a Mac computer:
First, you need to open the Apple menu.
Then, select the System Preferences option.
Now, you go to Bluetooth and make sure it is turned on.
Next, you have to look for a machine model.
Once it appears, you have to select it to establish a connection.
Afterward, hit the Pair tab.
Enter the PIN 0000 when prompted.
Question 3: How to connect Cricut using a USB cable?
Answer: Connecting any computer with a USB cable is easy and not as complex as the wireless connection is. This is because a wireless connection can be lengthy and tedious sometimes. However, if you want to connect it through a cord, you need a USB cable and connect one end to the computer and another to your Cricut machine. That’s all you need to do.
Conclusion
In this blog, I am basically talking about how to setup Cricut on various devices, including Windows, Mac, iOS, and Android. You don’t need to worry about setup since you can use Cricut Design Space on mobile phones and computers. In simpler terms, you can setup your Cricut with a mobile device or computer. Thus, start setting up your Cricut. No matter which model you are using, this guide has everything you need to setup all models of Cricut.
#cricut machine setup#How to setup your cricut#How to setup cricut#how to setup cricut maker#how to setup cricut explore
0 notes
Text
Explore the possibilities with a Cricut cutting machine to make enticing projects. Get the machine from Cricut’s official site and set it up using Setup Cricut.com. For this, navigate to cricut.com/setup. After this, select the Cricut new machine setup you are using and start cutting the material you want. Cricut is capable of cutting various materials up to 300+ uninterruptedly. Use your computer or mobile device to create an alluring design and control all the functions of your Cricut with one click.
#cricut maker setup#cricut maker 3#Cricut Maker Machine#cricut.com/setup pc#cricut.com/setup windows#cricut.com/setup#cricut explore air 2#cricut design space download#cricut software app#cricut new machine setup#cricut project ideas
0 notes
Text
Cricut Maker vs Maker 3: Comparison to Choose the Best Option
You have landed on the right blog if you are looking forward to deciding between the Cricut Maker vs Maker 3 machine. As a professional Cricut crafter, I have used both tools for a significant time. And to be honest, both machines are my favorite. However, it can be a challenge for new crafters to decide which machine they should buy. But don't worry, as I will provide you with comprehensive content to help you choose the best tool.
In addition, Cricut Maker and Maker 3 are two of the highly sought-after crafting machines available in the market. These machines come with smart features and advanced crafting specs that help crafters make brand-like crafting results. So, keep reading this blog till the end to get to learn the major difference between both machines.
Cricut Maker vs Maker 3: Overview
In the section below, I am going to provide a complete overview of both Cricut Maker and Maker 3 machines.
Cricut Maker
Cricut Maker is the first iteration in the brand's Maker series. This machine is considered among the most worthwhile and versatile cutting machines for beginners. With the help of this machine, crafters can cut 100+ materials, including metal, glass, wood, leather, and smart materials. Plus, the machines work with 13 additional tools to offer top-tier cutting, scoring, foiling, drawing, and writing results.

The machine also works with fine point blades to offer flawless cuts for intricate designs. Also, the machine comes with Bluetooth/USB connectivity options and has a companion app to connect with various devices. You can easily connect the Maker machine to your computer and phone. This machine offers a great deal of comfort for beginners who want to use a full-featured crafting machine.
Cricut Maker 3
When it comes to the most advanced crafting cutting machine of the brand, the Cricut Maker 3 stands in the first position. This machine is the third iteration of the Maker series and has everything a DIYer needs to get pro-level results. It includes all the features available in its predecessor. Cricut Maker 3 has got so many improvements to their previous iteration. It has a sleek design and sturdy build quality to give durability and reliability. Plus, its easy-to-use interface gives the user the utmost comfort to use the machine without any hassle. Also, it works with the roll holder to offer a long materials-cutting experience at once.
In addition, the machine comes with seamless connectivity options and is compatible with Windows, Android, Mac, and iOS devices. It also needs the Cricut Design Space companion app to set up and operate. With the help of the machine and the app, anyone can create jaw-dropping DIY crafts in no time. Most importantly, this machine is considered among the most sought-after cutting machines available on the market.
Cricut Maker vs Maker 3: Features Comparison
This comparison will help you understand the major differences between the Cricut Maker and Maker 3 machines.

Conclusion
After reading this blog and learning about the features and differences between Cricut Maker vs Maker 3, it is clear that both machines are perfect in their own position. However, it depends on one choice and budget which cutting machine you should buy. Cricut Maker 3 offers all the premium features and is more expensive than the original Maker. If you already have the Cricut Maker, then there is no actual need to upgrade. But, if you are buying Cricut Maker 3 and do not have any other major cutting machine, then you can go for it.
Frequently Asked Questions
What Machine Is Best Between the Cricut Maker vs Cricut Maker 3?
Cricut Maker vs Maker 3 are both worthwhile and advanced machines for crafting. Also, both machines offer almost the same features and specs. However, both machines have a little difference in power and prices. You can buy any of these machines based on your budget. If you are a complete beginner, then go for Cricut Maker, and for professional crafting, choose Maker 3.
What Are the Features Available in Cricut Maker and Maker 3?
Here are some primary features that are available in both machines.
● Cricut Maker and Maker 3 can cut 300+ materials with pinpoint precision and accuracy.
● These machines work with a plethora of special materials, such as metal, wood, glass, and smart materials.
● They are compatible with the 13 additional tools to write, foil, score, deboss, and cut on materials.
● Both Cricut machines are identical in shape and size.
Which Devices Are Compatible With Cricut Maker Machines?
Cricut Maker machines are compatible with computers and phones. They also support various operating systems, such as Mac, Android, Windows, and iOS. But they do not work with Chromebooks. To connect your Cricut Maker machine, you can use the Bluetooth or USB connection options. Also, to complete the setup process of your machine, it is necessary to download the Cricut app on your desktop or smartphone.
#Cricut maker vs Cricut maker 3#Cricut maker vs maker 3#cricut.com/setup#cricut setup#cricut explore air 2#cricut crafts#cricut software
0 notes
Text
Top 8 Cricut Cardstock Projects for Beginners to Try in 2024
In the beginning, when I first started making DIY projects with my Cricut machine, I was particularly obsessed with cardstock projects. I used to search for Cricut cardstock projects for beginners all the time on the internet, and during this period, I made several projects. But you know what made me so obsessed with cardstock? Cardstock itself! Yes, you heard that right! Cardstock projects are beginner-friendly, and hence, I can create a wide range of beautiful decor items. Be it paper flowers or wedding cards, I can make them easily on my Cricut machine.
Therefore, I have hundreds of ideas for free Cricut projects with cardstock. So, I am going to share the top 8 projects made from cardstock. These are beginner-friendly, and you can create them easily without much help.
1. Paper Daisy Flower

These colorful daisy flowers just look like real ones. But I made them last year on Christmas to decorate my bedroom. I don’t know why, but I like the natural vibes; therefore, I made it using cardstock paper and decorated my home to give it a natural look. These Cricut cardstock projects for beginners are easy and simple to make. All you need is colorful cardstock and an SVG file, and then you are all set!
2. Congrats Card
Want to congratulate someone? Here, you can try this card made with cardstock. I made this to congratulate one of my friends who recently got engaged with his love. I always love to create simple but iconic designs, and the design of the ring looks just amazing. For this, I used my Cricut Joy, and the use of a holographic insert card gives it a pleasant look that no one can ignore.
3. LGBT Wedding Card
Now embrace diversity with this gay wedding card! Last month, my childhood friend James got married to his boyfriend, and it was the first gay wedding that I attended. So how could I miss the chance to make them feel special? Therefore, I decided to make one such card that I gifted them along with the gift. Also, Cricut cardstock projects for beginners can be easily made with Cricut Joy, meaning no prior crafting skills are required.
4. Paper Wreath

Flower wreaths are the best way to decorate your home during festivals, ceremonial events, condolences, and remembrances. I used white cardstock for making this wreath. And it looks perfect with a black background. You can also try a similar light-colored wreath that will look amazing with the dark walls. So what are you waiting for? Give it a try, and let your wreath spread positive vibes during a special ceremony.
5. Birthday Banners

I am always excited about the new year because it brings everyone’s birthday. So, you are also going to celebrate a lot of birthday parties, and maybe you will organize a party. Why don’t you decorate your home with these banners? These banners were made with cardstock. You can also use glitter cardstock paper that can add stunning looks to your party. So, avoid simple decoration this year and try such Cricut cardstock projects for beginners. With these ideas, you can make everyone’s day special.
6. Shadow Box
Want to make advanced projects? Try this shadow box, which might be a little intimidating for the first time, but trust me, this is going to be beginner-friendly. When I made this, it took me more time than other projects. So, be ready to dedicate your time to this project. This elegant shadow box can be the best gift for handing to someone you love. However, this project will require you to use light cardstock.
7. Paper Mug Plant

Use this mug plant to decorate your study table and your dining table as a centerpiece. The process of making this project is simple; all you need to do is use any Cricut machine such as Maker, Explore, or Joy series. All of them can help you make this beautiful project. I basically made this for my daughter’s study table. So, whether you are starting it for the first time, you don’t need to worry much about the result. Just upload the right SVG files or create your own flower on the Design Space and leave everything to your cutting machine.
8. Gift Tags

Gift tags are the things to use with gifts. I always make my own gift tags instead of buying a new one because I can personalize them according to the receivers. Yes, this is the biggest advantage I know. This is why you should try your Cricut machine and some pieces of your cardstock to make such beautiful gift tags that are easy to make and hassle-free. So, be it your Cricut Maker or small Joy, this project can be made with any machine.
Wrap Up
In short, I have come up with these 8 Cricut cardstock projects for beginners that I have already created a year ago. Now, I have piled them up in this blog for you. Most free Cricut projects with cardstock are beginner-friendly and can be made with all types of Cricut machines. Moreover, you will not need any prior experience as a crafter to try this project. All you need is essential supplies to make these projects quickly.
FAQs
Question 1: What are the free Cricut cardstock projects?
Answer: There are many options available with cardstock. All of them are easy to make with any Cricut machine. Following are the projects you can try with cardstock:
Paper flowers
Cake toppers
Giant paper flower
Pumpkin cart
Adorable unicorn crown
DIY turtle art for kid
Wedding card
Paper flower wreath
Garland
Mandala layered art
3D alphabet letters
Question 2: How can I make 3D layered Cricut projects with cardstock?
Answer: Layering cardstock projects can be a little daunting in the beginning, especially when you are a beginner. But don’t worry, the following steps will help you make a layered 3D layered project:
Select a layered SVG
Unzip the folder
Upload the SVG to Design Space
Resize your design
Modify the design accordingly
Cut your layered SVG
Assemble the cut pieces of cardstock
Now, you have successfully created your first layered projects with cardstock using Cricut.
Question 3: What size of cardstock can I cut with Cricut?
Answer: With a Cricut cutting machine, you can cut the cardstock measuring 0.27 mm thick. However, Maker machines can cut the materials up to 3/32 of an inch or 2.4mm thick. Besides, the maximum thickness of any material may vary depending on the rigidity and density of the material.
#Cricut cardstock projects for beginners#free Cricut projects with cardstock#how to setup cricut maker#Cricut New Machine Setup#cricut explore air 2#cricut.com sign in#cricut design space login#cricut.com/create#cricut software app
0 notes
Text

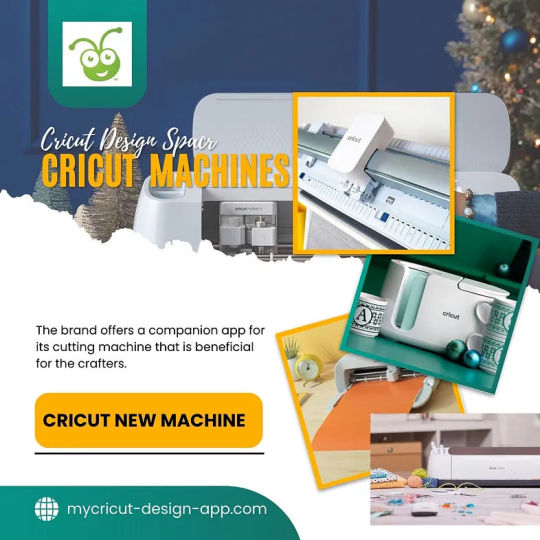
The brand offers a companion app for its cutting machine that is beneficial for the crafters. One of the most popular apps the brand offers is Cricut Design Space. This app is compatible with cutting machines like the Cricut Joy series, Cricut Explore series, and Cricut Maker series. Plus, this app comes with various images, text fonts, and ready-to-make projects that help in creating eye-catching designs in no time. Plus, this app is also crucial for Cricut cutting machines setup and operating them. To download the Cricut Design Space app on a computer or learn about the app more, visit cricut.com/setup.
#Latest Cricut Machine#cricut.com/setup pc#cricut.com setup download#cricut.com/setup#Cricut.com#cricut.com/setup windows#cricut.com sign in#cricut.com/create#cricut.com design space#cricut explore air 2#cricut design space login
0 notes
Text
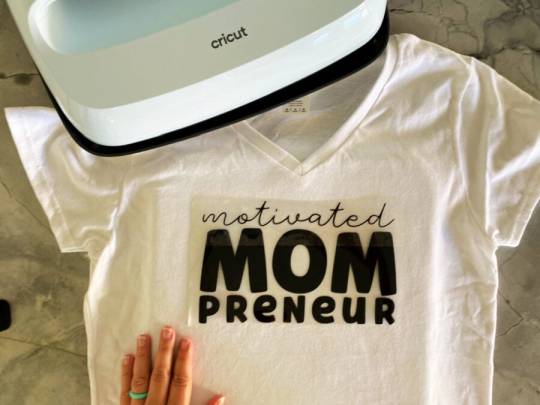
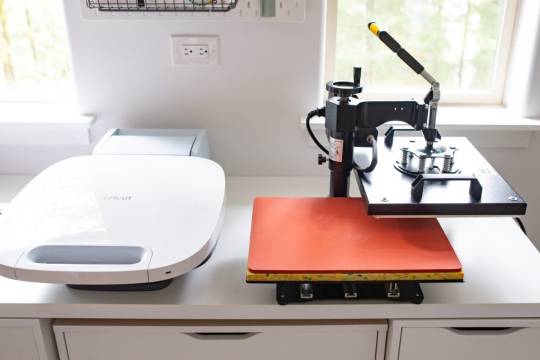
How to Use Cricut EasyPress 2: Tips for Perfect Heat Transfers
Many of you were eager to learn how to use Cricut EasyPress 2. Today, I finally came up with this tutorial in which I am going to make a T-shirt. My purpose in selecting this project was to explain to you the process of using the Cricut EasyPress 2 Heat Press machine.
You won’t believe how passionate I am about creating T-shirts. Every time, I make one personalized shirt for myself or my friends. They appreciate the creativity I add to the design. But today, I will create a T-shirt for my mommy. For me, this project is special because my mom has recently started her new business, and I want to appreciate her with my crafting skills.
In contrast, I will explain each step thoroughly so that you can learn how to make a shirt with the help of EasyPress 2 and how to transfer the iron-on design. Besides, we will start by gathering supplies first. Let’s proceed to learn more!
Step 1: Gather Essential Supplies
Initially, we will need to ensure whether we have enough items to make this project or not. If not, then you will need to arrange them first. Below, I am providing some essential supplies that are mandatory for making shirts:
Cricut Cutting Machine
Design Space
Heat Guide
Standard Grip Cutting Mat
Everyday Iron-On
Premium Fine Point blade or Fine Point
Iron-On Protective Sheet (optional)
Weeding tools
EasyPress 2
T-Shirt Blank.
Now, I have given you the list of all supplies needed to create a shirt. Let’s move to the second step, where you will learn how to set the timer and temperature. This step is a must before you learn how to use Cricut EasyPress 2.
Step 2: Prepare Your Design
Here’s the simple design that I have created: no image and no complex graphics, just simple text: Motivated Mom Primeur. You can also try similar text using your Cricut Design Space.
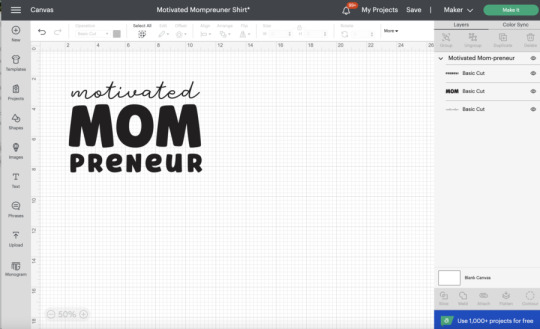
Next, you have to resize your design so that it easily fits your T-shirt.
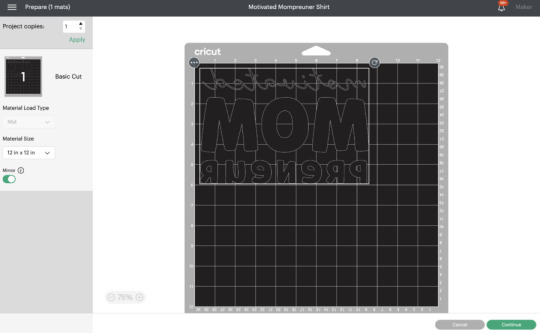
Don’t forget to mirror your design. Then, you need to select Everyday Iron-on from the given list of materials on Design Space. Set your Explore cutting machine dial to the Custom.
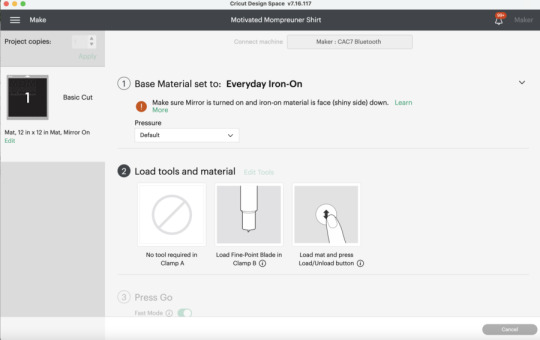
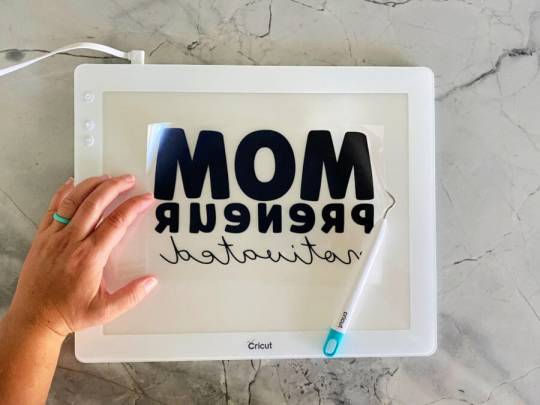
After that, place the mat onto the StandardGrip cutting mat. Now, load it into the machine. Next, select the Go button after the light blinks. After cutting, weed the material using Bright Pad and the weeding tool.
Then, we cut the iron-on design. Let’s set the timer and temperature then I will show you how to use Cricut EasyPress 2.
Step 3: Set the Timer and Temperature
The following steps will help you set the timer and temperature according to your materials. Follow the steps one by one:
First, you have to use the Cricut Heat Guide to complete the project settings.
Next, you will need to press the Timer icon button.
Then, use the + and - buttons to adjust the recommended time.
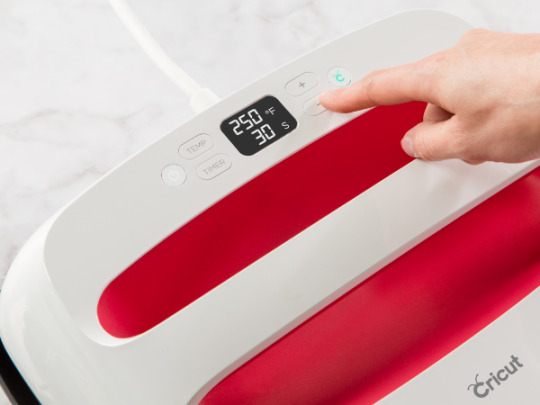
Afterward, you will have to press the Temperature icon.
Again, use the same + and - buttons to adjust the required temperature.
Now, you will notice the orange light, indicating your EasyPress 2 is heating up. At the same time, the green light indicates that its temperature has reached the set limit.
Finally, you will hear a beep sound, meaning you are ready to use it.
After this step, you will need to press your iron-on design onto your blank T-shirt. Once done, move to the next step to learn how to use Cricut EasyPress 2.
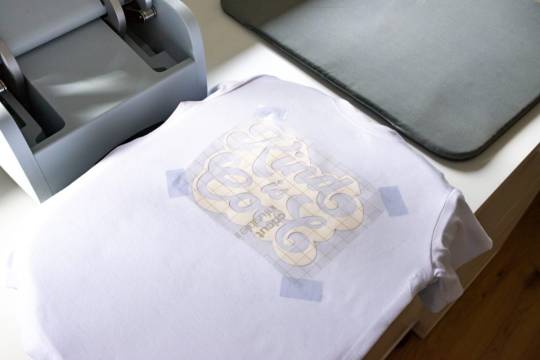
Step 4: Apply Iron-on Design with Cricut EasyPress 2
Whenever you are going to use this EasyPress, you have to make sure you are using the device at room temperature. At the same time, your fabrics and other base materials must be dry. Once you have ensured these, you can move to the following steps to transfer your design onto a T-shirt.
Before following the steps below, make sure you have followed all the instructions included in step 3. Here’s the step to transfer the iron-on design on a blank T-shirt:
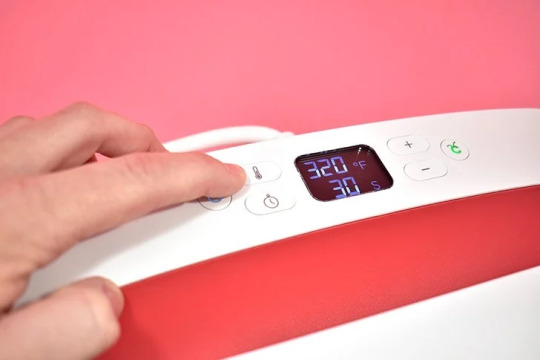
Once your EasyPress is ready, you need to preheat your blank to 315° for 5 seconds. This temperature is recommended for a 100% pure cotton shirt. Other materials might have different temperatures.
After that, place your weeded cut design onto your shirt (the sticky side should be face down).
Next, place your EasyPress 2 on the iron-on and press it for 30 seconds with gentle pressure.
Now, you need to flip over the shirt to repeat the same process from the back side.
Let it cool, and then peel off the plastic sheet.
This is what my mom’s new shirt looks like!

Conclusion
In this guide, I have taught how to use Cricut EasyPress 2. This guide is going to be really helpful for beginners who don’t know the use of this innovative device. In this guide, I explained the use of EasyPress with the help of a simple project, i.e., I made a shirt for my mom. With this guide, everyone, including those who are not much into crafting can also learn how to use this particular device. Now, create something on your own!
FAQs
Question 1: What can I do with Cricut EasyPress 2?
Answer: The Cricut EasyPress 2 family is compatible with various brands, such as heat-transfer vinyl and iron-on transfers. All three sizes of EasyPress are suitable for iron-on projects. So, no matter what you are going to make, this innovative device is capable of transferring designs on baby gear, hats, T-shirts, bags, blankets, and much more.
Question 2: Is it necessary to use a heat mat with my Cricut EasyPress 2?
Answer: Using a Cricut heat mat has its own benefits, as it provides the proper flat surface that helps to transfer the design evenly onto the blank. However, for infusible ink, you should always try to keep the mat. Although there are other alternatives that you can try, it will not offer a flat, even surface. Hence, it is advisable to use the EasyPress mat.
Question 3: Can I use a regular iron instead of a Cricut EasyPress 2?
Answer: No, I would not recommend anyone to use a household iron for transferring the vinyl design on their blank. This is because it might ruin the vinyl design. In addition, different materials, such as cotton, linen, etc., require the temperature accordingly. In simpler terms, you can’t use the same temperature for all types of material. Hence,the Cricut EasyPress 2 Heat Press machine is capable of adjusting the time and temperature according to the material. That is why EasyPress is recommended over regular iron.
0 notes
Text
How to Use Cricut Autopress: Your Get Started Guide
If you are reading this blog, it’s because you want to learn how to use Cricut Autopress. Ever since I started my crafting journey, I have created a lot of crafts. But for the long term, I decided to start my own venture, which is a custom T-shirt business. Through this business, I have sold thousands of T-shirts using my press.

Since Cricut Autopress is designed for industrial purposes, it offers incredible features compared to conventional heat press machines. Since I am an expert in using this machine, I can guide you in getting started with your Cricut Autopress machine. Plus, I will show you how to make your first project using this heat press.
After reading this blog, you will be able to use it without anyone’s help. So, whether you want to make a bunch of T-shirts for your family or tote bags, this Cricut machine has you covered!
What Can You Do with Cricut EasyPress?
Earlier, we had a traditional heat press, which was not very user-friendly. That used to be so heavy, making it difficult to place it somewhere else. But Cricut launched its new version of heat-press which is called a Cricut Autopress. With this press, you can stick iron-on vinyl, Cricut Infusible Ink, and sublimation prints on a wide range of flat blanks. These blanks include T-shirts, coasters, tote bags, and much more.
I know you might be thinking about Cricut EasyPress, such as why we can’t use EasyPress instead of buying this bulky machine. After all, they both do the same things as EasyPress.

But, being the owner of a T-shirt designing business, I know the utmost importance of having an Autopress. In contrast, it was not made for personal use but for industrial use so that it could handle massive projects quickly. But for smaller projects, EasyPress is always a good option.
Steps for Cricut Autopress Setup on Your Computer
Before we move to how to use Cricut Autopress, every machine needs to be set up. However, setting up an Autopress is relatively easy. Follow the steps below to set your Cricut Autopress heat press:
First of all, unbox the machine by removing the black handles.
Take out the USB cord to connect your Autopress Control Pod to your computer.
Go to the Cricut Setup and follow the steps given on the screen to set up your heat press.
If you want to set it up via Design Space, then just go to the top left menu and select the New Product Setup.
Note for Mac users: Newer computer users who do not have a Standard USB driver will need to use a USB-to-USB converter. But if you have a Cricut Mug Press, then you must already have this converter.
How to Use Cricut Autopress for Making an Iron-on Project?
Let’s take an example to understand the usage of Autopress. In this example, I am going to use a Cricut Infusible Ink on my customer’s T-shirt. Before we use this press, we will first need to create a design on Design Space. Afterward, cut the same design using your Cricut cutting machine. After cutting the design, move to the step-by-step instructions given below to apply the design to the T-shirt:
Step 1: Set the Time & Temperature
First of all, I am going to switch on my Cricut Autopress. Next, I am going to preheat my blanks. For this, we need to set the time and temperature for our compatible materials based on a heat guide. For my blank, I have set the temperature to 400° for 15 seconds. You can modify your temperature and time according to your materials using the Cricut Heat Guide.
Step 2: Preheat the Blank

Let’s learn how to use Cricut Autopress for preheating. In order to preheat my blank, I simply put my shirt on the base of the heat press. Afterward, I close the Autopress and try to press the handle downward until it gives a click sound.
After closing it, the timer will start counting down. Then, the press will open up automatically once the timer reaches zero. Since it might be too hot, do not try to touch it very soon, and leave it to cool down.
Step 3: Place Your Design on the Blank T-shirt
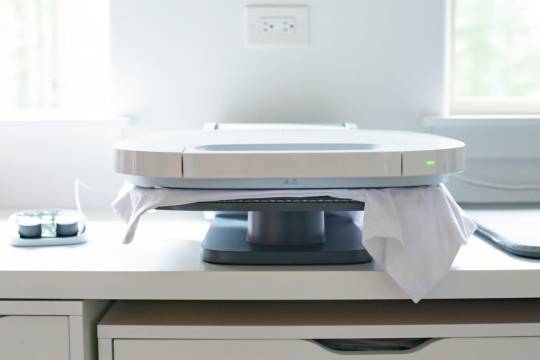
I always do preheat because it removes the crease, and the surface becomes evenly flat, making it an ideal surface for your design. So, after preheating, I place a cardstock inside my blank and then place the Infusible Ink design on my blank.
As you can see in the above image, I have used heat-resistant tape to keep the design in the center. Also, my design is facing downward. Afterward, I place the butcher paper on the top of my T-shirt blank.
Step 4: Apply the Pressure to Your T-shirt
Before applying the pressure, I reset the Pod for 45 seconds. Then, pull the handle down to apply the pressure until it produces a click sound. Once your countdown reaches zero, you should leave it for a while to cool down. Later on, you can remove the transfer!
Finally, our guide on how to use Cricut Autopress comes to an end. Here’s what my Infusible Ink design looks like on a white T-shirt.

FAQs
Question 1: What projects can I make with Cricut Autopress?
Answer: the upgraded version of the traditional heat press, Cricut Autopress, is mainly designed for bigger projects. However, the possibilities are endless with this advanced heat press. These projects include clothing such as T-shirts, tote bags, and any other oversized clothes. Besides, you can also make home Decor, e.g., personalized address sign plate/board and ceramic coasters.
Question 2: Should I use Cricut Autopress without the mat?
Answer: You can only use Autopress without a mat when you are using a thicker blank. However, thin blanks require you to use the mat. Then, just adjust the heat and temperature for your compatible materials and place the design onto your blank. Afterward, you can pull down the handle to press the heat press. As a result, your design will adhere to the blank. Make sure you do not touch it just after applying the design. Let it cool down and take it out.
Question 3: Can I adjust the pressure on Cricut Autopress?
Answer: No, you don’t need to apply pressure yourself, as Cricut Autopress comes with an automatic pressure feature. Thus, it can apply the necessary pressure automatically on any project with up to 2 inches of thickness. However, you just need to lower the heat plate and press down the handle so that the motor engages properly. Finally, the in-build mechanism will do the rest to adjust the pressure.
Conclusion
In a nutshell, I have written this guide on how to use Cricut Autopress for beginners. Using this guide, they can make their first project easily. To help the beginner, I have added points like what you can do with your Cricut Autopress. Further, I discussed the setup procedure of the press. Without this setup, we cannot get started with this device. Last but not least, the step-by-step tutorial to make your first project can help you apply your design on a T-shirt or any other blank effortlessly.
1 note
·
View note
Text
Cricut Black Friday Deals: Explore Exclusive Discounts 2023
Black Friday is the best time to get the best deals. Isn’t it? I am so freaked out by the amazing Cricut Black Friday deals in 2023, and you will be too. This day is going to be very special for all the crafters like me who are either involved in a crafting business or thinking of getting involved in it. So, let’s see what you can get in Black Friday Cricut deals.
Due to the high demand for Cricut machines, Cricut-related tools, and materials, the deals are great for buyers. Well, these deals come around once a year, so make sure you get what you want. So, without further ado, let’s check out what deals will be on Cricut Black Friday.
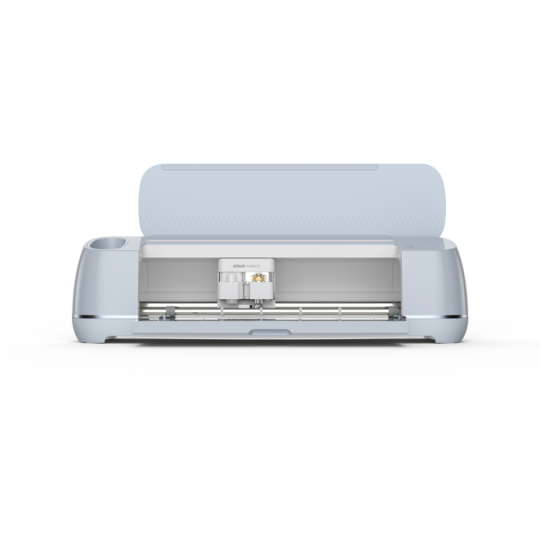
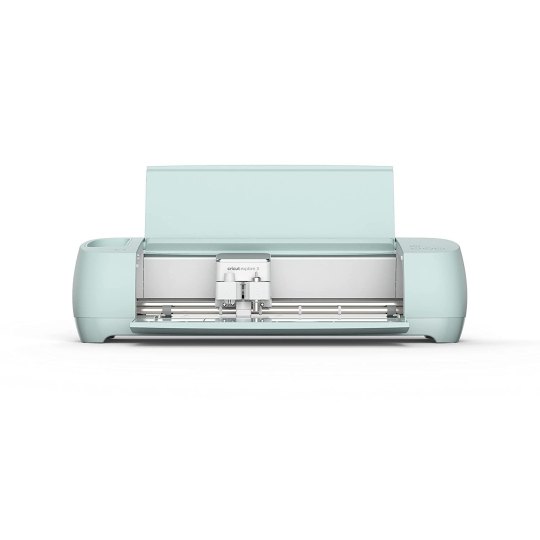
1. Cricut Maker 3
This is our first member on the list, and I hope there will be many users who are waiting for this to be on sale. So, the time has come when you can save up to $88 on this great machine. Here are some of the best Cricut Maker deals for Black Friday in 2023.
Alt text: A Cricut Maker 3 machine
You can get the Cricut Maker 3 from Cricut with the Cricut Access membership discount at $341.99. Hence, you will save a hefty amount here. Besides, this machine is also available on Amazon at $429, where you can save $60. However, I prefer to purchase it from the Cricut website.
2. Cricut Maker
After Maker 3, Cricut Maker is next in my Cricut Black Friday deals. You can get it on sale during these amazing deals season. There is a wide range of websites that are currently offering Cricut Maker at a lower price.

Alt text: A Cricut Maker machine
Cricut is offering the Cricut Maker at $249.99, and with the Access membership, it will go up to $224.99. Hence, you will save about $25 on this incredible machine. Moreover, Amazon is offering this machine for $289.99.
3. Cricut Explore 3
Here comes the Cricut Explore series. Explore 3 is the latest Cricut machine in this series, and many users adore it. Interestingly, Cricut is offering it at only $287.99 with the Cricut Access membership. On Amazon, you can grab it at $276 with a $40 off, whereas Walmart is offering the same at $279 instead of $319.99.
Alt text: A Cricut Explore 3 machine
4. Cricut Explore Air 2
This machine is my all-time favorite due to its remarkable performance and awesome cutting. Also, this machine is large in size and can make numerous crafts in one go. So, who else wants to purchase it?
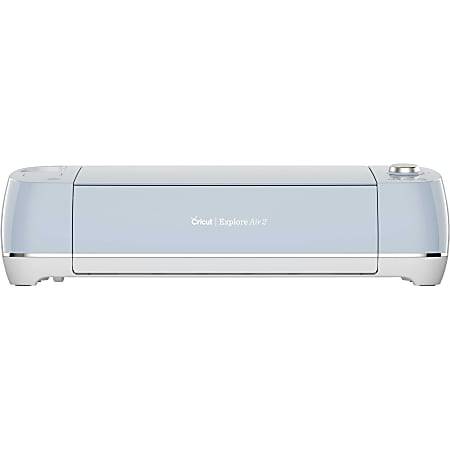
Alt text: A Cricut Explore Air 2 craft machine
In this Cricut Black Friday deals present a golden opportunity to acquire a machine like Explore Air 2 at a great discounted rate. On Cricut, you will get this machine at $179.99, along with a Cricut Access membership, whereas Walmart is offering it at $199.00. So, don’t miss out on the opportunity and grab this machine for your dreams.
5. Cricut Joy
After all the large Cricut machines, we finally come to Cricut Joy, a tiny machine in Cricut’s lineup that offers brilliant features and utmost capabilities. If you ask me for reviews, I would say don’t skip this machine.
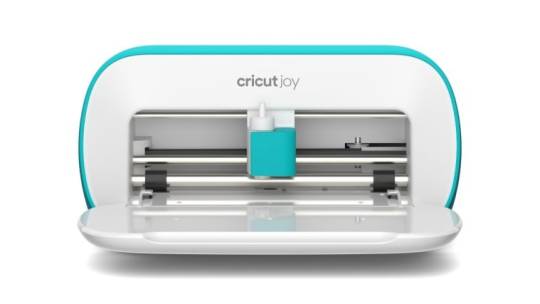
Alt text: A Cricut Joy cutting machine
As it is packed with great cutting features, you can use it for all your small to medium-sized crafts. Furthermore, it is portable and can be carried anywhere you want.
I have used Explore 3 and Air 2 so much in my crafting journey, but Cricut Joy is the machine I have barely used. But as much as I used it, I have never been disappointed.
This tiny machine is available at $169.99 on Cricut, along with the Cricut Membership. At Walmart, you can get it for $122.19, and on Amazon, it is available at $121.50. So, it can be one of the best Cricut Black Friday deals for you.
6. Cricut Easy Press 3
The Cricut Easy Press 3 is available at Amazon and Cricut at reasonable prices. Therefore, you can select from where you want to purchase it. If you want to create an iron-on project with your Cricut, you will need Easy Press machines to transfer the heat. After research, I found that two platforms are offering it at the best deal - Cricut and Amazon.
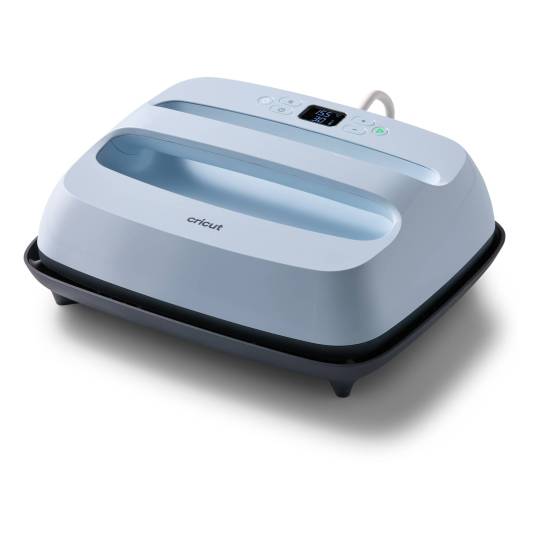
Alt Text: A Cricut Easy Press 3 machine
From the Black Friday deal, the Easy Press 3 deal is amazing, and I really love this machine. Cricut Easy Press 3 is available at $199.99 at Cricut and Amazon. So, you can get it from any of these platforms.
Conclusion
Hopefully, you liked my short guide on Cricut Black Friday deals2023. This year is just about to end, and you can take advantage of these crazy deals to get your desired Cricut machine at a lower price than the original. There are different platforms that offer Cricut machines, but Cricut’s official website can be the best one to purchase a machine. I have used the official websites a lot of times to get my desired Cricut machines.
#Cricut black Friday deals 2023#Black Friday Cricut deals#what deals will be on Cricut Black Friday#Cricut Black Friday deals#cricut.com/setup pc#cricut.com/setup windows#cricut.com/setup#cricut explore air 2#design.cricut.com#cricut new machine setup#cricut design space login
0 notes
Text
How to Download the Cricut App on a PC and Smartphone?
Whenever we think about making a new project from a Cricut machine, our minds automatically shift towards loading mats, pressing buttons, and other activities. But before any of the physical magic occurs, the DIYer needs to design their first project in the Cricut app (Design Space.) This Cricut software communicates with the Cricut machine, guiding the crafting process.
Cricut Design Space is an easy-to-understand app that makes it easier for newbies to be more original. Besides, one can easily download the app on their desktops and mobiles. Along with software, the user also gets a Cricut Access subscription plan. Without wasting any more time, let's begin by teaching you about the basics of Design Space and the download process.
What are Cricut App System Requirements?
To continue with the journey of making new designs on a daily basis, all users must ensure that their devices are satisfying system requirements. If you need to learn about it, then examine the content given in this table. You will get a clear overview of the Design Space system requirements:
For Windows
Operating System: Windows 10 or later.
CPU: Intel ™ Dual Core or equivalent.
RAM: 4 GB and 2 GB free disk space.
Display: 1024px x 768px.
Internet Connectivity: Download speed: Min. 2-3Mbps & Upload speed: Min 1-2Mbps
Offline Feature: Available for desktop Design Space.
For Mac
Operating System: macOS11 or the latest version.
CPU: 1.83 GHz
RAM: 4 GB RAM with 2 GB free disk space.
Display: 1024px x 768px.
Internet Connectivity: Min speed: 2-3 to download & 1-2 Mbps to upload.
Offline Feature: Supports on the desktop without internet connectivity.
For Android
Operating System: Android or higher.
Compatible Devices: Mobile devices and tablets only.
Broadband Connectivity: 2-3 Mbps for downloading & 1-2Mbps for uploading.
Offline Feature: Currently not available.
For iOS
Operating System: iOS 15 or later
Compatible Devices: iOS SE (3rd generation), 13, 12 & 11 series.
Broadband Connectivity: 2-3 Mbps for downloading & 1-2Mbps for uploading.
Offline Feature: Available for iOS devices.
Since you've come across the Design Space minimum system requirements, read about the download and installation process in the sections below.
How to Download and Install Cricut App on Windows?
Equally important, following these steps to learn about downloading and installing the software on Windows OS:
First, switch on your system and open the search engine of your choice.
After reaching the search engine page, go to the Design Space home page.
Next, tap the Download box and wait till the download process is going on.
Now, double-click the file in the browser or your Downloads folder.

Further, a pop-up window will open, asking you to trust the application.
Following this, a setup window will display the installation progress.

After that, the Cricut app will appear on your system home screen.
Now, open the app and sign in with your Cricut ID & password.
Lastly, you can start creating designs on the software for free without any hurries.
Further adding to the blog, you will be getting to learn about downloading the software on Mac OS.
How to Download and Install Cricut App on Mac?
Equally important, this part of the blog will assist you in learning about downloading & installing Cricut Design Space on the Mac operating system.
Start the process by opening the Safari search engine and pay a visit to the Design Space's official page.
Now, press the Download option, and when the download comes to an end, double-click the .dmg file.
Next, move the app to the Applications folder to start the installation process.

Following this, launch the app by going to the Applications folder and double-clicking the Cricut app.
Also, read the Mac notice and tap the OK option to carry on with the process.

Further, create your account or sign in with your Cricut login details.
Congrats! You can now start creating your designs on the software canvas.
How to Download Cricut Design Space on iOS Devices?
As said in the opening lines of the blog, the Design Space is compatible with smartphones. It won't matter if you have a smartphone; the software will smoothly install on the device. For that, you need to follow these steps:
First, turn on your iOS device and open the App Store app.

After opening the app, type Design Spaceinside the Search section.
Next, press the Get option and cross-check the download with the iTunes password.
Now, wait till the installation process is going on.
When the installation is complete, your screen will display two options: New Machine Setup & App Overview.
If you don't want to choose any of the options, then quickly press the X icon.
Here you go! Sign in and start designing instantly without wasting any time.
Following the installation of the Cricut app on iOS devices, the Android user can also install it on their system.
How to Download Cricut Design Space on Android Devices?
Furthermore, let us introduce you to the steps to install Design Space on Android devices.
Begin the process by clicking the Google Play Store on your mobile.
After that, start looking for Cricut Design Space and then press the Install button.

Following the installation of the app, you will get to see that it will appear on your phone's home screen.
Now, simply click the icon, then sign in, and you are all ready to show your creativity on the canvas.
Considering all of these earlier said details in this blog, the DIYer can easily craft out the projects using the Design Space. However, they need to be very careful while accessing the Cricut software and using its tools & other features.
Conclusion
As a conclusion to the blog, the Cricut app is an app that runs together with the cut-die machine while creating any project. With the Design Space, the craft plotter will be able to do something. Besides, this easy-to-learn software boosts the DIYer's confidence level and gives them a light that they use to see the correct path. However, getting the software isn't a piece of cake, as the user needs to ensure that their PCs and smartphones fulfil the system requirements. If they satisfy the requirements, then they won't be facing any problems while downloading the app.
Frequently Asked Questions
Question: What is Cricut Access?
Answer: Cricut Access is a monthly or yearly subscription plan that maximizes the DIYers, allowing them to use images, fonts, and ready-to-use projects. With the Access plan, the user will get to experience certain features such as automatic background remover, priority member care, and many more. In addition, the DIYer having the plan also gets to save $10 while shopping from the official website.
Question: How Can I Install Cricut App on My iOS Device?
Answer: With the help of these steps, you can download the app on your iOS device:
Start the process by switching on your OS device and opening the App Store app.
Now, type Design Space inside the Search section.
Press the Get option and verify the download with the iTunes password.
After the installation is finished, your screen will display two options.
In case you don't want any option, then press the X icon.
At last, sign in and start making projects instantly.
Question: How to Download Cricut App on Windows?
Answer: These steps will help you learn how to download the app on Windows:
First, open the search engine and go to the Design Space setup page.
Next, press the Download option and double-click the file in the browser.
Further, select the I trust the application visible inside the pop-up window.
After that, the Design Space will appear on your system home screen.
Now, sign in with your Cricut ID & password.
Finally, you can start making designs and patterns using the Cricut app.
#Cricut App#Cricut Software#cricut.com setup download#cricut.com/setup#cricut explore air 2#cricut setup
0 notes
Text
6 Ghostly-Themed Halloween Shirt Ideas for Cricut in 2023
Do you want to make your personalized Halloween shirts? Whether you want spooky Halloween shirt ideas for Cricut or cute new shirt ideas for your loved ones, you will get the best shirt ideas in this blog. It is always exciting to make your own shirts for Halloween. We can add our own creativity and ideas. However, some people find the easier way to get the idea for Halloween shirts. So, this write-up will give you the best Cricut Halloween shirts.
Below in the write-up, we have mentioned the 6+ spooky shirt ideas that you can try on Halloween this year. These shirt ideas will inspire you to make your own shirt ideas with similar designs.
1. DIY Colorful Halloween Shirt
This colorful DIY shirt is made using Cricut Design Space. This is a fun project for both children and adults. It seems to be a great idea for a Halloween party! No?
For making these shirts, you will need items like white t-shirts, HTV, Easypress, EasyPress Mat, Design Space file, and fabric markers. Even though Cricut Design Space has a wide range of options, we chose this little skull. The process is the same as you do for other Cricut projects. Just send a file to cut and then use Easypress to transfer the design on your shirts. If you don’t like this one, then don’t worry. We’ve got so many Halloween shirt ideas for Cricut.
2. Come We Fly Halloween Shirt

Now, celebrate Halloween with this Come Fly shirt if you are looking for a shirt design that looks a little scary with some humor. This is also the perfect choice if you want to make a Disney Halloween shirt to celebrate your favorite witches like the Sanderson Sisters and all. People watching the Hocus Pocus Halloween movie must try this shirt for a Halloween party.
3. Halloween Maternity Shirt
If you are expecting your baby, try this shirt on Halloween Eve. It doesn’t only look pretty, but the text “expecting a little pumpkin shirt” makes it cute and exciting. You can also gift it to someone who will soon be a mother. It would look great and won’t consume so much of your time. However, the design is also user-friendly; you just need to use eye-catching fonts or something that makes it more spooky.
4. Halloween Shirt With Bats and Cats
The bats and cats are an essential part of Halloween decorations and designs. Without this, we can’t give a scary look. Also, bad cats are believed to be a bad omen or always considered the companion of witches. Similarly, the bats fall under the animalistic version of vampires.
In contrast, bats are always active at night and are perfect for creating dark and scary environments. You can use these animals’ pictures as per your choice. However, you can also take reference from the above picture.
5. Bad Witch Vibes Graphic Shirt
No matter which machine you are using, almost all Cricut give their best to make your shirt designs successful. You should ensure the size of your shirt, then choose the machine which can make the perfect size of shirt.
6. Goofy Skeleton Printed Shirt

To give you some unique Halloween shirt ideas for Cricut, we have this jolly skeleton design idea for your shirts. For the Halloween festival, vampires, werewolves, and skeletons play a crucial role. Besides, you can try this jolly skeleton, which looks not only funny but also eye-catching on Halloween. The design looks so amazing that it can increase anyone’s heartbeat. So this jolly skeleton is the best option for people who aren’t a big fan of wolves and vamps.
Conclusion
That’s all for Halloween shirt ideas for Cricut. Everyone is excited about this festival and wants to stand out from the crowd. Hence, you have the best ideas for your shirts to try on Halloween Eve. Plus, you can make these designs yourself using a Cricut machine. These 6 spooky shirt designs will make you stand out at a Halloween party. So what are you waiting for? Try these spooky ideas and let them make you look unique.
FAQs
Question 1: What Cricut materials do I use for my Halloween shirts?
Answer: You can try various materials to make your own Halloween shirts. However, we recommend the Cricut iron-on as it is the best for clothing and other projects. The reason why this is the best is because it has a heat-resistant backing that helps in adhering it to your clothes. Moreover, the Cricut iron can outlast up to 50 washes.
Question 2: Is it costly to make Halloween shirts with Cricut?
Answer: After buying the These 6 spooky shirt designs, you will only pay for iron-on materials. However, the materials cost less than $10 for the 12” x 24” rolls of iron-on materials. It also depends on the size of your final design, like how many shirts you can produce with these rolls.
Question 3: Is Cricut good for shirts?
Answer: Cricut machines are available in different models and come at different prices. However, a second or third-generation Cricut Explore machine can do the job if you want to focus on shirts for your Halloween festival. Moreover, if you want to buy a budget-friendly machine, Cricut Joy is the perfect choice.
#Cricut Halloween shirts#Cricut.com/setup#cricut.com/setup pc#cricut.com/setup windows#cricut explore air 2#cricut design space download#cricut new machine setup#cricut setup#cricut design space
0 notes
Text
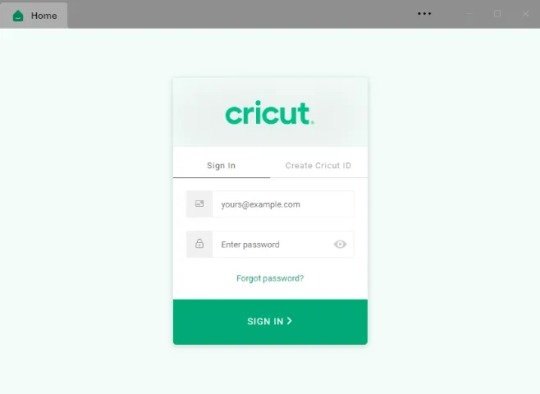
Cricut Design Space Login - Cricut Setup
With an intention to make the Cricut app run on PCs & mobiles, all the DIYers need to know the basic system requirements. Each OS comes with its separate requirements, which should be fulfilled to support the app. Once the app satisfies the requirements, it will start running on the devices without any technical glitches. However, to get the app on the devices, they need to open cricut.com/setup.
Visit - design.cricut.com
www.cricut.com/setup
Cricut Design Space
cricut.com/setup windows
#cricut.com/setup#design.cricut.com#cricut crafts#cricut explore air 2#cricut design space login#cricut new machine setup#www.cricut.com/setup#Cricut Design Space#cricut.com/setup windows#Cricut.com setup mac#Cricut setup#Cricut.com setup download#Cricut.com sign in#cricut.com/setup pc#Setup Cricut.com#Cricut Design Space Login
2 notes
·
View notes