#cricut setup download
Text
How to Connect Cricut Maker 3 to Bluetooth: Full Guide
Whether you want to connect Cricut Maker 3 to Bluetooth or a USB cable, this step is always recommended when you are up to the Cricut setup! However, this blog will especially focus on how to connect Cricut Maker 3 to computer and mobile devices.
Like many of you, I remember the day I started crafting with my first Cricut Explore Air 2, purchased with my savings. The excitement was real, but so was the confusion. I found myself unable to connect my device to the Cricut machine, a common issue for beginners. However, with the help of the internet, I was able to overcome this challenge and learn the steps to connect my Cricut machine.
Besides, the connection is exactly the same for all devices. Being an expert in crafting, I can teach you to connect your Cricut Maker 3 to your Windows, MacBook, Android, and iOS devices. So, let’s get started now!
Connect Cricut Maker 3 to Bluetooth on Windows 10
When it came to establishing a connection with Windows computers, I was very excited. It is still a cakewalk for me. I can do it within a minute, and so can you! Yes, you can also make this connection in a couple of minutes. Let me show you how.
Here are the superb, simple steps you need to follow to connect Cricut to a PC via Bluetooth:
Connect Cricut Maker 3 to Bluetooth on MacBook
Thanks to Cricut, we can use Cricut on our MacBook without any hassle. However, the first step would be the same for Mac as for Windows 10. To learn the steps to connect to Cricut, users need to do the following:
Connect Cricut Maker 3 to Bluetooth on Android
Android devices, including Samsung, Google Pixel, LG, Motorola, and One Plus, are compatible with Cricut machines. Hence, if you want to connect Cricut Maker 3 to your Android devices via Bluetooth, you need to go through the following steps:
Connect Cricut Maker 3 to Bluetooth on iPhone/iPad
Are you using an iPhone or iPad? You can also connect your Cricut to Bluetooth on these devices without hassle. To connect, you have to follow the steps below:
FAQs
Question 1: Why is my Cricut Maker 3 not connecting to my Android?
Answer: Whenever you encounter this issue on your Android, you will need to check for the following points:
Question 2: Can I connect Cricut Maker 3 to a PC via a USB cable?
Answer: Yes, you can! You can connect Cricut to your computer using a USB cable. To connect, you have to go along with the following steps:
Question 3: What do I need to connect my Cricut Maker 3 to PC?
Answer: In order to connect a Cricut machine to your Windows computer, you will need things as follows:
Visit: install cricut design space app
cricut.com/setup
Source: https://cricutmakermachines.com/how-to-connect-cricut-maker-3-to-bluetooth-full-guide/
#cricut install setup#install cricut design space#install cricut design space app#install cricut explore air 2#cricut.com/setup login#cricut.com/setup windows#cricut.com/register#cricut.com/create#cricut.com/setup#cricut.com sign in#cricut.com design space#www.cricut.com setup login#cricut new machine setup#cricut design space#cricut explore 3#cricut explore air 2#cricut setup maker#cricut setup#cricut setup create account#cricut setup download#cricut setup on computer#cricut create connect to computer#setting up my cricut maker#setting up your cricut maker
0 notes
Text
What Are Basic Cricut Maker Tips And Shortcuts for Beginners?
It's very important for all beginners to learn about the basic Cricut maker tips before becoming a master at handling the machine. With the help of those tricks & shortcuts, they'll be able to complete their project a lot easier.
Visit:- cricut.com/setup
design.cricut.com
cricut explore air 2
cricut setup download
cricut.com setup Mac
Other than that, they'll also get to know how to handle their mistakes and utilize their crafting skills. This post will assist you in gathering some of the essential Maker tricks required while accessing the cutting machine.
1. Use Ready-to-Use Make Projects
Preferring ready-to-make projects is one of the best Cricut Maker tips that save the crafters time by directly choosing the projects from the Design Space. The project included in the app helps the users without any pressure of messing up during the cutting process. Through these projects, it will be fun to learn more about the different kinds of projects.
2. Download Design Space
In order to get the customized project from the smart cutting machine, it's important for every user to install Design Space software/app. Moreover, it also assists the DIYers in creating a wide range of projects. In addition, it is an easy-to-learn app available for free to users.
3. Get Basic Tool Set
Furthermore, you aren't supposed to have all kinds of supplies while creating new projects on Cricut. The crafters need to choose some of the basic tools as per the type of project. Apart from that, it's important for them to carry the correct tools during cutting; otherwise, they'll end up spoiling the project.
4. Don't Waste Testing Materials
While unboxing the provided box, the users will be provided with testing materials for the trial. Moreover, the users shouldn't waste the materials during the testing process; otherwise, they'll face the issue of a lack of supplies while designing the project in the future. Apart from that, you can also save money by saving the supplies from getting wasted to purchase new materials.
5. Use Cricut Maker Aluminium Foil
One of the common Cricut Maker tips to increase the longevity of the deep-point blades & fine-point blades is by using Aluminum foil. From the sheet, tear off a 12" sheet of aluminum sheet and make a tight ball out of it. Following this, push down the blade's plunger to expose the blade. Once the blade gets exposed, poke down the pointed part of the blade at least 40-50 times.
Flipping Mat for Removing Material
Intending to remove the material from the filled mat, you've to flip it over so that it faces down on the work surface. Following this, with soft hands, bend over the mat upwards, away from the material. It'll be putting a bending force over the mat, not on the material. With the help of this process, the material will start popping out from the mat.
6. Using Cricut Maker Scraper Tool
Other Cricut Maker tips that are commonly used by DIYers to clean up the mat include the Scraper tool. This tool is available in two different sizes: regular size & extra large scraper. One can easily remove the little bits of dust and debris from the mat.
7. Use Baby Wipes
Other than the above-said shortcuts, you can also prefer using baby wipes to get the mat into its exact texture. Ensure that the wipes are alcohol-free before wiping them down on the mat. Moreover, smoothly cover the whole mat in a circular pattern and let it dry for at least 10-15 minutes. The process will regenerate some percentage of its stickiness.
8. Use Correct Tools During Weeding
One of the toughest jobs while weeding Vinyl is not preferring the correct tools. The majority of the people use only Cricut weeder during the process, not realizing that there are other tools also. Intending to get the desirable project, it's essential to have a collection of correct tools such as dental tools, weeders & crafting knives.
9. Use Baby Powder For Cut Lines
Another method that can be included as the Cricut Maker tips involves baby powder on the Vinyl and spreading it with a makeup brush. After spreading the powder, the DIYers will be able to see the cut lines more closely, making it easier to weed better and quicker. Moreover, it is a good option for those who have weaker eyesight.
Intending to make the project look much more attractive, every crafter can refer to these tips or shortcuts depending upon their needs or the project they are working on. Moreover, it can be anticipated that they'll be using the correct tip before proceeding toward the next design.
Frequently Asked Questions
Question: How to Position Design While Engraving on Cricut Maker?
Answer: Follow the steps about positioning design for the Cricut Maker engraving process:
Press Make It after completing the design on the Design Space software.
Select & drag the design to the location of the mat where you want to engrave.
After that, place the material on the mat in a parallel location.
You can use the SnapMat feature to accurately position the design if you are using the app.
Question: What Are the Pros of the Cricut Maker Machine?
Answer: The pros & cons of Cricut Maker machine are available below:
● It is fantastic for cutting fabric as well as thick materials.
● It also uses tools such as the Rotary and Knife blades to cut down various materials.
● Specially designed to use the Sewing Pattern library with 2 times faster mode for cutting Vinyl & paper.
● The embedded Bluetooth permits wireless connection.
● Warranty is no longer voided by commercial use.
Question: What Are the Cricut Maker Machine Shortcuts for Projects?
Answer: Some of the other Maker shortcuts that can assist the users in making their designing process for new projects much easier are as follows:
● Keep the mats within easy reach.
● Shift with less sticky tape by saving sanity.
● Prefer double presses for better results.
● Keep FabricGrip Mats cleaner with you all the time.
● Choose lint rollers for removing debris before starting new projects.
● Remove tacks from new mats.
Source url- https://cricutdesignmachine.wordpress.com/2023/06/19/what-are-basic-cricut-maker-tips-and-shortcuts-for-beginners/
#cricut maker tips#Cricut.com/setup#design.cricut.com#Cricut explore air 2#cricut setup download#cricut.com setup mac#Cricut design space#Cricut maker setup#cricut maker machine#cricut setup
0 notes
Text
How to Clean Your Cricut Mat: Learn the Top 3 Methods Here

A Cricut mat can become dirty after several uses. Sometimes, they may start losing their stickiness. I have been crafting for the last 5 years, and I have experienced the same situation. However, you can overcome this issue efficiently and save time. All you need to do is learn how to clean your Cricut mat. Yes, you heard it right. Once you have an idea about the Cricut cutting mat cleaning ways, you can select one and start using your mat like before.
The Cricut mat becomes dirty with the regular cleaning process, and thus, it becomes necessary to clean it and make it sticky again. I often see Cricut users looking for methods to clean their cutting mats. Hence, I decided to write a helpful blog post on it. Here, I will share the three easy ways with you all guys.
Let’s dive into the post.
Method 1: Using Baby Wipes
Are you looking for how to clean Cricut mat with baby wipes? Well, in this section we will get to know mat cleaning with baby wipes.
Simply move to your crafting room and grab some baby wipes.
If you don’t have baby wipes, first purchase them.
Grab baby wipes in your hand.
Now, move to the one corner of your mat.
Go with circular emotions and wipe the mat
Next, make sure that you have cleaned the entire mat.
Don’t apply too much pressure while cleaning the mat.
Finally, let your Cricut cutting mat dry for around 3 to 5 minutes.
While learning how to clean your Cricut mat using this method, you need to be a bit careful. It is a good way to go with light pressure. You might need 2 to 3 wipes to clean the mat. When you follow this you will find that your mat has become clean and sticky again.
Method 2: With LA’s Totally Awesome Cleaner
LA’s Totally Awesome cleaner is a great way of cleaning the mat and making it ready for use. But the thing is how you will use it. Get into the below-mentioned steps and follow them carefully.
Initiate by reading all the instructions mentioned in the cleaner.
Spray an even coat of the cleaner on your cutting mat.
Now, allow the cleaner to sit on the mat for something around 3 to 5 minutes.
Next, you will need to grab the scraper tool.
Hold the scraper and use a light hand.
Otherwise, you will damage the mat by removing its adhesive.
If you didn’t get the result the first time, go back and try the second time.
Don’t try to remove all the tiny particles from the mat.
When you rinse the mat, they will automatically come out.
After that, use warm water to rinse off the mat.
Lastly, keep the mat out and allow it to dry for approximately 20 minutes.
With these super easy steps, you can clean your Cricut mat and use it like before. The method is easy to follow and as you have seen, it takes very less time.
Important Note: While spraying make sure that you are not under spraying. If you under spray the cleaner, the mat will not clean.
Method 3: Using Dawn Dishwashing Liquid
Another method you can go for cleaning your mat is using the dawn dishwashing liquid. This way you have to learn how to clean your Cricut mat. Here is a step-by-step method to show you the process.
First, move to your Cricut cutting mat.
Once you are there, grab the dawn dishwashing liquid.
Now, put in some dawn dish soap on your mat.
In the next step, allow the mat to sit for approximately 3 to 5 minutes.
Thereafter, hold your cutting mat.
Run water into it.
Then, use your fingers to rub away the tiny unwanted particles.
You can use a paper towel for this purpose.
We recommend not using a sponge or other similar things.
The adhesive from your mat will rinse off.
Next, go over your Cricut cutting mat.
Use a dry paper towel to dry your mat.
This is how easily you can clean your mat and use it to make the craft you want. Out of the above-mentioned methods, you can select one and execute it to clean your mat thoroughly.
Conclusion
Cricut mats get dirty after further use, and thus, they need to be cleaned properly. With a proper cleaning technique, they can be put into use again, and thus, Cricut users can save a little money, too. Learn how to clean your Cricut mat and then start using them for cutting. There are three major ways of cleaning mats. These are using baby wipes (gentle cleaning method) or LA’s totally awesome cleaner or dawn dishwashing liquid.
Frequently Asked Questions
Can You Suggest Some Ways to Keep My Mats Clean?
Yes, here are some easy-to-follow suggestions that will help you keep your mats clean. More than that, it helps keep the adhesive of the mat long, too.
Most often, you use a lint roller/scraper to clean your Cricut cutting mat.
Remember to replace the plastic protector sheet.
When you proceed with cutting, don’t forget to use the right mat as per the material.
Do I Need to Clean My Cricut Mat Regularly?
No, you don’t need to clean your mat on a regular basis. Cleaning cutting mats depends on how much you use them. Found the Cricut mat not sticky after cleaning? If you craft regularly and use your mat most often, it is a good idea to clean your mats more often. However, if you craft one or two times a week, there is no need to clean the mat regularly.
How Can I Clean a Cricut Cutting Mat Using Dish Soap?
Do you want to clean your mat right now? If yes, you can use dish soap. Here are the methods explaining how you can proceed. Thus, learn how to clean your Cricut mat below.
Grab a scraper tool and use it to remove unwanted material from your mat.
Then, lay down your mat on a flat surface.
Use a dish brush (soft) and scrub the mat’s surface.
In the last step, let your cutting mat dry.
For more information visit: Cricut.com setup mac
Cricut.com/create
Cricut Setup on computer
Cricut design space download
Source: How to Clean Your Cricut Mat
#how to clean your Cricut mat#cricut design space download#design.cricut.com#Cricut setup on computer#cricut.com/create#cricut machine setup
2 notes
·
View notes
Text
How to Use Cricut Infusible Ink Pens: Beginner’s Guide
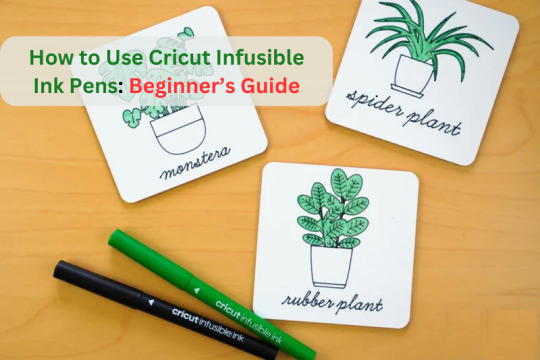
Hey crafters! Excited to create something new? I will show you how to use Cricut infusible ink pens in this post. Even if you’re a beginner or a pro-level crafter, I would say read this guide once and learn how you can use the Cricut infusible ink pens incredibly. This blog covers a step-by-step guide to creating a project using your Cricut machine and its infusible ink pens.
Now, the big question in your mind is, how do these Cricut pens work? These pens work on the principle of sublimation process where the ink turns into gas form while heated and then again comes back into solid form. Thus, these infusible products from Cricut work best to deliver great results. Explore my blog to learn everything in detail.
What Do You Need to Get Started?
When you’re creating a project, you’ll need some necessary Cricut accessories to get started with it and get exceptional results. Have a look at the checklist below.
Cricut cutting machine
Cricut Design Space
Infusible ink pens
Cricut Heat Press
Transfer paper
Lint roller
Sublimation blank
Parchment paper
Using all these accessories, you’ll design the best-looking sublimation design using your Cricut. So, here we go!
How to Use Cricut Infusible Ink Pens to Make a Keychain?
If you want to create something personal that you can always keep with you, a keychain is a good option. Also, it is a bit easier than other projects. Let’s move on to its steps and learn something more.
Step 1: Select a Design From Cricut Design Space
To start, you need to use your Cricut Design Space software to select a design for your keychain. Here, you have all the options to edit your design. I’m using text as my design. You can choose yours. If you want to use a pre-made design, you have the option to upload a design from the Design Space library. To modify it, click on the Edit option on the screen. Also, you can resize your design to fit the blank.
Once you are ready with the design, click the Lock option to fix it. Now, go to the Operation option, change it to pen, and select the size. For instance, I’m using a fine point 0.4 pen. After that, you’ll see the option for infusible ink with its color.
After everything, hit the Make It option and send the design to your machine.
Step 2: Set the Settings for Cricut Infusible Ink Pens
Before you go forward with the next steps, you have to mirror your design before putting it on the mat. Next, choose the size for your Cricut mat and hit the Next button to enter the material settings option.
Then, click on the All Materials option and write “copy.” Now, select your copy paper and hit the Close option. In case you don’t get the desired material, you can use the nearest number.
Afterward, your Design Space software will tell you which color infusible pen you should use first and then. Also, you can go with the on-screen steps and insert your Cricut mat with the paper on it. Next, you can put your first infusible ink pen into the pen carriage and hit the “C” button.
Once your design is drawn on the paper, take it off from the mat carefully. Then, move ahead to learn how to use Cricut infusible ink pens on your blank.
Step 3: Use the Heat Press to Fix Your Design
Take a blank for the keychain. And then, use a lint roller to brush off the leftovers and debris. Now, place the design paper on the keychain blank and cover it using heat-resistant tape. Finally, your design is secured.
In order to prevent your blank from the heat, you need to take 2-3 pieces of copy paper to use them around the blank. When you have covered your blank with the paper pieces, you need to cover it with parchment paper. It will look exactly like this image.
Step 4: Apply the Heat Press
After covering your blank with the parchment paper, you have to place it in the center of your heat press in the center. Next, you’ll have to set the time, heat, and pressure as mentioned in the heat guide.
Apply the heat for about 90 seconds, and then let the design cool before removing the paper. After you do this, use pliers to attach the rings to your blank, and finally, your keychain is ready.
Conclusion
I assume you know how to use Cricut infusible ink pens on your blank to create a perfect keychain project. Ensure that you arrange all the necessary materials to avoid any mistakes. As this was an iron-on project, you must have a heat press. Moreover, the project is sensitive as it includes heat pressing. Hence, it’s always wise to use the Cricut Heat Guide.
FAQs
Can You Use Infusible Ink Pens Directly on Fabric?
No, the infusible ink pens are not meant to be directly used on fabric. As the heating process requires different polyester-based materials, the fabric is not an ideal material for getting the sublimation ink directly. You can rather use vinyl to design anything and then transfer it to any fabric you want.
What Kind of Paper Do You Use for Infusible Ink Pens?
While using infusible ink pens or markers, you need laser copy paper to place on your blank. However, you don’t need to place it directly onto your blank. In fact, it can be used as a carrier to transfer your design to your blank.
Can I Use a Household Iron for Cricut Infusible Ink?
Yes, you can use a regular iron to experiment with iron-on projects. However, it’ll only work for some light materials. But, if your project type is complex and you have to apply heat on a hard surface, you’ll have to use a heat press.
For more information visit: Cricut.com setup mac
design.cricut.com
Cricut design space download
Cricut setup on computer
Source: How to Use Cricut Infusible Ink Pens
#How to Use Cricut Infusible Ink Pens#cricut design space download#cricut.com/setup#Cricut Design Space login#cricut software app#Cricut setup on computer#cricut machine setup#cricut explore air 2 setup
2 notes
·
View notes
Text
Cricut Computer Setup: Full Guide for Windows and Mac

Ever since I started doing the Cricut computer setup, the excitement of setting up a new Cricut machine is still as fresh as it ever was. But do you know how to setup a Cricut machine on a computer? If your answer is no, then chillax! You have already opened the right page, so you will definitely find something helpful.
So, what do we need to do before setting up a Cricut? Well, the only thing you will need to know is to establish a connection between your Cricut and computer. But the next question is—HOW? And by which method? There are two methods: USB or Bluetooth. We can do it easily by following some easy ways. Want to know? Let’s check out this blog to learn more!
Lastly, you must complete the machine setup, and this process is the same for both Mac and Windows. Let’s get started!
Cricut Computer Setup for Windows and Mac
Setup is easy if you will do it once. But even if you are a beginner, it is going to be a breeze. Just trust me and follow the steps that I have given below. Remember the below-mentioned steps are the same for both Mac and Windows computers:
Here’s the Cricut setup on computer (Windows and Mac):
First, launch an internet browser and head to the cricut.com/setup website.
Now, you will need to download and install the Cricut software on your computer.
Next, follow the steps given to your display and create your new Cricut account accordingly.
If you already have an account, you should sign in to your Cricut ID using your username and password.
Then, select your Cricut machine model for the setup procedure.
Now, switch on the Cricut by inserting the power cable into its power outlet.
Hit the power button on your Cricut machine.
Next, establish a connection between the Cricut and your device, either using a USB cord or Bluetooth (To learn how to connect it properly, you should navigate to the next section given below).
Afterward, you should register your Cricut cutting machine.
Finally, your Cricut setup on computer is done, and you will be prompted to test the cut.
Now, you might have learned the Cricut computer setup. Below, I have explained how to connect your Cricut to your computer via Bluetooth. Let’s delve into it!
How to Connect Cricut Machine to Computer via Bluetooth?
Here, I want to focus on the steps to connect Cricut to a computer. Many crafters, especially beginners, can face difficulties while connecting. So, I’ve made it easier for you.
Below are the steps to connect Cricut to a Mac and Windows using a Bluetooth wireless connection:
Windows
The first thing you need to do is keep your machine at an adequate distance, about 10-15 feet from your computer. If you are using Explore models, you should insert the wireless Bluetooth adapter.
Now, check whether you have enabled Bluetooth. To do this, go to Settings and then move to the Devices option.
Then, you can enable Bluetooth by clicking on the toggle button.
Next, click on the Add Bluetooth or other device.
So, you will have to wait until your Bluetooth finds your Cricut machine.
Afterward, select the machine from the available list.
Finally, you have successfully paired the machine.
Mac
The first step would be the same as the above.
Then, you have to hit the Apple menu and select the System Preferences option from the given options.
Look for the Bluetooth option and check whether it is enabled or off. If it is off, you should turn it on.
Now, you will see your Mac Bluetooth is looking for an available device, such as your Cricut machine.
Once your Cricut machine appears in the list, you must select it to pair with your computer.
Once the pairing is done with your Mac, you are ready to setup your machine further.
Once you complete your Cricut computer setup, you can start making your projects hassle-free.
FAQs
How is the Cricut app crucial for machine setup?
The Cricut app, Cricut Design Space, plays a pivotal role in machine setup. It helps you connect your Cricut machine setup and allows your computer to communicate with your Cricut cutting machine. Whether it is a computer or mobile device, the Cricut software is compatible with all four platforms: Mac, Windows, iOS, and Android. However, you will be prompted to download the app during machine setup. Thus, it is a crucial part of the Cricut machine setup. Without this software, your setup is incomplete.
What are the system requirements for using Cricut software on Mac?
The minimum system requirements for using the Cricut Design app on a Mac computer are as follows:
macOS 11 or later
USB port or Bluetooth
1.83 GHz CPU
Minimum 2 to 3 Mbps download speed and 1 to 2 Mbps upload speed
4 GB RAM
2 GB free disk space
Minimum display screen resolution of 1024px x 768px
Can I setup my Cricut machine using my Samsung Galaxy?
Yes, you can setup your Cricut machine using your Samsung Galaxy device. To setup on an Android phone, you have to follow the steps below:
First, connect the Cricut’s power cord to the wall outlet.
You need to pair your device and the Cricut via Bluetooth.
Then, you have to download the Cricut app from the Google Play Store.
Open the software and start signing in or creating a Cricut ID.
Choose the model, and your setup will be completed.
Final Thoughts
In a nutshell, I have explained the Cricut computer setup procedure in easy steps for both Mac and Windows users. The setup process given in this blog is based on the setup that I performed recently. It doesn’t matter whether you are a Mac or Windows computer. For any Cricut users, the setup is a must to get started! Without this, you will not be able to make a single cut.
For more information visit: cricut design space download
design.cricut.com
cricut.com/create
Source: Cricut setup on computer
#Cricut setup on computer#Cricut computer setup#cricut new machine setup#cricut machine setup#cricut design space download#cricut design space software#cricut design space app#cricut design space login
2 notes
·
View notes
Text
How to Pair Cricut Maker to Phone and Computer: Full Guide
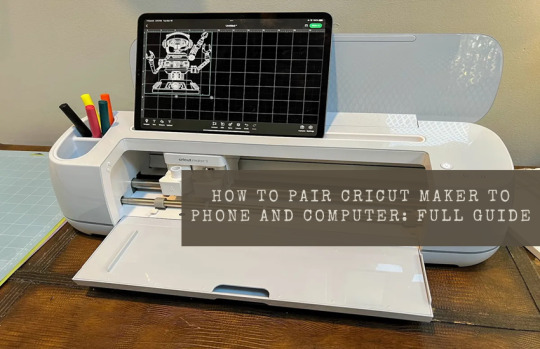
Every crafter will agree that the Cricut Maker Setup is one of the smartest and favorite models among cutting machines. This Cricut machine can cut 300+ materials such as vinyl, iron-on, cardstock, and more. It can also cut, write, foil, and score different materials. To start with this Cricut cutting machine, one must know how to pair Cricut Maker with a computer and smartphone.
Crafters have two options for pairing both devices: Bluetooth and USB cable. However, it is their call to decide in which mode to connect their Cricut machine to a computer and mobile devices. Also, to begin any projects, all users must download the Cricut software and connect it to their device.
If you cover the entire blog from top to bottom, you will quickly learn how to set up and pair this Cricut machine with devices.
How to Setup Cricut Maker on a Computer?
Before getting started with how to pair Cricut Maker, all the users need to set up their Cricut product on a computer. To properly end the setup process, they need to go through the below-shared steps:
Lay the first stone of the setup process by unpacking your Cricut machine & switching it on.
After doing that, connect both devices via USB cable or Bluetooth.
Next, visit cricut.com/setup and install the Design Space app on your computer.
Then, create your Cricut ID or sign in with the login details.
Now, follow the instructions appearing in your front on the screen.
Finally, you will be called for a test cut after completing the setup process.
How to Pair Cricut Maker to Windows and Mac?
Below are some tips and instructions for pairing this Cricut product with Windows and Mac systems.
Windows
In addition to this blog section, look at the steps below and learn about setting up both devices.
Go ahead with the process by checking that your Maker machine is within 10-15 feet of your computer.
Now, tick the Settings icon and land on the Windows Settings tab.
Following this, choose Devices and check that the Bluetooth is on.
After that, hit Add Bluetooth or other device that appears at the top of the screen.
Next, click the Bluetooth button under the Add a device tab.
A window will appear at this point. Click on your Cricut model.
Finally, your Maker and Windows pairing process will come to an end.
Mac
This section explains how to pair Cricut Maker with a Mac system.
Make the first move by ensuring that your Cricut cutting machine is on.
Afterward, check that it is under the range of 10-15 ft of your Mac system.
Next, open the Apple menu, choose System Preferences, and click the Bluetooth icon.
Check that your Bluetooth is on, and select your Cricut model from the list.
After a few minutes, your device’s pairing process will end.
How to Pair Cricut Maker to Phone (Android/iOS)?
Further referring to the blog, let’s discuss the process that will help the user pair smartphones with this Cricut product.
Android
Take the first step and ensure that your Cricut machine is on and positioned within 10-15 ft of your mobile device.
After that, scroll down your phone’s home screen and hold on to the Bluetooth icon for a few seconds.
Now, turn on your device’s Bluetooth and let it scan for the machine for a few minutes.
Next, choose your model name, and the pairing process between your Android and Maker will end.
iOS
To get things moving, check that your Cricut Maker is on and within 10-15 feet of your iOS device.
Go to the Settings tab and activate your device’s Bluetooth feature.
After activating the Bluetooth, a list of available devices will be shared in front of you.
Select your model name from the list at this point, and both of your devices will be paired successfully.
By paying special attention to these steps, the user can swiftly pair up their respective smartphones with the Cricut Maker machine. Moreover, they need to be very cautious so they don’t make any mistakes during the process.
Frequently Asked Questions
How to Setup My Cricut Maker on a Smartphone?
With the help of the below steps, you can effortlessly set up a Maker machine with smartphones:
Begin the process by plugging the machine and turning on its power.
After that, pair your smartphone with the Cricut machine via Bluetooth.
Install the Design Space app on your device and create your account.
Next, go to the Menu section and tick the Cricut Machine Setup option.
Following this, choose your machine name from the list and follow the steps to finish the setup.
Finally, when informed of the test cut, you will know about the setup completion.
How to Connect Cricut Maker to Devices via USB Cable?
To connect the Cricut cutting machine with devices via a USB cord, the user needs to follow these steps:
First, unpack your Cricut product and USB cable very carefully.
Following this, switch on your machine and put one cord into the machine port.
Afterward, insert another end of the cable into the device and let it connect with each other.
Now, the Cricut Maker will turn on and be ready for cutting purposes.
How Do I Pair My Cricut Maker With iOS via Bluetooth?
With the help of these steps, you can effortlessly connect the Cricut product with iOS devices:
Check that your Cricut machine is enabled and place it under your device’s 10-15 ft range.
Next, go to the Settings tab and turn on your device’s Bluetooth.
After a few seconds, a list of devices will be shared on your phone screen.
Tap the model name, and the pairing process will end after a few seconds.
For More Information Visit: www.cricut.com setup login
Cricut Design Space Download
Cricut setup on computer
Source: How to Pair Cricut Maker
#how to pair cricut maker#cricut maker setup#cricut design space app#cricut design space login#cricut design space download#Cricut setup on computer#cricut machine setup#how to setup cricut maker
3 notes
·
View notes
Text
How to Use Cricut BrightPad: Beginner's Guide to Get Started
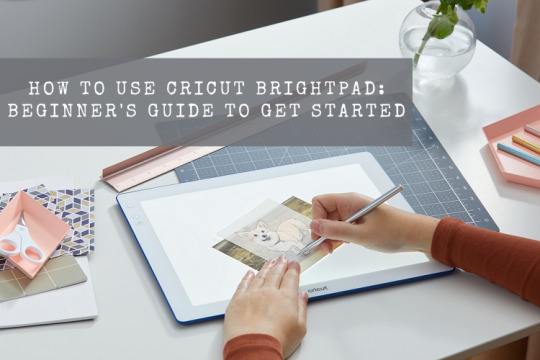
Hey there! Do you want to learn how to use Cricut BrightPad in simple steps? In this blog, I am covering everything about BrightPad, such as a list of projects you can create, how it works, and how to use it.
I truly appreciate Cricut for this innovative craft machine. Indeed, I will not forget the day when I ruined one of my vinyl designs. I worked hard on it as I made this from scratch. Since I was a beginner, I was not aware that I needed to be extra cautious while weeding it. But as I started weeding, I mistakenly weeded the part that I should not have removed. That day, I couldn’t save my design, and due to this disappointment, I headed to the Cricut website Cricut.com/setup and found this amazing gadget: Cricut BrightPad. I have used it in all my DIY projects where there are fine cuts. Keep reading to learn more!
How Does Cricut BrightPad Work?
First, let’s understand what is a Cricut BrightPad. The BrightPad is a lightbox tool used to add light from behind or under a project. The device is simple, and you can easily adjust the brightness level using the power button. So, there are no extra or complex settings to do. Just a single button that does everything for you.
Although the BrightPad doesn’t come with a rechargeable battery, Cricut BrightPad Go, which is the latest model in Cricut’s lineup, comes with a lithium-ion rechargeable battery. But later in this blog, we will only talk about how to use Cricut BrightPad, not the latest one.
As you can see in the picture below, this is the purpose of using this light pad. Be it glitter vinyl design or other, you can simply weed the design by putting it on the top of the BrightPad. Moreover, you can adjust the brightness as per your requirements using the power button.
Things You Can Do With Cricut BrightPad
Other than weeding, there are several things you can do with BrightPad. So, you don’t know that it is only for weeding. I know 90% use of this device is for weeding, but for the rest, you can do the following. Here’s what you can do with BrightPad:
Jewelry Making
Creating Baking Pieces
Weed Vinyl
Trace Lettering
Painting without Pencil Lines
Work with Metal Pieces
Piece Together Quilt Squares
Work with Beads
Trace Images
Now, let us look at the steps below to understand the use of BrightPad.
How to Use Cricut BrightPad for the First Time?
As I have already discussed above, you can perform various types of tasks on BrightPad. Be it weeding, tracing, jewelry making, and more. So, let me show you how you can use the following steps:
First of all, you will need a wall adapter so that you can plug in the BrightPad to the power source.
Then, press the Power button to turn on the device.
You need to place the cut vinyl design or anything that you are working on on the top surface of BrightPad. You can also use the painter’s tape to tape your vinyl to keep it in one place.
After that, you can start weeding the negative space from the vinyl. If required, press the same power button to adjust the brightness level.
So far, you might have understood how to use Cricut BrightPad for the weeding of a vinyl design. Now, you can easily use it as there is no setup required, and it is portable and easy to use. So whether it is tracing the figure, jewelry making, or anything like weeding, the Cricut has made it easier for you in just a single press. Plug, Press, and Use; that’s what you will need to do only.
FAQS
Do I need to plug in the Cricut BrightPad?
In Cricut BrightPad, there is no battery. Hence, you will need to plug it into the power source every time you use it. For this, you can use a standard USB wall adapter; otherwise, use a computer USB port to light the BrightPad. Plus, Cricut doesn’t provide any wall adapter with this product. So, you need to use your own wall adapter.
Is it possible to use Cricut BrightPad with an external battery pack?
As per Cricut, you can use the BrightPad with external battery packs, but they have never tested this method and also do not guarantee the charge expectancy while using the external battery. So, you can use it but at your own risk. Besides this, you always have an option to try with the direct power source.
What do Cricut BrightPad button lights indicate?
The meaning of the BrightPad button is simple. For example, when you plug it into the power source, the power button turns white, indicating it has been plugged into the power socket. Also, it turns white when it is on, and the BrightPad surface is lighting. Hence, there is one single-color light that is given only in the BrightPad.
What is the main difference between Cricut BrightPad and BrightPad Go?
The first basic difference between both the devices is that A BrightPad comes with a single power button that is used to change the brightness level and power on the device. On the other hand, Cricut BrightPad Go has one dedicated button for power buttons and another up and down button for brightness settings. Besides, BrightPad has more features, such as a rechargeable battery, a scratch-resistant surface, a non-slip base, and more.
Wrap Up
In this blog, we learned how to use Cricut BrightPad. Besides these, I also explained how this device works and the list of things you can do with BrightPad. At last, I talked about the use of this device. The use is quite simple and easy, as you don’t need to do a complex setup before using the BrightPad. Using this device, you can work on fine design and cut vinyl that is not easily visible in room light.
For more information visit: install cricut explore air 2
cricut explore air 3 setup
cricut Design Space download
cricut machine set up
Source: How to Use Cricut BrightPad
#how to use Cricut BrightPad#Cricut BrightPad Go#what is a Cricut BrightPad#cricut.com/setup#cricut design space download#install cricut explore air 2#cricut machine setup
3 notes
·
View notes
Text
How Do I Set Up My Cricut Maker? [Ultimate Guide]
Buying a new Cricut Maker can be overwhelming for all of us. Initially, setup can be daunting, but once you do it, you will love the overall process. However, you can easily set up any Cricut machine without needing much assistance.
The post is all about how do I set up my Cricut Maker. Through this write-up, we will see the items while unboxing the new Cricut Maker. Further, you will explore the Cricut Maker and its types. Afterward, we will explain the complete process of setting up your Cricut Maker machine.
What Do You Get in the Cricut Maker Box?
Unboxing a new product is always an exciting task. While unboxing the Cricut Maker machine, we got several items that we will be discussing here. However, you always have the option to select the bundles when you buy the machine from Cricut's official website.
Following are the items that you get in the box of the new Cricut Maker:
Apart from these, you will get the following:
The best thing is that we get the blades and tools along with the new Cricut machine. These blades allow us to try various products before buying more blades.
How Do I Set Up My Cricut Maker on a Computer?
When we talk about setting up Cricut Maker machine, it means we want to connect it to our devices like computers or mobile phones. However, there are certain ways to connect these machines to our devices. For example, we can connect our Cricut Maker to our computer or phone via Bluetooth or USB cable. So, it is the users’ choice to choose which way is the most suitable for them.
Below, we explain how to set up Cricut Maker. This method is only applicable for Windows or Mac users only:
How Do I Set Up My Cricut Maker on a Mobile?
Here's how to set up your Cricut Maker on Mobile devices with iOS or Android operating systems:
Cricut Maker is the most advanced and versatile in Cricut's lineup. However, the box contains various items that you can use to make several projects uninterruptedly. In this write-up, we explained the Maker and its features in detail. It helps the users to get an overview of machines so that they can use them without any hassle. After exploring the Maker cutting machine, the blog found out how do I set up my Cricut Maker.
FAQs
Question 1: Can I set up the Cricut Maker easily?
Answer: People think the setup is daunting, but this is not the case. Cricut machines are just like printers. The only difference is that Cricut has blades to cut. However, when you go through the notice period, you will find the setup is too easy and complete in less time. While setting up, you will need to download and install the Design Space app. This app will guide you through the further setup process, making it easy for beginners to set up the machine in one go.
Question 2: How do I connect my mobile phone to my Cricut?
Answer: Here, we are going to show you the method to connect your mobile device to the Cricut machine. Here, we are using iPhone or iOS devices. So, ensure you have an iOS device.
Question 3: Can I use the Cricut without its software?
Answer: No, you must use the Cricut Design Space app to send your design to your Cricut device. The machine is the companion for your Cricut cutting machine. Without this machine, you can't cut anything. However, the Design Space is essential for creating intricate designs and then sending them to the machine. Also, the app is the only way to maintain communication between your computer and Cricut.
Visit: cricut.com/setup
cricut.com/setup
Source: https://cricutmakersetup.wordpress.com/2023/10/21/how-do-i-set-up-my-cricut-maker-ultimate-guide/
#cricut explore air 2#design space setup#cricut maker#cricut.com/setup#cricut.com design space#cricut.com/create#cricut.com sign in#design cricut.com download#digital design
2 notes
·
View notes
Text
Do you take your crafts seriously? Cricut is a perfect machine that allows you to craft with your heart. So, use the machine and employ all your crafting skills to end up with a wide range of personalized and professional handmade items. Also, download and install the Design Space software to add more creativity to your project. Go to cricut.com/setup and get the software right away. Once you make a unique and attractive project, give it a professional touch and take your crafting skills to a commercial level. Cricut Design Space Login You can utilize online platforms to sell them and make some extra bucks while staying in the comfort of your home.
#Cricut Design Space#cricut design space login#cricut design space download#cricut design space for mac#cricut design space app#cricut design space setup#cricut software#cricut.com setup windows#cricut.com/setup windows#cricut.com/setup#cricut.com sign in#cricut.com/create#cricut.com design space#design cricut.com download
2 notes
·
View notes
Text
Cricut Design Space Login - Cricut Setup
With an intention to make the Cricut app run on PCs & mobiles, all the DIYers need to know the basic system requirements. Each OS comes with its separate requirements, which should be fulfilled to support the app. Once the app satisfies the requirements, it will start running on the devices without any technical glitches. However, to get the app on the devices, they need to open cricut.com/setup.
Visit - design.cricut.com
www.cricut.com/setup
Cricut Design Space
cricut.com/setup windows
#cricut.com/setup#design.cricut.com#cricut crafts#cricut explore air 2#cricut design space login#cricut new machine setup#www.cricut.com/setup#Cricut Design Space#cricut.com/setup windows#Cricut.com setup mac#Cricut setup#Cricut.com setup download#Cricut.com sign in#cricut.com/setup pc#Setup Cricut.com#Cricut Design Space Login
2 notes
·
View notes
Text
Discover 5 Best Printer for Cricut Projects in 2024
Searching for the best printer for Cricut projects? If so, look no further; I can help you with that! The only reason we need a printer for crafts is because we want to make some stickers, for which we need to use a Print Then Cut feature. I don’t know whether you have heard this term before, but some Cricut machines come with this new feature that makes creating a project that requires printed images. Cricut then cuts those printed images accordingly.
There are many printers in the marketplace, but which one is better? Well, this is what I will tell you in this blog. I know it can be daunting for many novice crafters when they start making their first project using a printer and Cricut machine. But you don’t have to worry at all, as I am with you in finding the best printers for Cricut users. Let’s get started!
1. Canon PIXMA TS9521C Printer
If you are looking for the best printer for Cricut projects, look no further than this Canon PIXMA TS9521C printer. This model has a big printer size and is also heavy compared to other branded printers, making it the perfect choice for your crafts. If you want something that prints high-quality images in no time, then the Canon PIXMA TS9521C printer is the perfect choice for you!
There are many pros and cons of using this printer. So, let’s get into it.
Pros:
Cons:
2. Epson EcoTank Printer
If you still couldn’t find the best printer for Cricut projects, chillax! So, what I think is that it is the perfect choice for those who are into everyday printing. Not only that, it can also be suitable for those who want the best sublimation printer. However, the one thing that you need to know is that this printer will use only sublimation ink. Besides, you can’t use any other inks that you use for other printers. So, what are the pros and cons? Let’s know it further!
Pros:
Cons:
3. Canon TS6420 Printer
If you trust the Canon brand, you can use the Canon TS6420 printing device. Also, it is the best printer for Cricut projects, with top-notch features and great quality. It can also help you explore the Print Then Cut feature. So, without wasting much time, you will need to know the pros and cons of using a Canon TS6420 printer; let’s explore:
Pros:
Cons:
4. HP Envy 6455E Printer
The HP Envy 6455E printer is the best printer for Cricut projects. Since it is a mid-range printer, it has satisfied many crafters. So, whether it is about price or quality, this Envy model will provide everything you need to try the Print Then Cut feature. You have to try this model for better quality, especially if you are looking for something in the mid-range.
Pros:
Cons:
5. Canon PIXMA TS3320
Last but not least, this is what I am using currently; it has done a lot of things for me. So, I bought this along with my Cricut Maker 3 machine last year. The sole purpose of buying this machine was to explore the Print Then Cut feature. I had never tried this before, so I wanted to give it a try! Now, it was a great experience. Besides, do you know what the best part was and what its pros were? So, let’s dig into it:
Pros:
Cons:
FAQs
Question 1: What should I check before buying a printer for Cricut?
Answer: Before buying a printer or any machine, you must check its system requirements. Once you are sure about it, then there are other factors you have to check.
Here are the factors you need to check before buying a printer for Cricut:
Question 2: What type of printer do I need for Cricut?
Answer: Many printers are available in the marketplace that you can use to create unique crafts with Cricut. They must meet some criteria, such as the type of paper they can print, the print quality, and more. Whether you want to create stickers or decals, this printer will help you stand out!
Below, I have mentioned some printers that you can use for your DIY projects:
Question 3: Should I choose a laser or inkjet printer for Cricut?
Answer: Although inkjet printers are a better option for many crafters, the laser printer has its own place for crafting. It is because, with a laser printer, you can have a high volume of coloring book pages, planner pages, and foiling craft paper that would be better suited for a laser printer. Hence, you can choose a printer that suits your needs and create your stickers or anything hassle-free.
Visit: install cricut design space app
cricut.com/setup
www.cricut.com setup login
Source: https://cricutdesignappspace.wordpress.com/2024/05/10/discover-5-best-printer-for-cricut-projects-in-2024/
#www.cricut.com setup login#www.cricut.com/setup#www.cricut.com/setup login#cricut.com/setup app#cricut explore air 2#cricut.com/setup#cricut new machine setup#cricut design space#cricut maker 3#cricut.com/setup windows#cricut.com/setup mac#cricut.com/setup login#cricut.com setup mac#cricut create connect to computer#cricut.com setup download#cricut setup download#cricut setup#setting up my cricut maker#setting up your cricut maker#cricut setup on computer#cricut design space download#cricut design space app#cricut design space login#cricut new product setup#cricut new product device
0 notes
Text
How to Connect Cricut to Mac: A Step-by-Step Guide
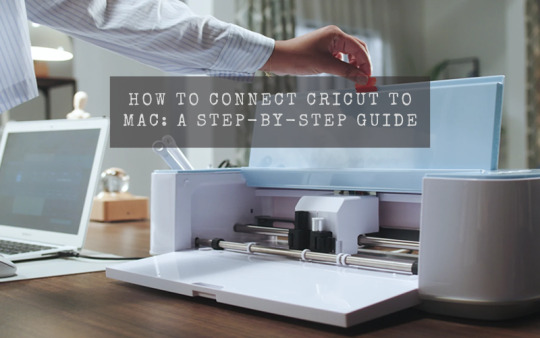
Hi crafters! How’s your crafting routine going? Are you struggling with connecting your Cricut machine to your Mac? Don’t worry—I will share the easiest steps to connect a Cricut machine to a Mac computer. If you want to learn about it deeply, stick to this blog till the end and discover all the steps included in connecting Cricut to Mac. So, if you are wondering how to connect Cricut to Mac, all your queries will be resolved by reading this blog.
Before moving to the final steps, I want you to know something about Cricut Design Space. This is a software application from Cricut that allows you to create various creative designs with the help of images, fonts, texts, and templates. Therefore, when you are setting up your Cricut machine, you’ll need to install this software on your computer.
Minimum System Requirements for Mac to Setup on Cricut
When you are learning how to connect Cricut to Mac, you’ll need to take care of some basic system requirements for a Mac. The Cricut Design space app needs minimum system requirements to be set up on a Mac. Below are the requirements for a Mac.
Operating system- macOS 11 or recent
Connectivity- USB port or Bluetooth
CPU- 1.83 GHz
Storage- 2GB
RAM– Minimum 4GB
Resolution- At least 1024 x 768 px
When your Mac has all these requirements, you’re good to go to setup your Cricut to your Mac computer. Let’s check out all the other steps involved in its setup.
How to Download & Install Cricut Design Space on Mac?
When you are about to set up your Cricut on a Mac, you’ll need to download and install the Cricut software on it. Below are the steps to do it correctly.
Initially, visit the Safari browser on your Mac.
After that, navigate to design.cricut.com on your search bar and hit Enter.
Now, locate the Cricut Design Space and click on the Download button.
After that, let the download start and then reach the Downloads folder.
Then, open the downloaded file from that folder and drag it to the Applications folder.
Next, your Cricut app icon will be added to the Applications folder.
In the next step, open the Cricut Design app on your Mac.
Afterward, you’ll need to sign in or log in to the Cricut ID.
If you’re a new user, you need to create a new Cricut account.
In the last step, continue with the on-screen directions.
That’s it for downloading and installing the Cricut software on your Mac operating system. Now, you can move forward with the connection process.
How to Connect Cricut to Mac: 2 Different Methods
To connect a Cricut machine to a Mac, you have completed the first step, which is to download and install the Cricut software. Now, you’re all ready to connect your Cricut to Mac.
Method 1: With a USB Cable
As you already know, a USB connection is a primary method of connection; you can use it to connect your Cricut to a Mac via a USB connection. Let’s learn how to connect Cricut to MacBook with USB.
Initially, you need to connect your USB cable on one end to your Mac computer and another end to the machine.
Mostly, you’ll find the USB port at the back of your machine.
Thereafter, you’ll see your devices blinking with a white light.
At last, open your Cricut app, and you’ll see that your machine is set up via USB.
That’s how to connect Cricut to Mac via a USB connection. Once you connect your Cricut to a USB connection, you’re ready to get the Cricut Design Space and use your Cricut machine.
Method 2: Via Bluetooth
Follow these steps to connect your Cricut to your Mac via Bluetooth connection. Let’s check them here.
To start, enable your Cricut new product setup and your Mac computer.
Then, enable the Bluetooth option on your Mac.
To turn on the Bluetooth option, you’ll have to move to the Apple menu.
After that, you should head to the System Preferences option.
Next, check for the Bluetooth option and enable it.
Now, choose the Pair option and type the PIN code.
If you don’t know the code, type “0000.”
Lastly, select your Cricut model and click on the Pair option.
That’s how to connect Cricut to Mac Bluetooth. Now, you’re all ready to use your Cricut machine with your Mac.
Conclusion
Finally, you’ve learned how to connect Cricut to Mac and everything related to Cricut connection to a Mac computer. Now, you’re good to go make crafts and use your Cricut machine for multipurpose purposes. Utilize the Cricut Design Space software that has almost everything you need, from a beautiful design library to great templates. So you can use them for your upcoming projects easily. Also, you can use any method to connect your Cricut to a Mac, such as USB or Bluetooth.
FAQs
How Can I Update Cricut Design Space on My Mac?
To update the Cricut app on a Mac computer, follow these steps:
Initially, turn on your Cricut to a Mac via USB or Bluetooth.
You may get a notification for firmware updates.
After the connection, click on the Update option to continue with the update.
After that, you have to start the update process.
Next, turn on the power button, and a purple color will indicate the progress.
When the update is finished, click on the Done option to make projects.
Is It a Good Choice to Connect Cricut Machine to Mac?
Obviously yes. A Mac is a great device to set up Cricut machine on. If you’re using a Mac computer, it can be the best choice ever. However, the setup process is somewhat similar to Windows, but there are different sets of minimum system requirements for Mac you need to check.
How to Connect Cricut to Windows PC?
To connect your Cricut to a Windows PC, follow these steps:
To get started, you can either use a USB cable or Bluetooth.
The steps to start with a Bluetooth connection are below.
From the Start menu, choose the Settings option and launch the Devices option.
After that, check if the Bluetooth is ON.
Now, hit the Add Bluetooth or other device option.
Next, choose the Bluetooth option and allow your devices to connect.design.cricut.com
Source: How to Connect Cricut to Mac
#connect cricut to Mac#cricut design space download#cricut design space login#design.cricut.com#cricut machine setup#cricut software app
2 notes
·
View notes
Text
How to Connect Cricut Joy to Computer: A Complete Guide
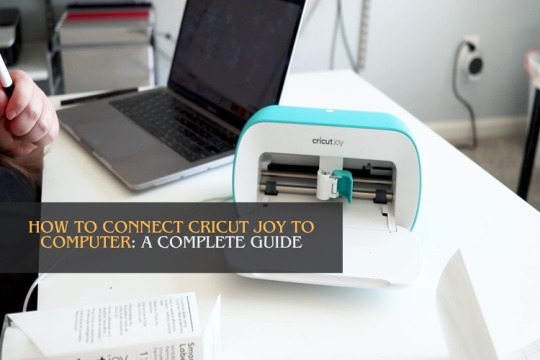
Hey, have you just got a new Cricut Joy machine? Here’s something important for you! In this blog, I am going to talk about how to connect Cricut Joy to computer. This guide will be crucial to you as every crafter who buys a new Cricut needs to set up their machine. In order to set it up, you need to connect it to your device.
But do you know which method is used to connect the Cricut cutting machine to a compatible device? Well, the short answer is Bluetooth only. Unfortunately, you can’t connect your Cricut Joy with a USB cable as there is no USB port available.
Since we can only connect it via Bluetooth, you have to know different methods to connect this Cricut model on Windows and Mac. Yes, the process of connecting the Cricut machine slightly varies for both types of computers. And I have covered them in detail. Let’s delve into it!
Minimum System Requirements for Using Cricut Design Space
Before I show you how to connect Cricut Joy to computer, you must know the basic requirements. These basic needs are important for your system to run the Cricut Design Space software.
The Cricut Design Space software is a companion app used to create amazing designs, command the machine for various operations, and set up our machine. Below, I have provided the requirements for Windows and Mac. Read them carefully:
For Windows
Operating System
Windows 11 and Windows 10 and newer (X64 processors)
Microsoft Windows 11 and newer (ARM64 processors)
Browsers
Google Chrome
Firefox
Microsoft Edge
Hardware
2 GB RAM
1.3 GB free drive space
1 GHz Processor
For Mac
Operating System
14.x (Sonoma); 4.21.x or later
13.x (Ventura); 4.21.x or later
12.x (Monterey); 4.21.x or later
11.x (Big Sur); 4.21.x
10.15.x (Catalina); 4.21.x
Supported Browsers
Safari
Google Chrome
Hardware
Processor: Intel, Apple Silicon M1, M2, and M3 processors
2GB RAM
About 300 MB Hard Drive Space
How to Connect Cricut Joy to Computer?
You might not believe it, but connecting Cricut Joy to computer is a breeze. Before connecting with Joy, you must ensure that your computer meets the basic requirements to run the Cricut app. After that, you can start establishing the connection. Let’s start with a Windows computer first.
Windows
Unbox your machine and take out all the accessories and items that come with your machine.
Then, place your Cricut machine at a distance of 10 – 15 feet away from your computer.
Now, you have to turn it on by plugging it into the power source.
After that, head to the Start menu and select Settings.
Later, you need to click on Devices.
Make sure you have turned on your Bluetooth.
Here, you will need to click on ‘Add Bluetooth or other device’.
Thereon, click on the Bluetooth tab and stay until your PC is searching for your Cricut machine. Once it appears in your list, select it to connect.
Eventually, Bluetooth is paired now.
Mac
Power on your Mac using your power cord.
Next, place your machine on a flat surface and keep it 10 to 15 feet away from your Mac.
Then, head to the Apple menu and choose the option System Preferences.
Now, find the Bluetooth option on your Mac
So, verify whether the Bluetooth is ON.
Later, you will need to select your Cricut model from the available list.
Now, you have paired your Cricut machine setup with your Mac computer.
Finally, I have explained how to connect Cricut Joy to computer. Now, you are ready to make anything amazing using your Cricut cutting machine.
FAQs
Question 1: Can I setup my Cricut Joy on a mobile device?
Answer: Yes, you can easily set up your Cricut Joy on Android and iOS mobile devices. The Cricut cutting machines connect with Bluetooth only, so you will need a smartphone. Compatibility plays a pivotal role in running the Design Space app, which is a must-have app for setup.
Question 2: Do I need software to access Cricut Joy?
Answer: Absolutely, yes! Without software, you will not be able to access Cricut Joy. The software is used to set up and connect your machine to a computer or mobile device. Further, you have to use the software to create beautiful designs and send them to the Cricut machine to cut them. Thus, the software is important for giving commands to Cricut.
Question 3: Can I connect Cricut Joy with a USB cable?
Answer: No, you can’t! Cricut Joy only connects via Bluetooth. Except for the Joy model, all the Cricut machines can be connected via both USB and Bluetooth. Since Cricut Joy doesn’t have a USB port, you will only need to rely on Bluetooth. The pairing is simple and the same as other Cricut machines.
Wrap Up
Since you have learned how to connect Cricut Joy to computer, you must have an idea of the right way to connect your Cricut. Whether you are a novice crafter or a pro, a new Cricut must be connected to your compatible device. However, before connecting the Cricut machine to a computer, you must check the system requirements that I have already provided in his blog above. So, use Cricut Joy to make endless projects in no time.
For more information visit: design.cricut.com
www.cricut.com/setup login
cricut design space app
Source: How to Connect Cricut Joy to Computer
#how to connect cricut joy to computer#connecting cricut joy to computer#cricut design space download#cricut design space app#cricut design space software#cricut design space login#cricut machine setup#cricut joy app#cricut joy machine
2 notes
·
View notes
Text
Cricut login design space
Unleash your creativity with Cricut machines for custom projects. Whether you're crafting for fun or small business, Cricut's versatile machines and Design Space offer endless possibilities. Visit cricut.com/setup to download and install the Cricut software and access a wide range of free and subscription-based designs. From customizing materials to crafting various projects, Cricut makes creativity easy and enjoyable.
#Cricut.com/setup#design.cricut.com#www.cricut.com/setup#Cricut Design Space#cricut.com/setup windows#Cricut.com setup mac#Cricut setup#Cricut.com setup download#Cricut.com sign in
2 notes
·
View notes
Text
How to Make a Personalized Cricut Water Bottle: Top 3 Ideas

The Cricut water bottle is more than just an accessory for hydration, as it’s a great way to show off your creativity and personal style. If you are interested in learning how to make a water bottle with the Cricut machine, I have prepared this blog post just for you. In this blog, I will first share with you 3 unique water bottle projects that are very popular and expensive in the market, which I made myself with some supplies and a Cricut machine.
Next, I will show you step-by-step how you can make such bottles in only a short time. Once you learn it, you will be able to make many things like bottles, glasses, and cups. Now, I can’t wait to start this guide.
3 Most Popular Cricut Water Bottle Ideas
The following are the trending water bottle ideas that you should try to show your creative side. Bottles are very easy to style and don’t take much time. If you are a person who loves exploring new ideas, you are going to love these three ideas.
Berg Water Bottle
Whether you’re a working professional or in college, you can make this project with your Cricut. This is a water bottle from a very popular brand, Berg, which you can prepare yourself at your home. I made this because I had to give it to my clients at the crafting office. To make this, buy a plain water bottle, cut out several permanent vinyl berg designs with a Cricut, and attach.
Cricut Water Bottle With Vinyl
My daughter wants to serve the country as a professional nurse, and I keep giving her small gifts to keep her motivated. She loves to personalize things, so I gifted her a personalized water bottle. To make this, I need a Cricut machine and vinyl. You can also make this by simply cutting your design on vinyl.
Sports Water Bottle
If you are also a sports lover, like to go to the gym and also do workouts. It is your responsibility to keep yourself hydrated, and for this, you need a water bottle that will excite you. This Cricut allows you to personalize a plain water bottle according to you.
To make this first, go to the Design Space, create a stencil design, choose the correct material setting, and cut it out.
How to Make a Water Bottle With Your Cricut Machine?
After sharing my top Cricut bottle ideas with you, I’ll now walk you through the complete step-by-step process of how to make a custom Cricut water bottle.
Step 1: Collect All the Tools and Supplies
The first thing you have to do is gather all the essential materials you will require for your project.
A Step by step instruction
Cricut cutting machine
Permanent adhesive vinyl
Transfer tape
Cutting mat
Scraper tool
Blank water bottles
A computer with Design Space installed
Downloaded SVG file
Step 2: Upload Your SVG File on the Design Space
First, we connected our Cricut machine to our computer and opened the Design Space.
Now, click on the New Project on this software.
After this, press the Upload icon on the left-hand corner of your screen.
Then, browse and find the SVG file from your computer system.
Next, import the file, write a name and tag for it, and select Upload.
Here, I am making more than 3 Cricut water bottle designs, so I have selected multiple designs.
Now, measure your bottle and resize your design accordingly using the edit tool.
Step 3: Choose the Appropriate Material Settings
The design we will make on the bottle must be curved; for this, click on the design and use the curve tool. Once everything is prepared according to plan, click on the Make It option.
Now, you will be on a new page, mirror the design here, and click on Continue.
Subsequently, set the material as permanent vinyl and maintain the default pressure setting.
Step 4: Cut the Design
Now leave your computer as it is, take your permanent vinyl, and lay it on the Cricut mat with the shiny side down. And after that use the roller to fit it correctly.
Moreover, press the Load button on the machine and load the mat. Then go back to your computer and click on the Continue option. After this, the Go button of your machine will start flashing; click on it.
Step 5: Weed Out Your Design & Prepare a Bottle
Once the design is cut, click the unload button on the machine, unload the sheet, and remove the sheet from the mat. Now, use the weeding tool to remove negative parts from the design.
Finally, clean your bottle and dry it using your towel.
Step 6: Apply the Design to Your Bottle
Furthermore, cover the vinyl design with a small piece of transfer tape and peel away the backing paper.
Finally, apply the vinyl to the water bottle using a scraper tool. This will look straight on our curved water bottle. After this, use the scraper and run it on the bottle.
Final Words
Personalized bottles can be used as gifts for family and friends or for corporate, graduation programs, and other special events. And the bottle of your choice will not be available in the market, even if it is available, the price will be very high. And that’s the problem the Cricut water bottle solves. You can make it as per your requirement with Cricut; it can be either permanent or temporary.
For more information visit: cricut.com/setup
cricut.com/register
cricut easy press 3 setup
how to set up cricut easypress 3
#Cricut water bottle#Cricut water bottle ideas#Cricut.com/setup#Cricut design space download#Cricut design space login#www.cricut.com/setup login#cricut easypress 3 app#cricut.com/register
3 notes
·
View notes
Text
7 Cricut Maker 3 Leather Projects to Enhance Your Style

Hey, are you looking for some unique Cricut Maker 3 leather projects? Look no further than this guide! In this post, I am going to tell you the best DIY projects that you can create with leather. About 3 weeks ago, I finished my Cricut leather projects. I have aimed to make a few projects so that I could write this blog diligently. But do you know what was the most difficult part of this project? Cutting intricate designs on leather. Yes, it might not be easy to cut, but they require patience during both cutting and weeding such designs.
Without any further delay, let’s get straight into this blog to find out the most amazing ideas for creating leather Cricut projects.
1. Bracelets
Do you love bracelets? If so, you must give it a shot! When I was looking for ideas for Cricut Maker 3 leather projects, it had been on my mind for a long time. Finally, I gave it a try and saw how beautiful it looked. If you have any friends you want to give this bracelet to, it would be great!
2. Hair Accessories
Do you want something for your hair? You might wonder what I can make for my hair or other beauty stuff. Well, this leather accessory is also made with leather. As you can see, it might look a little tedious, but it is a piece of cake. Start diving into your Crafting journey and create what you need the most.
I gave it a flower shape, and if you are a little bit familiar with Cricut Maker 3 Setup, then it is a breeze for Maker 3 to cut such designs.
3. Earrings
I love leather earrings, as they enhance my beauty and are easy to create. Beginners who are looking for the best Cricut Maker 3 leather projects should try them out! Why? Because they are really easy to make. I also wanted to make them a little unique, so I added some glittery effects. This is what I needed, and hence, I made them.
4. Keychains
If you want personalized keychains, then here I have something for you! Whether you are a novice crafter or a pro, this keychain is easy to make. All I did was add some texts with different font styles to my Design Space.
Finally, after finishing my design, I started my Cricut Maker 3 and cut all the words Daddy and Daniel to make keychains. I handed it to my dad, my brother, and my dinner.
5. Crossbody Bag
Today, everyone wants to use a body bag, and what if you have a personalized one? Sounds like a great idea, no? I created this simple bag for myself as I am not much into personalized stuff. But you can have one if you want. The process of making this bag is easier, and you will need iron-on vinyl to make such a beautiful crossbody bag.
6. Monogram Keyring
Looking for super easy-to-make Cricut Maker 3 leather projects? Here is the monogram keyring that is most widely useful, and it would be great if you could give it a shot! This is a great beginner project, and any beginner should try to make something unique. I also used paint to color it to make it look stunning! Lastly, you can see the result in the picture, like how elegant it looks.
7. Cord Organizers
Every one of us uses earphones or a charger, but sometimes managing those clumsy wires is boring and tedious. So, I decided to create something that could organize my cords or wires. Here, you go with leather cord organizers, which I created using my Cricut. There are many cuts that I had to make, and I preferred my Cricut Maker to cut them as they are faster and provide precise cuts, making them look professional rather than handmade.
FAQs
Can I cut leather with Cricut Maker 3?
Yes, leather can be easily cut with Cricut Maker 3. It can also cut other materials such as fabric, paper, and balsa wood without any problem. In order to cut the leather, you have to use a knife blade, and the thickness of the leather should be up to 2.4 mm or 3/32 mm thick. However, you have to use a clean cutting mat with a sharp blue edge for better results.
What are the essential Cricut tools for cutting leather?
There are some common tools that you can use to cut leather. They are as follows:
Utility knife: This sharp knife is considered a versatile tool for cutting your leather.
Rotary cutter: This is a tool that comes with a wheel-shaped blade. Ideal for long and straight cuts.
Leather shears: A kind of specialized scissors idea for cutting thick and tough leather.
Round knife: It is a popular tool that is most widely used for cutting leather.
How thick can I cut leather with Cricut Maker 3?
If you want to cut the leather on Cricut Maker 3, you can cut up to 7 oz thick. The best thing about the Maker 3 machine is that it cuts anything precisely. In addition, cutting the leather is a breeze. You will also have to use a knife blade for all these leather Cricut projects.
Wrapping Up
As you went through the 7 Cricut Maker 3 leather projects, you might have found them easy to make. The best thing about these leather projects is that they are beginner-friendly. So, you will not need to worry about the complexity of the projects; just turn on the Cricut Maker 3 and prepare the leather that you want to cut. After cutting, the result will be fantastic and will stand out!
For more information and visit: www.cricut.com/setup login
cricut.com/create
Cricut Design Space App
Source: Cricut Maker 3 Leather Projects
#Cricut Maker 3 leather projects#leather Cricut projects#cricut design space download#Cricut maker setup#cricut maker 3 setup#Cricut Design Space Login#Cricut Design Space App#Cricut New Machine Setup
2 notes
·
View notes
Last Seen Blogs

xx-woozle-xx
xx_woozle_xx

shawdy504
Untitled

abracadabralittle
Abracadabra Little

zquicv
Rip Kiki

tightshinyclothes
Tight & Shiny Clothes