
Last Seen Blogs

zaarah567
Coralwealthinvestment

kuensel
Untitled

neoxvrs
lynn

comocriarredevpnwindows10segura
Untitled

ipxakachi
Creativity that's enclosed within your mind
Text
How to Cut Wood With Cricut: A Step-by-Step Guide

Wood is a perfect material for creating unique and long-lasting designs. I have been using the Cricut machine setup for a long time and have gained an appreciation for my wood projects. My best friend and I recently made some awesome home decor for our bedrooms and halls. And you know what? They turned out to be nice handmade pieces. But one thing we found tedious was cutting wood. Since my friend was new to Cricut wood projects, she struggled with cutting and moving forward. Luckily, I helped her cut wood with Cricut and ended the project nicely.
Moreover, I have seen many beginners need help cutting wood using a Cricut machine. With all these in mind, I am here with a useful tutorial to help crafters cut wood. Dive into this blog post and learn the step-by-step process.
Step 1: Getting the Right Tools and Supplies
Have you planned to get started with a wood project? First of all, you will need to gather all the essential equipment. Take a look at a few of them below.
Cricut Machine
Initially, you will need to have a Cricut machine. You can have a Cricut Maker for this purpose. Do you need to learn how to cut wood with Cricut Maker? You can do it effortlessly. This machine has new technology to help you with an efficient cutting process. One of the best things you can find in this machine is the Drive Housing.
Knife Blade
A knife blade is an important tool for cutting wood material. It goes excellently with cutting plywood and other tough materials. This blade goes multiple runs while you try to slice a thicker material. So, you can be assured of precise cutting when you use a knife blade. It included a light score pass, a lighter pass, and a heavier pass in the center to bring out nice-cut results.
Material (Wood That You Want to Cut)
You can purchase some wood material that is designed to work with a Cricut machine. This way, you can cut wood with Cricut and create DIY projects. Either go to a local store or go online to get wood material. You will only need to ensure that your machine is compatible with the material.
Step 2: Preparing Your Cricut Machine
The next step in cutting wood is preparing a Cricut machine for cutting. Here are some simple instructions to assist you with the cutting process.
First of all, move to your Cricut machine.
After that, grab the knife blade and load it into your machine.
Now, find the roller bar on your Cricut.
Then, slide the white star wheels until it comes to the right side.
Further, ensure that the black rubber wheels will move your Cricut mat.
Finally, put in some force to slide the white wheels properly.
You need to perform these steps while preparing your Cricut machine for cutting. But, this cut wood Cricut tutorial for beginners still needs to be completed. You will need to proceed with the one last step, i.e., start cutting wood.
Step 3: Start Cutting Your Project
The final step of cutting wood is the cutting process itself. You will be required to cut the board in these steps. So, start the process using the steps below.
Start by creating a pass in the middle of the cutting files.
The Cricut Design Space Software will start preparing to cut the wood.
Next, your Cricut machine will start slicing the wood in multiple passes.
In the next step, ensure that your sheet is completed or not.
If not, run an additional pass.
Next, look at your mat and the wood material.
Further, if you can lift the wood, the process is complete.
After that, move to Design Space on your system.
Finally, eject your mat from the Cricut machine.
These are the three basic steps that you can follow to cut wood with Cricut. So, while you try to cut the material, follow them carefully.
What Do You Do When a Cricut Knife Blade Doesn’t Cut the Material?
Sometimes, the knife blade can fail to cut through the wood material. If this is your case, you must proceed with some further steps. Remember to retrieve the pad from your Cricut machine once all passes have been proceeded. In addition, follow these helpful steps.
First, remember to keep the mat if there are some necessary cut passes.
Next, use a weeding tool and examine your material cuts.
After that, use a tiny hand tool if you find that a section needs more slicing.
Thereafter, navigate to the Go icon in the Cricut Design Space.
Start further phases for a smooth cut.
It is your job to decide whether the material needs additional passes.
Finally, use an X-acto knife tool to finish off these cuts.
These valuable steps will help you with cutting material precisely.
Conclusion
Wood is a great material you can use for creating numerous DIY projects. After all, these help make projects everlasting and creative. If you are a beginner crafter, you can learn how to cut wood with Cricut and begin with the projects you have in mind. The process includes three key steps. These are gathering the right tools and materials, preparing the Cricut machine, and starting the cutting process. Proceed carefully with the process and take your crafting creativity to newer heights.
Frequently Asked Questions
What Wood Should Crafters Use in Cricut?
Crafters can start crafting with the two most common varieties of wood, basswood and balsa wood. These two wood varieties are lightweight and work great in creating various handmade crafts.
Balsa Wood: Balsa is the cheapest option, and you can find it readily available at craft and other related stores.
Basswood: It is thicker and stronger than balsa. Please note it is not prone to warping. Moreover, the Cricut machine’s knife blade works while cutting through it.
How to Cut Wood with a Cricut Maker?
Do you have a Cricut Maker machine? Find below a few steps to cut wood with Cricut Maker.
In the initial step, go to Cricut Design Space.
Next, tap on Make It.
After that, move to your Cricut Maker and tap on Go.
Run the cut passes according to the size and complexity of your project.
Now, eject the cutting mat.
Double-check your cut result.
Peel the mat from the material.
How Do I Cut Wood With Cricut Explore Air 2?
If you have Cricut Explore Air 2, you can cut wood and do exciting wood projects. Follow these easy-to-follow steps.
Go to the Cricut Design Space app and make a design.
Set your machine’s dial to custom settings.
Now, place your material on the mat.
Insert the cutting mat and tap on the Go button.
Double-check your cut results.
Finally, remove the mat and the tape.
For More Information Visit: cricut.com setup windows
cricut.com sign in
install cricut explore air 2
Source: Cut Wood With Cricut
#cut wood with Cricut#how to cut wood with Cricut maker#cricut design space download#cricut design space software#cricut design space login#Cricut.com setup mac#Cricut maker setup#cricut machine setup#cricut explore air 2 setup
0 notes
Text
Cricut Hat Press Reviews: Features, Specifications, and More

Hey, crafters fam! Welcome to my new blog post, in which I share Cricut Hat Press reviews. Reviews are really helpful for many crafters, as they can help them understand the reasons for buying this heat press machine.
Although I do the same when I have to purchase something, I always go to Google and find the reason. Be it a gadget or a machine like a Cricut cutting machine or a Hat Press, you don’t have to worry. In this blog, I will tell you all about the Hat Press machine, like why it’s the best choice for crafters.
A month ago, I was busy with my Cricut project. In this, I made my own hat using my Cricut cutting mat and Hat Press. My experience with this press was superb. Now, let’s jump aboard to learn more!
Cricut Hat Press Reviews: Overview
You might understand what a Hat Press is if you have used the Cricut EasyPress 2 or 3. The purpose of this press is the same as EasyPress; the only difference is that Hat Press is used to press the hat or cap as they have curved surfaces. It also has different temperature settings for different blanks.
In the overview, I will share the key features, specs, and pros/cons to give you a general idea of Hat Press.
Features:
It connects via Bluetooth using the Cricut Heat app to send the temperatures and settings.
Safe Auto shut-off feature
Three heat settings for multiple heat-transfer ranges
Goes up to a maximum of 400°F (205°C)
Specs:
A product of a well-known brand named Cricut
Connect through Bluetooth
Measured Dimensions: Width is 6.5 inches, Height is 5.1 inches
Weighs up to 2.4 lbs
Zen Blue color
Works with Infusible Ink, HTV, and more
Pros:
Bluetooth connectivity
Lightweight and compact design
Automatic safe shut-off
Easy-to-reach buttons
Cons:
There is no bag for storage
Apt for smaller designs
Its curved heat plate does not allow us to work near the brim of the hat
The cost is high for occasional users, and it is used only for hats
Cricut Hat Press Reviews: Technical Specifications
If you are a Cricut EasyPress 3 user, you will notice a few similarities between these two devices. This press excels at transferring infusible ink, iron-on heat transfer vinyl (HTV), and sublimation paper. It also reaches a maximum temperature of up to 400 ℉ (205 °C).
Now, let’s move ahead to learn the technical specifications of Hat Press:
Cricut Heat App
Do you know you will need to use a Cricut Heat app to activate your Hat Press? For this, you will need to download the app and then sign in to your Cricut ID.
However, the on-screen instructions were really helpful when I was setting up my Hat Press.
Here’s a glimpse of the Cricut Hat Press activation via the Heat app:
Working With Iron-On
When I used my Cricut Hat Press with iron-on to make hats, the overall experience was quite satisfying. The final result was also as per my expectations. During the process, the Cricut Hat Press Guide taught me general guidelines to complete my projects as quickly as possible.
In addition, when you use it with Cricut’s Smart Materials and Cricut’s newer machines, the process will feel very fluid, meaning you won’t find it boring or tedious.
Working With Infusible Ink
For me, the more advanced trial is to use this Infusible Ink for my hats. Also, it allows you to use a wide range of colors, making you focus attentively so you don’t mess up paper layering to prevent bleeding.
However, for better guidance, you will need to rely on the Cricut Heat app for some guidance. As a result, it will guide you in layering your design properly.
In short, this is the best option for those who want the multi-layer colors on their hats.
So, these Cricut Hat Press reviews might have helped you understand the reason so that you can decide to get this Cricut Hat Press machine.
FAQs
Can I use any hat with my Cricut Hat Press?
Cricut has designed its Hat Press in such a way that it can transfer the design to all types of hats. However, if you want to see the best results, then make sure your hat blank fits smoothly over your hat-pressing form. Also, you have to ensure the press surface has firm pressure so no bumps remain on the pockets between your hat and the pressing form.
Why do I need a Cricut Hat Press?
This heat press is specially designed to transfer your infusible or vinyl design onto your blank hat. Since hats are curved, this machine also comes with a curved surface plate coated with ceramic. Also, there are three levels up to 400° F. (2.5°C). Besides, you can use it for any hat, such as adult-size hats, sun hats, and ball caps.
Is Cricut Hat Press really worth buying?
As per my crafting experiences, I can assure you that it is a really useful Cricut accessory. If you are a sports lover or you want to start a small venture that sells customized caps or hats, then you can get this device so that you can transfer the design onto the hat. This Cricut Hat Press transfers the design really amazingly. Hence, yes, it is worth buying if you need to use it repeatedly.
Wrap Up
That’s all in Cricut Hat Press reviews. In this guide, I have discussed many points, such as key features, specifications, and the pros and cons, which help you decide whether it is worth buying or not. Besides, there are technical specifications that you must know as they will help you understand the working process of your Cricut Hat Press along with iron-on and infusible ink materials. So, find a suitable reason to get this Cricut Hat Press machine.
For more information visit: Cricut.com setup mac
install cricut design space app
cricut explore air 3 setup
cricut new machine setup
Source: Cricut Hat Press Reviews
#Cricut Hat Press Reviews#Cricut Hat Press guide#Cricut Hat Press machine#cricut design space download#install cricut explore air 2#cricut machine setup#Design Space software#cricut explore air 3 setup
1 note
·
View note
Text
How to Use Cricut BrightPad: Beginner's Guide to Get Started
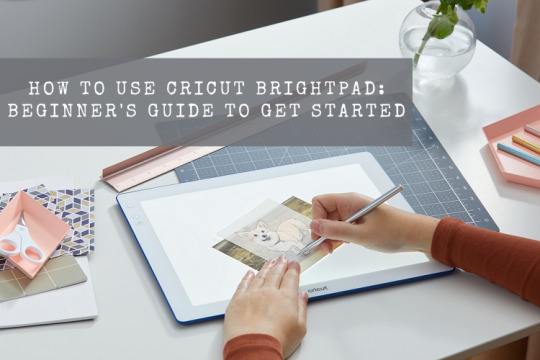
Hey there! Do you want to learn how to use Cricut BrightPad in simple steps? In this blog, I am covering everything about BrightPad, such as a list of projects you can create, how it works, and how to use it.
I truly appreciate Cricut for this innovative craft machine. Indeed, I will not forget the day when I ruined one of my vinyl designs. I worked hard on it as I made this from scratch. Since I was a beginner, I was not aware that I needed to be extra cautious while weeding it. But as I started weeding, I mistakenly weeded the part that I should not have removed. That day, I couldn’t save my design, and due to this disappointment, I headed to the Cricut website Cricut.com/setup and found this amazing gadget: Cricut BrightPad. I have used it in all my DIY projects where there are fine cuts. Keep reading to learn more!
How Does Cricut BrightPad Work?
First, let’s understand what is a Cricut BrightPad. The BrightPad is a lightbox tool used to add light from behind or under a project. The device is simple, and you can easily adjust the brightness level using the power button. So, there are no extra or complex settings to do. Just a single button that does everything for you.
Although the BrightPad doesn’t come with a rechargeable battery, Cricut BrightPad Go, which is the latest model in Cricut’s lineup, comes with a lithium-ion rechargeable battery. But later in this blog, we will only talk about how to use Cricut BrightPad, not the latest one.
As you can see in the picture below, this is the purpose of using this light pad. Be it glitter vinyl design or other, you can simply weed the design by putting it on the top of the BrightPad. Moreover, you can adjust the brightness as per your requirements using the power button.
Things You Can Do With Cricut BrightPad
Other than weeding, there are several things you can do with BrightPad. So, you don’t know that it is only for weeding. I know 90% use of this device is for weeding, but for the rest, you can do the following. Here’s what you can do with BrightPad:
Jewelry Making
Creating Baking Pieces
Weed Vinyl
Trace Lettering
Painting without Pencil Lines
Work with Metal Pieces
Piece Together Quilt Squares
Work with Beads
Trace Images
Now, let us look at the steps below to understand the use of BrightPad.
How to Use Cricut BrightPad for the First Time?
As I have already discussed above, you can perform various types of tasks on BrightPad. Be it weeding, tracing, jewelry making, and more. So, let me show you how you can use the following steps:
First of all, you will need a wall adapter so that you can plug in the BrightPad to the power source.
Then, press the Power button to turn on the device.
You need to place the cut vinyl design or anything that you are working on on the top surface of BrightPad. You can also use the painter’s tape to tape your vinyl to keep it in one place.
After that, you can start weeding the negative space from the vinyl. If required, press the same power button to adjust the brightness level.
So far, you might have understood how to use Cricut BrightPad for the weeding of a vinyl design. Now, you can easily use it as there is no setup required, and it is portable and easy to use. So whether it is tracing the figure, jewelry making, or anything like weeding, the Cricut has made it easier for you in just a single press. Plug, Press, and Use; that’s what you will need to do only.
FAQS
Do I need to plug in the Cricut BrightPad?
In Cricut BrightPad, there is no battery. Hence, you will need to plug it into the power source every time you use it. For this, you can use a standard USB wall adapter; otherwise, use a computer USB port to light the BrightPad. Plus, Cricut doesn’t provide any wall adapter with this product. So, you need to use your own wall adapter.
Is it possible to use Cricut BrightPad with an external battery pack?
As per Cricut, you can use the BrightPad with external battery packs, but they have never tested this method and also do not guarantee the charge expectancy while using the external battery. So, you can use it but at your own risk. Besides this, you always have an option to try with the direct power source.
What do Cricut BrightPad button lights indicate?
The meaning of the BrightPad button is simple. For example, when you plug it into the power source, the power button turns white, indicating it has been plugged into the power socket. Also, it turns white when it is on, and the BrightPad surface is lighting. Hence, there is one single-color light that is given only in the BrightPad.
What is the main difference between Cricut BrightPad and BrightPad Go?
The first basic difference between both the devices is that A BrightPad comes with a single power button that is used to change the brightness level and power on the device. On the other hand, Cricut BrightPad Go has one dedicated button for power buttons and another up and down button for brightness settings. Besides, BrightPad has more features, such as a rechargeable battery, a scratch-resistant surface, a non-slip base, and more.
Wrap Up
In this blog, we learned how to use Cricut BrightPad. Besides these, I also explained how this device works and the list of things you can do with BrightPad. At last, I talked about the use of this device. The use is quite simple and easy, as you don’t need to do a complex setup before using the BrightPad. Using this device, you can work on fine design and cut vinyl that is not easily visible in room light.
For more information visit: install cricut explore air 2
cricut explore air 3 setup
cricut Design Space download
cricut machine set up
Source: How to Use Cricut BrightPad
#how to use Cricut BrightPad#Cricut BrightPad Go#what is a Cricut BrightPad#cricut.com/setup#cricut design space download#install cricut explore air 2#cricut machine setup
3 notes
·
View notes
Text
6 Cricut Ideas for New Year’s to Celebrate Your Festive Season

Finding something new, like Cricut ideas for New Years, is a challenging task. I always find myself in a dilemma and don’t understand what to make and what not to make. In early December, I started creating DIY projects for Christmas Eve. At the same time, I decided to seek ideas for the New Year’s celebration. Since I was working on Cricut and I had to buy a lot of materials for my project, I decided to put the project together. So, be it decorations or other useful stuff like coffee mugs and hair bands for my daughter, I made many such projects using Cricut.
On the other hand, you will find various inspiring Cricut New Years projects in this blog that will help you brighten up your festive season. Let’s explore ideas for finding intricately designed craft items with the Cricut.
1. Hair Bands
Want to make something for a girl child? With Cricut, you can make personalized bands with golden glitter paper. My daughter wanted me to make this band for her, so I used my Cricut Maker to show its magic. And the result was SUPERB!
Whether you like this font or not, you always have options to try different fonts from the Design Space app, as it offers a variety of fonts for free. In addition, you can use a simple plastic band on which you have to stick your design using the glue gun.
2. Vinyl Shirt
This beautiful white shirt will add charm to your New Year celebration, and you are going to look really good in this attire. This white shirt with black Mickey Mouse graphics makes it a children-friendly shirt.
Also, I made this for my son, Harry, who loves such simple graphics designs on shirts. I used a Cricut Maker to cut the vinyl design and an SVG file on my Design Space. If you will try then you can find many SVG files easily on the internet. So try them out and enjoy the New Year with your friends and family with these amazing Cricut ideas for New Years.
3. Mug
Want to gift someone this New Year? Here, I have brought one of the best Cricut ideas for the New Year. It will make your day special as well for others. The Cricut Mug Press can help you craft a beautiful mug. All you need to do is create your design on Design Space and send the design to the Cricut machine to cut the design. This will make your design look professional and fantastic.
4. Sparkly Glass
This sparkly glass, which I made last year for my cousin, was super easy to make with Cricut Joy. In supplies, I used black cardstock, metallic and holographic adhesive vinyl, transfer tape, and glass. Besides, I used a Cricut tool set, such as the weeding hook and scraper tool. And for design, I used an SVG file that I purchased at an affordable price. Children especially find such Cricut ideas for New Years suitable for themselves as they love wearing these weird stuff.
5. Paper Card
During the New Year, I often send cards to my friends and family. However, coming up with new ideas for cards every year seems like a tedious task for me. But, this year, I wanted to make a simple-looking card. Of course, I used a cardstock and a Cricut Joy pen and finally wrote this text using the Cricut Joy machine. It hardly took more than 10 minutes. So why don’t you try this card? It is simple and easy to make. Share your lovely message with this card and bring a smile to your loved one’s face.
6. Wall Decal
Wall decal is one of the best Cricut ideas for New Years as it gives the real vibes of the New Year. In addition, the simple vinyl based decal is temporary and can be removed after some period of time. For this, you can use a removable Cricut vinyl that is not permanent that you use for your shirt. Moreover, this wall decal is different and works really great. So, give it a try and see what it looks like. But, I would say there is not much hard work needed as you have to use stylish fonts that look perfect on your wall.
Wrapping Up
The idea of making New Year projects with a Cricut machine is simple. On the other hand, the machine is capable of cutting different materials, which makes your task easy and cuts anything with precision. In this blog, I have explained 6 projects, including a wall decal, custom card, sparkly glass, etc. Also, I made all these projects myself in the initial days of December. So, set up your Cricut machine and start making crafts to spread the love around you.
FAQs
What last-minute Cricut New Years projects can I try?
The projects you can make at the last moment will be smaller and simple. For this, you can try the following ideas:
Paper luminaries
Star decorations
Personalized Hoodies/Shirts
Celebratory cups and bottle wrappers
Gift tags
Cupcakes toppers
Custom decor
Wall decals
Greeting cards
How do I find Cricut ideas for New Years?
You can try many Cricut ideas and templates that are already available on Cricut Design Space. You can access these designs for free of cost and you will not need to spend much time wandering here and there on the internet. The Cricut comes with its own resources, be it stylish fonts and graphics designs, all of which are available for free. However, there are subscription plans also available, so if you are looking for premium images and font styles, then look no further than the subscription of Cricut Access.
What do I need to make New Year Cricut projects?
Well, the list of New Year projects is huge, and all different projects will require you to have different supplies. Hence, I am taking an example of a project and will share the supplies needed for the same.
Cricut cutting machine
Infusible Ink
StandardGrip Mat
Lint roller
Heat-resistant tape
Cricut Mug Press
EasyPress Mat
For more information visit: Cricut.com setup mac
Install Cricut Explore Air 2
install cricut design space app
Source: Cricut Ideas for New Year
#Cricut Ideas for New Years#Cricut.com/setup#cricut design space app#install cricut explore air 2#cricut machine setup
1 note
·
View note
Text
Top 10 Cricut Halloween Costume Ideas for 2023

Halloween is a spooky holiday that comes without any warning and leaves you busy completing the decorations and finalizing the costumes. There are two kinds of people in this world: one who gets dressed up and goes out on Halloween. On the other hand, the other one locks themselves in their room. It doesn’t matter that you belong to the category, but there are certainly the best Cricut Halloween costume ideas that will make your day.
No one celebrates this day better than celebs, and all thanks to their stylists, squads, and their big budget. While some visit thrift stores or Amazon to get the costumes, the remaining ones utilize their Cricut cutting machines to design dresses. Pay special attention here as it will be great to learn DIY Halloween costumes, which can be made out of Cricut.
1. Professor Snape from Harry Potter

2. Ghostbusters Costumes

3. Cruella De Vil from Cruella

4. Mavis from Hotel Transylvania

5. Princess Jasmine from Aladdin

6. Captain America from Marvel

7. Sheldon Cooper from The Big Bang Theory

8. Ross Geller from FRIENDS

9. Professor from Money Heist

10. Lara Jean from To The All The Boys I’ve Loved Before
Finally, dress yourself as an average 16-year-old Lara Jean for the coming Halloween night. You can dress up by choosing a floral embroidered bomber jacket, floral choker, satin scrunchie, mini backpack, and combat boots. Apart from that, you can also take inspiration from her outfits such as cheerleader or blue color straight-dress.

Frequently Asked Questions
How Can I Create My DIY Cricut Halloween Costumes?
To get customized Cricut Halloween costume ideas, the DIYer needs to follow these steps:
First, open the Cricut app and create your design on the Canvas.
After creating the design, load the material on the mat and press the Go button.
Next, unload the material from the machine and weed out the extra material.
Lastly, try the outfit by wearing it and do the essential changes.
Which Supplies Do I Need to Create My Halloween Costumes 2023?
To craft out one of the easiest Halloween costumes for the year 2023, all the DIYers need to have some primary supplies. The supplies will help them in giving perfect formation to their costume as per their wish. Have a look at the supplies below:
Cricut cutting machine
Cricut Heat Press
Design Space app
Weeding Tool
Glue Gun
Blanks
Smart Materials
Cricut cutting mat
Scissors
Trimmer
Which are the Best Halloween Costumes to Try in 2023?
Intending to make this year’s Halloween amazing, everyone is searching for the perfect dress. Some of the best dress which you can carry on 31st Oct 2023 are given below:
Barbie & Ken
Vecna from Stranger Things
Hermoine Granger from Harry Potter
Iron Man from Marvel
Batman from DC
Harley Quin from Suicide Squad
Monica Geller from FRIENDS
Maleficent from Maleficent
Monkey.D.Luffy from One Piece
For more information visit: cricut.com/setup explore air 2
Cricut.com setup mac
Install Cricut Explore Air 2
Cricut Machine Set up
#cricut halloween costume ideas#halloween#halloween costumes#halloween 2023#cricut explore air 2#cricut.com/setup#install cricut design space app#cricut design space login
1 note
·
View note
Text
How to Setup Cricut Explore on Computers and Mobiles?

Setting up the new cutting machine is always exciting, but at the same time, it becomes a little challenging for newbies. Every consumer has their own way of setting up the Cricut machine. Some people want to setup their cutting machine on Mac/Windows, and others want to setup on their mobile device. However, they need a guide that can help them with simple and easy steps to install the Cricut machine easily. In this guide, we will discuss how to setup Cricut Explore on computers (Windows/Mac) and mobiles (iOS/Android). Before this procedure, you will need to download Cricut Design Space software and then pair it with your device via Bluetooth. Afterward, we will proceed with the complete setup process. So, let’s get started.
How to Download Cricut Design Space on Your Device?
The Cricut software is known as a Design Space, which is compatible with all platforms, including Windows, Mac, Android, and iOS. It assists Cricut machines to communicate with your computers and mobiles. To download the app on Windows/Mac computers, follow the steps below:
For Windows/Mac
Open the browser on your device, then go to the design.cricut.com.
Mark the I Agree button and then download the app.
After downloading the app, go to the Downloads folder.
Then, begin installing the Design Space on your computer.
In the last step, follow the on-screen instructions.
You will need to go to the Play Store (for Android users) and the App Store (for iOS users)to download the app. Here are the steps to download the Cricut app on Android and iOS devices.
For Android
Go to the Play Store and search for Cricut Design Space.
Then, you will see an app with a C icon in green color.
Click on Install to start downloading it.
After installation, the app will be visible on your home screen.
For iOS
Open the App Store app, and type Cricut Design Space in the search bar.
Once the app is visible, click on the Get button to install the app.
After complete installation, you can setup the app with your cuttingmachine.
How to Connect Cricut Explore on Your Device via Bluetooth?
Most computers come with Bluetooth compatibility. In case your computer does not have Bluetooth, then you can connect your devices using a USB cable. Before you connect with Bluetooth, make sure you have turned on the machine, and the distance should not be more than 10-15 feet between your computer and the device.
Follow the steps to pair Cricut Explore on computers and mobile devices.
On Windows
Open Settings and then click on Devices.
Ensure the Bluetooth is switched on.
After that, hit the Add Bluetooth tab.
Next, choose Bluetooth and let the computer search the Cricut machine.
Once the Cricut Explore machine name is detected by Bluetooth, you can select it.
Further, enter the PIN 0000.
On Mac
Navigate to the Apple menu.
Thereafter, select the System Preferences.
Then, you have to select Bluetooth.
After that, ensure the Bluetooth is on.
Next, look for the Cricut Explore name in the given list.
Once you find the machine, select it and then enter the PIN 0000.
Then, choose OK.
Finally, you have paired the Mac with a Cricut machine.
On Android
Navigate to mobile Settings and open Bluetooth.
Find the machine in your Bluetooth list and enter the PIN 0000.
Then, hit the OK button.
On iOS
Go to your Settings app on iOS.
Select the Bluetooth option.
Here, Bluetooth must be turned on.
Then, find the machine in the list and type the PIN 0000.
How to Setup Cricut Explore on Computers?
Now, it’s time to setup the Cricut digital cutter on Windows and Mac.
Open the browser and visit cricut.com/setup.
Then, download the Cricut Design Space and install it.
Further, with the help of on-screen instructions, create a Cricut ID.
Afterward, you have to select the Cricut Explore.
Switch on the machine and connect it to the computer using USB or Bluetooth.
Finally, you are done with the setup process.
How to Setup Cricut Explore on Mobile Devices?
Surprisingly, Cricut offers the Design Space app for both Android and iOS users. However, you can’t access all the features as you can on computers. But still, you can get the most out of the Cricut app. Let us setup the Cricut Explore on mobile devices. We have already mentioned the download procedure above for Android and iOS devices. Go and read them to download the Cricut app.
Download and install the Cricut app.
Open the app and then create a Cricut ID or sign in.
Hit the Menu tab and opt for the Machine Setup option.
Then, you have to select the Cricut machine model.
By following the on-screen prompts, you need to turn on the device.
Then, pair the Cricut Explore to iOS and Android using Bluetooth.
Finally, you have completed your Cricut Explore setup.
Conclusion
In short, the Cricut Explore setup doesn’t take much time. However, you will need to download the Cricut Design Space app from Cricut’s office website, and then you are ready to setup on various devices. You also need to pair your device with the Cricut machine so that communication can take place between the device and the Cricut machine you are using. Further, you can complete the setup of your Cricut Explore Air 2 easily with this simple guide.
FAQs
Is Cricut Explore worth buying?
Explore series are the most valuable crafting cutting machines; they are always the perfect choice for DIYers. With these incredible features, crafters can make various projects, including gifts, birthdays, and greeting cards. Plus, it can cut 100+ materials easily in less time. For crafters and DIYers, this is the best machine that they can go for.
Should I buy Cricut Explore 2 or 3?
Explore 3 is 2x faster compared to Explore Air 2. So, in terms of speed and faster performance, yes, the Explore 3 is something you must go for. In other words, Explore 3 can cut up to 8 inches per second. While Cricut Explore Air 2 cut 4 inches per second.
How can I make money via Cricut?
Yes, you can make money using Cricut machines. There are many ways that you can use it. For example, you can start your T-shirt designing business. Plus, you can offer coffee mugs with customized designs. In addition, you can teach people to use the Cricut machine and lead workshops on various Cricut projects.
For more information visit: Cricut.com setup mac
Install Cricut Explore Air 2
cricut explore air 2 software
Source: how to setup cricut explore
#Cricut.com setup mac#Install Cricut Explore Air 2#cricut explore air 2 software#Cricut Design Space#cricut explore air 2 setup#install cricut design space app#how to setup cricut explore
0 notes
Text
Latest Cricut Machine September 2023: Cricut Joy Xtra

Now, get ready to have extra features and cool DIY-making projects with a brand-new Cricut Joy Xtra machine. The brand has introduced this latest Cricut machine as the second model in the Cricut Joy series. As we know, Cricut Joy was already a hit due to its compact designs and amazing features.
Now, to provide crafters with more hassle-free crafting for small projects, Cricut Joy Xtra comes in a slightly bigger size. Plus, there are many other changes you can see in its features. So, if you are also excited to add this machine to the pack of your Crafting machine, then here is everything you need to know.
Cricut Joy Xtra: An Overview
Cricut Joy Xtra has everything you already saw in its predecessor, Cricut Joy. However, there are some improvements, such as bigger shapes, Print Then Cut features, more cutting power, printer compatibility, and others. Plus, this latest Cricut machine ensures more precision and accuracy while cutting materials. And this machine allows full-color stickers, custom cards, T-shirts, vinyl decals & more.
In addition, crafters can easily connect the machine to their computer or smartphone devices through the Cricut Design Space app. Also, beginner crafters are not required to have much crafting experience to work with Joy Xtra. With the help of this machine, crafters can easily cut, write, foil, and draw. In short, this machine is a power-packed smart cutting option to upgrade from Cricut Joy.
Major Features of Cricut Joy Xtra
Have a look at the features you are going to see in the Joy Xtra machine.
Joy Xtra comes with the Print Then Cut feature that helps in printing the design and cutting it with the machine.
This latest Cricut machine also comes in a bigger size than the Cricut Joy.
And Cricut Joy Xtra is compatible with Cricut Design Space on both computer and mobile phone devices.
Plus, it comes with Bluetooth compatibility that helps it connect to other devices seamlessly.
The brand offers best-in-class support service with the purchase of the machine.
Works with 50+ materials, including all the popular materials like iron-on, vinyl, cardstock, and smart materials.
Its smart design allows crafters to use the machine without any prior experience with the machine.
New crafters get free live workshops, online courses & beginner cheat sheets to help them learn the art of DIY crafts.
Specifications of Cricut Joy Xtra
Here is the specification of the Joy Xtra machine that is necessary to know if you are considering buying this machine.
First, the cutting speed of the Cricut Joy Xtra is 5.65 inches per second.
This latest Cricut machine dimension is 12.5 in x 6 in x 5.5 in (31.7 cm x 15.2 cm x 13.9 cm).
The maximum cut size of this machine using the mat is 8.2 in x 11.7 in (20.8 cm x 29.7 cm).
Plus, the max cut size of smart materials is 8.5 in x 4 ft (21.6 cm x 1.2 m).
Lastly, the weight of this compact machine is 6 lbs (2.7 kg), which makes it highly portable.
Products That Come With Cricut Joy Xtra
The products Joy Xtra machine includes are listed below:
Cricut Joy Xtra machine
Cricut Mini Weeder
Premium Fine-Point Blade + Housing
Cricut Joy Fine Point Pen
Power adapter
Welcome card
Materials for a practice cut
50 free, pre-designed projects in the companion app
Free trial subscription to Cricut Access™ (for new subscribers)
Conclusion
Above, you go to the in-depth information about the Cricut Joy Xtra machine, its features, and specifications. Now, you have complete knowledge of what to expect from this latest Cricut machine. Plus, this machine is $50 more than Cricut Joy. For beginners, it is one of the most worthwhile Cricut machines you should have. If you are a hobbyist and already have the Cricut Joy machine, then there is no need to get this machine. However, if pro-crafters, this machine can be a prudent investment.
Frequently Asked Questions
What is Cricut Joy Xtra?
Joy Xtra is the latest Cricut machine and successor of the Cricut Joy. This machine has got some new features other than Cricut Joy features. Plus, the machine got a bigger size than its predecessor and comes with more cutting power. It is the best option for crafters and hobbyists who are looking for a compact Cricut cutting machine. The machine comes with powerful cutting blades that help in cutting, writing, foiling, and drawing.
What is the Price of a Joy Xtra Machine of Cricut?
Cricut Joy Xtra is an amazing compact machine offered by the brand that comes with various unique features. The machine is easy to use and offers the utmost accuracy while cutting. With the help of this machine, crafters can cut more than 50 materials, including Cricut Smart Materials. Plus, the Print Then Cut feature is also included, which was unable in its predecessors. The price of the machine is $199, which is $50 more expensive than the Cricut Joy machine.
What Can I Do With the Joy Xtra Machine?
The Cricut Joy Xtra is a smart machine that comes with various advanced features. Plus, the machine is compatible with a variety of materials like cardstock, iron-on (HTV), and smart materials. And, with the help of the Joy Xtra machine, crafters can make T-shirts, vinyl decals, full-color stickers, custom cards, and many others. So, this machine is the best option as an entry-level DIY cutting machine.
For more information visit: Install Cricut Explore Air 2
Cricut.com setup mac
Cricut New Machine Setup
cricut explore air 2 setup
how to setup cricut explore
Source: Cricut Joy Xtra
#Cricut Joy Xtra#Cricut Explore Setup#cricut design space#Cricut.com setup mac#Cricut New Machine Setup#how to setup cricut explore#Install Cricut Explore Air 2
0 notes
Text
Cricut EasyPress: Explore Its Types and Main Differences

Do you want to buy a new Cricut EasyPress? And willing to learn more about it, like what it does and how many types of heat presses there are? Avid crafters know how much it takes to make these unique projects. Also, they always wish to gift their loved ones. Once you start making your custom Cricut projects, you will like creating more and more. Through this blog, I will discuss everything you need to know about this EasyPress. Further, we will learn about its latest version, i.e., EasyPress 2, EasyPress 3, and EasyPress Mini.
What is a Cricut EasyPress?
The EasyPress is a hybrid between an iron and a heat press. Cricut released this heat press in 2017 with a heat plate size of 9 inches X 9 inches (25cm x 25cm). This EasyPress completes pro-looking iron-on and heat transfer projects. They include making T-shirts, jumpsuits, blankets, and more. It combines the speed, accuracy, and reliability of a heat press at the convenience of an iron. It works great when used with traditional heat-transfer vinyl and other fun stuff. For instance, heat-transfer foil, metallic materials, and glitter.
What is Cricut EasyPress Mini?
The EasyPress Mini is the smallest size and comes in raspberry color. It looks tiny but can do a lot in less time. It is the perfect fit for small projects. Plus, it is compatible with extra small projects.
These small projects include shoes, stuffed animals, and more. It can go into curves with contours and between buttons due to its oval-shaped design.
What is Cricut EasyPress 3?
The EasyPress 3 is the smarter and latest version of the whole EasyPress series. It means you can integrate your EasyPress 3 with the Cricut Heat App. As a result, you will not need to guess anything, as the app will guide you through everything you need to get started.
Further, it has temperature control, heat distribution, and safety features. It also has a built-in Bluetooth feature, so you can use it from anywhere.
Main Differences Between Cricut EasyPress and EasyPress 2
Both machines have similar features. The Cricut provides a handy guide that outlines the differences between EasyPress and EasyPress 2. Further, Cricut released the EasyPress in 2017, a 9" x 9" size. Another release was in 2018 for EasyPress 2, which is available in 3 different sizes:
Smaller than the other 2 Easypress, and its dimension is 6″ x 7″, suitable for smaller projects.
Medium, i.e., 9″ x 9″, and ideal for everyday use.
The largest one comes in a 12″ x 10″ size, a great fit for larger format projects.
Here are the major updates included in the EasyPress 2:
Temperature – the precise temperature control upto 400°F (205°C). Whereas the original EasyPress has precise temperatures upto 360°F (180°C).
Heats up quickly – it heats 25% faster than the original press.
Available in different sizes with a range of price points.
It also has a micro USB port to update the firmware.
Below are the things available in EasyPress 2 but not in the original EasyPress.
Range of Color Choices – A range of colors is available.
Educational resources – You can register your product online for educational materials and updates.
Safety – the innovative design of the press keeps the work surface upto 60°F cooler.
Remembers settings – it can remember time and temperature settings from the last use.
How is Cricut EasyPress Different From a Household Iron?
You should never use a household iron to apply heat-activated vinyl. Consequently, you may get unwanted results. Household iron is inefficient in providing heat evenly to the area. In other words, you will be unable to maintain the exact temperature for the required area. As a result, some areas might not receive the required heat. Also, most household irons come with steam holes at the bottom, which prevents even surface heat distribution.
In contrast, the heat press design is square. Its squared shape helps you to distribute the heat evenly to the surface. Hence, you will get a quality transmission. Thus, we should always use EasyPress for applying heat on activated vinyl surfaces.
Conclusion
The Cricut EasyPress is a smart heat press tool in various sizes to meet all your project's demands. The Mini version is also great for small projects and can work on different types of shapes. In this blog, we have mentioned all about EasyPress. You must understand its types and differences. However, the guide will help you when you want to buy a new EasyPress. For example, heat press machines come in various sizes so that you can buy them as per your project demand. Besides, the blog explains the difference between EasyPress and EasyPress 2.
FAQs
What can I use to protect my surface from Cricut EasyPress?
You can protect it using EasyPress Mat. It prevents your surface area from heat. It also creates a suitable environment for iron-on-transfers. Hence, you can protect your surface by using items you already have at home. You can save a lot if you use household items as your mat.
Does iron-on (HTV) require a lot of pressure?
The iron-on (HTV), or heat transfer vinyl, requires even heat with little pressure. All types of Cricut EasyPress can deliver heat equally on the surface. Also, the users can control the pressure. Yet, you will always need heat, pressure, and time for a long-lasting transfer. The balance of these items ensures the best results.
How does the EasyPress Mini work differently than other EasyPress?
They both have similar functions. But the difference is that Cricut EasyPress Mini has one button with three settings, i.e., Low, Medium, and High. For this, you need to use a separate timer to count down during the application. Plus, you must frequently move over the design during the transfer process. On the other hand, the rest of the EasyPress is available in three different sizes. They are suitable for small, medium, and large projects.
Source: Cricut EasyPress
Visit: Cricut.com setup mac
design.cricut.com/setup
Cricut New Machine Setup
Cricut Explore Air 2 Setup
Install Cricut Explore Air 2
#Cricut EasyPress#Cricut EasyPress 3#Cricut.com setup mac#Cricut New Machine Setup#Cricut Explore Air 2 Setup#cricut design space
1 note
·
View note
Text
Cricut Explore Air 2: A Smart Machine for Making DIY Projects

A Cricut machine is an electronic smart cutting machine that is designed to cut all sorts of different materials. The machine works similarly to a standard printer. The only difference is that Cricut doesn't print anything on paper but uses its blades to cut a design out of the paper. There are several Cricut machines with unique features and specifications. However, this blog will discuss Cricut's best-selling machine, i.e., Cricut Explore Air 2. We will talk about its features and specifications in more detail.
Features of Cricut Explore Air 2
We will begin with the specs, looks, and other features that made this machine. Let us begin.
Design
The Air 2 machine exposes the blades, and you can see how it moves, making it an attractive feature. It is where the user can see how the machine cuts the materials. It is a full-sized cutting machine that is perfect for any crafter. Also, the Cricut Explore Air 2 size is 5.91x22.17x7.01 inches and weighs close to 11 lbs.
Further, the machine can cut more than 100 materials, including paper, vinyl, cardstock, selected leather types, and fabric backed by a stabilizer. Moreover, it works with mats of 12 by 12 inches or 12 by 24 inches of mat size. So, the Explore Air 2 can easily be used to create full-size cuts on iron-on or large vinyl decals.
Double Speed
The Cricut Explore Air 2 is created to be faster and brings Fast mode. This machine becomes the perfect device to accomplish tasks for a crafter looking to work on complicated projects. Further, the double-speed mode is addictive; once you start using it, it will be difficult to cut to normal speed again.
Cutting Force
The cutting force of this machine is 350g, which makes it a stronger machine in its price range. Further, the machine with more cutting power means it can easily cut material. Along with its maximum cutting size of 11.5 by 23.5 inches. The Explore Air 2 can cut tougher and thicker materials like never before. Also, that is why it can cut upto 100 different materials.
Dual Carriage
The dual carriage is one of the attractive features of the Explore Air 2 machine. The two-carriage system means the machine can hold and use two tools simultaneously. So, if your projects contain drawing and cutting, this machine will do the dual task simultaneously.
Blades and Cutting Depth
The Air 2 can cut upto 2 mm thick material, which is the standard thickness. Further, the blade is made out of German carbide steel, which has high ultra resistance.
Connectivity
The Explore Air 2 machine comes with the ability to connect with computers and mobile phones. It can do that by using Bluetooth and USB cable. So, wireless connectivity helps to avoid extra wires, and your room will look more organized.
Pros and Cons of Cricut Explore Air 2
After briefly examining the machine's features, it is important to know the advantages and disadvantages of the Air 2.
Pros:
The Air 2 machine can cut, write, foil, and even score on the materials.
Further, the machine can cut more than 100 different materials. So, it allows you to work with any machine.
Another attractive feature of the machine is its ability to connect wirelessly using Bluetooth.
Also, with the fast mode, you can complete projects quickly.
If you want to cut a print design, the Cricut Explore Air 2 machine can do that.
Moreover, you will get free Design Space software to work with the machine.
Cons:
The Explore Air 2 machine is not compatible with the blades of the Adaptive Tool system.
Also, it requires a cutting mat since it cannot cut Smart materials, which can be cut without any mat.
Further, the maximum cutting length that a machine can cut is 23 inches.
If you are looking for a portable cutting machine, Explore Air 2 is not the one.
Conclusion
The Cricut Explore series machines are one of the best for beginners and experienced crafters. Especially the Cricut Explore Air 2 machine is a great machine that can cut at twice the speed as its older machines. If you are looking for a cutting machine that can cut precisely and accurately, then the Air 2 machine is the best. Also, the wireless connectivity makes it easier to work without getting trapped between the wires.
FAQs
What is included in the Explore Air 2 box?
The Explore Air 2 box contains many things to help you start crafting. You will get an Explore Air 2 machine and Premium Fine-Point Blade with its Housing. Also, you will get a Fine-Point Black Pen and a LightGrip Mat of 12 by 12 inches. You will get a Power Adapter and a USB cable for powering the machine to connect to the laptop. You will also see a Welcome Book, a Free Trial of Cricut Access, and 50 ready-to-make projects.
What materials can I cut with the Explore Air 2 machine?
The Cricut Explore Air 2 machine can quickly cut more than 100 different materials. So, you will be able to cut materials such as vinyl iron, bonded fabric, heat transfer vinyl, vinyl decals, normal paper, glitter paper, cardstock, or poster boards. If you want to cut tougher and thicker materials, the machine can cut leather, balsa wood, etc.
How to connect the Explore Air 2 to my computer?
You can connect the Air 2 machine to the computer in two ways. The first is with a USB cable, and the second is with Bluetooth. With USB, connect the respective ends of the cable to the machine and computer and let the computer detect the machine. Bluetooth is simple, like adding any other Bluetooth device to the computer.
Source: https://cricutair.wordpress.com/2023/08/04/cricut-explore-air-2/
For More Information Visit: Cricut.com/setup
how to setup cricut explore
Cricut.com setup mac
design.cricut.com/setup
Install Cricut Explore Air 2 setup
#Cricut Explore Air 2#Cricut Explore Air 2 Software#Cricut.com/setup#Cricut.com setup mac#Cricut New Machine Setup#install cricut design space app#design.cricut.com/setup#Install Cricut Explore Air 2#how to setup cricut explore
5 notes
·
View notes