#genshin impact tutorial
Text
i wanted to share a few tips, tricks, and habits I've learned from Genshin that might make your life a little easier playing. they'll be most handy to early game players, but some of you might have gotten mid-late (per version 3.3) without learning all of these. I hope they help someone. there are a LOT so I grouped them into categories to make it a little easier to track.
Party Building:
some 4* are honest to god more valuable to your team than 5*. Even your starters. Kaeya works both as support and reaction factory if you don't want him as a dps, Amber is helpful for hunting and early game puzzles, and Lisa is actually amazing as a DPS on- or off-screen. you have every right to keep your Primogems to yourself until you feel like using them and to hell with what anyone on the servers says.
Noelle is, in fact, designed to be a DPS and not a shield support unit. her best artefacts aren't unlocked until Inazuma, but loading her up with Berserkers and Gladiators will help her until you can reach her full potential.
in the early game, build one or two DPS characters and make use of the free 5* gifts that are Barbara and Xiangling. building Kaeya and Xiangling with high energy recharge and putting them with Barbara means you will have a fairly consistent reaction factory going on around you, providing Freeze, Melt and Vaporize depending on which part makes first contact.
battery is an unofficial character role that you ought to try take advantage of. these characters generate extra energy particles that get your characters' bursts ready faster. using The Exile series on these characters is an easy early-game way to take advantage of this effect. some characters are known as 'flat batteries', so all off-screen characters gain the same amount of energy, while others are 'elemental batteries' where shared elements get a higher bonus and other elements have diminished returns. Raiden Shogun is the queen of flat batteries, but other good characters that you'll likely already have are Bennett, Sucrose, Diona, and even Kaeya if you're okay with the elemental deficit. here's an in depth breakdown of how energy works and a list of good batteries as of sept 2022, which was the most recent list I could find.
Things You Really Must Acquire:
head up to the end of Stormbearer Point and find the nun there. exhaust your dialogue trees with her and receive the Barbatos Ratatouille recipe. normal yield is a 20% stamina reduction for sprinting and gliding for 900 seconds. that's fifteen minutes of reduced stamina consumption. delicious yield gives a 25% reduction. if you happen to have Venti and he cooks it, he may make A Buoyant Breeze - the results are the same stamina reduction for thirty minutes. at this point it's purely a flex that you can do it, you will never need that much time!
solve the puzzle at Quinyun Peak and access the Luxurious Chest on the floating island. collect the recipe for Adeptus' Temptation. take the time to unlock auto cooking and use Xiangling to make it. normal yield is +316 ATK and +10% Crit Rate for 5min to all characters, delicious yield is +372 ATK and +12% Crit Rate for 5min. there is no character specialty version as of writing in 3.3.
after reaching adventure level 40, buy the recipe for Pile 'em Up from Sara at the Good Hunter. Xiangling is a good cook for it, but if you get a Diluc, immediately make the switch. normal boosts crit rate by 15% for 5min, delicious boosts it by 20%. Diluc's Once Upon a Time in Mondstadt will boost crit rate and crit damage by 20% for 5min. Cured Pork Dry Hotpot and Baklava both have the same crit rate increase, but do not have a character specialty as of writing in 3.3, so Pile 'em Up is still standing superior.
make sure to talk to Sister Victoria in the Favonius Church and exhaust your dialogue trees with her, because she will give you an artefact that you won't be able to try and farm until you're halfway through Liyue.
talk to everyone, honestly. there are good things to find everywhere. probably a number of which i haven't found because i gotta go fast.
collect all of the shinies. yes, the weapons and artefacts are usually grey or green. if i hadn't ignored them in the early game, i wouldn't be short on resources to level up my actually good artefacts, and now i can't find them all again and and have a very limited supply. don't be me wasting Mora on the artefact merchants.
Wishing:
i had to google the mechanics of pity, so if you also don't completely understand what the hell soft pity means, let me explain. every 90th wish without having a 5* result is guaranteed to be 5*. 'soft pity' refers to when you start getting an increased chance of a 5* at around 70 wishes. this is why the wish history is so valuable to you if you have limited primogems. if you have already received a standard 5* from the special character banner, your next 5* is guaranteed to be the banner character. effectively, from the last time you received a banner 5* character, every 180th wish is guaranteed to be the banner 5* unless you receive it sooner.
most of you shouldn't bother on the weapon banner if you don't plan to be a whale, because the pity system there only guarantees your course charted banner weapon after 270 wishes. you are more likely to end up with the other banner weapon than the one you actually selected at your 90th or 180th wish. the only mercy here is that reaching the banner weapon you didn't select doesn't reset you to 0 out of 270.
i haven't seen anyone actually compile or compare the costs of reaching full potential on a weapon or character, so i'm going to do that now. you need 5 of the same weapon to reach full rank up and unlock 100% of the weapon's stat boosting ability, and at 160 primogems a wish, we are talking about a potential of 216,000 primogems to guarantee that you reach full potential. since there is no work around with rank 5 being the most useful a weapon can be, as rank only increases the numeric value of their secondary effect, this shows just how expensive the weapon banner actually is if you want full use of a BIS. meanwhile, if you say C6 is the highest value a character can have, you need 6 copies. at your worst possible luck, 6 runs of 180 at 160 a pop makes 172,800 primogems if you really feel the need to hit C6.
regarding Constellations and value, most characters actually do not C6 to be most useful on your team. Constellations provide additional effects to abilities or boost the power of certain secondary effects in abilities, but rarely does anything past C4 cause a truly worthwhile improvement to the core abilities of a character.
and now jumping off of how useful Constellations are, some characters should never be C6'd. Bennett is the most famous example. his C6 Burst applies Pyro to every weapon your team may use until his Burst ends. this means you cannot apply other elements, and he may weaken the damage of non-Pyro DPS units like Eula. thankfully you have to manually apply the Constellation after you receive them in a wish, so always read the changes before you apply them, especially on the even numbers as they tend to have the larger changes.
already C6'd a character and got another copy, like my legendary C12 Heizou? you get enough Starglitter to buy a free wish. this is actually more than just money back, because that wish still counted to your pity. I am now realising that Heizou was, in fact, helping me to C1 my Murder Narwhal.
Resources:
every day, hop up to at least the Liyue General Store and get a full allowance of Wheat, Milk, and Rice. consider hitting a couple more stores for Milk specifically because you can refine it into Butter, Cream and Cheese. these will give you the widest variety of meals to make.
also regarding refining ingredients - don't bother with Bacon or Sausages. at least not until you learn Cold Cut Platter, More-and-More, and Rice Cake Soup. those are the only 3 recipes that require them, and you can make much better use of Raw Meat and Ham for the same or even better effect.
you can reach Sumeru early by going over the Chasm in Liyue. if you're okay with possibly messing with the very first quest in Ghardaville, I highly recommend passing through and unlocking most of the rainforest area of Sumeru (or you can use the quest navigator to keep away from the quest trigger). this area is insanely resource rich, especially for hunters. Rishboland Tigers, Spinokroks, and Sumpter Beasts all drop 3-4 pieces of Raw Meat when killed. Spinokroks are easy to find in any of the watery ravines throughout the area, while Rishboland Tigers prefer to hide where there's lots of trees to plan ambushes from. use your pins when you find a spawn location and you'll never have to worry about lacking meat again.
while in Inazuma, reach reputation level 3 to automatically gain a quest called the Art of Horticulture. this quest gives you the Seed Dispensary. while it's equipped, any time you harvest plants from the game, you'll also gain a Seed for that plant (some plants don't count, any rewards or crate loot won't count, and Whopperflowers are still Whopperflowers). you can store up to 20 of each seed. when in the Serenitea Pot, you can purchase places to plant these seeds, which may take up to 3 days to grow. effectively, this allows you to double your yield from picking plants. even using Nahida's skill will still yield seeds if the Dispensery is equipped, and some of the included plants are Small Lampgrass and Sea Ganoderma. go grow you some DPS units honey.
food buffs of the same category do not stack, nor does one number overrule a portion of the other's effect. I would know, I've been trying to pair Adeptus' Temptation and Once Upon a Time in Mondstadt for over a month now. the new one simply overrules the old one.
hold your fragile resin until you hit adventure level 45. the highest level domain runs guaruntee you at least one 5* resource.
for the love of Morax make yourself some Condensed Resin. i wish they would raise the limit on how much you can hold at a time. you get double yield from domains and Ley Lines when you use these.
if you're gathering crystalflies, this is the best method i've found; go to the Anemo Archon Statue in Windrise. select a tall male character to run around the tree very fast. this is best performed with a Sayu in the team if you have her, as her passive causes crystalflies to be slower to try and flee. other Archon statues, very large trees, and unique natural structures that relate to the Archon of the area (ex - caverns in Liyue, windy forests in Mondstadt) are all good crystalfly hunting areas, but I've found the tree in Windrise is best as the crystalflies are spread out and you can grab one without the other 3-4 immediately dipping.
tapping the sprint button is measurably superior to holding it. over the same distance, you will use less stamina and go much quicker.
if gathering fish is as frustrating for you as it is for me, I have two work arounds. the first is to go to the little ponds in front of Bubu Pharmacy, which will have 3 fish each and which you can mostly walk if you use a tall male character. the second is to make use of Lisa and unleash charged attacks on the water - any fish that swims into the electrified area will immediately turn into a fish fillet that you no longer have to chase. any Electro character works but so far Lisa is an easy win even on Yae. just be aware that it will take a while for the Electro to clear, and you can take damage swimming through that field.
need to mine harder ores like Crystal or Amythest, but no Geo or Claymore? I get it, they can be pretty slow to attack, you might not wanna get jumped while using them. find something to climb on and do a dive attack. I swapped Zhongli for Layla to take advantage of Cryo app shields while paired with Tartaglia and Keqing - she can mine an Amythest lump in 2-3 very short dives.
#genshin#genshin impact#genshin impact tutorial#genshin tutorial#genshin impact tips and tricks#genshin tips and tricks#genshin tips#genshin impact tips
57 notes
·
View notes
Text

screw it hits ur haikavetham with the dnp crafts beam
nothing more invigorating than drawing something that caters to my brain only (plus the four people who this caters to i hope u enjoy). something about holding the knife your loved one used to carve out your heart with one hand and holding their hand in the other all while an ominous presence looms behind you reminded me of them idk
#kavetham#haikaveh#alhaitham#kaveh#genshin impact#what do i tag this…..#dan and phil crafts#tagged reluctantly#thank u DanAndPhilCRAFTS - Slime tutorial for one of the fav haikavethams i’ve drawn this year🙏
611 notes
·
View notes
Text
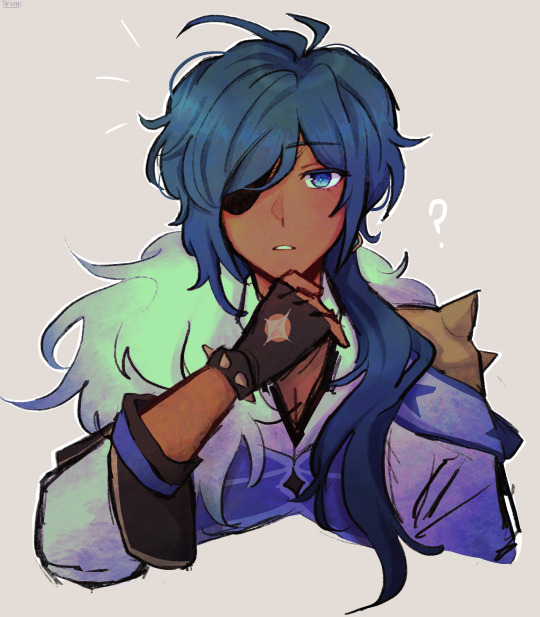
smol kaeya doodle
#genshin#genshin impact#kaeya#kaeya alberich#genshin kaeya#alberich#trying out procreate#cuz i got a new ipad :3#kaeya is my test subject#searched for no tutorials#its the last yr of fuck it we ball
546 notes
·
View notes
Text
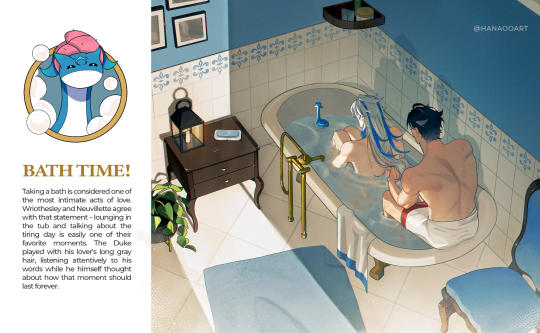
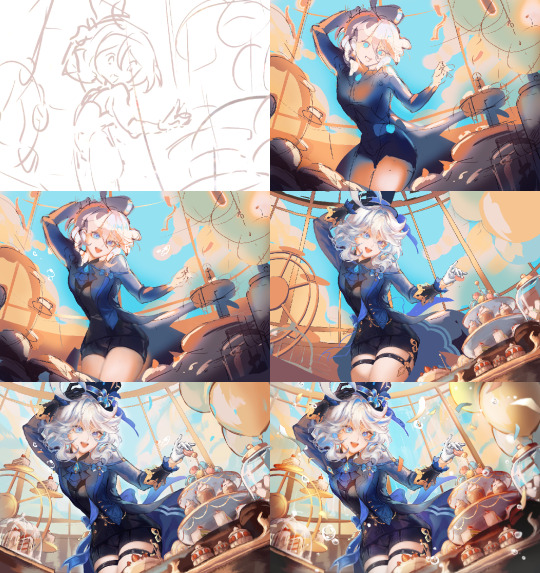
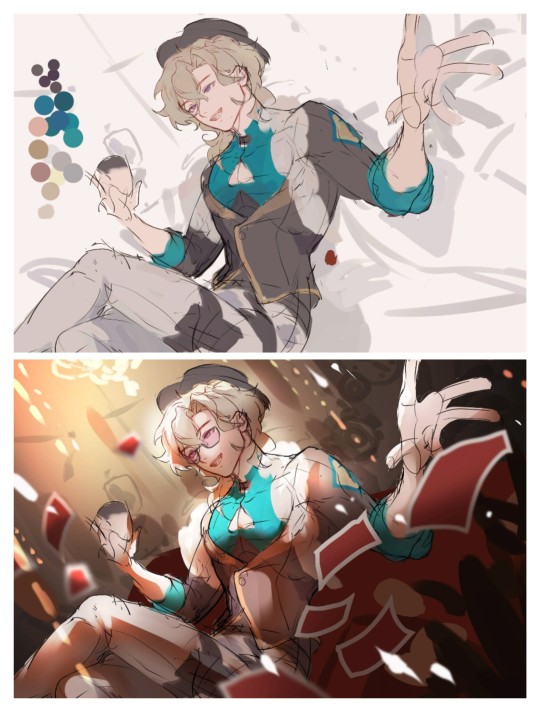
Bath time! 🧼💙
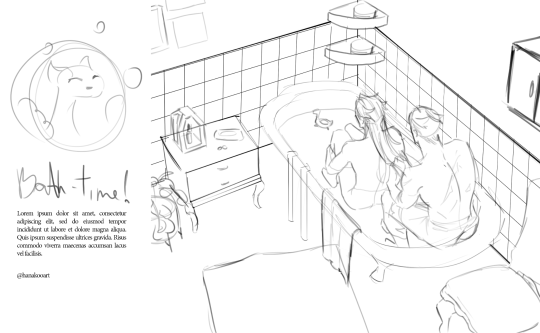
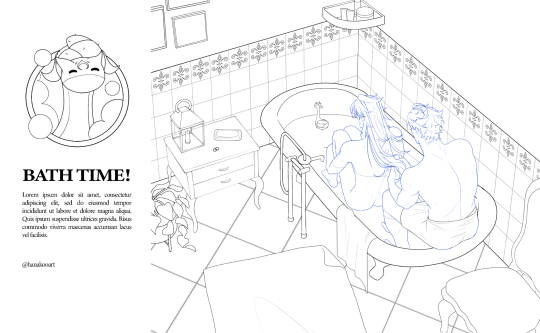
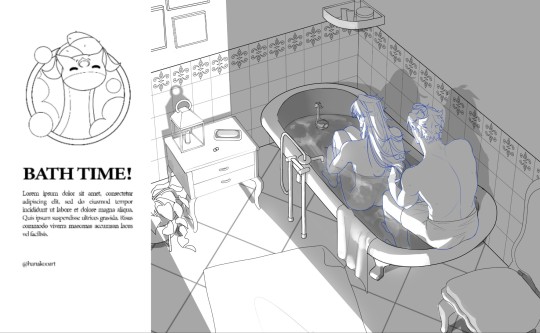

I thought you would like to see my painting process too since many people often praise it! Working with grayscale before placing the colors helps a lot to decide the contrast of everything so I always use this to my advantage to create the desired atmosphere for the painting.
You can always ask questions on my profile to find out more 💙 thank you
#wriolette#wriothesley#neuvillette#genshin impact fanart#genshin impact art#genshin#genshin impact#fontaine#fanart#illustration#painting process#coloring tutorial
163 notes
·
View notes
Text
Finished neuvilette's fanart ☺💖 like and support please!
#genshin gaming#genshin art#genshin xiao#genshin impact#genshin fanart#genshin x reader#neuvilette fanart#neuvithesley#neuvillette fanart#neuvilette genshin#neuvillette#neuvifuri#genshin wanderer#genshin wriothesley#fanart drawing#video games fanart#fypシ#tumblr fyp#fyp#fypage#art tumblr#timelapse#speedpaint#art tutorial#art tips#commisions open
187 notes
·
View notes
Note
Hi, I'm sure you get this often but I really love your recent genshin artwork, do you think you could explain your painting process? I love the colouring effect in that piece especially. Thank you.
Thank you so much! I got a few messages like this from my previous piece (thank you guys for the staff pick & blaze btw, I really didn't expect all the support😭) so I thought I'd share a bit of my process below as thanks.
I always do my lineart first because it feels less daunting to me when applying colours. I will do some rough colours first so I can easily adjust it to my liking.

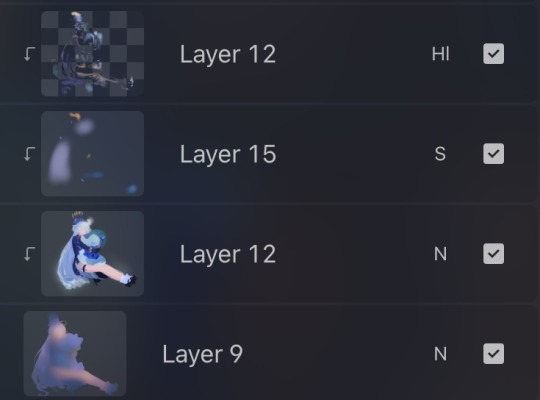
Next, I make sure to separate each character into different layers when I clean it up. I like to work one character or object at a time, it's less overwhelming for me that way, and I can use clipping masks for ease of rendering.

I'll usually apply some adjustment layers on top of the base layer for shadows and highlights. When I say base layer, I just mean a layer of the colour without any effects.
I like using 'hard light' for shadows, and 'screen' for highlights, but you can really use whatever clicks with you.
Rinse & repeat this process for every character in the illustration. Note that I make Furina the focus so everything behind her will be less rendered than the elements in front of them (Neuvillette is a lot less rendered compared to Furina, and the painting in the back barely has much shading).
Once I render out each asset in the illustration and add shadows & highlights to my liking, I then to merge foreground/ midground/ background elements so I can make the overall illustration clearer to read. I don't want it to feel messy or overcrowded, and I think it's easy to get tunnel-visioned in small details and lose the clarity of the entire illustration.
Make sure to zoom out constantly and make your illustration B&W to check the values to see if the drawing is clear.

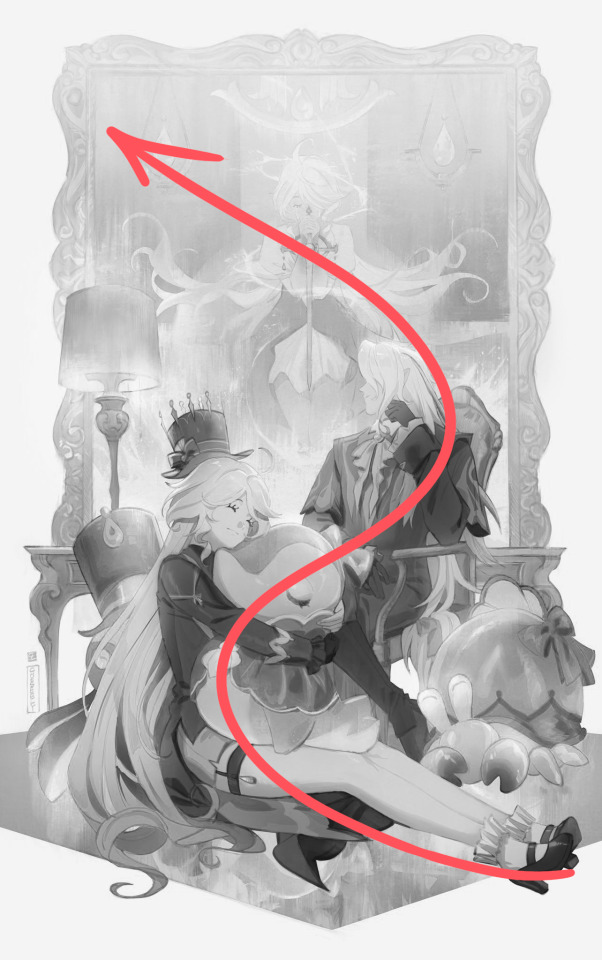
I created a simple S curve with the values for readability, and have the foreground elements have darker values & contrasts.
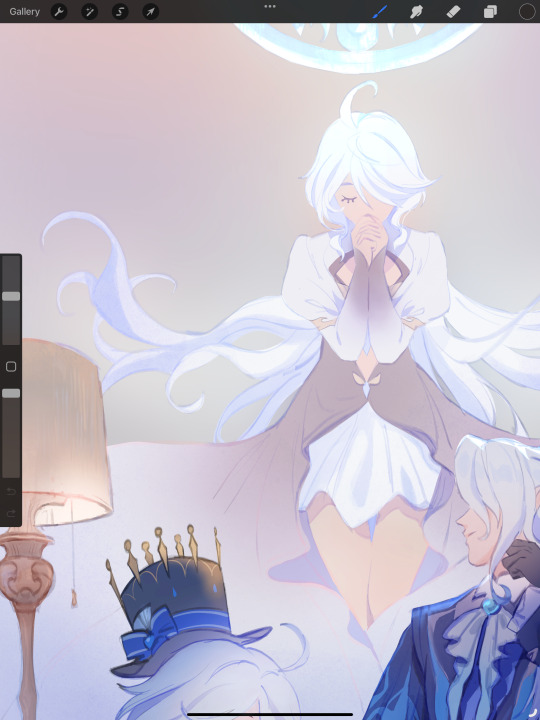
As for the BG, I wanted to add more textures into the drawing, particularly the painting in the back. Here's an image of it when I only added in the base colours.
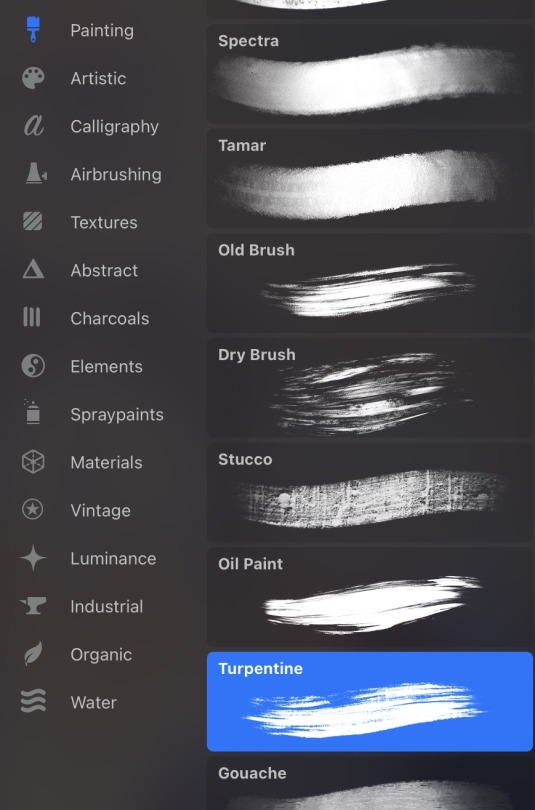
I use the smudge tool to create more texture once I fill in the base colours. Since I don't really 'paint' anything with the textures in, I just put in the base colours and take a textured brush to smudge it. However, over-smudging can lose the painterly texture I want, so I usually smudge vertically or horizontally in a single stroke to create a sense of movement.
Another thing to note is that I only textured the BG, I thought it would help it blend into the background a bit better. I usually wouldn't do this for the foreground because I want those elements to be clearer.
At the very end, I tend to spend a fair bit of time just fiddling with more adjustment layers, various filters (such as blur, or noise), or liquify small details to really finalize the piece. Just vibes...basically this is me

Anyway, I hope that was helpful & it made sense!! Feel free to message me if you have any other questions & I'll try my best to answer! I might've glazed over a lot since I didn't wanna make this too long.
207 notes
·
View notes
Note
do you have any speedpaints of your art available?? id love to see how you color and shade, so detailed and well done!
Thank youuu! I haven't rlly tried to record speed paints :0 but if there's demand, I can try!
I may not have speed paints, but I have process pictures. here are some of them!
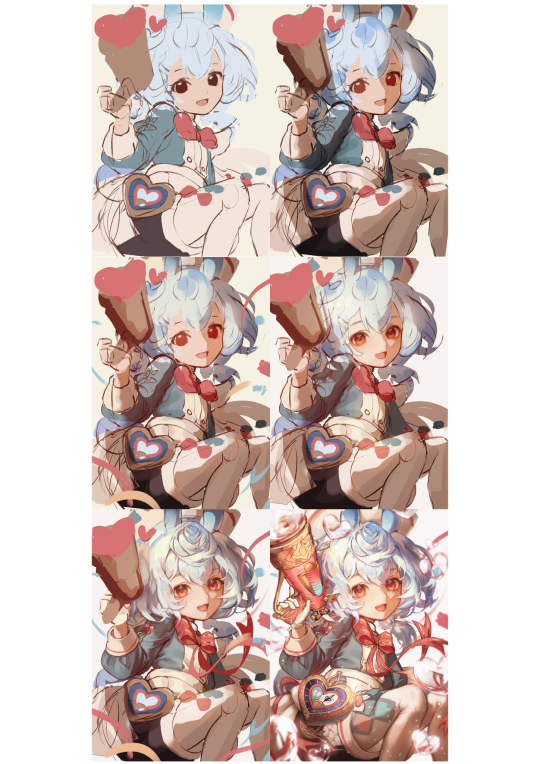
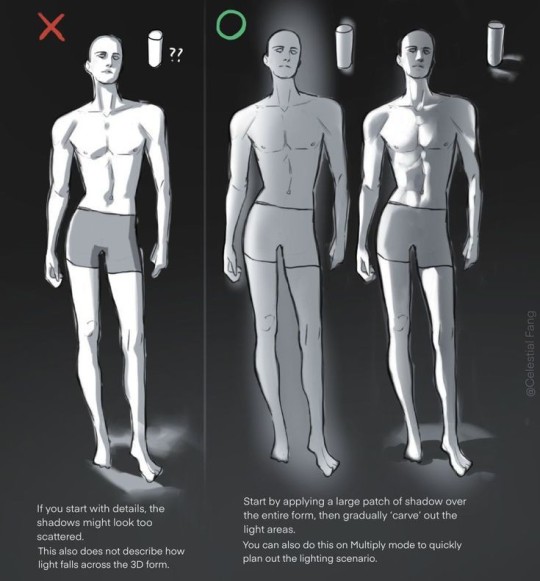
When keying/painting base of an artwork I use a big brush/lasso to lay in the main light/shadows on layer modes before detailing it.
Then rendering is just merging the whole thing, and painting over using your base. I throw in more layer modes/adjustments as I see fit along the way :)
This post by celestialfang pretty much describes exactly how I lay both shadows and light. block first, then chip at it. you can get a lovely blend of hard and soft edges this way
feel free to ask Abt the specifics if ur interested:]!
85 notes
·
View notes
Text

wanted something nice for my artfight profile (~Suenden-Hund) so I made myself a little snoozer kabukitty
#genshin impact#fanart#scaramouche#scarameow#kabukimono#wanderer#genshin wanderer#gif#animated#its a bit rough bcs i was too lazy to look up tutorials for the CSP animation tools#and i havent animated anything in a long while#but i still think its cute
215 notes
·
View notes
Text
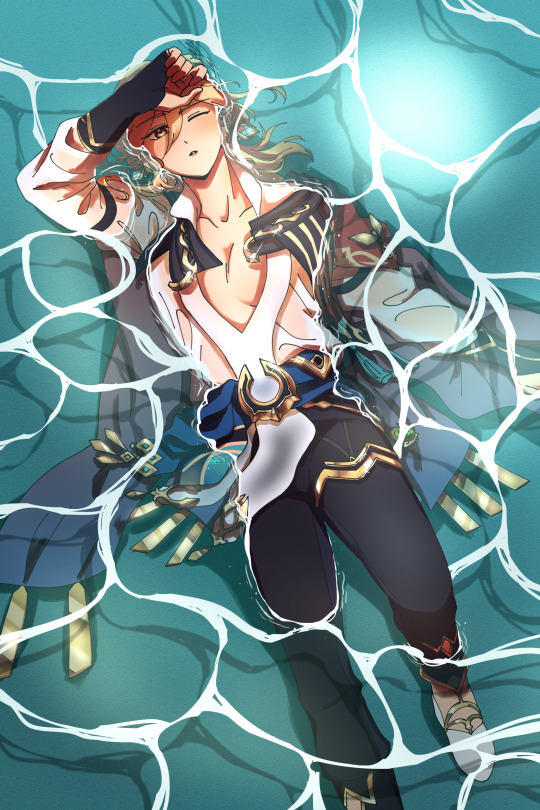
sunlight on water
open for better quality | no reposts
#kaveh#genshin impact#genshin#fanart#myart#doodle#i must confess i looked up a wet shirt tutorial After i had drawn it so if it doesn't look right that is why#this is my first time rendering water like this too and i'm surprised it looks decent#midway through drawing kaveh i was realized i needed to tone it down on the details otherwise i'd get caught up in them#the metal accessories alone took hours#i'm seeing a lot of areas i can improve on but dare i say. this is printworthy?#no.. i shouldn't get ahead of myself hehe#on god i will get over my fear of contrast and kaveh is the beginning#my contrast and vibrant color era begins now#i want to upload a work in progress post for this piece#maybe later bc i need A Break
371 notes
·
View notes
Text
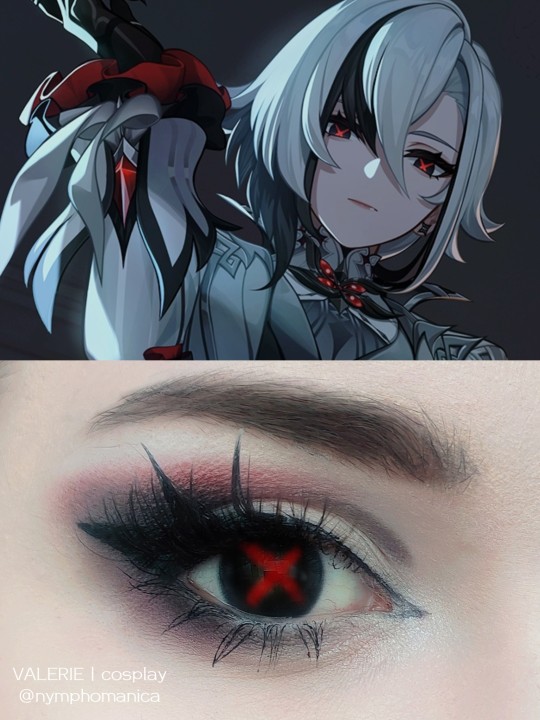
Arlecchino - Genshin Impact
Cosplay makeup
#cosplay#cosplayer#makeup#cosplay makeup#cosplay tutorial#arlecchino#arlechinno genshin#genshin cosplay#genshin impact
24 notes
·
View notes
Text
been a second so have a kaeya :)
#my art#kaeya#kaeya alberich#genshin impact#eyestrain#since there's some RGB shifting#plus bright colors#im not Too Happy with this piece but happy enough to post#i havent rendered in years so im very rusty#i need to watch more tutorials#and study more references
25 notes
·
View notes
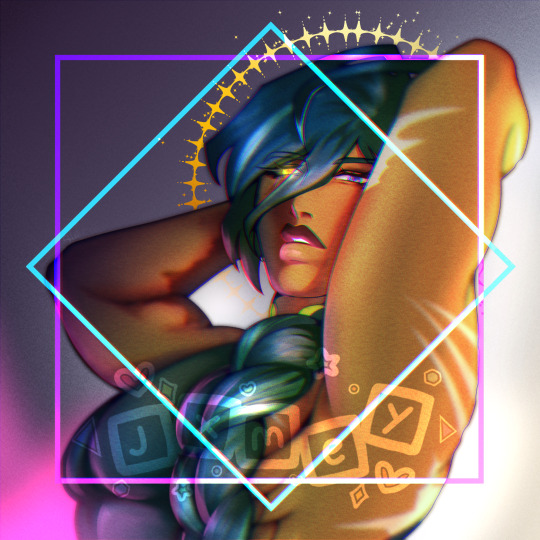
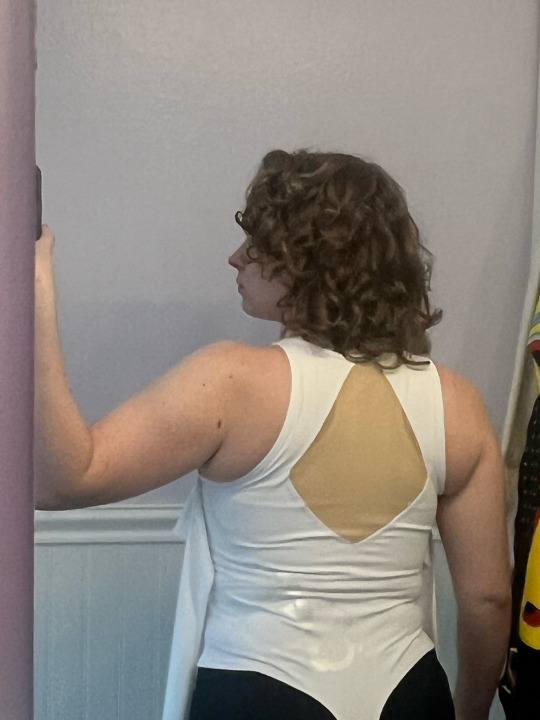
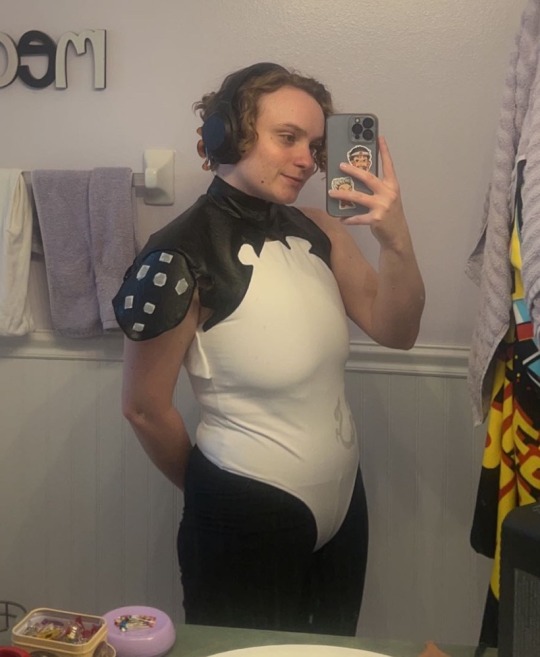
Text
taking some time today to discuss xiao! specifically the upgrades i made to him for metrocon 2023. i did so much experimenting with new techniques and materials, so i wanted to share that here to document, and maybe inspire some of my fellow artists/cosplayers!

i don’t think i could ever properly explain how happy i was after remaking xiao’s shirt. the previous version (which was purchased) fit really poorly, and the fabric was not great. it constantly pulled out from the waist of the pants and it practically blocked any airflow. the solution was simple: remake it from a bodysuit. that way the shirt not only stayed in place but also already gave me a much better form-fitting base to start out with. the mesh panel in the back was the part i worried about the most but ended up being the part i’m happiest with! i used power mesh that i hand dyed to be close to my skin tone (though the color isn’t very clear due to my binder’s color).
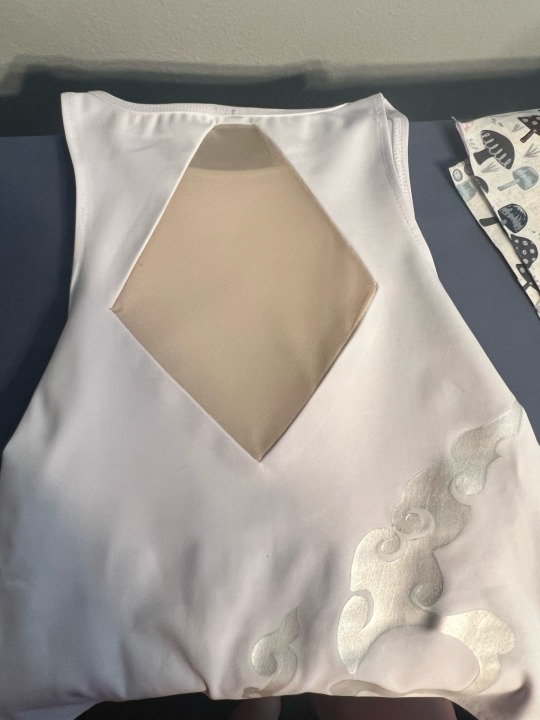
the swirling pattern on the bodysuit is a metallic white fabric paint. i made a digital drawing of the pattern on procreate, then printed it onto freezer paper. after cutting it out with an exacto knife, you can actually iron freezer paper onto fabric (shiny side facing the fabric) and it creates a nearly seamless stencil for fabric paint! i see myself using this technique a lot in the future, it’s literally perfect!!
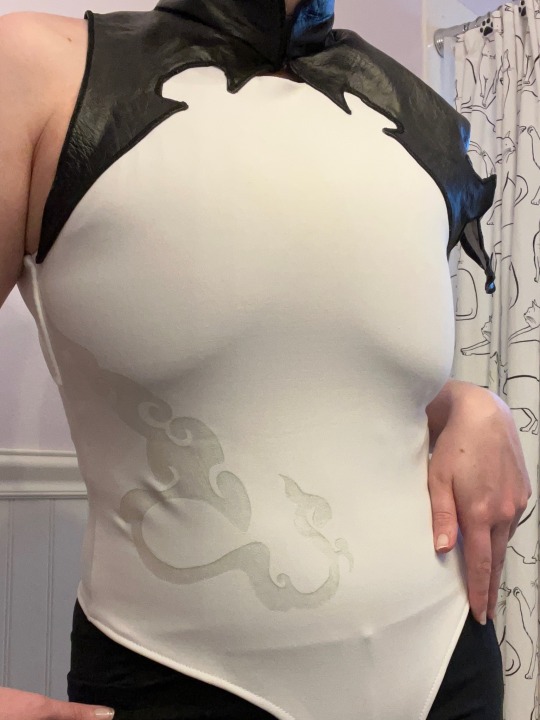
the black leather piece at the neck and shoulders was my biggest obstacle. not only have i never worked with leather, but it is also a non-stretch material i’d be attaching to the collar/neck portion that very much needed to be able to stretch to be pulled on. thankfully the design worked out that i could have 2 closure points, one on the back of the neck and one at the front of the neck. the entire piece is hemmed by folding over and gluing the raw edge to the inside, then i glued hem tape over those raw edges to cover them and make them softer on the skin (the entire leather piece is unlined, due to its complex shape). all the visible edges of the leather were satin stitched to give them a clean, crisp edge. the gold appliqués on the front and back are 2mm eva foam covered in a gold stretch fabric, then glued onto the bodysuit with e6000!
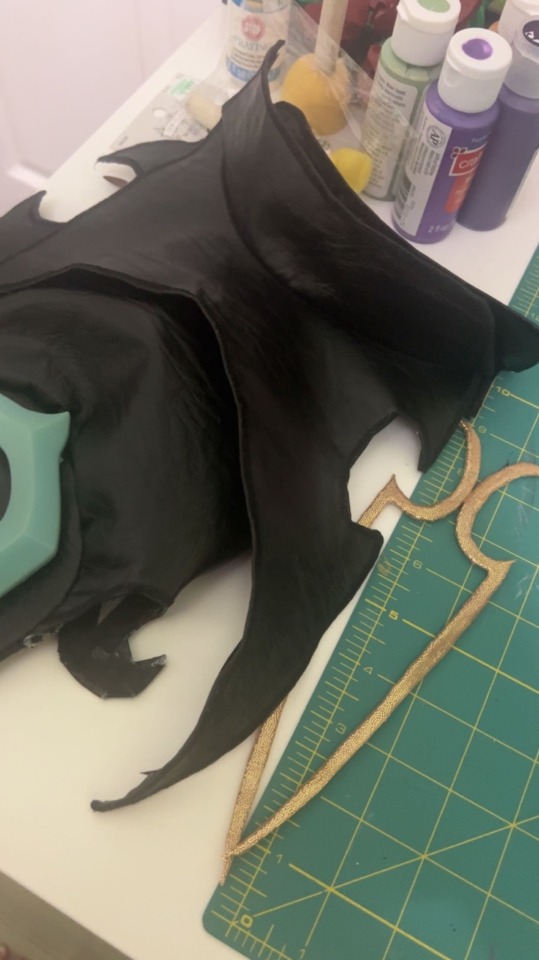

the two white pieces that frame the mesh panel on the back gave me more difficulty than i expected. their shape is a bit deceiving, and needing them to lie flat on my back without sacrificing the stretch of the main garment meant i couldn’t just top stitch them onto the back. and while i’m not super happy with how they ended up aligning (where they meet at the top is much further down than i was aiming for), i still think it came out really nice!
and that’s the finished top!
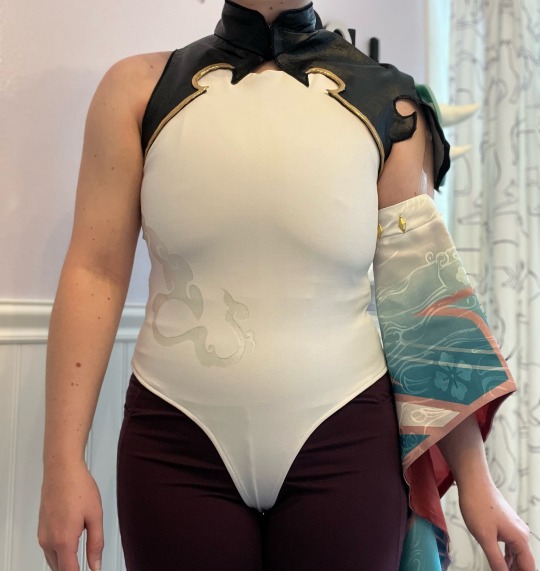
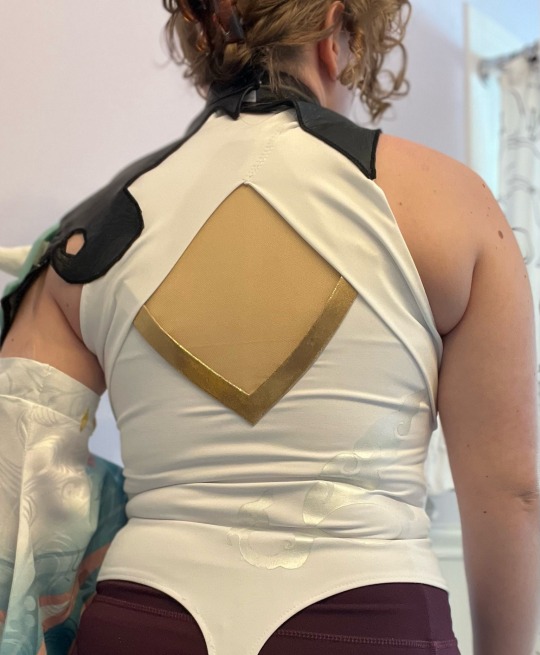
here’s a front and back of the finished top! the sleeve is held up with clear bra straps that hook onto the inside of the shirt at the shoulder. all in all, i absolutely love how this newer shirt came out.
besides the shirt/bodysuit, the boots also got an upgrade! i snagged some boots on sale on amazon for $20, which was an insane steal! this style is very universal for so many costumes, and it also helps that the boots are comfortable and flat too! all of the accessories on the boots are affixed temporarily or from the inside (velcro, snaps, and elastic) so that the integrity of the outer boot remains untouched and i can reuse them for several costumes and even everyday wear. i also replaced the gold piece around the neck that holds the “scarf.” just like the pieces on the shirt, it is 2mm foam covered in gold fabric. this not only helps the gold elements feel more cohesive but also lies a lot more comfortably on my neck!
#cosplay#cosplayer#tutorial#sewing#sewist#cosplay breakdown#cosplay tutorial#genshin impact xiao#xiao genshin impact#genshin xiao#genshin impact#genshin impact cosplay#genshin impact xiao cosplay#genshin xiao cosplay#xiao cosplay#genshin cosplay#cosplay wip#metrocon#metrocon 2023#xiao#adeptus xiao
103 notes
·
View notes
Text
first post... furina de fontaine...

#this is not my usual ARTSTYLE#coloring mostly inspired by badjaunes hyperpop tutorial on yt#i actually did most of this at school...#i got fruit punch at the store today#yummy yummy in my tummy tummy#tumblr try not to destroy the quality challenge go!!!#furina#genshin#genshin impact#my art#illustration#artwork#Art#Fanart#toasters collection
24 notes
·
View notes
Text
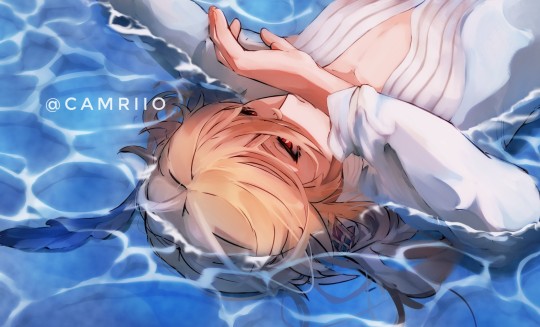
<3
#kaveh#kaveh fanart#genshin impact kaveh#genshin#genshin impact#genshin fanart#genshin impact fanart#es que me salio un tutorial de como hacer awita y lo tenía que intentar JSJSJSS#el kaveh fue la víctima#camriio art
75 notes
·
View notes
Text
if anyone of you guys could share, please do. i’m in a state of need and my family really needs the money before we get kicked out/evicted.
if you are able to donate, anything helps! please.
#rentry graphics#help post#edits#rentry#rentry edit#rentry layout#spider man#shenhe layout#gofundme#makima#send help#rentry tutorial#rentry inspo#share#in need#pls help#this is a cry for help#anime and manga#anime aesthetic#genshin impact#baal genshin impact#genshin fanart#genshin x reader#genshin impact layout#genshin lisa#genshin spoilers#genshin impact lockscreens#hoyoverse#honkai star rail#snap me
27 notes
·
View notes
Text
PANTALONE!
7 notes
·
View notes
Last Seen Blogs

starscream
★★★

natsider000
secret forts

dengekiboys
Electrocuted Animated Boys

bestraleighmassage
Raleigh Massage

castanedaflanagan09
The Love of Mcconnell 496