#dsmp crochet
Text
i just wanted to share with you guys a project i’m gonna be working on.
so back in like— january of 2021 i got to work crocheting a cloak for my Technoblade cosplay. it was my first big crochet project, and it took me five months to finish. i finished it the day of the convention i was cosplaying Techno at.
it was— not the best craftsmanship. like i said, it was my first big crochet project, and i really didn’t know what i was doing.
so i decided that, as a tribute, i’m going to be remaking it.
here’s all of my materials.

this is the yarn i’m using for the main body! i completely bought out my craft store’s stocks of it.

I’m using this yarn for the trim. i think i’m gonna do a couple rows of the velvet, and then use the fluffy blanket yarn to make the “fur” trim that the cloak has.

here’s what i’m using for the fastenings. that was one of the biggest issues with my original cloak, so i bought a bunch of cool lookin’ stuff this time around. i don’t know what exactly I’m gonna do yet, but hopefully it works out! originally i was just going to use more of the yarn to connect the fastenings, but i saw the red leather string and just had to have it. it’s also gonna look really nice with the charms i think.

the charms are my favorite part. besides the ribbon charm, which is for cancer awareness, each charm represents a person in Techno’s life/that person’s character on the DreamSMP.
i’m using the green and purple winged charms for phil and kristin. the bee and crown are for tubbo and ranboo. the spool of thread from the crafting pack of charms is for tommy, both because i love the sewing c!tommy headcanon and because tommy just sorta ties things together. i dunno, that made more sense in my head. the rainbow heart is for niki, my sibling insisted on that one. the music note is for wilbur, of course. i wanna collect more charms, for more people’s characters and for more people in Technoblade’s life. i feel like that’s something c!Technoblade would have done.

anyways, that’s it for my rambling. i’ll keep you guys updated on my progress, i can’t wait to share my final product.
donate to https://www.curesarcoma.org/technoblade-tribute/ if you can.
#technoblade#cancer tw#death tw#crochet#dream smp#dsmp#dsmp techno#dsmp crochet#dsmp cosplay#technoblade cosplay#technoblade tribute
47 notes
·
View notes
Text
Crochetblr
WHERE ARE YOUR DSMP DESIGNS PLZ IM DESPERATE I CAN ONLY MAKE SO MANY GREEN AND BLUE HATS
4 notes
·
View notes
Text

Currently trying to decide if i want to make the crosses sharp or rounded in my crochet pattern, id love opinions.
8 notes
·
View notes
Text

Made this a while ago, but since I'm posting some of my other old DSMP art from my Instagram, thought I'd post this too
#dsmp fanart#dsmp#dreamwastaken#dream fanart#crochet#crocheters of tumblr#art#artists on tumblr#fanart#amigurimi#i dont use patterns#minecraft#cross posted on instagram#minecraft fanart#yes i do have a mug of Dream’s face#my friend got it for me as a joke but i love it#victoriacoffee's art
156 notes
·
View notes
Text
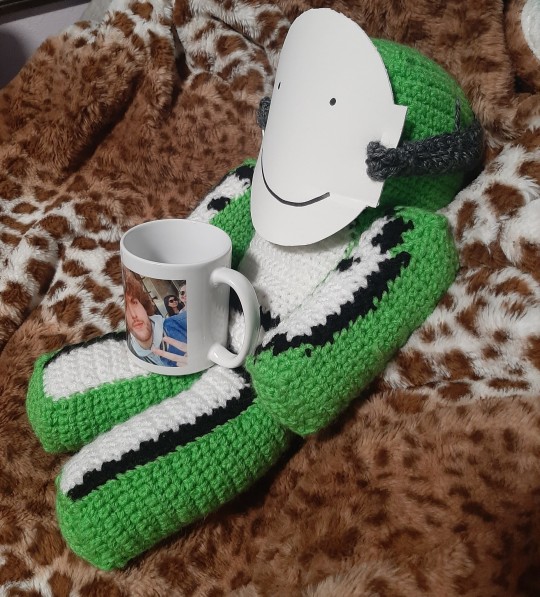
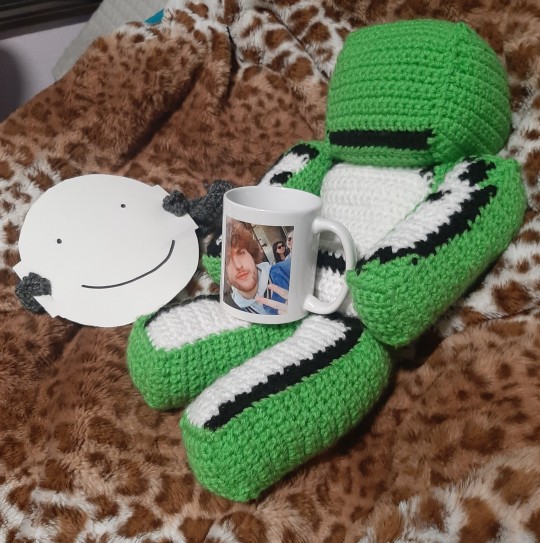
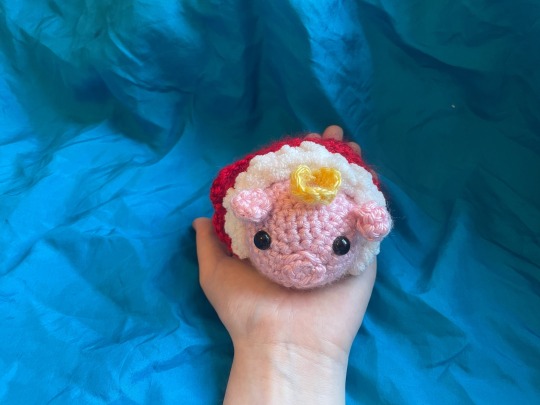
More toys!
Today it's Tubbo and his silly family


tomorrow who knows
(if you want to look at Toyboo a little bit closer)
#crochet#amigurumi#art#crafts#dsmp#tubbo#c!tubbo#ranboo#c!ranboo#beeduo#michael beloved#this lil petit fambily 🥹 i love them so much#mikhas crafts
237 notes
·
View notes
Text
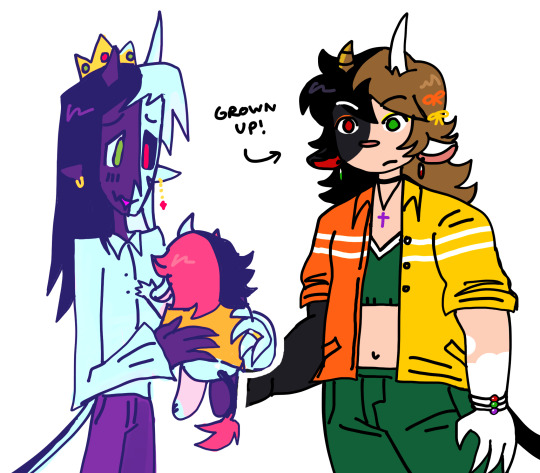

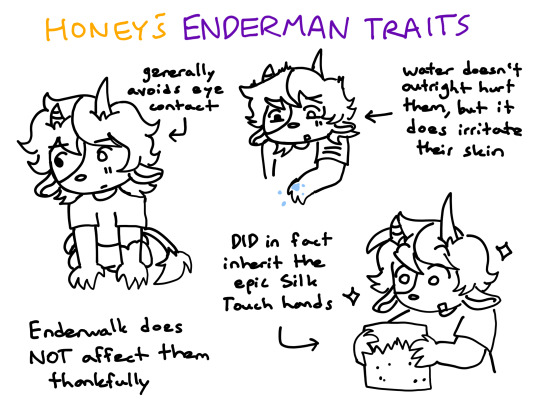
jokes on me i actually drew more of them immediately. anyways. all grown up!!!! (+ sum more info)
#dsmp#c!ranboo#beeduo#michael_beloved#michael underscore beloved#honey_beloved (oc)#fanart#i tried to incorporate elements from all of benchtrio into adult honey's outfit ^_^ their influences u could say#button up shirt like tubbo wore in the early smp days and its colored half and half like ranboo#their shoes look like tommy's and they also wear a prime necklace (i think honey would come to follow prime growing up around tommy)#and then their little crochet top thing was vaguely tommy inspired from his iconic shirt + sweater. i think tommy made that top for them#oh and then they have these cute bracelets w each of bench trio's colors. i think tommy also made those lol#michael i didnt put as much thought into honestly i just kinda went w what felt right. but his fashion sense is def influenced#by his parents as well. at least if u look at what kind of outfits ive thrown them in before in past art#OH also in addition to the enderman stuff. honey can also speak ender relatively well having learned from ranboo
56 notes
·
View notes
Text
things i’ve made for my shop !!
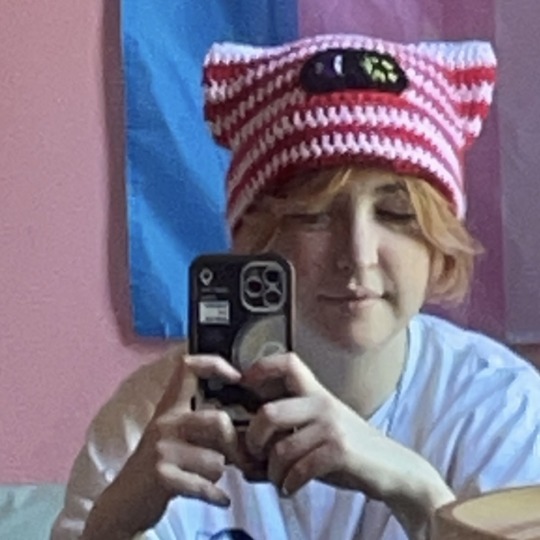
slimecicle inspired cat hats !! fluffy and non-fluffy


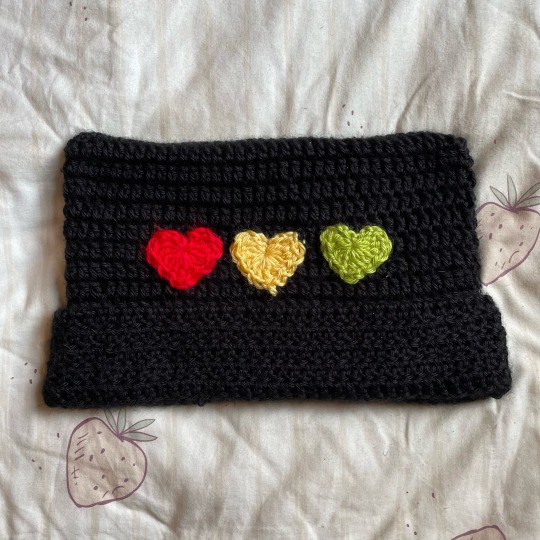
bookmarks !! i’ve also made a lavender one !!

shroud my beloved !! i plan on making more colours for spiders along with fluffy ones


technopig !! i have also made technoblade themed cat hats and kandi and have plans for more techno themed things [i honestly just make things i want lmaoo]
tommyinnit inspired cat hat !! ive also made a philza one :3 and im working on a mumza one
skephalo fluffy cat hats !! im working on non-fluffy ones hehehe

last life cat hat !!
fluffy cat hats !! ive made them in yellow, green, blue, purple, white, black, grey and can make them in any other colours :3

#shopmoonymoss#moonymoss#small business#dsmp#dream smp#mcyt#interest check#sneak peek#tommyinnit#technoblade#last life#hermitcraft#skephalo#skeppy#badboyhalo#bbh#shroud the spider#spider#crochet#crochet plushie#plushie#cat hat#crochet cat hat#crochet pig#crochet spider#bookmark#slimecicle
25 notes
·
View notes
Text
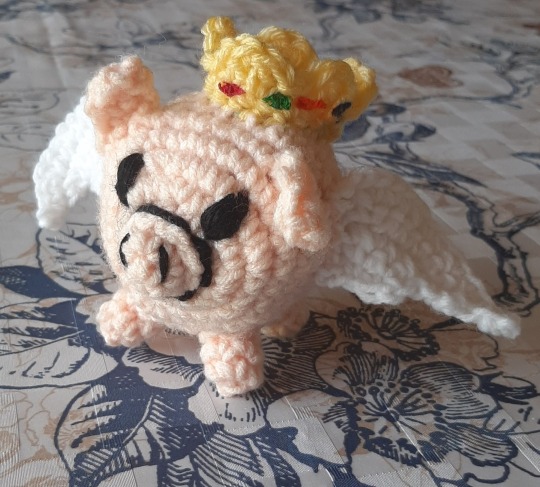
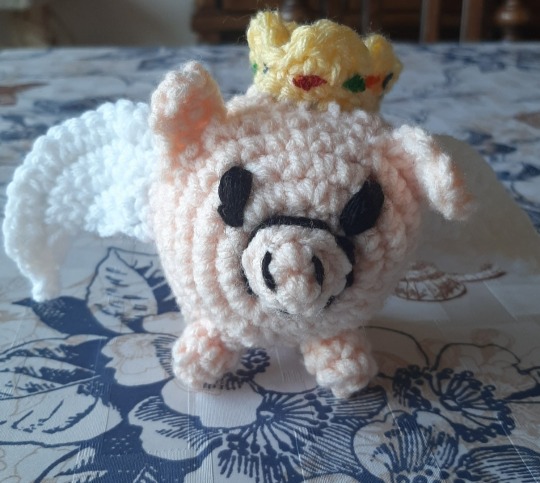
Technoblade - Amigurumi tutorial

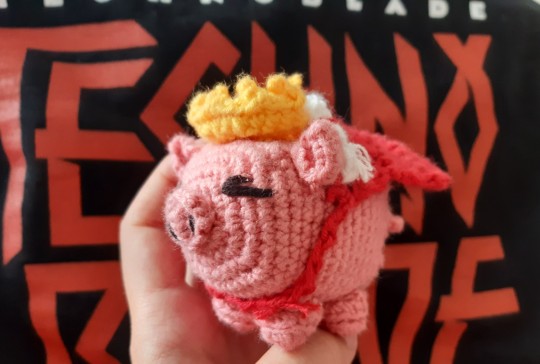


(I recommend knowing basic crochet techniques before starting this project)
Disclaimer : I am not an expert, nor am I a native english speaker. I apologize if some instructions feel unclear, feel free to message me if you have any questions.
For this project I used several other tutorials for the pig and the crown.
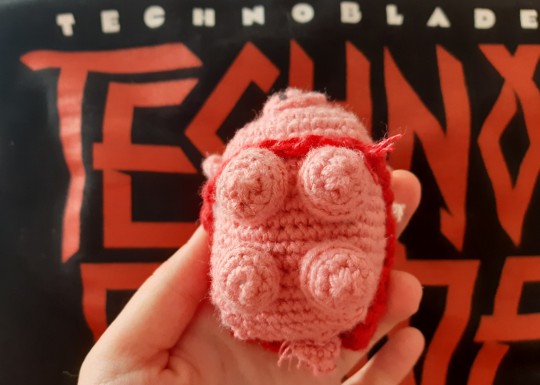
Pig :
I followed this tutorial and only made the following changes :
Body : instead of doing 6 rows of 40sc (R8-R14), I added 4 more rows. In total, I did 10 rows of 40sc. This gives the pig a more rectangular look, much like the Minecraft Pig in-game.
Legs : I added a fourth row where I did the exact same thing as Row 3.
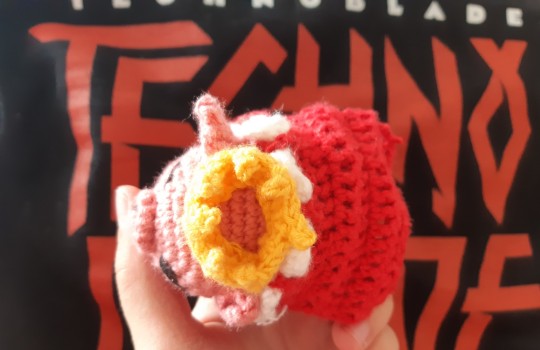
Crown :
I used this video. It also comes with a written tutorial for those who prefer written instructions (you'll need to scroll down a bit).
Eyes :
I chose to embroider them, but of course feel free to do as you please. You can find plenty of embroidering tutorials on youtube, like this one for example.
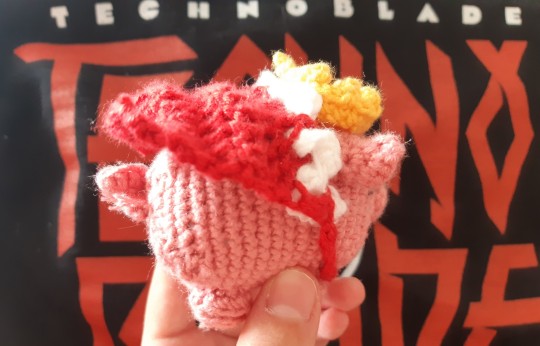
Cape (red part) :
I did a serie of chains and stopped once in a while to mesure it on my pig's body. Mine was 15 chains long, but it'll depend on your yarn size. I worked my way back and forth the chain by double crocheting it. I stopped once I was satisfied with the length of the cape (about 5 rows for my pig).
Cape (white part) :
I started with a serie of chains. I recommend adding a bit more than the red cape (I did 15ch for the red part and about 20ch for the white part).
I followed the exact same tutorial as the curly pig tail one (linked above). I then sew the white part and the red part together.
Finishing the cape
I chose to not sew the cape to the body : you can do as you please !
I started a row of chains from one end of my cape. I kept mesuring it while I looped it around the pig's chin/belly. Once I reached the other side of the cape, I sew it on the red part of the cape.
I designed the cape by myself and I am by no means an expert at crochet x) There is probably an easier, better way to do it. Feel free to share in the comments.
Thanks for reading :)
I would love to see you guys' versions of this little Technopig - feel free to reblog with your creations ! 🐷
#technoblade#technoblade never dies#dsmp techno#technoblr#mcyt#amigurumi#blood for the blood god#my posts#mine#crochet#crow caws#dsmp#dream smp#c!techno
287 notes
·
View notes
Text

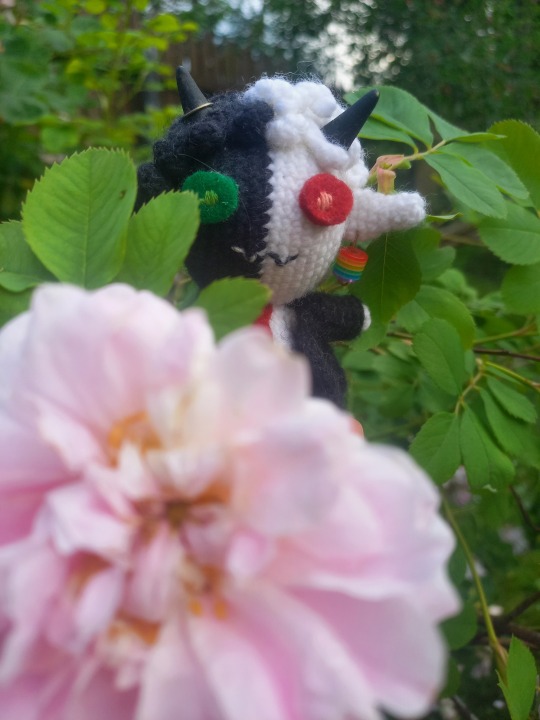
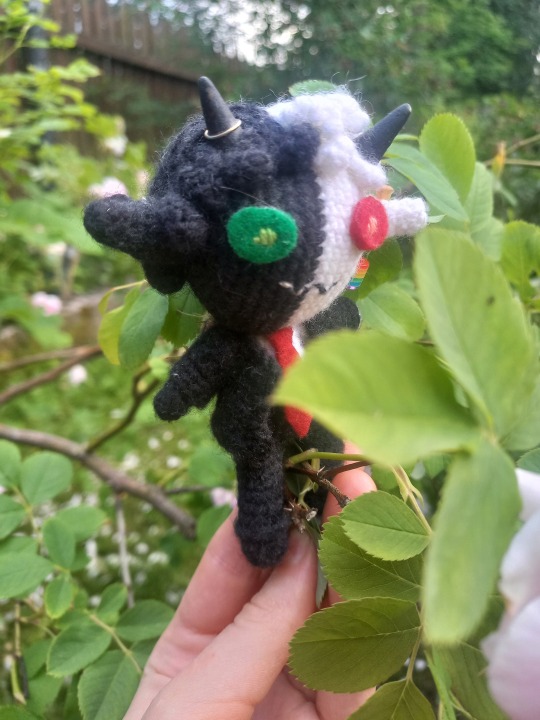
so i heard ghostbur and friend were reunited :)
#ghostbur#dsmp#wilbur soot#c!wilbur#cwilbur#soot speaks#these are my lil guys :)#i’m also working on a revivedbur but i have been feeling more knitting than crochet lately so he is taking a bit longer
225 notes
·
View notes
Text
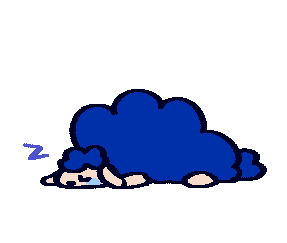
everyone look at him right now or I'll scream

yes his name is friend yes he is one of the best things I've ever fucking made with my own two hands yes you may hold him.
(video tutorial i used <3)
@kattarofran @winter-mornings @wakanawill @areus-in-a-little-cave y'all might enjoy him <3
286 notes
·
View notes
Text
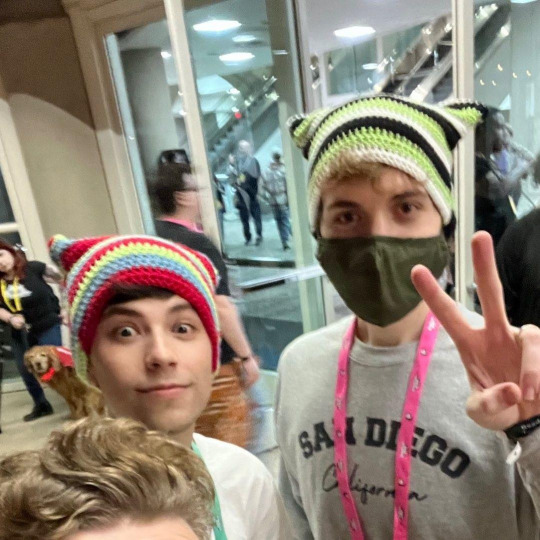
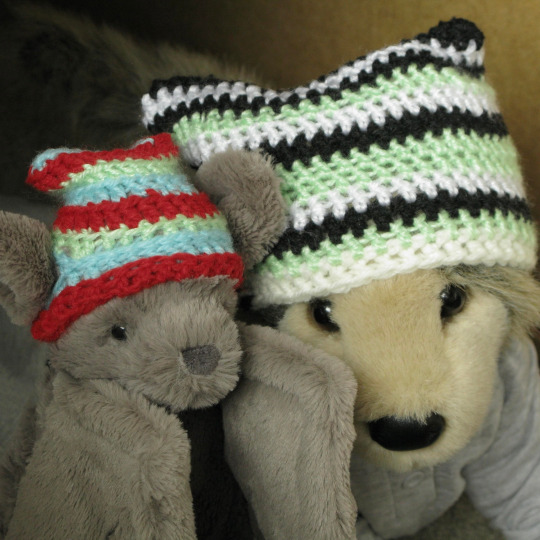
this actually makes me sick never did i ever think i would see georgenotfound wearing a matching dnf cat hat with dream

#FUN FACT I CROCHETED A CAT HAT IN THIS EXACT STYLE BUT DARKER GREEN AND BLACK#i’m the president of my crochet club at my school#also they look so cute stop#these fuckers#gnf#dream#georgenotfound#dreamwastaken#dnf#dreamnotfound#dteam#dream smp#dsmp
152 notes
·
View notes
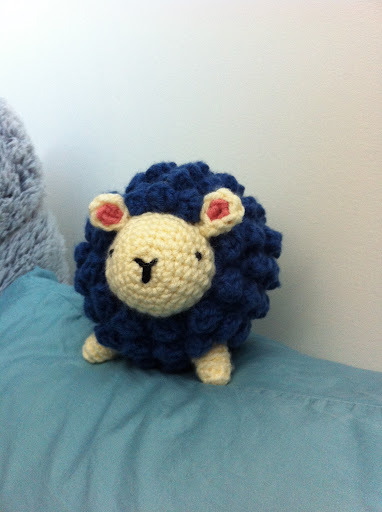
Text
Ghostbur Stimboard


x | x | x
x | • | x
x | x | x
#ghostbur#stimboard#jj's personal stimboard#dsmp stimboard#ghostbur stimboard#wilbur soot#wilbur soot stimboard#bursona#yellow#blue#friend#dsmp friend#friend the sheep#fabric#yarn#crochet#knitting#sewing#slime#paint#paint mixing#plushie#stuffie#stuffed animal#sheep#lamb
22 notes
·
View notes
Text
˗ˏˋ dream and george plushie hats ! :D ˎˊ˗
#plushblr#plushcore#jellycat#dsmp panel#safeplush#mcyt#dreamwastaken#georgenotfound#douglas#douglas tyson wolf#jellycat bashful bat#I was so excited when I noticed they had CROCHET hats!! :O
24 notes
·
View notes
Text
me writing emduo fics: theyre all in the same universe, this is the same techno and phil every single goddamn time. obviously.
me writing tntduo fics: why the fuck would these be the same characters?? obviously these are different universes for every fic, why would i write them any other way
#bee buzzes#anyway currently working on an emduo fic that is prob gonna be more emduo fluff#also have some plans for qsmp tntduo#im not fully caught up but i know whats happening very generally#so#thats good enough for me#ive been watching the vods while crocheting and now that neverafters ending ill have nothing else to watch while i work#i also have a sewing project i need to work on so im ready to get fully caught up#also i swear im working on my wips#the karlnapity one should be done. soon.#its just a fucking beast and im not sure where i wanna end it so it just keeps going#the one abt everyones time before the dsmp will also be updated soon#honestly i just forgot abt her and only remember when i ask myself what wips i have#as for the time travel fic. itll happen#i swear i know where im going with it its just taking a while ahaha#also i wanna fulfill some more of the times challenge prompts still#and some of the pinch hits from the void prompts#im gonna finish everything i promiseeee#oh also working on a techno-centric fic#maybe emduo maybe twinsduo maybe bedrock bros maybe just general sbi#idk yet#im just key smashing and hoping for the best lmao#anyway thats my lineup. bon appetit
14 notes
·
View notes
Text
Crochet Technoblade I made which may or may not be inspired by the lyrics of Until I End Up Dead by Dream :)
#crochet#amigurumi#technoblade#technoblade never dies#crocheters of tumblr#dsmp fanart#dsmp#fanart#technoblade fanart#uieud#dreamwastaken#cross posted on instagram#victoriacoffee's art
153 notes
·
View notes
Text
My wonderful girlfriend started her tumblr blog so I kinda got inspired by that and now wanna show people something I can do
Soooo here
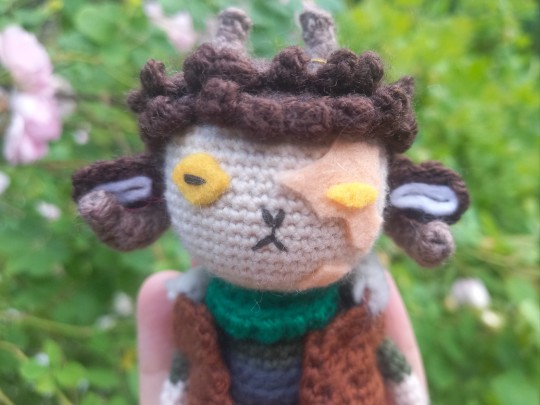
lil toy Ranbooby


#crochet#amigurumi#art#crafts#dsmp#ranboo#c!ranboo#didn't see that before but he has some hair on him#that's probably from my gf's cat haha#mikhas crafts
25 notes
·
View notes
Last Seen Blogs
bleachedbabez-blog
Kate
fashionn-thelifestyle-blog
Fashionn-TheLifestyle
saralora
Untitled

chaoticdestinyflower
Untitled
kuzumasa60-2
葛正(弐)