#custom rig tutorial
Text

Custom Rig / SimRipper Tutorial
Hi hello, welcome to todays lecture! Nah it's real simple even if it doesn't look it, I promise! I'm gonna go ahead and assume you have some basic knowledge of Blender/pose making for this tutorial, so I won't be going over how to set up your rigs or anything. Feel free to ask me any questions though! My previous pose tutorial is here if that's what you're looking for.
Disclaimer: I use this process to rip sims for posing only, idk if it's different for making renders 'cause that I ain't my jam. Although I assume it's pretty similar.
You're gonna need Blender (I use 2.79b but I'm pretty sure the newer version works okay for posing too) and SimRipper which you can get here...
Blender (2.79b)
SimRipper
First things first, you're gonna wanna dress your sims! Just go in game like you usually would and once you're done dressing 'em you can save and exit.
Hint: SimRipper will load up your sim wearing the outfit they're dressed in when you exit the game. I usually make sure they're wearing the right outfit before I quit. You can load up other ones later but it can take a while so it just saves some time.
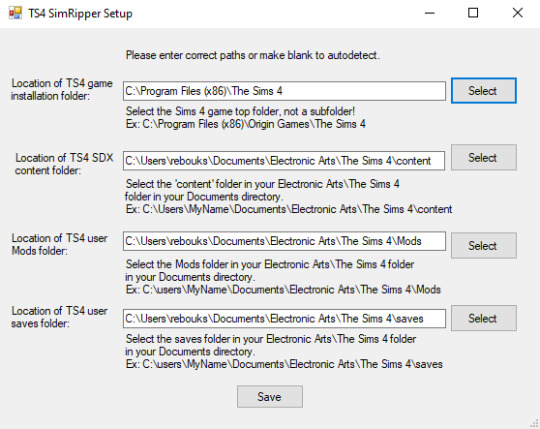
Okay! Once your simmies are dressed and you've downloaded the SimRipper/extracted the file, double click on the .exe to open the application. You'll be greeted with this:

Click "Retry" to set up the correct paths then hit save.
(I only needed to set up the first one so I'll assume you do too! If not just let it know where everything's installed)
Once you've hit save the application will open! Hit "Select" on the right and choose the correct save file, like so:

Hint: SimRipper is slow so don't worry if it says Not Responding or seems to take a while, it's pretty normal. The less sims/outfits there are in a save file, the quicker it'll work. You can make a blank save to make it faster but I don't bother; it doesn't take too long and I can't be arsed.
You'll be greeted with a long list of all the sims in that save file. Find and click on the sim you wanna rip:
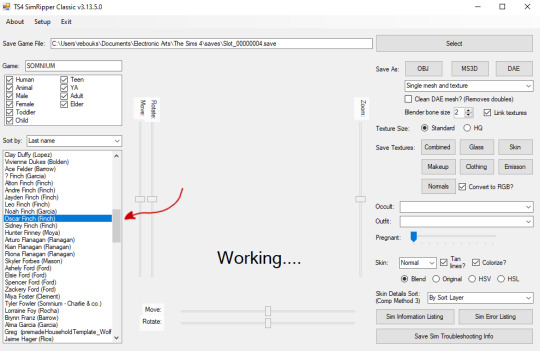
Once your sim has loaded up there's a couple of things we wanna change:
Change the top drop down menu to "Solid and glass meshes and textures" - this'll make it easier to get rid of eyelashes etc later (we don't really need those for posing and they get in the way of the eyes)
Click HQ - it'll look better, trust me!
You can change their outfit here too if they're not wearing the right one - though it'll take a while to load up again.
I like to hit the "Tanned" option, especially for paler sims, since blender seems to really wash them out and it hurts my eyes 😂 - personal preference though!
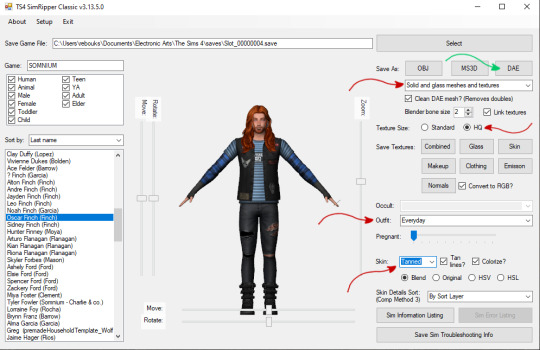
Once everything's set you'll need to click on "DAE" near the top right, this'll save your sim as a .dae file ready for blender. Again, it might take a while! Once you're done, you should have these files:

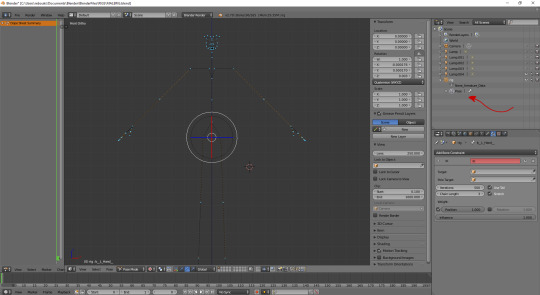
Okie doke! Now we're off to Blender. Open up your rig and click the little plus to the left of it to extend the menu.
You're gonna right click on each of these body parts like "bottom" "feet" etc etc and hit delete until they're all gone.
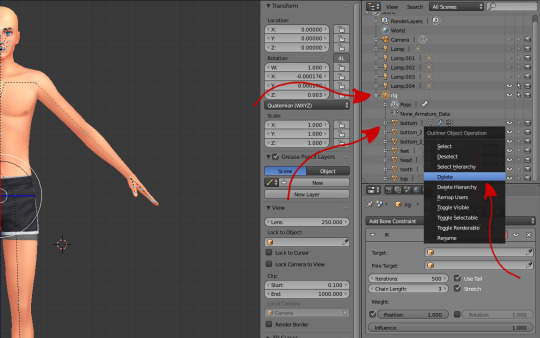
Once you've deleted every body part, you'll be left with an empty rig like this:
Now that our rig is empty, we can import our .dae file!
Go to "File" -> "Import" -> "Collada (Default) (.dae) like so:
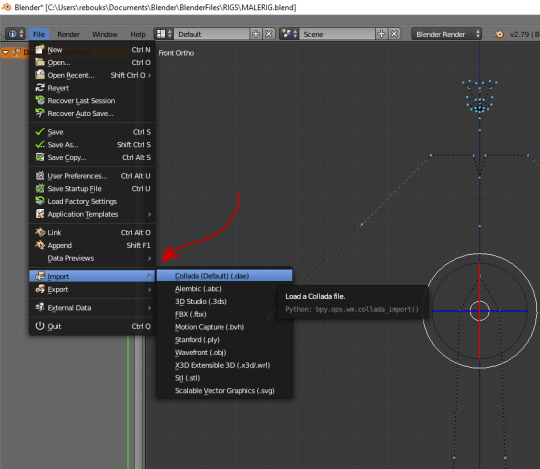
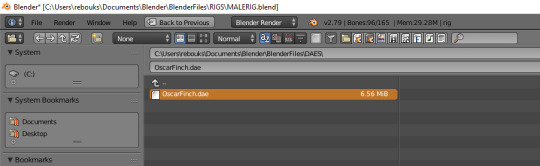
Find your .dae file and double click on it to import it.
Hint: I like to make a separate folder for my .dae files and I regularly delete 'em once I've saved my rig. I like tidy files!
Hi Oscar!
I'mma go ahead and right click on this extra lamp that was imported and hit delete 'cause I don't need it! You can keep it if your eyes aren't sensitive little babies like mine, it doesn't matter much.

Okay.. so now we should have a "rig" and a "rig.001"! Click the little plus signs to the left again so you can see what's in the hierarchy of each one, and then:
Click the upside down orange triangle of your sim from the "rig.001" rig and drag it up to the first one, then drop it on top of "rig"
A box should come up like the one below and you wanna click on "Object"
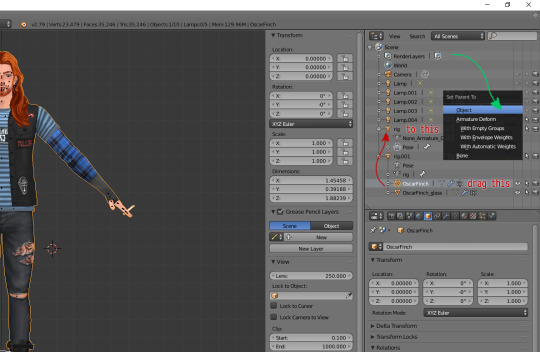
All we've done here is move Oscar (or whoever) from the extra imported rig to the original. We don't need that extra rig or the glass textures (the eyelashes etc) anymore so get rid of it by right clicking it and hitting "Delete Hierarchy" like so:
Hint: "Delete Hierarchy" is different from "Delete" and gets rid of the whole hierarchy (shocker) at once!

I like to rename my rigs, it can get complicated when you start posing more than one sim so naming them just makes it easier. Double click on where it says "rig" then rename it:

Now we need to attach your sim to the rig, as below!
Left click on the sim (aka "OscarFinch" in this case)
Head to the toolbar just below and click on the little wrench/spanner.
A little further down, click on the box beneath "Object:" and choose your sim/rig
In this case it's called "OSCAR", but if you didn't rename your rig it'll still be called "rig".
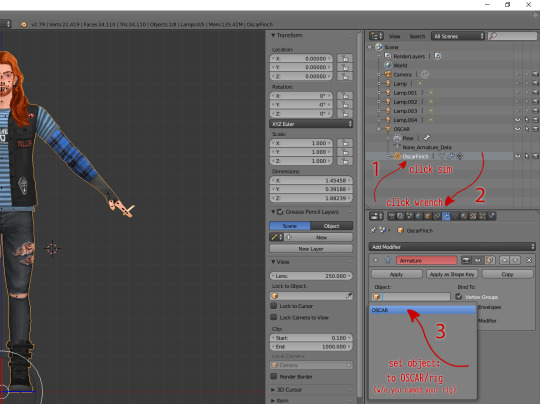
And that's it, you now have a custom rig 👍
Just make sure you save it!
You can go ahead and click on the little plus/minus to hide the drop down/extra info of the rig and start posing! \o/

Once you've done this a couple of times you won't even have to think about it anymore! I do it almost everyday and I had to really pay attention to what I was doing for this tutorial 'cause I was like ??? when I tried to think how I do it lmao.
They're so much more fun to work with than the base rigs, no more clipping, better facial expressions, poses with clothes in mind?! Amazing 😌
Extra Hint!
If you rip a sim who's dressed with a pose accessory assigned to a stigmata joint, it'll still move as if you imported that accessory via blender. I randomly found this out by accident but it might save you some time!

I hope you found this easy enough to follow, but lmk if you have any questions! I think this is one of those things everyone kinda does a bit differently. Like.. one tut I saw you had to add the textures in separately n' shit? Idk that one confused me so this is how I do it and it works, so I hope it does for you too! ❤
Happy SimRipping!
(sounds kinda painful, doesn't it? ouch)
#sims 4#ts4#blender tips#custom rig tutorial#simripper tutorial#simripping tutorial#simblr#posing tips#tips
456 notes
·
View notes
Text
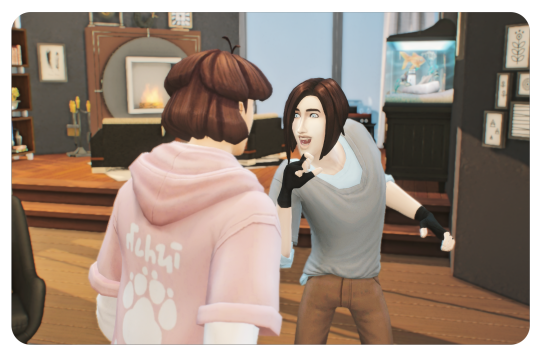
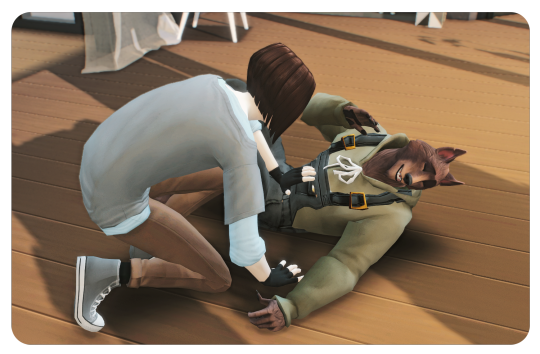
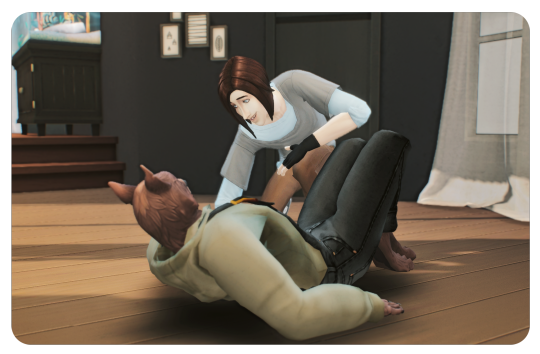
prove to me i'm not gonna die alone, put your arm 'round my collarbone and open the door. don't lie to me if you're putting the dog to sleep, that pet you just couldn't keep.
#the sims 4#sims 4#ts4#ts4 edit#ts4 screenshots#river dipping#🦇#theodore doe#matthias evanoff#echthroi#a burning house to live in#sim spice#or whatever jndfkhnf#do i like the hair strands? not really but if i post this without the hair strand layer you can see theo's hair clipping w/ matthias#(which wouldn't have been a problem had i not switched theo's hair since i made this pose with the old one on the custom rig)#and even tho i TRIED fixing it it just looks bad so you're getting this instead... be gentle i literally have never done this before#i also didn't watch or read any tutorials on how ppl normally edit... which i probably should have dkhnkfgh#anyway editing aside!! this pose is from a series of paintings so i've got more poses i'm making based on them#oh and the caption comes from putting the dog to sleep by the antlers which is theo and matthias's song!!!#like it's THEIR song!!! no one else can listen to it actually not even me! it's just for them when they're slow dancing in theo's apartment#reading the lyrics is akin to torturing myself i won't lie like i'm being waterboarded and teeth are being pulled every time#we'll see if tumblr gets me for this post... lmao
277 notes
·
View notes
Text
Making dynamic poses/animations that adjust to a sims body with Animation Tools by thepancake1
Made this short guide after talking to thepancake1. I haven't seen many people use this feature yet and felt like it might be worth sharing? There are some limitations to be aware of, but I think it's a useful option (for poses as well as animations) 😊
Many thanks to thepancake1 for the tools and for the helpful explanations he provided for this guide.
1. Background and in-game mechanics
The way TS4 handles different body shapes and clothes in animations (for example, in order to avoid clipping) is basically by putting markers (“slots”) on the surface of a sims body that can be then used as (IK) targets with the in-game IK system.
As you probably know, IK (Inverse Kinematics) – as opposed to the default FK (Forward Kinematics) – is a set-up where bones in a chain are influenced backwards. So, for example, when you move a hand, the arm will follow.
In a similar way, what in-game IK does, is assigning a bone or slot to animate relative to. For example, if your sim is posed with hands on the hips, you can assign the hands to the hips slot and the game will then process the pose/animation and perform IK in real time to change the position of the arms and hands relative to the hips.
Note that there are limitations to this system, though, as only hands, feet and the root bind can procedurally target other bones/slots.
Hereby, feet targets and root target are mainly used in interactions with objects, in particular in sitting animations (where, for example, the root is targeting a chair slot).
Hand targets are mainly used for adjusting a pose/animation to a sims body shape and clothes.
The in-game IK always influences the complete arm/leg (chain: foot-calf-thigh/hand-forearm-upperarm).
You can find an article that provides some background information here: https://simsvip.com/2014/08/20/community-blog-the-sims-4-animations/
2. Using the feature in custom poses/animations
Per default, when you make custom poses/animations with Blender and S4S, the relevant information that the game requires to apply in-game IK is not included. And so, you will notice that while a pose might look good with the base rig in Blender, it might not fit other sims with a different shape in game, in particular causing clipping.
You can use TS4 SimRipper to fine-tune a pose for a certain sim, but this might not be the solution you’re looking for, if you share your poses and/or want them to be compatible with different kinds of sims.
The animation tools now include a feature that makes it possible to use in-game IK with custom poses/animation as described in part 1.
Disclaimer:
The animation tools are in development and subject to change.
Currently TS4 SimRipper sims are not properly supported. (Although, imo for the purpose of the task, it doesn't make much sense to use them as models.)
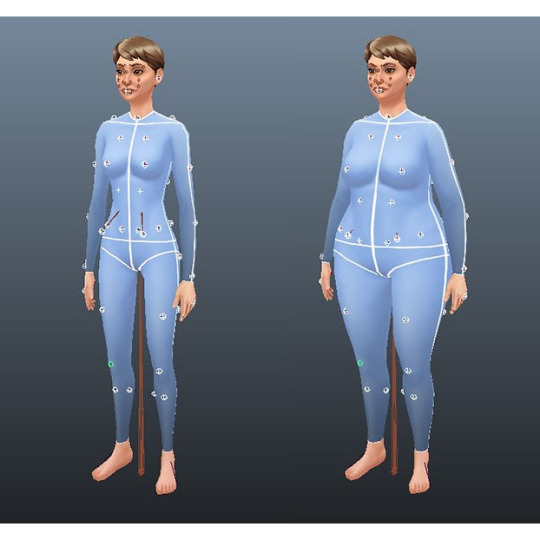
As you can see in the comparison below, there might be some accuracy loss for the flexibility gained. (The position of the arms in the version without IK targets matches exactly the pose I made in Blender but doesn't work at all for the heavier sim causing extreme clipping. At the same time, the version with IK targets deviates a bit from the pose I made, but works for any sim.)

Below a short guide on how to set it up with the example pose I made.
1) You can download the tools HERE. Make sure to check the installation guide and tutorials in the wiki tab for the basics. (Note: The tools were originally made for Blender 3.0 but also support newer versions, in particular Blender 3.3.)
Some additional tips for poses in another post of mine HERE.
After you set up the tools in Blender and have made your pose:
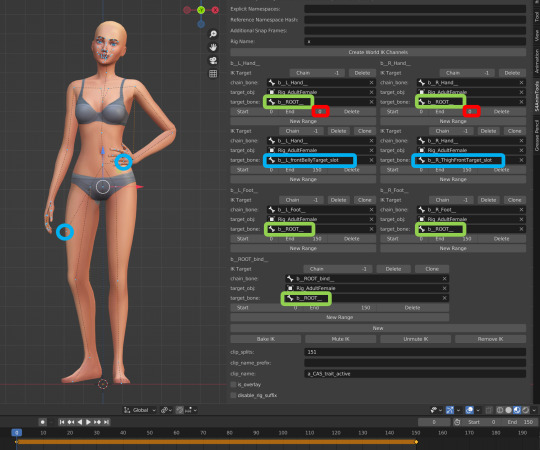
2) Go to the S4AnimTools panel. Fill out rig name, clip splits and clip name as described in the tutorials linked above (also make sure to select “Allow Jaw Animation”).
3) Find & click “Create World IK channels”.

This will create 5 IK channels for the afore mentioned hands, feet and b_ROOT_bind bone. You can also add channels either by cloning the existing ones or clicking “Create World IK channels” again. To get rid of unwanted channels click “Delete”.
4) Set up the targeted bones/slots based on the type of pose you made.
In my example, I created a pose where a sim has the left hand on the hip, and the right hand close to the thigh. Therefore, I added IK channels targeting the “b__L_frontBellyTarget_slot” and “b__R_ThighFrontTarget_slot”.
The slots are marked blue in the picture below. Some notes:
The slots are hidden by default, I made them visible for the picture. You can unhide all bones/slots available by pressing Alt+H. But I recommend doing this on a separate rig/in another blend file or undo it directly afterwards if you don't want all the (unneccessary) bones/slots blocking your view.
The selected slots worked well enough for my example, but you should figure out what is suitable for you. (Fo example, the HandDangle slots seem to be commonly used when the arms are hanging near the body.)
As orientation you can also look up clip files for EA poses/animations via the S4S Game File Cruiser and see what bones/slots are used as targets ("Warehouse" tab -> "SlotAssignments"; IKChainIndex: 0 - left hand / 1 - right hand / 2 - left foot / 3 - right foot /4 - root bind). On that note: The Clip Pack export loses/resets the slot data, but you can use it to find an animation and check its Instance ID to then search for in the Game File Cruiser. (If you know the name of an animation you can also determine its Instance ID by converting the name with the S4S Hash Generator.)
5) To ensure an animation works properly and, in particular, blends with other animations in game, each IK channel should (also) target b_ROOT of the rig.
The bones are marked green in the picture below. This set up was recommened to me by pancake. Another experienced creator mentioned though that it's only necessary to target b_ROOT at the start and end of an animation, in his experience.
Also note that this seems to be a restriction for animations that are made as in-game interactions and might not be necessary for poses or animations used with Andrews Pose player.
6) The start and end frame is set according to the length of the pose/animation (I want to use the pose as a CAS trait pose and set the duration to 150 frames = 5 seconds), except for the b_ROOT target for hands where the end frame is set to 0 in my example, since they are also targeting the slots “b__L_frontBellyTarget_slot” and “b__R_ThighFrontTarget_slot” during the animation.
Note: My example is a static pose. In animations, however, you can also target different slots at different times by setting up multiple IK channels and specifying the start frame and end frame respectively.
7) Bake the animation by pressing “Bake IK”.
8) Export the clip and create a package with your pose/animation as described in the linked tutorials above.
@ts4-poses @thefoxburyinstitute
658 notes
·
View notes
Text
ts4 in hq | tutorial
this tutorial is for nvidia graphics card users only.
download & install geforce experience
open the geforce app and hover over the sims 4 in the games & apps panel. select the details option.
click the wrench icon beside the optimize button in order to customize your resolution settings.
from the resolution dropdown menu, select your desired resolution. mine is set to the highest dynamic super resolution of 3840x2160. be kind to your rig when making a selection and don't push too far if you don't think your computer can handle it.
from the display mode dropdown menu, select windowed borderless. i use this setting because i'm able to alt+tab out of ts4 to my desktop or other windows i may have open.
click apply and you're good to go. next time you launch your game it will open with these settings. should you change the resolution settings in your game for whatever reason, you'll need close the game and start from step #2 again for the game to display properly with these settings.
115 notes
·
View notes
Text

CRYSTAL GRECA SET - GAME EDITION
New meshes
HQ/BG compatible
Set contains: choker, earrings, bracelets and rings
20 swatches
Unisex teen +
All LODs
Custom thumbnails
Disallowed for random
DOWNLOAD:
PATREON [PUBLIC RELEASE: OCT 3RD]
------------------------------------------------------------------------------
CRYSTAL GRECA SET - BLENDER EDITION [SHOWN ON COVER]
New mesh
HQ textures [6144x2048 and 4096x2048]
12 diffuse textures [3 textures for each model]
Rigged
Material Nodes for customization
Tutorials included
DOWNLOAD:
PATREON
-------------------------------------------------------------
WHAT IS BLENDER EDITION?
Blender Edition is a special edition that has more texture space (usually 2048x2048) and can be used only in Blender due to different UV Mapping. This edition allows you to create renders with more quality and flexibility than models exported from the game itself.
Archive with this edition contains .blend file, diffuse textures, normal maps and tutorials on how to use it.
IMPORTANT NOTE:
Blender Editions will be available to Platinum and Diamond members only. Early Access doesn't apply to Blender Edition since this edition weren't made for the game and is basically a separate 3D model.
#sims 4 cc#sims 4#sims 4 custom content#sims 4 accessories#sims 4 jewelry#sims 4 earrings#sims 4 necklace#sims 4 choker#sims 4 bracelet#sims 4 ring#sims 4 rings
141 notes
·
View notes
Text
TS4: Occult Socials from TS3 v1.0
This mod adds several unique social interactions for occult sims (mostly for werewolves, though), converted from The Sims 3.
There are (for now):
Show Teeth (werewolves, vampires);
Rub Belly (werewolves).
THIS MOD REQUIRES XML INJECTOR!
Interactions description
Show Teeth
Category: Friendly -> Affection


Available for:
Werewolf to Vampire;
Vampire to Werewolf;
Werewolf to Werewolf;
Vampire to Vampire;
Teen-Elder;
Any relashionship score. Can be rejected. Autonomous.
Rub Belly
Category: Friendly -> Affection


Available for:
AnySim to Werewolf in beastform (but not in rampage);
Teen-Elder.
Requires 50 points friendship score. Succesfull only. Autonomous.
Sims get buff "Fuzzy Feelings" after doing this interaction. The actor gets buff from Cats and Dogs, the target werewolf gets custom buff.
Compatibility
This mod should not conflict with other mods because it adds new interactions and does not override any game sources.
Required addons
At least one of these:
GP04 Vampires;
GP12 Werewolves.
Recommended addons
The mod uses some sources from these addons:
EP04 Cats and Dogs.
If you don't have some addons from this list, you should also take extra packages from archive MissingAddonsSources. In other way you'll miss some buffs, pictures or sound/vocal effects. You'll also see "Lama pics" instead of missing pictures.
Take packages only for addons you DON'T own. If you have all recommended addons, you don't need this archive at all.
Installation
Install XML Injector (if you don't already have it) - just download it from ScumbumboMods website and put it into your Mods folder.
Put the OccultSocials package into your Mods folder.
If you don't own some Addons from "Recommended Addons" list, you should also download "MissingAddonsSources" archive and put packages of addons you don't have to your Mods folder.
Make sure you enabled script mods in game settings.
That's all!
Supported languages
English;
Russian.
Others are in English.
I have partial draft for them. If you wish to help me with completing the translations (or fix English, ha-ha), please contact me!
Additional Info
I'd like to continue working on this mod. These interactions may be added in future:
Sniff inappropriately (werewolves);
Whack on nose (werewolves).
Play fetch (werewolves).
If you also remember some interesting occult socials in TS3 which can be added to this mod, you can suggest them in comments!
Thanks&Credits:
Zebru for Mod Constructor
Zero for tutorials and personal help with some issues
thepancake1 for S3toS4 reference rig blender file
denton47 for TS4SoundTool
Scumbumbo team for XML Injector
andrew for S4Studio
-DOWNLOAD- (MTS)
#sims 4 mod#sims 4 mods#ts4 download#s4 download#ts4 custom content#ts4mod#ts4 mod#ts4 mods#the sims 4 mod#the sims 4 mods#s4 mod#ts4#thesims4#the sims 4#sims4#s4#ts4 occult#ts4occult#ts4 werewolves#ts4werewolves#ts4 vampires#ts4vampires#ts3tots4#ts3to ts4#s3tos4#s3 to s4#category:ts4mods
216 notes
·
View notes
Text
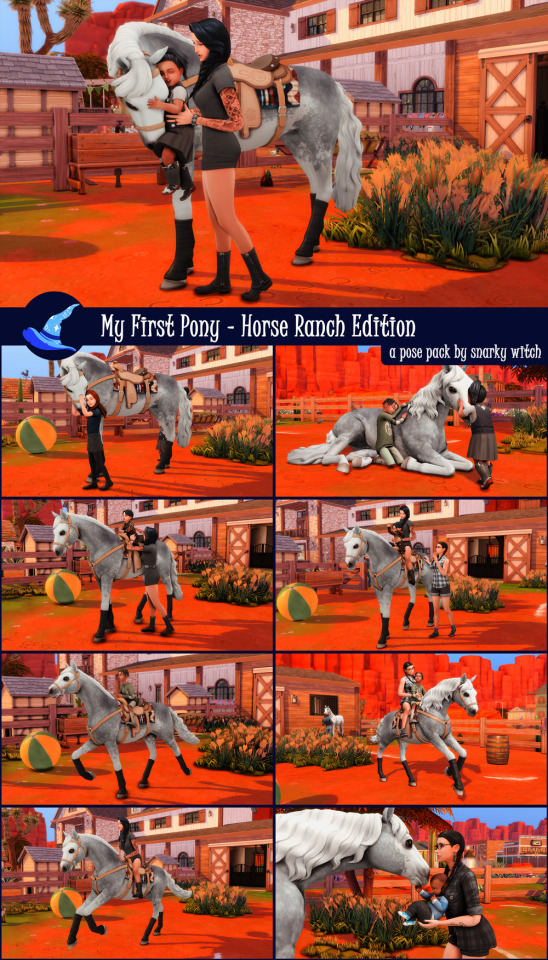
My First Pony - Horse Ranch Edition Pose Pack (CurseForge, Free)
I made this pose pack years ago before Horse Ranch came out using custom deco horses. As soon as Horse Ranch came out, I started getting requests to remake this pack using the horses from the expansion pack so I obliged! I've redone all the original poses from that pack using the horse rigs from Horse Ranch, plus a new pose with an infant. I hope you and your Sims enjoy them!
And if you don't have the Horse Ranch expansion and want the original pose pack with the deco horses, it's still available right here.
WHAT'S INCLUDED
10 poses for a horse and Sims of all ages (infant-elder)
Thumbnails and descriptions for all poses
WHAT YOU WILL NEED
Sim Teleporter
Pose Player
EA saddle (Western recommended) from Horse Ranch
HOW TO POSE
Check out my tutorial on Sims Community!
TOU
DON’T reupload or edit!
DON’T put behind a paywall!
DON’T claim as your own!
(Optional) DO tag me if you use them! I love seeing other people enjoying the stuff I make.
DOWNLOAD ON CURSEFORGE (Free, No Ads)
@ts4-poses
119 notes
·
View notes
Text
🟨 Modding Poses for Cyberpunk 2077 (and general modding reminders!)
It's really exciting to see everyone getting into modding latetly, especially pose making 🤏
I want to throw a couple of resources into One Big Post to make sure everyone has everything to get started- BUT FIRST
a couple of general Modding Reminders 🤲
━━━━━━━━━━━━━━━━━━━━━━━━━━━━━━
▶ Remember that modding, just like any other creative outlet, is supposed to be fun!
When a project start to frustrate you, make you doubt your ability/skills, when you start comparing yourselves to others-
Stop! Disconnect, and take a break, walk a bit, splash water on your face, eat something! It's really easy to spiral down (been there, done that)
It's important to remind yourself of why you're modding in the first place! Take a look at your inspiration, your blorbos
Don't lock your brain into One Frustrating Project; have a couple of smaller projects or ideas on the side that you can go to when the creative juice is flowing to not get stuck on one particular project
▶ Modding is exciting, and you want to mod ALL the things asap! Other do as well, and might have the same ideas
It can be frustrating to see someone else release a mod that you thought of doing, that might've been sitting in your to-do list for a long time. That's ok! It's normal to feel that way, but don't let that sap your creativity
Someone made a pose/pose pack that is similar to what you wanted to make? Do it anyway! It won't be the same, because it comes from you! This applies to general modding as well, to clothes, to recolors
Everyone have their own vision of things. It might be a similar pose, but the body language is different, the hands sit on the skin differently... The model you want to port won't have the same materials, normal map, or colors as the one that is already available!
Modding is accessible by everyone. Nobody owns ideas, or references, or models available on the internet. Don't let anyone tell you otherwise, and mod what you want, when you want to, and how you want to!
━━━━━━━━━━━━━━━━━━━━━━━━━━━━━━
▶ Tutorials and Resources for pose making
With the reminders out of the way, here's everything you'll need to get into Pose Making! I see this is something that a lot of you want to tackle, and it's better to have everything ready to get started 🤲
The tutorials are in order of workflow!
🔹 XbaeBsae's Tutorial - Custom Poses and Animation
This is the first step!
With those templates, you'll be able to start creating the poses in Blender using the Cyberpunk's body models (Woman, Man, Man Big...) ⚠ Be sure to get the proper requirements and versions!
🔹 PinkyDude's Tutorial - Retargeting Animations
OPTIONAL
If you want your poses to be available for other rigs (Man poses for Man Big, or Woman poses for Man, etc) this is how you achieve that! You'll learn all about retargeting.
It's also useful if you want to import other games's animation/poses into CP77
🔹 Halkuonn's Tutorial - Importing Poses into CP77
An important step;
getting your poses from Blender to an .anim file!
🔹 ManaVortex's Resources - Poses for AMM
🔹 ManaVortex's Resources - Poses for Photomode
Both type of additions are compatible with each others!
I personally recommend working on the AMM addition first, as you'll be able to use the same files and mod structure later for the Photomode addition :D
🔹 XbaeBsae's Resources - Nibble to NPCs 2.0
OPTIONAL
The Nibble to NPC 2.0 mod has a resource pack for modder to make their poses pack compatible with the Nibble Replacer! Make sure to update all of the requirements, and AMM, to have the ability to pose NPCs using custom poses in Photomode
━━━━━━━━━━━━━━━━━━━━━━━━━━━━━━
⚠ KNOWN ISSUE | T-posing
You probably saw me and a couple of other pose modders and users complain about the T-posing issue- it's sadly still ongoing, and no real fix has been found so far.
We tried using unique workspots and entities for each packs, but they somehow keep overwriting one another in really random ways (MA and MB are compatible, but sometimes MA and WA won't be useable together? Sometimes you won't be able to use different packs from a same modder, etc)
Once (if!) we find a fix, we'll be sure to update our mods and to share the knowledge with y'all 😩 for now, we make do
As always, don't take this post as THE modding method! I'm simply an old modder sharing my two cents for all the new baby modders rolling in, hyped as fuck 🤲 Welcome to the modding side 🧡
#Cyberpunk 2077#Cyberpunk 2077 Modding#Tutorial#Pose Making#UUHHH Idk how to tag this but Yeah!!#Please don't overwhelm yourselves- it can happen even unconsciously! Take breaks and be gentle with yourselves 🤏#and don't hesitate to ask around for help! There is a lot of resources and tutorials#and good people willing to answer questions or share knowledge as well :3#long post#text#apologize for any typo or spelling ITS GETTING LATE and I didn't re-read myself 👁👄👁 ahgfhhgf
73 notes
·
View notes
Text
Hey MCYTblr!
Have you ever wanted to make an animation but have no drawing or animating skill?
Do you want a good, free and easy reference maker or poser for Minecraft skins, blocks, even worlds?
Do you want custom hats, accessories, blocks, items and much more?
You have stumbled upon Luigra's reccomendation list of Minecraft fan content tools!
All of these are free and have plenty of tutorials! They have been around for a while, and while you may have heard of all of these already, I haven't really noticed that many people in the community make Minecraft content for MCYTs.
Mine-imator
It's a program that allows you to make wallpapers, animations, renders, almost anything you'd like! It has very intuitive interface, and you can pose a skin in any way you'd like, add tons of props, background, and animate everything! While a good 3D animation still takes effort, you may perhaps find it easier if you struggle with 2D animations!
I've also seen a lot of people use Blender, which provides more general 3D options but may also be harder to learn. I haven't used it, but I'm putting this here as a reccomendation as well!
Blockbench
It's a program designed perfect for Minecraft modeling! It has tons of plug-ins, extensive tutorials and easy to use UI. This is where you can make custom resource packs, hats, skins, weapons, any model you want!
It has animation features as well, although those are more geared towards in-game animations! You can also use a plugin to import your models from Blockbench into Mine-imator!
PMC3D/Planet Minecraft Skin Editor
There are plenty of skin editors out there, but in my experience PMC has been the most comfortable and easy one (and it also lets you edit textures of various mobs). I am actually surprised by how few mcyt fanskin makers I see out there, and I think it's a very underrated medium!
If you have an AU or a design for an mcyt, you should definitely make a skin out of that. Especially if you think their skin could use some improvements.
Bonus:
For pixel art, there are plenty of really good programs out there, but if you want a free browser one, what I personally use is Pixilart. Mine-imator doesn't let you export videos as gifs, so for that I use Ezgif. For modeling and improved Mine-imator rigs, you can also use Modelbench. Also they have forums that you can get sooo much helpful resources from!
As well as that, you should also try to create machinimas within Minecraft itself, for which I reccomend getting Blockbuster with FutureMC, and maybe even Emoticons if you'd like!
Hashtag #PutThe"Minecraft"In"MinecraftRoleplay" ✌️
#minecraft#minecraft tools#mcyt#it IS a post related directly to Minecraft the game so I am not crosstagging here#long post#mcytblr
512 notes
·
View notes
Photo
Hello! I made this list of tips for Twitter months ago, chickened out of sharing it because I didn’t want folk to think I was acting like some kind of authority on posing, and then eventually posted it last night.
Anyway, I had a couple of requests to post it here as well, and as Twitter really made a hatchet job of my thread I thought having everything together in one post might be helpful.
I’ve kept the same cover image with the missing word typo because it’s stupid and amuses me. May useful? May not useful!
This list assumes you know the basics of posing already. If you’ve never posed before and are looking to learn, then I can’t recommend the @katverse series of tutorials enough - start here.
These are just little tricks which I wish I’d known sooner!
1. ALWAYS move Sims via their root point, never the orange dot! If the orange dot is moved, they won't be in the right place when you put the poses in game. If you do move the dot, change to Object Mode, click on the orange dot, hit Alt+R & then Alt+G.

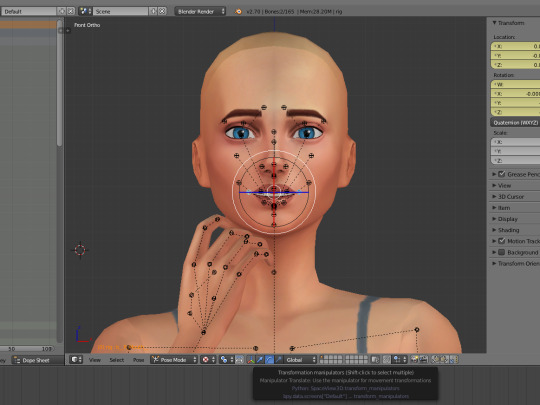
2. The side menu is really useful for selecting points on the face, such as the eyes. To bring the menu up, press A to select all points then hit I & select either Location or LocRot - I don't think it really matters unless you're saving now, in which case you want LocRot.

3. Need to reset a point? Right click on the point so that it turns blue, then hit Alt+R. Need to select multiple points? Hold shift while right-clicking points. Need to reset the whole rig? Hit A until all points turn blue, then Alt+R.
4. You can also copy and paste certain points or entire poses by selecting the point(s) first, then hitting Ctl+C, then Ctl+V to paste. Please only use this knowledge for good, not evil - no stealing people's poses, adjusting them slightly, and then paywalling them (it happens).
5. I recommend working on expressions when the face is viewed straight on, in either 1, 3, 4, or +1 view. This helps you avoid any unnatural twists. For a natural expression, remember to move eyelids, squints, and eyebrows as well as the mouth! If I’ve already posed the Sim and need to adjust their expression, or have just straight up forgotten to do it, then I copy the head point (right click so the point goes blue, CTL+C) and twist ONLY the head so that it’s straight on in one of these views. Then I just paste the point back again when finished (right click, CTL+V).

6. With the mouth, I like to lift the corners (either right click & drag if asymmetrical, or raise both via the translate tool - you can always drag later) & then use the rotate tool to give a softer curve. Remember to always open the mouth with the jaw point, not the mouth. Oh - and don’t forget how raising, stretching, or lowering the lips can alter an expression! But don’t stretch too far, remember how real mouths are shaped.
7. Fingers! Those bastards. On all my base rigs, I have the W, X, and Y points locked on ALL finger joints so they don't squiggle all over the place. You can unlock them on the 0 joints if you want to spread the fingers etc. once in position. You can also lock the jaw point in the same way - this means you can open the mouth whatever position the head is in, and not get a weird crossed look. I recommend saving base rigs with all these points pre-locked so that you don't have to go through them every time. Sometimes I’ll lock the eyelid rotation and knee rotation, too.
8. It's a good idea to view your pose from every position before finalising it, as you can catch weird angles/clipping that way. Hold down the mouse wheel to move freely. Use 1, 3, 4, and +1 views to make sure feet etc. are flush with the ground line.
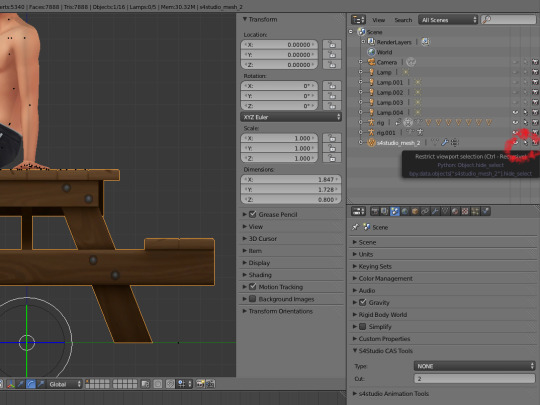
9. If you're working with custom rigs/ objects/accessories, it's helpful to restrict selection so you don't accidentally move them (also very annoying if you keep clicking on them instead of the rig). Right click the mesh so it gets an orange outline, then click that arrow. You can also use the eye to hide things like rigs/objects/accessories, which is useful if you’re making poses using big objects such as cars or horses who are in the goddamn way.
10. Custom rigs! I love custom rigs! I REALLY recommend making these if you’re creating poses for your own Sims/story. They completely eliminate clipping because you’re able to make the poses SPECIFICALLY for that Sims’ body shape/clothing/hairstyle. Expressions can change wildly depending on the Sim the pose is used on, so making them for your specific Sim means you know it will look right for them. I have a folder of saved bases for all my story Sims with various outfits and hairstyles - and naked versions hehehee. If you're making poses for others to use, the default rig is best - and remember to leave a lil gap between hands etc. to account for different clothes, body shapes etc. I recommend this tutorial if you wanna make custom rigs.
If I’m sharing story poses that featured my beloved vampire (and most do), I have to copy all poses from the custom rigs and paste them onto default rigs before sharing them because he’s a skinny lil disaster with a feminine body preset and his poses would NOT work for the majority - there’d be too much clipping.
11. When moving one part of the body, you’re really moving the whole body. Use pelvis, spine, neck & head points to create a natural curve - you only want to move each one a lil bit. Remember that bodies lean, twist, slouch. You can put a lot of emotion into the bend of a spine. Putting the entire twist &/or bend into one point makes things look a little weird. Move the neck joint THEN the head joint for head turns - start that movement right down the spine if the Sim is really twisting to look at something!
12. Clavicles. Don’t overlook them because arm movement starts here! You can move the forearm a certain amount without it starting to look weird, but if your Sim is reaching up/forward/backwards then you want to start that stretch/rotation in the clavicle point.
13. There are other things you can do to help with posing, like using helper rigs or setting up IK targets, but I didn’t get on with them - they’re a different learning curve. It’s all about what works best for you! This is just my personal list of things I've found useful.
Anyway, that's it. I am extremely mediocre, I make lots of mistakes all the time, I am most definitely still learning, there are MUCH better posemakers than me out there, and probably better ways of working; but learning all the points mentioned here has definitely helped me along the way. Enjoy posing!
364 notes
·
View notes
Text

Current Story: Forever in Between
Beginning // Latest // Extras // Everything


Finished Story: Somnium
Beginning // End // Characters // Chapter Breakdowns
Somnium contains many mature themes throughout, I'd rate it 18+ but you do you...
Content Warnings: smoking, drugs, addiction, alcohol, sexual content, violence, assault, blood, death/murder, guns/weapons, mental health issues/mentions & trafficking.
All trigger warnings will be spelt as one word.. eg: twdrugs
Poses | Patreon | Ko-Fi
Builds
Other CC
Posing Tutorial
Custom Rig Tips
Sim Dumps
Legacy/Gameplay [semi-abandoned]
Edits
No wcif's plx 🖤
#ts4#sims 4#simblr#ts4 story#story navigation#navigation#housekeeping#hint.. read somnium before fib c:#hint hint.. no wcif's plx and ty 🤸♀️
221 notes
·
View notes
Text

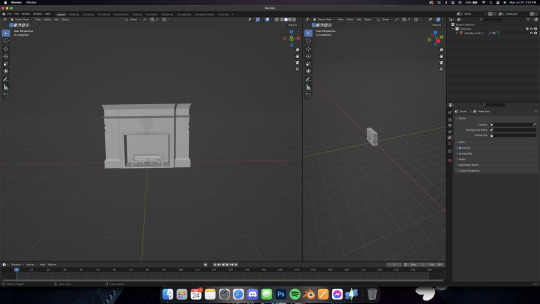
Blender Tutorial: Building a Scene
Part 1: Importing Furniture from Sims 4
Building a scene from scratch is no mean feat, so this will likely be a multi-part tutorial.
In this tutorial I'll be going over the basics on building a scene. This will be the barebones necessities to get a room with a moose and some nice lighting to place your sims in for a render.
There are, of course, more in-depth and complicated ways of doing this, but these are the basics and the easiest (in my opinion!) way to get a nice little scene without too much work.
With that all said, let's get started!
Let's start by adding furniture into our scene.
Usually I'd build a room first but I know many of your were asking how to do this so I'll cover this first!
Step 1: Exporting Meshes and Textures from S4S
Appending furniture and decor to a scene works the same way as appending jewelry to a sim. First we have to prepare it for blender in Sims 4 Studio.
If you're using a piece of furniture from the game, select "Object" in Sims 4 Studio. It may load slowly so be patient!

Then you'll see the game's full catalogue:

Filter and sort as needed to find what you're looking for.
For this tutorial I'm going to remake (and revamp) one of the first blender scenes I've ever made, which looked like this:

So I'll export the fireplace first. It's from Vintage Glamour, so I'll filter my S4S by Vintage Glamour, and here it is:
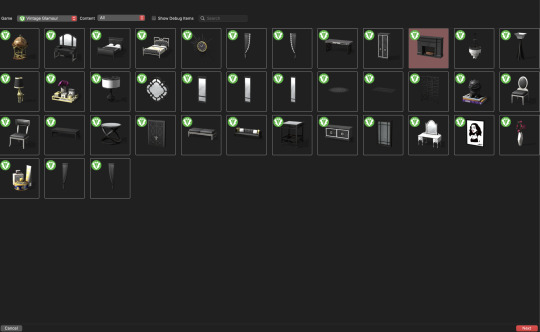
Highlight the fireplace then click "Next"
Name the package anything, but make it easy to remember. If you need another swatch in the future you can always open the fireplace directly in S4S instead of searching for it each time.
Save it somewhere easy to find!
Once opened, you'll see this:

To render furniture, we need to export the Mesh and Texture files.
I'm in the habit of exporting my mesh first, so we'll do it that way.
Click the "mesh" tab and you'll see this:

Click "Export Mesh" and save the .blend file somewhere easy to find!
I typically keep the .package, .mesh, and .png (texture) files all in the same place.
I find it easier while working in blender. Do whatever makes sense to you just make sure to stay organized!
After saving the mesh, navigate to the Texture tab and do the same thing:

Export the texture and save it somewhere easy to find.
Repeat this process for all the furniture you'll need for your scene.
Step Two: Appending Furniture Items into Blender & Applying Textures
Now let's go into blender.
As always, delete the default cube, lamp, and camera, then set up your workspace in whatever way is comfortable for you.
I like to set mine up like this:

Now, just like with jewelry, let's append our fireplace in.
Go to File -> Append and locate your fireplace .blend file.
Open the file, then the Object folder, then select all "studio_mesh" files you see:


You should then have something like this:

Delete the bone_bone and rig as always, then also delete the footprint, which for me was the first studio_mesh in my Outliner list.

Then you'll have the fireplace by itself:
Navigate to the Shader Editor in your preferred workspace, then to the "Material Properties" tab.


Click the minus beside the diffuse texture to get rid of it.
Then click the "New" button that appears once the diffuse is gone.


Nodes will appear in your shader tab!

Like we did with jewelry, add in an Image Texture node, a Mix Shader, and a Transparent BSDF.
Connect and arrange them exactly like I have here:

Make sure you add in your texture file in the Image Texture node (click open, then navigate to your .png file we exported from S4S).
Change the blend mode to Alpha Hashed in your properties window, like this:

And make sure you're in Material Preview mode (I wasn't) by pressing Z on your keyboard and selecting "Material preview"

Now you should have something like this!

In Part Two, we'll add in the walls of the room and maybe a window!
Some notes before I leave you:
Using CC works the same way, you can add it into the custom content folder in S4S OR you can double-click the package file and open it in S4S that way.
Some objects, like trees, have more than one texture. I'll do a separate mini tutorial on that if yall need but basically you'll export both texture files and then apply them to the proper parts of the object (for a tree, for example, the leaves and trunk are often separate texture files)
Please let me know if yall have any questions! And stay tuned for Part Two!
#salemsims tutorial#render school tutorial#sims 4 render tutorial#sims 4 blender tutorial#render tutorial#blender tutorial#tutorial
43 notes
·
View notes
Note
Yo your rigging skills are immaculate! Where did you learn such dark magics, I'm still learning modeling as a baseline. But I figured I might aswell ask then post it for others!
Helloo! Thanks for your compliment 🥹 I'm glad the stuff I do looks cool enough to make you say that.
Part 1st - The Inception
When it comes to 3D I still consider myself more on the hobbyist side than the professional one.
I have a weird past in self-taught 3D modeling and game development at the same time so the logic for topology, weights, constraints and such seems to have a dedicated core in my brain that developed through sheer trial, error, tutorials and some actual studying. But I don't think I can exactly pinpoint a linear path that has taught me all of this.
Part 2nd - The Ruse
On the other hand, low poly models are much more manageable than modern high fidelity stuff. That certainly works in favour of hiding my weak spots hahaha.
Part 3rd - The Rigs
When it comes to the rigs I use in my videos, I've been testing different approaches. Thankfully, the extraction tools do preserve the original weights for the most part, but I have had to do weight necromancy to recover missing information sometimes, I made a script to recover missing weights whenever that happens.
My older MGS animations use just some basic IKs and Drivers on top of the deform bones (I should get fined for those crimes) because they were a ton of characters, I wanted to save time and the extraction workflow was pretty new to me and I didn't know what to expect next.
For the newer ones, I started adding more complex control rigs until I hit a limit where it was not scalable.

To speed things up, I now have a custom set of tools to quickly name bones and then I map them to a Rigify uh... rig. That's how I rigged The Boss for a recent video.
Part 4th - The Craftpersonship
I do continue to make new rigs for original characters from scratch because I like to learn and improve in that front rather than just rely on tools to make them for me whenever I have the time for that.
49 notes
·
View notes
Text
Morrigan's Custom Rig Tutorial - Making a Base Rig
So the lovely @mattodore asked me how to set custom rig heights, and also about having multiple "outfits" on the same rig, and since none of the tutorials I know of covered that, I decided to do one myself!
We're gonna cover how to set up a "base rig" for your sim, which includes their custom height and multiple outfits, so that you don't have to make a new rig from scratch every time you pose.
This is going under the cut, because it's gonna get long.
Basics:
For the purposes of this, I'm going to assume you know how to use SimRipper and blender at least a little bit. If you've never made a custom rig, this tutorial by @rebouks is a great place to start!
To follow this tutorial, you're going to need the following:
SimRipper
Blender (version of your choice, but remember that only certain versions technically work with s4s. Those include 2.78, 2.79, and anything above 3.3. I personally use 2.79, but that's because I don't like change.)
A sim of your choice, with multiple outfits, placed on any lot in any save.
Let's get started!
First Steps:
First off, you're going to need to rip your sim. Follow the tutorial I linked above to get your sim ripped, and into blender. Once you have your custom rig set up, we're ready to continue.
Optional Step 1: IK Chains
So, before you continue with this tutorial, there's something really easy you can do that will make pose-making much easier! Two things, actually. One of them is setting IK chains, and the other is locking the finger joints.
Setting IK chains means that when you move your sim's foot or hand, their whole arm moves with it, in a natural and logical way. This makes posing arms and legs SO much faster and easier.
To do it, select your sim's hand or foot joint, then go to the Bone Constraints tab in the side bar. Hit "add Bone Constraint" and select "Inverse Kinematics".
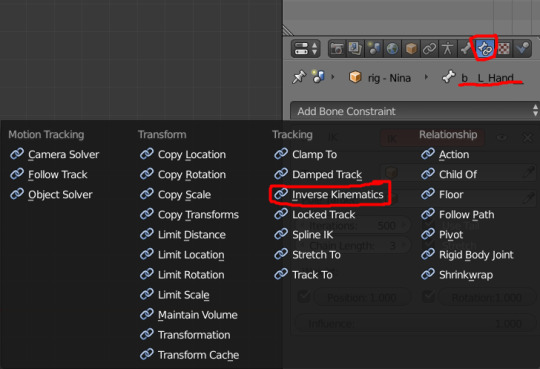
Then change the "chain length" setting to 3.
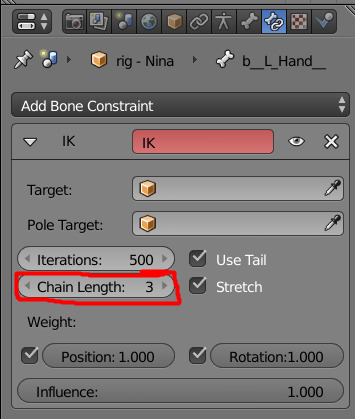
Now go back to the rig, hit "g" and see if your sim's arm moves, not just the hand. If it does, congrats, you did it! Now go through and do it for the other hand and feet.
Optional Step 2: Locking the Fingers
Sometimes when posing, you bend a finger from one direction, only to look at it from another angle and find that it looks broken. Luckily, there's an easy way to make sure that doesn't happen. (Credit to @ratboysims for the original tutorial on how to do this, but it seems to have been deleted.)
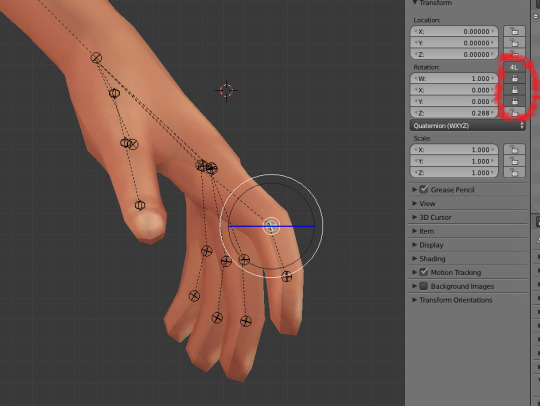
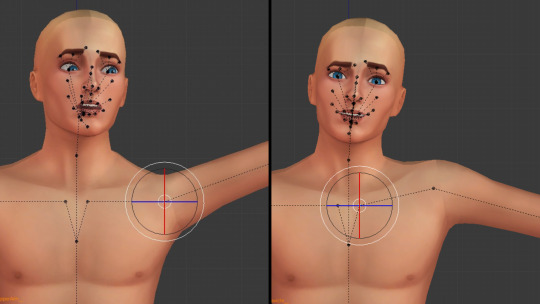
Select any of your sims' finger joints. I usually do the 1 and 2 joints, but not the 0 joint, but that's just personal preference. Hit the small plus sign at the top right of your screen to bring up the transform panel.

Under where it says "rotation", toggle the lock icons so that all of them except for the Z are locked.
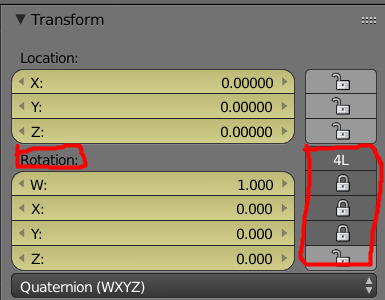
Now when you rotate your sims' fingers they should only bend up or down, not side to side. If you need to bend them side to side for a specific reason, just unlock the locks, adjust the finger, and lock them again.
TIP: I advise having a blank, uncustomized rig that has the IK chains and locked fingers already done. That way, every time you make a custom rig, you don't have to redo this.
Now onto the part I was actually asked about...
Adjusting the Height:
If your sims are canonically different heights, you're going to want to keep that consistent when you pose them. Adjusting your sims' height in blender is SUPER easy!
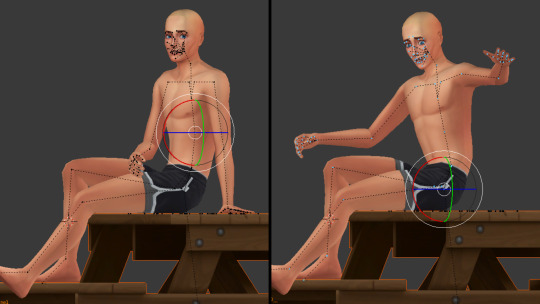
Just right-click on any of the joints I've circled here:
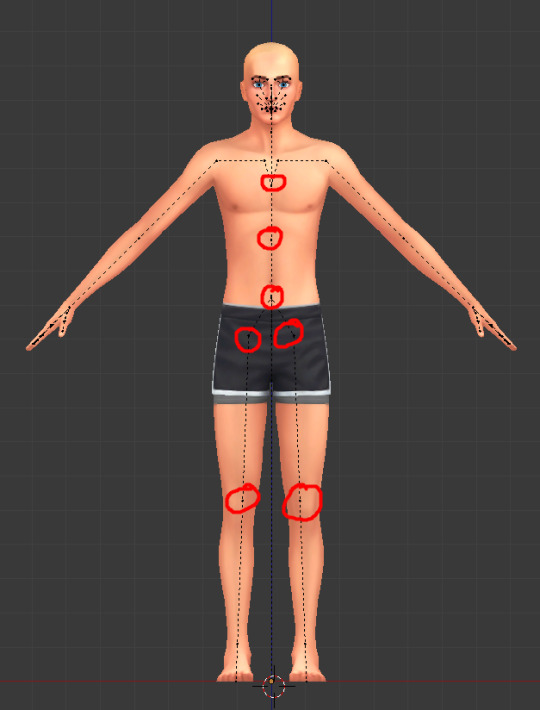
Once you have the joint selected, 3 different colored arrows will show up. (If you're looking at them head-on, you'll only see two. That's normal!) Select the blue one, and drag it up or down.

It's important to use the arrows rather than simply the "g" key. This will ensure that your sim isn't crooked.
TIP: Use a combination of all the points I showed above to get a more "realistic"-looking sim. If you only manipulate one or two, you'll end up with some very odd proportions.
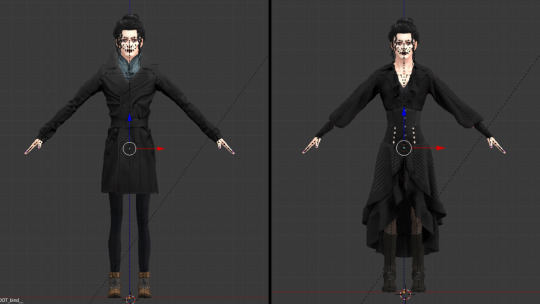
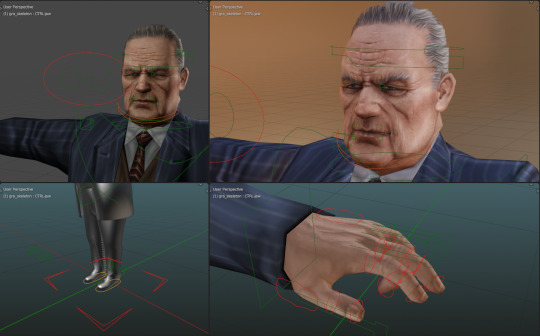
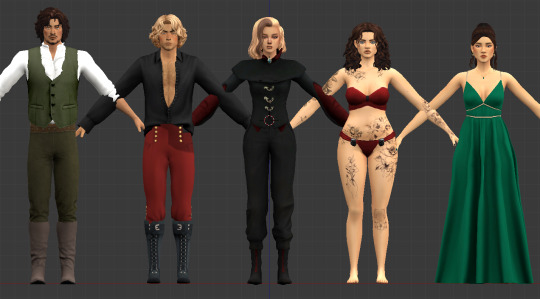
Here's an example of what I was able to achieve using height manipulations. The sim in the middle, Nina, is the default height.
Once you have your sim at their desired height, save your file!!! (In case something goes wrong later, or you don't want to add more outfits, you won't have to redo it.)
Adding Additional Outfits
One of the biggest benefits of a custom rig is being able to ensure there is zero clipping by using the exact outfit and hair that your sim is going to wear. But your sim isn't going to be wearing the same outfit in every picture. And what if they're wearing black? Or a dress? Something that makes it hard to see the joints in blender? That's where having multiple outfits on the same rig is helpful.
Export your 2nd (or 3rd, etc.) outfit from SimRipper. This should follow the same process you did the first time. You can choose which outfit to export by clicking on the dropdown menu labeled "outfit".

Save the file as a DAE as normal. If you're saving it in the same folder as the first one (and you haven't deleted the first one), you'll have to name it something different, or put it in it's own subfolder. I tend to name mine something like "[sim name] - Formal" to make it obvious which is which.
Open your custom rig in blender. Go to "file > import > collada (DAE)" and select your new outfit.
This is exactly like importing it the first time, so you can follow the exact same steps. The only different is that now you will have multiple of them.
If you didn't rename the DAE itself, your sidebar should look something like this. (You'll only have two, and also may or may not have the glass versions, depending on if your sim has transparency on any of their outfit.)

Rename those little sub-files into something more descriptive, so you know what you're looking for.
Looking at your sim, it might look a little wild, because all the outfits are overlapping. Just toggle the eye icons so that only the outfit you want to be working with is showing.
Repeat as many times as you want to have as many outfits as you need. (Feel free to delete any outfits you don't need after using them, etc.)
TIP: Have a "naked" version of your sim (aka, them in a swimsuit or underwear) for easy selection of joints and easier viewing of pose details. This is especially helpful if your sim is wearing something that obscures part of the rig (ex: a floor-length dress) or a dark color that hides the joints.
You did it! Now save your file, take a break, get a snack and a drink, and get to making poses!
(Make sure you save a version with your sim unposed and at the correct height so you can use it as a base for every single pose. That is the whole point of this, after all!)
If you have any questions, I'd be happy to answer them to the best of my ability. Just send me an ask! <3
51 notes
·
View notes
Text
GIV CUT SUNGLASSES + BLENDER EDITION

GIV CUT SUNGLASSES - GAME EDITION
New mesh
HQ/BG compatible
20 swatches
Unisex teen +
All LODs
Custom thumbnails
Disallowed for random
DOWNLOAD
PATREON [PUBLIC RELEASE: SEPT 17TH]
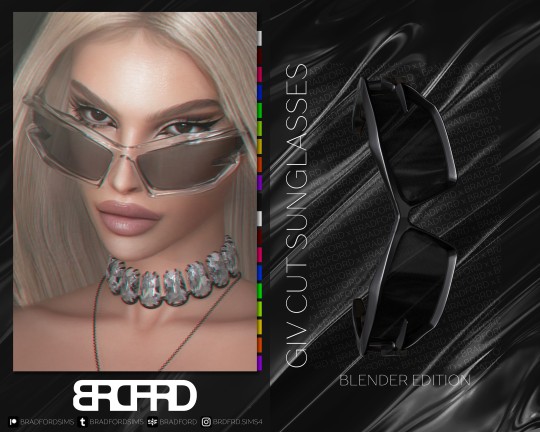
GIV CUT SUNGLASSES - BLENDER EDITION
New mesh
HQ textures [6144x2048]
20 diffuse textures
3 versions: glossy, matte and clear frames [shown on picture]
Rigged
Material Nodes for customization
Tutorials included
DOWNLOAD:
PATREON
-------------------------------------------------------------
WHAT IS BLENDER EDITION?
Blender Edition is a special edition that has more texture space (usually 2048x2048) and can be used only in Blender due to different UV Mapping. This edition allows you to create renders with more quality and flexibility than models exported from the game itself.
Archive with this edition contains .blend file, diffuse textures, normal maps and tutorials on how to use it.
IMPORTANT NOTE:
Blender Editions will be available to Platinum and Diamond members only. Early Access doesn't apply to Blender Edition since this edition weren't made for the game and is basically a separate 3D model.
69 notes
·
View notes
Note
Hi I love your mods! I want to start doing projects and improving my sims 3 game. The first project I want to start is taking all the cc cars I have from fresh prince and give them the features and animations of the fixer upper car so it can be more realistic and sims can actually sit in the cars and then eventually I want to see if I can change the sims 3 cars code and so we can drive in the driveway and exit of the driveway like use the sims 2 car animations. But my question is I know there’s a script mod where someone added the scripts of the fixer upper car to all the base games cars so I have the scripts and stuff and I have that mod downloaded, and I can easily add it to all the cc cars. But where do I begin for animating like where do I start learning how to create pie menu interactions all that like you? You’re a big inspiration for me btw. And If my projects all work out I’ll definitely share it on Mod the sims or my tumblr. I even want to also ask permission from quack games and modify the third permission mod and see if I can make a first person mod from it and have it toggle between both first and third person. Sort of like gta. Thanks again for creating these awesome mods.
Thanks so much for the nice words! 🤗 It's so cool to see people wanting to get into modding for TS3. Your excitement is getting me excited and I love your ideas! First person view driving would be epic!
Having TS2 style cars in TS3 is definitely something I've thought about (and I'm sure a lot of others as well). It's actually on my list of mods I'd like to do but so far down my WIP list so I'm glad to hear that you're going to tackle it. It's a lot of work but it can be done!
As for how to animate cars. There's not a lot of tutorials out there but I learned how to do custom object rigs just from looking at the game files of other animated objects in S3pe and seeing how MLOD files are set up and how they link to mesh parts (groups, vertices, joints, etc). So I would start there. Having basic Milkshape and Blender knowledge will help. Cars are technically already animated objects but of course, not like in TS2 but that also means the amount of custom anims you'd need to do is basically the doors, hood, trunk which are basic X rotation, hinge-like animations so it's not advanced stuff.
Also TS2 has a ton of in-game and cc cars with all the object animations you'd need so I would also export some TS2 car meshes into Milkshape or Blender and look at how they work. There's actually a lot of TS3 cars that cc creators have converted to TS2 that you could just convert back. (I say "just", it'd be a lot of work but it's totally doable!)
MTS has a ton of great tutorials here. Good luck and keep us posted on the project! I need my Vehicle Enthusiasts to actually have something to live for. 😉
21 notes
·
View notes
Last Seen Blogs

theoldcrane
theOldCrane

choigaigoi
Sans titre

finneganhawley91
The Journey of Kornum 240

clxndestinethoughts
clandestine.
teadrunknyc
Tea Drunk