#blender tips
Text

Custom Rig / SimRipper Tutorial
Hi hello, welcome to todays lecture! Nah it's real simple even if it doesn't look it, I promise! I'm gonna go ahead and assume you have some basic knowledge of Blender/pose making for this tutorial, so I won't be going over how to set up your rigs or anything. Feel free to ask me any questions though! My previous pose tutorial is here if that's what you're looking for.
Disclaimer: I use this process to rip sims for posing only, idk if it's different for making renders 'cause that I ain't my jam. Although I assume it's pretty similar.
You're gonna need Blender (I use 2.79b but I'm pretty sure the newer version works okay for posing too) and SimRipper which you can get here...
Blender (2.79b)
SimRipper
First things first, you're gonna wanna dress your sims! Just go in game like you usually would and once you're done dressing 'em you can save and exit.
Hint: SimRipper will load up your sim wearing the outfit they're dressed in when you exit the game. I usually make sure they're wearing the right outfit before I quit. You can load up other ones later but it can take a while so it just saves some time.
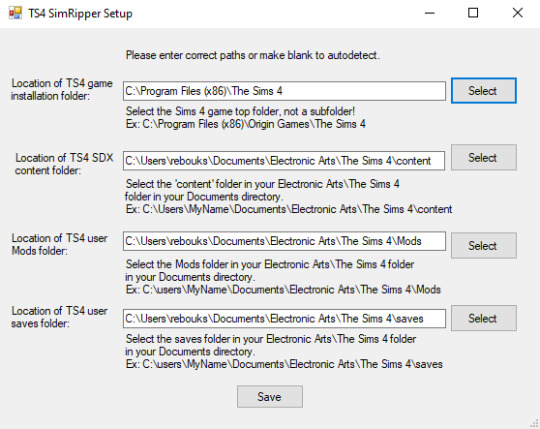
Okay! Once your simmies are dressed and you've downloaded the SimRipper/extracted the file, double click on the .exe to open the application. You'll be greeted with this:

Click "Retry" to set up the correct paths then hit save.
(I only needed to set up the first one so I'll assume you do too! If not just let it know where everything's installed)
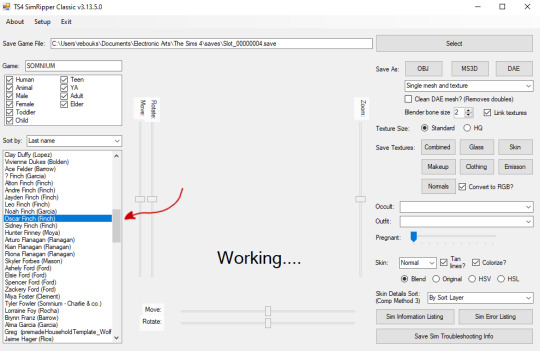
Once you've hit save the application will open! Hit "Select" on the right and choose the correct save file, like so:

Hint: SimRipper is slow so don't worry if it says Not Responding or seems to take a while, it's pretty normal. The less sims/outfits there are in a save file, the quicker it'll work. You can make a blank save to make it faster but I don't bother; it doesn't take too long and I can't be arsed.
You'll be greeted with a long list of all the sims in that save file. Find and click on the sim you wanna rip:
Once your sim has loaded up there's a couple of things we wanna change:
Change the top drop down menu to "Solid and glass meshes and textures" - this'll make it easier to get rid of eyelashes etc later (we don't really need those for posing and they get in the way of the eyes)
Click HQ - it'll look better, trust me!
You can change their outfit here too if they're not wearing the right one - though it'll take a while to load up again.
I like to hit the "Tanned" option, especially for paler sims, since blender seems to really wash them out and it hurts my eyes 😂 - personal preference though!
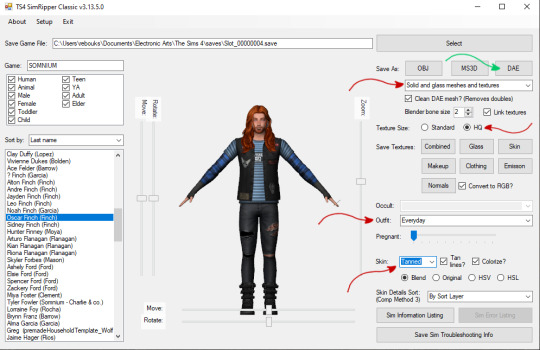
Once everything's set you'll need to click on "DAE" near the top right, this'll save your sim as a .dae file ready for blender. Again, it might take a while! Once you're done, you should have these files:

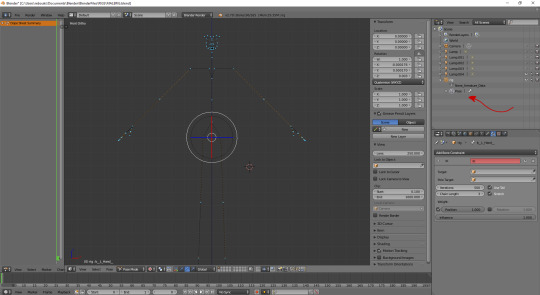
Okie doke! Now we're off to Blender. Open up your rig and click the little plus to the left of it to extend the menu.
You're gonna right click on each of these body parts like "bottom" "feet" etc etc and hit delete until they're all gone.
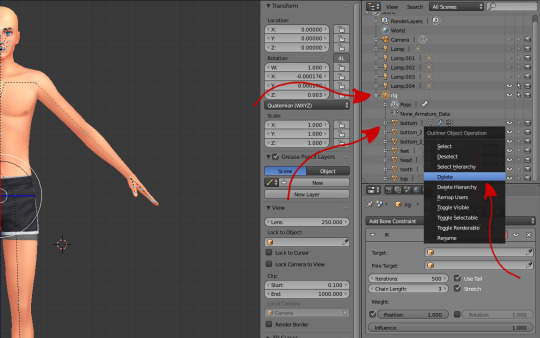
Once you've deleted every body part, you'll be left with an empty rig like this:
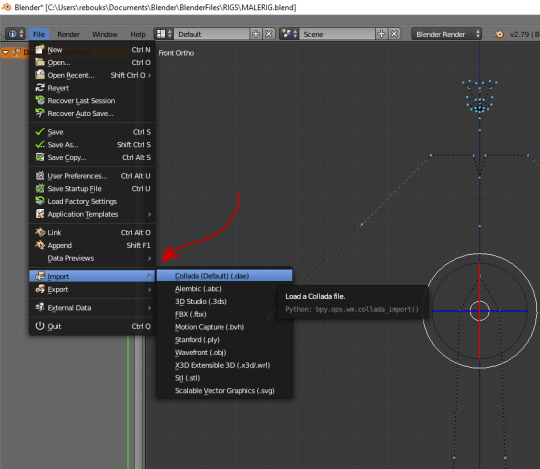
Now that our rig is empty, we can import our .dae file!
Go to "File" -> "Import" -> "Collada (Default) (.dae) like so:
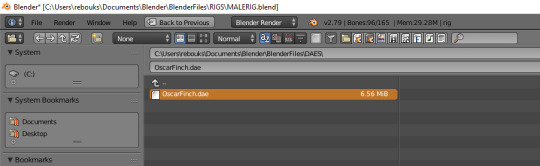
Find your .dae file and double click on it to import it.
Hint: I like to make a separate folder for my .dae files and I regularly delete 'em once I've saved my rig. I like tidy files!
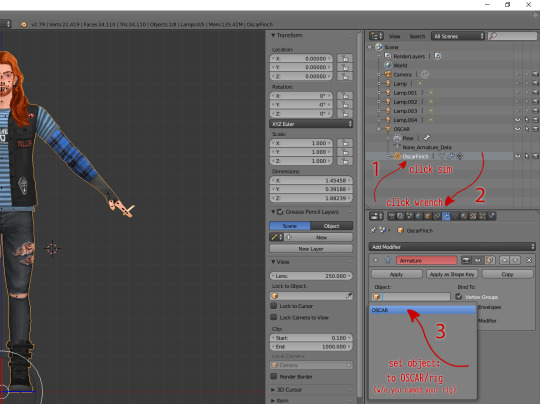
Hi Oscar!
I'mma go ahead and right click on this extra lamp that was imported and hit delete 'cause I don't need it! You can keep it if your eyes aren't sensitive little babies like mine, it doesn't matter much.

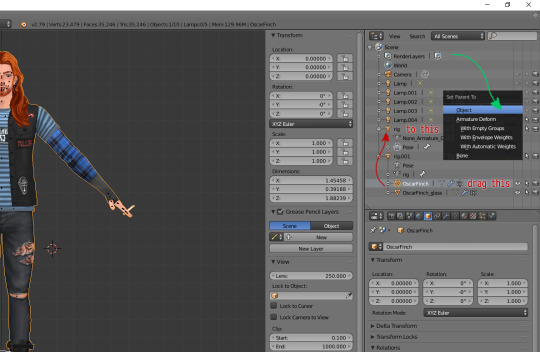
Okay.. so now we should have a "rig" and a "rig.001"! Click the little plus signs to the left again so you can see what's in the hierarchy of each one, and then:
Click the upside down orange triangle of your sim from the "rig.001" rig and drag it up to the first one, then drop it on top of "rig"
A box should come up like the one below and you wanna click on "Object"
All we've done here is move Oscar (or whoever) from the extra imported rig to the original. We don't need that extra rig or the glass textures (the eyelashes etc) anymore so get rid of it by right clicking it and hitting "Delete Hierarchy" like so:
Hint: "Delete Hierarchy" is different from "Delete" and gets rid of the whole hierarchy (shocker) at once!

I like to rename my rigs, it can get complicated when you start posing more than one sim so naming them just makes it easier. Double click on where it says "rig" then rename it:

Now we need to attach your sim to the rig, as below!
Left click on the sim (aka "OscarFinch" in this case)
Head to the toolbar just below and click on the little wrench/spanner.
A little further down, click on the box beneath "Object:" and choose your sim/rig
In this case it's called "OSCAR", but if you didn't rename your rig it'll still be called "rig".
And that's it, you now have a custom rig 👍
Just make sure you save it!
You can go ahead and click on the little plus/minus to hide the drop down/extra info of the rig and start posing! \o/

Once you've done this a couple of times you won't even have to think about it anymore! I do it almost everyday and I had to really pay attention to what I was doing for this tutorial 'cause I was like ??? when I tried to think how I do it lmao.
They're so much more fun to work with than the base rigs, no more clipping, better facial expressions, poses with clothes in mind?! Amazing 😌
Extra Hint!
If you rip a sim who's dressed with a pose accessory assigned to a stigmata joint, it'll still move as if you imported that accessory via blender. I randomly found this out by accident but it might save you some time!

I hope you found this easy enough to follow, but lmk if you have any questions! I think this is one of those things everyone kinda does a bit differently. Like.. one tut I saw you had to add the textures in separately n' shit? Idk that one confused me so this is how I do it and it works, so I hope it does for you too! ❤
Happy SimRipping!
(sounds kinda painful, doesn't it? ouch)
#sims 4#ts4#blender tips#custom rig tutorial#simripper tutorial#simripping tutorial#simblr#posing tips#tips
456 notes
·
View notes
Text
not sure if any of my fellow blender nerds know this but if you want to import an object from TS2 that has joints (like to control the blanket on a bed, possibly to open a fridge maybe??) you need to import it to milkshape from SimPE, then export it as an SMD. you might need source's plugins for blender but i think they might come with it anyway?
19 notes
·
View notes
Text
i'm seeing a lot of clay hairs with like, insane poly (but still crunchy in game) and i beg you to lower the resolution on your curves. it saves you decimation time and your hair looks pretty much the same after


you don't even have to go as low as 4 but ffs, don't leave it at 12.
this is quick to show size (bc them edges aren't creased or anything) but details from 1 will be backed into 2 with a normal map and just texturing.

69 notes
·
View notes
Note
is it ok to ask how u edit ur lookbooks? i love your style sm
hiii!!!! omg thank you 🥹
first thing you need to know is that where my lookbooks are concerned i'm not doing a whole lot of editing. that's my secret, i think. i do as much as i can in blender. which is why this is exceedingly flattering for you to say because i do not consider myself very good at editing (mostly compared to those ppl that do shadows and hair strands, that's not my bag yanno!!!) i also try not to get too repetitive, so this is all just kind of general. if you got specific lookbooks in mind, i can dig into it.
also to preface this, i'm not going to link to any specific tutorials, because i don't know your particular learning style and there are soooo many tutorials out there that i could take hours just finding one. so i'm sorry but i'm going to have to leave the research with you, and point you in the right direction.
i've been using the same PSD, more or less, for well over 10 years now. i tweak it a little every time. learning how to make your own PSD can be a game changer-- you can learn how to manipulate the colors the way you wanna manipulate them, and if you use it long enough (like i have!) you'll create a signature. i'm such a sucker for the selective color adjustment layer, it's how i get my pinks so uniform. 💗
almost as important as a PSD is the action you use. i also made that, just a little sharpening, very tiny topaz effect, and more smart sharpen. in doing this (either taking the time to learn to make your own, or finding one you like) you'll free up a lot of time by quickly filtering your images and moving onto the fun parts.
layers layers layers!!!!
blending options for your layer open up (little mermaid voice) a whole new world! whether it's text you're bringing style to, cool outlines, soft glows, you can have a lot of fun just playing around.
fonts. just collect cool fonts you like. lost-type co-op is one of my favorites. play around with making some typography. there's no right answers!! but if you're working in a bigger canvas, make sure to zoom out so you know it's gonna be readable when tumblr scales it down to fit its format.
if you're going the blender route:
get in the habit of doing transparent background versions of every shot. even if i don't plan on using them, i just have them, and it makes editing a lot easier, a lot less painful. don't even have to crop out the backgrounds, it's just done.
learning how to use the compositor is another game changer. it's how i bring a little bit of a glow to my renders and make them pop without even having to open photoshop.
turn on node wrangler. this isn't relevant to anything in specific just look into how to enable node wrangler and thank me later.
also turn on the ratio aspects in your blender camera settings. this will allow you to see if things are centered, or juuuust the right amount of off-center if, if you're into that.
#i hope literally any of this is helpful#my brain is scrambled egg today i'm tired it's been long my head hurts#and i was about to work on this months lookbook when my mouse died :3#asks#anon#blender tips#photoshop tips
10 notes
·
View notes
Text
How to select a face and face loop of object in Edit Mode in Blender
Blender tutorial video shows how to select a face and face loop of object in Edit Mode with using shortcuts. To select a face of object, we can switch to edit mode, and use the face selection to select face using Left Mouse Button. In this video, we will show how to select a face individually, how to select multiple faces, how to select connected faces, and how to select face loop with direction.…

View On WordPress
0 notes
Text
now that i'm pretty much at my highest weight i think i should do a gaining challenge for the month of november 😈 i rlly want to push myself and finish out the year strong
#i am so close to finishing unpacking all these stupid boxes in my new place and then i am obligation free indefinitely#ready 2 hunker down on the couch#i saw reiina did a boost shake challenge tied to tips recently and thought something like that would be neat!!!#and still need to recreate lisalous shake recipe in the new blender i got#suggestions for how i should set it up? or teasing abt how enormous i am? will turn anon back on rn
1K notes
·
View notes
Text


If you are a 2D artist, this is your sign to learn Blender so you will never have to guess again. Nothing replaces proper references from life, but it helps tremendously understanding how materials will work in a certain setting (that you have full control over).
Plus I only cried for two weeks when I started out.
#thanks for coming to my ted talk#art help#digital art#art tutorial#art tips#art reference#artists on tumblr#blender#artwork
196 notes
·
View notes
Video
youtube
How to DRAW your own 3D models! | Blender TIPS + TRICKS
I don’t often do full-on tutorials like this, but I’ve really caught the 3D-art bug recently and wanted to talk about this fun new sketching method I’ve been trying to pick up!
Feels good to be back behind the mic after spending so long working non-stop on secret project stuff lol - I still have a little ways to go on all that, but for now I hope y’all can enjoy going on this lil’ learning journey with me! ✨
🍁 LINKS 🍁
#artists on tumblr#ABD illustrates#tips + tricks#tutorial#blender#ngl i have a lil anxiety about this one cause its so far from what i normally do (character art)#but this whole 3D scenery drawing thing is really FUN and i really wanted to talk about it sdfghkfs
580 notes
·
View notes
Text

Midnight
#call of duty#modern warfare#call of duty modern warfare#MWII#CoD MWII#blender renders#Phillip Graves#Philip Graves#Shadow Company#CoD OC#OC: Jax#Jackie Ramirez#Ship: High Places#oh to make out sloppy with your hot loser bf in the middle of the night#you can't even see it but Graves is on his tip toes#shortass#loser#he sucks#I need him carnaly#eating drywall
99 notes
·
View notes
Text
Quick tip for my fellow (Asti) artists for the perfect reference :D
You don't need to know Blender for this except for some tiny basics that you can learn in less than 30 min!
Download Blender. It's free and amazing.
Download this Astarion model as .blend file.
Unpack the ZIP and open the .blend file with double click. It should open in Blender automatically when you have installed the software. (I probably renamed the file so don't worry.)

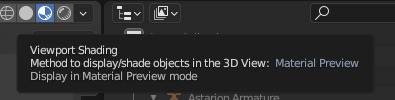
4. Once opened in Blender, look for the globe symbols on the top right of the window and click the middle globe "Viewport Shading".
5. You should now have something like this:

Don't get distracted by the camera, the lights or the shlong, you won't need any of it (probably)
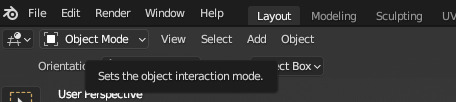
6. Go to the top left of the window and make sure "Object mode" ist activated.
7. Pick the "Modeling" tab.

8. Click on the Asti. You can zoom in and out with mouse wheel. You can navigate by pressing the mouse wheel alone and move the mouse or pressing mouse wheel + shift.
9. On the very right, there should be an area that is called "Scene collection".

Navigate to this window and click on the eye symbol next to "Astarion Armature" to make sure it is visible if it isn't yet.

10. Make sure you still have object mode activated. Click on the "Astarion armature". Now you should see a lot of orange fancy thingamabobs around Asti.

11. Now it is important that you navigate to the "Object Mode" tab and pick "Pose Mode".
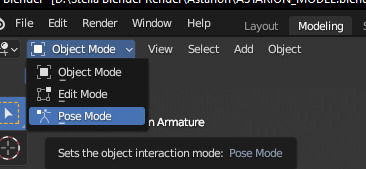
You will now see that the thingamabobs (his rig) will become colourful. Perfect, almost done :D
Now it is time for Asti to strike some Poses!
Click on any of the colourful lines (Some are not able to be moved, but you will figure out which one does what).
In this example, I picked the rig for this arm/wrist:
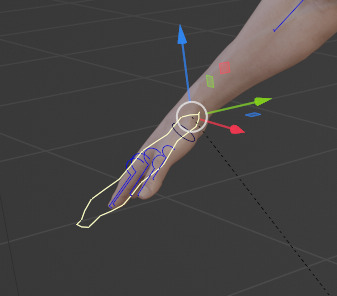
On the left side of the window, you should see a toolbar that looks like this:

If the toolbar is not there, simply press "T". All we basically need are these two:

If you pick one of these an click on the parts of Asti's rig that you want to move, you can move them up or down with the arrow option ("Move") or rotate them in any direction with the option below the arrow. ("Rotate").
Let's rotate Asti's hand:

I click + hold the red line and move it upwards.

EASY GOING! this is honestly basically it. Play around with it a bit and you will get the gist :)
You can really get him into any pose you like, it may be a bit fiddly to find out if you are new to Blender, but it is totally worth it :)
This is not only a great ref tool for Asti artists, generally he makes a remarkable ref for studying the male anatomy, facial structure, hand poses and so much more :)
I hope my little tutorial was helpful to you, I usually don't make tutorials so I hope I was able to make it somewhat comprehensible 😅
I just really wanted to share this because it was a real game changer to me. :)
If you have any questions, feel free to ask in the comments/DMs etc.
Also here's a dope Blender beginner tutorial:
youtube
Happy painting/modeling!! ♥
#astarion#bg3#astarion ancunin#bg3 astarion#baldur's gate 3#baldurs gate 3#bg3 art#art tips#astarion art#astarion fanart#baldurs gate astarion#blender#astarion 3d#mystuff#Youtube#bg3 fanart
53 notes
·
View notes
Text
"I should get into blender"
Many artists often joke about this.
But honestly, please don't force yourself to do it or think that this is the best way to getting better at 2D art. 3D is its own, very huge, complex and confusing medium of art with a high learning curve. You can easily get frustrated at the start. There's plenty of other ways to use 3D tools to help you.
But if you're scared and still looking to break into it here's some ideas you can do to start small and/or use it to help with your 2D art:
If you just want to model objects for you to trace/use as references:
-> Basic lowpoly modelling is enough, especially if you just wanna get a background perspective right. Get some cubes, extrude faces and move around their faces/edges/verts.
-> Alternatively, go to sketchfab and look for models, get it into position, screenshot and trace it. No modelling needed.
-> Learn how to block out scenes or characters!
If you want to make characters:
-> Learn 3D Sculpting! It's a lot more intuitive for a 2D artist. Blender has a sculpting feature. There's also NomadSculpt on iPad but it costs a little money.
-> Also helps immensely with anatomy practise! Look up some anatomy references and really work out the details by blocking out the shapes of muscles.
-> You can also do other props with sculpting, it's called Hard Surface but it's more difficult to do than organic shapes.
The infamous Blender Donut tutorial:
-> This may be subjective but I've seen many 3D artists actually recommend against doing the Blender Donut. It doesn't cover all of the basics.
-> Look for tutorials that aren't Blender Guru. You could also just look up individual steps such as "blender lowpoly modelling" or whatever.
-> There are multiple ways to start out with a model. I personally like to do lowpoly (also known as low-to-high workflow) without using the subdivision modifier. Find something that's right for you!
3D taught me a ton about art and did make my 2D art improve. But I also do it because it's fun on its own. Don't think you have to do it. You're doing fine.
Also these are just ideas, i am not a professional. I'm simply going off from my own and other art students' experiences.
If you do try it, i wish you good luck and have fun!
#3d#art tips#blender#b3d#this isnt negative i just think the statements of '3d helps you improve your art' and 'dont push yourself to get into 3d' can coexist#every time i see people joke about 'getting into blender is the 'ill work out' for artists' i get upset#bc you dont need to! you are fine#and even if you do want to try it out. you can start small! you dont need to know everything. it doesnt have to be scary#dont learn 5 steps at once just learn one
128 notes
·
View notes
Text

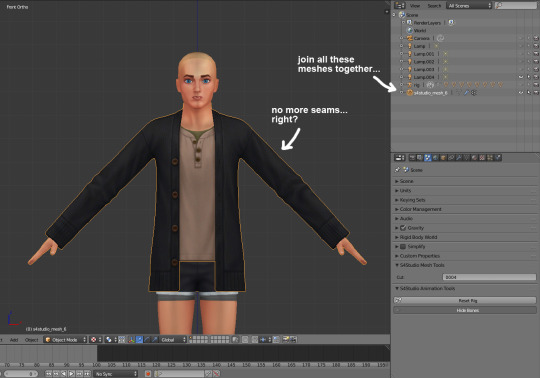
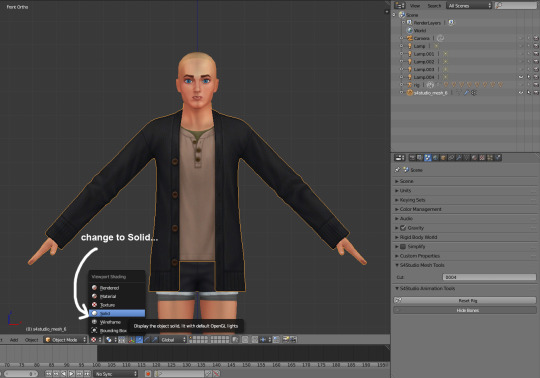

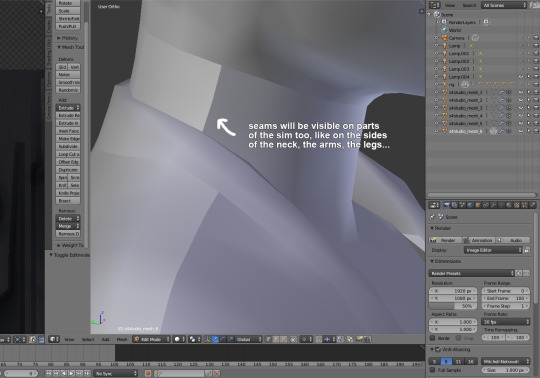

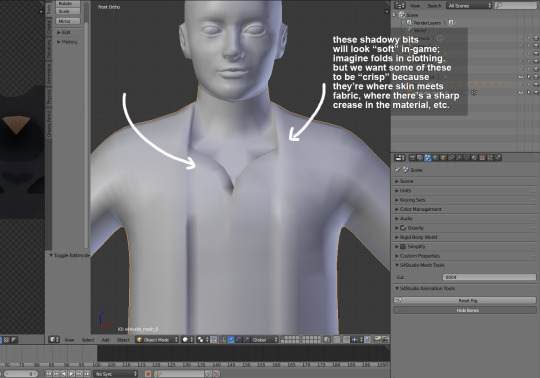
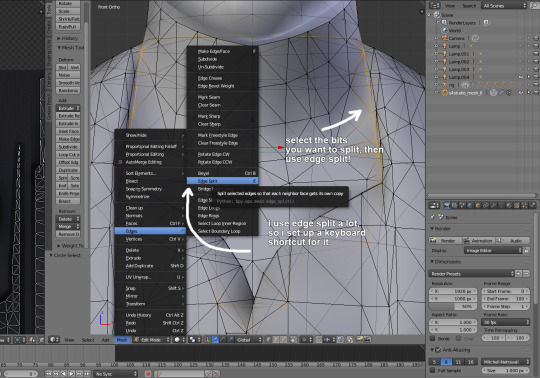

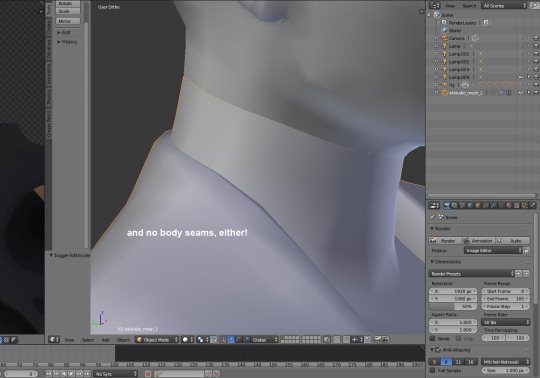
i've been making custom content for almost a year now, so i thought it might be helpful to start sharing little things i've learned to do in blender! i created this step-by-step guide on how to remove seams from a maxis mesh and how to edge split parts of meshes which should appear "crisp." i think they really help to make custom content look neater in-game.
you don't need to do this if you're making recolors, but if you export the mesh from sims 4 studio (i.e. to make something from a pack base game compatible), these seams will appear.
i hope this is helpful for others who are starting off editing maxis meshes themselves! 💪💪
#let me know if this is like. an obvious tip. lol#i never saw it in tutorials so i thought i would share :3c#oh god i have to think of a new tag.#tips and tutorials#there. descriptive.#also this assumes that you know a lot of blender basics.. if anyone is interested in like a toe to tip ''how i make cc'' thing i can do tha
71 notes
·
View notes
Text
do you guys like rarepairs
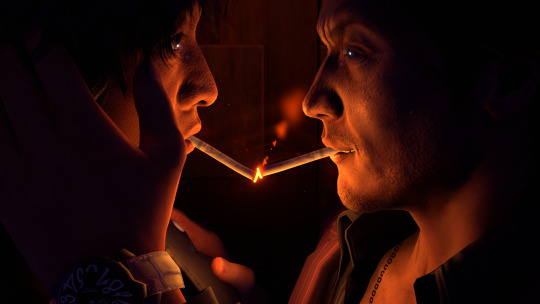
#akiyama shun#yagami takayuki#akiyaga#ryu ga gotoku#yakuza#hehehe theyre touching tips#3d artwork#blender3d#blender#3d art#rgg#rgg fanart
37 notes
·
View notes
Text

That Lestat Redraw...
This render has the record of being my biggest render in terms of file size and I had no choice but to size this one down and upload its true version in the Drive.
Anyway to enjoy its glory: HD size
Also an Alt version with less painting look
#ts4#ts4 renders#bg3#astarion ancunin#chloe pries#tav#astarion#anyway tip for poses put the pictures as reference in blender#i tried to compress this pic but it just ends up giving astarion orange eyes lmao
25 notes
·
View notes
Text
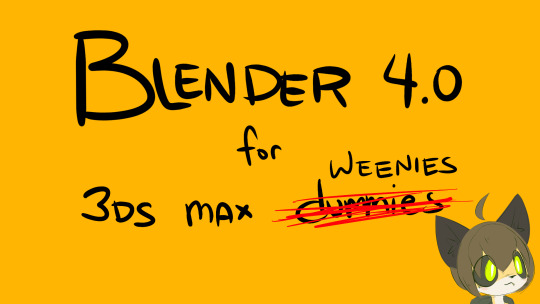
I made a tutorial for 3D Studio max users for blender
youtube
13 notes
·
View notes
Last Seen Blogs

slinx127
Slinx 127
daily-desert
daily desert

kandykane78
KandyKane

tato009
YAXKINarquitectura

bimbo-schooled
Bimbo Goals