#craftsmart
Photo

My spread for #thanksgiving week in my mini dashboard layout @the_happy_planner using the Fall Harvest sticker book paired with some craftsmart scrapbook paper from @michaelsstores 😁 #thehappyplanner #minihappyplanner #minidashboardlayout #minidashboard #dashboardspread #dashboardlayouts #planner #plannercommunity #scrapbook #michaels #scrapbookpaper #craftsmart #plannerstickers #plannerlayout https://www.instagram.com/p/ClMNoyAp5bz/?igshid=NGJjMDIxMWI=
#thanksgiving#thehappyplanner#minihappyplanner#minidashboardlayout#minidashboard#dashboardspread#dashboardlayouts#planner#plannercommunity#scrapbook#michaels#scrapbookpaper#craftsmart#plannerstickers#plannerlayout
0 notes
Text


Milla Vodello made using DAS Stone airdry clay
#psychonauts#milla vodello#airdry clay#clay sculpture#clay figure#this is the first clay figure I've ever made so if she looks a little like peanut sonic you know why#I used craftsmart acrylic paint and prismacolor pencils for everything else btw#my art
37 notes
·
View notes
Text

Hee hee hoo hoo I made potions
#They're going in my housemates's presents#The bottles were from the dollar store and could hold 1.5ml of liquid#But I used metallic craftsmart paint and glitter for these#I kinda want to make more. It was fun#dnd
2 notes
·
View notes
Text
watching art videos and recognizing michaels products counts as a mental illness i think
#someone whips out some ribbon with the Celebrate It™ brand logo on it#and im like haha. thats a michaels store brand. sold exclusively at michaels#brot posts#michaels posting#or craftsmart. artists loft. art minds. recollections#what else is there im sure we have other store brands#BELMONT. belmont frames.#CREATOLOGY. for kids crafts#oh and uhm. make market thats the newest one#ASHLAND for seasonal stuff too#if you shop at michaels and you see any of these brands just know theyre the equivalent of store brand#bc for some reason Michael loves to move away from name brands and produce everything in house#theyre trying to move away from name brands as much as possible which is crazy to me like we cant have ALL store brand thats stupid#especially for the fine arts and stuff like you cant have people looking for like posca or copic markers and. we just. dont sell them??#we are an art store how do we not sell name brand fine art stuff#idk. i digress#we’re definitely transitioning away from name brands but the rest is hearsay on reddit like surely we can never reach 100% its just insane#but yeah we’re definitely moving more towards in house production#like just recently we got rid of DIAMOND DOTS. FUCKING DIAMOND DOTS#and replaced it with the fucking make market store brand version#oh and the art minds vinyl rolls. instead of cricut or siser now we got store brand vinyl#etc etc all new shit from the past few months#but at least thats IN ADDITION to cricut and siser unlike make market which just replaced diamond dots entirely#head in my hands i am burdened with knowledge about the inner workings of michael#WAIT SORRY I REMEMBERED ANOTHER. BEAD LANDING FOR JEWELRY !!!
6 notes
·
View notes
Text
loops and threads soft classic my beloved. they should teleport every single ball of this to me at al times im love
#i love you formerly craftsmart value. good good yarn#big twist BETRAYED ME it splits SO EASILY!!!!! soft classic woukd never i love it#im having an emotional affair with a yarn brand. girl i used to hate micheals i finally understand why they’re still in business#the only caveat is the fewer color options but oooogh i love it#leaf green soft classic i legitimately once teared up when i when i thought i ran out and i found i had an extra ball i forgot i had
1 note
·
View note
Text
Honestly I really gotta get some more acrylic paints for crafts (I have a whole set but they're glossy and I need matte finish) the ones I have now really aren't vibrant enough to achieve certain colors no matter how much I mix them... Plus I'm just missing some colors (like magenta and stuff... Which also impacts my ability to mix colors greatly)
Mostly I need a more vibrant red tho I think, the red is pretty muted
#the brand i got is craftsmart i think??? its a brand sold at Michaels stores idk if they sell them other places#but yeah i need to get a more vibrant mix of colors ... for sure#ill see if my brother wants to take a trip down to Michael's soon (once i get my bank figured out... so i actually have access to my money.)
1 note
·
View note
Text
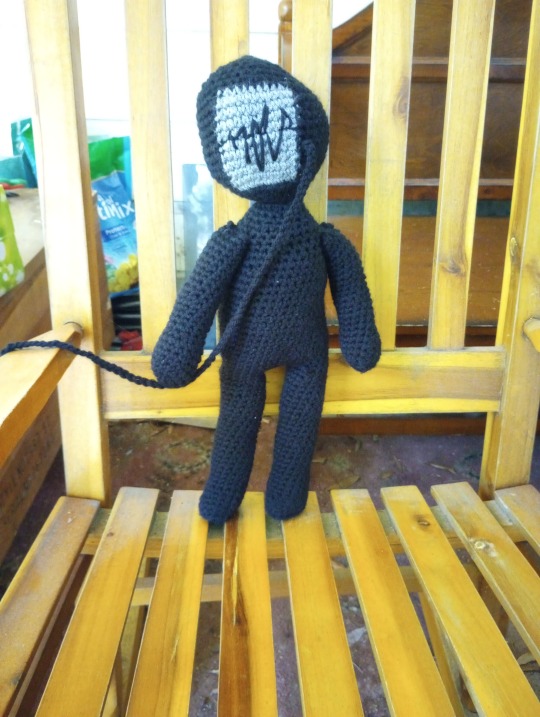
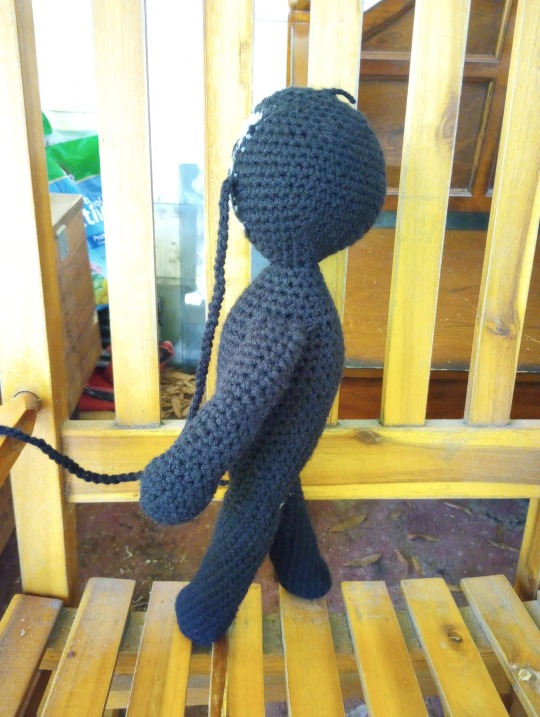
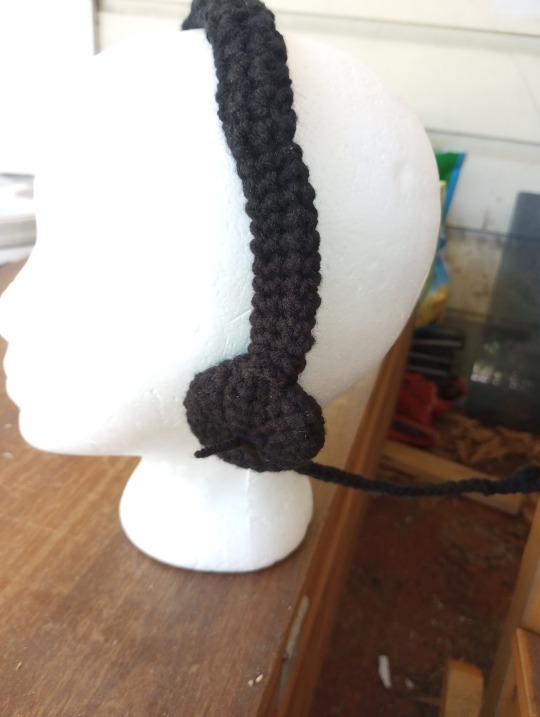
"Stay safe out there."
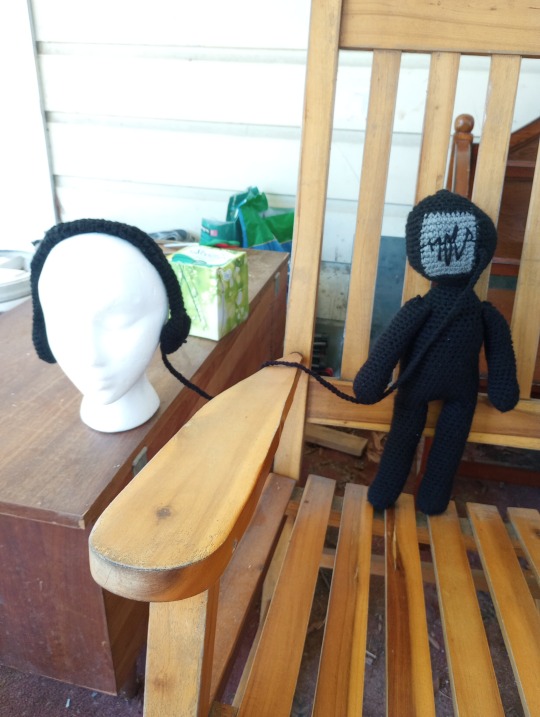
Character Name: Mistholme/The Audio Tour Guide
Fandom: @the-mistholme-museum [Podcast]
Voiced/Written By: Dom Guilfoyle
Yarn Used:
Body: CraftSmart Value - Black
Interface: CraftSmart Value - Heather Gray
Voice: CraftSmart Value - Black
Headphones: CraftSmart Value - Black
Basic pattern here.
Do you have any fucking idea how much it sucks wanting to hug something that not only literally but canonically doesn’t have a body? A lot.
Oh, my sweet, innocent, naive, trusting little Guide. Never lose that childlike wonder, no matter how much about the world you learn. And never lose your love of storytelling. I had hoped to finish Declan and the Guide before the finale of Mistholme, but I figure I finished close enough to the end that I can still ride that high. (Also, if you haven’t listened, go listen. Now. If you liked TMA’s format of “seemingly unconnected/only loosely connected stories that slowly coalesce into a coherent storyline that can, will, and must break your heart a thousand times over and have you begging for more”, you’ll love it.)
The Guide went through a lot of transformations over the course of the show, both in terms of personality and in terms of…existence, I guess. Without spoiling too terribly much, I rather got the impression at the beginning of the podcast that there were physical audio tour guides you would pick up at the entrance to the Mistholme Museum with the latest version of the Guide on them that you would then turn in before leaving, but by the end, you could—and frequently did—download the Guide directly to your phone. So how do you convey that as something you can give the hugs it so richly deserves and desperately needs?
This is a fun one to write up, because…well, for the most part, I didn’t vary the basic pattern. As mentioned, the Guide doesn’t have a body, but it does have a personality, so I just made a black, person-shaped void to be its “body”. Where it varies, though…is the head.
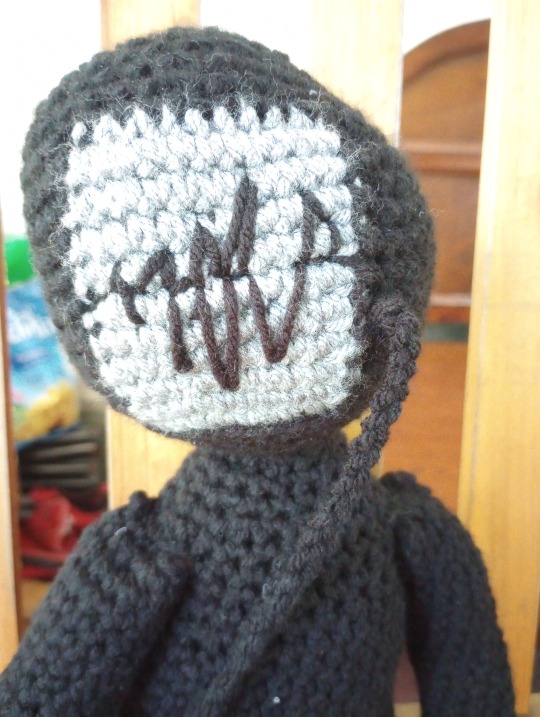
Interface: I wanted this to look like the display screen of an audio tour guide, so I stitched in the back loops only of the stitches forming a square where a person’s face would be beginning with R60 and ending on R71. Then I embroidered a sound wave onto it. Simple enough to describe. Surprisingly only slightly more difficult to execute.

Headphones: You’ve probably figured this out by now, but I will absolutely make my life as complicated as possible in order to avoid having to sew too many pieces together. I think these turned out pretty damn good, though! Pattern is as follows:
Earpiece 1:
R1: 6sc in magic circle, sl st in first sc (6 sc).
R2: Ch 1, 2sc in each st around, sl st in first sc (12 sc).
R3: Ch 1, [sc in first st, 2sc in next st] 6 times around, sl st in first sc (18 sc).
R4: Ch 1, [sc in first two st, 2sc in next st] 6 times around, sl st in first sc (24 sc).
R5: Ch 1, sc in first st, ch 2, skip next st, sc in next 23 st, sl st in first sc (23 sc, 2 ch).
R6: Ch 1, sc in first st, sc in ch sp, [inv dec, sc in next 2 st] 5 times around, inv dec, sl st in first sc (18 sc).
R6: Ch 1, [sc in back loop of first st, inv dec] 6 times around, sl st in first sc (12 sc).
R7: Ch 1, inv dec 6 times around, sl st in first st (6 sc).
Sl st up to ch sp.
Headband:
R8: Ch 1, 2sc in ch sp, sc in next 4 st around gap, sl st in first sc (6 sc).
R9-17: Ch 1, sc in each st around, sl st in first sc (6 sc).
R18-22: Ch 1, sc in first two st, hdc in next st, dc in next two st, hdc in next st, sl st in first sc (2 sc, 2 hdc, 2 dc).
R23-27: Ch 2, hdc in each st around, sl st in first hdc (6 hdc).
R28-32: Ch 1, sc in first two st, hdc in next st, dc in next two st, hdc in next st, sl sti n first sc (2sc, 2hdc, 2dc).
R33-42: Ch 1, sc in each st around, sl st in first sc (6 sc). Fasten off.
Earpiece 2:
R1: 6sc in magic circle, sl st in first sc (6 sc).
R2: Ch 1, 2sc in each st around, sl st in first sc (12 sc).
R3: Ch 1, [sc in first st, 2sc in next st] 6 times around, sl st in first sc (18 sc).
R4: Ch 1, [sc in first two st, 2sc in next st] 6 times around, sl st in first sc (24 sc).
R5: Ch 1, sc in first st, ch 2, skip next st, sc in next 23 st, sl st in first sc (23 sc, 2 ch).
R6: Ch 1, sc through first st and first st of end of headband, sc through ch sp and second st of end of headband, inv dec through end of headband, [sc in next two st, inv dec] five times around, sl st in first sc through end of headband if necessary (18 sc).
R7: Ch 1, [sc in back loop of first st, inv dec] 6 times around, sl st in first sc (12 sc).
R8: Ch 1, inv dec 6 times around, sl st in first st (6 sc).
Sl st down to bottom of headpiece.
Cord: Ch 34. Sc in 2nd ch from hook, sc in next 5 ch, sl st into next ch, turn. Sc in back of ch 6 times, sl st in first sc. Ch to desired length.
Join to head next to interface.
#blorbo from my shows#crocheting#the mistholme museum of mystery morbidity and mortality#audio tour guide#mistholme guide#I'm so happy with him you have no idea
34 notes
·
View notes
Note
Your Jed and Octavius dolls are really cool!
thank you !! they were so fun to make--i highly encourage everyone to try !! i used affordable materials, all of which i already had on hand!
i'll ramble about it under the cut if you're interested.

(charms from @badpanini :D !! )
i did a mock-up sketch of approx the size i wanted the dolls to be, then started to sculpt their parts according to that guide. (literally just a crime scene outline with a vague armature line going through it)
i used sculpey iii to sculpt their heads, hands, feet, and armor! then i used some wire and electrical tape to make the armatures and hot clued the clay parts onto them. i used scraps of flannel fabric from a previous project and wrapped it around the wire using A LOT of hot glue to make sure it was secure!
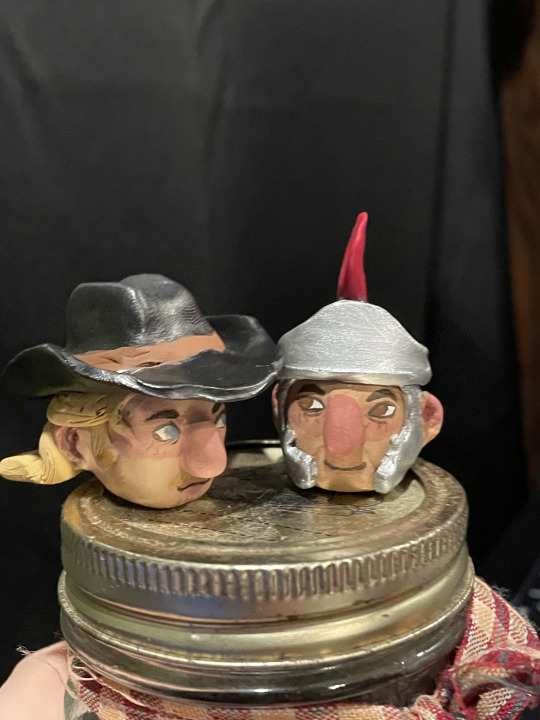
i wrapped the torso first to make sure the most finicky part of the armature was stable, then moved onto the arms and legs. if you're wondering how the limbs are so nice and bendy, i made sure to wrap the flannel in segments! i wrapped the limbs in two sections each: forearm, upper arm, thighs, and calves! this makes the "joints" uniform each time i go to pose them!
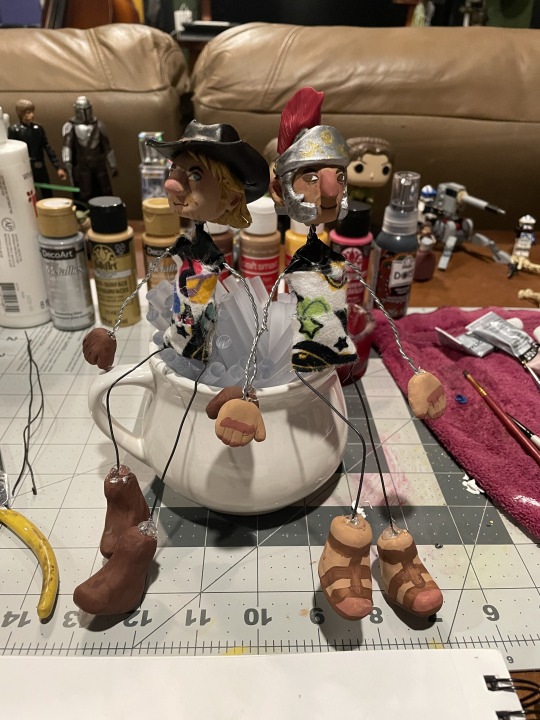
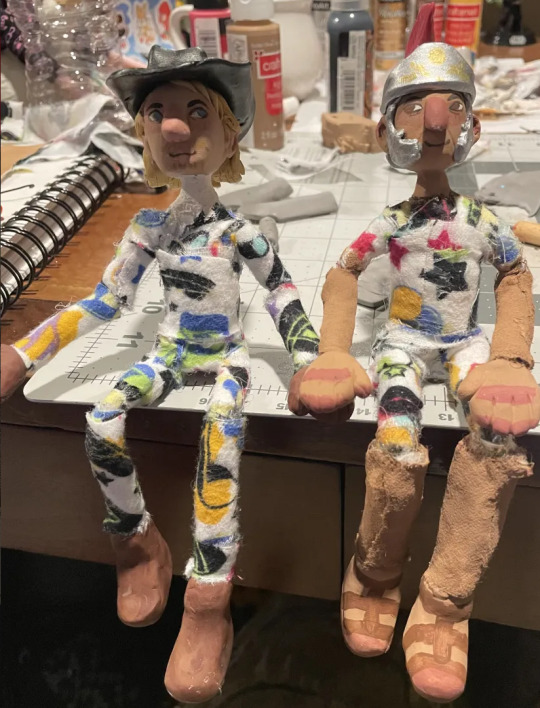
i used that same flannel but inside-out for oct's arms! i hid the seam on the front because i knew the gauntlets would cover it. i have a bottle of "golden brown" craftsmart acrylic paint that i used for his skintone straight out of the bottle, so i painted the fabric with it to match the clay !
their clothes were a pain in the ass to make, because you have to maneuver the dolls around to be able to sew them on HAHAHA
yes, i did make jed's jeans under the chaps. it was awful. but it added to the whole thing.
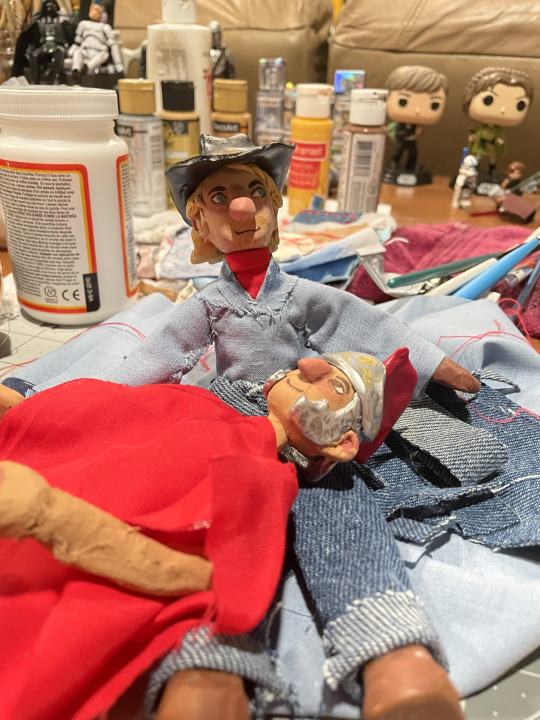
for this entire craft, hot glue was my best friend. my ride-or-die. i can't even begin to tell you how many sticks of hot glue i went through.
i had a trial and error (emphasis on error) phase where i was impatient and tried to use hot glue to make octavius' arms because i was stumped, and it was horrible and ended up losing one of his hands and had to sculpt a new one. (literally lost it. not that it cracked, it just. disappeared into my carpet. think the tenth doctor. gonna have a metacrisis happen, i fear.)
then there was the air dry clay fiasco. do not recommend unless you love waiting or just are a god at sculpting w that stuff. i'm not.
but yeah i mixed my own colors for their blush and some little details here and there, but mostly used stuff straight from the bottle! i have this AMAZING silver paint that is SO shiny with one coat only!! every piece of oct's armor? one coat of this stuff. it's the DecoArt Dazzling Metallics in "shimmering silver". CANNOT get enough of this stuff. i want to eat it.
anyways.
i havent made their weapons yet, and i'm debating making them at all. but honestly they were just so fun to make. took me about 4 days of working on them on and off i think.
i may have forgotten something, so please ask if you want clarification for anything !
30 notes
·
View notes
Note
Do you have any recommendations of what kind of materials to use for begginers? I don't have a lot of money and I wouldn't like to buy a expensive clay and and not really using it well and just wasted :(
I really cant think of much to tell you in the way of sculpting, you could start out with cheap polymer clay, but I don't really have a brand suggestion- I've used the same brand and type for years and havent messed with much else. Be aware that you do get what you pay for, so be prepared to handle with care, or spend more time reinforcing with toothpicks/tinfoil/wire etc. Honestly the most expensive thing I use IS the clay
As for paints, Michael's store brand acrylics "craftsmart" aren't too shabby and are decently cheap.
For fabric, raid your local Joann's remnant bins. They're usually 75% off. You'll get up to a yard of fabric for a couple bucks. Sometimes I even get clothes from thrift stores and use that for fabric.
If anyone else has suggestions, please comment!
60 notes
·
View notes
Note
do you have a favorite brand of yarn??
(i am asking this while falling deep into your sad brown eyes btw)
FIRST of all my eyes are green second of all….call me Basic but lately I’ve been soooo into Craftsmart acrylic yarn. It’s soft it’s my favorite weight and it’s super affordable !!!! But all time favorite I would say is probably Caron simply soft. But it depends on the project !!
4 notes
·
View notes
Photo
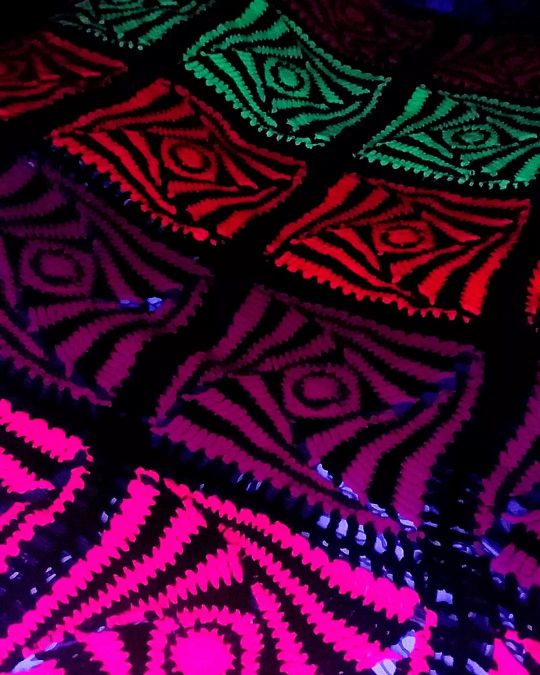
Big Top Blacklight Blanket!!!! 💖💛🧡💜💖 Giving me major dark rave/funhouse/Killer Klowns vibes and I love it!! 🤡 This is my first time crocheting a normal size blanket/throw (55"x55" perfect for my Full size bed) AND first time doing a granny square design! It took me 16 days to make!! And sooo many skeins of yarn. And this blanket is HEAVY. I usually sleep under light and fluffy blankets and I slept under this last night and it was like a weighted blanket, lol. ⬇️ The square design is from a YouTube tutorial by @littlejohnsyarn called "Pin Wheel Granny Square" but I did add an extra round in the beginning (for round 3) so there would be less holes in the center. 🎯 [ If you want a link to the tutorial, or to see how I added an extra row, or other crochet nerd deets, check out my Ravelry post, my profile is: WhatsHisCape ] ☢☢☢☢ #crochet #crocheting #grannysquare #crochetblanket #quilt #yarn #yarnaddict #fiberart #handmade #homemade #diy #killerklowns #darkrave #blacklight #blacklightreactive #uvreactive #neon #trippy #funky #halloween #halloweenblanket #halloweendiy #craftsmart #craftsmartneon #craftsmartvalue #craftsmartyarn https://www.instagram.com/p/CjtJjnzPLWr/?igshid=NGJjMDIxMWI=
#crochet#crocheting#grannysquare#crochetblanket#quilt#yarn#yarnaddict#fiberart#handmade#homemade#diy#killerklowns#darkrave#blacklight#blacklightreactive#uvreactive#neon#trippy#funky#halloween#halloweenblanket#halloweendiy#craftsmart#craftsmartneon#craftsmartvalue#craftsmartyarn
11 notes
·
View notes
Note
hey how do you make it so the paint on your patches dont flake off? :( The one I made the other day started flaking off pretty damn fast
ah most people would say use fabric paint since it's actually meant for it but since I use acrylic. uhh. sorry idrk man I kind of just make sure when I paint that I really get it into the fibres of the fabric, layer it on thickly a good few times, and before I wear it I run my jacket through the washer and dryer so the water and heat kind of bakes it into the fabric
it could also be the type of acrylic you're using maybe? you'll want acrylic that dries rubbery and stretchy so it flexes better with the fabric and lasts through the tumbling of washes, if it dries hard and crispy it's not gonna stay long :(
I use arteza expert thick acrylic (a little pricey I think unfortunately), so if you're using a cheaper acrylic like craftsmart, artist's loft, or apple barrel you might want to find a thicker paint

#I'm sorry I hope this helped#I'm bad at explaining & I'm not 100% sure why my acrylic is sticking so well#so my only thought is the texture (rubbery vs stiff) of the acrylic
3 notes
·
View notes
Text
My NB pals and guys and gals I got myself some real, grownup acrylics to try vs the craftsmart liquidy stuff I have for doing things with the kiddo and it just arrived and I am terrified and excited! Woooooooooo!!!
5 notes
·
View notes
Photo

여상 (5.875 x 10in cardboard) follow @kyujani_ • #여상 #에이티즈 #kpop #ateez #ateezfanart #yeosang #kyujani #art #kpopartist • media: • craftsmart, violet matte acrylic • sargent art, ivory black acrylic • handy art, titanium white acrylic • barnabas blattgold, imitation gold leaf • barnabas blattgold, metal leaf gilding adhesive https://www.instagram.com/p/CpOxLBZssce/?igshid=NGJjMDIxMWI=
6 notes
·
View notes
Photo

New baby blanket I'm making for a custom order!!! It's Butter by Craftsmart for the yarn... gosh, it's so pretty! I will definitely be using it again. If you'd like your own custom continuous blanket (3Ft x 3Ft, 4Ft x 4Ft, 5Ft x 5Ft, 6Ft x 6Ft, or bigger), feel free to DM me! #handmade #crochet #crochetersofinstagram #crochetcommunity #crafts #crocheting #craft #craftsmartyarn #babyblanket #crochetedbabyblanket #crochetedblanket #customorder #customblanket #fiberart #fiberartist #art (at Gulfport, Mississippi) https://www.instagram.com/p/Coez9cvu7Go/?igshid=NGJjMDIxMWI=
#handmade#crochet#crochetersofinstagram#crochetcommunity#crafts#crocheting#craft#craftsmartyarn#babyblanket#crochetedbabyblanket#crochetedblanket#customorder#customblanket#fiberart#fiberartist#art
4 notes
·
View notes
Note
hello! I'm in love with your clay pieces, your painting and especially the eyes look so smooth. Would you mind sharing which paints and glaze you use for your pieces? :)
Hello! Thank you so much!! ^^ As far as paints go, I use gouache and acrylic paint. I don't really have a preferred brand of gouache, I usually just order whatever looks okay on Amazon, to be honest. And with acrylic, I like the Michael's brand paint, the CraftSmart ones- I've been using them for years. Then for glaze, I use something called Varathane Polyurethane (the gloss finish) but I'd be careful with this stuff, the fumes aren't great for you, so just be careful! I hope that helps!
1 note
·
View note
Last Seen Blogs

annachristinamay
Schwimmen in Rastern Grundlagen der Zeichnung

teamnarr8oftheparableverse
Team Narr-8 (The Stanley Parable post and art blog)

yled-blog
Heart of Gold

merry-kissmas
tis the season

wabhrp
#wabhrp