#brickcentral tips
Text
TIPS: Bringing Landscapes indoors
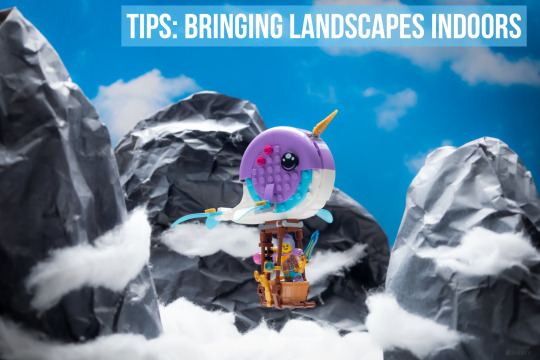
Hi community! This week I will be showing you how to create mountains out of packaging paper, some paint and some cotton.
Everyone has these piles of papers from packages delivered to our home. The first thing we do with them is to throw them away. However, you can transform this into mountains fairly easily (or caves, or rock walls...). Another item that I find unvaluable is a blue sky poster with some clouds (you can also print your own of course).
The first step is to crumple up the paper and make shapes with it. Triangles work great for mountains. You can also give them depth by stuffing them with (yes, you guess right) more packaging paper. To keep the shape I put some tape in the back. It will eventually get destroyed with handleling, but this way they last a bit more.
Once made, I put them in a box in the balcony (or on the street with some paper) and I paint them completely with a grey spray paint. If you don't have one, you can also paint with a brush! the spray is just faster.
I used three different colors to give them some shape. Grey overall, black aiming from the botton (shadows) and white from the top (snow and highlights). These three colors will be enough to give a more realistic impression that just gray.

I then use the cotton to create some clouds. I cut some small bits and put it around the mountains, and the rest at the bottom, to give the impression that we are flying above the clouds to the mountain tops.

For the next tip I will show you how to use moss for grasslands, and how to care for it, so you can always have it available.
@taskera
23 notes
·
View notes
Text

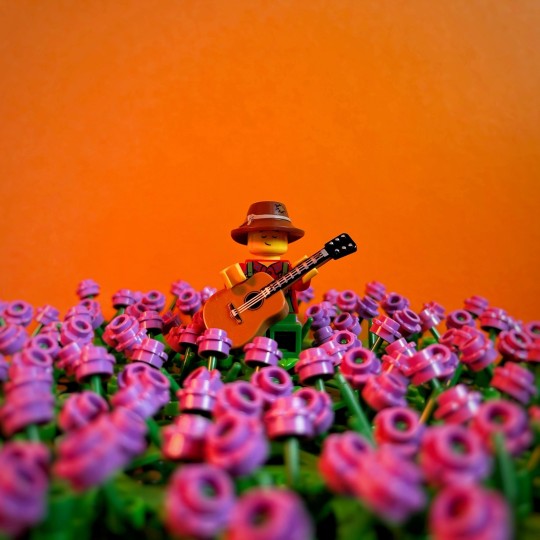
Have a coffee and a song on me! ☕🎸
Have a look at the tips and BTS on @brickcentral
23 notes
·
View notes
Text
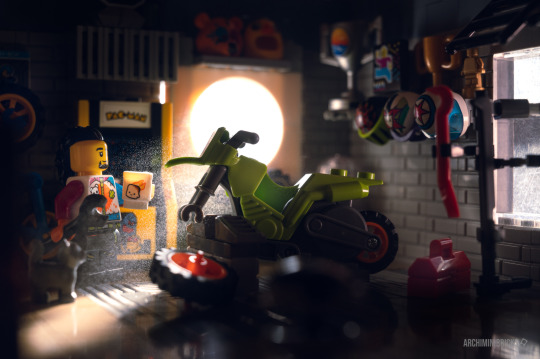
Mancave morning
#lego#lego photography#brickcentral#toy photography#afol#legophotography#toyphotography#photography tips#brickcentral member#minifigures#mancave#bikers#bikelife#dirtbike
63 notes
·
View notes
Text
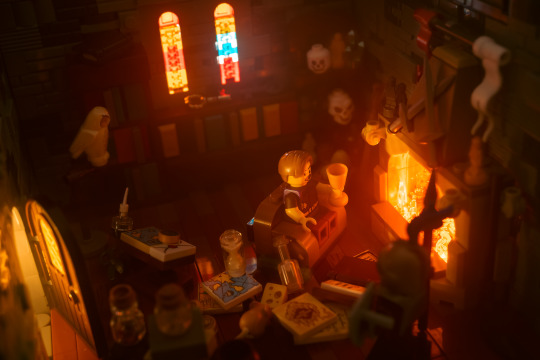
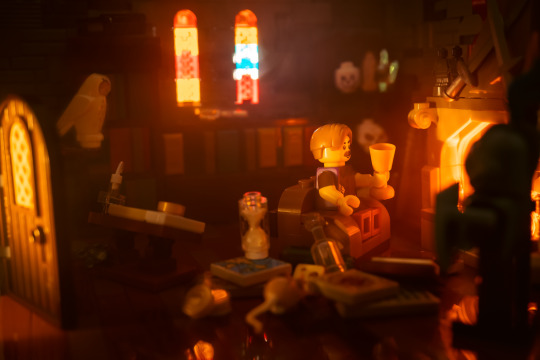
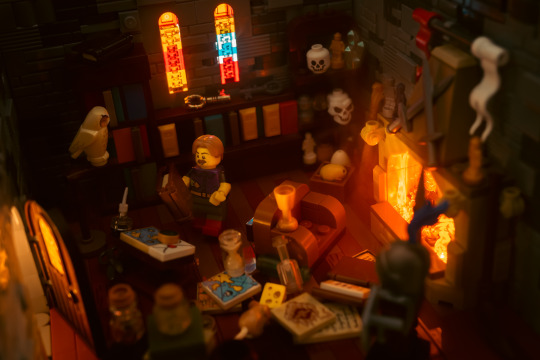
The Fireplace Room
The first two pictures shows the same scene but with different camera angles. This example shows how a different point of view can change a the message or feeling of an image.
Are you interested to learn more about different camera angles and their effects? Read the tips written by @minifig-lifescenes on @brickcentral
The third picture is just a little bonus for you 😉
#lego#afol#legophotography#lego photography#photography tips#brickcentral#medieval#lego castle#legocastle#moc#legomoc#light effects#camera angles
82 notes
·
View notes
Text
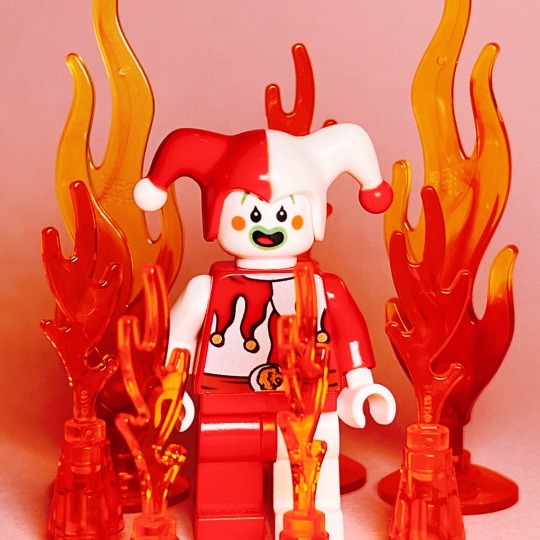
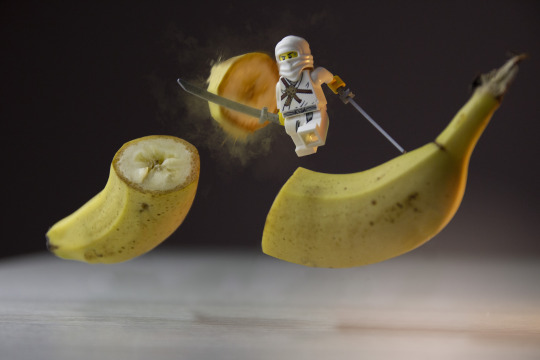
tumblr tuesday: minifig friends
Hello Tuesday, it’s Tumblr. Why do we find tiny things so charming? Who knows! This week, we’re celebrating the minifig photography community and the stories they tell. These folks really know how to set a scene: We’ve got everything from sweet encounters with the “real” world to surreal icons re-imagined. And a clown in flames. Because, well, that just felt very on-brand. We see you, minifig community. Welcome.
@brickobscura:
@jbarchietto:
@thebricklumberjack:
@thebrickdwarf
@wendyverboom:
@brickexposure:

@bricksuntold:

@joschka-vanderlucht

@sarouxbastoux:

Feeling inspired? Head over to @brickcentral for loads of LEGO toy photography tips, features, and activities.
#tumblr tuesday#minifig friends#minifig photography#LEGO#minifigs#photography#minitature#miniature photography#LEGO stories#brickcentral#long post#toy photography#cw clown
3K notes
·
View notes
Text

Half my taco every time
Shot this one in my Friends book nook for the @brickcentral contest about using a couple LEGO photography tips.
119 notes
·
View notes
Text
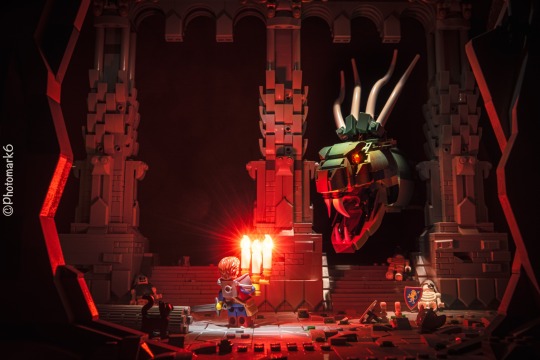
Only the bravest knights explored the deepest Temple ruins. Rumour spoke of mythical monsters that stalked the darkness. Even by candle light, you can’t be sure of what surprises await…
My entry into the @brickcentral monthly theme for April celebrating the 10 years of BC
I originally had something quite small planned for this months challenge to celebrate @brickcentral 10 year birthday! However, after a couple of days building, this MOC emerged! Inspiration came from some great fantasy artwork I found (like the below) and I really wanted to create a similar vibe.

Everything is practical with only a tiny amount of post processing. The all important candles where lit using some micro orange LEDs and they provided most of the light for the scene (a long time was spent hiding wires from the camera!). There are also two small LEDs used as ‘fill lights’ just to bring out the dragon and our brave knight a little more. Some slight haze was added with a face mister to help add to the vibe (also gave the added benefit of making the LED candles look a bit more realistic).
Safe to say, I’m am very happy to have stumbled across the @brickcentral community a couple of years ago. Without the amazing friendships made and inspiring pictures taken each month (and useful tips and hints) by the community, I don’t think I would have had the motivation to push my Lego photography forward. Happy birthday @brickcentral.
#bc_tenyearsofbc#lego#toyphotography#afol#legominifigures#legophotography#toyartistry#brickcentral#legomoc#photography#lego medieval#dragon art#fantasy art
85 notes
·
View notes
Text

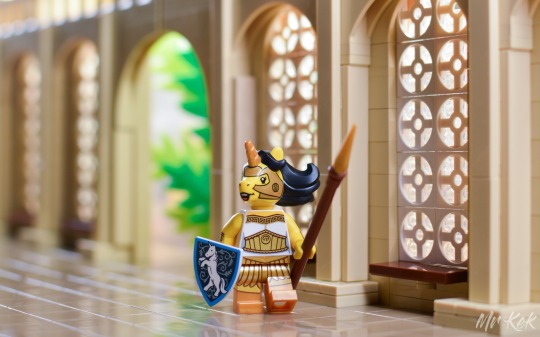
Falcons Charge!
~~~
Second entry to #bc_tipfest photo contest on @brickcentral
I used the tips Use a Screen, Pose Your subject
1. Use a Screen: The entire mountain/field background is a image projected on my iPad. Im a location where a view like that it impossible to find and shoot it so, using a digital screen background is an easy way to get around that!
2. Pose Your Subjects: All the minifigs and horses are aligned parallel to another to show that they are all charging across the field as a coherent group. The Commander is set up front with a much grander horse, while the others are not so far behind, following his lead.
#lego#afol#minifig#minifigure#toy photography#lego photography#brickcentral#fantasy#lego fantasy#lego castle#black falcon knights#black falcons#bc tipfest#LEGO medieval#horse charge#charge#horse#medieval
30 notes
·
View notes
Text
The palace and its hanging gardens
BTS: have you seen @laurent's tips on Brickcentral?
His trick allows you to enlarge a moc by placing a mirror behind it, it allows us to build only half of our scene. A real time saver.

The unicorn head comes from BAM from the Lego store in Bordeaux. She has pretty golden details on her cheeks and a lion's head.
42 notes
·
View notes
Text
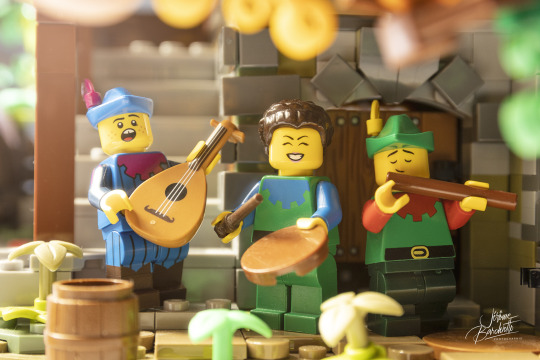
My entry to #bc_tipfest photo contest on @brickcentral :
The Medieval Band
For my 2nd entry, I used other tips, just to vary a bit :)
- Build an environment: I'm more used to shooting outdoors in natural settings, especially at this time of year. But I tried to change my habits by creating a 100% lego environment. As the main subject is a group of minstrels, the setting had to be medieval. I based the set on the forge. I used natural light to illuminate my scene, but with a large gold reflector to give it a warm ambience. I added tree branches (bonsai) to create a frame around the group and create a "cosy" atmosphere :)
- Use props and add details: brick-build scenes are already detailed, but adding props reinforces the impression. In this case, I wanted to create a group of minstrels, so I equipped them with medieval clothes and instruments that existed at the time, to be credible. I could have chosen anachronistic instruments to make a gag, but that wasn't my intention or the emotion I wanted to convey.
- Pose your subjects : I hesitated for a long time over the choice of faces, but I finally found those that corresponded well to the joyful mood of the minstrels while being compatible with singing and playing musical instruments.
I hope this photo speaks to you in the same way I imagined it :)
#afol#brickcentral#legominifigures#legophotography#legophoto#minifigs#lego photography#lego castle#lego classic#lego knights#frenchafol#lego medieval#lego#legoart#minifigures#toy photoshoot#toys#forestmen
16 notes
·
View notes
Text
Tips: Bringing Landscapes Indoors

For this last week I will encourage you to use live plants as decor. The ones I use the most are Bonsais, they already have the right proportions for our minifigures!
Bonsais are hard to take care of, and perhaps is not the kind of plant many people have at home, but even if it's a simple ficus or a small pine tree, real plants give the photographs something that cannot be achieved with plastic ones. You can still see in the photograph it's alive.
You don't have to use them stand alone if you don't want to. Combined with previous tips, you can create beautiful landscapes on your table. A bit of moss for a grass field, some real or handmade rocks as far away mountains. All perfectly minifigure size.
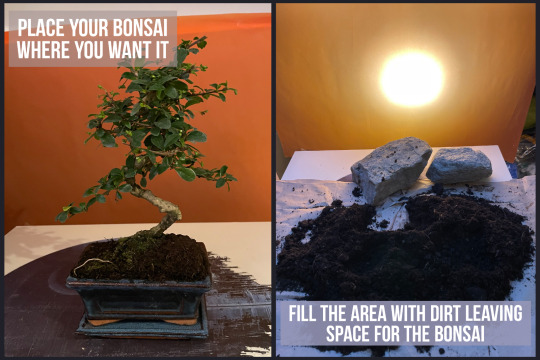
Pick your plant and place it wherever you want to take the picture and surround it with dirt and rocks to cover the base. You don't need to remove it from the pot, this way the plant is better protected and will last longer. Add some real rocks, some moss and a beautiful backdrop. I use a very simple one, with a semi-transparent orange paper and a lamp behind to backlit the scene. But you could use a printout of your own pictures or even a television.
Place now your minifigures, your sets or mocs around or in front of the bonsai.
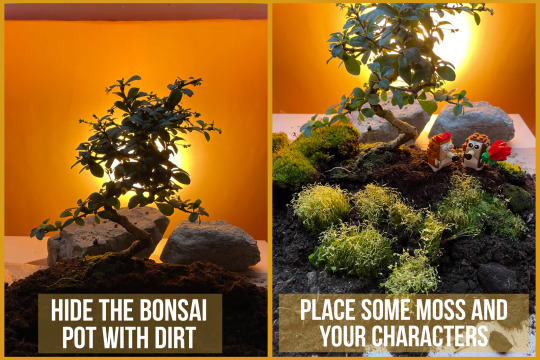
Keep your eyes open. Everything can be used to create new worlds, you just need a bit of imagination.
@taskera
16 notes
·
View notes
Text
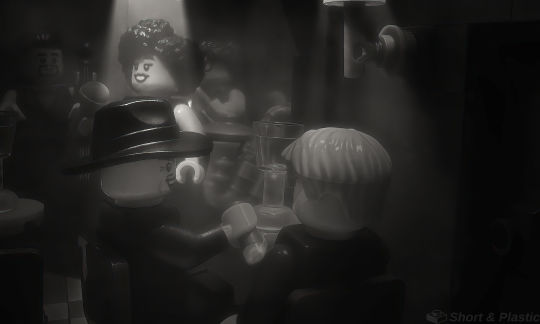
"I've got a little proposition for you."
I have to blame credit @fourbrickstall for this one, due to her recent focus [see what I did there?] on using a phone camera for toy photography. I still use my phone for this once in awhile, and needed to in order to shoot this angle in the new Jazz Club modular build. [And my phone just barely fit!] Certainly neither of my DSLRs would have, so it's nice to have options, and Anna's timely reminder has been helpful.
Be sure to check out @fourbrickstall and Take Better Toy Photos for more inspiration, tips, and just damn fine toy photos! And if you aren't following @brickcentral... do you even have a reason?
32 notes
·
View notes
Text
Orient express 21344

Wait a minute, wasn't that supposed to be green?
I had great pleasure and chance to photograph this long, long, loooong set.

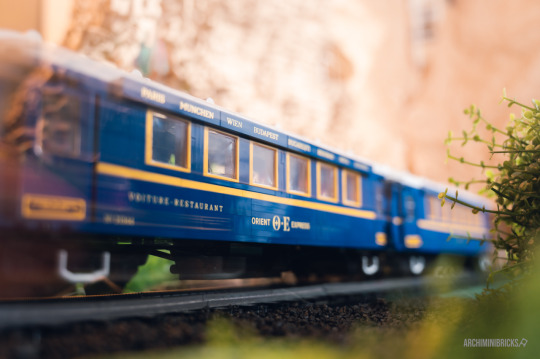

Illuminating the carriages from the inside in a night scenery gives beautiful effects


8 really great minifigures that fit into the era and luxury vibe perfectly.


Beautiful details
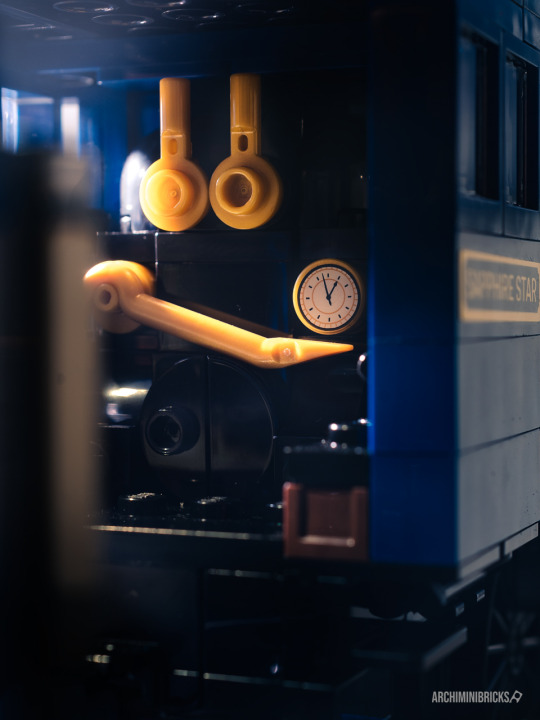

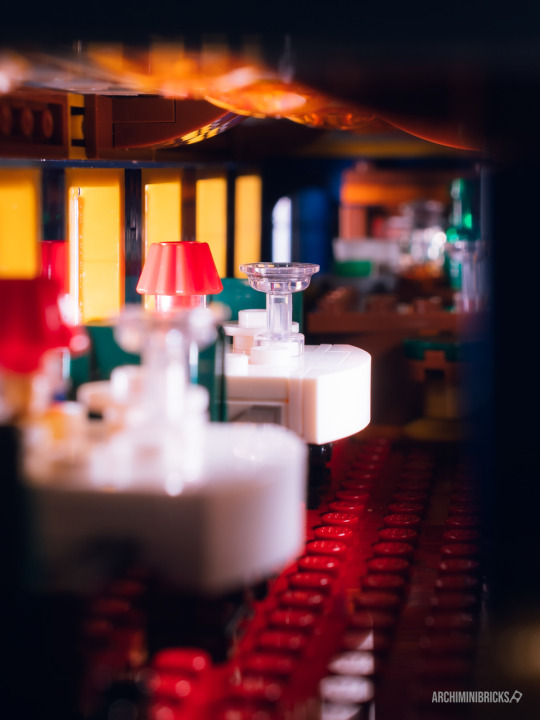
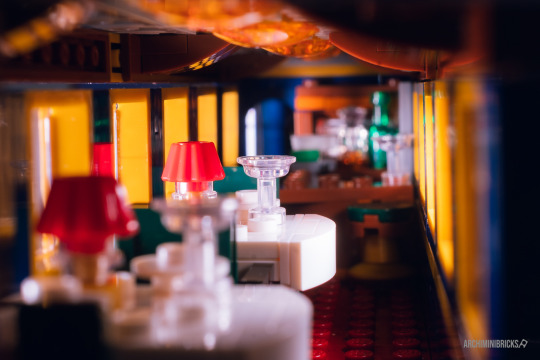

I received this set from LEGO thanks to @brickcentral for a photo shoot but all opinions are my own.
Full review with some BTS examples is here
#lego#lego photography#brickcentral#toy photography#afol#legophotography#toyphotography#minifigures#photography tips#brickcentral member#orient express#oriental#lego train#train spotting#train#luxury#luxurious
31 notes
·
View notes
Text

Space Adventure 🚀🧑🚀🪐
This is my second picture for the contest of the month on @brickcentral by @monsieurkek
The picture is inspired by one of the pictures by @ycsolo from his tips last month
#brickcentral adventure#lego#brickcentral#legophotography#toy#afol#lego photography#photography#toy photography#toyphotography#oc art#space adventure#outer space#space#lego adventurers#adventure#photography tips#macro photography#astronaut
34 notes
·
View notes
Text

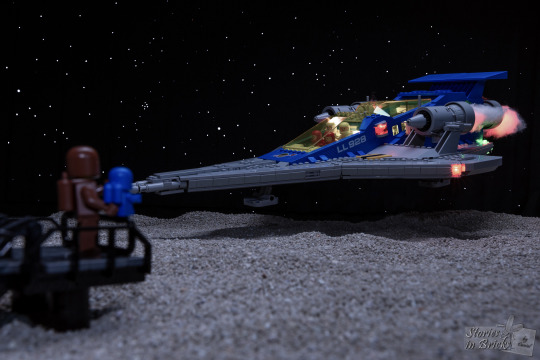
Coming home
As a gift for myself, I got me the Galaxy Explorer which goes very nicely with the new astronaut and astronaut baby from the current minifigure series.
I made this little space scene all with practical effects. If you want to know how to make the stary background, check out the tips-and-tricks article I wrote over on @brickcentral this month.
#lego#legoart#legophotography#toyphotography#spaceship#space#coming home#galaxy explorer#brickcentral#toyartistry
29 notes
·
View notes
Text

We all have a caring side.
This photo was taken last year, 2021, for falling rain tips challenge by @fourbrickstall of @brickcentral I used a spray bottle for the rain and my shutter speed on the fast side. Now that I have learned a bit more about photography, I would’ve used a white card or reflector to slightly brighten up Hulk’s face. This was a really fun challenge!
#legophotography#toyphotography#legominifigures#photography#lego#brickcentral#incredible hulk#hulkamania#raindrops
49 notes
·
View notes
Last Seen Blogs

hetaliaa
Japan: Sounds badass.

hamsterdancen
homestucklover69

betarev3
Dirtmagnet

piglinmyfeet
Those wizards were in gay love

awesomegifts
Tanpa judul