#and now i can do like 4 bottles of 400ml
Text
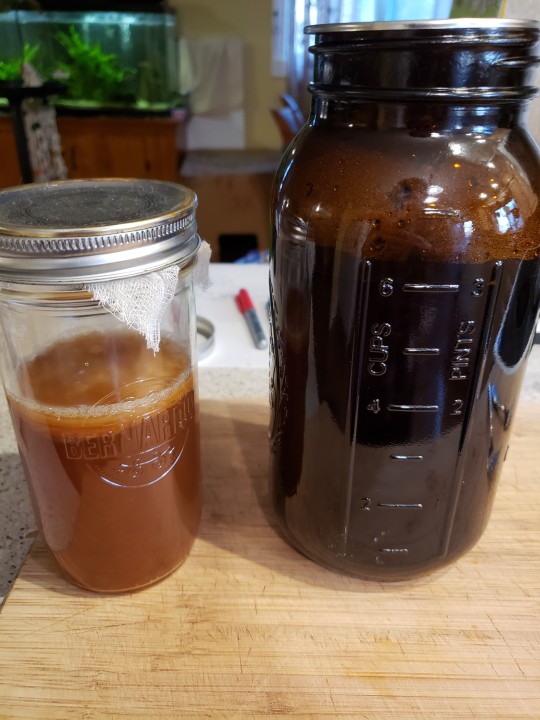


upgraded my snotty buddies enclosure from a 750ml to a 2L. it is Enrichment.
#just enrichment#not that my 750 made me 1 kombucha a week#and now i can do like 4 bottles of 400ml#lets flavour em in 5-6 days!!#got wild blueberries#partridgeberries#raspberries#maybe 4 will be passionfruit#HM
1 note
·
View note
Text
NUT MILK CITY LIMITS

This should have been my Boston blog. And I will write one, someday soon.
But limited as we are to four walls, dodging pavement cyclists and the kindness of delivery folk, let’s settle for a tale of lockdown invention.
That said, my story does start in Boston - or rather, leaving it. It was the real start of The Weird, around early-mid March, when I still took the tube into work and was looking forward to a visit to the hairdresser (lockdown was announced the day before my appointment in case you were wondering. So there will be no selfies here). We managed to head off to the US the day that Trump banned the rest of Europe from flying and I won’t lie, we felt lucky. I sat next to a Canadian student on the flight who explained, as she coughed, that she had traded her study trip around Europe for a £2,000 ticket-chance of getting home.
We got to our faintly Psycho- throwback hotel that night, where we seemed to be the only guests. And for three days we toured the (mostly shut) sites of Boston with the streets all but empty.

At one stage, as we strolled past a CVS store, two young women emerged, insanely juggling 4x16 pack toilet roll bags. How we laughed. The way those pesky kids laugh as the Scooby-ghoul looms behind them. On the Sunday, any holiday vibe had been replaced with low level anxiety, counting down the hours to our flight leaving the US on time and as planned.
And since we landed back in London, that’s been it. Travel now means taking the car for a weekly local drive to keep the battery ticking over, and let’s not dwell on the cancelled trip to Vietnam. The Supermarket Sweep race as you grab random packs off shelves before the personal space invader twats sneak up behind you is now replaced by the delivery time lotto of Amazon Fresh. Got a formula for that, Dale Winton?
But there have been new things to smile about: neighbourhoods coming together every Thursday evening to Clap for Carers; the bravery of NHS workers and a whole army of people I hope we’ll never take for granted again; friends and family checking in on each other much more than ever usual. And the travel buzz achieved by changing our backgrounds on Zoom. Don’t knock it, the endorphin kick is real.
And dare I say there have been pleasures too: delicious meat, fish and vegetables delivered from local suppliers, and weekends full of invention possibilities. “ Are we all fucking bakers now??” Twitter ranted in week 2 of lockdown as flour and eggs became the New Disappeared. Cashew milk, the one nut milk I enjoy, became similarly scarce for a short while, but I discovered the eye-wateringly expensive delights of Milkadamia until sanity returned.
Faced with the random nature of vegetable boxes, half used packs of speciality flours otherwise doomed to outlive their sell by date and the excitement of what you can achieve with a carton of buttermilk and bicarb of soda - life in the kitchen is nothing short of a blast right now. Just like wartime? We have no rationing and plenty of Chipotle paste so, er, no.
Breaking my veg box virginity has been liberating. There are the highs of high-sheen aubergines and those creamy new potatoes of the season, and the occasional low of celery on three consecutive weeks. But the thrill of anticipation when we open the door to a new box is palpable. And finding specialist suppliers for everything from sumac to burrata has made me realise that up until the pandemic I’d been shopping all wrong and wasting far too much money. With the simple elimination of impulse purchase I have hit my notional monthly food budget for the first time ever.
So here are a bunch of recipes for what I consider my best lockdown experiments. Stock up on your store cupboard essentials and you can use whatever basics are available that week. And by store cupboard essentials I mean: Olive and coconut oils, smoked paprika, cumin, turmeric, chilli flakes, soy sauce, baking powder and bicarbonate of soda (you don’t need yeast for soda bread or flat breads). And whatever flour you can find, you’ll be able to do something with it.
Bolli-cauli biryani with camargue rice

Forget boiling cauliflower ever again. Chop florets, toss them in spice and oil and roast to crispy, caramelised deliciousness every time. Serves 2-3.
Ingredients
1 medium cauliflower, cut into florets, then cut each floret in half to create bite size pieces
The cauliflower leaves, pulled from the fibrous stalks
2 medium red onions, quartered
1-2 large red chillies, split from top to bottom but kept intact
2 tsp. Sumac
2 tsp ground cumin
1 tsp kosher salt
Generous grind of black pepper
1 tsp chilli flakes
3 tbsp. Olive oil
300g camargue red rice (1 small mug)
25g salted butter
Plan yoghurt to serve
How to make:
Heat the oven to 190C.
In a large bowl, toss the cauliflower, cauliflower leaves, chillies and onion (and any other chunky vegetable you hav in the fridge eg.squash, aubergine or courgettes) with the spices and olive oil. Spread out onto a large roasting pan and pop into the oven for 40-45 mins, turning everything half way through. The edges of the vegetables will caramelise and the leaves will crisp up.

Meanwhile, heat the butter in a saucepan until it bubbles then add the rice and toss until you get a toasty aroma. If you used a small cup, then now add a small cup and an extra quarter cup (or if you measured 300g then add 400ml water) and a generous pinch of salt. Bring to the boil, stirring once and then simmer on a medium heat until the water is all but absorbed (about 15-20 mins). At this point, cover with a lid, turn the heat to low and cook for a further 10-15 mins. Turn off the heat and leave covered for a further 10 minutes before fluffing the rice up.

When the bolli-cauli is ready, remove from the oven and serve over a generous scoop of the toasty, chewy buttery camargue rice. Add a dollop of yoghurt on the side and some mango chutney to serve. And treat yourself to some poppadoms for the crunch factor.
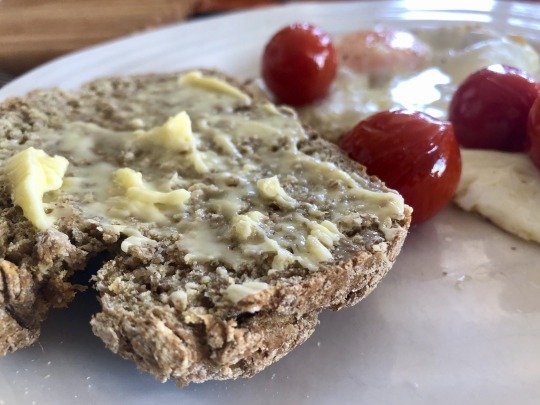
Beer and Buttermilk Soda Bread
My favourite bread of the lockdown - and no yeast required. Based on a Paul Hollywood recipe, mine replaces stout with any old beer or lager you may have in the fridge, and a range of ‘bin end flours: Wholemeal, basic brown, spelt and strong white.
Ingredients:
500g wholemeal flour (or a mix of any brown or grain flours you have)
250g strong white flour
280ml buttermilk
300ml bottle of beer or lager
2 tsp salt
2 Tbsp. bicarbonate of soda
How to make:
Mix the flours, bicarbonate of soda and salt in a large bowl.
Make a well in the centre and add the buttermilk and beer.
Mix until everything comes together then knead gently until you have a cohesive ball.
Pop into a 2lb loaf tin and press slightly into the corners.
Leave to rest for 30 mins.
Heat the oven to 210C. Bake the loaf for 10 minutes, then turn the oven down to 180C and bake for a further 25-30 minutes. Cool in the tin for 10 minutes then turn out onto a wire rack. The base should sound hollow when you tap it.
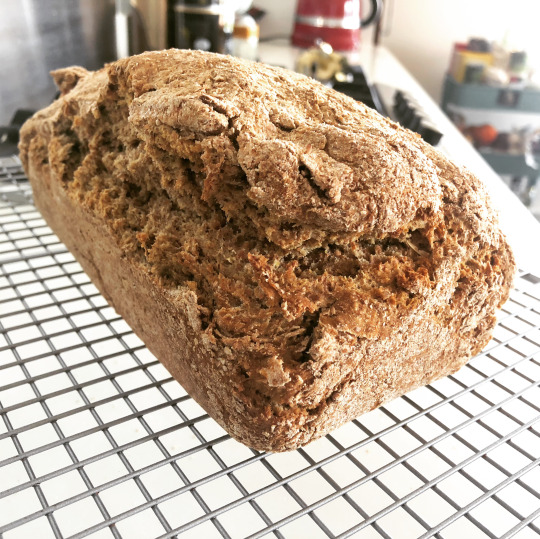
Cool then slice and slather with butter. This bread is also excellent toasted.
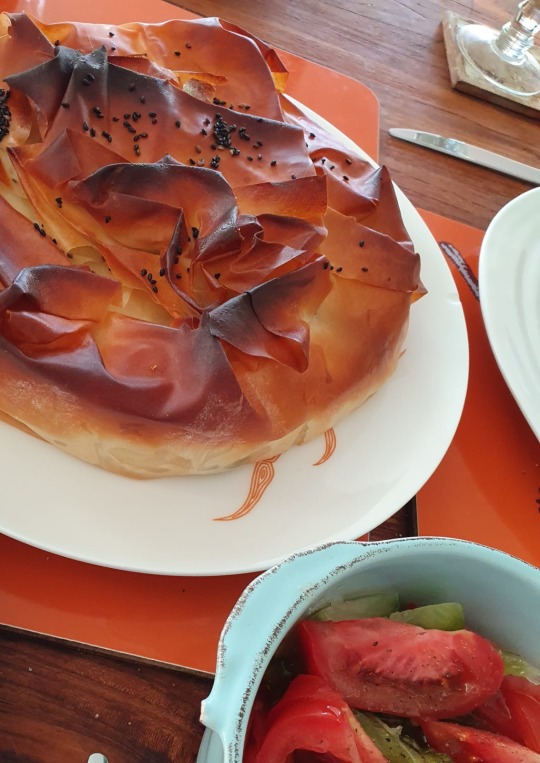
Spinach, Ricotta and Feta Pie
The superstar look of this pie as it emerges from the oven belies a super-easy method. If you can’t get hold of ricotta, just use cream cheese. Serves 4.
Ingredients
7 sheets filo pastry
2 garlic cloves, chopped finely
1 medium onion, finely chopped
250g spinach
1 large egg
1 tsp. Grated nutmeg
250g ricotta, mascarpone or cream cheese.
125g feta cheese, crumbled
Handful of fresh oregano leaves, chopped finely.
100ml olive oil.
1 tsp. Nigella seeds
How to make:
Heat the oven to 200C.
Heat 1 tbsp. Olive oil in a frying pan then saute the onion and garlic on a low heat until soft. Add the spinach and cook gently until wilted - about 5 minutes. Turn into a sieve or colander and squeeze out as much liquid as you can. Season with salt and freshly ground black pepper and put to one side.
Beat the egg with the ricotta and nutmeg then season. Crumble in the feta, then add the spinach and onion mixture.
Brush a 22cm loose bottomed cake tin with olive oil and lay a sheet of filo pastry along the bottom and the sides. Brush again with oil, then add a second sheet at an angle to the first. Keep brushing each sheet with oil, then adding the next layers at an angle until you have used six sheets and they are lining the tin in a flower petal formation.
Tip the spinach and cheese mix into the tin then fold each ‘petal’ of filo on top to form a lid to the tart. Brush with more oil then scrunch up the seventh sheet of filo, perch it on top of the pie and brush with the remaining oil. Scatter over the nigella seeds.

Pop into the oven for 25-30 minutes (watch the top so it doesn’t turn from golden to burnt).
Remove from the oven, cool slightly, before releasing the sides of the tin and transferring the pie to a plate to serve.

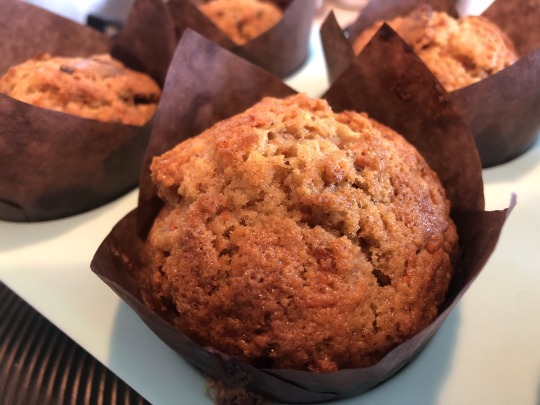
Carrot cake muffins with mandarin frosting

Not really the season for carrot-eating, but grated three carrots into this cake mix and you have a winner. And the frosting is a great way to use up mandarins. Makes 6 Large muffins.
Ingredients
1.5 cups plain flour
1.5 tsp. Bicarb of soda
¾ cup demarara sugar
½ tsp. salt
½ tsp. Cinnamon
1 cup cashew nut milk
2 eggs, beaten
½ cup sunflower oil
1 tsp. Vanilla Extract
3 carrots, shredded
50g pecan nuts, roughly chopped.
For the frosting:
Juice of 1 mandarin
1.5 cups icing sugar
How to make
Heat the oven to 180C.
In a large mixing bowl, combine the flour, bicarb. Of soda, sugar, cinnamon and salt. Add the eggs, oil, vanilla and cashew nut milk and mix again until a smooth batter. Fold in the carrots and the pecans.
In a muffin tin with 6 cases (or double the recipe and use 12). Fill each paper cup with the muffin batter until ¾ full then pop into the oven and bake for 20-25 minutes, until they are fully risen.
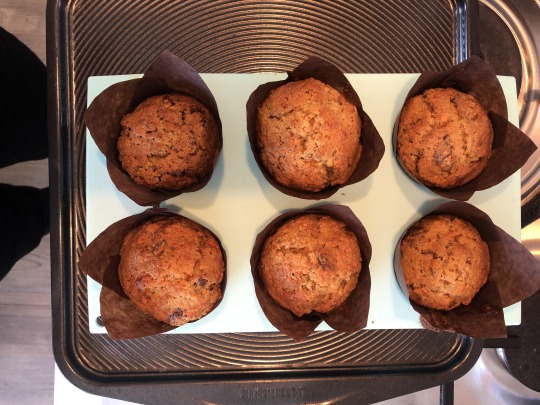
Remove from the oven and cool in the tin before removing each muffin and placing on a cooling rack to cool completely.
When the muffins are cool, mix the mandarin juice with the icing sugar until you have a smooth and sluggish paste. Ice each muffin and serve.

1 note
·
View note
Note
Skincare/ makeup culture ☕️
oooh. i’ll divide this post into two parts: makeup culture and skincare culture.
(1.) makeup culture.
i think everyone knows that I’ve never liked makeup, mostly because I had relatively bad cystic acne throughout high school, that reacted badly to all of the makeup that my sister used (but most particularly her l’oreal foundation). I think makeup culture is particularly harmful to young girls, like the makeup youtube channels that are run by the parents I suppose of 8 year olds, where the 8yo is the actual youtuber.
like don’t get me wrong, i know young girls like playing with makeup (I actually did when I was that age, funnily enough)….. but the fact that professional or just plain fucking ridiculously expensive makeup palettes are now being marketed to girls in bloody primary/grade/elementary school, is just fucking wrong. and yeah there’s the post on here about how some younger girls are finding themselves ugly when they don’t wear properly applied makeup or something like that. and that breaks my heart. why the fuck should a young girl be made to feel ugly if she can’t blend like josiemaycosmetics (I made that up btw idk any makeup channels besides Jeffree star, James Charles and that tatti woman tbh) and can’t afford the bullshit Too Faced $98 powered foundation, $65 Sunday Riley blush (I roughly remember the price of this particular blush bc my sister bought it for me for my 20th birthday so that I could according to her “look good for uni” but I never actually used it lmao… and it’s no longer sold here in australia) and Kylie Jenner’s overpriced lip kits and idk Smashbox “photo finish” primer priced between $AU23-$AU55????
like I had this bad enough in fucking HIGH SCHOOL with my sister telling me that I’d “never get a boyfriend” or “never get a date for the formal/junior prom” if I didn’t spend hundreds of $$$$ for a good face of makeup and didn’t spend hours and hours learning how to do my own makeup. or how last year for my uni grad, she made out that I’d ruin my own uni grad if we didn’t spend $250 on the makeup artist we got for me….. where I unfortunately found out that my skin reacts to MAC products 😭😨 bc the MUA used MAC concealer and foundation. my sister also expected me to remember the setting spray the woman used for my makeup, when I was there from like 4:30am till like 6:45am and i was barely fucking awake. the setting spray probably could’ve easily cost over $100. let’s be real here. like why am I expected to remember shit that early in the morning???
one of my least favourite things with makeup culture is that you’re not meant to fuck it up in any way, shape or form. like when my sister did my makeup for my two high school formals/proms (year 10 & year 12) she constantly told me not to scratch my face while she was doing it (but it made me itchy, hooray for L’Oréal being shit lmao)…. not to fuck it up while I ate at those events….. and she didn’t let me eat before my uni grad last year bc “you’d definitely fuck up your makeup. don’t you dare scratch your face at all today!” like for someone who has hypersensitive/highly reactive skin that she has to scratch when it’s itchy….. and also loves fucking stuffing her face with food….. expecting me to never touch/scratch my face and to practically starve myself to preserve the integrity of my makeup (that i ended up paying for some in the end anyway) for an event is fucking stupid and over-restrictive.
like i always hated the way that the kardashians ate on KUWTK bc it looked so fucking mechanical and whatever bc they had to obvs preserve their makeup while shooting and also look nice for the camera. like why the fuck am I expected to eat ~like that~ when I have a faceload of MU on???? FUCK OFF. I will scratch it off. I will smear the food all over my face (ok not really) and eat however I motherfucking want, thank you very fucking much. like for my uni grad last year I was up from 4am and my grad ended at like 12:30pm….. so I didn’t have food til about 12:35 when I left the hall. and the whole time while I was eating my sister kept reminding me to not fuck up my makeup that we’d spent $250 on. JUST LET ME FUCKING EAT WOMAN, I SWEAR TO FUCK. lmao.
the last thing I hate the most about makeup culture is that like….. I absolutely hate makeup like I said above….. but once I have it on I feel pretty and cry a bit bc I’ll just never learn to do it myself…. mostly bc I couldn’t be bothered…. bc I save hundreds, if not thousands of $$$$ from not buying all the bullshit essential items you need just for a ~basic no makeup, makeup look~, and bc my hands have never been steady enough to use some of the things, like false eyelashes and eyelash curlers or liquid eyeliner/normal eyeliner…..
but yeah. I just hate that it makes me feel pretty???? but I also feel good and more natural without it???? and I’ll never like my sister’s comment that: “you’re the prettier one out of the two of us…. but if only you hurried up and learnt to do your makeup, you’d be even prettier” or some dumb semi-condescending shit comment she’s said to me like that before. like why is the only way a woman can be pretty (other than some clothes that make her feel good) by smearing 100s/1000s of dollars worth of makeup on???? like why the fuck am I expected to spend all that money when a good bulk of men will never bother with the male makeup trend anyway???? like why am I expected to act differently when I basically just have grown up face-paint on lmao???? I’ve never felt natural in makeup, I’ve always felt awkward and like…. not sound like an cringey edgelord emo kid…. but i never felt ~real~ wearing makeup lmao. just yeah.
but yeah I also understand makeup is an art and I appreciate that. makeup culture is so fucked on all sides for women.
(2.) skincare culture:
now skincare culture is different for me. considering that, like I said before, I had relatively bad cystic acne…. and I’ve since also developed eczema during the winter months….. so I’ve had to develop a good skincare routine over the years to keep my skin under control. but again, there are parts that I don’t like about skincare culture…. like women are typically meant to spend, again, hundreds and if not thousands of dollars on super expensive skin creams (some of which I’ve tried) to fix their fine lines, their laugh lines, their crows feet, their blemishes, their birth marks and cellulite…… the list truly goes on and on….. and on top of that (well this hellsite which isn’t entirely accurate) I’m, or we as women, are expected to teach all of that to men in their 20s???? like fuck off. why and how the fuck didn’t they get the fucking memo to look after their own goddamned skin???? like my 20s are already tiring enough, and now I gotta pass on important skincare advice to men, who could easily fucking find it themselves online???? lord help their asses lmao.
but other than the men bit…. yeah skincare culture is just as bad as makeup culture. like when Cosmo mag was still running in australia, more than half of the shit the women at Cosmo were advertising as part of their skincare routines were literally $300 night treatment creams or moisturisers; $150 facial cleansers; or $500 skin peels, or $600 appointments at dermatologists and skin therapies like electrolysis that I’ll probs never be able to afford. like one of the luxury brands that I LOVE (💖) is Mario badescu bc the two pimple treatments that i sometimes I use from them (the drying lotion and the anti-acne serum) are the ONLY two acne treatments that have NEVER made my face turn red and my skin peel off (besides a really good neutrogena one that Neutrogena discontinued 😭). every other chemist bought pimple treatment cream makes my skin peel off/itchy/turn red. but sadly the two Mario badescu treatments are priced over $50 if bought together (ones now $31 (formerly $28, this one’s great bc it dries clear), the other is like $26, this one dries pink). so the chemist bought ones like the ones by Clearasil or OXY10 are my saviours at $11.99-$12.99, even though they dry out my skin to buggery and leave big white marks on my face bc they both dry white lmao. but I’ve gotta suffer that for the price of beauty lmao.
also there’s expensive face washes (or skin care program packs etc) from Paula’s choice that I love.... but again they were like $35 for a 400ml bottle and $25 for a fucking 150ml or 250ml bottle. now the one i like is $20 for 177ml, which is a rip off. some of the other luxury things that I’ve tried (via free samples) that don’t work, like Kate Somerville (priced at like $65 and over), Philosophy and god knows what else that i’ve bought from Mecca Cosmetica, which is the Aussie version of Sephora in the past. and yes, for acne treatments, i’ve used pro-activ before. it was ok… but i never used it in high school, after the awful time we had trying to cancel our subscription to it back in the day for my sister lol.
also can we talk about the ultrasonic face brush systems that are still raging strongly??? like they’re also super rip offs, especially with buying replacement heads for $35 a pop. like I’ve had a Clarisonic for years (that I’ve stopped using, admittedly)…. the model was roughly $250 when I got it for my like 19th birthday. now they’re even more expensive at like $315 for the latest “clarisonic mia fit cleansing system” which is linked on the $315. or now there’s the foreo that costs anywhere between $75 (the cheapest model) to fucking almost $400… ie $395. the replacement heads for the clarisonic and i suppose replacement like pads or something for the foreo are meant to be replaced every three months “for optimum cleansing” or whatever. like $35 every three months is a lot to maintain after a while. also using the clarisonic added like 10 extra minutes to my showers/general skincare routine bc you’re meant to use it for five mins or whatever and then spend another 5mins washing it out to make sure that it doesn’t collect mould and buildup too much soap residue. it was just a lot of effort to use, even if it did make me feel like i had a better and deeper face washing routine.
and yes, i know there’s Lush. both my sister and i (but more my sister) were obsessed with Lush back in high school, after one of our sydney cousins introduced it to us. but Lush’s skincare stuff for pimples just never worked for us. it made me breakout more, actually. but their old apple pie and choc-orange lip balms were the BOMB. it’s a pity that they no longer make them tbh. their jelly soaps were fun to use and smelt nice too. i can’t remember much else about lush tbh lmao.
for face masks, i’ve found that store/chemist bought formula 10.0.06 or whatever works the best for my skin. but the push, especially again in cosmo and other places, to buy more expensive face-masks and like designer FMs that you should really ask a professional to use first imo, is fucking harmful, especially when you’ve got ones that take off the whole top layer of skin from your face (like the famous and the overly popular charcoal face peel masks), or so i’ve read. like it’s yikes out there. please be safe with these masks, ya’ll. and the same goes for making your own organic face masks, considering that i’ve seen posts on here about using lemon juice which is bad for your skin??? idk anyway. i also hate how with the face masks i buy, there’s about 6 different “skin-illuminating”/“skin brightening”/”skin detoxing” etc masks, that all essentially do the same fucking thing. just keep it at one and fucking go; for gods fucking sake lmao.
but yeah, skincare culture does suck just as much as makeup culture, considering that is heavily focused on women’s self-esteem and wallets…. and barely ever focuses on men. like it’s a double-edged sword tbh.
also as side notes: why the actual fuck are makeup companies still giving their makeup shades or makeup lines sexual names???? like i just found a fucking blush shade by NARS, in my research for this post, called “Orgasm”???? like what the FUCK is wrong with ya’ll??? like y’all actually have the fucking AUDACITY to really make 8 year olds say that in their makeup tutorial videos as well??? “our best selling orgasm collection” sweet lord. that sounds bad. y’all need to sort your shit out, and so do the people who name nail polish shades..
the other worrying general beauty trends that i keep getting on my facebook newsfeed are the teeth whitening systems like hismile and at home laser treatment machines… and then also the charcoal toothpastes to whiten your teeth. oh and also the facial skin “vacuums”, that suck out dirt/oil and your blackheads/pimples etc from your pores. stay safe out there everyone, and do your bloody research. don’t believe the reviews and the hype.
also finally: take your skin type and skin condition/(s) into account if you want to use any of the things that I’ve mentioned that I use/have used on this post. or that I’ve just generally mentioned, like the Clarisonic and the foreo. because what works for me, might not work for you. I’m not a skincare expert or dermatologist. check with your doctor or a skincare professional or whatever before you start using some of these things, even if you might think that it’s stupid & pointless to do so.
5 notes
·
View notes
Note
What recipes can I make in only a pot or pan with inexpensive ingredients? (Btw I love your blog)
Hey Anon! Thank you for the kind words :DFor inexpensive staples you should look into stocking:
Rice - one big bag can last usually 2 or more months but its worth the investmentSugar - one bag can last a whileBeans - I’m looking at dried as they’re less expensive than canned, but you can buy a small bag a week if you want.Vinegar - For most recipes I’d recommend Red wine or Apple Cider vinegar, but white can work as well. A large bottle isn’t too pricey and will last a while.
Inexpensive ingredients can range, but my usual go-to when I’m budgeting my meals more are these:Lentils (dried is less expensive then cans)Another type of beans (chickpea, Kidney, Black-eyed)Cooking Onion (you can usually buy a bag for $2 and they last a month)GarlicTomatoMushroomsCabbageCarrotsSoy sauce and or hot sauce
———————————————————————————————————–
Using these ingredients you can make a few different recipes.These are my own, and based on what I’ve made in the past. I don’t now your access to spices, and spices can be quite expensive so I’ll leave them as optional, however flavour will be better with spices.Vegetable StockVeggie stock is super easy to make, and requires your veggie scraps, a pot and a freezer. For me, it saved me about $3 a week. Although seeming like a small amount, that’s ~$156 a year.
As you cook more, you can cut off the ends of the veggies (such as the tops of carrots, the ends of broccoli or mushrooms, the skins of garlic or onion). Rather than throwing them out, you can store these ends in a bag or container and collect them in the freezer. when your container is full, put them in a pot and cover with water. Add any herbs (oregano, Thyme, Bay) and salt and pepper to taste. Bring your pot to the boil and then reduce to a simmer. Cook for 25-35 minutes. Once done, drain the broth into a bowl, you can just try to pour it carefully or if you have a strainer to use, drain it through the strainer. Discard the boiled veggie scraps.You can store the broth in the fridge for up to 4 days or the freezer for up to 5 months. Lentil Cabbage SoupIf you have been collecting veggie scraps or have some homemade veggie stock available to you you can easily make this dish. Its a quick, light meal that you can also add cooked rice to if you desire.
½ cup sliced Cabbage1/3 cup lentils (or another bean) - pre-cooked1 clove minced GarlicPepper and salt to taste2 cups Vegetable stock1 tsp soy sauce or hot sauce½ cup cooked rice (optional)*
Bring your veggie stock to a boil with the pepper and garlic. Mix in the hot sauce or soy sauce. Taste and add salt to your preference. Add the lentils and if using rice, spoon the rice out into a bowl. Add your cabbage to the soup and cook for 1-2 minutes. Once the cabbage is cooked, pour into the bowl over rice(if using) and enjoy!
*You can use rice, pasta or quinoa for this recipe
Red beans and riceAssuming you have invested in a large bag of rice to use for the month, this is a great protein packed starch to have along side veggies.
1 Cup rice 1 ¾ cups water ½ cup red beans or lentils½ cup chopped tomatoSalt to taste
If using white rice and pre-cooked lentils/beans, add the rice and tomato to a pan with your salt. Add 1 ¾ cups of water and bring to the boil. once at the boil, reduce to medium heat and cook for 15-18 minutes. At the 13 - 15 minute mark, add your beans/lentils and continue cooking. Once the water has boiled away, fluff your rice.
If using brown ricepre-cooked lentils/beans, add the rice and tomato to a pan with your salt. Add 2 ½ cups of water and bring to the boil. reduce to medium heat and cook for 25 - 30 minutes.At the 23 - 25 minute mark, add your beans/lentils and continue cooking. Once the water has boiled away, fluff your rice.
You can also add Mexican chili spice or paprika to the rice to add flavour.
Cabbage RollsThis recipe will use most of the ingredients listed above, and can be used to make lunches or dinners for a while. The lentil filling will last in the fridge for half a week to 5 days.Cabbage - take off the leaves and use the largest outside leaves for this recipe1 ½ Cup Lentils (cooked)1 medium Tomato diced (or ½ large tomato)2-3 Sliced Mushroom½ diced Onion2 cloves Garlic, minced1 tsp soy sauce or hot sauce (different flavour depending on what you add)1 cup waterPepper and Salt to TasteRecommended but not required - 1 tsp Mexican chili spice, 1/2 tsp ginger or ginger powderBring a pot of water to a boil, in this pot you will be blanching the cabbage leaves. This will help wrap the filling in the cabbage leaves without the rolls coming undone or being too bitter. Submerge a few leaves at a time and cook for 1 to 3 minutes. Set the cabbage leaves aside and begin working on the filling.For the fillingHave the lentils cooked ahead of time or use a 400ml can of lentils for this. In your pan, add a few TBS of water or vegetable stock instead of oil to cook your Onion and mushroom. Add the onion and mushroom to the pan and cook on medium heat for 5 minutes or until soft. Add the garlic and any spices you’re using excluding Salt. This includes soy sauce or hot sauce(I’d recommend Sriracha). Add your tomato and ½ the extra water. After 7-10 minutes add the Lentils. If your pot is drying out, add more water to the pot as you cook. Since you’re not using oil, the risk of your dish sticking is higher so you want to keep a layer of water/sauce in the pot while cooking.Cook for 10 -13 minutes, and keep adding water up to the 8 minute mark. Once the filling starts looking like a saucy ‘meat like’ filling you can take it off the heat.
Spoon your filling into you cabbage leaves and roll them up. You can store the filling on its own and make up blanched leaves or store the full rolls for almost a week.Cole SlawThis is a simple oil and vinegar dressed coleslaw,
1 cup Cabbage - Cut into thin strips ½ cup Carrot - cut into thin strips
¼ cup vinegar 1tsp sugarSalt and pepper to taste1 clove diced GarlicOptional (but reccomended) 2TBS Olive or peanut oil
Prepare the dressing first, using the Vinegar, Salt, pepper, sugar, garlic and Oil. (note: The oil makes this recipe more palatable, but its not required. This dressing is to wilt down the cabbage and carrot and add some acid to the recipe).Cut up your carrot, and cabbage. Add to a bowl with your vinegar dressing and let rest for 15-20 minutes or until the cabbage wilts. This can be stored for 1 - 1 ½ week.Lentil SlawThis is a little off the beaten path, but a nice no-cook meal like the cole slaw above.1 cup Cabbage - Cut into thin strips ½ cup Carrot - cut into thin strips½ cup lentils (cooked)Optional - 1/2 cup Diced Tomato¼ cup vinegar 1tsp sugarSalt and pepper to taste1 clove diced GarlicOptional (but reccomended) 2TBS Olive or peanut oilPrepare the dressing first, using the Vinegar, Salt, pepper, sugar, garlic and Oil. (note: The oil makes this recipe more palatable, but its not required. This dressing is to wilt down the cabbage and carrot and add some acid to the recipe).I highly recommend Apple Cider vinegar or Red Wine vinegar for this recipe but you can use white vinegar.
Cut up your carrot, and cabbage. Add to a bowl with your vinegar dressing and let rest for 15-20 minutes. Prepare your lentils and diced tomato (if using). You can add an extra bulb of garlic to your lentil mix if wanted.
Once the Cabbage is wilted, mix in your lentils (and tomato if using). Once mixed you can serve.-----------------------------------------------------------------------------------------------------------One little note - Most of these recipes I do by sight, so I’ve never written them out until now. The ratios may need a little tweaking when you make them so taste as you go. I tend to eat low salt, low sugar so my taste is very different from the average westerner.I hope these helped, and isn’t just a wall of text - Good luck!Vegan and Vegetarian Recipes!
#vegetarian recipe#vegan recipe#recipes#vegan#budgeting#recipe#food#coooking#budget cooking#ask#anon#recipe blog#cooking blog#food blog#veggies
499 notes
·
View notes
Video
youtube
Food Grade Material: This portable juicer cup is made of food-grade PP & ABS material, BPA-free, non-toxic and eco-friendly, you can enjoy fresh nutrient retention and wonderful leisure time.
Built-in Rechargeable Lithium Batteries: With built-in battery & USB cable, this single-serve blender can be easily charged by power bank, laptop, computer or other USB devices, keep your travel on the go.
**Upgraded 6 Blades in 3D for Superb Mixing: **SUS304 stainless steel made sawtooth blades, 22,000 revolutions per minute, which can effortlessly pulverize fruits, vegetables into amazing smoothies. It doesn’t leave chunks of fruit and ice and no noisy like traditional blenders.
Portable and Multi-functional: This smoothie blender is not only for mixing kinds of fruit and vegetables but also for other baby food. It’s very portable for traveling, camping, fishing, etc outdoor.
**Easy to use and clean: **This blender has smart protection device, magnetic sensing switch safe to use and clean, the juicer cup's body and bottom can be separated, you can easy to clean it. Great small kitchen appliances for you!
Shop Now 👉 https://trendvolt.com/products/portable-blender-bottle/
Shop Now 👉 https://trendvolt.com/products/portable-blender-bottle/
How to make juice with this Smoothies Blender?
1. Fully charge your blender ~3 hours when first using. Then 1 hour is ok for every charge. The blender cannot work when charging. It can be charged by power bank, adapter, car charger, computer USB port, etc.
2. Cut the ingredients into about 1-inch pieces, add some liquid in such as milk, water.
3. Reverse the blender, turn on the blender, turn it at 45 or 180 degrees, shake the blender up and down. Adjust the shaking speed according to the viscosity of the food.
4. Pour out the juice, enjoy your time.
How to clean the blender?
Pour half of the cup water into the blender cup, turn on the blender for ~5 seconds, then pour out the dirty water. (Keep the base away from the water.)
Specifications:
Material: Food grade PP & ABS(BPA free)
Blade Material: 304 Stainless Steel
Capacity: 400ml (13.7 oz)
Weight: 460g (16.2 oz)
Size(DH): 8.222.5cm /3.2”*8.9”
Color: Pink
Battery Type: Lithium-ion
Battery Capacity: 2000mAh 3.7V
Package Included:
1* portable personal blender, 1* USB charging cable, 1* User manual,1* Cleaning brush
Magnetic Sensor Design:
The cup body should be tightened, or it may leak; meanwhile, the blender won’t work if the safety sensor not aligned
Safety Sensor to ensure safe, the blades won’t spin if the cup opened or doesn’t tighten.
Shop Now 👉 https://trendvolt.com/products/portable-blender-bottle/
Shop Now 👉 https://trendvolt.com/products/portable-blender-bottle/
Multiple Charging Methods:
You can charge the blender by power bank, computer, car charger and adapter or other USB devices.
Easy to clean:
Pour half of the cup water into the blender cup, turn on the button ~5 seconds, just pour out the dirty water.
Keep Base Away from Water:
Please keep base away from water when cleaning, especially the USB charging port.
FAQ:
Q: Can it be charged on a computer?
A: Yes, it can be charged by power bank, car charger, adapter, or computer
Q: Can it blender ice?
A: Sure, but please add some liquid(like milk, water) in, then turn on the blender, shake it when blending.
Q: Why the motor stopped working?
A: The blade might get stuck, please invert and restart it.
Q: The LED between and red flashes, what's wrong?
A: Battery low status, please charge it.
Q: The red light flashes but the motor does not work, what's wrong?
A: Ingredients too large, please make it smaller and restart.
Q: Can I use it when charging?
A: No, please do not use the item when charging.
Q: What size should be cut into small pieces?
A: Cut fruit pieces no more than 0.5 inches.
Shop Now 👉 https://trendvolt.com/products/portable-blender-bottle/
Shop Now 👉 https://trendvolt.com/products/portable-blender-bottle/
#portable blender#portable blender bottle#battery powered blender bottle#battery blender bottle#portable blender battery#battery powered blenders#rechargeable portable blender#portable battery blender#best blender for smoothies#blender reviews#personal blender#blender market#best personal blender#ninja juicer#best blender 2019#best blender 2020#small blender#protein shaker#protein shaker bottle#blender bottles#shaker bottles#best shaker bottle#single serve blender#ninja personal blender#cheap blenders#best cheap blender#blendjet reviews#best smoothie maker#top blenders#amazon ninja blender
0 notes
Text
Little Ladies’ Day-Inspired Marbled Sakura Chiffon Cake Recipe
So this is my entry for Ensemble FC’s cooking competition. Thought that this would be fun lil thing to do in my spare time, so I thought why not? I’ve made this cake before several times, but they weren’t as perfect as I hoped. So after a few tweaks here and there, I’m proud to present this recipe of mine!
Although there is no required theme for the competition, since it’s FFXIV after all, I might as well make it a tad FFXIV-inspired! As this cake contains cherry blossoms, what could be a more fitting theme than Little Ladies’ Day?
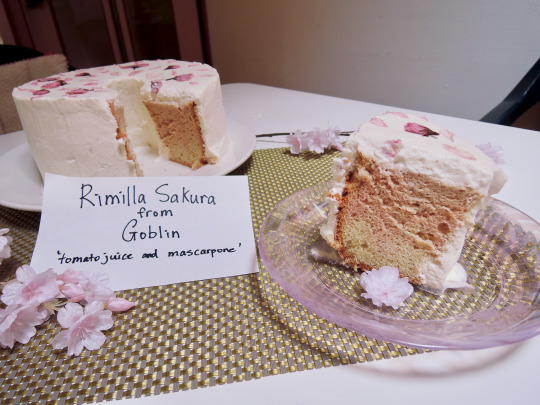
Henceforth, I present you all with this Little Ladies’ Day-inspired, Marbled Sakura Chiffon Cake!
With that, here is the recipe for the cake below:
INGREDIENTS

- 5 eggs, separated
- 50g sugar (egg yolks)
- 50g sugar (egg whites; for meringue)
- 80ml vegetable oil
- 100ml milk(feel free to use any other non-dairy substitute, as I only had soy milk on hand when I made this)
- 6g sakura powder(or just chopped up cherry blossom flowers if you can’t find sakura powder)
- 120g cake flour
- 1 tsp baking powder
- red food coloring
Sakura Whipped Cream
- 400ml cream
- 3 tbsp sugar
- 15-20g salted cherry blossom flowers, soaked in water to remove salt beforehand
- 4 salted cherry blossom leaves pieces, also soaked in water to remove salt beforehand
- additional cherry blossom flowers, for decoration
EQUIPMENT
Angel Food Cake pan(20cm/8” diameter)
2 large bowls
several other smaller bowls to contain other ingredients
balloon whisk
hand mixer
2 flexible silicone spatulas
fine mesh strainer(for sifting flour)
For frosting the cake
2 offset spatulas; 1 long one and a smaller one for the inner part of the chiffon cake
PREPARATION
1. First put the preserved cherry blossom flowers into cold water, so as to lightly rinse off the excess salt. Remove the cherry blossoms, and drain the water out. Fill in again with fresh, cold water, and leave it to soak overnight to remove excess salt from the flowers.
2. Repeat same step with the cherry blossom leaves this time; however, you do not need to soak in the leaves as long as the flowers.
3. The next day, pick up the flowers and leaves on top, so as to not re-introduce the salt back into them again, and drain.
4. Roughly chop up the leaves; flowers are optional if you’d like to chop them up as well. This is to release its aroma and flavor even more, and help infuse it into the cream more easily.
5. In a medium-sized container, pour the cream, flowers and leaves in and lightly mix together to combine. Put it back into the refrigerator covered, and leave it to cold-infuse for the rest of the day.
6. Afterwards, feel free to repeat steps 1 and 2 for the flowers, to prepare beforehand for the decoration.
INSTRUCTIONS
1. Preheat oven to 170°C/338°F
2. Beat the egg yolks and sugar in a bowl, until it becomes pale in color, and thick in consistency.
3. Pour in the vegetable oil while mixing, till fully incorporated. It should resemble mayonnaise at this point; would most likely taste similar to sweet mayonnaise. Then add the milk in and mix to fully combine.
4. In a separate bowl, combine the flour, baking powder and sakura powder together. Then proceed to sieve it once(or two times if you’d like, but just once should be able to suffice). Then pour the dry ingredients into the egg mixture, and mix with a balloon whisk till it’s barely combined.
5. Proceed to separate the batch in half, into different bowls. In one batch, put some red food coloring into it and mix to combine. Feel free to adjust the red food coloring amount, depending on how pink you want it to be. Keep in mind that the meringue will also lighten the color, so don’t be afraid to make it a bit more pink than intended.
6. Now to make the meringue! Be sure beforehand that the bowl you’re using for the meringue is clean and free of grease; as any oils or fat will prevent the egg whites from foaming. Lightly beat the egg whites on low speed, until it foams up. From there, gradually add in the sugar slowly into the meringue, until well incorporated. Then continue to beat the meringue till it reaches stiff peaks. You can usually tell when you pick it up with your whisk, and its tip doesn’t fall over. Another way of telling is to turn the bowl upside down, and it should be standing without moving or falling out of the bowl.
7. From there, divide the meringue in half, for the two respective batches. In each batch, put in 1/3 or 1/4 from each half of the meringue into the batter, and mix it in as normal. By sacrificing those 1/3 or 1/4 parts, it’ll deflate them, but it will make the cake mixture a lot lighter, so that it’ll be easier to combine in the rest of the meringue.
8. With a silicone spatula, fold in the meringue into each of its respective batches, till it’s barely incorporated; as we do not want to deflate the air within the meringue too much.
9. Now to proceed to pour the batter into the pan. With a laddle, first scoop up the pink batch into the pan, then the non-colored batch, and from there continue to alternate between the two batches, till you run out of the batter and filled the pan. With the colors, doesn’t matter which color you start off with at first, since it’ll end up the same anyways :^)
10. With either a knife or a wooden skewer, swirl it around the batter a few times to create that marble pattern, and to remove any potential pockets of air inside. Don’t mix it too much though, as we still want to keep the two colors somewhat separate and keep that marbled pattern. Additionally, with a cloth underneath, tap the cake pan several times on a flat surface, to further remove any remaining air.
11. With the oven preheated beforehand, bake the cake at 170°C for 50 minutes.
12. When it’s done baking, remove from the oven, and proceed to leave it to cool upside down. I usually use a bottle with a long neck to hang the cake pan upside down with. This is to prevent the cake from shrinking back down, as this is a very light cake.
13. When the cake is completely cooled, use an offset spatula or flexible knife to cut along the edge of the pan. For the inner section of the cake, use a smaller offset spatula or knife to also cut along the edge.
14. When the cake is detached from the cake, remove the center piece from the side part of the pan. Then proceed to cut the cake away from the bottom pan, and remove carefully.
15. Place on a cutting board, and with a long serrated knife, or any long knife you have on hand; proceed to cut off the top dome part of the cake, to ensure that the top of the cake is flat and even.
16. Now to make the cherry blossom whipped cream! Take out the cherry blossom-infused cream out of the refrigerator, and take out the flowers and leaf pieces that were in the cream, but make sure to squeeze out any excess cream from those flower and leaf pieces.
17. In a large bowl, pour in the cream and 3 tbsp of sugar. For good measure if you want, have another bowl underneath, filled with ice water to ensure it whips voluminously. You can also refrigerate the bowl you’d beat the cream in beforehand as well, but that’s totally optional. Then proceed to beat the cream on high speed, till it’s fluffy and reaches stiff peaks. Be sure to take care in not over-beating the cream, as it would separate and turn into butter.
18. To prep for the decoration beforehand, drain the cherry blossom flowers that we previously left soaking to remove excess salt, and take care in carefully laying out the cherry blossom flowers and petals to dry out on a paper towel; so as to maintain its beautiful shape.
FROSTING AND DECORATING THE CAKE
1. Place cake onto a turning table. With an offset spatula, add a generous amount of whipped cream on the top, just roughly smoothly it and covering the top’s surface. With the smaller offset spatula, proceed to add some whipped cream within the center part of the cake and roughly cover the surface. Also add a generous amount of the cream to the sides as well, again just roughly covering the sides. If you feel that some areas need more cream, feel free to add more cream onto those areas.
2. From here, use an offset spatula to smooth out the cream as best you can, it’s ok if it’s not completely perfect! For the sides, you may also use a bench knife/dough scraper to smooth the cream out. Or, alternatively, you can also go for a more rustic look with the cream if you do not wish to go through the hassle of painstakingly smoothing it out.
3. Now onto finally decorating the cake! Proceed to place the cherry blossom flowers and petals on top of the cake, and arrange them however to your liking!
4. It is done! Cut and serve a slice, and enjoy the fruits of your labor!
0 notes
Text
Sorry I haven’t posted for a while I have had a yucky bug :(. Sometimes you do just fancy a classic dinner and they are really comforting. Even though this is simple it has a real depth of flavour. I used Paul’s homemade wine for this dish and it worked a treat. He had a batch he wasn’t keen on so I have been using them in cooking and they add a really fruity flavour. The other thing’s I love about this recipe is the wine dyes the chicken red which for some reason always makes me smile. The others are it is easy to make, a one pot and can be prepared in advance if you have friends or family coming over.
Ingredients (serves 2)
4 chicken thighs (I like skinless but I don’t think the French would agree)
75g box of smoked pancetta lardons
1 large onion, peeled and sliced
2 carrots, scrubbed and sliced diagonally
2 garlic cloves, peeled and finely chopped
1/2 bottle of red wine
400ml of chicken stock
small bunch of thyme leaves
250g punnet of chestnut mushrooms, sliced
1 tsp corn flour mixed with a splash of water (thickener)
seasoning to taste
oil for frying
Directions
Preheat oven to 140 degrees fan
Heat a tablespoon of olive oil in a large Dutch oven. (If you have a cast iron pot it’s perfect for it.) Fry your bacon or pancetta lardons for 5-6 minutes until browned and remove them to a plate lined with paper towel.
Season your chicken pieces with salt and pepper and brown them in the same pot in batches to avoid overcrowding. Remove to the same plate as bacon. You are not cooking your chicken all the way through, just browning on both sides.
Add the sliced onions and carrots, cook over medium heat for 10 minutes, add the garlic and cook for 1 minute longer stirring the whole time until it is fragrant and doesn’t burn Add a splash of stock and scrape all the burned bits to incorporate them into your sauce, now add bacon and chicken with all the juices they collected, pour in your wine, chicken stock and thyme sprigs and bring to a boil. Once boiling, cover with a lid and put it in the oven for an hour.
When chicken is cooked with clear juices add in the corn flour, taste and adjust seasoning if needed. Slice mushrooms thickly and add to the pot, taste and adjust the seasoning if needed. Put back in the oven with the lid off for 10-15 minutes to allow the sauce to thicken and the mushrooms to cook. serve with crusty bread or couscous. Enjoy.
The Classic Coq Au Vin #recipe #foodblogger #cooking #dinner #coqauvin #onepot #healthy #food Sorry I haven't posted for a while I have had a yucky bug :(. Sometimes you do just fancy a classic dinner and they are really comforting.
0 notes
Last Seen Blogs

mmizmir
İzmir 👩❤️💋👨:)

gravity-falls-party
Ask The Gravity Falls Party

darcyfoot
Untitled

pinkclubwear
Pinkclubwear

wayneooverton
Wayne O. Overton Tumblr