#analog technology
Text
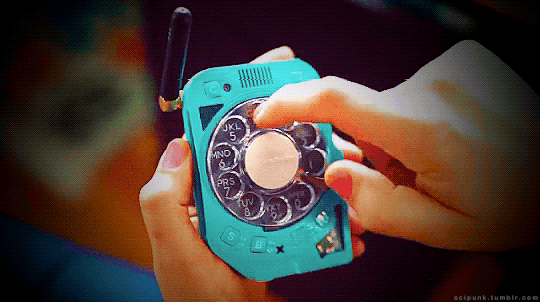

Rotary Un-Smartphone
#cyberpunk aesthetic#retro futurism#rotary phone#retro design#hacker girl#smartphone#analog technology#hacking#gadgets#electronics#hacker#retro tech#modding#cyberpunk#vintage tech
326 notes
·
View notes
Text


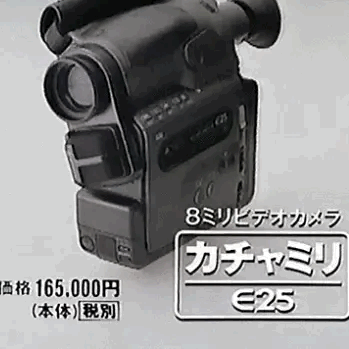
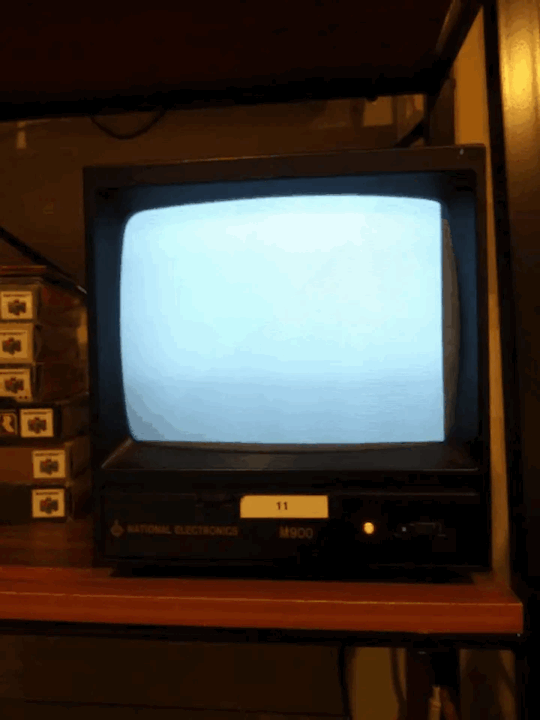


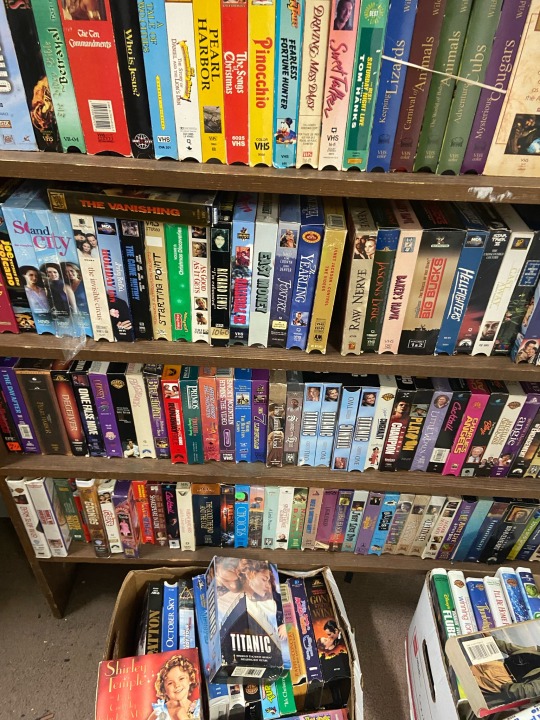
Video Store & VHS
for @ashyslashyy
X - X - X
X - X - X
X - X - X
x
#vhs#video store#black#blue#white#multicolor#tv#tv static#analogue#analog#analog technology#analogue technology#tech#technology#video tapes#cassette tapes#camera#retro#retro aesthetic#retro 80s#stim#stimmy#stimming#stimblr#sensory#stimboard#soda boards#hands#tech stim
69 notes
·
View notes
Text
the masculine urge to send cryptic messages in morse code
6 notes
·
View notes
Photo


from synthesizers, anyone? from music educators journal, 1971
#i used this article for a paper a few months back. fun to read knowing how much music technology has evolved since#analog technology#synthesizer#music production#1970s#music
3 notes
·
View notes
Text
God i miss feeding technology little pancakes of information. Floppy disks, CDs, DVDs, etc. We fucked up by phasing that out so quickly. The machines are hungry and we've stolen their mouths in the name of progress
#machine#80s#90s#early 2000s#cds#dvd#floppy disk#analog technology#technology#progress#upgrades#but at what cost
1 note
·
View note
Text
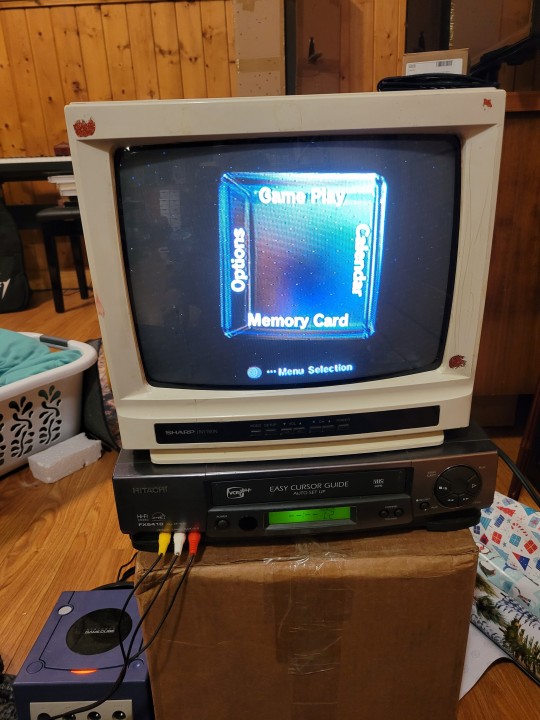

Wifey and I found this CRT tv for $8 at the local secondhand store! We're so excited to finally have one!
#now we just need to get games for the game cube but we're broke currently#it probably belonged to a kid considering the stickers that were on the corners#they were sparkly halloween ones#the picture is beautiful too#crt tv#analog technology
1 note
·
View note
Text
A lot of it has probably happened more recently because of the almost ubiquitous use of digital audio and digital cinema now. Part of the reason with that is because when everything was shot on film and edited with tape, it was a much more laborious process and it was much more technically challenging to do a whole lot with sound design. Everything had to be a very conscious choice and a very intentional soundscape that they create. Since it was so cost-intensive and labor-intensive, they wanted to make sure that the story got across first and emotion gets sort of directed with music, and that's about it. And every pass that you do with an analogue system depletes the quality as well: it's like making a photocopy of a photocopy. But now, they have much faster turnarounds and much more capabilities as far as what they can do with the sound design, including playing around with ambience and sound effects. To put a concrete reason on it is hard, but a lot of it comes down to 'I have this toy, so I'm going to play with it.
— Here's Why Movie Dialogue Has Gotten More Difficult To Understand (And Three Ways To Fix It)
#thomas curley#here's why movie dialogue has gotten more difficult to understand (and three ways to fix it)#history#film#film history#movies#sound#sound engineering#music#technology#digital technology#analog technology
1 note
·
View note
Text
#retro#vhs#vintage#80's#1980s#betamax#neon#haze#futuretech#betawave#new era#futurewave#the eighties#technology#analog
389 notes
·
View notes
Text

#cyberpunk#aesthetics#future#futurism#futuristic#y2k#technology#tech#analog#photo#photography#retro#design
300 notes
·
View notes
Text
167 notes
·
View notes
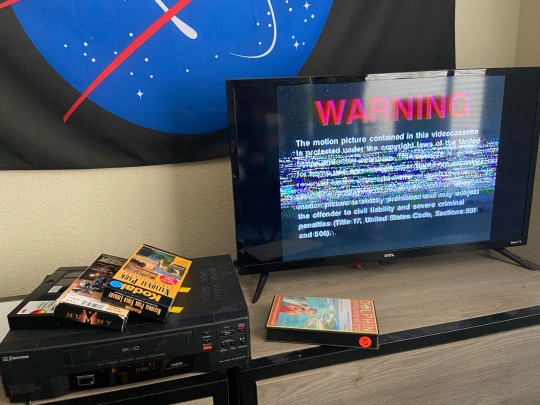
Text
Hey, do you want to learn how to play VHS tapes in the year 202X?
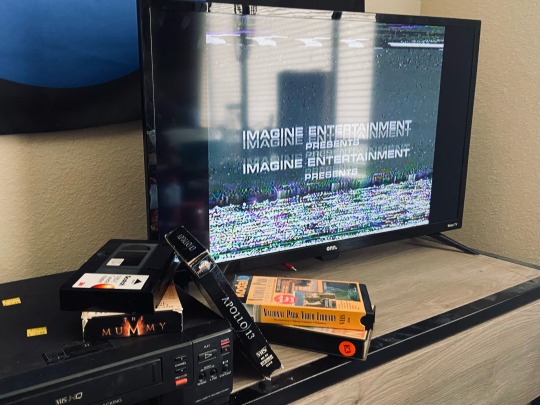
I know this is my art blog, but it has come to my attention that some of you are too young to have experienced the joys of the Video Home System in its prime. Come hither so I can teach you and we can embrace the beauty of physical media together. If you have a thrift store and a TV, this process should work for you.
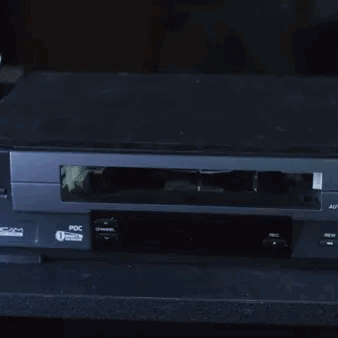
Step 1: Get a VCR ($4-$15)
DO NOT BUY EXPENSIVE VCR/COMBO SETS FROM THE INTERNET!
The ones you find on sites like eBay and Etsy are insanely overpriced and might not even work. Instead, find a Goodwill, Savers, or independent thrift store near you and go to the electronics section. There’s a good chance they’ll have at least one VCR. If they don’t, try a different shop. You can also check local online marketplaces, yard sales, etc.
Good things to look for:
4 (or more) Heads — Heads are the things that actually read the tape. The more heads you have, the better your picture is going to be.
Auto Tracking — Poor tracking can create a rolling picture, which is a pain to fix. An auto tracking VCR does that work for you.
Pre-2000 — After 2000, electronics started being mass produced with plastic casings and cheap parts. VCRs made after this time are a whole lot easier to break. Ideally, you want something from the late 80s to mid 90s.
Well-known brands — Sony, Toshiba, etc. Japanese manufacturers tend to have the best quality. Early Emersons are nice too.
Generally good condition — If there’s a bullet hole in the case, it’s probably best to pass on. A bit of dust isn’t an issue, but major damage isn’t a good sign. If you can, plug the machine into a power outlet in the store and see if it even turns on.
Head cleaning indicator — Not something you *need*, but I find it nice to have. You’ll want to use a head cleaning tape when the indicator starts flashing.
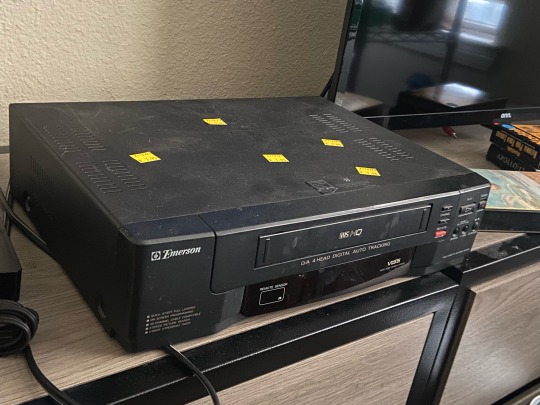
This is the one I’ll be using for the sake of this guide. This is an old Emerson that I picked up from Goodwill for $7.95. (Notice the five price tags they slapped on top.)
Step 2: Get Some Tapes (¢10-$1)
This is the fun part. Almost every thrift store will have some VHS tapes, usually near the books/DVDs/records. I’ve seen them as expensive as a dollar, but some stores will just give them away for free. I suggest buying a few movies you like, plus one or two shitty tapes to test out your VCR with.

You may also find 20 different copies of Titanic in every store. This is a normal occurance.
Remember to check the condition of any tape you plan on putting in your machine. If the spool looks moldy, you *can* try to clean it, but you’ll need another VCR to do so. If the tape looks wrinkled or otherwise damaged, you can still probably play it, but it will look and sound a lot rougher than you should expect. If the casing is damaged, I wouldn’t risk trying to put it in your VCR at all.
Remember: VHS tapes stopped being produced commercially in 2006. Most tapes you find aren’t going to be in the best shape, because they’re all a few decades old. (Sometimes, though, you will come across a tape with an excellent picture, good sound quality, and subtitles! The Mummy tape that I own is near perfect.)
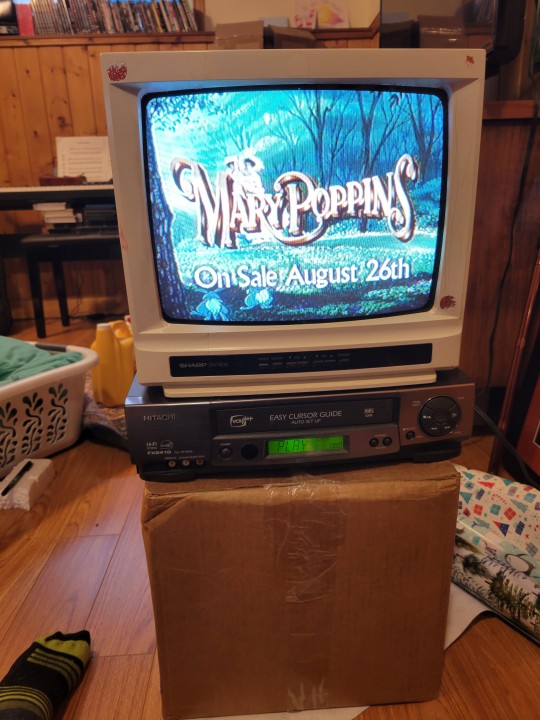
Step 3: Connecting the VCR to Your TV
For this step, you’re going to want a coaxial cable and a set of RCA cables (the red, yellow, and white ones). If your TV doesn’t have an RCA input, you’ll also need an RCA-to-HDMI converter. If your TV also doesn’t have an HDMI input for whatever reason, you’re shit out of luck.
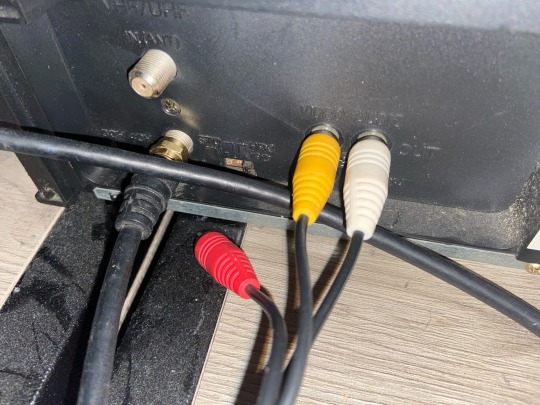
You’ll plug these cables into the “out” or “out to tv” connection on your VCR, then plug the other end into the back of your TV.
Note: Not all VCRs have right audio (the red one)! That’s fine. Just leave it hanging free. The left audio (white) is your mono audio, so you’ll just have that instead.
Lastly, put the channel switch on the back of your VCR on 3 or 4. I keep mine on 3. This is the number for the channel you’ll go to on your TV to actually see what the VCR is playing.
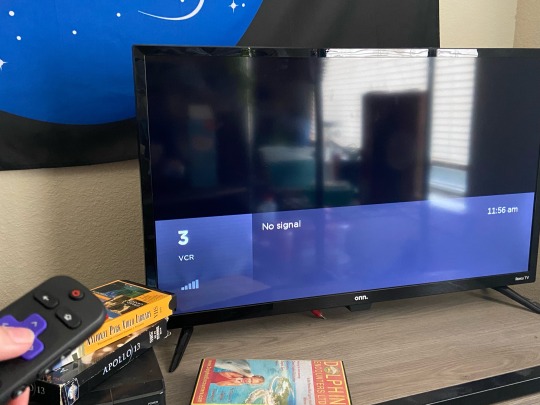
Step 4: Setting up the TV
I use a little Roku TV, which is surprisingly steady to set up for VCR input:
Settings ➡️ TV Inputs ➡️ Live TV
From here, you’ll either be prompted to scan for channels OR you’ll have to select “scan for antenna channels”. It will ask you if you want to have channels 3 and 4, to which you’ll say “yeah, I do want channels 3 and 4” and click the button that lets you have channels 3 and 4. If you don’t have an antenna, you can skip the other prompts.
I haven’t done this on any other type of TV, but the process should be pretty similar: get yourself to channels 3 and 4 through whatever means necessary.
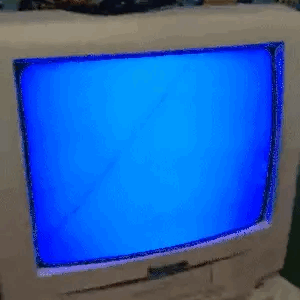
Once you’re there, it should look like this. Sad, blank, and lonely. But not for long.
Step 5: Playing Your Tapes
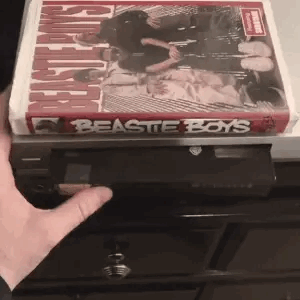
This is where things can go really really well or really really wrong. If everything is hooked up, you can grab your shitty tape and insert it into the VCR.
(Make sure there isn’t anything else in there first, though. Some people don’t remove their precious Titanic copies before donating these things.)
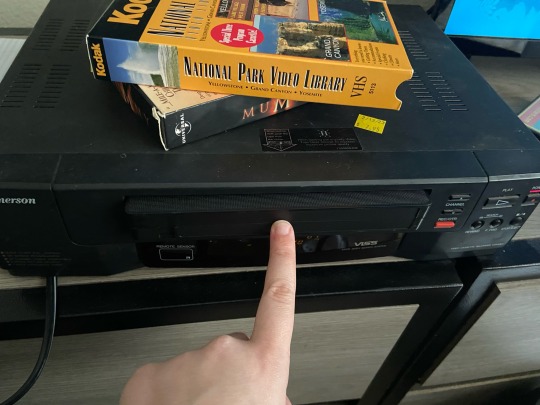
You’ll want a tape that’s fairly clean, with no casing damage, and already rewound (black tape in the left window). To insert the tape into a front-loading VCR, slowly and firmly slide it into the slot. Once it’s most of the way in, the machine should “grab” it and pull it all the way inside. You’ll hear the machine make some noises.
(If those noises are really crunchy, that’s probably not a good thing. Troubleshoot with your favorite search engine or head over to r/VHS to see if anyone can help you.)
Once your machine is only making some clunky whirring sounds, it should be safe to press the play button. Enjoy watching your favorite films in the least pleasant format possible. Don’t forget to rewind em when you’re done.
If you have issues, the freaks over at r/VHS tend to be really helpful, but you can also find decade-old YouTube videos that might answer your questions too.
180 notes
·
View notes
Text


Masky (Marble Hornets) stimboard with woods + creepy and VHS themes
☽ - ✰ - ☾ ☽ - ✰ - ☾ ☽ - ✰ - ☾
ଘ(੭ˊᵕˋ)੭ ੈ♡‧₊˚ for anon!
#💙 sugar life posting 🌙#stimboard#requests#Marble Hornets#creepypasta#ARGs#analog horror#Masky#Masky - Marble Hornets#Masky - Creepypasta#animation#animated#analog#tech#phones#telephones#technology#TVs#televisions#VHs#VHS tapes#VHS players#woods#forests#nature#creepy#scary#scarycore#creepycore#horrorcore
65 notes
·
View notes
Text

Minolta X-700
#minolta x-700#wikipedia#wikipedia pictures#wikimedia commons#tech#technology#techcore#technologycore#vintage tech#vintage technology#vintage camera#analog film#film photography#film camera#analog photography#analog camera#camera#photography#minolta#minolta slr#slr#single lens reflex camera#vintage#analog#film
10 notes
·
View notes
Text

There was a home video tape format called Video 2000 (V2000), that was released in late-1970s and discontinued in late-1980s. It was mostly owned by Philips. These kinds of tapes can literally record video content on both sides in the similar way as audio cassettes.
The format itself, had minor success in Europe, just like what Sony's Betamax (Beta) had its same level of success in the US. However, both of them lost to VHS. But, Video 2000 is obscure and unpopular in North America.
The image is from Wikimedia Commons.
#video 2000#v2000#philips#video tape#magnetic tape#tape media#physical media#old tech#old technology#vintage technology#vintage tech#retro tech#analog media
13 notes
·
View notes
Text
doug eiffel is a radio guy in every sense. eiffel still listens to music on the radio and he complains about what they play, but no matter how many times people tell him he can just listen to his own music instead, he wants to listen to the radio and complain about it, so he won’t stop. eiffel thinks it’s sacrilege when classic rock stations play anything more recent than the 80s.
#wolf 359#w359#doug eiffel#i know this is true i feel it in my heart#he's an analog man#and he loves a good radio show. or a bad radio show. whatever#i feel like people underestimate how nostalgia brained eiffel is tbh#he likes some newer stuff but it's mostly very mainstream#he's a pop culture guy but a pop culture guy of another era and his attachment to the technology associated with that era of pop culture#is unshakable#he likes stuff he can take apart and fix by himself with whatever's lying around. he made his own walkie talkies. etc#type of guy who still has his blockbuster card in his wallet#type of guy who watches movies on tv even though he has them on dvd#and he worked in surveillance there's noo way he trusts streamlined modern technology with 'smart' features or the equivalent#i was watching a video the other day about local radio/tv repair places that went out of business because nothing is built#to be repaired anymore and products are designed so they can only be repaired/replaced by the companies that made them#and i think eiffel would have a lot to say about that. and he would be right.
212 notes
·
View notes
Text
if you have an actual story idea for the format you chose (that includes adapting existing horror stories into a different medium), or want to elaborate on why you chose it, please share in the tags!!!!! :D
and ofc as usual, reblog to reach more people, if you'd like 🖤
#polls#horror#october#halloween#I'm having horror related thoughts tonight and how the common format changes with time too!#(in part due to technology developing in certain ways. but not only!)#it's really interesting! esp given how certain formats have sort of an expected type of horror to go along with them. yknow?#like how most analog horror web series is cosmic horror of some sort. how slasher stories are most commonly told through film. etc#either way I'm curious to see what’ll be most common on tumblr! tho i have some suspicions and guesses already :3
19 notes
·
View notes
Last Seen Blogs


hogsnok
hogsnok

infinitymarvel
#1 Source for the Marvel Cinematic Universe

maverick-creator
MaskedMaverick

old-transport
Old trams & transport