#the sims 4 guide
Text
Guide on making custom coat presets. (Allows for better quality custom coats)
31/08/2023: The guide has been updated to reflect a step I missed - when exporting your custom textures, make sure to select "generate mipmaps", the step is reflected in more detail under the appropriate part. Ctrl+f and enter "mipmaps" to skip to it.
16/10/2023: Updated to add more info re: generating hash ID's.
Okay, I decided to throw this together. There's some things I can't figure out still, but oh well, we're just getting through this as we go.
To clarify what I mean - this is not a stencil or a brush.
This will appear here:
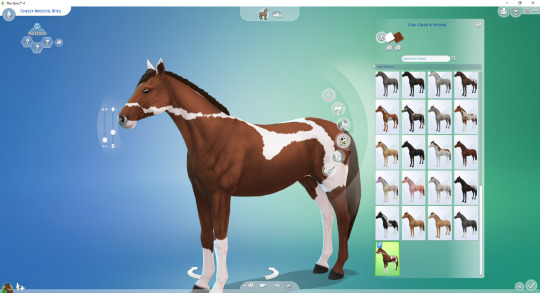
To preface this guide though, I cannot, for the life of me, figure out how to make it appear as an individual option in-game, so, these are considered SWATCHES of the original coats.
Okay, with that out of the way.
Things you'll need:
Sims 4 Studio
GIMP
Probably Notepad, but it's optional on how easy it is for you to track things.
Guide:
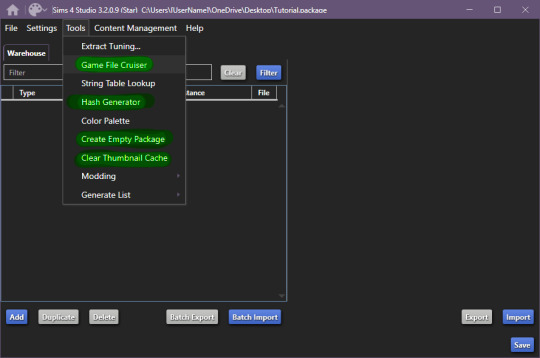
These are the tools we'll be using in S4S.
Start by creating your empty package, once you're done, open up Game File Cruiser:
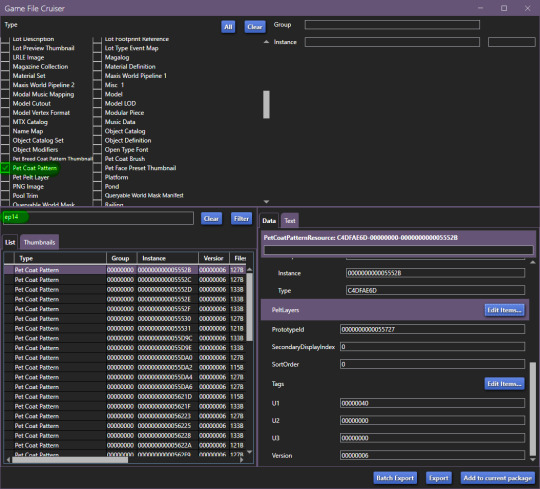
before you do ANYTHING, make absolutely sure that the search bar below the file list has "EP14" in it, otherwise you will 100% end up editing a cat or a dog coat pattern and that's now what we want, at all.
Add the first horse file to your package
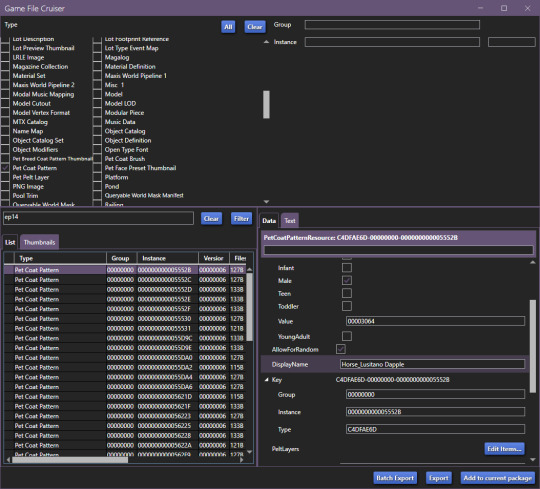
In our case, it's the Lusitano Dapple coat, don't worry, if you're making a breed-specific coat, you can change this later.
Now that it's been added to our package file, it should look like this:

We now have two options, I'll explain this to those who don't care about creating a game-generated thumbnail and want to find it easier.
To make your "test" thumbnail, you'll want to copy the instance ID of the file we just added to our package:
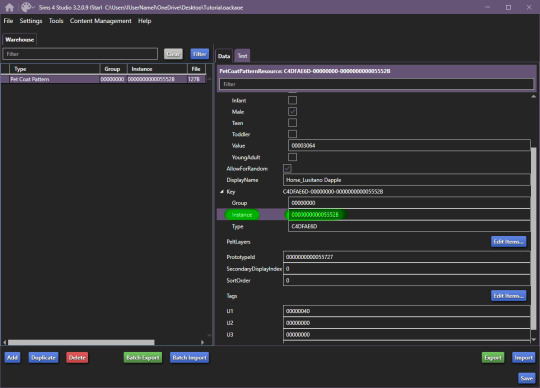
It should look like this, the instance ID should be in 2nd from the top search bar, then, select all and click filter (it just makes life easier than finding the specific file type).
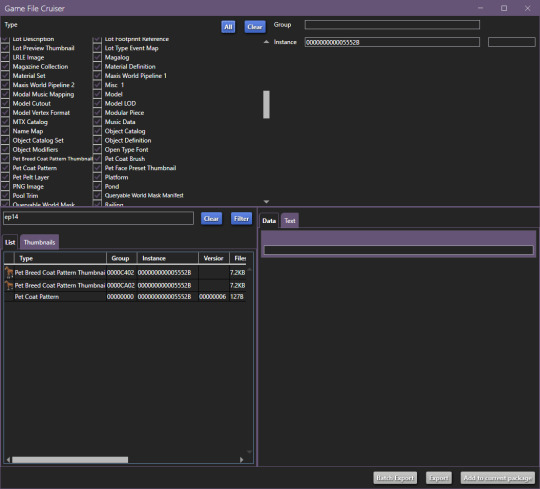
These are the current, in-game CAS thumbnails. We'll add both of them to the package, they're for ponies and adult horses.
Now you can export these two pictures (They need to be saved as .png's), edit them as you'd like and then import them back into the package.
Now, you CAN add up to 5 different pelt layers that can be easily recoloured in-game, however, we'll only be working with two pelt layers in this tutorial, because it's a tutorial and you'll learn how to make more of them anyway.
Click on "Pet Coat Pattern" and then look over the data:

From there, Click on "PetPeltLayers":
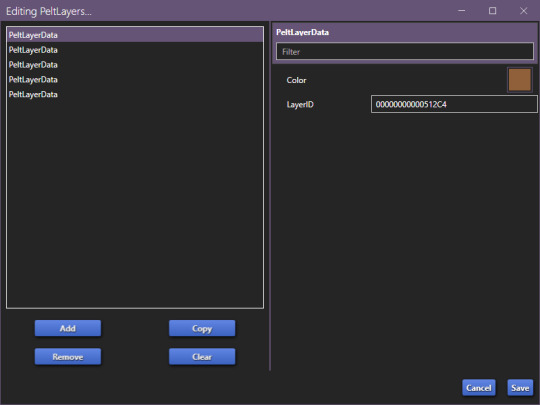
The first pelt layer is ALWAYS a solid colour, we'll begin by copying the LayerID (Instance ID) and going back to game file cruiser.
Just like previously, you should keep EP14 in the search bar and just use the instance ID bar to find things, as that's all we'll be doing.

Add the Pet Pelt Layer to your package file, then, copy the "texture key" from the Pet Pelt Layer:
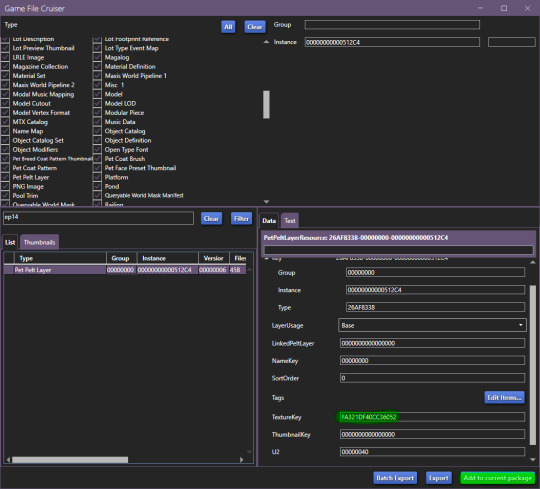
Then find the Texture Key:
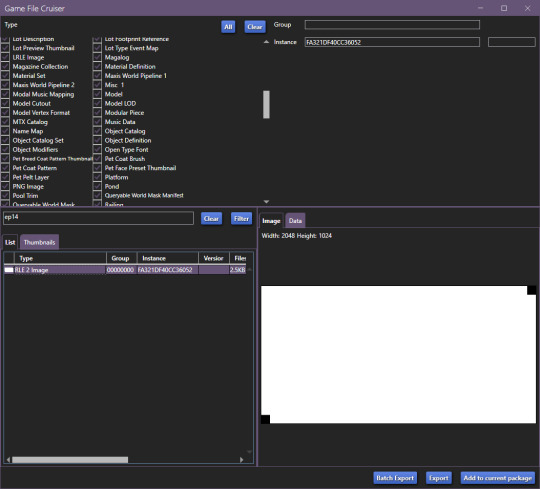
This is the solid colour layer, it HAS to be there as this is what will help you edit your base colour. Add this to your package file.
Now, our package file will look like this:
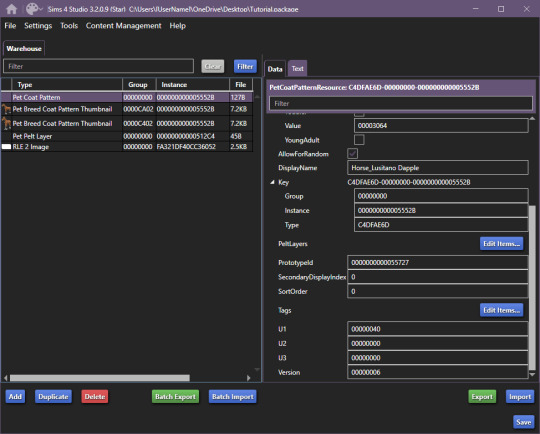
Unfortunately, we're not done, just yet, we'll want to grab at least the second PetPeltLayer:
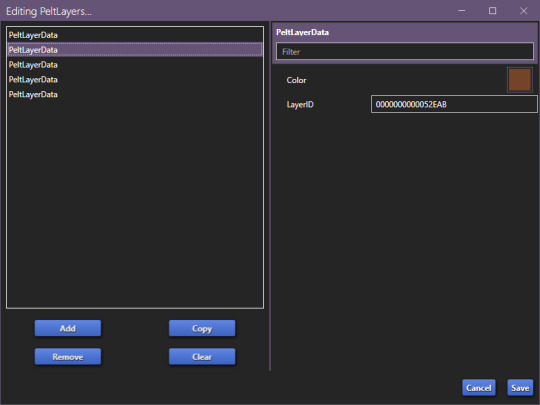
Just like before, we're going to copy the ID and find the Pet Pelt Layer + the Texture for this layer:

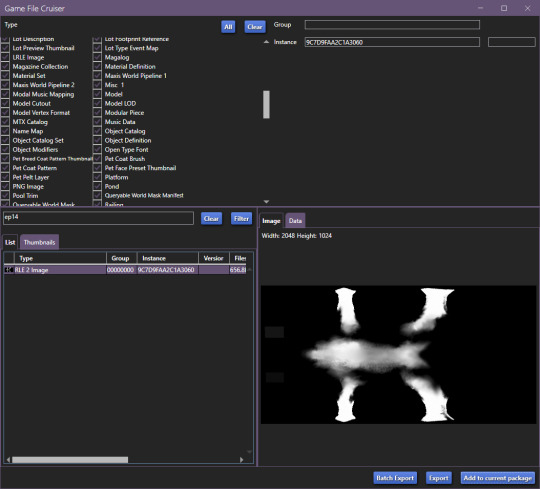
Now, our package file will look like this:
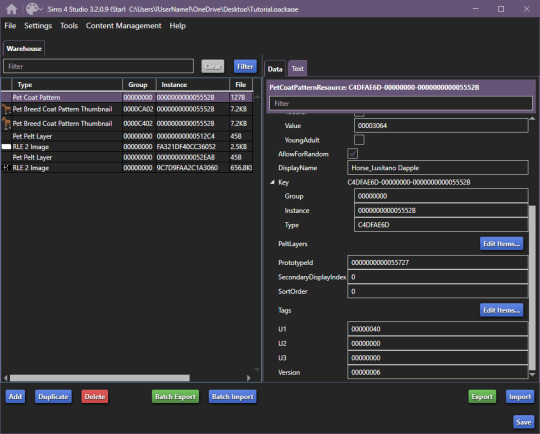
You can now go ahead and close the Game File Cruiser, we won't be using it anymore.
Right now, this is our package file and we need to do some cleanup first.
We'll be opening up the PetPeltLayers once more and we'll remove the last 3 entries:
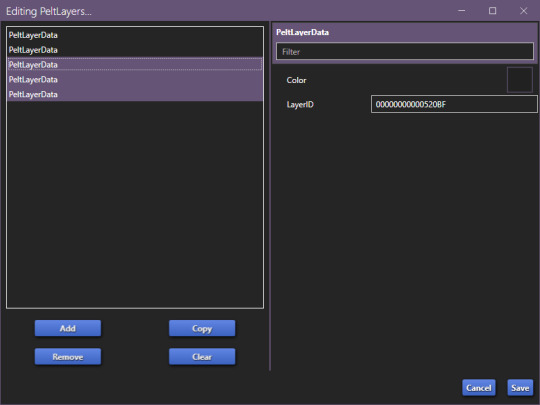
You should be left with only two entries, as that is what we'll be editing (leaving the other 3 will break the preset).
Now, we'll start generating new hash codes for everything:
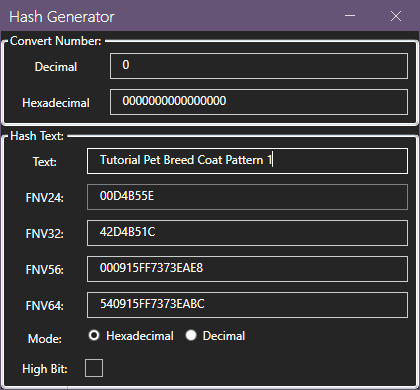
Edited 16/10/2023: When generating your hash ID's, please use your creator name ie.: "[YourCreatorName/Blogname]TutorialPetBreedCoatPattern11", this will give you a more unique hash code than hoping to be as descriptive as possible when generating the hashes (in this case instance ID's).
Thanks to Mizore Yukii for this advice, from Creator's Musings discord.
As in my previous guides, be descriptive with what you're typing there and then just change the last number.
The process is annoying and slow, so bear with the images, and follow along.

The TextureKey coloured in red is the 3rd ID you'll generate, it's what links the texture to the Pet Pelt Layer, which links it to the Pattern we're creating. (Sorry for the squished thumbnail, open it in your browser, I was running out of picture space for the rest of the tutorial lol).
And now we repeat this for the second Pet Pelt Layer.
Now, if you want the game to just generate the thumbnail for you, you can skip this step, if you want to make a custom thumbnail, then copy the Pet Coat Pattern Instance ID into the two Thumbnails we've added to our package file:
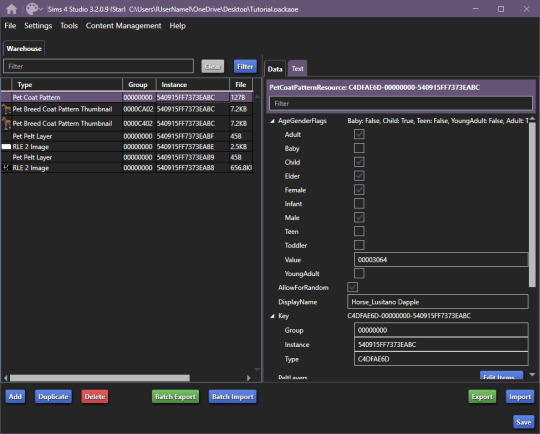
This is what the package file has to look like at this point.
Now is the relatively easy part, editing the second RLE 2 Image. We won't touch the base, because it's not necessary.
I recommend using the Horse Diffuse Map as a base when you're drawing your pattern. It'll be easier to see what you're doing. You can download it here: Horse Diffuse Map.
Remember, that your pattern HAS to be white, black space is IGNORED by the game and considered a "transparent" layer, so that you can see the layer beneath the you're working on.
This is my quick, and lazy test one I've made, I use a PNG of the Diffuse Map as a base and on a separate layer I draw with white coloured brushes:
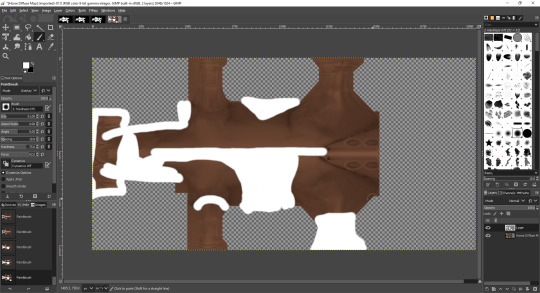
You may notice the very straight lines on the diffuse map - make sure to colour OVER them as if you do not, it will appear in-game because those are the seams where the mesh "meets"
Once you're satisfied with your pattern, you can go to export, just make sure that the white pattern is on a separate layer to the diffuse map. At this point you can add a black background underneath the white and export.
All you have to do is export the RLE2 Image you've edited as a DDS image in the L8 format and (edited 31/08/2023) select "Generate mipmaps" otherwise you will experience a glitch in-game where the coat disappears. You can leave the mipmap options as default, it should work correctly.
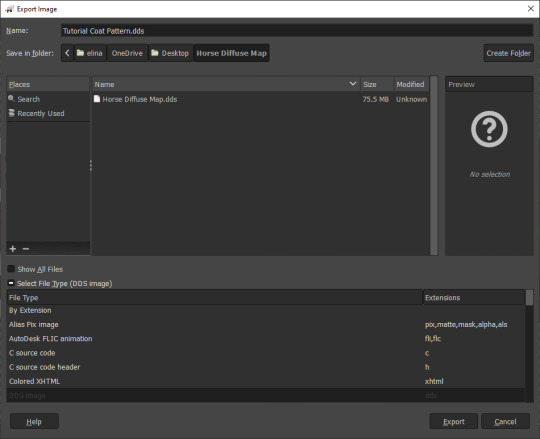
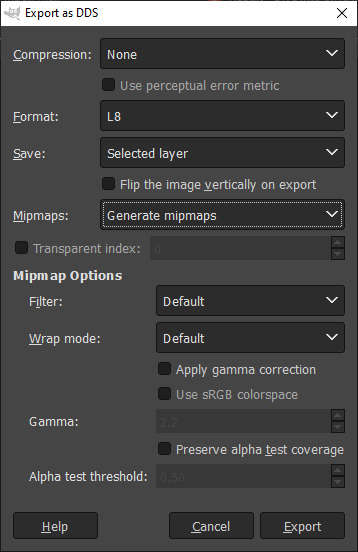
Then, we're going to import it into our package and save our package:
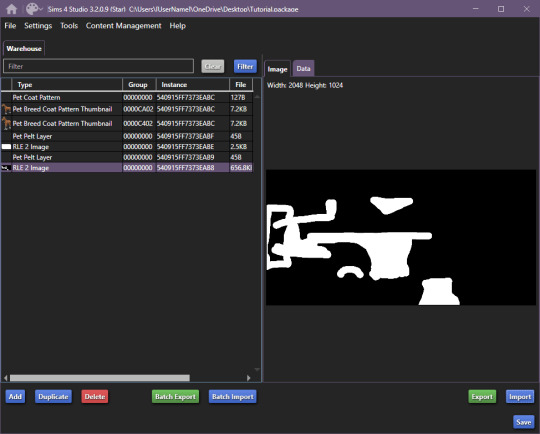
Remember to not touch the completely white base coat!
Now that this is over, we'll go back to Pet Coat Pattern and edit some settings.
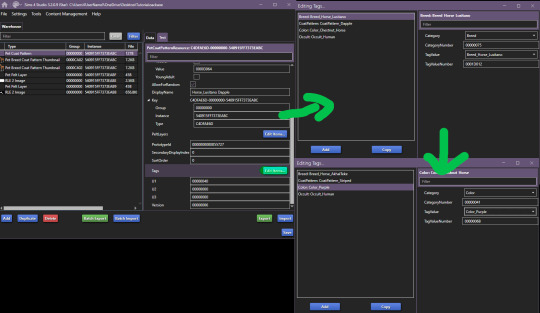
The first three settings is what I recommend changing around. The first setting changes the breed, the second setting changes how the coat pattern is labeled and the third setting changes the colour it's tagged under.
Only change "TagValue" - it will give you a dropdown menu, don't change anything else. The TagValueNumber changes automatically, so don't worry about it.
EDITED TO ADD:
Additionally, don't forget to go into "PetPeltLayer" and change the colours, this is what will show up as "base" colour that you can change in-game. You can change them for every PeltLayerData file you have.
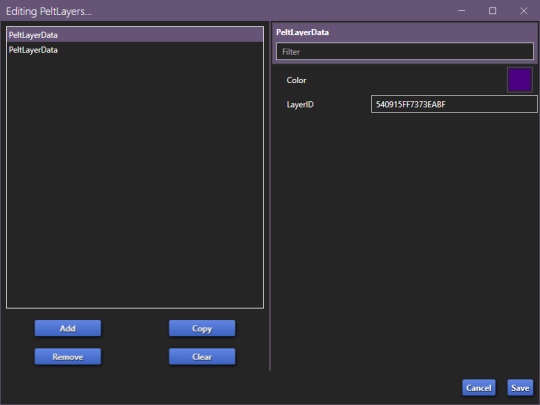
Now, save and go test it out in game:

Bada bing, bada boom we've got our "custom" coat preset.
If I've forgotten anything, let me know. This took me 2 hours to write, so forgive my typos. If anything is unclear, let me know. I ran into a struggle with the picture limit on Tumblr (found out that it's 30, I should move my guides somewhere else, but where?)
#The Sims 4#Sims 4#The Sims 4 Horses#The Sims 4 Pets#the sims 4 horse ranch#the sims 4 guide#sims 4 guide#sims 4 custom content guide#sims 4 horses guide
141 notes
·
View notes
Text
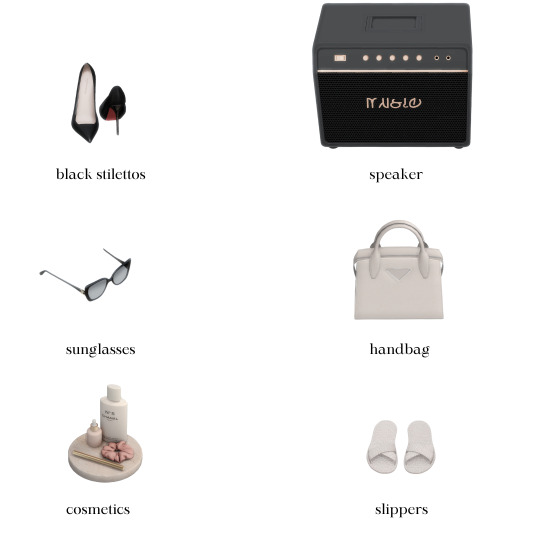

holiday gift guide: luxury edition
♡ black stilettos
♡ simlish orcaella speaker
♡ chanel sunglasses
♡ prada handbag
♡ cosmetics
♡ house slippers
part three of my holiday gift guide. as always, thank you so much to all of the amazing and talented cc creators! @xplatinumxluxexsimsx @wondymoondesign @syboubou @pinkbox-anye @sundays-sims
#simsplymaddy#cc recs#the sims 4 cc finds#the sims 4#ts4#ts4 simblr#ts4 maxis cc#ts4cc#the sims community#sims 4#ts4 screenshots#sims 4 cc#sims 4 simblr#the sims cc#sims#sims 4 gift guide#sims 4 christmas#sims 4 holiday#the sims 4 cc#the sims 4 simblr#new simblr#cc finds#ts4 maxis mix
150 notes
·
View notes
Text

I've been meaning to make this post for a while because there are always arguments and frustrations regarding WCIFs here on simblr. With new users and simblrs popping up every day, I thought it wise to take a few minutes to inform people on this topic as some people really might not even know what WCIF means or what the universally acceptable way to approach WCIF asks is.
WCIF is shorthand for "where can I find..."
If you are a simblr, it is a good idea to clarify in your blog's bio if you are open to messages asking about cc, that way people visiting your blog don't have to guess. You can indicate this by saying you are either WCIF Friendly or WCIF Unfriendly/No WCIFs. If someone is WCIF friendly, it means that they welcome messages in their ask box regarding where to find a certain mod, piece of cc, etc. If someone is WCIF unfriendly, this means they do not welcome messages in their ask box of this nature.
When someone is WCIF unfriendly, you should respect their terms and boundaries by not sending them a message asking where to find something for the sims. Yes, this means even "well-intended" asks that are ultra polite are not welcome to them (which is perfectly okay). Instead, first check if the user has a "CC Finds" sideblog where they reblog the cc they use.
If they don't have a "CC Finds" blog where they essentially archive the cc they use, you can make a post on your own blog with a screenshot (with a link to the original post) and/or a description of the cc you're looking for and tag it as public wcif, this way people can respond if they know what the mod or cc is. There are also reddit threads for sims 4 wcifs you can post on. If you don't want to do any of that, try googling it by description! You'd be surprised how intuitive the results can be.
On the other hand, if someone is WCIF friendly they are open to helping you find a specific piece of cc for the sims, but you should always send them a WCIF in their ask box, not through a private message or a comment on their post. This is so they can make one public post and avoid inquiries about the same cc over and over again. They will likely tag these posts on their page as "WCIF," so be sure to check their tags before you ask them about a piece of cc because they might have already linked to it in a different ask!
It should go without saying, but even though someone is WCIF friendly this doesn't mean you can disregard kindness when it comes to asking someone a favor. Say hi, ask politely (please and thank you go a long way ya know!), and be patient. People who are wcif friendly choose to take their time to link cc for others, so they're doing you a favor...be nice!
I think I covered the basics as simply as I could; the most important thing is to remember that there are real people on the other side of simblr blogs, and whether they have 13,000 followers or 3 they deserve to be respected. Just be kind and respect people's boundaries. I hope this helps someone, and if you didn't know about any of this... now you know! 👍
#ts4#the sims 4#sims 4#simblr#wcif#public wcif#ts4cc#ts4 custom content#wcif etiquette#wcif guide#<- tagging in lots of categories to reach a wide audience#I know this might seem silly but I think some people just like... need this explained. Some people just don't know#resources#atfs#alltimefail-sims
775 notes
·
View notes
Text
How to create visual "custom categories" with the new Sims 4 Studio Batch-Edit
As discovered by @vyxated Sims 4 Studio now supports batch-changing the Display Index number which allows you to easily sort your CC (see post here)
Using that, you can create visual "custom categories" for any existing category to sort your CC into smaller groups that share a thematic.
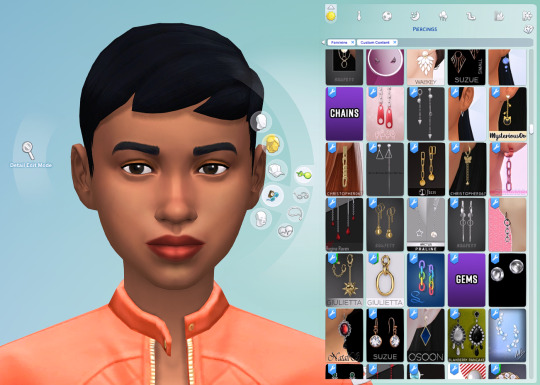
━━━━━━ ・❪ ☾ ❫ ・ ━━━━━━
Step 1: Creating folders
First you need to sort your CC into whatever categories you want.
I am sorting my earrings.
( I use Folder Painter to get colored folders)
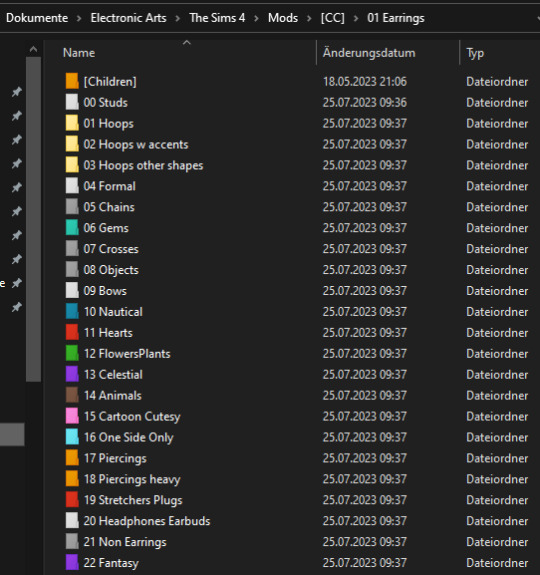
━━━━━━ ・❪ ☾ ❫ ・ ━━━━━━
Step 2 (Optional): Creating dividers
I highly recommend you to make some sort of divider for your categories (basically like my TidyCAS).
For that, in S4Studio start out by cloning any basegame CAS item.
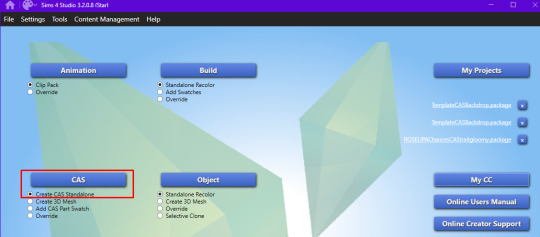
I usually always use the sunscreen facepaint, but it doesn't really matter, you shouldnt use smth with a mesh.
Or you can download this file and place it in Documents\Sims 4 Studio\Mods.
It has no texture, is enabled for a lot of things and disabled for random.
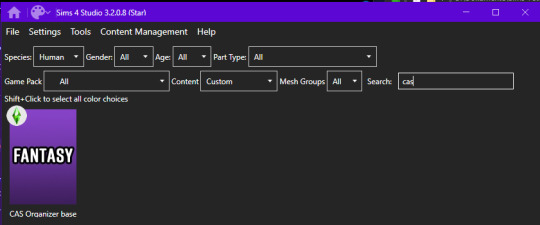
IMPORTANT: For every new divider you want to create, you have to clone the CAS item from S4Studio again. You cannot simply duplicate your divider CC and simply change it.
Save it as the number and name of your category. For me it would start with "00 Studs".
In that file, first import any type of custom thumbnail you want to use to display the category name.
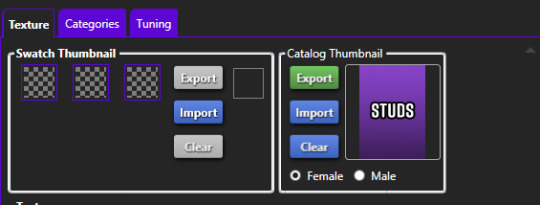
Then, change the category to whatever category you are working on and enable it for all ages, genders, fashion choices & outfit types you want and disable it for random.
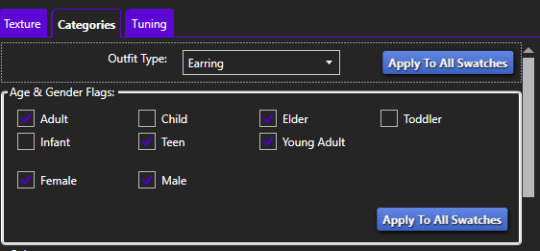
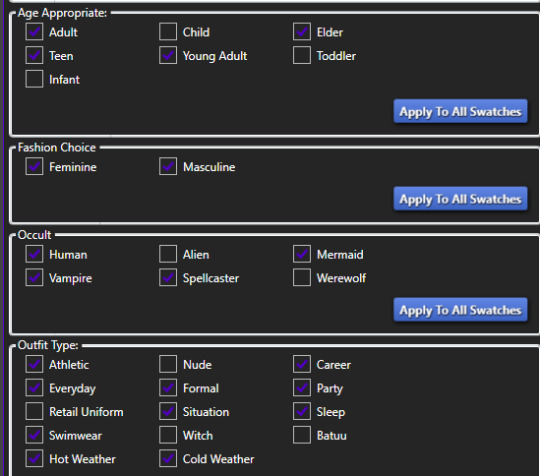

Now if you want, import an empty texture to get rid off the sunscreen, but since you won't apply that CC, it won't matter.
Download the empty texture here
Make sure to place the dividers OUTSIDE your sorted folders.
━━━━━━ ・❪ ☾ ❫ ・ ━━━━━━
Step 3: Batch processing in S4Studio
Now you want to batch process your folders in S4Studio.
First click on "My CC" and let it load.

Now right click your first folder and select "Batch Edit - Change CAS Display Index"
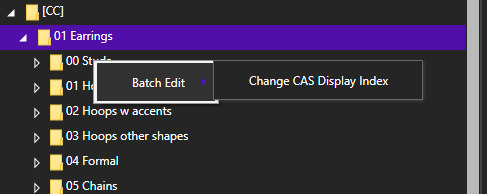
In the next window, press "Run".

Then, enter whatever number you want to start with.
The smaller the number, the higher up the content is. You can go into negatives and the limit is a veeeeeeeeeery high number.
If you just want to sort some normal CC, I recommend starting with 0 simply.
For the next folder I then always go up by 10, so 0-10-20-30-etc.

Then press "OK".
You will then get a popup with all your changed files (I sorted mine before so it's non lol)
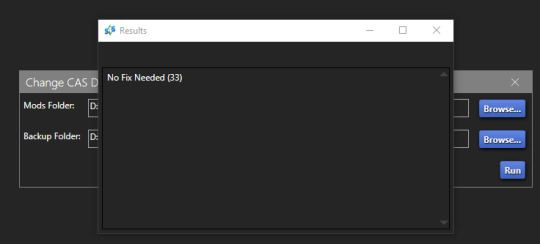
Note: Keep in mind that it does not sort your CC alphabetically.
Apparently it's by last modified date.
━━━━━━ ・❪ ☾ ❫ ・ ━━━━━━
If you have done step 2:
Step 4: Sorting your dividers
Lastly you want to make sure that your dividers show up at the beginning of the custom categories.
Open up your divider in S4Studio again if you closed it.
Click on "Warehouse", select the "CAS Part" and on the right in the "Filter" field search for "display".

Under "DisplayIndex" you now want to input a number that's before your category.
My category starts at 0, so I will change it to -1.
If the category starts with 10, I input 9 and so on.

"SecondaryDisplayIndex" is swatch order, so it doesn't matter here.
Then just save it.
━━━━━━ ・❪ ☾ ❫ ・ ━━━━━━
And that's it!
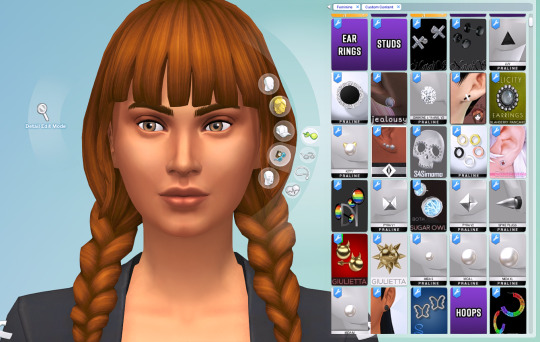
@thefoxburyinstitute
#ts4 tutorial#ts4 resources#tutorial#sims 4 studio#sims 4 tutorial#s4 guide#ts4 guide#sims 4 cas#sims 4 organazation#ts4 cas#yorututorials
323 notes
·
View notes
Text
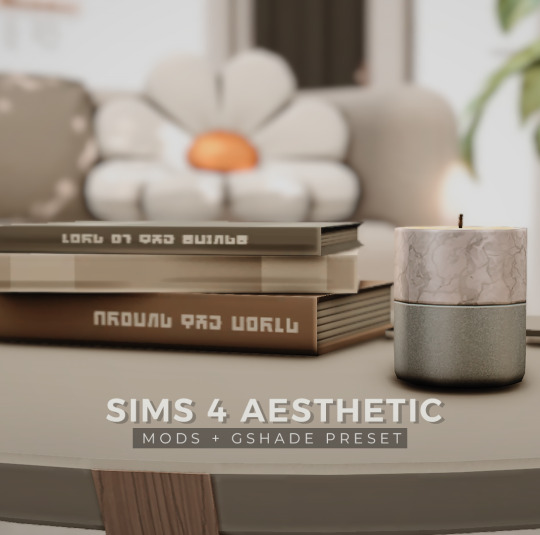
mods aesthetic para mejorar los sims 4 | aesthetic mods for the sims 4
mostraré una guía de como hacer los sims 4 aesthetic, además les compartiré mi gshade preset + cas background.
· ver tutorial + preset download
#the sims 4#los sims 4#sims 4#the sims#sims#ts4#ts4 cc#simmer#simblr#ts4cc#tianaberrie#sims 4 aesthetic#sims 4 mods#sims 4 tutorial#sims 4 guide#mods sims 4#the sims 4 aesthetic#ts4 aesthetic#aesthetic sims#aesthetic#cottagecore#cottage aesthetic#aesthetic mods#gshade preset#reshade preset#sims 4 preset#top mods sims 4#ts4 mods
68 notes
·
View notes
Text


Above: before-and-after pictures of this process. Thank you to @cloudywithachanceofsims, @silverthornestudfarm, and @blueridgeequines for giving me permission to use their coats as examples!
CK's Guide to Fixing Pixelated Horse Coats
As we all know, every time you paint a horse (or any pet or werewolf, really) in Create-a-Pet, it inevitably gets pixelated. This is due to the TS4 engine's compression of Sims textures, which it does to theoretically save on file space and load time. The more you paint on your horse (and the more you save it over and over again), the greater the artifact damage becomes, until you're left with a pixelated mess.
Luckily, I've figured out a way to fix it. Yay!
This method uses a program called chaiNNER, which is an incredibly versatile node-based graphics UI that (among many other things) uses AI models to upscale and process images. After a month and a half of experimenting on multiple different types of coats with about a dozen different models, I've identified two AI models that work best at repairing the artifacting damage done by TS4: RealESRGAN_x2plus and 2xAniscale. I extract the painted coats from the tray files using Cmar's Coat Converter, process them using chaiNNER, use Photoshop to make any touch ups (softening hard edges, fixing seams, adding in the appropriate hoof texture), and then create a new hoof swatch to put the newly fixed coat back into the game.
Fair warning: chaiNNER is a bit of a hefty program that requires significant RAM and VRAM to run. If you have a beefy gaming computer, you should have no issues running this (as long as no other major programs - games, graphics programs, etc. - are running as well). If you've got a lower end computer, though, your computer might not be able to handle it and this method might not be for you. Make sure to read all the documentation on chaiNNer's github before proceeding.
Before we begin, we're going to need to gather some resources. We will need:
A graphics program. I use Photoshop, but GIMP or any other program that can work in layers will work too.
chaiNNER
AI Models; these are the ones I use are RealESRGAN_x2plus and 2xAniscale
Cmar's Coat Converter to extract the coat textures from your tray files
Tray Importer (Optionally) to isolate your household tray files and save you the trouble of searching the Tray Folder
The TS4 Horse UV as a helpful guide to make sure all our textures are lined up properly
Sims 4 Studio to create your new package.
I recommend using S4S to export hoof swatch textures from the game or from existing hoof swatch cc. Some popular hoof swatch CC include @walnuthillfarm's Striped Hooves and @pure-winter-cc's Glorious Striped Hooves
This tutorial assumes you are familiar with the basics in how to use Sims 4 Studio, such as how to clone a base-game item & how to import and export textures, and the basic functions of your graphics program, such as adding multiple different image files together as layers. I'll try to keep my explanations as straight-forward as possible.
STEP ONE: Extract the Coats
Install Cmar's Coat Converter and run it. Cmar's Coat Converter works by looking through your tray files for specific texture files (ie. The coats of cats, dogs, horses, and werewolves) and converting them to png files. You can go through the households of your Tray folder one by one, but I typically just use Tray Importer to separate the household containing the horses I want to fix.
Save the extracted coats in a project folder. These are your OG coats.
STEP TWO: Extract the hoof textures
Open up S4S. To extract the hoof swatches from the base game, create a new package by clicking CAS -> New Package, filter everything by species (ie. Horse) and then part type (Hoof color). Highlight all the basegame swatches and then save your new package.
Open up that package and then extract the texture for each swatch. Save them in your project folder (In a 'basegame hooves' folder to keep things organized).
To extract the textures from Hoof Swatch CC files, simply open them up in S4S and repeat the above.
STEP THREE: Download the AI Models
Right as it says on the tin. These are the models I use currently & some notes about them:
RealESRGAN_x2plus - this model is THE workhorse. It repairs artifact damaging with minimal loss to texture quality and results in a very smooth coat. It may sometimes darken the texture a little bit, but it's not noticeable in-game. That being said, it has a harder time with finer details such as spots, individual ticking for roans, dapples etc. I run this one first on all the coats because it usually does the job.
These models are trained to find and repair any incidence of artifacting/jpeg damage and approximate what the image is supposed to look like. The reason RealESRGAN_x2plus has an especially hard time with spots/dapples/tiny repetitive details etc. because it registers those areas as particularly damaged and works extra hard to smooth it out… which can sometimes result in a bit of an iffy coat repair. When things don't turn out the way I want, I turn to...
2xAniscale - I use this model for any appaloosas, roans, sabinos etc. that have very fine detail and came out mangled by RealESRGAN_2xPlus. It's also good for light-duty repairing (in cases where people have only 'saved' the coat once, as opposed to working on it on and off). While not strong enough on its own to tackle the more heavily damaged coats, it still does a decent job while keeping the fine details intact.
Go make a folder somewhere and name it 'AI Models' or something similar, and drop these guys in there.
STEP FOUR: Setting up chaiNNER
Obviously, go ahead and download chaiNNER, and then (through chaiNNER itself) download & install the dependencies. You really only need PyTorch for this, so if you'd like, you can skip NCNN, ONNX, and Stable Diffusion.
At first glance, chaiNNER is a bit overwhelming. It is unlike any other graphics ui I've seen before, but the basic premise is pretty straightforward: you 'chain' together specific functions ('nodes') in order to get your result.
We're going to start by setting up a chain for single coat conversions.
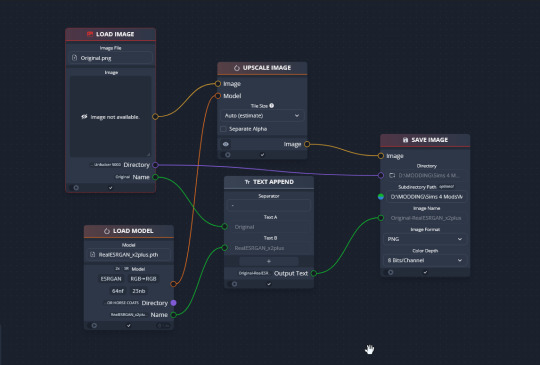
Drag & drop these nodes into your workspace:
Load Image
Save Image
Upscale Image
Load Model (From the PyTorch tab only!)
Text append
Next, connect the nodes just as I have connected them in the image.
Load Image, obviously, loads your image. We then tell the program we want to upscale that image by linking to the Upscale Image node. Upscaling can't happen without a model, so we then want to link Upscale Image with Load Model.
Text Append takes the original name of the image and combines it with the model name. This is super helpful, because if you're playing with many models at a time, you need to tell your result images apart. Link the output text to the Save Image Model.
Finally, Save Image obviously saves the image. We link the directory from Load Image to save it in the same place as the OG image, or, optionally, add in a file path link to another folder (in my case, I load images from a folder called 'Unprocessed' and save them into a folder called 'Processed'. Link the image from Upscale Image to Save Image to complete this chain.
Go in and select your image, model, and save locations.
Ta dah! You made your first chain.
To create an Iterator to batch process coats, we follow the same general idea, only we use 'Load Images'.
STEP FIVE: Run chaiNNER
Go ahead and run chaiNNER. Repeat using 2xAniscale if your spotty/dappled coat comes out funky.
Optionally, you can also add 'Resize' between 'Upscale' and 'Save Image' so the output texture is the same size as the OG. I like keeping mine big, as it makes it easier to fix any fine details in Photoshop.
STEP SIX: Combine in Photoshop
Go ahead and open up the horse UV, your coat texture & hoof swatches in Photoshop. This is a fairly straightforward process: layer the hooves overtop the texture, and then hide all hoof layers except the one you want. Make sure everything is lined up properly using the horse UV.
This is also where you would go in and fix any sharp, jagged edges you might spot. I often notice jagged edges on white face markings. Since the head is often one of the worst areas for artifacting, the AI models don't really have much to work with, resulting in jagged edges as they try to extrapolate what had been there 'before'. Either paint over it or use blur to smooth it out.
I personally would also remove any stray color that isn't the horse texture (body + ears). It won't hurt to leave it there, but I personally like things neat and tidy. Use the horse UV as a guide.
I also add in any little details using extracted stencils & layer masks.
Save your new coat as a png. Optionally, downsize it by 50% back to the original size. I don't do this because I'm very forgetful, but this would definitely help in keeping your package size smaller.
STEP SEVEN (Optional): Make a thumbnail
I make thumbnails for all the coats I do because it makes it much easier to identify them under the Hoof Swatch category. TS4 thumbnails are 144 x 148. You can label it with your horse's name, or stick a headshot in there etc. whatever works for you that will help it stand out from the other hoof swatches.
STEP EIGHT: Put it all Together
Finally, we've come to the end.
Using S4S, create a new package cloned from a hoof swatch. Import your new coat into 'Texture', and your thumbnail into 'Thumbnail'. Make sure you import the thumbnail for both Male and Female!
Check to make sure there aren't major seams, and that your texture is properly projected onto the S4S horse model. If there are seams, go back to check that your texture is lined up properly with the Horse UV. If there are minor seams (legs, chest, underbelly etc.) you can carefully paint (using the same color as on either side of the seam) just beyond the UV mesh boundaries to close the seam.
Then, go into Categories, scroll down, and uncheck Random. This will prevent random townie horses from wearing the coat.
Save your package.
Congratulations! You're done!
#ts4 tutorial#ts4 resource#ts4 guide#Ts4 horse cc#ts4 equestrian cc#sims 4 horse cc#sims 4 equestrian cc#ts4 equestrian#sims 4 equestrian#ts4 horses#sims 4 horses#ts4 horse ranch#sims 4 horse ranch#sims horses
50 notes
·
View notes
Photo

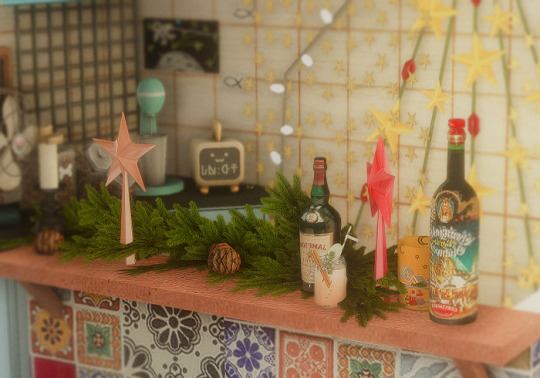



getting ready for winterfest. ❄️
#the sims 4#ts4#guiding lights#gl gen one#ts4 gameplay#their just the default party hub for this legacy#probably because their house is the easiest to decorate for me#i'm gonna die in the second gen of my whimsy legacy :O:#because you have to go all out for all the holidays
616 notes
·
View notes
Text
Let’s make a Sim!
I thought it’d be fun to do a quick step-by-step rundown of how I make Sims. Long post, so I’ll put everything under the cut:
Step 1. Start with a base.
I keep a set of blank base Sims in my gallery to start with, so I don’t have to waste time removing clothes/accessories/hair/etc. These one’s were originally premades (the ones that pop up when you first open CAS), but it really doesn’t matter what they look like because we’ll be changing everything about them in a second.
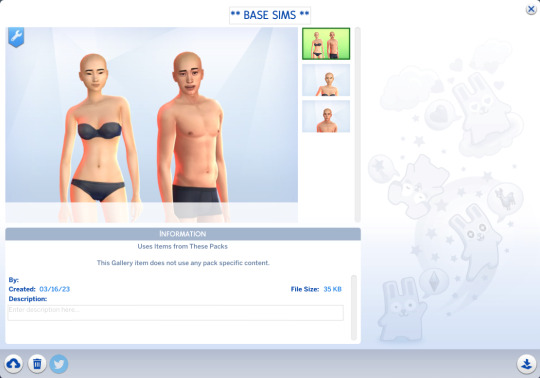
Step 2. Randomize!
First let’s untick everything but the “face” and “skin tone” boxes for the randomization options. (The whole point of starting off with a base Sim was so we wouldn’t have to bother removing stuff.)

And...randomize!
I use Zerbu’s More CAS Presets mod to add a bunch of additional presets, so randomizing will generally give me something different every time. (I also have a ton of custom presets, but linking them individually would take 100 years, so we’ll skip that.)
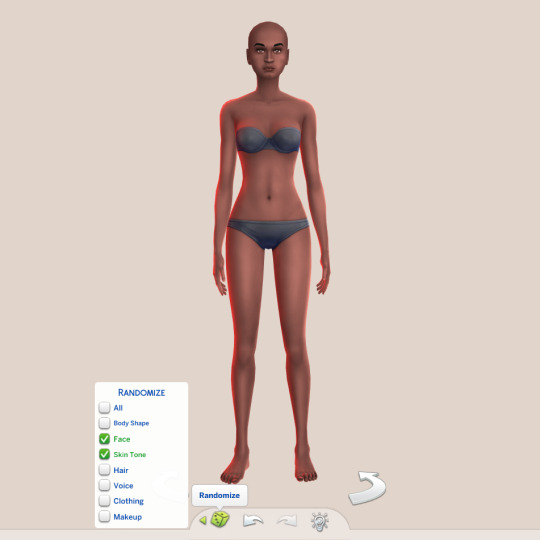
Perfect! We’ll use this as a base to work with.
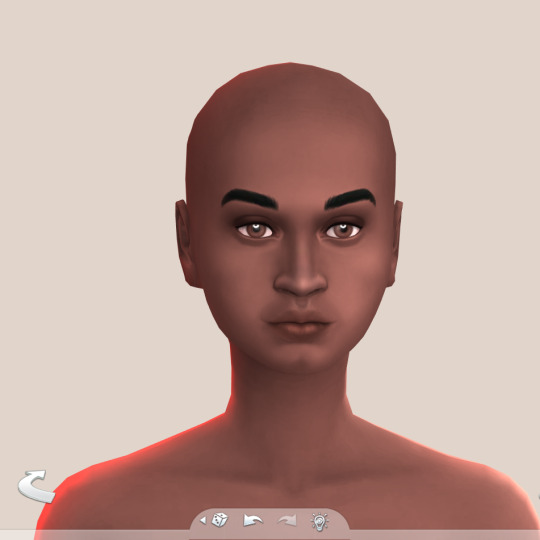
I actually like her underlying structure, so instead of choosing new face presets we’ll just work with what we already have.
Step 3. Adjust, adjust, adjust.
Let’s start making some adjustments. We’ll pull the ears out so they don’t lay so flat against her head, and lengthen her face a bit. I find that Sims tend to have kind of round face shapes with small jaws/chins, and I prefer them to be a little longer and more defined, so that’s usually the first thing I do. (Obviously you’ll tailor your Sims to your personal tastes, though.)
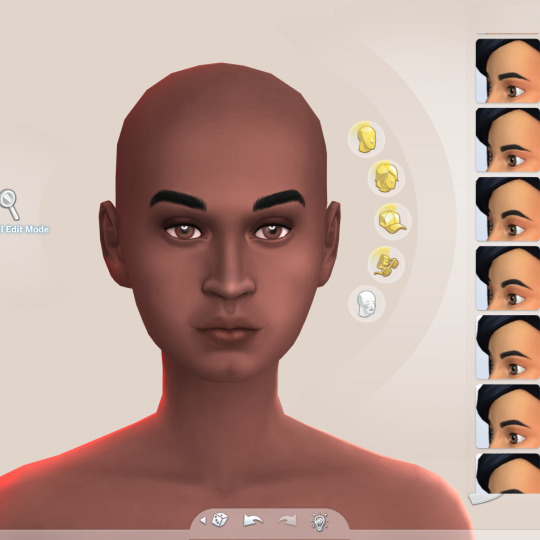
We’ll make some small adjustments to her jaw, cheeks, nose, lips, and chin. I prefer bigger noses on Sims, so I usually drag them down/out a bit. I also like sharper and more “severe” bone structure vs. soft and round, so I like to add extra definition.

Next we’ll add CC eyebrows (@ikari-sims‘s Jenna brows) and adjust the brow line a bit... (I’m a big fan of distinctive brows, so I tend to make them thicker/wider.)

Change the eye color (I’m using @missrubybird‘s Aqua Trigger eyes here), make a few more small facial tweaks...

Aaand there we are! I’m happy with her facial structure, so now we’ll move on to...
Step 4. Body.
I prefer custom body presets to the ones that come with the game, so we’ll use one of @obscurus-sims‘s female body presets and adjust it a bit (widen the shoulders and neck, make arms a bit thicker).
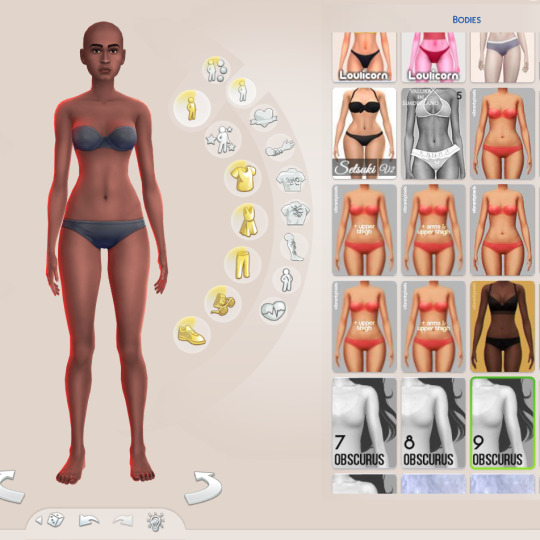
Step 5. Add body blush.
The first detail I add is always tattoo body blush. It’s a small difference, but that little bit of color is a must for me. I’m using a mix of @simandy‘s Torrada Blush and @obscurus-sims‘s Body Blush. (I think I use these two on every Sim I make.)
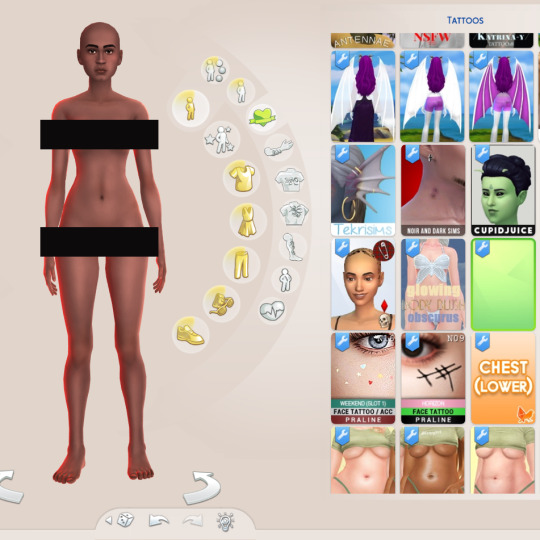
Step 6. Skin detail time!
Skin details do most of the heavy lifting. We’ll start with a skinblend (@obscurus-sims‘s N15 Overlay):

Then we’ll add some of @okruee‘s Misc. Face Details and one of @sammi-xox‘s Eye Masks.
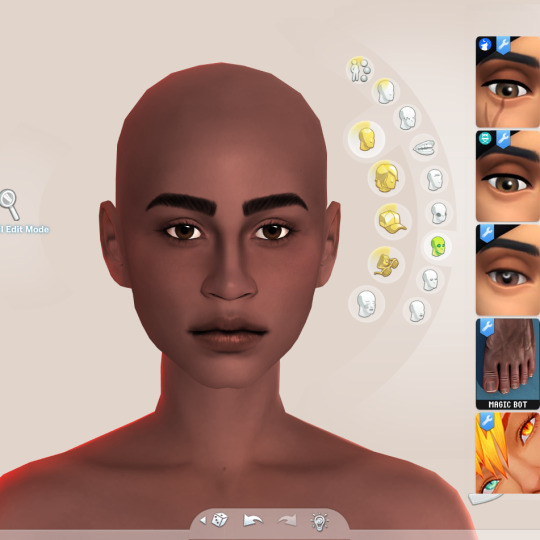
Then @mmsims‘s Eyelashes V7 + @mintvalentine‘s Lash Filler, @nesurii‘s Little Details, @pyxiidis‘s Miscellany Pt.2 Nosemask, and @miikocc‘s Face-kit No.1.

Fabulous. Officially done with details!
Step 7. Hair.
Next up is adding hair + a hairline. I’m really loving @daylifesims‘s Gretchen hair right now, and we’ll pair it with @pixelore‘s Organic hairline.

Step 8. Makeup.
Optional, of course. I’m using @pralinesims‘s Lioness Eyeliner, @grimcookies‘s August Eyeshadow, @thepeachyfaerie‘s Eraser Lipstick, and @crypticsim‘s Cloud Blush.

Step 9. Clothes & accessories.
Now let’s dress her up! We’ll go with @its-adrienpastel‘s Saviour Dress, @solistair‘s Calf Boots, @aharris00britney‘s Beret, @kumikya‘s Pearl Necklace, and @caio-cc‘s Naomi Earrings.


And there she is! I think she turned out super cute.
Before and after:

** Here’s a list of all the custom sliders used (warning: it’s a lot):
Chin/profile
Shoulders
Chin
Eyebrow 01 / Eyebrow 02
Eyebrow N1
Pouty Lips
Lips N3 & N4
Nose N2
Eyelids N1
Eye Slider 07
Cheek Slider 12
Nose Width
Mouth Scale
162 notes
·
View notes
Text
5th try at writing the guide on custom pet paint mode brushes, if tumblr manages to mess this one up i will have a fit
16/10/2023 Edited: Updated to add better hash ID generating practices.
Things you'll need:
Sims 4 Studio
GIMP
Notepad
Guide:
Tools that we will be using:

We'll begin by creating a new, empty package.
Save it somewhere convenient and easy to access.
Once you've saved the package, you'll be met with this screen:

From here, we'll go to Tools > Game File Cruiser
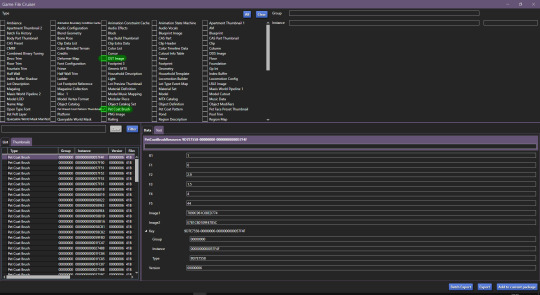
We'll be working with Pet Coat Brush files and DST Image, but for now we'll only select Pet Coat Brush file, so that it's easier for us.
I've selected the first brush file and I've highlighted the piece of data we'll need to use.
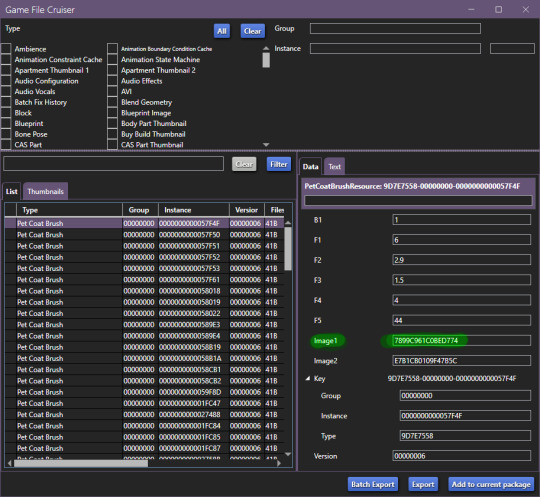
We'll have to use the Game File Cruiser search function, but first, press "Add to current package". When you've gotten the hang of this, you can explore the pre-existing brush files and decide which one you'd prefer to use as your base, all are different and correspond to different brushes/stamps in-game.
Once you've clicked on "add to current package" your package editor should look like this:

Now we'll copy the Image1 ID and go back to Game File Cruiser, select DST Image from the file type list and enter the ID into the search bar:

Now, click "Add to current package" and now the package file you're working on will look like this:

Before we move further, we need to generate new instance ID's, we'll need 3 of them.
Go to Tools > Hash Generator

Edited 16/10/2023: When generating your hash ID's, please use your creator name ie.: "[YourCreatorName/Blogname]TutorialCustomFurCoat1", this will give you a more unique hash code than hoping to be as descriptive as possible when generating the hashes (in this case instance ID's).
Thanks to Mizore Yukii for this advice, from Creator's Musings.
In the "text" field, enter whatever text you want, I just go with the item name/description + a number, to indicate which ID it is.
We'll need 3 of FNV64 hash codes.
These are the 3 ID's that I've generated:
514EF7FCFA080185
514EF7FCFA080186
514EF7FCFA080187
We'll use the first code for the Pet Coat Brush file, the second code for Image1 (Brush file) and the third for Image2 (Brush icon file).
Your Pet Coat Brush file should look like this now, with the updated ID's.
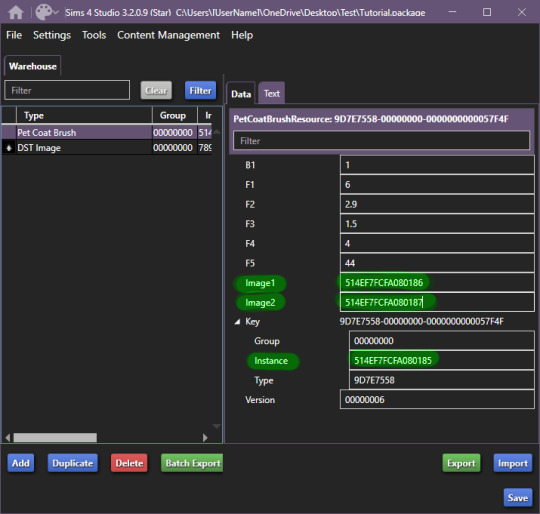
Moving forward, we'll be changing the ID for the DST Image1 (Brush in-game) -

Now that you've done this, you need to right click on DST Images > Duplicate, you'll be prompted with this window:
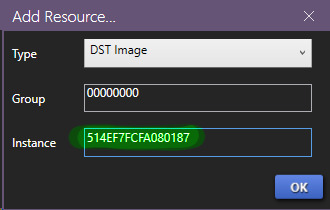
In this window, you'll use the last hash code you generated for the Image2 new ID (in-game icon).
Now! It'll all look like this:

To edit the brush we'll be seeing in-game, we'll now have to edit the image, begin by exporting the image available in DST Image.
Once that's done, open it up in whatever editing software you want to use, I'll be using GIMP, because it has built in DDS exporter, I recommend you do the same, however if not interested in doing so, make sure your program can export DDS images in L8 format, if not, edit in preferred software and use GIMP to export as DDS.
Once you've made your brush, you'll want to do as follows:

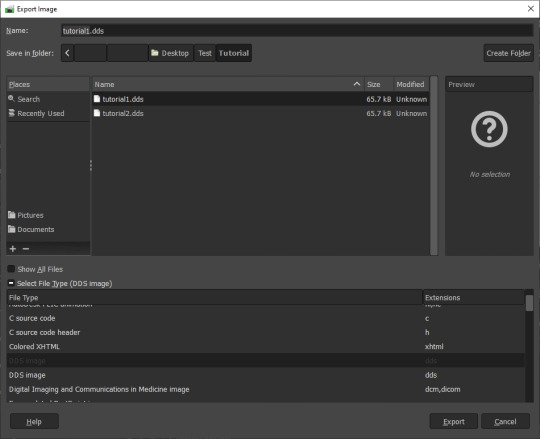

IMPORTANT
It MUST be exported in the format L8, it will appear broken in-game otherwise.
Then, import your custom made brush into S4S package editor:
Do the same for the icon:

You've got the easiest part down, now, comes the part with testing how well the brush works and behaves in-game.
The responsibility of this falls onto the values you may have seen in Pet Coat Brush file -
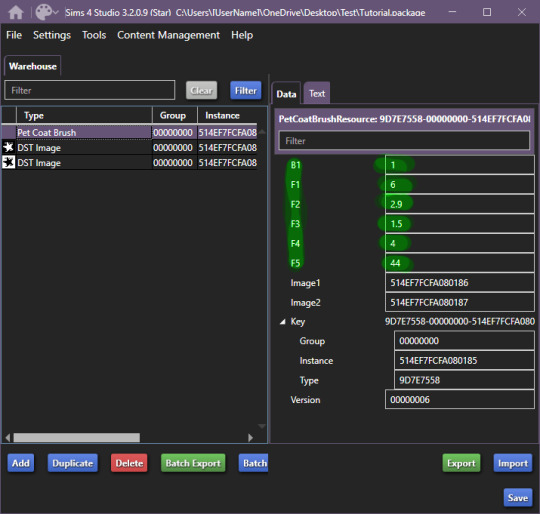
These are the values responsible for how the brush works in-game.
I'll be upfront right now, I can't get the rotation value to work, I'm not sure if I'm doing something incorrectly, but if I figure it out, I'll add to the guide eventually. I haven't had time to test this further, but as far as I've been able to test it, it works like a charm.
These are the value meanings -
Sorry for how lazy this is presented, as once I figured out the basic meaning, I moved forward.
B1 is responsible for sorting on whether your brush is considered a Brush or a Stamp. 0 & 2 - Brush, 1 & 3 Stamp EDITED 24/10/2023: 0 is non-rotating brush, 2 is a rotating brush!
For F1, I do NOT recommend using 0 or 5, when I tested these values in-game, they were extremely laggy when attempting to paint. 1 - Smooth Painting, 2 - Spaced Apart Slightly, Overlap, 3 - Spaced One After Another, Some Overlap, 4 - Spaced One After Another, No Overlap
F2 changes the size of the brush in-game, meaning how small it can be, I believe. 0 - 1px smallest size brush, scaling up changes how small the brush can get.
F3 I suspect is brush rotation, but I could not make it work on any of the brushes I tried making, so I'm not 100 sure. This is one of the brushes you'll have to look at values for in the existing in-game brush files, as I could not get this to work for myself.
F4 is the maximum the size of the brush will become. Maximum size the brush can get, I've tested it from 0 to 5, 5 is quite large, so I recommend that, but go for smaller as well.
F5 I'm not entirely sure, however during my testing, I found that this changes where exactly the brush appears in both stamps and brush tabs in-game. There may be more to it, however, I could not figure it out. The values I tested for this were 0, 1 and 2, this affected where the item appeared - 0 - First Row, First Item, 1, First Row, 2nd Item, 2 - 2nd Row, First Item, I've seen that these can go quite high, ie the base file I used being 44, so keep that in mind while changing this setting. For my personal brushes I use 0.
I recommend comparing existing brush files to the one you're looking to edit.
I believe this is it. If there are any questions, I'll try to answer as best as I can. If anyone wants to add anything to this, please do so, I'll be elated to update and credit you for the information shared.
This all came to be because I could not find a guide, but fortunately for me, I'm too good at figuring things out and even though I didn't quite understand how the Game File Cruiser worked a few days ago, I've consumed so much information it hurts my brain.
Forgot to add: Finished product
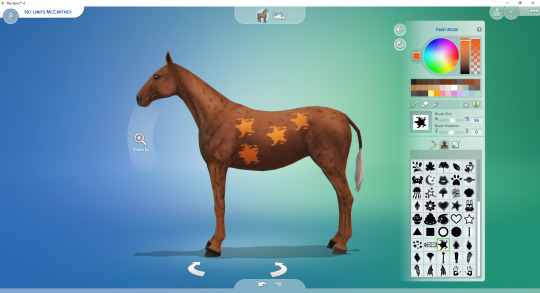
Because I didn't edit the Pet Coat Brush file I was working on, I've made a stamp, I recommend messing around for a while though and finding what you prefer. The values themselves are pretty easy and forgiving to edit.
So account for that, you'll definitely want to edit the values responsible for the brush working correctly. If you have any questions, please let me know, I tried to make this as clear as possible, and I know this is probably over the top for a guide, but I'm the kind of person who needs every small direction, to even know what I'm doing, when I'm following a guide.
UPDATED AGAIN, I FORGOT TO ADD THE ACTUAL VALUES I FOUND.
#The Sims 4 Guide#The Sims 4 Horse Ranch#The Sims 4 Custom Brushes#The Sims 4 CC guide#TS4 CC Guide#TS4 Horse Ranch#TS4 Horses#The Sims 4 Horses#Sims 4 Horses#Sims 4#Sims 4 Horse Ranch#The Sims 4 Tutorial#Sorry if this isn't a great guide#i tried really had and nearly had an aneurysm because tumblr deleted my previous attempts like 4 times
85 notes
·
View notes
Text

holiday gift guide: gaming edition 🎮
1 gaming chair
2 desk
3 ring light
4 monitor (includes mouse + keyboard)
5 gaming pc
6 vertical monitor
part five of my holiday gift guide! thank you to the cc creators! ♡ @vixonspixels and nickname_sims4 on tsr!
#simsplymaddy#holiday gift guide#the sims 4#ts4#cc recs#cc finds#ts4 custom content#sims 4 simblr#sims 4 maxis match#sims 4 cc#the sims cc#ts4 simblr#sims#the sims community#ts4 maxis cc#ts4cc#sims 4#simblr#sims community#sims 4 custom content#custom content#ts4 cc#the sims 4 cc#the sims 4 simblr#ts4 screenshots
70 notes
·
View notes
Photo

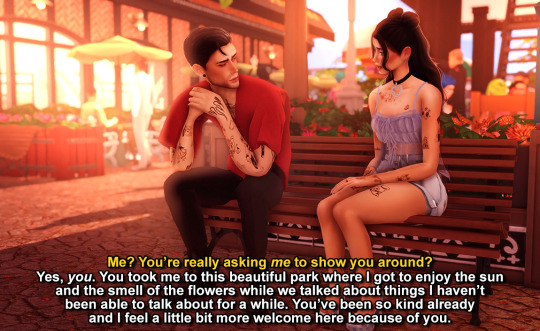
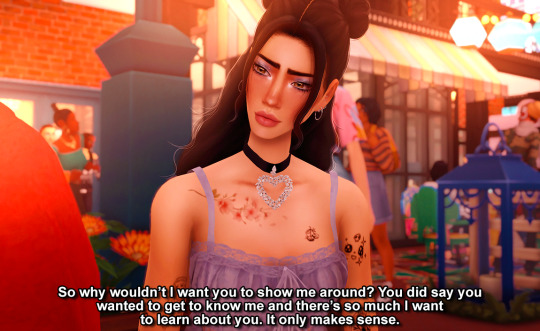

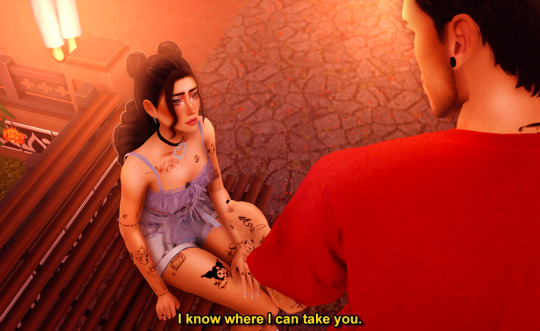

previously | next | beginning
#the sims 4#ts4#sims 4#ts4 story#ts4 gameplay#simblr#aliya's sims#risa#akira#karaoke secrets#phew got it done today hehe#we knew akira was smooth but damn look at risa here#needing a tour guide so why not ask him~#and what plan does he have in store for her 👀
102 notes
·
View notes
Text
Tutorial: Converting all types of CAS CC to work with color sliders (+ how to disable it)
This enables CAS CC to work with Color Sliders for Hair, Clothes, & Accessories by thepancake1 and @mizoreyukii.
Since S4 Studio only let's you batch convert hairs and update makeup for compatibility, I present to you: TS4AlphaConverter_2_2_0_0 by CmarNYC.

Keep in mind that enabling CAS CC for color sliders will increase the file sizes of your .package files!
Sliders will also always affect all the texture, i.e. you can't exclude accessories like buttons or zippers, so some textures might not work well.
Also check out this tutorial: Fixing slider compatible CAS CC with broken textures

💜 Requirements:
Color Slider mod
TS4AlphaConverter_2_2_0_0
CAS CC you want to enable
Featured CC by @trillyke @daylifesims @jius-sims @magic-bot

💜How to enable CC for color sliders
1. Download the required program, mod and CC you want.
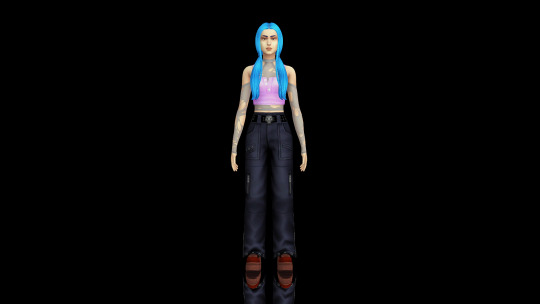
This is my outfit before sliders:

2. Open up Alpha Converter
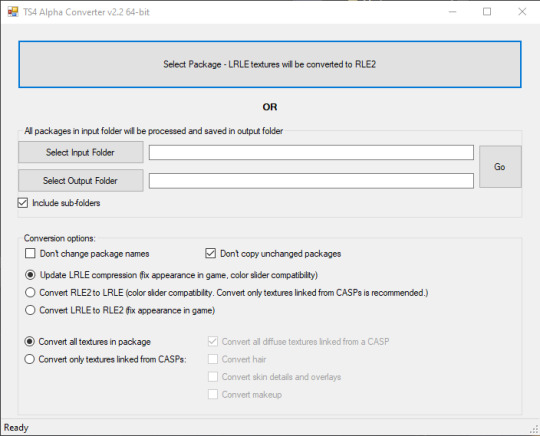
3. For enabling sliders, you can only use the folder option and not single files:
Select your input folder which contains the .packages you want to enable.
Then select your output folder where you want to save the new files.
"Include subfolders" is handy if your CC goes into more folders inside your input folder. It will reproduce the same file structure.
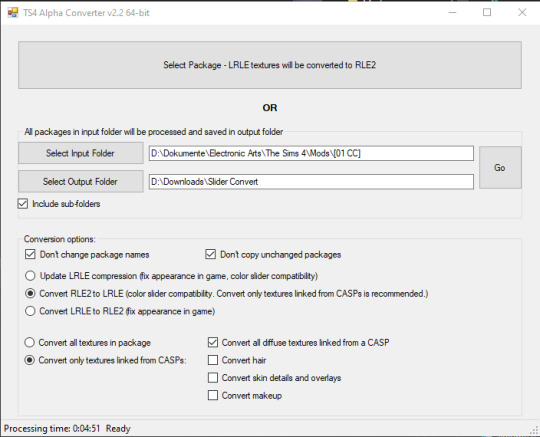
4. I would recommend enabling "Don't change package names" so you can just replace your input files directly, otherwise it adds "_Fixed" at the end of the filename.
I will also leave "Don't copy unchanged packages" checked.
5. Next we will select "Convert RLE2 to LRLE" to enable color sliders. I will explain the others later.
It then enables "Convert only textures linked from CASPs" which is good, e.g. it will only target actual CAS CC textures then and no Build & Buy for example.
Leave "Convert all diffuse textures linked from CASP" checked if you want to convert all types of CAS CC.
6. These are my finished settings:
7. Press "Go". It will then take a while depending on file amount and swatches, as it will have to go through textures one by one.
8. Check your finished files. The file size should be bigger, in this case it went up by 30 MB for only 5 files.

This is how the outfit looks after applying sliders to all pieces:

💜 How to disable CAS CC for color sliders
This time select "Convert LRLE to RLE2". You can leave "Convert only textures linked from CASPs".

2. Press "Go" and let it do it's thing.
3. As you can see, the file size went down again (middle), but it is not the same size as from the original file (right).

You will no longer be able to use sliders on the CAS CC piece, except transparency, which always works.

💜 Fixing slider compatible CAS CC with broken textures
If some of your CAS CC displays huge areas of missing, pixelated textures there is an issue with compression.
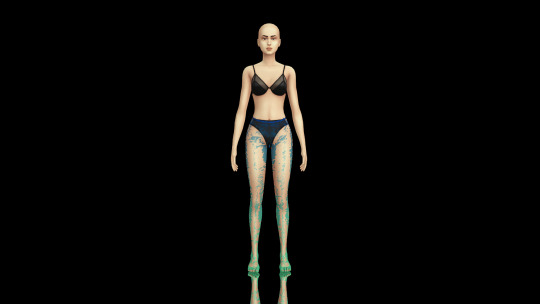
I don't know how and why this happens, but check out * this tutorial * on how to fix it.

@thefoxburyinstitute @maxismatchccworld @emilyccfinds @sssvitlanz
#yoru tutorials#ts4 tutorial#ts4 resources#tutorial#Sims 4 tutorial#s4 guide#ts4 guide#Sims 4 studio#Sims 4 cas#ts4 cas#color slider#cmarnyc#thepancake1#mizoreyukii
53 notes
·
View notes
Text

detectar mods conflictivos sims 4 | tips, escanea y elimina virus
esta es una guía definitiva de como detectar mods conflictivos, además les compartiré algunos tips para evitar errores en los sims 4 y podrás eliminar los mods dañados de tu juego.
· ver tutorial
*thanks to @twistedmexi for creating the mods*
#the sims 4#los sims 4#sims 4#the sims#sims#ts4#ts4 cc#simmer#simblr#ts4cc#tianaberrie#sims 4 aesthetic#sims 4 mods#sims 4 tutorial#sims 4 guide#mods sims 4#the sims 4 aesthetic#ts4 aesthetic#aesthetic#cottagecore#aesthetic mods#top mods sims 4#ts4 mods#sims 4 better exceptions#sims 4 modguard#twistedmexi#better exceptions
60 notes
·
View notes
Photo

lazy summer afternoon.
#the sims 4#ts4#ts4 render#sofia#kip#guiding lights#hmm i can't believe it's already beach time#just the local cryptid chilling with his lovely wife#nothin' to see here#also i've been staring at this thing for five hours#i still hate it#beachbabes2022
403 notes
·
View notes
Photo
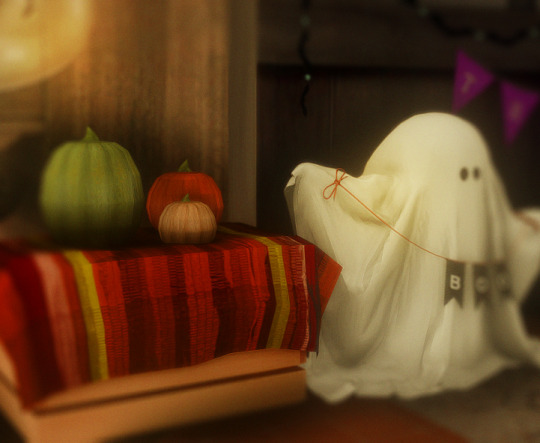

getting ready for the party. 🎃
#the sims 4#ts4#ts4 gameplay#gl gen one#guiding lights#their gonna party at joel + tris's house#honestly this is the time of year i can justify moving kip from home lot#because his human form still can't really pass for a regular human#no costume even needed for him
793 notes
·
View notes