#rp icon tutorial
Text
PHOTOPEA TUTORIAL / PHOTO FILTER FOR SKIN TONES:
a tutorial on HOW TO BRING OUT SKIN TONES if an image is 'too gray' (faded) or has too much of one (likely over saturated) color!
this technique can easily be applied to icons that already have a border ! just put your focus on the base image / icon ! this works on relatively anything, including poc and non-poc.
WHAT YOU WILL NEED: photopea...and your desired your base image(for example, i'll be showcasing inconsistent or otherwise dark/faded scene lighting, like twilight and saw).
DISCLAIMER: not all lighting/images are the same, nor are psd colorings. while some colorings may be designed to bring out reds/yellows(which is the filters we'll be using in this specific example), others may mute them and you may have to improvise with whatever color the psd you're using is designed to focus on. this is just a general idea, you will have to explore as you see fit. it's all going to depend on your personal taste !
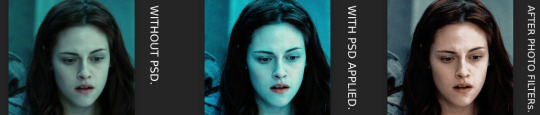
by the end of this, you should be able to manage results like this !
cool, huh?....anyway, on with the mechanics !
EXAMPLES:

[ BEFORE PSD ] [ SYNOPSIS ]
#01 / LEFT IMAGE ABOVE: too much green, becomes muted with psd and doesn't show variety.
#02 / RIGHT IMAGE ABOVE: the colors are very faded in this scene, and the pink focused psd in question made the image seem gray. we will start with EXAMPLE #01.
i will be using the same PSD on both, a custom psd i made and focuses on reds/pinks.

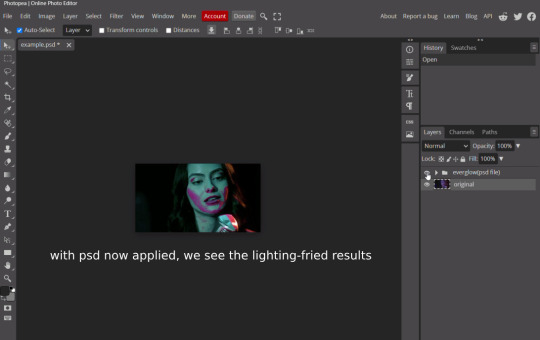
as you'll see above the PSD has now been applied...but now it's kinda boring :// (there's nothing wrong if you don't mind how it is above, everyone's got their aesthetic choice—HOWEVER, we're aiming to add skin tone...)
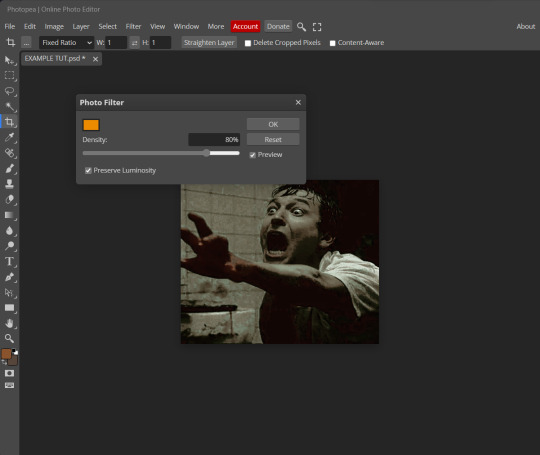
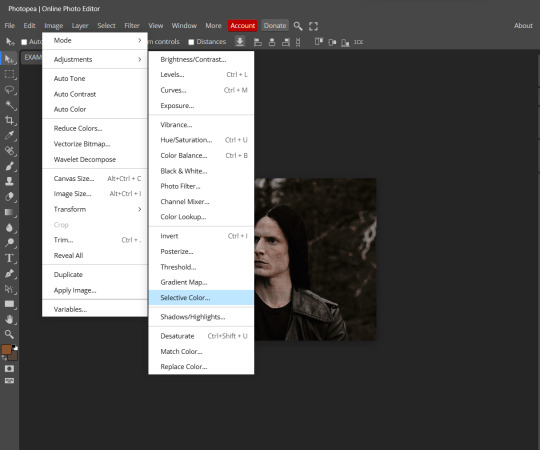
once you have your image open, you'll want to go to image>adjustments>photo filter; i went ahead highlighted it in yellow for easy finding !

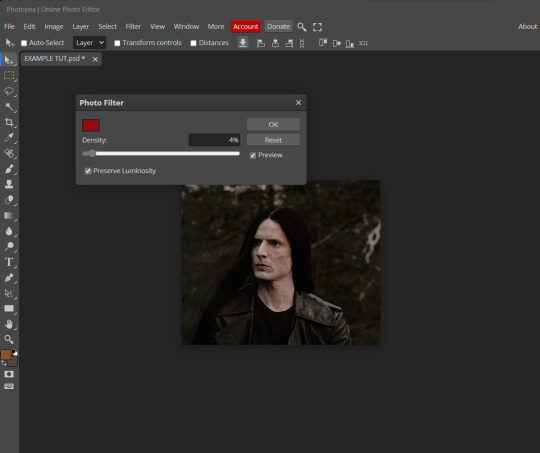
since this psd DOESN'T mute reds/yellows, (and those are usually the base of most/general skin tone combinations) i applied both a yellow and red filter. now, these colors i'll be using in this example, because they're in my default colors on the photo filter option—you can totally choose lighter or darker variants of these colors, or like i said, a different color altogether based on how the PSD you're using works. the toggle setting doesn't have to be exact to this example either—this is just what worked best on this image combined with the chosen PSD ! // RIGHT IMAGE IS THE FINAL RESULT AFTER APPLYING THE RED FILTER AFTER THE YELLOW.

repetition

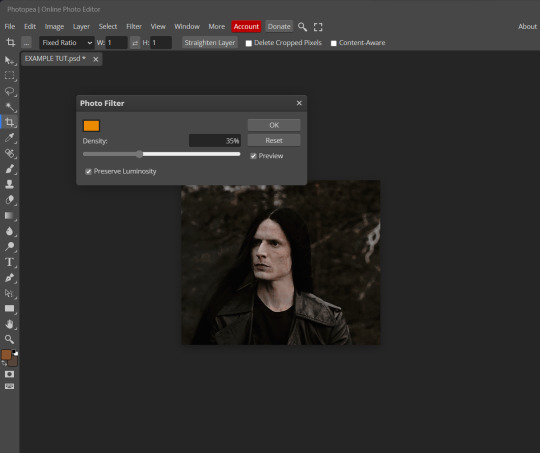
this scene in particular is very faded, and the red feels a little blotchy/over saturated here...so i'll show you an EXTRA STEP you can use ! in saying this, you don't have to do exactly this; you can even choose to go ahead with selective color to fix your image, without doing the filters, if you find that suitable. but i'll be showing you the magic of selective color to balance out the red toned overlay.
same concept as before, just a different selection: image>adjustments>selective color. think of selective colors as "balancing" the colors.
it does have a toggle selection for each color, which is super helpful, including diminishing or adding white highlights.
given the PSD colors, naturally, i'll be focusing on yellow and red.
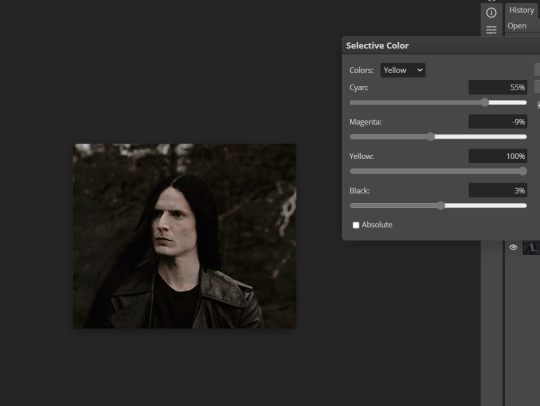

it's now got a general skin tone and red is not as blotchy !
[ FINAL RESULTS / CONSISTENCY WITH PSD APPLIED ]

this is a great hack i use quite a bit, it's great for maintaining consistency in your icons when the lighting is working against you...hope this was comprehensible and helpful, happy editing !
#FREE TO REBLOG !#leech's tutorials: photopea.#rp community#icon tutorial#rp icon tutorial#psd tutorial#roleplay coloring#roleplay help#roleplay resources#roleplay community#roleplay graphics#coloring psd#psds#icon psd#psd#roleplay psd#rp graphics#rp psd#rp resources#tutorial#editing tutorial#rpc tutorial#long post /#editing resources
177 notes
·
View notes
Text
follow up to this post; these tutorials are intended to help those who buy/use my psds , so that they may end up with the best possible results, as i'm no expert in editing by all means — and in saying so , like to make sure what i do put out will be fairly easy/convenient to use ( with as minimal adjustments as possible ! ) in this tutorial , i'll be showing you how i personally use minor adjustments to balance out shadows/blacks and fix ' deep fry ' coloring.
WHAT YOU WILL NEED: photopea and your desired your base image(in this example, i will be using a screencap from the series riverdale). [ screencap credit here. ]
DISCLAIMER: not all lighting/images are the same, nor are psd colorings. you may need to use more or less of these adjustments with specific images/lighting. this is just a general idea, you will have to explore as you see fit. it's all going to depend on your personal taste !
by the end of this tutorial, your results should go from something like this...

to this! much less of an eyesore.

starting with example one(middle image/psd applied) / i'm going to apply a clipping mask(this way if you make any mistakes, it won't effect your base image and you can easily delete the error). / in the second example, i've made a video to show you how balancing adjustments out may look in real time. beginning with example one:

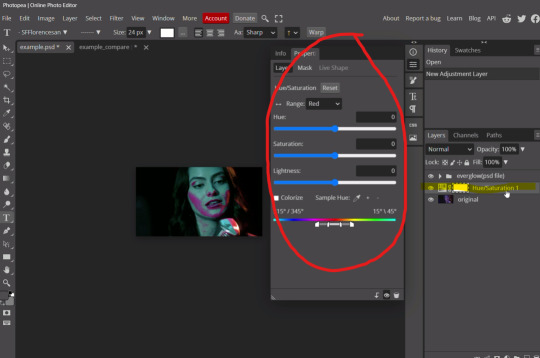
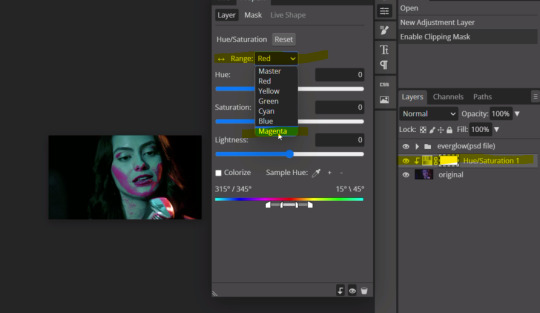
once you've applied your psd of choice, go to layer tab > new adjustment layer > hue/saturation. (the three yellow highlighted tabs)

this should instigate a pop up(circled in red) and add a layer above the image layer you're working with(it will say Hue/Saturation 1)
now, you're going to right click the Hue/Saturation tab, and you should be greeted with a dropdown option; click the 'clipping mask' option.

now the hue/saturation layer should be a clipping mask, and should look like the image below; the arrow indicates that it will work for the layer below the newly added adjustment. now, we can move on to the actual adjustments that will be applied within that clipping mask.

as previously mentioned, we want to focus on the base image colors(before the psd was applied); with that being said, the colors we want to balance out are magentas/blue/red, that it will match the cyan color. you can now go to the dropdown where it says 'range'(highlighted in yellow). i'm going to adjust magenta first, since its the primary color of this lighting.
and now, you may adjust the hue, saturation and lightness toggles as you see fit or until you feel like it matches, or is just generally less of an eyesore. in this case i did magenta > hue(-49); after that, i moved onto red > (hue-130) > (saturation7) > (lightness26) [ ... ] see how only adjusting the magenta left in the red highlight until we chose to edit it out.

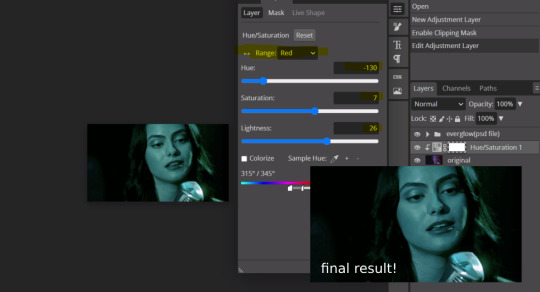
our end result for example one. now onto the example two video.
this next example(psd applied) will be a little different but ultimately the same method. instead of hue/saturation, im going to layer tab > new adjustment layer > selective color, that i may focus on shadows/blacks as well, since the psd made them a bit lighter than i'd prefer. (note: this also comes in handy if you have grain applied to an image and feel it makes it to light!)
using these two methods are my primary saving grace for inconsistent lighting, fried images or oversaturation. i hope you find this useful!
#* MY TUTORIALS.#long post /#FREE TO REBLOG !#rp community#icon tutorial#rp icon tutorial#psd tutorial#roleplay coloring#roleplay help#roleplay resources#roleplay community#roleplay graphics#coloring psd#psds#icon psd#psd#roleplay psd#rp graphics#rp psd#rp resources#tutorial#editing tutorial#rpc tutorial#editing resources#psd coloring
18 notes
·
View notes
Text
How I make icons
Method 1 involving PIXLR
Take screenshots and paste to Pixlr (a free browser friendly editor).
Crop to 1:1 ratio.
Page > Resize page (scale) > 100 x 100.
Filter > Details > Sharpen +10. Adjustment > Auto Adjust.
Method 2 involving ZIP FOLDERS
Take screenshots with Vivaldi Capture and Save as PNG.
Bulk Image Crop to 1:1 ratio.
Bulk Resize Photos to 100x100 dimensions.
Ediker to Sharpen.
#rp icons#rp icon tutorial#(Sharing in case anyone might find this useful.)#(There are quicker methods and methods with extra steps but I will go with these methods for now.)
4 notes
·
View notes
Text
𝘁𝘂𝘁𝗼𝗿𝗶𝗮𝗹 𝗱𝗲 𝗶𝗺𝗮𝗴𝗲𝗺 𝗰𝗼𝗺 𝗴𝗶𝗳! (rebloguem)
♡🔒 - 𝖿𝖺𝖼̧𝖺 𝗈 𝖽𝗈𝗐𝗇𝗅𝗈𝖺𝖽 𝖽𝗈 𝖼𝖺𝗉𝖼𝗎𝗍 𝖺𝗊𝗎𝗂 .
#messy moodboard#moodboard amino#wugem moodboard#rp moodboard#rp edit#rpg moodboard#tutoriais#jungkook moodboard#lisa moodboard#bts moodboard#blackpink moodboard#tutorial#taehyung icons
227 notes
·
View notes
Text
HOW TO GET YOUR OWN SCREENCAPS FOR MAKING ICONS / GFXs / ETC.
being able to find pre-made icons of whomever you want to roleplay as can be nothing short of tedious, right? well, that's why i've put it upon myself to make this tutorial! because idk about you guys but i prefer making my own icons because mine are all 150 x 65 because i simply like and prefer rectangular icons to square icons. so let's get down to business, yeah? and like pretty much all of my lengthy tutorials, this will be under a READ MORE.
STEP 1: PROGRAMS
the main program you'll need for this is VLC Media Player. the reason for this is because it has a built-in feature that allows you to screencap any video you play. now if you're roleplaying as a video game character and you need the cutscenes from said game ( or video game movies as i call them if they're all together in one video ) then i definitely recommend you getting 4K Video Downloader. the free version allows you to download up to 30 videos / day for free whereas the license grants you an unlimited # of downloads / day off of youtube.
STEP 2: THE SETUP
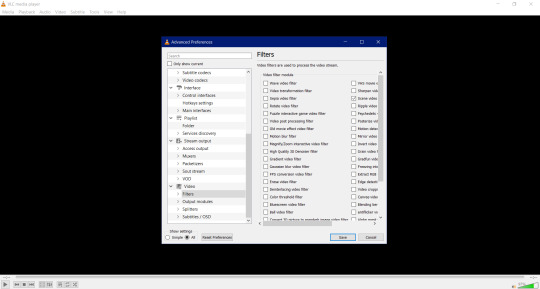
after you've install VLC Media Player, get it going and go to Tools > Preferences. once you've done that something like this should pop up.
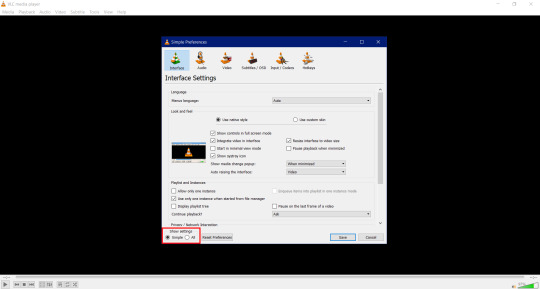

now do me a solid and click All in the box that's highlighted in the red box. by doing so will result in this popping
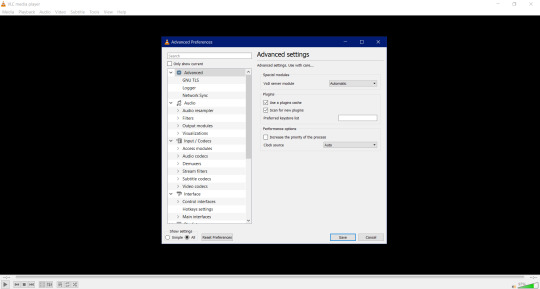

now scroll all the way down to where you see Video and then click on Filter. once done you'll have this pop up.

once you have this window up scroll the sidescroll all the way to the right until you see Scene filter video. it'll be third from the top as highlighted down below. check it and then click Save.


STEP 3: WE'RE ALMOST THERE
so once you hit Save, the box closes. there's nothing to freak out or worry about because that's perfectly normal. what we're gonna do now is have you go to ... like ... your Pictures folder and make a folder named after whatever you're getting screencaps for. if you're needing screencaps for, say, crisis core reunion then you'll create a new folder and name it something like ... say ... Crisis Core Reunion Screencaps. now do me a favor and double click on the folder so that you're now actually in it. you'll see why in a minute.
i need you to go back to Tools > Preferences > All > Videos in VLC Media Player. once you do that i need you to click on the little > right next to Filter so that a little drop down menu will pop up. it'll look a little something like this.

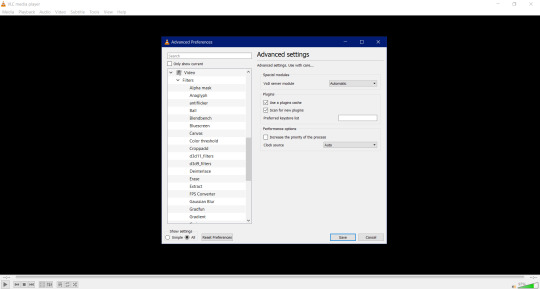
now scroll all the way down until you see Scene filter and click on that. once you've clicked on it this window will pop up.

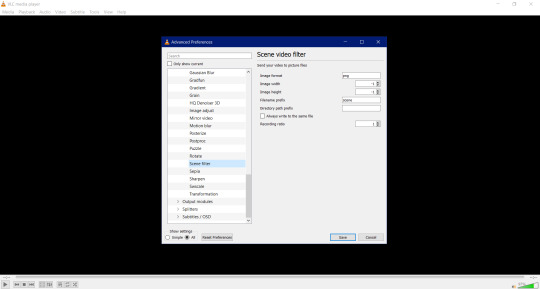
remember when i told you to keep that folder up and running for Crisis Core Reunion Screencaps? well, this is where it comes into play! click on where it says This PC > Pictures > Crisis Core Reunion Screencaps , highlight everything , and the press CTRL + C to copy it. and for those of you wondering ... ... ... ... ... it'll look a little something like this: C:\Users\PROFILE\Pictures\RP Stuff\References. that's perfectly normal!
now i want you go pay close attention to the box i have highlighted down below. why? because the original number they had for the Recording ratio is ridiculous. switching the number to 1 means that it'll take one ( 1 ) screencap every second! and the number of screencaps you'll have will determine how long your video game movie is.

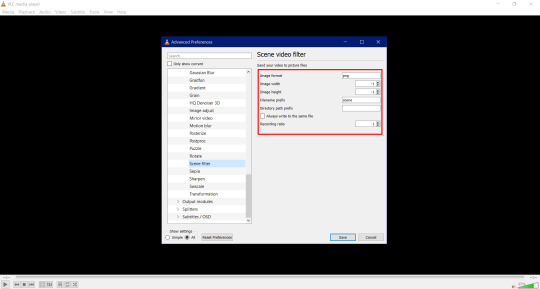
now you're probably wondering why the Directory path prefix is empty. of course you are. why wouldn't you be wondering it? well, that's where you're putting the directory for the directory path you just copied earlier! click on the empty box and press CTRL + V to paste it. once finished, click save and you're good to go.
STEP 4: GETTING THE ACTUAL SCREENCAPS
now that you've gotten all of the hard stuff done and out of the way, this is when you click on Media > Open file and then click on that Crisis Core Reunion movie you downloaded using 4K Video Downloader. once you have that going, the screencapping will commence and all you have to do is just minimize VLC Media Player and go on your merry way until the "movie" is done!
this is all you have to do to get screencaps. and all you have to do every time you want to get screencaps for something super specific is to make a folder for said thing, copy the directory path, and paste it into the Directory path prefix.
i'm hoping this tutorial was simple enough and easy to understand for y'all!
#how to#tutorial#tutorials#rp#rpc#roleplay#roleplay community#rpc tutorial#rpc tutorials#rp tutorial#rp tutorials#screencaps#screencap#icon#icons#iconing#gfx#graphics#photoshop#making icons#making
207 notes
·
View notes
Text

how to colour icon panels !! 🍒✨

want to give your icons a bit of spice under the psd ?? give it a little POP of colour ?? don't worry babes, i gotchu !! it's much easier than you may think && in this tutorial i'll give you all the lil tricks i use on a daily basis. ( remember if you found this helpful, reblogging && likeing is highly encouraged but not required )
this tutorial will cover 2 ways of colouring panels, plain white panels (without starting colour) && pre-coloured panels such as webcomics.
firstly you'll need : photoshop (PS for short) , manga panels source of your choosing ( i use this source here ), and a reference for colours to make things easier on yourself. it's recommended to use a drawing pad of somekind but this can also be done with a mouse && keyboard.
i'll be using panels from Therapy Game by Hinohara Meguru as an example. collect your panels by saving them to your pc, and also a reference image. this can be the title page / cover or a reference image of your muse. ( this is to be able to colour pick easily but if you can raw-dog colours you can skip this step Picasso. )
upload you ref && your panel side by side like this :

on the side with the panel, you'll add a NEW LAYER overtop and set that layer to MULTIPLY located at the bottom right corner. this is the layer you'll colour on.

the colouring doesn't have to be neat-- and you don't need to colour the whole thing. you're going to crop them for icons later anyway.
i'll also warn you now, it's going to look FLAT. that is okay !! because you'll be adding your own psd to it later anyway.

see ?? super flat, but we add a little psd and suddenly the graphic looks much more unified !! it'll hide alot of your shading mistakes so don't fret !!

now this part comes from a personal recommendation from yours truly -- save the whole panel WITHOUT a PSD !! put it in a folder somewhere on your pc / external drive, ect. the reason for this is because having a stash of coloured panels at your disposal allows you to just pull up PS and make and icon lickity-split on the spot without the need to batch edit or spend your time making a million icons when you could be focused on the fun part-- WRITING !!

icon credit.
now that you know how to do the basics-- what about pre-coloured panels ?? DON'T WORRY !! i said i gotchu babes ! i'll use the same example and we'll just pretend its pre-coloured.
the steps are basically the same except we will be adding 1 more to the beginning. first upload your reference and panel like before. then on the panel side, BEFORE YOU ADD A NEW LAYER, go to the top add click ADJUSTMENTS.

click on hue/ saturation && bring the middle slider ( the saturation ) all the way down. this makes your panel black & white.
left click on the new layer labeled hue/ saturation and click merge down. NOW you can continue the rest of the tutorial as if it were a plain panel !!
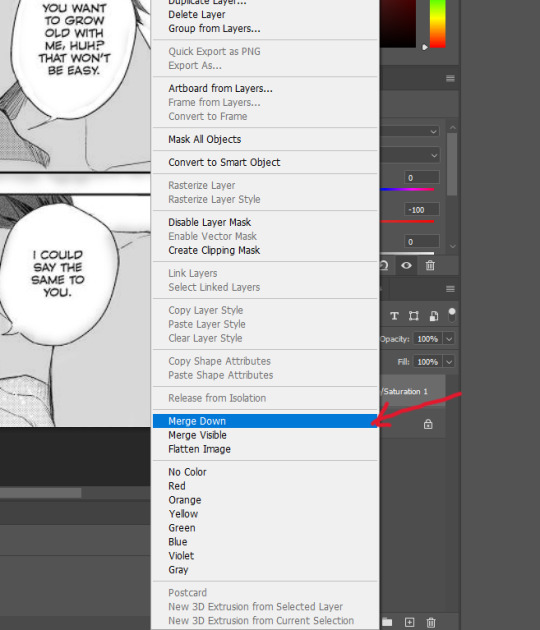
thats it's that the WHOLE tutorial !! 🍒 way to go superstar !! 🍒 now you can experiment with brushes and giving your icons / graphics your own personal touch. i use this method myself && it works like a dream. if you enjoyed this tutorial or found it helpful, consider reblogging. it helps me out alot !
#【 ⎯⎯⎯ 🍒 ; 】 tutorials.#【 ⎯⎯⎯ 🍒 ; 】 beta editor tips.#【 ⎯⎯⎯ 🍒 ; 】 icons tips.#rp resources#long post#icon resource
12 notes
·
View notes
Text
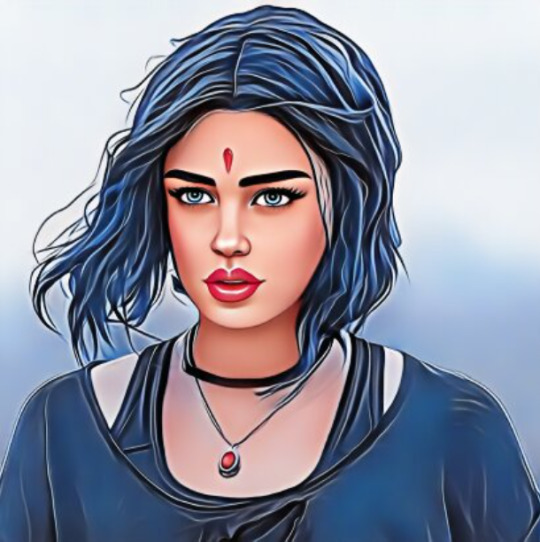
Comic Version of Maggie


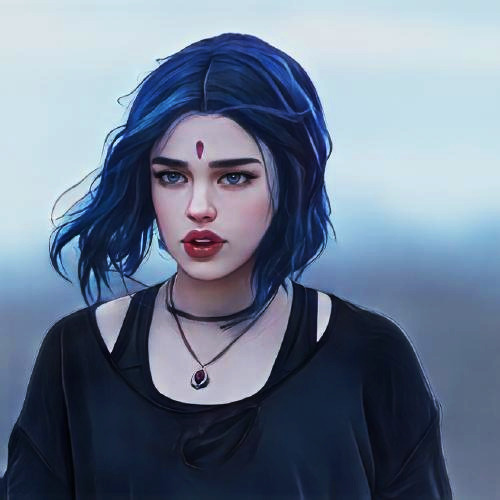
Original:

Used this sites: (x) (x) for the first two pictures. They're free to use and you don't have to sign up. At least I didn't had to and I made a few pics there
And also this site (x) for the third one. This is also really good and you can use it for free too (kind of). Only thing is you have to sign up if you want to download the picture and with the free account you can only download one pic per day (Or you just make a screenshot works too and you don't have to sign up...). Beside that some things are only accessible with premium for which you have to pay. Also depending on what filter you use you maybe have to edit it a little.
Edit: I made a little mistake on this site (x) you also need to sign up to download the picture. It's been a while since I used them so I remembered it wrong. I also checked the other site (x) and this one works with out signing up.
#ooc:mun#maggie's comic verse#maggie mccoy#maggie moon#phantasma#tried to use photoshop to turn real pictures into comic pictures but totally failed and it took way too long#tbh it's not worth the stress just for rp icons if i can use these pages instead#photoshop is just too much of a struggle and it's getting really annoying and frustrating to use#especially when you follow every step of the tutorial and nothing works#don't have the patience and time for this#if anyone knows other sites or apps etc. or other ways to make real pictures into comic version i'll be happy to hear it#if possible something that's free to use or not that expensive
1 note
·
View note
Text
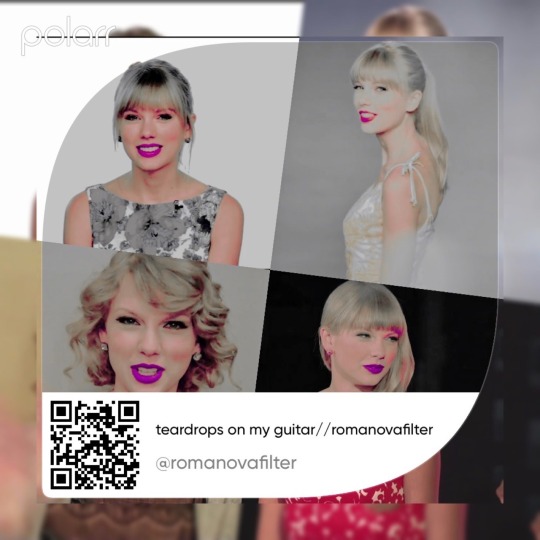
Give credit
#polarr codes#photo#polarr filters#polarr#polarr filter#polarr code#filters#filtered#filter#fanpage#editing tutorial#taylor swift#editing needs#editing#rp#edit#edits#icon#icons#debut
5 notes
·
View notes
Text
tag setup.
#base icons#screencaps#paid resources#psd#carrd template#discord resources#discord tutorial#coloring psd#rp icon template#template#photopea#promo template#photoshop template#graphic template#social media template#social media graphic
0 notes
Text
⠀⠀⠀𓆩♡𓆪 ➔ tag dump: resources.

#໑ 🌼 ⥽ 𝐫𝐞𝐬𝐨𝐮𝐫𝐜𝐞𝐬 ♡◞ ᅟ ❪ ⠀ themes. ⠀ ❫#໑ 🌼 ⥽ 𝐫𝐞𝐬𝐨𝐮𝐫𝐜𝐞𝐬 ♡◞ ᅟ ❪ ⠀ gif icons. ⠀ ❫#໑ 🌼 ⥽ 𝐫𝐞𝐬𝐨𝐮𝐫𝐜𝐞𝐬 ♡◞ ᅟ ❪ ⠀ tutorials. ⠀ ❫#໑ 🌼 ⥽ 𝐫𝐞𝐬𝐨𝐮𝐫𝐜𝐞𝐬 ♡◞ ᅟ ❪ ⠀ rp related. ⠀ ❫#໑ 🌼 ⥽ 𝐫𝐞𝐬𝐨𝐮𝐫𝐜𝐞𝐬 ♡◞ ᅟ ❪ ⠀ photoshop related. ⠀ ❫#໑ 🌼 ⥽ 𝐫𝐞𝐬𝐨𝐮𝐫𝐜𝐞𝐬 ♡◞ ᅟ ❪ ⠀ askmemes. ⠀ ❫#໑ 🌼 ⥽ 𝐫𝐞𝐬𝐨𝐮𝐫𝐜𝐞𝐬 ♡◞ ᅟ ❪ ⠀ character help. ⠀ ❫#໑ 🌻 ⥽ 𝐬𝐭𝐫𝐚𝐰𝐛𝐞𝐫𝐫𝐲 𝐣𝐞𝐥𝐥𝐲 ♡◞ ᅟ ❪ ⠀ tag dump. ⠀ ❫
0 notes
Text


Eu fiz esse mood atoa, ia vender ele, porém... sla, não gostei muito, na realidade odiei ele, ficou pior do que eu imaginei.
Mas agradeço de verdade ao @nick-web pois o icon principal ( do perfil ) foi feito com base no tutorial de icon rp dele.
Eu sinceramente queria ter feito algo melhor para postar e marcar, porém decidi ir postando alguns moods para no fim ver a minha evolução no fim. Não postarei frequentemente, apenas pro diversão e tédio, então talvez poste mais de um em um dia ou simplesmente poste um a cada ano-
Enfim, obrigado nick pelo tuto, você é incrível. 🐣
195 notes
·
View notes
Photo
TUTORIAL: using discord webhooks to get tumblr notifications in discord
hello everyone !! i’ve been using discord webhooks to get notifications in a channel of a personal server when i receive a new reply, ask, mention, or follower on any of my rp or personal accounts. you are also able to read the received asks, replies, and mentions you get right in the discord channel.
as someone with a fair number of separate tumblr accounts, it’s been a great feature to avoid having multiple windows or tumblr sessions open at once while still being aware of new activity on all my tumblr blogs.
it’s super easy to set up and requires only very basic knowledge of tumblr and discord !! the tutorial walks you through every step and shouldn’t take longer than 5-10 minutes at most to set up ( depending on how many blogs you are linking ).
not sure if this is something you’re interested in ?? examples of this in use are at the bottom of this post !!
written 06.16.22. last edited 02.23.24.

GETTING STARTED
this integration is extremely easy and straightforward to set up, especially if you’re already familiar with discord !! you do not need discord nitro or anything special in discord for this to work.
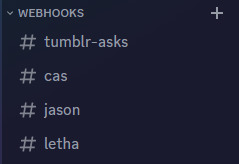
first and foremost, you will need a “personal server” in discord so you can set the channel where you will receive your notifications. the way i have mine set up is a category dedicated to webhooks and a channel for each muse or account. if you are using this to pull in asks from an rp main or other shared account, you could also pull the notifications into your ooc server in a private admin-only channel.
create the channel you want your notifications to go to BEFORE proceeding.

ON DISCORD
in your personal server ( or the server you will be pulling the notifications into ), right click on the server name to head to server settings > integrations > webhooks.

click “New Webhook” and you will see the default webhook set up. this page is also where you can return to later and adjust any of your existing webhook settings if needed (eg. post to a different channel, change a webhook icon) or delete a webhook if it is no longer needed.


you can set your webhook icon and name ( again, i usually correspond this to the particular muse the webhook will be used for ), and then select the channel you want your notifications to go to from the drop down.
you can have ONE webhook for each blog ( sideblogs can be separated out ) if you wish. at this time for a single blog you cannot have different notification types or on a post-by-post basis post to different discord channels as a blog can only use one webhook at a time (and therefore must post to the same channel).
i currently have one webhook for each rp account i have that each post to their own channel, as well as several webhooks which collect any asks i receive on my personal non-rp accounts and post to the same channel.
you can have multiple webhooks post to the same channel by selecting the same channel in the webhook setup or use the same webhook across multiple blogs by pasting the same webhook url into each separate blog ( but it will look the same for all of them, of course ).
once your webhook looks like you want it to, click “Copy Webhook URL”.
HEAD TO TUMBLR
this integration is part of tumblr labs so you need to make sure you have those enabled. on your account, head to settings > labs. toggle on “Enable Tumblr Labs”.
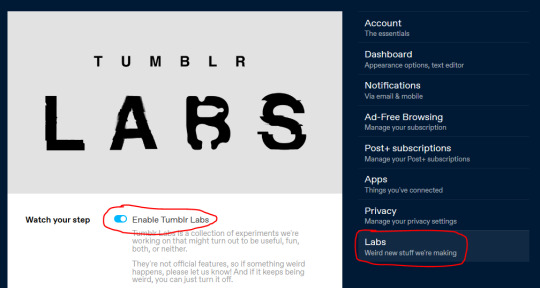
scroll to the bottom and toggle on “Tumblr to Discord Webhooks”.

head to the settings of the blog or sideblog you want to link the webhook to ( the same place where you can control your ask box, who can message you, your url, etc ). scroll to the bottom and there is new section called “Discord Notifications” !!
08/10/23 edit: some users have reported that the “Discord Notifications” section does not always show up immediately. the settings page needs to completely refresh for the section to show, so first try manually refreshing the settings page. if this does not work, toggle the tumblr to discord webhooks off and on and refresh. it has reportedly always shown up with a little time and persistence.
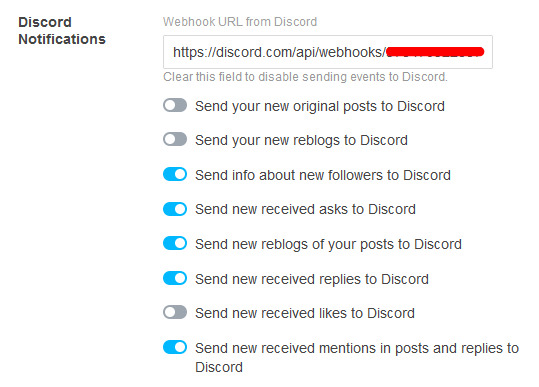
paste the Webhook URL you copied from discord in the text field and then toggle the items that you wish to receive notifications for in discord.
09/10/23 edit: if you receive an error saying the webhook url is not valid upon pasting it into the entry box, make sure the webhook url uses ‘discord.com’ and not ‘discordapp.com‘. the webhook should look like: https://discord.com/api/webhooks/<insert long series of numbers here>/<insert long series of upper and lowercase letters>. updating your discord app is also recommended if you have not done so recently.
in order, i am receiving notifications on : any new followers, any new asks, any new reblogs ( replies or if someone reblogs a promo or otherwise ), any new replies ( if someone comments on a post of mine ), and any new mentions (if someone @’s you in a post). in the next section, i have pasted screenshots of what each notification looks like in the discord channel.
12/29/23 edit: you still receive a notification in discord when you reply if you wrote the starter ( even though tumblr has removed activity notifications when you interact with your own posts ). i have also noticed that sometimes two simultaneous notifications will come in for your partner’s reply if you wrote the starter ( eg. your partner’s reply shows twice on discord ).
this ends the tutorial — you should be all ready to go !! feel free to send yourself an ask or follow one of your own blogs to test it out.
WHAT IT LOOKS LIKE IN USE...
in general you are told who the notification is from, and if there is something new to read, it is displayed !! where applicable, the top text in blue is a hyperlink directly to the post it is notifying you of !!
NEW FOLLOWER NOTIF:

RECEIVED ASK:

NEW REBLOG ( non-reply / no added caption ):
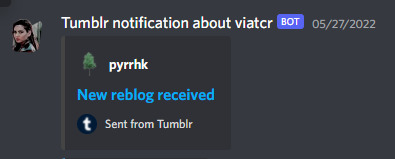
NEW REBLOG ( a reply ): if using the Legacy editor with editable reblogs, your reply will show first (shown in yellow bracket), followed by your partner’s reply (shown here in red bracket). unfortunately, formatting & blockquotes don’t come through, but it works in a pinch if you don’t want to log in to read the reply !!

with the beta editor + trim reblogs, you will just see your partner’s new reply ( not your own ). formatting still doesn’t come through, but everything is readable!

A MENTION: you are told who mentioned you in the post or comment as well as the comment or post itself. you can click the blue link text at the top to be brought right to the relevant post! (as of 02.23.24. it seems notifications for mentions in posts are broken though they still work when you are mentioned in a comment. i have sent a ticket to staff notifying them of this ).

CONCLUDING NOTES
i hope you found this helpful !! and if you did, please consider giving this a like or reblog.
if you come across any bugs while setting this up, please consider dropping something in my ask so that i can include it in the tutorial. thanks so much <3
1K notes
·
View notes
Text

x template
this is another random & really quick template I've made based on the website with many names now. it's very basic so feel encouraged to edit it as much as you'd like. i haven't found a proper resource for icons that allow reusing them in public templates so it's all text but don't hesitate to switch them out yourself. it's all clipping masks and some gradient.
Font: calibri
Size: 540/600 px
Uses: Clipping Masks, rectangle (Tutorial)
Rules:
- Edit it as much as you'd like but please don't use this in other creator's templates.
- Do not repost this or claim it as yours.
- Please like/reblog this post if using.
- Do not use this to for real celebrity rps or other real people
[ Click the Source Link to access the download ]
124 notes
·
View notes
Text
TEMPLATES : rp icon border . (114)
MINE : all resources . (89)
TEMPLATES : google docs . (65)
TEMPLATES : character psd . (47)
REBLOGGED : vocab . (43)
COLORING : coloring psd . (38)
TUTORIAL : textography . (37)
TEMPLATES : promo template . (36)
MINE : out of resources . (29)
TEMPLATES : dash icon . (25)
MINE : photopea tutorial . (24)
REBLOGGED : websites . (22)
TEMPLATES : banner . (21)
REBLOGGED : social media psd . (20)
REBLOGGED : important public service announcement . (20)
TEMPLATES : carrd . (19)
REBLOGGED : coloring tutorial . (18)
THEMES : all themes . (14)
REBLOGGED : gif tutorial . (13)
long post tw (13)
MINE : website recs . (12)
MINE : answered ask . (12)
REBLOGGED : photoshop action . (12)
THEMES : main theme . (11)
MINE : formatting tutorials . (11)
REBLOGGED: writing help . (10)
REBLOGGED : plot ideas . (10)
MINE : indie roleplay tutorials . (9)
MINE : discord tutorials . (9)
REBLOGGED : discord tutorial . (8)
TEMPLATES : header . (8)
TEMPLATES : answered ask banner . (7)
REBLOGGED : ask meme . (7)
TEMPLATES : pinned post . (6)
REBLOGGED : font pack . (6)
TUTORIAL : formatting . (6)
TUTORIAL : photoshop . (6)
TEMPLATES : discord . (6)
TEMPLATES : admin pack . (6)
REBLOGGED : stats templates . (6)
REBLOGGED : tumblr updates . (5)
REBLOGGED : character aesthetic masterlist . (5)
flashing gif tw (5)
MINE : textures . (4)
GIFS : gif pack . (4)
TUTORIAL : manip . (4)
REBLOGGED : discord servers . (4)
skull tw (4)
COLORING : base coloring . (4)
REBLOGGED : plotting help . (3)
REBLOGGED : name masterlists . (3)
TEMPLATES : google spreadsheet . (3)
REBLOGGED : gif texture . (3)
MINE : photoshop action . (3)
FACE CLAIM : danielle rose russell . (3)
COLORING : color correction . (3)
PROMOS : indie group verses . (3)
pinned post (3)
TUTORIAL : google docs (3)
REBLOGGED : writing advice . (3)
TUTORIAL : google sites . (3)
flashing tw (3)
REBLOGGED : smile happy tag . (3)
REBLOGGED : face claim directory . (3)
REBLOGGED : editing tips . (3)
REBLOGGED : color schemes . (2)
MINE : stats templates . (2)
FACE CLAIM : sabrina carpenter . (2)
MINE : google docs . (2)
reshare (2)
MINE : private promo commission . (2)
REBLOGGED : admin help . (2)
REBLOGGED : textures . (2)
TEMPLATES : google slides . (2)
REBLOGGED : deaf . (2)
REBLOGGED : hard of hearing . (2)
REBLOGGED : character development questions . (2)
TEMPLATES : text psd . (2)
TUTORIAL : gif sharpening . (2)
THEMES : about theme . (2)
REBLOGGED : guides . (2)
REBLOGGED : fc directory . (2)
REBLOGGED : tag style masterlist . (2)
gif tw (2)
REBLOGGED : photoshop tips . (2)
REBLOGGED : edit inspo . (1)
TEMPLATES : google presentation . (1)
REBLOGGED : google search . (1)
REBLOGGED : google . (1)
REBLOGGED : discord server template . (1)
REBLOGGED : job masterlist . (1)
REBLOGGED : all masterlists . (1)
MINE : private icon border . (1)
REBLOGGED : ptsd . (1)
MINE : filmora 9 tutorial . (1)
REBLOGGED : reblog . (1)
REBLOGGED : cptsd . (1)
REBLOGGED : outlining a novel . (1)
REBLOGGED : discord tip . (1)
THEMES : fansite theme . (1)
MINE : gradients . (1)
REBLOGGED : discord tupperbot . (1)
REBLOGGED : rph help . (1)
PROMOS : positivity messages . (1)
MINE : roleplay help . (1)
REBLOGGED : discord emoji . (1)
MINE : templates . (1)
REBLOGGED : firefox . (1)
REBLOGGED : dash icon . (1)
MINE : practice manips . (1)
REBLOGGED : mental health . (1)
REBLOGGED : about roleplayer . (1)
REBLOGGED : tumblr etiquette. (1)
REBLOGGED : tumblr tips . (1)
REBLOGGED : how to play . (1)
REBLOGGED : substance abuse disorder . (1)
REBLOGGED : Character naming . (1)
REBLOGGED : lgbtq . (1)
REBLOGGED : hex codes . (1)
MINE : coloring psd . (1)
REBLOGGED : gif settings . (1)
REBLOGGED : character voice . (1)
REBLOGGED : canva tutorial . (1)
REBLOGGED : ship inspo . (1)
REBLOGGED : character development and creation . (1)
photoshop action (1)
MINE : credits . (1)
TUTORIAL : gif effect . (1)
REBLOGGED : chrome extensions . (1)
REBLOGGED : psd making tutorial . (1)
PROMO : rph blog . (1)
REBLOGGED : dnd roleplay style . (1)
TEMPLATE : netflix . (1)
TUTORIAL : tumblr . (1)
REBLOGGED : screencaps . (1)
TV SHOW : Cobra Kai . (1)
MINE : tumblr tutorials . (1)
TEMPLATES : paid . (1)
REBLOGGED : quote . (1)
REBLOGGED : smut guide . (1)
TUTORIAL : icon sharpening . (1)
REBLOGGED : labels masterlist . (1)
REBLOGGED : hand to hand combat . (1)
TUTORIAL : icon tutorial . (1)
REBLOGGED : locations . (1)
MINE : carrd examples . (1)
REBLOGGED : png pack . (1)
MINE : gif pack . (1)
REBLOGGED : topaz . (1)
FACE CLAIM : peyton alex smith . (1)
REBLOGGED : rp etiquette. (1)
REBLOGGED : instagram psd . (1)
FACE CLAIM : rebecca breeds . (1)
REBLOGGED : character alignment . (1)
MINE : video walkthroughs . (1)
MINE : pngs . (1)
FACE CLAIM : jenny boyd . (1)
MINE : base icons . (1)
REBLOGGED : google sites tutorial . (1)
TUTORIAL : coding help . (1)
TUTORIAL : screencapping . (1)
ICONS : rp icons . (1)
MINE : shout out . (1)
MINE : photoshop tutorial . (1)
TUTORIAL : photopea . (1)
THEMES : navigation theme . (1)
MINE : screencaps . (1)
MINE : playlist tutorial collection . (1)
388 notes
·
View notes
Text
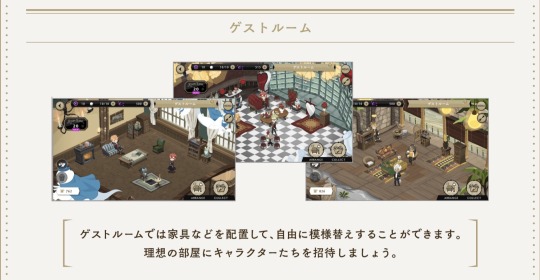
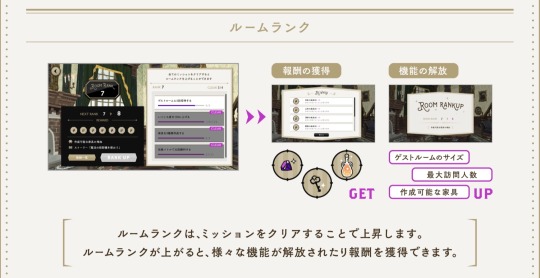
ツイステ Twisted Wonderland GAMEPLAY “Guest Room”
The long-awaited decoration campaign is here ~
Concept:
The boundlessly kind Headmaster is opening more rooms at Ombroryo for the Prefect to decorate and invite friends over. Grim and the ghosts are here to help make sure the Guest Rooms look at their best !
Game Interface:
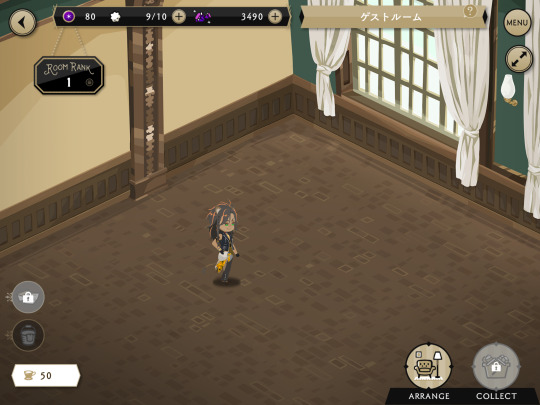
Click on GuestRoom from the Game Home to enter Ombroryo subhomepage;
You’ll get a random visitor from all the Cards you have (+ you can invite 1 Friend every 12hours) wandering around the Room;
Some icons are locked at the beginning, they will unlock when you unlock superior “Room Rank” levels;
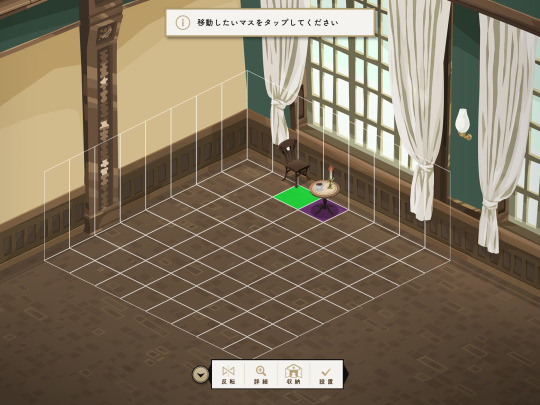
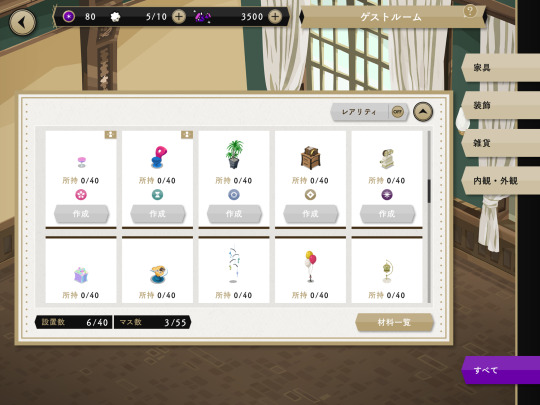
“Arrange” is the menu where you have your furniture “Storage”, where you can craft them “Create” (unlock at Room Rank 2), and where you can decorate the room “Move”;

“Collect” (unlock at Room Rank 3) is the exploration menu where you can get crafting materials as rewards for test battles across NRC campus;

In “Collect”, you use RP points (5 per day) or RP potions (peach-colored potions) to challenge various fights across campus and win the crafting materials;
In “Collect”, each fight has some fixed students who must participate in it, and the overall difficulty of the fight is the same as for Tests + Extra that’s designed for lvl.80+ (don’t be too ambitious or you’ll get zero rewards);
“Collect” map (rewards and opponents) changes every day, and the roster of materials changes depending on the map so watch out for the magic crystals of the Dorm you like;

“Invite” (unlock at Room Rank 5) is the menu where you can see each character favourite decoration style (among the 5 themes Elegant, Pop, Unique, Basic, Stylish), your friendship level with each of their card, and invite them to visit your Guest Room;

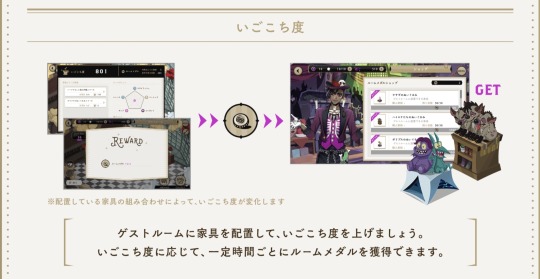
the icon with the coffee cup is where you can see the evaluation of your room and collect Room Medals to exchange at Sam shop for extra items;
How to Progress:
early Rank up will have a mini story scene, and each rank up afterwards gives you some rewards,
there is no tutorial but the early Rank missions guide through each interface, from placing furniture to the room to crafting, for example the materials rewards of Rank 1 will help you reach the next Rank by crafting the recommended furniture and placing it in your room,
once you’ve unlocked “Collect” battles, you can take your time to progress with your 5 battles a day, I recommend unlocking “Invite” on your first day as well if you can,
try to check what kind of crafting materials you need before challenging a battle, basic materials like wood or glass are needed for all decoration styles, but the little pots of painting-looking thingy are only for one “theme = decoration style” (e.g. elegant),
you will need some magical gems to craft SR and SSR furnitures from each Dorm, but I recommend focusing on basic materials at the beginning until you reach Room Rank 7 (if you use the RP potions, try to have a balance of materials and paints).
there are rewards if you complete a full dorm Lounge, so you may want to focus on Ombroryo furnitures first.
the reason why the square blueprint to place furnitures is tiny is because the rest of the screen may include balconies, chandelier and etc. if you want a fuller feeling for your Guest Room, try crafting these ones early.
Enjoy ~
536 notes
·
View notes
Text

Helpful RP TIPS ✨feat. beta editor
subject : how to make custom text colours && formatting.
using beta editor is a learning curve for those of use that are used to legacy ( rip ol' boi ) . you can say goodbye to all that beautiful custom formatting that gave your blog that PIZZAZ. . . . SIKE !! you can still do all that time consuming / wonderful formatting just as easy. there is a small work around but one you should be used to if you are using Roleplay Formatter ( view this tutorial here ) .
⇧ this right here ? garbage. trash. colour choice is not the vibe. do better t/umblr. what even is that red ?? that green ?? CARDINAL SIN.
luckily for you, i'm going to show you an easy way to make your text colours match your blog aesthetic using icons && graphics.
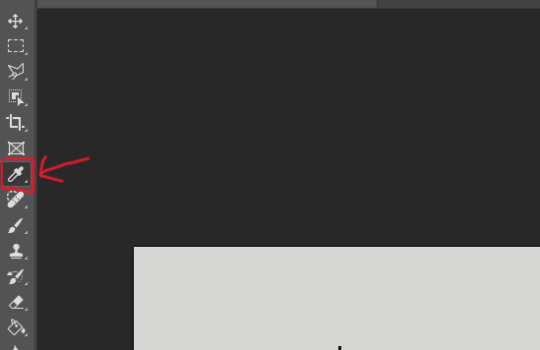
first youre going to want to pull up adobe PhotoShop ( PS for short ) or any other editing service you use for your icons / graphics. the most important part if that it uses the ' EYEDROPPER ' tool function. now assuming your icons / graphics ( i'll be using my icons as an example ), already have the PSD you want attached an active-- use the eyedropper tool on the colours you want to use. i recommend three for variety but you can do as many as you want.
keep in mind by default most people's blog editors have a white background. so using white text is not recommended. i personally like to use 1 vibrant colour && 2 muted colours because of eye strain. vibrant colours can be overwhelming for some viewers but you are welcome to do whichever colours you like. it is subjective after all.
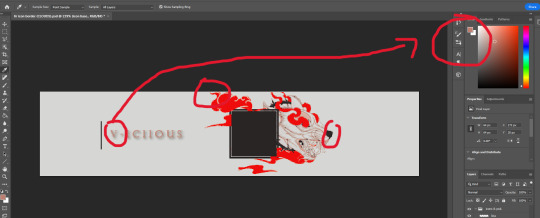
now that youve selected your colour, consider having a notepad ready ( either digital or ol' fashioned pen & paper ) . at the TOP RIGHT side of the program in PS you'll see your colours, click the top overlayed square. this will open a sub-menu that shows you indepth stats. from there you'll see that EXACT colours HEXCODE.
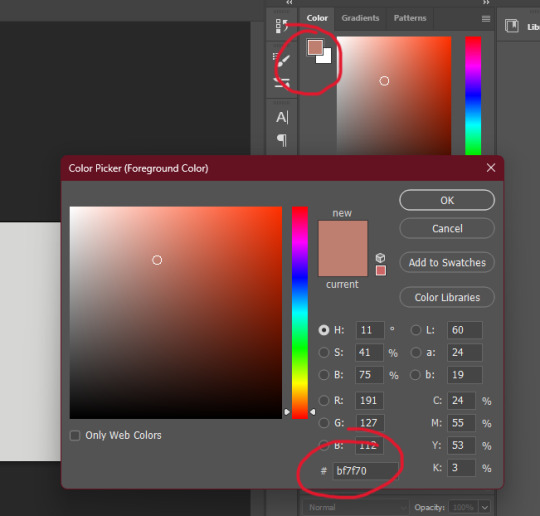
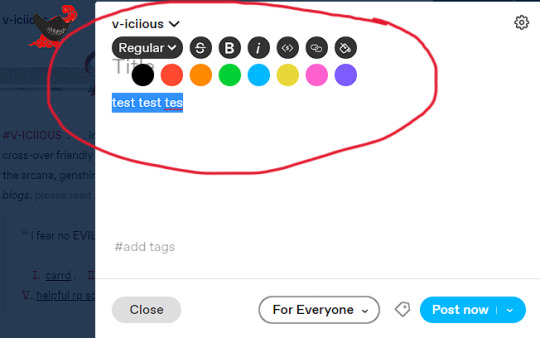
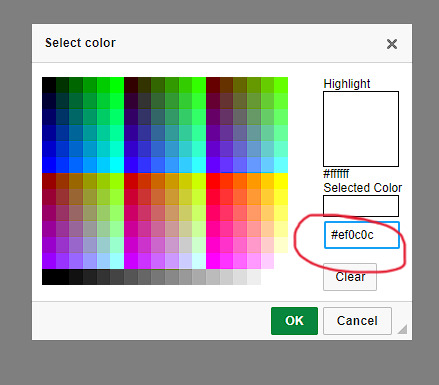
go ahead && write down the HEXCODEs including the ' # ' sign. you'll plug in this code here in the Roleplay Formatter. ( the ' A ' symbol at the TOP RIGHT. ) from there another sub menu will open and you'll click ' More Colors '. that is where you will plug in your hexcode. while the editor is open it will save your colours, however when you close they will disappear which is why i recommend writing them down. but you can always just have PS open and copy & paste them from there. its a matter of personal prefenece at this point.

and thats it. Thats the whole thing. take your now formatted and coloured reply, copy the source code and paste it into t/umblr's HTML editor ! play around with bolding, italics, capitalizing, && enlarging / shrinking specific words or phrases to give your reply that speical little OMPH !! you're on your way to being a pro, good job !

67 notes
·
View notes
Last Seen Blogs

tinkachu000
Lo-fi nap time
eternalmoonlight19
[Exit, persued by a bear]
boombo0
:o
nickysaysyolo
Nicky Says Yolo
mspaintakus
Ms Paint Akutagawa