#purple triangles quilt
Text

🔼.🟣.🩶
158 notes
·
View notes
Text

I finally got around to washing my rainbow triangle quilt and putting it on my bed!
Not pictured: under this rainbow quilt is another, different rainbow quilt lol
#sewing#handmade#quilt#rainbow triangles quilt#postcards from sweden quilt#under the second rainbow quilt is a quilt my grandma made my dad when he was a kid#it’s flannel and delicate with age#so it’s in a duvet cover#which is…not rainbow#the duvet cover is striped green and blue and purple though! so it’s half a rainbow!#also the walls in my room are pink but the quilt is so bright they kinda look orange-ish?#I’m delighted! I did not pick pink for my walls but half the rooms I’ve had in my life have been pink#maybe I want orange walls#maybe yellow? maybe green
447 notes
·
View notes
Text
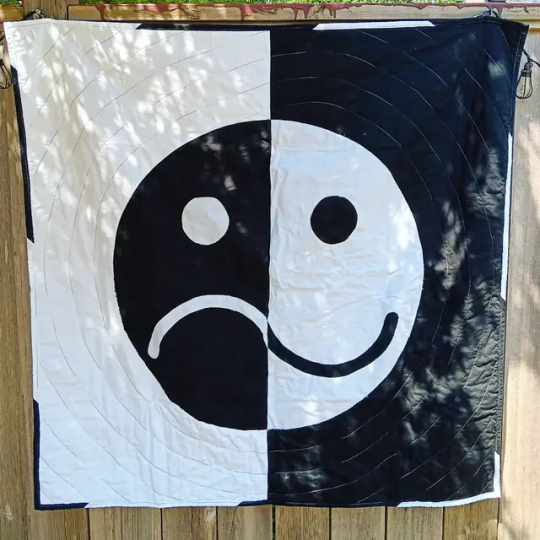
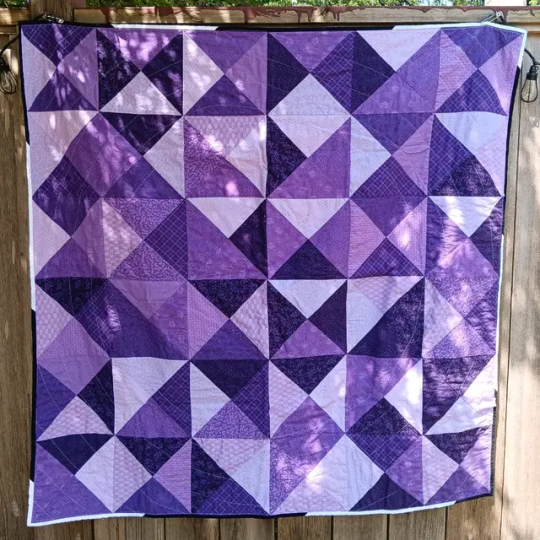
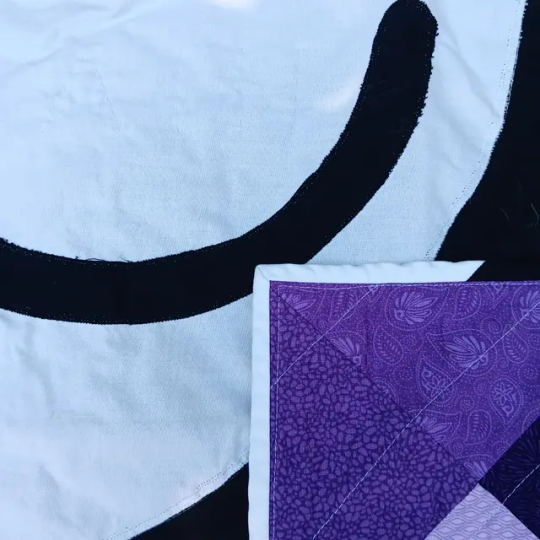
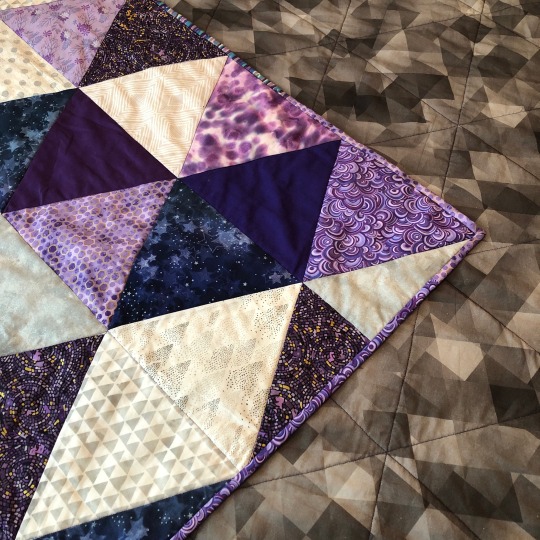
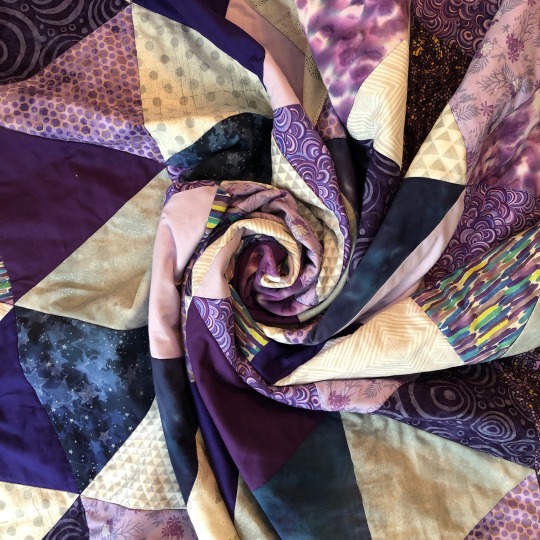
[ID. Three pictures of a square Fall Out Boy-themed quilt hung on a fence. The front is the smiley/frowny face logo from So Much (For) Stardust, with a black half that is frowning and the white half smiling. The background is also a black/white split, inverted from the logo. It is quilted with a black and white variegated thread in a spiral around the logo, and hand quilting within the logo reads "What would you trade the pain for?" in black or white thread to blend in. The back of the quilt is made up of different shades and prints of purple fabric in a gemlike quarter square triangle pattern. The quilt is bound in alternating black and white. In order, the photos show the quilt's front, back, and a close up of the front with a corner folded up to show the back. End ID.]
#fall out boy#falloutboy#fob#so much for stardust#smfsd#mania#quilting#crafting#sewing#FINALLY got this one to the person I made it for so now yall get to see it
560 notes
·
View notes
Text
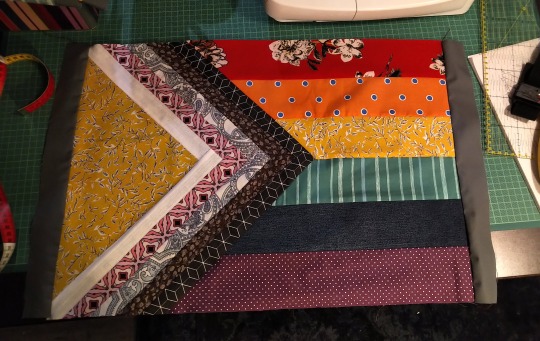
Progress Pride Flag Quilt Block Pattern & Tutorial

Don't you just love the flag of our people? Do you have an inner grandma that years to make stuff? Do you want to combine these two things and make a queer quilt?
Well, I've got you.
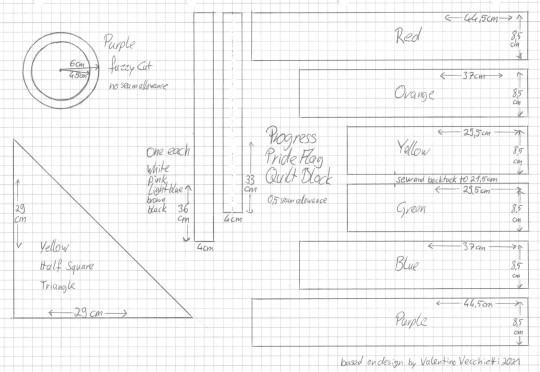
Behold the pattern! And my lack of graphic skills, so I drew it on paper!
Basically it's a bunch of rectangles, one half square triangle and a fuzzy cut circle. I don't know shit about quilting and I was able to come up with it. Why Centimeter, you ask? Because I'm German and that's what I'm familiar with. Why weird measurements and not jelly rolls and layer cakes and stuff? Because I'm German and quilting is not really a thing here.
Onto the tutorial!
You'll need:
A scrap of fabric of red, orange, yellow, green, blue, purple, black, brown, light blue, pink, white each
additional fabric for the border
Cutting mat, quilting ruler, roll cutter
sewing machine
thread
pins
double sided interfacing
iron and ironing board
fabric sheers
compasses
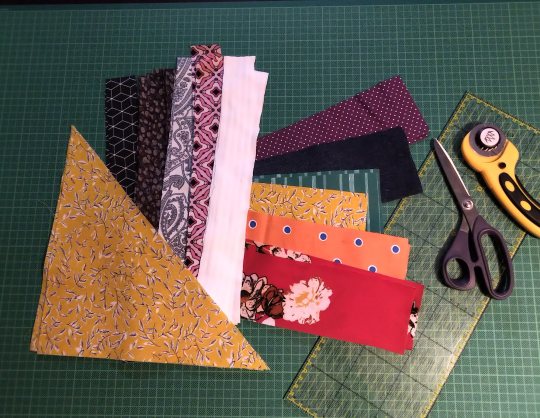
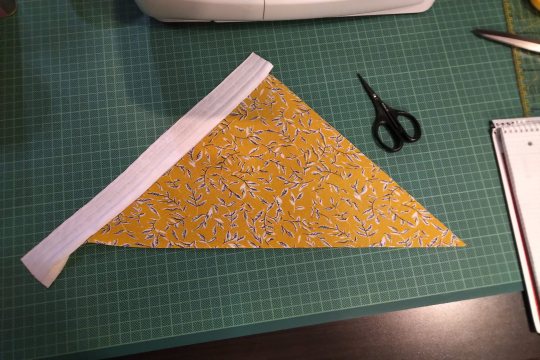
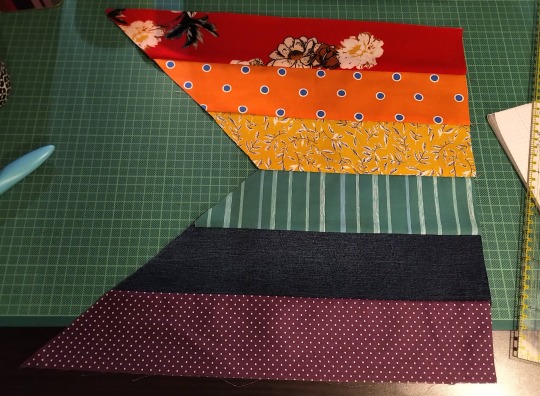
Step 1: Cut everything. Duh. We'll take care of the circle later, don't worry about that now. The half square triangle is exactly what it sounds like. A square and then you cut it diagonally. That's why I didn't give the length of the hypotenuse.
(Note: I'm making two blocks at the same time, that's why there's so much fabric. Also this is a middle of the night project, hence the lighting.)
I'm using all kinds of different fabrics, different weights and drapes, some stretchy, some transparent, so I needed to interface some of them.
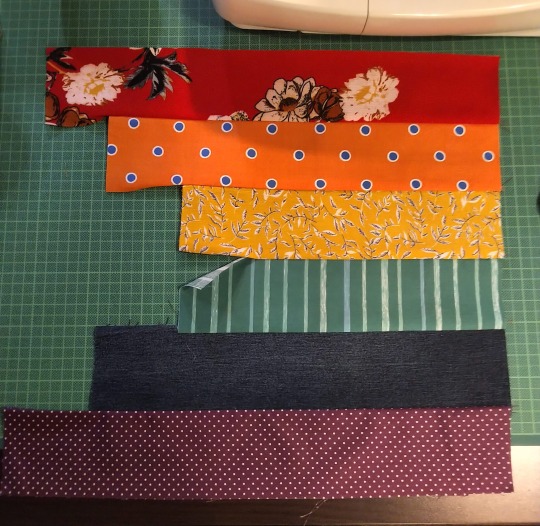
Step 2: Sew the rainbow together. 0,5cm seam allowance on everything, that's exactly the edge of the foot on your machine. Double and triple check that everything is facing the right direction before sewing. The seam of yellow and green does not get sewn fully, only 21,5 cm! That's important later! Also backtack there. Don't forget to iron.
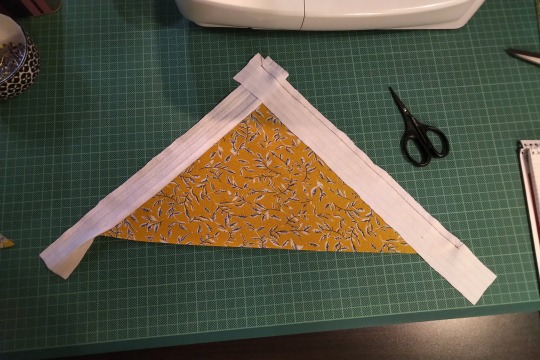
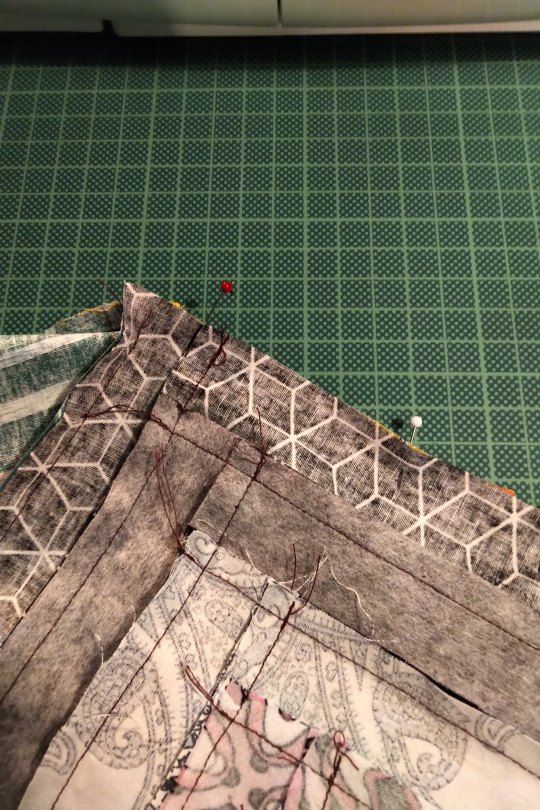
Step 3: Sew the strips to the half square triangle. For this you have to switch between the sewing machine and the ironing board constantly. Attach the shorter strip diretly to one side of the HST, iron it open. The second strip of the same colour gets attatched to the other side of the HST and the first strip. Look at the pictures closely if you're unsure how that works. Also the strips are longer than the triangle. We'll square that up later.
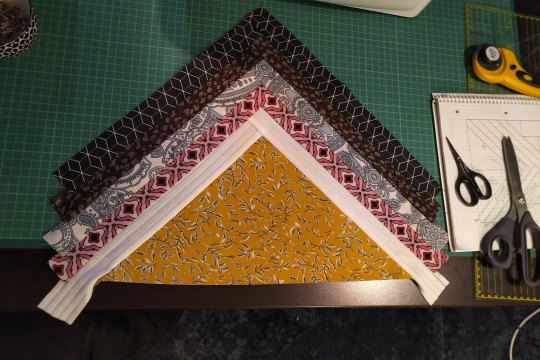
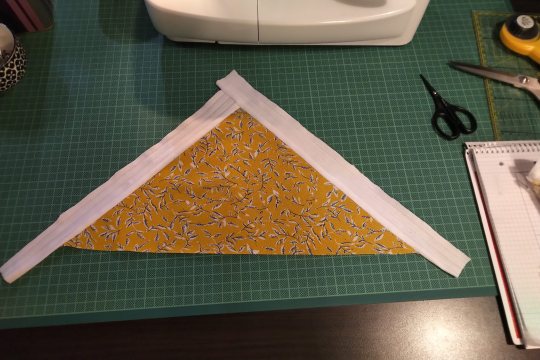
All strips attatched will look like this. See how the two strips meet at the tip!
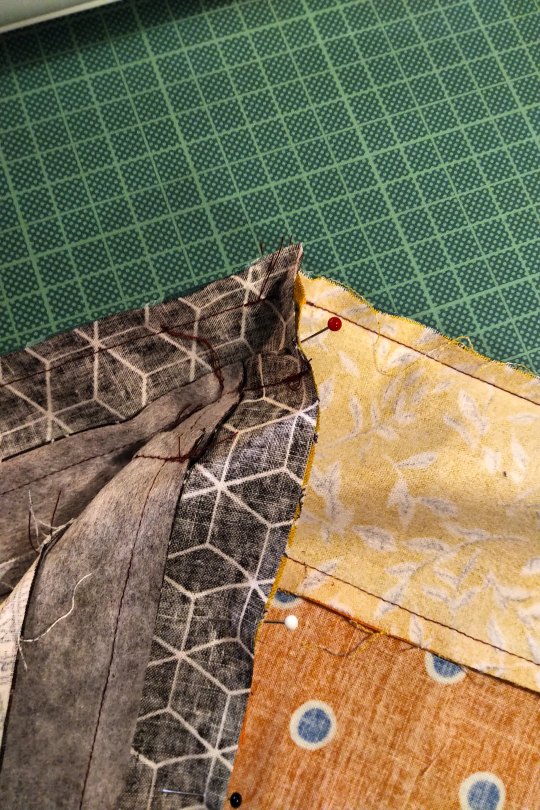
Step 4: Cut the rainbow part to size. The seam between yellow and green is 22cm long. The shorter seam from before and some seam allowance. The outsides of red and purple are 44,5cm long. You will cut a little triangle from every single colour. Do this slowly and carefully. Maybe your fabrics have stretched a bit (mine did). Don't worry, it will be ok.

Step 5: The Y seam, part one. Y seams are tricky, but there's only one for this block. So put your straps part on your rainbow part and line them up so that the tip of the strip part overhangs the seam between yellow and green. Remember that it's not about the edges of the fabric, but where the seam will be. So position the strap part so that the 0,5cm seam will meet the yellow-green seam.
But don't sew all the way! Leave 0,5cm at the tip!
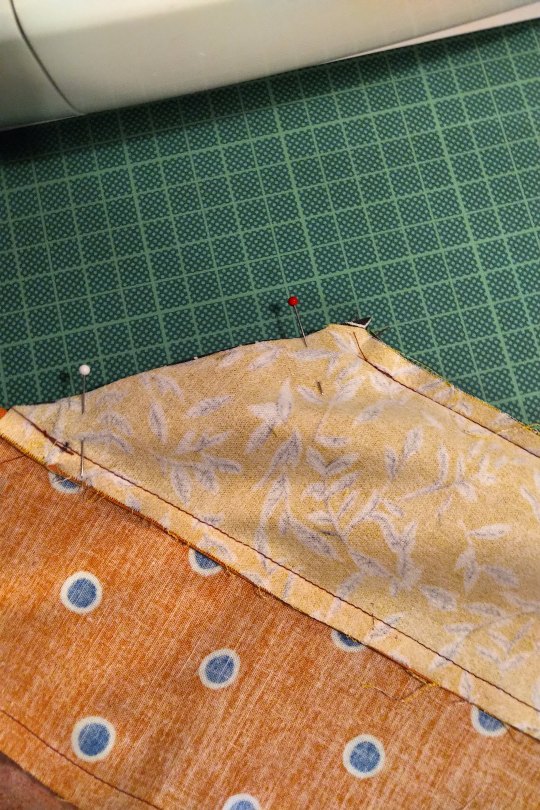
Step 6: The Y seam, part two. Now, fold both the rainbow part and the strips part in half and if you've done the last step correctly, the remaining two edges will allign. Pin and sew.
I can't explain it better than I've done here, I'm sure there are tutorias out there. Good luck!
Step 7: Square up. Iron your block to that everything is nice and straight and flat. Then use the fabric edges of the red and purple to cut the remaining ends of the strips. Use the HST to cut the white. Be careful, the long side of the triangle is on the bias and likely stretched a bit.
I already added borders here. I'm making a pillow case.
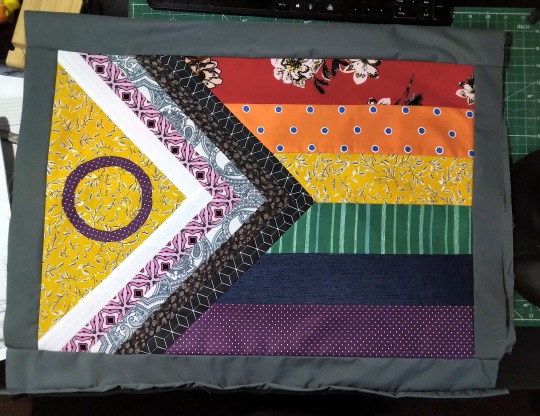
Step 8: Fuzzy cut and raw edge applique. Double sided iron on interfacing is essentially double sided tape. It has two types of glue, one gets activated by 2 seconds of heat, the other by 5 or so (depends on the product). The second side is also covered with a paper that needs to be removed before the second glueing. Read the instructions of the product you are using!
Use your compasses to draw a circle on the protective paper side of the interfacing. Cut it out roughly. Then place it with the rougher side on the backside of your purple fabric and iron for 2 seconds on middle heat. If you've just ironed your fabric before and the ironing board is still hot, wait for it to cool down. Also let the fabric cool down after applying. Then cut out your circle. The interfacing will have stiffened the fabric, so that shouldn't be a problem. Then remove the protective paper, place the circle on the yellow triangle where you want it and iron for 5 seconds. Let cool.
And you're done! The applique at this point is only secured with the interfacing, but it should hold fairly well. The quilting will secure it further.
And that's it. BTW, did you know that this design was made by Valentino Vecchietti for Intersex Equality Rights UK in 2021? Now you do. Happy quilting!
#lgbt+#lgbtq+#lgbtq community#pride flag#progress pride flag#valentino vecchietti#quilting#quilt#quilt block#quilt pattern#quilt tutorial#sewing#sewing machine#sewing tutorial#sewing pattern
107 notes
·
View notes
Text
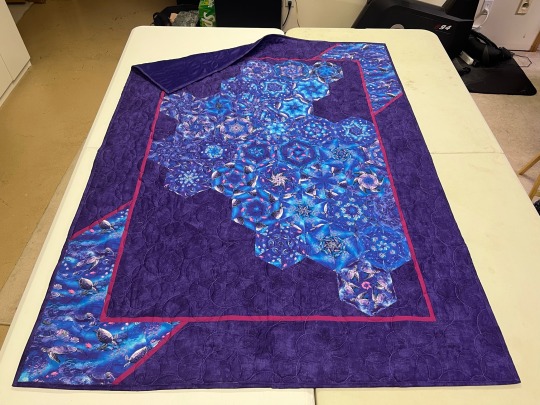

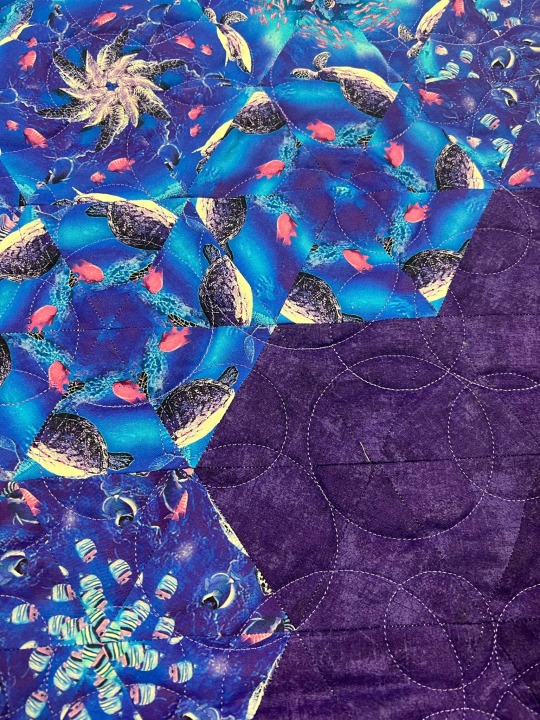
A one block wonder made of equilateral triangles. Quilted it in overlapping circles because the main fabric is fish, so: bubbles! I also put the left over fabric I had from the blocks into the border so you could see the original pattern on it. Purple minky went on the back to make it soft and cuddly.
50 notes
·
View notes
Text
A Quilt
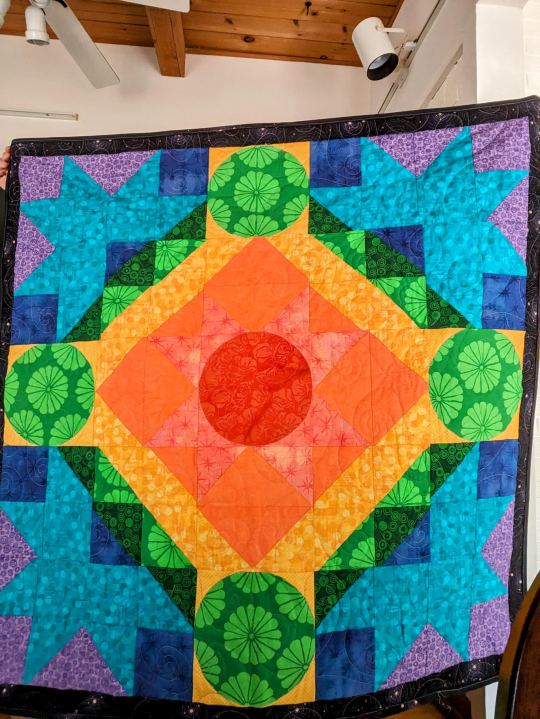
This is my own pattern, but I believe in releasing these things into the wild, so I'm gonna tell you how to make it.
The original is a crib/baby quilt, so it was envisioned to be 40"x40", which means each square is 8" plus seam allowance. Feel free to do your own quilt math and make it bigger or smaller. If you want like a 50x50 lap quilt, you could add a thicker border around the edge. I don't care. It's your quilt.
Here's a diagram that shows the squares:

There are five types of squares that get repeated.
For type 1, I cut a circle out of the focal material and basically glued it down using an iron-on applique product. Many of these have names like "Heat and Bond." Ask the old ladies at your quilt store if you're not sure which one to get. After I appliqued it, I stitched around the circle with a thread in a pretty color using a zigzag stitch. Because the stitching does take up the fabric a bit, you may want to cut this square a little big (like...9" instead of 8.5") and then trim it if you need to. You will need five circle blocks.
For type 2, I did these as two flying geese, because there are ways to make a lot of flying geese pretty easily. You could also do it as four half-square triangles, or an orange square on point and just sew on the corners. I don't care. I don't think one way is inherently superior, although depending on your fabric, maybe you want fewer seams. Or maybe more seams is easier for you. You will need four blocks like this.
For type 3, you have four half-square triangles (HSTs): one orange/yellow, two light green/yellow, and one dark green/dark blue. Since there are four of these blocks, that works out to four orange/yellow, eight light green/yellow, and four dark green/dark blue. (Damn it, that's math. I wasn't gonna do that.)
Blocks 4a and 4b are mirror images. Each one contains a square of light blue, a square of dark blue, a dark green/light blue HST, and a light blue/light purple HST. Be careful when you assemble these--it is easy to get confused, especially if you don't especially like rotating shapes in your head or whatever. You need four of each (so eight total with these colors).
Block 5 is essentially the same: one light blue square, one light purple square, and two light blue/light purple HSTs. You need four of these.
I put on a dark purple border. If I'd done better math, I would have made it bigger, but whatever.
Tips: Iron everything at every stage. I press my seams to the side rather than open. Spray starch if you have to. Quilt it in the way that makes you the happiest. Bind it with either more dark purple (if you have enough, I didn't) or black (if you have enough, I didn't), or both in some kind of random arrangement (ding).
That's it. Easy, right?
#quilt pattern#handmade quilt#rainbow quilt#fiber arts#quilting#fabric art#i made a thing#textiles#textile art#sewing#baby quilt#how to make a quilt
30 notes
·
View notes
Text

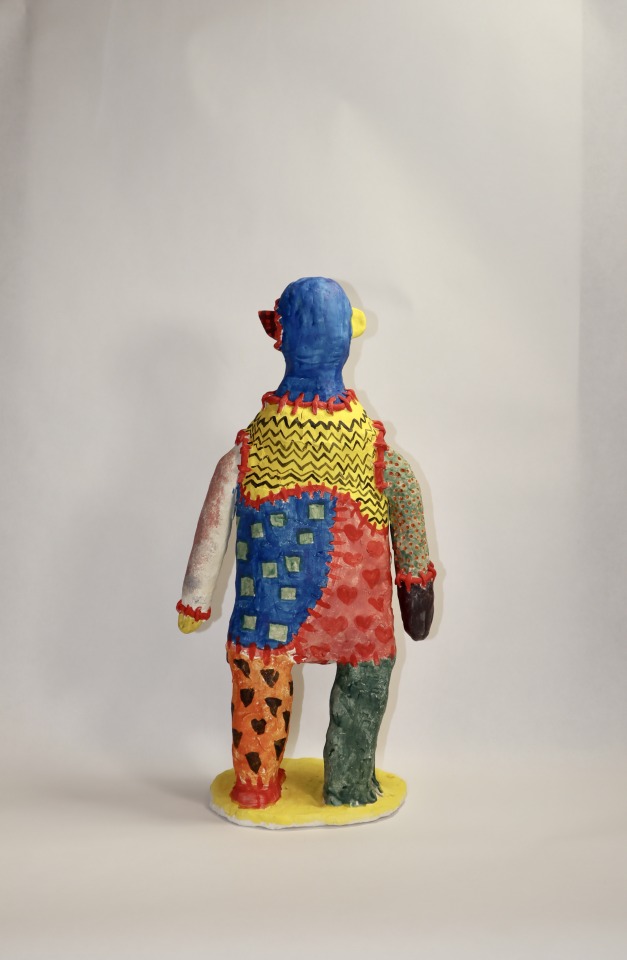
meet patchenstein! he's inspired by frankenstein, patchwork rag dolls, and quilts. he's a very happy fellow.
image 1 ID: A very colorful humanoid statue. The statue is decorated with red colored stitches, some raised and some painted on. In between the stitches are areas of painted colors, patterns, and textures. The head of the statue is bald. The left side of the face, top of the head, and neck have all been painted a bright blue. The left ear, eye, and the mouth have all been painted yellow. The mouth is a wide smile resembling a traditional smiley face. There is raised stitching around the right eye. The right eye is red and the face around it is a duller, more brown red. The right ear is pointed and painted red with a simple black grid pattern. Around the neck is raised red stitching. The top of the chest is painted bright yellow with black zigzag lines going across it horizontally. On the right side of the chest there is a red heart. Both arms are attached by raised red stitching. The top of the left arm is mostly green and textured with orange dots that have been poked into the surface. Halfway down the arm there is diagonal raised red stitching. Below that, the arm is dark purple and ends in a stub/rounded “hand”. Most of the right arm is lightly colored with pink which has been painted on with a sponge to give it texture. There is raised red stitching before the right “hand”, which is bright yellow. On the middle right of the torso there is a section of blue with green squares. The lower left of the torso is pink with red hearts. The left leg and half of the left foot are painted dark green, while the tip of the left foot is black. The right leg is orange with black triangles pointed downwards. The right foot is red. The statue stands on a circular base, which has been painted bright yellow. The whole thing has a matte finish.
image 2 ID: The back of the sculpture. All of the designs from the front have continued onto the back. The bright yellow with black zigzags takes up less space on the back, while the blue with green squares and pink with red hearts take up bigger portions. The back of the right arm (left when facing from the back) is mostly white, but the pink sponging can be seen in parts.
23 notes
·
View notes
Text
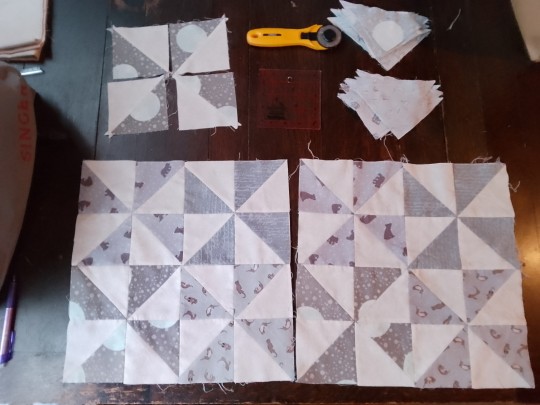
Finally working on a quilt with some semblance of planning in it! The bear and otter fabric are slightly more purple in real life but overall it's a very muted blue-grey palette. 36 out of 384 half square triangles pieced, only 348 to go!
#quilting#quiltblr#pinwheel quilt#hand piecing#it would go faster if i did it by machine but wheres the fun in that
5 notes
·
View notes
Text
A quilter I am not.

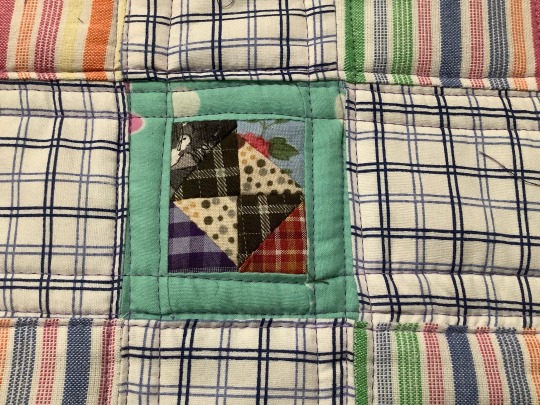
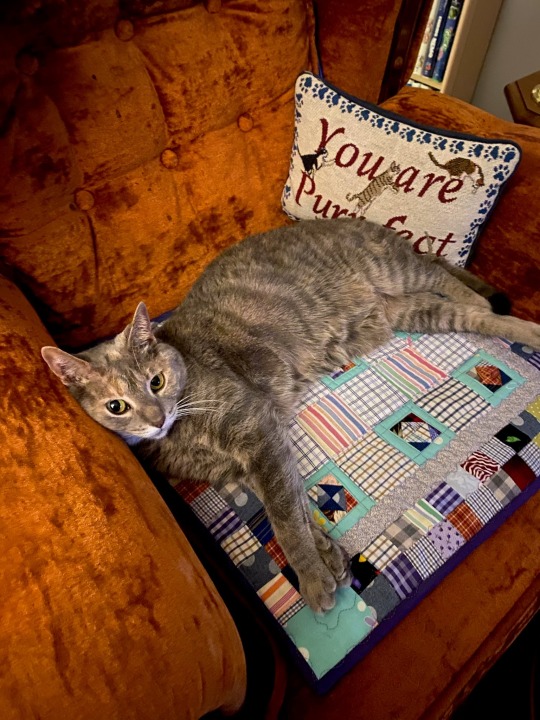
Spent the better part of 9 hours piecing some of my smallest precut squares together to end up with this little pet quilt for a friend. It’s wonky as fuck, but her cats won’t care 😹. I started off strong with the centers of the nine 1/2 square triangle blocks, which are right at 1.5”. It’s when I started adding borders and other bits that I lost things. I’m quite fond of the outer pieced borders though. The whole thing is just over 19” square, quilted to 2 layers of polyester felt, then backed and bound with purple broadcloth.
As always, all fabric was scrap, or gifted to me.
Update: Ellie claimed it immediately and made herself comfy.
0 notes
Text
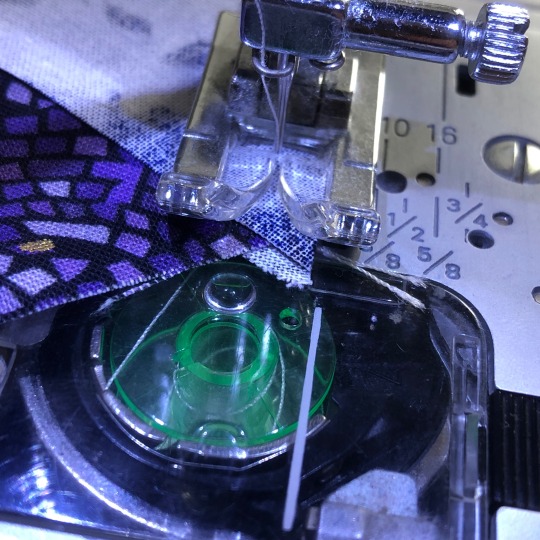
IDK if this picture is legible but I won this round of bobbin chicken so hard.
73 notes
·
View notes
Text


I’m pretty sure I’ve posted this before but it makes me so happy to be able to pull back the rainbow quilt on my bed to show another rainbow quilt
#sewing#quilts#quilting#rainbow quilts#rainbow triangles quilt#it’s just like a little spark of happiness every time I see my bed now#rainbows!! and I made them!!#and someday I’m going to make my sky quilt#(which will be blues and grays and white)#I also currently have my purple beehive quilt#which lives on the couch with me#so maybe the sky quilt will be for when I’m sitting at my desk??#it’ll be a while I’ve got many many quilts to make before then
127 notes
·
View notes
Text
Wide cross quilt block video tutorial
This is a great alternate block. Stay tuned for another tutorial where we’ll combine it with another block to make a beautiful quilt.
Learn to make a wide cross quilt block in 2 minutes:
Cutting instructions
1 square, 4 3/4″ x 4 3/4″ in purple for the centre
1 square, 7 1/4″ x 7 1/4″ in navy cut into 4 triangles
4 strips, 4 3/4″ x 7″ in the background fabric
Do you wish to receive my…

View On WordPress
0 notes
Text
Excerpt from No Horizontal Tomorrow
I published my new book-length poem, No Horizontal Tomorrow, on Lulu earlier this month. Below is the third section, for your consideration. --Raymond Cummings
III.
Not the house you heard about, I’m talkin’ bout —
A bronzed bust, immortal and seized, gazing down from a high shelf at someone standing by the patio door, even though there’s no one standing by the patio door.
An eerily precise portrait of Morgan Freeman, his expression on the cusp of curling into a saintly smile, surveying the steps leading down to the main level.
A housecat contemplating an oriole perched in a molting palm tree; the oriole has its head cocked, diffidently, in another direction.
A poster for a concert doubling as its illustrator’s exploratory sketch session — the line work in black Sharpie, the figures densely shaded with pinks and purples, canary yellow splotches erupting at apparent random. It is also, somehow, a collage of very active superhero comic book scenes rendered with a rough, underground comix flair. The block lettering bulges out.
A trio of abstractions, Kente cloth-clad, posing fluidly in place — are they dancing, or celebrating? — within a frame near the kitchen. Mere feet away: the ancient Egyptian version, on a papyrus square that isn’t a papyrus square.
A quilt, its off-brand “L”s and near triangles and almost squares pieced together like a completed puzzle, a myriad procession of patterned blues and purples and stained whites, flowers, leaves, petals, and vines, intensities and recessions.
A still life of yellow wild flowers, overflowing from a teal, handled jug.
A cloth print of the island of St. Thomas, as if sourced from a satellite equipped with a night vision filter, the main island and its satellites ringed with color gradations intended to indicate relative marine shallowness (bays, quays) or mean height above sea level (mountains, rises). It is both tranquil and mildly deranged.
An impressionist, photorealistic watercolor of a long-haired girl treading water in a swimming pool (miniature print, Ellicott City).
A herd of rabbits scampering across a hilly landscape, flowing from the left down, then to the right and circling up to the top, where a man with a cane leads a camel that a woman is riding, in a scene of pointedly forced perspective. The sky in this painting seems especially painted in a non-figurative sense, its blues too blue — a precious mural sky that’s a mere sliver of the entire canvas – while trees gnarled and foal dot the hunter green and dun hills dominating this view. It is difficult to overcome the impression that these rabbits are attacking these travelers, that this is the prelude to some grisly, fabled massacre.
A man and a boy, side by side, stare straight out of a woodcut. The man, goateed, is reserved; he wears glasses with rectangular frames.. The boy – whose glasses frames are curved – is far more exuberant, flashing a toothy grin.
A gauzy netherworld floating somewhere between Heaven and Earth, illuminated by a benevolent sun next to a pastel rainbow and a vanishing moon, nestled within a cool, chromatic haze that glows like the inside of an oyster shell.
A rectangular window looking out upon a color run or the crescendo of a psychedelic symphony, impossibly sensuous paint presented in specks and flicks and squiggles and daubs, dense, layered, four-dimensional — or a leisurely drive-by paintballing pulled over an afternoon. This is forever a new painting, in a constant state of self-reinvention or reinterpretation, with different aspects jumping out each time: deep mystical blues and purples, jagged little streaks of crimson, pensive sunset oranges, scattered punk pinks, greens sprouting everywhere like fresh weeds after a rain shower. Stare long enough and a dark, crooked ridge reveals itself beyond the swirling pyrotechnics, a wavy but unmistakable implication of something stolid and foundational, a ridge line or towering, authoritative cluster of trees. To the left, a mirror.
Abstracted figs, one sliced.
A nautical scene where a cruise ship, a sailboat, and a shipping vessel idle as fluffy clouds and an ethereal sky look on, impassive.
A circle of children, crudely detailed and multiculturally representative, holding hands in a white-gray whirlwind. They have heads but lack faces; this painting looks like how Boards Of Canada covering “It’s A Small World, After All” might sound.
A small canvas where, while green smears dominate, yellows lurk close to the middle. This work should be titled “Chlorophyll study No. 9.” Words and phrases were pasted over its surface to form a haphazard, descending poetry, concluding with: “panting towards the sea.”
Question: How free are you?
1 note
·
View note
Text
WIP blanket update 6/05/21*
*The information in this post is outdated because I typed the whole thing up, saved it to my drafts to add links… and promptly forgot to do so 😅 I’ve actually finished the ten-stitch by now, and done work on a few others as well, including my Granny Square Quilt!
Hey, y’all! It’s been about two and a half months since I did a blanket update, but I’ve been doing a lot of work on some of them lately, trying to get as much done on the ten-stitch and granny stripe specifically before I go back to work in a week! My goal is to finish the ten-stitch before the 13th of June, but… we’ll see 😅 The reason I’ve been focusing so much on those two blankets specifically is because they’re not so transportable, so, while I am able to bring projects to work with me and work on them during breaks and downtime, I can’t exactly transport an entire, massive “worked in one piece” blanket like the ten-stitch or granny stripe with me. But smaller quilt-style or pieced afghans are a lot easier to transport, because I can throw a few balls/skeins/etc of yarn into my bag for the day and make a few pieces if I have time! Thankfully, 3/5 of the blankets on my to-make list ATM are pieced blankets—you can check out my “coming soon” blanket post to see what some of those are, but two of them are also introduced in this post!
Not pictured: Granny Square Quilt, because it’s still currently on pause, although I plan to start working on it again once I go back to work; Mitered Granny and Tilt-a-Whirl because I’ve finished them both! Stay tuned for individual posts about those two FOs!

Ten-Stitch (Knit)
As of these photos, I was about halfway through this blanket—I was around halfway through cake four, and I’m planning to use eight cakes total and then use the ninth to just finish up whatever edge I run out of the eighth cake on so that I don’t have a weird chunk missing out of it! Since I took these photos about a week ago (I’ve really been procrastinating on writing this post oops—) I’ve finished the fourth cake and have only a little left of the fifth cake! So, even if I don’t finish the blanket by 6/13 like I’d like to, I should be close and can hopefully get it done before work gets crazy again. As you can see, though, my little furry lady seems to like this blanket already! She used to sleep on it a lot before I had to move all my work back up into my room when my brother moved back into the basement, so I’m sure she’s looking forward to being able to sleep on it again when it’s finished!

Floral Beauty Throw
The last time I talked about this blanket, it was in my “coming soon” post. I decided to make a few test squares before starting the blanket itself, because I wasn’t sure if I wanted to use a US H or I size hook, so I made two squares with each size. The two on the left are with the H hook, and the two on the right are with the I hook. As you can see, there isn’t really much difference between them 😂 I plan to block them (the yarn has a wool content, so I’m going to have to soak rather than steam block, which makes me a little sad because steam blocking is so much easier) to make sure, but at this point I’m planning to use the I hook, and, if I can block all four to be close enough in size, I’ll probably just include the two H hook squares in the final afghan.
On the bright side, I won’t have tons of ends to weave in for this blanket, since the yarn is self-striping!
Total pieces: 4/30 (although I may do more squares depending on how my yarn gets used)


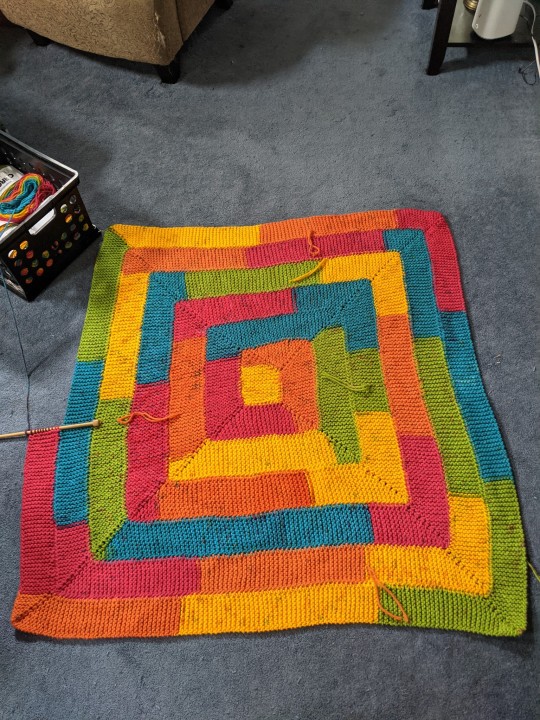
Granny Stripe Blanket
It may not look like it, but I’ve actually done a ton of work on this blanket recently! In my last WIP post, I had about 38 rows done—as of these photos, I have about 60 done! It’s officially gotten too long to double over for photos, and the width of it makes it really difficult to take top-down photos, so it’s hard to get good pictures of, but I really love how it’s turning out so far! I also love how the color pooling has been sort of bouncing from side to side the further I go! I can’t wait to see how it turns out!
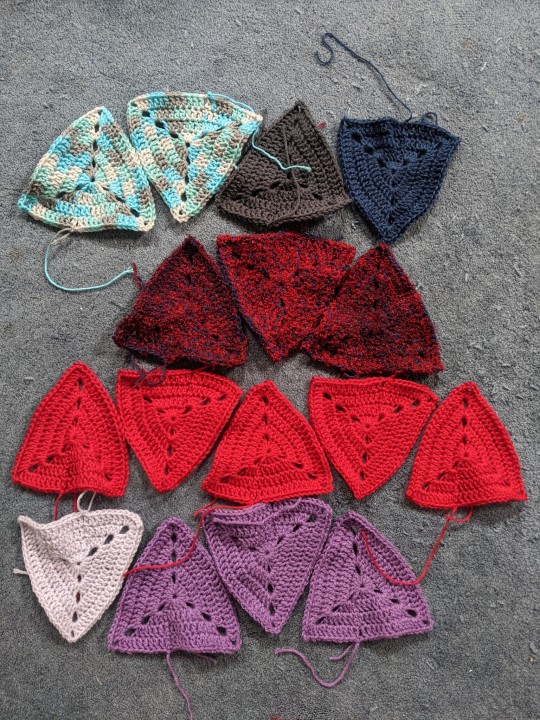
Scrap Granny Triangle Quilt
I wasn’t planning on starting this blanket just yet—it’s going to be a good one for taking back to work—but I hit a point recently where I didn’t want to work on any of my WIPs so I decided to start this instead 😅 I’m really happy with how it’s going so far! I’m using scrap and leftover yarn for the triangles, and plan to do some mixing of textures in it. You can already see a bit of that here, as I’ve used some bits of fuzzy yarn, as well as some Caron Simply Soft scraps that have different textures than the worsted yarns I’ll be using for the majority of the blanket. I already know that I’ll have to pick up a few skeins to supplement my scraps, so I think I’m going to look for more of the turquoise/grey/white variegated yarn from those two triangles at the top left, as well as some different shades of purple and blue, keeping the red for more accent triangles rather than making it a main color of the blanket. There are a few things kind of bumming me out about this blanket, though—namely that I’m going to need a lot more triangles than I realized to make the blanket as big as I’d like to… and that it looks like I’m going to have to block every. single. triangle…
I’ve also tweaked the pattern slightly (check my coming soon post to see the photo pattern I’m using for reference) because I wasn’t able to neatly work the corners the way the pattern indicated they should be work, so you can see where my rows are joined in the middle of the triangle sides. I don’t mind this too much, though, and I think once the ends are woven in, and the whole thing is pieced together, they’ll be much less noticeable. Hopefully.
Total pieces: 15/225 (approx)
#wip blankets#wip#knitting#crochet#blanket#afghan#original post#original#ten stitch blanket#floral beauty throw#granny stripes#granny triangle#scrap blanket#caron chunky cakes#caron chunky cakes rainbow jellies#caron cakes rainbow sprinkles#caron cakes yarn#caron cakes#red heart super saver stripes retro stripe#retro stripe#red heart super saver
27 notes
·
View notes
Photo

The ladies are done. This is the International Sisters Block, reengineered by Preeti Harris. It’s a relatively easy block. But this is the first time I’ve ever done anything on point. There is simple (somewhat) math to figuring out the setting triangles and corner triangles.
This took days to quilt, and it’s not even that big of a quilt. I used different thread in each dress & headpiece to quilt; something that matched or complemented the fabric. Also, depending on the fabric, I either meandered in it, or (more times than not) followed and echoed the print on the fabric. This is especially noticeable on the paisleys, peacock feathers, and the Paula Nadelstern Duets fabrics. Some fabric didn’t have a print easy to work with echoing, so I stayed with a tight meander on those.
The background is a mix of vintage white for the blocks, and white for the cashing, although in the lower right corner, that rule doesn’t seem to apply. I purposely did not quilt over the faces or hands of the ladies. It just didn’t feel right.
The fabrics are a mix of JoAnn (mostly the beige-y and yellow florals), Kaffe Fassett, Paula Nadelstern, Moda’s Arboretum collection (gold paisley, and purple floral), and some QT fabrics (green paisley). The border is pieced from leftovers (a lot of Nadelstern in there, some of which is not in the quilt itself).
The binding was different. I used Corey Yoder’s 2″ binding technique of sewing on the back first, wrapping it around to the front, then sewing a seam about 1/8″ (or less) from the folded edge. It’s a slower process, but striking. I may test 2 1/4″ binding with that same technique to see how it comes out. There are two pluses to this: 1) it’s a nice, neat seam on the front; and 2) that second seam to tack it all down is on the back, not the front. Since mine was all black (as is the backing), it didn’t even show.
2 notes
·
View notes
Last Seen Blogs

svalleynow
SValleyNow.com News

hey2b
Hey2b
poicyss
Howdy-ho!

dekoweltanita
Unbetitelt

tdsnews
Canada's Daily Source for News, Politics and More