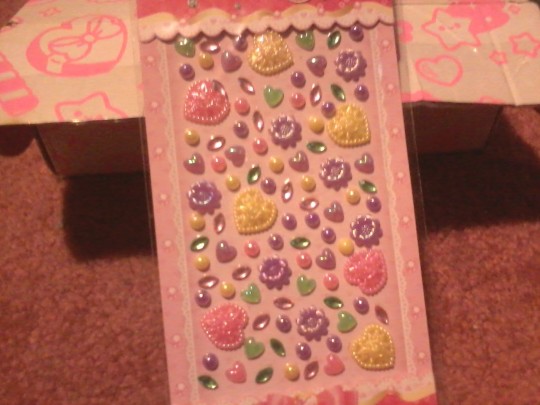
#i keep my coloring books and markers handy always pretty much
Text
Coloring!!
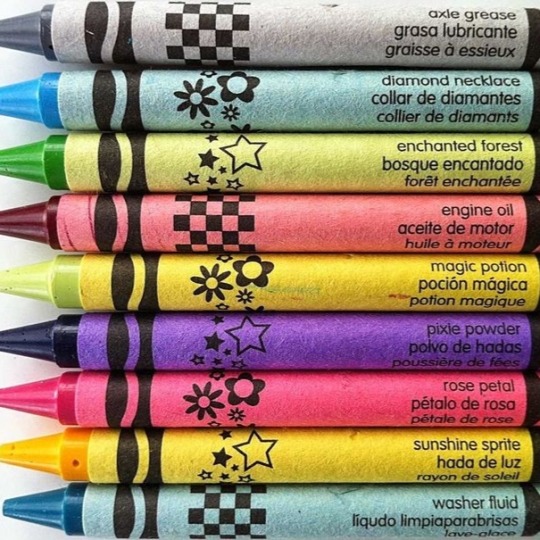


#Coloring#!!!#my go to agere activity#i keep my coloring books and markers handy always pretty much#there's another paci i wanted in here but i didn't wanna take anything out#oh well#anyway i hope you enjoy!#as always#sfw interaction only#moodboard#sfw agere#age regression#agere#sfw littlespace#agere moodboard#babyre#baby regression#age dreaming#coloring moodboard
1K notes
·
View notes
Text
So the final cause, if I recall my Aristotle (I was terrible at Aristotelian logic, or at least at what the badly illustrated homeschool textbook said was Aristotelian logic), was that my apartment has been growing irregularly more squalorous for months. Occasionally I would have a bout of energy and put my groceries in the pantry, but for the most part I've been doing well to keep up on the laundry. The proximal cause was... probably the coloring books.
Anyway, this morning I put on pants that were not sweatpants, probably for the first time in months, because going to get vaccinated is a festal occasion and one ought to look one's best. (I put on my cute top with the frilly shoulder straps and the little rosettes, too, since I figured it'd be smart to wear something sleeveless. And my combat boots with the pastel tiedye laces, in case of hiking, which also turned out to be smart. I was decked out.)
So then I went and showed a number of people my ID and my appointment email, and they poked me with a timy needle -- not as small as the one they used in the ER for the insulin that time, I didn't even feel that one, but a very nice thin needle compared to my usual standard of needles, which are the ones they use to try and get blood *out* of you, and often fail when you are me. Then they made me sit down for fifteen minutes in case I took an allergy, and then they gave me a lollipop (I got blue cotton candy, my favorite flavor) and a sticker with a hashtag on it and I left.
Then I got to wend my way back from the place where the vaccinations were happening -- it was a big event on the college campus, since they have a lot of nice big rooms and wide open spaces there -- and it happened I was coming back from a direction I do not usually wend my way from, and I dropped into Michaels. Usually I go to Joann's, because they have fabric, which Michaels doesn't, and Michaels is generally a bit froofier in the sorts of craft supplies they stock at least locally, but the Michaels and the Joann's are right across the street from each other, and I still haven't heard anything about my special order on the floss color that Joann's was out of. Michaels doesn't have the full range of DMC colors, but I took a look and they did in fact have the color I needed.
Then I wandered around some, because Michaels actually does have a bigger yarn selection than Joann's, and I found some Patons Kroy (my absolute favorite sock yarn for feel and texture) in a colorway I didn't loathe, which is *not* something I've been able to find since they stopped making that one colorway with all the orange and black and gray stripes, which I loved dearly and can't remember the name of. So I was like "this will be just the thing for that one lace scarf I was looking at that needs wool yarn in case it has to be blocked to look right", because knitted lace is like that and you can't block acrylic. You can "kill" acrylic but that's different and I'd rather not.
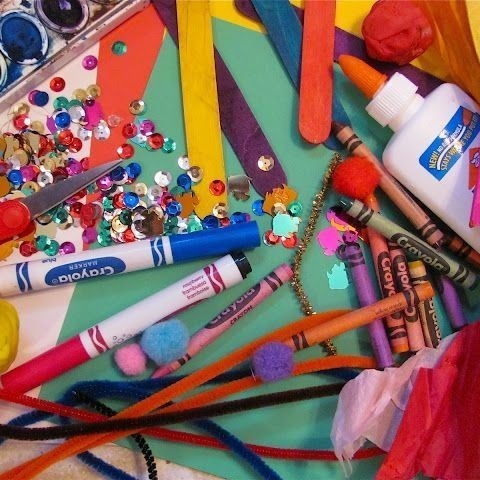
Um. Anyway. Then I wandered around some more, because I get into Michaels so seldom that it's handy to look at what-all they've got while I'm there. Over the past... week or so I have had a sudden bout of wanting to color in coloring books, because that happens to me sometimes; there was an impulse trip to the Walmart way out in the boondocks on the unlit road for Crayola colored pencils, because I decided I was not going to pay eight times as much for Prismacolors.
(The really infuriating thing about coloring books, in my opinion, is that right now you can either find the kiddie newsprint coloring books which are with us always, of course, or you can find "adult coloring books" which are *in-fucking-variably* filled with horses and lions and whales and other large charismatic mammals covered in what look for all the world like quilting patterns. If I wanted to color a rendition of a quilt filled with tiny stripes and polka dots, I'd get some graph paper! And the dots and lines and so forth are so tiny that you can *only* color them with colored pencils, because that's Adulty.)
(Yes, I know they sell coloring pages on Etsy and places. I've been avoiding the print shop for at least a month and a half now, when if I would put the things on my thumb drive and go to it, I could start getting my student loans out of default. I would never wind up printing coloring pages off of Etsy. No, I don't know why. Print shops scare me, perhaps slightly worse than post offices.)
Um. Where was I? So I had gone way far out to the Walmart nobody goes to which therefore often has interesting things in stock, and I had discovered that Crayola still does the glitter crayons I had coveted as a tiny, and they also make double-ended scented markers, which are like the coolest thing ever to the tiny early-nineties child I still am in my heart. So as of this morning, my kitchen counter was completely covered with... things. There was already the sewing machine and the Dr Pepper that doesn't taste like an old shoe, and the peanut butter and the elephant-shaped porcelain wax-warmer, but there had been a narrow slot where I could put a plate and eat my meals -- my only table having been co-opted a year ago by my workstation. Now that slot was filled with various Crayola products and a coloring book with mermaids in it, which at least had a few pages that could be colored partly with markers or crayons, instead of being entirely minced into geometric shapes barely larger than a pencil lead.
SO, what happened after I got vaccinated and found yarn and floss, is that I found out that Crayola still makes the *pearlescent* crayons I coveted even more as a kid. I had gotten one in a little sample pack included with my big 64-box, and it was very precious to me. It's long gone now, of course.
So of course then I bought the pearlescent crayons, and then I bitched at Leia for a while about how I didn't have any coloring books I could use these wonderful crayons *on* unless I wanted to go back to the Lisa Frank newsprint of my youth. (They did actually have Lisa Frank. I strongly considered it. But my tastes have evolved beyond newsprint.)
Then I googled some things, and I found Walmart listing a Crayola mandala coloring book. I went to look for it, and I didn't find it, but I did find a different coloring book with "stained glass" style pictures (sadly not on actual tracing paper, but it occurs to me that if I could source some tracing paper, which it further occurs to me that I haven't seen in years although admittedly I haven't been looking, that I could *trace them* and color them and tape them on my windows like the tacky '90s kid I am), which GLORY HALLELUJAH has spaces big enough to fucking color in!
...Michaels also had neon and metallic Crayola crayons. I might go back. They were 24-packs of each. The single silver and gold crayons from my mom's 64-pack were pretty much only used for Easter eggs in our house, so as not to use them up. I just -- I have a wealth beyond imagining of special effect crayons and markers available to me, and I'm struggling to find anywhere to use them. This seems backwards.
So anyway, then I also found a cute sundress big enough to go over my ass, and then I sat in the furniture section for a while and pondered buying a new table so I wouldn't have to keep stacking coloring books on top of the peanut butter jar in order to eat, and it occurred to me that if I took down my Christmas tree, which I've had up since the Before Times (having gotten it from in fact the same Walmart east of anywhere after all the rest in town were sold out of the particular model), then I would have a space along the back of the kitchen counter where I could hypothetically put a table.
So, because I am a sensible and moderate individual, I bought a thing of string to tie up the Christmas tree branches with, and did not buy a table yet. Then it was time for D&D, so I hurried home and put my vaccination card on the fridge and got into the voice chat and started taking down the Christmas tree.
Then it was five hours later, and I had started konmari-ing the whole apartment in order to have somewhere to store the Christmas tree, and I had discovered that my closet shelf was almost entirely full of empty cardboard boxes, so I had pulled all those out and rifled through them to make sure they didn't contain anything important, and after rescuing three cards from a friend and one glasses chamois, I stuffed most of the boxes in a trash bag, jammed the condensed Christmas tree and all the winter blankets and my air mattress and various other wintry things into the giant box my office chair came in, managed to get that giant box up onto the closet shelf (I have some soreness around my injection site but I honestly don't know if it's a side effect of the vaccination or a pulled muscle from wiggling a very large heavy box into a very tight space over my head), and moved the Goodwill oddities into a midsize box that I think I brought my workstation home in, but they just moved the remaining onsite agents into a much smaller room so I don't think I'm going to be asked to bring my workstation back for a while, and when I do go to bring it back I think the monitors will fit nicely in my washtub.
(I'm giving Goodwill my crockpot. After I forgot the garbanzos in it for three days until the chicken broth started to stink, I decided I am not a person who needs to own a crockpot. Also something like eight skeins of rather ugly yarn because I bought too much for the baby blankets I was making.)
(I'm not sure why I own a washtub. It's bright blue and plastic. It does have a use, which is to hand-wash my weighted blanket in occasionally, as of course you can't put twenty-odd pounds of glass baubles in a washing machine.)
(I certainly did make some life choices that led me here, did I not.)
Annnnyway, so now I have an almost empty three-drawer Rubbermaid dresser, an entirely empty and extremely large Rubbermaid tote (I'm pretty sure I could trap myself in there, but I haven't tried), a mostly empty square ottoman which is also a storage box, and a royal shitton of tiny things like office supplies and party favors that don't *go* anywhere.
"A place for everything" is the really hard part, you know. I achieved it once. Then I moved out of that apartment and have never achieved it again. Once things *have* places, then even if you don't have the spoons to put the peanut butter jar back in the pantry right *now*, you know it has a spot between the Hormel and the Chef Boyardee, and it's way easier than "oh god if I open the pantry there won't be any room and I'll wind up putting the peanut butter under the bathroom sink with the Johnnie Walker Black or maybe over the kitchen sink on top of the Thermacare back wraps."
(You're supposed to store whisky upright in a cool dark place, okay. None of the upper cabinet shelves are tall enough, so I could have put it either directly over the water heater or directly next to the oven. Instead it lurks behind the toilet paper, next to the Clorox wipes and the pre-pandemic Lush bath bomb, which I should... probably use at some point.)
Erm. So then I was pondering what-all storage I would need to source in order to begin having places in which to put things, *findable* places which is the real grail, and -- I think I took a pause to read Dreamwidth and someone linked me a plushie trilobite, okay. I haven't yet entirely decided whether to buy it, but it occurred to me that I definitely have no home for a plushie trilobite, any more than for the amazing Zaeed plushie currently trapped under my cross stitching or the Star Wars Build-a-Bear who was supposed to make Ewok noises until three weeks of freeze-thaw cycle in a malfunctioning package locker did for his electronic squeaker, or the poor American Girl doll languishing inside the ottoman.
So then I was like "we used to have that little net corner hammock for stuffed animals when I was a kid, we never could get it mounted right, but perhaps with fewer cooks that would be a good option". So I googled for one, and all I could find was an assortment of JUMBO five-or-six-foot-long double-deep toy hammocks, obviously necessary to keep your child from drowning in the flood of stuffed animals that have taken over beds in the past thirty years.
(Okay, I was pretty toy-deprived as a kid, the 1980s were not in general what you would call a time of less stuff in American households. Still. I have a twin bed. I can hardly even *find* a toy hammock that wouldn't be bigger than my bed in some dimension.)
So then, it being the aforementioned five hours later with a lot of D&D combined with hard physical labor in the middle, I said to myself, said I, "Hammocks are made out of net, and nets are made out of strings." And by god, if there is one thing I'm better at than another, it is making things out of string. I've never actually gotten around to trying out the whole process of making an actual fisherman's net, which is much more closely related to tatting than to knitting, but I have yarn and most of the possible knitting or crocheting supplies I would need to invent things.
Which, at long last, explains why I have paused to write this halfway through creating a triangular filet crochet toy hammock out of sparkly yellow yarn.
Joann's is having a 50% off sale on plastic storage whatsits tomorrow, but I think I'll probably spend a large part of the day putting office supplies into ziploc bags and hanging them in rows on the wall with pushpins so as to figure out what-all I in fact own.
#i feel like this probably needs at least a few warning tags#but i have no idea what those would be at this point
6 notes
·
View notes
Note
Oh my god i lov ur art so much!! Ur so good at drawing ppl!!!i lov how u draw DT so much i could cry!! Would it be possible to show ur art process?
Oh my gosh thank you!! No one has ever asked for my process before. It got pretty long due to all the photos, so check out my art-process-slash-tutorial under the cut!
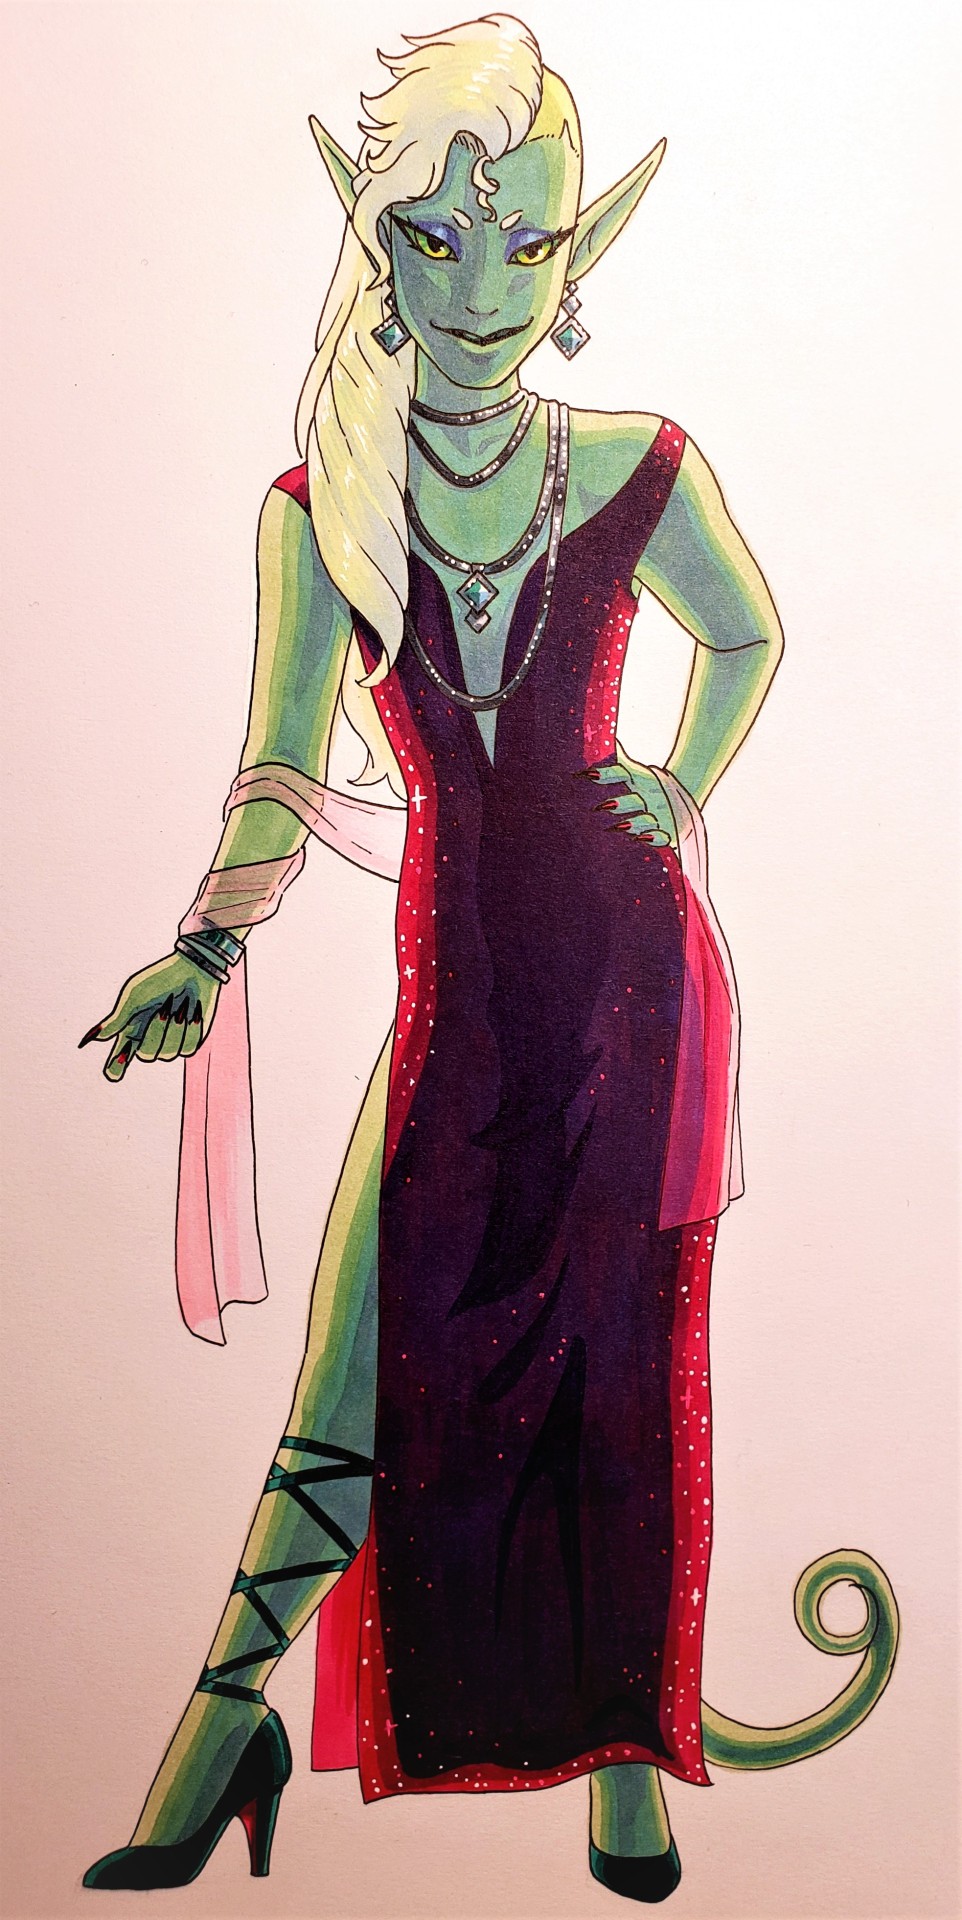
1. So the first step is, of course, figuring out what I want to draw. This is often the hardest step… but not for the last few months cause I always wanna draw DT lol.
2. Sketch the shapes and the “skeleton.”
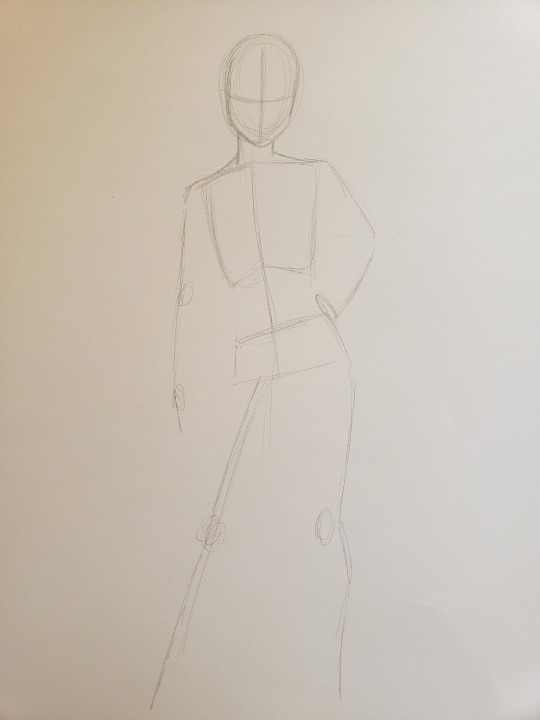
I pull out my trusty mechanical pencil and make a loose outline of the figure.You’re not really supposed to use mechanical because they makes dark lines and the pressure is hard to control. Teachers will tell you to use a hard graphite pencil for light, easily erasable lines. If you’re using this process as an example for some reason, do as I say not as I do lol.
I like to start with an oval for the head and work my way down. You’re not supposed to do that either. Teachers tell you to start with the “line of action” cause it helps make the pose cohesive and improves composition. I’ll do that when I’m going for a non-static pose, Teach, get off my back.
2. Flesh out the figure.
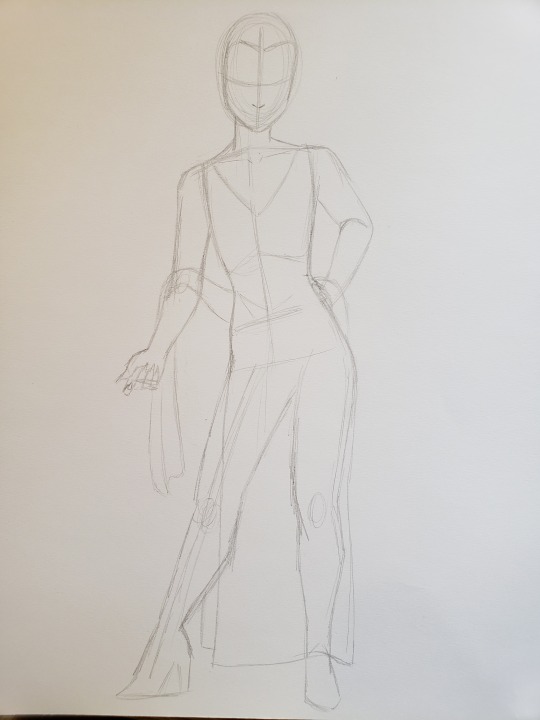
Here’s where I make the lines. They’re called contours but they’re the lines of the drawing. That’s all. DT might be tricky for some artists because they’re very androgynous. I give ‘em some hip, shapely leggy, no boobs, wide shoulders and a snatched waist waiT I FORGOT THE FUCKING TAIL HOLD ON I GOTTAJ UST HOLDO N A MINUTE WAI
3. Add detail.

This is where I work on the facial features and things like jewelry and clothing design. I count it as a separate step because I have to lean in reeeeeal close to get the little details right, and it usually takes a lot of erasing before I’m satisfied.
4. Ink it.
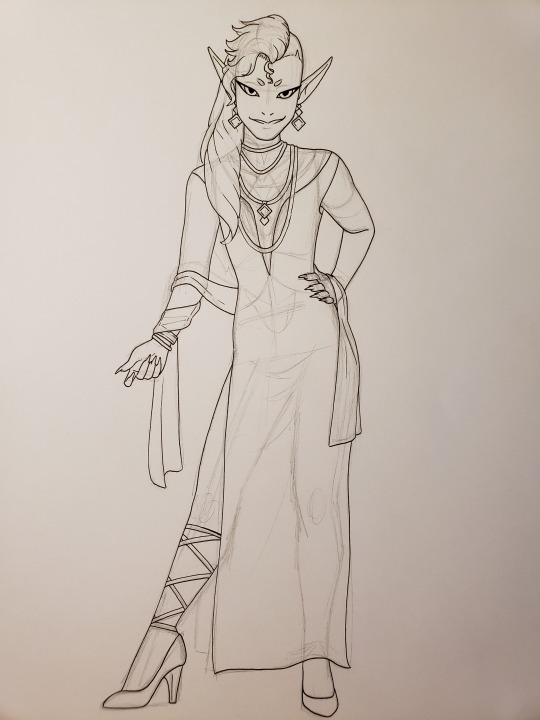
Once my pencil drawing is sufficiently finished (and sometimes earlier shh), I start inking it with a felt tip pen. Some people use this thing called VaRyInG LiNe WiDtH or whatEVER but it’s easier to I like a nice thin line all throughout the drawing so the details don’t get lost. I use a .1 or .05 tip pen. For tiny details, I like to use a .005 if I have one! But I don’t have one :’(
If you’re the artist’s girlfriend, you have a step at this stage!
4.b. Watch your future wife slave over the drawing for three days without adding the tail and SAY NOTHING.
5. Erase the pencil.
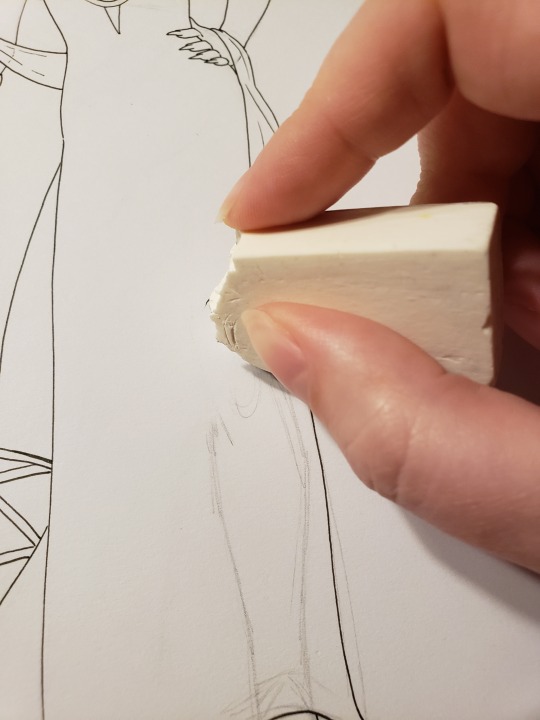
KEY: the pen must be dry. Felt tips are supposed to dry fast, but don’t be fooled. Give it at least a full minute. Trust me. Then CAREFULLY run a big eraser over the whole drawing to get rid of the pencil sketch underneath. Hold the edge of your paper in place and go slow, because the eraser WILL catch on the paper and it WILL fold your beautiful line drawing in half.
6. Clean up the lines.
An optional step. If I make some lines I’m not satisfied with, all is not lost. I use my handy white gel pen to clean them up. I simply draw the new line, and go over the old one with the gel pen.

Note that this doesn’t really work if you want the new line to be on the inside of the shape. Markers don’t like to go over gel pen so good. I’ve tried. Also doesn’t work if you’re planning to add a background for the same reason.

Et voila! You can hardly even see where the old line was.
7. Whip out the Bucket of Assorted Alcohol Markers™ and do the flat colors.
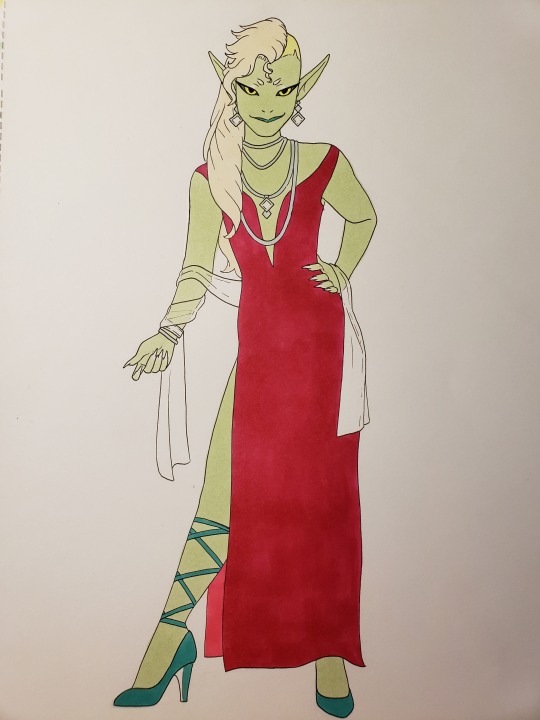
Everything I’ve put on this blog so far has been colored with alcohol markers. They’re long-lasting, they’re smooth, they’re printer-perfect, they’re outrageously expensive, they’re sometimes available at wish.com for a fraction of the store price, they’re great. When you do the flat colors, you want to put down the lightest colors in the drawing first. You can’t layer light colors on top of dark. They won’t show up and the light marker will absorb the dark color. Basically, do the highlight colors first. They might look bad together. That’s OK. These aren’t the final colors of the drawing.
If you don’t have your own BoAAM™, no problem. Simply borrow your sister’s in exchange for a stint with your Nintendo Switch.
The next step is to add the shadows. If you’re like me, and you’re just getting back into art after neglecting it for a few years, don’t try to do something complicated like back-lighting or a sheer scarf on top of a dark material. That’s really the worst decision you can make.
8. Add shadows that indicate back-lighting, and keep in mind the sheer scarf on top of the dark dress will need all new colors for every layer of shadow you choose to add.

A whole book could be written on how to color shadows, so I’ll try to keep it brief. If the light source is warm colored (like sunlight or your average lightbulb), the shadows should be cooler. If the light source is cool (like, I don’t know, the neon sign at your favorite club), the shadows should be warmer. Here I have light green and hot pink for the highlights; I used blue-green and purple for the shadows, respectively.
You might wonder why I color the entire shape with the lighter color if only a little bit of it shows through. There is some layering effect with markers. The purple I used on the dress was really QUITE purple - but when put on top of the hot pink, it looks more like a dark pink! Essentially, layering colors makes the end result more cohesive.
And hey don’t forget the tai– fuck.
9. Add some more shadows, and
10. Add the finishing details, because I forgot to take a picture in between these two steps oops.

If you’re going for intense lighting, you’ll want high contrast. That means using a very light highlight and/or a very dark shadow. So, I added two (2) more layers of shadow. It’s most noticeable on the dress - you can see the hot pink at the edges, then the pinkish-purple, then the dark purple, then the DARKER purple that accentuates the waves in the fabric of the dress.
Now to finish off my drawings I whip out the white gel pen again. This is SO useful. It can go on top of (dry) marker or pen or whatever and it’s small and precise. Here I used it to add shinies on the eyes, shinies on the jewelry, highlights on the hair, and sparkles on the dress. It makes things POP. I seriously cannot recommend a white gel pen enough if you do traditional art.
11. Ah fuck I forgot the tail.
DRAW the fucking tail and TRY to remember which of your 24,124 colors you used on the rest of the skin damn it was it hydrangea blue or phthalo blue
12. Scan it. Or, if you’re like me and are stuck in a hotel while your home repairs are taking pace, take a picture with your phone. Mind the angle - make sure your camera/phone is parallel to the paper or it’ll get distorted.
13. Digital editing. Play with the exposure and contrast and whatnot in your phone’s photo editing software until you’re satisfied with the result.
15. UPLOAD. DONE. CELEBRATE.
72 notes
·
View notes
Text
Cutie Reviews: Kawaii Box April 19
I probably would have done this yesterday, but I ended up going to the county fair; it was horribly hot (despite how cloudy it was) and it actually made me feel sick being out there. By the time we got home I was very sore and worn out.
So here I am today, refreshed and ready!
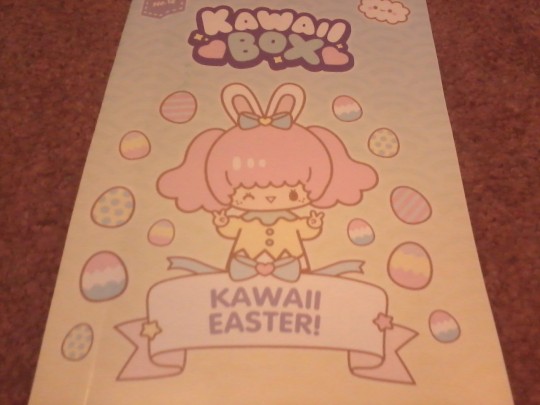
Word of the month: Usagi - Rabbit
Amuse Chinmari Munchkin Plushie
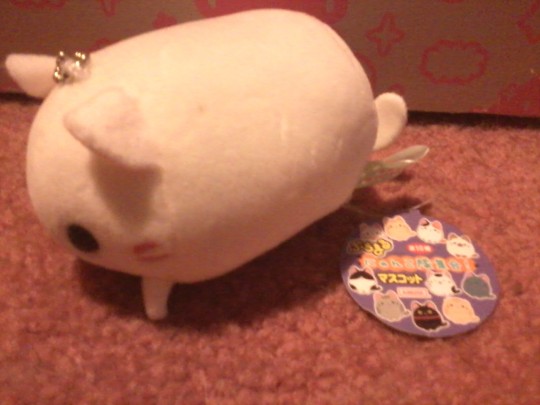
Our first item is an adorable plushie neko from Amuse. It is palm-sized and includes a ball chain so that you can bring it around with you wherever you go. It’s squishy and slightly stretchy, and there are 10 unique, colorful, adorable kitties in all~
On Blippo, these are $6.90. But keep in mind only a handful of them are an option, not the entire series.
(btw, am I the only one who thinks the one I got could also be a mouse? I know its a cat but from the front I keep thinking mouse. Still adorable either way.)
Rating: ♥ ♥ ♥ ♥ ♥
It’s very cute and soft! It’s like a fluffy squishy, but without the rise action. I feel like I’m squishing on a marshmallow while holding it, and it’s kind of soothing in a way... Although, it’s not nearly as stretchy as my other similar plush I’ve gotten. It has a very sweet little face~
Also, there’s no problems quality wise.
Kawaii Ribbon Hair Clips
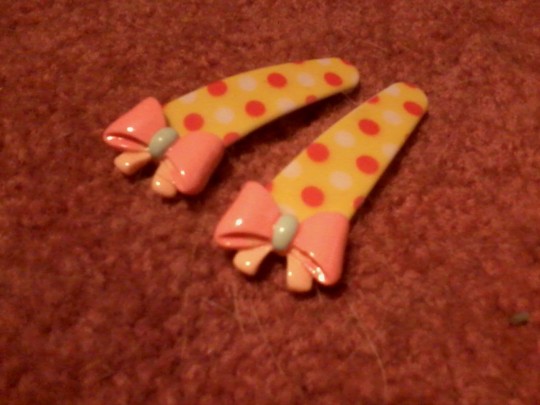
Next up we have these sweet little Blippo exclusive clips, each featuring a dot pattern and a cute bow charm. They come in a set of 2 in a variety of colors.
On Blippo, these cost $1.90.
Rating: ♥ ♥ ♥
The quality of the clip is great, it has a tight snap due to being a whole metal piece with a “coat” over it, and nothing is flimsy or loose. It’s a really cute concept too, but... I actually really hate this color combination. It’s not that bad but... I just don’t like it <3< the bow coloring could have been better, but what mainly bugs me is those vibrant orange-red spots against the yellow background. I would have rather gotten any other of the clips, but that’s just me. On Blippo, this is one of the sold out sets so it must have been well-liked by everyone else...
Also, I noticed the quality of the clip, and I’m kind of worried this is the metal prone to rusting due to how it feels. I could be wrong, but...
Neko Bookmarks & Disney Notebook
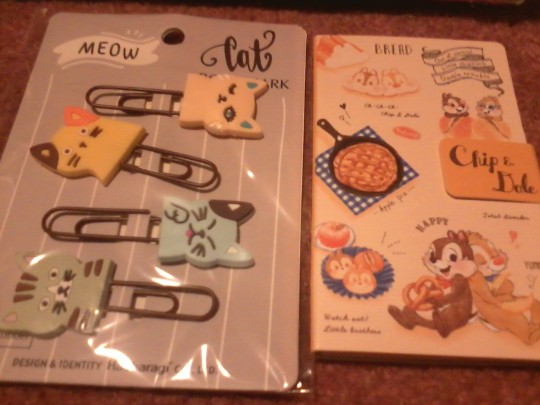
Next we have two, really cute stationery items; first is this set of kitty bookmarks, each featuring a big paper clip with a soft rubber kitty on the top half. On Blippo these are $3.50, and you can get them in a few different colored sets.
Rating: ♥ ♥ ♥ ♥
I think these are pretty cute and fun, I’m not sure how I feel about the kind of oddly colorful color scheme of the set I got, but in a way I kind of like it too. They’re as fun to play with as they are to use, but because of the soft rubber and the fact it is a paper clip, you can’t man-handle these.
--------
To go with our usual stationery hall, we also get an adorable Disney themed notebook. There is a big variety of cutesy, pastel designs and characters (from tsum tsum to mickey and friends to Winnie the Pooh to Disney Princesses!), and each notebook costs $6.90.
The notebooks are simple, featuring a magnetic clip to keep it shut and 2 types of pages per-book.
Rating: ♥ ♥ ♥ ♥ ♥
While on one hand, I think I would have liked to get one of the other ones more, I’ve always had a soft spot for Chip and Dale so I’m not disappointed. They’re so cute aren’t they?
Meanwhile in terms of the notebook I think it has some nice quality. I like the magnetic clip feature, its very decorative and sweet looking, and it’s just plain fun to use. It’s small size makes it very handy for carrying in a variety of places.
Ice Cream Cup Charm

These sweet Harajuku-inspired charms are as cute as they are delicious looking~ Each features several cutesy deco bits, like fake fruits and sweets, pearls or gems, and a gem star. They have a small cellphone charm-like strap so that you can connect it and take it with you on the go too!
Everything is plastic, with the exception of the deco cream, which feels a bit squishy-soft. There are a few different variants, and each one costs $3.50.
Rating: ♥ ♥ ♥
As cute as it is, I wanted to mention that the Blippo website describes these as being scented- I smell a weird plastic rubber scent, nothing delicious or appealing (and I did keep it sealed in its package this entire time). Also, as you can see on mine there is a chance there is a small amount of smearing of the cream.
However, it is handmade and I like the little differences in a way to make it more unique. I’ll probably end up using this as a cute display item.
Nail Decoration Set
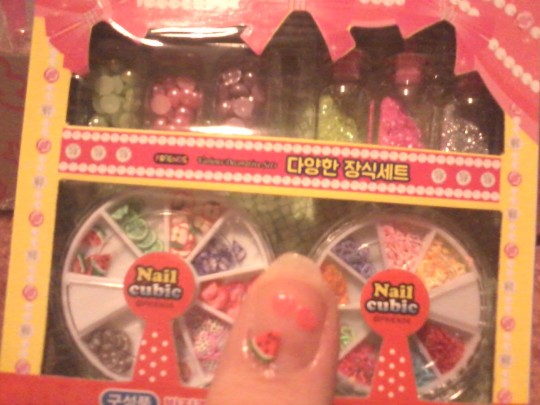
These DIY kits and items always seem to be Dollar Store quality don’t they? I’m not sure if that’s a good or bad thing, but as long as they work out it’s not that bad right?
This a korean nail decoration kit, and you get all sorts of cute and fun deco bits for your nails, all you need to do is supply the clear polish, or whatever color you’re using, but you should have a clear coat to go on top once you finish to help seal everything in. As you can see we get some shiny dot pieces, glittery, star and heart flakes, and various fruits, smiley faces, and kitty head pieces made from clay cane.
Each one costs $4.50 on blippo, and there are 4 sets available. But the only things besides the packaging difference is the glitter and dot piece colors.
Rating: ♥ ♥ ♥ ♥ ♥
As I’m not really an experienced nail person, I decided to just do my thumbs. I wanted something summery, so I just added a watermelon slice and two of the shiny hot pink flakes to match. But as a pro-tip I do know a few things; such as using a pair of tweezers when adding the pieces, it makes like way easier. As I said before you want clear polish to seal them onto the nail, I did probably 4-5 coats per-nail.
Anyway, for someone inexperienced (or just someone who likes doing deco nails or making slime) I think kits like this are pretty nice. Like it obviously works, and I think everything is really cute, you can really get creative or go for something simple if you wanted.
Morinaga Disney Chocolate Cookies
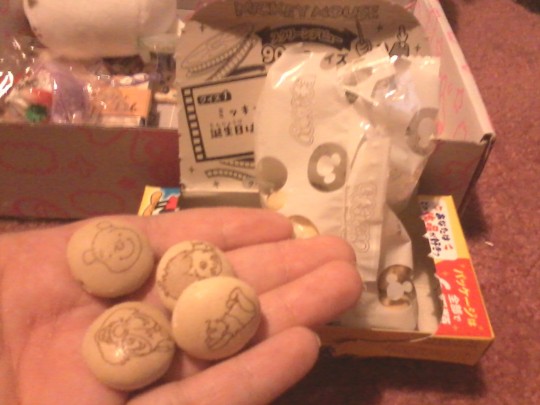
For this month we get a box of chocolate cookies/biscuits from Morinaga, featuring Mickey Mouse on the packaging. As for the cookies, it’s probably the usual variety, because as you can see I got a handful of Winnie the Pooh in the pic. Not that I mind or anything, they all taste the same. You can get a wide variety of 300 different Disney characters in total! Lucky people will also find a heart-shaped biscuit~♥
Each box features one of Mickey’s well-known depictions; for example mine is based on Steamboat Willie. Each box is also 234 calories and costs $2.73.
I’m not going to bother rating these because I had them before. They always taste good and you get a nice blend of cookie/biscuit and chocolate. And no, I didn’t get any heart-shaped ones, and ironically enough I didn’t get any Mickey either. I did get Minnie though, which was kind of nice since she is my favorite.
Bunny Ears Icecream Pen & Lipstick Wax Pen

Back to stationery now, we get two very cute and fun looking writing utensils. First is this icecream pen with a pair of bunny ears for that extra hint of sweetness~
The cream on top and bunny ears are slightly soft and squishy, and there are 2 available; one with yellow inner-ear like i got, or one with pink. Isn’t that ironic...? Each one costs $4.90.
Rating: ♥ ♥ ♥ ♥ ♥
Despite my not being a fan of yellow, the difference is so tiny that it doesn’t bother me very much. The pen is easy and comfortable to grip, it writes very smoothly and I haven’t noticed any issues with the ink besides the typical smear with fine tips, but if you give it a few minutes to dry you should be good to go.
Overall it’s a very fun, Easter perfect pen; although you can’t put the cap on it while using it, which always bugs me a little...
---
Next is an adorable wax pen inspired by a lipstick ♥ These come in a variety of colors in both the warm and cold color-scheme, and each costs $2.50. Essentially they are wax highlighters and underlining pieces, and they can be twisted to extend, just like a real lipstick!
I think it might even be scented. I smell something from mine that could pass as being Green Apple, but nothing mentions there being any sort of scent. It’s pleasant and light though.
Rating: ♥ ♥ ♥ ♥ ♥
So besides just looking really cute, I think it would be a really nice alternate for things like pens or highlighting markers. The wax is soft to apply and is visible, while not having an obnoxious scent or drying period.
I’m not sure I’ll have too much use for this, but I am very tempted to buy a couple, or even all of them to do a review and see how they all look, check for scent, etc. I find them aesthetically pleasing and would love just having them for a display item- and in times of need they could be used as a crayon :D
Jewelry Seal Stickers
This is our last item, an adorable set of Jewelry heart and flower seals/stickers. These are available for $2.50 on Blippo and come in a few various colors. As you can see, besides the various hearts and flowers, we also get some spherical pieces and some diamond, leaf-like pieces. They are plastic pieces, giving them a sort of 3Dish look.
I wanted to use them on something. Since I already have gem hearts and Sanrio on my phone, I decided to put them on something else I rely on- perhaps more than my phone:
This is my hand mirror... which is actually several times bigger than most hand mirrors. That’s because this is a vibrant, lighting up mirror that folds back on itself when sitting. It also zooms in, making it useful for hair removal and makeup application.
I’m not any kind of expert or someone with a need to have everything in perfect measurement, so I just went for it. What do you think?
Rating: ♥ ♥ ♥ ♥
I really like these! But I did notice a little issue while using them. Some of their sticky pieces wanted to stay on the packaging, or it rolled up while trying to get them off. They were still usable of course, but it did make the process a little tiny bit less fun. It only happened on a couple though, the rest were fine.
♥ Cutie Ranking ♥
Content - ♥ ♥ ♥ ♥ ♥ I have no complaints, I really like everything. It’s all practical and very kawaii~
Price - ♥ ♥ ♥ ♥ Everything comes to $39.83- which greatly shocked me; I think that might be the most money spent on these boxes yet or us, and remmeber we only pay about 20 dollars. On one hand, if you were to buy everything you would get free shipping and a free gift on Blippo, but I felt like a couple of the items could be cheaper, too...
Theme - ♥ I’m sorry but they completely failed this time. We got ONE Easter item- and what makes it worse is that they did WAY better last year with an Easter box, and I know they could have done better this time too. I was kind of disappointed.
Total Rank: 9 out of 10 Cuties. So once again the theme was a huge bust and I feel like they wasted a good opportunity- especially since nobody else really did anything Easter related in comparison to last year. However, despite getting a lot of the typical, same old same old stuff, I really found myself drawn to the ones specifically in this box. The quality is there, they’re ultra-cute and fun to use, so I thought this box did way better than last months, but in saying that, I’m not sure which box I would go to first if I could only choose one, I found items I loved in both of them a lot.
♥ Cutie Scale ♥
1. Wax Lipstick Pen - I admit, this specific color might not have been my first choice- but I think not only is it really pretty and cute to look at, but it’s just plain fun to use :D It’s like a really soft, possibly scented crayon.
2. Nail Decoration Set - Very fun, just like the stickers. I’m excited to try to come up with some other ideas using it and the previous nail set I got from this box. I like the wide variety of pieces we get too!
3. Bunny Icecream Pen - It’s simple but really cute, you get the idea right away looking at it. I just wish I had a place to put the cap... I did consider resting it on the bunny ear, but I don’t want it to get dirty. It’s actually a lot more comfortable to hold than it looks.
4. Jewelry Seal Stickers - Super pretty, it was a lot of fun decoing with them. But like I said, you need to be careful using them since some of their sticky pieces like to cause problems...
5. Neko Plushie - I love its sweet little face~ It’s so soft x3
6. Icecream Cup Charm - It’s almost delicious looking enough to eat~ I am a little bothered by the issue I saw on mine, bu I could probably fix it with some paint or something.
7. Morinaga Chocolate Cookies/Biscuis - very tasty with a mild-sweetness. I love how creative and fun they are when looking at the characters, but I will fault it on the fact that I never tossed this around or anything and I had a bit of a mess and a handful of broken cookies/biscuits waiting for me when I opened it.
8. Disney Chip and Dale Notebook - I think it’s really cute, and I love how decorative it is. But in terms of color-scheme, I’ve never been a big brown fan. That has nothing to do with its use though, the quality is great and if I needed to get more notebooks I’d probably order a few others in the set.
9. Cat Clips - The cartoony design and colors is really fun to look at, but I am worried they will be kind of fragile...
10. Ribbon Hair Clips - I really, really wanted to like these! I love ribbons and bows, and dot patterns, and hair clips. But I cannot stand the color combinations in this specific set and unless I had something to match or compliment them, I probably won’t be using them.
2 notes
·
View notes
Note
do you have tips on taking notes?
yes!! i have many, so i tried to make it easier for you to navigate :)
L O N G post ahead of you, covering lecture notes and readings notes, from a college senior :)
lecture notes:
i suggest using a notebook and pen, physically writing down. it’s easier to study, and since it’s using your body, you have a much higher retention rate on your side than if you use a laptop.
i have used my laptop for taking notes before. it’s easier to take more notes, word for word, but that’s not always helpful. maybe that’s your style, especially if you enjoy rewriting your notes all pretty and more successfully when you get home. i am not that girl.
more notes does not always equal better! it’s good for you to listen actively, selecting what is important and what is not. i take very thorough notes. i take a lot of notes. if you need notes for a missed class, i. am. your. girl. that doesn’t mean i write out everything word for word. selecting details, clauses, and images really helps me to not only keep up, but also to memorize later. plus, when you’re typing, it’s easier to type all the words out without really processing the whole meaning. remember that dense notes are harder to study
finally, when you write by hand, you can get more creative with your style. occasionally, i’ll web notes out from one, rather than a traditional outline, bc it makes more sense for the topic
it also helps my anxiety! so much! if i force myself to take great in depth notes, then my mind has to dedicate more brain space to the task at hand than to my anxieties.
stick to one of these though. it really sucks to get into a test and realize you didn’t study half of your notes bc you forgot half were on your laptop. it’s awful lol.
if you use a laptop, get used to how it works first. do u know how much i resent trying to switch from a bullet that is under other bullets (like this one, not filled in) to a main point bullet (the ones filled in). it can be so confusing. also make sure you use a program you like. you can take directly into documents, but i find that i really love evernote, as i can make notebooks for classes, stacks of notebooks for my college, and that i can tag notes with specific classes and topics.
if you’re on paper, for fuck’s sake, divide your notebook into sections for classes. keep it all together. those notebooks with handy dandy dividers are so helpful, and they keep you from carrying around 5 notebooks at once.
i wouldn’t worry too much about highlighters and such in class. there’s just so much going on then. save highlighting and color coding for later, and count it as studying.
don’t worry about traditional outlining styles, with roman numerals or whatever. i take notes very simply. bullets/dashes, subnotes under a broad note.
do it how it makes sense to you! maybe that includes different bullet styles, different places for different types of information (on a simple level, i start writing chapter numbers and titles as far to the left as i can go, over the margins, in bold and capital letters. i also usually go over these later in a certain color marker)
in some classes it is helpful for me to write the topic along the top of the page in a highlighter (color coding is lovely) the main idea/topic for each page. the classes this was most obviously helpful in were astronomy (COMETS or BLACKHOLES etc) and shakespeare (MUCH ADO ACT 2 or ROMEO etc)
it’s easiest to just note page numbers of referenced complex diagrams, as they are usually in your reading or accessible online
your style might look different in each class. whatever works.
note everything (everything) your professor writes on the board. if it’s important enough for your professor to write it, it’s probably important enough for you to write it.
note examples only if it’s helpful for your memory. however, make light note of things like famous people and their science/psych experiments. but in math and such, note! the! examples! and! reasons! will help you so much.
examples that have emotion, imagery, or sound are going to be more helpful. applicable examples are most helpful. good professors will lecture you accordingly. lazy ones will not.
star anything that the professor stresses or hints will be tested. anything that they say is a major theme or whatever.
note main ideas/points/themes, definitions, conclusions,
use your tests to help you figure out what you need to know. ask questions about the tests too. in every class i’ve taken, i’m totally shocked at how willingly people ask about exam format and how willingly the professor will tell us how it will work. they want you to succeed.
people learn differently! i suggest taking notes in class and later adding touches that help you. count it as study time too. a warm up, if you will.
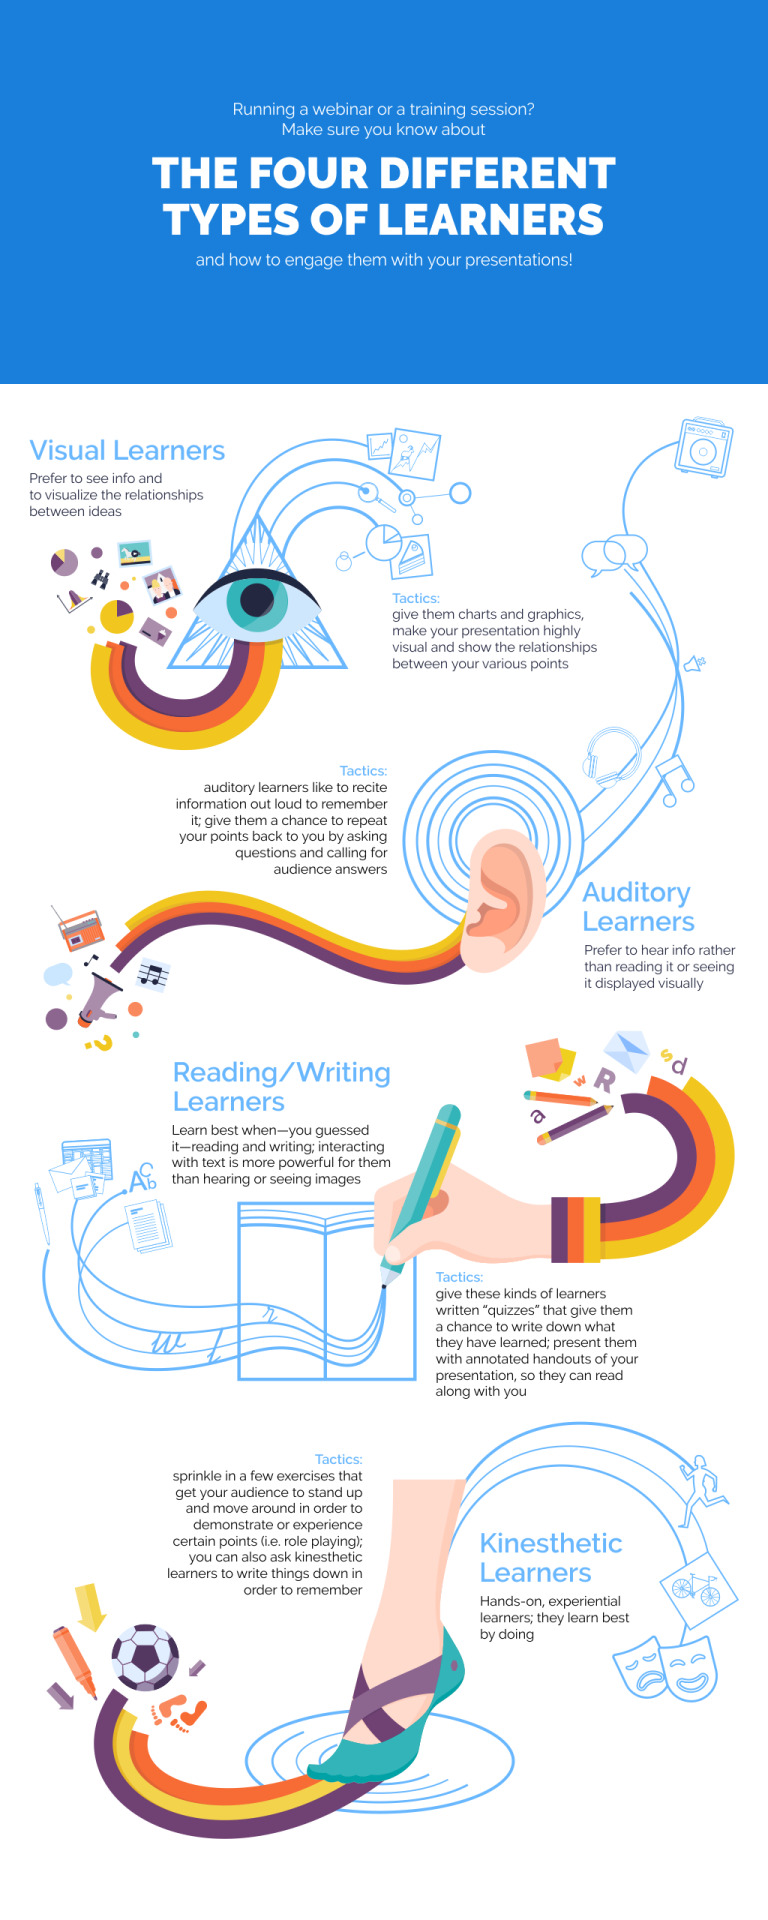
if you’re visual, this might include highlighting, color coding, drawing diagrams, etc.
if you’re an auditory learner, reading the notes out loud and organizing them accordingly, as well as making up rhymes, rhythms and such, might help you. some auditory learners actually like to record lectures and listen to them later.
if you learn best through movement, rewriting or making flashcards will be great for you.
sometimes professors go really. fuckin. fast. why. idk? but
dont be afraid to ask them to go back a slide bc i guarantee, you will be the class hero for asking
develop a little bit of shorthand. sometimes i end up using initials, arrows, abbreviations… this is where i got “bc” and “thru” and “u” and such. lol. also, list things vertically, rather than using commas and “and/&/+) it’ll be more clear later
some professors you literally cannot take notes on. it sucks. you’re going to need to do the readings and pick their brains on how the test will be to figure out how to prepare. take home tests are your best friend. thank god for them. seriously. get your butt to church and do some worshipping.
if your professor puts powerpoints online, save the powerpoints, ya never know.
look at inspiration if you want, but remember that notes on studyblr are usually copied from class notes. if you’re too focused on how pretty your notes are, good luck to you
finally, the day before an exam, i review my notes that i have (hopefully) been studying. i like to make a one page cheat sheet / study guide on everything i didn’t remember, leaving out everything i understand, memorized, or want to disregard.
reading notes:
ima be real and tell you i hardly ever do reading unless i will be tested on it in class in multiple choice. and im an english student. ye i suck, i know. i dont condone shirking the system but u know what, reading shakespeare or 18th century lit literally makes me want to kill myself. so, im a senior in college, and have barely ever done the reading for a class. the thing is, if you do it right, anything is better than just reading the words on the page and not getting the meaning. dont be a reading zombie. read actively, even if it’s not the actual reading. doing this, i have a 3.9 gpa. so. there’s hope for us yet.
first of all, yall need to do your damn reading. idc how. but due to the fact that a test will be multiple choice, essay answer, a presentation, or a paper, you’re going to not love pulling nothing out of your ass. can be done tho. just be fake deep.
that being said, i’m writing a lot below, but the reality is that if it’s lit, your notes dont have to be longer than a sentence. if it’s a textbook, more.
the same formatting question comes into play here, except it’s should you take notes in your book or in a notebook?
listen i’m always going to be pro notebook, pro physically writing it out as it helps me really get the information into my head, rather than more passively highlighting
i tend to do both, if im willing to mark up a book. i underline and highlight things that stick out to me, and i write them down as well. sometimes when reading literature/essays, if i know the contextual/meaning notes will be interesting to me later, i will copy notes both into my notebook and also less in depth onto post it notes (which also make sweet little flashcards btw), which i will stick into the passage. this is so helpful when a) im reading it again later and b) when we are discussing a passage in class
buy used books. it’s cheaper. until it happens to u, u do NOT UNDERSTAND how EXCITING it is to get a book that has highlights and underlines in it ALREADY. DUDE. my work is basically DONE for me. now take that lightly, bc often different ppl will highlight different pieces of information. however, it is helpful.
look up summaries. do not simply rely on cliffsnotes and sparknotes, esp since professors are very aware of these. google “title of book, summary, chapter notes, whatever youre looking for” and use the blog posts, the book reviews, the papers that come up. does this method probably take a bit longer? maybe? but it’s easier on my tired brain.
if you don’t have time to read your textbook one day and really want to, read the introduction and the conclusion to the chapter, or the first and last sentences to the paragraphs. it’s not great, but it’s something.
like your lectures, note definitions, conclusions, and helpful examples, as well as people and dates. if i’m reading literature and i’m deciding to be a smart student i will keep several logs as well. these logs will make it so. easy. to study for your exam:
updated character lists, including name, relationships, and anything defining and important
scene/chapter summaries, just a sentence summarizing what happened where
any quotes or themes that stand out
i highly highly highly recommend getting your hands on a copy of the well educated mind for note taking on a range of genres. this is what i had to use through high school and while it’s involved, it’s incredibly helpful.
if you’re going to have to cite your notes, note the page number in the margin every time you flip the page
the biggest issue i have with reading is when and where to do it. before or after class? always ask your professor if they do not tell you. where in your notebooks? i always do it on the next blank page bc leaving space stresses me the fuck out. make notes on the top of your pages of corresponding lectures/readings.
for both lectures and readings i really really really suggest either having something to drink or something to snack on (think fruit, loose nuts, m&ms. small loose things rather than things u bite? idk they just last longer?)
okay i hope this was somewhat helpful even tho it’s an incredibly longwinded post. it seems like a lot, but the reality is that while i take a lot of notes, i don’t make them complicated, i don’t have rules, i just do what feels right in the moment. they’re not at all stressful. just take it easy and do whatever works for you :)
if anyone has other tips, feel free to reply :)
377 notes
·
View notes
Photo
8.10.17 // 11:00am // guide to school supply shopping
this one was requested by @catharticstudying (thanks for the request!)
so it is upon us. every studyblr's favorite time of year. no, not going back to school (though i guess some of you enjoy this?), but getting new stationery/school supplies! here i've compiled 2 lists (one for hs, one for college) of some essentials you might consider getting for the coming school year (and some reasons and some links). read til the end if you want some tips for getting the best prices/saving money! xoxo, m
*also not sponsored or anything by any of the companies i link, they're just products i enjoy+have used for years*
high school:
1. spiral notebooks. i personally prefer notebooks to binders. they have smaller rings, which comes in handy as a lefty, and provide a layer of "padding" that you don't get if you just write on a single sheet. i think it makes for smoother writing. you can still tear out pages (unlike composition books) which i also like. accel (the staples brand) makes good, plastic cover notebooks with a nice plastic pocket for less than mead/five star, so i go for those.
2. binders. personally i use these for compiling study guides i've made + other resources. you can also take notes/keep your notes in these if you prefer being able to rearrange (which isn't an option in notebooks). i personally prefer having a few 1/2 inch or 1 inch binders because they are more portable and i don't put much stuff in binders, but some people like to keep everything in a 3 inch one, it's all up to preference!
3. folders. these are great for organizing handouts and you can get one for each class to stay organized. i was always a little too lazy to punch holes in things, so this was my binder substitute. if you get the ones with prongs, you can also make little "booklets" like you can in binders, so i also used these for study guides. some other types of folders include:
>>> multipocket folders: great if you don't want an individual folder for each class
>>> expanding file folders: these are a little bulkier, but you can still bring them to class if you choose. another great binder alternative (especially if you like all your things in one place). i also use mine to file old school work and keep it at home.
4. a planning system. i'm sure you've seen these all over studyblr, but they are really useful. keeping track of important dates+assignments will make your life a lot easier. you can use a planner or a bullet journal or whatever you like. here are some options:
>>>planners: lilly pulitzer (super pretty for someone who wants something decorative but is too lazy to do it themselves. also super expensive so you can guilt yourself into using it), erin condren (these seem pretty popular? also pricey though they look lil cheaper through staples?), happy planner (still quite cute+customizable, but a little cheaper at $20ish. you can get it at michaels so use that 40% off coupon)
>>>>>>>>for even more affordable options, try target or staples :) it doesn't have to be expensive to keep you organized! (i've linked cheaper options from each store)
>>> bullet journals: moleskine (cream paper, thread bound, hard/soft cover, dotted/gridded/lined/blank paper), leuchtturm 1917 (same as moleskine but with only hard cover and an index in front -- i've linked my current bujo), muji dot grid notebook (more affordable, spiral, white paper)
>>>>>>>>or just use whatever notebook you have laying around/want to use
5. calculator. depending on the level of math/science you're taking, you'll either want a graphing (the model i used and loved, though idt they sell them new anymore) or scientific calculator.
6. pencil case. pretty self explanatory. i prefer canvas bc of the stretch (unfortunately idt they sell the one i have anymore so i found a standard one) here's some stuff to put in it (links are to personal favs):
>>> pencils (mechanical | regular)
>>> an eraser (these are annoyingly hard to find)
>>> dark blue/black pens (i personally only use black). favs include: pentel energel, zebra f-301, bic round stic
>>> more colorful pens (tbh not totally necessary). more favs: bic atlantis, staedler triplus, pilot g-tec
>>>>>> colored pencils are a great, cheaper alternative to colored pens if you're on a tight budget. or crayola supertips!
>>> highlighters (so i don't actually use these i just color code with pen or underline, but you might want them) i linked some pastel ones from amazon (since they seem so trendy) that are a fair bit cheaper than the more popular brands
>>> white out (i prefer tape bc no dry time. also don't really use this much...)
>>> ruler (i love my little folding ruler from taiwan)
>>> post its (notes + flags/tabs)
7. a backpack. get one that will last over a super cheap, "cute" one from f21. definitely a better investment. i used my jansport for 8 years before getting a new backpack this year (but that wasn't because the bag was worn out). you'll be carrying a bunch of books, so get something with good back + shoulder padding!
8. water bottle. ok not really school supplies, but still very necessary. stay hydrated! (unlike me, the shriveled prune)
college/university:
you'll probably need all (or at least most) of the above. here are a few extras:
1. laptop. pretty self explanatory, but you can do sooo much on these. look up answers, watch lectures, take notes, do hw, write essays, you know the drill. (link to the one i have -- not cheap -- which is no means necessary)
>>> and obviously bring/have a charger
2. external battery. you'll probably be out and about much longer than you were in high school and having a portable way to charge your phone is a lifesaver.
3. flash drive/hard drive. if you have a really important presentation, i wouldn't just rely on emailing it to yourself. also, if you do a lot of your work on your computer, backing files up is probably a good idea (hey m, you should implement your own advice...)
4. dry erase board+marker. the board is good for studying for exams/doing practice problems without using too much paper and the marker is good for (use with the board, obv) when the library study rooms have no markers aka always.
5. smallish stapler. i print so much stuff around campus and there isn't always a stapler. having one i can carry around is amazing. (i also don't like the super baby ones so *i think* this is the one i have)
saving money:
1. keep an eye out for sales: this is obviously a good way to save money. knowing what you want and looking for sales is the best way to go.
2. use coupons: i know a lot of major school supply stores (target, walmart, staples etc) don't do this, but if your local store does, go on the hunt for those coupons.
3. michaels. kinda tied to the above point, but michaels always has coupons. you won't be able to get a lot of stuff there but sometimes you can find planners/notebooks/sticky notes and colored pens/pencils. they have weird stuff in weird places, so be thorough.
4. marshalls/tj maxx + the like. these places are great for water bottles, backpacks, organizational items as well as cue notebooks+planners. the last 2 will always (at least usually) be more expensive than your generic notebooks, but sometimes cheaper that the regular, super cute stuff.
5. amazon. they can sometimes have cheaper prices than in store retailers and also have a huge selection of stuff.
as usual, this was a lot, but i hoped this helped! lmk if you have questions or have other things you'd like to see for the bts (not beyond the scene) season :)
#pennyfynotes#pfynguides#back to school#studyblr#study#stationery#college#university#high school#supplies#pens#pencils#hufflepuffwannabe#noodledesk#eminotes#ohlooklily#rhubarbstudies#emmastudies#intellectys#hittingthebooks
156 notes
·
View notes
Text
My Day on the Spring Clean Your Studio Blog Hop
Welcome to my day on the Spring Clean Your Studio Blog Hop!
Four years ago (yes, that long!) I wrote a series of posts giving you a tour of my sewing studio. You’ll find links to those posts at the end of this post. I share my sewing room with my husband who is also self-employed. The room is over the garage and so it’s larger than a normal bedroom.
Here’s what my studio looked like back then…
When I got serious about quilting as a business four years ago, I came up with a plan for organizing my space. Although I’m pretty computer savvy, I used simple grid paper to design my sewing room. You could use grid paper too!
The photo on the left shows the original arrangement. Within a few months, I decided that I needed more organization so purchased a cabinet from Ikea and moved the sofa table from the living room up to my sewing room to use for a cutting table.
As you can see on the map, my computer desk and my sewing table (Kate’s desk) and two filing cabinets form an L shape in which I mostly work. The Ikea cabinet is close by and it has a small cutting mat on it and a small ironing board. This forms the heart of my sewing area.
On the other side of the filing cabinets, I placed my sofa table and on top of that, my large cutting mat. I have several bookcases in which I store my fabrics, batting, tools, and projects. (The tools and projects are stored in plastic containers marked with labels.)
Under the sofa table, I placed an Ikea set of sliding drawers. I organized my fabric scraps by size in these drawers—1/2 to 1”, 2-2-1/2”, and so on.
As wonderful as I thought I my setup was, over time I kept finding little things that I thought I could improve. I kept collecting these ideas and then one day, I knew it was time to implement my changes.
My Sewing Studio 2.0
Recently, my husband replaced his desk with a much smaller one so I decided it was finally time to redo my sewing studio.
Before I get into the details, here is a short video tour of what my studio looks now.
Switching my sewing table and my desk
One of the things I didn’t like about my old set up was how the sun would come in the windows and shine on my computer screen. Likewise, I didn’t like how little sun shone on my sewing machine table. So duh, I switched them, placing my sewing machine closer to the windows and my computer further away.
Now the sun shines brightly on my sewing area and doesn’t glare on my computer monitor.
Improving the cutting and pressing area
Next, I liked the idea of having a place for my large cutting mat, but the sofa table simply wasn’t wide enough. So I moved the sofa table close to the windows, and placed the Ikea drawer unit underneath (the one with my fabric scraps). My desk used to butt up against the window, so when I switched the desk and my sewing machine table, I left a space next to the window big enough to put the sofa table.
By putting my sofa table next to the Ikea cabinet, I created one long table against the window. Now I have room for my ironing station, cutting mat, and my Accuquilt GO! cutter in one place (a recent addition to my sewing studio.)
Notice how I can move the cutting mat to the sofa table to create a larger area for pressing and arranging pieces for sewing. I love the flexibility of this new area.
So what about my big cutting mat? Well, I replaced the sofa table with a folding table from Costco. The new table is wide enough for the big cutting mat with room to spare. I use this cutting area to trim quilts and to cut long borders.
I’ve placed the table on risers to make it the perfect height for cutting. As a plus, this also gives me plenty of space underneath to organize my other sewing machines, sewing machine totes, photo backgrounds, printed patterns and such.
Making space for photography
As a blogger and social media maven <grin> I’ve learned that photography is important. To get beautiful photos you need lots of light. Although I have a wall of windows in my studio, they don’t get a lot of light in them, especially later in the afternoon when I tend to take pictures. So for Christmas I got myself a photo cube. That’s the big black cube you see next to my big cutting table here. Inside it has lights and a vinyl background I can switch out when I want a different color.
As I was rearranging my studio, I kept in mind that I needed to have a place for the photo cube. In the end, I put it on top of one of my filing cabinets. That moves it out of the way of my sewing/computer area, yet keeps it convenient when I need to take studio shots.
A place for books…(and more importantly—fabric!)
During the big reorganization, I straightened my husband’s books on our built-in bookshelf and found room for my quilting books. That freed up some space on my short bookshelf for my black and white fabrics and current works in progress.
By moving my black and white fabrics from my two big bookshelves, I freed up space for fabric that’s been sitting around in bags on the floor waiting for some place for me to put it. (Oops! <wink>)
Keeping the batting from driving me batty
I had most of my batting stored above my bookshelves, with batting scraps in one of the fabric drawers of my Ikea cabinet. This kinda worked but I wanted my batting all together.
More importantly though, I wanted to organize my batting by size to make it easier to find batting that was big enough for my current project. So during my reorganization, I took all my new batts and wrote the size on one end with a marker so I could tell their size from the floor.
Then I took my batting scraps and pinned a small piece of paper with the size to each one. I placed those batting scraps in two boxes—10” or less wide (any length) and 30” or more. Guess I don’t have any batting in between? <grin>
A home for my printer
Big on my wish list during my reorganization was to find a convenient place for my printer and pattern papers. The printer used to be closer to my husband’s desk and to get to it I had to walk around my desk and large cutting table (and a bunch of bags on the floor) to the other side of the room. To say this was inconvenient was an understatement.
When I moved the quilt books and subsequently moved my black and white fabrics, that small bookshelf had just enough room for my current projects. Since they used to sit on a small black cabinet near the stairs (in a completely unorganized pile—not even in boxes!) that cabinet top suddenly became free! So I put the printer and paper on it. This little change has literally changed my life and made things so much easier! (The cabinet by the way holds tools I don’t use much, plus foundation papers and other specialty items.)
Organizing my thread
The final item on my wish list was to get my thread and my Island Batiks organized.
I’d bought a lot of Aurifil sets as several Markets and they needed to be organized into my existing thread collection, sorted by color. So I went to JoAnns and bought more thread organizers for all the new thread and solved that problem.
I just love looking at all this thread!
I kept two of the little thread collection cases—they now hold the basic colors I piece with. I keep them near my sewing machine so they are so handy! Previously I would haul down the right thread collection case and sort through it to find the perfect white, grey, beige or black that I needed. Another problem solved!
organizing my Island Batiks
My Island Batiks on the other hand, were always a bit disorganized. New collections were placed in the Ikea fabric drawers while older pieces were stored in several cardboard boxes, tucked in various places of my sewing room. Since I’m an Island Batik Ambassador, I like to share the name of the Island Batik collections I use in my quilts so my readers can find those same fabrics too if they want, and that takes a lot of organization on my part. So this was a must do.
First I gathered my batiks from their various hidey-holes, sorted the older pieces by color and placed them in the fabric drawers of my Ikea cabinet. I organized the new collections (including the collections I can’t share with you just yet) and placed them in one of the open sections of the Ikea cabinet. Having them out in the open reminds me to use them (as soon as I’m allowed) for my monthly Island Batik Ambassador challenges.
Having all my Island Batiks in one place organized by color has made a huge difference since I am constantly designing and quilting with batiks. My life is so easy now and all it took was this one little change!
While organizing my batiks into the drawers of the Ikea cabinet, I took the opportunity to organize other items I use often such as my postal supplies, fusibles, and giveaways. Now the Ikea cabinet contains the things I use most often instead of a bunch of miscellaneous supplies I thought might fit in the drawers.
My dream design wall…
The final change wasn’t really a change but a fix. Years ago, my husband installed a design wall for me. I made it in sections so it could be portable. That also allowed me to take it off the wall if I wanted.
Originally we attached it using Contact strips. But it kept pulling away from the wall in a few places. And I never did use it elsewhere so having it portable seemed silly. So I had him screw it into the wall. Now it’s nice and steady.
I love my big design wall!
Well that’s my studio! Here’s what I learned:
When organizing your studio, don’t sweat it. Sometimes it takes living and working in your sewing room to figure out what you really need and where.
Think about how you work. What do you use daily? What do you want to have nearby? (Hint: you probably will want your ironing and cutting areas near your sewing machine for convenience.)
Consider light. Another thing that was big on my list during the redo was light. I just can’t see things as well as I used to. So I upgraded my light bulbs to LED which are brighter and cooler (I hate getting hot!). I also added a bright light by my sewing machine. Love it! I still need to add more lights over by my design wall but that means a trip to Ikea so it’ll have to wait for now.
Little things mean a lot. Sometimes all you need is a little change. Labeling my batting with the sizes has saved me so much time! So has organizing my batiks. And my thread. I lived with the disorganization and made it work but taking the time to organize those three things has made my life so much easier! So don’t let the idea of organizing your studio overwhelm you. Start with the one thing that bugs you the most, and change that.
Thanks for stopping by!
Be sure to visit the other blogs on the hop!
The hop just started a few days ago so you haven’t missed much yet! To catch up, visit
April 1 - Sam Hunter - Hunter Design Studio
April 2 - Marian Pena - Seams to be Sew
Tomorrow is Martha’s turn.
April 4 - Martha Wolf - Pinwheel Productions
The hop continues through April 27th, one studio per day. For the rest of the blog hop schedule, click the on the QAL and Blog Hops tab above and choose Spring Clean Your Studio Blog Hop!
you might also like
TEll me…what would you most like to change about your sewing studio?
0 notes
Last Seen Blogs

yahsa1720
Yahsa

steelballruntrailnotes
Offscreen Steel Ball Run
aishatonu
Poetic Cauliflower
twominifigs
Esperance

wyclair
Mia