#i got the specular lighting on it like
Photo

warrior
#furry#anthro#illustration#digital art#fantasy#yall ever have that one piece you slap down in like 30 minutes and it becomes your most favorite piece you've ever done#this one's that for me#i got the specular lighting on it like#so nice
4K notes
·
View notes
Note
Oooh, what about Journey? I think the sand probably took a lot to pull off
it did!! i watched a video about it, god, like 6 years ago or something and it was a very very important thing for them to get just right. this is goimg to be a longer one because i know this one pretty extensively
here's the steps they took to reach it!!
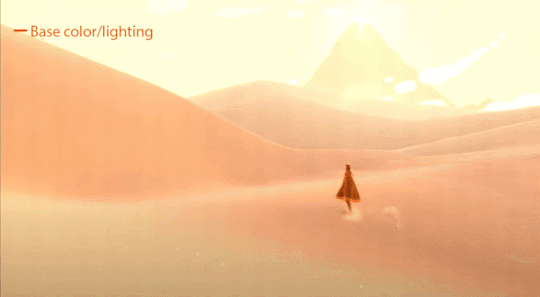
and heres it all broken down:
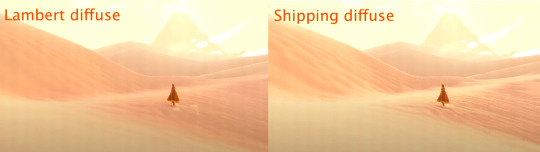
so first off comes the base lighting!! when it comes to lighting things in videogames, a pretty common model is the lambert model. essentially you get how bright things are just by comparing the normal (the direction your pixel is facing in 3d space) with the light direction (so if your pixel is facing the light, it returns 1, full brightness. if the light is 90 degrees perpendicular to the pixel, it returns 0, completely dark. and pointing even further away you start to go negative. facing a full 180 gives you -1. thats dot product baybe!!!)

but they didnt like it. so. they just tried adding and multiplying random things!!! literally. until they got the thing on the right which they were like yeah this is better :)
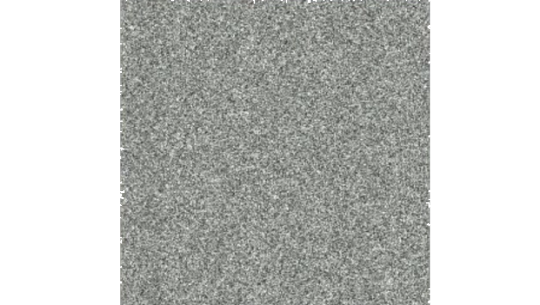
you will also notice the little waves in the sand. all the sand dunes were built out of a heightmap (where things lower to the ground are closer to black and things higher off the ground are closer to white). so they used a really upscaled version of it to map a tiling normal map on top. they picked the map automatically based on how steep the sand was, and which direction it was facing (east/west got one texture, north/south got the other texture)

then its time for sparkles!!!! they do something very similar to what i do for sparkles, which is essentially, they take a very noisy normal map like this and if you are looking directly at a pixels direction, it sparkles!!
this did create an issue, where the tops of sand dunes look uh, not what they were going for! (also before i transition to the next topic i should also mention the "ocean specular" where they basically just took the lighting equation you usually use for reflecting the sun/moon off of water, and uh, set it up on the sand instead with the above normal map. and it worked!!! ok back to the tops of the sand dunes issue)
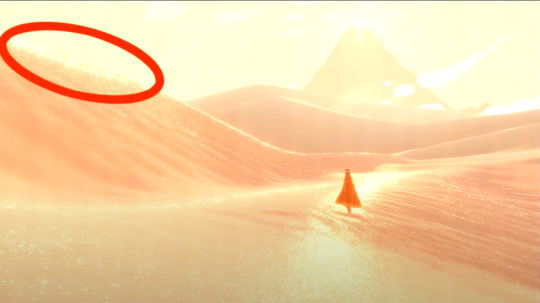
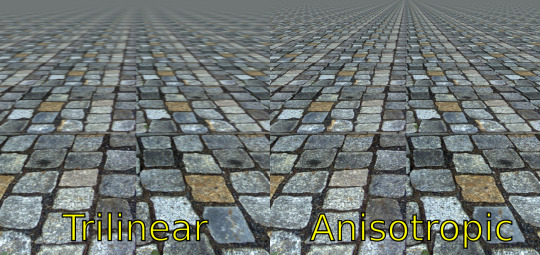
so certain parts just didnt look as they intended and this was a result of the anisotropic filtering failing. what is anisotropic filtering you ask ?? well i will do my best to explain it because i didnt actually understand it until 5 minutes ago!!!! this is going to be the longest part of this whole explanation!!!
so any time you are looking at a videogame with textures, those textures are generally coming from squares (or other Normal Shapes like a healthy rectangle). but ! lets say you are viewing something from a steep angle
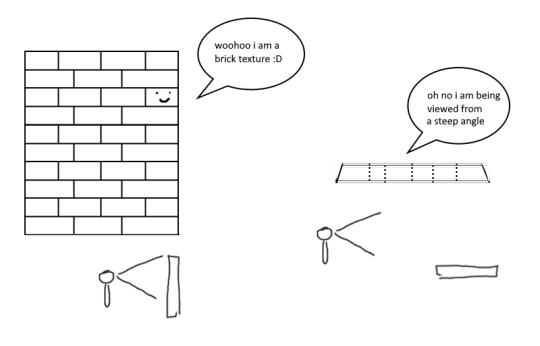
it gets all messed up!!! so howww do we fix this. well first we have to look at something called mip mapping. this is Another thing that is needded because video game textures are generally squares. because if you look at them from far away, the way each pixel gets sampled, you end up with some artifacting!!
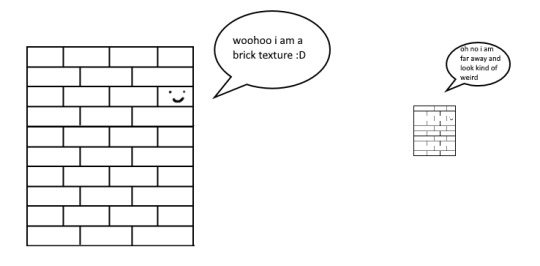
so mip maps essentially just are the original texture, but a bunch of times scaled down Properly. and now when you sample that texture from far away (so see something off in the distance that has that texture), instead of sampling from the original which might not look good from that distance, you sample from the scaled down one, which does look good from that distance
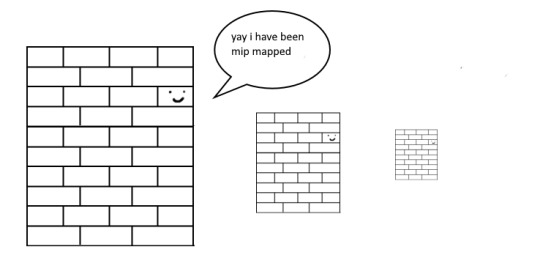
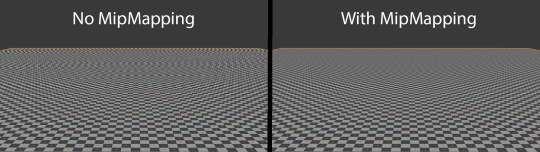
ok. do you understand mip mapping now. ok. great. now imagine you are a GPU and you know exactly. which parts of each different mip map to sample from. to make the texture look the Absolute Best from the angle you are looking at it from. how do you decide which mip map to sample, and how to sample it? i dont know. i dont know. i dont know how it works. but thats anisotropic filtering. without it looking at things from a steep angle will look blurry, but with it, your GPU knows how to make it look Crisp by using all the different mip maps and sampling them multiple times. yay! the more you let it sample, the crisper it can get. without is on the left, with is on the right!!
ok. now. generally this is just a nice little thing to have because its kind of expensive. BUT. when you are using a normal map that is very very grainy like the journey people are, for all the sparkles. having texture fidelity hold up at all angles is very very important. because without it, your textures can get a bit muddied when viewing it from any angle that isnt Straight On, and this will happen
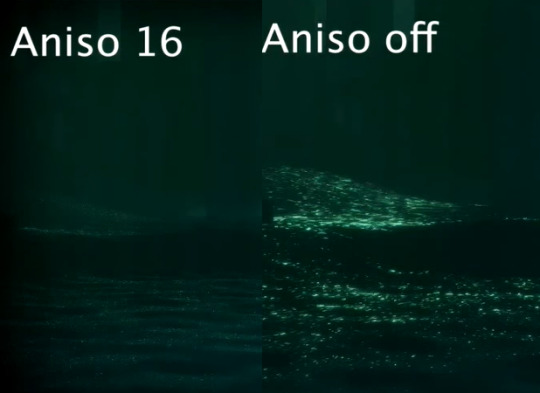
cool? sure. but not what they were going for!! (16 means that the aniso is allowed to sample the mip maps sixteen times!! thats a lot)
but luckily aniso 16 allows for that pixel perfect normal map look they are going for. EXCEPT. when viewed from the steepest of angles. bringing us back here
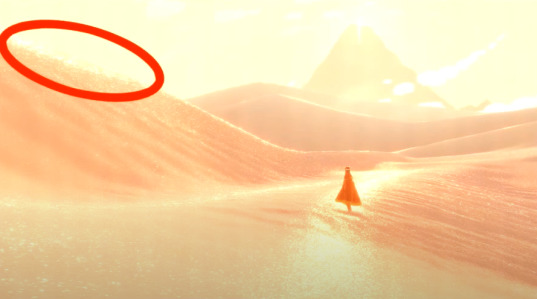
so how did they fix this ? its really really clever. yo uguys rmemeber mip maps right. so if you have a texture. and have its mip maps look like this

that means that anything closer to you will look darker, because its sampling from the biggest mip map, and the further away you get, the lighter the texture is going to end up. EXCEPT !!!! because of aisononotropic filtering. it will do the whole sample other mip maps too. and the places where the anisotropic filtering fail just so happen to be the places where it starts sampling the furthest texture. making the parts that fail that are close to the camera end up as white!!!
you can see that little ridge that was causing problems is a solid white at the tip, when it should still be grey. so they used this and essentially just told it not to render sparkles on the white parts. problem solved

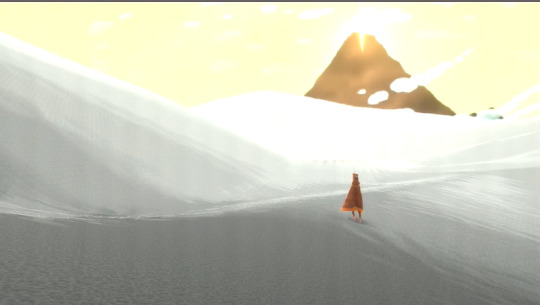
we arent done yet though because you guys remember the mip maps? well. they are causing their own problems. because when you shrink down the sparkly normal map, it got Less Sparkly, and a bit smooth. soooo . they just made the normal map mip maps sharper (they just multipled them by 2. this just Worked)

the Sharp mip maps are on the left here!!
and uh... thats it!!!! phew. hope at least some of this made sense
433 notes
·
View notes
Text
thank you for the kind words :) of course i can make a tutorial, it's actually super simple!
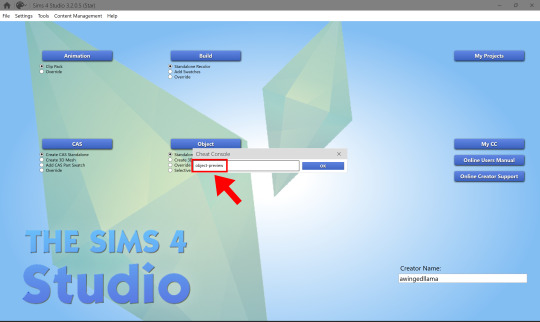
1: Open up Sims 4 Studio and press CTRL+Shift+C, like you would in-game. Type 'object-preview' into the Cheat Console.
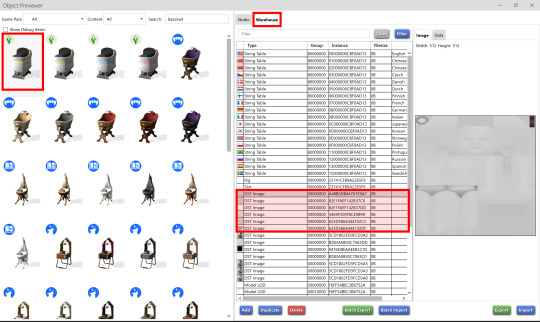
2: Search 'bassinet' and click on the Warehouse on the studio tab. The resources in red are EA's default newborn skin.
3: Shift+click to select multiple resources - make sure the instance numbers match the ones in the pic above. Then click on 'Batch Export'. Don't change the file name from 'export.binary'.
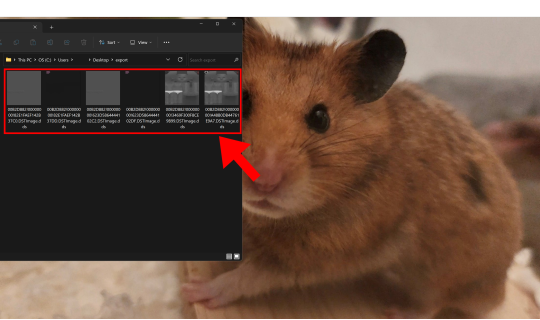
4: This is how the images should be named after saving, for reference. (this step is really just an excuse to sneak in a lil pic of my son hamster, heh)
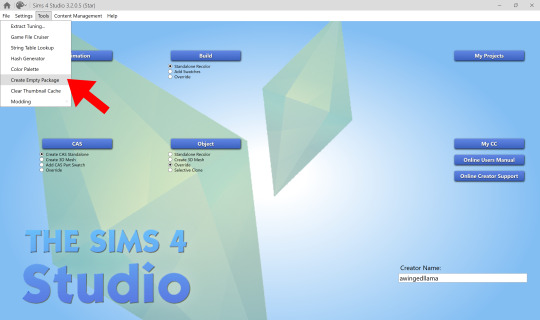
5: Once you've got your images, close the object previewer. Click on 'Tools' to create an empty package.

6: Click 'Batch Import' and select the images you've just saved.
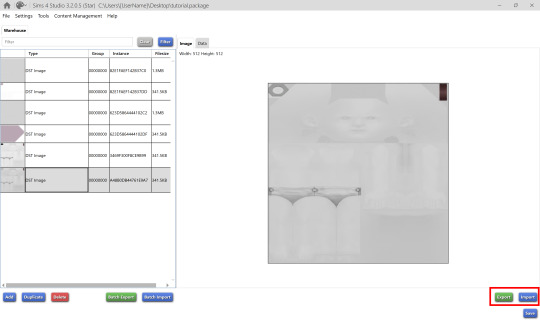
And you've got your default replacement package! Now you can export the images (as .dds to preserve the alpha channel!) and edit them however you like, then re-import them.
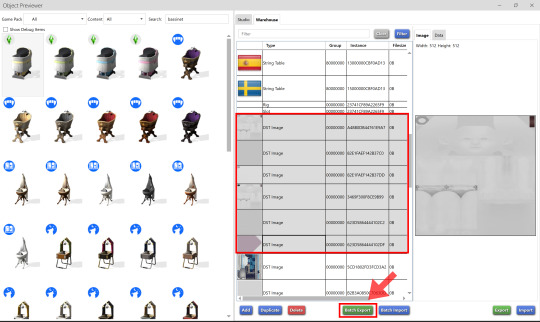
The two light grey DST images are the normal maps (just a diaper by default). The pink ones are specular maps (just the eyeball). The greyscale ghost-looking ones are the actual overlay texture.
and if this seems like too much work feel free to just use my replacement .package as a base lol
207 notes
·
View notes
Text
Let There Be TERI | Wall Art | Sims 4 CC

Behold, the magnificence of Theresa Apocalypse!… in her memetic Teri-derp form 😆
Base Game Compatible
Free Download: HERE (SFS)
Alternative Download: Google Drive
I love Honkai Impact 3rd and Sims 4, and I wanted my Simself to share this joy, so I made this. This is a recolour of that Plumbob wall frame, but with Teri instead to make it way cuter, and the overly reflective specular removed. Frames come in the original light brown, white, and black colours, and an additional dark brown swatch made by me.
Theresa, also known affectionally as Teri to certain groups of people, holds a special place in my heart for leading me to group of people I'm proud to call friends. A belated Happy Anniversary to all fellow SEA captains! Let me know if your Sims like it.
(ahem Originally, I meant to share this when the patch (V7.0) was released, but I fell sick for a long time, was busy and distracted thenafter, got sick again, and… gotshyeachtimeIrememberedaboutthisandkeptputtingitoff.)
Teri Teri sekai de ichiban kawaii~!
Please do not steal and/or reupload this work behind a paywall, or convert it for use in any other game it was intended for, etc. This CC is free to download in the above download link.
Original images by miHoYo, edited by me.
© All rights reserved by miHoYo
18 notes
·
View notes
Text
Conversion process/tutorial for freefall water wall
As inquired by @dailycard, I’m sharing the conversion process for my recent creation: Freefall Water Wall. This guide is NOT intended for beginners as I only show what I think the important steps. If this is the first time you tried to make a conversion, I suggest you try something like Pixel Jackpot’s 4to3 wall decor video tutorial first.
This tutorial will cover:
Using counter shader (part C step 9)
Using phong alpha shader and UV scroll parameter (part C step 6-8)
Making occluder shadow (Part D step 4-15)
This tutorial will NOT cover:
Setting up TSR Workshop (TSRW)
Making object mask
Tools used:
1. Older TSRW (I used the 2.0.86.0 version) for:
Cloning TS3 object base item you want to work on
Importing mesh, because sometimes you can get an error when doing this in the newer TSRW
Changing shader
Adding shader parameter
2. Newer TSRW (I used the latest 2.2.114 version) for:
Exporting TS4 mesh & maps
Changing footprint
Changing bones position
Changing occluder shadow
3. Milkshape & its plugin for TSR Workshop
4. Photoshop
Part A. Prepare the required resources.
A1. In NEWER TSRW:
1. Open the Sims 4 small freefall water wall object. Copy the object’s name, description & price information to a notepad txt file.
2. Export the object mesh. In my case, there is only hLOD available. Considering the mesh is quite low poly anyway, I believe it can be used for as the mLOD as well. The sunshadow is not necessary whatsoever.
3. Export the diffuse map of material 1 (fountain body) & 2 (waterfall effect) as png. Material 0 diffuse map is not necessary because it’s just for drop shadow.

4. Open a similar looking object that has an occluder shadow. I used TS4 Romantic Garden’s Thriumphal Arch of Gluteus Maximus because it has an empty center & covered the upper part (I tested them in game first). Note the value for each of occluder entry (number 3). For this, I just took a photo each with my phone for convenience.

A2. In OLDER TSRW:
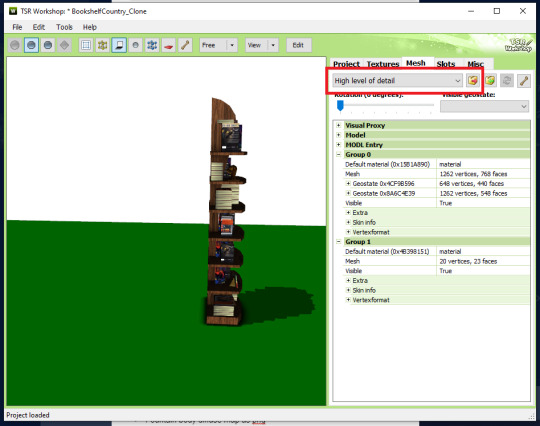
Open a Sims 3 object that fit perfectly against a wall. I used the bookshelf modern high 1x1. Export its hLOD mesh and name it along the line of “Wall Fit Reference Mesh”. I suggest using the older TSRW because sometimes I got an error when exporting in the newer version.
Part A check list:
Object’s name, description & price in a notepad txt file.
Small freefall water wall TS4 hLOD mesh as wso file.
Fountain body diffuse map as png file.
Waterfall effect diffuse map as png file.
EACH of occluder shadow entries value as notes/pictures.
Wall fit reference TS3 object mesh as wso file.
Part B. Editing the resources.
B1. In milkshape:
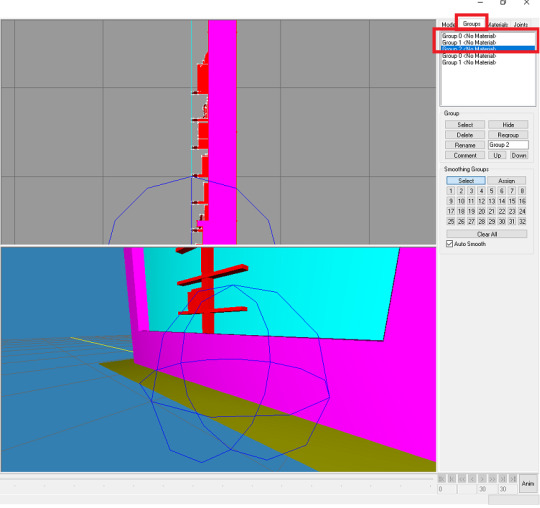
1. Import the small freefall water wall TS4 hLOD mesh. Then import the wall fit reference TS3 object mesh. Your workspace will looked like this:

2. Go to Groups tab. Double click each of the upper “Group 0″, “Group 1″, and “Group 2″ to select them.
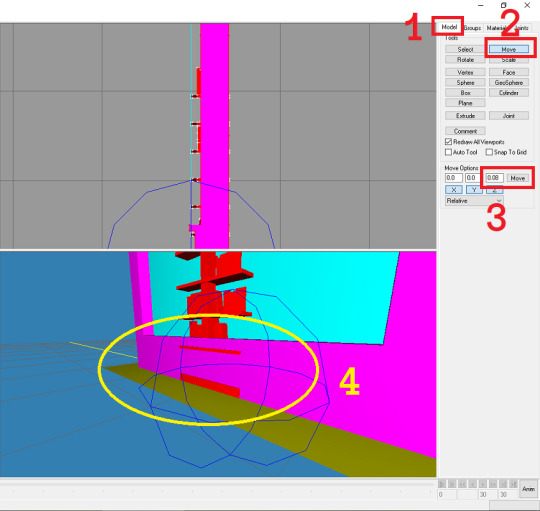
3. Go to Model tabs. Choose Move (Number 2). Change the Z value to 0.08 and click Move (Number 3). The waterfall should clip slightly through the reference bookshelf.
4. Go back to the groups tab. Double click each group again to deselect the upper group 0-2 (Number 1). Select the lower group 0 and click delete. Select the lower group 1 and click delete (Number 2&3).

5. Export as “hLOD edit”.
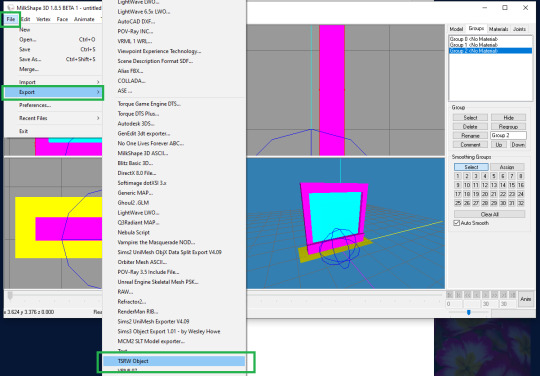
6. Delete the “Group 0″ (red box). Select “Group 1″, rename to “Group 0”. Select “Group 2″, rename to “Group 1” (green box). Export as “mLOD edit”.

B2. In photoshop:
1. Import your fountain body diffuse map png file. Your workspace should looked like this:

2. Add the hue/saturation & levels adjustment layer.

3. In the hue/saturation adjustment layer, under the master control I changed the saturation value to -100 and lightness to -15. Save as “multiplier map” in png format.
4. You can also use the level adjustment layer to tweak its brightness and make the (optional) “specular map” in png format. I didn’t do this step as the lion fountain I’m using as clone doesn’t require it.
5. Make the masking map in png format. This is more of trial & error though, so I will not explain much. Here’s the mask map comparison I created as reference against the original diffuse map:

Part B check list:
1. Combined these item in milkshape:
Small freefall water wall TS4 hLOD mesh as wso file.
Wall fit reference TS3 object mesh as wso file.
To make:
hLOD edit mesh as wso file.
mLOD edit mesh as wso file.
2. Edited the “fountain body diffuse map as png file” in photoshop to make:
Multiplier map as png file.
Specular map as png file (optional).
Mask map as png file.
3. Unused part A items:
Object’s name, description & price in a notepad txt file.
Waterfall effect diffuse map as png file.
EACH of occluder shadow entries value as notes/pictures.
Part C. Building the object. In OLDER TSRW:
1. Clone the fountain france statue 2x2 TS3 object. Under the project tab, input the object’s name, description & price. Change the item flags. In my case, I do not change anything because I want the waterfall fountain to be found and placed similarly to the lion fountain. Save your project!
2. Go to textures. Choose the 2nd swatch dropdown option. Click on the smaller dropdown option on the left of it and choose delete.

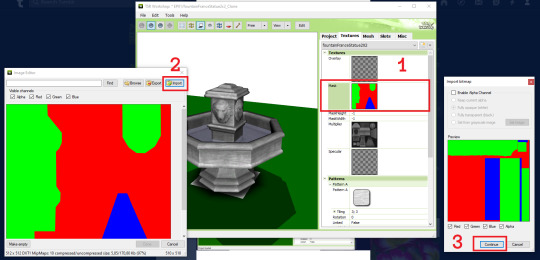
3. Import your mask map. Do the same to your multiplier & (optional) specular map. Make sure your overlay & stencil maps is empty. You can also change the pattern now or just leave it the same as default. Save your file.
4. Go to mesh tab. Import your “hLOD edit” and “mLOD edit” mesh.
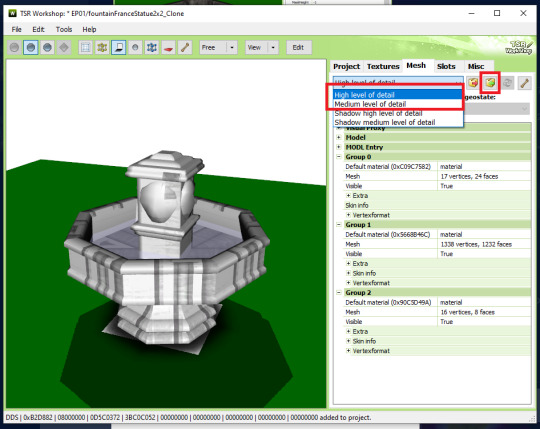
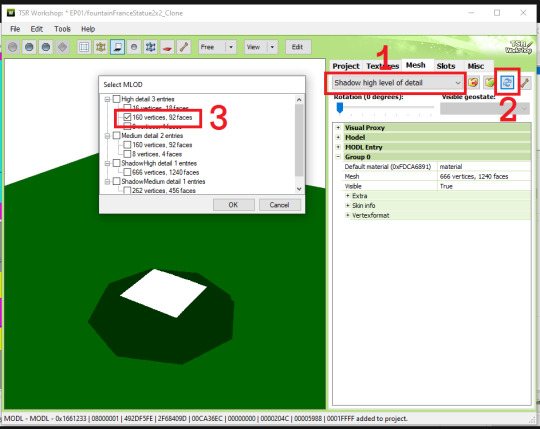
5. Select the “Shadow high level of detail”. Click on the generate shadow mesh. Choose the “160 vertices, 92 faces”. In my case, I can do the same for “Shadow medium level of detail”. Ignore the weird white square for now. We will remove it later. Save your file.
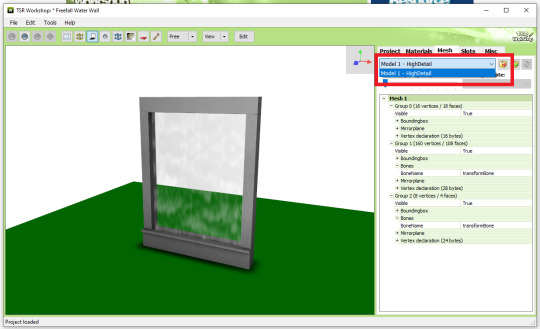
6. Select the “High level of detail” from the drop down menu again (Number 1). Edit the Group 2 material (Number 2). Choose the Phong alpha shader (Number 3). When prompted, choose YES! (Number 4)

7. Click the blue “+ Add” to show a new property window. Choose the UVScrollSpeed from the drop down menu. Click OK.

8. Replace the alpha map & diffuse map with “waterfall effect diffuse map” (Number 1&2). Make empty the Specular map (Number 3). Change the UV scroll speed parameter to 0 ; -0,8 (Number 4). When prompted to update the material definition to all LOD, choose YES (Number 5).
NOTE: If the object animation played in a different direction than intended here, change the UV Scroll Speed Parameter to positive or vice versa.
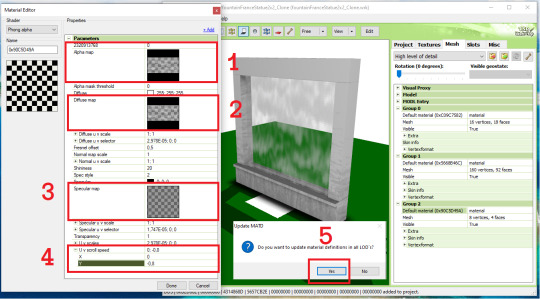
9. Go back to the main mesh tab, now choose to edit the group 1 material (number 1). Change the phong shader to counters shader (Number 2 & 3). If prompted to use the common values for this shader, choose NO! (Number 4). Click Done (Number 5). When prompted to update the material definition to all LOD, choose YES! (Number 6). Don’t forget to check if the changes has been made in the Medium Level of Detail. Save your file.

Part C check list:
1. In the “Project” tab: Edited the object’s name, description & price.
2. In the “Textures” tab:
Imported multiplier, specular (optional), and mask map.
Make sure your overlay & stencil maps is empty or disabled.
Change the pattern (optional).
3. In the “Mesh” tab:
Imported hLOD and mLOD edit mesh.
Generated the sunshadow in “Shadow High” and “Shadow Medium Level of Detail”.
Change the Group 2 Material to phong alpha shader, add the UV Scroll Speed parameter to 0 ; -0,8, import the alpha & diffuse map, and empty the specular map.
Change the Group 1 Material to counter shader.
Part D. Finishing the object. In NEWER TSRW:
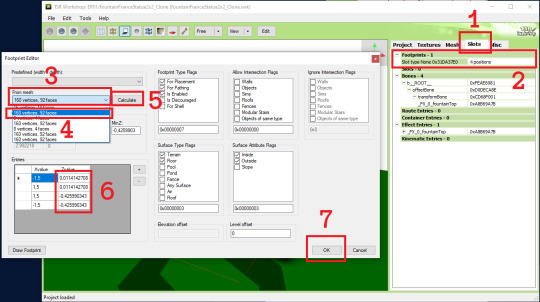
1. Open your saved project. Go to the Slots tab (Number 1). Edit the Footprints (Number 2). Select the first 160 vertices (Number 3&4) and click calculate (Number 5). Change the Z value of 0,0114142708 to exactly 0. Change the value of -0,425990343 to exactly -0,425 (Number 6). Click OK (Number 7).
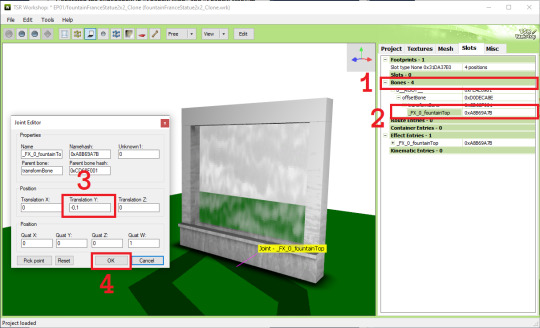
2. Expand the bones group (Number 1). Select the fountainTop entry to edit (Number 2). Change the Translation Y to -0,1 (Number 3). Click OK (Number 4). Save your project.
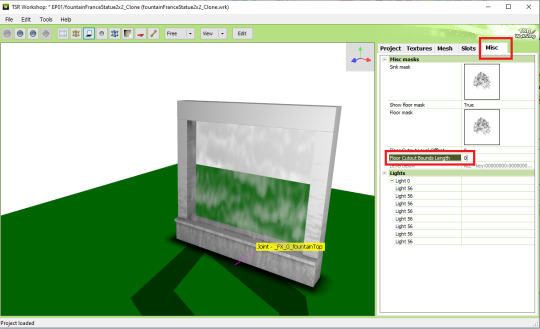
3. In the Misc tab, change the floor cutout bounds length to 0. This will remove the weird white square from before.
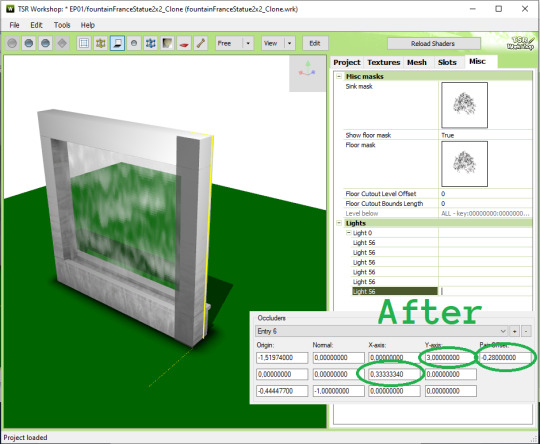
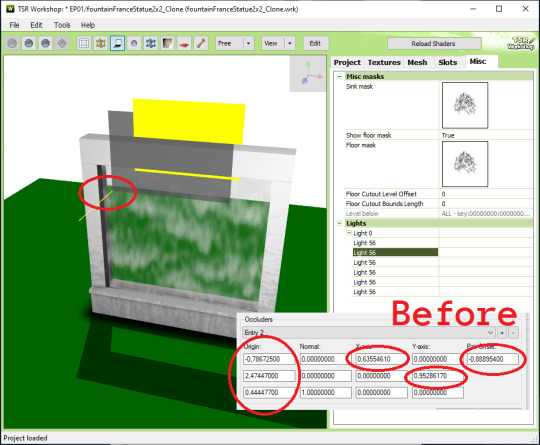
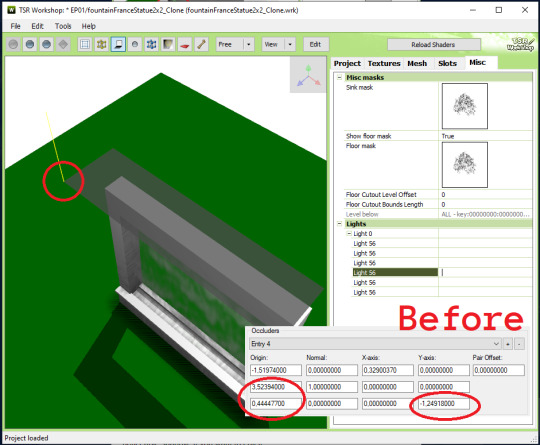
4. It’s recommended to create a new save file now as we will be editing the occulders. Expand the lights section and edit the Light 0 to show the Lite Editor Window (Number 1). Manually replace every occlusion entry value with the ones you noted/took photo of (Number 2). In my case the entry listed here is up to 8 occulders while the reference only had 6, so you can just delete the entry 7 & 8 using the - button.
NOTE: When manually inputing the value, use the tab key to quickly switch to the next value. You can also opt out the last zeroes from the value. If the original value was 1,51974000; you can just input 1,51974 and the zeroes will be automatically added after clicking OK.

5. The occluders should looked like this now. Try familiarizing yourself with each of the occluders by clicking on the light 56 entries one by one before we edit them to fit the object.

6. This is what I think how the occluder value works. Since I couldn’t find other sources, please let me know if I am incorrect. This is based on our occluder #1.
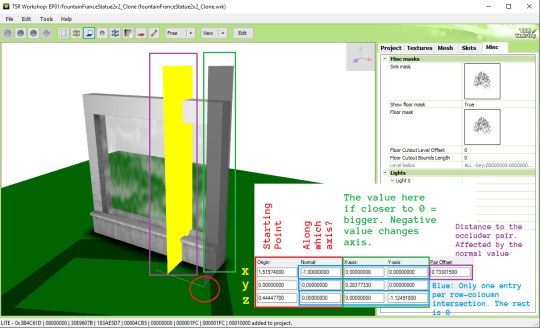
7. Now I want to change the starting point z value so it could fit much better. This whole part is a trial and error process. I changed the value from 0,444477 to -0,1.

8. Referencing to Pocci’s Blog, for the green note I wrote the value are more accurately called inversely proportional (as in 1/n). For example if I know the height of the object is exactly 3 tiles (n), equate 1/3 and I can input the value 0,3333333 to get the perfect height.
9. Next, I think the thickness of the object was 1/3 tiles, so using the equation 1/n and input 3 as the Y-axis z value without changing the - mark.

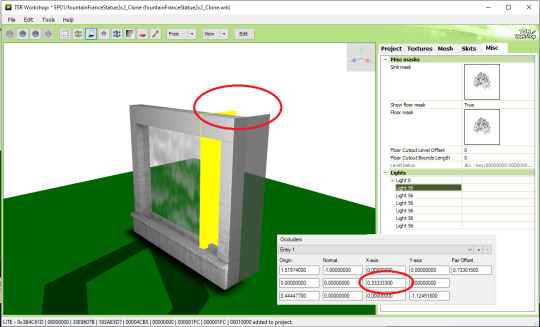
10. Lastly, I want the pair occluder to be closer, so I changed the pair offset value from 0,733... to just 0,28. Now we are finished with occluder #1.

11. Let’s jump to occluder #3 as it was the mirror of occluder #1. We can change the value similar to the occluder #1 while preserving the - value only for the orange circle shown below:
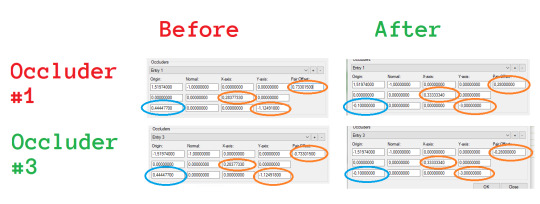
Occluder #3 result:
12.For occluder #6, the starting point is okay. We just need to change the plane size, shown red below:

13. Occluder #5 is similar to occluder #6, but with extra step fixing the starting point. Shown red below:


14. For occluder #2, I wanted to move it to the ground because when placed near the ceiling, the shadow they cast seemed less noticeable anyway. The values changed are shown red below:

15. For the final occluder #4, you can either delete them or fixing a few value shown red below. They intersect with the ceiling anyway so they won’t be noticeable if you delete them.

16. DONE! Export your file & test in game :)
thanks for @sims3tutorialhub for a few initial references I used :3
PS: this tutorial does not fully reflect the final published version of the conversion object I made, i.e. it has 2 more variations than described here.
20 notes
·
View notes
Text
So I’m at Peets and was glancing outside and realized the glare from cars outside coming through the door glass didn’t look like a bunch of rainbow rays from the bright spot, but like a dipole field pattern, and what?!
And of course that’s fascinating! I took off my glasses and same phenomenon! But going outside, glare from the same spots looks more like a standard wave diffraction pattern - a bessel function with some rays. So I think it’s something about the door glass and the angle the light is refracted through it, probably the polarization from reflecting off the cars?
…and now I’ve got slowly recovering spots in my vision because I was staring at specular reflections of sunlight
4 notes
·
View notes
Text
it seems like sometime around the early 2010 game engines got really good with certain lighting tricks. like, a combination of things like specular and bump mapping and transitioning between indoor and outdoor areas visually. and it makes a huge difference in da:i, even though polygon count isn’t much higher or anything. i wonder if it was just iterating on existing technologies or if the performance of graphics cards hit a new milestone around that time or what.
anyway, i forgot how pretty da:i is. and it’s an eight year old game i’m playing with the graphics settings mostly turned down pretty low!
21 notes
·
View notes
Text
Sailor Moon's hair
tbh, I had it, especially the texture, in middle school
quite a lot
that's how my real hair folds and unfolds itself at that age
then I ask to turn it blonde and it was grey/ash-brown on the outside, blonde on the inside. same Sailor Moon texture
then the mother saw it in its full lenght and she had it cut
then it turned into Irma's hair colour and then Will's red
and then orange
and then it just got stuck changing colours
then I got photographed from the back throughout the years and it has an anime specularity when orange or dark brown, it doesn't matter
---
I think it just looks like that when it's long anyway: the hair texture
but the current white hair acts as an albedo surface, so it just reflects light in order to change colours so easily / it's metallic/gold;
the albedo surface is akin to snow reflecting light (snow has a 70% albedo reflecting coefficient)
(white hair, white as snow) - REV 19
it's the white of metals that shows up on camera. that's why it looks anime-like.
but it's its reflective surface that truly makes it change colours both in person and on camera.
I played around with metaphysical/physical stuff too much as a child ha ha
prophetically
then we got the bust to finalise the Sailor Moon character...
0 notes
Text
Practice 1: Development Project 1
Development 1(Memory & Nostalgia)
Blog 2
From Hot Wheels to Hyperreal: My Process Demonstrating and Finishing a Toy Vehicle Work of Art
In my last blog, we travelled through the making of a stunning scene in Unbelievable Motor 5. Now, buckle up for the following adventure segment: changing a dearest Hot Wheels vehicle from cherished, lifelong recollections into a photorealistic highlight for our virtual world!
Demonstrating Lunacy in Blender (Levels 41-60):
Reference Gathering: Before jumping into Blender, I accumulated a mother lode of references. Artstation offered an amazing cluster of staggering vehicle models, and I even snapped some high-goal photographs of my dependable Hot Wheels sidekick. These references turned into my directing stars, guaranteeing each bend and detail was caught with precision.
Network Sorcery: Blender's instinctive connection point greeted me wholeheartedly. I started by shutting out the fundamental states of the vehicle, beginning with straightforward shapes and chambers. With each keystroke, my digital Hot Wheels began to take shape slowly.
Circling the Circle: With the fundamental structures set up, the time had come to refine them. I utilized Circle Slices and Expel apparatuses to add unobtrusive bends and characterize edges, giving close consideration to the exceptional highlights that make my picked Hot Wheels vehicle unique.
Smoothing the Ride: When the harsh chiselling was finished, I embraced Blender's strong Subsurf modifier. This supernatural instrument streamlined the lattice, killing unforgiving edges and giving my vehicle a smooth, clean look.
Detail Criminal investigator: The real fun began here! Utilizing reference photographs as my compass, I added every one of the multifaceted subtleties that rejuvenate a Hot Wheels vehicle - the famous fire decals, the little spoiler, the mind-boggling headlights. Every component, fastidiously displayed and situated, added a layer of authenticity to my virtual work of art.
Sensation of Substance (Levels 61-80):
Surface Expedition: After getting my 3D model ready, it was time to start a new quest: tracking down the ideal surfaces. Substance Painter turned into my jungle gym, offering an immense library of materials and instruments to rejuvenate my vision.
Base Manufacturer: Beginning with a fresh start, I established the groundwork for my surfaces. I replicated the vibrant hues and reflective surfaces of my chosen Hot Wheels paint job using base colours and metallic maps.
Decal Dynamo: Time to release the decals! Substance Painter's natural decal framework permitted me to consistently apply the notable Hot Wheels flares and different logos, guaranteeing wonderful arrangement and fresh detail.
Enduring Hero: Nothing says "authenticity" like a hint of mileage. Utilizing unpretentious unpleasantness and soil maps, I added scratches, dust, and unobtrusive defects, changing my unblemished model into a vehicle with a story to tell.
Final details: The last venture in Substance Painter included baking my surfaces onto the model. This fundamental step blended every one of the layers and subtleties into a solitary, consistently applied textural show-stopper.
81-Level Unreal Rendezvous:
Import with Certainty: Furnished with my finished model, I got back to Unbelievable Motor, the stage for my virtual vehicle to sparkle. Bringing in the .fbx document was a breeze, and soon, my computerized Hot Wheels emerged inside the recognizable Stunning connection point.
Material Matters: Unbelievably strong Material Manager permitted me to improve the surfaces. To get a very realistic look, I changed the specular values, changed the reflections, and added some subtle subsurface scattering.
Lighting the Way: To make any 3D object stand out, the lighting must be just right. I painstakingly shaped the lighting in Stunning, utilizing a mix of directional lights, regional lights, and even post-handling impacts to make an emotional, yet grounded, climate for my small scale show-stopper.
Initiating the Story: The last step was making a phase deserving of my computerized Hot Wheels. I constructed a straightforward course utilizing Unbelievable's calculation devices, adding surfaces and props to make an energetic, eye-getting scene.


0 notes
Text
After Effects Ray Traced 3d Deprecated
This is a high level overview of all of the features you can use in the High Definition Render Pipeline (HDRP). This document presents the features in the following categories:
Basic example for doing hardware accelerated ray tracing using the VKKHRaccelerationstructure and VKKHRraytracingpipeline extensions. Shows how to setup acceleration structures, ray tracing pipelines and the shader binding table needed to do the actual ray tracing. Ray traced shadows. Adds ray traced shadows casting using the new ray. Introduction to Ray-traced 3D, how to activate it, the 3D layers it adds, and the many options that are available in those layers. Adobe After Effects Features. I try to give some volume to a composition with extruding, depth of field Enabling Ray-traced 3D I got this: “After Effects error: Ray-traced 3D: Out of paged mapped memory for ray tracer. Your project may exceed card limits. Try closing other applications. Try updating the CUDA driver.” My card is a MSI using a NVIDIA GTX 1060 6gb.
How can you fix Ray-traced 3D error??Optix.dll file: https://www.reddit.com/r/AfterEffects/comments/32ok72/gtx970cuda/. Vatsal isc handbook of physics pdf download.
Project
Platform support
You can run HDRP Projects on Xbox One, PS4, and compute Shader compatible devices for DirectX 11, DirectX 12, Metal, and Vulkan.
Virtual Reality
HDRP is compatible with VR and optimized for single-pass rendering. For more information about Virtual Reality, see the VR documentation.
Camera-relative rendering
Use HDRP to render distance GameObjects with large world-space coordinates in a more robust and numerically stable way than the built-in render pipeline. For information on how HDRP achieves this, see the Camera-relative rendering documentation.
Dynamic resolution

When you use dynamic resolution, HDRP can render at varying resolutions. To do this, it either uses hardware features, if available, or renders to render targets that are equal size or smaller than the current viewport. This helps maintain a stable frame rate in your Unity Project. For more information on dynamic resolution, as well as the types that HDRP supports, see the dynamic resolution documentation.
Volumes
Use Volumes to localize environmental Scene settings and post-processing effects. You can have multiple Volumes inside a Scene, and make effects like fog density, sky color, or exposure depend on the position of the Camera. For information on how to use Volumes in HDRP, see the Volumes documentation.
Materials
HDRP Shaders allow you to use the following features:
Opaque/transparent surfaces.
Different blend modes for transparent surfaces.
Transparent surfaces that work with fog.
Refraction and distortion for transparent surfaces.
Material types.
Anisotropy, for surfaces that have highlights that change when you view them from different angles, like brushed metal or velvet.
Iridescence, for surfaces that appear to change color as you view them from different angles, like soap bubbles or insect wings.
Metallic, for surfaces only lit by specular lighting and take the base color input for specular color. For example, aluminum, copper, and steel.
Specular Color, for surfaces that you want to have a colored specular highlight.
Subsurface Scattering, for translucent surfaces that simulate light interaction and scattering, like skin or plant leaves.
Translucent, for surfaces that simulate light interaction, but do not blur light that transmits through the Material.
Pixel and vertex displacement, for surfaces that you want to displace based on a height map.
Emission, for Materials that you want to act as a self-illuminating light source.
Decals, for surfaces that you want to project a Texture onto.
Detail mapping, for surfaces that you want to add micro details to.
Lit Shader
Use the Lit Shader to easily create realistic Materials and includes options for effects including subsurface scattering, iridescence, and translucency. This is the default Shader in HDRP. For more information, including the full list of Shader properties, see the Lit Shader documentation.
Layered Lit Shader
The Layered Lit Shader combines a main Material with other tileable Materials in order to produce visuals with a similar quality to a single high-resolution texture, but at a lower performance cost than a Lit Shader using the single high-resolution Texture. For more information, including a full list of Shader properties, see the Layered Lit Shader documentation.
Unlit Shader
The Unlit Shader allows you to create Materials that are not affected by lighting. Unlit Shaders are perfect for visual effects. For more information, including a full list of Shader properties, see the Unlit Shader documentation.
With the Shadow Matte option in the settings, we can have the surface receive shadow without lighting. We have Opaque or Transparent shadow with alpha for each of them.
StackLit Shader
The StackLit Shader improves on the Lit Shader in favor of quality over performance. This Shader coats surfaces more accurately than the Lit Shader, and, unlike the Lit Shader, allows you to use multiple Material features like anisotropy, subsurface scattering iridescence, and hazy parametrization at the same time.
Hair Shader
The Hair Shader is purpose-built to accurately render realistic hair in your Unity Project. It uses an improved Kajiya Kay lighting model which features better energy conservation and provides you with more flexibility. For more information, including a full list of Shader properties, see the Hair Shader and Hair Master Stack documentation.
Fabric Shader
The Fabric Shader allows you to render realistic fabric Materials in HDRP. You can use the cotton wool or silk lighting model to create a wide variety of fabrics. For more information, including a full list of Shader properties, see the Cotton/Wool Shader, Silk Shader, and Fabric Master Stack documentation.
AxF Shader
The AxF Shader supports the X-Rite AxF measured Material format. The AxF importer, available in Unity Enterprise for Product Lifecylce, automatically populates an AxF Material when it imports AxF Assets. For more information, including a full list of Shader properties, see the AxF Shader documentation.
Decals
HDRP allows you to apply decals to surfaces in your Scene. To apply a decal to a surface, you can either use the Decal Projector component to project the decal onto the surface, or assign the decal shader directly to a Mesh and then place the Mesh on the surface. For more information, see the Decal documentation.
HDRP also supports Decal Layers which allows you to control which GameObjects receive decals or not.
Terrain Shader
The Terrain Lit Shader is compatible with the built-in terrain system and supports up to eight layers in a single draw call. This Shader uses the same lighting model as the Lit Shader. For more information, including the full list of Shader properties, see the Terrain Lit Shader documentation.
Lighting
Light types
The HDRP light types use physical light units to help you light your Scene in the most realistic way possible. To assist you in creating physically-accurate lights, the Light component Inspector includes icons alongside the Intensity and Temperature properties. Each icon displays the real-world light source that the value of each property currently represents. Each icon is also a button which you can click to access a list of preset values that match real-world light sources. For lights to behave properly when using PLU, you need to respect HDRP unit convention (1 Unity unit equals 1 meter). The HDRP light types are:
Directional
Color temperature
Colored cookie
Shadowmask support
Spot
Color temperature
Colored cookie
Shadowmask support
Cone, pyramid and box shapes
Point
Color temperature
Colored cookie
Shadowmask support
Rectangle
Color temperature
Colored Cookie
Shadowmask support
Tube
Color temperature
No Shadowmask support
Disk (Baked only)
Color temperature
No Shadowmask support
For more information, including the full list of light properties, see the Light component documentation.
IES Profiles and light cookies
HDRP supports the Illuminating Engineering Society's (IES) file format for describing the distribution of light from a light source. HDRP supports the IES profile for Point, Spot (Cone, Pyramid, and Box), and rectangular Area Lights. You can also mix the IES profile with cookies and even use the profile and cookie mix for light map baking.
Reflection probes
HDRP supports cubemap reflections that take surface smoothness into account. HDRP cubemap reflection optionaly support a fake distance based roughness. This helps you produce realistic reflections in your Scene in real time. For more information, see the introduction to Reflection Probes
Planar reflection probe
HDRP supports Planar reflection probes that take surface smoothness into account. This allows you to to create effects that mimic a shiny mirror or a wet floor. HDRP includes accurate filtering for planar reflection that is close to being physically-based.
For more information, see Planar Reflection Probe.
Screen-space reflection and refraction
HDRP provides a screen-space solution for reflection and refraction. It uses the depth and color buffer of the screen to help simulate the path that light travels to the Camera and uses this to calculate accurate reflection and refraction. You can use this feature for transparent materials too, such as windows or water. For more information, see the screen-space reflection and screen-space refraction documentation.
Screen-space global illumination
HDRP supports screen-space global illumination (SSGI). SSGI is an algorithm that accesses the indirect diffuse lighting that the environment generates. It works in the same way as the Screen Space Reflection in that it uses ray marching to calculate the result.
Screen-space distortion
HDRP provides a screen-space solution for distortion. Distortion is similar to refraction except that it is purely artistic driven. For more information, see the distortion documentation.
Exposure
HDRP allows you to calculate exposure using several methods. This includes:
Histogram exposure
HDRP's exposure implementation computes a histogram of the image which allows you to select high and low percentile values to discard. Discarding outlying values in the shadows or highlights helps to calculate a more stable exposure.
For more information, see Exposure.

Metering mode
HDRP's exposure implementation includes a metering mask. This includes a texture-based mask and a procedural mode.
For more information, see Exposure.
Emission
HDRP Materials support light emission, which allows you to make a Material into a self-illuminated visible source of light. Global illumination takes emission into account and you can use physical light units to set the intensity based on real-world lights.
Shadows
HDRP uses multiple methods to calculate shadows:
Shadow cascades: HDRP uses cascade splits to control the quality of shadows cast by Directional Lights based on the distance from the Camera.
Contact Shadows: HDRP raymarches inside the depth buffer to process these shadows. That way, HDRP captures small details that regular shadow algorithms fail to capture.
Micro Shadows: HDRP uses the normal map and ambient occlusion map of a Material to estimate the shadows that those maps would cast if they were Meshes.
To decrease aliasing for the main cascade shadow maps, you can apply different filters to them, like PCF or PCSS.
For punctual and area light shadows, HDRP allows for dynamic resolution based on how much screen the light covers. HDRP rescales the content of the shadow atlas when it would be otherwise full. For more information on the filtering algorithms that HDRP uses, see the filtering qualities documentation.
In the advanced settings of the shadow maps, there is also the possibility to apply a tint on the shadow or the penumbra of the shadow.
Sky
In HDRP, you set up the sky inside a Volume, so you can change sky settings, or even the type of sky itself, depending on the position of the Camera in the Scene. HDRP allows you to separate the visual sky from the sky that you use for environment lighting. HDRP includes the following built-in sky types for you to use in your Unity Project:
Gradient Sky: Renders a simple sky with three color zones for the top, middle, and bottom sections of the sky.
HDRI Sky: Constructs a sky environment based on a cubemap texture you set within the HDRI Volume component.
Physically Based Sky: Simulates a spherical planet with a two-part atmosphere which features exponentially decreasing density with respect to altitude.
Procedural Sky: Produces an environment based on the values you choose within the Procedural Sky Volume component. This is similar to Unity’s built-in render pipeline procedural sky. This sky type has been deprecated, but you can still use it in your HDRP Project. For information on how, see Upgrading to 2019.3.
HDRP is able to handle multiple skies seen by different Cameras.
Fog
In HDRP, you set up fog, inside a Volume, so you can change fog settings, or even the fog type itself, depending on the position of the Camera in the Scene. You can set the color of the fog yourself or use the color of the sky. HDRP fog affects Materials with both opaque and transparent surfaces. HDRP implements an exponential fog with optional volumetric effects.
Light Layers
Light Layers are LayerMasks that you specify for Lights and Meshes. Lights only illuminate Meshes that are on Light Layers that you enable on the Light. You can also use Light Layers in the shadow map settings to decouple shadows from lighting. For more information on Light Layers, see the Light Layers documentation.
Light layers In the shadow map dropdown can also be used to control which object receives a shadow from which light. By default both Light Layers and Shadow Map Light Layers are synchronized so the result is coherent (When an object receives light it also casts shadows). For more information on Shadow Map Light Layers, see the Shadow Light Layer section
Screen space ambient occlusion
HDRP includes a screen space ambient occlusion effect that approximates ambient occlusion in real time. It approximates the intensity and position of ambient light on a GameObject’s surface, based on the light in the Scene and the environment around the GameObject.
Screen space specular occlusion
HDRP also provides an extension to the screen space ambient occlusion effect which supports directional information. HDRP applies this directly to indirect specular lighting.
Physical light units
HDRP uses real-world physical light units, so you can easily light your Scene in a realistic way. For more information on physical light units, including a list of which units HDRP uses, see the physical light units documentation.
When using physical light unit, the intensity of lights can be really high and cause precision issue and clamping of highlight.To counteract this effect HDRP use pre-exposure. Pre-exposure apply the camera exposition from the previous frame before storing the lighting information.
Ray tracing (Preview)
HDRP uses ray tracing to replace some of its screen space effects, shadowing techniques, and Mesh rendering techniques.Real time raytracing effect are currently in Preview and behavior could change in the future.
Ray-Traced Ambient Occlusion replaces screen space ambient occlusion with a more accurate, ray-traced, ambient occlusion technique that can use off screen data.
Ray-Traced Contact Shadows replaces contact shadows with a more accurate, ray-traced, contact shadow technique that can use off screen data.
Ray-Traced Global Illumination is an alternative to Light Probes and lightmaps in HDRP.
Ray-Traced Reflections is a replacement for screen space reflection that uses a ray-traced reflection technique that can use off-screen data.
Ray-Traced Shadows replace shadow maps for Directional, Point, and Area Lights.
Recursive Ray Tracing replaces the rendering pipeline for Meshes. Meshes that use this feature cast refraction and reflection rays recursively.
Ray-Traced Subsurface Scattering is an alternative to Subsurface-Scattering that can make use of off-screen data.
Camera
Post-processing
HDRP includes its own purpose-built implementation for post-processing to produce exceptionally high-quality graphics. You can use post-processing to apply full-screen filters and effects to the Camera to drastically improve the visuals of your Unity Project with little set-up time. For an overview on HDRP post-processing, see the post-processing documentation.
Accumulation motion blur
HDRP includes a recording API which you can use to render effects such as high-quality accumulation motion blur. This technique creates the final 'converged' frame by combining information from multiple intermediate sub-frames. This API allows your scripts to extract the properly converged final frames and perform further processing or save them to disk.
For information about this feature, and for some example scripts, see Multiframe rendering and accumulation.
After Effects Error Ray Traced 3d Deprecated
Anti-Aliasing
HDRP includes the following anti-aliasing methods to help you remove aliasing effects with performance and quality in mind:
Multisample anti-aliasing(MSAA): Samples multiple locations within every pixel and combines these samples to produce the final pixel. You can use an alpha to mask out an area to use MSAA. This is the most resource intensive anti-aliasing technique in HDRP.
Temporal anti-aliasing(TAA): Uses frames from a history buffer to smooth edges more effectively than fast approximate anti-aliasing. It is substantially better at smoothing edges in motion, but you must enable motion vectors for this.
Subpixel morphological anti-aliasing(SMAA): Finds patterns in borders of the image and blends the pixels on these borders according to the pattern.
Fast approximate anti-aliasing(FXAA): Smooths edges on a per-pixel level. This is the least resource intensive anti-aliasing technique in HDRP.
Physical Camera
HDRP uses a physically-based Camera system that works seamlessly with the other physical features of HDRP, such as physical light units, to produce physically-accurate, unified results. A physically-based camera works like a real-world camera, and therefore uses the same properties. This allows you to configure an HDRP Camera to mimic the behavior of a real-world camera, with expected results for effects such as exposure and depth of field. For more information on HDRP's physically-based camera, includings a description of how to use it, see the Camera component documentation.
Custom Post-processing
HDRP allows you to add your own custom post processes integrated with the volume framework. They can be injected after opaque and sky object, before the temporal anti-aliasing pass, before builtin post processes or after builtin post processes. For more information, see the Custom Post-processing documentation.
Custom Passes
Custom Passes allow you to inject shader and C# at certain points inside the render loop, giving you the ability to draw objects, do fullscreen passes and read some camera buffers like depth, color or normal, see the Custom Pass documentation.
The Custom Pass API allows you to render GameObjects from another point of view, like a disabled camera, within the rendering of your main Camera. This API also comes with built-in support for rendering Depth, Normal and Tangent into an RTHandle.

You can also use this Camera override to render some GameObjects with a different field of view, like arms in a first-person application.
Custom Pass AOV Export
This feature allows you to export arbitrary data from custom pass injection points using an extension of the Arbitrary Output Variables (AOV) API in HDRP. An example use-case is for exporting “Object IDs” that are rendered with a custom pass. For information about the feature and example scripts, see the AOV documentation.
Path tracing
Path-traced depth of field
HDRP includes a depth of field mode for producing path-traced images with high-quality defocus blur. Compared to post-processed depth of field, this mode works with multiple layers of transparency and does not produce any artifacts, apart from noise typical in path traced images. You can fix this by increasing the sample count and/or using an external denoising tool.
For more information about this feature, see Depth-of-field.
Path tracer convergence
HDRP includes a recording API which you can use to render converged path-traced images. This technique creates the final 'converged' frame by combining information from multiple intermediate sub-frames. This API allows your scripts to extract the properly converged final frames and perform further processing or save them to disk.
Path-traced sub-surface scattering
Path tracing supports subsurface scattering (SSS), using a random walk approach. To use it, enable path tracing and set up SSS in the same way as you would for HDRP materials.
For information on SSS in HDRP, see subsurface scattering.
Path-traced fog
Path tracing now supports fog absorption. Like SSS, to use this feature, enable path tracing and set up fog in the same way as you would for standard fog in HDRP.
For information on fog in HDRP, see fog.
Tools
Render Pipeline Wizard
To help you set up HDRP quickly and correctly, HDRP provides the Render Pipeline Wizard. Use the wizard to fix configuration issues with a single button click, and create a template Scene that is already configured with default Scene settings. For more information on the Render Pipeline Wizard, including a description of how to use it, see the Render Pipeline Wizard documentation.
Render Pipeline Debugger
The Render Pipeline Debugger contains many debugging and visualization tools to help you to understand and solve any issues quickly. For more information on the Render Pipeline Debugger, including a description of how to use it, see the Render Pipeline Debugger documentation.
LookDev
The LookDev is a viewer that allows you to import and display Assets in a good, consistent lighting environment. Use it to validate outsourced Assets or to showcase your own created Asset with HDRP. For more information on the LookDev, including a description of how to use it, see the LookDev documentation.
Debug modes
HDRP includes debug modes that to help you debug your assets, your lighting, and your scene.
Lighting debug view
To help you to debug lighting in your Scene, HDRP includes various lighting debug view modes that allow you to separate the various components of the light into multiple parts. These debug modes are also available in the AOV API to allow recorders to export them:
Diffuse
Specular
Direct diffuse
Direct specular
Indirect diffuse
Reflection
Refraction
Light layer debug mode
HDRP includes a light layer debug mode that displays the light layers assigned to each GameObject or highlights GameObjects that match the light layers of a specific Light.
For more information, see the Lighting panel section in the HDRP debug window.
Volume debug mode
The Render Pipeline Debug window has a Volume panel which you can use to visualize the Volume components that affect a specific Camera.
For each Volume that contributes to the final interpolated value, the Volume panel shows the value of each property and whether or not it is overridden. It also calculates the Volume's influence percentage using the Volume's weight and blend distance.
For more information, see the Volume panel section in the HDRP debug window.
Quad Overdraw and Vertex Density
This debug tool is made of two parts:
Quad Overdraw: This highlights GPU quads running multiple fragment shaders caused by small or thin triangles.
Vertex Density: This displays pixels running multiple vertex shaders.
This is useful for Meshes that are far away or highly detailed. This debug tool can help you find GameObjects in your scene that may require LODs. This mode is not currently supported on Metal.
After Effects Ray Traced 3d Deprecated Free
MatCap mode
In MatCap mode, HDRP replaces the functionality of the Scene window's Lighting button with a material capture (MatCap.md) view. This mode is particularly useful to navigate and get a sense of the Scene without setting up the Scene lighting. For more information on the MatCap mode, including a description of how to use it, see MatCap mode
Backplate
From the HDRI Sky, you can directly project the bottom part onto a plane with various shapes such as a Rectangle, Circle, Ellipse, or Infinite plane.
To match the scale of the GameObjects in your Scene, you can vary the pixel footprint.
Light Explorer
The Light Explorer allows you to select and edit light sources: Directional lights, Point lights, Spot lights, Area lights, Reflection Probes, Planar Probes and Sky and Fog volumes
After Effects Ray Traced 3d Deprecated Pdf
Graphics Compositor
The Graphics Compositor allows real-time compositing operations between layers of 3D content, static images, and videos.
This tool support three types of compositing techniques:
Graph-based compositions guided by Shader Graph.
Camera stacking compositions: Multiple cameras render to the same render target and the result can then be used in graph-based composition.
3D composition: Insert composition layers into a 3D Scene to create effects like reflections/refractions between composited layers on a 3D GameObject.
Overall, this tool allows you to compose a final frame by mixing images and videos with 3D content in real-time inside Unity, without the need of an external compositing tool.
For information about the feature, see the HDRP Compositor documentation.
Programming
Material architecture
HDRP supports forward and deferred Materials. Deferred Materials are more efficient than Forward Materials, but support a slightly limited set of properties. Forward Material have no property limitations, but are slower to render than Deferred Materials.
HDRP's Material architecture allows you to add your own forward Materials and includes a list of rules you must follow to compile your Material in HDRP.
After Effects Ray Traced 3d Deprecated Files
Lighting architecture
HDRP uses a hybrid tile and cluster renderer for forward and deferred rendering of opaque and transparent GameObjects. This creates a local light list to allow HDRP to render a high number of Lights. Use the forward renderer to light more complex Materials, such as those that use subsurface scattering or are anisotropic. Use the deferred renderer to increase the processing speed of lighting for common Materials, such as standard Lit or Unlit Materials. For more information on HDRP's lighting architecture, including an explanation of tile and cluster rendering, see the lighting pipeline documentation.
Control on Shadow Update
HDRP provides an API to ask a light to update their shadow maps. All you have to do is set the shadow map update mode to OnDemand and call RequestShadowMapRendering() in the RequestShadowMapRendering class.
How To Create 3d Objects In After Effects No Plugins After Effects Tutorial Plugins
In this video tutorial we'll take a look at how to quickly create 3d objects in after effects. download project files: schoolofmotion tutoria. Download source file: patreon posts 3d shapes in 32030085⭐ visit channel: moveshapes videos subscribe: y. Lights affect only layers that have 3d enabled. choose layer > new > light to add a light into a composition. choose a type of light from the light type menu in the light settings dialog box. there are four kinds of lights in after effects: parallel light has a continuous direction, without any spread, like a laser. I go over a quick method to create 3d objects in adobe after effects. you can then have them rotate and even be effected by lighting. learn to conquer youtub. After effects is a robust program, capable of more than you're probably aware. that's why we want to show you three easy ways you can create 3d text, without any fancy gadgets or gizmos (okay, one fancy expression).
How Make 3d In After Effects Tutorial Youtube
In this video i will be teaching you how to create 3d text in after effects. in the video, i demonstrated this using adobe after effects cc 2018.be sure to s. Element 3d is by far the best native 3d option in after effects, with highly customizable options and a ton of great presets with which you can quickly create amazing titles with little effort. the plugin works surprisingly fast, in light of it’s functionality. 3d proanimator ae is a revolutionary new plug in that creates 3d motion graphics directly inside of adobe after effects. it's fast, really fast, when compared to other 3d programs. see the product details for more information or add the software to your cart to get star.
Using Shapeshifter For After Effects To Create 3d Objects Quickly
Quickly Create 3d In After Effects
in this video tutorial we'll take a look at how to quickly create 3d objects in after effects. download project files: download source file: patreon posts 3d shapes in 32030085 ⭐ visit channel: moveshapes videos ✓ subscribe: i go over a quick method to create 3d objects in adobe after effects. you can then have them rotate and even be effected by lighting. learn to conquer download the free ae project file and follow along with step by step directions on creating 3d text using just after effects. no plugins required! ****download in this video editing tutorial, i will show you how to extrude a 2d flat png logo image into a 3d animated rotating logo in after effects cc 2018. my website another quick tutorial showing you how to create and control 3d objects inside of after effects, using no 3rd party plugins. download move anchor point plugin: in this video i will be teaching you how to create 3d text in after effects. in the video, i demonstrated this using adobe after effects cc 2018. be sure to use spline objects, extrude objects, and the powerful animation tools in the mograph module to create and animate a mobile video game device with cel in this tutorial, we will create a isometric icon that you will be able rotate link 3d. this animation technique will speed up your workflow. ⭐ download complete new in adobe after effects utilize a new mode that offers an array of 3d tools created to help you navigate and design in 3d space better and faster. exciting bit.ly 3ang6ct create a 3d trading card in after effects with this simple breakdown. check out the blog post for more information, plus a free download of hi guys, in this video, i will be showing you the steps you can follow to bring a still photograph to life and turn it from a 2d flat image into a cool 3d scene by
Related image with quickly create 3d in after effects
After Effects Ray Traced 3d Deprecated Video
Related image with quickly create 3d in after effects
0 notes
Photo


@mack3030 @xldkx (full flickr album)
I’ve been fielding questions from friends that don’t make cc or do 3-d imaging about how these screenshots mean they stole meshes and did the behind the scenes work to doxx people. So I did a bit of an ELI5.
CC is made up of a few parts,
the mesh, or form that makes the item look 3-d;
the UV Map, or textures, the part that has color;
the programming that allows it to work.
When we recolor something, the texture is split into 3 more layers:
the diffuse layer- the picture
the normal map, also called bump map, an embossed layer that adds dimensionality without polygons;
the specular map, also called spec map, way of telling the game engine where to add shine and how much in what way. (I have a deep dive into spec maps here)
When they talk about baking a watermark into the normal map that means that they are changing the bump map to have a very slight difference that won’t show very much in game, but will in their image editor. Assuming they keep a database of serial numbers and who they sent them out to, it would be easy to keep track of who got what. This is what is meant by “trackers in the cc.” It isn’t a key logger or something, it’s more like how you know if the cash you are handling is legal tender.
Watermarks are so old that the term comes from the parchment and papermaking trades of the Middle Ages. They would take a stamp and press it into the damp sheet and create a thinner area. This would create a mark that would be distinct to the shop that made it and would show when held up to the light. Such things are still employed today by paper makers. Someone who is experienced at editing images and making images wouldn’t need to ask how to make a watermark. It would take experimentation to get it looking the way they wanted it, but it wouldn’t require them to consult about how to do it at all. They might want to see if there’s an easier way or post about how they do it asking about how others do it so they can compare.
In the example about the doll, they are concerned about the level of detail in the doll’s mesh. Every object in the game, including the sims and their clothes is made up of polygons (called polys) that at their most basic look like a pyramid. The more polys something has the more complex it is and the more detailed it is. Think about the way that Mine Craft is compared to The Sims 4 and Grand Theft Auto. If you look at the doll, it is extremely detailed. I can see parts of its eye, the way its cloths wrinkle, individual strands of hair. She says that it has 2,000,000 polys and she would like to get them down to about 20,000. This would reduce the complexity by 99%.
The doll in the Twitter post looks unchanged to me from the original model she purchased, but with a diffuse layer. If 99% of the polys had been removed from that promo shot, then I wouldn’t be able to see the details in the hair and the face in the same way as the mesh shot. I am a rank n00b at blender, but it seems to me that after removing all that detail from the mesh, it would lose most of what attracted me to it in the first place. I would probably be better served by making a new, simpler mesh and then adding the unique details on the diffuse layer. The fact that she’s asking for help to remove this much details suggests that using the decimate tool is too hard for her or that creating a new mesh inspired by this one is beyond her skills.
And finally we come to the lamp which she is wondering how to unwrap. Unwrapping the UV Map is the process of making flat shapes that can be made to cover the mesh. Imagine taking your clothes apart at the seams to lay the pieces flat. This is a basic task someone who was able to make such a complicated lamp would’ve been able to do. There are multiple ways to approach this, generally you’d go for a long trapezoid for the lampshade and various sizes of rectangles for the base.
To sum up: Given these three examples, there is no way she would’ve been able to make the hundreds of items in her back catalog. If she had attempted to make even a quarter of them, she wouldn’t have needed to ask these questions.
107 notes
·
View notes
Photo

“Oops, I did it again! I played with your heart, got lost in the game.” 🎵
A new wip/coming soon item, and finally I’m back creating a shoe!!
I’m so happy with how it looks, turned out so glossy and looks like latex, that obviously is a reference to Britney Spears’s “Oops I Did It Again” ICONIC outfit.
THE HISTORY BEHIND THIS ITEM: I was looking thru the new meshes and them see the Square Heels... The first thing that came to my mind was “I need to do a boots with it”, while I was thinking in a design for it the music player started to play “Oops, I did It Again”... Well, you got it! hahaha
More photos, details and release date bellow the cut!
* THIS POST IS PROGRAMMED! *
For these boots I did 25 swatch colors, all plain colors.
As usual it’s base game compatible and made for female frame.
The photos bellow shows the boots in-game without edition, HQ mod or reshade:

These boots use specular map for having this glossy look, so this “shine” follows the light of the game.
So, I’m thinking here, are you guys interested in an opaque version of these boots, with a leather like texture?! 🤔 Maybe I’ll set a quick poll for decide it...
And this wip will be released tomorrow (Saturday, 5th June)!
As soon I wake up (just to remember, this post it programmed), I’ll finish the last details and the previews, for posting it Saturday.
Also, I have another wip, that’s a hair. You can see it here!
I’m so anxious for see the amazing looks you guys will do with it! <3
See you guys later with more hair updates, XOXO <33
#s4wip#ts4wip#s4 wip#ts4 wip#s4cc#s4 cc#ts4cc#ts4 cc#s4ccwip#ts4ccwip#work in progress#s4 work in progress#ts4 work in progress
106 notes
·
View notes
Note
Ok but what if the Traffic trio go back in time and meet the Jorney to the West crew?
This is the Time-traveling shenanigans I was waiting for LET’S GO!
(I haven't finished the book yet, I'm just at chapter 14, so the JTTW crew might seem a bit OOC)
Ok, first of all, let’s say that the Traffic Light Trio meets the JTTW gang after they had to deal with Red Boy (I’ll call him that for now just so it’s easier to tell him apart from RedSon).
So our band of colorful kids finds themself pretty much lost in what looks like a forest with no idea of when they are.
They opt to walk around for a bit in the hopes of finding something that might help them, and they do find someone.
Not too far away from where they appeared there’s a camp with a water demon and a pig demon bickering amongst themselves and a meditating monk.
Surely these aren’t the same monk and demons that traveled west with the Monkey, right?
Aaaaaaaannndd MK is already gone talking to them. Great
The monk and the demons are startled by the new human but, thanks to MK’s charm, they quickly fall into a pleasant conversation.
“What bring you here in the middle of the woods young one?”
“Oh, me and my friends, we ... we’re traveling to a nearby town! Yup, that’s it!”
“And where are your companions?”
“They’re ... looking for food”
So now Red and Mei are left hiding somewhere (there’s no way in hell Red is going anywhere near the monk, especially because he couldn’t see where the monkey was) while MK happily chats with the pilgrims.
Meanwhile, hidden by the tree’s fronds, the Monkey King silently observed everything happening.
He saw the three younglings appear out of nowhere and he saw the demon and the girl hide not too far away from their camp.
The only reason why he didn’t spring down and took care of the demon yet was because of the young boy that was chatting with his master.
There was something about the kid's aura that was so familiar. Almost like looking into a mirror, but not quite like a reflection.
So, now truly curious about this kid, the monkey jumped down from his hiding spot and in front of the boy.
Now, the first reaction that the monkey expected out of the kid was panic, but what he got instead was eyes full of admiration and his name pronounced without any fear.
So this kid not only knew who he is, he's not scared of him? Well, there's a first time for everything.
And the Monkey wasn't the only one surprised by the boy's odd behavior, his gleefulness did not go unnoticed by the other demons and the monk (who already knew this was going to bost the monkey's ego by several times and would probably cause some problems).
Wukong, now truly amused by the kid's antics, asked him to call for his friends and MK's happy-go-lucky attitude was quickly replaced by hidden panic.
He knows that Monkey King and his companions had to fight RedSon and would surely recognize him even if he's several centuries older now. The problem is that he doesn't know if the pilgrims had already fought Red or not, and now that he thinks about it he should have tried to gather that information while he was talking to the monk.
So now MK is trying his best to come up with an excuse as to why his friends couldn't come to meet them, and he was utterly failing!
Seeing that things were going downhill for her friend, Mei decided that they might as well be done with it, and went up to the camp dragging behind a complaining Red.
As soon as the green girl and the fire demon were in sight, the pig and the fish took a defensive stance while the monk became several shade paler. The monkey, on the other end, kept looking rather amused.
"What are you doing here? I thought Guanyin had looked you up somewhere. Don't tell me she let you out on good behavior?"
And before Red could spat out some insult at the monkey, Mei slapped a hand over his mouth and answered for him.
"Yup! Red here is been a really good demon! He's hanging out with us now!"
With everyone a tad bit calmer after Mei's lie, the two groups sat at the opposite sides of the camp and kept for themself.
Now, after the whole incident with the young version of the Traffic Light Trio, the two mortals and the demon find out that the artifact that allowed them to go back in time needs a whole day to recharge before it could be used again. Which meant that they had to wait till the next night before they could go back home.
Be in the past for a whole day wasn't a problem for MK, the change of seeing his idol in his glory days was too good to past, but Mei and Red were less thrilled about it.
Zhu Bajie had been looking at Mei since she set foot out in the camp and, while she wasn't exactly new to this type of attention, she definitely wasn't a fan of it.
Red was currently having a glaring contest with the Monkey King, Wukong's gaze clearly saying "try anything funny and I'll make you taste my iron rod" and Red responding with a "fuck you" look.
The air was dense between the two parties and it stayed that way up until everyone went to sleep.
The next day the JTTW gang set to travel again, followed by the two mortals and the demon, in silence.
But the silent peace was interrupted in the afternoon when demons decided to attack the traveling group with every intention of kidnapping the holy Tang priest.
Mei and Red had no problems defending themself, one with her jade sword and the other with fire, but MK was not doing so good.
Since they met the pilgrims MK did his best not to use any of Monkey King's powers, because he didn't know if it would mess up with the flow of time if his mentor find out he had a successor before he decided he wanted to retire.
So he was now fighting with his bare hands and he was getting quickly tired out.
Red: Noodle boy what are you doing! Use the staff!
MK: But, Monkey King-
Mei: We'll deal with him later!
And so, the Monkie Kid manifested the as-you-wish cudgel and set off to fight again.
Now, the appearance of a second golden staff did not go unnoticed. It distracted Sandy so much that a demon manages to get a lucky hit on him, but he was quickly killed by the fish.
After the fight was over, and the demons that weren't killed run away, the monkey approached the MK.
The soon-to-be mentor standing right in front of his successor, like a specular image, and asked him why he had an identical version of his golden cudgel.
Knowing full well that lying to Wukong would be futile (if not extremely stupid) the kids had no other choice but to tell them the truth.
And so they explained everything, from MK becoming the monkey's successor, to Red joining their side, and the artifact that led them here.
The monk and the pilgrims listen to them intently, but they didn't truly believe the story these kids were telling them.
When the Traffic Light Trio was done explaining their story, Wukong started to laugh. And not because he didn't believe them, on the contrary, he was sure that 99% of what they told them was true!
No, the Monkey was laughing because "he wanted to retire". That had to be a joke right? Why the hell would he ever retire!?
After the monkey's laugh finally subsumed both parties started to happily chat, with the pilgrims asking questions about the future and the youngest three doing their best not to answer those questions.
But sadly, the time artifact was finally fully charged and it was time for the Traffic Light Trio to go back home.
So after some quick goodbyes and farewells (very quick on Wukong's part) the two mortals and the demon grab a hold of the artifact and get transported back home.
Several days after their little trip back in time, MK can't get Wukong's words out of his head.
"Why would I ever retire?"
With time people can change and MK knows how much the Monkey King changed during his journey west, but there was a weird feeling that went along with the words the young monkey spoke, and he couldn't stop thinking about it.
#someone who can actually wirte#I beg#please turn this mess into a fic#lego monkie kid#monkie kid#monkie kid au#time artifact au#journey to the west#jttw#traffic light trio#winter answer#winterpower98
152 notes
·
View notes
Note
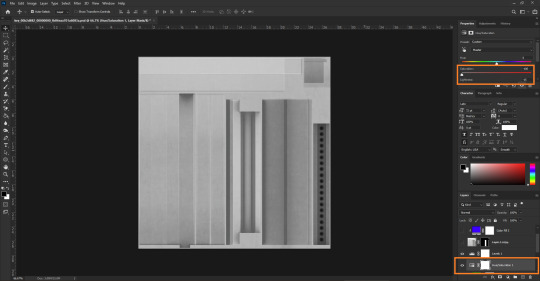
Hi! I was wondering when converting s4 to s3 how do you make the multiplier and specular? Thank you for your time!
Hmm, okay, how to explain it without taking too much time...
THE MULTIPLIER
All right. While many people prefer to re-bake a multiplier on Blender (and you can find bake tutorials VERY EASILY), I actually REALLY LIKE the painted-on wooden texture of many EAxis objects, so I extract a diffuse from my object of choice:
(as I told in a previous post, I actually extract two, a high contrast one for the mask, a low contrast one for the multiplier, and I make the mask FIRST.)
PNG is fine; I only had to extract a diffuse in DDS once, because EAxis screwed with the alpha.
I make my mask (it’s basically selecting different colored parts and filling it with color channels, that’s for another time), then I add it as a new layer over my multiplier diffuse:
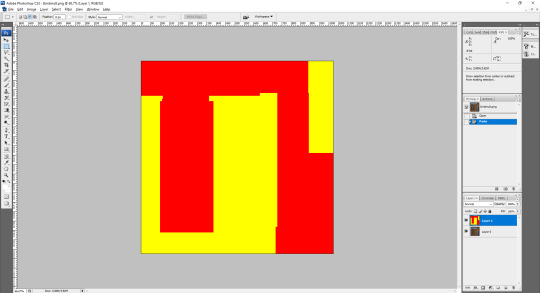
See the bottom right corner? Two layers!
But before playing with the magic wand, I go to Layer 0 / Background Layer / whatever it works on your image editor, and I desaturate the multiplier. In Photoshop, it’s Image > Adjustments > Desaturate.
My multiplier layer looks like this now.
While it LOOKS like it’s finished, now I need to check if the average color of a certain part of the texture is middle grey, or RGB 128, 128, 128 (some people go for 133-133-133 to avoid flat blacks, assuming the risk of getting overblown pure white recolors, but that’s a matter of TASTE).
For that, I’ll reactivate my mask layer and use the magic wand to select the red channel, THEN I hide my mask layer again. Do not forget to set tolerance as 0, no anti-aliasing, not contiguous.
If you do it right, your selection will look like this

Now it’s just a matter of using the eyedropper tool to click on a not very bright, not very dark part of the selection and see if it’s 128-128-128 or very close to it (126 to 130 is an okay margin).
In this case, it’s a little too dark, so I go to Image > Adjustments > Brightness/Contrast and I fiddle only with the Brightness slider until getting close to my result (you CAN use the eyedropper without applying the changes, just look at the upper right corner to check the new value. For this selection, I used Brightness +38.
(Some textures, especially when too light, need to be darkened by Adjustment > Curves, but that’s more of an outright Photoshop tutorial than just fiddling with stuff. Practice, practice, pratice...)
All right, it looks like this now, with only the part of the multiplier that will be affected by the red channel brightened:
If your item has only one channel, then save your multiplier, it’s finished (and you really didn’t need to paste the mask as a new layer to help with the selections, since a one-channel mask is fully red, but it’s good to get into the habit)
For every other channel, press Ctrl + D to deselect everything, reactivate your mask layer, select the new channel, repeat everything. But IMPORTANT: different channels WILL require different Brightness values UNLESS you got a monochromatic diffuse, and not every item comes with a plain swatch.

In this case, my second channel needed an adjustment of Brightness +28, just to prove what I just said about different channels, different values :)
Since my example only came with two colors, I save it as PNG for now. I only convert to DDS when it’s over 1024x1024 or I’m pretty sure that the DDS compression won’t fill my texture with artifacts. Even multipliers with transparent or translucent parts work with PNG just fine.
THE SPECULAR
You’ll NEED a finished multiplier first. Yes, really.
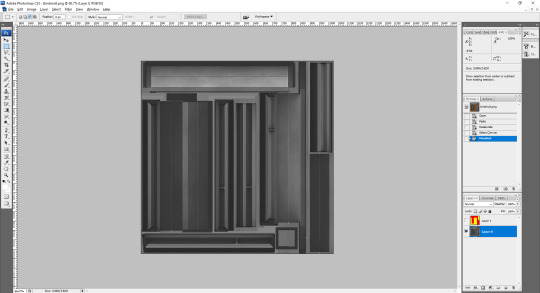
The fastest way is to select everything, go to Image > Adjustments > Brightness/Contrast, and hike the Brightness to +100 or +110 and up the Contrast a little.

LIIIGHT.
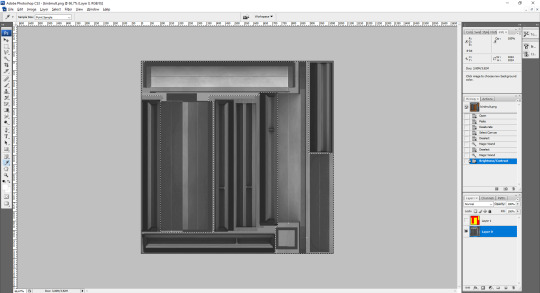
Than you go to the Channels tab of your Layers window and add a new Alpha Channel by clicking this button:
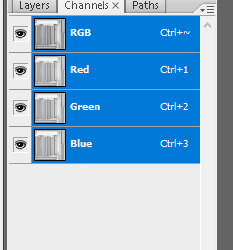
You’ll have a brand-new Alpha 1 channel that’s fully black. That’s fine, keep it that way.
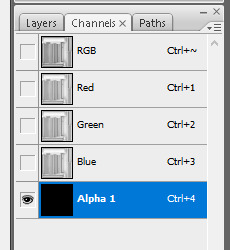
Select the RGB channel, you’ll see that your specular will have a faint red tint - no worries, that’s just to show that your Alpha is also active.
Now, you’ll have to save it as a DDS, no ifs or buts:

ALWAYS keep the Alpha Channels option ON, or else you’ll have an item that’s always shiny because no alpha means a fully white alpha, which means the game will force the brightness of the original, hyper-brightened texture ALL THE TIME. Black alpha, and it means things only get shiny if you add a shiny pattern in CASt.

In the next window, choose DXT5 compression.
And that’s... the basics. Checking if it gets noisy, if it needs more adjusts after you import it to TSRW, etc, are matters of practice, getting familiar with your image editor, and developing a good eye for subtle color changes. But the necessary parts are those that I explained, and they’ll work great in 95% of the cases!
(the other 5% are for when you need a translucent part in Phong Alpha shader to not be recolorable because Phong Alpha overlays SUCK, when TSRW messes with your textures no matter if it’s PNG or DDS and you’ll need to save a texture as 8.8.8.8 uncompressed DDS and replace it with S3PE, and all sorts of... annoying issues)
Also credits for @enable--llamas for finally showing me a way to make speculars that WORK.
This is a tad slapdash, but hope it helps!
58 notes
·
View notes
Note
Maybe it was the universe way of telling me to shut the fuck up😂. I had it in my notes, I’ll try again: take 2, action 🎬
Okay it was so fucked up to hear Sasha tell her story. It was the first time she actually mentioned what specifically happened out loud and that her family was involved… awful is an euphemism.
And from a narrative standpoint, I love how it almost feels like their roles have been reversed, as if their journeys were two parallel lines and at some point they became specular. It makes more sense in my head and maybe I’m imagining it, but what I mean is Sasha starting to get better (sloowly but she’s at least accepting help) and jk shutting down. And it also relates to how they’re so similar yet complementary to each other.
Side note: Sasha is such a real and relatable character. The rush of having a goal and running towards it as fast as you can knowing it will burn you out and the feeling of “if not me then who” to fix the world problems you clearly cannot fix on your own. There is an Italian Netflix cartoon (really particular because it’s entirely dubbed in Roman dialect) called “Tear along the dotted line”, it’s the same genre as Bojack Horseman, so it makes you question your existence in 20 minutes. Point is, there is a scene that really made me think of these specific issues Sasha is dealing with in which there is the main character as a child freaking out because he was good at math at first and he thought his math teacher put all these expectations on him but as time went on things got more complicated and he didn’t really understand anything anymore (honestly me lol) and he was panicking about his math teacher being let down by him not getting good grades. So his friend tells him he is just one out of hundreds of students, the math teacher doesn’t really care, and says “don’t you see how great this is? That you don’t need to carry the weight of the world on your shoulders, that you’re just a blade of glass in the middle of the meadow? Don’t you feel lighter?”
Anyway, hope things will get better soon for Sasha. And for JK too, hopefully REALLY soon cause I can’t take it anymore, what happened to shy little cute boy I miss him😭
🌸
That sense of lightness is totally what she needs, and the realization that she is both special and also not, that it’s just her the chosen one to save the world. Guilt is a running struggle for both of them throughout the series 💔❤️🩹
If the universe is trying to stand between us it needs to gtfo. It’s too fun hearing your thoughts!
6 notes
·
View notes
Text
The Covenant: Fall Bonfire

Caleb Danvers x Reader
Word Count: 1,135
The sun had been out in full force that day, which made for a specular sunset. Beautiful hues of pink, orange, and purple melted together in the sky like something out of a vaporwave mural, the quickly fading light promising a perfect night sky view.
Fall was an interesting season for trees in New England; one day the leaves would be in full autumn bloom and by the next the entire tree would lose them, all the crunchy brown leaves laid on the ground.
Caleb had been busy for most of Saturday helping his mom rake their property. Normally, they would’ve paid someone else to do it, but he thought it might be a good opportunity to get his mom out of the house. Understanding that he would likely be tired after working all day, and that his mom would want to do dinner with him afterwards, you tried telling him that it was fine if you guys didn’t see each other that day.
Still, he insisted that he wanted to see you regardless if he was tired or had to wait until after dinner. You suggested a bonfire at your place and he agreed without hesitation. Since you had come up with the idea, he insisted on contributing everything else that was needed. You reminded him not to worry about wood as there was plenty of it to burn at your family’s home, but that didn’t stop him from promptly showing up at the doorstep at eight o’clock, arms full of fire wood.
“I’ll put this out back and come back for the rest of the stuff.”
You led him around the outside of the house to the backyard. He dropped the wood next the firepit and jogged to the car, returning with a bag that had matches, lighter fluid, and stuff for s’mores.
“I know they’re your favorite,” he said with a smile. He dug around and pulled out several packs of chocolate. “Hershey’s is classic, but I thought it could be fun to experiment with these.”
He showed you a bright orange pack that you instantly recognized as Reese’s cups. You couldn’t tone down your big, goofy smile no matter how you tried. Caleb wasn’t a super flashy guy by nature, but he was very intuitive and him remembering that s’mores were a favorite of yours reminded you how lucky you were to call him your boyfriend.
“It’s perfect, Caleb. Now all we need is some good tunes.”
“Damn,” he muttered. “I forgot about the music.”
He sighed in agitation and started talking under his breath, putting himself down. Caleb was so used to being seen as perfect, and he held himself to such high standards, that if he did something and failed to meet expectations, he considered it a failure. You were working with him to loosen up his perfectionism, but it was something he was still working on.
“Hey,” you said interrupting his frustrations with a kiss. “Everything’s fine, okay? I’ll grab my radio from inside and it’ll be fine.”
You ran into your room, grabbed the boombox, and were back outside with Caleb in a flash. You turned it on and flipped to your favorite station while he got the fire started. When he got it going, flames licking up the logs and the wood cracking, you worked together to spread the blankets on the ground. The pillows were added last in a fluffy heap.
Now that it was properly dark out, the orange flames were mesmerizing to watch as were the fingers of smoke that danced up in the air.
Caleb speared marshmallows on two roasting sticks, handing one to you and keeping one for himself. Caleb circled the fire searching for the perfect spot to roast his marshmallow. You simply stuck yours directly into the flames, holding it there until it lit up. Pulling it back, you circled your lips and blew it out with a single puff of breath.
Happy with your charred creation, you set it between two graham crackers and stuck in a piece of chocolate. Caleb looked at you in minor disapproval as he slowly turned his marshmallow. He crinkled his nose.
“I don’t know how you can eat yours black.”
“I’ll have you know, this is the best way to eat a s’more,” you protested with your mouth full.
He shook his head and checked his progress. He finally finished his golden masterpiece and followed your assembly process. He closed his eyes in ecstasy as he put it in his mouth.
“Now this is the way to eat a s’more,” he groaned. He finished the rest in one bite and stuck another marshmallow on the roaster. “I’ll make you one and you’ll see.”
“I really like mine charred. Honest,” you crossed your heart. “But I won’t say no to you making me one.”
You kneeled behind him as he sat, slowly turning the roasting stick, and plastered yourself against his back, wrapping your arms around his waist. He made another golden beauty and put the s’more together for you, this time with the Reese’s cup inserted inside instead of the Hershey’s.
Even though the new combination had sounded good when Caleb described it earlier, but you were still surprised by how yummy it was. In fact, this version may top the original.
“Try some, it’s super good.”
You held out your hand to him and he moaned as he chewed. Licking at your fingers, he smiled enticingly at you and you couldn’t resist him. You playfully jumped him, knocking both of you to the ground where you landed on the cozy pillows and blankets from earlier.
You planted a big kiss on his lips from your position hovering above him. His lips parted to allow you access to his mouth and he surged underneath you, his hands tightly gripping your thighs. The heated exploration delved into increasingly bold licking and petting.
Afterwards, you two were cuddled together, your head resting on his pecs, gazing at the stars overhead. Caleb absently stroked your arm with one hand while the other pointed out constellations.
“There’s the Big Dipper, and Orion’s Belt is over there next to Eridanus...”
Hearing you yawn, he stopped talking and went still. “Am I boring you?” he asked quietly.
You popped yourself up on your forearms and slapped his chest. “Of course not! I’m just really cozy right now.”
He relaxed as you laid back down to cuddle with him. Caleb resumed his stargazing, his voice further soothing you until your limbs tingled and turned to liquid.
In the background, an acoustic song played softly on your radio and the distinct smoky smell of burning wood drifted around you. It was a calm autumn night and you were in your loving boy’s arms.
It truly was a perfect night.
_______________
Here’s a short piece for Caleb. All the Sons would make good boyfriends, in their own ways, but Caleb is the closet to a fairytale boyfriend type. Hopefully this wasn’t too cheesy and thanks for reading!
60 notes
·
View notes
Last Seen Blogs

goingplacesfarandnear
Going Places Far & Near

p-freu
No name

asfamilychurchblog
AS FAMILY CHURCH

simmerkate
SimmerKate

nnjthndr
NT