
ilvansims3conversion
Ilvan Sims 3 Conversion
Sims 3 Maxis Match Build/Buy Conversions. No requests, suggestions are welcome though. Check my main blog for WIPs @ilvansims3
21 posts
Don't wanna be here? Send us removal request.
Last Seen Blogs

kylo-renofficial
Welcome to my Twisted Mind

beanyboobee
GenralQueenCycle

supermo0
Mo0!

avinaturals
Avi Naturals-Pure Natural Essential Oils

segernatural
bob seger is a heller
Text

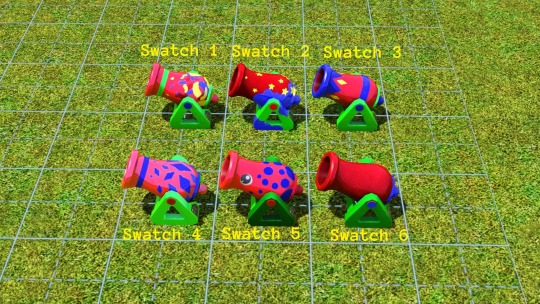


4to3 Growing Together Celebration Cannon as Late Night FX Machine Conversion
One of the objects that I liked from the pack was this cannon and wanted them to be somewhat functional when I converted it to the sims 3. So I thought of cloning the FX Machine from Late Night and replace it with this mesh. Now it's perfect for kids parties and other celebrations! :)
Direct download links: SimFileShare | MediaFire
MTS download page
More info under the cut:
These are cloned from LATE NIGHT FX Machine object. You need it to be installed on your game to function properly.
Original sims 4 price & description.
Can be found in: Buy mode > by function > entertainment > parties
Size: 1x1
Price: $120
There are 6 swatches:
Swatch 1-3: 4 recolor channels
Swatch 4-6: 3 recolor channels
hLOD : 681 poly
mLOD: 382 poly
There is a minor visual problem with the animation angle when changing the delay other than the default value of "continuous". I have tried changing the angle up to the base bone, but it's still can't work properly. So please refrain from changing the the delay on this object, otherwise it just looked a bit funky.
@pis3update @xto3conversionsfinds @matchsim @gifappels-stuff @katsujiiccfinds @neillesims-ts3ccfinds @kpccfinds @ts3-ccfinds @ts3ccmp @4t3bbdatabase
#4to3#4to3 conversion#ts3cc download#sims 3 cc#ts3 cc finds#4t3#4t3 conversion#ts3 conversion#ts3 simblr#ts3cc#sims 3 cc finds#cc finds#s3cc download#sims 3 download#sims 4 growing together#sims 3 late night#celebration cannon#fx machine
212 notes
·
View notes
Text
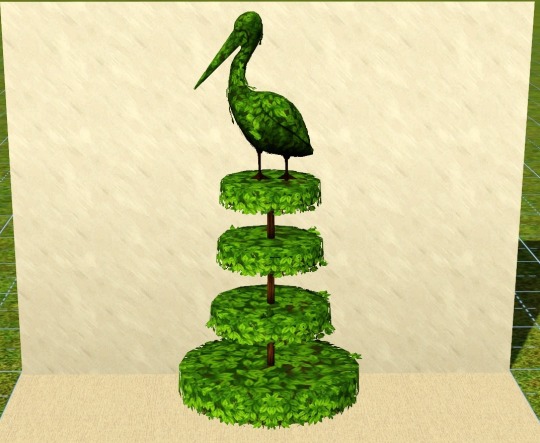
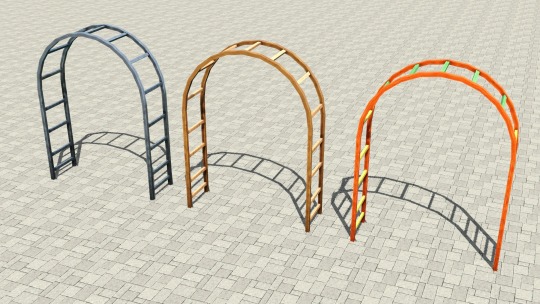
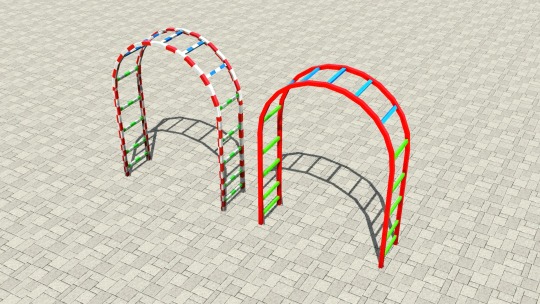
4to3 Growing Together Debug Pelican Topiary & Base Game Debug "Metaleasy" Garden Arch Redux 2x1 version Conversion
Direct download links:
Pelican Topiary: SimFileShare | MediaFire
"Metaleasy" Garden Arch Redux 2x1: SimFileShare | MediaFire
More info under the cut:
Growing Together Pelican Topiary:

Found in: Build mode > Shrubs
1 swatch, NON recolorable
Size: 2x2
2010 poly hLOD | 745 poly mLOD
Price: $50
Environment: 1
Catalogue description made by me
Check out my other topiary conversions:
Mod the sims page:
Tumblr page:
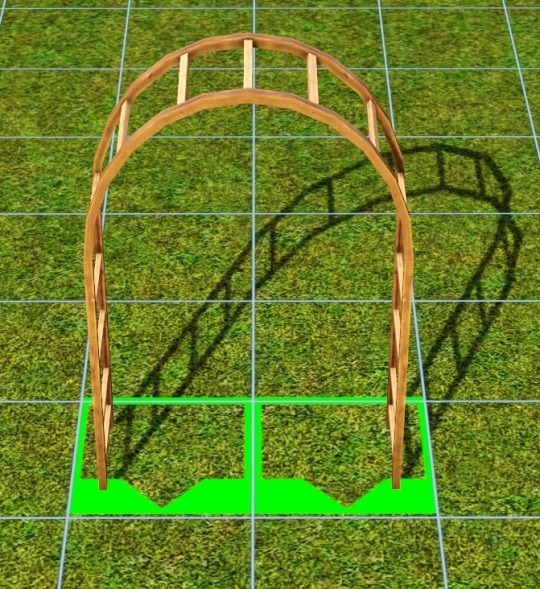
"Metaleasy" Garden Arch Redux 2x1 version, as suggested by @fluttereyes:
Left: Original 3x1 size | Right: Redux 2x1 version
Found in: buy mode > by function > decor > plants / sculptures
Price: $115
Size: 2x1
3 swatches
3 recolor channels
mLOD 250 | hLOD 420
Sims can walk under it
Catalogue detail credits to @alistu / Menaceman44 at MTS
Original garden arch conversion tumblr page:
@pis3update @xto3conversionsfinds @matchsim @gifappels-stuff @katsujiiccfinds @neillesims-ts3ccfinds @kpccfinds @ts3-ccfinds @ts3ccmp @4t3bbdatabase
#4to3#4to3 conversion#ts3cc download#sims 3 cc#ts3 cc finds#4t3#4t3 conversion#ts3 conversion#ts3 simblr#ts3cc#sims 4 growing together#sims 4 debug object#sims 3 decor#sims 3 download#simblr#the sims 3#maxis match#s3cc download#cc finds#sims 3 cc finds#topiaries#garden arch#garden
98 notes
·
View notes
Text
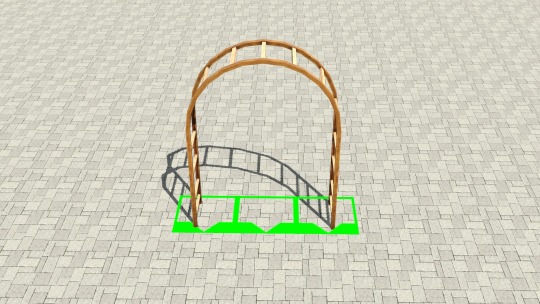
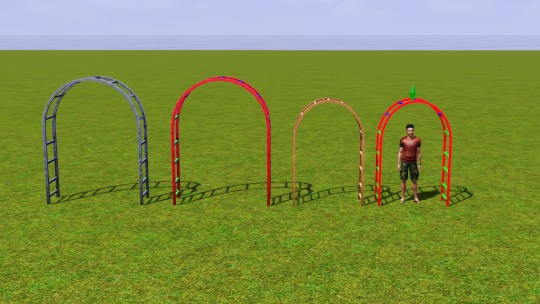
4to3 Base Game Debug Object: "Metaleasy" Garden Arch Conversion
Direct Download: SimFileShare | MediaFire
Catalogue detail credits to @alistu / Menaceman44 at MTS
More info under the cut:
Found in buy mode > by function > decor > plants / sculptures
Price: $145
Size: 3x1
3 swatches
3 recolor channels
mLOD 232 | hLOD 402
Sims can walk under it
@pis3update @xto3conversionsfinds @matchsim @gifappels-stuff @katsujiiccfinds @neillesims-ts3ccfinds @kpccfinds @ts3-ccfinds @ts3ccmp @4t3bbdatabase
#4to3#4to3 conversion#ts3cc download#sims 3 cc#ts3 cc finds#ts3 simblr#ts3 conversion#ts3cc#4t3#4t3 conversion#garden arch#sims 4 debug object#sims 4 base game
147 notes
·
View notes
Text
A little news/update
Hello everyone! I wanted to post a little news/update about my conversion projects. With the new EP just around the corner, I prefer conserving my energy and wait after the release date to convert new objects from it.
In the meantime, I have been working on converting the Elixir of Life aspiration reward from sims 2. It will be fully functional if you have the fountain of youth store item. It's still not perfect yet, so please bear with me :)

For other WIPs, you can check my main blog @ilvansims3
24 notes
·
View notes
Text


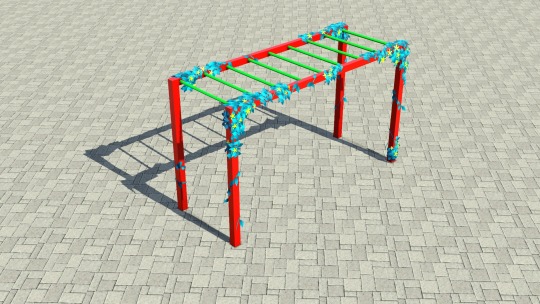
4to3 Monkey Bars as Showtime Chin Up Bars Conversion
When I was converting these Romantic Garden Plants, I saw the monkey bar that comes with the pack. I don't think that they have been converted before, and would love to make them somewhat functional in my game. So I decided to clone the Chin Up Bars from Showtime and replace its mesh with these monkey bars. Now your teen-elder sims can join in with the younger age sims on the playground! They can be found in entertainment > sporting goods.
Full details on my modthesims page.
Direct download: simfileshare folder | mediafire folder
@pis3update @xto3conversionsfinds @matchsim @gifappels-stuff @katsujiiccfinds @neillesims-ts3ccfinds @kpccfinds @ts3-ccfinds @ts3ccmp
#4to3 conversion#4to3#4t3 conversion#4t3#sims 4 romantic garden stuff#monkey bars#chin up bars#ts3cc download#sims 3 cc#ts3 cc finds#ts3 conversion#ts3 simblr#ts3cc#s3cc download#sims 3 download#cc finds#sims 3 cc finds
399 notes
·
View notes
Text

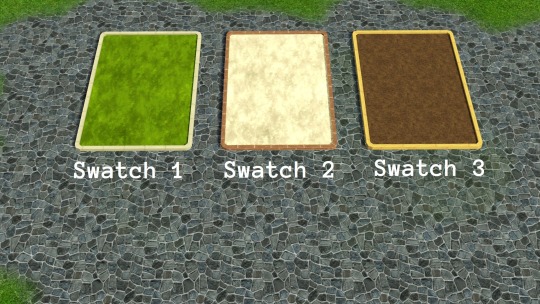
4to3 Debug Garden Plot Conversion
I'm currently on a gardening spree, so this time I have converted these garden plots from the sims 4 debug catalog for the sims 3 :D
Every item cost 50 simoleons, has 1 environment value and can be found in build mode > rocks
Full details (polycount, etc) on my modthesims page
Download links: simfileshare folder | mediafire folder
@gifappels-stuff @xto3conversionsfinds @acottonsock @pis3update @matchsim @katsujiiccfinds @smfinds
#4to3#4t3#4to3 conversion#4t3 conversion#s3ccfinds#s3cc download#ts4 to ts3#ts3 cc finds#ts3cc download#ts3 simblr#ts3 conversion#sims 3 cc#sims 3 download#the sims 3#simblr#sims#garden#maxis match
347 notes
·
View notes
Text
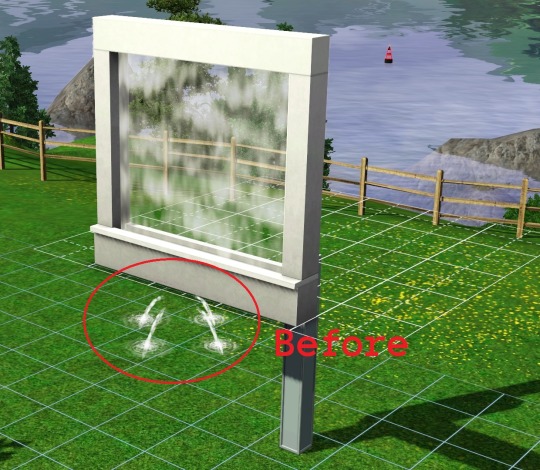

Smaller Fountain Emitter Effect of My 4to3 Converted Fountain Objects
Hello everyone, this is a small update for all of my previously converted fountain objects that uses the WA lion fountain emitter. In this version:
The emitter will be much smaller and less noticeable. Keep in mind that they cannot be fully removed.
The sound volume will remain the same.
You don't need to update to this version if this does not bother you.
Remove the previous version first if you decide to use this one.
World Adventures is still required.
Download Links: simfileshare folder | mediafire folder
The updated objects are:
S4 Spa Day - Sculpture - Freefall Water Wall set
S4 Spa Day - Fountain Object - The Number One Waterfall set
S4 Base Game - Fountain Object - Falling Water Modern Fountain
S4 CityLiving - Fountain Objects - Waterfall for Your Wall
#updated mods#updated_mods#ts4 to ts3#4t3 conversion#4to3 conversion#sims 3 conversion#ts3 conversion#sims 3 decor#decor#maxis match#fountain objects#4to3#4t3#s3ccfinds#s3cc download#s3cc#ts3 cc finds#ts3cc download#ts3 simblr
26 notes
·
View notes
Text
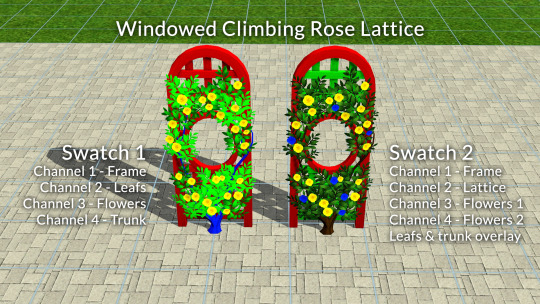

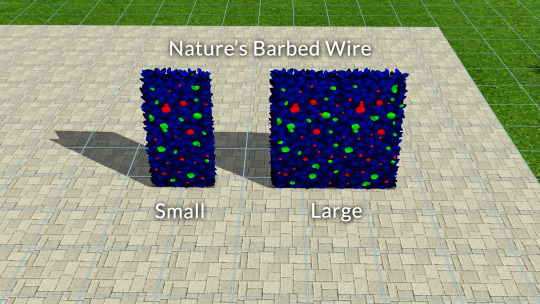
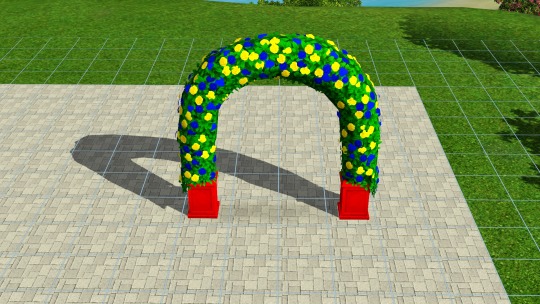
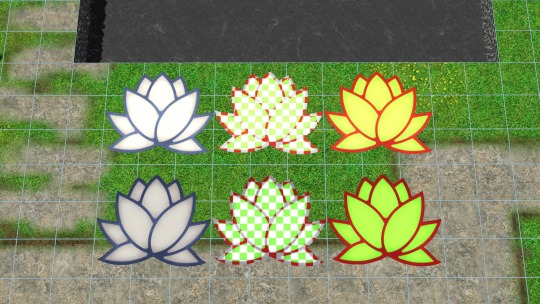
4to3 Romantic Garden Plant Conversions
Set the valentines day mood with these plants converted from Sims 4 Romantic Garden Stuff! <3 <3
Full details on my modthesims page.
Direct download: simfileshare folder | mediafire folder
Update 18-02-2023 Version 2:
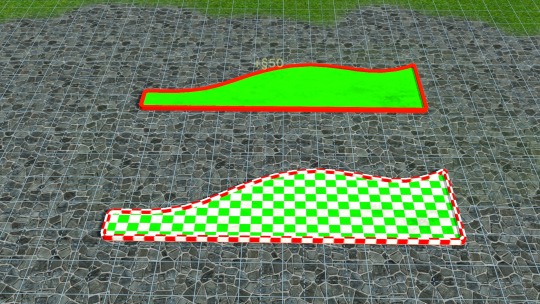
Fixed the green footprint / bounding / placement box issue
Added Perennials for Millennials Wedding Arch version (Requries Generations)
Reverted back to using phong shader instead of counter shader because I found inconsistency in rendering transparency.
A little side note: I believe these items have been converted before by ladesire. This is my version that I made purely from the beginning with recolor options that I wanted.
@xto3conversionsfinds @gifappels-stuff @pis3update @katsujiiccfinds @matchsim @smfinds @littlesimpixels
#4to3#4to3 conversion#4t3#4t3 conversion#sims 4 romantic garden stuff#sims 3 cc#ts3cc#ts3cc download#thesims3cc#ts3 cc finds#s3cc download#sims 3 decor#sims 3 download#sims 3 conversion#ts3 conversion#sims 3 cc finds#cc finds#maxis match#ts3 simblr#sims 3 simblr#simblr#the sims 3#ts3#plants
277 notes
·
View notes
Photo
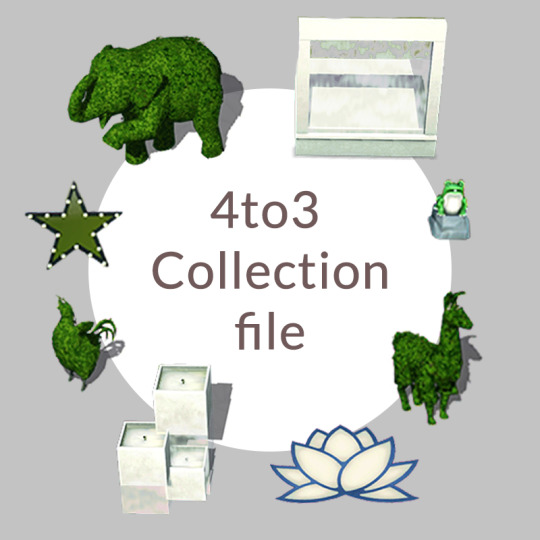
Ilvansims3conversion 4to3 collection file
This is the collection.package file that goes into your documents > Electronic Arts > The Sims 3 > Collections > User for my 4to3 conversions. This is NOT a compilation / all-in-one objects file. I will be updating this file and reblogging bi-monthly, so just download the most recent ones. It is perfectly fine if you do not have all of my items, they simply will not show up in the collection catalog :)
Direct download links: simfileshare folder | mediafire folder
42 notes
·
View notes
Note
How good are you at converting chandeliers? Because I have another request for you: YUMIA's Antique chandelier set! Here's a link incase you're wondering: https://yumia-x.tumblr.com/post/674636095577899008/antique-chandelier-point-light-4-height-5
Hi there! If you are wondering, I have converted outdoor lights before and shouldn’t be too hard to convert them as they behave similarly. Though, I am sorry I have to decline your request as it is not maxis match. I do plan to convert the existing chandeliers from sims 4 someday, so you might want to stay tuned for it instead :)
1 note
·
View note
Photo

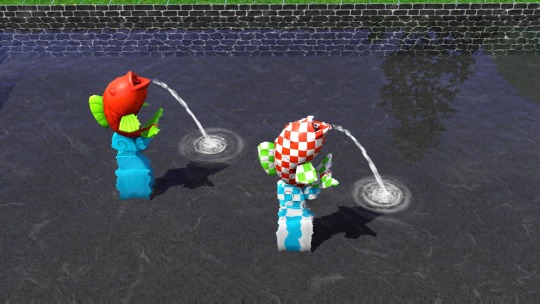


4to3 Fountain Objects Conversion Pack (17 Items: World Adventures & Showtime Required)
The fountain object catalog could really use some new items, so I tried converting these from sims 4. This conversion pack contains a selection of decorative fountain emitters (e.g. spitting fish & frogs) and lightings that was categorized under the object decoration in the sims 4. :D
Link to my modthesims post
Due to the number of items in this pack, I’ll be making it modthesims exclusive as I cannot possibly post all of the item details one by one here (you’ll notice once you’ve seen the details I wrote there). You don’t need to register to download and it is recommended to carefully check each item details, requirement & known issues (nothing major, just some info on what to look out for). To remedy this, I’m planning on making a collection file of my conversion tumblr exclusive within next week.
Lastly, on a personal note: Happy Chinese New Year everyone. I’m feeling a little burnt and gonna take it easy for the coming weeks. I’ll be posting more conversion around valentines day :3
@xto3conversionsfinds @littlesimpixels @gifappels-stuff @pis3update @matchsim @katsujiiccfinds
#4to3#4to3 conversion#the sims 3#thesims3cc#sims 3 decor#sims 3 download#sims 4 spa day#sims 4 cottage living#sims 4 dine out#sims 4 my wedding stories#ts3 simblr#sims 3 simblr#4t3#4t3 conversion#TS3CC#ts3cc download#ts3 cc finds#ts3 conversion#sims 3 cc#sims 3 cc finds#s3cc#cc finds#maxis match#modthesims_exclusive#fountains#lights
212 notes
·
View notes
Photo
Update 20/01/2023 | Version 2: footprint fix.
You now can place them perpendicular to a wall without moveobjects :) All the file links have been updated to this version. It is not necessary to update if you are okay using moveobjects.
4to3 Spa Day Freefall Water Wall Set Conversion *Requires WA*
I really liked these fountain from Sims 4 Spa Day. But since no one has converted them yet, so this is my first attempt at converting these kind of animated objects :D :D
Details & known issues (nothing major, just some info on what to look out for) on my modthesims page. !!Requires World Adventures!! Direct download links below:
Keep reading
413 notes
·
View notes
Note
Can you help me with some convertions please? I got a lot cool Sim 4 stuff a log off Versace themen things …
Love your work Buddy
Hi there! Glad you liked my conversions :)
Which part do you need help with? I prefer not to dabble in alpha cc though, but I’d be glad to give out pointers and references for the converting process.
1 note
·
View note
Text
Conversion process/tutorial for freefall water wall
As inquired by @dailycard, I’m sharing the conversion process for my recent creation: Freefall Water Wall. This guide is NOT intended for beginners as I only show what I think the important steps. If this is the first time you tried to make a conversion, I suggest you try something like Pixel Jackpot’s 4to3 wall decor video tutorial first.
This tutorial will cover:
Using counter shader (part C step 9)
Using phong alpha shader and UV scroll parameter (part C step 6-8)
Making occluder shadow (Part D step 4-15)
This tutorial will NOT cover:
Setting up TSR Workshop (TSRW)
Making object mask
Tools used:
1. Older TSRW (I used the 2.0.86.0 version) for:
Cloning TS3 object base item you want to work on
Importing mesh, because sometimes you can get an error when doing this in the newer TSRW
Changing shader
Adding shader parameter
2. Newer TSRW (I used the latest 2.2.114 version) for:
Exporting TS4 mesh & maps
Changing footprint
Changing bones position
Changing occluder shadow
3. Milkshape & its plugin for TSR Workshop
4. Photoshop
Part A. Prepare the required resources.
A1. In NEWER TSRW:
1. Open the Sims 4 small freefall water wall object. Copy the object’s name, description & price information to a notepad txt file.
2. Export the object mesh. In my case, there is only hLOD available. Considering the mesh is quite low poly anyway, I believe it can be used for as the mLOD as well. The sunshadow is not necessary whatsoever.
3. Export the diffuse map of material 1 (fountain body) & 2 (waterfall effect) as png. Material 0 diffuse map is not necessary because it’s just for drop shadow.

4. Open a similar looking object that has an occluder shadow. I used TS4 Romantic Garden’s Thriumphal Arch of Gluteus Maximus because it has an empty center & covered the upper part (I tested them in game first). Note the value for each of occluder entry (number 3). For this, I just took a photo each with my phone for convenience.

A2. In OLDER TSRW:
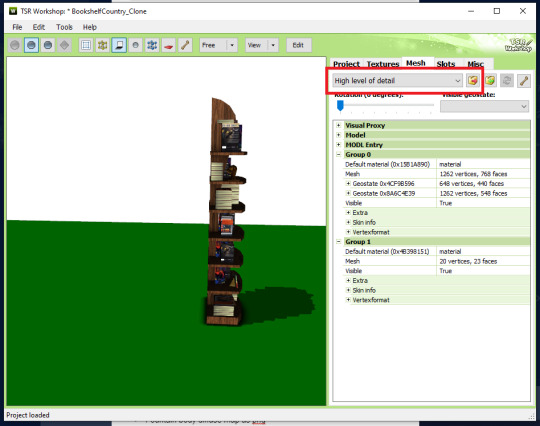
Open a Sims 3 object that fit perfectly against a wall. I used the bookshelf modern high 1x1. Export its hLOD mesh and name it along the line of “Wall Fit Reference Mesh”. I suggest using the older TSRW because sometimes I got an error when exporting in the newer version.
Part A check list:
Object’s name, description & price in a notepad txt file.
Small freefall water wall TS4 hLOD mesh as wso file.
Fountain body diffuse map as png file.
Waterfall effect diffuse map as png file.
EACH of occluder shadow entries value as notes/pictures.
Wall fit reference TS3 object mesh as wso file.
Part B. Editing the resources.
B1. In milkshape:
1. Import the small freefall water wall TS4 hLOD mesh. Then import the wall fit reference TS3 object mesh. Your workspace will looked like this:

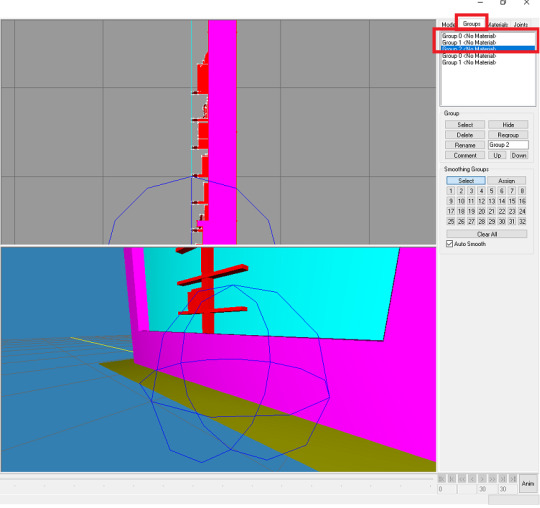
2. Go to Groups tab. Double click each of the upper “Group 0″, “Group 1″, and “Group 2″ to select them.
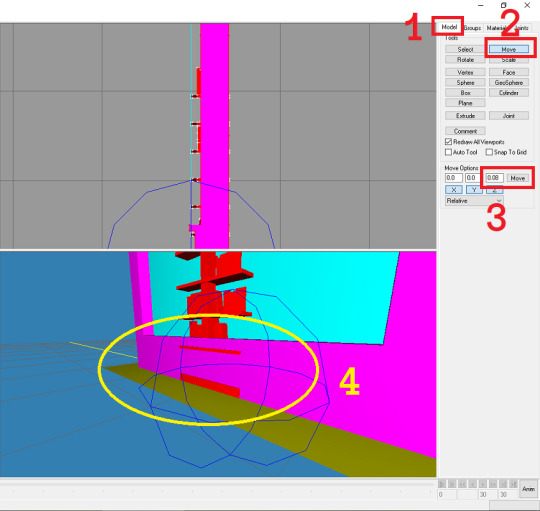
3. Go to Model tabs. Choose Move (Number 2). Change the Z value to 0.08 and click Move (Number 3). The waterfall should clip slightly through the reference bookshelf.
4. Go back to the groups tab. Double click each group again to deselect the upper group 0-2 (Number 1). Select the lower group 0 and click delete. Select the lower group 1 and click delete (Number 2&3).

5. Export as “hLOD edit”.
6. Delete the “Group 0″ (red box). Select “Group 1″, rename to “Group 0”. Select “Group 2″, rename to “Group 1” (green box). Export as “mLOD edit”.

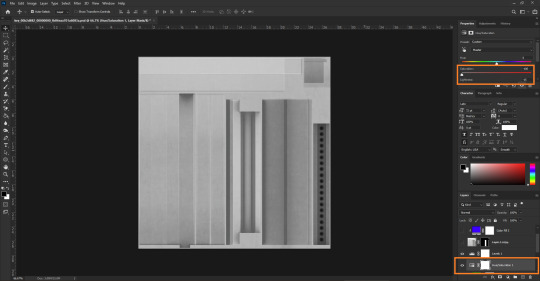
B2. In photoshop:
1. Import your fountain body diffuse map png file. Your workspace should looked like this:

2. Add the hue/saturation & levels adjustment layer.

3. In the hue/saturation adjustment layer, under the master control I changed the saturation value to -100 and lightness to -15. Save as “multiplier map” in png format.
4. You can also use the level adjustment layer to tweak its brightness and make the (optional) “specular map” in png format. I didn’t do this step as the lion fountain I’m using as clone doesn’t require it.
5. Make the masking map in png format. This is more of trial & error though, so I will not explain much. Here’s the mask map comparison I created as reference against the original diffuse map:

Part B check list:
1. Combined these item in milkshape:
Small freefall water wall TS4 hLOD mesh as wso file.
Wall fit reference TS3 object mesh as wso file.
To make:
hLOD edit mesh as wso file.
mLOD edit mesh as wso file.
2. Edited the “fountain body diffuse map as png file” in photoshop to make:
Multiplier map as png file.
Specular map as png file (optional).
Mask map as png file.
3. Unused part A items:
Object’s name, description & price in a notepad txt file.
Waterfall effect diffuse map as png file.
EACH of occluder shadow entries value as notes/pictures.
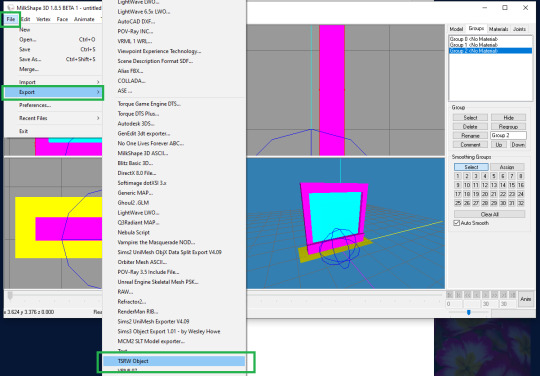
Part C. Building the object. In OLDER TSRW:
1. Clone the fountain france statue 2x2 TS3 object. Under the project tab, input the object’s name, description & price. Change the item flags. In my case, I do not change anything because I want the waterfall fountain to be found and placed similarly to the lion fountain. Save your project!
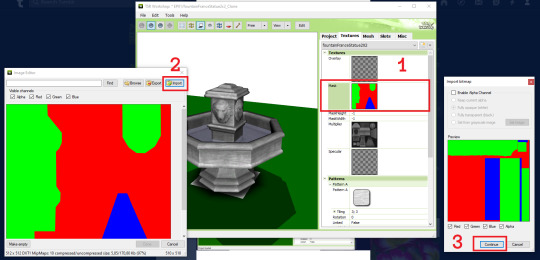
2. Go to textures. Choose the 2nd swatch dropdown option. Click on the smaller dropdown option on the left of it and choose delete.

3. Import your mask map. Do the same to your multiplier & (optional) specular map. Make sure your overlay & stencil maps is empty. You can also change the pattern now or just leave it the same as default. Save your file.
4. Go to mesh tab. Import your “hLOD edit” and “mLOD edit” mesh.
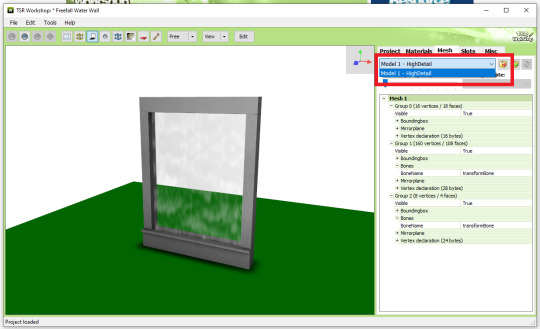
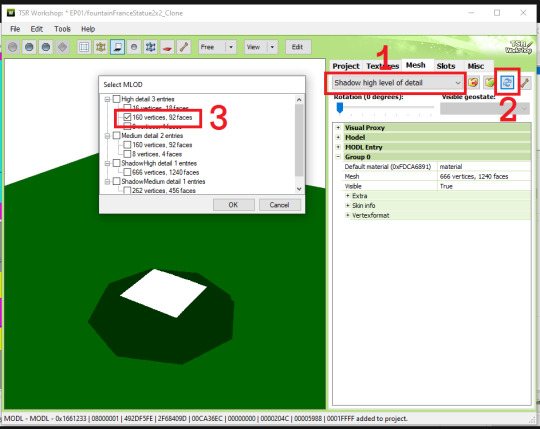
5. Select the “Shadow high level of detail”. Click on the generate shadow mesh. Choose the “160 vertices, 92 faces”. In my case, I can do the same for “Shadow medium level of detail”. Ignore the weird white square for now. We will remove it later. Save your file.
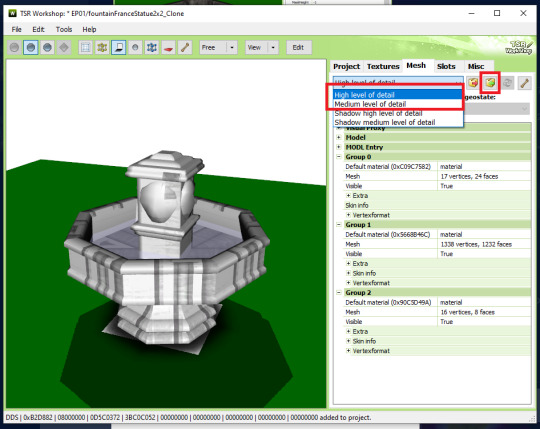
6. Select the “High level of detail” from the drop down menu again (Number 1). Edit the Group 2 material (Number 2). Choose the Phong alpha shader (Number 3). When prompted, choose YES! (Number 4)

7. Click the blue “+ Add” to show a new property window. Choose the UVScrollSpeed from the drop down menu. Click OK.

8. Replace the alpha map & diffuse map with “waterfall effect diffuse map” (Number 1&2). Make empty the Specular map (Number 3). Change the UV scroll speed parameter to 0 ; -0,8 (Number 4). When prompted to update the material definition to all LOD, choose YES (Number 5).
NOTE: If the object animation played in a different direction than intended here, change the UV Scroll Speed Parameter to positive or vice versa.
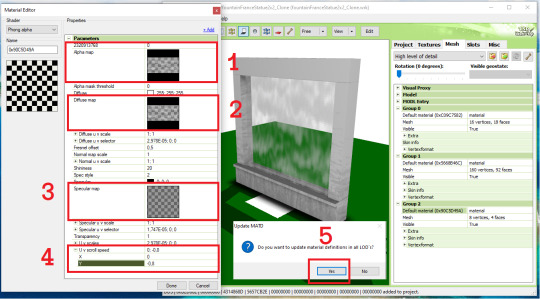
9. Go back to the main mesh tab, now choose to edit the group 1 material (number 1). Change the phong shader to counters shader (Number 2 & 3). If prompted to use the common values for this shader, choose NO! (Number 4). Click Done (Number 5). When prompted to update the material definition to all LOD, choose YES! (Number 6). Don’t forget to check if the changes has been made in the Medium Level of Detail. Save your file.

Part C check list:
1. In the “Project” tab: Edited the object’s name, description & price.
2. In the “Textures” tab:
Imported multiplier, specular (optional), and mask map.
Make sure your overlay & stencil maps is empty or disabled.
Change the pattern (optional).
3. In the “Mesh” tab:
Imported hLOD and mLOD edit mesh.
Generated the sunshadow in “Shadow High” and “Shadow Medium Level of Detail”.
Change the Group 2 Material to phong alpha shader, add the UV Scroll Speed parameter to 0 ; -0,8, import the alpha & diffuse map, and empty the specular map.
Change the Group 1 Material to counter shader.
Part D. Finishing the object. In NEWER TSRW:
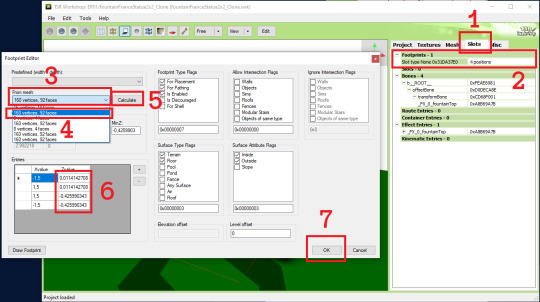
1. Open your saved project. Go to the Slots tab (Number 1). Edit the Footprints (Number 2). Select the first 160 vertices (Number 3&4) and click calculate (Number 5). Change the Z value of 0,0114142708 to exactly 0. Change the value of -0,425990343 to exactly -0,425 (Number 6). Click OK (Number 7).
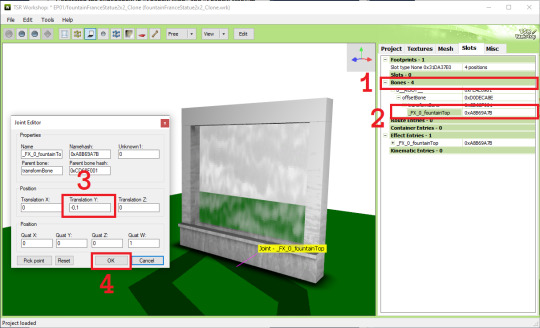
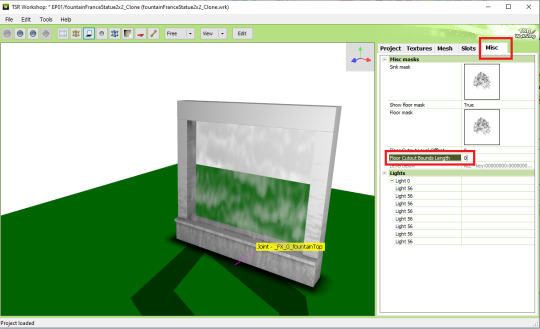
2. Expand the bones group (Number 1). Select the fountainTop entry to edit (Number 2). Change the Translation Y to -0,1 (Number 3). Click OK (Number 4). Save your project.
3. In the Misc tab, change the floor cutout bounds length to 0. This will remove the weird white square from before.
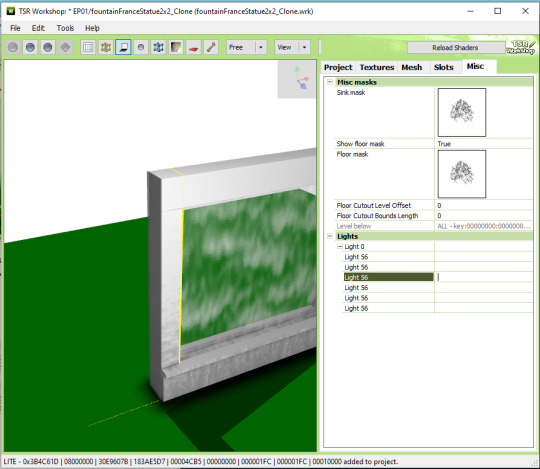
4. It’s recommended to create a new save file now as we will be editing the occulders. Expand the lights section and edit the Light 0 to show the Lite Editor Window (Number 1). Manually replace every occlusion entry value with the ones you noted/took photo of (Number 2). In my case the entry listed here is up to 8 occulders while the reference only had 6, so you can just delete the entry 7 & 8 using the - button.
NOTE: When manually inputing the value, use the tab key to quickly switch to the next value. You can also opt out the last zeroes from the value. If the original value was 1,51974000; you can just input 1,51974 and the zeroes will be automatically added after clicking OK.

5. The occluders should looked like this now. Try familiarizing yourself with each of the occluders by clicking on the light 56 entries one by one before we edit them to fit the object.

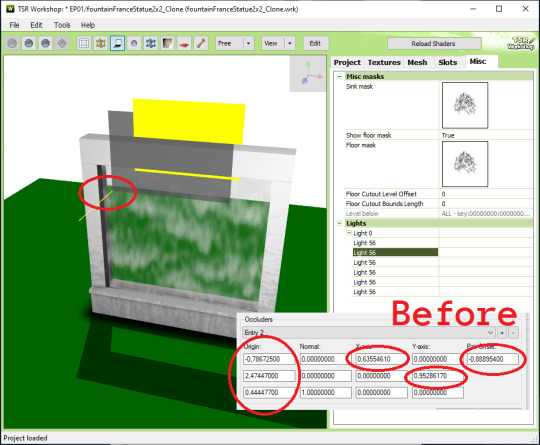
6. This is what I think how the occluder value works. Since I couldn’t find other sources, please let me know if I am incorrect. This is based on our occluder #1.
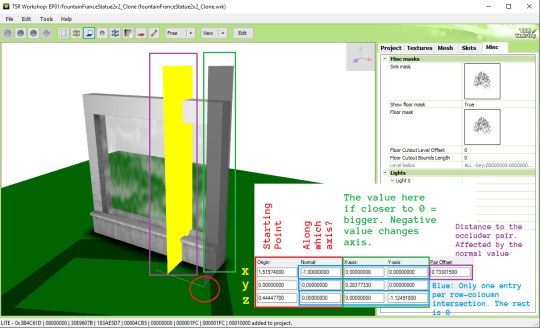
7. Now I want to change the starting point z value so it could fit much better. This whole part is a trial and error process. I changed the value from 0,444477 to -0,1.

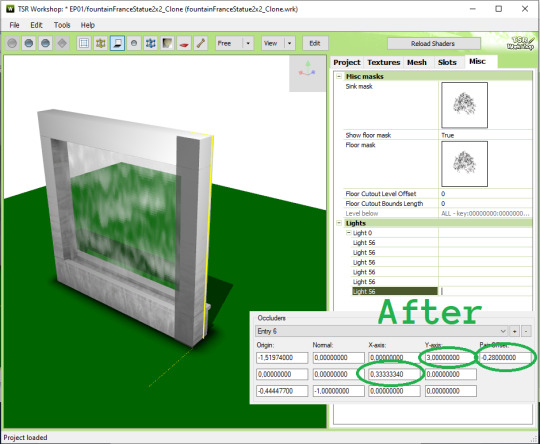
8. Referencing to Pocci’s Blog, for the green note I wrote the value are more accurately called inversely proportional (as in 1/n). For example if I know the height of the object is exactly 3 tiles (n), equate 1/3 and I can input the value 0,3333333 to get the perfect height.
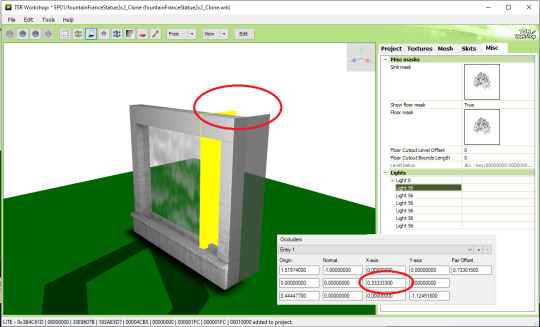
9. Next, I think the thickness of the object was 1/3 tiles, so using the equation 1/n and input 3 as the Y-axis z value without changing the - mark.

10. Lastly, I want the pair occluder to be closer, so I changed the pair offset value from 0,733... to just 0,28. Now we are finished with occluder #1.

11. Let’s jump to occluder #3 as it was the mirror of occluder #1. We can change the value similar to the occluder #1 while preserving the - value only for the orange circle shown below:
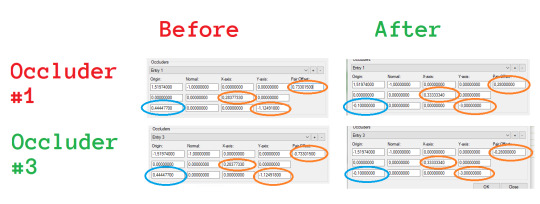
Occluder #3 result:
12.For occluder #6, the starting point is okay. We just need to change the plane size, shown red below:

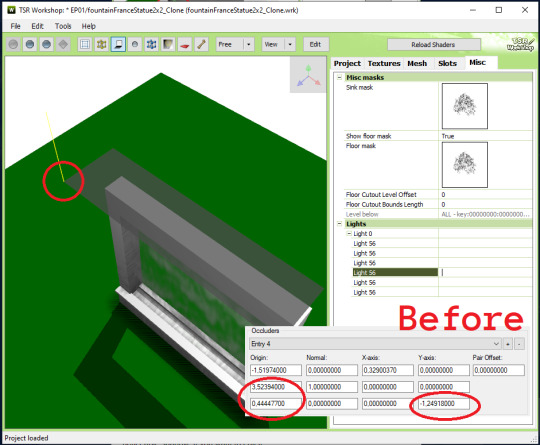
13. Occluder #5 is similar to occluder #6, but with extra step fixing the starting point. Shown red below:


14. For occluder #2, I wanted to move it to the ground because when placed near the ceiling, the shadow they cast seemed less noticeable anyway. The values changed are shown red below:

15. For the final occluder #4, you can either delete them or fixing a few value shown red below. They intersect with the ceiling anyway so they won’t be noticeable if you delete them.

16. DONE! Export your file & test in game :)
thanks for @sims3tutorialhub for a few initial references I used :3
PS: this tutorial does not fully reflect the final published version of the conversion object I made, i.e. it has 2 more variations than described here.
20 notes
·
View notes
Note
Do you conversion outfits or just Objects
Hello, I only do conversion for build buy objects :)
1 note
·
View note
Photo
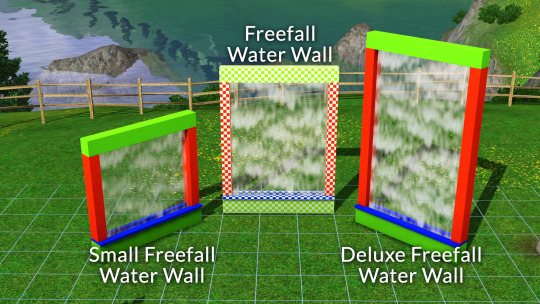
4to3 Spa Day Freefall Water Wall Set Conversion *Requires WA*
I really liked these fountain from Sims 4 Spa Day. But since no one has converted them yet, so this is my first attempt at converting these kind of animated objects :D :D
Details & known issues (nothing major, just some info on what to look out for) on my modthesims page. !!Requires World Adventures!! Direct download links below:
The links below has been updated to Version 2: footprint fix. You now can place them perpendicular to a wall without using moveobjects. It is not necessary to update to this version if you are okay using moveobjects.
Small Freefall Water Wall v2: SFS | mediafire
Freefall Water Wall v2: SFS | mediafire
Deluxe Freefall Water Wall v2: SFS | mediafire
@katsujiiccfinds @xto3conversionsfinds @matchsim @pis3update @acottonsock @gifappels-stuff @mspoodleccfinds @ts3-ccfinds @kpccfinds
#4to3#4to3 conversion#4t3#4t3 conversion#the sims 3#sims 3 cc#sims 4 spa day#sims 3 decor#sims 3 fountain#ts3 simblr#simblr#thesims3cc#sims 3 simblr#TS3CC#ts3 conversion#ts3 cc finds#ts3cc download#maxis match#fountains#decor
413 notes
·
View notes
Note
If you convert to TS3, then how about converting the "Soulful Entrance Door" from "The Sims 4: Vampires" and peacemaker's matching double door and matching arches, with and without the ornamentations? Please see the attached pictures!


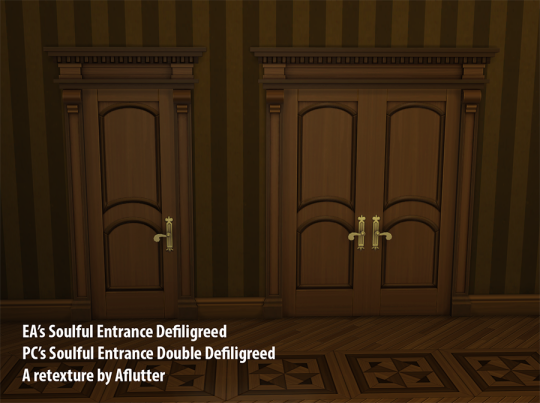

Hi there! Thank you for your suggestion. If you have permission by the original creators, I would love to help convert them especially those 3 tile arches :) Though I have never converted doors & arches before and currently still finishing the fountains from my first post, so it would take a while.
18 notes
·
View notes