#hand sew
Text
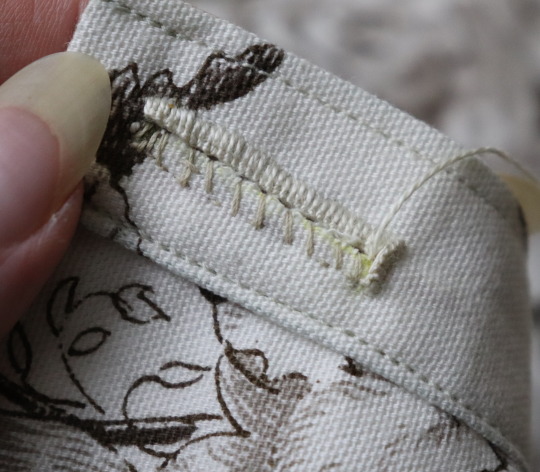
So my coworker asked I'd I could mend a tear in the crotch of his work pants and I was like.. well no. Cause while I do like to do fiber arts and have dabbled a very small bit in sewing (both hand and machine) it's not something I really have the supplies or experience to do.
But ofc this mf brings his pants in anyway. It's been like 3 weeks but I finally got around to buying some fusible web tape and hand stitched his seam
These pictures aren't the best cause it's midnight but like. Tell me I didn't kill this for my first time


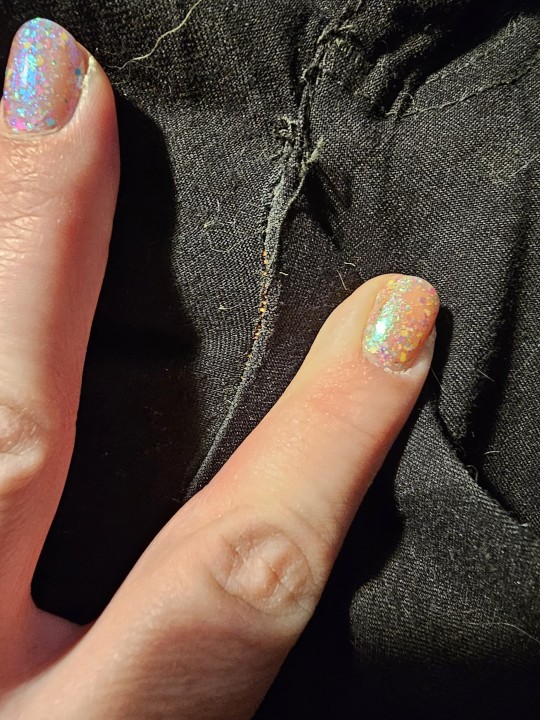
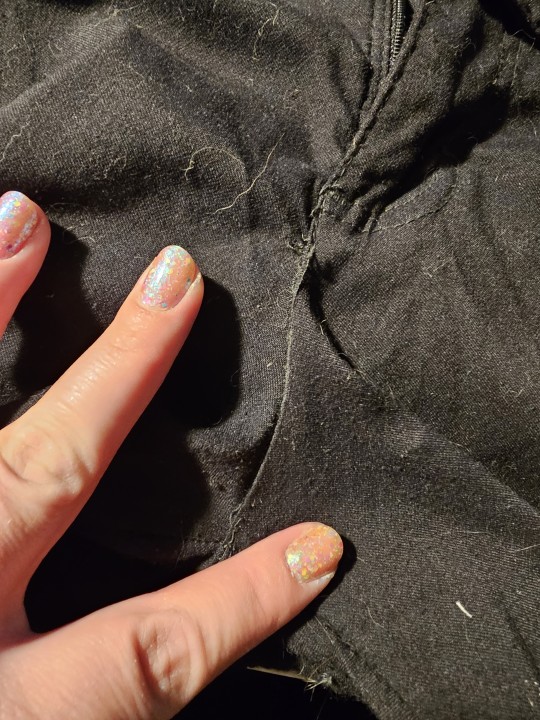
And like yes I know you're supposed to match the color thread to the fabric but my coworker and I constantly screw with each other and I know he won't care, so I went with what I liked and ya boy likes neons.
PLUS I DID SO GOOD ITS NOT LIKE ANYONES GONNA SEE IT ANYWAY RIGHT
I did not remotely want to repair these pants but I did and I'm literally so proud of myself rn.
#clothing mending#mending clothes#hand sewing#clothing repair#uhh idk what else to tag#hand sew#hand sewn
16 notes
·
View notes
Video
how to knot of your thread
44 notes
·
View notes
Video
youtube
How to make a jar cover - easy hand sewing tutorial
#handmade#hand embroidery#handembroidery#hand sewing#handsewn#hand sew#cottage kitchen#cottagecore#cottage life#cottagecharm#cottage vibes#cottage aesthetic#EmbroideryPattern#DIY Projects#diydecor
14 notes
·
View notes
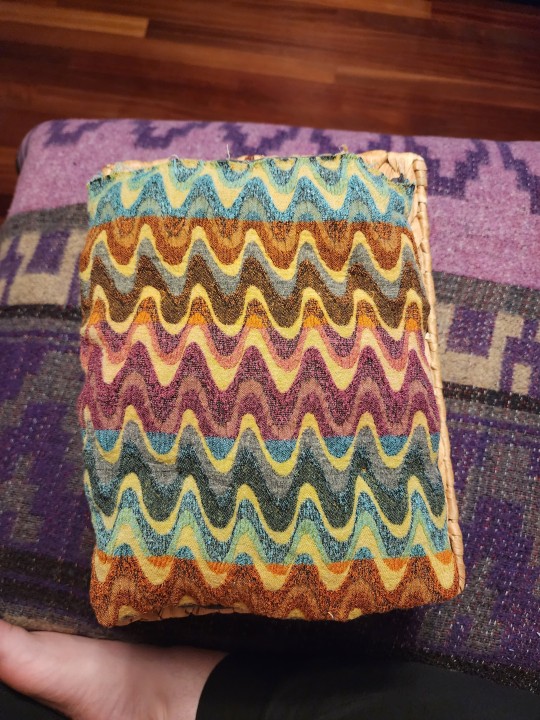
Text
i made riff a futon 💗


5 notes
·
View notes
Text
"Don't just throw ripped jeans away, you can repair them using these 10 cute Visible Mending techniques!!" unfortunately my friend the first point of failure for every single pair of jeans i have owned in my life has been the Crotch and Ass. Knees: fine, cuffs: fine; but 3 years in, and all that stands between the world and my astronaut-patterned taint is 0.5µm of denim worn so thin that every squat threatens to tear it to shreds like wet toilet paper. If the Tiktok craft community could figure out a way to resurrect jeans afflicted in such a way that doesn't involve adding a whole ass buttpatch like some sort of inverse assless chaps situation then that'd be great
#and yes i have indeed experimented with trying to add invisible patches on the INSIDE of the jean but unfortunately#trying to sew anything to the non-euclidean hellscape that is the crotch area of a pair of pants#inevitably ends up 1. (hand-sewing) puckered as hell or 2. (machine sewing) w me accidentally sewing a leg hole closed 😔
60K notes
·
View notes
Text
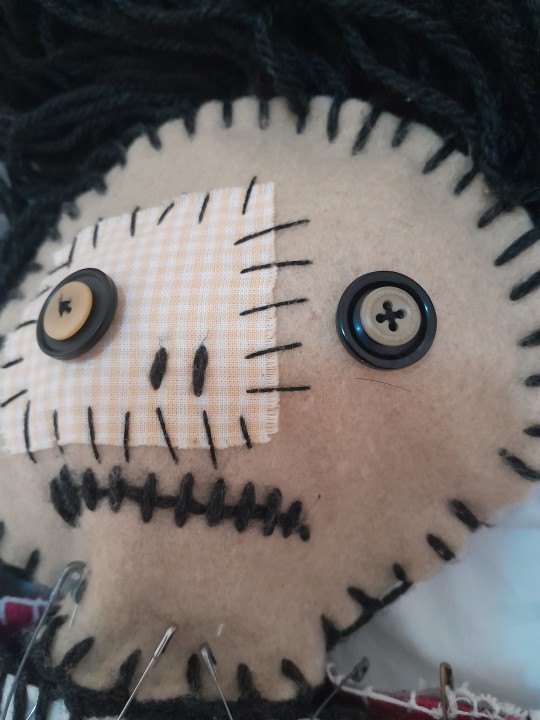
I'd like to introduce to everyone this horrid thing I created about a year ago but haven't shown many people yet (probably for the best).
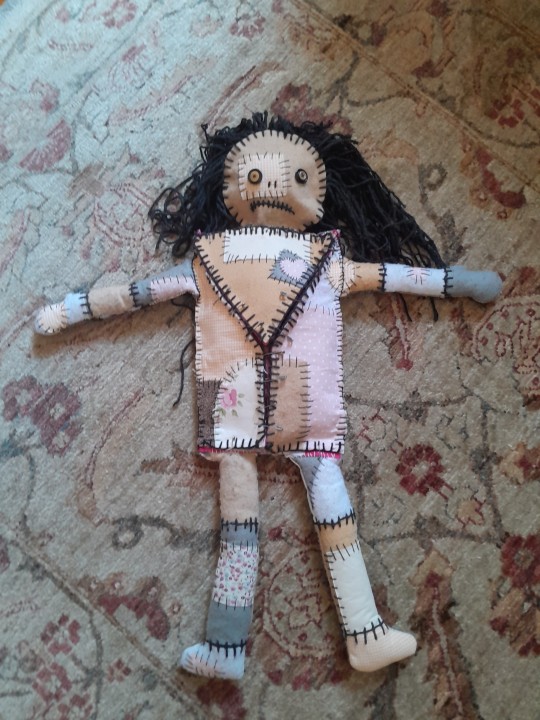
This is Baby. AKA The Monster. AKA Sight Tremendous and Abhorred, AKA Vile Insect, AKA A Thing Such As Even Dante Could Not Have Conceived, etc, etc. It's made from bits of scrap fabric I scrounged from various sources and is roughly the size of a human toddler. Its design is based on Mary Shelly's original descriptions of Frankenstein's creature.
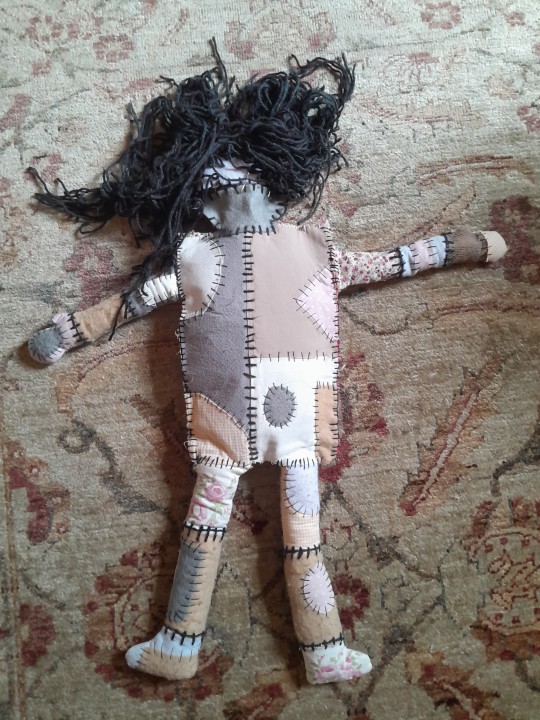
But that's not all! Behold!
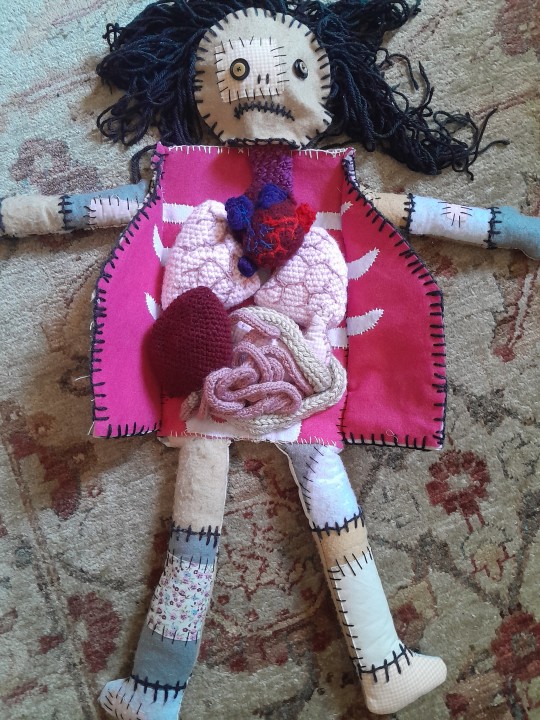
You can dissect this little abomination to reveal a full set of crocheted, knitted, and scrap fabric organs, all hand-stitched by yours truly!
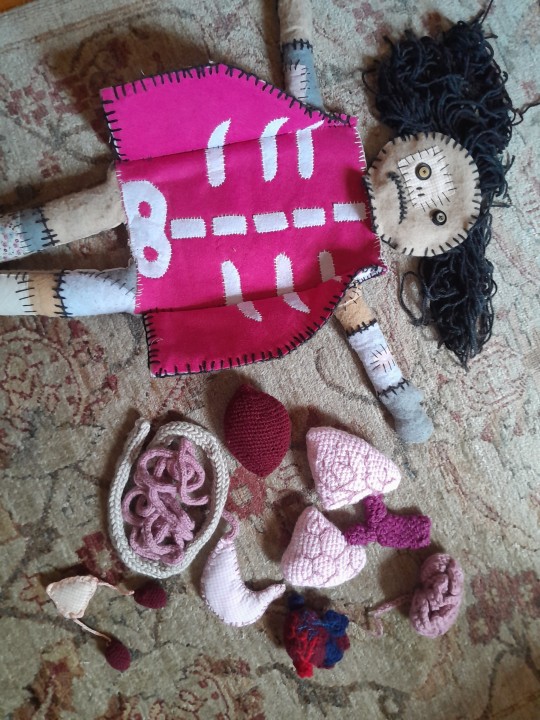
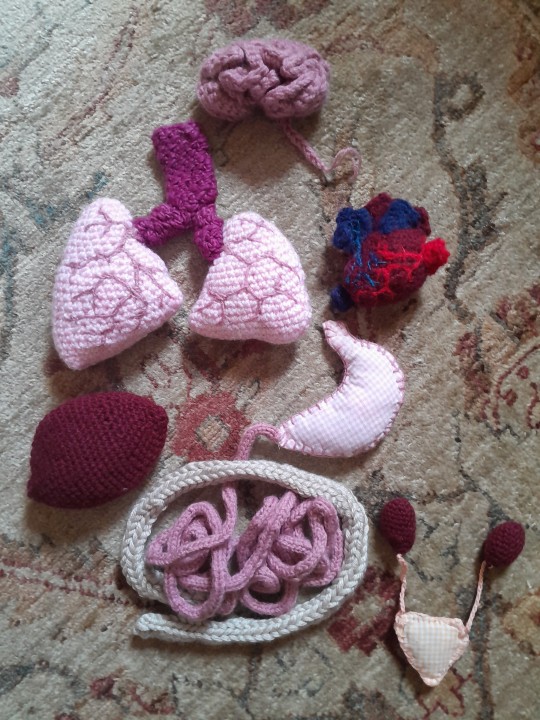
It has a heart, stomach, lungs, liver, small and large intestine, kidneys, bladder, and, of course, a brain! So it can ponder the horrors of its own existence!

I used this pattern by Less Than Three for the heart. I ended up felting it because I screwed up most of the stitches (I was relatively new to crochet at the time). The result was a bit of a blobby mess, but oh well.
So yeah. This thing lives in my house now (my family hates it). I have yet to reap the full consequences of my hubris.
#frankenstein#crafts#sewing#crochet#knitting#craftblr#yarn#creepy cute#horror dolls#hand stitching#little guy#creature#anatomy#monster#gore#kind of
13K notes
·
View notes
Text
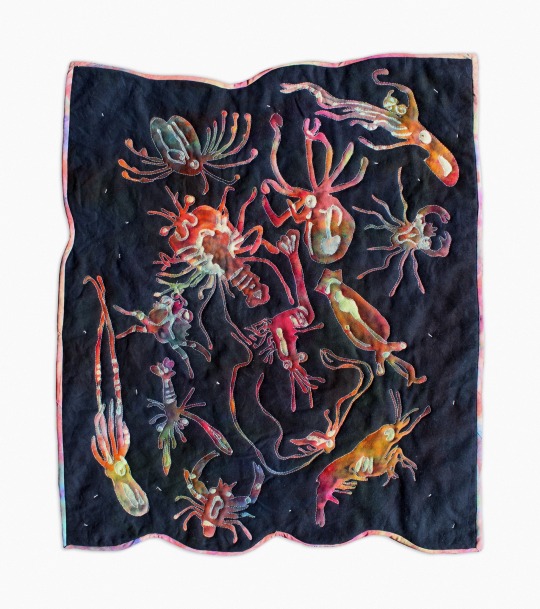
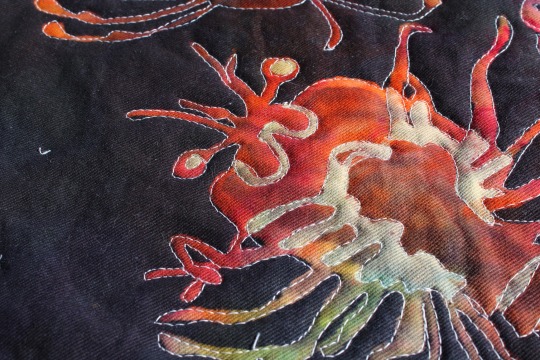
Blackwater Dive
2024, hand bleached and dyed denim, cotton batting and thread
inspired by blackwater photography of plankton! this was my first time layering bleach painting. All the silhouettes were painted with bleaching gel, loosely tie dyed, and then bleached again to make the highlights. I quilted the piece using my free motion foot to outline each individual animal and tacked down the rest of the quilt with small satin stitches that remind me of marine snow. I dyed bias tape to match. super happy with this one and excited to show it in a gallery setting soon!
#my art#queer artist#fiber art#quilt#plankton#marine biology#art#hand dyed#bleach painting#quilting#sewing#sewing machine#shrimp#crustacean#cephalopod#squid#crab#lobster
7K notes
·
View notes
Text
yk when you see someone share a finished handmade item that they clearly spent a lot of time and money on and it's just. The absolute tackiest thing you have seen in your life. And then you ask yourself why someone would waste all those resources on such an eyesore.
(no, of course you can't relate to that because you're a much nicer person than me)
In any case.
BEHOLD!
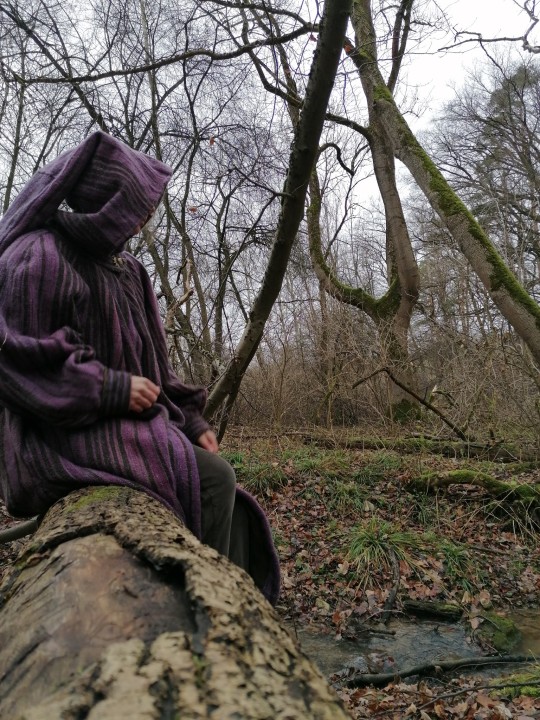
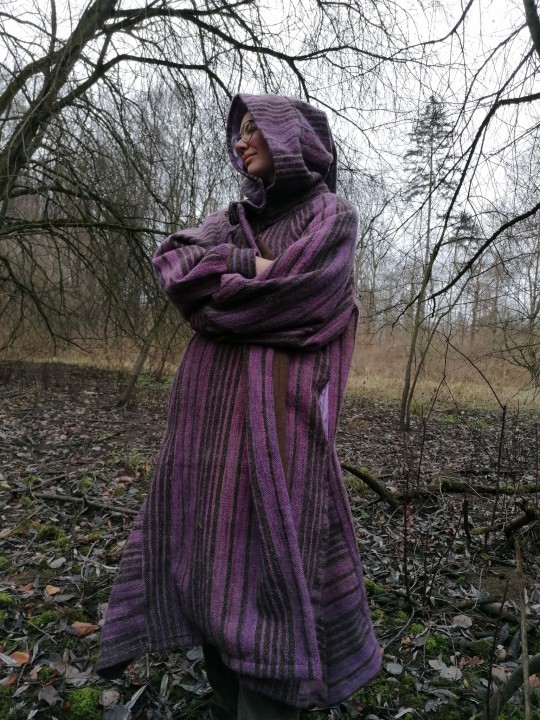
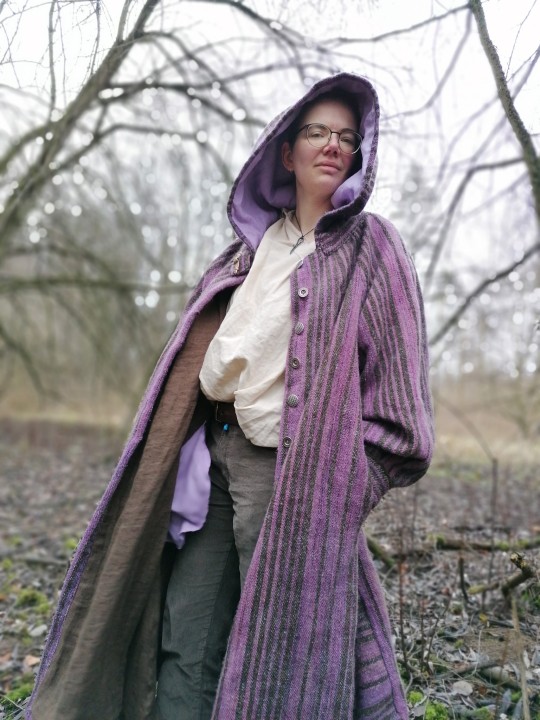
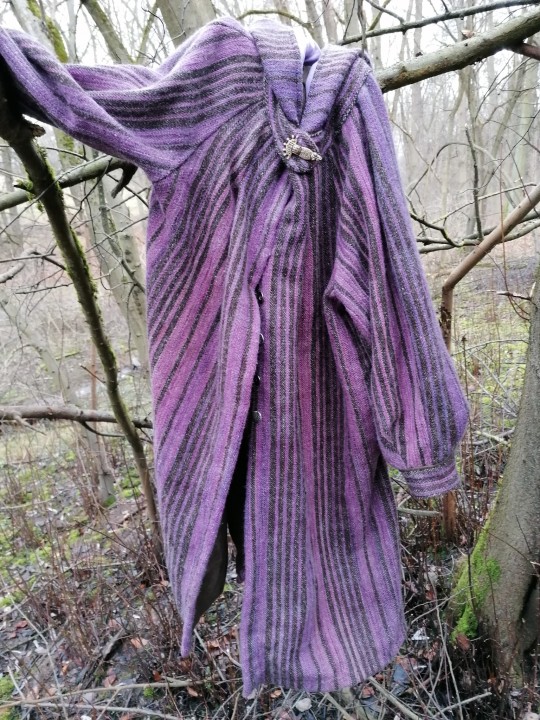
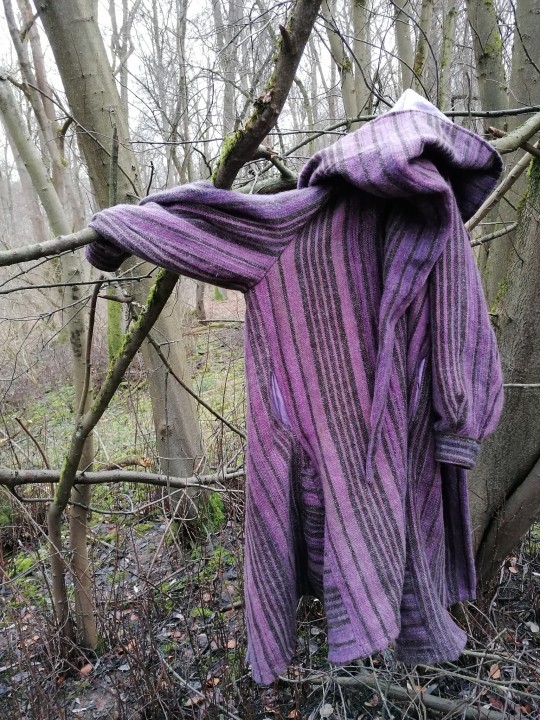
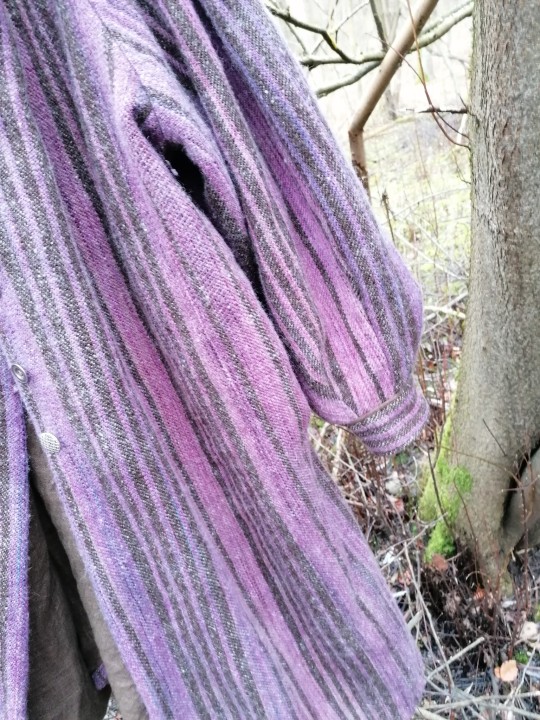
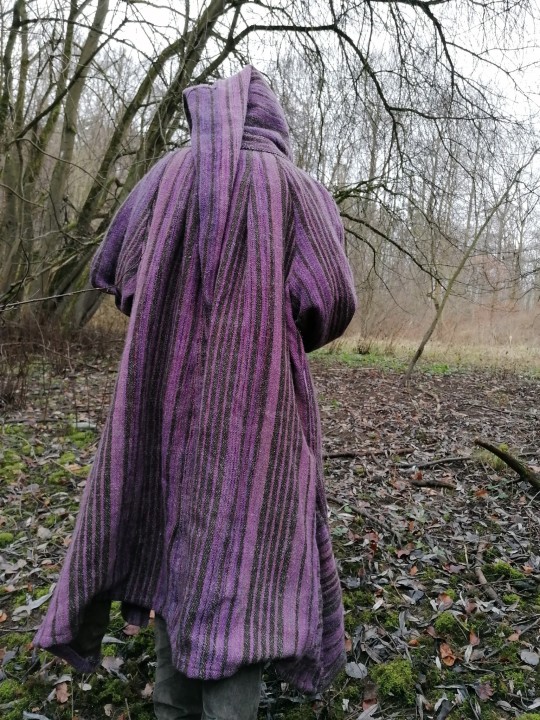
A wool coat!
The top fabric is handwoven and handspun, the whole thing is sewn by hand, too.
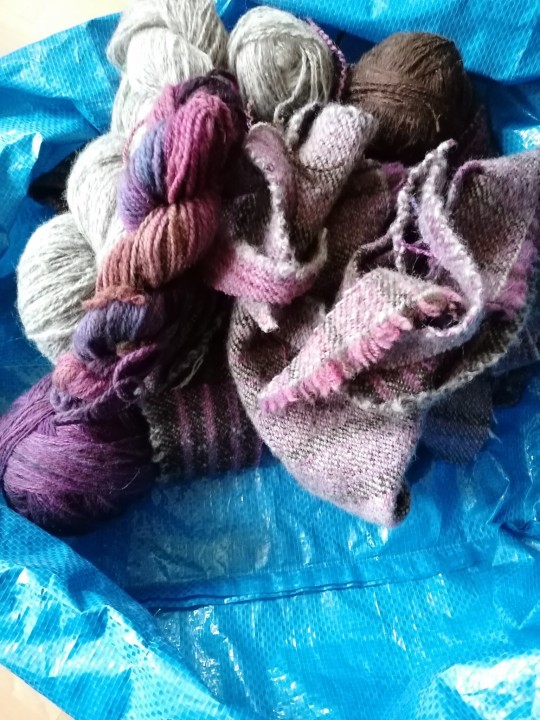
Leftovers. Barely anything, all things considered, which is very satisfying.
This thing took me well over 3 years to make, on and off. And now I'm done.
Thank you for your attention.
#carry on XD#i hope y'all realize that when I say tacky it's with nothing but love in my heart#yes it's ugly. that's the whole point.#everyone should have an item in their wardrobe that will get Looks and raised eyebrows#it's good for you#anyway can't believe I'm done! this is a huge boost to my crafting hubris I CAN DO ANYTHING#wizard bathrobe adventures#handweaving#handspinning#hand sewing#look what i made#crafts#overall I'm happy with it even though there's. things that aren't ideal#the pockets are set a bit too low#and i should have made it a tiny bit longer not much but maybe like 5cm#anyway#overall it's a nice coat i think#Now That's What I Call Slow Fashion
4K notes
·
View notes
Text
broke: Izzy wearing makeup and singing for the crew is OOC
woke: Izzy is open to experimenting and trying new things now because hitting rock bottom helped him realize how depressed his old life made him and he now knows he needs to change to find happiness
bespoke: he's like this now because they cut off the homophobic leg
#our flag means death#ofmd s2 spoilers#izzy hands#thanks syb for putting this idea in my head during our sewing day <3
4K notes
·
View notes
Text
there is something very beautiful about the irresistible human desire to create
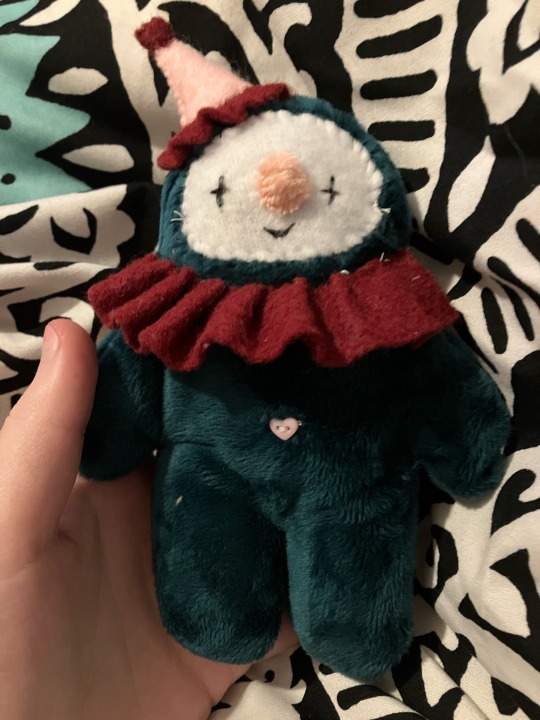
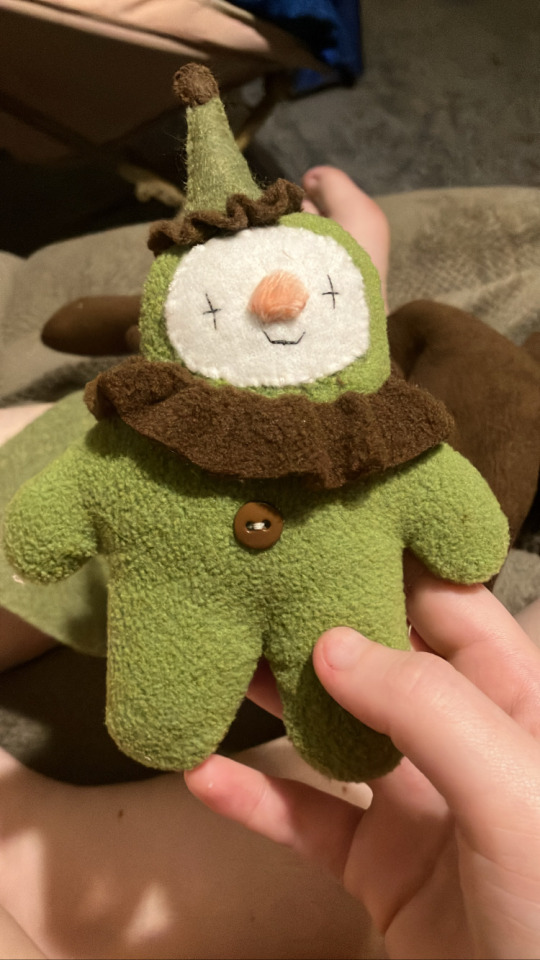

clowns like these will be on etsy very soon <3
UPDATE: etsy fucking banned me lol. currently selling these via cashapp within the united states only
#clowns#clown#clown plush#clown posting#plushies#sewing#hand sewing#they have names#because there is also something beautiful about#the human desire to name and pack bond with anything and everything
4K notes
·
View notes
Text
We all know existential dread, but I propose (and please tell be if this is already a thing) existential awe.
Sometimes when I handsew or weave or something I get this immense feeling of connection to humanity. People for thousands of years all over the world have sat down and sewn a garment. Archeologists find needles and awls all the time. When I'm tablet weaving I have the same frustration at the arduous process of threading the tablets as the person 2600 years ago must have felt when they made the bands that were found in a celtic man's burial mount not far from my home. They probably also felt their back after a few hours of this.
#thought of the day#existential musings#hand crafted#handmade#hand sewing#hand weaving#tablet weaving
3K notes
·
View notes
Text
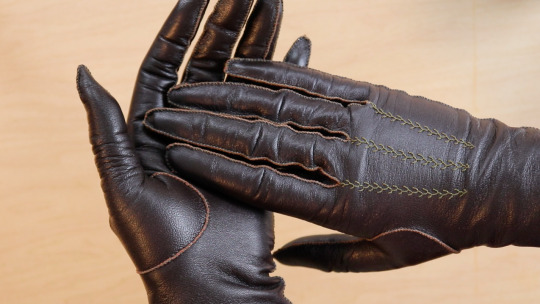
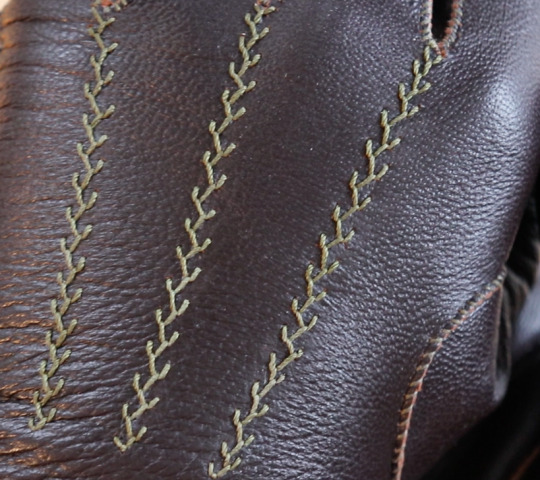
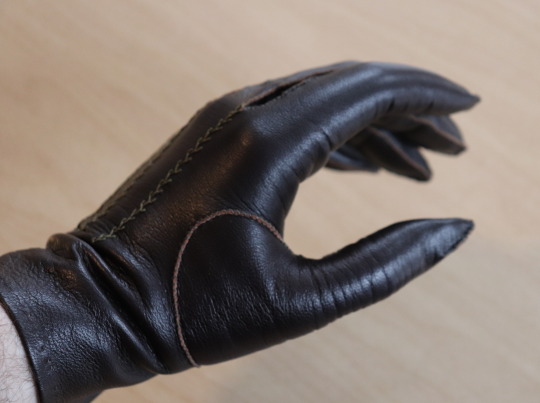


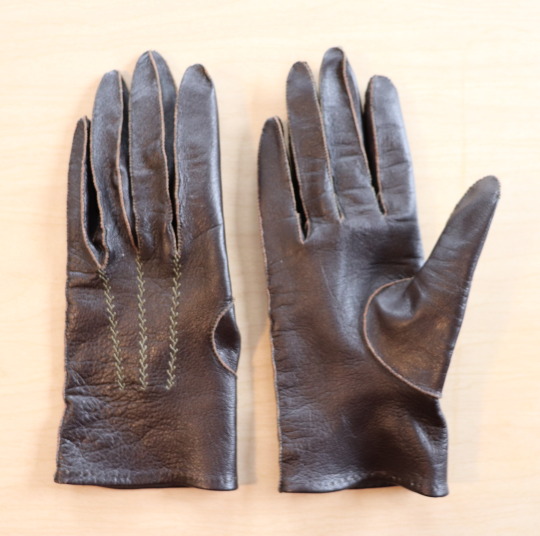
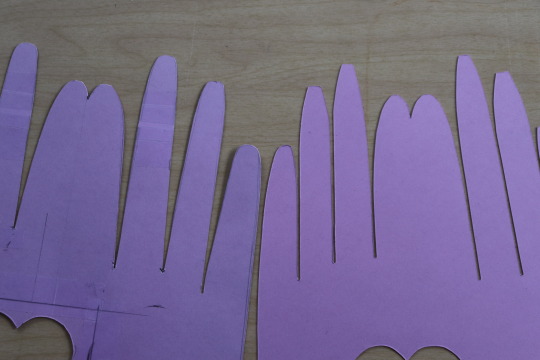
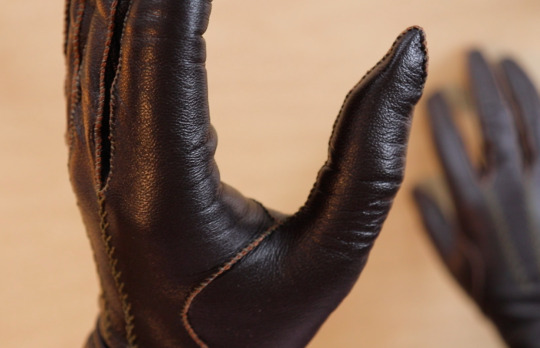
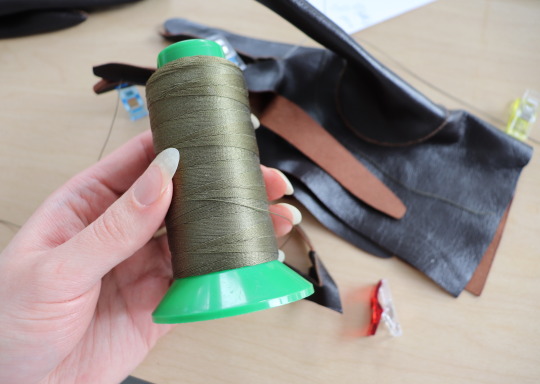

Finished another pair of gloves last week, this time in dark brown leather from ItalianSkins and sewn up with some olive green silk thread that was a very lucky thrift store find. (It was in a mixed baggie and I didn't know it was silk until I got home!)
In my glove video I mentioned wanting to re-draw my pattern so the fingers are angled in more tightly, and so the thumb piece is longer, and I did that for these. The thumb fits much better, and the bases of the fingers are no longer too loose.
I also tried the straighter style of fourchettes, but didn't like them as much as the V shaped ones. I think the curved edges put a bit too much material onto the backs of the fingers and made them wrinklier. (Though this particular leather is not the stretchiest, so it may be better with a stretchier one.)
I did 3 rows of feather stitch on the back of the hand, since I'd seen that on an extant pair and thought it looked nice. I used a regular needle for that part because I was worried a leather needle would damage the thread.
1K notes
·
View notes
Text
oh yeah btw i made this
#it's my first time doing hand embroidery#my partner has taken up sewing so i embroidered this on their project#it was fun#now i gotta figure out what i'm gonna do next#embroidery#fiber art#textile art
2K notes
·
View notes
Note
Any tips on learning to make buttonholes? I've been putting it off for.... *checks notes* like three years.... but better late than never and all that. I don't have any fancy machines so I gotta do it by hand but that seems right up your alley.
Thanks!
It IS up my alley, yes, I do most of my buttonholes by hand!
I'm actually part way through filming an 18th century buttonhole tutorial, but I expect it'll be a few more weeks before I finish that and put it on the youtubes, so in the meantime here's the very very short version. (The long version is looking like it'll probably be about 40 minutes maybe, judging by how much script I've written compared to my last video?)
Mark your line, a bit longer than your button is wide. I usually use a graphite mechanical pencil on light fabrics, and a light coloured pencil crayon on dark ones. (I have fabric pencils too, but they're much softer and leave a thicker line.)
You may want to baste the layers together around all the marked buttonholes if you're working on something big and the layers are shifty and slippery. I'm not basting here because this is just a pants placket.

Do a little running stitch (or perhaps a running backstitch) in fine thread around the line at the width you want the finished buttonhole to be. This holds the layers of fabric together and acts as a nice little guide for when you do the buttonhole stitches.

Cut along the marked line using a buttonhole cutter, or a woodworking chisel. Glossy magazines are the best surface to put underneath your work as you push down, and you can give it a little tap with a rubber mallet if it's not going through all the way.

I'm aware that there are some people who cut their buttonholes open using seam rippers, and if any of them are reading this please know that that is abhorrent behaviour and I need you to stop it immediately. Stop it.
Go get a buttonhole cutter for 10 bucks and your life will be better for it. Or go to the nearest hardware store and get a little woodworking chisel. This includes machine buttonholes, use the buttonhole cutter on them too. If you continue to cut open buttonholes with a seam ripper after reading this you are personally responsible for at least 3 of the grey hairs on my head.
Do a whipstitch around the cut edges, to help prevent fraying while you work and to keep all those threads out of the way. (For my everyday shirts I usually do a machine buttonhole instead of this step, and then just hand stitch over it, because it's a bit faster and a lot sturdier on the thin fabrics.)

I like to mark out my button locations at this point, because I can mark them through the holes without the buttonhole stitches getting in the way.
For the actual buttonhole stitches it's really nice if you have silk buttonhole twist, but I usually use those little balls of DMC cotton pearl/perle because it's cheap and a good weight. NOT stranded embroidery floss, no separate strands! It's got to be one smooth twisted thing!
Here's a comparison pic between silk buttonhole twist (left) and cotton pearl (right). Both can make nice looking buttonholes, but the silk is a bit nicer to work with and the knots line up more smoothly.

I've actually only used the silk for one garment ever, but am going to try to do it more often on my nicer things. I find the cotton holds up well enough to daily wear though, despite being not ideal. The buttonholes are never the first part of my garments to wear out.
I cut a piece of about one arm's length more or less, depending on the size of buttonhole. For any hole longer than about 4cm I use 2 threads, one to do each side, because the end gets very frayed and scruffy by the time you've put it through the fabric that many times.
I wax about 2cm of the tip (Not the entire thread. I wax the outlining/overcasting thread but not the buttonhole thread itself.) to make it stick in the fabric better when I start off the thread.
I don't tend to tie it, I just do a couple of stabstitches or backstitches and it holds well. (I'm generally very thorough with tying off my threads when it comes to hand sewing, but a buttonhole is basically a long row of knots, so it's pretty sturdy.)

Put the needle through underneath, with the tip coming up right along that little outline you sewed earlier. And I personally like to take the ends that are already in my hand and wrap them around the tip of the needle like so, but a lot of people loop the other end up around the other way, so here's a link to a buttonhole video with that method. Try both and see which one you prefer, the resulting knot is the same either way.


Sometimes I can pull the thread from the end near the needle and have the stitch look nice, but often I grab it closer to the base and give it a little wiggle to nestle it into place. This is more necessary with the cotton than it is with the silk.
The knot should be on top of the cut edge of the fabric, not in front of it.

You can put your stitches further apart than I do if you want, they'll still work if they've got little gaps in between them.
Keep going up that edge and when you get to the end you can either flip immediately to the other side and start back down again, or you can do a bar tack. (You can also fan out the stitches around the end if you want, but I don't like to anymore because I think the rectangular ends look nicer.)
Here's a bar tack vs. no bar tack sample. They just make it look more sharp, and they reinforce the ends.

For a bar tack do a few long stitches across the entire end.

And then do buttonhole stitches on top of those long stitches. I also like to snag a tiny bit of the fabric underneath.

Then stick the needle down into the fabric right where you ended that last stitch on the corner of the bar tack, so you don't pull that corner out of shape, and then just go back to making buttonhole stitches down the other side.
Then do the second bar tack once you get back to the end.

To finish off my thread I make it sticky with a bit more beeswax, waxing it as close to the fabric as I can get, and then bring it through to the back and pull it underneath the stitches down one side and trim it off.


In my experience it stays put perfectly well this way without tying it off.
Voila! An beautiful buttonholes!


If you want keyhole ones you can clip or punch a little rounded bit at one end of the cut and fan your stitches out around that and only do the bar tack at one end, like I did on my 1830's dressing gown.

(I won't do that style in my video though, because they're not 18th century.)
Do samples before doing them on a garment! Do as many practice ones as you need to, it takes a while for them to get good! Mine did not look this nice 10 years ago.
Your first one will probably look pretty bad, but your hundredth will be much better!
Edit: Video finished!
youtube
And here's the blog post, which is mostly a slightly longer version of this post.
#ask#buttonholes#sewing#hand sewing#sewing tutorial#I've been procrastinating on the video this week#I want it done! I don't want to work on it I want new projects! I want to cut out more gloves!#currently forcing myself to do the last few buttonholes on these pants and then maybe I can cut out new gloves? as a treat?#but I hope I get some filming done tomorrow too
3K notes
·
View notes
Text
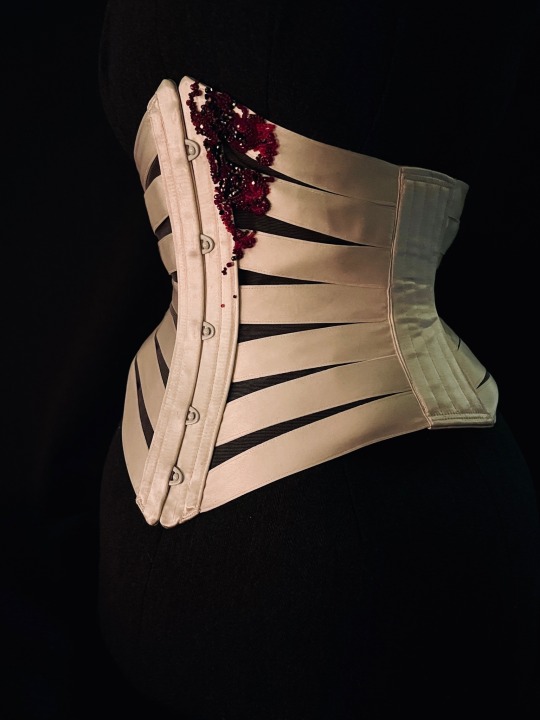
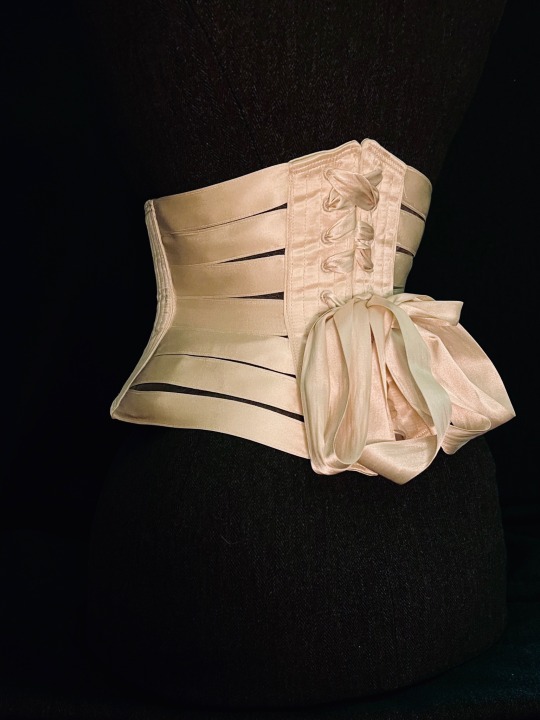
The Saddest Girl In The World
Edwardian-ish ribbon corset with beading, 2023
Silk ribbon, cotton taffeta ribbon, Czech glass beads
#project: crown prince kiriona#project: ribbon corset#project: historical sewing#cosplay#media: the locked tomb#tlt#the locked tomb#historical costume#Edwardian#Nona the ninth#historical sewing#costume#poetry in costume#beading#excuse the iffy lacing I used what I had on hand which is too wide and I didn’t want to unlace Helga#EDIT: upsetti#I captioned it something sensible rather than WHITHER THE HAMBURGER???#there’s time#not sure why this has broken 1000 notes but it is releasing all the brain chemicals
3K notes
·
View notes
Text
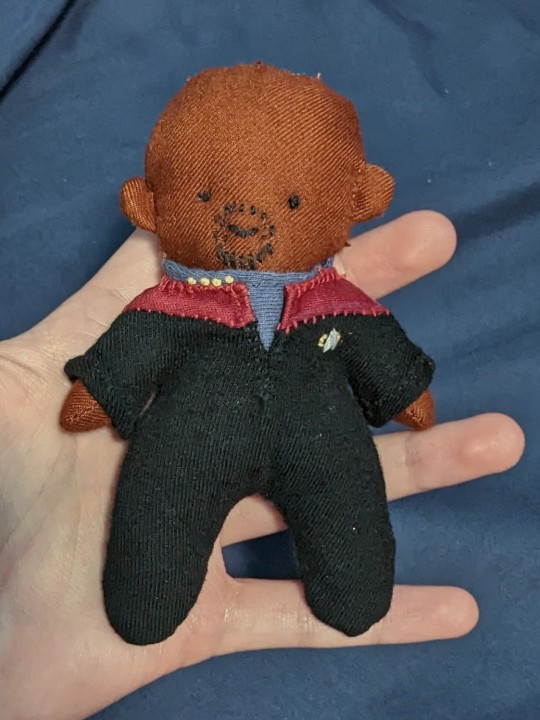
experimenting w making little trek dolls for the STLV craft swap :))
#sisko first bc idk how I'm gonna make hair LMAO but isn't he so cute??#made the doll a while ago but I just made his little outfit today and yesterday :))#hopefully giving them away for free means no one will mind the shoddy craftsmanship lmao#I think I've set a new record for terrible hand sewing. and there's raw edges on the inside. and none of the thread is the right color#but WHO CARES HES SO CUTE!!!!#it's the early ds9 uniform bc I've been watching voy and I'm sooo enamored with their uniforms ugh I need to make an actual life size one#watching voyager will have u saying things like. surely it can't be that hard to sew an invisible zipper??#anyways. need to figure out how to make hair so I can make characters other than him and picard 💀💀#ds9#star trek#benjamin sisko#deep space nine#captain sisko#narcissus's echoes#narcissus plays dress up#(?)
1K notes
·
View notes
Last Seen Blogs

romyschneiderlove
Romy Schneider

softkapla
SOFT KAPLAMA

postfortheparks
Post for the Parks

milestraw3
Builders In Peterborough.

kingshitviva
kingshit