#free photoshop plugins
Text
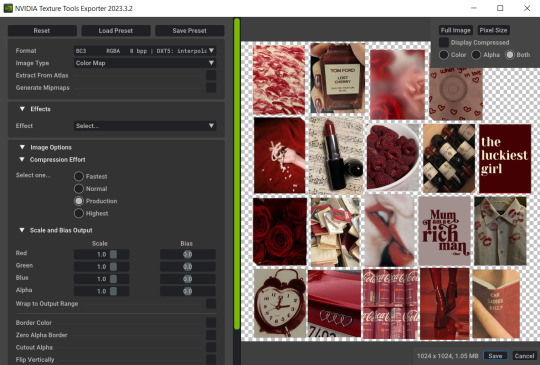
Photoshop File Extension
Photoshop File Extension – Photoshop में बनाई गई Image by default .PSD Format में Save होती हैं। .PSD Photoshop का Extensions होता हैं जिसका पूरा Name Photoshop Documents हैं परन्तु Photoshop में बनाई गई File को हम किसी भी File Format में Save कर सकते हैं जैसे – GIF, IMG, PNG, JPG, WPG, tiff, EPS.
File Extensions
GIF (Graphical image file)
IMG file format
Tiff (Tag image file format)
EPS…
View On WordPress
#adobe photoshop#adobe photoshop tutorial#best photoshop extension panel#best photoshop extensions#extension error in photoshop#extension photoshop#file extension#file extension list#file types in photoshop#free photoshop plugins#how to add unordered list in photoshop#how to manage files in photoshop#how to remove recent files in adobe photoshop#how to reset tools in photoshop#installing a photoshop extension panel#photoshop#photoshop cc#photoshop extension#photoshop extension 2021#photoshop extension error#photoshop extension fix#photoshop extension install#photoshop extension panel#photoshop extensions#photoshop how to add extension#photoshop plugins#photoshop shortcut key list in hindi#photoshop tutorial#photoshop tutorials#save as vs export in photoshop
0 notes
Text
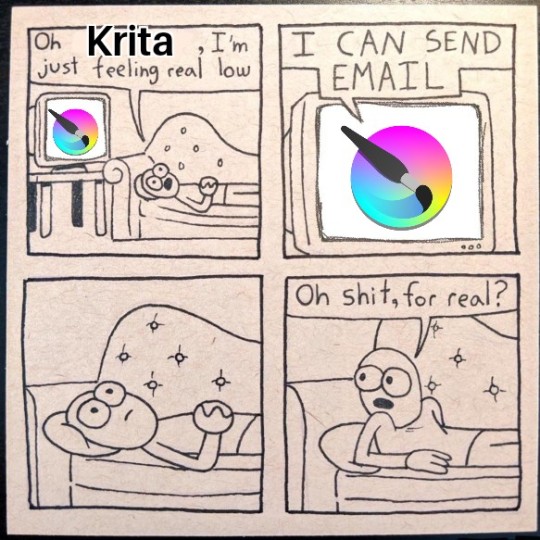
It’s really fucking hysterical at this point how much I don’t know about my own drawing software.
I mean I've been using Krita for what, five years now? And I'm still learning just how much I don't fucking know about this program and its capabilities. I only discovered it has stabilizers half a year ago. I had to look up a video that showed me what dockers to enable for animation and how to use them. Not to mention the dozens of blending modes which I’m still trying to figure out what exactly they do an how to use them. This program is a marvel of engineering but I’m using like, 5% of it at most. I feel like the Doctor being scolded by River Song about improper use of the TARDIS every time I learn that there's a feature in Krita that makes what I want to do five hundred times easier and more efficient.
There's this one guy on Youtube called David Revoy that has in-depth tutorials specifically about Krita, and I have never felt this indebted to one man’s thankless work before. It’s thanks to him that I learned that something called a coloring mask is even a thing, and it has improved my life DRAMATICALLY ever since I’ve learned about it.
However I do need to watch his videos one at a time with breaks because my brain is being blown with the sheer amount of information in each one. It's just me going "wait you can do WHAT?!" every five seconds for the entirety of the 15-minute video every time.
Every time, every fucking time I’m stuck trying to painstaikingly draw something manually, and then learn about another feature Krita has that’d make the process a thousand times easier and better, it’s basically:
Every FUCKING time
#and for the record I would NOT be surprised at this point if there's a plugin that makes Krita send emails#i don't think i'll ever be able to switch to another program at this point honestly.#why learn Photoshop when I can google 'how do thing in Krita' and it turns out IT HAS THAT FEATURE I JUST DIDN'T KNOW WHERE TO FIND IT#I am fucking committed to learning the ins and outs of Krita now#I am married to this program and we have a mortgage#i am SO ANGRY about how GENUINELY AMAZING this software is#it's FREE. It's a FREE FUCKING SOFTWARE#CONSTANTLY BEING UPDATED. WITH GREAT DOCUMENTATION. IT CAN EVEN DO ANIMATION.#but you can't bloody find ANYTHING in it without a step-by-step tutorial#anyways. fuck your Adobes go download Krita instead. this has been an angry psa#krita#drawing software#digital art
36 notes
·
View notes
Text
Photo retouching services
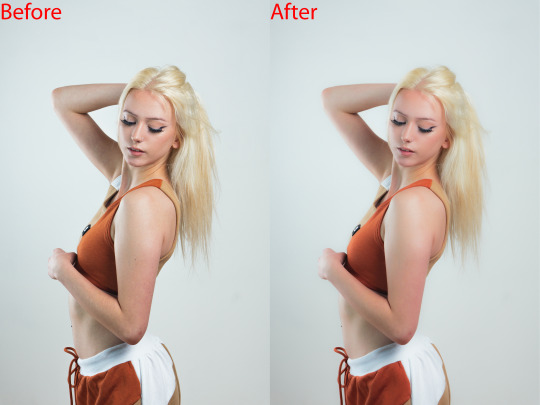
Photo retouching services are offered by many companies and freelancers, and they involve editing digital images to improve their appearance or fix any flaws. These services can range from basic adjustments like color correction and exposure balancing to more advanced techniques such as removing blemishes, reshaping the body, or even adding or removing objects from the image.
That's correct! Photo retouching services encompass a wide range of editing techniques to enhance the visual appeal of digital images. These services are commonly used in various industries, including fashion, advertising, e-commerce, and photography.
Basic adjustments typically involve correcting exposure, color balance, contrast, and sharpness to improve the overall appearance of the image. More advanced techniques may include skin retouching to remove blemishes, wrinkles, or scars, as well as body reshaping to slim or enhance body contours.
Other advanced retouching services may include background removal, adding or removing objects or people from the image, and composite image creation. These services are often used to create visually stunning images for advertising, marketing campaigns, or personal projects.
It's important to note that photo retouching services should be done with care and attention to detail to maintain the integrity of the original image while enhancing its visual appeal.
#affinity photo high end retouching#skin smoothing capture one#skin retouching and color grading in photoshop#pixelmator pro skin retouching#face retouching in photoshop cc plugins#one click skin retouching free photoshop action#affinity photo face retouch#capture one skin smoothing#capture one portrait retouching#capture one pro skin retouching#capture one skin retouching#capture one face retouching#masking photo editing lightroom#masking in adobe camera raw#skin smoothing plugin photoshop#skin retouching camera raw#skin retouching capture one#skin retouching and photo masking service
0 notes
Text
how to make cool blobby turing patterns in photoshop
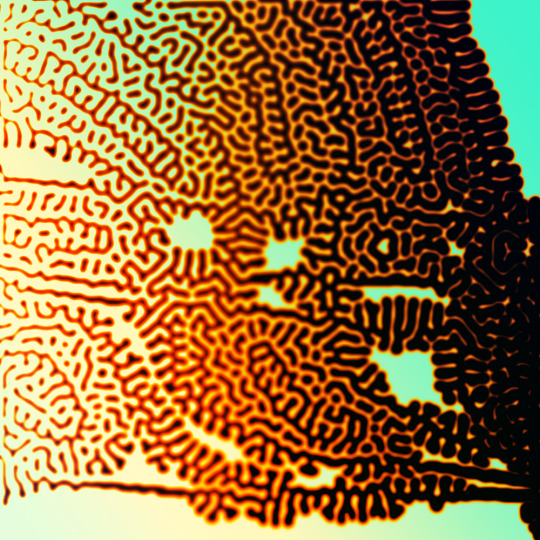
i'll preface with i learned the basic loop from skimming a tutorial on youtube, but as someone who prefers written tutorials i'm sure many would appreciate one! also, the second part of this is some of the visual effects i figured out on my own using blending modes and stuff.
i'm using photoshop CS4 on a mac so some buttons and stuff might be in different places on windows and newer photoshop versions but all the actions are the same. my canvas is 1000x1000 pixels.
UPDATES (i'm hoping these'll show up whenever you open the readmore?)
it's possible to do something similar in krita using this plugin, made by the love @arcaedex
it's also possible to do this in photopea, a free browser alternative to photoshop! the results are pretty much identical.
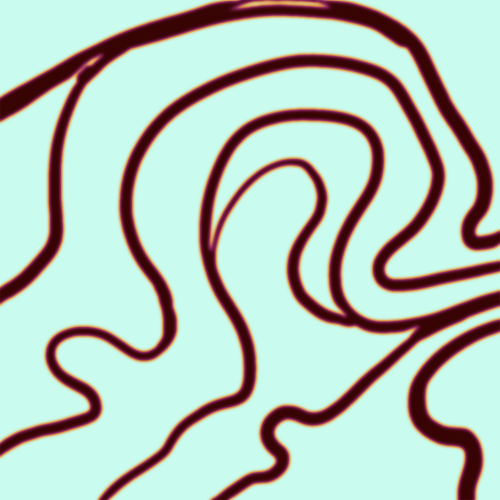
FIRST off you wanna get or make a black and white image of some kind. it has to be one layer. can be noise, a photo, a bunch of lines, whatever. here's mine, just some quick airbrush lines:

now find the actions tab. idk what it looks like in newer versions of photoshop but you probably won't need to dig!
hit the little page thingy to make a new pattern. once you hit 'record', it'll record everything you do. the little square 'stop' icon will end it.
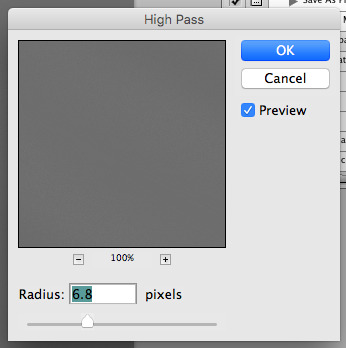
now you want to do a high pass filter. you can mess around with the radius to change the size of your squiggles, but the tutorial had it set to 6. experiment!
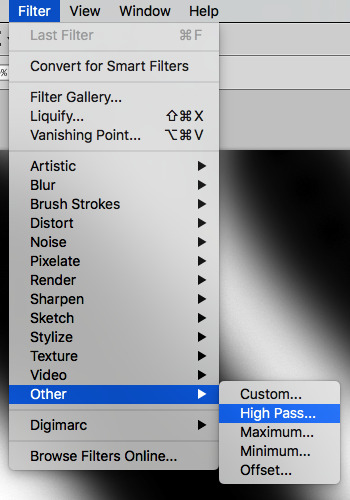
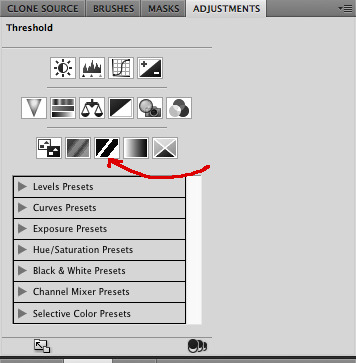
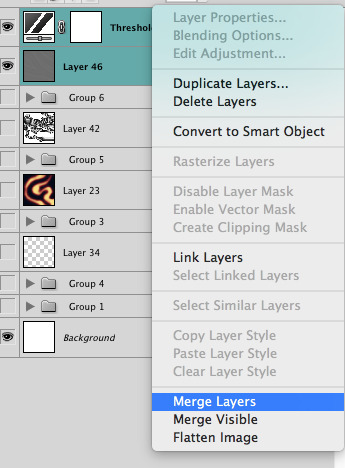
now add the 'threshold' adjustment layer. i use the adjustments tab but i think there's also a dropdown menu somewhere. keep it at the default, 128. merge it down. (control or command + E or you can right click it like some kind of weirdo)
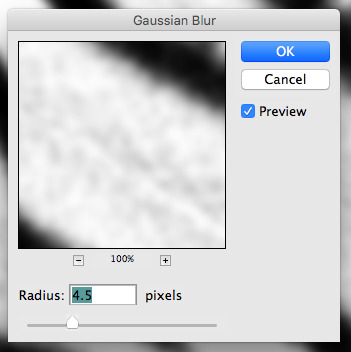
and finally, the gaussian blur! the radius of this affects the shape and size of your squiggles as well. i like to keep it around 4.5 but you can mess around with that too.
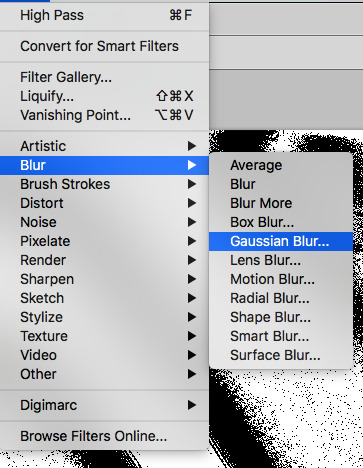
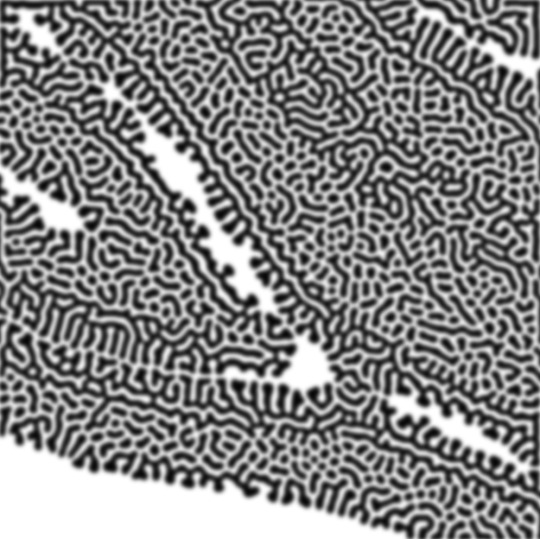
after that, hit 'stop' on the action you're recording, and then repeat it a bunch of times using the 'play' button, until you have something you like, like this:
WOW!! that was fun!! and only a little tedious thanks to the power of macros. anyway, here's some fun layer blending stuff i like to do. it's with a different pattern cause i made this bit first.
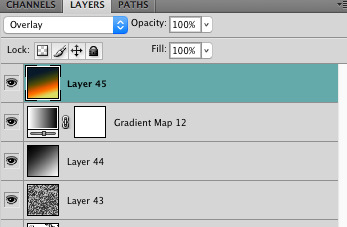
anyway, using a black and white gradient (or a grey base that you do black and white airbrush on), make a layer with the vivid light. this will make the blobs look thicker or thinner.


then, for cool colors, do a gradient map adjustment layer over that:

and finally, my best friend, the overlay layer. just using a gradient here bc i'm lazy, but feel free to experiment with brushes, colors, and blending modes!

NOW GO. MAKE COOL SHIT WITH THE POWER OF MATH. AND SEND IT TO ME
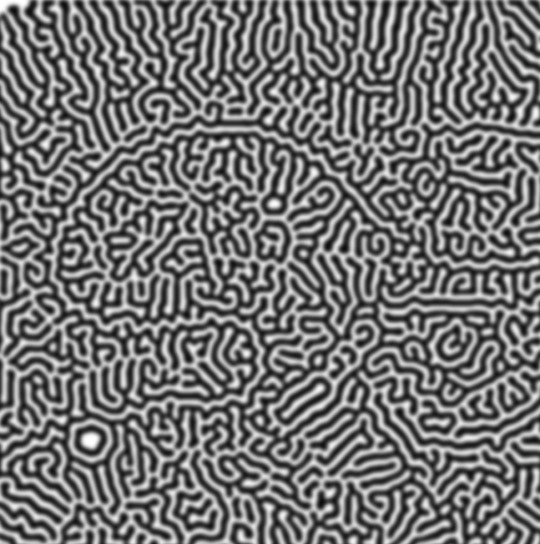
also these are not hard and fast rules PLEASE mess around with them to see what kind of weird shit you can make. here's a gif. as you can see i added some random airblush blobs in the middle of it, for fun.
924 notes
·
View notes
Text
4t3 Conversion of Grouped posters by @cosmiccs4 + Recoloring PSD with tutorial
8 non-recolorable presets
1024 textures
Included PSD for retexturing (tutorial how to use under the cut)
113 poly, all LODs
Shiftable
Price - 5§
BGC
Compressed package
TOU, Ko-Fi
DOWNLOAD | ALT | SIMBLR.CC
Tutorial: How to use my PSD for retexturing
You need:
Photoshop with .dds plugin
My retexture PSD and package file of posters
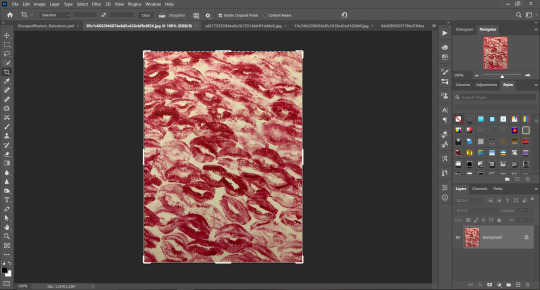
19 pictures to your liking, preferably vertical
TSRW
Sims3Pack Multi Installer and Compressionizer
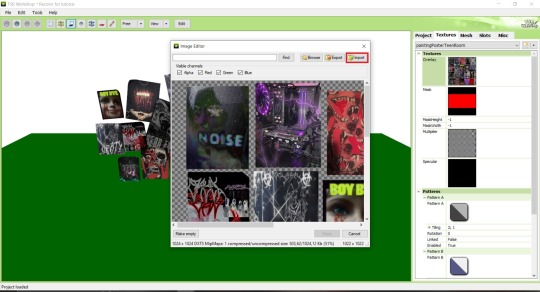
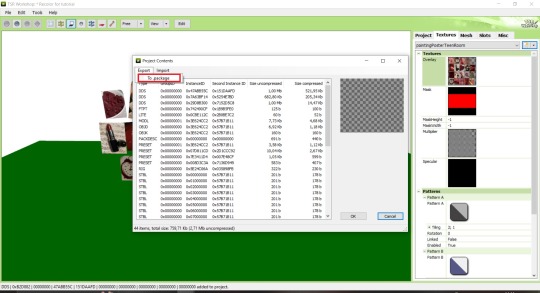
Step 1: Open my PSD file, open your images:
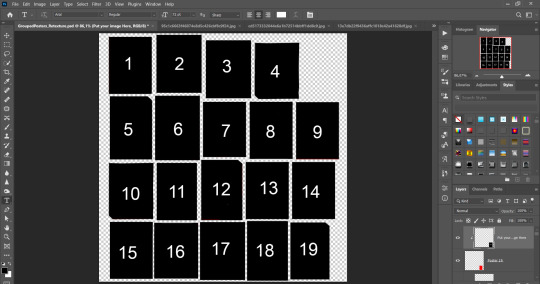
Step 2: Select (Ctrl+A) copy and paste to posters file (Ctrl+C, Ctrl+V) first of your images :
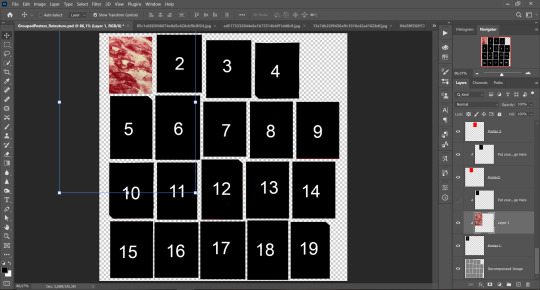
Step 3: Choose where you want to put it, for reference you can use one of the presets:
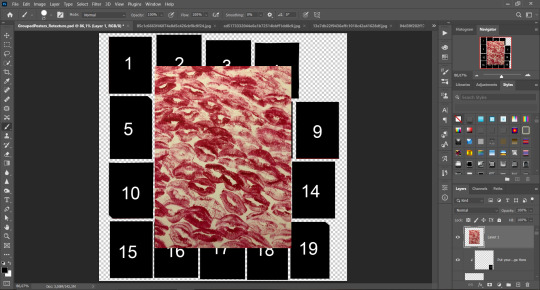
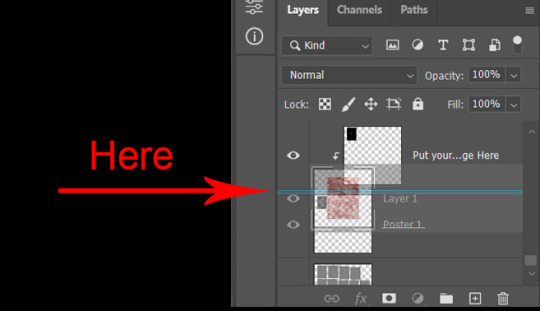
Step 4: After you decided with placement of your image. Move its layer in the Layers tab between "Poster x" and "Put your image here" layers, it will create a clipping mask, which allows the picture to be fit within the poster without cropping. Hide or delete "Put your image here" layer.
Step 5: Use Transform, Free Transform and Move tools to resize the image by your liking:

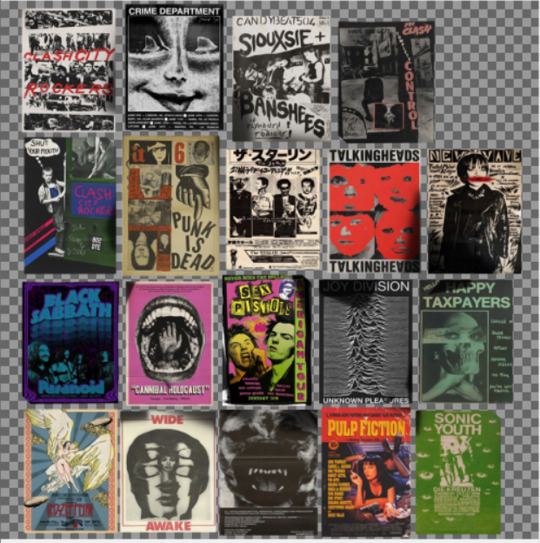
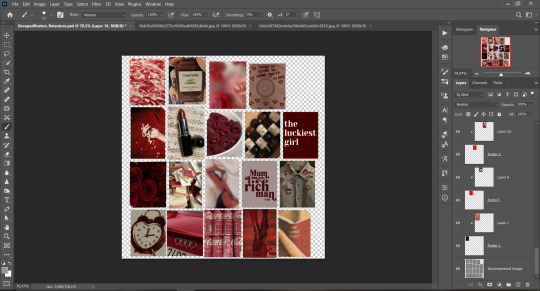
Step 6: Repeat the Step 2-5 with other 18 images:
*vibes are totally random, all images from Pinterest*
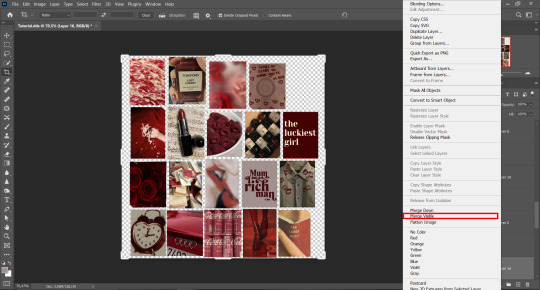
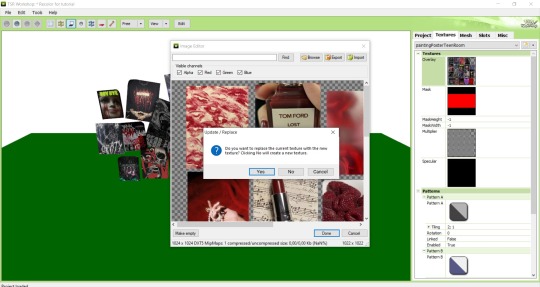
Step 7: After you've done, delete all the "Put your image here" layers, if you didn't it before. Right-click on the Layers tab and press Merge Visible (Shift + Ctrl + E). Now press Save As (Control + Shift + S) and save your image as .DDS with this parameters (2nd picture):
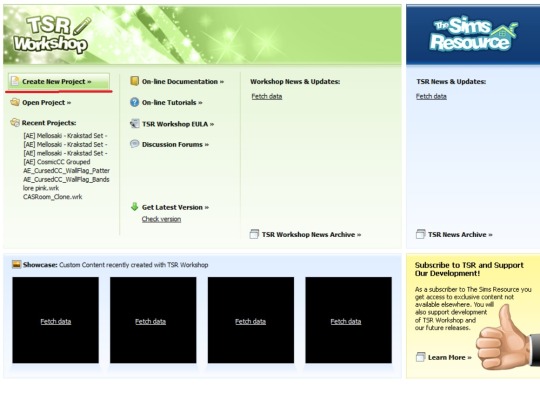
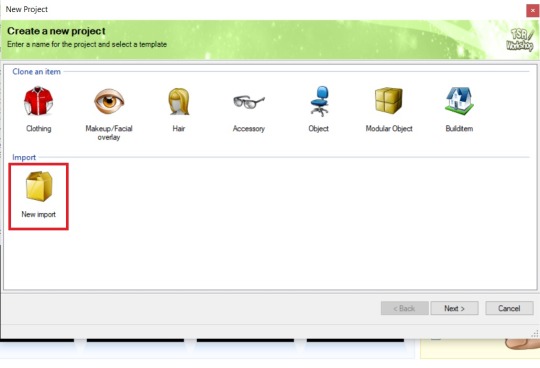
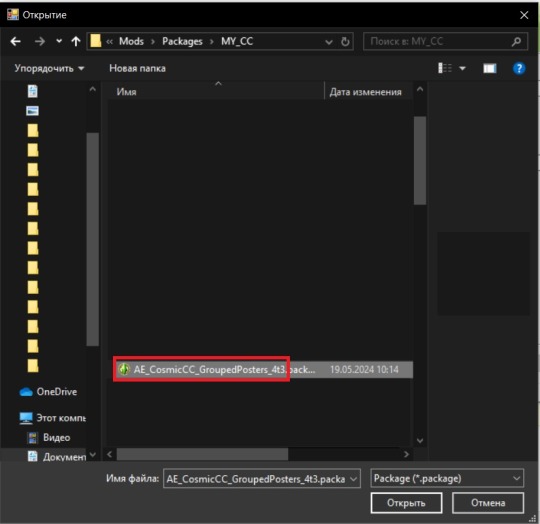
Step 8: Go to TSRW. Press Create New Project > New Import, and select package with my posters. Give for your recolor unique Title and Project name, otherwise it will override original posters:
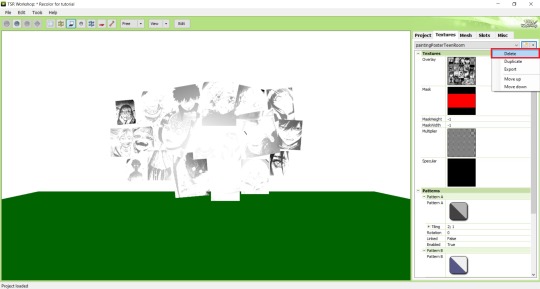
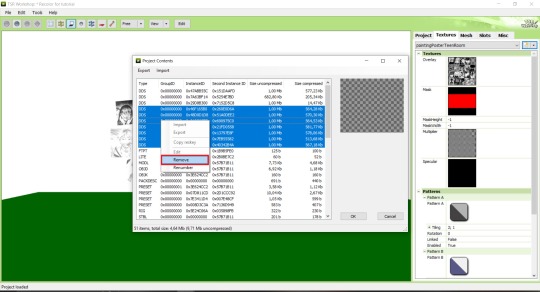
Step 9: In Textures tab go through all the presets except the first one and delete them. Then go to Edit > Project Contents and remove all the textures of removed presets. Its pretty common when someone make retexture of TS3 mesh and leave that unused textures in file, which leads to increasing its size:
Step 10: Press Edit button next to the Overlay tab. Then press Import button and select your retexture. Press Done and when this pop-up appears, press Yes:
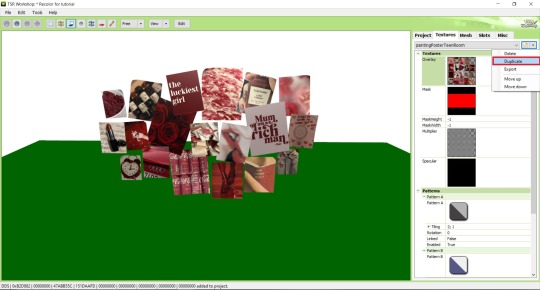
Step 11: If you want to add more presets press Duplicate and reapeat Step 10, but instead, when pop-up about replacing the texture appears, press No.
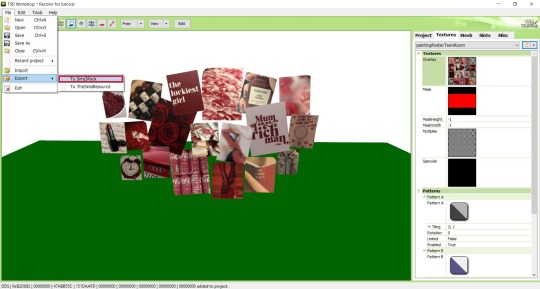
Step 12: After you've done, press File > Export > To Sims3pack or Edit > Project Contents > Export > To .package. If you choose the first method, convert your Sims3pack to Package and in both cases run it through Compressionizer. Test your recolor In-game, make thumbnails (if you want to share it) and have fun!
For those who read this tutorial to the end, click HERE to download this recolor.

@pis3update @xto3conversionsfinds @wanderingsimsfinds @kpccfinds @simfluencer-network @sssvitlanz @simblrcc-site
249 notes
·
View notes
Note
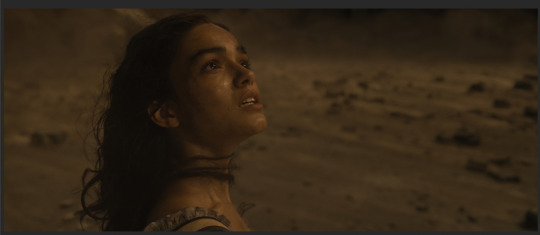
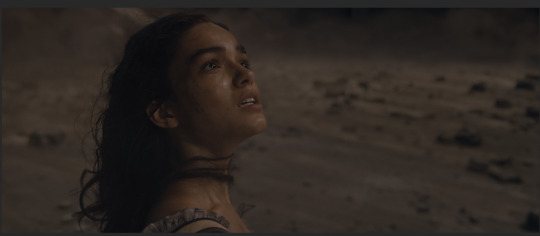
Hii! Sorry to bother you, but I just saw your post about that one GoT scene with "camera raw filter" and *have* to ask...what is that?! That looks insanely good. I tried doing a quick google search, and it seems like it's a Photoshop pluggin, maybe? I'm not too sure... Would you mind sharing a bit more about it, pretty please?
the post anon is referring to:
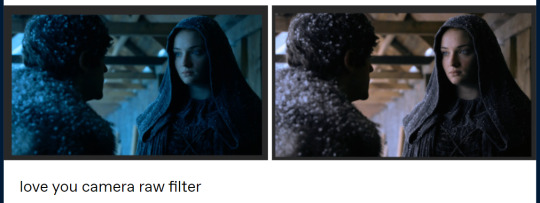
this is by no means an adequate guide or even a comprehensible explanation, but i hope it helps out somewhat.
you are correct, camera raw filter is a photoshop plugin. you can download it from here (works with 🏴☠️d/portable versions too): the installation is pretty straight forward, just do it as you would with any program.
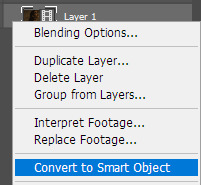
before you do anything, make sure your screencaps are a smart object (it will obviously be faster if you add a camera raw filter after you've resized and added whatever it is you need to add, but you can always just do it with the original sized screencaps). it's easier to edit the properties from a smart object than to go back and try to get it right again from scratch.
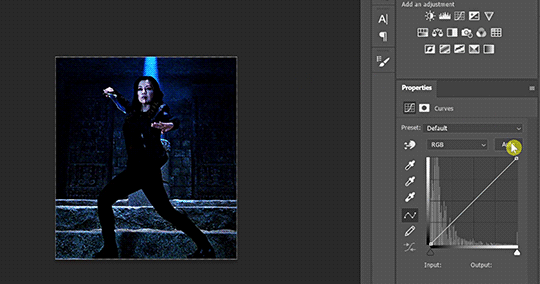
you will find it under filter > camera raw filter… this will bring up a new window:

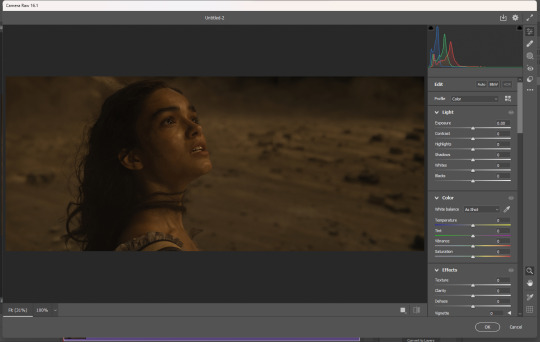
you can add as many of them as you need to. if you want to edit it because you think you've made it too bright or too blue or something, just double click on camera raw filter under your smart object:

if you're editing one scene and you would like for everything to look uniform, you can also just bring over your settings because they're smart objects:

okay enough yapping, back to what you came here for. let's go through all that i use/have used and how they work. you can mix and match them however you want - what works for one scene might not work for another.
the 'Light' section you can use to fix the light of the scene but i basically only use it if i want to "strengthen"/darken the whites and highlights. if your files are too dark or lack contrast, you can fix that here.

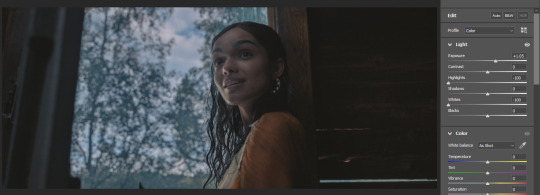

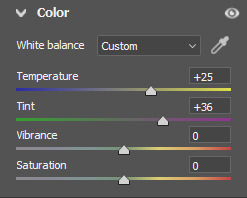
the 'Color' section!!! chef's kiss. this is what i used for the Sansa screencap. first you need to think about whether your screencap is too yellow or too blue, and then slide it towards the opposite direction. after i did that, it was way too green, so i used the tint feature to help out with that.


if you have handled today's media, you know that they haaaate color. so still in 'Color', in vibrance/saturation (i have never worked out the difference and atp i don't really care asdfghjkl) you can adjust that as well but it's for all the colors of the rainbow. you can enhance colors better in 'Caliberation' (see below).

i don't really use 'Effects', but the Vignette feature is a lifesaver if you encounter those. an example:
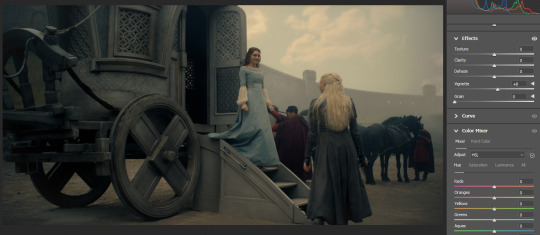
i have never touched 'Curve' but i image it works just like curves.
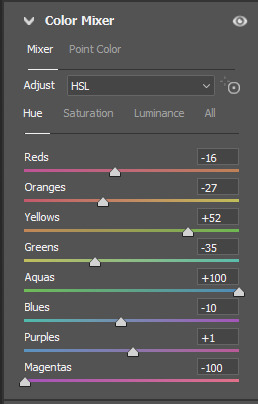
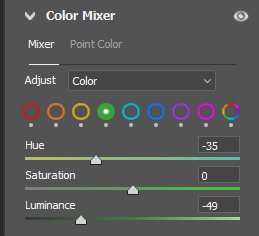
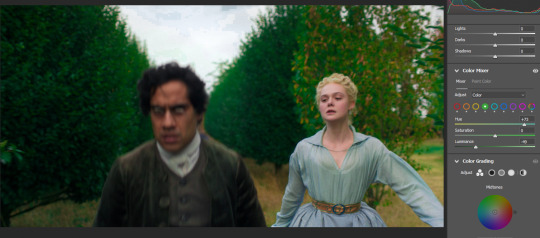
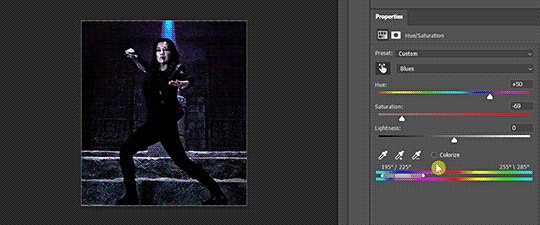
'Color Mixer' is good to manipulate colors. it's basically hue/saturation but lowkey better. if you switch to 'Color' in Adjust, you can edit them more accurately (Capcut has a feature similar to this i think).
ngl i don't have a good example of this now so enjoy this cartoonish something:

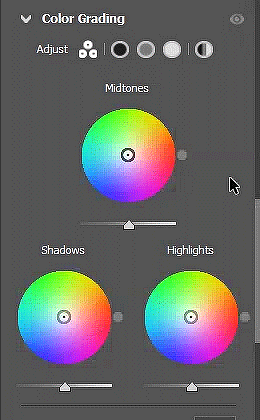
and we have arrived at my favorite!!! with 'Color Grading', you can fix almost anything: Midtones, Shadows and Highlights. it's basically a color wheel and you can try to find the black midtone and white points that will neutralize your screencaps. you can be more accurate with them if you click the circles in Adjust. basically a more freestyle curves i think.
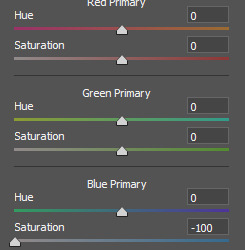
lastly, 'Calibration'. you can also enhance or diminish colors here based on whether they belong in the red, green or blue primary. eg if you have a scene that's way too yellow, you can try and bring down the saturation in Blue Primary and it will help tremendously.


if you have any further questions, feel free to send me another ask!
382 notes
·
View notes
Text
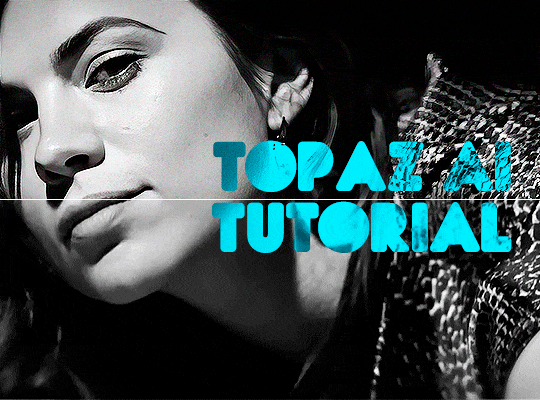
TOPAZ AI TUTORIAL
i was asked to do a tutorial for Topaz AI (a software that enhances screencaps), so here it is! :)
[tutorial under the cut]
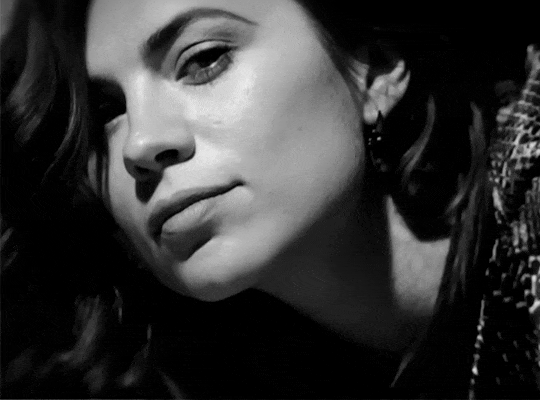
i’m going to gif a 720p YouTube video from 12 years ago as an example. it’s the bottom of the barrel when it comes to image quality, but in the end, you won’t believe it was once so shitty. here’s the gif, without any editing:
THE APPLICATION
Topaz AI is a paid software for image enhancement. you can download it for free, but your images will have watermarks. here's a random link that has nothing to do with this tutorial.
you can use Topaz AI as a Photoshop plugin or use the software separately. i will explain both methods in this tutorial.
USING SEPARATELY
it’s the way i do it because it’s more computer-friendly, the plugin can take a toll on your PC, especially when you’re dealing with a lot of screencaps.
you first take screencaps as you normally would (if you don’t, here’s a tutorial on how to do it). open Topaz AI and select all the images. wait a while for the software to do its thing.

on the left, there is your screencap untouched. on the right, is your edited version. if you click the edited screencap and hold, Topaz will show you the original, that way you can compare the versions even better than just looking at them side by side.
Topaz AI will automatically recognize faces, if any, and enhance them. this can be toggled off, by disabling the “recovering faces” option in the right panel. it’s always on for me, though. you can tweak this feature by clicking on its name, the same thing for the others.
Topaz AI will also automatically upscale your screencaps if they’re too small (less than 4k). it will upscale them to achieve said 4k (in this gif’s case, the original 1280x720 screencaps became 4621x2599). i suggest that you let the app upscale those images, giving you more gif size flexibility. you can change into whatever size you want if you want something less heavy to store. don’t worry though, even these “4k screencaps” are very light megabytes-wise, so you won’t need a supercomputer. it might take a while to render all your screencaps, though, if you’re on a lower-end computer. (the folder with the edited screencaps ended up being 1GB, but that’s because it contains 123 screencaps, which is a lot of screencaps for 4k giffing).
two options won’t be automatically selected, Remove Noise and Sharpening, you will need to enable them to use them. rarely i don’t use Remove Noise, as is the best tool to remove pixelization. the Sharpening option depends on the gif, sometimes your gif will end up too over-sharpened (because of Topaz’s sharpening and later your own). that said, i used the Sharpening option on this gif.

next, select all images by clicking the “select all” button. you will notice that one of the screencaps’s thumbnails (in my case, the first one) will have small icons the others don’t have. this is the screencap you enhanced. you will need to click the dots menu, select “apply”, and then click “apply current settings to selected images”. this way, every screencap will have the same settings. if you don’t do this step, you will end up with one edited screencap and the rest will remain untouched!

all things done, click “save X images”. in the next panel, you can select where to save your new screencaps and how you want to name them. i always choose to add a topaz- prefix so i know what files i’m dealing with while giffing.
just a note: if your way of uploading screencaps to Photoshop is through image sequence, you will need to change the names of your new screencaps so PS can perceive that as a sequence (screencap1, screencap2, etc). you can do that by selecting all the screencaps in your folder, then selecting to rename just one of them and the rest will receive numbers at the end, from first to last. you don’t need to rename them one by one.
here’s the first gif again, without any editing:
without Topaz enhancement but with sharpening:

without sharpening, only the Topaz enhancement:

with Topaz enhancement and sharpening:
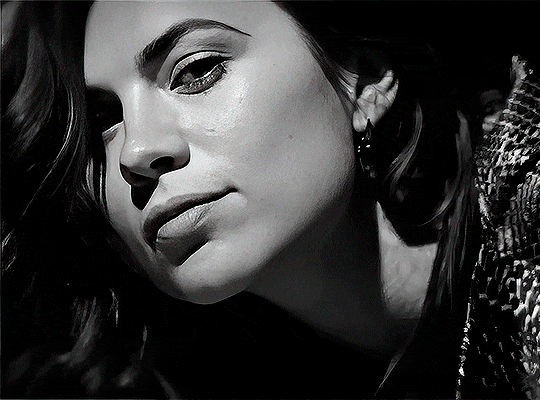
her skin is so smooth that it is a bit unrealistic. i could have edited that while tweaking the “Recovering Faces” option and/or the “Remove Noise” option, but i prefer to add noise (filter > noise > add noise) when necessary. this way, i don’t risk not enhancing the quality of the screencaps enough.

i added +3 of noise, making the gif look more natural. it’s a subtle difference, but i thought it necessary one in this case. you can continue to edit your gif as your heart desires.
VOILA! 🥳
AS A PHOTOSHOP PLUGIN
if you have Topaz AI installed on your computer, Photoshop will recognize it. you will find it in filter > Topaz Labs > Topaz AI. while in timeline mode, select the filter. the same Topaz AI window will pop up and you can tweak things the same way you do when you use the software separately. by using the plugin, you don’t need to upload your edited screencaps or use screencaps at all, a video clip (turned into a Smart Layer, that is) will suffice. the downside is that for every little thing you do, Topaz AI will recalculate stuff, so you practically can’t do anything without facing a waiting screen. a solution for that is to edit your gif in shitty quality as you would edit an HD one and at the very end, you enable Topaz AI. or just separately edit the screencaps following the first method.
this is it! it's a very simple software to use. the only downside is that it can take a while to render all screencaps, even with a stronger computer, but nothing too ridiculous.
any questions, feel free to contact me! :)
#*#*tutorial#alielook#usershreyu#userlaro#userchibi#tusernath#usersanshou#userbunneis#userzil#tuserlou#jokerous#usersnat#userdavid#userbuckleys#userbarrow#gif tutorial#completeresources#ps help#resources
143 notes
·
View notes
Text
I wanted to have a post to link to that visually demonstrates why, even you don't plan to use any of the other rulers and features, Lazy Nezumi Pro's smoothing alone is reason enough to get it for Photoshop.
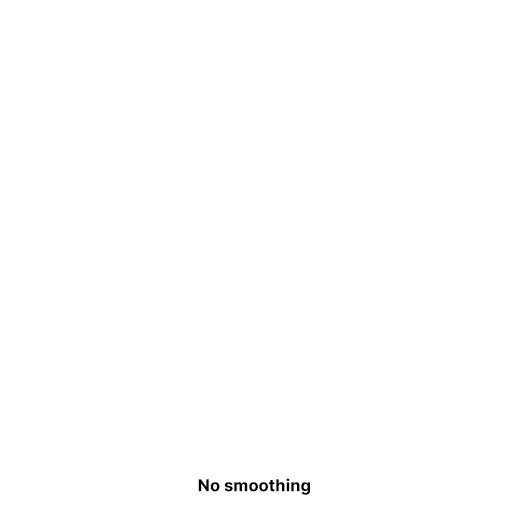
Here's our baseline. Photoshop without smoothing.

Now here's a comparison between the smoothing options.
This isn't a paid ad. I just think...
well, LOOK AT IT. "Smoothing". C'mon!
(I want to make a separate post for CSP. CSP's stabilizer is an order of magnitude more sane, but it has some huge weaknesses as you crank the stabilizer higher that requires a few more gifs to really show)
Here's affiliate link: https://lazynezumi.com/?ai=pharan
I *DON'T* get a kickback from the link, but if a lot of you use it, it does help me justify being annoying to them. :p
Lazy Nezumi Pro is an amazing feat of engineering/one-time purchase pen smoothing and rulers plugin application for Windows. It works with all sorts of digital art programs (there's a compatibility list on their site). You get free updates for one year.
#drawing#photoshop plugin#photoshop smoothing#photoshop stabilizer#lazy nezumi pro#lnp#digital art tools#photoshop shoelacing#stabilizer for photoshop
79 notes
·
View notes
Text
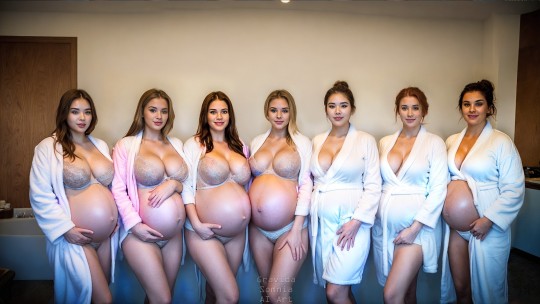
A text post for a change! tldr: There's some technical details re: Dayspa Squad which spills into discussion of the software & hardware used, and a few other thoughts.
Group pics are difficult with the limitations of the AI I'm using (SD 1.5, sdxl is better but my budget gaming laptop can't run it the way I use 1.5 without overheating), and people have noted that they often look like a row of clones. So this time (and last) I've found a suitable txt2img generation (top left) then re-run it through img2img and added variations in the prompt to produce different, still very similar looking groups, with many typical AI pic problems e.g. too many/not enough fingers & hands:
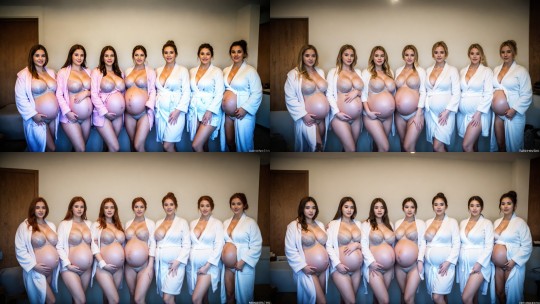
but from that I'll use Krita + the clone tool aligned to each pic and take parts of each that seem apt; hopefully between all the iterations there's enough non-freaky hands and other parts to go around!
You can see I haven't done a perfect job - especially with the 2nd woman from the left's dressing gown and hand, and the breasts still look cloned. Such flaws and others are much less noticeable on IG with it's limited image resolution and most users having a small screen experience. My excuse is that the milestone came up sooner than expected and I rushed it (I only started after noticing I'd hit 8,995 followers and it took about 20 minutes all up, a few minutes before I hit 9k). But a little more time and scrutiny and even running a couple more iterations could have gone a long way.
Photoshop could just regenerate individual elements if you want it to but I'm not a pro user and can't justify the expense (such functionality wouldn't be available to unlicenced users). I'm more familiar with GIMP but I prefer Krita for simple clone tool operations because it loads quicker and the default brush is perfect for how I use it + the smart patch tool is also handy. I could also use the SD plugin within Krita/GIMP for similar functionality but I found the interface too clunky so I prefer to work manually for this sort of thing.
This method is the sort of thing I'd use earlier on to fix weirdness like mutant hands, multiple weird bellybuttons and other AI body horror. Or to get a striking individual image juuuust right, like this one or this one. Nowadays the raw outputs are often realistic enough that simple touchups can take care of aberrations. We're not far off having an app that laypeople can use that will make pics like this without a need for editing - but for now I'm happy in this niche.
Assets Used (All software free for personal use, mostly free for commercial use):
Software:
Stability Matrix with the Automatic1111 WebUI
Krita (has a learning curve but so does PS, amazing functionality that I've barely made use of because I'm not an actual artist)
Irfanview (free for personal use but I've licensed it so I can use it for work if needed, totally worth it)
AI Checkpoints/Loras/Embeddings:
Photosomnia Omega (my SD1.5 photorealism model blend)
Pregmix 2 Lora (will update eventually but it's not available yet, for now try Pregmix 1 or other pregnancy Loras on civitAI)
FreeU/FreeU webUI plugin
Negative photorealism embeddings used to help a lot but I don't need them so much now due to how far the model and Lora has come. They still deserve a mention as they have been very useful and will continue to be so with a variety of models:
fcneg
kkw-ph1-neg
Bad_NegAnatomy
Hardware:
2nd hand laptop with an i7, 16gb ram, 1G SSD, and 8gb rtx graphics.
4gb nvidia GTX graphics is considered the bare minimum but an RTX with 8gb is gonna be the minimum practical for working with HD resolutions & SDXL. Cheaper laptops will struggle with heat management, PCs will hit your power bills.
Radeon graphics can technically work, they're good for people who love fucking around with linux because things aren't working and want to apply that approach to AI artgen software. If you don't enjoy that sort of frustration don't bother.
Apple isn't supported for Stability Matrix yet but apparently many implementations of SD will work on a Macbook Pro with the M1/M2 chip and preferably at least 16gb of ram. Draw Things will run on an newish iphone/ipad but I found it too clunky to use for serious pics and it's not practical for high resolution work.
While reflecting on the artistic mediocrity of this otherwise pleasing pic, a paraphrase of T.K. crossed my mind, namely that the AI revolution has been an utter disaster for human art. It does have a place alongside real art but as an example I hate seeing AI garbage in advertisements knowing that it's not only deceptive garbage that pretends to be something it's not AND it's also more lost payments for working artists/photographers/models. But I also think that fake erotica photos people make for themselves or share freely are outside of that problem, as long as they don't depict actual identifiable persons. I will not do fakes without consent, maybe everyone has their price but mine hasn't even come close to being reached, which I'll admit isn't possible without some level of privilege.
I'd like to not be judgmental of people who do make AI fakes for $ but otoh AI users must have some level of privilege to be able to access and use the technology. What I have seen with technology and other things is that irresponsible use is likely to be met with irresponsible regulation and I do wonder (not worry) how much longer blogs like this will be legal. Anyway for now just enjoy the pics! There will be more to enjoy soon. If you've bothered to scroll through thanks for reading and thanks for being a fan!
74 notes
·
View notes
Text

* ( ❀ ˆ꒳ˆ˵ ) ♡ Ꮺ 𝗧𝗜𝗡𝗬𝗧𝗢𝗪𝗡𝗦 — 𝖩𝖤𝖮𝖭𝖦𝖧𝖠𝖭.𝖠𝖳𝖭 ੭

— introducing jeonghan.atn version 01 & 02 , this is a photoshop action that uses topaz clean and is designed for medium reaction gifs with a sizing of 268x151 but can probably go up to 268x165 ! this is my first time messing with topaz clean by myself so it's not going to be perfect , which is why i included two versions + feedback is heavily appreciated ♡ download is in the source link + below the read more along with a known bug & fix. please like & reblog if you plan on using this action ! it will not work unless you have topaz clean , but to my understanding it is now free so i'll link it below and hopefully it works for you ( ˘͈ ᵕ ˘͈ ♡) ~
❀ DOWNLOAD + DISCLAIMER.
download the action file - here
you require topaz clean otherwise this action will not work. from what i've been told topaz clean is now free and you can get it here by scrolling down to "classic plugin downloads" and downloading "clean" for either windows or mac.
❀ APPLYING THE ACTION + BUGFIX.
it's not always obvious , but if you observe the top and left side of your gif you may notice a strange line where the clean doesn't seem to have applied. this has an easy fix ! it's not actually prominent on the gif i used for this example but i've attached a video tutorial on how to fix it if it effects you.
watch the tutorial - here
from 00:00 - 00:56 the video shows you how to apply the action.
but make sure "actions" is ticked in the windows tab and that you've actually loaded the downloaded action; you can load the action by clicking on the four lines in the corner of the action tab and selecting "load actions".
from 00:56 to 01:55 the video shows you how to fix the bug if you encounter it - just drag the rectangle selection tool down to where you see the bug end. it's not the proper way to fix it but it works at least. looking back , i can see that 0.4 on gaussian blur looked a little strange so i would fiddle with the number again and see what looks best.
❀ RECOGNITION.
this action was inspired by xb3/apa/nd/4's own topaz action , but was never reuploaded by them when their account got deleted. you can view their remade deviantart by searching the name above without the "/s"

what the gifs look like with colour if anybody's curious </3 this will always vary of course but i happened to think the black and white version showed what it actually looks like in photoshop more effectively.
#photoshop action#action#rph#rpc#gif action#resources#rph resource#rpc resource#action resource#rph action#rpc action#free rpc#free rph#free#tinytowns#m: resources#gif resources#gif resource#ps action
102 notes
·
View notes
Text
skin retouching and photo masking service
Welcome to Merchynt's world of creativity, where every image is transformed into a masterpiece! 🎨 Our skin retouching and Photo Masking Service are designed to elevate your photographs to new heights of perfection. Whether you're a photographer looking to enhance your portfolio, a business in need of stunning visuals, or simply someone who appreciates impeccable image refinement, Merchynt is here to exceed your expectations. ✨
Our Photo maskings is not just about editing; it's about crafting enchanting visuals that captivate and inspire. With our meticulous attention to detail and commitment to excellence, we ensure that every image tells a story of beauty and sophistication. 💫
Join the ranks of satisfied clients who have experienced the Merchynt difference. Discover the transformative power of our services and unlock the full potential of your images. 🌟 Trust in Merchynt for unparalleled quality, reliability, and creativity. Let us turn your vision into reality!
#photography#professional editing#skin smoothing#affinity photo high end retouching#high end skin retouching action#skin retouching and color grading in photoshop#pixelmator pro skin retouching#face retouching in photoshop cc plugins#one click skin retouching free photoshop action#affinity photo face retouch#capture one skin smoothing#capture one portrait retouching#capture one pro skin retouching#capture one skin retouching#capture one face retouching#masking photo editing lightroom#skin smoothing plugin photoshop#skin retouching camera raw#skin retouching capture one
0 notes
Text
2077, April
"You really think I can make it, survive this?"

"'Course you can. I mean, you did already die and come back once, didn't ya?"
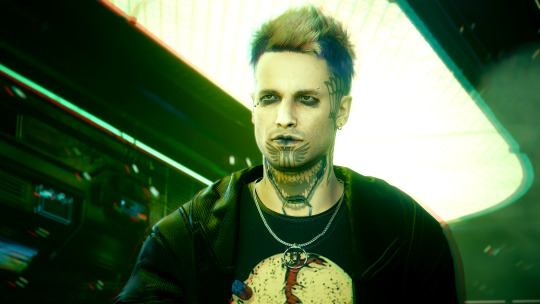
The chance of a lifetime the Konpeki Plaza Heist should have been turned Vince's existence into a living nightmare. Going from "just living, day by day" to "sheer survival, at all costs" in the manner of moments and following a row of bad decisions made by everyone involved, this was now definitely his last chance to get his life back on the right track. A second chance, after so many other second chances he'd already botched... while the one who would've really deserved another shot was now gone from Vince's life forever.
Jackie, the one person he had never regretted to trust in, who had never let him down, helped him out of the greatest messes, wouldn't be at his side through his biggest challenge so far. Vince would often lie awake at night wondering "What if he'd just kept the damn biochip? Would he be here now, instead of me? Why am I still here when he'd deserved it so much more?"
But then again... Jackie wouldn't have deserved Johnny Silverhand, Vince's newly acquired brain parasite from days long gone, unwanted voice of unreason, and perpetual threat to his mere existence.
Vince was dying, losing himself, little by little, day by day, after it had taken him ten long years to get to a point of self-acceptance and recognizing his strengths, desires, what he truly wanted from life. It was the cruelest irony of fate imaginable.
Misty's words accompanied him through his darkest moments: as long as your heart's still beating, there is hope.
Vince never wanted to be a legend... but for Jackie's sake, he'd make sure everyone would remember their names. He'd survive this, get rid of the Relic, of the terrorist in his brain, and make it out alive. No matter the cost.
Vince through the years (7/9)
A handful of before and after screenshots this time:
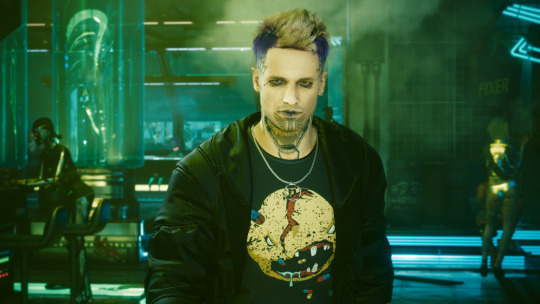

Some slight colour adjustments, and a little Relic-like glitch effect like it happens to Johnny whenever he's visible!


Also these two didn't make it to the final set, but I still really love the flying sparks effect :O These are completely vanilla, done in vanilla Photomode without path tracing. There's a lot of particle effects going on at Afterlife that render very interestingly sometimes (I think only since the graphics update though, since pics in Photomode take a moment to render, creating this motion blur/ long exposure effect). Sometimes this a bit annoying when you want to go for a relatively clean shot, but these looked really kinda cool for once xD
I've also been playing around a lot with a free filter plugin (search for GMIC) for Photoshop that has some really nice glitch effects, chromatic abberation, amongst many many many others :o If you don't know it and use Photoshop (although I think there are versions for other programs available as well!), I can definitely recommend it!
Now, to what I wrote above the cut, briefly. This is a relatively short post compared to all others in the series cause it's obviously the one aligning with what canonically happens in game and there's no need to retell all that in great detail xD What I wanted to focus on though was Vince's shift of mind between pre-Heist and post-Heist.
Before the heist, when Dex asks him what he wants, a quiet life or a blaze of glory, Vince is internally leaning more to a quiet life. Assuming though that that's not what Dex would wanna hear, probably, he deflects, gives him no clear answer. But yes, after having to run away from home, struggling on the street, busting his ass for Arasaka and barely making it out of all of that alive, had it not been for Jackie, he has no intentions of just throwing all his growth and progress away by blowing himself up in some daredevil endeavour. He's reached a point where he genuinely likes himself, his body, his life, and while he's not perfect, still in recovery from his time at Arasaka, and has done messed up things to get here, he would've been content with just small-time, low-risk merc work for the years to come.
With Jackie gone though, who has been a constant guidance over the last 10 years, with everything that rains down on Vince during the post-Konpeki shitstorm, I think this would change. He's being told "you're gonna lose yourself, forget who you are", "the body you literally shaped after your own wishes will soon be Johnny's", whom he cannot stand, no one wants to work with him initially after such a legendary failure, he has "a few weeks, at most" left to live... fuck all that, so hard. He's gonna fight tooth and nail to make it out of it alive, forget the quiet life.
He's gonna make sure as hell that, if all ends up being in vain, people will remember him and that he didn't settle for the easy way out. If he has to die, he'll do so standing - maybe scared, but head held high. Cause everything else would be a disservice to how far both he and Jackie have come together, to who he is at his core: a rebellious kid who once rather would've taken on a whole Valentino gang on his own instead of calling his corpo mother for help, someone who quit his secure job because he refused to keep taking the abuse from his boss, who risked his life for his best friend despite sending himself down a spiral of despair in the aftermath. He's not scared of getting his hands dirty, of forging his own path (alone, if need be), and of taking risks if he thinks they're worth it for himself or the people he's loyal to.
#cyberpunk 2077#cyberpunk 2077 vp#cyberpunk vp#cp2077#cp2077 vp#virtual photography#male v monday#male v cyberpunk#cyberpunk v#corpo v#jackie welles#misty olszewski#my vp#vincent ezaki#vince through the years#my boiiii has gone through so much x') and there's more to come#but he'll get his happy ending after so much shit I promise
40 notes
·
View notes
Note
usually im not one to clown on another anon but "you can edit things for free with photoshop" is such an out of touch thing to say. do they know that photoshop is very much Not free?
I mean you’re speaking to someone who still uses an ‘evaluation copy’ of CS6, but yeah. And people pay for brushes and actions and plugins and texture packs etc without batting an eyelid. It’s okay to spend money on your hobbies if you can afford to!
21 notes
·
View notes
Text
Hi there! I have never gotten around to make a gif tutorial because there are plenty of good ones out there and I suck at explaining things. Back when I basically use my side blog (@marvelsaos) as my main, I didn’t get that many questions regarding gif making, I presume because many people who followed me there weren’t gif makers. But this year, I finally come back to my real main blog and started posting more gifs over here. This blog is where I mostly follow gif makers and is mostly followed by gif makers. I have gotten a lot more ask on how to achieve certain things in my gifs, most notably my recent Winnie The Pooh set. And this is why I decided to make this post. This is by no means a tutorial, just a post sharing my giffing journey and the things I do in gif making that might be of your interest.
‼️Tons of rambling below. Text, image & gif heavy. Proceed with caution‼️

Table of Contents
Introduction
The Basics
Everything about making a simple gif from start to finish
How to optimize your giffing process
The more advanced stuff?
“Recolouring” & rotoscoping in After Effects
Tutorials mentioned in this post
Acknowledgement
Feel free to jump to any section you find useful. Most of the ramblings are in the introduction.
1. Introduction
i. How I started
You thought that was the intro?! I’m the kind of person who someone would know for a decade without hearing me say a word, and when I finally spoke (usually about stuff that I’m passionate about) I just go on and on and on and it shocks people to no end. I’ve been on tumblr 10 years now as some of you might know I’m doing my 10 year celebration, but I didn’t start giffing until about 7 years ago. And I just realised I have never properly introduced myself. Hi! My name’s Winnie and my username across all social media is Ms_Stanatic. Before I started giffing, my main fangirling platform was IG, and boy I’ve got sooooo many accounts I don’t even remember all of them, the bigger ones were mofy, ouat & aos related, and these days I’m giffing all of my old favs for old time sakes. If you happened to know me back then, drop by and say hi. It probably felt like I drop off the face of the earth when I quit IG. The show that got me started on giffing was, as some of you might know, Agents of SHIELD. @marvelsaos was my “main” blog for the first 6+ years of my giffing journey. Now thinking back it was because I finally got my first laptop when I got into uni and didn’t have to make edits on my android phones anymore. But at the time, all I wanted to do was to capture Melinda May’s eye rolls and actions and static images just weren’t doing it for me anymore. And that’s how I embarked on the journey of gif making.
ii. Tools/ Softwares I used
I had a Macbook air back then, and finding a cracked photoshop for mac was kinda hard, so I had to settle with GIMP. Without the GAP plugin may I add because I do not know how to install it till this day, so it was just pure nightmare. Making gif in the beginning was the most tedious thing I ever did, I’ll explain a bit more later on. The giffing community felt very different back then. I don’t know if it’s because I wasn’t aware or because I wasn’t in it. I felt like there wasn’t as many giffing tutorials on this site, and all I kept seeing was people sharing their psds. It might have been useful if I had photoshop but I didn’t. So the idea was that you can just open up the psd files and drag the adjustment layers onto the image stacks that compose of your gif, and the adjustment layers would affect all the layers beneath it. Not with GIMP though. In GIMP, the adjustment layer(s) only affect the single layer right underneath it. You heard me right. At that time the gif size limit on tumblr was 2mb, a gif I made is usually 20-30 frames/ layers. So I had to duplicate the adjustment layers 20-30 times, them move them right above each image layer. And if I don’t like how it looks, I had to do it all over again. This is slowly turning into a rant but seriously thinking about it gives me headaches. Also, did I mention I didn’t even read up on tutorials and stuff, I basically just googled everything I needed, how to screencap, import it into GIMP, crop & resize, how to use curve, then lastly how to export. No sharpening, no nothing. I didn’t even learn about recolouring like less than 2 years ago (my AoS peeps know which post I’m talking about 😉). This went on for about a year or two, then uni got busy and my life basically went downhill. Somehow, AoS pulled me out of that deep dark hole and get me back on my feet again also because I finally graduated but I’d like to think it’s my love for tv that saved me. I got a bit more time on my hand, I decided to go back to giffing and this time I was determined to get GAP installed on GIMP and have it working. But alas I have failed once again. It was around that time I found out photoshop’s older versions like cs5 was free to download, so I got that instead and finally begin giffing with photoshop.
Moral of the story: Try your best to get photoshop for giffing. It’ll save you so much headache.
And my story didn’t end there. While I was using cs5, I think many people have switch to photoshop cc which has the timeline function for things like smart sharpen (which was a major topic back then) and keyframes (which is what I heard people talking all about these days). Even without timeline, photoshop is definitely a step up from GIMP personally and I managed with a workaround on the smart sharpen function thanks to Julie (@doramilaje). Side note, all the gif makers (beginners & experienced alike) I’ve talked to are all such amazing people. They put so much energy into this craft and are more than happy to talk to you about it when asked. So don’t be afraid, just ask nicely. And maybe go off anon, you might make a friend or two.
2019-20 were probably my most prolific giffing years, I giffed non stop every single day as if it was my full time job. For me, it was something small and easy to complete and it kept my days going. And eventually my Macbook Air that I’ve been using for 5 years was starting to give up on me. And when I upgraded the OS system to Catalina, it no longer supports cs5 and I was devastated. I eventually got my hands on photoshop cc 2020, and in some ways I re-learnt how to make gifs again (like for the third time?).
I knew it was about time to get a new laptop. And now that I know I’m gonna use it for some heavy duty, and I didn’t want to get another macbook because I’m just not that crazy about it and at that time I wanted to use avisynth (more on that later) which was only available on windows (I didn’t know how to install vapoursynth on my macbook ok?). Eventually I got a gaming laptop with a 10th gen i-7 processor and a Wacom Intuos Pro using my sibling’s student discount. I got the Wacom tablet trying to get into digital drawing, but eventually it came in super handy with just day to day editing and especially recolouring.
Moral of the story: Start with whatever you’ve got, then upgrade your equipment when you’re serious about it.
iii. What I’m doing now?
This year has been kinda different for me. In the past, it has always felt like I’m on my own sitting in front of my laptop churning out gifs 24/7. This year, I’ve joined a couple other blogs and gif maker/ ps user networks, learnt a whole lot of new things and diversified my giffing content (I have been giffing AoS 99.9% of the time non stop previously I kid you not). And I’ll be back in school for my part time masters a month or two later, so who knows how often I can gif. I don’t ever wanna stop giffing but I know one day I will, and before that day comes I just wanna share some of my memories with you guys on this hell site. So, basically all that led to this post.
2. The Basics
I’m gonna assume you have a bit of knowledge about gif making. If you’re a complete newbie, I’ve tried my best to link some tutorials to help you understand or get started. And don’t get intimidated by the length of this post. Even though a lot goes into gif making, once you get everything sorted and find your routine, it’ll become second nature. The following is simply my workflow of gif making. It is by no means the right/ better way of gif making. Everyone does things a bit or drastically differently, I’m just here to share my process in hopes that someone might learnt something new or find something interesting. If I got something wrong, feel free to inbox/ message me and address it politely, since I didn’t exactly started out giffing with clear directions, I do get some of the fundaments wrong. And I am no expert in photoshop or any editing software, it’s more of a learning as I go sort of thing. So just take everything with a grain of salt. With all the disclaimers out of the way, here come the things you’re probably here for.
i. Video source
There’s one simple rule, go with the most HQ one, I’m talking 1080p or 4k and make sure it’s the biggest in file size because not all 1080p are created equally. Here’s a post by Taylor (@kylos) explaining all of that and where to download as well. For the most part I just use 1080p because I personally can’t tell the difference but I’m sacrificing a lot of time for a 4k video to load/ process. It’s only instances like these I would use a 4k source.

(gif taken from my set here)
Downloads are gonna take up space but you probably want to keep them if you might gif the show/ movie in the future again since you already spend all that time downloading, so you might need to invest in some hard drives for this. I used to use my uni’s unlimited gdrive plan which was available even after I graduated, but after Google cancelled it I was in huge trouble. I save pretty much all my hd downloads and all my psds & gifs. I’ve recently got a WD Elements 12TB just so I can transfer all 6+TB data on my gdrive to there with space left for the next couple of years.
ii. Screencapping vs Video clipping
So there are a couple of ways to go about this that I’m aware of.
screencapping with mpv (tutorial by Taylor) or other softwares
video clipping with handbrake (here’s an in depth tutorial on gif making including clipping with handbrake by Nums @cillianmurphy), vlc, km player, etc.
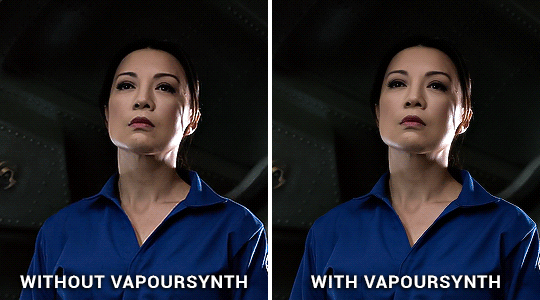
video clipping + cropping + resizing with Vapoursynth (download here | tutorial by Em @realstraykids)
I have tried all of the above. I started with screencapping till around late 2020, when I found out about avisynth (now replaced by vapoursynth) and finally got my hands on a pc where I can download it. I was using screencaps for a really long time because older versions of ps don’t have timeline, I would end up having to convert the video back to frames anyways so why don’t I just import screencaps as is. I think it’s the same logic for me now, because I start all of my editing in timeline, so it’s just quicker to import video clips for me (especially when comparing screencapping with mpv vs video clipping with handbrake). From late 2020 till now, I mostly use avisynth/ vapoursynth. There should be less detail lost when resizing using vapoursynth compared to ps. Personally, I think ps does a pretty good job and I wouldn’t say vapoursynth is a must, it just happens to be a video clipping and resizing two in one tool for me. Vapoursynth has additional denoise & sharpening tools, but I just couldn’t quite get the setting right to incorporate them into my giffing routine, so I stick with ps for those purposes.
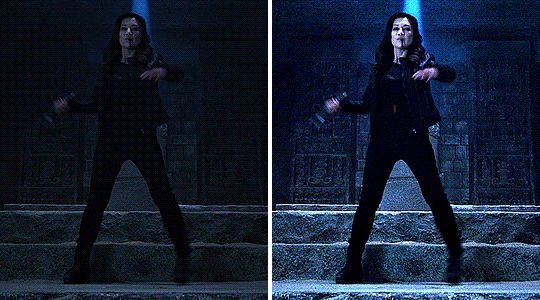
Here’s a comparison for you if you’re thinking about using it. On the left is how I used to gif without vapoursynth. I did the same thing for both gifs except for sharpening, because the clips from vapoursynth just look slightly sharpened to me so I compensated with more sharpening on the left. Honestly, now looking at it side by side I actually like the one without vapoursynth more 😂 I’ll let you decide for yourself. Also, when I’m doing a huge compilation set where there are a lot of gifs and they are basically tiny and I don’t really have the dimensions in mind yet, I’ll just go with video clipping. It’s faster and I can resize it later.
iii. Resizing
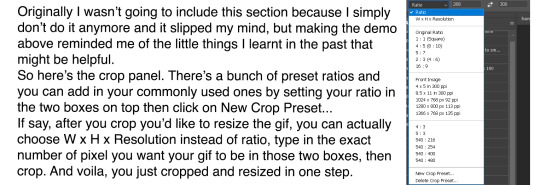
There might be reasons why you don’t want to use the W x H x Resolution crop for your gif, because in the image size panel you can actually choose how you want your resampling setting. Normally I just go with Preserve Details 2.0, and set reduce Noise to 100%.

iv. Sharpening
Once I load my clips into ps, the first thing I do is add smart sharpen to them. For the longest time I only sharpen once. Here’s a sharpening tutorial by Ava (@anya-chalotra). I think those settings are mostly what people use and if you’re new to this you should probably stick with that. But I’ll let you on a secret (not a secret anymore now that’s in the open), I don’t do the whole over sharpen then blur it out thing, I just sharpen to the amount I like. This is coming from someone who spent the first 2? years giffing without sharpening, and when I do realize people sharpen I didn’t even look/ properly follow a tutorial on how to do it. I just knew smart sharpen is a thing. So, I’m sure there’s good reasons why you should sharpen to 500% then add gaussian blur and you probably should do that too. Prior to using vapoursynth, my settings were like radius 0.3, amount 100%-200%. With vapoursynth, I find it slightly sharpens my clips so I go with radius 0.3, amount 50% like 90% of the time.
Then there’s the second sharpen thing if you noticed in my banner gif which I learnt from Sid’s (@sidonidoneeey) tutorial recently. I think it adds more contrast & definition to the objects in the gif.

Here’s a comparison for you to decide for yourself. I tried the max sharpening then add gaussian blur method in the second gif, and I’m still not quite convinced.
v. Colouring
This I would say is pretty much the essence of a gif maker’s style. Again, everybody does it differently, different gif makers swear by different adjustment layers.
Here are some tutorials for getting rid those difficult colour cast:
Kate’s (@dewandawise) channel mixer tutorial
Airam’s (@magnusedom) colouring tutorial
The best/ most experienced gif makers I know all swear by channel mixer so you should definitely check out Kate’s tutorial.
Personally, my routine adjustment layers are like the ones in the banner gif. Levels → (+/- Curves) → Colour Balance and/or Selective Colour and/or Hue/Saturation → (+/-Vibrance). Then repeat any of those if necessary.
Levels:
Personally, I always start my colouring with levels. When I first started giffing, all I heard about is curves and I spent a lot of time fussing around with it not knowing what it actually does. Until I found out about levels. It is way easier to understand than curves and very suitable for beginners in my opinion.
You basically drag the right most arrow to meet the right side of the histogram. What you’re doing is telling ps what value in the gif you want to be the brightest (aka white), and everything beyond that value is going to be white as a result. You do the same thing on the left, and in this case defining the darkest/ black in your gif. I find this to be the simplest way to brighten and add contrast to gifs. The results as you can see is night and day.
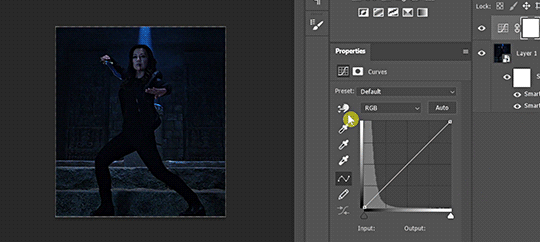
Curves:
Curves can basically do what levels do but more. See those two arrows under the histogram in curves (right), they basically do the same thing as what I just showed you in levels (left). And then obviously you can manipulate the curve to get your gif how you want, but honestly I still don’t fully understand what curves is so I’m not gonna try and explain that to you. What I can do is show you some other neat tricks you can do with curves.

You can click on the hand with the pointing finger icon, click and drag up to brighten or down to darken on any area in the gif you’d like to edit.
Another thing I like to do is click on the white (last) or grey (second) eyedropper, then click on an area where you think should be white or grey to get rid of any unwanted colour cast. This video tutorial goes more in depth and is more of a proper way of doing it, but I just don’t bother with doing all of that normally.
So here you can see I click on the grey eyedropper, than I clicked somewhere in the background I think should be grey, ideally further away from that blue light beam behind her because everything near that is just gonna be more bluish. And you can see immediately the ground has less of a cyan tint and there’s more red in her skin. Sometimes, you have to try a couple of different places to get the best results. Sometimes, it just won’t work at all.

You can also Alt+click on the auto button, and a panel shows up. Click on them and see if any of those works for you. But normally I don’t use this because I have already enhanced the brightness and contrast with levels.
Once I get my overall values how I like it, I go into colour correcting. Usually nothing drastic, just trying to get rid of any colour tint and get the gif to look more neutral in colour. My go to are colour balance, selective colour and hue/saturation.
Colour balance:
This is usually my go to to adjust the overall tone of the gif, and the panel gives a good visual of rgb vs cmy.
Selective colour:
This is when I only want to adjust the tone of a particular colour without affecting the rest of the gif. I usually go to red the most to adjust characters’ skin tones. Also, people often ask if they should use relative or absolute mode. I would say for simple adjustment I would go with relative because it’s more subtle, but for major colour change and I want it to really show I’ll go with absolute.
Hue/Saturation:
This I usually go in and click on the hand button then click on wherever in your gif you want to change the colour. Slide the hue or saturation slider around till you’re satisfied.
If you want to, say, change your background to a single colour, check the box colourized. And slide the hue slider to your desire colour. Then paint black over the object in the layer mask to preserve it’s original colours.


Also, that slider you see right there. The center light grey region is where the colours would be affected by the changes you made. And the two darker grey regions flanking it are sort of a buffer so the colour transition isn’t as stark if it makes sense. You can basically slide those sliders closer to each other so the adjustment affects a smaller targeted range of colours. You can always crank the saturation to the max to see what part of the gif you’re changing the colours of.
Photo Filter:
This is a cool one that I learnt about recently. You can basically apply a warming/ cooling filter to quickly change the tone of the gif. Sometimes it helps with getting rid of that last bit of an unwanted colour filter.
vi. Blend modes
Do you know that you can change the blend modes of your adjustment layers to get a different result? I don’t think a lot of people do this, I don’t either most of the time. But there are a couple ones that you might find helpful.
Screen: This will brighten up the gif a lot, could be helpful with really dark scenes.
Colour: When I want my adjustment layer to only affect the colours but not the brightness of the gif.
Luminosity: When I don’t want my adjustment layer to affect the colours.
Here’s a video explaining all the blend modes in photoshop.
vii. Denoise & Clean
It was from the same post that I learnt about avisynth that I found out about Topaz Labs, particularly their denoise plugin & clean plugin. I won’t go in depth into that because I’ve tried it a couple of times and couldn’t get the settings that work for me and it is very time consuming. But if it is something you want to try, here’s a post of the user sharing her topaz settings. What I actually want to talk about is Camera Raw in ps.
I normally add my denoise filter after I coloured the gif, because all the brightening and saturating the gif with colours add more noise to the original clip itself. But if a scene is particularly grainy to begin with, I’ll add a denoise filter right after sharpening, add my adjustment layers, then another denoise filter if necessary. Also, if you want to keep more details in the certain areas like the hair of the characters, just take a soft round brush and paint black in the smart filter layer mask.
Go to Filter → Camera Raw Filter. The denoise function is under the tab Detail. I usually only move the noise reduction and colour noise reduction slider, and keep the detail at 50.
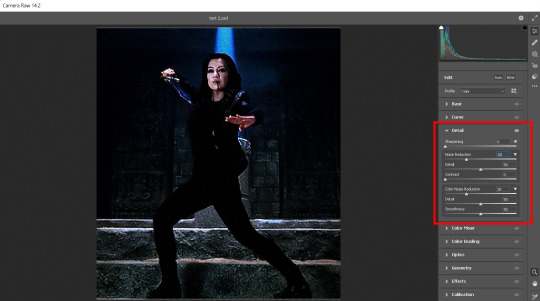
There’s so much more you can do with camera raw. Here’s a tutorial by @michietuts on how to colour your gifs with camera raw. I actually completely forgot about it until I went digging for tutorials for this post. I think the reason why I never got into using camera raw to colour gifs is simply because there’s too many sliders and it’ll take a long time to figure out what works, so I just stick with what worked for me.
viii. Convert to frames & export
After I add all my adjustment layers and denoise filters, I normally convert it back to frames for further editing because I find it takes so long for the video to play in timeline mode. It’s just easier for me to gauge what I want to do with the gif in frame mode, such as whether more adjustment is needed, or how I want to crop my gif. I know a lot of people would just edit everything in timeline mode, and convert back to frames as a last step to change the delay to 0.05s before exporting. You can do it however you want. It’s just spending so much time with cs5, I’ve grown accustomed to editing in frames mode.
Here is my export settings:

For most people, it’s the choice between selective vs adaptive and diffusion vs pattern. Personally I prefer how adaptive pattern looks and I rarely change it across different gifs because I have my export action automated. There’s more explanation and comparison in Ava’s tutorial here.
ix. Subtitles
The majority of gifs I make are what I call “scene edits”. Not that I’m lazy or anything and don’t want to be bothered with making fancier gifs, it’s just what I like to do. Especially when giffing a show I haven’t giffed before I always start with making plenty of scenes, to the point where I can recall just about any scenes from that show when I want to make a fancier gif set. So I’m just gonna share me text settings for the subtitle, show you how I center the text box to the bottom and how to duplicate it to the rest of your files.
Press T for the text tool, and type in whatever subtitle you need. Here are my subtitle settings:

Alt+A to select the whole canvas then press V for the move tool. Then select align horizontal centers and align bottom edges.

Now that you have your text centered at the bottom, you might want to style it. I usually go for a stroke outside the text, some people op for drop shadow or both. Right click your text layer and select Blending Options... Check the Stroke box, change the size to 3px, position to outside and colour to black.
To duplicate text box to the same exact position in another gif, right click your text layer and choose Duplicate Layer... Then choose whichever document you want to duplicate to and press ok.
And of course I have my text duplication automated, so the text would show up in all my gifs in a matter of seconds.
x. Recap

3. How to optimize your giffing process
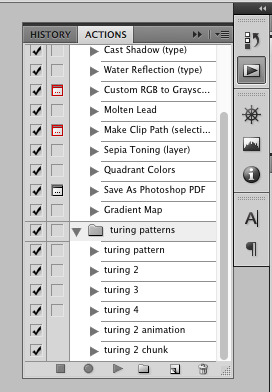
i. Actions
This one single function in ps is gonna save you sooooo much time & energy my friends. If you’re a chronic giffer like me, you probably spend all your time starring into your computer and just clicking away like a manic, especially those times when new episodes drop and everyone is trying to get their gifs out there as quick as possible. Let me tell you, life before I found out about actions was miserable. Back then, my laptop was even slower, so maybe after I did one thing I had to wait for it to load, then repeat the same process to the rest of the gifs in the set, which is normally 10 in total. I had to grab my laptop with me during meals because I basically couldn’t walk away from it. Actions was a lifesaver, especially for things you’d routinely do when making gifs like sharpening, resizing, denoising, convert to frames, export, etc. You basically use actions to record yourself doing it once, and you can just hit play every time you want ps to do it again. And to take it a step further, you can automate ps to play that action on all the opened files. You then record that automation into an action, then voila you can sharpen/resize/export all your gifs in one click. Now, I can click automate convert to frames, go out and eat dinner and come back to it.

Now here are my actions. I know the naming doesn’t make much sense to you, but basically I have actions to automate sharpening, denoising, converting to frames, setting frame delays, exporting and saving. And yes, I do regularly hit that automate save button so I don’t lose everything when my ps crashes. Then there’s actions for formatting subtitles, duplicating layers, pasting frames after or over frames. I think this covers about everything I use on a daily basis.
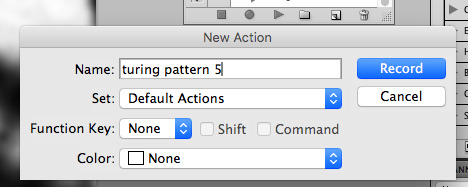
Here’s how you record an action and automate said action. (Left gif) First you click on the folder icon to create new set, name it and click ok. Click the + icon to add new action, name it and press record. Then you do whatever you want to record, and when you’re done click to stop button to stop recording. (Right gif) To create an automation of the new action, click the + icon to add new action, name it and press record. (Third gif) Then go to File → Automate → Batch. Choose the set the action you want to automate is in, then choose the action. Click ok then stop recording. Now you have an action to automate the previous action you made.

(gif below) The box on the left of your action is the dialog on/off button. Basically if you check it those dialog boxes will pop up every time after you played the action, which is good if you want to customize every time but not so much when your goal is to click one button and let it run across all gif without interruption. I check most of them off except for the denoise filter which I do want to customize for each gif.
To get the action panel to look like the one I showed in the first picture, click on the little button on the top right corner of the actions panel and choose button mode. And you’ll get to play an action by simply clicking on it.

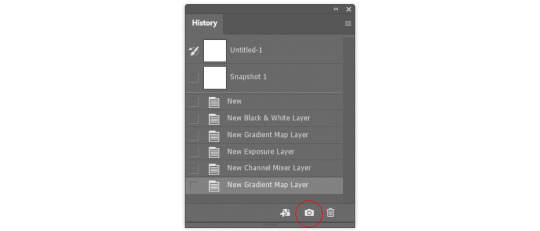
ii. History
There are a couple of things I do in this panel. Have you ever make an adjustment, undo, make a new adjustment, and now no matter how many times you hit revert you just can’t get back that first adjustment you made? There’s a simple fix in the history settings. Click on the little button on the top right corner of the history panel and choose History Options, then check the box “Allow Non-Linear History” and click ok.

I often like to use the history to go back to previous adjustment, because I can see clearly what has been done (sometimes I click on the wrong button without knowing) and I can go further back without keep hitting Crl+Z. You can also click on the camera icon in the bottom right to take a snapshot of the current process/ step of the gif, so in case you don’t like some changes you make, you can always go back to that snapshot. Or you can take snapshots of different adjustments you made to the gifs, then you can quickly compare how they look by toggling between snapshots.
iii. Keyboard Shortcuts
Know/ customize the shortcuts for things you often do, such as Crt+Z for undo, T for add text, V for move, Crl+A for select all, etc. It’ll save time & effort in the long run.
To customize, simply go to Edit → Keyboard Shortcuts.
iv. My Workspace
I’m the least organized person I know but I still want to talk about my ps workspace. It’s been structure to fit my giffing needs. Basically all the panels I need are there, and I maximize my space for the document window and timeline.

If you go to Window → Workspace → New Workspace, you can save your current workspace as a preset. So maybe if you moved things around or accidentally closed some panel that you don’t remember the name for, just click on that preset workspace, or if it says you’re already in that workspace click reset “whatever the name of your workspace” and your workspace will be reset. There’s mainly 2 workspace I toggle between, one for giffing and another for digital painting.

4. The more advanced stuff?
i. “Recolouring”
I’m not gonna spend a lot of time on this part because the next part is actually what I really want to talk about. But Hue/Saturation is going to be your friend if you want some major colour change. Then add a gradient map over it for good measure. I’ll link some tutorials for you if you don’t know what I mean.
Becca’s (@yenvengerberg) mega colouring tutorial
Kate’s tutorial on @usergif (←there’s all sorts of gif tutorials in their resources directory, go check it out)
People would always tell you to find gifs where the character barely moves or the background is of a contrasting colour to make the process easier. Now, with timeline you’ve got keyframes to help with slightly more movement. But what if you want to make something like this gif below? 😨
I made this during my earlier days of recolouring (which was not that long ago), and the only thing I could think of was colour it frame by frame. This gif has 73 frames. There are 8 gifs in this set which I had to all colour frame by frame. It was a long and tedious process I tell you, but the results, in my humble opinion, is stunning!!! But what if I tell you it can be done without colouring it frame by frame and it only takes a fraction of the time I spent?
(gif taken from my set here)
ii. After Effects & Rotoscoping
The reason I started using after effects was for this gif set. I got a gif request and my inspiration was the intro from the youtube channel sortedfood. Here’s how one of the gif looks like.
See the character cut out on the right? Basically the same thing in my recent Winnie the Pooh set. In my first trial, I was trying to do it frame by frame on ps like I always did, but there was no way I could get it looking smooth, it gets very jagged when the background was a completely different scene. And with some googling, that’s how I found out about rotoscoping on after effects.
This is the youtube tutorial I learnt it from and the one I send it to people when they ask me how I do character cut outs like that. I’ll try to quickly show you how I do it below, but please refer to that video if you want more details.
Usually I export my gifs as videos in timeline mode in ps, then import the video into ae. After I’m done, I’ll export the ae file as video, import it back into ps, convert back to frames and do the rest.
Here are my steps to rotoscoping:
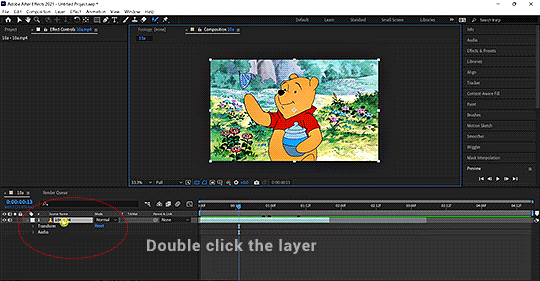
Double click the layer you’d like to work on. The layer window should pop up and that is what you want to work with.
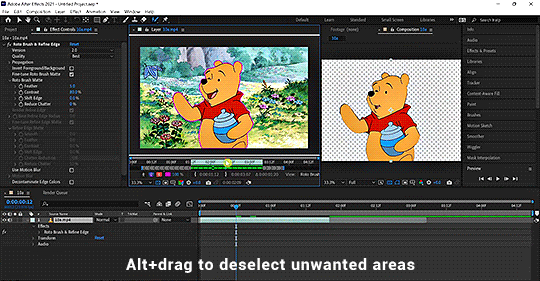
Click on the Rotobrush tool and paint across the object you want to include. Always paint across, not outline.
I have my roto brush set to version to 2.0, and I would change the quality from standard to best.
Continue painting until everything is included. Alt+drag to deselect unwanted parts. Hit spacebar when done and let it run.
You can change the properties of the roto brush selection in effect controls.
If you want a more detailed written explanation than this. Go to adobe’s help page on roto brush here.
Once you have the cut out of the object you desire, there are many things you can do with it.
Duplicate the original layer, change the colour of the bottom layer as aforementioned. And now you have a gif with a different coloured background.
Or you can have a different background (either a solid colour or a different video/gif)
You can have text behind the object, etc.
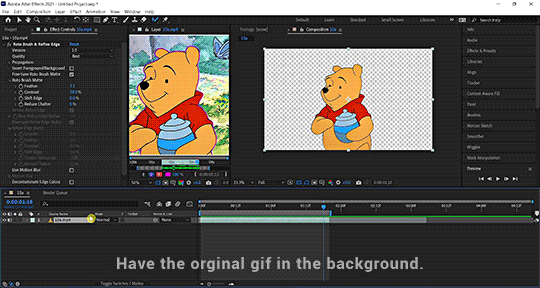
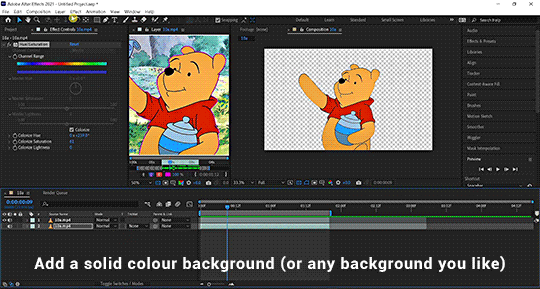
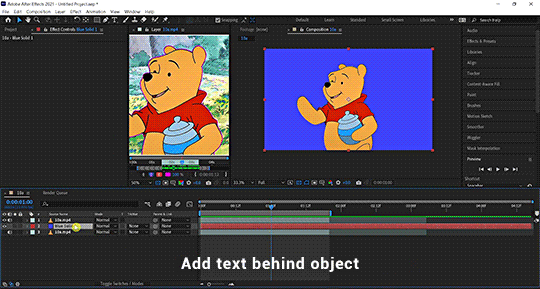

You get the idea. (This is a simple demo, please excuse the quality and choppiness of the gif)
Now you’ll never recolour gifs the same way again. Here’s a Kate & Yelena gif for you guys (even though it’s not the best, could’ve blurred out the edges a bit more but it’s still pretty damn awesome and I wouldn’t have coloured it like that if it wasn’t for ae)
(gif taken from my set here)
Here’s another gif I made with AE from this set. The possibility is endless and I’m barely scratching the surface. I can do a separate AE tutorial if you guys are interested. Let me know in the comments or tags.

5. Tutorials mentioned in this post
i. Text tutorials
@kylos’s film downloading and screencapping tips for making gifs
@kylos’s gif tutorial
@cillianmurphy’s giffing 101- your ultimate guide on how to make gifs
@realstraykids‘s gifmaking with vapoursynth tutorial
@anya-chalotra‘s sharpening & exporting tutorial
@sidonidoneeey‘s sharpening tutorial
@dewandawise‘s the beginner’s guide to channel mixer
@magnusedom’s colouring tutorial
@yenvengerberg’s mega colouring tutorial
@usergif’s how to change the background of any gif tutorial
adobe’s Roto Brush and Refine Matte
ii. Video tutorials
PiXimperfect’s Color Correction with Easy "4-Point" Technique!
PiXimperfect’s The Science of All 27 Blend Modes in Photoshop!
@michietuts‘s How to Color Grade Gifs Using Camera Raw
C.M. de la VEGA ‘s Get the Best Results with Rotobrush 2
6. Acknowledgement
Thank you so much to the authors of all the amazing tutorials, everything was so eloquently written, well explained and easy to follow.
And a huge shoutout to the people at @pscentral & @womenofmcu. Our conversations on gif making have prompted me to write this post.
I’ve learnt so much from the people at psc and thank you Ace & Val for creating this place that I didn’t even know I needed. It is one place I feel truly belong. So If anyone is interested in gif making, come join us at pscentral.
And thank you to the ladies at womenofmcu for being so nice and welcoming, always love chatting with you lot.
Last but not least, I’m patting myself on the back. For someone who’s terrible with words this is one hell of a long text post.
As always, happy giffing!
#completeresources#allresources#ps resources#userdanni#maystag#usergiu#tuserheidi#usershreyu#uservivaldi#userfnuggi#supervalcsi#aphrandt#userdean#userannalise#userrainbow#uservier#userelio#rogerhealey#tusercat#my tutorials#gif tutorial#even though I said this is not a tutorial I still need to tag it in a way I can find it
296 notes
·
View notes
Text
Krita has a free plugin that provides the same functionality as Adobe Photoshop's Firefly AI.
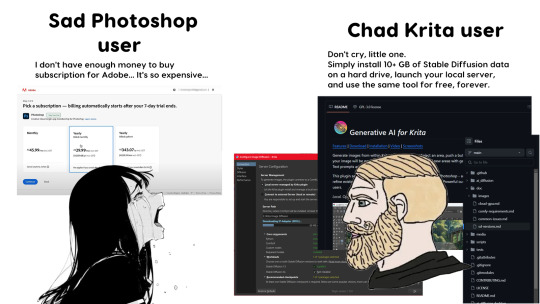
The new tool has plenty of use cases and is a great example of generative AI being a helpful tool for designers and artists, not their replacement. I'm using it to fill in textures in sketches, adjust photos, generate palettes. No strings attached, no subscription needed. Just 10+ GB of Stable Diffusion data on your hard drive, for free, forever.
Download it from here. Don't pay unneeded, unethically priced subscriptions to a company who says "buying isn't owning" and then squeezes the last penny out of you for tools that you can get elsewhere for free.
7 notes
·
View notes
Note
Hello, have you talker about your art process anywhere? I am very interested in how you got into glitch art/photomanipulation/however you’d call this, and i want to learn more. Do you have programs you use, plugins, do you use any physical media or scanography/scanner manipulation? I really want to hear about anything you wanna talk about regarding the creation process for your art. Thank you for sharing your work.
Yes! Unfortunately, I tried answering this question in a ton of detail but tumblr didn’t save it as a draft automatically - which was a frustrating experience to say the least - so this is my second attempt at answering this ask — you’ve asked a lot of really valuable questions here, I’ll do my best to be concise in my answers!
When I first began playing around with editing software, I was 16 and simply wanted to make memes and silly edits. This was around 2015-2016, whenever vaporwave was a fresh concept and Resonance was trending on Vine — which is a sentence that makes me feel fucking ancient. I was really entranced by vaporwave, which had this off-white nostalgia for post-consumerist 80s and 90s cultural trends. I later became interested in how many of those cultural trends persisted and evolved into Y2K culture and beyond.

these are some of the images I was working on during that period of time, which were loosely inspired by indie horror and jazz cups and soundcloud rap. I was so proud of learning how to make my own scanlines using GIMP :)
Late 2016 I began my freshman year at a hoighty-toighty art school that I was too poor to attend, and quickly entered a mental health downward spiral — but I learned many valuable things, most of that info was painfully basic; my education prior to that was not anything special. I would not consider myself someone with exceptional aptitude for art — I just have a chronic compulsion to break things.
So, where to begin? My recommendation to anyone who’s newly interested in this style of artwork and editing:
Glitchet is a repository of info regarding many different styles and methods of distortion - from sonification to slipscans, there’s a ton of good info to comb through. Most of the techniques and tools covered are free to use, but there is some paid stuff out there too - but if you know your way around, virtually everything is free. More on that shortly :)
As for my process, programs, plugins, etc - there is a lot, and I don’t think I can cover everything. Primarily: Photoshop, After Effects, GIMP, ArtStudio Pro for iOS, Procreate, DestroyPix, and a number of other pieces of software that perform smaller, specific functions - such as BigJpg for AI-upscaling. I also employ analogue/physical distortion techniques like circuit-bending, slipscan, and more. These require additional hardware and knowledge; such as access to a copier/scanner, old CRT screens, and the ability to solder + work with low voltage electronics without accidentally shorting them out. Best part is that you can ✨layer✨ anything and everything, collage style — which is my favorite aspect, very playful and exploratory.
Now, if you’re like me and can’t afford fuck-all, but wholeheartedly believe that money should not be a limiting factor for creativity, I recommend installing the Adobe Creative Suite from downloadpirate(dot)com - which is also where I’ve gotten many of my plugins, although I do also pay for the plugins that I come to really appreciate, as they’re typically done by independent developers who could actually use the scratch. Same risks as any pirate cove: intrusive ads, popups, and redirect chains - use Ublock Origin to kill these annoyances. I recommend performing a scan with Malwarebytes after using any sketchy-looking-download site, but I was raised to be a bit paranoid so that’s purely preferential.
As for plugins:
Filenames in this image may correspond with the developer of the plugin — you can just search the filename + ‘after effects plugin’ and you’ll almost certainly find your way.
Most commonly, I use Pixelsorter, Pixdither, Displacer Pro, Pixel Stretch, and Hacksaw — although some of the plugs that I use aren’t listed above, like Datamosher, which is a script-based solution that helps remove i-frames from a clip in After Effects, all without having to use VLC and any handwritten scripts (the ol’ fashioned way).
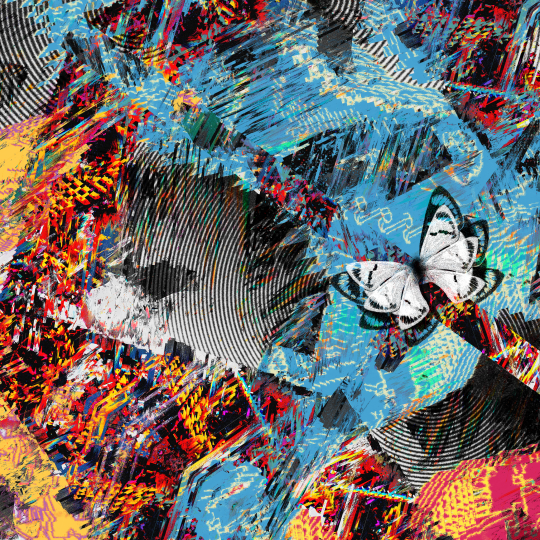
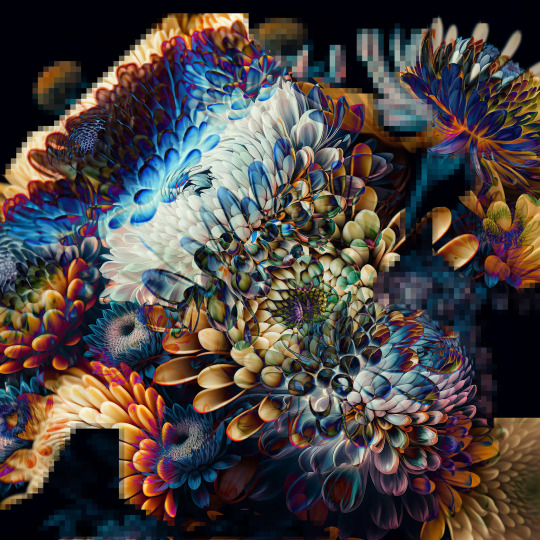
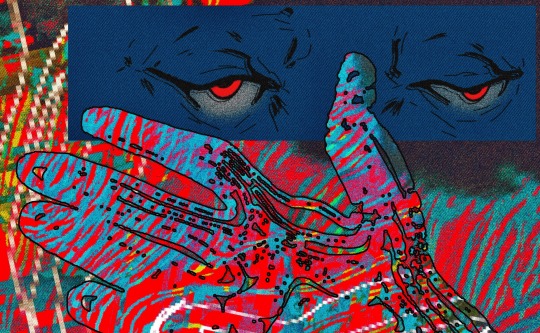

These are all from the last year or so, to show the relative growth I’ve experienced since my time spent as a creature of 16 years. Naturally, I’m also like, more of a person now - so the art is partly better because I’ve simply suffered more :p
When I started, I didn’t know any of the jargon or how to describe a specific effect I was trying to achieve - so I taught myself how to do stuff by googling around, and if I couldn’t find an answer (which was 90% of the time) I’d just try to figure shit out. Which rarely ever resulted in outright success, but was always a significant learning experience. That’s why I’m so quick to drop the link to Glitchet! Sometimes I can’t help but wonder what I’d be doing now if I had known there was an online library for info on how to produce different types of distortions - definitely would’ve spent less time trial-and-erroring my way through aesthetics.
In conclusion: there’s so much to try and you should try absolutely everything that interests you. It’s free if you’re cool enough to steal it; though some things (like hardware) are gonna cost. You don’t need talent or an exceptional education, though both of those things would certainly help — and you’ll never run out of things to learn because there are infinite ways to break shit. More so than anything else, you need a willingness to explore, experiment, and fail often. You’ll fail miserably at times, so a proclivity for humiliation is also a big plus. Eventually your failures will start looking like successes; but you’ll have forgotten the difference by then and will be free to make whatever the fuck you want :)
I’m glad that you enjoy the work! tumblr has always been the best place for me to share my lil jpegs and actually find a real sense of connection with others who are similarly jazzed. My life completely bottomed-out a few years ago and I was in a really bad place whenever I logged into my blog for the first time in half-a-decade and started posting again. My personal growth from then to now has been a strange and incredible experience, and I’m so glad that I had the art and the funny little gays on this website to help me through the toughest points and teach me valuable things about myself; so if I can give back a little knowledge, I’ll gladly take that opportunity! I hope these findings serve you as well as they’ve served me.
#my asks#THANK YOU!!#I hope this is formatted in a way that is easy to read - clarity and concision are not my strongest skills#godspeed!#documentation#reference
16 notes
·
View notes
Last Seen Blogs