#error_message
Photo

Forbidden Large
Error 403 - Your love is forbidden 🔞❤️🔞
Sticker design for FC 2024 that came just in time!
Telegram Channel: https://t.me/zav_art
My website - https://zav.gay
0 notes
Link
Troubleshooting "Failed to Load steamui.dll" Error in Steam Encountering the "Failed to Load steamui.dll" error in Steam can be frustrating for users as it prevents them from accessing the platform and its features. It is crucial to address this error promptly to regain access to Steam and continue enjoying the gaming experience it offers. In this troubleshooting guide, we will explore the common causes of the error and provide step-by-step solutions to resolve it. By following the methods outlined in this guide, you can effectively troubleshoot the "Failed to Load steamui.dll" error and get back to gaming in no time. [caption id="attachment_63363" align="aligncenter" width="1280"] failed to load steamui.dll[/caption] Understanding the Error The "steamui.dll" file is an essential component of Steam's functionality. It is responsible for providing the graphical user interface (GUI) that allows users to navigate through the Steam platform. When this file fails to load, it can prevent Steam from launching properly. There are several potential causes for the "Failed to Load steamui.dll" error. One common cause is file corruption, which can occur due to various reasons such as incomplete downloads, improper shutdowns, or malware infections. Additionally, conflicts with other software, outdated drivers, or even system file errors can also lead to this error. It is important to note that the error may manifest differently for different users. Some may encounter a pop-up error message, while others may experience crashes or freezing of the Steam client. Troubleshooting Methods Verifying Integrity of Game Files One of the first steps to troubleshoot the "Failed to Load steamui.dll" error is to verify the integrity of your game files using Steam's built-in feature. This method is particularly useful if the error is caused by a corrupted "steamui.dll" file. Launch the Steam client and go to the "Library" tab. Right-click on the game that is encountering the error and select "Properties" from the drop-down menu. In the properties window, navigate to the "Local Files" tab and click on the "Verify Integrity of Game Files" button. Wait for the verification process to complete. Steam will automatically detect and replace any corrupted or missing files. Once the process is finished, restart Steam and try launching the game again to see if the error persists. Verifying the integrity of game files can often resolve issues related to corrupted "steamui.dll" files, allowing Steam to function properly again. Updating Steam and Graphics Drivers Outdated software, including both the Steam client and graphics drivers, can sometimes cause the "Failed to Load steamui.dll" error. Updating these components can help resolve compatibility issues and ensure the smooth functioning of Steam. To update Steam, open the client and go to the "Steam" menu located in the top-left corner of the window. Select "Check for Steam Client Updates" from the drop-down menu. If any updates are available, follow the prompts to install them. Updating graphics drivers depends on the manufacturer of your graphics card. For NVIDIA graphics cards, you can use the GeForce Experience software to check for updates. For AMD graphics cards, visit the AMD website and download the latest drivers for your specific model. After updating both Steam and your graphics drivers, restart your computer and launch Steam to see if the error persists. Keeping your software up to date is crucial for optimal performance and can often resolve the "Failed to Load steamui.dll" error. Disabling Conflicting Software Conflicts with other software, such as antivirus programs or firewalls, can interfere with Steam's functioning and result in the "Failed to Load steamui.dll" error. Temporarily disabling or uninstalling conflicting software can help identify and resolve these conflicts. Identify any antivirus programs, firewalls, or other security software that may be running on your computer. Temporarily disable or turn off the identified software. Refer to the software's documentation or settings for instructions on how to do this. Restart your computer and launch Steam to see if the error still occurs. If the error is resolved, it indicates that the conflicting software was causing the issue. If you determine that specific software is causing the conflict, you can try adding Steam to the software's exception or whitelist list to allow it to function without interference. Remember to re-enable or reinstall any security software that was disabled after troubleshooting. It is important to maintain a secure system. Disabling conflicting software can help identify if they are causing the "Failed to Load steamui.dll" error. By temporarily removing these conflicts, you can determine if they are the root cause of the issue. Reinstalling Steam If the previous methods haven't resolved the error, reinstalling Steam can help fix any issues related to corrupted or missing "steamui.dll" files. Before reinstalling, it is recommended to back up your game files and settings. You can do this by navigating to the Steam folder on your computer (usually located in C: Program FilesSteam) and copying the "steamapps" folder to a safe location. Next, uninstall Steam by going to the "Control Panel" in Windows, selecting "Programs," and then "Uninstall a program." Find Steam in the list of installed programs, right-click on it, and select "Uninstall." After the uninstallation process is complete, download the latest version of Steam from the official Steam website (https://store.steampowered.com/about/). Run the Steam installer and follow the on-screen instructions to reinstall the client. Once Steam is installed, copy the "steamapps" folder back into the Steam directory to restore your game files and settings. Launch Steam and check if the error is resolved. Reinstalling Steam can often fix issues related to corrupted or missing "steamui.dll" files, allowing for a fresh installation of the client. Running System File Checker The System File Checker (SFC) is a built-in Windows tool that can scan and repair corrupted system files, which may be causing the "Failed to Load steamui.dll" error. Open the Command Prompt as an administrator. You can do this by searching for "Command Prompt" in the Windows Start menu, right-clicking on it, and selecting "Run as administrator." In the Command Prompt window, type the command "sfc /scannow" (without quotes) and press Enter. Wait for the scanning process to complete. The SFC tool will scan your system files and attempt to repair any corrupted files it finds. Once the scan is finished, restart your computer and launch Steam to see if the error is resolved. Running the System File Checker can help fix system file-related errors, including issues with the "steamui.dll" file. However, it is important to note that this process may take some time, and administrative privileges are required. Frequently Asked Questions Q: Why am I getting the "Failed to Load steamui.dll" error? A: The error can occur due to various reasons, such as file corruption, conflicts with other software, outdated drivers, or system file errors. Q: Can verifying the integrity of game files fix the error? A: Yes, verifying the integrity of game files using Steam's built-in feature can help resolve issues related to corrupted "steamui.dll" files. Q: How can I update Steam and graphics drivers? A: To update Steam, go to the "Steam" menu in the client, select "Check for Steam Client Updates," and follow the prompts. Updating graphics drivers depends on the manufacturer of your graphics card and can be done through software like GeForce Experience or by visiting the manufacturer's website. Q: Should I disable my antivirus software to troubleshoot the error? A: Temporarily disabling antivirus software or other security software can help identify if they are causing conflicts with Steam. However, it is important to re-enable or reinstall the software after troubleshooting to maintain a secure system. Q: What should I do if reinstalling Steam doesn't fix the error? A: If reinstalling Steam does not resolve the issue, you can try running the System File Checker (SFC) tool to scan and repair any corrupted system files that may be causing the error. Additionally, you can reach out to Steam support for further assistance. Q: Can I back up my game files before reinstalling Steam? A: Yes, it is highly recommended to back up your game files and settings before reinstalling Steam. You can do this by copying the "steamapps" folder from the Steam directory to a safe location. Encountering the "Failed to Load steamui.dll" error in Steam can be frustrating, but with the troubleshooting methods outlined in this guide, you can effectively resolve the issue and regain access to the platform. Verifying the integrity of game files, updating Steam and graphics drivers, disabling conflicting software, reinstalling Steam, and running the System File Checker are all effective methods to troubleshoot this error. Remember to always keep your software up to date and maintain a secure system. If the error persists, don't hesitate to seek further assistance from Steam support. By addressing the "Failed to Load steamui.dll" error promptly, you can ensure a smooth and optimal gaming experience on the Steam platform.
#computer#corrupt#crash#DLL_file#download#error#error_message#failed_to_load#fix#game#Gaming#issue#launcher#missing#PC_gaming#problem#reinstall#reinstalling#software#startup#steam#Steam_client#Steam_games#Steam_library#steamui.dll#troubleshooting#update#Windows
0 notes
Text
ImportError: cannot import name 'apiv1' from partially initialized module 'app.api' (most likely due to a circular import)
I've been trying to get my API working with a Flask app but keep receiving circular reference warnings no-matter what I change.
I might be being silly. But I don't understand how the modules are only partially loaded.
I'm trying to implement the factory pattern, but struggling to do so successfully.
Here is my code:
app/__init__.py:
from flask import Flaskfrom flask_login import LoginManagerfrom flask_sqlalchemy import SQLAlchemydb = SQLAlchemy()login = LoginManager()def create_app(): app = Flask(__name__) from config import Config app.config.from_object(Config) db.init_app(app) from app.api import apiv1 app.register_blueprint(apiv1) login.init_app(app) login.login_view = 'login' return app
app/api/__init__.py:
from manage import appfrom flask_restplus import Apifrom flask import Blueprintfrom flask_limiter import Limiterfrom flask_limiter.util import get_remote_addresslimiter = Limiter( app, key_func=get_remote_address,)apiv1 = Blueprint('api', __name__, url_prefix='/api')api = Api(apiv1, doc='/documentation', version='1.0', title='Docket API', description='API for Docket. Create users and todo items through a REST API.\n' 'First of all, begin by registering a new user via the registration form in the web interface.\n' 'Or via a `POST` request to the `/Register/` end point', decorators=[limiter.limit("50/day", error_message="You have reached the API limit for today")])
manage.py:
from app import create_app, dbfrom flask_migrate import Migratefrom flask_script import Managerapp = create_app()manager = Manager(app)migrate = Migrate(app, db)from app.routes import *from app.models import *if __name__ == '__main__': app.run(debug=True)
Obviouly i'm missing something. But i'm not sure what :/
https://codehunter.cc/a/flask/importerror-cannot-import-name-apiv1-from-partially-initialized-module-app-api-most-likely-due-to-a-circular-import
0 notes
Text
Pirate 5K, Wylie Texas
https://secure.getmeregistered.com/get_information.php?event_id=137897&error_code=1349037&error_message=User+opted+out+of+platform%3A+The+action+attempted+is+disallowed%2C+because+the+user+has+opted+out+of+Facebook+platform.#_=_
0 notes
Text
SQL Interview Questions and Answers - Part 22:
Q201. How can you Handle Exceptions in SQL? Can you use the TRY/CATCH in SQL?
Q202. What is the TRY-CATCH Exception Handling Mechanism in SQL?
Q203. What is the @@ERROR function in SQL?
Q204. What is ERROR_MESSAGE() function in SQL?
Q205. What is the use of the RAISERROR () function in SQL?
Q206. What is the use of the THROW Statement in SQL?
Q207. What is the difference between the RAISERROR function and the THROW statement?
Q208. What are the Predefined Errors and their formats in SQL?
Q209. How can you generate user-defined custom error messages in SQL?
Q210. What is the Error Severity in SQL? What is its use?
#sqlinterviewquestions #mostfrequentlyaskedsqlinterviewquestions #sqlinterviewquestionsandanswers #interviewquestionsandanswers #techpointfundamentals #techpointfunda #techpoint #sql #database #interview

Please visit www.techpointfunda.com for more Interview Questions and Answers.
#sqlinterviewquestions#mostfrequentlyaskedsqlinterviewquestions#sqlinterviewquestionsandanswers#interviewquestionsandanswers#techpointfundamentals#techpointfunda#techpoint#interview
1 note
·
View note
Audio
I like Zelda a lot so I made this.
1 note
·
View note
Link
Why Does My PC Stutters Every Few Seconds? | TechnologiTouch
0 notes
Photo

Error messages by TiBiDi https://www.reddit.com/r/ProgrammerHumor/comments/drynul/error_messages/?utm_source=ifttt
2 notes
·
View notes
Text
Use Exception handling in SQL Server
Use Exception handling in SQL Server
Example of using error handling in SQL Server
Error handling in SQL Server as a programming block:
-- Example generate the exception for divide by zero
BEGIN TRY
SELECT 1 / 0 AS Error;
END TRY
BEGIN CATCH
SELECT
ERROR_NUMBER() AS ErrorNumber,
ERROR_STATE() AS ErrorState,
ERROR_SEVERITY() AS ErrorSeverity,
ERROR_PROCEDURE() AS ErrorProcedure,
ERROR_LINE() AS ErrorLine,
ERROR_MESSAGE() AS…

View On WordPress
0 notes
Text
How to format timelines with formattable in R
library(formattable) library(htmltools) timeline_widget <- function(start, duration, label, error_message, is_outgoing_call) { mapply(function(start, duration, label, error_message, is_outgoing_call) { doRenderTags( div(class = "timeline-widget", style = style(display = "grid", `grid-template-columns` = "fit-content(100px) fit-content(1500px)", `grid-column-gap` = "5px"), list( span(class = "timeline-marker", style = style(`margin-left` = paste0(round(start * 3) + 10, "px"), `min-width` = '1px', width = paste0(round(duration * 3), "px"), `background-color` = csscolor("#FA614B66")), HTML(" ")), span(class = "timeline-label", style = style(`marging-left` = "5px", `font-weight` = ifelse(!is_outgoing_call, "bold", NA), color = ifelse(!is.na(error_message), "red", NA)), label)))) }, start, duration, label, error_message, is_outgoing_call, SIMPLIFY = FALSE) }
data %>% formattable(list( timeline = ~timeline_widget(timeline_start, timeline_duration, timeline_label, error, outgoing), ) )
0 notes
Link
Troubleshooting Error 0x80070002: A Comprehensive Guide to Resolving Common Windows Issues Are you experiencing error 0x80070002 on your Windows system? This error can be frustrating and impact your overall user experience. In this comprehensive guide, we will delve into the causes of error 0x80070002 and provide you with a structured approach to troubleshooting and resolving this issue. By understanding the MECE (Mutually Exclusive, Collectively Exhaustive) framework and following our troubleshooting methodology, you can effectively identify and resolve the underlying problems causing this error. [caption id="attachment_63352" align="aligncenter" width="1280"] error 0x80070002[/caption] Understanding Error 0x80070002 Error 0x80070002 is a common Windows error that occurs when a file or component is missing or cannot be found. This error can be caused by various factors, such as corrupted files, outdated drivers, incompatible software, disk errors, or insufficient disk space. When this error occurs, it can affect the performance of your system and hinder your ability to use certain features or applications. It is important to identify the specific context in which error 0x80070002 occurs. Does it happen during software installation, Windows updates, or while accessing specific files? Understanding the specific scenario will help in the troubleshooting process. MECE Framework: A Structured Approach to Troubleshooting The MECE (Mutually Exclusive, Collectively Exhaustive) framework is a structured approach to problem-solving that helps in systematically analyzing and resolving issues. By applying this framework to error 0x80070002, you can break down the problem into mutually exclusive categories and collectively exhaustive solutions. Using the MECE framework offers several benefits, including a systematic and organized approach to troubleshooting, ensuring that all possible causes and solutions are considered, and saving time and effort by focusing on the most relevant areas. Now, let's apply the MECE framework to error 0x80070002 and explore the different categories that could be causing this issue. Troubleshooting Methodology Isolating the Issue The first step in troubleshooting error 0x80070002 is to isolate the issue by identifying the specific Windows component or process associated with the error. To gather relevant information, you can use event logs and error messages. Check if the error occurs during specific actions, such as software installations, Windows updates, or accessing certain files. This information will help narrow down the potential causes and guide your troubleshooting efforts. MECE Analysis: Mutually Exclusive Categories a. Software-related Issues Software conflicts, outdated drivers, or incompatible programs can contribute to error 0x80070002. To address software-related issues: Update or reinstall the software that is causing the error. Check for any available driver updates from the manufacturer's website. Ensure that all installed programs are compatible with your version of Windows. b. Hardware-related Issues Hardware compatibility and connectivity problems can also trigger error 0x80070002. To troubleshoot hardware-related issues: Verify that all hardware components are properly connected and functioning. Check for any hardware driver updates from the manufacturer's website. If you suspect a faulty hardware component, consider replacing it. MECE Analysis: Collectively Exhaustive Categories a. File System and Disk Errors Corrupted files, disk errors, or insufficient disk space can lead to error 0x80070002. To resolve file system and disk errors: Use the built-in Windows tools, such as CHKDSK, to scan and repair disk errors. Free up disk space by deleting unnecessary files or moving them to an external storage device. If you suspect corrupted files, use the System File Checker (SFC) tool to repair them. b. Windows Update Problems Issues with Windows updates, such as failed installations or incomplete updates, can trigger error 0x80070002. To troubleshoot Windows update problems: Check your internet connection and ensure it is stable. Restart your computer and try installing the updates again. If the issue persists, use the Windows Update Troubleshooter to diagnose and resolve update-related errors. Consider manually downloading and installing the problematic update from the Microsoft Update Catalog. Frequently Asked Questions Q: What causes error 0x80070002? A: Error 0x80070002 can be caused by various factors, including corrupted files, outdated drivers, incompatible software, disk errors, or insufficient disk space. Q: How can I fix error 0x80070002? A: To fix error 0x80070002, you can try updating or reinstalling the software causing the error, checking hardware compatibility and connectivity, resolving file system and disk errors, or troubleshooting Windows update problems. Refer to the relevant sections in this guide for detailed steps. Q: Can insufficient disk space cause error 0x80070002? A: Yes, error 0x80070002 can occur when there is insufficient disk space available. Make sure to free up disk space by deleting unnecessary files or moving them to an external storage device. Q: How can I check for software conflicts? A: To check for software conflicts, uninstall any recently installed programs or updates that might be causing the error. You can also use the Windows Event Viewer to identify any conflicting software or processes. In conclusion, error 0x80070002 can be a frustrating issue for Windows users, but by following a structured approach to troubleshooting using the MECE framework, you can effectively identify and resolve the underlying problems. Isolate the issue, analyze mutually exclusive categories such as software and hardware-related issues, and examine collectively exhaustive categories like file system and disk errors or Windows update problems. By applying the methods outlined in this guide, you can enhance your Windows experience and resolve error 0x80070002 efficiently.
#0x80070002#error#error_code#error_code_0x80070002#error_code_0x80070002_fix#error_code_0x80070002_solution#error_code_0x80070002_troubleshooting#error_code_0x80070002_Windows_10#error_code_0x80070002_Windows_update#error_code_0x80070002_Windows_update_fix#error_code_0x80070002_Windows_update_solution#error_message#error_solution#error_troubleshooting#fix_error#troubleshooting#Windows_10_error#Windows_error#Windows_update
0 notes
Text
AUTH_USER_MODEL refers to model .. that has not been installed and created AbstractUser models not able to login
AUTH_USER_MODEL error solved in EDIT3. Passwords still will not save on user creation via form.
I'm using Django 1.5 playing around with the new user override/extension features, and I am not able to register new users via my registration form - only via the Admin. When registering via the registration form, I get the following error:
Manager isn't available; User has been swapped for 'poker.PokerUser'
models.py:
class PokerUser(AbstractUser): poker_relate = models.ForeignKey(settings.AUTH_USER_MODEL, null=True, blank=True) token = models.EmailField() USER_CHOICES = ( ('1', 'Staker'), ('2', 'Horse') ) user_type = models.CharField(choices=USER_CHOICES, max_length=10) username1 = models.CharField(null=True, blank=True, max_length=40) username2 = models.CharField(null=True, blank=True, max_length=40) username3 = models.CharField(null=True, blank=True, max_length=40) username4 = models.CharField(null=True, blank=True, max_length=40) username5 = models.CharField(null=True, blank=True, max_length=40)
PokerUserForm model:
class PokerUserForm(UserCreationForm): class Meta: model = PokerUser fields = ('username','password1','password2','email','user_type','token','username1','username2','username3','username4','username5',)
I've attempted to change the model in the PokerUserForm model to use get_user_model() instead of explicitly defining the model by setting model = get_user_model() instead of model = PokerUser but then I receive the following error:
django.core.exceptions.ImproperlyConfigured: AUTH_USER_MODEL refers to model 'poker.PokerUser' that has not been installed
My AUTH_USER_MODEL is setup in my settings.py like so:
AUTH_USER_MODEL = 'poker.PokerUser'
On we go - my Registration view in views.py:
def UserRegistration(request): player = PokerUser() if request.method == 'POST': form = PokerUserForm(request.POST, instance=player) if form.is_valid(): player.email_address = form.cleaned_data['email'] player.user_type = form.cleaned_data['user_type'] # if player is staker, token is their own email. otherwise their token is their staker's email and # their relation is their staker if player.user_type == '1' or player.user_type == 'staker': player.token = player.email_address else: player.token = form.cleaned_data['token'] staker = PokerUser.objects.get(email=player.token) player.poker_relate = staker player.save() return HttpResponseRedirect('/') else: form = PokerUserForm() initialData = {'form': form} csrfContext = RequestContext(request, initialData) return render_to_response('registration/register.html', csrfContext)
EDIT1:
According to the docs, the UserCreationForm must be recreated for use with custom user classes.
I overrode the entire UserCreationForm as follows:
class UserCreationForm(forms.ModelForm): """ A form that creates a user, with no privileges, from the given username and password. """ error_messages = { 'duplicate_username': _("A user with that username already exists."), 'password_mismatch': _("The two password fields didn't match."), } username = forms.RegexField(label=_("Username"), max_length=30, regex=r'^[\w.@+-]+$', help_text=_("Required. 30 characters or fewer. Letters, digits and " "@/./+/-/_ only."), error_messages={ 'invalid': _("This value may contain only letters, numbers and " "@/./+/-/_ characters.")}) password1 = forms.CharField(label=_("Password"), widget=forms.PasswordInput) password2 = forms.CharField(label=_("Password confirmation"), widget=forms.PasswordInput, help_text=_("Enter the same password as above, for verification.")) class Meta: model = PokerUser fields = ('username','password1','password2','email','user_type','token','username1','username2','username3','username4','username5',) def clean_username(self): # Since User.username is unique, this check is redundant, # but it sets a nicer error message than the ORM. See #13147. username = self.cleaned_data["username"] try: PokerUser.objects.get(username=username) except PokerUser.DoesNotExist: return username raise forms.ValidationError(self.error_messages['duplicate_username']) def clean_password2(self): password1 = self.cleaned_data.get("password1") password2 = self.cleaned_data.get("password2") if password1 and password2 and password1 != password2: raise forms.ValidationError( self.error_messages['password_mismatch']) return password2 def save(self, commit=True): user = super(UserCreationForm, self).save(commit=False) user.set_password(self.cleaned_data["password1"]) if commit: user.save() return user
And this was able to resolve this error:
The Manager isn't available; User has been swapped for 'poker.PokerUser'
Now, the users get created but are not able to log in. When I check the users in the admin, all of the information seems to be correct except for the password. Adding a password manually in the admin does not seem to work correctly. Still, adding users via the admin work correctly.
EDIT 2:
I'm still unable to login as any of my AbstractUser models created via the registration form. I have completely overridden the UserCreationForm as outlined above, and am unable to implement get_user_model() with this error:
AUTH_USER_MODEL refers to model 'poker.PokerUser' that has not been installed
The Django code for get_user_model() is:
def get_user_model(): "Return the User model that is active in this project" from django.conf import settings from django.db.models import get_model try: app_label, model_name = settings.AUTH_USER_MODEL.split('.') except ValueError: raise ImproperlyConfigured("AUTH_USER_MODEL must be of the form 'app_label.model_name'") user_model = get_model(app_label, model_name) if user_model is None: raise ImproperlyConfigured("AUTH_USER_MODEL refers to model '%s' that has not been installed" % settings.AUTH_USER_MODEL) return user_model
Since I have AUTH_USER_MODEL = 'poker.PokerUser' setup in my settings.py, this should work. I've verified this through the Django console:
>>> from django.contrib.auth import get_user_model>>> settings.AUTH_USER_MODELOut[14]: 'poker.PokerUser'>>> from django.db.models import get_model>>> app_label, model_name = settings.AUTH_USER_MODEL.split('.')>>> user_model = get_model(app_label, model_name)>>> user_modelOut[18]: poker.models.PokerUser
However the implementation still does not work correctly.
If you've read this far, thanks!
EDIT3:
AUTH_USER_MODEL refers to model 'poker.PokerUser' that has not been installed has been fixed. I accidentally had the UserCreationForm that I recreated in poker.models instead of registration.forms, so when I ran get_user_model() that was assigned to poker.PokerUser, it couldn't resolve since it was already in that location.
Now the only issue left is that when creating new users, their passwords will not save. I've narrowed it down to a single method in the UserCreationForm by placing print statements here:
def clean_password2(self): password1 = self.cleaned_data.get("password1") print password1 password2 = self.cleaned_data.get("password2") print password2 if password1 and password2 and password1 != password2: raise forms.ValidationError( self.error_messages['password_mismatch']) print password2 return password2def save(self, commit=True): user = super(UserCreationForm, self).save(commit=False) user.set_password(self.cleaned_data["password1"]) print self.cleaned_data["password1"] if commit: user.save() return user
The print password1 and print password1 statements in clean_password2 display the plain text password, but print self.cleaned_data["password1"] in the save method is blank. Why is my form data not being passed to the save method?
TL;DR AbstractUser model creation is working in both Admin and via registration form, but only the users created via Admin are able to login. The users created via the registration form are unable to log in and seem to be saved without a password - all other information is saved correctly.
https://codehunter.cc/a/django/auth-user-model-refers-to-model-that-has-not-been-installed-and-created-abstractuser-models-not-able-to-login
0 notes
Audio
Ethereal Tether is an atmospheric track that is also available to buy or download on Bandcamp!
3 notes
·
View notes
Text
Registration form with PHP and MySQL

In every website the user need to create the account and login to that account to access the services of that website. In this guide, I will teach you how to build a php login page using mysql as a database.
Next, you need to create a table in a database called "consumer."
I am using user table in the tutorial example.
CREATE TABLE 'user' (
'id' int(11) NOT NULL PRIMARY KEY AUTO_INCREMENT,
'fname' varchar(80) NOT NULL,
'lname' varchar(80) NOT NULL,
'email' varchar(80) NOT NULL,
'password' varchar(80) NOT NULL
) ENGINE=InnoDB DEFAULT CHARSET=latin1;
Create a new connect.php file for database connectivity.
Registration form with MySQL and PHP
Registration Form
Error!
Success!
First Name:
Last Name:
Email address:
Password:
Confirm Password:
Submit
Add the following code in section.
On submit assign $_POST values in variables.
Validate the values –
To check the input values are valid or not created a $isValid = true variable. When any validity is incorrect, then allocate incorrect to $isValid and the record is not added.
First, check if all values are entered or not. If not entered then assign false to $isValid and "Please fill all fields." to $error_message.
Check if entered password and confirm password are equal or not. If not equal then assign false to $isValid and "Confirm password not matching." to $error_message.
#MysqlForm #PhpandMysqlRegistrationform #Phpform #Registrationform
Read the full article
0 notes
Link
Finished this one today. An interesting and enjoyable read....
0 notes
Text
django ModelForm
>>> from django.forms import ModelForm >>> from myapp.models import Article # Create the form class. >>> class ArticleForm(ModelForm): ... class Meta: ... model = Article ... fields = ['pub_date', 'headline', 'content', 'reporter'] # Creating a form to add an article. >>> form = ArticleForm() # Creating a form to change an existing article. >>> article = Article.objects.get(pk=1) >>> form = ArticleForm(instance=article)
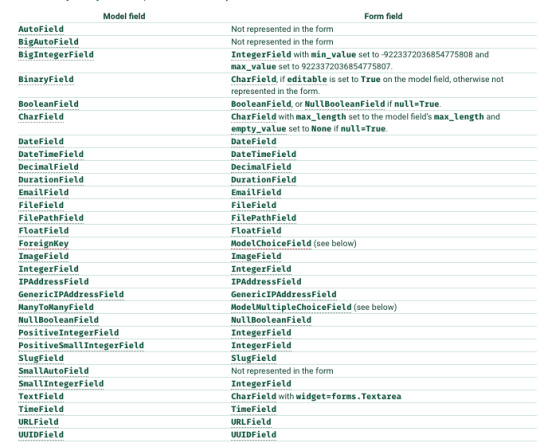
ForeignKey is represented by django.forms.ModelChoiceField, which is a ChoiceField whose choices are a model QuerySet.
ManyToManyField is represented by django.forms.ModelMultipleChoiceField, which is a MultipleChoiceField whose choices are a model QuerySet.
model 에서 blank=True 설정 되어있으면 modelform에서는 required 값이 False되고 그외에는 required=True.
form 필드 label 는 model field의 verbose_name 의 값을 이용하되 첫글자는 대문자로 한다.
form 필드의 help_text 는 model의 help_text을 이용한다.
model field 가 만약 choices set 이면 form field의 widget은 Select가 된다.보통은 blank 가 선택되어있는데 blank=False가 설정되어있다면 blank는 없어진다. 만약 model field 가 default값이 설정되어 있다면 그것이 initially selected 가 된다.
modelform은 기본적으로 model의 field를 따라서 만들어지게 되는데 이를 override하고 싶다면 Overriding the default fields 를 따른다.
Validation on a ModelForm
There are two main steps involved in validating a ModelForm:
Validating the form
Validating the model instance
is_valid()를 호출하거나, errors에 접근하거나 full_clean()를 직접호출하면 validation 과정이 시작된다.
form validation을 원래대로 수행하고 model validation을 수행한다.
Overriding the clean() method
You can override the clean() method on a model form to provide additional validation in the same way you can on a normal form.
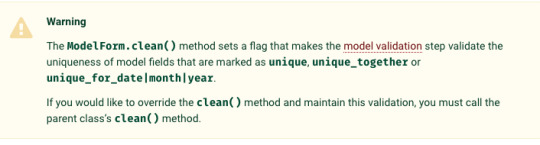
Interaction with model validation
As part of the validation process, ModelForm will call the clean() method of each field on your model that has a corresponding field on your form. If you have excluded any model fields, validation will not be run on those fields.
model validation에서 full_clean()을 호출하면 차례로 clean_fields() , clean(), validate_unique()가 호출되면서 validatoin을 수행하게 된다. Model.full_clean(exclude=None, validate_unique=True) 에서 특정 fields를 validation에서 제외할수 있다. 또 Model.clean_fields(exclude=None)에서도 선택적으로 제외할수 있다. 이렇게 제외된 것은 modelform validation에서도 제외된다는 이야기 이다.
See the form validation documentation for more on how field cleaning and validation work.
The model’s clean() method will be called before any uniqueness checks are made. See Validating objects for more information on the model’s clean() hook.
Considerations regarding model’s error_messages
form field level에서 정의 된 Error messages 나 form Meta level 에서 정의된 Error messages가 항상 model field level에서 정의된 것보다 우선한다. 다만 form level에서 error가 발생하지 않고 model validation에서 error가 발생한경우만 model field level의 error messages를 사용한다.
NON_FIELD_ERRORS 에 model validation에서 발생한 error_messages 를 dictionary 형태로 Meta class에 정의해 넣을수 있다.
from django.core.exceptions import NON_FIELD_ERRORS from django.forms import ModelForm class ArticleForm(ModelForm): class Meta: error_messages = { NON_FIELD_ERRORS: { 'unique_together': "%(model_name)s's %(field_labels)s are not unique.", } }
The save()method
ModelForm 는 save() method를 가지며 이미 존재하는 model instance를 instance키워드 argument로 전달 받으면 update를 수행하고 아니면 create을 수행한다.
>>> from myapp.models import Article >>> from myapp.forms import ArticleForm # Create a form instance from POST data. >>> f = ArticleForm(request.POST) # Save a new Article object from the form's data. >>> new_article = f.save() # Create a form to edit an existing Article, but use # POST data to populate the form. >>> a = Article.objects.get(pk=1) >>> f = ArticleForm(request.POST, instance=a) >>> f.save()
validation을 수행하지 않고 바로 save()를 수행하는 경우 form.errors를 save()과정에서 확인 하게 되는데 확인하면 바로 validation이 수행된다. 그래서 문제 있는 경우 form.errors는 True값으로 표현되며 ValueError가 raise된다.
꼭 입력되지 않아도 되는 model field에 어떤 값이 주어지지 않으면 model field의 default값이 자동으로 채워지게 된다. 단 이 작동방식은 CheckboxInput, CheckboxSelectMultiple, or SelectMultiple (or any custom widget whose value_omitted_from_data() method always returns False) 에는 적용되지 않는다.
This save() method accepts an optional commit keyword argument, which accepts either True or False. If you call save() with commit=False, then it will return an object that hasn’t yet been saved to the database. 여기서 database에 저장되지 않은 상태에서 개발자가 추가로 data를 임의로 넣을수있다.
commit=False를 사용한 경우 model에 many-to-many relation field가 있다면 Django 가 save_m2m() method 를 ModelForm class에 제공하는데 아래와 같이 instance 를 가진 form을 먼저 저장하고 save_m2m() 를 호출해주어야 한다.
# Create a form instance with POST data. >>> f = AuthorForm(request.POST) # Create, but don't save the new author instance. >>> new_author = f.save(commit=False) # Modify the author in some way. >>> new_author.some_field = 'some_value' # Save the new instance. >>> new_author.save() # Now, save the many-to-many data for the form. >>> f.save_m2m()
Calling save_m2m() is only required if you use save(commit=False). When you use a save() on a form, all data – including many-to-many data – is saved without the need for any additional method calls. For example:
# Create a form instance with POST data. >>> a = Author() >>> f = AuthorForm(request.POST, instance=a) # Create and save the new author instance. There's no need to do anything else. >>> new_author = f.save()
is_multipart() method is used to determine whether a form requires multipart file upload (and hence whether request.FILES must be passed to the form), etc. See Binding uploaded files to a form for more information.
Selecting the fields to use
Meta에 fields를 설정해서 어떤 fields가 form에 포함될지를 결정한다.
'__all__' 모든 fields사용을 나타낸다.
from django.forms import ModelForm class AuthorForm(ModelForm): class Meta: model = Author fields = '__all__'
exclude 는 몇몇을 제외한다.
class PartialAuthorForm(ModelForm): class Meta: model = Author exclude = ['title']
model 에 정의되어 있는 field의 순대로 form에 위치하게 된다. 단 ManyToManyField 는 마지막에 위치한다.
model field에 editable=False 설정했으며 form에는 포함되지 않는다.
Note
form Meta fields에 포함되어있지 않거나 exclude를 통해 제외된 field를 model단계에서저장할때 값을 요구하는 경우가 있다. 이런경우는 개발자가 손수 추가로 해당 data를 넣어 주어야 한다.
author = Author(title='Mr') form = PartialAuthorForm(request.POST, instance=author) form.save()
Alternatively, you can use save(commit=False) and manually set any extra required fields:
form = PartialAuthorForm(request.POST) author = form.save(commit=False) author.title = 'Mr' author.save()
Overriding the default fields
기본적으로 model에 정의되어있는 field에 따라 modelform field도 결정된다. 다만 Meta에 widgets이 설정하면 설정에 따라 바뀌게 된다.
from django.forms import ModelForm, Textarea from myapp.models import Author class AuthorForm(ModelForm): class Meta: model = Author fields = ('name', 'title', 'birth_date') widgets = { 'name': Textarea(attrs={'cols': 80, 'rows': 20}), }
widgets dictionary 에는 widget instances (e.g., Textarea(...)) 나 classes (e.g., Textarea)를 넣을수 있다. non-empty choices attribute 성질을 가지는 field의 경우에는 widgets dictionary 를 이용해서 바꿀수 없고 Meta밖에 명시적으로 field성질을 명시 해줘야 한다.
widgets을 이용해서 그 형태를 바꾼것과 같은 방법으로 labels, help_texts, error_messages 도 Meta class에서 바꿀수 있다.
from django.utils.translation import gettext_lazy as _ class AuthorForm(ModelForm): class Meta: model = Author fields = ('name', 'title', 'birth_date') labels = { 'name': _('Writer'), } help_texts = { 'name': _('Some useful help text.'), } error_messages = { 'name': { 'max_length': _("This writer's name is too long."), }, }
field_classes 를 통해 custom field를 사용할수 있다.
예시)
from django.forms import ModelForm from myapp.models import Article class ArticleForm(ModelForm): class Meta: model = Article fields = ['pub_date', 'headline', 'content', 'reporter', 'slug'] field_classes = { 'slug': MySlugFormField, }
field를 좀더 customize해서 사용하고싶은 경우 예를 들어 its type, validators, required 등을 바꾸고 싶은 경우 일반 Form에서 field를 작성하듯 명시적으로 field를 작성해 주면 된다.
from django.forms import CharField, ModelForm from myapp.models import Article class ArticleForm(ModelForm): slug = CharField(validators=[validate_slug]) class Meta: model = Article fields = ['pub_date', 'headline', 'content', 'reporter', 'slug']
Note
ModelForm is a regular Form which can automatically generate certain fields. The fields that are automatically generated depend on the content of the Meta class and on which fields have already been defined declaratively. Basically, ModelForm will only generate fields that are missing from the form, or in other words, fields that weren’t defined declaratively.
아래와 같이 이해했다.
ModelForm 은 Meta class 에 정의된 fields 내용과 ModelForm에 명시적으로 표기된 fields 내용을 기반으로 form을 만든다. Meta fields에 기록된 fields중에 ModelForm에 명시적으로 표기된것이 아닌것은 model을 기반으로 자동으로 만든다.
field에 대한 속성이 Meta에도 있고 ModelForm에도 명시적으로 속성이 정의된경우(일반 Form에서 field 속성 정의하듯) 명시적으로 정의된것이 우선한다. 또 명시적으로 속성을 정의한 경우 model에 정의된 속성이 무시되므로 다시 정의해주어야 한다. 예를 들어 max_length가 model에 정의되어 있고 해당 field를 명시적으로 override한 경우 ModelForm에서도 정의해주어야 한다.
class Article(models.Model): headline = models.CharField( max_length=200, null=True, blank=True, help_text='Use puns liberally', ) content = models.TextField()
class ArticleForm(ModelForm): headline = MyFormField( max_length=200, required=False, help_text='Use puns liberally', ) class Meta: model = Article fields = ['headline', 'content']
ModeForm에서 Meta class를 이용하건 Form에서 명시적으로 override하건 두경우다 field가 기존 data를 받아들일수 있는 형식이어야 한다. 아닌 경우
ValueError 가 raise된다.
Enabling localization of fields
By default, the fields in a ModelForm will not localize their data. To enable localization for fields, you can use the localized_fields attribute on the Meta class.
>>> from django.forms import ModelForm >>> from myapp.models import Author >>> class AuthorForm(ModelForm): ... class Meta: ... model = Author ... localized_fields = ('birth_date',)
If localized_fields is set to the special value '__all__', all fields will be localized.
Form inheritance
extra fields 또는 extra methods 를 추가 하고자 하는 경우 inheritance 하는 것도 좋은 방법이다.
>>> class EnhancedArticleForm(ArticleForm): ... def clean_pub_date(self):
위의 경우 pub_date field 에 대한 extra validation 를 추가하는 것을 보여준다.
ModelForm을 inherit하는 경우도 있지만 아래와 같이 ModelForm안의 Meta class를 inherit할수도 있다.
>>> class RestrictedArticleForm(EnhancedArticleForm): ... class Meta(ArticleForm.Meta): ... exclude = ('body',)
This adds the extra method from the EnhancedArticleForm and modifies the original ArticleForm.Meta to remove one field.
There are a couple of things to note, however.
Normal Python name resolution rules apply. If you have multiple base classes that declare a Meta inner class, only the first one will be used. This means the child’s Meta, if it exists, otherwise the Meta of the first parent, etc.
Form 이나 ModelForm 를 inherit할수 있고 둘가지를 동시에 할수도 있는데 둘다 하는 경우 ModelForm MRO에서 맨우선할수 있도록 inherit class을 기입할때 가장 먼저 한다.
parent class에 명시적으로 정의된 field의 경우 child class에서 field이름= None을 통해 하부 클래스에서 없앨수 있다. ModelForm metaclass 를 통해 생성된 fields는 이 방법으로 제거할수 없다.그런경우 이방법 Selecting the fields to use. 을 사용한다.
Providing initial values
일반 form과 마찬가지로 form 생성될때 initial parameter 를 이용 Initial values를 가지게 할수 있다. 이때 model field, form field 에서 정의된 initial값은 무시된다.
>>> article = Article.objects.get(pk=1) >>> article.headline 'My headline' >>> form = ArticleForm(initial={'headline': 'Initial headline'}, instance=article) >>> form['headline'].value() 'Initial headline'
ModelForm factory function
>>> from django.forms import modelform_factory >>> from myapp.models import Book >>> BookForm = modelform_factory(Book, fields=("author", "title"))
어떤 fields들이 들어갈지 위와 같이 지정할수 있다. (fields 와 exclude를 사용할수 있다)
>>> from django.forms import Textarea >>> Form = modelform_factory(Book, form=BookForm, ... widgets={"title": Textarea()})
아래와 같이 localization 을 설정할수 있다.
>>> Form = modelform_factory(Author, form=AuthorForm, localized_fields=("birth_date",))
Model formsets
class models.BaseModelFormSet
>>> from django.forms import modelformset_factory >>> from myapp.models import Author >>> AuthorFormSet = modelformset_factory(Author, fields=('name', 'title'))
fields 와 exclude를 이용 어떤 form에 어떤 fields가 나오게 할지 지정할수 있다.
>>> AuthorFormSet = modelformset_factory(Author, exclude=('birth_date',))
>>> formset = AuthorFormSet() >>> print(formset) <input type="hidden" name="form-TOTAL_FORMS" value="1" id="id_form-TOTAL_FORMS"><input type="hidden" name="form-INITIAL_FORMS" value="0" id="id_form-INITIAL_FORMS"><input type="hidden" name="form-MAX_NUM_FORMS" id="id_form-MAX_NUM_FORMS"> <tr><th><label for="id_form-0-name">Name:</label></th><td><input id="id_form-0-name" type="text" name="form-0-name" maxlength="100"></td></tr> <tr><th><label for="id_form-0-title">Title:</label></th><td><select name="form-0-title" id="id_form-0-title"> <option value="" selected>---------</option> <option value="MR">Mr.</option> <option value="MRS">Mrs.</option> <option value="MS">Ms.</option> </select><input type="hidden" name="form-0-id" id="id_form-0-id"></td></tr>
Note
When using multi-table inheritance, forms generated by a formset factory will contain a parent link field (by default <parent_model_name>_ptr) instead of an id field. (잘 이해가 되지 않음)
Changing the queryset
기본적으로 Modelformset의 경우 model의 모든 obj들 가지는 queryset을 사용 form들을 만들게 된다. 이를 바꾸기 위해 queryset argument를 아래와 같이 사용한다.
>>> formset = AuthorFormSet(queryset=Author.objects.filter(name__startswith='O'))
또 다른 방법으로는 queryset property값을 아래와 같이 지정해 주는 것이다.
from django.forms import BaseModelFormSet from myapp.models import Author class BaseAuthorFormSet(BaseModelFormSet): def __init__(self, *args, **kwargs): super().__init__(*args, **kwargs) self.queryset = Author.objects.filter(name__startswith='O')
Then, pass your BaseAuthorFormSet class to the factory function:
>>> AuthorFormSet = modelformset_factory( ... Author, fields=('name', 'title'), formset=BaseAuthorFormSet)
기본 instance를 이용하지 않으려는 경우 아래 방법을 사용한다.
>>> AuthorFormSet(queryset=Author.objects.none())
Changing the form
modelformset_factory 는 기본적으로 modelform_factory()를 이용해 form을 만든다.그러나 아래와 같이 form을 만들어 사용할수도 있다. 아래의 경우 validation과정을 바꾼경우 이다.
class AuthorForm(forms.ModelForm): class Meta: model = Author fields = ('name', 'title') def clean_name(self): # custom validation for the name field ...
아래와 model form 을 만들어서 factory에 전달한다.
AuthorFormSet = modelformset_factory(Author, form=AuthorForm)
꼭 위에와 같이 model form을 만들어서 사용할 필요는 없다.
modelformset_factory function의 몇몇 arguments 설정으로 통해 form을 조정할수 있기 때문이다. modelformset_factory 설정 arguments들은 modelform_factory를 거쳐 만들어질 form을 변경하게 된다.
modelformset_factory function의 arguments 설정으로 통해 form을 조정하는 방법
Specifying widgets to use in the form with widgets
Using the widgets parameter. This works the same way as the widgets dictionary on the inner Meta class of a ModelForm works:
>>> AuthorFormSet = modelformset_factory( ... Author, fields=('name', 'title'), ... widgets={'name': Textarea(attrs={'cols': 80, 'rows': 20})})
Enabling localization for fields with localized_fields
Using the localized_fields parameter, you can enable localization for fields in the form.
>>> AuthorFormSet = modelformset_factory( ... Author, fields=('name', 'title', 'birth_date'), ... localized_fields=('birth_date',))
If localized_fields is set to the special value '__all__', all fields will be localized.
Providing initial values
regular formsets과 마찬가지로 formset class를 만들때 사용하는 modelformset_factory()에 initial parameter를 이용해서 initial data 를 설정할수 있다. 다만 initial values 들은 이미 존재하는 model obj에 적용되는 것이 아니라 extra로 만들어지는 form에만 적용된다. extra에 initialized된 값들이 변경되지 않으면 사용자가 변경하지 않은 것으로 알고 해당 form은 validation, save를 거치지 않게 된다.
Saving objects in the formset
ModelForm과 마찬가지로 save()를 통해 저장한다. save()호출하면 저절로 validation작업을수행하게 된다.
# Create a formset instance with POST data. >>> formset = AuthorFormSet(request.POST) # Assuming all is valid, save the data. >>> instances = formset.save()
save() 는 save작업을 하며 저장된 instances를 리턴한다. 변화되지 않는 form은 validation, save작업도 하지 않으며 결과 instances에도 포함되지 않는다.
model에는 존재하나 ModelForm에는 fields, exclude 등의 방법으로 포함되지 않은 경우 값은 단순히 save()작업으로 값이 입력되지는 않는다. 입력이 필요하다면 개발자가 직접 입력하는 작업을 수행해야 한다.
commit=False 를 이용 unsaved model instances 를 얻은 다음 data를 추가하는 작업을 아래와 같이 할수 있다.
# don't save to the database >>> instances = formset.save(commit=False) >>> for instance in instances: ... # do something with instance ... instance.save()
If your formset contains a ManyToManyField, you’ll also need to call formset.save_m2m() to ensure the many-to-many relationships are saved properly.
save() 호출후에 formset obj는 아래 속성을 추가로 갖게 된다.
models.BaseModelFormSet.changed_objects
models.BaseModelFormSet.deleted_objects
models.BaseModelFormSet.new_objects
Limiting the number of editable objects
일반 formsets과 마찬가지로 max_num 과 extra parameters 를 사용할수 있다. 이를 통해 modelformset_factory()를 통해 extra forms 갯수를 조정할수 있다.
max_num 는 기존 model obj를 위한 form을 막지는 않는다.
>>> Author.objects.order_by('name') <QuerySet [<Author: Charles Baudelaire>, <Author: Paul Verlaine>, <Author: Walt Whitman>]> >>> AuthorFormSet = modelformset_factory(Author, fields=('name',), max_num=1) >>> formset = AuthorFormSet(queryset=Author.objects.order_by('name')) >>> [x.name for x in formset.get_queryset()] ['Charles Baudelaire', 'Paul Verlaine', 'Walt Whitman']
extra=0 라 하더라도 form이 생성되는 것을 막는 것은 아니다. 예를 들어 JavaScript 를 이용 새 form을 추가 할수 있다. 또한 추가된 form의 POST data를 막는 것도 아니다. 즉 extra=0라고 하더라도 create작업을 수행할수도 있다. 다만 formset이 extra form을 생성해 주는 것이 아닌 것이다.
If the value of max_num is greater than the number of existing related objects, up to extra additional blank forms will be added to the formset, so long as the total number of forms does not exceed max_num:
>>> AuthorFormSet = modelformset_factory(Author, fields=('name',), max_num=4, extra=2) >>> formset = AuthorFormSet(queryset=Author.objects.order_by('name')) >>> for form in formset: ... print(form.as_table()) <tr><th><label for="id_form-0-name">Name:</label></th><td><input id="id_form-0-name" type="text" name="form-0-name" value="Charles Baudelaire" maxlength="100"><input type="hidden" name="form-0-id" value="1" id="id_form-0-id"></td></tr> <tr><th><label for="id_form-1-name">Name:</label></th><td><input id="id_form-1-name" type="text" name="form-1-name" value="Paul Verlaine" maxlength="100"><input type="hidden" name="form-1-id" value="3" id="id_form-1-id"></td></tr> <tr><th><label for="id_form-2-name">Name:</label></th><td><input id="id_form-2-name" type="text" name="form-2-name" value="Walt Whitman" maxlength="100"><input type="hidden" name="form-2-id" value="2" id="id_form-2-id"></td></tr> <tr><th><label for="id_form-3-name">Name:</label></th><td><input id="id_form-3-name" type="text" name="form-3-name" maxlength="100"><input type="hidden" name="form-3-id" id="id_form-3-id"></td></tr>
A max_num value of None (the default) puts a high limit on the number of forms displayed (1000). In practice this is equivalent to no limit.
Using a model formset in a view
from django.forms import modelformset_factory from django.shortcuts import render from myapp.models import Author def manage_authors(request): AuthorFormSet = modelformset_factory(Author, fields=('name', 'title')) if request.method == 'POST': formset = AuthorFormSet(request.POST, request.FILES) if formset.is_valid(): formset.save() # do something. else: formset = AuthorFormSet() return render(request, 'manage_authors.html', {'formset': formset})
As you can see, the view logic of a model formset isn’t drastically different than that of a “normal” formset. The only difference is that we call formset.save() to save the data into the database. (This was described above, in Saving objects in the formset.)
Overriding clean() on a ModelFormSet
Just like with ModelForms, by default the clean() method of a ModelFormSet will validate that none of the items in the formset violate the unique constraints on your model (either unique, unique_together or unique_for_date|month|year). If you want to override the clean() method on a ModelFormSet and maintain this validation, you must call the parent class’s clean method:
from django.forms import BaseModelFormSet class MyModelFormSet(BaseModelFormSet): def clean(self): super().clean() # example custom validation across forms in the formset for form in self.forms: # your custom formset validation ...
Also note that by the time you reach this step, individual model instances have already been created for each Form. Modifying a value in form.cleaned_data is not sufficient to affect the saved value. If you wish to modify a value in ModelFormSet.clean() you must modify form.instance:
from django.forms import BaseModelFormSet class MyModelFormSet(BaseModelFormSet): def clean(self): super().clean() for form in self.forms: name = form.cleaned_data['name'].upper() form.cleaned_data['name'] = name # update the instance value. form.instance.name = name
Using a custom queryset
As stated earlier, you can override the default queryset used by the model formset:
from django.forms import modelformset_factory from django.shortcuts import render from myapp.models import Author def manage_authors(request): AuthorFormSet = modelformset_factory(Author, fields=('name', 'title')) if request.method == "POST": formset = AuthorFormSet( request.POST, request.FILES, queryset=Author.objects.filter(name__startswith='O'), ) if formset.is_valid(): formset.save() # Do something. else: formset = AuthorFormSet(queryset=Author.objects.filter(name__startswith='O')) return render(request, 'manage_authors.html', {'formset': formset})
Note that we pass the queryset argument in both the POST and GET cases in this example.
Using the formset in the template
formset을 template에 render하는 방법3가지
1.
<form method="post"> {{ formset }} </form>
2.
<form method="post"> {{ formset.management_form }} {% for form in formset %} {{ form }} {% endfor %} </form>
When you manually render the forms yourself, be sure to render the management form as shown above. See the management form documentation.
3.
<form method="post"> {{ formset.management_form }} {% for form in formset %} {% for field in form %} {{ field.label_tag }} {{ field }} {% endfor %} {% endfor %} </form>
위 방법은 form.id를 수동으로 만들지 않는 점 유의
아래방법은 form.id가 있어야 된다.
<form method="post"> {{ formset.management_form }} {% for form in formset %} {{ form.id }} <ul> <li>{{ form.name }}</li> <li>{{ form.age }}</li> </ul> {% endfor %} </form>
need to explicitly render {{ form.id }}
0 notes
Last Seen Blogs

thewitcherfromgermany
Black Forest Witcher

speechandlanguagepathologis-blog
kiran khan

wdwnopsd
why don't we stuff

deadyoungpoets
Dead young poets

chyww
lactodumbass