#diy lolita
Text
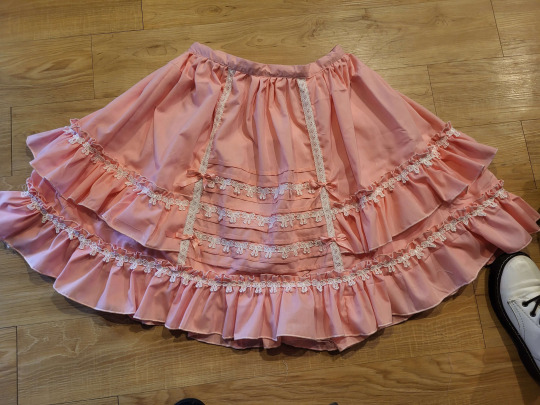
If anyone is wondering, this tutorial to make this skirt is still a method that works. Both those links are from wayback machine captures from a time before Photobucket betraying us all and deleting pictures.
Yes, I'm still mad about that.
Anyway, in the spirit of seeing if budget lolita was still doable in 2023, here we go with a cost breakdown:
>Main skirt fabric was a $10 walmart 4-yard precut; enough fabric to make waist ties not pictured here
>Skirt is fully lined with a polyester bedsheet I got for $1 at a surplus store
>The bow lace was part of a bulk purchase, ended up costing 21cents a yard. Skirt probably has 6-8 yards of lace on it. The little vertical strips were scraps from another project. Back shirring on skirt is 1/4" elastic, which covid conveniently made super cheap.
>I didn't have the zipper on hand, so I had to buy one for $1 at walmart. As anyone who has been on Wawak knows, that's massively overpaying for zippers.
This skirt is 3" longer and a few sizes larger than the one in the post. I had to make a new cutting layout for the skirt, and it took a fair bit of additional fabric. In addition, to save on fabric width, the "side seams" on this are actually a little bit farther back than the side of the skirt. I cut the back of the skirt to full fabric width, and then added the adjustment for the fullness into the side front pieces. Clarice, who wrote the original tutorial, mentions that the person she made it for was very small, so I sized it up a little bit.
I make sketches like this as I go for personal reference, but maybe it'll be helpful.
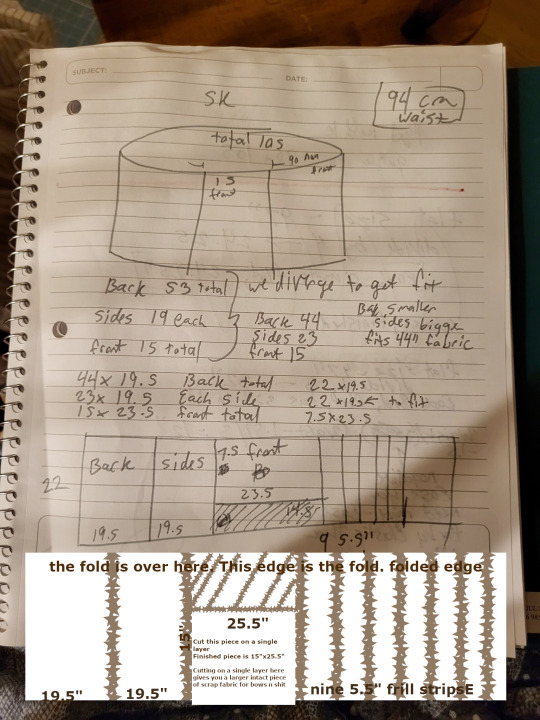
In the spirit of livejournal, I "clarified" my sketch by making it more confusing in GIMP.
(Your pieces you need to cut will be back: 44"x19.5", cut 1. Side Front, 22"x19.5", cut 2. Center Front, 15"x25.5", cut 1. Frills, 5.5"x44", cut 9 or 10).
So, when we get into it, yeah, if you have a good design (or can copy a good design) and you're willing to put some time into it, you can still do a budget lolita skirt for under $20 of materials, if you're careful. I'm mostly making this post to save which archive.org captures are the ones with working pictures.
(It also helps if you don't mess up on the waistband so many times that it slowly shrinks into a 1" waistband.)
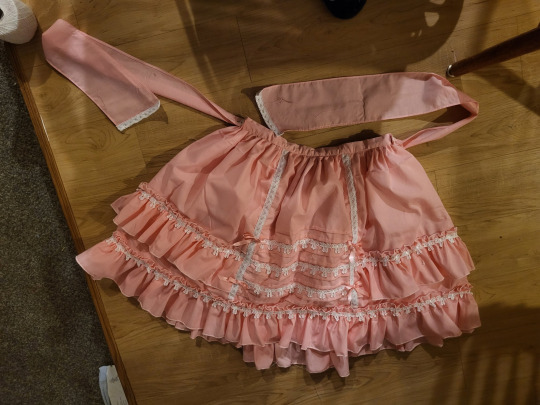
Fun fact: the trim on the ends of the waist ties may or may not be because I hemmed them sloppily and the hem came up bubbly, and zigzagging some lace onto the bottom handily covered up the bubbling. One of the advantages about knowing a decent amount about lolita fashion is that you can look at things and go, "Yeah, if I added x here, it'd be fine," and knowing enough about sewing to go, "yeah, if I do x cheat here, it'll look better" and being able to put the two together and go, "hey, if I cheat here, it'll still look lolita!" It's a good feeling.
Anyway, if anyone else has ever used Clarice's tutorial to make a skirt, I'd love to see it! This is my second time using it, but the last time was almost a decade ago at this point, and I think I've improved a lot since then.
390 notes
·
View notes
Text


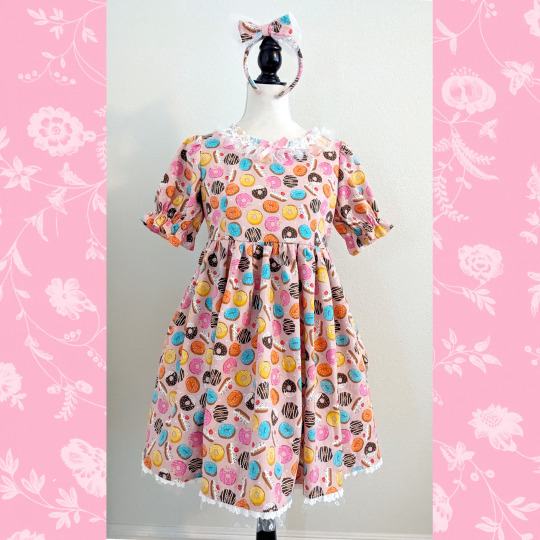
I made a new dress <3
#me#himer0pa#lolita fashion#egl community#egl fashion#sweet lolita#eglfashion#sweet lolita fashion#country lolita#diy lolita#handmade lolita#handmade dress#handmade lolita dress#sewing#lolita sewing
135 notes
·
View notes
Text
34 notes
·
View notes
Text
Lolita Cutsew · How To Make A Blouse · Sewing on Cut Out + Keep
3 notes
·
View notes
Photo
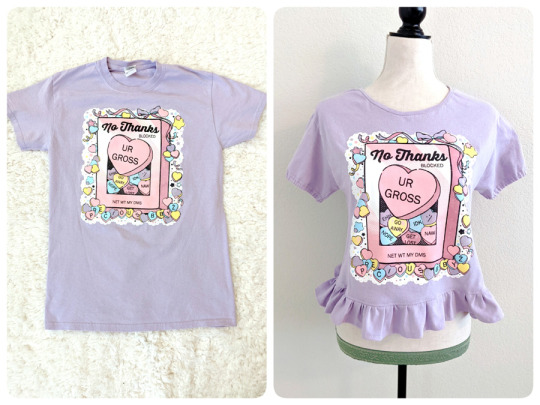
T-shirt refashion from regular unisex shirt to cute lolita-style cutsew! No serger/overlocker machine used, only some elastic. So happy to have finally redone this shirt to something that fits and is comfy but cute. Base tee shirt from https://preciousbbyz.com/
Check out the tutorial and video here!
https://starsbegantofall.blogspot.com/2022/06/diy-tutorial-precious-bbyz-cutsew-from.html
#handmade lolita#cutsew#t-shirt refashion#lolita tutorial#casual lolita#fairy kei#cutsew tutorial#diy lolita
34 notes
·
View notes
Text
Check out how stinking cute my bestie is in this ridiculous skirt I made her. I designed the fabric as well and it's available on my Spoonflower shop.
#instagram#dino#dinos#lolita#diy lolita#handmade lolita#dinosaurs#clever girl#fabric#fabric design#spoonflower
0 notes
Text
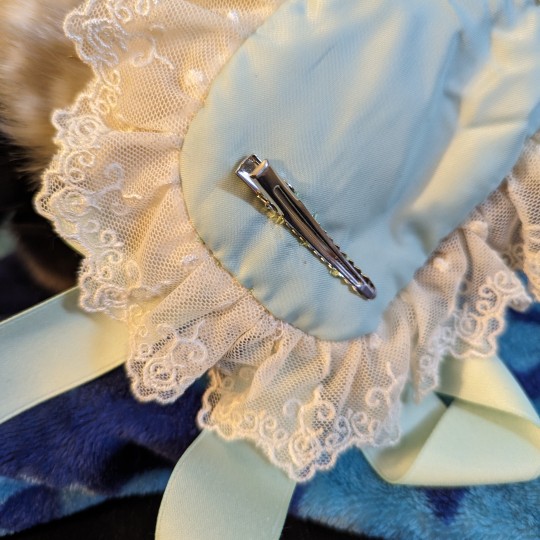
Someone on a sewing discord I follow that was created by @20dollarlolita asked if anyone had the dimensions of a BtSSB headbow so they could make their own and I drew up a schematic. Decided to also include my AP headbow as well for comparison. Enjoy!

The bow itself is extra long because of internal wire. To create the double bow effect you just fold in the edges of the loop.
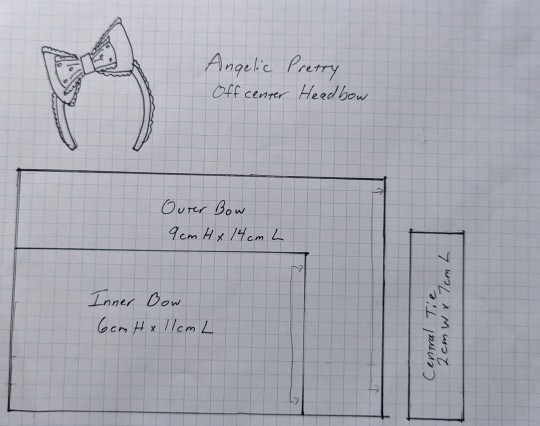
The AP bow is really good to scale up or down because the finished product is very precise.
Both of these are the finished dimensions. If you want to use it to make your own- don't forget seam allowance! ❤️🧡💛💚🩵💙
205 notes
·
View notes
Text
I wanted a velveteen skirt, so I made a velveteen skirt🖤
#egl#egl fashion#egl sewing#egl community#lolita fashion#lolita community#lolita sewing#sewing#handmade#handmade lolita#diy#handmade fashion
356 notes
·
View notes
Text
This mermaid came to shore for some good food and quality time with friends!!
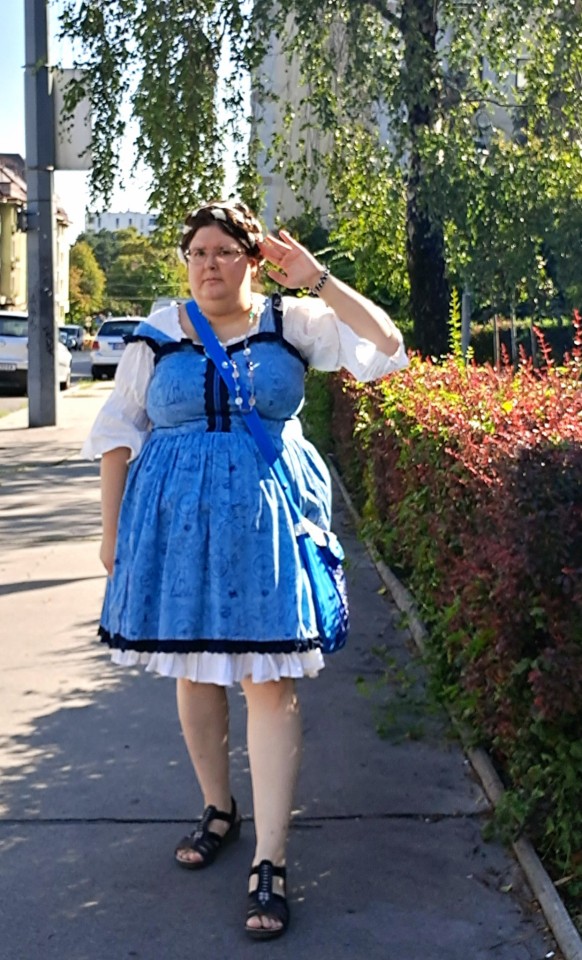
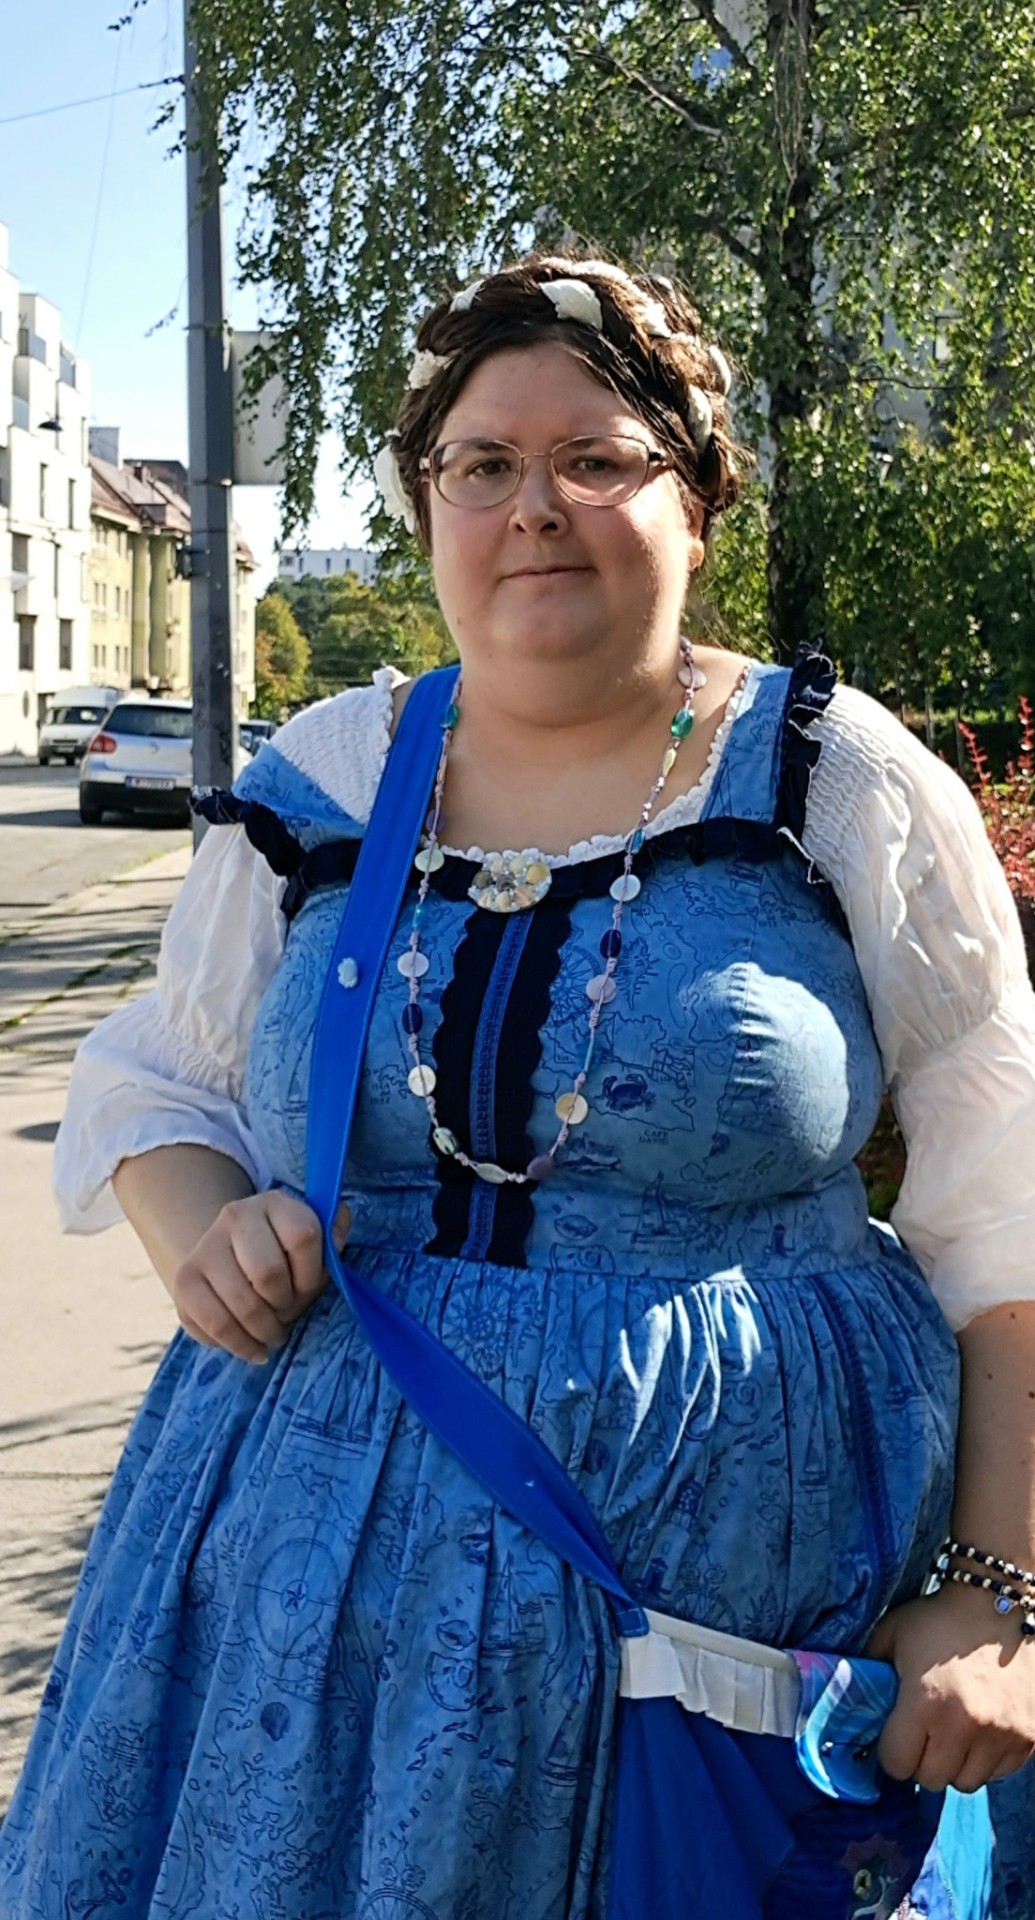
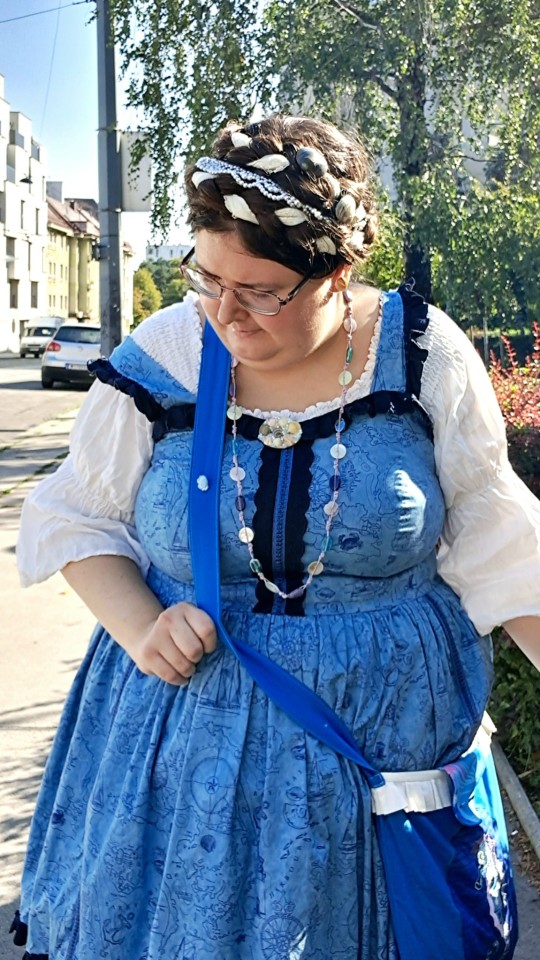

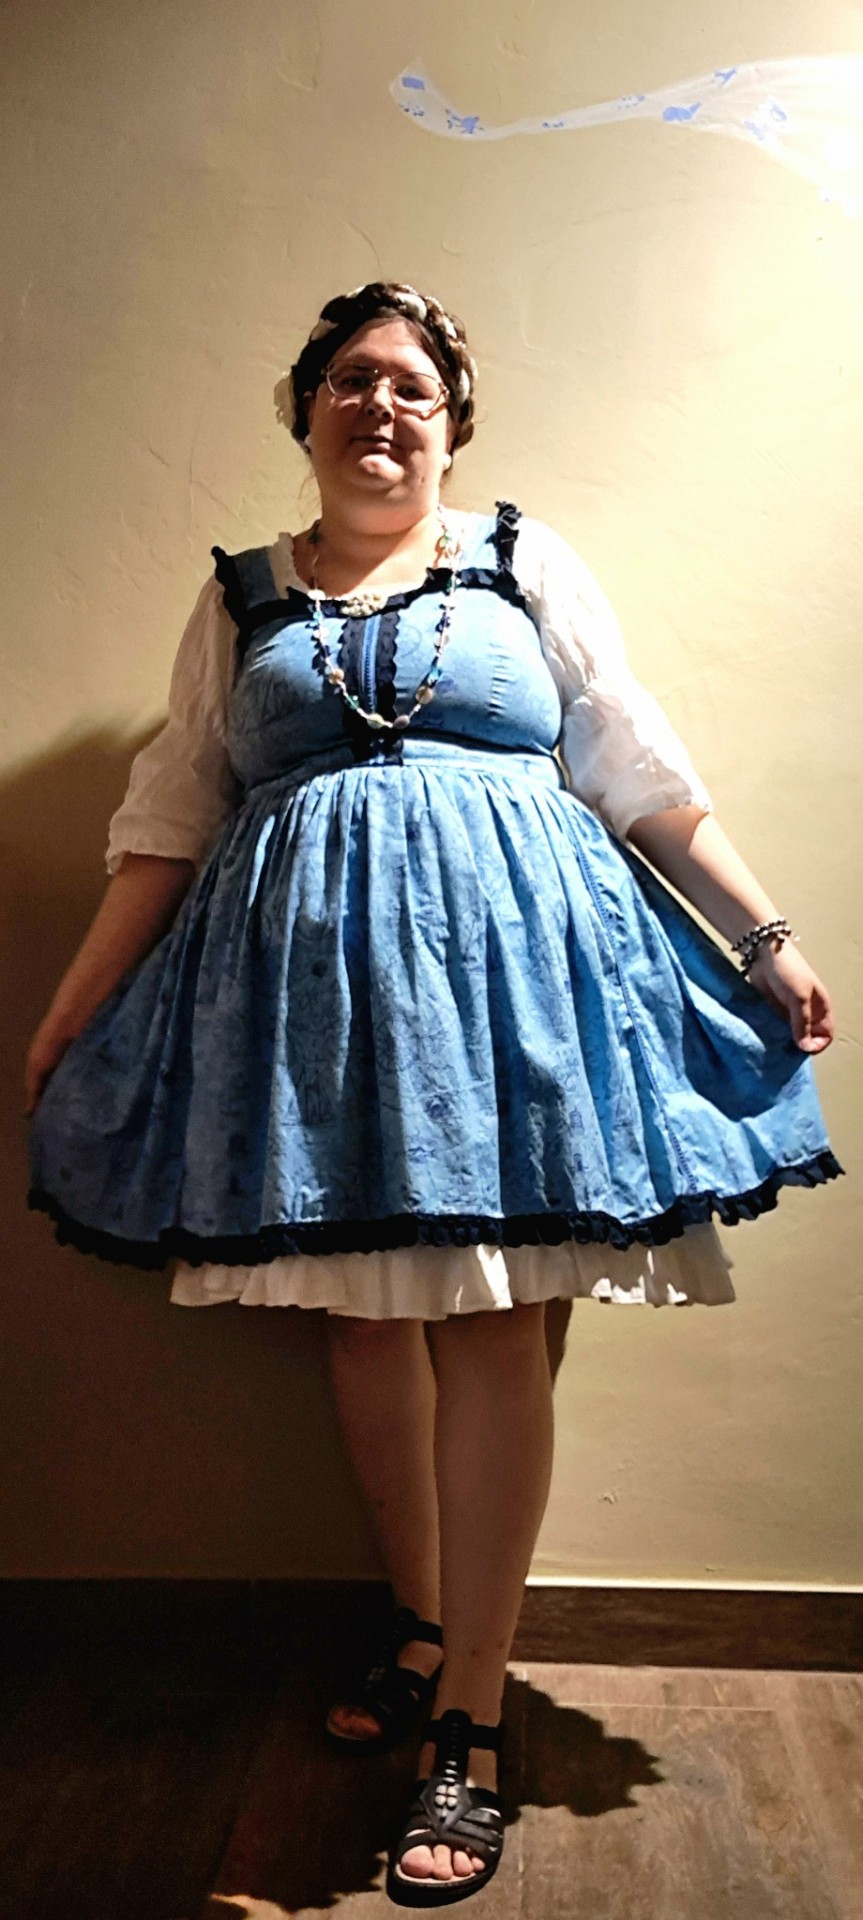

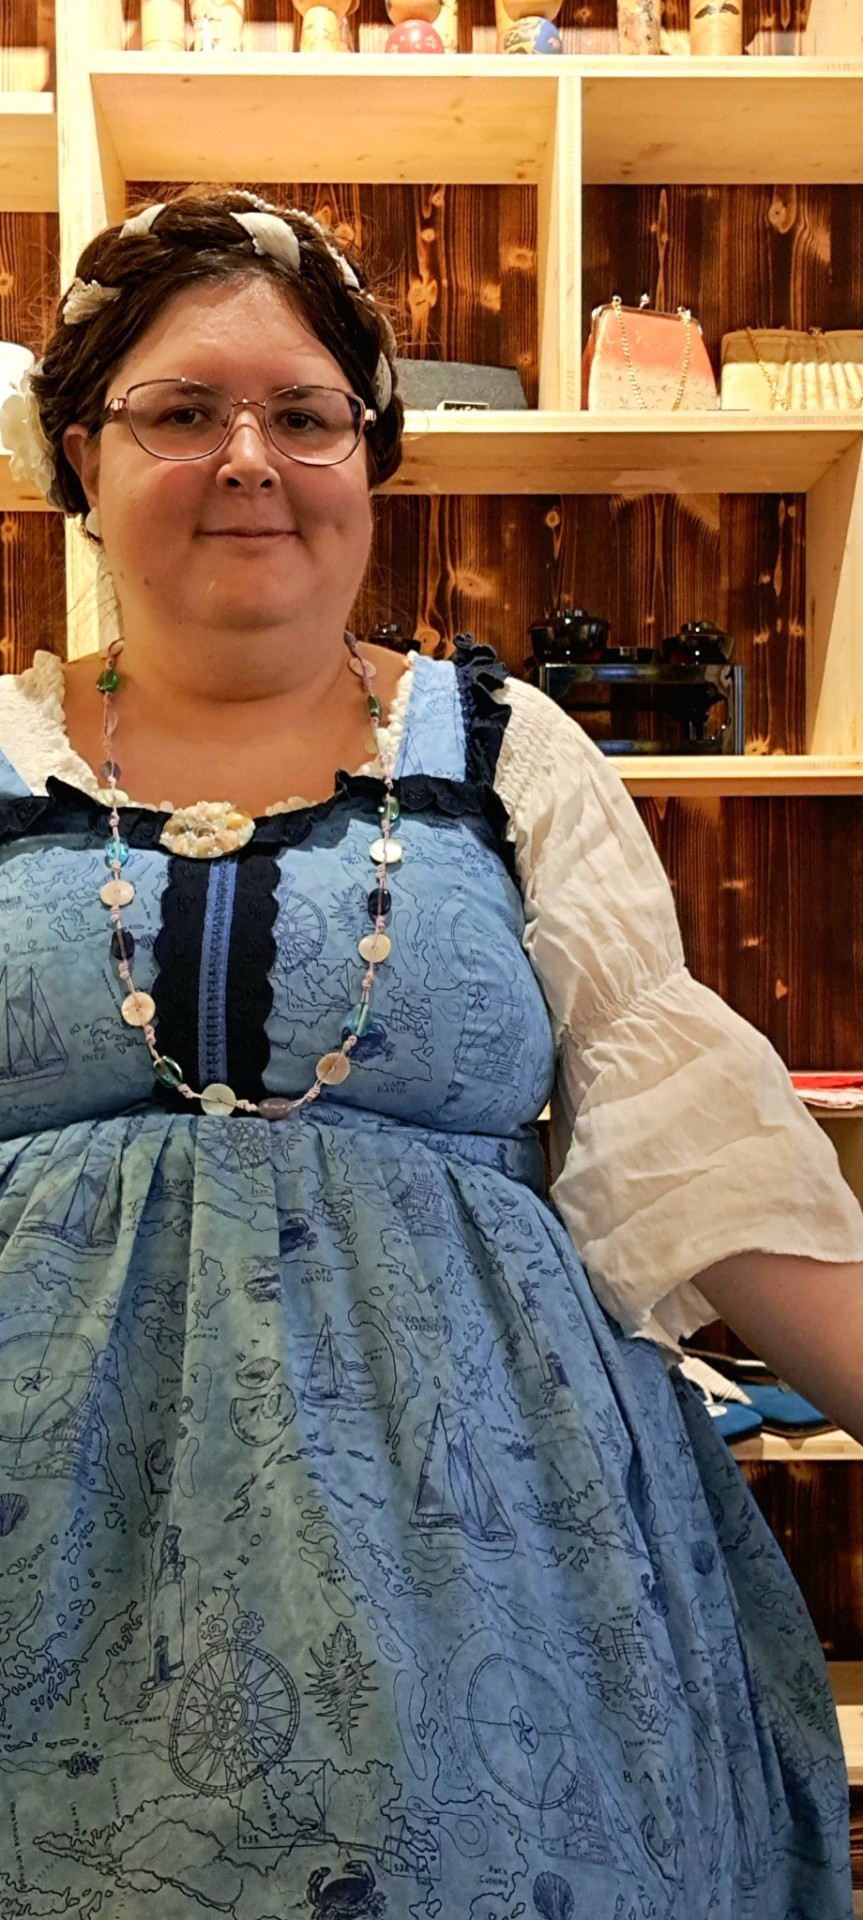

This lolita fashion meetup took place during our latest heatwave, at the beginning when it had about 32°C. Still way too hot, but my linen blouse at least was very breathable! I've thrifted the blouse in spring and fixed the sleeves to be less tight - don't want to be strangulated on my elbows! I decided to go with the mermaid theme I've already envisioned last summer with this dress, but didn't have the opportunity to style yet. I think the big flowy sleeves of the linen blouse and the hair style I made are very mermaidy! I used a lace scarf, a pearl necklace, flower hair clips and shell hairclips and made a double milkmaid braid / hair crown up do. I also have a handmade shell-and-pearls brooch and a long necklace with mother of pearl discs and turquoise and light purple glass beads.
The bag is handmade, but not by me. I got it through a craft swap (my only contribution is the flap to keep it closed - which I haven't made button holes for yet, so I have to safety pin it shut with a big ass safety pin!)
[id]Picture 1 is a full body picture of Amy. Amy is a young fat white woman with glasses and long brown hair. In the pictures she's wearing her hair in a double milkmaid braid, with the hair braided around a white lacey scarf. White pearls and seashells, as well as white flowers complete the mermaid hairdo. Her blue dress features a map and is giving ocean and pirate vibes. The flowey white blouse is meant to symbolise the white spray of the waves. The hem of a flowy white underskirt is also peeking out underneath the dress. It's symbolising sea foam as well! She's wearing a brooch with little seashells on it and a long necklace with mother-of-pearl discs and glass beads on it, to give more mermaid vibes. The bag fits the theme as well (of course!). Even her black sandals have white fishes on them!
Picure 2- 6 are various more close-up pictures of OP. She wanted to show of her elaborate hairdo and the various accessories she's wearing.
Picture 7: OP is standing in front of a wooden shelf filled with Japanese knickknacks. They are for sale at the restaurant. She's smiling softly at the viewer.
Picture 8: A big round plate with a straight edge (pointing to the table's edge). The plate is black and decorated with a red rim. There is an oblong serving dish placed on top, with some gyoza and spring rolls on some white baking paper, as well as some sweet potato hash browns.
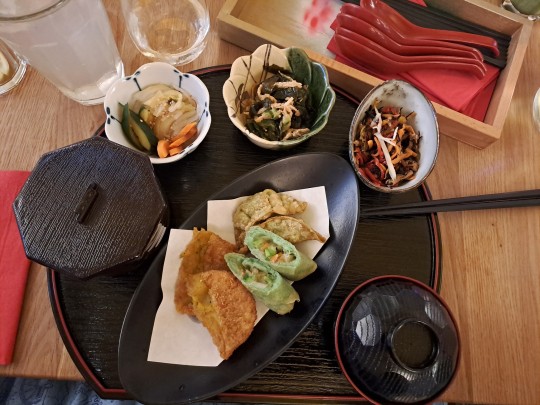
Picture 9: A big round wooden serving plate with a red rim. On top is a pretty blue-and-white patterned bowl with a red rim, with various vegetable tempura in it. Next to it is a little bowl with scalloped edges and soy sauce pimped with spring onions in it (to dip the tempura into). There's also a red napkin with black chopsticks on the plate.[/id]
#diy#sewing#handmade fashion#handmade#plussize fashion#plussize j fashion#eglcommunity#handmade lolita fashion#in couldn't decide which pictures to include so i included all
94 notes
·
View notes
Text
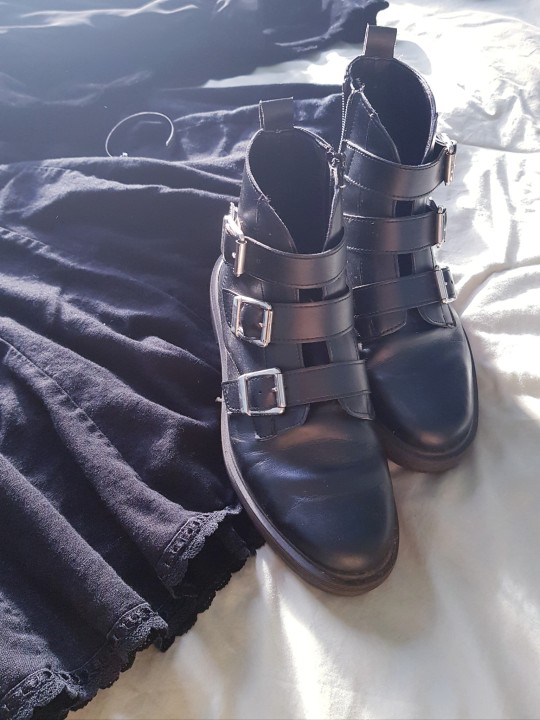
Shoe repair: Regluing soles.
So, when I was out and about, dressed all cute, my Bodyline shoes did to me what my Bodyline shoes have done to me many times before.

By the end of my trip to the quality retail establishment known as Five Below, the platform and sole of my Mary Jane pump had detached itself.
As I've mentioned before, it's generally not a bad idea to have some tape in your purse when you're working with Bodyline shoes. Almost every pair of Bodyline shoes that I've owned has broken on me in some way, and sometimes you need to tape it back together to get home. I was driving myself this time, and I keep backup shoes in my car because of a longstanding ankle problem, so my day wasn't completely ruined.
if you have to tape your pump to your foot so you can get through the day, I find that putting a few loops of tape around the middle works pretty well, Tape all the way over your foot and all the way under the shoe. This allows the tape to actually support the shoe, instead of trying to peel off, and it's relatively subtle if you have to do it, like I had to at the convention earlier this year.
Anyway, Bodyline's shoes are just not meant for northern California in the summer, and I think the glue just melts, so I actually had two pairs I needed to glue back together. There's part of me that actually looks forward to needing to do this, because I know that my glue job won't fall apart, and my shoes will be better in the end. I did a tutorial on regluing shoes back in 2015, so it's time to redo that tutorial.

Let's take a look at what we need to do this:
One, we need a place to work that will be safe if little bits of glue get on it. If we do this right, we will not drip glue everywhere. However, if we do this right, we also will not be somewhere that a little drop of glue will destroy.
Two, you need clamps and clamping material. I'm going to be honest, getting some good quick-release clamps and keeping them with your sewing/crafting/diy supplies will be a game changer in many aspects of what you do.
Pretty much any clamp that you get will be good for something, but here's my favorites:
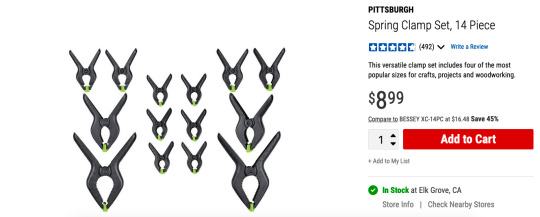
Rabbit-ear spring clamps. The smaller sizes are really good to have around because you sometimes just need A Thing to hold A Thing nice and tight. I used one of the really big ones to hold the sole of the black shoe's rubber sole onto the back. The clamping surface swivels so they're good for clamping angled things.

These things are like a traditional c-clamp, but with a quick-slide action that makes them way easier and faster to use than a c-clamp. I have like 20 of these with my weaving supplies because it's way better than a warping peg or a table clamp. These have a swivel clamping surface, so they can do angles okay. The end of the clamp that swivels also adjusts in and out, so you can use that to put clamping force over a edge of a shoe and avoid bending the edges too much. You can also use that screw mechanism to really tightly clamp something.

You can take the end off one of these and put it on the other end, and then it's a reverse clamp used to hold things apart. I like these little 4" ones for a lot of applications. You can also get a really tight clamp/strong spread with these because of the ratcheting handle. In this tutorial, I use one of these, but I'm using the 14" version instead of the 4" version. This is because I don't know how to read when I buy things online.
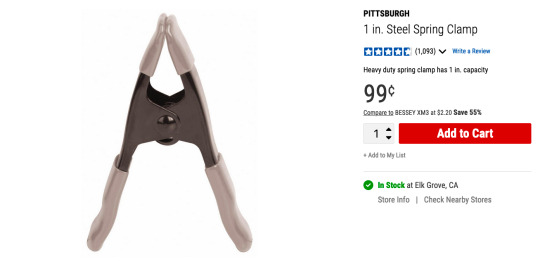
And I'm throwing this 99 cent spring clamp in here because I use these in sewing all the time. Any time you need to get some fabric together and out of the way, this is your tool. Also, if you have rented costumes that are larger than your actor, you can clamp the extra fabric in the back to make it look like it fits them (and then clamp it in the front for any shots of them from behind). I keep these on my dress form as well, because I'm a slightly different size than my dress form, and clamping the back edge of the garment sometimes makes it photograph better on the form.
So get yourself some clamps. In addition to those clamps, I used bungee cords and a lot of stained towels/discarded shipping envelopes to stuff the insides of the shoe. Don't need to make new trash if you reuse the trash you have.
Let's talk about glue, really fast. In that picture, we have four kinds of glue.
Shoe Goo: This is the one I used in this tutorial. Shoe Goo is a glue made specifically for shoes. It's a little bit flexible when dry, is water proof, and can withstand higher temps intermittently. This means that it won't melt when you leave your shoes in your car on a summer day.
E-6000: E-6000 will glue most things to most other things. It comes in a few colors and dries flexible. I keep it on hand, and I have fixed shoes with it before. I like the Goo a little better for this specific application, but I use E6000 on small things like broken buckles. I think I fixed the left shoe of this black pair with E6000, because the store I was at didn't carry Shoe Goo.
Fix All Adhesive: I've used this one in a pinch before. You can find it in more places. It also does something that the other two glues can't do, which I'll go into in a minute.
Glossy Accents: Glossy Accents should not be out there. Glossy Accents is not ready for shoe repair. Glossy Accents does not know what it's doing out there with all those strong glues. Glossy Accents should go back home. Do not use Glossy Accents on your shoe repairs.
Please note that, with the exception of the accidental inclusion of Glossy Accents, all of these are called solvent glues. A water-based glue has water in it, and the glue will dry as fast as water evaporates. If you want it to dry faster, you can replace the water with a solvent like acetone, which will dry as fast as acetone evaporates, which is much faster. If you expose a dried water-based glue to water, it could dissolve back into the glue, making the join weak. A solvent-based glue won't dissolve in water, but you also can't use water to clean it up. Read the instructions on your glue. It will tell you, "when wet, clean up with x." Find out what X is and then have that on hand. Hopefully, you won't need it. Also, most solvent glues are flammable, so don't smoke or burn candles while you do that. The lighter in that picture up there, much like Glossy Accents, has no place in that image and should just go home.

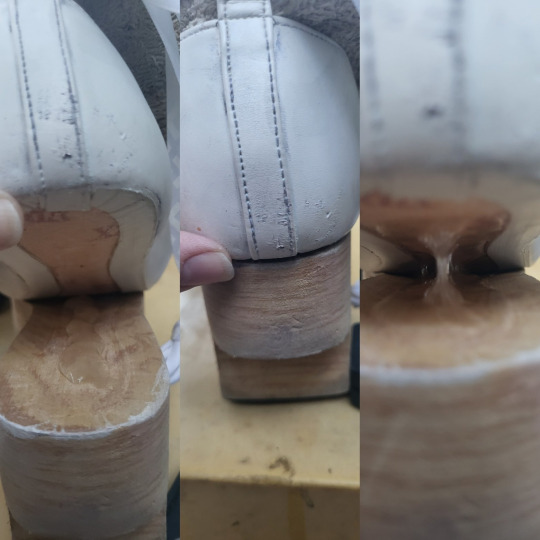
My white rocking horse shoe is a really good example of an easy shoe to re-glue. The front is still attached, but the back is free. Because the front it attached, it will keep the back in alignment. You don't need to worry about lining it up as much, because the shoe will line it up for you.
This is also nice because there's not really any dirt or grass in there. If your shoe broke and you had to walk home with your sole missing, you might have dirt to clean out before you do this glue.
What we do here is pretty simple: put a lot of glue in there, spread it around, put the two sides, together, clamp, and come back later.
How much glue? You want enough so that there's not a lot of empty air pockets between the two sides of the shoe. You want it to be shoe to glue to shoe, without air between. However, you don't want so much that a ton runs out of the sides of the shoes and you need to do cleanup.
I did a nice fat bead of glue down the sole, squished it together, and then pulled it apart. From that point, I could spread the glue around and get good coverage. You want glue on both parts to be glued.
Then, apply some force onto the shoe, to really get the two glue surfaces touching each other as much as possible. I like to just put the shoe on my foot and stand on it for a few seconds.
Once I've put some pressure onto it, I check for two things. The first is for any glue squeeze-out. Acetone cleans that up, but it can also dissolve some of the finishes on some shoes, so be careful with throwing it on there.
The second thing I look for is any areas where the sole and the shoe are not properly joining. You can see in that three-part pic up there that the back of the shoe wasn't totally meeting the sole, so I had to make sure that I had glue all the way back there.
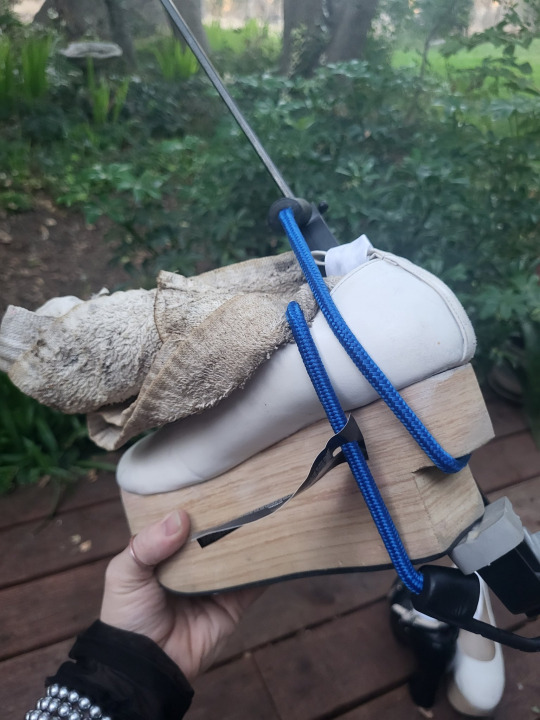
Then it was time to stuff the shoe with something (I used a stained towel) and apply clamps to it. We stuff the shoe so that the clamp can't bend the edges of the shoe down and break them. Here I have one large clamp to provide most of the clamping force, and then a bungee cord to make sure that very back part stays stuck to the sole properly.
Once I was confident that everything was making contact, and that any excess glue was cleaned up, I could set the shoe aside and allow the glue to cure.
So what's going on with the Fix All glue? The main different thing about the fix-all glue is that they instruct you to apply it to both sides, let it dry, and then bring the sides together. This makes two changes to doing it with Shoe Goo.
First of all, when you use glue that dries first, you only get a single chance to align the two parts. This means it's a good choice for things that are very easy to align (like this shoe where the front half is still attached) and not very good for things that might take a couple of tries (like my black pump with the whole platform detached).
The second thing is that it grabs hold immediately, making it a good option for things that are difficult to effectively clamp. You will still want to clamp it in place until it dries, but it will do a lot of that initial holding for you.
Know that one kind of glue will give you multiple tries, but must be heavily clamped while it dries, and another kind will only give you one shot, but it'll do some of the holding for you. (If you really need that sudden grab and long hold, and you're applying it to a large heavy-wear area like the entire sole of a shoe, you probably want Barge All-Purpose TF Cement. It's a dangerous product to work with, but exposing yourself multiple times to different slightly-less dangerous products to glue and then reglue and reglue a shoe as it keeps falling apart seems like a not better option IMO).
So a glue that has you let both sides dry first can be really great if you have just the tip of the rubber sole starting to peel back. The other advantage is that, if the glue dries before it sticks, it dries faster than if you have glue trapped between two non-porous surfaces. Because of this, I use Fix-All when I'm just gluing the soft rubber coating on the sole back into place.
On the black shoes, I needed a few tries to be able to get the platform aligned with the upper. The platform had completely detached, so I had to make sure it was in proper alignment. The right shoe is also where my bad ankle is, so I had to make sure the shoe wasn't twisted, so that my ankle wouldn't be under additional stress.

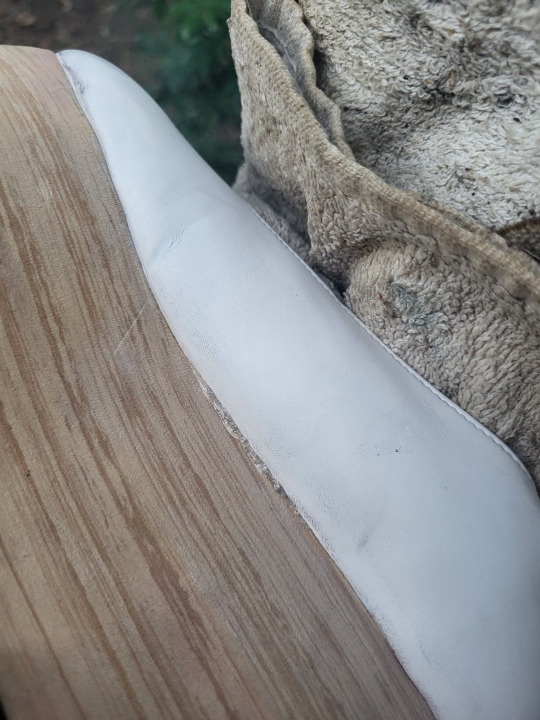
Here's how much glue I used, before it was spread around. I moved it around to make sure there weren't big patches with no glue. Good contact is good bond.
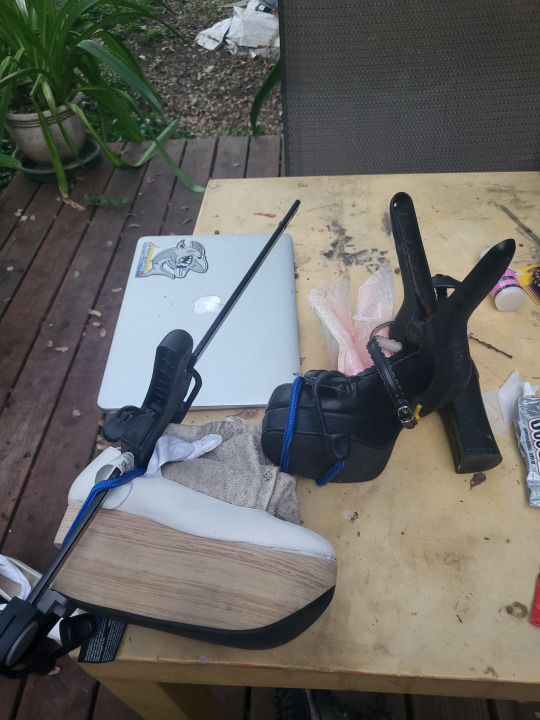
And here's how I clamped it. I shoved a bubble mailer (waste not; reuse your trash!) into the toe of the shoe, and the wrapped a bungee cord around that to hold on the platform. Then, I used a rabbit-ear clamp to hold the instep together.
And then it's just about giving it 24 hours to mostly cure. After 24 hours, it's a good idea to remove the clamps, so you don't put stress on the walls of the shoe. However, give it a full 48 before you try to wear the shoes, because there's still some final curing that has to happen before the whole thing is ready to be put under stress.
And now you can go out and about, knowing that your shoes are stronger than before, and that you won't need to fix that shoe again.
#tutorial#shoe repair#20dollarlolita#lolita fashion#diy lolita#long post#bodyline#rockinghorse shoes#rhs#i told myself i'd be doing a better job with pictures of this one and then used the ugliest table ever
123 notes
·
View notes
Photo

Crochet Bao
#etsy shop#lolitable#crochet#crochet pattern#crochet patterns#kawaii#cute#aesthetic#cozy#craftcore#DIY fashion#crafting#egl#lolita fashion#alt fashion#alternative fashion#lolitafashion#sweet lolita#classic lolita
516 notes
·
View notes
Text

🕸cottage goth skirt flip🕸
Hello and happy new year friends :) hope you all had a nice rest over the holidays- I did, and finished off this skirt flip I've had in progress for ages!
🕸Thrifted linen skirt, linen scraps, deadstock eyelet lace, made up into a milkmaid style dress with a ruffled bust. Self draft pattern.
🕸Styled with : new look blouse, monsoon velvet jacket and vintage purse, office boots, silver bangle and onyx ring, all items thrifted! Except my silver dragonfly from Accessorize, which is a very old and loved gift :)
#classic lolita#dolly kei#mori kei#vintage#mori girl#mori fashion#natural kei#offbrand#autumn style#ootd#gothic lolita#cottage witch#cottage goth#goth dress#lolita sewing#diy#skirt to dress#cozy style#vintage purse#me made wardrobe#dressmaking
184 notes
·
View notes
Text

#goth#death core#metal music#metalhead#diy#alternative rock#ave satanas#666 satan#black metal#cradle of filth#666 aesthetic#the number of the beast is 666#satanism#satanic#hail satan#worship satan#angel number 666#gothic lolita#goth aesthetic#gothcore#gothic#romantic goth#gothic aesthetic#guitar#goth girl#gotham#gothgoth
12 notes
·
View notes
Text
"We have Angelic Pretty Melty Cream Donut at home" one piece dress, made by myself. I made this from some thicc cotton fabric from Joann's. Even sewed 2 pockets!
As usual, read the full sew along post at my website here! Or not. I can't control you, the 4 live people reading this post and the 300 spm bots.
https://starsbegantofall.com/2023/09/13/fashion-otome-no-sewing-donut-op-dress-sewalong/
3 notes
·
View notes
Text
youtube
New video on decorating my chair for my goth themed room <3
#diy#how to#goth#gothic#handmade#kawaii#jfashion#youtube#gothic lolita#pastel goth#goth aesthetic#victorian#gothic victorian#indie fashion#coquette#dollette#altfashion#Youtube
10 notes
·
View notes
Text
Things that should be said in lolita more often
I hope to make a series of these, as someone who has been watching J-fashion evolve longer than some of you have been alive. Not a brag, (as my knees, hip and ankles can attest to) just a reality.
My first one is:
It's Okay to Alter Your Clothes and Accessories However You Want! For Whatever Reason!
Don't like those waist ties? Yeet 'em. Heart shaped charm not gonna work with your coord? Nip that thread. Barrette but you want a clip? Swap it out.
Personally, I despise anything that ties under my chin and when I got this Unideer fawn headpiece, they were the first things to go.

I also took out the combs because they will not work with my short hair and replaced them with clips. I will reattach a comb in the middle to provide additional support, though.
Doing this also allows me to use that ribbon to make bows for my future planned coord.

"But that may detract from the resell value-"
NO!
If you wanted to get into the fashion for the speculative value, you wouldn't be wearing it to begin with.
Change it however makes you happy and comfortable.
79 notes
·
View notes
Last Seen Blogs

gayvecchio
I was in the closet with Detective Vecchio

thebucketcrew
The Bucket Crew

monqu1y
言論封殺勢力に抗する
mileena--kahnumm
MonsterGirl Supremacy :)

soupslashers
soup