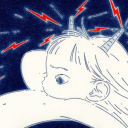
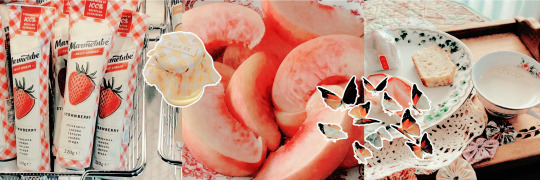
#<3 green psd
Text
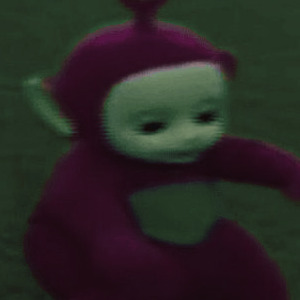

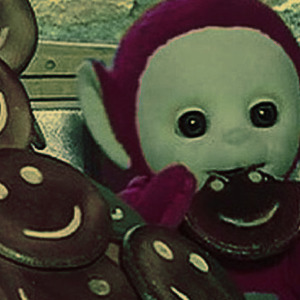


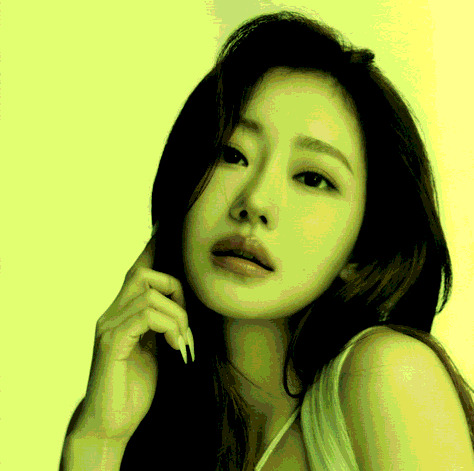
❀ Pure Green PSD, by MilaDesign ≋
.:♪*:・’゚♭.:*・♪’゚。.*#:・’゚.:*♪:・’.:♪*:・’゚♭.:*・♪’゚。.*#:・’゚.
ask is open !!
rules :
➜ Fav + Reblog if you download;
➜ Don't share it;
Pure Green, by Mila Design
.:♪*:・’゚♭.:*・♪’゚。.*#:・’゚.:*♪:・’.:♪*:・’゚♭.:*・♪’゚。.*#:・’゚.
#psd#coloring#psdcoloring#photoshop#psd photoshop#teletubbies#green psd#green moodboard#creepy cute#colouring#<3 green psd
7 notes
·
View notes
Text
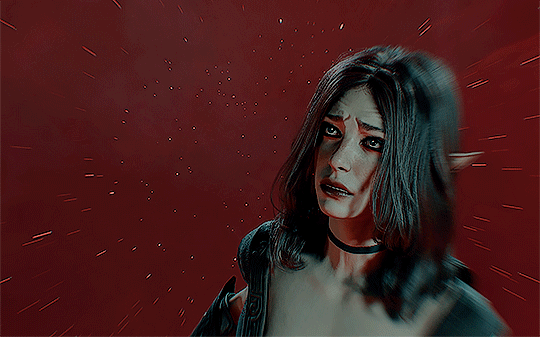
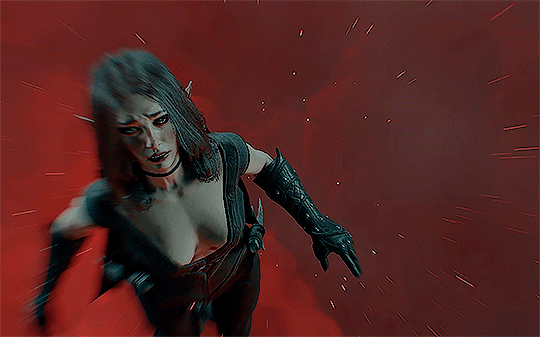

You were the jewelled hope for their design, but now you are their flaw.
#game: baldur's gate 3#baldur's gate 3#bg3edit#baldursgate3edit#bg3 oc#bg3 tav#gamingedit#videogameedit#bg3 spoilers#yes this is the same psd on all three gifs#the lighting in this scene was WILD#the second time i played it through it wasn't even red it was green#also i'm going insane over the patchy coloring#if anyone knows how to make gifs that are actually smooth and is in need of a firstborn#i will gladly pledge you mine in return for help#oc: kahlan#don't think i've posted about her yet so here's a first look!
65 notes
·
View notes
Photo


ㅤ ⠀⠀⠀⠀ . 。*◯ ⃝ ㅤ ︵ ⠀⠀⠀⠀⠀headers ⠀⠀ by ⠀⠀ saericons . ⠀⠀ !!
⠀⠀ ⠀ ⠀ ⠀⠀ ⠀ ⠀⠀ ⠀ ⟆⟆. ♡ ⠀⠀ ⠀⠀ like or reblog if u use.⠀⠀⠀⠀⠀ɞ
#headers#collage headers#headers 3#psd#collage headers psd#headers twitter#headers by me#green headers#pink headers#magenta headers#coral headers#grunge headers#elegant headers#white headers#black header#dark headers#twitter rp#edit rp#kpop rp#saericons#layouts psd
135 notes
·
View notes
Photo
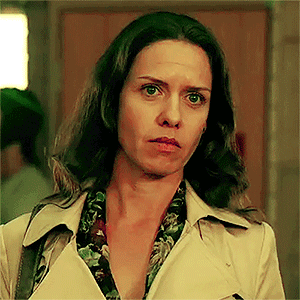
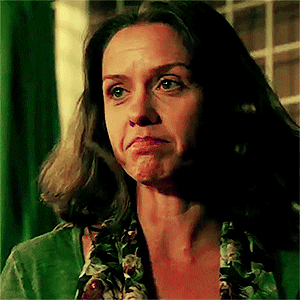


KATE ATKINSON as VERA BENNETT
WENTWORTH | “The Governor’s Pleasure” (3x01)
#kate atkinson#vera bennett#wentworth#wentworth gifs#kate atko#wentworth season 3#mygifs.#*#perfectfoil#usercroft#psd by natasharomanovf <3#originally wasnt sure about the green but the more i look at them she's so pretty ?
28 notes
·
View notes
Text


Red, Gery & GREEN
or GREEN & GREY ?
#I know I know that Diego is very red as a whole vibe but this psd makes everything green and looks good with his caps so ...#opinions / advice / thoughts pls <3#[OOC.] — Mari chitchats
2 notes
·
View notes
Text

simblr trading card template - by @buttertrait and I <3
butter and I were like what if we made trading cards for our sims and then we worked together to make this template so we can all pretend we're exchanging cards in the playground.
font we used: bad comic - but will work with mostly any font
change the skill bars with the move tool on the layers named "CHARISMA SKILL" "BODY SKILL" "LOGIC SKILL". just move them left and right!
Layers are colour coded - green you edit, red you dont!
Made with photoshop 2021 but should work on any photoshop/ program that can open .psd files
grab @deathbypufferfish 's brilliant build-a-sim icon pack here for the icons
dont forget to add ur username at the bottom so we know where we got the card from :O!
post them under " #simblrtradingcards " so we can collect them all :> (note, tumblr search only reads the first 5 tags on a post. anything after 5 doesnt show up on search)
download psd / gimp (google drive)
957 notes
·
View notes
Text

In celebration of reaching 900 followers!
Ever since I started playing the Globetrotter challenge by @moonfi; I've been creating a collection of UI Widget style templates. This collection includes 20(ish) different templates for you to use in your gameplay screenshots. I'm hoping I did my best to make this as user-friendly as possible; but if you have any questions or notice something off - don't hesitate to message me or send an ask!
[Terms of Use]
Do: Use & edit as much as you want and/or know how to.
Don't: Reupload & claim as your own.
Do: Link back to this post if asked where they're from.
[You Need]
Fonts: April | Lemonmilk | Kids Handmade
TS4 Icons: deathbypufferfish | w-sims | TheSimKid
(I've had L'Universims' icons before they were hacked but as far as I know they've moved to a new website so download from there at your own risk.)
DOWNLOAD (SFS) 66.3mb **FIXED** (Missing moodlet)
[Tips & Hints]
Open the awkwardwhims psd collection file in Photoshop, then drag & drop the folder or group of templates onto your image.
The photo album template was inspired by @folkbreeze (definitely check out their resources, they're all so nice!) & other various examples I saw online.
Resize the template by selecting the folder as a whole; resizing individual layers may makes things unaligned.
Feel free to change background colors/fonts/etc as much as you want.
The text message template has 3 styles: sender, green receiver & blue receiver. There are also reaction icons & a separate reaction bar.
For the to-do list template I didn't include every aspiration icon (I was trying to keep this file as small as possible) but you can download this pack by @deathbypufferfish that has all the aspiration icons you'll need. However, it may be missing some of the newer aspiratons.
When adding photos (album cover/recent photos/etc) use a clipping mask.
The weather template includes all the different weather icons, so be sure to hide/unhide the one that applies.
For the new transaction template, make sure to only change the number of the price otherwise the Simoleon symbol will get changed to Times New Roman.
The notification message template is for life events, bad events & default game notifications (ie: legacy player, etc).
DOWNLOAD (SFS) 66.3mb **FIXED** (Missing moodlet)
@alwaysfreecc @maxismatchccworld
1K notes
·
View notes
Text

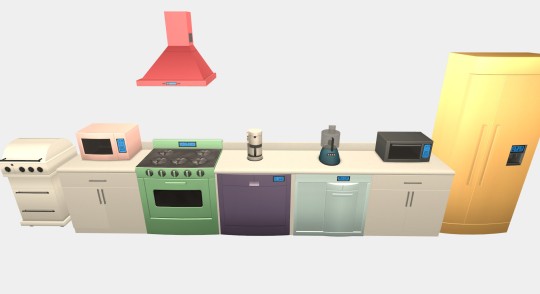

I've finished recoloring the FreeTime appliances (+ a matching Super Sucker Vent)! As usual, they come in the 10 Cluedo Colors.
The list of items recolored in this set (FreeTime required):
Char-Pane Grill
CryonicFresh
Deluxe Coffee Maker by YouBrew
EliteChef Home Range
Frugal Fruitlover's Friend
Gravitrash by Jackson Compaction
The Dish De-atomizer
The Nanowaver
Timeless Toaster Oven
And from Kitchen & Bath Interior Design Stuff:
Super Sucker Vent
They are very shiny so they might look a little lighter than usual Cluedo Colors in brightly lit spaces. The Char-Pane Grill is a little darker because when placed outside it looked ridiculously bright otherwise. Dirty states for the stove are included.
As my poll showed, people hated my green people were divided about the display colors so I've decided to make three versions for the three different display colors (blue, green and grey). The recolors are compatible with each other so you can have 30 different recolors for each item if you want too (I won't judge you). Might be handy too if you want to compare them in-game.
Default options are included if you want to replace the original colors. These also come in the three different display versions and use the colors green, peacock, scarlet and white. I have not made a default replacement for the Super Sucker Vent because it's not really a part of the FreeTime set and I didn't know what colors I would use. (I've also already made 3 different default replacements for it.)
Credits: @shastakiss (colors)
Download (green display version)
Download (blue display version)
Download (grey display version)
And if you're not interested in the recolors but would like a clear glass default, just download this file (clear glass is already included in the downloads above).
Download (clear glass default for Frugal Fruitlover's Friend)
Last but not least, if you hate all three display colors or if you had hoped I would have done more colors for these items (I wanted to initially but it became too much work with the different displays) then I have some good news for you! I have cleaned up my .psd files for all these ten items and made it a nice little folder for you to download and recolor them so you can make more yourself.
Download (.psd files)
#sims 2 cc#s2cc#ts2cc#ts2 cc#sims 2 recolor#sims 2 recolors#sims 2 objects#sims 2 download#sims 2 default replacement#sims 2 default#cluedo colors#default cluedo#mydownloads#mydownloads recolors objects#mydownloads default objects
349 notes
·
View notes
Text


PSD PACK #1 — period dramas
in this folder, there's ten psds created for the shows: reign and the tudors but they should work across any period drama with dark or yellow/green lighting <3 just remember to always adjust the curves (and channel mixer if necessary) to suit the lighting of the scene
a lot of these are pretty basic colourings, and some are pretty similar but these are the ones that i use the most often!
#dailypsd#psdresources#completeresources#allresources#psd pack#psd colouring#photoshop resource#gif psd#01#ps help#useratz#usershreyu#userzil#usershri#usermery#userbloomingwarrior#niniblr#usercats#userfaiths#usermare#userbess
288 notes
·
View notes
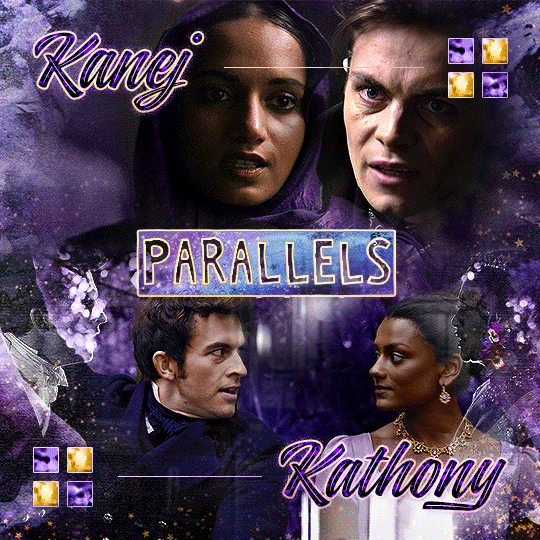
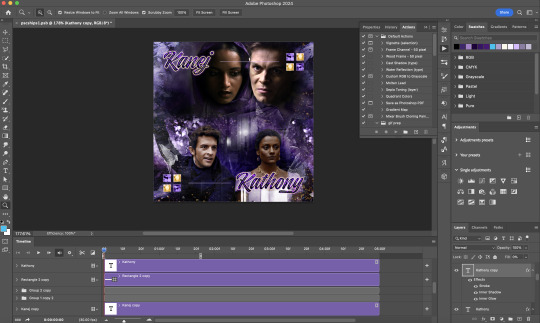
Note
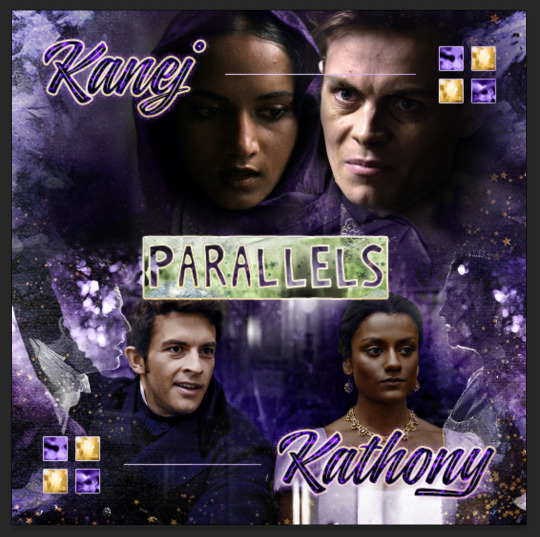
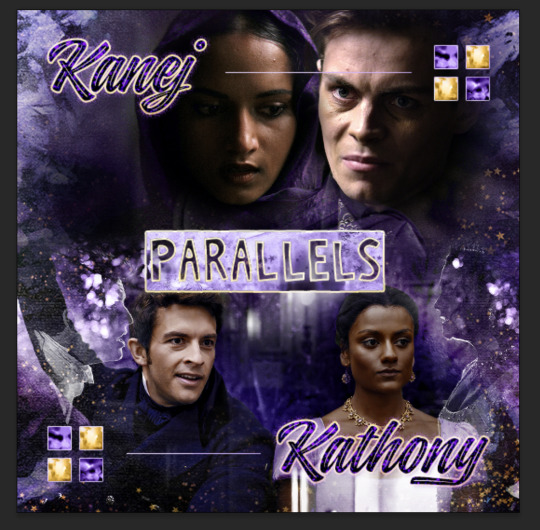
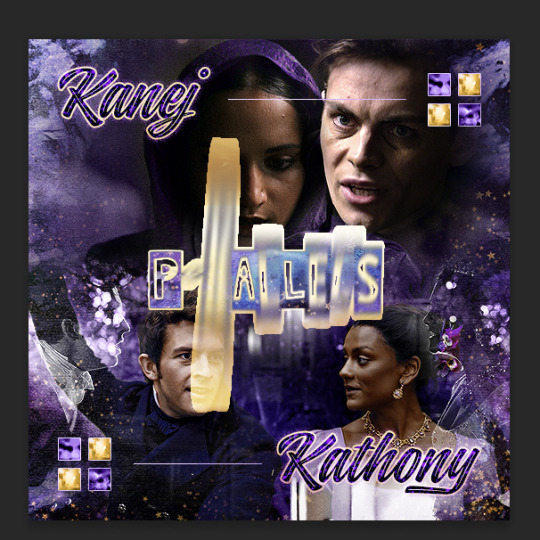
Oh I’m sorry I have GOT to ask! How did you do the text animation in the first gif of 718688291365502976/pscentral-event-15-favourite-ships-kanej?? It’s just. It’s so beautiful
Hi anon! I've used After Effects to create the text animation in the first panel of this post. I'll show you the basic idea of how I've created the animated text effect here :D
What you need:
A cutout font (the font that I've used is Trouble Child Outblack by @justlikethistrain)
Adobe Photoshop with Video Timeline feature
Adobe After Effects
Supplementary files: gif prep action pack / golden outline layer style / assorted textures
Difficulty: advanced; knowledge in gifmaking with the video timeline interface assumed
Note: This tutorial assumes that you're working with all of the composite gifs in a Photoshop composition file and using the video timeline interface
Other useful tutorials to refer to: Text overlay effect / After Effects text animation / clipping mask vs layer mask
Tutorial under the cut. Like / reblog if you find this useful!
1) Photoshop: Preparing your gif panel
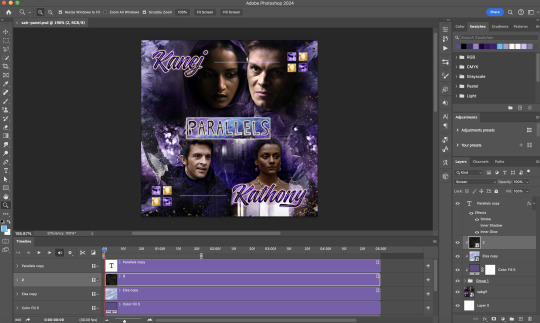
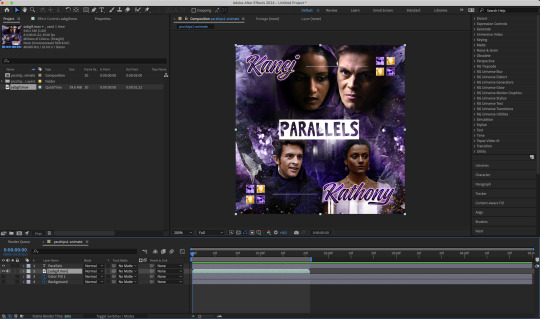
Setting up your PSD composition panel: Create a blank PSD file and set it to Tumblr dimensions (540px x 540px in this particular gifset)
Enable Video Timeline and drag all of the component gifs from your folder to the PSD composition file. Resize / move these gifs around until you're happy with the placements.
Trim the timeline work area so it's the same length as the shortest component gif you've added to the PSD composition file. You can also add some textures & additional adjustment onto this panel.
2) Photoshop: Exporting your base gif
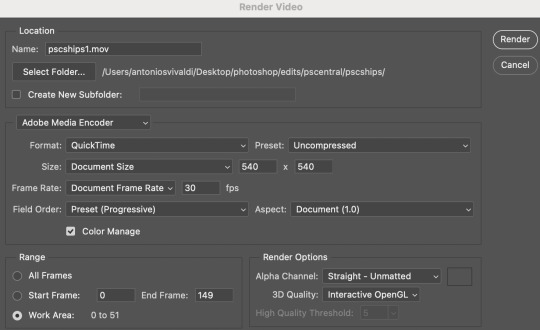
I highly recommend exporting the base gif right now, to ensure a smoother experience scrubbing through the video timeline when adding finishing touches later on in the workflow.
My preferred method is to render the composition as a video clip from File > Export > Render video.
To get the optimal export quality, I use the following settings:
3) Photoshop: Preparing your text layer
Make a new Photoshop composition file of Tumblr dimensions

Drag in the video clip that you've just rendered (the base gif) to this composition file
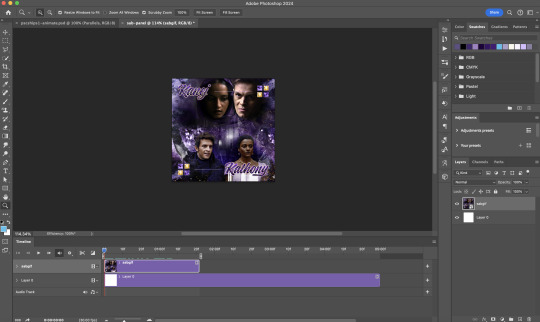
Add a new text layer in your PSD composition file and set the colour to white then tweak this layer until you're happy with the text placement.
For performance optimisations on After Effects, I duplicate the PSD composition file and delete all other layers. This PSD file contains only the text layer that will be animated.
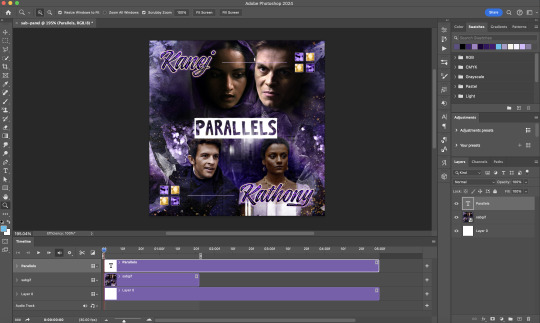
4) Photoshop: Adding overlays & decorations on the text layer
This step allows you to preview the text effect without the animations (i.e. allows you to tweak the texturings & colourings)
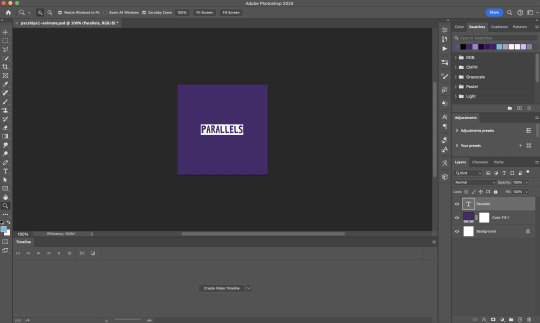
Duplicate the text layer. Set the bottom layer's (highlighted in red) blend mode to Exclusion and apply the gold outline layer style to the top layer (highlighted in green). Make sure the Inner Shadow is disabled!
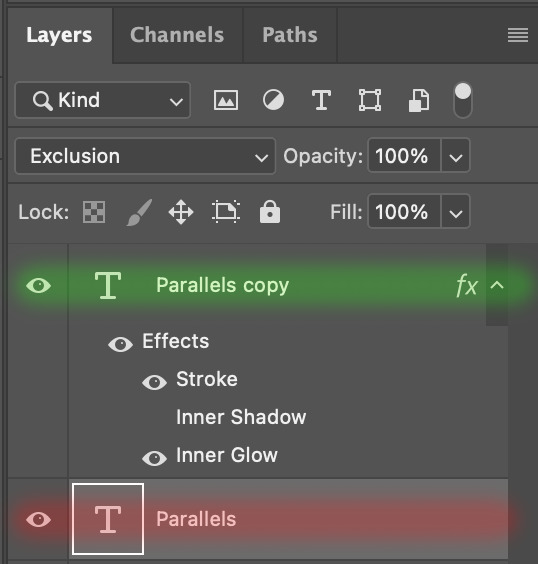
The panel now looks like this
I want to have the liberty to use different colours & textures on the bottom text layer with animation, so the next thing I do is to right click on the bottom text layer and select "Group from Layers"
To change the colour of the filled text layer to purple:
Collapse the Group that you've just created
On top of the collapsed Group a purple Colour Fill layer,
Set the Fill layer's blend mode to "Colour"
Right click on the Fill layer and select "Create Clipping Mask"
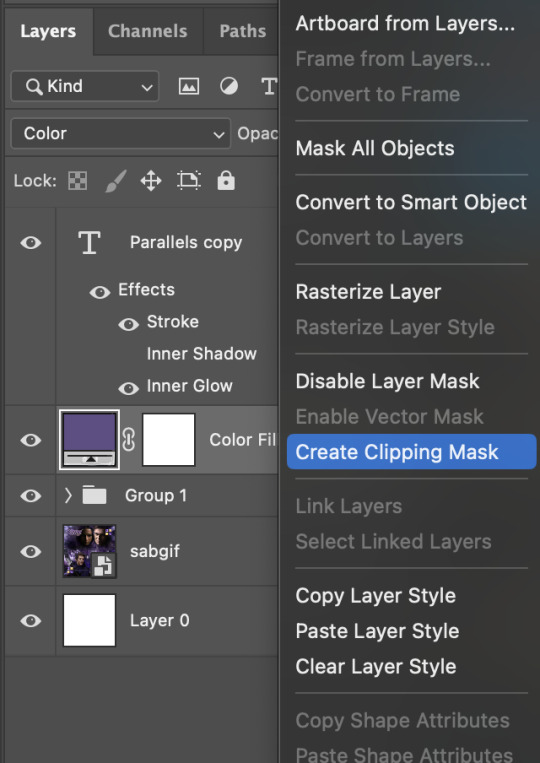
Now the colour of the filled text layer is purple
After adding more textures & decorations on the text layer (with photo negative effects) I get the following:
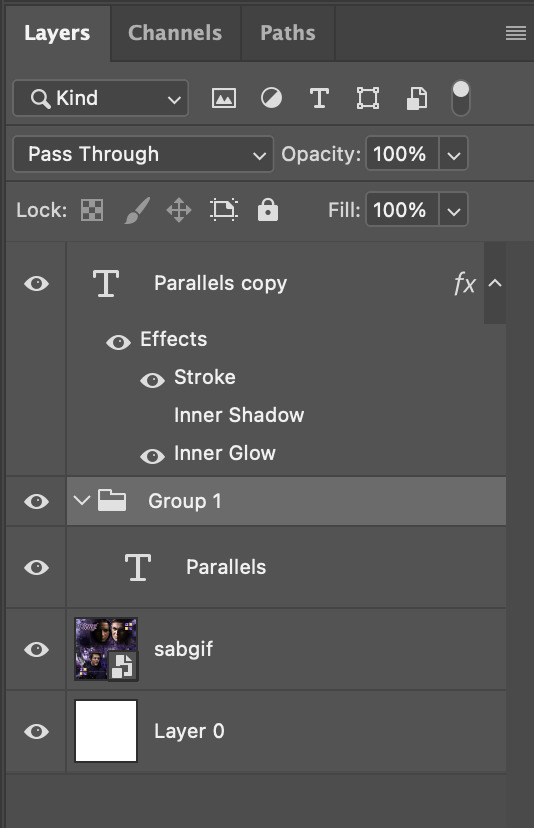
5) Photoshop: Adding overlays & decorations on the text layer
To avoid performance issues on After Effects, I make a new PSD file of the same dimension. With both the PSD files open, I select the text layer (highlighted in red) while holding Shift, I drag this to the blank PSD file (see the green arrow)
Holding Shift ensures that the layer's placement is preserved when it's copied to a separate PSD file.

In the new PSD file, I set the text layer's blend mode to "Normal"
6) After Effects: Animating your text layer
Make a new project on After Effects and drag in the text layer PSD file. Import this file as a Composition

Also drag in the base gif video clip to the AE project.
While we won't be exporting anything with the base gif visible, having this file in the project file is useful if you want to have a better picture of how the animation will look in tandem with the gif.
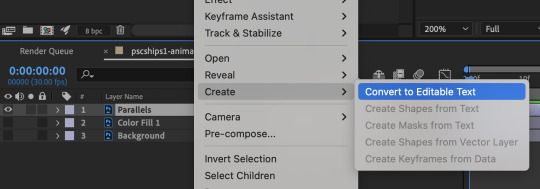
Double click on the composition. Hide the colour fill and background layers. Then right click on the text layer, go to Create > Convert to Editable Text
To be able to preview the animation with the base gif, drag the video clip to the composition file and below the text layer. The visibility of the layer can be toggled on / off anytime in the After Effects workflow
Now we prepare the text layer to be animated. Because the final animated effects is 3D & has motion blur, right click on the text layer and select "3D layer" (highlighted in green) and Switches > Motion Blur (highlighted in red)

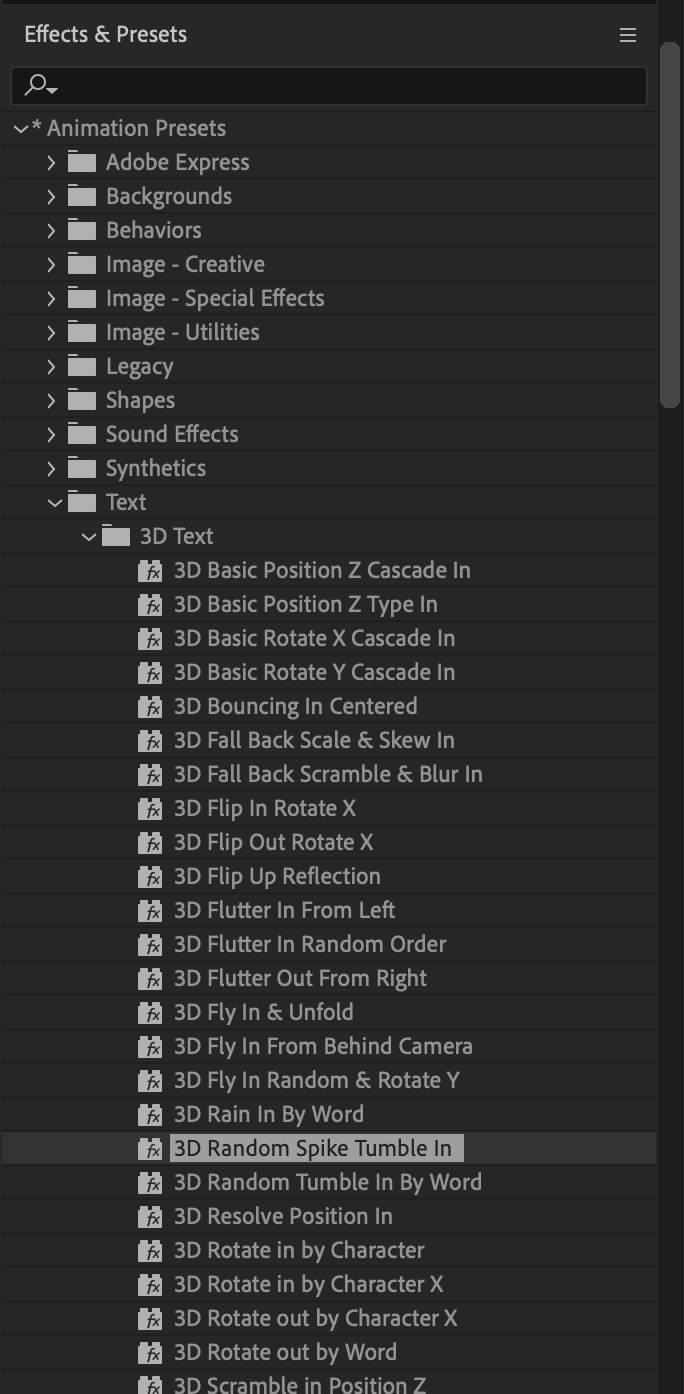
Go to Animation Presets > Text to browse through some presets that you could use to animate the text layer. For this gifset, I've used a preset within the 3D Text folder called "3D Random Spike Tumble in".
While selecting your text layer, press U to view the keyframes and you can adjust the position of these keyframes until you're happy.
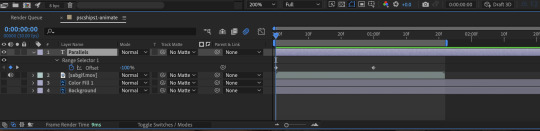
For more finishing touches, press U again to tweak more options in this preset. In this case, I do to Animato 1 > Range Selector and changed the Colour Fill to #fff (the default colour is light yellow)
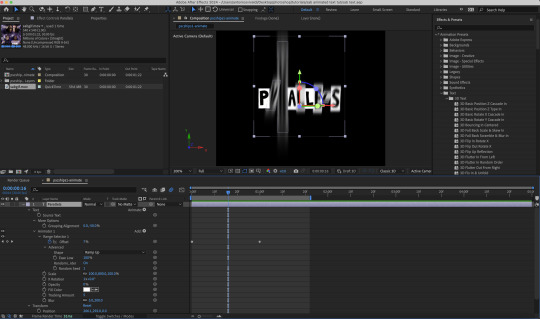
Then do you File > Export > Add to Render Queue
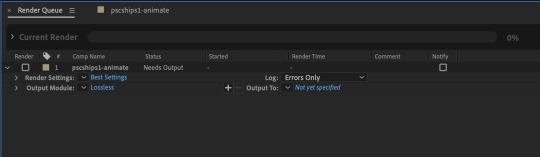
Click on the Output Module and use the following settings to render the text layer as a video file with transparency
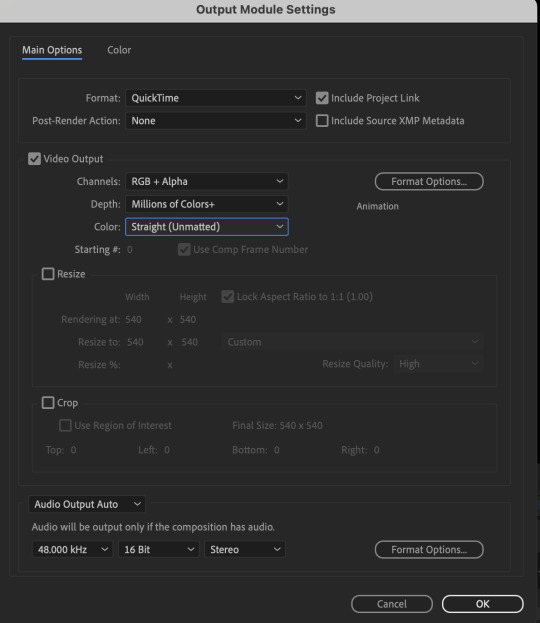
Then after specifying the folder in which you'll export the video to, click "Render" to render the video file containing your animated text layer.

7) Photoshop: Adding the animated text & finishing touches
On Photoshop, drag the rendered clip containing animated text, to the PSD composition file with the static text layers.
Duplicate the animated text video layer
Drag one of the layers inside Group 1 and set the blend mode to "Exclusion" (Highlighted in green)
Move the other layer to the top and apply the gold outline layer style with Inner Shadow disabled (highlighted in red)
Hide both text layers (highlighted in yellow)

By scrubbing through the timeline, I've noticed that the animation didn't look clean enough, so I'll add some finishing touches
By selecting the upper text layer containing layer styles, go to the timeline and add opacity keyframes going from opacity 0% to 100% a few frames apart

Once you're happy with the finishing touches, flatten / render your PSD composition file, change the frame delay to 0.05s and export your gif and voila!

I hope this helps 💖
#tutorial#gif tutorial#photoshop tutorial#after effects#chaoticresources#dearindies#userriel#useralien#userraffa#usershreyu#user.tee#useryoshi#usernik#userjoeys#usersole#arthurpendragonns#userhallie#*#my tutorials#my resources
107 notes
·
View notes
Text


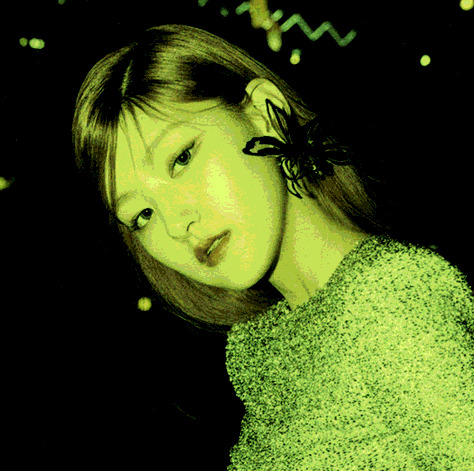

NOBODY KNOWS, PSD #016
Give me a heart if you like it
psd :)
(sorry if i didn't posted this days, i was focusing on D.A, but i'm back to this account )
#psd#coloring#psdcoloring#colouring#psd photoshop#icons with psd#photoshop#psd coloring#kiss of life#kiss of life natty#kiss of life belle#kiss of life haneul#kiss of life julie#green psd#<3 green psd
5 notes
·
View notes
Text
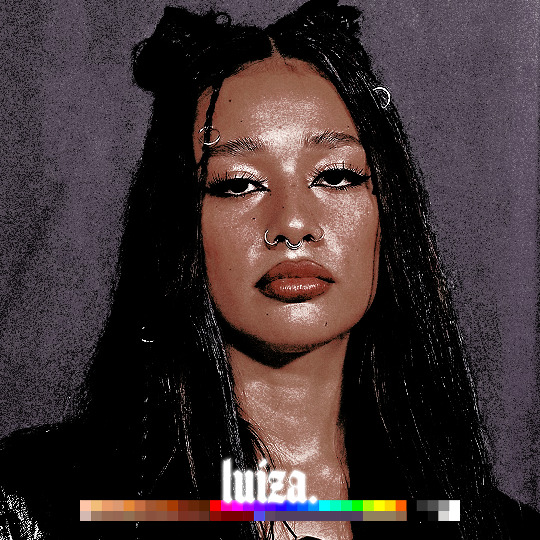
# LUIZA : a medium contrast PSD that turns blues and greens into muted purples. turns highlights into a glowy pop. made for one of my own muses and never got around to using it </3
feel free to edit as you please.
credit is required.
do not redistribute, sell, use in commissions, or try to pass off as your own. i will hunt you down.
download in source link.
free / pay what you can.
86 notes
·
View notes
Text


Dollettes 300 + editing event !
Info below cut ..

Thank kyu everybunnie for 300 + followers !! Im super greatful for all of you <3
The event starts april 1st and ends on april 7th !! ( Moved dates due to palestine strike week ! ) . Kyu are allowed to post up to 2 times a day ! Use the tag angeldollies300 and tag me so i can see ur edit !
Any type of edits r allowed ! ( graphics , layouts , wallpapers , moodboards , stimboards , etc , etc ... ) Feel free to do any media aslong as it isnt problematic / weird !
You will need to complete all the prompts to finish the event , the winners will be picked at random once the event finishes !
Prompts ( thank kyu to kio 4 helping me w the last one ! ) :
Day 1 : A character thats associated with summer or a character thats associated with winter
Day 2 : A green character or a purple character
Day 3 : A character you relate to the most or a character you relate to the least
Day 4 : Edit 2 different characters from different medias
1st place winner : 3 layouts , 3 graphics and 2 custom psds !!
2nd place winner : 2 layouts , 2 graphics and 1 custom psd !!
3rd place winner : 1 layout and 2 graphics !!
Could i get a promo ?
@kiochisato @anarkissedd @adoringpuppet @narcaptor @sanguinems @bpdtsukasa @seraphidol @intersweet @iv-ry @demeurel @yaoitistic @synthists @lavendergalactic @fairykving @pwupsicle @buttonaiko @shrineofnarukami @cutlolita @dollrelicz @mischiefesse @deertism @courtesse @demoheir @star--boyyy @candy--hrts @battampria @sweetheartseamstress @synthdoll @jirai-girl @smilingnap @magnoliawriter @metalbody @circuswhisprs @slaughterboyf @yanpyro @morticianic @gunlolita @cherryshh @yuumebow @idolrinko @astromiis @catburgerhelper @stellaimuse @i43furi @ghostflora-s @strawberrymedicine @p1nk-sugar @multieyedsimp + anybunnie else that wants to reblog !

70 notes
·
View notes
Note
hi :) i love ur buffy gifs so much! they always look so nice!! would you be willing to do a coloring tutorial to show how you usually color btvs? or perhaps save the PSD the next time you gif buffy and share that?
oh i feel your pain!! and thank you so much <3
i colour each gif from scratch and don't save psds so i can't offer you something there but i've done up a buffy colouring tutorial here!!
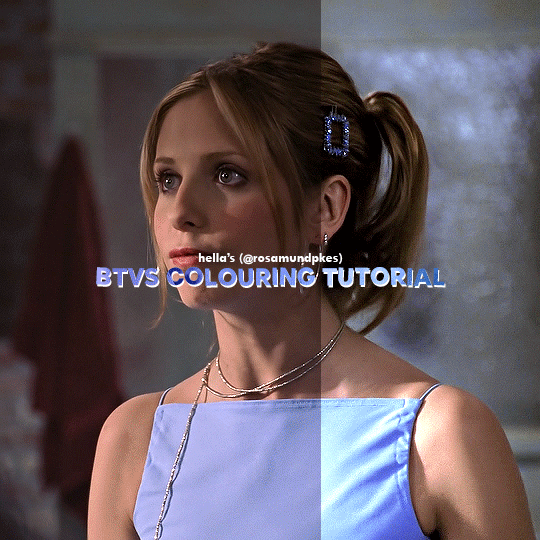
Here's the uncoloured gif.

Step 1: The nice part about giffing Buffy is there is usually a grey or blueish grey pixel in the whites of her eyes that is perfect for a white point curves. I played around with different pixels on different points on the gif until I found one I liked.
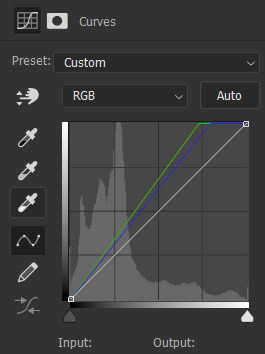
Step 2: I always like to do the brightening first so I added on Levels and Exposure layers. BTVS has weird highlights where its very prone to white or yellow/white patches so I try to use as little as Exposure as possible but I like the Gamma Correction part.
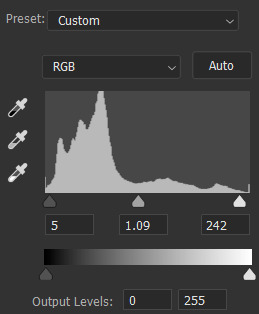


Step 3: Channel Mixer is a lifesaver for Buffy because it usually has such a warm tint. I pretty much only use the Red and Blue settings but it helps make the gif cooler without the effects on shadows and midtones like Colour Balance.


Step 4: Selective Colour is mostly just to fix skintones and background colours. I typically wind up adjusting the cyan and yellow sliders for the reds and blues until her hair and skin looked normal. Sometimes BTVS has magenta in the shadows on her face so I increased the yellow there (while it makes sense to actual reduce the magenta, I'm going to a natural skintone not green).
You can also see that there are some white spots on her shirt, right arm, and the right part of her face. On the white, I increased the blacks and reduced the yellows to fix the colour and reduce the brightness.


Step 5: Hue/Saturation doesn't make a hugely noticeable difference here but it's a good opportunity to make final tweaks to colours and reduce overall warmth saturation. My personal preference is to have lower red/yellow saturation so I lowered that and made slight Hue adjustments (the yellows were still a little red for my liking). There was also some magenta in her eyes and teeth so I completely lowered the saturation and upped the brightness to fix that.


Step 6: The gif is still a little dark for my liking so I threw on a final Levels layer to brighten up her face. Usually, I would use exposure but if I did that I would end up with some serious white patches.

And that's it!! Each Buffy gif is slightly different but I would suggest making the gifs cooler and increasing the brightness through Curves and Levels without using Exposure.
#gif tutorial#tutorial#tutorials#photoshop tutorial#coloring tutorial#hella's inbox#anonymous#hope it helps!!
64 notes
·
View notes
Text


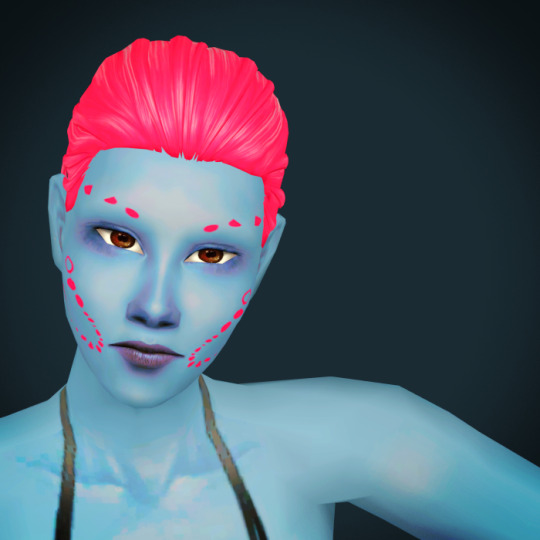
Pyxis' Intergalactic Overlays for TS2
I have been thinking about this Wishing Tree request almost non-stop ever since berrynooboos posted the 4t2 PSDs. There was talk of an overlay box in the same thread and I definitely didn't want to take it away from anyone working on it, but like "the children yearn for the mines", I yearn for more overlay boxes.
Now that the PSDs have been sitting in my computer's Downloads folder for months and this month's theme on GOS is Takin' Care of Business, now is the time! And just in time for my birthday 🎂
👽 👽 👽
👽Intergalactic Body Box - SFS / MF
Found in misc > dresser for 0 simoleons | box is jinxxsims 4t2 RoM Mystical Crystal Cluster | 5 options, 10 pooklet colors each
👽Intergalactic Face Box - SFS / MF
Found in misc > dresser for 0 simoleons | box is jinxxsims 4t2 RoM Mystical Crystal Cluster | 2 options, 10 pooklet colors each
👽 👽 👽
The body overlays were heavily edited by me and are mapped for TF-AF, but when I tested on males and toddlers and children, they looked decent (ie "Full Body" (green alien with blue overlay) has seams issues that are a bit obvious, but I can live with it.)
credits: @pyxis-likes-ts4 @berrynooboos pooklet & iakoa for the color palette and gimp actions
skintone pictured in the previews are either in game or by Iakoa here
some pics below the cut
As a disclaimer: the Half Body Red file - for whatever reason - only sometimes works. I don't know why as the instances/groups are different for each file. Maybe someone with a big brain can tell me why? Until then, 🤷♀️ Please let me know if there are any other concerns or issues!
regarding half body red - i have rebuilt the file 3-4 times, I cleared cache, I added the file into simpe to make a new file, changed the instance/group numbers and changed the naming convention numerous times. I checked the box and it works when i replace the BCON with another overlay file. I really don't know. I also really don't want to troubleshoot further on it. -- this appears to be a "me" issue, but I wanted to notate, just in case.


#4t2#sims 4t2#4t2cc#sims 2 cc#s2cc#sims 2 download#ts2 download#the sims 2 cc#ts2 overlays#tattoo overlays#download#dl:box#dl:sup
447 notes
·
View notes
Text
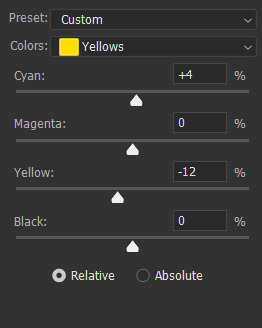
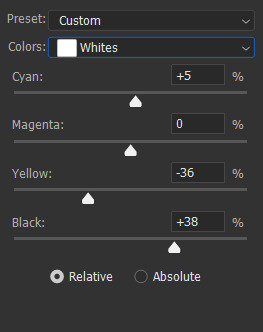
CMYK Explanations
Hey there Kääryleet!
We have heard you. Y'all want to know what is and how to use CMYK. So here's a quick explanation:
1-What is CMYK?
CMYK is a colour setting! It stands for the 4 colours of ink a printer uses: Cyan, Magenta, Yellow and Black. By layering these inks on the paper, we can print pretty much any colour we want! It follows the rules of substractive model of colour, like paint.
2-Isn't that how it is by default?
Anything you do on a screen is by default in RGB (Red, Blue, Green), and that's because your screen uses light and not pigment to show colours. That's the additive colour model. So, unless you selected CMYK or Print in your software, you're working in RGB.
3- What does that mean for me?
All you need to do is to set your file in CMYK. Depending on the software you use, it should be in the "File" or "Edit" menus. It's VERY important that you set the colour mode BEFORE you start your work. Why? Because going to CMYK from RBG means you're re-encoding your colours, and they will look duller/bad once printed, and there's a fairly good chance it will stop looking good on screen too. It's also pretty hard to correct once it's done. Don't forget we will be providing a PSD template, and we'll set it to CMYK.
4-Is there any colour limitations to CMYK?
Short answer? No. Just set your file to CMYK and start drawing. Pick any colour you want, as many as you want. Long answer? Yes, but it's simply because some colours cannot be printed with the normal printing process, as they require special pigments and ink. But that's not important for our project, so no need to worry about it.
And that's about it, folks! I'm leaving you with this short video that explains the colour models a bit better:
youtube
115 notes
·
View notes
Last Seen Blogs
paulmccartneysgroupie
"oh, i believe in yesterday"
hijack-frostcup
Fandoms tho

space-alliance-solo
Space alliance

kaias1x1
fine line