bkmckitchen
BKMCKitchen
The adventures of a Brooklyn boy in his kitchen. @BKMCKitchen on Instagram.
29 posts
Don't wanna be here? Send us removal request.
Last Seen Blogs

mijamija1234
Felicità

royaliuonline
RoyaliU

squidnomad
Squid Nomad Marketing Agency

markusx78
Ghost

kira-hiroto
Kira*Star
Photo
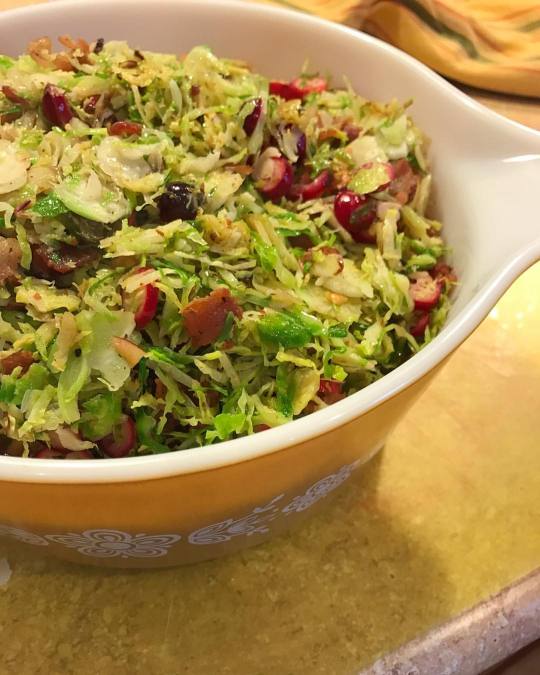
Let's be honest here, everyone knows that the best part of any #Thanksgiving dinner is the sides, amirite? Turkey may be the star of the show, but the sides make the magic happen. One of my favorite vegetables to make on Thanksgiving is Brussels sprouts. They can be prepared so many different ways, and lend themselves so well to such a wide variety of flavors. Now, I don't necessarily believe that EVERYTHING is better with bacon...but Brussels sprouts most definitely are. Add a bit of acid (lime juice, vinegar, or sriracha if you like a little heat) and you're in business. My current favorite method of preparation is pictured here. Use a mandoline to finely shred the sprouts, give them a quick sautée in bacon fat, then toss in some toasted almonds, the crispy bacon, and some fresh fruit (I used fresh cranberries, but pomegranate or diced apples would be great also.) Happy Thanksgiving, everybody...eat up! #🦃 #hoosierfood #bkmckitchen (at Greensburg, Indiana)
0 notes
Photo

When my dad and stepmom came to visit Indy last weekend, I was so stoked to share with them some of my favorite places to eat in the city. The vibrant, exciting food scene that I discovered upon moving here was such a pleasant surprise, and I couldn't wait to let them in on some Indy's culinary gems. So when they asked me to pick a spot for dinner on Saturday night, I knew there was no choice but to take them to @tinkerstrest. I'd only eaten there once before, but it was by far the best meal I've eaten since moving here, and my second trip certainly didn't disappoint. Everything we ordered was of course delicious. But my favorite course may have been the "savory dessert." Weird? Maybe. Plate-licking good? Hell yea. #🍴 Seen: sweet pea cake with mint, carrot gelee, vanilla-infused olive oil, lemon basil ice cream, and pink peppercorns. It sounds like a lot, I know. But it really all worked together in the most spectacular way. My favorite touch may have been the pink peppercorns. The citrusy, unexpected bite that they add to the dish really made the whole thing pop. Tinker Street: 2 for 2. #nailedit #bkmckeatsout #eatweirdstuff #keepindyindie #yum (at Tinker Street)
1 note
·
View note
Photo
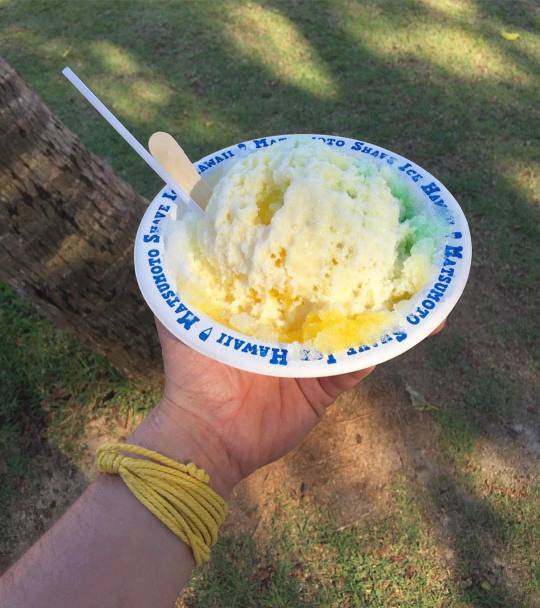
I used to think that shave ice was just a fancy way of saying "snow cone." But after visiting Matsumoto Shave Ice, in the oh-so-adorable #northshore town of Haleiwa, my skepticism has been quelled. With dozens of flavors available, ice cream, and more exotic add-ons such as condensed milk, mochi, and azuki beans available, what Matsumoto is offering is a distinctly Hawaiian dessert, that is the perfect late-afternoon (or anytime) treat, after spending a beautiful day exploring the island. #🍧 Seen: mango, green apple, and #lemonade shave ice with condensed milk. #makelemonade #notyourmotherssnowcone #keepingcool #bkmckeatshawaii #latergram @matsumotoshaveice (at Matsumoto Shave Ice Official)
1 note
·
View note
Photo
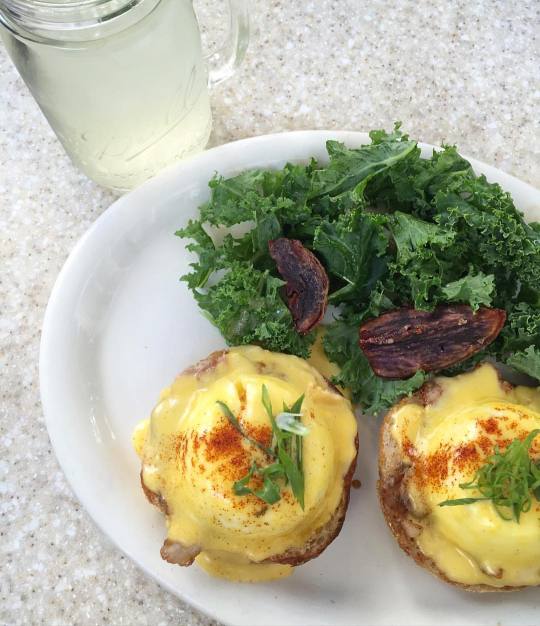
Last week, I traveled with one of my best friends, @michaelmacko, to #Hawaii, to celebrate his birthday. Having never traveled to our 50th state before, I wasn't really sure what to expect from the food scene there. Upon my arrival, I was pleasantly surprised to discover a thriving culinary community, deeply rooted in local ingredients, drawing inspiration from all of the various cultures that contribute to the Hawaii we know today. I had my hands full keeping up with my regular Instagram account (@bkmck) while I was there, so decided to hold off on updating this account with all my #foodventures until my return. So, without further ado, here is a first glimpse at one of the many incredible meals that contributed to my noticeable weight gain over the course of my trip. #🍴🍍🌴 Seen: from Heavenly Island Lifestyle in Waikiki, Eggs Benedict with locally farmed eggs, local shinsato #porkbelly, a kale and Okinawan purple potato salad, and a Wailua pineapple soda. #godblessbrunch #eatlocal #bkmckeatshawaii #🐖 @heavenlywaikiki (at HEAVENLY)
1 note
·
View note
Photo
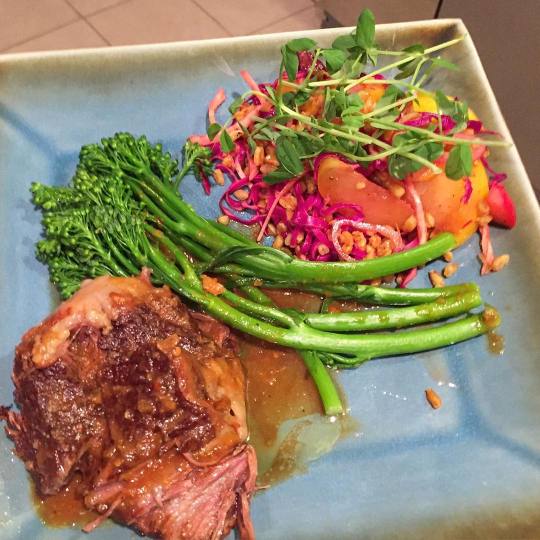
#dinnerformyboyfriend: Asian-marinated, slow-cooked beef short ribs; turmeric and lime-infused farro with red cabbage, shallots, celery root, blood orange, lemon plums, and pea shoots; steamed broccolini. #👬🍴 #gayswhocook #gayswhoeat #foodgays #jarrytype #bkmckcooks #bkmckitchen
0 notes
Photo

When I moved to #Indy from #NYC, I foolishly thought that would mean the end of being able to eat amazing, #authentic #ethnic food on the regular. Boy, was I wrong. If you know where to look, and aren't afraid to venture off the beaten path a bit, Indy is full of an incredible #variety of food options from all over the world. Don't limit yourself! #🍜 Seen: beef #pho from Saigon Restaurant in Lafayette Square. #fullofflavor #theplatelesstraveled #hoosierfood #eathereindy #loveindy #bkmckeatsout (at Saigon Restaurant Indianapolis)
#loveindy#pho#variety#fullofflavor#eathereindy#indy#hoosierfood#bkmckeatsout#ethnic#nyc#theplatelesstraveled#authentic#🍜
1 note
·
View note
Photo
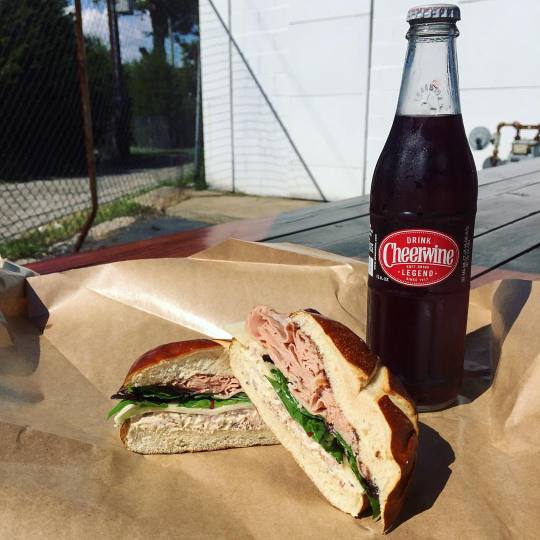
#sandwichoftheday from @wildwoodmarket: @smokinggoosemeatery mortadella, swiss, creamy sage and bacon spread, shallot, balsamic glaze, and spring mix, on a pretzel bun. And a Cheerwine to wash it down. #😍 I have been wanting to try this place for weeks, pretty much since the moment I moved to Indiana. So stoked I finally made it here for lunch. #😎 #bkmckeatsout #bkmckitchen #hoosierfood #loveindy (at Wildwood Market)
0 notes
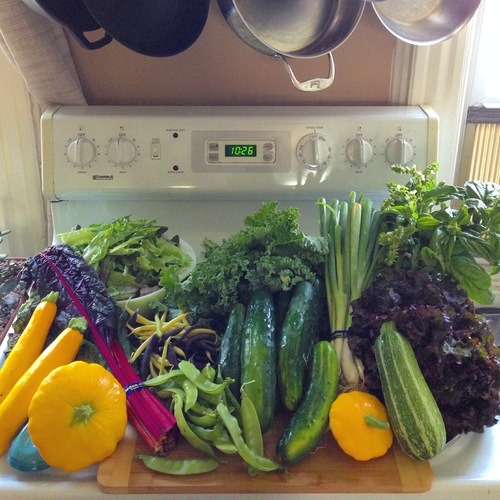
Photo

#CSA pickup - September 20th #bkmckitchen
1 note
·
View note
Text
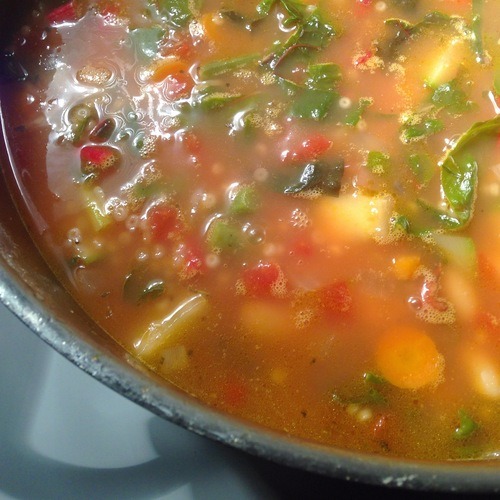
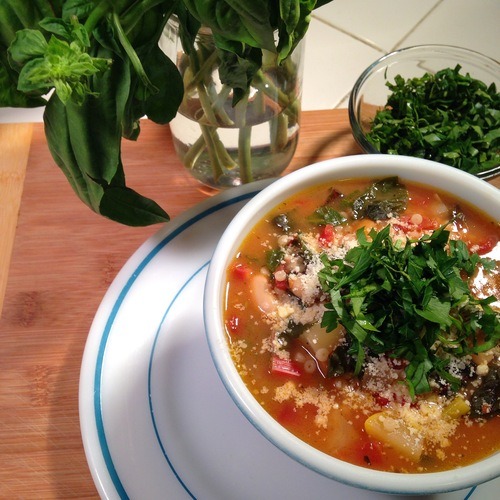
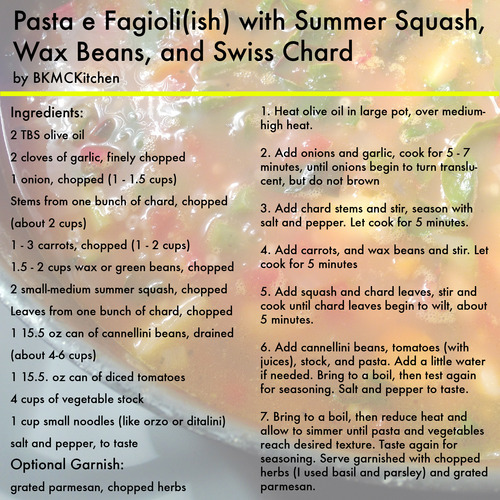
Pasta e Fagioli(ish) with Summer Squash, Wax Beans and Swiss Chard

The leaves are beginning to turn, and there's enough of a chill in the air at night to sleep with the window open, instead of with the AC blasting at 60 degrees. And, while I mourn the end of beach weather, I can admit there are certain things about fall that even I look forward to.
One of those things is a really good bowl of soup. I don't know about you, but the last thing I want to eat on a hot summer day is a big, steamy bowl of soup. I'm getting sweaty just thinking about it. Yuck.
But, when the weather starts to change, it suddenly begins to seem ok again. It's right around the same time I feel confident making my seasonal switch from iced to hot coffee.
Anyway, that brings me to this soup. It's tasty, warm, comforting, but still summery and light enough that you don't need a nap or a cold shower after eating it. This isn't a chowder we're talking about. (psssst…scroll all the way to the bottom if you want to bypass all my rambling and get straight to the recipe!)

I know I've mentioned before that certain dishes are really great for "refrigerator clean-out" cooking. To me, soup is kind of the ultimate incarnation of that philosophy. You can really put pretty much anything (within reason) together in a soup, and make it work.
When I make soup, I consider two main concerns:
1. Will these ingredients taste good together?
This seems like kind of a no-brainer, but really, just give it some thought. If you don't like the way flavors taste together when they're not in soup, putting them in a soup is not going to make it any better. So, no peanut butter, bleu cheese, and pickle soup.
2. What ingredient(s) do I want to feature most prominently?
This will help dictate how big you want to chop up your ingredients, and what order you add them to the pot. Anything you add early in the cooking process will cook down over time, and lend a nice base flavor to the soup. Whereas, if you add something towards the end of cooking, it will retain more of its unique flavor and texture, and be more prominent in the final dish.
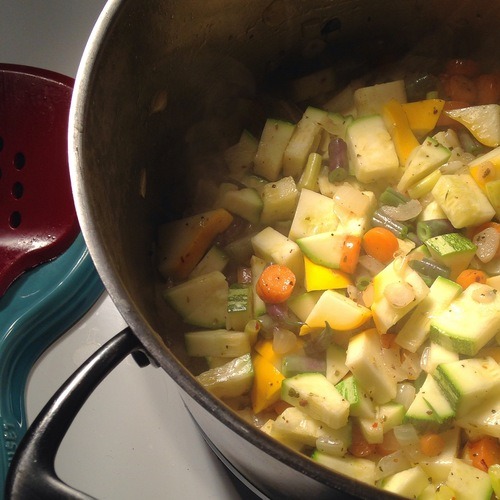
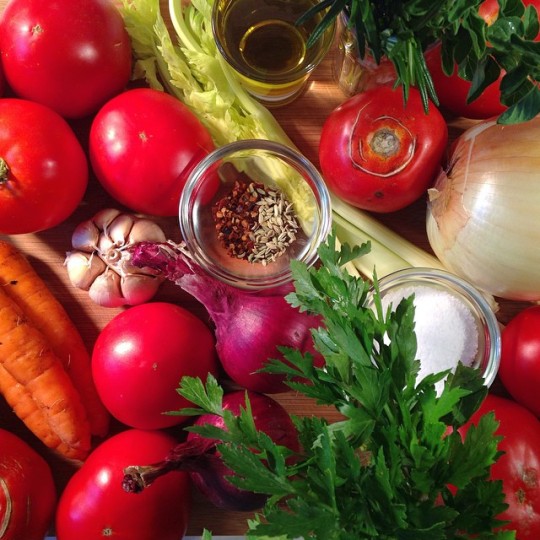
For this soup, I wanted to use up a bunch of swiss chard from our CSA pickup, as well as some squash, strings beans, and carrots that I had in the fridge. I also included an onion, some garlic, a can of cannellini beans, and a can of tomatoes. I wanted the veggies, specifically the squash and fresh beans to really be the stars of this soup.
Once you figure out what you're putting in the soup, and have an idea of what you want the final product to taste like, then it's just a matter of layering the flavors and ingredients into the pan as you're cooking. Here's a good outline to follow:
If you're making a soup with meat in it, like a beef-vegetable, brown the meat in your soup pot first, then pull it out and put it aside for later.
Cook your aromatics/base. This is where you lay the groundwork for your soup, adding in ingredients like onion, celery, carrot (you may know this as a mirepoix), as well as garlic or chills, that you want to use to create a nice base flavor for the soup. They won't necessarily feature prominently in the final dish, but are excellent supporting players. Let this cook for a few minutes over medium heat, until your garlic (if you're using it) is fragrant, and your onions (if you're using them) turn translucent. I like to add any dried herbs and spices that i'm using at this point as well.
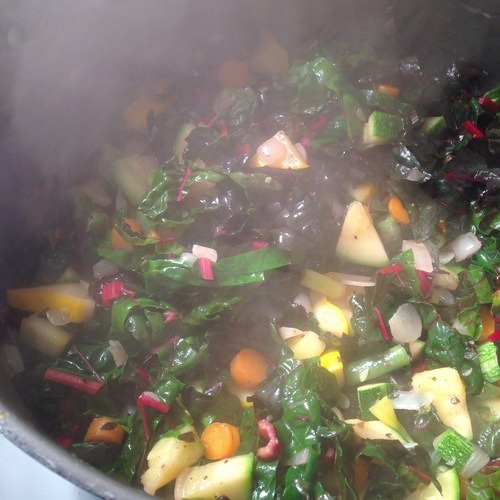
Harder vegetables, like green beans, root vegetables, or swiss chard stems, that you want to let cook for a little while, go in next. Stir them in and let them cook for 5 - 10 minutes.
Soft vegetables or greens, like summer squash, that you want to cook more gently go in last. After they cook for a couple minutes, then I like to add back in the meat, if I'm using it.
Last, add your broth or stock. From what I hear, homemade is the way to go with this for the best flavor. But honestly, I've never made a stock in my life. Revoke my foodie card now. But seriously, there are a lot of great pre-made stocks and broths at the grocery store that I think are great for a quick soup. Base your choice on whatever you prefer, and let the rest of the soup ingredients guide you. For a soup with meat in it, it makes sense to use the corresponding type of stock. But for vegetable-based soups like this, you could go with chicken, beef, or even vegetable or mushroom stock, if you wanted to keep it vegan. I also add canned beans at this point, because if you put them in earlier they can kind of turn to mush. Canned tomatoes would also go in now, if you're using them, as well as any pasta that you're adding directly to the soup.
Once you've got all your ingredients in the pot, bring them to a boil, then reduce heat to low and let it simmer. Your soup is ready once the vegetables and pasta reach the texture you're looking for. Like mushy squash? Cook it to death if you want! I prefer the veggies to have a bit more color and bite to them, so I don't let them cook for too long.
Now you just have to decide how to top your soup. Grated cheese is always a good option, as are chopped fresh herbs, crumbled bacon, or something crispy like fried onions or croutons. I went with parmesan, as well as some chopped basil and parsley. However you top it, this dish is perfect for those inevitable cool autumn nights.
Enjoy!
x
- BKMCK
#bkmckitchen#food#cooking#soup#fresh#local#vegetables#csa#community supported agriculture#squash#wax beans#pole beans#string beans#onion#carrots#garlic#beans#cannellini beans#tomatoes#diced tomatoes#chard#swiss chard#rainbow chard#pasta#autumn#autumnal food#autumnal#yum#warm#cold weather cooking
3 notes
·
View notes
Text
Carciofi alla Giudea - July 14th
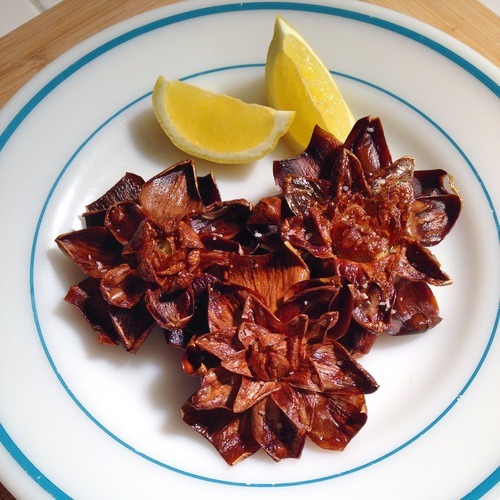
Yes, more baby vegetables. Sue me. I bought these cute little artichokes on the same day that I picked up the mini zucchini and the Fairy Tale eggplant from my last post. I don't know what came over me that day! I'm not going to worry too much about it though, because these little guys were amazingly tasty.
Growing up in Southern California, where you actually see them growing wild by the side of the freeway sometimes, artichokes were a pretty regular addition to our dinner table. Rather than baby artichokes like these, they were always the more common large globe variety that you're likely to see at your grocery store.
My mom would boil or steam the artichokes, and serve them to us with little bowls of Hollandaise sauce. We'd pull the leaves off one by one, dip them in the sauce, them scrape the meager flesh off with our teeth, discarding whatever we couldn't eat. It always seemed like such a special treat; a chance for us to play with our food, and also a chance to eat Hollandaise. I swear I could have eaten that sauce with a spoon. Though, I'm glad I didn't, because I probably would have died of a heart attack around age 7.
Anyway, I'd never cooked or even eaten a baby artichoke before, so when I saw these, I decided to pick up a few and see what I could do. I remembered having seen them prepared this way, I think on the Food Network or something, so decided to go with that. I mean, fried anything is good, right? Having never made them previously, I went online to find a recipe to work from. You can find the recipe that I used here.
Quick side note: "carciofi all Giudea" literally translates to "Jewish-style artichokes. It is a dish closely associated with the Jewish ghetto in Rome, hence the name. But let's be real, it's a deep-fried artichoke, so you could just call it that if you're not comfortable with your Italian skills.
OK, so here is what the artichokes looked like when I bought them:
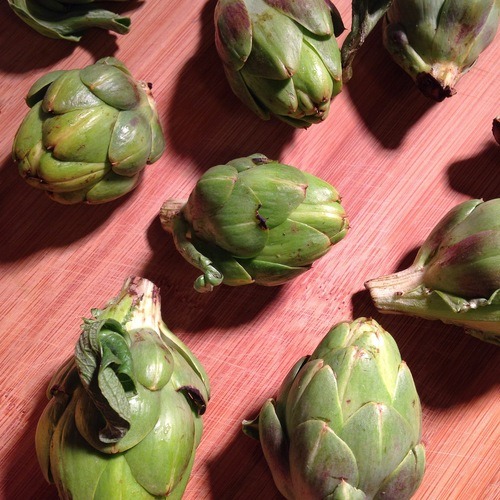
Kind of what you'd expect; little artichokes. After trimming the ends of the stems, removing the tough outer leaves, and cutting off any remaining thorns, the recipe calls for dropping the artichokes in a bowl of water, acidulated with a bit of lemon juice.
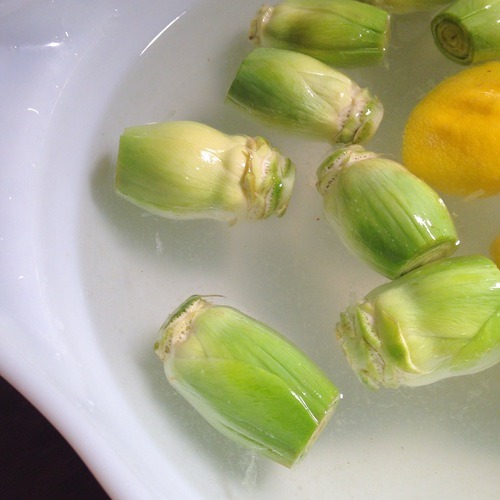
This is supposed to keep the artichokes from reacting to the air and turning brown like a cut apple or a bowl of day-old guacamole. I say "supposed to," because as you'll see, this didn't really work for me. Anyway, once all your artichokes are trimmed, it's time to quickly blanch them in boiling water. This makes it easier to open up and fold back the leaves, giving them a distinctive flower shape.
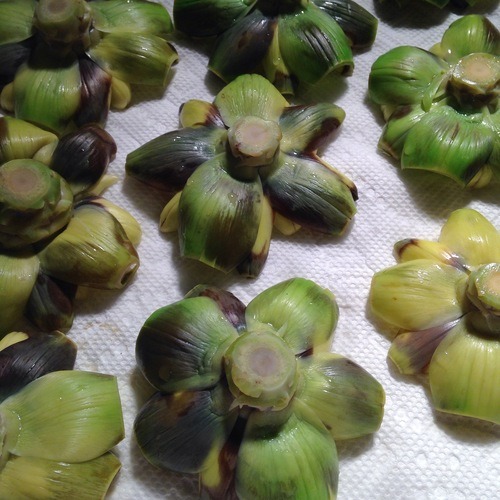
So, now you see what I mean about them turning brown. It doesn't look very pretty, but as far as I could tell, doesn't affect the taste at all. And besides, the next step is frying them in olive oil, at which point they turn nice and golden-brown anyway, so who cares?
I didn't take any pictures of actual process of frying these, because honestly, it was pretty stressful! Lots of hot bubbling oil and trying not to burn the artichokes, while also not burning down my apartment.
After removing from the oil, sprinkle the artichokes with a little bit of salt, and a squeeze of lemon juice, and you're good to go. The leaves get crispy, while the hearts stay tender, and the whole thing develops a delicious, kind of nutty flavor. These are best eaten as soon as they're cooked, which is OK, because they're so good they won't last long anyway.
Not going to lie, these were kind of a pain in the ass to make. Yes, the outcome tasted amazing, but it was a lot of prep work for something that took all of 30 seconds to eat. I'm probably not going to make these again any time soon, but I'm glad I gave it a shot. It's fun to challenge yourself in the kitchen sometimes, just to prove that you can do it!
x
- BKMCK
#bkmckitchen#cooking#food#homemade#brooklyn#nyc#fried#deep fried#artichoke#artichokes#baby veggies#baby artichokes#carciofi#carciofi alla giudea#lemon#salt#simple#fresh#tasty#yum#nom#fried food
2 notes
·
View notes
Text
Israeli Couscous with Baby Zucchini and Fairy Tale Eggplant - July 12th

So, is it just me, or are miniature vegetables the cutest things ever? OK, maybe not the cutest, but I think we can all agree that they are up there on the list. Taking something normal-sized and miniaturizing it is a pretty surefire way to elicit a reaction along the lines of "OMG AWWWWW!" from anyone whose heart isn't made of stone. That's exactly how I ended up with a bunch of adorable mini zucchini and eggplants from the greenmarket.
I already had a kitchen full of veggies for the week, but as I was walking through the market, the baby eggplants caught my eye first. They are a cultivar called "Fairy Tale" that I was told is not only smaller than their more well-known oversized purple relatives, but also less bitter, and less full of seeds. I can't say I'm an eggplant fan, but I was intrigued, so picked up a few. Then, on my way back to the subway, I walked past another stand that was selling the mini zucchini (which as far as I know, are just normal zucchini that have been harvested before reaching full size. Correct me if I'm wrong). I figured, why not continue the theme, and picked up a few of them too. Yet again, no idea what I was going to make with these as I was buying them, but I guess I went baby (vegetable) crazy, and couldn't help myself.
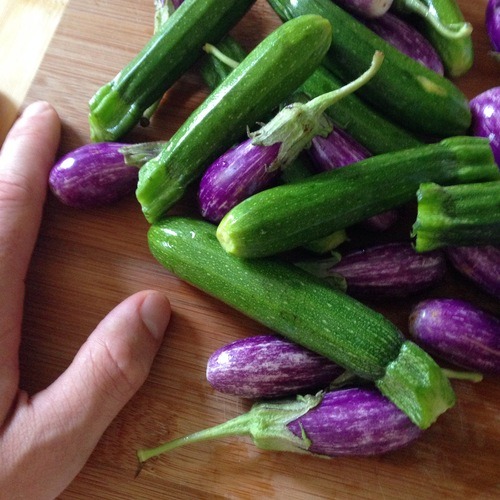
I mean, look at them! Can you even? I want to pinch their cheeks and speak baby-talk to them. Or, you know, throw them in a pan and eat them.
The woman at Bodhitree Farm stand, where I bought the eggplants, suggested that the best way to cook them was to slice them in half, and sear them in a hot pan. Sounded good to me, and who was I to argue? So, that was my starting point. I figured I could do that, then mix them with some other veggies and a grain of some sort to make a salad, which seems to be my go-to lately.
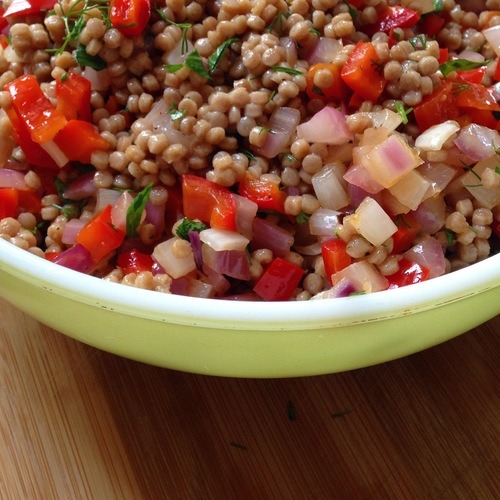
I poked around what I had in the kitchen already, and decided that a red pepper, an onion, some goat cheese, and a handful each of parsley and dill would complement the eggplant nicely, and stay in keeping with the sort of Mediterranean vibe I had going on. Rather than mix the veggies with an actual grain, I opted for some whole wheat Israeli couscous instead.
Israeli couscous, if you haven't had it, is basically little ball-shaped pasta. It's larger than regular couscous (which a lot of people think is a grain..it's not. Surprise!), and a different shape than other small pastas, like orzo. It's usually made out of white or semolina flour like regular pasta, but you can also find whole wheat, or even vegetable-infused varieties in some places.
Anyway, this dish came together super easily. I started with the red pepper and onion, chopping them up into small pieces.

I sautéed those veggies, then mixed them into the cooked couscous, along with chopped parsley and dill. Next, I sliced all of the baby eggplant and zucchini lengthwise, and seared them in a crazy hot pan for a few minutes until they got nice and caramelized.
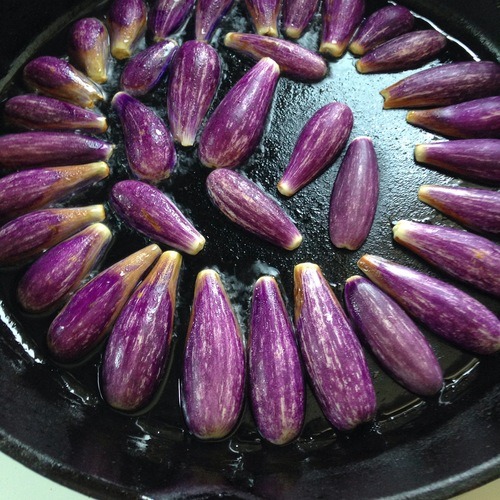
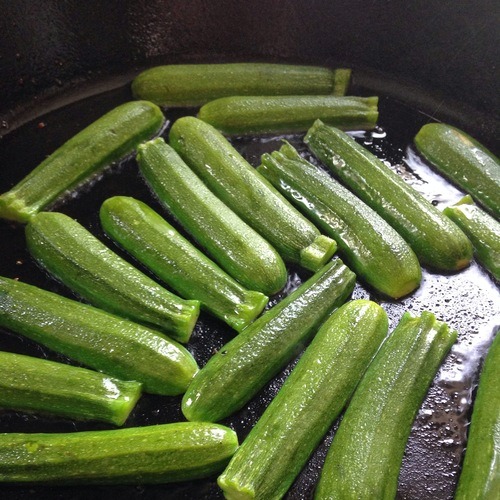
I was a little bummed to find, as I cooked them, that the eggplant lost their purple color, and turned kind of a drab brown. Unfortunately, that's just what happens when you cook them, and I don't think anything can be done about it. They're not as pretty, but they did taste really good.
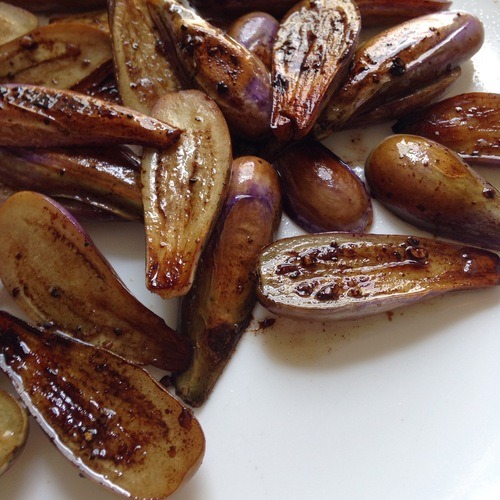
Once the eggplants and zucchini caramelized, I seasoned them with salt and pepper, and splashed a little bit of balsamic vinegar in the pan. Then I chopped up a few of the zucchini, and mixed them in with the herbs, couscous, and pepper/onion mixture. I left all the eggplant in halves, mixing some into the couscous, and arranged the rest on top of the couscous, along with the remaining zucchini. I finished off the whole thing with another splash of balsamic, a drizzle of olive oil, and a liberal sprinkling of goat cheese.
Tasty, easy, healthy, and a great way to use any vegetables that are just too cute for you to not bring home!
x
- BKMCK
#bkmckitchen#cooking#food#nom#vegetables#healthy#good#yum#organic#greenmarket#farm to table#israeli#couscous#israeli couscous#baby veggies#eggplant#fairytale#fairy tale eggplant#zucchini#mini#miniature#adorable#cute#salad#seared#balsamic#goat cheese#herbs#dill#parsley
1 note
·
View note
Text
An Ode to The Sour Cherry
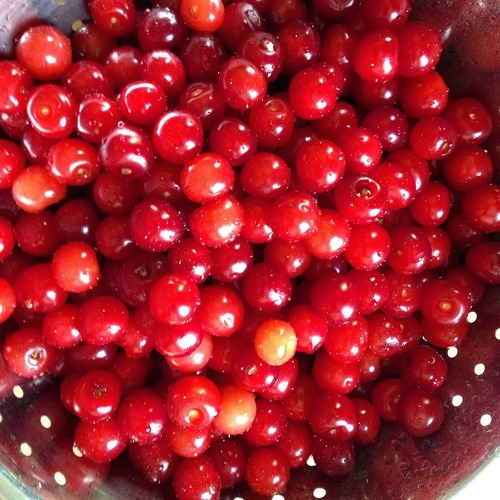
If you've never heard of a sour cherry before, don't worry, you're not alone. Before I moved from Southern California to NYC eleven years ago, I hadn't either. And, as the name would indicate, it's a much different fruit than what you usually find at the grocery store. If you're really into it, read more about sour cherries here.
Sour cherries generally appear at our greenmarkets here in New York around the 4th of July. Maybe a week or two before, maybe a week or two after, but generally around that time frame. Some of the farmers that sell them actually only do so for a single week, while others manage to stretch out their harvest.
Either way, sour cherries are one of those hyper-seasonal, hyper-local foods (see also: ramps, fiddleheads, garlic scapes) that inspire a sort of rabid fanaticism among devotees.
After first trying sour cherries a few years ago, I was immediately hooked, and am now one of those weirdos who buys excessive amounts of them once they are in season. This year, I bought one quart, quickly realized that wasn't enough, then went back and bought two more. That's a lot of cherries.
They are great for snacking on, especially if you like sour foods. But, they are even better for cooking with. However, doing that involves pitting them. Do you know how long it would take to pit three quarts of cherries, singlehandedly, manually? No? Neither do I, because I actually broke down and bought a cherry-pitter.
I used to make fun of those kind of ridiculously specific tools that can only be used for a single, repetitive task. No longer. I understand now. I'm not saying everyone needs a cherry-pitter…most people really, really don't. But in this case, it did come in handy.
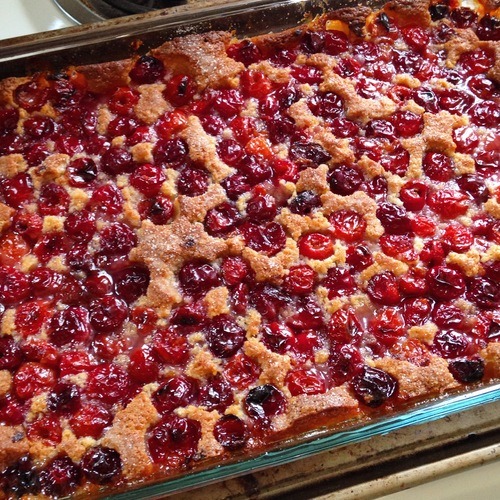
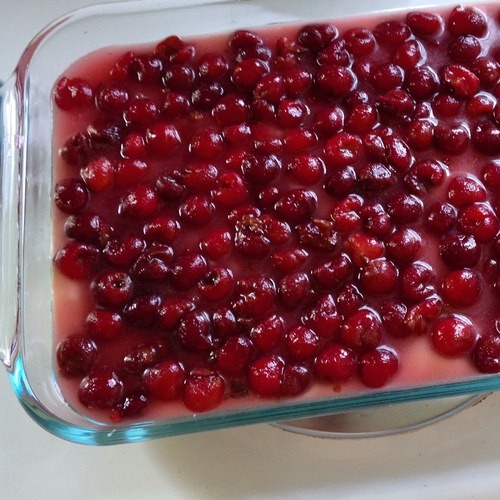
I decided that I wanted to use some of my cherries to make a cobbler. Having never made one before (I'm usually not much of a baker), I set to work finding a recipe. I ended up using one that my mom posted on her Facebook wall a while back, that I thought sounded great. You can find the recipe here. There are all different types of cobblers out there…fruit on bottom, fruit on top, crumb-topped, etc etc etc. I'm not going to argue over what is an isn't cobbler. All that matters to me is that it tastes good. This one happens to call for pouring the fruit on top of the batter. Then, as it bakes, the fruit sinks down and the batter rises and it all comes together in a symphony of deliciousness.
I made a couple small changes to the recipe. First, obviously, I used cherries instead of blackberries. Second, I doubled to recipe, because it sounded like a pathetically small cobbler to me. And if it turned out anywhere half as good as I expected, I'd want way more than the recipe made.
I'm going to toot my own horn here a bit, and say that this cobbler turned out AMAZING. It wasn't necessarily what I expected, but it tasted incredible. The texture ended up being very dense, almost cake-like, sticky, and a little bit chewy, kind of like a fruit bar. It was sweet, but with some bite and a hint of bitterness from the cherries. I can't wait until sour cherry season next year, so I can make this again. In the meantime, I'll just have to test out cobbler recipes with different kinds of fruit. Cobbler may become a staple food for me.
x
- BKMCK
#bkmckitchen#local#cooking#food#csa#cobbler#sour cherries#brooklyn#new york#kentucky#lousiville#baked#baked goods#southern cooking#southern food#yum
2 notes
·
View notes
Text
CSA Pickup Week 5 - July 12th, 2014
This week's CSA pickup included:
2.5 lbs of assorted summer squash
6 cucumbers
1 bunch of rainbow swiss chard
1 pint of snow peas
1 head of red leaf lettuce
1 bunch of scallions
1 bunch of kale
mesclun greens
basil
mixed wax and velour beans (yellow and purple versions of green beans)
I called it when I said last week that I thought there would be more cucumbers and squash to come! From my own experience growing them in the past, I know that they are super productive, and you almost always end up with more than you know what to do with. It'll be fun coming up with ideas for how to use them!
x
- BKMCK
#bkmckitchen#csa#local#vegetables#organic#fresh#food#cooking#squash#basil#lettuce#scallions#kale#cucumbers#snow peas#wax beans#velour beans#swiss chard#rainbow chard#mesclun#greens#salad#healthy#summer
2 notes
·
View notes
Text
Barley Risotto with Mushrooms, Fava Beans, and Sweet Corn; Burrata, Peach and Mustard Green "Caprese" - July 9th
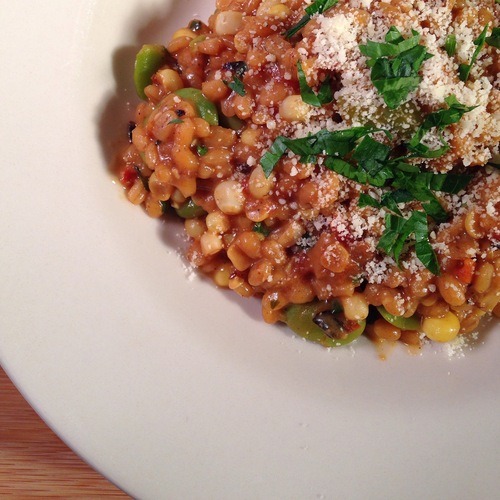
You may be experiencing a bit of culinary déjà vu at the moment, because yes, I did recently post a recipe for barley risotto. In my previous post, I mentioned that the dish was really versatile, and could be made with pretty much any type of vegetable you wanted. This second take on it is a great example of that!
After Jake and I got back from a week in Indiana for the 4th of July, we had basically no food in the kitchen. Because we were out of town, we missed our CSA pickup for the week, which was a bummer, of course. BUT, on the bright side, it meant I got a chance to go to the greenmarket and just buy a bunch of stuff for us, instead of having to use what we were given.
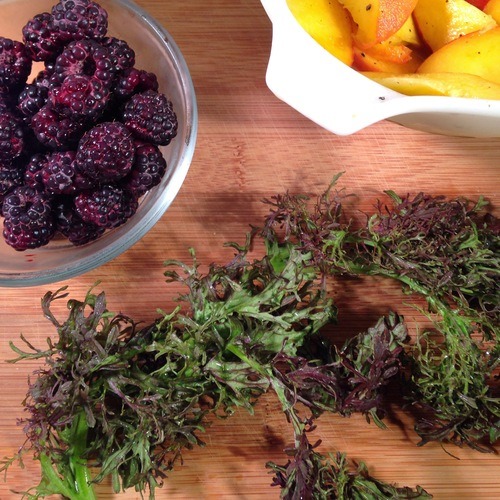
I picked up some beautiful shiitake mushrooms, sweet corn, and fava beans (I was excited to give them another shot after the last time!). I also bought a few delicious, juicy peaches, a container of tart black raspberries, and a big bunch of spicy red mustard greens.
I wasn't shopping with any particular dishes in mind, but I was absolutely thinking about how flavors work together. I think that's always a great way to shop; even if you don't know exactly what you want to make, start with an ingredient or two that looks good, or that you enjoy, then build from there!
In this case, I started with the peaches. They looked great, and the stand at the greenmarket had samples, which totally sold me on them.
Peaches and berries are a classic, tasty combination, so when I saw the black raspberries, I picked up a box, knowing that I could probably make something with the two fruits.
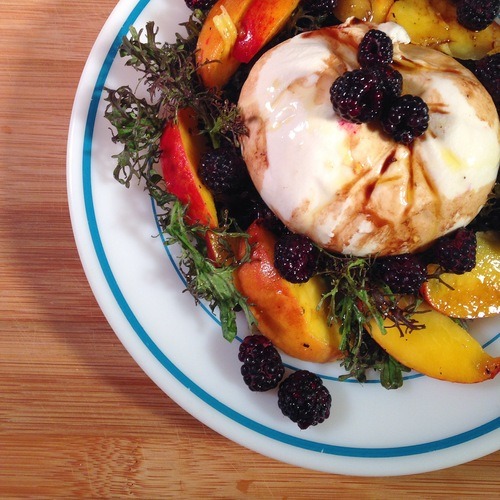
As I wandered over to another stand, the mustard greens caught my eye. They color and texture were interesting, and I like the bitter, peppery flavor of the greens (that said, it's not for everyone.) This is when everything kind of clicked in my mind, and I thought about doing a different take on a caprese (mozzarella, tomato, and basil) salad, but with peaches and mustard greens.
So, I set out to find a ball of fresh mozzarella to complete the dish. But, when I saw the burrata for sale instead, that sealed the deal. If you've never had burrata before, do yourself a favor and find some. It's not very commonly found at grocery stores, because it is meant to be eaten very fresh, soon after it's made. But, even "okay" burrata is better than no burrata at all. It's basically a pouch of fresh mozzarella, filled with cream and more mozzarella. It's insane. And, it's the perfect creamy foil to the tangy and bitter flavors of my peaches and mustard greens.
I ended up marinating my sliced peaches with a splash of rice vinegar, along with some salt and pepper. Then, combined the peaches with the burrata, mustard greens, and blackberries on a plate, doused the whole thing with some good balsamic vinegar and olive oil, and went to town. It's not the prettiest plate I've ever made, but damn it tasted good.
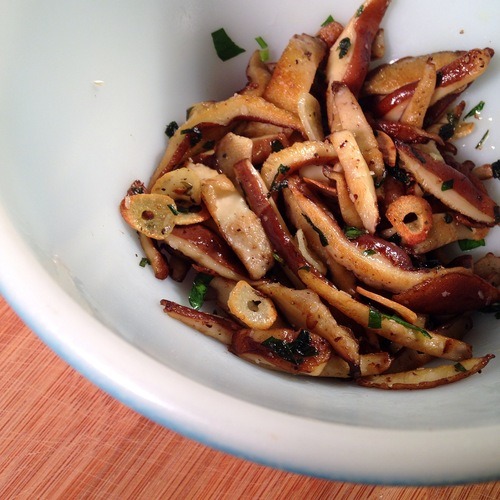
Seeing as I have already prepped fava beans, and made a barley risotto before, I'm not going to walk through how to do all that again. Go check out the previous posts if you're interested. I made this risotto using the exact same technique as last time, but changed up the ingredients entirely. Whereas before, the asparagus and spinach made for a light, early-spring sort of flavor profile, in this case, the mushrooms, corn, and beans came together for a much sweeter, earthier final dish. Both were delicious, but definitely two very different meals, created using the same methods.
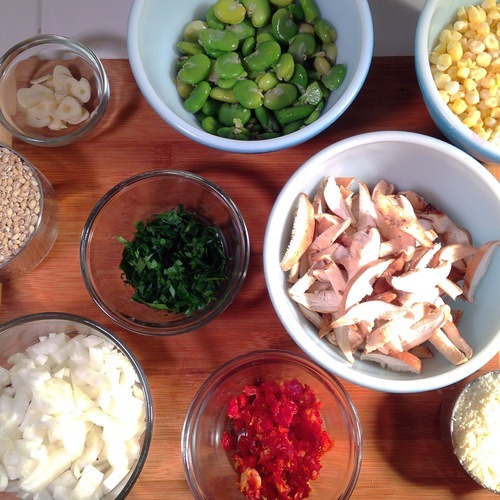

The one thing I did do differently this time was to pre-cook my mushrooms, then add them already cooked, near the end of the process. This allowed me to get a nice sear and some caramelization on the mushrooms, which wouldn't happen if I had just added them raw into the risotto.
I know this hasn't been the most informative post, recipe-wise, but I hope it shed a little light on my thought process when I'm shopping and cooking, and maybe helped someone who is nervous about grocery shopping! If you're not shopping from a recipe, don't worry. You don't have to shop with specific dishes and ingredients in mind. Just hit the greenmarket or grocery store, pick something that looks good to you, then go from there! If you're not sure what "goes with" whatever you picked up, Google it! There are millions of recipes online that you can use as inspiration, even if you don't follow one of them exactly. Cooking is all about experimentation, and combining ingredients in ways that you (and whomever else may be eating what your food) enjoy! It's just food, don't be afraid of it.
x
- BKMCK
#bkmckitchen#food#cooking#vegetables#recipe#csa#local#brooklyn#new york#barley#risotto#shiitake#mushrooms#corn#sundried tomatoes#fava beans#beans#garlic#onion#parmesan#burrata#cheese#peaches#marinated#rice vinegar#mustard greens#black raspberry#salad#healthy#fresh
1 note
·
View note
Text
Red Quinoa with Marinated Squash Ribbons, Radishes, and Broccoli Rabe - June 30th
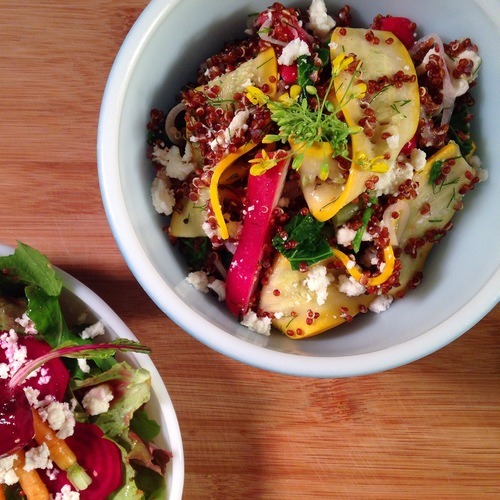
I think most people have eaten, or at least heard of, quinoa at this point. But just in case, let's get something out of the way: it's pronounced "KEEN-wah" not "kwin-oh-uh." Now that that's settled, onto the dish.
I made this meal the night before Jake andI left for vacation, as a way of using up all the veggies we had left in the fridge from this week's CSA pickup. It all looked kind of non-sensical, honestly. Nothing seemed to go together, and I was drawing a blank. So, I went for my old standby move, which is to throw everything together in a bowl with some grain and call it a salad. Ta-da!
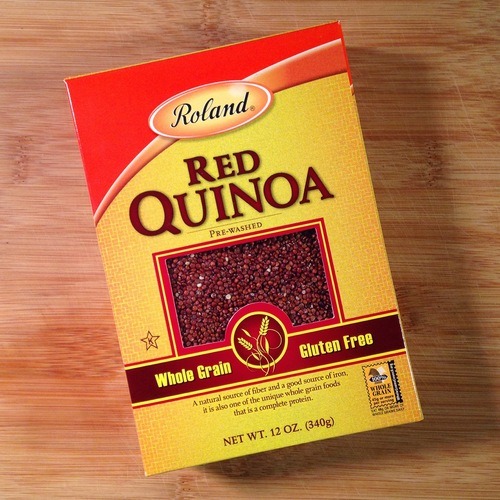
I had a box of red quinoa in the pantry, so decided to use that as my base. Red quinoa is the chewier, nuttier cousin to the more common white quinoa. It has a bit more texture and "bite" to it, and feels healthier, though I have no idea if that's true or not. Just cook it according to the directions on the box and set aside.
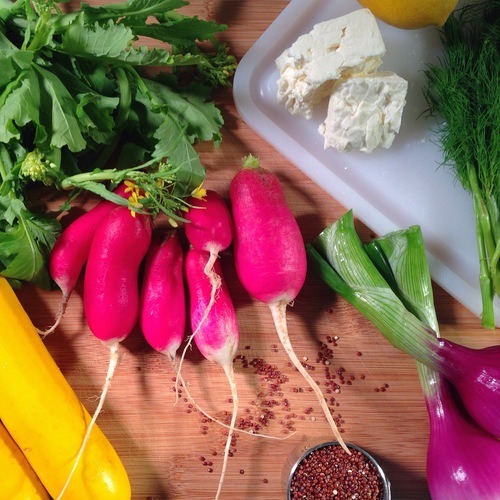
Aside from the quinoa, my group of misfit ingredients also included:
2 small yellow squash (cut into ribbons with a vegetable peeler. Thin slices would work too, but I was feeling fancy)
1 bunch of radishes, cut into halves or quarters, depending on size
2 small spring onions, thinly sliced (any sweet onion will do!)
1 bunch of broccoli rabe
1 small bunch of dill (a couple tablespoons or so, to taste)
A couple tablespoons of crumbled feta or queso fresco
juice of one lemon
salt and pepper to taste
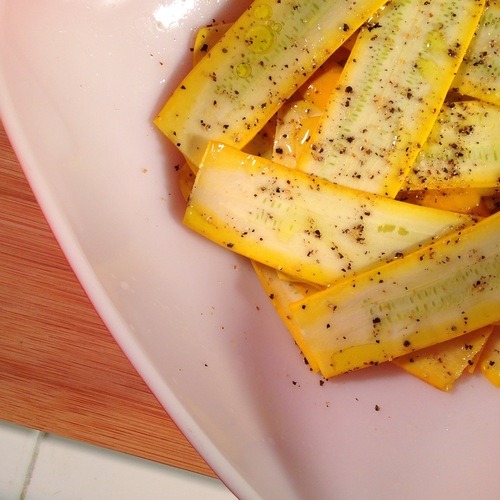
I started out with the squash, because I wanted to marinate them for a bit before putting them in the salad. I used a vegetable peeler to cut the squash into ribbons, then dressed them with salt and pepper, olive oil, and the juice from half a lemon.
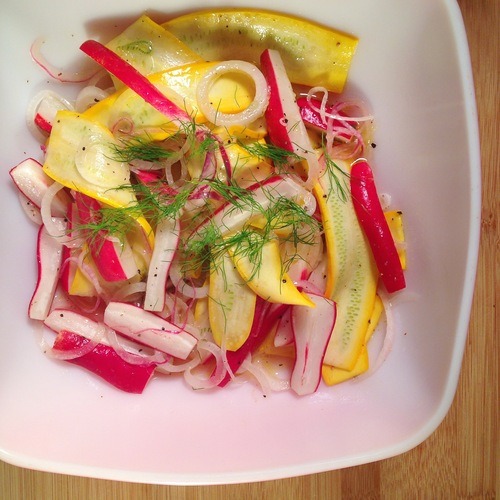
The radishes and onion, I cut up and added to the bowl with the squash, along with a bit of the dill.
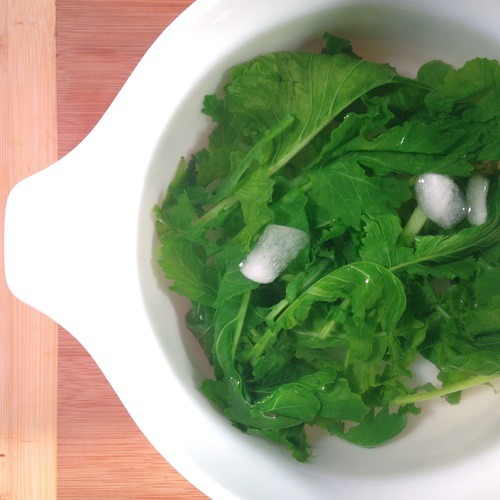
The only part of this dish that requires any cooking, besides the quinoa, is the broccoli rabe. I guess you could eat it raw, but it's pretty bitter, so I like to quickly blanch it to mellow out the flavor.
Just bring a big pot of salty water to a boil, drop in your washed broccoli rabe, and allow to cook for about 30 seconds until the greens wilt, but aren't falling apart, and haven't lost their bright green color. Transfer the greens from your pot into a bowl of salted ice water. This shocks the greens to stop them from cooking and preserve the color.
Once the broccoli rabe has cooled, remove it from the ice water, squeeze out any excess liquid over the sink, then chop up into bite size pieces. Mix the chopped broccoli rabe in with your marinated raw veggies, as well as your quinoa, the rest of your dill, lemon juice, some more olive oil, salt & pepper.
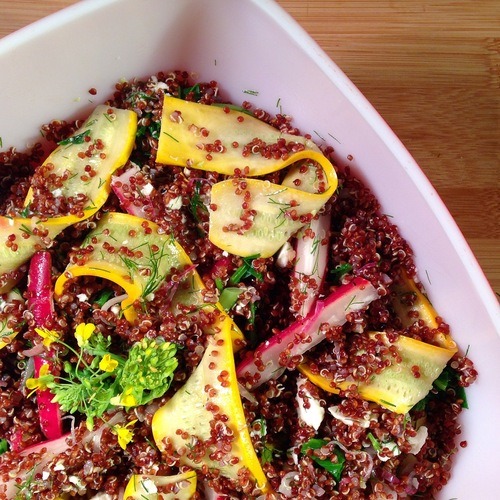
If you're a vegan, you can stop there, it's ready to eat. But I fucking love cheese. So, I added a little hunk of crumbled feta as well. It was a teeny, tiny, practically microscopic piece though, so I also sprinkled some crumbled queso fresco on top.
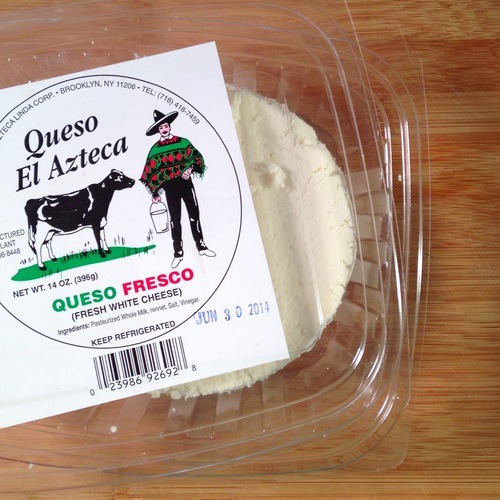
Queso fresco is a fresh, white, Mexican-style cheese. It's kind of similar to feta, but a bit less creamy, salty, and tangy. It's mild and tasty and basically, if you see some, you should buy it and put it on everything.
I served this salad with another salad, just some simple mixed greens with raw carrots and beets, because I needed to use up those damn vegetables. But this would also make a great one-bowl meal on its own, and keeps well for lunch the next day!
x
- BKMCK
#bkmckitchen#food#cooking#csa#local#vegetables#brooklyn#new york#quinoa#squash#radishes#broccoli rabe#dill#cheese#feta#lemon#queso fresco#olive oil#salad#healthy#fresh
9 notes
·
View notes
Text
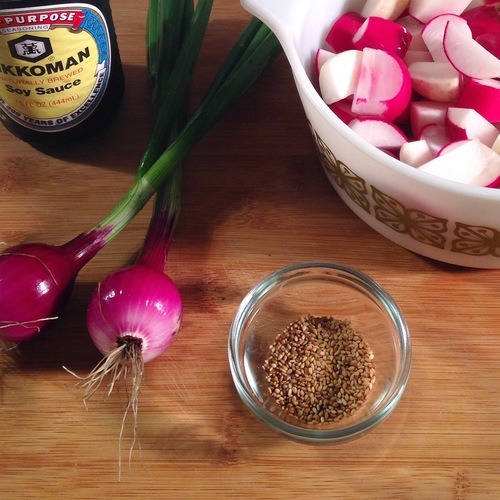
Chicken and Snow Pea Stir-Fry, Roasted Radishes and Turnips, Marinated Cucumber Salad - June 29th
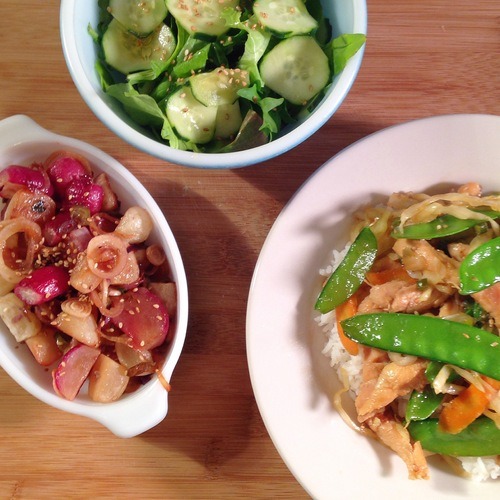
I love to make stir-fries, because they are easy, fast, and a great way to use up a bunch of vegetables that you may have languishing in the fridge. Traditionally, you'd make a stir fry in a wok. But, because I have a crappy electric stove that does not lend itself to using a proper wok, I improvise and make it in my biggest, heaviest, stainless steel frying pan.
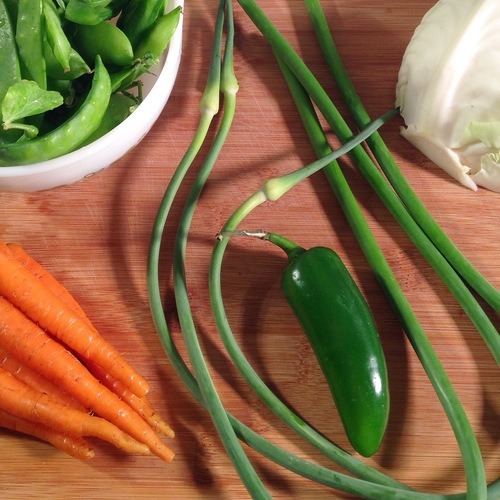
When I was planning this dish, my thinking was, "OK, I have a lot of snow peas, radishes, and salad turnips in the refrigerator. What can I do with them?"
I love sautéed snow peas with soy sauce, so decided to go in that direction. Along with the peas (1.5 pints), radishes, and turnips, I pulled out:
1 lb of chicken stir fry pieces, or thinly sliced breast meat
a handful of baby carrots, thinly sliced (about 1 cup)
half a cabbage, leftover from when I made sauerkraut, shredded (about 2 cups)
a jalapeño (minced)
three garlic scapes, sliced (sub with 1 or 2 cloves of regular minced garlic)
chili paste, to taste
fresh grated ginger, to taste
But I'm going to be honest, something about the idea of radishes and turnips in the stir-fry wasn't sitting right with me, and it started to seem like a lot of vegetables for one dish anyway.

So, I made the executive decision to turn the radishes and turnips into their own separate dish. I thought that roasting them seemed like a good idea. But, I'd never roasted a radish in my life, so did a little Googling to confirm that it wasn't the ravings of a lunatic. I came across a recipe that sounded perfect, and used it as my guideline.
I made a couple changes, substituting spring onions from the greenmarket in place of scallions, and adding the turnips in place of just radishes. Otherwise, I followed the recipe exactly, and was super stoked with how it turned out! Definitely something I'll be trying again in the future, and testing out with other flavor combinations.
Now, on to the main event.

When you make stir-fry, it's important to have all your ingredients chopped and ready to go before you start cooking. Once you do start cooking, here are a couple rules to remember:
Your pan should be HOT! I wouldn't use a non-stick pan, because the idea of all the carcinogens that leach out of them at high heats gives me the heebie jeebies.
DON'T use olive oil. You'll burn the hell out of it, trying to get it hot enough. I like to use peanut oil, grape seed oil, or safflower oil, which can all tolerate the high heat you need.
Don't overcrowd your pan. I'm totally guilty of doing this, and it is kind of a bummer, because you end up with something more like steamed vegetables. They still will taste fine, but they'll just be kind of sad, which leads to my last tip...
It's called STIR fry because you should be STIRRING it with a spatula the whole time. If you let everything just sit there and cook, especially when you're using a regular pan in place of a wok, it will steam and your vegetables will get soft and floppy. I don't know about you guys, but I hate limp peas and carrots.
I like to start by cooking my protein first. In this case, the chicken, that I marinated with some soy sauce and teriyaki sauce ahead of time. Once the meat is cooked, pull it out of the pan, and put it aside.
Now, the fun starts, as you toss all your little bowls of veggies into the pan, one at a time. Here's the general outline I follow when cooking a stir-fry:
aromatics (garlic, chili peppers, chili paste, grated ginger, etc.) 1 - 2 minutes
harder vegetables, or anything that will take a while to cook (onions, carrots, green beans, cabbage, maybe bell peppers, etc.) 2 - 3 minutes
softer vegetables, or pre-cooked items (snow peas, green onions, canned water chestnuts, bell peppers, etc.) 1 - 3 minutes
Sauces (soy sauce, teriyaki sauce, ponzu sauce, etc.)
So for this particular dish, I went in this order:
garlic scapes, jalapeño, ginger, and chili paste
carrots, cabbage
snowpeas, cooked chicken
teriyaki sauce (I'm OBSESSED with Soy Vay, but use whatever kind you like.)
Please keep in mind, this is just a general idea to help guide someone who may have no clue what he's doing. Feel free to alter it, add your vegetables whenever you want, and cook them however long you want. But for me, I love when the vegetables come out of the pan still bright and flavorful, with a little bit of crunch to them. That's why it's important to keep an eye on this and keep stirring when you're making it. Once you've added the sauces, it's ready to serve!
I like to eat stir-fry over rice, either brown or white, depending on how health-conscious I'm feeling that day. You could also use some kind of asian noodle like an udon or soba. Either is great, just make sure you have it cooked and ready to go ahead of time, because the stir-fry only takes a couple of minutes.
I also made a quick salad to serve with this dish, in keeping with the Asian theme I had going. I thinly sliced the small cucumber from our CSA share, then quickly marinated them while cooking dinner, in a very simple dressing of rice vinegar, a splash of soy sauce, and a big pinch of kosher salt. When ready to serve, I just spooned the cucumbers and the marinade over mesclun greens, and sprinkled it all with toasted sesame seeds. A quick and tasty update on a mixed green salad to go with our quick and easy stir-fry!
x
- BKMCK
#bkmckitchen#csa#food#cooking#vegetables#fresh#local#organic#stir-fry#chicken#asian#snow peas#carrots#cabbage#garlic scapes#chili#jalapeno#ginger#teriyaki sesame#roasted#radishes#turnips#spring onion#soy sauce#salad#mesclun#cucumbers#rice vinegar
3 notes
·
View notes