
yonderwoods
Kind of Cosplay?
Crafts and cosplay.
I sometimes take pictures and always procrastinate.
94 posts
Don't wanna be here? Send us removal request.
Last Seen Blogs

kabirbajaj
Interesting Science Videos
versezllesang
spill the blood
thelavishlifestyles
The Lavish Lifestyles
luv-sie
SIE

dyasthings
Jari menari
Photo

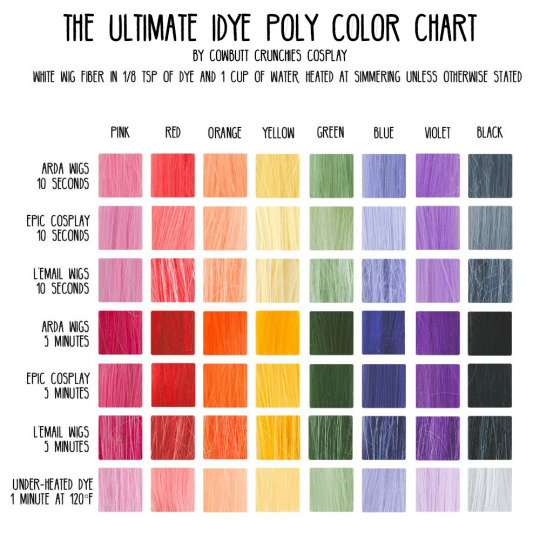
Ready to get dyeing? Using a polyester dye is a great way to permanently color any synthetic wig. IDye Poly and Rit’s new line of synthetic dye called Dyemore are two great options for wig-coloring - click below the cut for a more in-depth Dyemore review, as well as instructions to jump start your journey into wig dyeing.
For folks who want a physical, true-color version of this chart, you can find it in Cosplay Culture Magazine’s August-September issue!
Keep reading
4K notes
·
View notes
Text
Hello again!
Back from the dead! Sorry for the long hiatus. Not a lot has happened, but have I got plenty of things to come. Current cosplays to finish: Ana Amari Planted cosplays: Carley (TWDG), Sophie Hatter (Howls Moving Castle) I’ll be able to update more as well as post the few photos I have of completed costumes. Check out my Instagram (@yonderwonderer) - is definitely more active there. Thank you guys so much for your patience - I’ll be around soon!
2 notes
·
View notes
Photo


Herostime Silk Suit Review
Last month I purchased a Cindy Moon/Silk suit from Herostime.com and I am in love with this suit! Aside from a few minor drawbacks the suit is perfect and I definitely look forwards to wearing this suit to conventions and having better shots taken of it.
Edit: I will be posting a follow-up review after wearing it to Phoenix Fan Fest!
The suit I ordered was Cindy Moon/Silk’s suit as shown in her solo comic, Silk. I opted for custom sizing (an additional $10 USD) and it was definitely worth it - the suit fits like a glove and is really comfy. The half-mask was an additional $3 and the forearm zippers were another $10. The forearm zippers are especially useful when you need to free your hands without taking off half the suit (like for using your phone). There are several other changes offered on the website such as U-shaped zippers, calf zippers, and built-in soles. I decided to just wear shoes with my suit and save myself the money.
One common complaint I heard was the sheerness of suits. My suit isn’t extremely sheer but brightly colored undergarments do show through and as the suit is skin tight, seamless underwear seems the way to go (and an easy fix).
Shipping was extremely fast, especially as my suit was a custom order. My suit took 12 days to arrive, and the average (judging by reviews) seems to be about two weeks.
Now as in love as I am with the suit, there are still a few nit-picky things I’m not too fond of. They are minor, however, and some aren’t noticeable while wearing the suit.
Muscle Shading - specifically the boob shading, is rather high and basically falls half-way on my chest. I can tug the suit down some to re-position the shading but is a nuisance regardless. Otherwise I find the shading flattering on me.
Patterns on Seams - not all of the printed patterns match up at the seams. However, the incorrect alignment isn’t noticeable due to the placement on the suit and the size of the patterns (the ones I found were on the shoulders and underside of my arms).
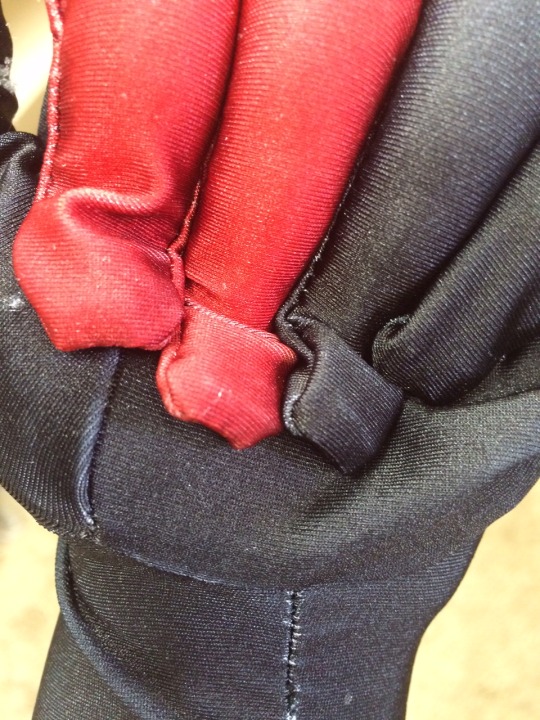
Red Lines - I’m assuming these were part of the printed pattern and meant to be hidden in the seams. There are a few lines still shown (only on the gloves for me) so again, a minor thing.
Gloves - the gloves run big, or at least they run big on me. The fingers are slightly too long but, hey, who’s gonna notice?
Snagging - a word of caution to anyone buying the suit, it does snag and it does snag noticeably. It is easy to catch the fabric and leave behind the little white tufts as shown above. I’d say to just be mindful when wearing the suit, try not to catch it on anything like velcro, concrete, etc, and everything should be fine.
Again, all of these drawbacks are minor and barely noticeable (save for the shading, perhaps?) and I am definitely pleased with my purchase. If I’ll ever need another suit, I’ll be sure to consider Herostime.
#cosplay#.cosplay review#cindy moon#cindy moon cosplay#silk#silk cosplay#marvel cosplay#spiderverse cosplay#herostime#herostime review
3 notes
·
View notes
Photo


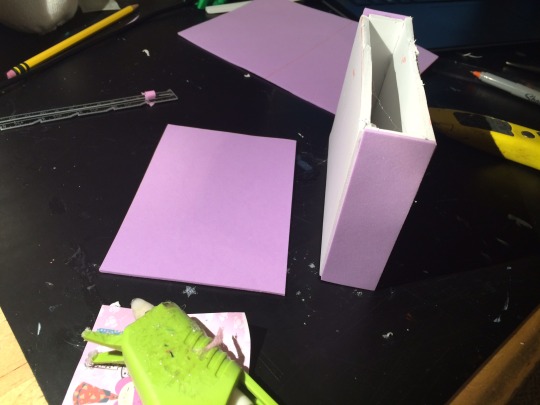


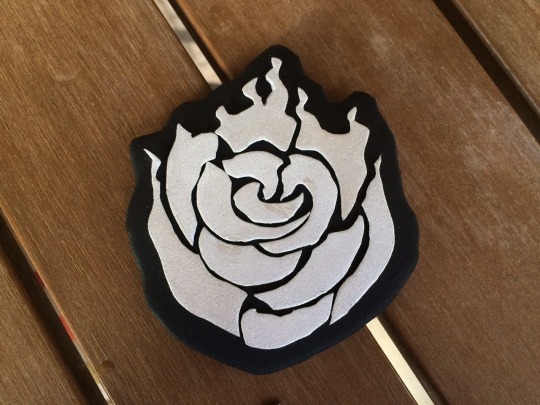
RWBY Ruby Rose - Clip Case
Crafted entirely from craft foam and hot glue!
I made the basic shape of the box by measuring cutting rectangles for the four sides (front, left and right sides, and bottom). I made the top/flap out of one long piece, cutting it extra long and shortening it to my tastes. The box was then "finished" with thin craft foam to cover unfinished edges and a messy glue job. I also attached snaps with hot glue to make the box functional, although it is too small to be practical, but I am sure velcro would work just as well.
After priming the foam, I started with spray painting the box but disliked how inflexible the paint was. When I tried to use the flap the paint would chip off. I ended up using Tulip fabric paint to finish off the case assuming the medium would be flexible enough to not chip should I ever move the flap of the case.
Once painted, I attached it to the belt by gluing velcro strips to both my belt and the back of the case. I could have attached it various other ways but opted for velcro so I would have the ability to re-position (somewhat) and remove the case if needed.
A word of caution though: hot glue isn’t infallible especially on slick fabrics (such as pleather, like my belt). If pulled too hard the glue can peel off and, in my case, the velcro could separate completely from the belt. I suggest with more time, to sew the velcro on or attach it with a stronger glue.
#cosplay#cosplay wip#rwby cosplay#rwby#ruby rose cosplay#ruby rose#prop#cosplay prop#cosplay props#craft foam#prop build#prop building#wip#props
2 notes
·
View notes
Photo

Edit 6/10/16: Finished!
To save myself time and headaches, I used pre-made ruffles. How lucky was I to find these....
Attaching them was simple enough:
I put the boots on and measured the circumference of my calf where the boots ended. I added an inch or so to the measurement (to be safe) and cut the ruffles to size.
I could either glue or sew the ruffles (to the lining of the boots) from there so I opted to simply hot glue them on. I started by attached both ends of the ruffle to either side of the zippered parts of the shoe and then gluing the strips towards the tongue of the boot.
As the boots expand some to fit me, I did not glue the ruffle onto the tongue and instead left the few inches of slack so when I put the boot on, it fit perfectly. I just had to remember to tuck the ruffle into the boot when I wore them!
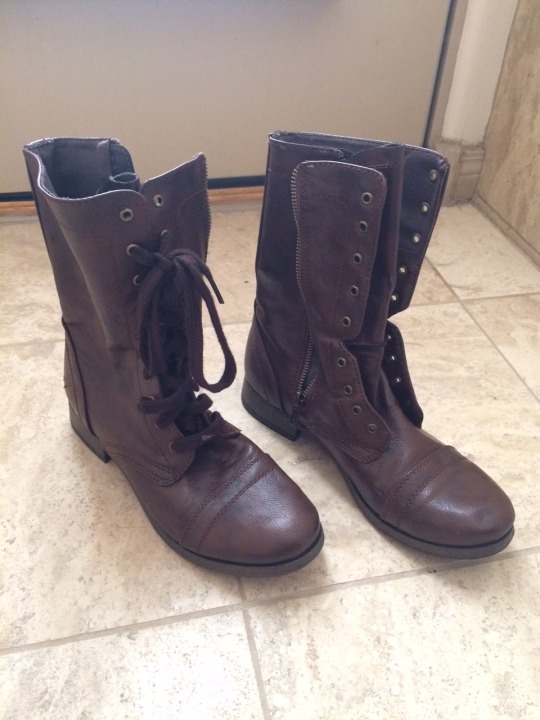


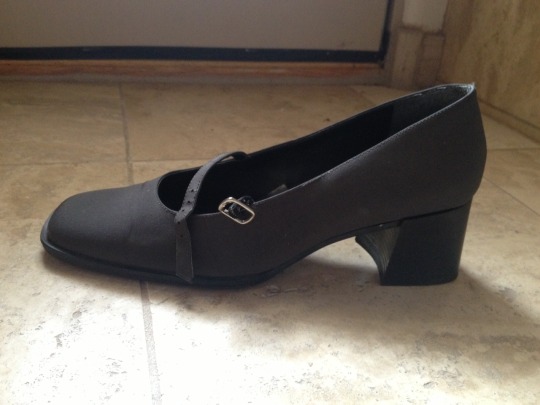
RWBY Ruby Rose - Shoes
Both the shoes and soles were painted (with Angelus Leather paint and a mixture of acrylic and mod podge, respectively). All I need are the laces and these shoes are done!
Keep reading
#cosplay#cosplay wip#wip#rwby#rwby cosplay#ruby rose#ruby rose cosplay#shoes#costume shoes#custom shoes#diy
8 notes
·
View notes
Photo

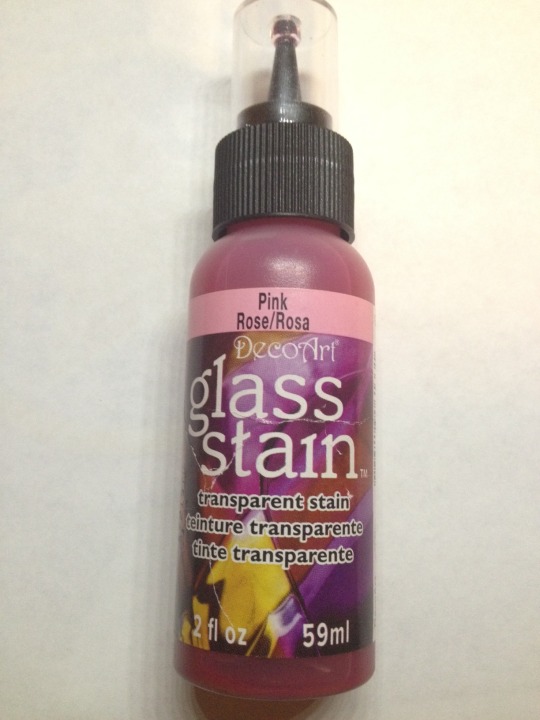
Edit 6/9/16: I ended up replacing the lenses with colored plastic (I was fortunate to find a plastic folder in the color I needed and simply cut lenses from that) after the original lenses fell off and the glass stain chipped. With a stronger glue (I used hot glue this time) and flexible “lenses” these should last longer than before.
If you cannot find plastic in the color you need, it is possible to dye plastic sheets using iDye Poly.
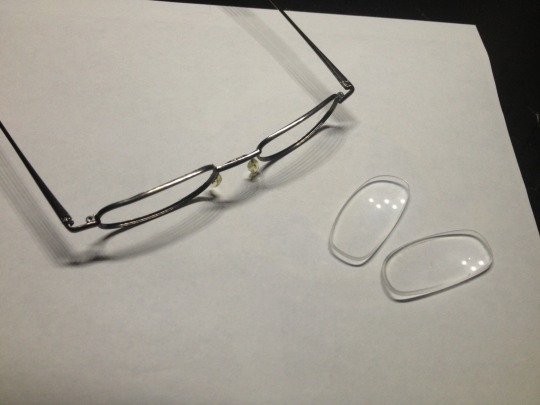

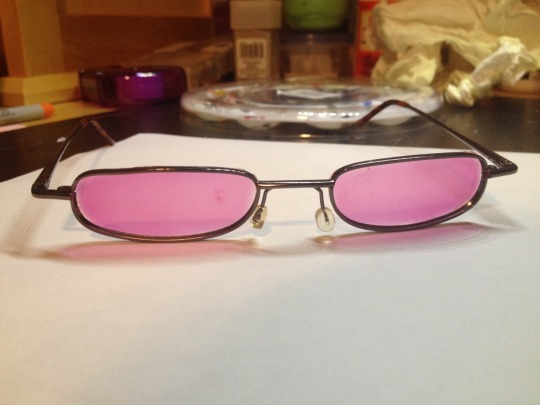
MSA Vivi - Glasses
There’s bound to be an easier (and more accurate) way of recreating Vivi’s glasses but this was my method:
popped lenses out of thrift store reading glasses.
traced lens shape onto a plastic sheet (I used the sheet stickers usually come attached to)
filled outlined shape with glass stain
cut and glued onto back of frames
I’d recommend finding some sort of plastic to fill the frames with instead (the paint is prone to air bubbles as well as uneven coloring if not dried on a level surface) if following the method above.
#msa#msa vivi#msa vivi cosplay#vivi cosplay#cosplay#cosplay wip#vivi#mystery skulls#mystery skulls ghost#mystery skulls animated#mystery skulls cosplay#mystery skulls animated cosplay
22 notes
·
View notes
Text
Woohoo...
Well it’s been a while hasn’t it?
Phoenix Comic Con was a blast as always. I was able to drool over fantastic costumes and meet so many wonderful people that recognized my own. Just as the year before (with Korra) most of my work was done in a rush in the four days leading up to the con so I am sadly without many pictures. Worry not, I’ll be posting what I can and will update my next cosplay plans soon.
Photos of my completed Ruby Rose will be delayed as well. As my poor luck would have it, I was unable to have them done during PHXCC (although I doubt I would’ve survived outside in the 110+ weather). I’ll be sure to have some done in the near future - the whole cosplay just turned out so well!
As always, my instagram receives more regular updates so you can follow me there if you’d like. If not, I promise to start posting on here more (rather than dumping photos and vanishing for months on end XD).
2 notes
·
View notes
Text
Instagram Account
Finally got myself a cosplay account. Follow me there (if you’d like) for regular updates!
https://www.instagram.com/yonderwonderer/
2 notes
·
View notes
Photo


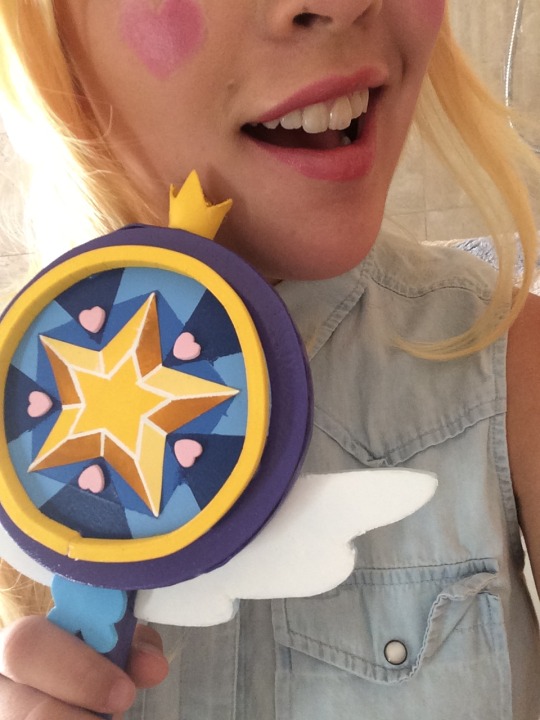

Star Butterfly vs. The Forces of Evil - Star Butterfly Wand (2/2)
After painting...and repainting several pieces of the wand, I'm finally satisfied with my work (even if the edges may have bled a bit).And did it ever come together. I couldn't have hoped for a better end product!
I just wish I had a cosplay to go along with it...
First
#cosplay#cosplay wip#wip#star butterfly#star butterfly cosplay#star vs the forces of evil#star vs the forces of evil cosplay#disney#disney cosplay#cosplay prop#prop#cosplay prop wip#star butterfly wand
14 notes
·
View notes
Photo


RWBY - Ruby Rose
The dress, cape and wig, have all be finished and after their test run at Taiyou Con, I have plenty of adjustments to make...
Dress
petticoat requires more ruffles along the bottom to give skirt desired shape
belt/corset needs to be shortened and loosened
some basting still needs to be removed...
Cape
edges need to be properly finished
need to attach permanent clasps on dress front to attach cape to it
There’s more, I know it, I just can’t think of anything yet...
#rwby#ruby rose#rwby cosplay#ruby rose cosplay#cosplay#cosplay wip#rooster teeth cosplay#pcc 2016#phxcc 2016
8 notes
·
View notes
Photo


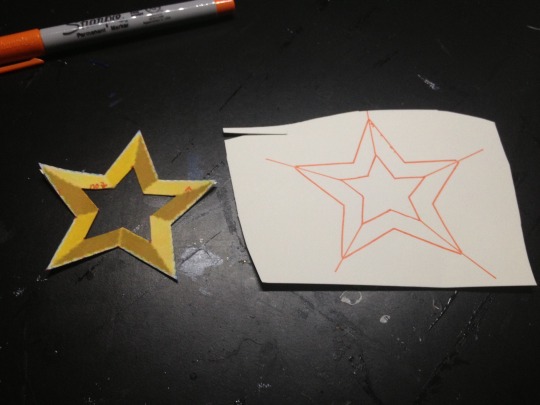


Star Butterfly vs. The Forces of Evil - Star Butterfly Wand (1/2)
Every piece has been prepped for painting! (Another side project while I procrastinate on finishing Ruby)
wings/butterfly/border/bottom piece - craft foam, covered with modeling paste and gesso to prime and even out layers
handle - cut from a wooden dowel, primed and sanded
head of wand - Styrofoam ball, details traced onto card stock and a hole carved into the bottom using a hot knife
star - traced onto carstock and folded
crown - wonderflex that was cut, shaped and primed
Next
#star butterfly#star butterfly cosplay#cosplay#cosplay wip#wip#prop#cosplay prop wip#prop wip#star vs the forces of evil#star vs the forces of evil cosplay#wand#disney#disney XD
25 notes
·
View notes
Photo


RWBY Ruby Rose - Accessories
Plenty of spray paint and spray primer. I’m going to need to pick up more.
Emblem - I printed three copies of Ruby's emblem, using one as the pattern for the black base and another for the rose petals, gluing them onto craft foam with a glue stick (so they wouldn't really stay on) and then following the edges to cut the pieces out. Both were primed with gesso before being painted (base - acrylic, petals - spray paint). The third copy was then used as reference for placement of the petals (I arranged them on top before taping the whole thing together and gluing it as one piece onto the base). Beware - the tape removed some of the paint and primer but its barely noticeable with touch ups.
Crosses - Beads found at a craft store. I removed the loops with wire cutters and rough edges were filed down. Both were primed with a spray primer and then painted with spray paint. I'll attach these to the cape either by hand stitching, glue, or by attaching pin backings to them.
Bullets - Bought a bullet belt from Spirit Halloween and removed a section to be primed and spray painted silver. They came with clips to hold them together which I will likely be using when I attach them to the belt.
#cosplay#wip#cosplay wip#rwby#ruby rose#rwby cosplay#ruby rose cosplay#rooster teeth cosplay#rooster teeth#taiyou con#taiyou con 2016
8 notes
·
View notes
Photo

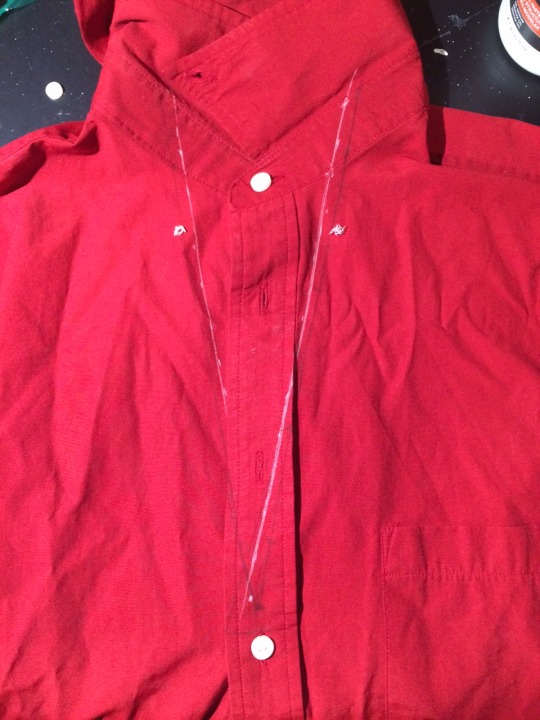


Monkey D. Luffy - Complete
A birthday gift for a friend made from thrift store purchases and scrap fleece and ribbon.
Top - Originally a dress shirt found at a thrift store. I cut the sleeves right at the shoulder seam and removed most of collar; the raw edges that remained were folded over and stitched down. The v-neck was drawn with chalk before being cut - with a seam allowance included - before being folded over and sewn (fabric glue is also an option, especially to tame raw edges). The buttons were replaced as well (although I didn't trouble myself with creating new button holes to reduce the number to three for screen accuracy).
Bottoms - The denim shorts (found at a thrift store) required no cutting so I simply made cuffs out of spare white fleece. The cuffs were rectangles of fleece sewn together to create circles with one edge finished - folded over and stitched. I then glued these onto the shorts (sewing was another option), gluing the unfinished edge onto the inside of the shorts.
In hindsight, it would've been better (and more accurate) to use shorts made from sweatpants material, some styles which might not have required addition cuffs and could've simply been rolled up.
The glue I used was Aleene’s Super Fabric Adhesive, meant for denim and is supposed to be washable after drying.
Hat - A basic straw, sun hat which I trimmed the brim of (and added mod podge to prevent any fraying on raw edges) and added red ribbon to.
#cosplay#Completed Project#monkey d. luffy#one piece#wip#cosplay wip#not for me#luffy cosplay#monkey d. luffy cosplay#one piece cosplay
3 notes
·
View notes
Text
or a Happy Holidays, if you don’t celebrate it. ^^
Merry Christmas to all my amazing followers. ☃
139K notes
·
View notes
Photo
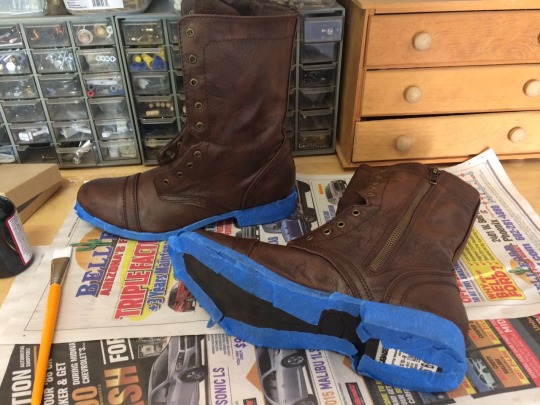
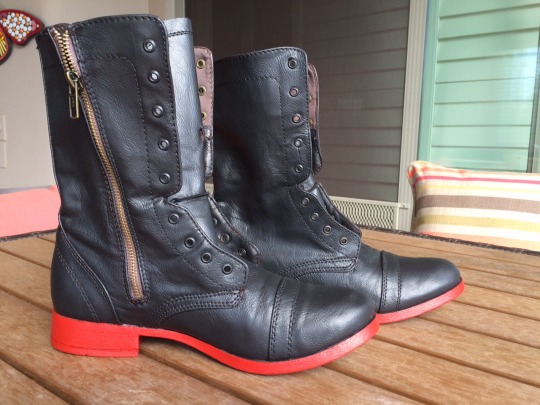
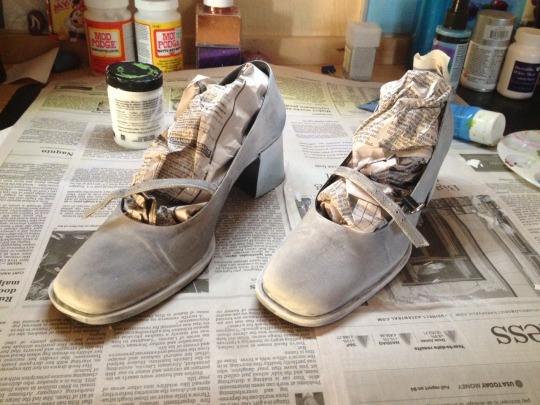
RWBY Ruby Rose - Shoes
Both the shoes and soles were painted (with Angelus Leather paint and a mixture of acrylic and mod podge, respectively). All I need are the laces and these shoes are done!
I bought fake leather boots from a local thrift store (i.e. super cheap) and stripped them down using Angelus' leather preparer. I ended up using half of the bottle because it dried very quickly on the rag I was using (I'm not sure if that is common or not). I used Angelus' matte black paint for the shoes and thus far I am very impressed. The paint was surprisingly opaque (I ended up using 2 coats and a lot of paint left) but thin enough that it didn't leave a thick film on the shoes (that I would worry would crack/chip).
Once the boots were dry, I painted the soles using a 1:1 mixture of mod podge and acrylic paint. Because the soles were originally dark brown/black in color, it took about five coats to completely cover them with color. Before I've used gesso and acrylic but the color would chip after a single wear so, hopefully, this will stay on better!
8 notes
·
View notes
Photo

MSA Vivi - Complete(?)
I was able to test out Vivi with highwayextinguisher over the summer. The wig needs restyling (it flattened out on trip back), skirt ironing, and the glasses fixing (one of the lenses popped out halfway through the night) but I am impressed overall with how it turned out (and isn’t Arthur amazing?! Don’t hesitate to check out her blog as well!)
#vivi#vivi cosplay#msa vivi#msa#msa cosplay#msa vivi cosplay#cosplay#cosplay wip#wip#complete costume#mystery skulls#mystery skulls animated#mystery skulls animated cosplay#mystery skulls ghost
10 notes
·
View notes
Photo
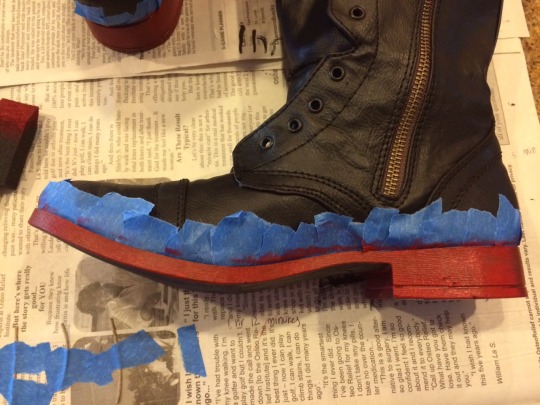
Final coats added, the shoes were ready for a test run. They held up fairly well beyond the slight chipping around the heels due to an incorrect primer and paint.


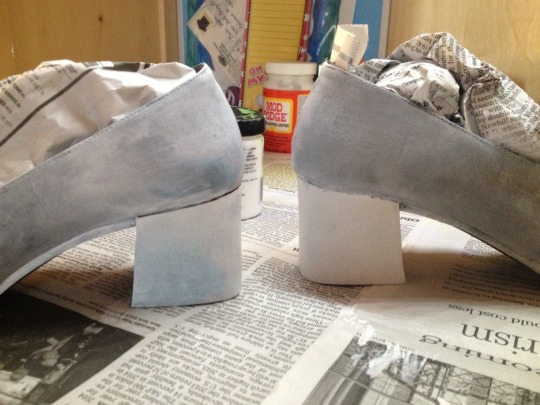
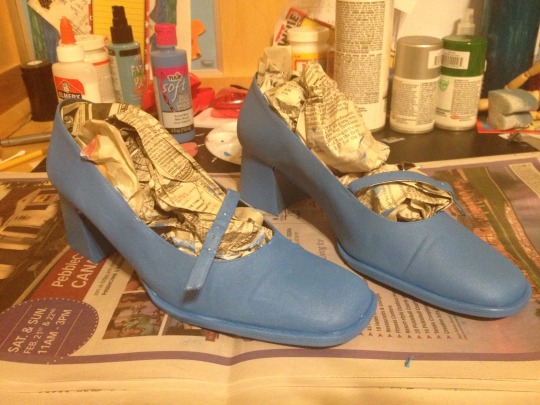
MSA Vivi: Shoes - Part 1
Three different paints later (two the wrong color, one that cracked when flexed) and the shoes are finally receiving a complete coat. Originally I had planned to straight up paint the shoes with fabric paint only to find it wouldn’t show. Layers of gesso were applied in hopes of having the paint show only to find that it was too light. Thankfully I was able to find a workable shade later….
#vivi#vivi cosplay#cosplay#wip#coslpay wip#mystery skulls#mystery skulls animated#mystery skulls ghost#mystery skulls cosplay#mystery skulls animated ghost#msa#msa cosplay#shoes#shoe
10 notes
·
View notes