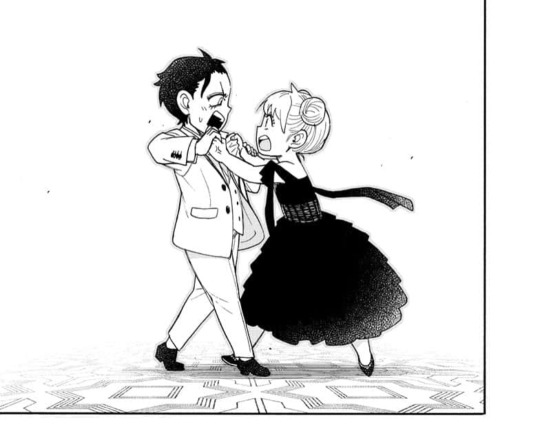
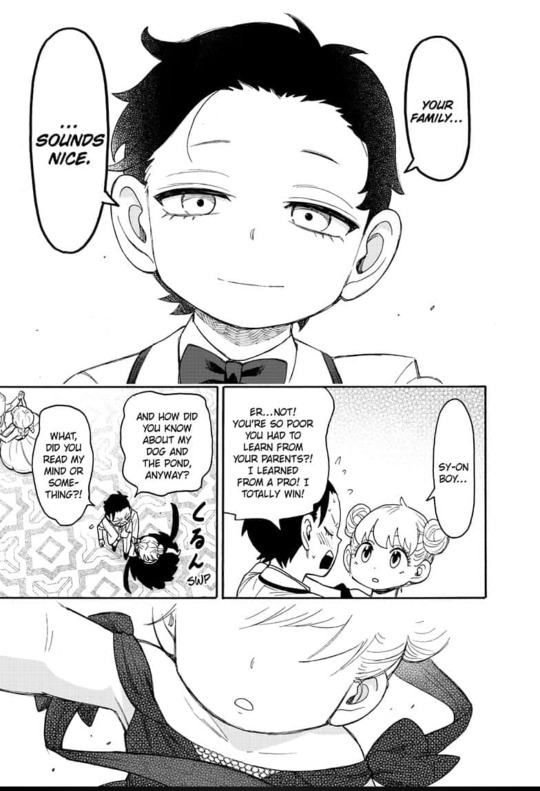
untealted
How's the weather?
Hello! Feel free to explore
°
Multifandom- current fandom(s): Spy x family, monkie kid, trigun and tristamp
°
Commissions open btw!
111 posts
Don't wanna be here? Send us removal request.
Last Seen Blogs

acidoepatico
Un amor no se olvida cuando es de verdad

big-friendly-birb
an unbreakable connection

lettheweirdnessin
Let the Weirdness In.
organicgeometryworld
۞ ȮRGɅNIC GEȮMETRY

lordexplosion97
Untitled
Text
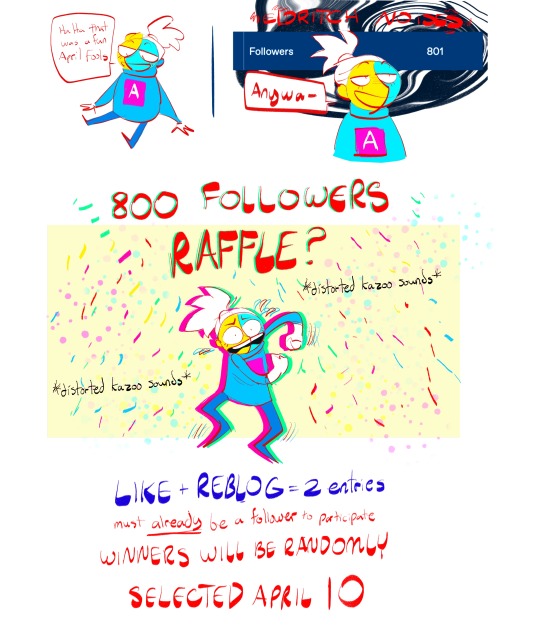
HI??????????
?????????????????????????
I'll be throwing everyone's names into a randomizer on April 10th and pull 4 times to see the winners. I'll publicly post the winners here, and then DM to see what they'd like to request!
Thank you everyone this is extremely unexpected!?
Must have already been a follower before this post to participate!
Requests for winners still follow my commission rules I'll put it under the cut here
127 notes
·
View notes
Text
YOU KNOW WHAT TIME IT IS
SPY X FAMILY SPOILERS
.
.
.
IF THERE'S ONE THING I KNOW-
I WOULD DIE FOR THESE TWOOO
NO HESITATION
LIKE FULL ON BAMP BAMP! TAKING THEM BULLETS 😭😭😭😭
ALSO
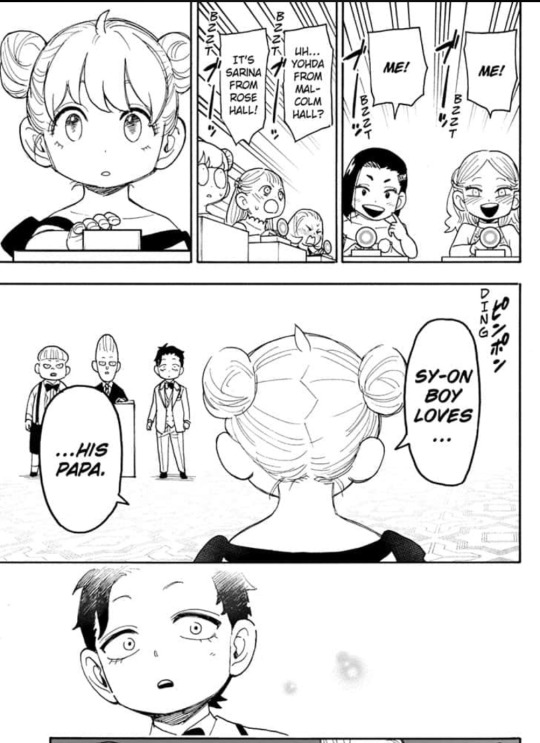
Can we just appreciate their friendship? How much they've grown on each other? How she knewwww- that his father is his everything??? And with this- shes recognised how they are practically one in the same. Leading to trust?!?!? TO THEN REVEALLLL???!?!?
Even as he doesn't believe her.
ITS KNOWING THAT SHE TRUSTS HIM!!!
ARGHHHHH
they...are everything. Thank you for coming to my ted talk.
#spy x family#spy x family manga#my thoughts#spy family#spy x family spoilers#spy x family anya#spy x family loid#spy x family damian#sxf#spy fam#BSJSBSJSBS#THEY'RE TOO CUTE
47 notes
·
View notes
Text
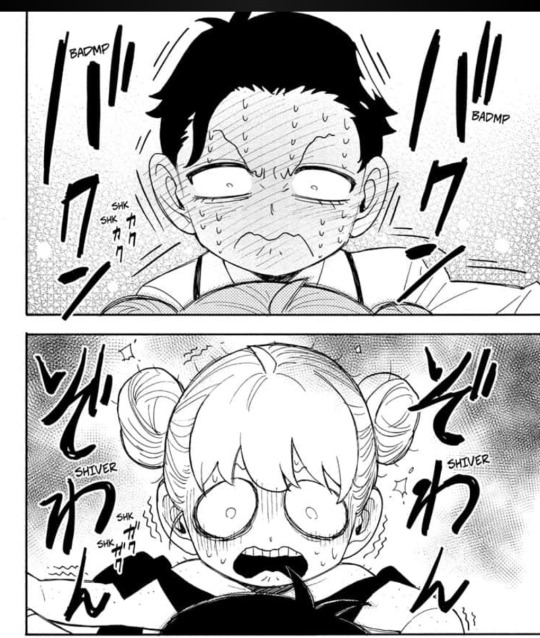
BROOOO-
The latest chapter 😭😭🤣🤣 Both cute and funny 😭😭
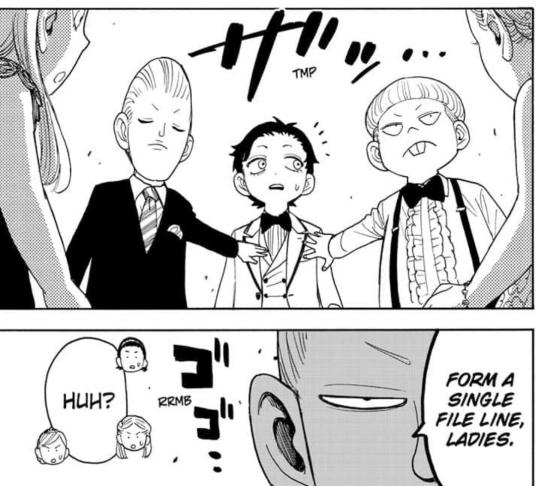
First let's appreciate how cool my boy is like, in the corner all cool looking and confident and-

But Anya-
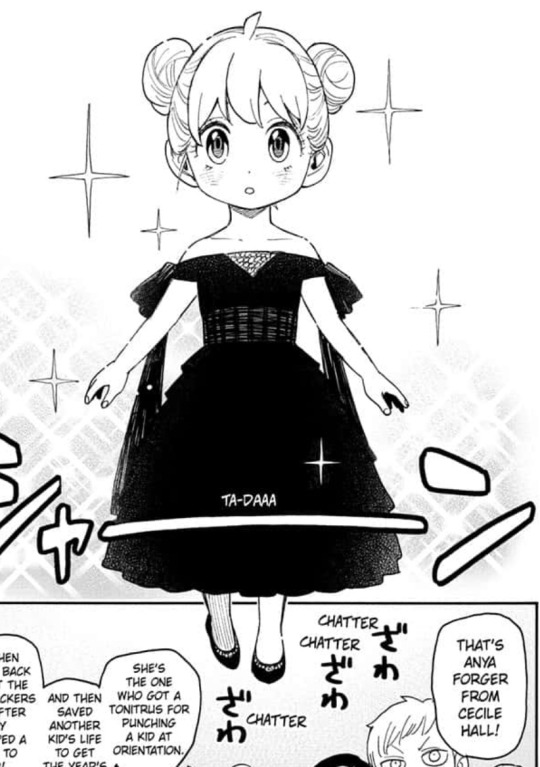
Who ever picked the dress (who I'm guessing is Loid) ate cuz' she looks sooo goood 😭😭🙌🙌💕💕
Becky gurl...I love you. Please tease this boy into oblivion 🤣🤣 Also I'm glad Anya has some admirers outside of Damian cuz' I love me some cute children drama so-

Best wingmen. Like we all need these two in our lives
Overall great comeback for SxF can't wait for the awaited competition between the girlies 🤣
#spy x family spoilers#spy family#spy x family loid#spy x family manga#spy x family chapter 95#spy x family anya#spy x family#my thoughts#silly children being silly#best way for sxf to return#might just be one of my favourite chapters 😭#hope tatsuya endo rested well 🙏#BROOO SCHOOL SHOULD ENDDD I WANNA DRAW FANARTTTT#aaaaaa
64 notes
·
View notes
Text
Spoilers for spy X family
.
.
.

So awestruck by her beauty, he fell to his knees
#this made me cackle#spy family#spoilers#spy x family spoilers#twiyor#loidyor#i love them so much#aaaaaa#my thoughts#spy x family manga#spy x family#loid forger#yor forger#spy x family chapter 86#spy x family chapter 86 spoilers
89 notes
·
View notes
Photo

#LESSS GOOOO#I FINALLY GOT TO DO ONE OF THESE#you cannot understand how happy this makes me.#aaaaaa#VSJWBWISN-#my thoughts#Hey look ma i made it#🙌🙌🙌#just b4 the day needs too
279K notes
·
View notes
Text
A general cane guide for writers and artists (from a cane user, writer, and artist!)
Disclaimer: Though I have been using a cane for 6 years, I am not a doctor, nor am I by any means an expert. This guide is true to my experience, but there are as many ways to use a cane as there are cane users!
This guide will not include: White canes for blindness, crutches, walkers, or wheelchairs as I have no personal experience with these.
This is meant to be a general guide to get you started and avoid some common mishaps/misconceptions, but you absolutely should continue to do your own research outside of this guide!
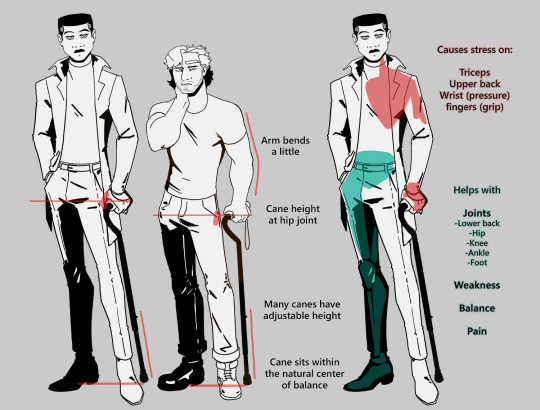
The biggest recurring problem I've seen is using the cane on the wrong side. The cane goes on the opposite side of the pain! If your character has even-sided pain or needs it for balance/weakness, then use the cane in the non-dominant hand to keep the dominant hand free. Some cane users also switch sides to give their arm a rest!
A cane takes about 20% of your weight off the opposite leg. It should fit within your natural gait and become something of an extension of your body. If you need more weight off than 20%, then crutches, a walker, or a wheelchair is needed.
Putting more pressure on the cane, using it on the wrong side, or having it at the wrong height will make it less effective, and can cause long term damage to your body from improper pressure and posture. (Hugh Laurie genuinely hurt his body from years of using a cane wrong on House!)
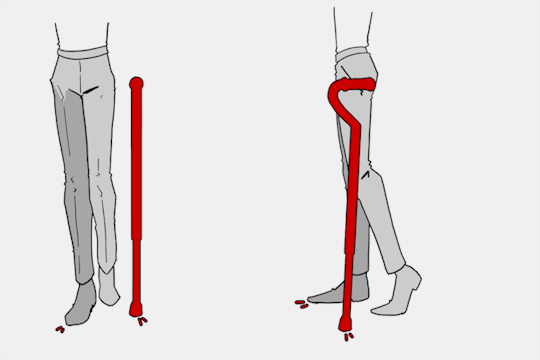
(an animated GIF of a cane matching the natural walking gait. It turns red when pressure is placed on it.)
When going up and down stairs, there is an ideal standard: You want to use the handrail and the cane at the same time, or prioritize the handrail if it's only on one side. When going up stairs you lead with your good leg and follow with the cane and hurt leg together. When going down stairs you lead with the cane, then the good leg, and THEN the leg that needs help.
Realistically though, many people don't move out of the way for cane users to access the railing, many stairs don't have railings, and many are wet, rusty, or generally not ideal to grip.
In these cases, if you have a friend nearby, holding on to them is a good idea. Or, take it one step at a time carefully if you're alone.
Now we come to a very common mistake I see... Using fashion canes for medical use!
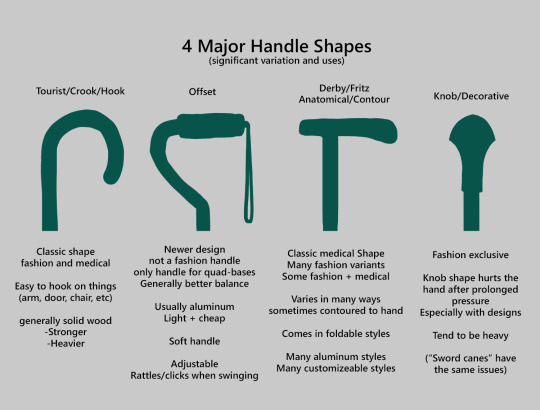
(These are 4 broad shapes, but there is INCREDIBLE variation in cane handles. Research heavily what will be best for your character's specific needs!)
The handle is the contact point for all the weight you're putting on your cane, and that pressure is being put onto your hand, wrist, and shoulder. So the shape is very important for long term use!
Knob handles (and very decorative handles) are not used for medical use for this reason. It adds extra stress to the body and can damage your hand to put constant pressure onto these painful shapes.
The weight of a cane is also incredibly important, as a heavier cane will cause wear on your body much faster. When you're using it all day, it gets heavy fast! If your character struggles with weakness, then they won't want a heavy cane if they can help it!
This is also part of why sword canes aren't usually very viable for medical use (along with them usually being knob handles) is that swords are extra weight!
However, a small knife or perhaps a retractable blade hidden within the base might be viable even for weak characters.
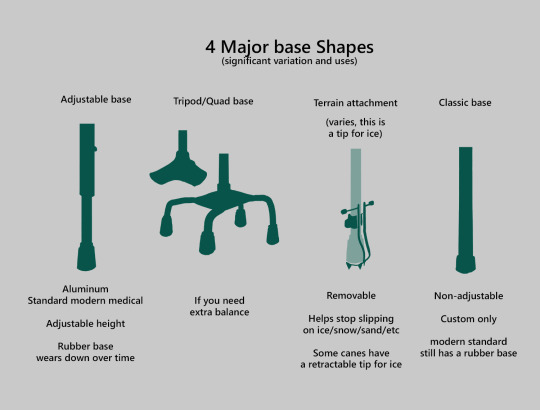
Bases have a lot of variability as well, and the modern standard is generally adjustable bases. Adjustable canes are very handy if your character regularly changes shoe height, for instance (gotta keep the height at your hip!)
Canes help on most terrain with their standard base and structure. But for some terrain, you might want a different base, or to forego the cane entirely! This article covers it pretty well.
Many cane users decorate their canes! Stickers are incredibly common, and painting canes is relatively common as well! You'll also see people replacing the standard wrist strap with a personalized one, or even adding a small charm to the ring the strap connects to. (nothing too large, or it gets annoying as the cane is swinging around everywhere)
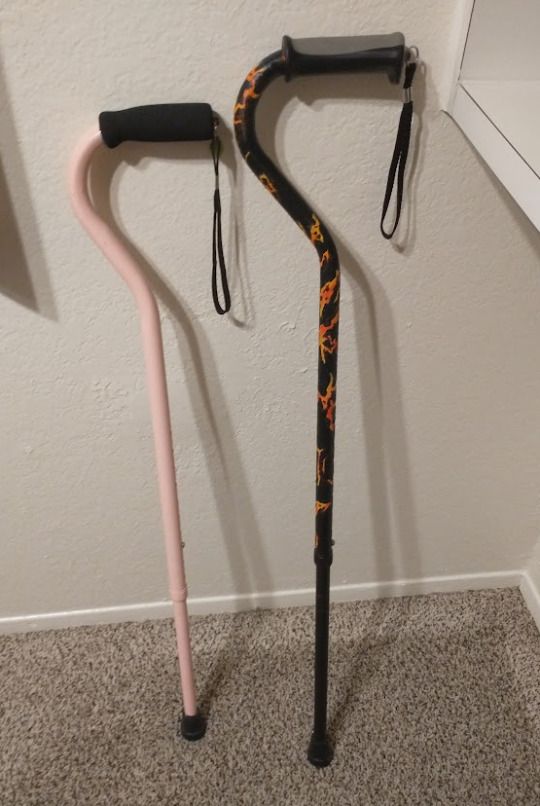
(my canes, for reference)
If your character uses a cane full time, then they might also have multiple canes that look different aesthetically to match their outfits!
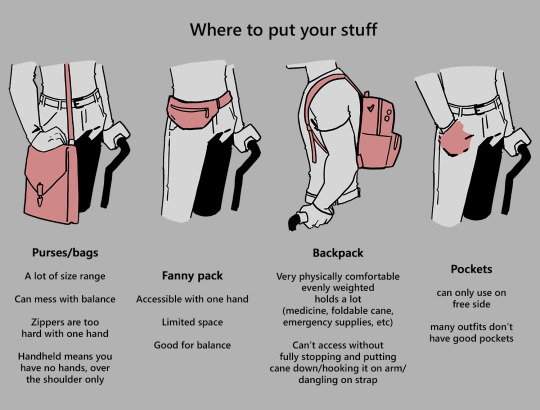
When it comes to practical things outside of the cane, you reasonably only have one hand available while it's being used. Many people will hook their cane onto their arm or let it dangle on the strap (if they have one) while using their cane arm, but it's often significantly less convenient than 2 hands. But, if you need 2 hands, then it's either setting the cane down or letting it hang!
For this reason, optimizing one handed use is ideal! Keeping bags/items on the side of your free hand helps keep your items accessible.
When sitting, the cane either leans against a wall or table, goes under the chair, or hooks onto the back of the chair. (It often falls when hanging off of a chair, in my experience)
When getting up, the user will either use their cane to help them balance/support as they stand, or get up and then grab their cane. This depends on what it's being used for (balance vs pain when walking, for instance!)
That's everything I can think of for now. Thank you for reading my long-but-absolutely-not-comprehensive list of things to keep in mind when writing or drawing a cane user!
Happy disability pride month! Go forth and make more characters use canes!!!
73K notes
·
View notes
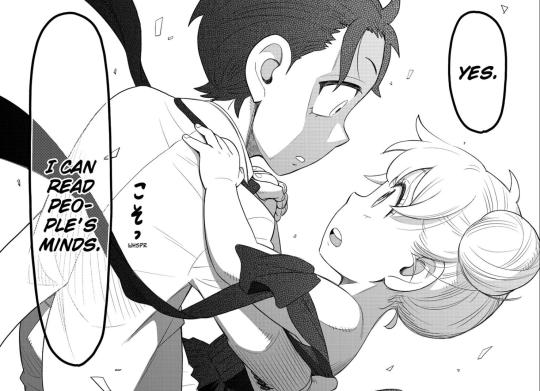
Text
Spoilers for spy X family
.
.
.
He's so in love with yor
Fr fr
Deny all you want man, but actions can say a lot more than words
But love aside, I love how this chapter goes to show how much Loid has grown attached to his 'family'. Choosing to not kill off a family member as not only understanding the pain that comes from it to the loved one (Yor) but the attachment he has grown himself.
I just-
Ignore me as I just *goes to my corner to sob*
#spy x family#spy x family anya#spy x family spoilers#spy x family yuri#spy x family manga#spy x family loid#spy family#aaaaaa#hes so in love#he legit cant kill off a family member for the sake of his love for yor and how he has likely started enduring yuri's quirkyness#love him#made my day#10/10
52 notes
·
View notes
Text
SPOILERS FOR SPY X FAMILY
.
.
.
.

CRIME!!
Tatsuya Endo this is a crime I tell you!!! CRIME 😭😭😭
#spy x family#spy x family spoilers#spy x family manga#spy x family loid#spy x family yuri#gotta wait another 2 weeks#🥲🥲🥲#*sobs*#spy x family chapter 82
38 notes
·
View notes
Note
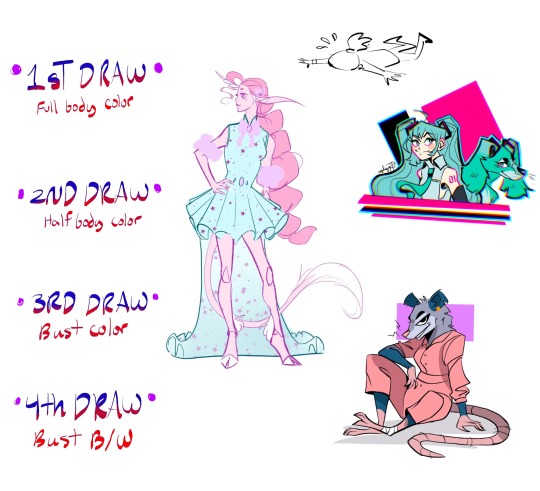
Could you do these 💥😺🪄 for monkie kid fandom ?
This was a challenging but fun design 🤧 (But thank you for sending this! It was, as I said, a fun challenge)
For some reason when I saw the kitty emoji, I immediately thought Tiger so I ran with it.
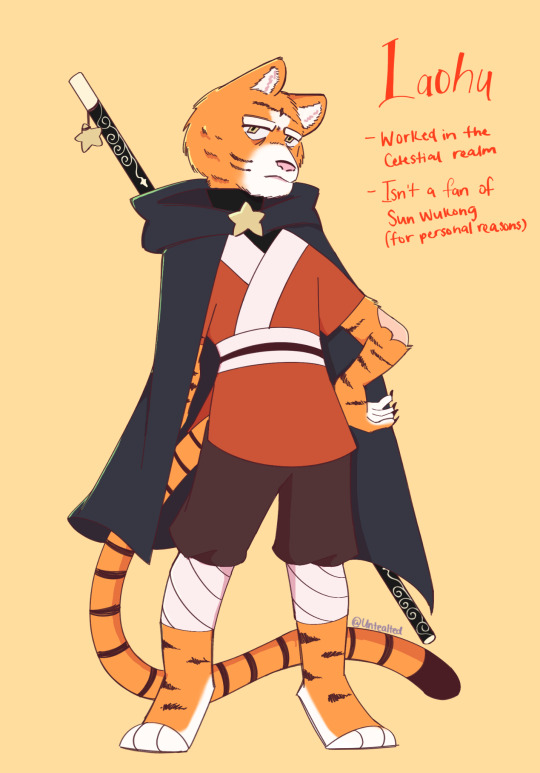
One thing I noticed as well, was when working on this design, I tended to forget or not know how to include the explosion emoji so I decided to have it be a factor that's a part of their backstory. (This might be a recurring thing for other designs)
With the wand emoji, I had it be a weapon and plays into his backstory as well.
Initially I wanted to stay in my comfort zone but decided to do something I hadn't really done before. Hence Laohu was born! His name is what it is as he worked and grew up in the celestial realm but he wasn't respected at all. Looked down by many expect one person, who plays a huge role in his backstory (and is linked to the stars 👀) . But that's something else for another day.
For now, I'm satisfied with the design but I will definitely go back and refine or redesign some elements. Overall, I had fun :3
#monkie kid#art#character design#character challenge#my thoughts#asks#three emoji challenge#critique welcome#ngl his head structure is a struggle to get right-#But ill grow and learn#lego monkie kid#monkie kid oc#lego monkie kid oc#oc#tiger oc#tiger
5 notes
·
View notes
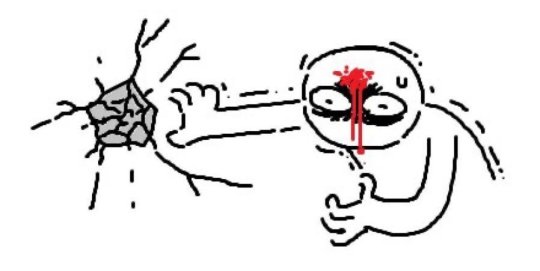
Text
Spoilers for across the spiderverse
.
.

#across the spiderverse#meme#rema#prowler#across the spider verse spoilers#IM NOT SORRY#I had to-#It was the first thing that ran through my head. When I saw him 😭🤧#aaaaaa#i love this movie
13 notes
·
View notes
Text
Send three emojis and I'll (try) and design ocs for fandoms!!
I wanna practice more character design but I wanna try and do ones for shows >:3
You can pick the fandom but please avoid anything weird or inappropriate.
#fandom#monkie kid#murder drones#trigun stampede#spy x family#art#character design challenge for myself#aaaaaa#three emoji challenge#character challenge
3 notes
·
View notes
Text
In the mood to start WW3 maybe


#why did i actually struggle with this one#fullmetal alchemist#trigun#polls#I-#anime#vash the stampede#edward elric
820 notes
·
View notes
Text
*SPY X FAMILY SPOILERS*
ABSJBSJS-
IM VIBRATING
I-

IM GOING ABSOLUTELY FERAL


#look at loid being so smooth#aaaaaa#my heart pls-#twiyor#spy x family spoilers#spy x family manga#chapter 79#ABNDNS-#giggling and twirling my hair#theyre so in love#look at them#Im too happy over this#Im about to cry#pls#i#spy x family
74 notes
·
View notes
Text
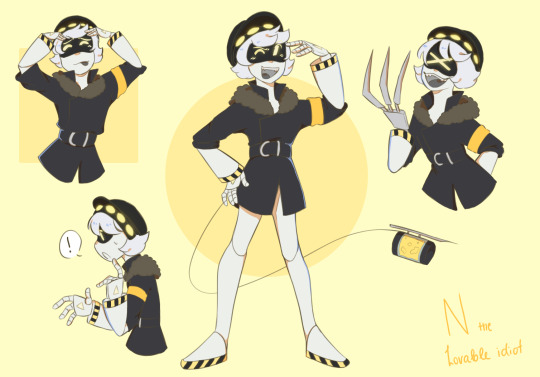
The lovable 'idiot' we all love and admire
#n md#n murder drones#murder drones art#md#murder drones#glitch productions#glitch#I love him#one of my favourite characters#fanart#art#medibandpaint
78 notes
·
View notes
Text
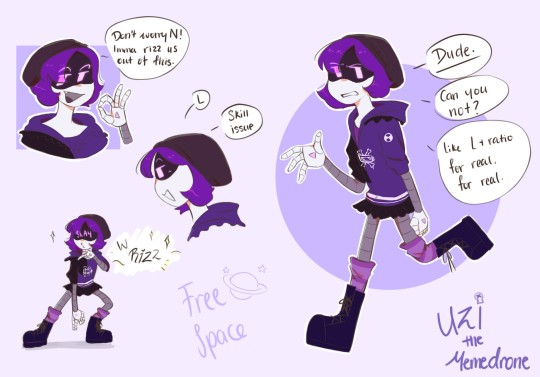
The grand 'memedrone'
Maybe I'll try and draw N next
#fanart#medibandpaint#murder drones#Please#please don't be like me and use various references.#md uzi#uzi murder drones#glitch#glitch productions#murder drones art#im loving the show#would recommend
275 notes
·
View notes
Text
How to structure a chapter
Writing a chapter for the first time can be overwhelming, because well… what actually makes a chapter?
Really, it’s entirely up to you. But I know that’s useless advice, so here are some steps I personally use to help you structure your chapter effectively
📌 Step 1 - Determine the main point of your chapter
What is a singular plot point, event, character arc point, or relationship progression/regression that you would like to dedicate this chapter to?
📌 Step 2 - Determine the change
What changes in this chapter? Whatever event you decided to tackle, it should show a different situation at the beginning of your chapter from the end. What happened that changed that initial situation you opened with?
📌 Step 3 - Determine the scenes
Now that you’ve got the main idea of your chapter down, and you know it showcases a change, you can get a bit more detailed with it. Separate it into scenes by thinking of the locations where this change takes place.
Each new location = a new scene.
📌 Step 4 - Determine the beats
Beats are an even smaller story structure element than scenes. It’s anything important that happens within a scene, it’s anything worth noting down.
Here's an example of a simple chapter breakdown →
Chapter 1
Annie’s first day at school after a car accident she was involved in the previous week. She goes from accepting help to proving she doesn’t need it.
Scene 1 (bus)
Annie is hesitant to get on the bus
With the help of her best friend, she manages the trip to school
Scene 2 (class)
teacher is shocked to see Annie back so quickly
Annie feels annoyed by the extra attention on her
Scene 3 (lunch)
Annie’s friends treat her as if she’s going to break
the drama teacher comes by to announce a new play, but tells Annie she’s excused under the circumstances
Scene 4 (hallway)
Annie signs up for the lead of the project to prove she’s fine
By the way...
Plotter’s Almanac is dropping in just 4 days! This book will guide you in outlining your project from beginning to end, and shine light on the things you should focus on when you actually start to write!

3K notes
·
View notes