#heightmap
Text

yippie !!!!
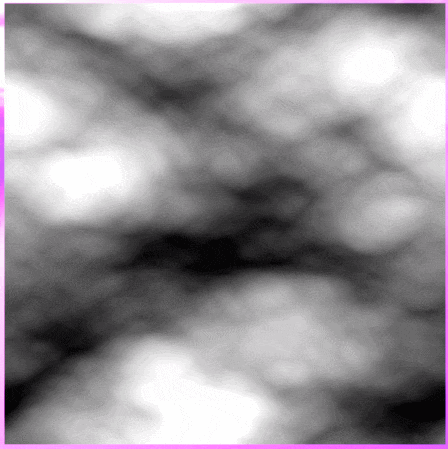
#wave heightmap + wave normalmap#i got it on the gpu so its at 128 samples :)#still havent done the Scary Algorithm yet though so it slows down once i go up to 256#but tomorrow!!! maybe
204 notes
·
View notes
Text

trying to generate a huge fuckoff pangea with better continents mod and clearly i did something wrong if the spawn structure itself fails to generate
#honestly cant wait to see what mess will generate#first attempt ended up with entirely mountains world (fucked up heightmap)#and second had correct biomes but no mountains (still fucked up the heightmap)
2 notes
·
View notes
Text
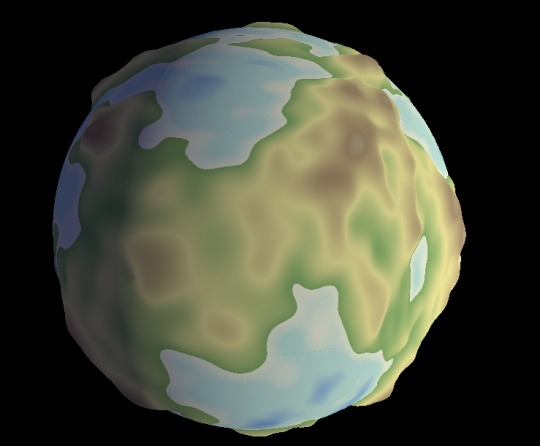
AAAANYways. look at the map ive been working on :]
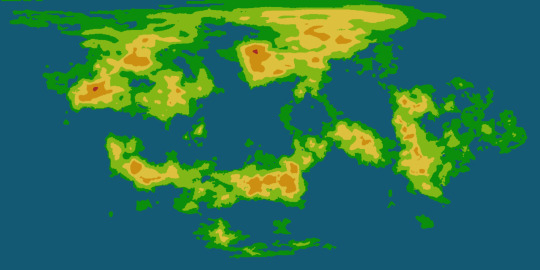
#its actually rlyyy unfortunate bc ive been spending all day sprucing it up it ws originally just generated by the globe making site i like#and then i realized that i dont quitee know how to make the height map.. the original generation it ws rly easy i just made the map#grayscale and then futzed with it a little bit and i got it looking rly good..but im the process of lining everything to make it easier to#comprehend they got too seperate from eachother sighs. so i might have to go in and manually add more transitional colors#but the trouble is id have to do that for the height map AND the normal map which is also a geographical map..#also its rly weird. on da site i rly prefer the look of the 3d heightmap#rather than 2d just adding like shadows your know#but when i do the 3d it gets this huge black blotch that i cant for the life of me get rid of#and it rly sucks. bc i think its sooo cute when i have the height map intensity set pretty high#bc it makes da planet look small..#but yas. and i cant just use the uhmm original height map#bc i made some pretttyy extensive edits#not rly. mainly i#well its hard t talk abt bc its all technically one continent but that ties into what i changed#bc i didnt realize it was all one continent bc on the original map it generated it was cut up rly weird#and i couldnt get it to fit as one thing. so i went in and smushed some aprts closer together#the biggest is umm the bottom right corner#the top part of that mass USED to hang down below and to the rifht#and bled over to the other side of the image#i moved that and the top left land mass to be closer to the top right#so i could fit it all together...#and the hright map thing wouldnt be an issue if the 3d height map thing was working. it just looks sliiiightly wonky with the 2d height map#i also need to smooth out the whole thing bc i used a digital brush like an IDIOT and i dont like how that looks when its on the sphere#oh also do u guys wanna see the globe of it.. grins#ik i was already doing this awhile ago but ohwell.#once i get it wayyy more finalized like. once ive added in major settlements and the like. id love to try to make an actual globe of it..#i wanna get it to a point im rly happy with FIRST bc otherwise ill change things on the globe#and then ill get annoyed bc i wont be able to transfer the irl globe into a digital one#bc thats what happened last time when i sketched a world on a ball. grins.#hopefully i dont drop this one like i did with that one.. idt i will since i have an accurate flat map thats literally made to be a globe
5 notes
·
View notes
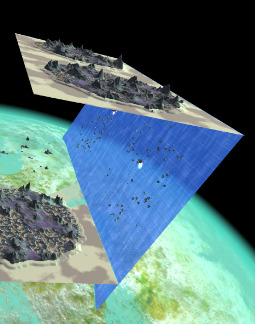
Text
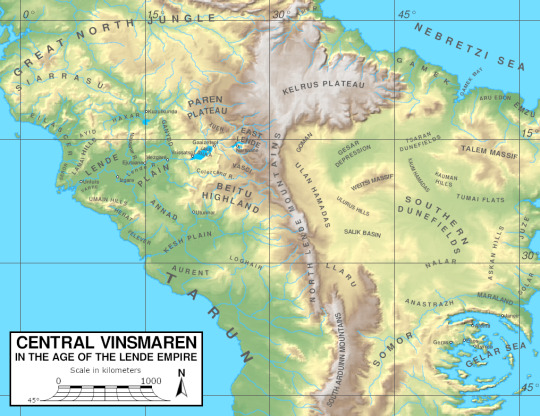
#sogant raha#fun with maps#the projection is awkward:#it's a braun stereographic map that's compressed vertically by 5%#because that's what i use for the eu4 version of these maps#and that's what the underlying heightmap was prepared for#but i wanted to make a pretty version first
10 notes
·
View notes
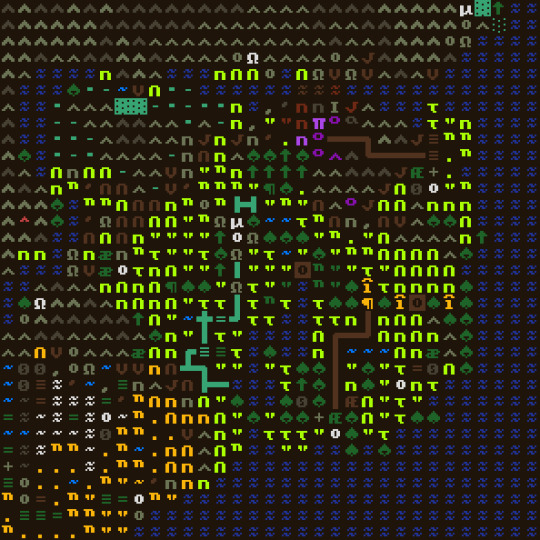
Text
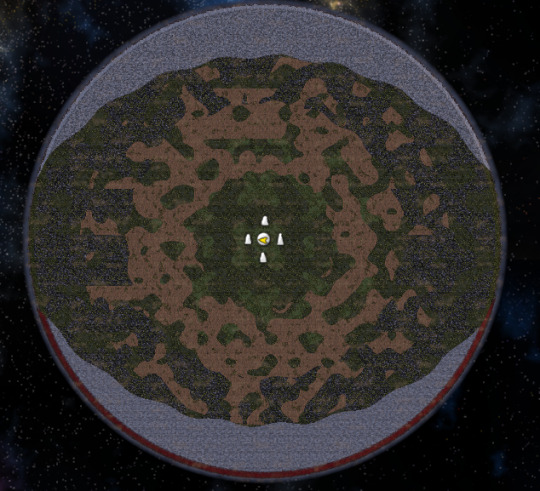
ough..... mabp

#this is lor i think :)#or the world that contains lor anyway bc lor is technically just the bit in the lower middle#i will probably need to tweak it a bit but not TOO much#bc the editor auto generates routes & u cant see them here but i have the sea routes exactly how i want them#& editing the heightmap too much can fuck that up
6 notes
·
View notes
Note
puki do you still do 3d rendering?
yah I actually am doing some rn, I am learning how to generate terrain generation stuff
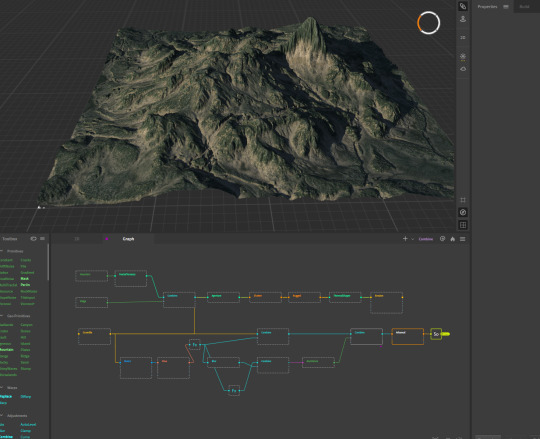
it has a node specifically for trees but I'm confused how to add the mask to the 2D nodes so that they show up, and Idk how it'd look in the renderer, or if it's maybe better just to add trees myself in C4D instead. BUT the idea of literally having all terrain, rocks, trees be imported in one chunk, and then just having to move the heightmap and textures over to C4D sounds sexy.
4K notes
·
View notes
Photo


Tears of the Kingdom - Surface, Skies, Depths. Created using a heightmap extracted from Breath of the Wild, plus basemaps extracted from TotK, and some painting over in photoshop.
5K notes
·
View notes
Text
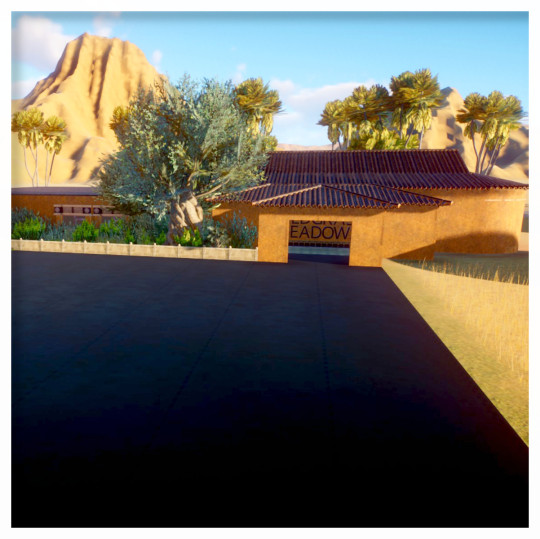


This is my first time deleting the premade entrance and starting my own. The building mechanics in this game used to really intimidate me, but even though i'm nowhere near as advanced as some people, i'm having a lot of fun with it. this is a new zoo on an Asia Grassland map, Sandbox mode with the challenge preset.
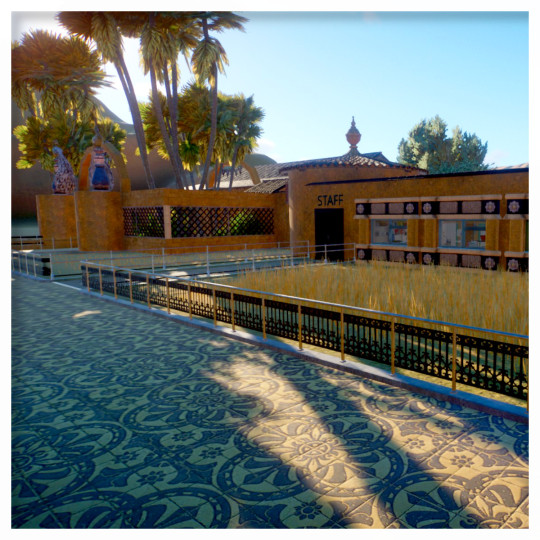

The entrance has a connected staff area with all the necessary facilities inside. My plan is to have a on-grid boulevard that runs through the entire zoo and connecting the main themed areas, and then filling it in with more organic-looking designs for contrast.
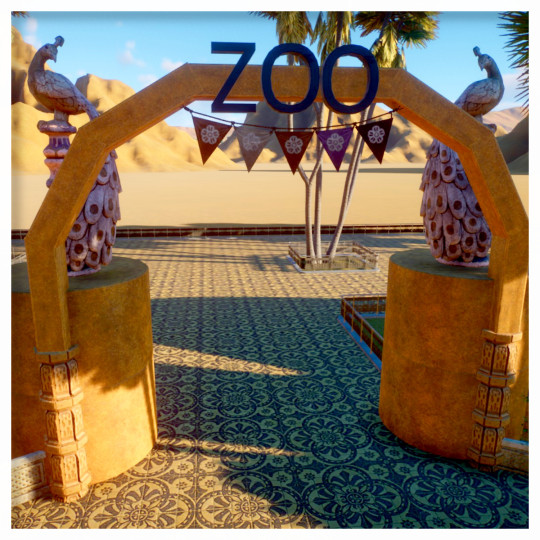
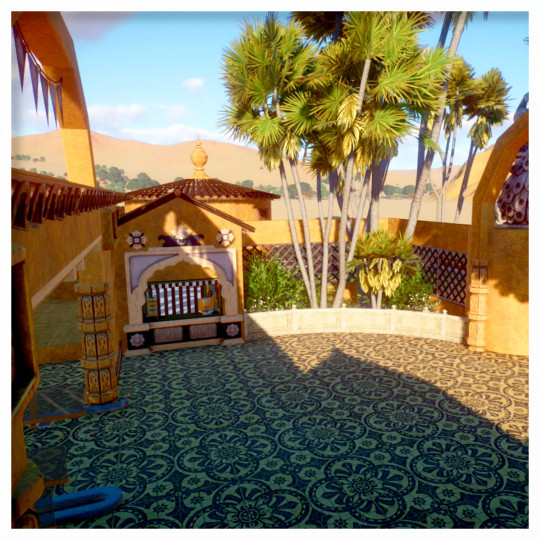
There's an info booth on either side of the entrance, where guests will inevitably complain about the price of umbrellas or something
#zooposting#planet zoo#wildgrass meadows#i should probably add some detailing to make the black void of asphalt actually look like a parking lot#but im impatient i want to get to the animals lmao#guest spawners are hidden off to the side in a mountain tunnel thing#also im using a heightmap by Acala for the mountains in the background#edited for typos and sometimes i to include a word
1 note
·
View note
Text
swtor/hero engine file stuff makes me want to cry
0 notes
Text
BotW Hyrule world preset for Dwarf Fortress
This is just something I made a couple years ago for my own enjoyment, but since Dwarf Fortress has had a recent surge in poplarity since last year, I figured I might as well share it :)
It's a map worldgen file that allows you to generate worlds that look like the BotW/TotK version of Hyrule.
It comes with a Medium, Small, and Smaller present (sorry, I don't really like working with large or pocket world sizes dskjhdsfkhs)
Medium:

Small:

Smaller:
Elevation should be relatively accurate since it was generated from the game's actual heightmap. I tried to be as accurate as possible with biome placement, but it probably won't match 100% (placing biomes in a dwarf fortress map preset is hard since the editor doesn't actually let you place biomes manually, instead you set the values for rainfall, drainage and temperature and it generates the biomes based on that 😬)
How to use:
Not sure if it works the same way in the Steam release, since I'm still using Dwarf Fortress classic, but I'm guessing it should work in the Steam version too unless they've changed how worldgen works in that version.
Download this world_gen.txt file
Go to your Dwarf Fortress install.
Go to data>init
Replace that folder's world_gen.txt file with this one.
In game, choose "Design new world with Advanced Parameters"
Choose one of the three presets (BOTW HYRULE, BOTW HYRULE SMALL, BOTW HYRULE SMALLER)
Before generating, you can tweak details like history length, number of civs, etc, etc etc.
Lemme know what y'all think.
I also have a few Elder Scrolls ones (Skyrim, Cyrodiil, Vvardenfell and the Iliac Bay) generated from those games' heightmaps which I might share in the future.
241 notes
·
View notes
Note
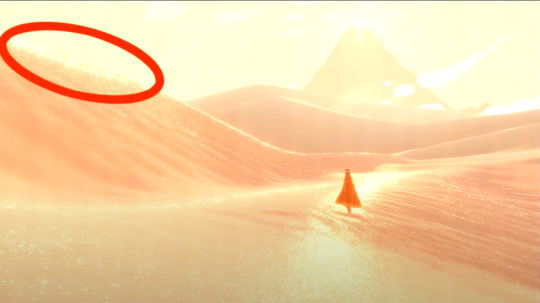
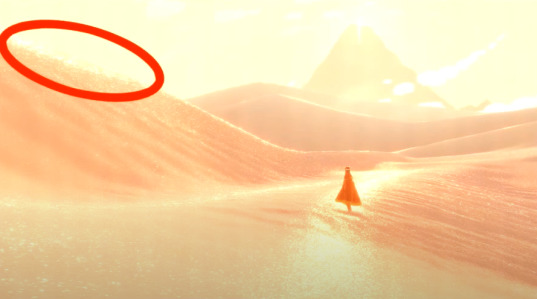
Oooh, what about Journey? I think the sand probably took a lot to pull off
it did!! i watched a video about it, god, like 6 years ago or something and it was a very very important thing for them to get just right. this is goimg to be a longer one because i know this one pretty extensively
here's the steps they took to reach it!!
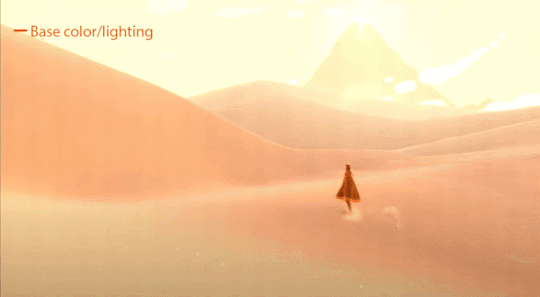
and heres it all broken down:
so first off comes the base lighting!! when it comes to lighting things in videogames, a pretty common model is the lambert model. essentially you get how bright things are just by comparing the normal (the direction your pixel is facing in 3d space) with the light direction (so if your pixel is facing the light, it returns 1, full brightness. if the light is 90 degrees perpendicular to the pixel, it returns 0, completely dark. and pointing even further away you start to go negative. facing a full 180 gives you -1. thats dot product baybe!!!)

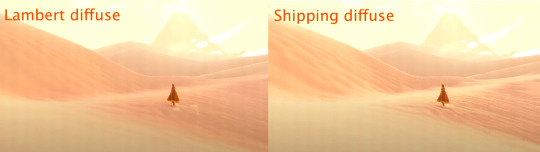
but they didnt like it. so. they just tried adding and multiplying random things!!! literally. until they got the thing on the right which they were like yeah this is better :)
you will also notice the little waves in the sand. all the sand dunes were built out of a heightmap (where things lower to the ground are closer to black and things higher off the ground are closer to white). so they used a really upscaled version of it to map a tiling normal map on top. they picked the map automatically based on how steep the sand was, and which direction it was facing (east/west got one texture, north/south got the other texture)

then its time for sparkles!!!! they do something very similar to what i do for sparkles, which is essentially, they take a very noisy normal map like this and if you are looking directly at a pixels direction, it sparkles!!
this did create an issue, where the tops of sand dunes look uh, not what they were going for! (also before i transition to the next topic i should also mention the "ocean specular" where they basically just took the lighting equation you usually use for reflecting the sun/moon off of water, and uh, set it up on the sand instead with the above normal map. and it worked!!! ok back to the tops of the sand dunes issue)
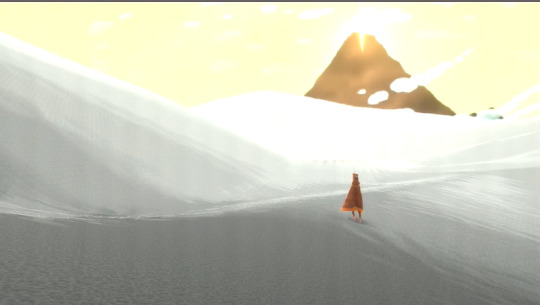
so certain parts just didnt look as they intended and this was a result of the anisotropic filtering failing. what is anisotropic filtering you ask ?? well i will do my best to explain it because i didnt actually understand it until 5 minutes ago!!!! this is going to be the longest part of this whole explanation!!!
so any time you are looking at a videogame with textures, those textures are generally coming from squares (or other Normal Shapes like a healthy rectangle). but ! lets say you are viewing something from a steep angle
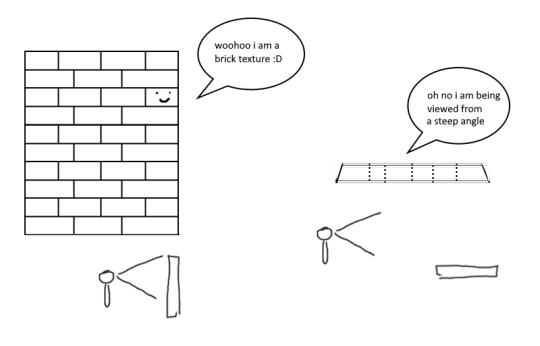
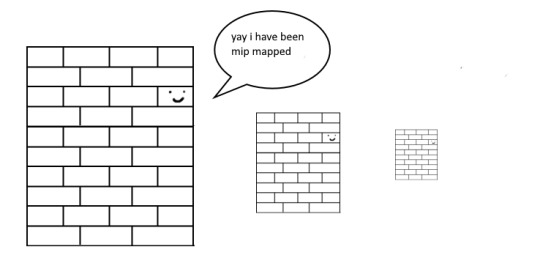
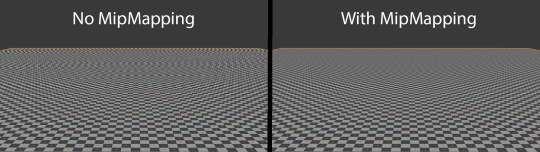
it gets all messed up!!! so howww do we fix this. well first we have to look at something called mip mapping. this is Another thing that is needded because video game textures are generally squares. because if you look at them from far away, the way each pixel gets sampled, you end up with some artifacting!!
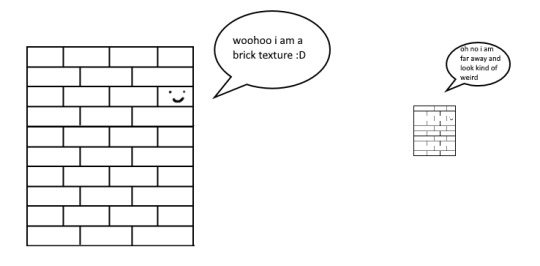
so mip maps essentially just are the original texture, but a bunch of times scaled down Properly. and now when you sample that texture from far away (so see something off in the distance that has that texture), instead of sampling from the original which might not look good from that distance, you sample from the scaled down one, which does look good from that distance
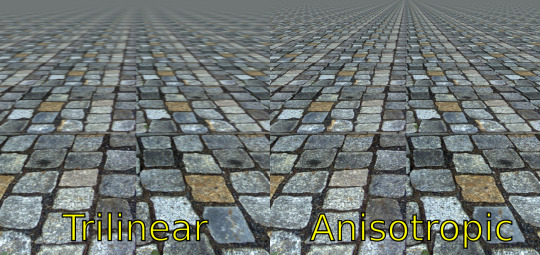
ok. do you understand mip mapping now. ok. great. now imagine you are a GPU and you know exactly. which parts of each different mip map to sample from. to make the texture look the Absolute Best from the angle you are looking at it from. how do you decide which mip map to sample, and how to sample it? i dont know. i dont know. i dont know how it works. but thats anisotropic filtering. without it looking at things from a steep angle will look blurry, but with it, your GPU knows how to make it look Crisp by using all the different mip maps and sampling them multiple times. yay! the more you let it sample, the crisper it can get. without is on the left, with is on the right!!
ok. now. generally this is just a nice little thing to have because its kind of expensive. BUT. when you are using a normal map that is very very grainy like the journey people are, for all the sparkles. having texture fidelity hold up at all angles is very very important. because without it, your textures can get a bit muddied when viewing it from any angle that isnt Straight On, and this will happen
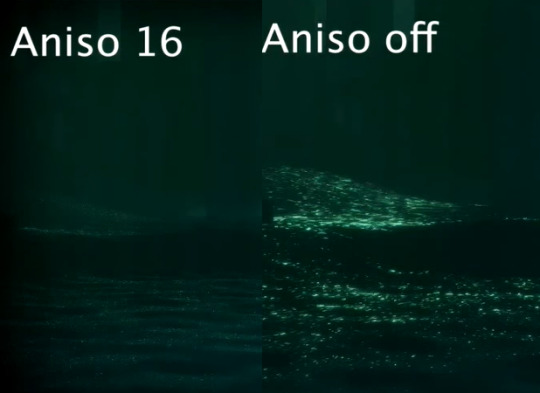
cool? sure. but not what they were going for!! (16 means that the aniso is allowed to sample the mip maps sixteen times!! thats a lot)
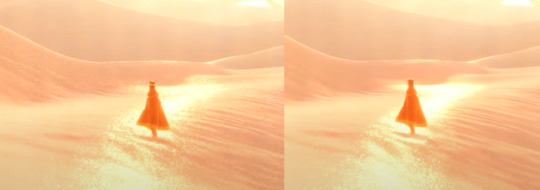
but luckily aniso 16 allows for that pixel perfect normal map look they are going for. EXCEPT. when viewed from the steepest of angles. bringing us back here
so how did they fix this ? its really really clever. yo uguys rmemeber mip maps right. so if you have a texture. and have its mip maps look like this

that means that anything closer to you will look darker, because its sampling from the biggest mip map, and the further away you get, the lighter the texture is going to end up. EXCEPT !!!! because of aisononotropic filtering. it will do the whole sample other mip maps too. and the places where the anisotropic filtering fail just so happen to be the places where it starts sampling the furthest texture. making the parts that fail that are close to the camera end up as white!!!
you can see that little ridge that was causing problems is a solid white at the tip, when it should still be grey. so they used this and essentially just told it not to render sparkles on the white parts. problem solved
we arent done yet though because you guys remember the mip maps? well. they are causing their own problems. because when you shrink down the sparkly normal map, it got Less Sparkly, and a bit smooth. soooo . they just made the normal map mip maps sharper (they just multipled them by 2. this just Worked)
the Sharp mip maps are on the left here!!
and uh... thats it!!!! phew. hope at least some of this made sense
433 notes
·
View notes
Text
im losing my sanity with this stupid mod
1 note
·
View note
Text

this is the firefox tabs of a man with several mental illnesses
#map to globe is my beautiful globe OMG i did a lot of work on it actually... i fixed up the poles a lot bc they were bothering me#they still arent perfect but yk. Unfortunately this does mean i have to redo the heightmap and ocean currents and by that token i have to#redo the temperature map Und the humidity map#but first i wanna redo the mountains bc i added a new mountain range that im Quite pleased with but its likee. previously all my mountains#were just kinda blobby shapes bc i was treating them more as likee. a series of altitudes#which tbf is what they were and it worked fine buttt i kinda wanna make them be more realistic mountain ranges.. ive already roughly#sketched out the ranges themselves like the lines and whatnot so probably tmrww i will go through and umm. yk.#i need to research more satellite imagery of actual mountain ranges so i can figure out the shape...#eventually One day im going to try and make my map actually look like a google earth kind of look at the world... but thats a ways away LOL
2 notes
·
View notes
Text
This blobby little planet represents a truly stupid amount of trial and error.
Godot's cubemap shaders are meant for... well, I'm not actually 100% sure what they're meant for. The primary use case for cubemaps seems to be skyboxes, but I don't think Godot uses them for that? *I* wanted to use them for texturing a cubesphere, to avoid the stretching artifacts of a UV sphere at the poles, which took some fiddling.
At first I wasn't using proper cubemaps--I was using an ArrayMesh with six surfaces distorted into a sphere shape, but that resulted in unavoidable seams along the faces if I wanted to do anything interesting with shaders to them. So I went back to square one (or cube one, I suppose), figured out how to make a proper cubesphere mesh (thanks, Catlike Coding!), then had to figure out how to write my own shader to texture that cubesphere properly--thankfully quite a simple process as far as shaders go.
Turns out shaders are super fun. You can do things like tweak the vertex positions to represent elevation using a heightmap, as in the image above.
65 notes
·
View notes
Text
Update on my post from yesterday: This is the current state of the seamless planet landing. I can procedurally generate terrain chunks on the north pole of the planet, which also runs pretty smoothly.
It's still just a heightmap-based Unity terrain though, which also means that it can't be rotated... It can only do this... xD
Not sure what I'm doing here, but I should probably focus on finishing the next update now, instead of whatever this is.
83 notes
·
View notes
Note
I really truly hate to ask but in your bio when it says map enjoyer the map part is not an acronym. is it??? or u mean the paper maps
ah. a normal map!
source. i think this is very pretty. this is a normal map. The idea is like. Suppose we want to have a 3d model of an old desk like this:
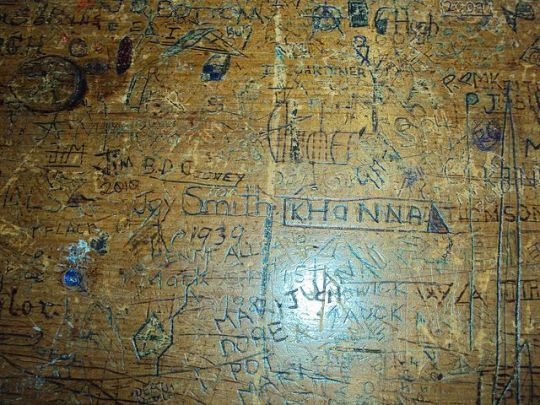
If we just throw that picture on a texture and hit render, we get something like this:
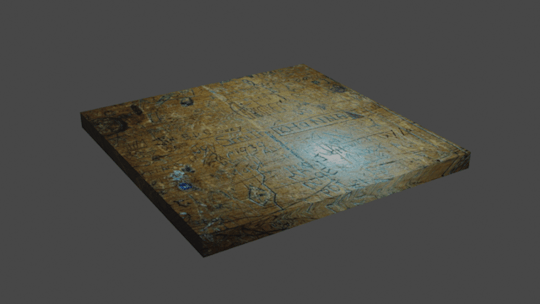
Which doesn't look particularly realistic! Notice how the light is staying in one place and all the highlights on the places where the pencil has dug into the wood don't move to catch the light. Our eyes automatically pick up a lot of detail about the texture of surfaces, and this doesn't look real.
in particular, the angle of the surface determines how much light is reflected at the camera. So we need a way to store the angle of every point on our surface! But it turns out we can use a neat coincidence; we see 3 primary colors and live in 3-dimensional space! To store the orientation of a surface, you can use the normal vector--the arrow perpendicular to the surface. (I like to imagine the object being covered in little tiny spikes sticking straight out at a right angle. We need a way to store those spikes.) Since we have 3 colors and 3 dimensions, we can encode the angle of the normal vector spikes as a color, where the red channel means the left-right angle, the green channel means the up-down angle, and the blue channel means the vertical angle sticking out at the viewer. So to go back to the old image:
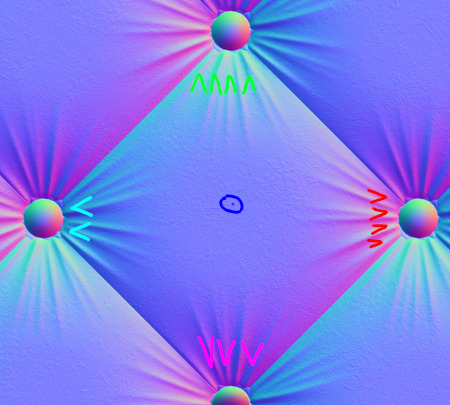
The cyan bits to the left (some green, some blue, no red) are spikes pointing to the left. The red/pink bits to the right are spikes pointing to the right. The neutral blue-grey color in the middle is a spike sticking straight up.
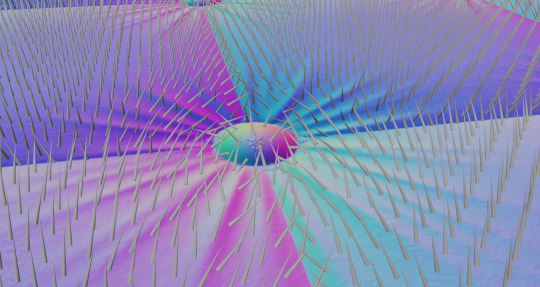
There's lots of ways to make a normal map. You can paint them yourself, you can model a really complicated geometry and then calculate a normal map to apply to a much simpler geometry, or you can create it as the "derivative" of a heightmap (a greyscale image where white is high bumps and black is dips). There's even cool neural network things that try to infer the height/normal map from a picture or video!
Here's that normal map I stole applied to a totally flat grey square, with the light moving. Look how convincing the illusion of depth is!
Here's two grey cubes smashing into one another except one has a normal map applied.

So I think this is a really cool technique! But I also think that normal maps, the images themselves, are stunningly beautiful. That's why the background of my avatar is a normal map!
Shoutout to gif.ski for making those gifs. I'm not really sure why its quality is 10x what i get from imagemagick or ffmpeg but it sure as hell is.
#thanks for the ask!#cw pedophila mention#re 'MAP' in the ask though. to be serious for a second.#thoughts alone (even pedophilia) cannot be bad in the absence of harm done. CSEM/molestation/sex w/ minors is very bad.#we stop CSE not by demonization but through better research/treatment and primarily thru structural changes to society/organizations.#(if this puts me on your DNI you are welcome to unfollow.)
23 notes
·
View notes
Last Seen Blogs

miminmimikyu
fly me to the music

batanniedinhfan
Sans titre

celestielswp
CELESTIELS

anxiousspacetomato
Thoughts that keep me up

immigration321
Untitled