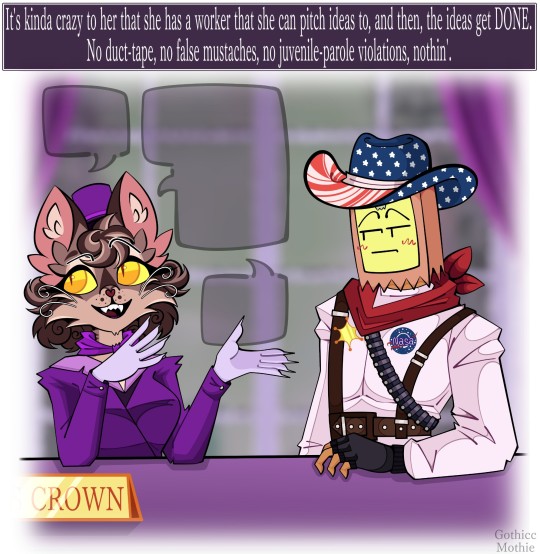
#cut out paper
Photo
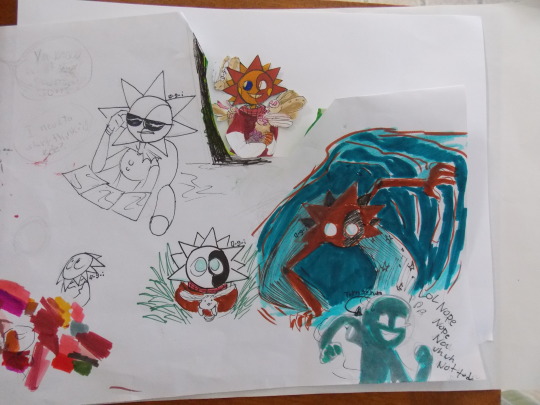
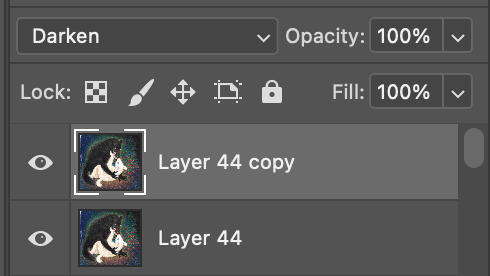
Sun and smol Eclipse, Eclipse with moths, and big Eclipse. The blue eye didn’t work out.
Up close below
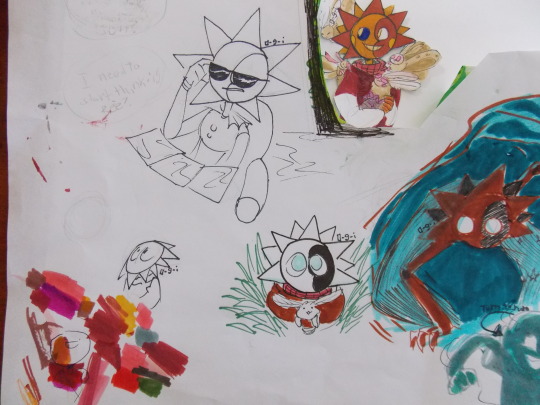
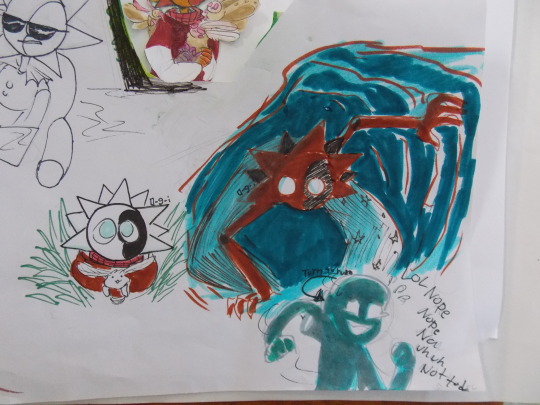
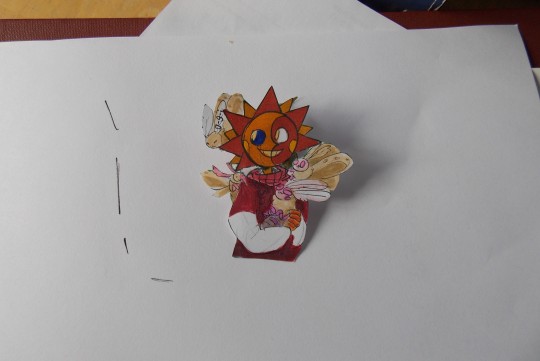
#drawings and doodles#0-g-i draws#Eclipse#fnaf eclipse#fnaf sb sun#fnaf sb eclipse#cut out paper#bug#moths
38 notes
·
View notes
Text
Heroes & Villains The DC Animated Universe - Paper Cut-Out Portraits and Profiles
Inque
Not much is known of the origins of the shapeshifting mercenary and saboteur known as Inque. How she came to possess her metahuman abilities remains unknown. Her form is composed of a dark, ink-like substance that is entirely malleable. This allowed her to alter her shape at will, forms her limbs into sharpened weapons, slip easily through cracks and slide across surfaces at great speeds. Her one vulnerability appeared to be water, which caused her to become defuse and lose her ability to maintain structural integrity. Although water was not lethal for Inque and she has been able to re-manifest her form once dried.
Inque was hired by Derrick Powers during a time in which Wayne/Powers was competing with Foxteca over a highly lucrative governmental contract. Powers tasked Inque with sabotaging Foxteca facilities so to ensure his company landed the contract. Bruce Wayne investigated the matter and assigned Batman (Terry McGinnis) to stand guard over the additional Foxteca plants in the case that the saboteur were to strike again. This indeed occurred yet Batman was unprepared for an altercation with someone as formidable as Inque and she easily evaded capture in their initial altercation.
Learning that Batman was once more meddling in his affairs, Derrick Powers tasked Inque with assassinating him and any accomplice he might be working with. Sneaking into the Batmobile, Inque accompanied Batman back to the Batcave before attacking him. Transforming into a torrent of ink, she nearly succeeded in suffocating Batman but was stopped by Bruce Wayne (who used an old Gray Ghost costume to hide his identity). Bruce ultimately utilized Mr. Freeze’s freeze gun to incapacitate Inque whereupon she was delivered to the authorities. Without the services of his saboteur, Powers lost out on the contract to Foxteca.
Inque would return on subsequent occasions to battle Batman. Some time thereafter, the mutagenic substance that bestowed Inque her abilities began to break down making it difficult to maintain a physical form. She turned to her estranged daughter, Deanna Clay, for aid. She had Deanna steal a mutagenic compound from Gotham Genetics that could stabilize her condition. Deanna went through with this, but cut the compound with a solvent as part of a plan to kill her mother and pilfer her savings. Inque discovered her daughter’s betrayal too late. Starting to dissolve, she attacked Deanna yet Batman arrived in time to save her. Together they watched Inque seemingly melt into nothingness.
Actress Shannon Kenny provided the voice for the villain with Inque first appearing in the third episode of the first season of Batman Beyond, ‘Black Out.’
4K notes
·
View notes
Text
Donatello for your thoughts
#a#art#animation#uh#rottmnt fanart#rottmnt donatello#anywho just adding onto the general headcannon that Donnie had eyebrow phases and that one of them was literally just sticking two pieces#of cut out paper on his head like a doofus#rottmnt
1K notes
·
View notes
Text
todays herbarium story: new fucking way of dating things to confuse future archivists. someone wrote 66-1-3 as the date on a specimen. obviously i assumed 66 was the year and either the day was January 3rd or March 1st. put “1966” for the year in the file, marked as needing confirmation.
anyway one of the historical archivists went back and used the guys name to figure out about what month he confirmed it? and it was fucking 1866. the guy who cataloged it died in 1920.
i inadvertently handled a specimen thats older literally everyone i know and love and my only thought was mild irritation because it was dated weird.
we still dont know if it was found in January or March.
#the narwhal speaks#unfortunately i do not have a photo of it#i didnt think it was that old because someone had cut the speciman out and pasted it onto slightly newer paper#so it looked like it was still ‘old’ enough to be from 1966#anyway. pissing myself with laughter#i think this is the oldest specimen we have in the herbarium and it has the most galaxy brain take of writing dates#stardate 66-1-3 today i fucking found a cool leucophyllum frutescens#also i didnt think it might have been 1800s because the oldest speciman i found before this was 1905
378 notes
·
View notes
Text
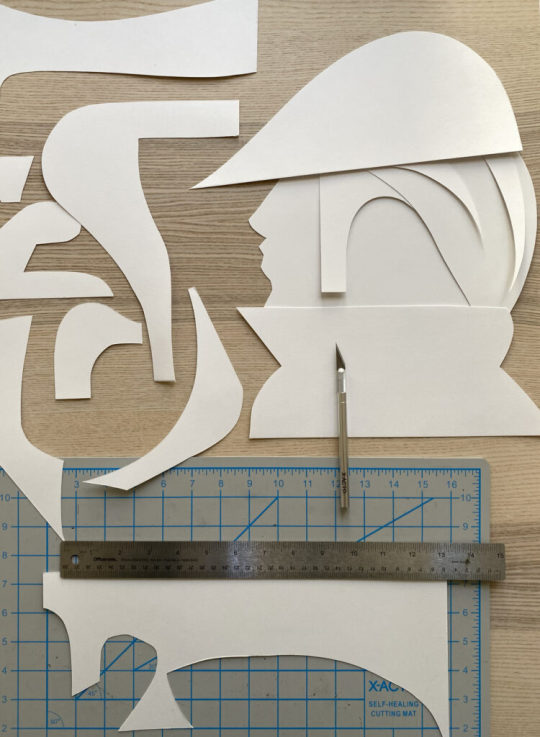
How to Create Paper Cut-Out Reliefs: Tips and Techniques for Beginners
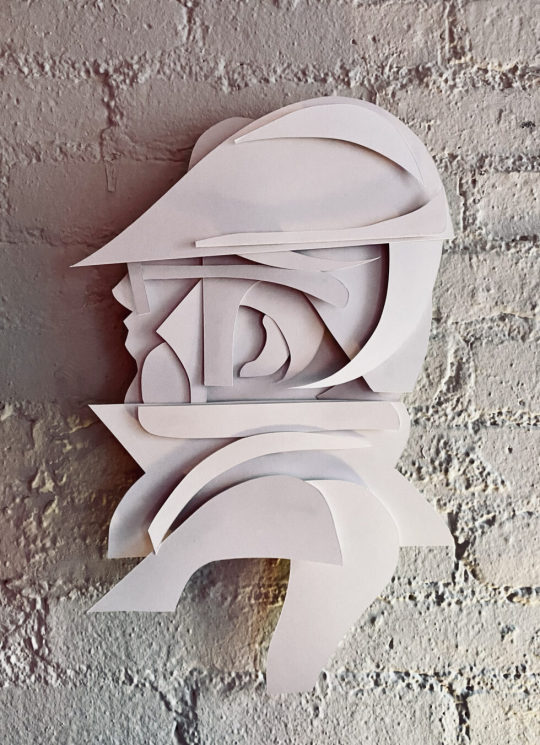
Back again with another lil' series of 2D wall relief paper cut-out forms. Both of the pieces below follow the same process and technique. Im really happy with the process and outcomes. Im working on animating them as we speak. I'll add them to this post later. My paintings inspire my drawings, and my drawings are inspired by those same forms found in my paintings. It makes sense that every so often I want to make those forms "pop out" and off the surface of a flat plane. Alas, it all starts with a quick sketch. See below, just a series of light loose free flowing lines take the lead, forward ->
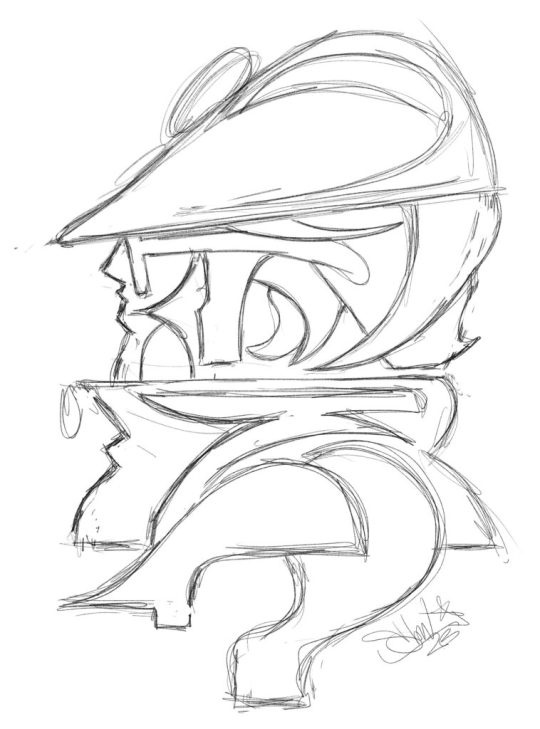
Here we have a dude posing for a profile style portrait. Most likely, this is inspired by the NYC B-Boys from the years 1983 - 87ish. Either way, it's nostalgia for me. Once the sketch feels good, I'll break out the paper and x-acto knife. I keep telling myself that one day Ill work with another material other than paper for these works, perhaps wood or metal.. It will happen, I can foresee it for sure, hang in there. Im using a white bristol paper for the cut outs, I believe it is the vellum type and not the glossy, but either or will work just fine. I love to cut paper and the whole medium of paper art in general.
Paper cut-outs, also known as paper cutting or Kirigami, is a traditional art form that involves cutting shapes and designs out of paper. The history of paper cutting can be traced back to ancient China and Japan, where it was practiced as a folk art. The Chinese and Japanese would create intricate designs, often featuring animals, plants, and mythical creatures, and use them as decorations for festivals and special occasions. I always loved it and have felt inspired by these pieces.
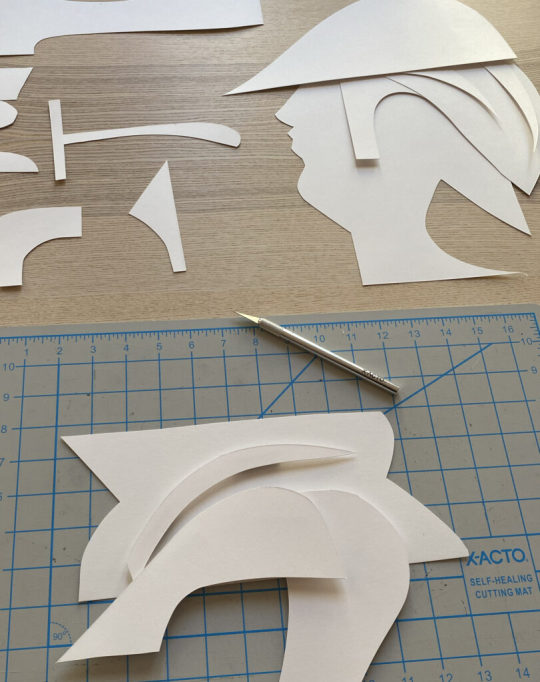
Using the sketch above, I apply the "map" of the shapes and forms that I see. Sometimes I redraw those forms on the paper that I will cut out, and sometimes I just "draw" with the x-acto knife to recreate the forms. Sometimes, it's a combination of both of those techniques. There is also a series of "out-take / byproduct" cut outs that do not make the final piece, those can be saved and used for the next piece, obviously!
I layer the forms on top of each other to compose the arrangement as a whole, its fun to watch it all come together, in the next phase, you will need some kind of durable tape or you can make little paper forms that can be pasted to both sides of the forms as they stack, this will create the gauge and depth of the piece once it is placed onto the wall.
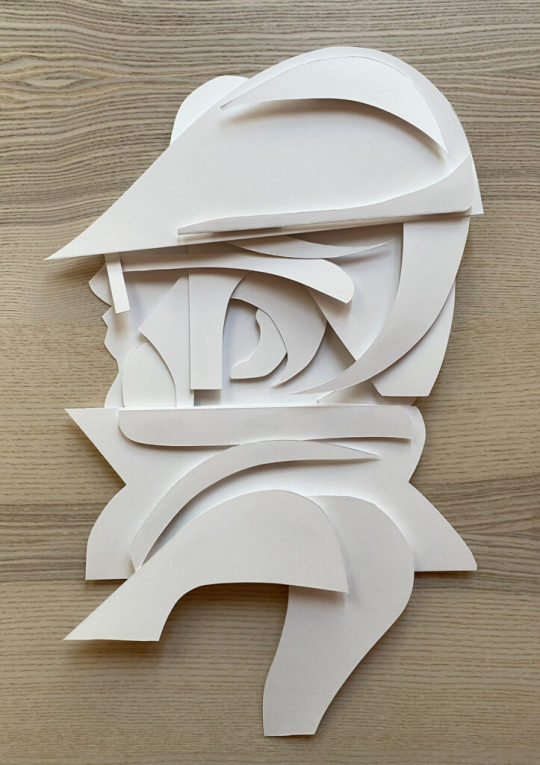
This is the final composition above, I love it! I used a roll of duct tape to make small cylinder forms that connect the pieces together, the piece as a whole comes "off of the surface of the wall" by about 1.5 - 2" inches - you can play with this a bit but keep in mind, the tape makes the piece heavier and it will want to comply with gravity :)
I hung the piece (also temporarily adhered via the same duct tape) for the photoshoot and to also get a good look at how it will function on the wall. I have an old painted fire place in my studio that is a great surface for hanging things, I love the contrast of textures between the bricks and the paper, as you know, the shadows will be super cool to see too.
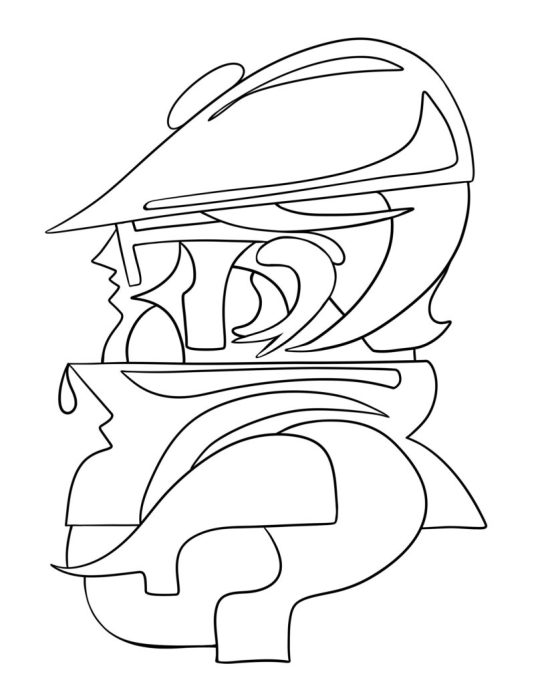
Once I had the whole piece constructed I took a few pictures of it. I immediately wanted a clean vector line drawing of the whole character. I brought the photo into adobe Fresco and used a vector brush to draw this lovely variation. This is how my brain works, I switch paths because I know they are really pipelines to the "next thing" that I will push this to, so forward we go.
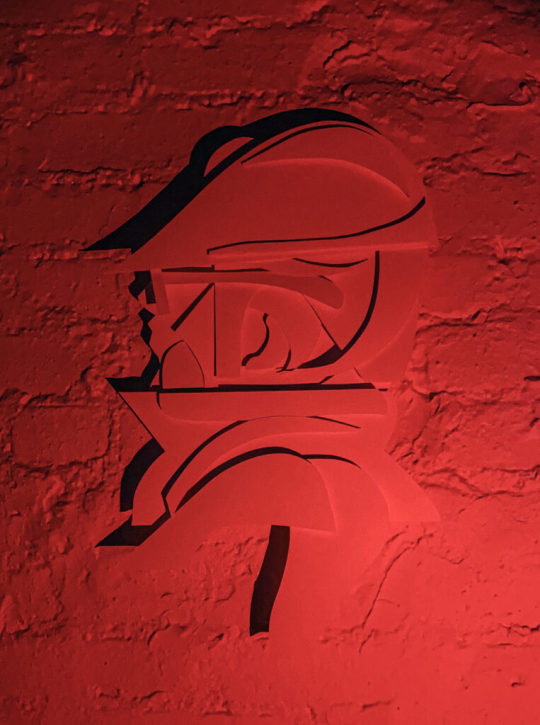
Then, it was light source and photo shoot time. Im not really happy with these picture as traditional "photographs" as I know I can do a much better job, but, as a series of "sketches" for a planned photo shoot, these will really help to make those plans a reality. I love neon colored lights. I have a bunch of them from various places and spaces that I found on the internet. Amazon has a great selection of flashlights with various colored light options. Get a few and play around with how the light can effect your work and the shadows that it creates. This is where the depth and gauge of your pieces play a role. The photos below are also a part of the same session, which all took place over a few days.
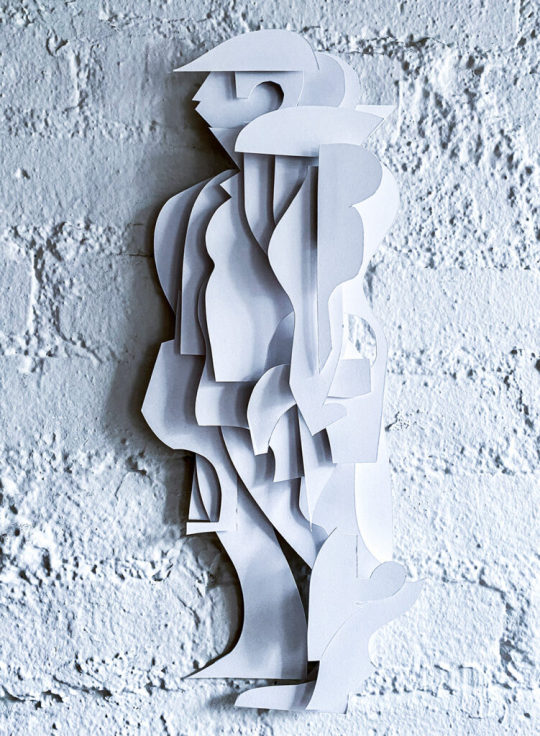
Here is another variation with a different character.. What do you think? Shall I make more?
#art#ryan seslow#ryanseslow#paper cut out#paper#paper art#2D design#2D#portrait#character design#graffiti#bboy#nyc#sculpture#paper sculpture
229 notes
·
View notes
Text
Enot in the style of Madoka Magica's witches
#freaky lil guy deserves a freaky lil depiction#but i tried to make em look like a paper cut out#i think it looks fine ?????#cursed lyss piece be upon thee#rain world#lyss art#my art#slugcat#rw enot#rw inv#pmmm#madoka magica#rw crossover#crossover#cw bright colors#cw eyestrain#ps i hope yall know like everything except the cat is screenshots#the egg and the eyes are real#:3
360 notes
·
View notes
Text
@bunnyspine can I offer you a silly sticker guy in this trying time?
#at first I forgot to download it as a png so it still had a white background#used remove.bg#it looked like i cut it out from wet paper at first#then i remembered that my time limit on my phone had a one more minute feature#sometimes that feature saves me#art#digital art#fanart#puppet#sunshine funtime#procreate#digital illustration#digital drawing#puppets#puppet art#stickers#my art#fan art#pawfulofdoodles#jammed to the crane wives while drawing him#I DIDN'T MAKE THE SLEEVES OF HIS HAT BIG ENOUGH DARN IT#im sorry i couldn't think of a more clever caption
212 notes
·
View notes
Note
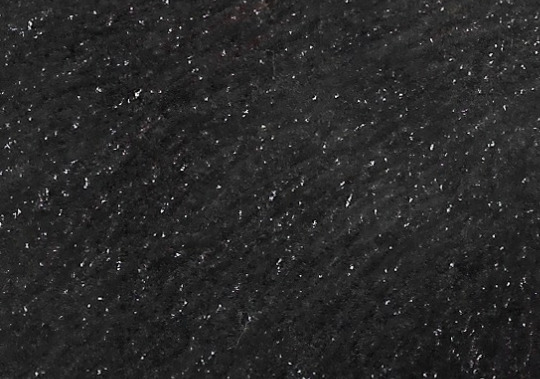
I love your artwork so much! Your colors are so vibrant and none of the white speckles in the paper ever shows, its so impressive and I really dig it! I was wondering if you use any sort of blending medium? Like baby oil or anything? Either way, I really enjoy looking at your artwork and I'm always excited to see whatever you'll make next
I use a colorless blender (prismacolor, which is wax-based so baby oil probably wouldnt work) but my scanner is also rly bad about picking up white specks in a way photographing the art with my phone isnt, so I usually have to do some digital editing to get rid of them as well.

I do this by duplicating the layer, setting the one on top to "darken," and using the mixer brush to blend out the white spots + just use the eyedropper tool to select the color of that area (needs to be a slightly lighter shade of it) and color over the white spots with the brush tool
i edited a small bit of the original scan to show what i mean
original:
with the edited layer:
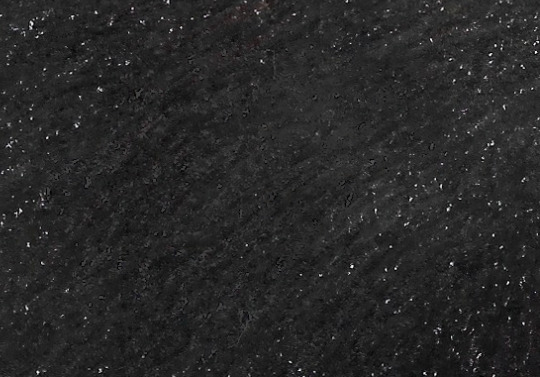
heres how it looks set to normal instead of darken, I used both the mixing brush and regular brush just to demo it

#explanation is under the cut. post got a bit too long#u prob have to click the image for full resolution to rly see what i mean about the white specks showing up#i think its bc the scanner is meant to scan documents. so it picks up the white specks of paper very brightly#how much editing is done varies from piece to piece#ive thought abt listing 'digital art' as one of the mediums in tags for the more heavily edited art#where it looks significantly different than the physical drawing in front of me#but i feel like that might be confusing#art where i set out to do some mix of traditional and digital is tagged this way but im not rly sure where to draw the line tbh#the hunger wasnt edited in a way where it looks significantly different from the original (just a bit darker)#the scan is just dull and light bc my scanner is like that lol#so with editing that one i was mostly just trying to make it look like the physical drawing in front of me#u can tell by the 'layer 44' in the screenshot these take a lot of editing lmao#art help
287 notes
·
View notes
Text

Oh Eddie...
#welcome home#fanart#welcome home fanart#my art#a little part 2 to my paper cut out art ^^#the update was just amazing!#woo!
290 notes
·
View notes
Text
Hmm....how hard can large scale mosaic possibly be? I feel like my plans for the room I'm working on could use something really shiny and impactful and maybe I want to make a fold-down cutting table and maybe I want to do it out of mosaic, even though that will be ungodly heavy.
It's a fun idea. I'm not sure if it's a good idea.
I haven't done mosaic since a one-off high school art class but I feel like the component skills are ones I already have, sooooo....
I have been keeping to a blue and gold celestial theme for both my guest room and my art workspaces, because if and when I move those spaces are likely to be combined. Cutting table, even though it would be for a different room, falls in the same vein, so I'm thinking something with a nice dark night sky and maybe some branches or leaves...
#if nothing else#I am likely to bleed less on my project than I did on the one in high school.#i sliced my arm open and bled profusely and never quite got all of it out#the third bedroom in my house is basically a junk room rn because the layout is awful#and i have been rotating that room in my head for weeks trying to see how it fits together in a functional way#it's going to still be storage but also my digital workspace/home for my modern tools#aka four ink printers#the laminator the 3d printer the laser engraver the cutting mats the paper storage#and also random crap like luggage and wrapping paper.#i think im settling on a library/bindery vibe#so loooots of built ins.#on a budget level i cannot afford to start this room for a while yet#and the same is also true on a time management scale#but for each project like this I tend to prefer to have everything fully realized in my head before i start#so im doing that now#mentally putting together lumber cut lists and figuring out if im going to have to buy a jigsaw
235 notes
·
View notes
Note
I salivate at the thought of skinning you alive
oh good, I thought I'd been left out. [for context to the reader, this is a reference to this post (I hope)]
On the spectrum from crocodile to passerine, I can only hope that human would be closer to crocodile, but not so close to be quite as tiring.
#I skinned a crocodile recently#actually just part of a crocodile#and it was exhausting#fascinating and extremely cool#but really a lot of work#the osteoderm make the back REALLY inflexible#so pulling it back takes a lot of strength#huge respect to the people who do that for a living#on the other hand#trying to skin a passerine is like trying to hammer in a nail with tissue paper#you just look at the damn thing and the skin rips#I have no idea how people make titmouse taxidermies#I have pretty good fine motor control#but I am not cut out to be a taxidermist#cw skinning#I guess?#let me know if this needs other warnings#I can't think of any right now#tag ramble#answers by Mark#Anon#Anonymous
215 notes
·
View notes
Text
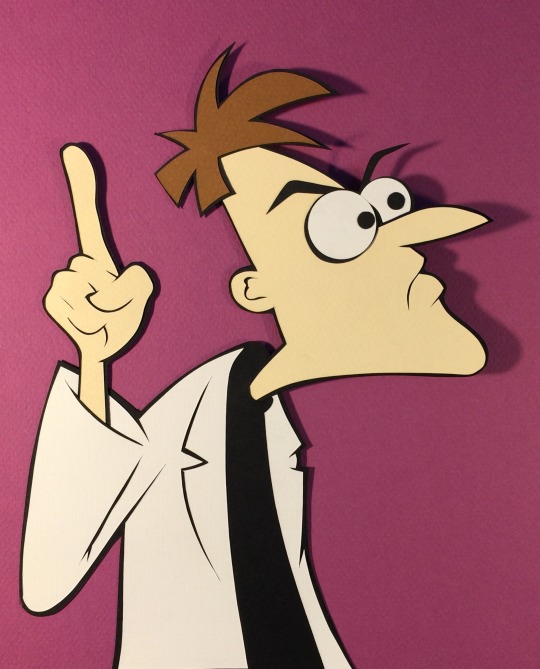
Profiles in Villainy
Dr. Doofenshmirtz
Doctor Heinz Doofenshmirtz (better known as Dr. Doofenshmirtz, or simply Doofenshmirtz) is an evil scientist hailing from the country of Drusselstein. He is the head of Doofenshmirtz Evil Incorporated, and he tends not to be evil in the traditional sense, but rather overly dramatic, eccentric and generally clueless. His usual lair is an office building that he apparently owns, though he's worked from other locations when necessary for his plans.
Doofenshmirtz attempts to wreak generally "evil" havoc and assert his rule across the entire Tri-State Area. Despite true dedication to this mission, nearly all of his schemes have been thwarted by his nemesis Perry the Platypus. Doofenshmirtz has become so accustomed to this dynamic that he tends to feel empty or even upset on those few occasions where Perry does not stand in his way.
The cad is voiced by Dan Povenmire and first appeared in the debut episode of Phineas and Ferb, airing on August 17th, 2007.
#Profiles in Villainy#Phineas and Ferb#Dr. Doofenshmirtz#Perry the Platypus#cut-out#paper art#Villains!
3K notes
·
View notes
Text
Healing takes time, like planning to inaugurate new establishments on the town. 🐱🇺🇸
#dialtown#mayor mingus#norm allen#paper bag man#his blush is out of limits!#he ain't paying attention tho#his ass is not listening!!!#what is she yapping about?#cutting taxes again?#maybe#maybe not#cat girl#corrupt#even
178 notes
·
View notes
Text
I think sonic would really like ska
#sonic the hedgehog#Spoiled art#Doodle#I love drawing on work paper and then cutting out my drawings before I shred the paper lol
456 notes
·
View notes
Text
Also I don't think I ever showed the finished Cheshire Cat I made
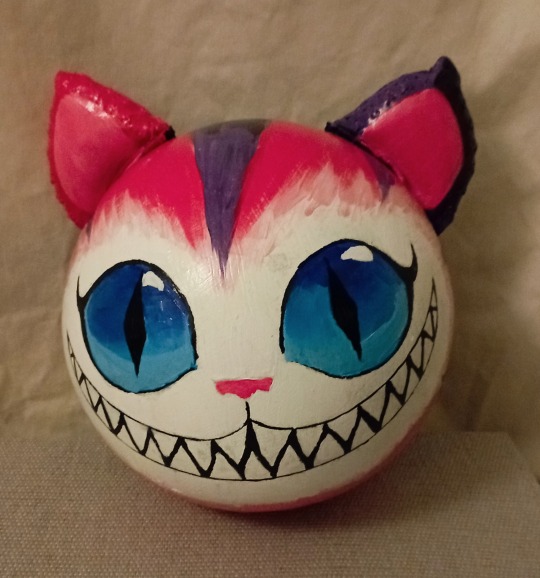
(it's a regular playing ball that I painted with acrylics and glued cat ears, which I also painted with acrylics)
#I cut out half a mouth and one eye from a printing paper to use as a stencil to make the features symmetrical#But otherwise it's freestyled
61 notes
·
View notes
Text

text taken from wayy later on in the script for loose stitches. dunno if it'll remain unchanged or if it'll make it into the final comic but it's a vibe rn and thats all that matters for my drawing class.
#nnstuff#nnart#art college#funfact i used cut out paper and a sharpie for this one#never let it be said that u need expensive art materials#loose stitches related
61 notes
·
View notes
Last Seen Blogs

taylor-yontz
SSgt Taylor Yontz

p1ssdr1nk3r
All Shrimp Are Cannibals

alexhollyhoc
AlexBun

day-as-sort
Untitled

danny-phantom-writings
Danny Phantom Writings