#but i still have a lot of gif sets i made in photopea in my drafts so those will still be coming out
Text
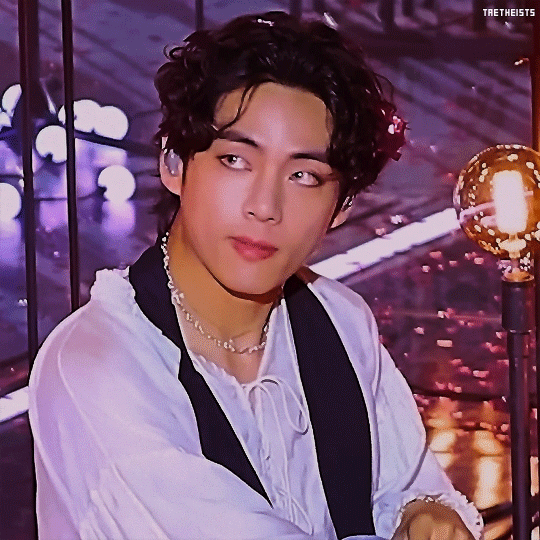
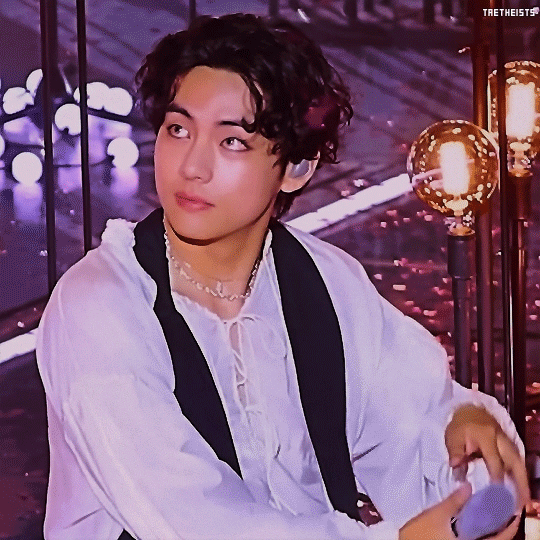
2023 gifs in review tag game
tagged by @khaotunq (here!) to post my favorite/most popular gifs throughout the year. thank you!!🩵🩵🩵
I only started making gifs partway through this year, so there was a big learning curve and i still think i'm pretty newbie but it has been a lot of fun and it's nice looking back on how much i think i've improved, though i have so much left to learn next year
i am going to ramble too much because this is my post, fair warning, forgive my self indulgence
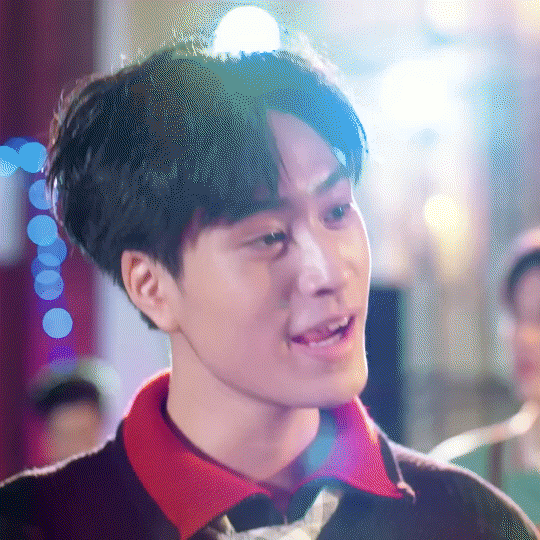
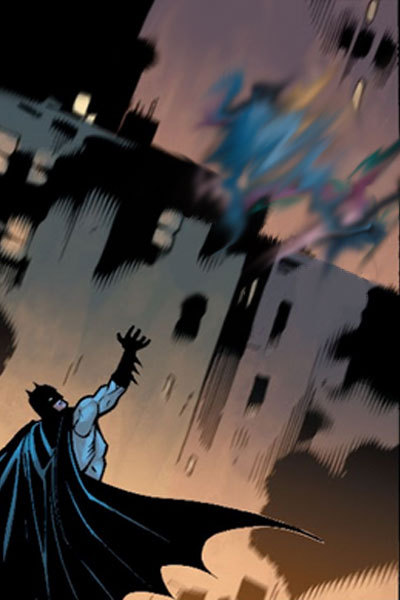
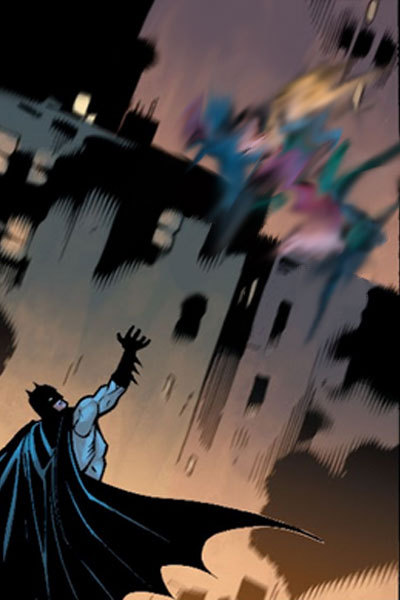
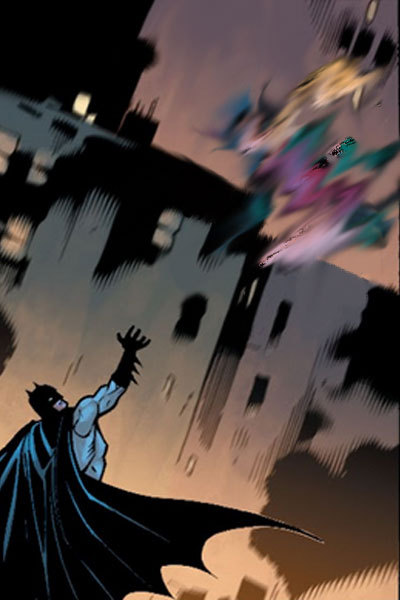
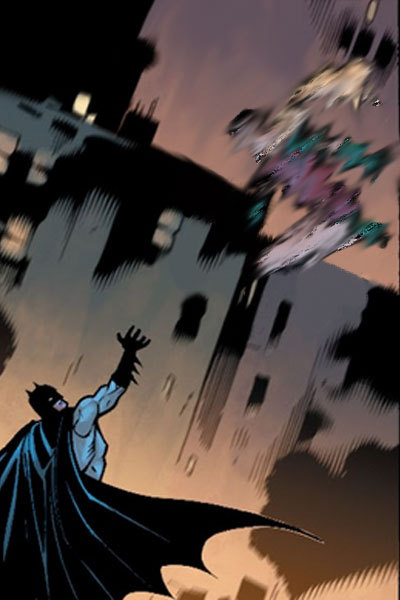
april
this was the very beginning, back in the photopea days before i tried photoshop (i am still quite fond of photopea, 1. because it is free and 2, for stills i think it's just as good as photoshop, but i could never figure out how to make gifs look good with its dithering system. i have seen some remarkable gifmakers using photopea tho so that's a my limited skill problem, and i'm glad i used it to dip my toes into the process!)
i only posted 1 set for abaab this month which looks not good but is still a very fun scene, but this was not actually the first thing i made (see below).
may
most popular: msp finale, tinn knowing all the words to gun's song <3
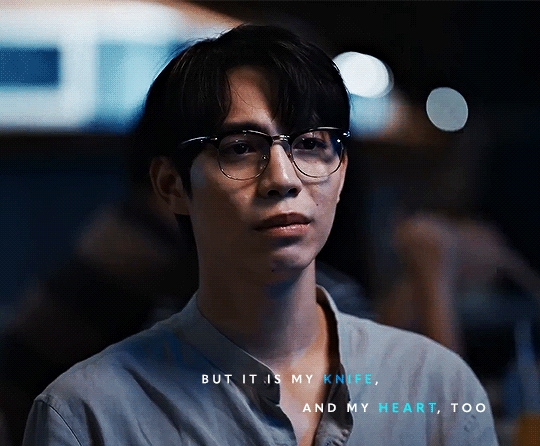
favorite: moonlight chicken, my first ever gifset and the reason i got into gifmaking because i wanted to capture the way moonlight chicken visually returned to locations and shots to underline its theme of loneliness being replaced by community, which is the mlc repetitions series

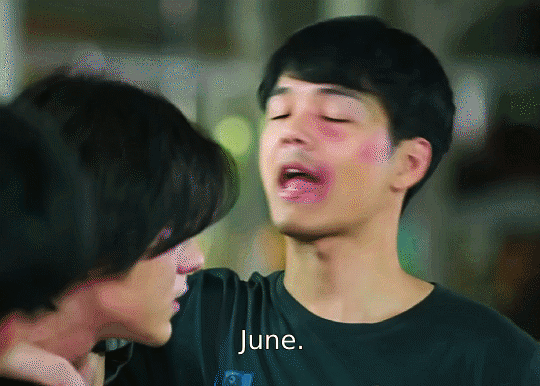
june
most popular & favorite: kiss me again (2018) and the lovely way june say's goodby to his friends (i learned how to add text to gifs for this one, and not only that but timed text! i thought it would get like 5 notes. it's very messy and doesn't look great, but i'm proud that i learned something with it, and i think its very funny and that's all that matters to me)

july
it's photoshop time now!! photoshop beloved you make such beautiful gifs and also you are So Slow and my computer cannot handle you.
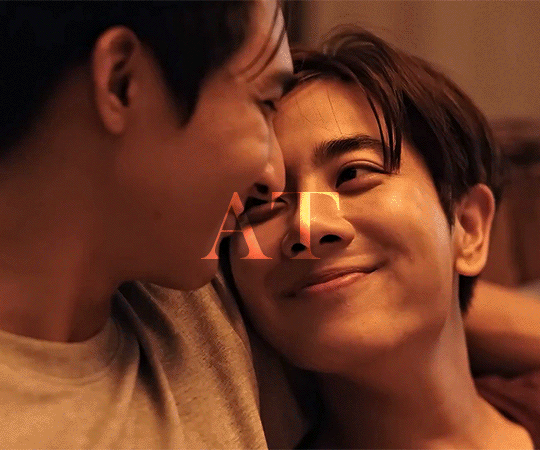
most popular: only friends original trailer set
favorite: jimwen looking at each other set (the start of my most belovedest of series, the followup to the first ever meta i wrote)
august
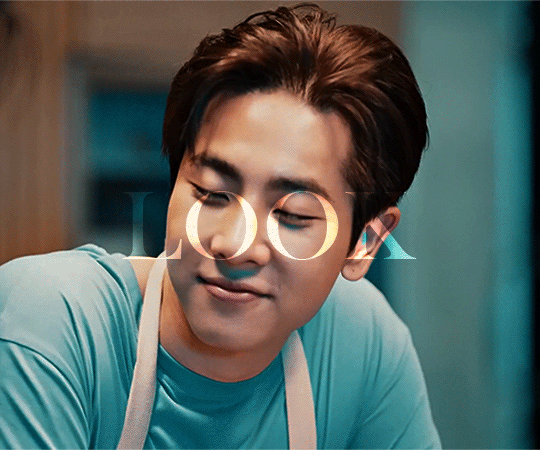
most popular: part 1 of the can't i look at you edits, cool tones edition
favorite: part 2 of the can't i look at you edits, warm toned edition (i love them both but this has two of my all time favorite wen faces)
hey its my profile picture and also i find it very funny that the Os line up with his eyes, and the second gif i love how impossibly happy they look
september
my busiest month in terms of gifs, in large part due to only friends
most popular: topmew and fire
favorite: alanwen poetry edit i spent soooo long learning keyframes for the heartbeat effect and then the ghosting effect was a happy accident thank you person in the background walking past at the right moment
(i also love my charn laws of attraction set because he was a surprise favorite character this year, i loved collecting the quotes for how he speaks of himself)

october
most popular: only friends sandray finale parallel set (it is. very very close to 1k which is. so many).
favorite: he's coming to me edit because it was so fun to make for @dudeyuri
november
most popular: not me sean and black getting along super duper well!
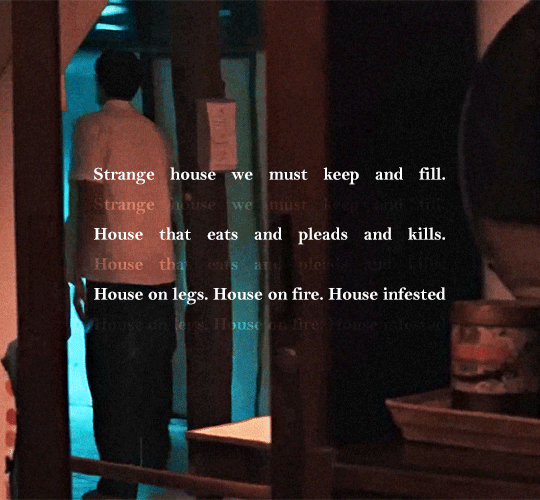
favorite: moonlight chicken haunted house edit, accompanying this meta/creative writing thing. i loved choosing liminal feeling shots for it and i liked how the simple typography turned out
december
most popular: a little jim and wen set i am very fond of
favorite: the moonlight chicken new years set i posted today. i love this little chicken diner

hey look i managed to mention moonlight chicken almost every month (i swear, i watched so many favorite shows this year but i loved making mlc gifs so much)
and that's that! thanks for reading if anyone read til the end.
no pressure tags for some amazingly talented creators who have made some of my favorite sets this year (if you feel like talking about some of your highlights, whether monthly or not, because you all make so much incredible work and i'd love to hear about it) : @hoppipolla @sollucets @icouldhyperfixatehim @celestial-sapphicss @chinzhilla @krystaljungs @moonkhao and anyone who wants to, consider yourself tagged <3
#tag game#bl superlatives 2023#rambling rambles#*mine#this was a fun retrospective!#thank you to all of the amazing creative people in this community that inspired me and taught me so much
15 notes
·
View notes
Text
how I edit my sims screenshots without a tablet and downloading a program
So, I’m lazy. I own Clip Studio Paint and I own a tablet, but when I’m playing the sims I’m 90% of the time too lazy to paint over my pictures. But I’m still a sucker for ✨aesthetic✨ and I’ve been asked how I do it, so here’s a guide on how to! It might seem long but trust me, it’s super easy, especially when you get used to it.
First things to consider (but not essential)
○ Reshade makes all the difference! You can follow this tutorial without one and I will show you how you can work around it, but it really helps a lot because it acts like a lovely filter in-game. I recommend Gshade because it’s easy to disable so you can just turn it on when you need screenshots. It also has a lot of pre-made presets and supports reshade presets.
How to install Reshade on the Sims 4 || How to install Gshade on the Sims 4 || my fave reshade presets: daisies & rose colored lenses
note: Gshade also has this really cool function that allows you to cut out the background immediately in-game, which works if you have a flat CAS background (either default or custom). You can disable this when you’re finished taking screencaps as it turns the ‘transparent’ bits bright green in game, but saves as transparent.
○ Don’t want to / can’t install reshade/gshade? No worries, they are basically in-game photoshop. All you need is some psd (you don’t need photoshop to follow follow this step, trust!). I really reccomend intramoon’s psd/actions, so download the ones you like! You can also search for ‘psd download’ on tumblr and there will be plenty you can choose from.
Now to the actual editing! (aka the less boring bits)
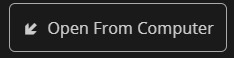
1. Go to photopea.com and open your screenshot there by clicking “Open From Computer”. Photopea is entirely free and supports psd files too!
2. (Skip this if you want to keep your background) Assuming you didn’t activate ChromaKey with Gshade (skip this step if you did) - long press the eraser tool and pick “Background Eraser”. Do your magic.

note: you might want to fiddle with the brush size and “mode” depending on what results you get.

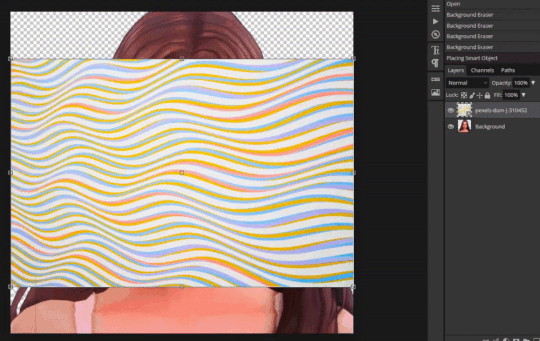
3. (Skip this if you kept your background) If you want to put a new background in, I recommend Pexels.com and search for “abstract background” or whatever you’d like. Once you’ve found one you like, download it.

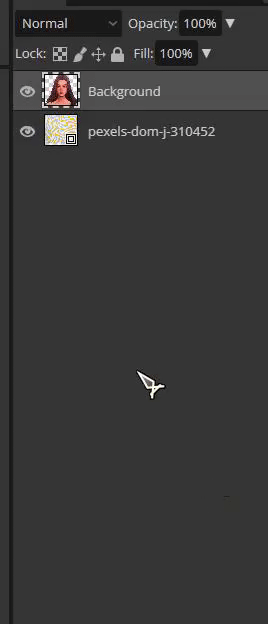
Open your background in PhotoPea. However, do it through Open > Open & Place

Then resize the image that got imported and put it behind your sim. Bam, there’s your background!
If you’re happy with how it’s looking, merge the layers by right clicking your sim layer and click “Merge Down”
4. (skip this step if you don’t want to use any psds) Open your .psd by clicking “Open”

Then select all the layers and press Ctrl+C

Switch tab and go to the file you were working with, you can find your tabs underneath the top menu

Then once you’re there, press Ctrl+V and your .psd layers will import to that file. Now adjust it accordingly, it might require experimenting since all psd files are different. I typically just collapse the folder (if they have it) and lower the opacity.
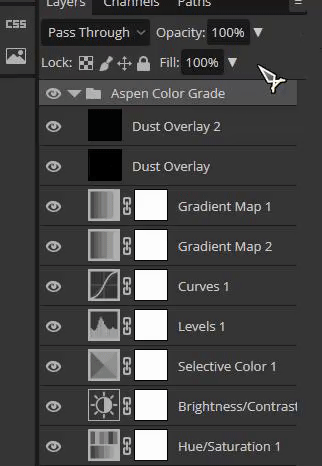
Then once you’re finished, select all your layers and select “Flatten Image”

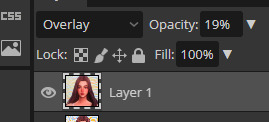
5. (Skip this if you used reshade) To add a soft glow, duplicate the layer by right clicking on it, select “Duplicate Layer” and then change the layer to “Overlay”. It will look extremely bright but don’t worry about that for now!

Go to Filter and press Blur > Gaussian Blur, then press OK.

Then lower the opacity to make it less bright. I usually have it very low, around 15 - 30%
6. Now it’s time to fix the jagged edges. Duplicate Layer by right clicking or press Ctrl+J

Go to Filter > Liquify
Now zoom in on the areas that stick out to you, that you’d like smoothed. Using the liquify brush, carefully manipulate the image until it looks how you’d like. You might have to play around with the settings, but I usually just change the brush size.
When you’re finished, press OK.

6. Now to polish your piece! Press Ctrl+J to duplicate your layer and then go to Filter > Stylize > Oil Paint
Untick “lighting” to get rid of the squiggly lines. t should now just look smooth, press OK.
Now go to eraser tool (you might have to hold it to get out of the “background eraser”. go to the brush settings and pick a soft brush, you can also adjust the size there.
Use the eraser to get back any detail that was lost when you used the oil paint effect. Usually this is around the eyes, but do it anywhere you feel like you want the detail restored. Click Ctrl+E to merge the layers once you’re finished, or use the flatten image method.
7. Duplicating the layer again (Ctrl+J), to get a more illustrated effect go to Filter > Blur > Surface Blur, then click OK. Repeat the Same process as you did at step 6 where you use the eraser brush to restore any detail lost (usually the hair), and then press Ctrl+E once you’re finished to merge your layer once more.

8. To add depth to the layer, duplicate the layer (Ctrl+J) and press Filter > Blur > Gaussian Blur. Change the radius to something low-ish and press OK.
Then using a bigger eraser brush, focus on the middle of the face/body, leaving the edges of the body/hair and background blurry. Then flatten the image once you’re finished (Ctrl+E)
9. To make ambient light, duplicate layer (Ctrl+J) and set the layer to Multiply. It will look very dark.

Click Ctrl+U and you will get a window that says “Hue Saturation”. Change it to a bit unnatural colour, I usually like pinkish tones but feel free to experiment. Don’t worry if it doesn’t look good right now. Lower the opacity a little bit, but not a lot. You still wand it to look a little odd.
Click on the black and white squares to make your colours black and white. Press the two arrows beneath it so that the white colour in top, then press on the Gradient Tool. Then go to the Menu and select the second option.

Use the gradient tool from one of the corners (select only one corner, feel free to experiment which one! All gives a different vibe), and drag it so that half is light and half still looks dark. Once you’re satisfied, flatten the image. (Ctrl+E)
10. For the last (and easiest step), sharpen your image. This time you don’t have to mess with the layers, just go to Filter > Sharpen and pick any of the sharpen options, I personally like Sharpen More. This maks the facial features pop.
That’s it! Simple, and trust me, the more times you do this, the easier it gets. ♥ I hope this was of any help!

260 notes
·
View notes
Text


1 year gif making celebration - taehyung and purple
bonus:

i can't believe it has been a year since i started gif making. to be specific though i started having an interest in gifing by june 7th, but didn't start actually making anything until the day after, june 8th. when i started i had no idea about coloring. i started out using giphy and imgur to make my frames before i came across photopea and gifski to take a video and make frames. if you can't use photoshop i highly suggest photopea. it was mostly me getting a grip on how to gif as in make the gif frames until i really started learning how to color. it wasn't until i started using photopea that i started to color for real.
photopea was a great start to my gif making days. i ended up even purchasing it without ads thinking i'll be using it for months, but nope! when there was a chance for me to start using photoshop i did switch over. i've been using photoshop since september 2021. it was definitely a change since photopea didn't have timeline, but it had a lot of the same features. i do remember asking for help on how to use photoshop, but then i ended up playing around and learning by myself. photoshop is probably the real program where i fell in love with my coloring and improved on my sharpness. i even tried using vapoursynth, but couldn't figure it out so i only kept up with photoshop. who knows maybe i'll try it again someday.
gif making started out as a new hobby for me after i graduated from college last year. then it became bigger than a hobby. it became an interest that meant a lot to me and it brought me joy. i always loved my laptop let's be real, i live on it lmao but gif making brought a new meaning. it was a place for me to express my own creativity and to also spend days working on gifs of my favorite group and one of my hyperfixations. there may have been times when i had trouble with my coloring or something else wasn't right, but in the end i always made sure i posted my best work. i came to be proud of my work and learned something new everyday. i still love my coloring, especially the use of selective color as well as camera raw filter. i suggest those to use if you also are a gif maker. then add more to that, there's my new love, high pass. when you take my three main loves with color overlay, i really do think my gifs are unstoppable and it makes me so proud of myself. always go out and do what you love. i made sure that gif making didn't become a chore for me as if it was a job. which is why i only worked on one gif set a day so i don't burn myself out.
i couldn't be here today without the use of photoshop, bts, and of course my mutuals and the people that reblog my content. i purple you all!
down below are people i love, see in my notifications, or just help me grow my account and support my work.
@itsallaboutzayn @usertae @userhobi @jinzayn @kimtaegis @jung-koook @honsool @taeyungie @btsgoldnetwork @purplearmynet @dailybts @dailybangtan @jimimn @marvelousbangtan @thornedswan @anpanmann @proofofjin @sugajimin @maknaelinegifs @jeonqquk @vantaenet @bisexualrapline @minieggukie @kithtaehyung @jimines @jeonjcngkook @minzbins @ohoshi @myungho @scoupsy @wonublr @pinkrasberry7 @sannie-hannie @angeldynxmite @jimilter @serotaejin @jungkooksource @yoonkookclub @clubjimin @pjmdaily @adventuresinwonderlust @lovejimin @namchyoon
there may be tons more people, but it's late and i'm tired so if you do happen to see this just know i love you so much and thank you!!
#bts#btsgifs#taehyung#btsgoldnet#vantaenet#esmetracks#shirleytothesea#userjeonqquk#heyryen#melontrack#tuserjay#usersky#trackofthesoul#dailybangtan#dailybts#dailydaegu#tusercait#annietrack#tusercelia#usertaeyungie#bangtanedit#btsedit#*samstuff#*gifs
172 notes
·
View notes
Note
do you have a guide to making your animated comic edits?
i don't, actually! in part because i'm relatively new to these parts and no one has asked for one, and in part because every gif i do is kind of a unique little adventure into teaching myself a new skill, so there isn't just one approach. but! i'm delighted that you want to know! so i'll try and walk you through a couple of them.
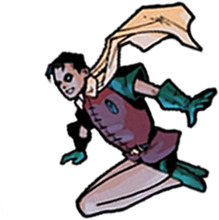
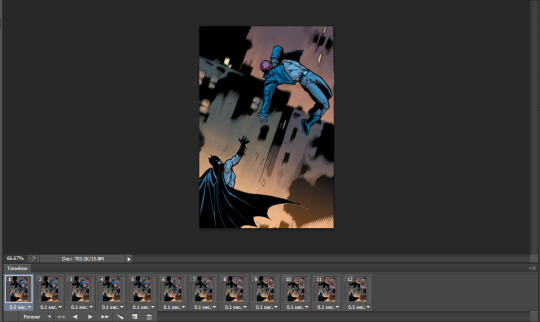
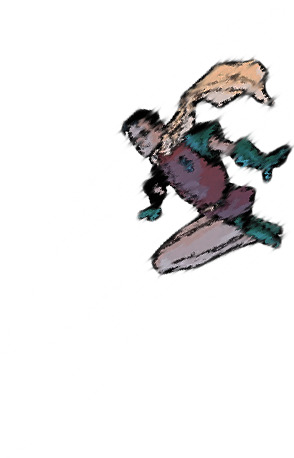
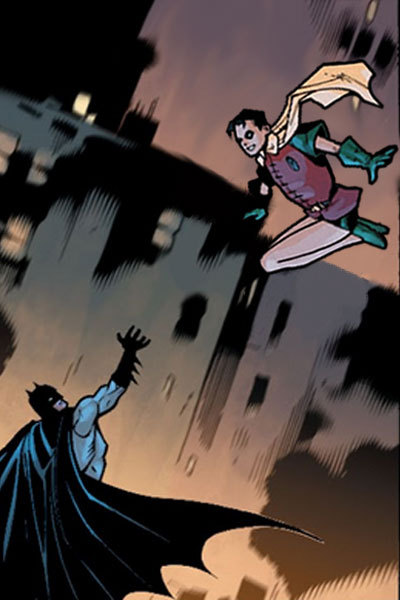
we'll start with this guy, because he's a favorite of mine and showcases a lot of the steps that i usually have to do:

tools you'll need: photoshop CS6; digital versions of the comics you'd like to edit.
(i assume you can use any version of photoshop or any editor capable of creating gifs, but CS6 is my preference. photopea is a fantastic free alternative, but figuring out timing and transitions is a lot harder there and requires more effort.)
step one: find your panels and elements
it's worth noting here that i cannot - and i mean this - cannot draw. at all. a lot of my life would be easier if i could, but here we stand. as such, nearly every element of these gifs is pulled from the comics themselves.
for this particular gif, which is admittedly on the simpler side, i needed two things: the initial panel, of jason leaping into the air, and a still image of jason as robin. preferably from the same run with the same artist, because that way, the art matches. i found these:

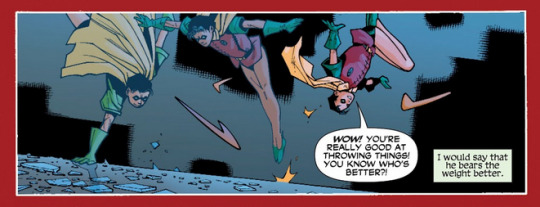
and that's all i needed for this one. sometimes i need to pull several panels for the vibe i want, or for specific things -- leaves to drift through the frame, magical elements, text and sound effects, speech bubbles, etc -- but adding those in follows pretty much the same processes either way.
step two: prep them!
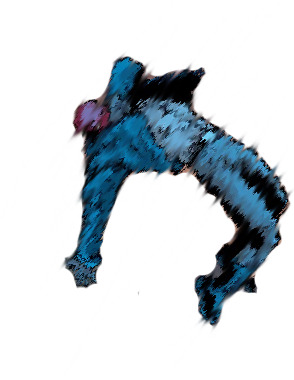
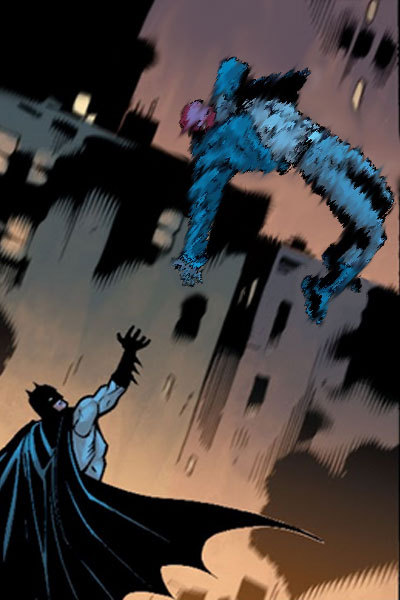
easier said than done, really. what i needed to do here was make myself a blank canvas around the elements that i would be messing with. this varies from project to project, but for this one, it goes as follows: remove the narration box and jason from the first panel; create an isolated version of jason that can be pasted back in; create an isolated version of robin that can be pasted in the same place at a similar angle.
this is a lengthy process, because i work off my laptop and have a touchpad and no artistic skills. here, it requires drawing in a lot of building and making a successfully blurry, ombre sky. and, because robin!jason's toes are cut off, i have to draw those in and try to match the shading.
(there's also some work here with color balance and photo filters to match coloration; i had to add some highlighting and change the colors on robin!jason a bit to match the background lighting of the overall image, but not by much. sometimes, this step is more involved.)
after some fiddling, i usually end up with things i'm happy with. for this gif, those are as follows:


(this is done through the blur tool, the magic wand selection tool, refining the edges of a selection, or -- in many cases, because comic lineart is my enemy - erasing every pixel of the background or character by hand. yes, there are easier ways to do this, but i like my time-consuming methodologies. they're soothing to me.)
and now we're ready for the fun parts.
part three: assembly!
so we take that background we just made and we paste hood!jason back on it on a new layer. silly that we have to, but yknow. it's fine. he's in there. and now the goal is to find a way to successfully transition from hood!jason to robin!jason in a way that's satisfactory.
i follow a lot of standard gifmaking practices, i feel like? but i'm also self-taught, so i actually don't know how true that is. i create a timeline in photoshop and set it to have a delay of about 0.2 seconds to start with, just to see how the transitions go. i usually start with 10 frames, and then add or remove depending on what seems right.
(the variations here can be broad, by the way. i have a green arrow gif with 140 frames with no delay and a wonder woman gif with six frames on a one-second delay, for example, but those are for another time. starting with 0.2 seconds' delay across 10 frames is just a comfortable starting place for me, is my point.)
this is what the timeline looks like for this project:
(it's that bar at the bottom. you can see the settings and all that as they appear in the final product: 0.1 second delay over 12 frames, so not too far off from my default. nice.)
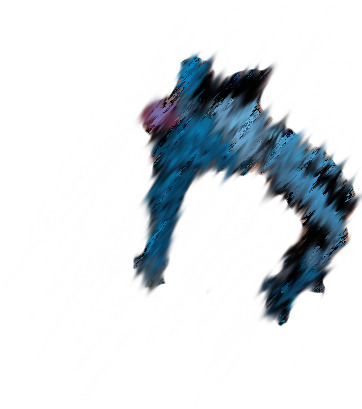
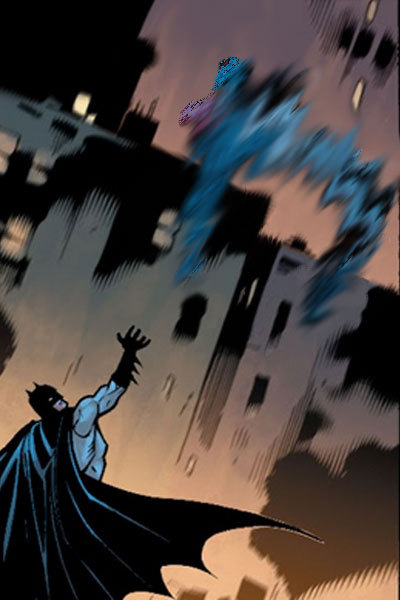
operating within that 10-12 frame range, i mess around with photo filters and the blur tool to both make hood!jason disappear and make robin!jason appear. this involved a heavy use of the "accented strokes" setting in the filter gallery and smudging and blurring until they looked how i wanted them to, which is to say, rather silly.
here's red hood vanishing:


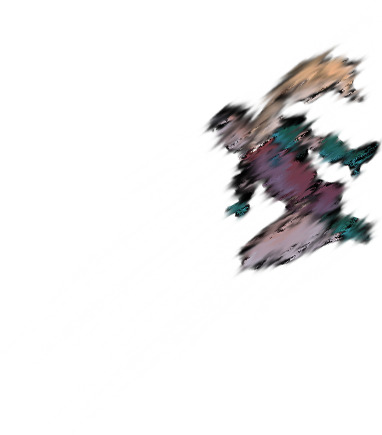
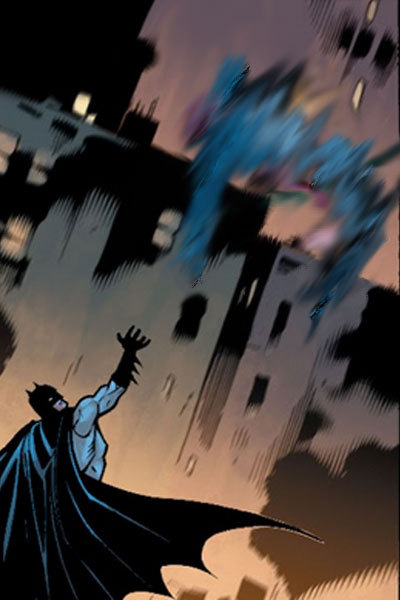
and here's robin appearing:


there are a few additional versions of these, but i think you get the idea. these are all the bits and bobs, and i just have to lay them out in the timeline in order to get the transition as i'd like it to be.
so i start with jason as hood, and then i move through the timeline and click and unclick the little eye to view them. this is also a heavy process; this gif has about twenty layers, and i'm revealing/hiding each one individually. that is actually not as bad as it could be; one of the poison ivy gifs i've published has about 600 layers that i did that with, and i have a green arrow gif with about 800 layers and 70 frames that i didn't even end up publishing because i wasn't happy with it. c'est la vie.
the end product should look something like this:


which, when played at 0.1 second delay and looped, looks like this:
part four: in conclusion...
i recognize this "guide" is messy and skips over quite a bit, but that's because every gif really is its own beast. i am very familiar with trial and error, and with trashing things that don't end up working out. each gifset takes me about 10-12 hours, depending on complexity, without even counting the time to track down panels or read the comics themselves.
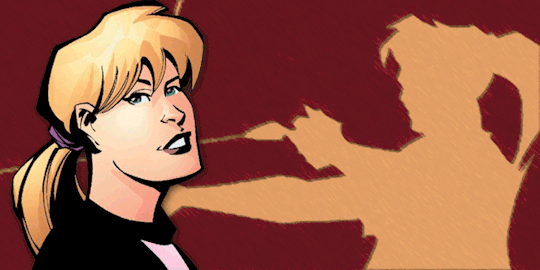
if you want to start with something simple, i suggest animating text bubbles. all you have to do for those is erase them from the background and then drop them back in over the top for about 0.5 or 01 seconds apiece for readability. this gif of mia, for example, was just isolating her from her background, creating a new background from a different panel, and then flipping the text on and off. it's got five frames on a 0.5-second delay.
basically... fuck around and find out. a lot. once you know how the gif timeline works and how to hide/reveal layers, the world is your oyster, because that's all this is.
again, i know this is messy and all over the place, but i hope it helps! have a little fun with it, and don't be afraid to mess up. it's fun either way. <3
#tbanimations#how to#ask.tb#elioherondale#i am always down to talk about how these got made so if there's a more specific one you had in mind...#feel free to ask about it#i am an open book i like discussing the things i make
9 notes
·
View notes
Text
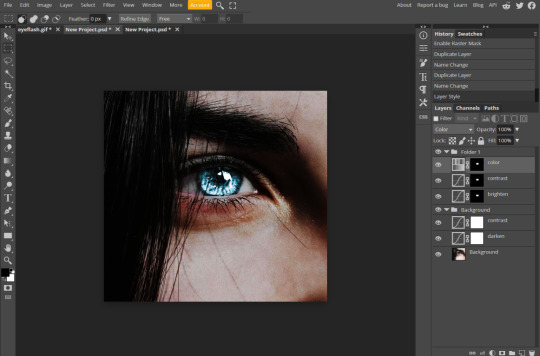
@moonrosey asked how i made the flashing eye gif in this set here, so i figured i would make a post to show it!
note: normally i would use photoshop to make things like this, but i made that set while i was at work and my job won’t allow us to download foreign software, so i have to use one of those free knockoff versions instead -- photopea, in this case. it would’ve been a lot easier in photoshop, but here i am.
so i’m going to show you how to make this gif in photopea:
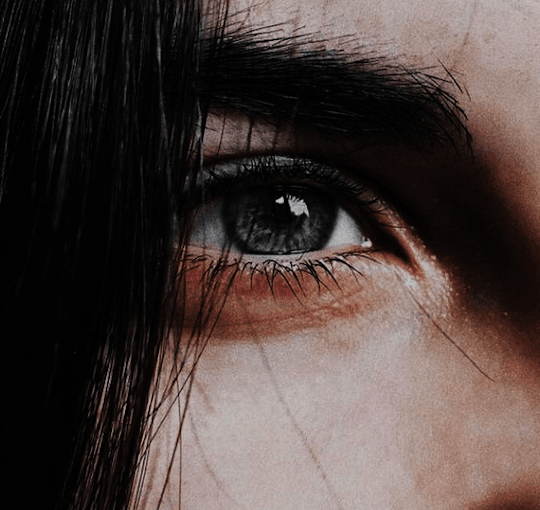
so i start out with my image

next i’m going to darken the image to make it more atmospheric, and so that the glow stands out more. i use two Curves adjustment layers, one to bring the whole thing down and then another to add contrast. the settings for those layers look like this, respectively:
now the image looks like this:
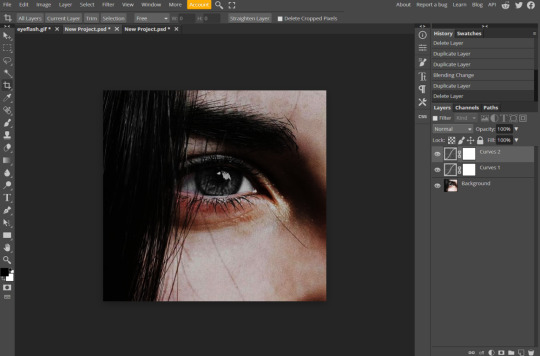
i’m going to put those three layers into a group so they stay out of the way, because (by the nature of photopea and how gifs function there) we’re going to end up with a lot of layers and it’s neater and less confusing like this.
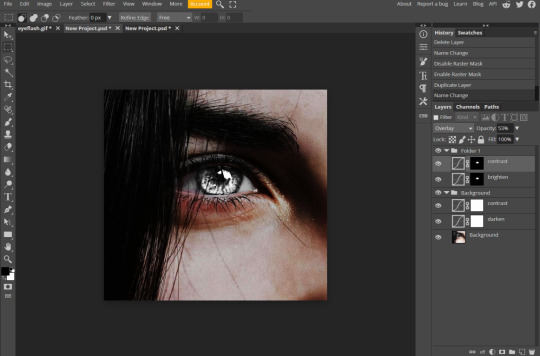
next, we need to create the end goal -- what we want the eye to look like when it’s lit up at its brightest. again, i use two Curves adjustment layers for this. the first is to brighten the eye up (a lot, i cranked it way up). but, because we want the eye to look like it’s glowing, we don’t want to bring the rest of the image up with it. so we need to use a mask, to make the adjustment only affect a certain part of the image.

the mask is that little square highlighted in green. whenever it’s filled with black, the adjustment won’t show, and where it’s filled with white, it will. so i filled the whole thing with black and then went in with a soft brush tool to paint in the iris area with white. now the eye is lit up brighter and the rest of the image remains dark.
next, i want to make the eye look like it’s glowing from the inside, which i’m going to achieve with some more contrast applied a little differently. it’s another Curves layer (this effect is mostly Curves tbh, lol). i duplicated the first Curves layer, actually, and then set the blend mode to overlay. this blend mode makes the dark parts darker and the light parts lighter, thus increasing contrast. i apply the same mask, so it only affects the eye, and i end up with this:
while making this, i decided spontaneously that i wanted to add color, because why not?? so to do that, i use a Hue/Saturation adjustment layer. i set it to colorize and upped the saturation (because the eye itself is grey, the color didn’t show up much until i did that), moved the hue slider around, and tweaked the lightness until i found a color i liked.
the layer settings look like this:

all that leaves the eye looking like this, though
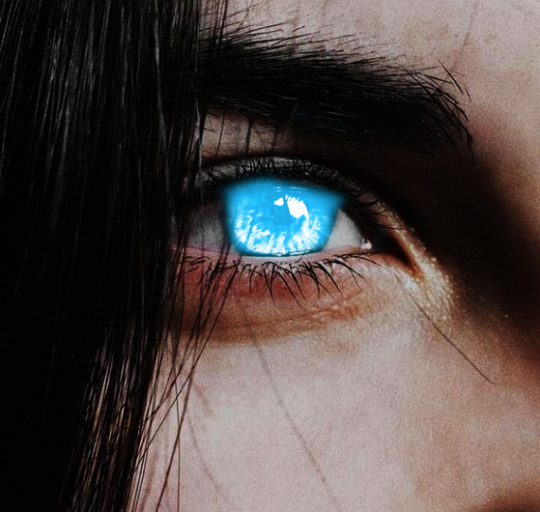
which is obviously not what we’re going for. set the blending mode of the H/S layer to color, and you’ll get this
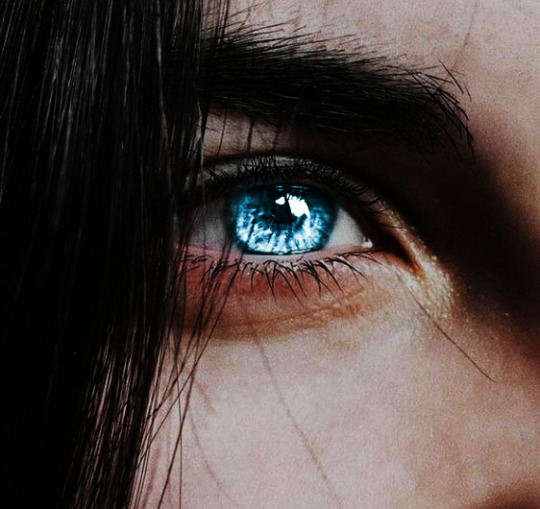
which is good, but could still be a little bit better. a good way to applied color look a little bit more natural, especially on high contrast images, is to go to the blending options:

that will give you a screen that looks like this:

i use the Blend If function! by moving the “current layer” sliders, you can remove the color from the blackest and whitest parts of the underlying image. you can see in the screenshot that i’ve moved the slider way up from the black end of the spectrum (making the black parts of the iris less blue) and a bit in from the white end of the spectrum (making just the whitest whites less blue). the sliders are two-part, so if you alt-click on one half of the slider, you can break it apart and the effect will be gradual and feathered instead of a harsh edge.
this change is subtle, but i feel like it makes a big difference. our image now looks like this:
that’s all for creating the final glowy look!!
if you were in photoshop, you’d be able to put this into the timeline and make good use of the built-in fade function to make it smoothly transition in and out. BUT ALAS, this is photopea, and here’s where things get complicated and annoying.
okay, so, to make gifs in photopea, you have to name layers a certain way to indicate to the program that This Layer Is A Frame In My Gif. that naming convention is “_a_”. any layer that is named starting with “_a_” will be its own frame in the animation. now, i don’t want each of my adjustment layers to be a standalone frame, so i’m going to utilize groups.
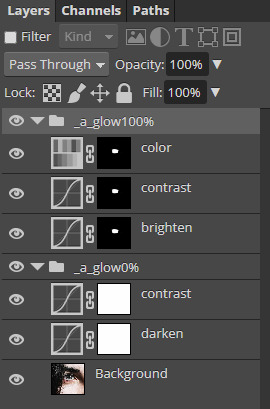
so far, my layers panel looks like this: two groups, indicated as Frames For The Gif, labeled for what part of the eye-glow-cycle they’re going to be -- 0% glowy (the base image) and 100% glowy (the one we just finished making). next up is to create the gradual fade in and out.
this would be so much easier in photoshop, i’m so sorry requires duplicating the glow100% folder over and over again and changing the opacity on each copy. for the original orange-kitsune-glow gif i made in set linked at the start, i think i used a 0%-25%-50%-75%-100%-75%-50%-25%-0% pattern, but for this one i decided to subdivide it a little more to make the animation smoother. the more frames with smaller more incremental changes made, the smoother the animation will be.
the only layer that you will not make into a frame is the very first group -- the Background layer. as the rest of the folders are nothing more than adjustments being made to that background layer, it needs to be present underneath every frame of the gif.

as you can see in the layers panel, i’ve got the pattern set up. every one of those folders contains the same set of layers (the brighten, overlay contrast, and color layers from earlier). don’t worry about how crazy bad the image on the screen looks with all of them turned on at once -- when the gif plays, each folder will only be shown once! they will not overlap like this when played.
so you can see that the pattern starts at the bottom with glow0%, walks upward through the percentages to glow100%, and then walks back downward to glow0% again. that will allow the effect to fade in and out.
but if you tried to play this (by going to “export gif”, that’s where it will preview the animation for you), it wouldn’t work properly, because photopea also requires you to specify the rate at which the gif will play. they need this in the number of milliseconds you want each frame to last for, included in the layer name like this: “_a_glow0%,500″. that would play for half a second. i want my animation to play faster than that, so it’s smoother and less jerky, so i’m going to specify 50 milliseconds for all of the in-between percentages, and then let it linger for longer on the 100% frame.
i will end up with something like this:
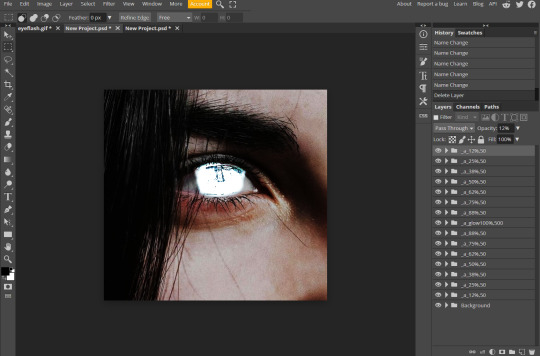
i want the gif to linger a little longer on the un-glowy part of the cycle, so i’m going to duplicate the Background folder, change its name to “_a_glow0%,500″, and move it to the top of the list.
aaaaaand that’s it! the animation is complete. export the gif and save it, and this is what you’ve got:
thanks for asking and giving me the excuse to waste 2 hours of my work day via aggressive photopea procrastination XD
#photoshop tutorial#but MINE this time alkjdgh#moonrosey#edits by me#my tutorials#assuming i ever make any more of those lol#might make a follow up post for how to do it on regular photoshop#much shorter tutorial i'm sure lmaoooo
60 notes
·
View notes
Text
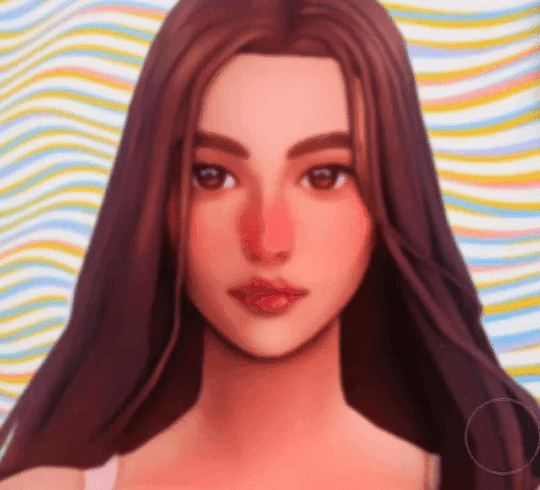
MY GIF-MAKING TUTORIAL
for @sunshinesquash
i use photopea.com for making gifs so if you have photoshop i’m not sure how much different these tools will be, but i hope this can help!! i also have a windows computer so if you have a mac my recording technique might not work :’( all the tools i use are pretty simple and basic so if you can’t afford to download a lot of software dont worry!
recording:
when you’re finding videos to use for gifs, you want to use the highest quality footage u can find! you normally always want to use 1080p, but if you can only find 720p then make sure its not too grainy!
for the actual recording, i use the (windows + g) shortcut. once you click that this should pop up!

if this is your first time opening the game bar, it might just show only the top bar - if that happens, click on the second icon! when the capture sidebar shows up click on the third icon and the recording will begin :] make sure that your recording is 4-5 seconds max, otherwise it will be too big for photopea to handle and there will be too many frames!
opening the recording:
all your recordings from the windows game bar will automatically show up in videos > captures.
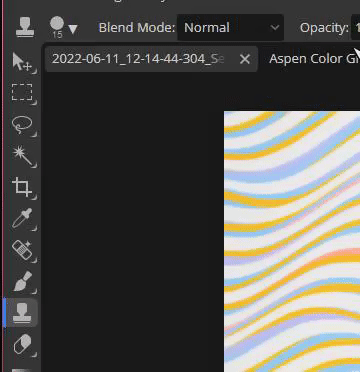
open photopea, and then click file > open and locate your recording!
when it’s opened photopea should look like this:

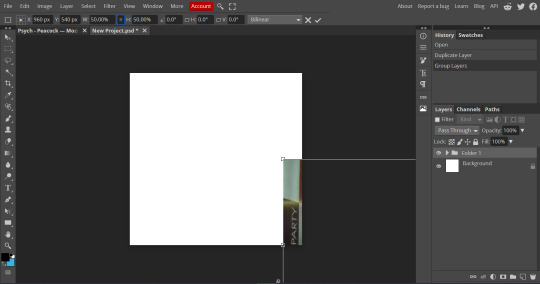
this image size is 1920 x 1080 which is way too big for photopea to load your final gif and for tumblr to accept! because of this you’ll click file > new and get to a pop-up that looks like this:

the size that i normally make my gifs is 540 x 540 which is what i’m going to use for this tutorial! you can always go for other dimensions - whatever you’re comfortable with :]. click create!
ok now comes the complicated part :
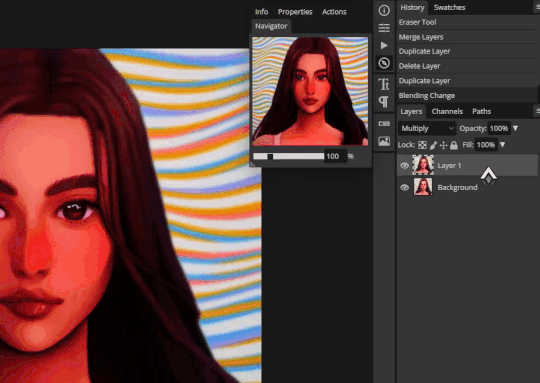
select all of the frames that you’re going to work with until they become highlighted grey. make sure the folder is not selected!

right click on the highlighted area so an options bar pops up!
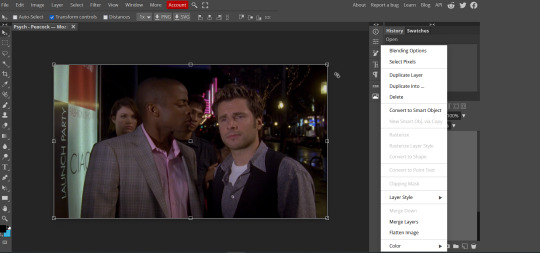
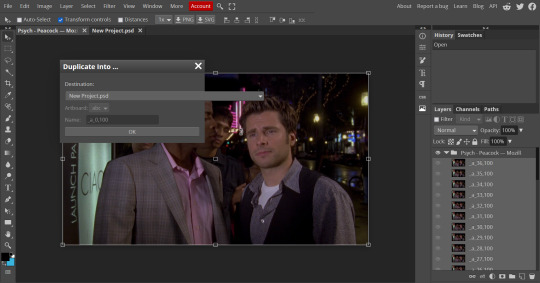
click on ‘duplicate into...’ and select the drop down menu and click on ‘new project.psd’. there will be a ‘new project’ and a ‘new project.psd’ option - ‘new project.psd is the one you want to click on! ‘new project.psd’ is the 540x540 project that you created.
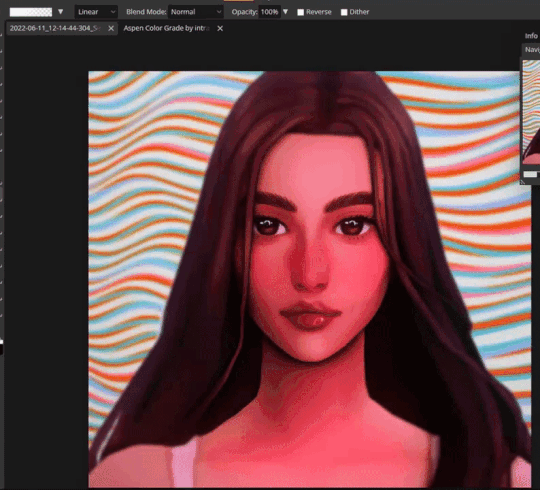
next, click on the tab that says ‘New Project.psd’ and it should show you something like this:
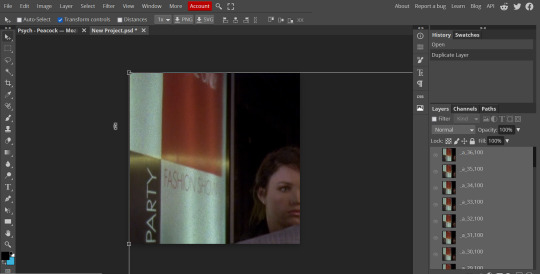
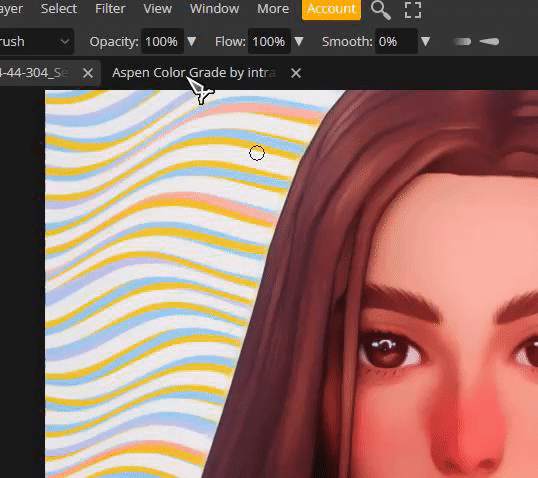
the frames are really zoomed in because of the different dimensions, so we’re going to fix that! make sure all of your frames are still highlighted and then click on the little folder button that i circled:
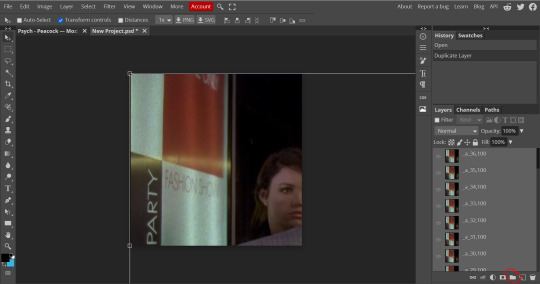
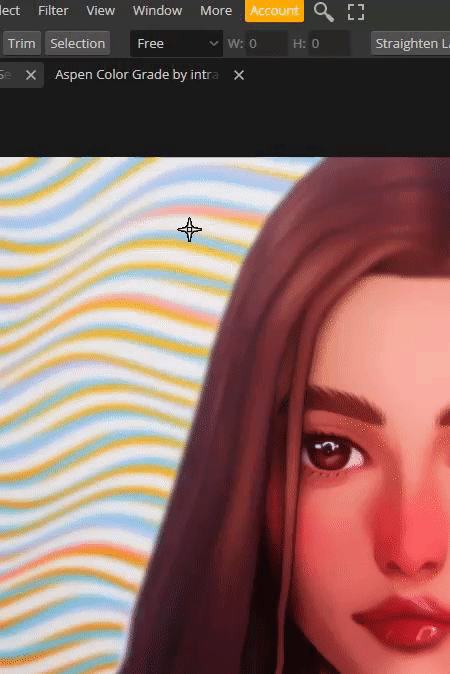
now all of your frames are going to be under a single folder. make sure ‘transform controls’ on the top menu is selected! now single click on the edge of the selected frames:

now a new menu is going to show up where it used to say ‘transform controls’ was! make sure the little hamburger button in between the dimensions is selected.

replace the 100% with 50% and now your dimensions will look like this!
now just drag that box of frames onto the white area! (make sure only the folder is selected on the side bar):

sharpening + color:
now you’re going to open that folder and then select all your frames again (make sure the folder is not highlighted):

now click filter > noise > and type in 1%.

im adding noise here because it helps smooth out the gif and makes sure there arent any wavy/grainy lines!
after you click ‘ok’ then click filter > sharpen > smart sharpen. you don’t have to change any settings here! just click ‘ok’ with the default settings.
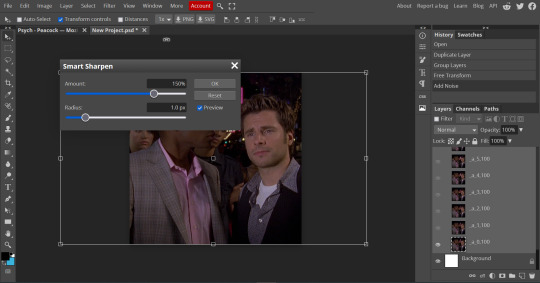
now your base gif is ready for coloring!
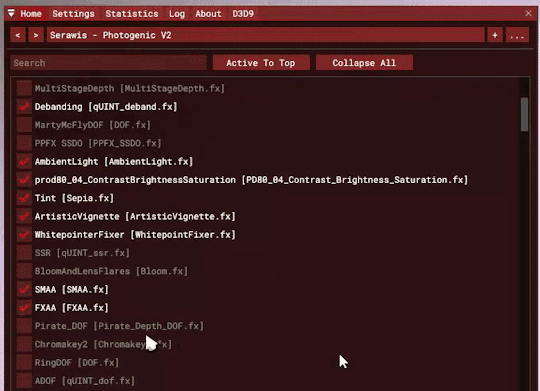
all your coloring tools will be under layer > new adjustment layer.
always remember that whatever settings/coloring that i use may be different from the way you want to do it! gif-making always starts with exploring and experimenting with your style :]
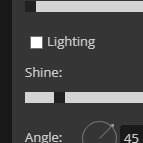
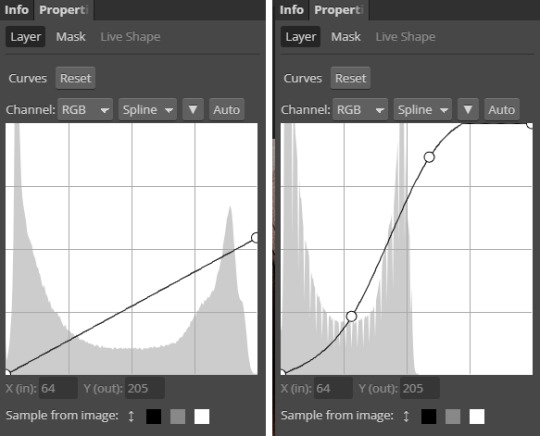
the first type of adjustment layers that i always start with are the ones that deal with adjusting brightness! depending on how dark your gif is you will either want to start with ‘brightness/contrast’ or ‘levels’. (you can also use curves but levels are easier to control for me.)
if you have a super dark gif, you’re going to want to start with ‘brightness/contrast’. no actual adjustments will be made to this layer but you’re going to make its type ‘screen.’

BE CAREFUL WITH THIS LAYER! doing ‘screen’ with brightness/contrast will often whitewash characters of color so for this gif we’re going to just use ‘levels’! (there are ways to get the original skin tone back when using this layer, so if it’s completely necessary depending on the scene, you’re going to have to work a lot with coloring adjustment layers to make sure not to oversaturate or whiten when doing this. you’ll get there with practice, but for this tutorial we’re going to work with safe adjustments!)
if the gif becomes too bright because of ‘screen’ in brightness/contrast you can adjust the opacity!
whenever you use brightness/contrast you’re also going to use a levels layer because just this layer can remove a lot of the depth
now let’s open the levels layer!
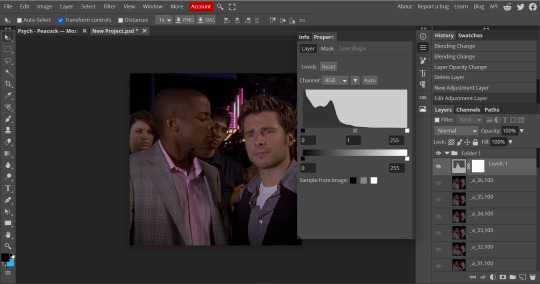
you’ll see the three squares that you can adjust - the black is shadows, the grey is mid-tones, and the white is highlights. when working with characters of color don’t brighten the mid-tones, this will also whitewash them! dragging the squares to the left will brighten, and to the right will darken. each scene will require different adjustments so explore and figure out what’s right! make sure when brightening, that you remember to give it enough depth.

now the gif has proper lighting!
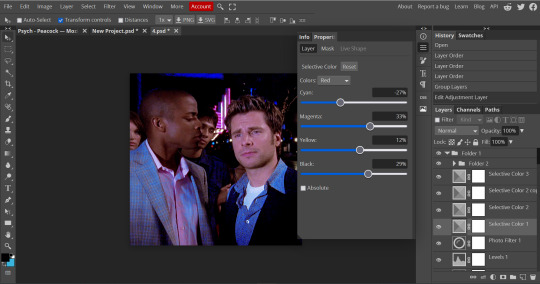
after your brightening layers, you’re going to look at the scene and check whether you need a photo filter layer! if your scene has a strange filter - for example, cw shows often use a weird dark yellow filter: this is where a photo filter comes in.
for this tutorial im going to show how to use the photo filter! shawn’s face has a yellow tint so we’re going to try this out. (there are ways to get rid of the yellow in selective color, but for this tutorial we’re going to start with photo filter.)
photopea automatically provides a yellow color photo filter which is not what we want for this scene! (if you have an especially blue scene this might help though!)

click on the orange square and drag the color picker to the opposite color of the one you’re trying to get rid. we’re getting rid of yellow, so we’ll select blue.
now, we’re going to adjust the density so it doesn’t look so blue. now it looks perfect!

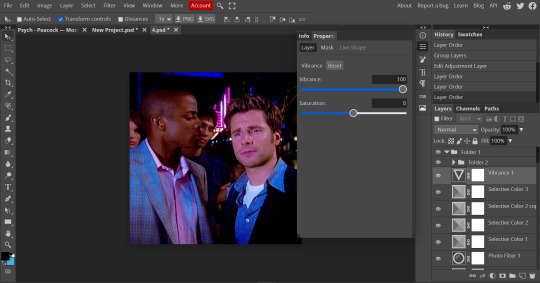
now we’re going to go to my favorite tool: selective color :]
you can see hints of blue, and pink in the scene already - so we’re going to really bring those out!!

click on the drop down that will bring up a list of colors! we’re going to especially go for cyan and blue. when i really need to bring out blue, i drag the cyan fully over to 100% and the yellow to -100%

if you look at the gif now, you can see that the blue is starting to come out! duplicate that selective colors layer until the blue becomes saturated enough, but not grainy. i duplicated mine’s three times for this gif!

now that you see how to manipulate the colors with selective colors, experiment and see what you can do! i felt like the skin tones were too pale so i messed with the reds :] you may think differently, that’s why coloring is subjective not objective!
one of my other favorite tools to use is the vibrance tool! make sure not too saturate your colors too much so be careful with this layer!
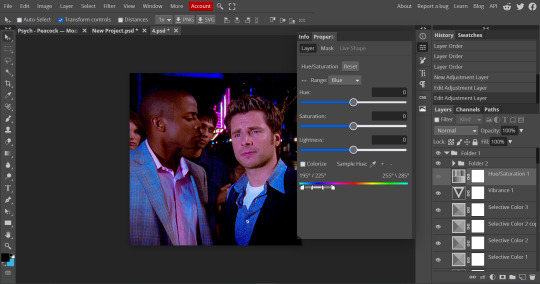
another really fun tool to use is the hue/saturation tool! if you have a very prominent stable color that isnt too grainy, you can manipulate it to another totally different color! this gif may not do too well, since the blue isn’t completely solid, but we can still test it out!
click on the drop down to the color you want to manipulate and have fun with it! i could make the blue a little cyan here without making it too grainy so this is what we ended up with :]

this is going to be the end of the tutorial for now but always feel free to ask me if you need some more advice. if some of it was confusing dm me or i can always make a video of my process!
[VERY IMPORTANT: REMEMBER that photopea.com is a website so it’s always prone to crashing. always ALWAYS save your psd’s after you’re done editing. a psd will save all your coloring and frames! go to file > save as psd. to export your frames as a gif go to file > export as > gif > save! if photopea starts lagging, it might be the time to open it in another tab and start making your other gifs there.]
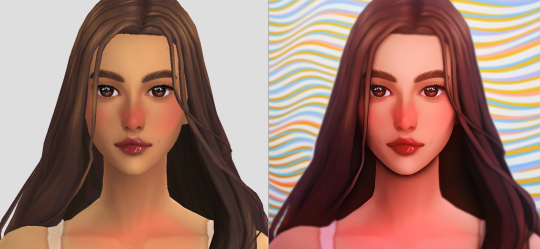
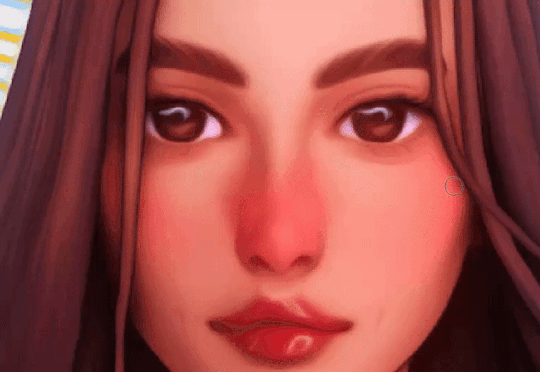
this is our before and after coloring!:

#husband.message#*mystuff#gif tutorial.#i hope this could help a little bit!!!!#ok for anyone to rb!!!
21 notes
·
View notes
Last Seen Blogs

mayuyubutt
Space Odyssey
gray-gray-gray-gray
gray
hauteadore
HAUTE ADORE
zebraslovescupcakestoo
Dreamer
weirdsht
Isshin