#and i know a bit about making frankenmeshes
Note
Hey GG! I hope you're doing well! I'm just wondering if you have a tutorial that you use to create those beautiful puffed sleeves in your WIPs and if you'd be able to link? I'm struggling a bit (ok, a lot) meshing my own, I'm not great at Blender but tutorials definitely help! - Asher (jewishsimming)
Hello, hello! I actually don't have a tutorial to refer you to but have whipped up a quasi-tutorial via some blender screenshots of how I achieve those puffed sleeves lol. I don't have a screen recording program on my pc anymore and am not really in the headspace to record a full-on video anyhow but the screenshots should help (I hope)!
Disclaimer: I'm not a blender expert despite having been a creator for some time now, and so what I'm about to show you is probably not the most efficient way of doing things. Throughout the years, I've learned certain tricks by playing around in blender but it does not mean I'm doing anything "correctly." Also, I'm just assuming you know the very basics of blender so I will not go into extreme step-by-step details of frankenmeshing. Here we go?
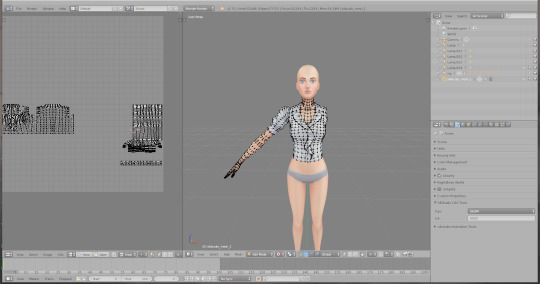
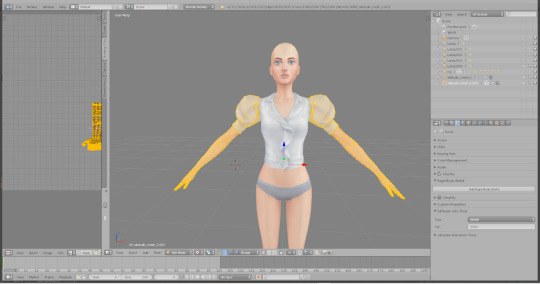
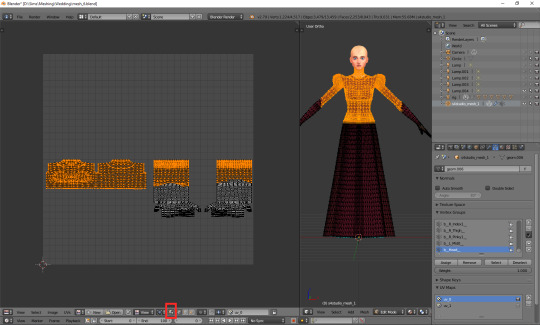
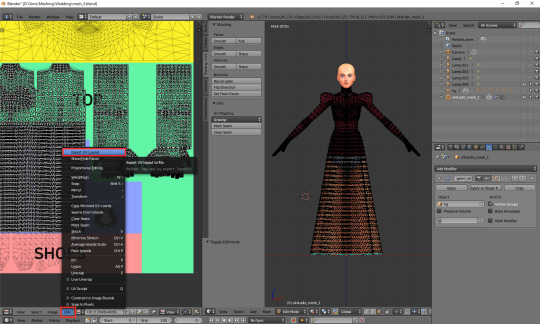
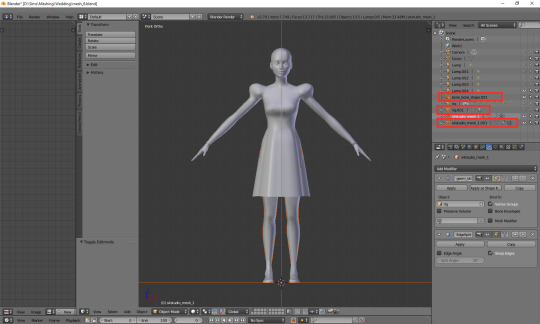
Once you have exported your base mesh with the sleeves you want to adjust, you'll want to delete one of the arms altogether as shown below.
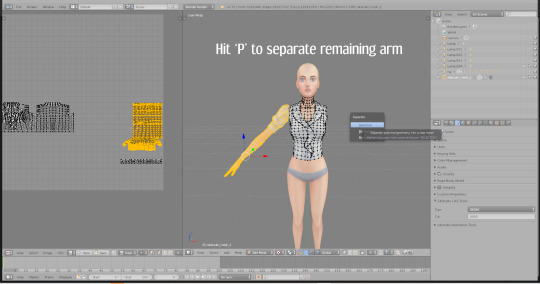
Then highlight the other arm and hit 'P' on your keyboard to separate this remaining arm from the rest of your mesh.
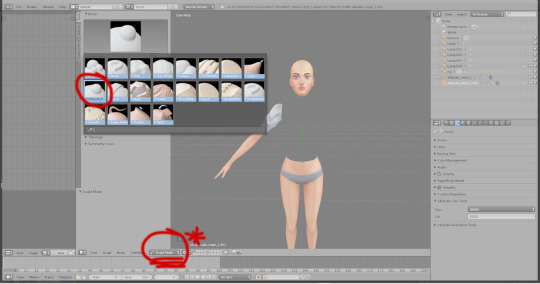
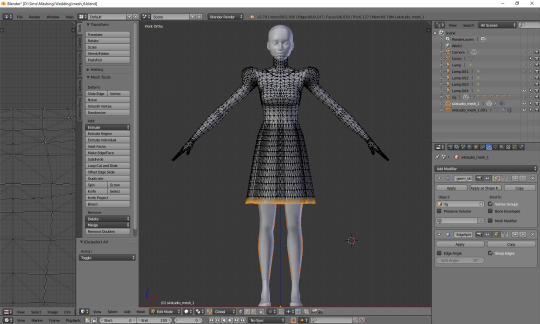
Click on the newly separated mesh and hide the other mesh while working. Then go into Sculpt Mode as shown in the photo below and select the "Inflate/Deflate" mode.
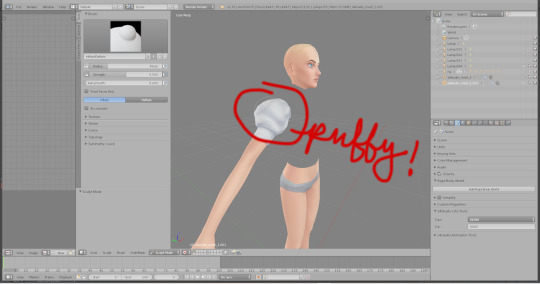
Then start "inflating" the sleeve as desired by clicking on the sleeve itself. You can adjust the radius, strength, and autosmooth sliders to your preference. I find that by separating the mesh, you are able to have better control and obviously avoid messing around the other parts of the original mesh. You can also play around with the "Grab" mode which also works!
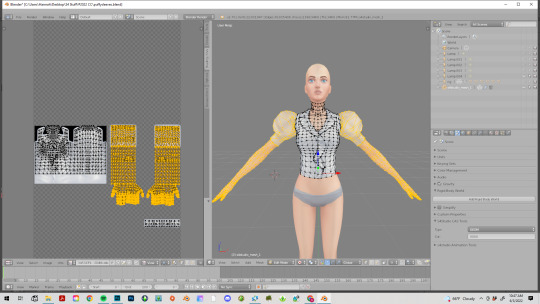
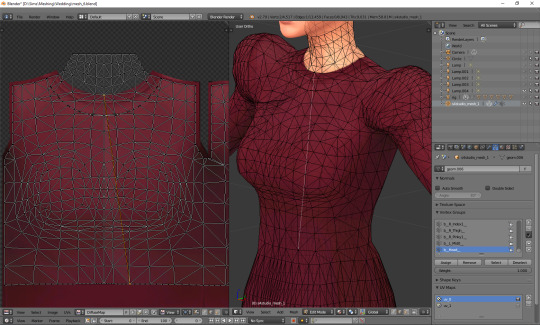
Once you have your desired shape, you will want to go back into edit mode and highlight the entire arm mesh. Then hit Mesh, and scroll to Symmetrize. This will automatically create a mirrored arm for you.
NOW the next few steps are tricky but make sure you do not miss a step or you'll end up with a wonky mesh!
You have to adjust the weight and UV maps. There are two ways you can go about this. You can either manually adjust weights and the UV maps OR you can use CAS Tools (I recommend!). If you choose to use CAS Tools, all you will want to do is join the two meshes back together and join the seams/weld the seams in UV-1 like you would normally do when you are frankenmeshing. Then run the mesh through CAS Tools and have it autocorrect weights and the UV maps.
For the sake of this "tutorial," here is how you can just adjust in blender without having to open a whole new application.
Manually Adjusting the Weights/UV Maps: You will have to do a weight transfer to make sure that the left arm have the correct weights before joining the two meshes back together. I won't go over the weight transfer in this "tutorial" because there are so many tutorials/resources already out there. Once you have completed your weight transfer, join the two meshes back together.
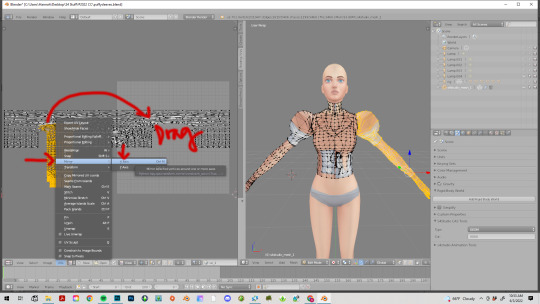
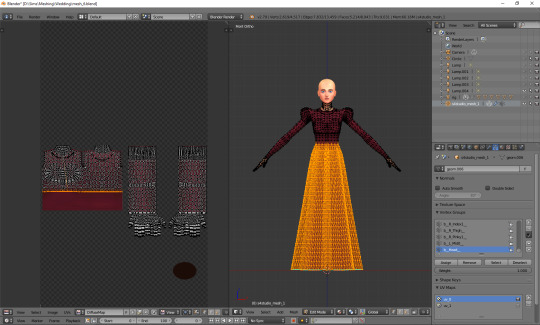
At this point, we will now adjust UV-0. Select your left arm on the UV-0 map and click on Mirror > X-Axis. Then move it onto the correct space on the map.

We will now adjust UV-1. Go into the UV-1 map after selecting the left arm entirely. You will then repeat the steps completed in UV-0. You will click on Mirror > X-Axis and drag the vertices accordingly.
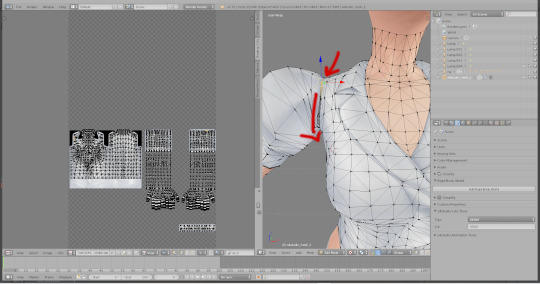
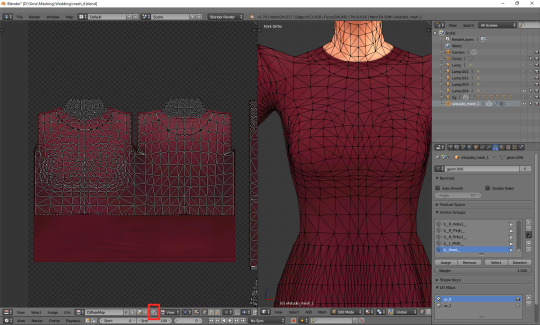
Then finally, merge the seams of the two meshes as you normally would when you frankenmesh. Make sure to weld the seams in UV-1 as well.
NOW, having said all that, CAS Tools will save you a lot of time and hurt. I would definitely use that application first before attempting this manual adjustment.
I hope this helps! Good luck!
#asks#resources#um this took a lifetime to screenshot and write lol#do I stay in blender or give my head a break lol#also jewishsimming - hope you're well - have missed your posts!
29 notes
·
View notes
Text
VI a. UV_0
(Previous: V. Adding missing body parts / Frankenmeshing / Finishing touches)
As promised, I'll finally talk about uv maps today. About time! Sorry it took so long; I hope at least you'll feel that it was worth the wait.
Generally speaking, uv maps are 2D representations of a 3D mesh. A mesh cut into pieces and made flat. TS4 meshes use two of them, called – very originally – uv_0 and uv_1. You can see them listed if you click the little triangular symbol in the panel on the very right (if you hover over the triangle, it says 'Data').

Why are there two? Because they serve very different purposes. To put it simply, uv_0 is responsible for the texture of your mesh, while uv_1 makes the mesh move with body sliders. Therefore we'll need to discuss them separately. Let's start with uv_0.
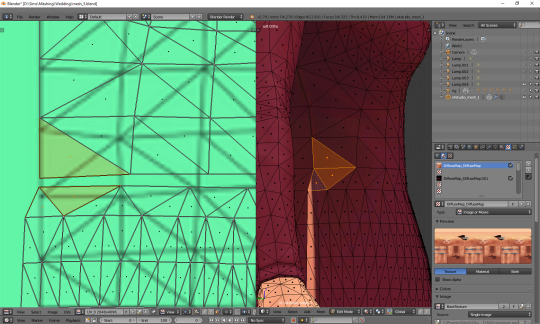
As you can see, uv_0 is the one selected by default. If you switch the mesh shading to 'Material' or 'Texture', you're going to immediately see any changes you make to it. The map itself is located in the window on the left – the one which we haven't used so far at all. Let's go into edit mode and then make that window bigger, so that we could see all the icons at the bottom.
Right now nothing is happening there. But let's just try selecting a random part of the mesh...
Important: when you use shortkeys, pay attention to your cursor's position! E.g. if you press b with your cursor in the uv map area, it'll activate the selection tool for the map, not for the 3D mesh.

You can see that a bunch of little dots appeared on the map! Those are your selected vertices.
Now, I don't know why this is the default option for Blender – your vertices being invisible on the uv map unless selected – but you can easily change it, so that you could always see them. You just have to click one of those tiny icons at the bottom. If you hover over it, it says 'Keep UV and edit mode mesh selection in sync'.
I find it way easier to work with this way: you can see all the vertices, and the ones which you selected are highlighted now, just like in case of the 3D model.
Then there's another important tiny button, right between 'UVs' and 'New'. If you click it, you'll see a list of all texture files associated with your mesh. In my case it's only two basic files: the body texture and the texture of the top I used as a base, but if you're frankenmeshing, that list can get much longer. Let's choose the original diffuse map.

You can see that the map reflects perfectly whatever is going on with the 3D mesh. The parts not covered by any texture use the skin texture instead. Not the whole texture of the top is used, because at the very beginning I cut off the bottom part of the mesh. There's also an abundance of vertices in the waist area, because I extruded the lowest row of vertices to make a skirt; and, as I didn't make any changes to the uv map yet, the new vertices appeared right on top of the original ones. In fact, if you select that lowest line on the uv map, you'll see that the whole skirt gets selected.
UV maps can also be useful for detecting weird stuff happening to your mesh. I can see that there's some line going across the top. I switched to edge select, selected it and found out it really is some completely useless edge going through my 3D mesh. No idea how it got there, but thanks to the uv map I could spot and delete it.
Just a couple of other tiny icons before we proceed to fixing our uv_0 map. Firstly, there's the little pin, which let's you – unsurprisingly – pin the currently used texture, so that Blender wouldn't switch to any other ones (yep, it likes doing it). Just click it and you're safe.
And then, right next to it, there's a little cross. Remember what I said about the list of used textures getting super long if you're frankenmeshing? It can get annoying if you don't need 80% of them, but have to scroll through them all whenever you want to switch from texture A to texture B. If you're sure you don't need a certain texture, select it and then shift-click that little cross. That'll tell Blender that this texture is not used, so it doesn't have to load it. You'll need to save your mesh, close Blender and reopen it for the changes to be applied!
OK. Now that you have an idea what's what, we can finally talk about editing the uv_0.
In case of TS4 diffuse maps, it's very important where you put your texture. Each category has its designated part on the map. It looks like this:
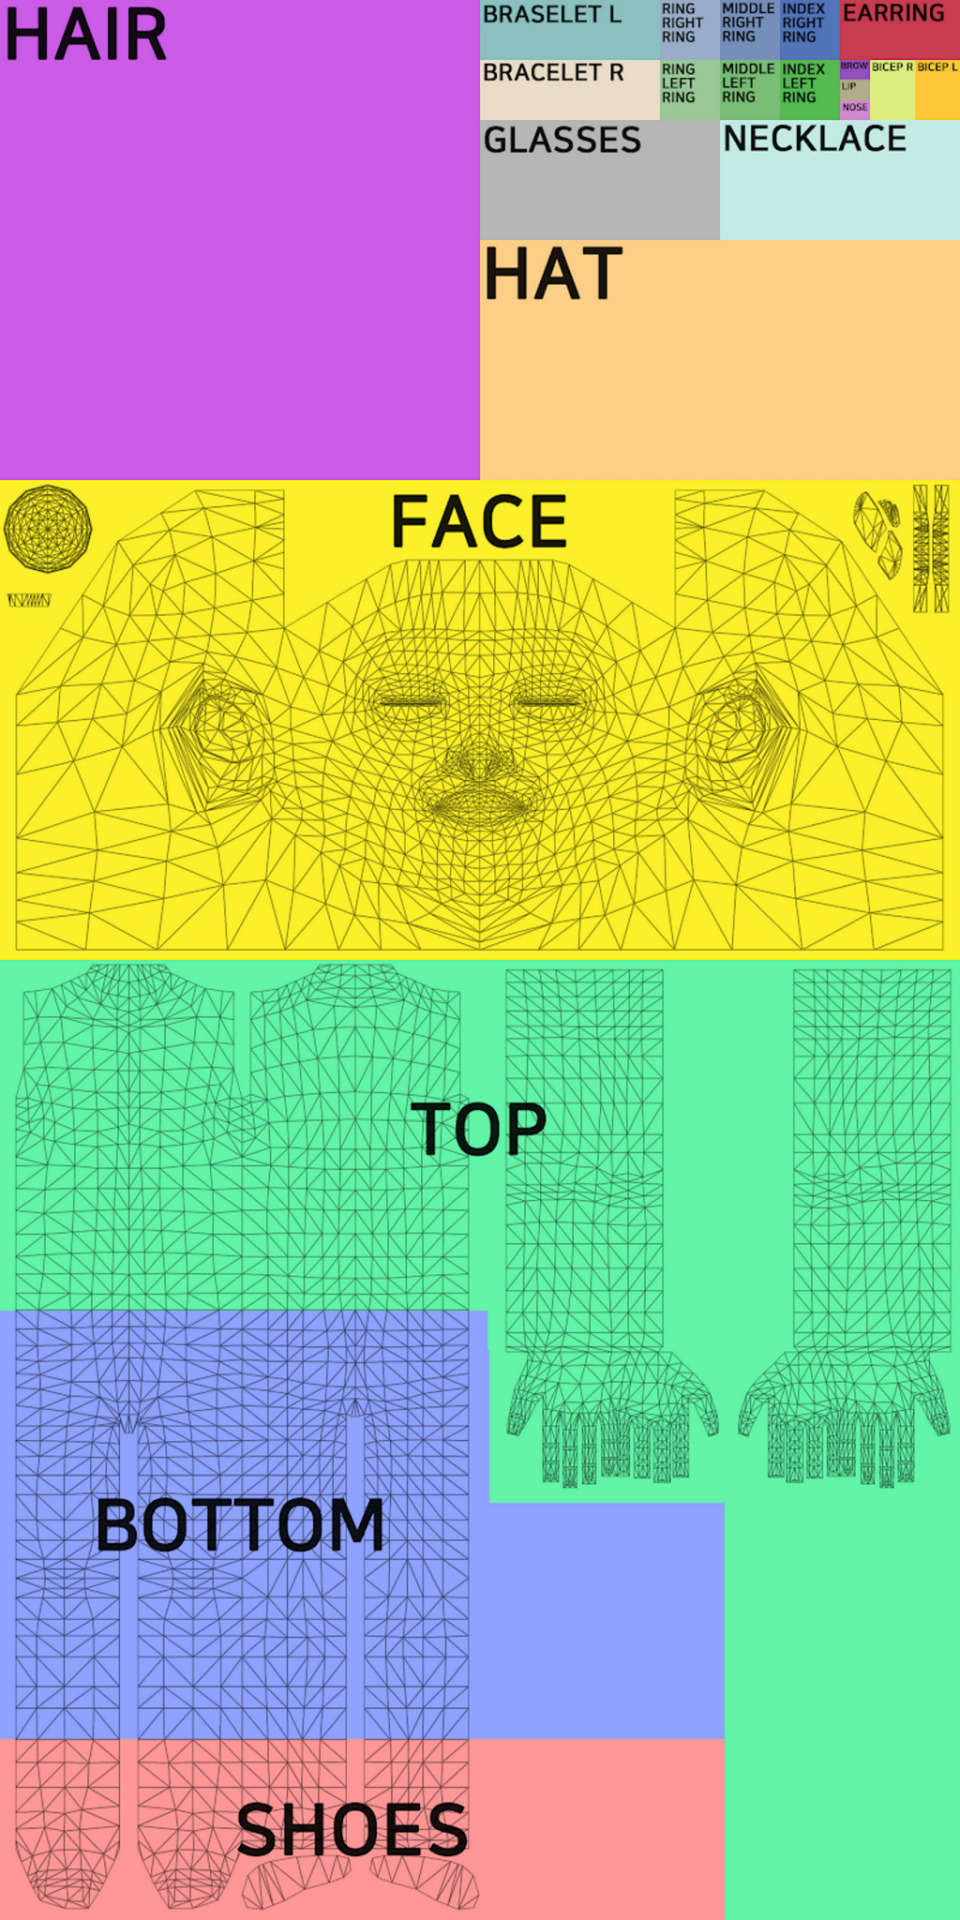
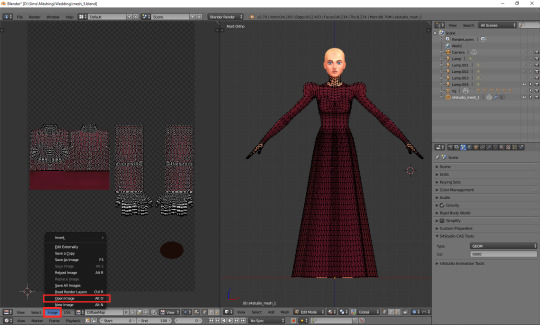
You can download the template in default, EA size (1024x2048) HERE, and a twice bigger one (2048x4096) HERE. In my own creations I always use the 2048x4096 format – it lets me fit in way more details without stuff getting badly pixelated – but that's obviously not a must. Now, at the bottom of the uv window, click 'Image' and then 'Open image'. Find the template you just downloaded and double-click it (or choose 'Open image').
Whatever you do with your uv map, there are two basic rules you have to follow. One, fit the vertices only in the place meant for the category you're working on. If you're making a dress, you can ignore the top/bottom division (although be aware that if you do ignore it, you won't be able to split your dress into separates), but that's the only exception. Don't let your vertices go into the shoes or face area. If you're making a skirt, stick to the area marked as bottom. If you're making a top, fit them all in the area marked as top. It seems obvious, but I've seen sooo many CC pieces which are incompatible with each other, because their textures overlap. Some of them are beautiful and even made by really well-known, established creators. So I think it doesn't hurt to overstress this point a bit. Please pay attention to it!
And two: don't move anything which is supposed to be bare skin. Or half-transparent texture printed on top of the skin (not 3D). It's an absolute no-no. Terrible stuff will happen if you do it. If you accidentally did it, then... Oh boy. You may try to move it back into the right position, but maybe it'd be easier to just delete those parts altogether and just append them anew (as explained in the previous part).
As for the parts which you intend to texture – so, in this case, your dress – you can theoretically put them anywhere you want (that is, as long as you stay in the top/bottom area and don't overlap the bare skin parts). Your map doesn't necessarily have to look like the ones made by EA. However, I think not following the EA style (top on the left, bottom underneath, sleeves on the right, any extra deco in the free slots) may result in your clothing being sunbathing-incompatible. I can't say for sure, as I don't have Island Living, so my sims don't tan, but I suspect the tan lines depend exactly on your uv_0 map. I don't think it makes any difference in case of Victorian dresses, but if you're making something more modern, which could leave some visible tan lines, you probably shouldn't go too wild while making your uv_0 map.
Let's go back to our dress. Because we used the top as a base, half of the work is already done. We only need to 'unwrap' the skirt (and any decorations, if you added them). There are 4 ways in which I usually approach it:
1) Selecting the rows in 3D view and moving them manually (g, y) on the uv map
It's not very practical now, when the skirt is already full of those horizontal lines, but at an earlier stage it would have been very quick and easy. The important thing is, you should do it before adding 'fillers' (i.e. those lines which you don't move, scale or whatever, but just add them and leave them as is). Depending on the size of your dress, you probably achieved the desired shape with 3-5 lines. Move them on the uv map, make sure the proportions look correct (you can always try to open some patterned image for a second, to see if everything looks ok – see part VI b) and only then add the fillers. They'll automatically appear in the right places on the map.
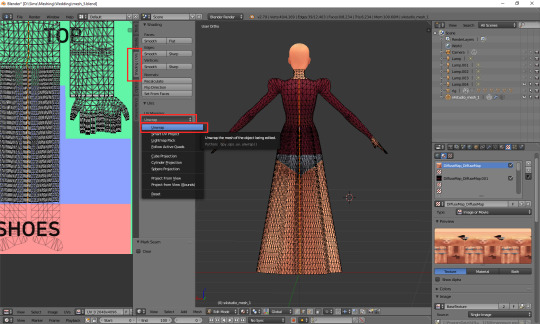
2) Cylinder projection
You can also decide to unwrap the skirt. Select it, either in the 3D mesh or uv map window. Now, with your cursor in the 3D mesh window, press t to unhide the panel on the left and go to the 3rd category: 'Shading/UVs'. In the UVs section you'll see a button called 'Unwrap'. If you click it, a drop-down menu will appear, with different unwrapping styles/options. Choose 'Cylinder projection'. Watch out: your viewpoint matters! Before you unwrap, go to the right side view (num 3).
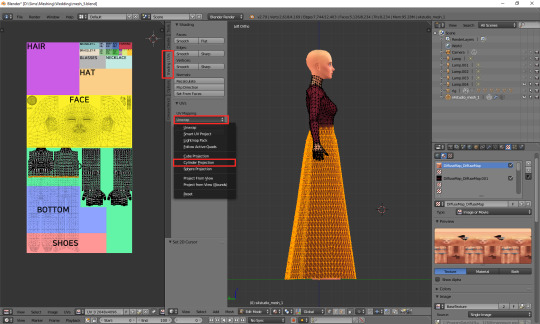
I took the screenshot from the wrong side, please pretend you didn't notice (-.-)
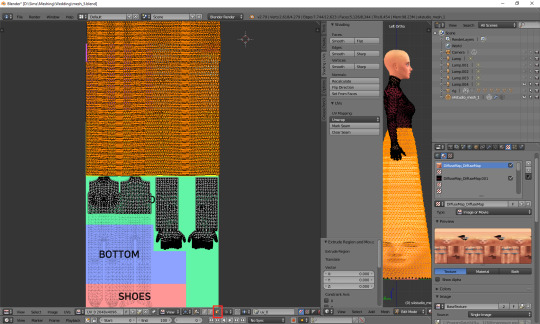
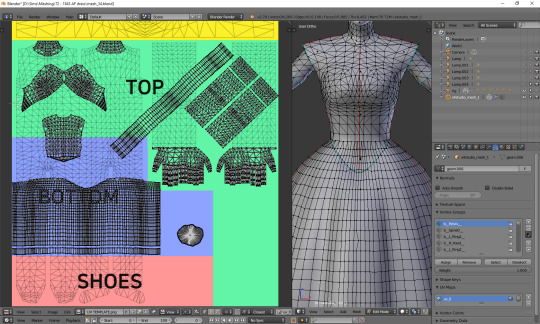
A whole bunch of new vertices should appear on your uv map – in a completely wrong place. We'll have to move them under the top. You'll notice, however, that if you try to move, scale or do whatever else with your skirt, it affects the lowest line of your top as well. That's because the top line of the skirt and the bottom line of the top are actually the same vertices, just duplicated on the uv map. You could select only that one line and edge split it (ctrl + e, in the 3D view), but an easier way around it is simply switching from vertex select to face select. Face select has some special powers when it comes to uv maps: it lets you not only move stuff separately, but also select parts of the mesh with L (multiple select with shift + L). Neither of those things works when in vertex or edge select mode.
Now you can simply scale the selection down and put it under the top. Adjust it in any way necessary, so that it'd align with the top nicely. Make sure that the faces are in the right places! Select the bottom-left face of the top and then, in the 3D view window (left side view, ctrl + num 3), click the face right underneath it. Is it the top-left one of the skirt on the uv map? If so, perfect! If not, you've got some manual moving to do. Just select any faces which are in the wrong place and move them along the x axis (g, x) till they are placed properly.
It should look fine by default though. That's exactly why we went to the right-side view before unwrapping.
If your skirt goes into the shoes area, scale it down along the y axis! (g, y)
Now the only thing left to do is to weld the vertices and get rid of the gap between the skirt and the top. Go back to vertex select and select the second vertex from the left. You'll see that – just as before – a vertex of the top gets highlighted too. Press W and, from the drop-down menu, choose 'Weld'.
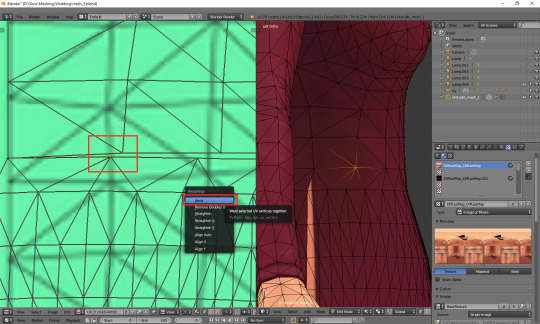
Do the same for all the vertices in that line, except for the first and last one.
What about the first and last one? The problem is, they are all actually the same vertex. If you select any of them, you'll see that the other one gets highlighted as well. Welding them would make them meet in the middle, and that's not something you want to happen. So what can you do? This time there's no other way around it than splitting. Select the whole vertical line (either the left or right one), move the cursor to the 3D view area, press ctrl + e and choose 'edge split'.
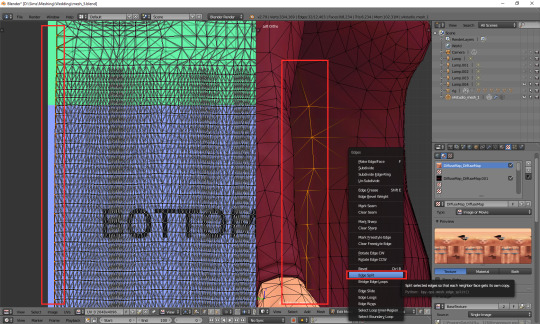
Now you should be able to weld each of those vertices separately. When you're done, select all (a) and (in 3D view) remove doubles (w).
And that's basically it. Of course, if you want to, you can dedicate some more time to your uv map, making sure everything looks absolutely perfect. You can, for example, edit certain lines – or all – and make them perfectly straight. Just select a line, press w and choose 'Align x/y'. It's especially useful for deco parts – you'll see what I mean once you get to texturing.
3) Professional tailoring (marking seams)
This method is quite crazy, but can be very useful in some cases – e.g. if you're making a patterned dress with a huuuuge skirt and want the pattern to look even. To use it, you have to imagine for a second that you're a tailor/seamstress and that your mesh is a real dress, made from real pieces of material. Where would this material be cut and sewn together?
Once you know where the seams would be, go to edge select mode and, well, select those edges. Then press ctrl + e and choose 'Mark seam'. Make sure you really mark all the seams which would be there in case of a real dress!
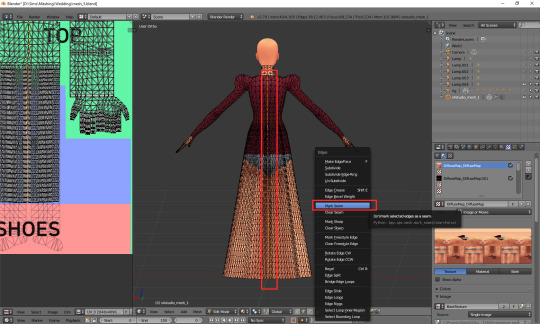
Once you're done, select your whole dress (or whatever it is that you're making). Do not select body parts! Once again go the panel on the left (if it's not there, unhide it with t) and this time simply select 'Unwrap'.
And now just go to face select, scale down the results of your unwrapping and put them anywhere (but in the right category :P). If something looks wrong, that most probably means you forgot to mark some seam. You'll have to go on a search for it. I'll be honest: I have zero idea of sewing, so using this method is quite tricky for me and I'm struggling myself with marking all the right edges as seams. I used it only twice so far, in my last 2 projects. Here's how my 1843 dress looks like after unwrapping:
As you can see, the uv map is plain crazy and, as mentioned before, definitely not tanning-compatible, but thanks to it later I didn't have to adjust the pattern to each part of the mesh individually – I could just fill the whole texture with pattern and only had to erase it from the parts which were supposed to be uncovered. It does make your life easier if you make 66 swatches :P.
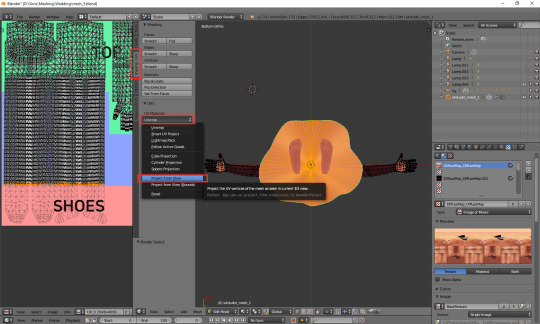
4) Projecting from view
Yet another unwrapping option, useful mostly for smaller, decorative elements. Or in general: for stuff which you can see properly. I use it mostly for bottoms (I mean... That thing 'closing' the dress at the bottom). Go to the bottom view (ctrl + 7), select the whole bottom part (might be easier to do on the uv map, now that you've unwrapped the skirt!) and, from the unwrap drop-down menu, select 'Project from view'.
Go to face select, scale the thing down and put it somewhere in the area for decorative elements. For example here:
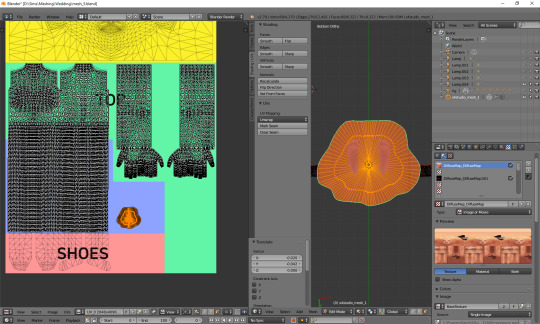
Done!
***
Here's also a small general tip: it's always better to separate clothing parts from body parts on the uv_0 map. I'm thinking especially of the neckline. It's the only way to get a sharp, clear line; if you just paint the neckline in your graphic editor, it'll become blurry in game. It seems that the devs realised it at some point too, as at least some pieces from later DLCs have a gap in the uv_0 between the neck and the collar. Just select the whole top-bottom area, deselect the neck and move the part which should be textured a bit down.
***
Whichever method you chose, your dress has a ready uv_0 map. Now there's only one thing left to do: you should export the uv layout, so that you'll know where to put your texture. At the bottom of the uv map area, click 'UVs' and then choose 'Export UV Layout'.
A new window will appear. Save it wherever you want, under whichever name. The only important thing is, you must tick that little box on the left saying 'All UVs'. Then just click the 'Export UV Layout' button.
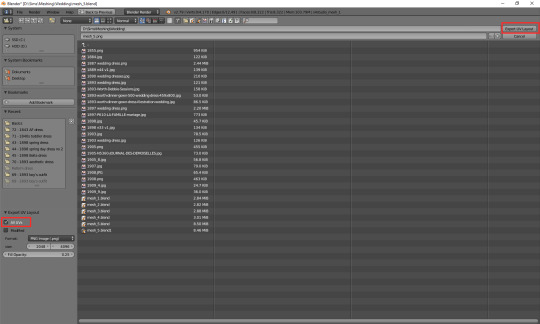
And that's all. Congratulations! You're fully done with your uv_0 map.
(Next: VI b. Changing the texture displayed in Blender)
71 notes
·
View notes
Note
Hi! sorry if this is a bother but is there a specific tutorial you followed to learn how to create your own meshes? because every single one i found or someone else linked isn't exactly a tutorial for beginners and requires you to basically already know what your doing.
“how did you make your hairs from scratch? did you follow a tutorial? what was your process? I want to try but I don’t know where to start”
hello friends! :) tbh there was no one specific tutorial… honestly, i spent a lot of time frankenmeshing to get familiar with the processes and blender but never actually released much
but unfortunately, i definitely don’t recommend starting to create meshes from scratch as a beginner because i know i tried and it did NOT end well alkfjsdalkf
diving into blender without knowing what you’re doing is VERY frustrating, i know from experience LMAO so i’m listing tutorials/resources under the cut from beginner to from-scratch meshing that i know are helpful, have been helpful to my friends, or that i realized after messing around to learn something would’ve helped me a TON
there’s some i’m missing i can’t find for the life of me rn so i’ll add to this later on too! also feel free to send me any tutorials you feel helped you :)
items with an *asterisk are ones i’ve personally used or wish i would’ve had when i started
beginner
i’d recommend starting with frankenmeshing clothing first! and then move onto frankenmeshing hair :) so clothes and beginner tutorials will be in this section, and hair tutorials will be in the next!
*blender guru’s blender beginner tutoriali didn’t use this tutorial in particular (thought i would have definitely saved me a lot of time) but blender guru on youtube has really good videos on blender for complete beginners! here is his full playlist of tutorials for 2.7! you probably only need the first one or two just to get your bearings in the program as you won’t really need to use much of materials or lighting for making sims cc
@teanmoon‘s blender cheat sheetpretty self-explanatory!
basic mesh shortening tutoriala good first project to do in blender imo
@deetron-sims‘ frankenmesh tutorialdespite not fully using this, i referred to it a few times when i’d get stuck lolit also contains stuff for normal maps and shadows! i don’t create LODs this way usually, i normally decimate a little bit for each LOD that isn’t LOD 0 (unless LOD 1 looks like trash, in which case i will import my LOD 0 onto there)
*edge split tutorialmarch 18, 2020: here is my version with updated pictures!okay so the pics are broken, but it’s pretty self-explanatory! if you ever get a weird shadow at the ends of your clothing after removing doubles, you need to do this!! i always remove doubles and do this :) i could attempt to redo the tutorial with pictures on tumblr if requested!
*@theslyd‘s multiple mesh tutorial aka making things bgc as wellnot for hair! (cut layers for hairs are for hat compatibility!) but definitely helpful for clothes… had to figure this out for myself so knowing this ahead of time would’ve been really really good
*@deetron-sims‘ specular tutorialthis is a meshing list but i needed to include this because it is a massive pet peeve of mine LMAO i know some people just import blank speculars and specular masks, which works, BUT if the item underneath (ie. tights or if you’re using a shiny mannequin) has any sort of specular or shine at all, then it will show through! you need to create a specular mask based off the alpha of your texture and then import in the blank specular itself if you want no shine to come through! i don’t create my speculars the way this tutorial does, but it works all the same :)
*texture location templatei would definitely recommend getting comfy with uv_0 mapping as a beginner! it just moves around textures really so you wouldn’t mess up morphs/weights :) the template also helps you understand why some cc conflicts with each other! because they’re placed in the same area, the game reads both textures for both items together
intermediate
various hair frankenmesh tutorials@okruee‘s video tutorial@simandy‘s written/picture tutorial (part 1 and part 2)another video tutorial (was told by @inkyblick, “i literally followed that // and i’m a dumbass with blender // but if I could do the thing, so can they”)
*@blogsimplesimmer’s hat chop tutoriali would recommend using @pralinesims‘ daydreamin hat set to do hat chops! they’re smaller which makes sure most hats fit! typically when i do hat chops, i use about 5-6 hats per chop in blender to make sure everything fits right…
what i usually use…horizontal chops: praline’s low (with extra fluffy hairs, you may have trouble with the low one, which is fine if you must omit because it’s rare you get a cap that low anyway) and regular caps, base game newsboy cap, get to work CapSurgical, discover university grad cap and bike helmet (i make sure the straps at the back of the head don’t clip out of the hair!)slanted chops: praline’s backwards and lifted caps, base game BaseballBackwards, base game CapPuffy, base game KnittedKuffi, ugly seasons CapKnitBrim
making sure that my hairs work with all of those hats, i haven’t run into a problem with any particular hat yet in game!
hair meshing tipswatch @aharris00britney‘s speed meshes! (or anybody else really, sometimes you can pick up some stuff and learn new tricks!)
quick uv_1 tutorialhaven’t used this myself but it looks rly helpful
also *@teanmoon‘s uv_1 and weight guides really help you understand what those things are for!!
advanced
*joint list for sims 4 skeletonsi use this for when i’m weighting my hairs! i don’t weight transfer at all because i can never get weight transfers to work right for me
*@tsminhsims‘ easy weight assignment for hair (1 / 2 / 3)i use this to weight my hairs :) i’ve made adjustments since as now i understand what affects where now but it’s a good starting point!
ALSO! i would recommend doing uv_1s and weights from scratch for practice on ea hairs before going in and doing on a from-scratch mesh so that you can know how to do it (since you could get frustraed by spending all that work on a mesh and not being able to get in game)
*blender tutorial - hair with curvesthis is the technique i use for my hairs, albeit adapted a little for myself after getting the hang of it! also you only really need to watch the first 10 minutes of the video as the rest is about lighting/texturing which we don’t need for sims 4
*@tekri’s tutorial on meshing from scratch in mayai’ll be honest, i really really tried this… buut i cannot work in maya at all LMAO the blender parts of this could be helpful for you though! there’s vertex painting, weights, uv_1, and hat chops! :)
the reason i suggested getting comfy with uv_0 mapping is because i haven’t exactly used a uv_0 tutorial myself, but rather understood how it worked and just went from there :) it’s kinda tedious but honestly the simplest part of the whole hair making process imo
other tutorial masterlists
@ridgeport’s cc making tutorial list@simlaughlove‘s tutorial page@tekri’s guide lists4s forum tutorial list
#Anonymous#ev.rss#tutorial masterlist#tutorials#i hope i got everything!#but yeah#if you want me to add a tutorial to the list#just let me know!!
221 notes
·
View notes
Photo
I know I’ve been quiet today, but it’s been a high pain level day.
I haven’t been able to sleep more than a few hours this past week and my back is sore from the moment I wake up, so sleeping in is not an option. I need a firm overlay for my bed. It’s a hi-lo, which means it had a remote to raise and all the cool stuff you can do with a hospital bed, but it's nicer looking. The mattress is too soft and my back gets so sore after laying in it for a few hours. I should be getting more lay down rest than what I am at the moment, but it's killing my back so I’m spending most of the day at my PC until I get the funding for the overlay as it was provided to me through our disability services.
A few days ago we ventured out to buy me a new desk chair, the old one had a broken wheel that Dad had fixed but was always a risk of breaking again, and was really wobbly and hard to raise up from as my legs are very weak, it doesn't raise up higher anymore, that kinda broke a while ago and it should be higher for me so it’s safer for me to get up. We weren’t able to try the chair first as they had no displays out, so we got it and they said we could return it if it wasn’t suitable, it’s raise height was higher than what I had so that was a big must for me. Well.. it wasn’t suitable, the material they used was a hard pleather for the chair. I tried making it as comfortable as possible yesterday, it was kinda digging into me, so I got a cushion and a sheet to put over it to soften it.. I tried sitting in it again this morning, but it was unbearable..
So I thought about my old chair, the seat part of it was still good, it’s pretty comfy, the only thing that sucks is the mechanics part of it. And I asked Dad if we could frankenmesh it.. old seat, new mechanics.. and it friggen worked! My Dad is McGyver.. he really saved my butt cause I don't know where else I would’ve found comfort...
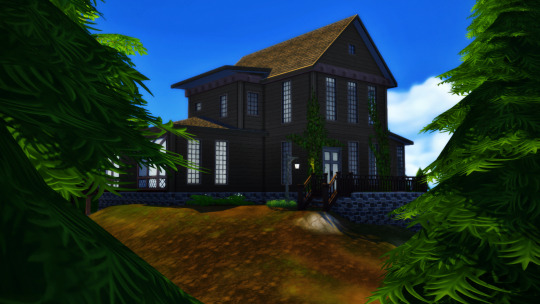
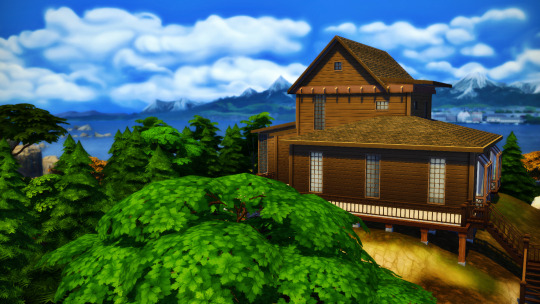
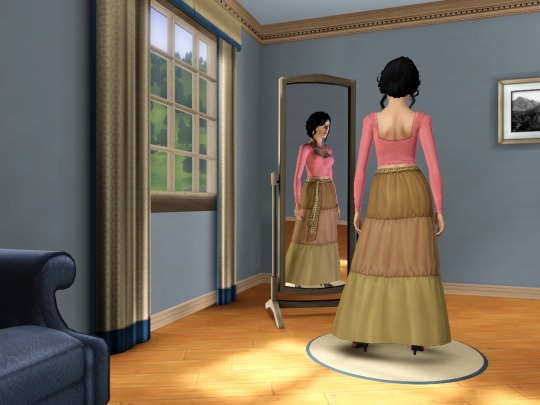
Anyways over the last few hours, I made a house for my personal game which is a post-apocalyptic repopulate the world game, I have started other families previously and wanted to play with that sim I created yesterday. It’s supposed to be more of a farmhouse feel, but I like the ivy and those windows so it kinda feels a bit more gothic. I’m not really in the mood to do any gameplay posts, I just don’t feel like storytelling right now, my brain is kinda mush and everything I think of seems boring or stupid..
Yeah so that’s what I’ve been doing, and tomorrows my birthday and it feels like it’s just gonna be another Monday..
#jess blab#it took me almost an hour to write this#and im fine#im happy about my chair but kinda neutral on everything else
19 notes
·
View notes
Note
I love your ccs. Which programs do you use when making these cc? Is it hard to do? How do u make? Thank you in advance. Love you
Thank you, Anon! So kind of you to say!
Making cc is a little hard in the beginning as there is a lot to figure out, but it gets easier the more you work with the programs. I use Blender to make the meshes, Paint tool Sai to make the textures and Sims4Studio to make the cc.
Blender is a little confusing in the beginning, but the more you tinker around the more you learn and the easier it gets. The best way to learn Blender is to experience Blender, so download it and play around for a bit!
Here is a great site linking tutorials about Blender (Sims4Studio.com).
I would not recommend Paint tool Sai if you have access to other programs like Photoshop. Photoshop has better options for cc-making, but I already had and is familiar with Sai. The important thing is that you have a program which supports transparent PNG-files.
To start making cc, I would recommend editing an already existing mesh or recolouring someone else’s mesh. This to get to know the programs you are working with. My first ever piece of cc was a recolor of this tiara.
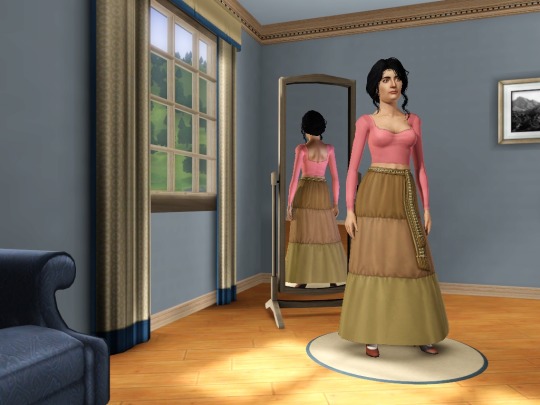
Edits can look like the dress I posted today. That dress is EA’s maxi dress with a wider skirt and a new texture. Starting making frankenmeshes or meshes from scratch before learning how weights, uv-maps and layers (I don’t even know what they are called) work is not the best idea in my opinon.
To learn, Sims4Studio has some great tutorials to follow, or you could do like me and learn by watching and studying EA’s and other CC-creator’s meshes. I find youtube meshing videos very helpful!
It’s not as hard as it sounds, but it’s a lot to figure out. But trust me, it’s super fun to make cc!!
I hope it was of help, Anon, if you have any more questions, feel free to ask!
15 notes
·
View notes
Photo
The Sims 4 Moschino Stuff - Early Access CAS Review
Huge thank you to the EA Game Changer Program for providing me with the opportunity to play Moschino Stuff early!
When I first heard about The Sims collaborating with Moschino to create a Sims 4 Stuff pack... well, let’s just say I wasn’t very happy about it lol I didn’t — and still don’t — understand how anyone on the Sims Team thought this would be something we wanted BUT I was determined to keep an open mind and not form any opinions until I was able to see exactly what was in the pack.
If you’ve ever read any of my Early Access reviews before you’ll know that I have never lied about my thoughts on new content and this review isn’t going to be any different. I will admit, while I wasn’t excited when the pack was announced, the trailer had me a little curious because the build/buy stuff looked really good. But to be completely honest, after checking everything out, I’m left feeling more than a little underwhelmed by this pack.
There are definitely some things that I like about it, and to me those things make it worth owning the pack personally, but there are also just as many things that I either have no interest in using, that I just plain don’t like, or that have issues/bugs that make it likely I won’t use them if they’re not changed/fixed.
I’m going to be posting two separate reviews (Create-A-Sim and Build/Buy) because there’s a fair bit to go over, and by that I mean I have many opinions. Because let’s face it, this is a $10 stuff pack; there’s never a ton of content in stuff packs lol So let’s get to it!
As always, if you have any questions about the pack, feel free to send me an ask!
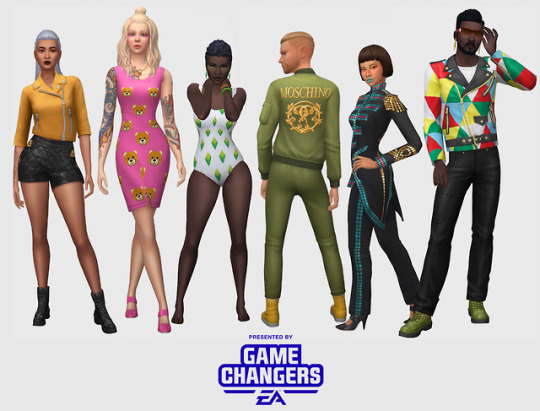
See a preview of all the new CAS items here
Something I really wasn’t expecting to care so much about was the CAS stuff. I have no interest in high-end fashion or Moschino in general, and even before seeing what was in the pack I knew I’d probably never use most of it... but never in a million years would I have thought I’d ever be so very disappointed by not just how lacking the CAS items were but also how tame they are.
When you hear the word “Moschino”, you immediately think crazy-unique high-end fashion. And if you’ve never heard of Moschino, you'd find exactly the same thing if you Googled it. However, nothing in this pack really says Moschino in that aspect and that is weirdly disappointing to me. I was worried that the Sims Team would go all out and every piece of clothing would be like that, but I never imagined that NONE of the clothing would be high fashion, and somehow that’s worse.
👗The Hair
The hairs are probably my favourite part of all of the CAS content and one of the only things I’m not completely disappointed with. The only thing I’m a little disappointed in is that aren’t any crazy high fashion looking ‘dos. But I do like the hairs we got and will definitely get a lot of use out of them, both in game and when it comes to making CC!
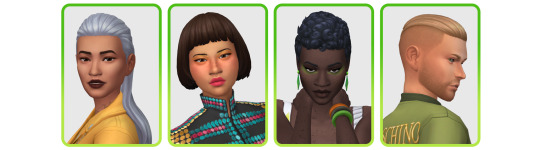
Oh and there’s also a weird texture glitch in the back of the long hair that only shows up on some of the swatches. Which, I mean let’s face it, when has there never been at least one hair with the weird texture issue that never gets fixed in any new pack? lol

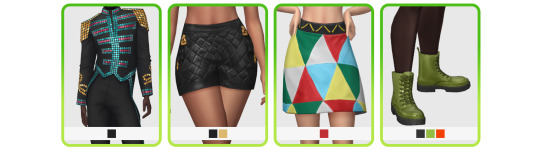
👗The Clothing
The first thing you’ll notice when you get the pack (if you get the pack) is that for a pack that is supposed to be focused on fashion, Moschino Stuff is really lacking in actual fashion. You’ll also notice that it’s even more lacking in colourways. Out of the 19 pieces of clothing in this back, quite a few of them have three swatches or less, a couple even have just one. And not a single piece of this pack’s clothing has more than 10 swatches.
I understand that this is just a stuff pack so there’s not supposed to be a lot of items in it, but it’s also supposed to be a stuff pack based around a fashion label.
I think the biggest issue I have with the clothing is that if you take the branding away that’s on some of the pieces, you would never know that the items were supposed to be high-end fashion let alone designed by Moschino. The Gurus did tell us that the stuff included would be more “wearable” than probably 90% of Moschino’s real life clothing ranges, but honestly, I would have preferred having less wearable stuff if it meant more CAS content. If you go to Moschino’s website they have some surprisingly ok stuff in their ready to wear ranges that practically screams Moschino, even if they didn’t have their name plastered all over it.

A lot of their couture stuff is a little too out there for my liking but again, it also screams Moschino. I’ve been looking at a lot of their collections over the past few days and I’ve not only realised that they have some really nice stuff that I would have actually loved to have seen in TS4, but also that the stuff that was chosen to be in the pack was all from collections that are now almost two years old. Despite my original concern with this collab, I found myself really, REALLY, hoping for some actual high-end clothing. My sims wouldn’t wear it on a daily basis but it would have been so good to use for photoshoots with the new Fashion Photographer career!
Once again we didn’t get anything for children or toddlers. I really don’t understand why consider Moschino actually makes some super cute stuff for babies and kids! Hell, I would have even settled for just some toddler and child versions of the freezer bunny/llamacorn tees.

Another issue I have with the CAS stuff is the English. This is a collab with Moschino, so obviously their name is going to be all over it, and I’m not saying it shouldn’t. All I’m saying is I really wish the Sims Team had listened to the 90% of the community that practically screamed at them “Please include Simlish swatches too!”.

Which brings me to my last point. The textures and meshes. Most of the meshes are really well done, but some... leave a lot to be desired. For example, the freezerbunny/llamacorn tee completely changes the shape of female sims bodies in a very strange way. I would have loved to have been able to use some of the male clothing on females too, like the tracksuit and marching band uniform, but of course they fell prey to the dreaded black hole crotch that all of the Sims “gender neutral” clothing has. And the suit jacket tee... is literally just a long sleeved tee with a suit jacket painted, which to be fair so is the original, but the Sims version is a poorly executed imitation.

Then there’s the pixelation on that llamacorn tee. I just... I don’t even really know what to say about it other than it disappoints me and I feel like literally every CC creator could have done a better job to be honest. Also, the Moschino font being in the same gradient as the old Sims branding is is a little strange considering how hard they’ve been pushing the rebranding.

I know it probably seems like I’m nitpicking but a lot of these issues have been constant problems with pretty much every pack that’s been bought out in last few years. I do like a couple of the CAS items — the matching quilted jacket and shorts, the cropped motto jacket, the boots, the plumbob earrings and swimsuit, and the hairs — but I’m still just really disappointed that CAS was so tame and lacking in a pack that is literally supposed to be a pack based on a high fashion label.
👗The Verdict
Overall, I would definitely not buy this pack purely for the CAS content. It’s okay, but nothing groundbreaking and and I probably won’t use a lot of it outside of the Fashion Photography career. I honestly feel like there’s way better CC out there actually. I’d love to be completely CC-free some day but until we start getting new, original content instead of just re-textured and reused/frankenmeshed stuff over and over again, I’d much rather download some gorgeous, unique CC made by the talented people in the community instead.
All thoughts and opinions expressed in this review are my own. I am not paid by EA to “hype” their games; I am given the opportunity to review their games early in exchange for an honest review.
Click here for my Build/Buy Review
259 notes
·
View notes
Text

Leone Abbacchio Outfit
This is, honestly, my favorite release so far! I don’t think anyone is nearly as hyped for this upload as I am. I’ve literally been hyping this up and talking about it for like...two weeks now? But it’s finally here and I’m so happy to share it with y’all!! I’m finally uploading Abbacchio’s outfit. It’s, obviously, not 100% accurate but I’m fairly happy with the way it turned out!
Abbacchio’s Outfit:
BGC (I tested it this time)
Full-body outfit
4 swatches (black w/ purple strings, black w/ green strings, purple w/ purple strings, and a darker purple w/ purple strings)
A frankenmesh of base game and Seasons meshes
Custom thumbnail
Disabled for random
Enabled for all genders (Itt does look a bit strange on feminine frames, but it works!)
More info, previews, and download under the cut!

These previews are completely unedited and straight up just pictures from CAS. They aren’t exactly...pretty? But showing off full-body outfits in previews is really hard.
I wanted to add more swatches, especially an inverted swatch, but the texture on this outfit is...a Nightmare to edit.

The only known issues I have right now are that the texture for the right shoulder is a little iffy. The original mesh for the top part of his outfit was the skating outfit from Seasons, and while I did go and edit most of the outfit, there were a few things I just had trouble editing out, and this was one of them. There are a few other spots on the outfit like this, but they didn’t personally bother me while playing ingame so I decided not to stress over editing them out. The other issue is, of course, since the jacket/skirt section is so long, it does clip a little bit when the Sim walks. I don’t really know a way around that, and it’s not excessive clipping, so I decided to leave that in as well.
DOWNLOAD (No ads, Google Drive)
If you have any problems with this at all, please feel free to let me know! I’m determined to make this piece of CC in particular as good as it can possibly be. I hope you enjoy and thanks for downloading!
#i'm so excited to post this!!#my cc#mycc#sims 4#the sims 4#ts4#s4#s4cc#s4mm#s4 maxis match#s4anime#s4fullbody#jojo's bizarre adventure#jjba#jojo's#leone abbacchio#abbacchio
125 notes
·
View notes
Note
Hi do you know any good tutorials for people who want to make their own sims3 custom content?
Dear Nony,
This questions gets asked a lot (not of me, but of other people in general). I can tell you from experience, I have struggled with how to make cc for many years (like… 2012 or earlier??) You are probably not going to like my answer, but then I didn’t much care for it either back in the day when I asked similar. I’m going to be hella nicer than some people are when asked this.
The problem is the question is extremely broad. If I answer it in as broad of terms as asked, then I’d have to say “No”. Because there isn’t any one comprehensive documentary on making sims 3 CC. With that said, however, there ARE lots of good tutorials on specific things. And for me, I cobbled together my current knowledge piecemeal for a lot of good small tip-torials.
There are certain things that are common to all CC making - like using a modeling tool such as Blender or Maya or (what’s the one the clothes makers use a lot?? I forget the name at the moment..). But then there are things specific to what you are making - makeup vs clothes vs hair vs objects vs poses.
I would say (and I personally didn’t do this but should have) is go out and find some tutorials on using blender. I liked Blender Guru’s videos on youtube. I’m sure there are tons of others. Here is the thing - they won’t be tutorials on how to make CC for sims but what it will give you is a lot of skills that you will need that you can apply later. Believe me, I wouldn’t be struggling so much if I had.
I would also say, get familiar with Photoshop or Gimp ($$ or Free) as you are going to need them. Photoshop ain’t cheap, but soooo worth it in the long run (assuming your pc can handle it) the 3d modeling is freaking handy to be able to paint right on your model. But you know, it’s an investment, so Gimp is great to start with. If you can swing photoshop, then Plearn has some great videos on youtube. Keep in mind it’s more from the perspective of photo editing, but the skills can be applied to CC making. I don’t know about tutorials for Gimp, there probably are some, but I do photoshop.
Now… That doesn’t get you to where you want to be, which is making CC. BUT useful skills you will need. As for making CC, keep in mind the old adage - how do you eat a dinosaur? One bite at a time. Yes, it’s a bit played, but true.
What worked for me (and that’s all I can speak to) was to start out on the fringes and work my way in. I started with making simple “edits” to existing packages like changing categories on clothing and adding thumbnails. Replacing images on paintings. Then I progressed up to poses. That lead to converting objects into accessories for poses - you aren’t actually making cc , but simply manipulating an already existing thing. That lead me into frankenmeshing clothing and then frankenmeshing objects. Again, you aren’t making the whole thing from scratch, but manipulating pieces parts.
So my final advice to you is rethink and re-scope your question. Right now, it’s way to broad for anyone to really answer well.
BTW, @sims3tutorialhub is a fantastic resource.
9 notes
·
View notes
Photo
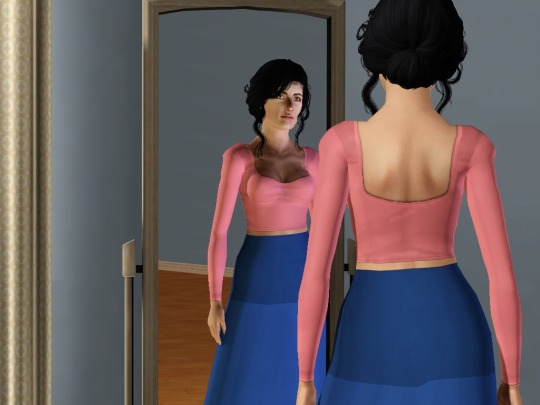
There’s something off about the shoulders on this top and I don’t know what; the “Cardassian Neck Trick” vibe and the fact that it’s too short to work with my historical skirts are what seals its fate despite it being cute and stuff. Even the pictures on T$R had this issue. (I know! I know, the same rule for knitting patterns as for Sims clothing--if the model has to do ridiculous poses while wearing the item featured to make it look good, or if something looks a bit awkward...don’t download make it.)
...I suppose I could learn to frankenmesh and rescue what I can of the neckline.
3 notes
·
View notes
Note
OMG I am curious on how you made glasses? I've been wanting to try forever!!
OMG! Connor, this is such an honor to me. 💛
I felt the same way before I started, but all it takes is opening Blender and do what you always do, because it’s nothing much, and as an amazing Hair Creator as you are, making glasses should be really easy for you to make. I think all hair creators can make anything else, because to me making hair is the hardest thing.
That said, all I did is frankenmesh two ea glasses, and tweaked the resulting one in edit mode, I just moved some (or a lot of) vertices and didn’t have any trouble with the weights whatsoever. I only needed my basic knowledge, nothing more.
It’s nothing fancy, I only used “translate” (move)“rotate” “scale” and “delete,” basically the basic tools you surely know by heart, I don’t remember using anything else.
I wasn’t planning on making a tutorial (and I don’t consider this as one) so the screenshots below are very bad as I only took them to show my progress to my BF.
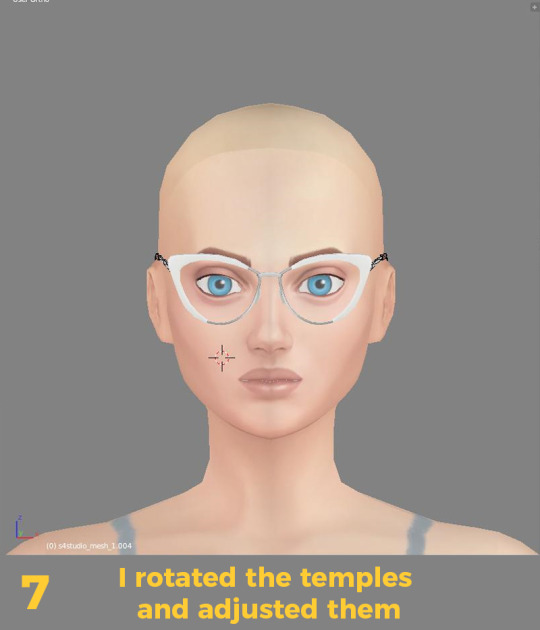
A little bit of more tweaking…

And tadaaa!
And I didn’t like the weight on the temples, so I transferred it from glasses N1, almost all of the glasses have the same weight (that’s the best part about making them I guess).
I was afraid of the transparency part but all I did was use the EA textures, so I didn’t have to worry about that. And I only had to make the diffuse and specular. To my knowledge the shadow and normal are always blank.
Again this wasn’t a tutorial, I’m sure you know more about meshing than I do, I just wanted to show you how easy it is.
All in all, it was really fun and much much easier than any hair I made. So I’m sure it will be easier for you since you’ve been making hairs way before and better than me. You should really try to make some, I’d love to see what you come up with. 💛💛💛
Again I really appreciate you sending me this ask.
54 notes
·
View notes
Note
What is your favorite part about Get Famous so far??!!?? :)
Hi love, thank you so much for the question! Honestly? I genuinely really like this pack and pretty much everything about it - making sims famous has always been really fun to me! But let me point out a few things that stand out as being extra lovely:
THIS INTERACTION! I don’t think I will ever get tired of when sims make this face while getting an autograph from a celebrity? It’s so cute dlfgkjlkfdg
Dirk dreamy Dreamer! I don’t know what it is about him but I just adore this townie (or well celeb) so much!! Maybe it’s because he was the first one to be nice to my sim, I don’t know, but I love him!

I’m a CAS lover in general so this outfit (and most of the new CAS stuff) is just everything to me! I’m always excited to have new pieces by EA that I can use as they are or use for frankenmeshing! ;-)
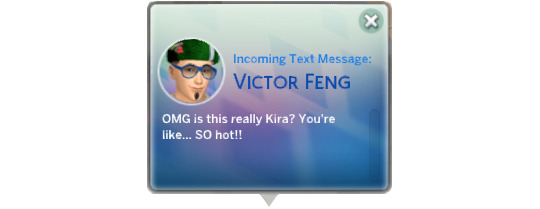
This crazy text message (and many more)! My sim was so (un?)lucky to get the public phone number quirk and it’s quite amusing to see her get random text messages every now and then!
And lastly we have the “join your sims at work” part of the acting career! As with all of the “join at work” jobs, it obviously gets a bit repetitive with time… but I really enjoy seeing what costumes they’ll be put in and what kind of acting they have to do! :-D
If you have any questions about the new pack you can send me an ask right here!
61 notes
·
View notes
Text
V. Adding missing body parts / Frankenmeshing / Finishing touches
(Previous: IV. The most useful meshing tools in Blender)
I know I promised to finally talk about uv maps, but I realised I forgot to cover some tiny, but important meshing-related details. Originally I hoped I could mention them in the parts dedicated to uvs or clones, but somehow they didn't properly fit into any of those topics, so I decided it'd be better to make a separate post about them. I probably will have to re-mention some of this stuff later though, so sorry in advance for anything being redundant!
1) Adding missing body parts
I mentioned a long time ago that my dress, being made from a top, comes without legs. It's not a problem, as it's supposed to be floor-length anyway – but what if it wasn't? What if it reached e.g. only until knees? Or what if you accidentally (or not) deleted/messed up some other body parts, like hands or neck, and wanted to replace them?
To fix this, first of all we need to get the right body meshes from S4S.
It's almost the same steps as in the very beginning, when we were getting the top which we used as a base for the dress. Open S4S, choose 'Create 3D mesh' under CAS and then click the CAS button. Just as back then, you'll see a list of all EA CAS assets existing in your game.
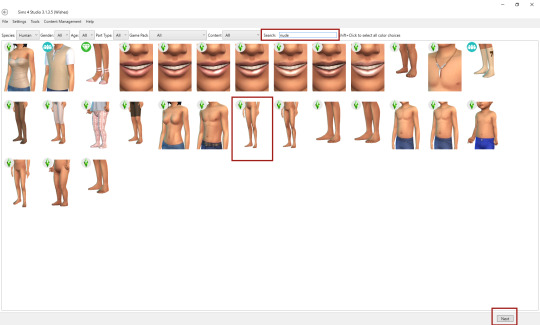
To find meshes of different body parts, type 'nude' in the box in the top right corner. No worries, it's The Sims, everything is safe for work (a.k.a. Barbie-style).
Now you have to select whatever it is that you need. Let's stick to the idea of a knee-length dress in need of some legs. Click the female naked bottom (if you're not sure which one is which, hover over the picture; it'll tell you if it's yf – young female – or ym - young male) and then hit 'Next'.
You'll be asked to name your package, but – just like in case of the top – it completely doesn't matter. It's only the mesh we want – once it's extracted, we can delete the package file.
Now that the package is created, you can access its data. Again, just like in case of the top: go to 'Meshes' and click the 'Export mesh' button. Make sure NOT to change the LOD!

You can close S4S now – that was all we needed from it.
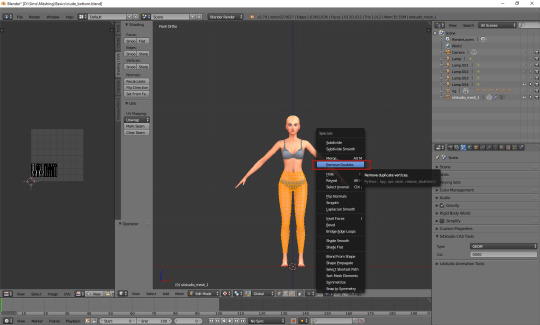
Before we go back to our mesh, I suggest we open the newly extracted legs' mesh, select all the vertices (a) and remove doubles (w, choose from the list). By default each mesh coming straight from S4S is cut in certain places (I guess wherever there are cuts in the uv-1?) - and in case of a naked body such cuts are most definitely not needed.
Save and close.
Now, open the mesh which needs the legs. For this tutorial, I cut off the bottom part of the dress I was making. As you can see, it's very legless.

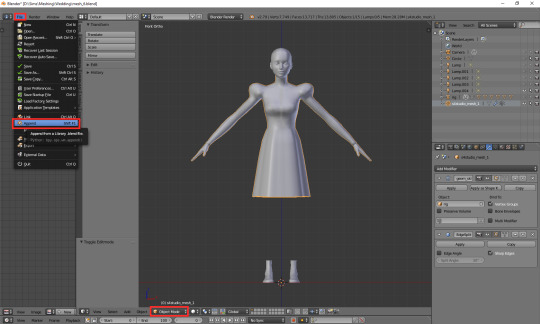
Go to Object Mode (tab), open the 'File' menu and choose 'Append'.
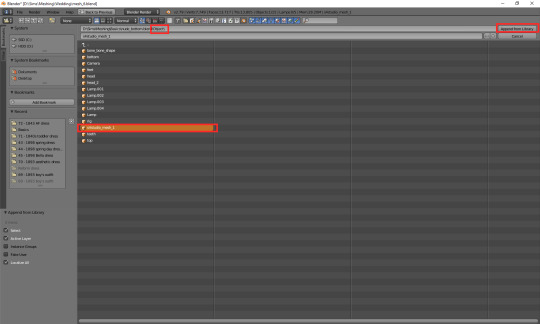
Now you have to find your extracted legs' mesh. However, you'll notice that just selecting the right blend file isn't enough – when you click it, it opens like a normal folder, making you choose from more specific contents of the blend file/package. Here comes the tricky and very important part: the mesh data sits in the 'Object' folder, NOT in 'Mesh'. When you open the 'Object' folder, you'll find inside the file you're looking for: s4studio_mesh_1. Select it and click 'Append from Library'.
Kaboom!
As you're going to join the legs with your mesh anyway, you can safely delete the bone_shape.001 and rig.001. You don't need them and they'll just be making your blend file bigger. It's only the mesh that's necessary.
Now we need to edit the appended legs by deleting the parts which we don't need. Select the legs' mesh, go to edit mode, turn on the x-ray and select (b) everything which will be hidden underneath the skirt. Leave some margin though!

Delete (x) the selected vertices and go back to object mode.
As you can see, right now your dress and the legs are separate from each other – in other words, they are separate cuts. And while some (...many...) EA meshes include several cuts, they are never cut in this way. We need to join them.
Select the legs' mesh on the right and, while holding shift, the dress' mesh. Then simply press ctrl+j. That's all! The legs are where they're supposed to be.

In case you're interested, if you want to do the opposite – turn a part of your mesh into a new cut – select that part, press p and choose 'selection' from the drop-down menu.

Of course, appending isn't limited to saving your dresses from leglessness. As mentioned, the same principle can be used for adding any other body parts... Or even clothes.
2) Frankenmeshing
There's not much I can say to it right now, without going into cuts, weights and uv maps, but if you want to try it, that's your starting point. You extract a couple of meshes from S4S, open one of them and then append the other ones. Depending on what it is that you're frankenmeshing, it might take some time to clean the meshes (i.e. delete the unwanted vertices). In most cases it's also very important to connect the vertices of the separate parts once you join the cuts! If you combine top A with sleeves B, or top C with skirt D, you have to merge the vertices where those parts connect – otherwise it'll at the very least look weird, and that's only a best case scenario.
3) Closing the mesh
I kind of mentioned this one last time, but I guess it won't hurt to explain it once again, this time properly. Whether your dress is short or super long, if you look at it from the bottom, you'll see that it's... Empty. Transparent. Unfinished. The legs – or feet – are ending apruptly, as if cut by a saw. We don't want to see it. That's why we need to close it.

(I remember when I was just learning to mesh I found this part super weird. I thought I'd rather not cut the legs, but duplicate the skirt and flip direction, to make it have both sides, just like in real life. While this idea is not completely ridiculous and can even be useful in certain cases (e.g. when you're making a half-transparent skirt – if it's see-through, you do need the legs to actually be underneath), there are two big reasons why you shouldn't do it: one, it might be very hard to get rid of any clipping, and two, the polycount could potentially kill you. Just in case you're having similar thoughts right now :) )
Select the lowest row of vertices. It might be a bit tricky now that the legs are appended – you might want to separate them into a new cut for a second, just so that they wouldn't be getting in your way. Or just hide them with h. Another easy method is selecting the row on the uv map, but we haven't covered this one yet, so let's stick to separating legs for now. Turn the x-ray on and, while in front view, select the row.
As mentioned last time, this lowest row is supposed to be a sharp edge, so before you proceed, mark it as sharp (ctrl+e)!
Turn the camera a bit to see what's going on underneath. Now extrude the vertices (e) and scale them (s). Click wherever.
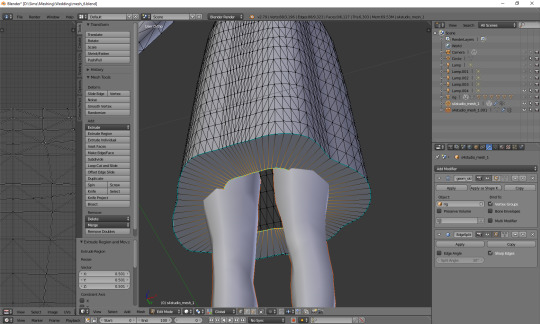
As you can see, the new, extruded circle is selected now. Press alt + m to merge those vertices and, from the drop-down menu, select 'at center'.
Personally I don't like it when the bottom of a dress is so completely flat, so I move that middle point a bit higher, along the z axis (g, z). That's also one of the reasons why I left that leg margin earlier. I guess you don't have to do it, but I think it makes it look a bit more natural.

If you separated the legs, you can once again adjoin them to the main mesh now.
It's very important to close any open ends your mesh might have. The bottom of your dress/skirt, cuffs, necklines, sleeves if they're short – everything must be closed, otherwise you'll notice it in the game, sooner or later. It's fine if you don't do it now – you might want to wait until you're done with uvs and weights – but eventually you have to do it. Just for a little crack, here's a screenshot I took while testing one of my dresses. It's floor-length, so it shouldn't matter if it's closed or not, right?
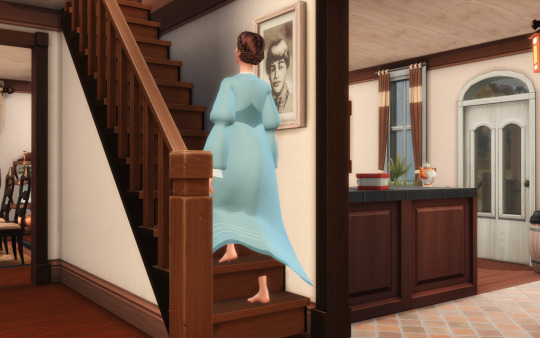
That’s how it ends.
***
The long-awaited uvs tutorial will follow very soon, unless I suddenly get some urgent project to work on. I know how badly it's needed, so it's scheduled now, like any normal job-related stuff. And as hard as it might be to believe, I'm actually quite good at meeting deadlines if they're set in stone – I might not enjoy it, but I get stuff done on time. Stay tuned!
(Next: VI a. UV_0)
51 notes
·
View notes
Note
Hi Renora! I was wondering, do you know any tutorials on blending two textures together? I've just frankenmeshed a pair of long sleeves onto that off-shoulder top that came with laundry day (the same one you used to make your 'flower power' top), but since I had to keep some of the original sleeves too, I'm unsure of how two make the textures mix nicely. Any advice would be greatly appreciated - but if you don't have any, thanks anyway for your time!
Hi dear!
Blending textures can be a tricky thing! It all depends on how well the textures match together, for example; if one texture is more detailed and the other more ‘flat’ so to speak it can be a really tough job!
below are some things I personally use when blending textures together. Every creator has it’s own way of doing this meaning that other might do it differently.
1. I always try to pick textures that are approximately the same style; both flat or very detailed in the same way. otherwise you will end up with a visible difference between them. for example; I made this denim blouse by loaning textures from the GT EP denim blouse. both denim and detailed textures.
2. After that I make a grey image (as shown in my PSD recolor files) of them and match all textures in the same grey color to avoid any color differences later. you can also do this later on… sometimes i’m not sure if a certain piece of cc will make the cut so I just make a rough texture first. to see if it’s any good. as long as you do this before merging layers.
3. And then comes the feather option (feature in photoshop, shift F6) this really is your friend! Or mine at least! ;) It is very handy to make textures run smoothly into one another!
4. If there are (still) some though parts the spot healing brush is also a very clever feature to remove any ‘seams’ / lines that are still visible from un-succesly blending 2 textures together. It does so much more so it’s definitely worth exploring! You can also remove unwanted texture seams etc. however it sometimes can be a tricky thing! the feature needs to recognize the right parts of the texture to sample, this is just a trial and error learning curve. you can always go 1 step back and try again since the result is always different the next time.
I hope this helps you out a bit dear!
Hopefully I’m able to record some videos in the near future for my youtube channel since I’d really love to do so! But i’m still very shy about it and of course due to my perfectionism needs to be perfect! -__-
12 notes
·
View notes
Note
For someone who wants to venture into the world of cc making, how would you suggest that I start? Also, do you have to use photoshop, or can you use an alternative like GIMP?
I suggest you start small/simple. If you have no experience and try to take on a huge project that you have to learn a dozen things to complete it, its going to turn you off cc making very quickly. It is best to try and master things one at a time rather then trying to learn everything at once without grasping the basics. Its much like Mathematics or any subject at school, they start you off simple, then build up to the more advanced stuff. Also don’t put any expectations on yourself that you know you wont accomplish. Goals are great, but realistic goals are better. I tried something new which each set I made, just one thing and I accomplished it then moved on. Its a great for boosting motivation too.
Putting the rest under a read more because of babble:
Grab blender right away. The more you play with it and experiment, the better off you are going to be. Just play around, look up videos or written tutorials and just get familiar with the program, you are going to be using it a lot. Same with GIMP. There is nothing I see more readily then people taking on a huge project and have no clue how to use the tools in front of them. Its much like a carpenter not being able to swing a hammer. It is overwhelming to begin with, but trust me, just focus on when you need to learn first and them do it in stages. Unfortunately this wont come by snapping your fingers together, but persistence and practice is key.
If you want to be a CAS creator, probably start with recolouring. Although it doesn’t seem glamourous as making meshes, it is an important aspect as the texture can make or break an item. There are plenty of tutorials out there on how to recolour as well. From there you can move on to mesh edits, then frankenmeshing, then from there you can do much more as you would have learnt UV Maps, weights and much more.
If you are more interested in objects , then I would again start with recolouring, and even mesh edits. You don’t have the complexity of weights for most objects so its a bit easier to start further along. Once you are comfortable you can try your hand at editing EA meshes. This will get you familiar with UV maps; one of the biggest pains in my ass when it comes to CC making. It takes a while to get a hang of them, and even longer to master.
When you get stuck and can’t figure out how to do it, I find googling the specifc issue (like UVMaps or resizing in Blender) gets you far more hits outside the community then inside it. Modding is such a vast topic and limiting yourself to just the simming community is seriously going to hinder you. Just make sure you are specific with what you are looking for, that helps a lot.
I think the biggest thing is make sure you are doing this for the ‘right’ reasons (totally subjective). If you are doing this because you are interested in the meshing for yourself, it is much easier to learn because you want to. If you are doing it for other reasons, it’s not going to be as easy because you are always going to have that little voice inside your head going “you could be doing something else.” Enthusiasm for a subject, just like at school, makes it more enjoyable and seem far less like work and more like a hobby.
As for the question about needing Photoshop? Definitely not. When I started I used GIMP (back in TS3 days). It is certainly capable of doing what you need. I do believe you need to grab the nVidia DDS plugin though (just like PS) so make sure you grab that. If any texture requires transparency of any kind, i feel PNG format kinda sucks for it. You can always revisit the idea of using PS later down the line. It does have some advantages (like being the default for texture tutorials) but it really isn’t necessary at all. There are actually some things GIMP does better the PS and wish i had those features back.
76 notes
·
View notes
Text
Ring My Bell [November 30, 2017]
COMPLETE
Summary: A social media post brings Emery and Eberhard together again for dinner after a long time of being apart. They end up having a passionate moment of sex, but ultimately, Emery ends up kicking Eberhard to the curb and leaving him wondering.
Emery walks to the address that Eberhard had provided, giving the door two knocks before he pulls out his phone to absentmindedly browse through his social media as he waits for Eberhard to open it, a bit curious to what the other man had chosen for their dinner that night, but ready to let the surprise take its course.
Eberhard hears the knocks on the door, having just finished setting the table, he picks up the two tequila & triple sec citrus cocktail's, pulling out his phone turning on the stereo, just as he opens the door, playing the iconic Anita Ward song, a playful grin on his lips, as he takes in the man, "Überraschung!" He exclaims, covering Emery’s eyes and putting the drink to his lips, "Getränk." He laughs, before moving his way back into the apartment, pulling Emery in with him, his hand still over his eyes, "Dessert oder Abendessen?" He questions.
Emery sees the door open revealing Eberhard, holding two cocktails, before he hears the iconic Anita Ward song playing as he walks in, immediately feeling Eberhard cover his eyes, and tasting a tequila-based drink at his lips. "What, that you learned to make a drink other than the whiskey on the rocks you used to make us when we'd sneak the good stuff from your parents' liquor cabinet back in our Charleroi days? Come on, E, you know I'd imply it, but never say it," he deadpans, before he's pulled into the apartment, hearing Eberhard's question. "And, E, you mean and," he faux-chides, waiting for Eberhard to reveal the surprise.
Eberhard's lips curl up into an amused grin as he recalls the memories associated with his dry words, a light laughter rolling from him, "Ah, no need for such psuedo politeness, E², I'll take that as a compliment though, glad to hear some things have improved with age, hm?" He teases, pausing a bit as his grin widens, "Hm, but. do. I?" He punctuates and draws out the words, tapping lightly over Emery's temple, as he continues to cover his eyes, linking his arm with his and leading him to the table, leaning in close to his ear, "Bzzzt. Wrong." he blows, as he moves his hand off his face revealing the spread laid out - including two farro breakfast bowls with blistered tomatoes and kale, seared tofu with sweet chili sauce broccoli and garlic studded rice, and crêpes with blackberry sauce and orange-scented ricotta. "Viola." He winks, sitting down at the table taking a drink of his cocktail, "Go willllllllld, wolf." He declares, finger gunning him, "Although, I really should've left you blindfolded for the incorrect answers, absolutely." He puts his hand under his chin thinking thoughtfully, "Aw, double dog damn." He laughs, fixing his plate.
"Well then," Emery muses, "quite impressed that you've learned to become more than a one trick pony who can jostle open his parents' liquor cabinet. Brava, E, perhaps there is hope for us all." He then allows Eberhard to lead him, hearing the buzzing in his ear before he reveals the spread, causing a small smile to twitch in Emery's face. "Incorrect, E? I'd argue that you offered me a choice and that you failed to deliver on either point. Should I blindfold you and put you in the corner for not being a proper host? For shame." He then sits down at the table, taking a sip of the cocktail before putting some of the food on its plate. "How are you going to make up for this transgression, E? Please, do tell me, I'm waiting with bated breath."
Eberhard lets out a breathy chuckle at Emery's words, "I am wholly humbled that I could inspire you so, E². Some things never change, hm?" He teases, revealing the spread, a widespread smile tugging at his lips as he hears Emery's response, "Come now, learn to think past the available choices, you must think for yourself, despite what is placed before you. I figured you would remember that." He faux chides, before he lets out another laugh at the threat, "Perhaps, if you believe you could accomplish such a feat, you are of course, free to try and exercise your will." He muses, moving to chew a tomato, a smile pulling at his lips as he takes a refreshing drink of his cocktail, "Try the food first, before you move to the punishment phase, partner. Put some perspective on it, please." He grins, tipping his faux cowboy hat, taking another bite of his food.
"And yet some things do," Emery muses, before listening to Eberhard's response. "Hm, and now that I've seen the choices, I still want both dessert and dinner. Don't give the power of choice when you aren't prepared to deliver, E." He then moves to chew some of his food, a twitch of a smile coming to his lips at the flavors in it. "Nothing like anything Lunchlady Dolores would cook of course, bless her soul and her Meatloaf Mondays, but it'll do, E, it'll do. Punishment still pending, of course." He then works at finishing his food, savoring the flavors of it all and enjoying the refreshing cocktail.
"Well, where have I fallen short?" He muses, his brow quirking as he looks over at Emery, noting the twitch of a smile, one of his own developing at the sight, letting out a boisterous laugh and turning up his nose at the mention of Meatloaf Mondays, "What a blow!" He feigns being shot, clutching his chest, "I believe you exercised your punishment with that statement alone, I don't believe I'll be able to cook again, that shook my confidence completely." He wails, "Although, now logic follows the punishment is back on you, then. For such improper table manners-" He moves to stand up, "Which is truly tragic seeing as how I had an additional dessert on the table to celebrate but now, I'm honor bound to withhold it from you." He teases leaning over Emery as he moves towards him, moving to grab and pinch his cheek, "What's a guy to do, when faced with the infallible Charleroi code of conduct." He laments dramatically, moving to the fridge pulling out the homemade caramel peanut butter truffles, biting one in half as he finishes off his drink, promptly refreshing it as he leans against the island, taking another bite of the treat, "So, what brings you to these parts, pal?" He muses thoughtfully.
"Just a general statement," Emery muses. "I'm certain you could say the same thing about me." He then hears Eberhard's boisterous laughter, and he raises his eyebrows, even as a twitch of a smile develops oh his lips at the sound. "Oh, no, E, Lunchlady Dolores was an icon. You should strive to be like her. Who else could think of such interpretive uses for spam?" He asks, before he feels the pinch of his cheek and raises his eyebrow slightly, hearing Eberhard's lamentation. "Drink whiskey and smoke on the rooftop and pray Headmaster Franklin doesn't find you," Emery offers, finishing off his drink before moving over to where Eberhard was at the island, taking one of the truffles and placing it in his mouth. "Terrible job of withholding, E. About as useful a confinement as having a prison out in an open field." He finishes the truffle, enjoying the flavor, before looking at Eberhard. "I think the real question is what brings you here? Last I heard from you, you were in Belgium."
Eberhard holds his hand up the mention of Dolores being an icon, another laugh falling from him, "Ah, you are correct. I take it back, despite our immeasurable differences and tumultuous relationship, I must give credit where credit is do, she was certainly a woman ahead of her time, able to frankenmesh such uniquely and utterly unappetizing unholy concoctions. That could only be done with the upmost sense of self and creativity. Kudos, Dolores." He says, raising his glass in cheers, a devious smirk playing on his lips as he recalls the memory, "Solid plan, don't recall that ever biting me in the ass." He retorts, before his grin widens at the thought of the youthful folly they had gotten up to in that particular spot, "-Well." He shrugs, popping the rest of the truffle into his mouth and chewing purposefully. His grin returning as he sees Emery take one of the truffles, his fist resting under his chin as he hums thoughtfully, "Wow, well, wouldn't you know it, that's always been a weakness of mine." He flashes a devilish smirk, thinking onto the origin of a particular formative nickname, quickly clicking his tongue a few times, giving him a casual shrug. "I am who I am." He smiles, at the turning of the question, "Shifty, shifty. Belgium, mmm." He muses on his time and the cumulative experiences he garnered there, "Well, that is certainly a huge chunk of the tale you need to be caught up on then, as always, time in Belgium came to an end, needed to stretch my feet some, did a lot of traveling, as you should, really racked up the experiences, for about a year or so, best times, truly. I got accepted to Berkeley, accomplished about a semester of that cool Cali cruisin' vibe, before dad fell ill, thought it best to transfer to Columbia, to be closer to everyone, reign myself back into the circle, he, uh, died a bit after that, and well, I've been here ever since, so around....three years." He summarizes, giving a small smile despite the sad memory, popping another truffle into his mouth, his gaze focused on Emery, "Boom. Spark notes of one Eberhard, Everhard, if you're nasty, or Charleroi class 2010, Vennett. You're up next, now." He smiles, shooting him with a playful one handed finger gun.
"As you should. Show some respect, E," Emery states, shaking his head, clicking his tongue a bit, before raising his glass in cheers. "Ah, and here I do. Don't tell me your memory has faded over the years, E? And here you were supposed to be the youthful one between us, shame." He lets out a small, almost chuckle. "As am I." He takes another drink of his cocktail, before listening to the story, hearing the bit about Dwight Vennett, the story having gone through the Charleroi grapevine, before he sets his drink down to tell his own story. "Here for a JSD. Been working as an attorney up in Boston after graduating from Yale Law because what better place for a disloyal Yale man to go than to Harvard territory? This all comes after finishing up my tenure on the track team during undergrad at Stanford. Published a few papers, co-authored a book, and the Emerson thing, but that's neither here nor there, Everhard" Emery shrugs, casually slipping in the nickname. "You know I'm nasty, no surprise there." He deadpans, giving another quick shrug.
A delighted grin pulls at Eberhard's lips, "Ah, do not tell me, you of all people subscribe to such a woefully archaic social construct such as that now, my, time has certainly changed things, indeed." He teases, "I have quite a few reminders of such audacious irreverent folly of youth, no need to fret, old man." He continues on, amusement lighting his eyes, prior to listening intently to Emery's story in turn, noting the professional tone he chose to use for such a thing, a flash of hurt flashing through him at the mention of Emerson, he reaches his hand out, placing it and gently rubbing along the top of Emery's hand, throwing him a knowing and soft apologetic look, he mindfully steers the conversation away from the topic, sensing it was not something he wished to delve further into, "Wow, such a beautifully broad bio, so superbly accomplished absolutely, mister. My, I am particularly positively proud of ewe." He admits honestly, extending the last word and making a playful 'baaa' sound, taking another truffle, chewing a warm laugh falling from him as he hears his response and the dead pan delivery of it, raising his brow, "Do I?" He muses thoughtfully, studying his faith, amusement and a hint of arousal playing within his eyes.
"I suppose it has," Emery has, giving Eberhard a shrug, before a smirk tugs at his lips at his mentions of their follies of youth. "Good to hear," he states, lifting up his drink in the air before taking another sip, then listening to Eberhard's story and telling his own, before he feels the gentle rubbing on the top of his hand, causing him to retract his hand, a strike of discomfort in his stomach at the apologetic look that comes across Eberhard's face, before he uses the same hand to run his fingers through his hair, brushing off the gesture. "Don't start the name jokes, you make it far too easy, Everhard," he states with a shrug, before he hears the question and sees the amusement and arousal flash through Eberhard's eyes. "Do you?" He muses in return, studying Eberhard closely.
Eberhard is caught a bit off-guard by the quickness of which Emery takes his hand back, watching Emery closely as he runs his hand through his hair, pulling back a bit, taking the opportunity to refresh his drink, taking a deep drink of it. A laugh escaping him as he hears Emery's words despite the bit of awkwardness that lingered because of his earlier gesture, "Damn, there are only so many ways to call me easy, you would think no?" He gives another amused laugh, as he takes another drink, a devilish smirk tugging on his lips as he hears the question thrown back to him, and notes the close gaze the other man was watching him, letting a casual shrug roll from him as he keeps eye contact with him, "It's all a matter of perspective, of course." He answers, taking another slow drink, "All about the context, little ewe." He winks, before he melodically and deeply hums the beat of little bo peep, a warmness coming over him as he moves from his position, and dances along to the beat of it and over to close the distance between them and moving his hand into his hair softly and leaning in for a kiss.
"I don't know, do you want me to keep trying?" Emery states, giving Eberhard another quick shrug as he takes a long sip of his drink, before he watches Eberhard dance closer to him until the distance between them is closed. He then feels the hand in his hair and sees Eberhard lean in for a kiss, from which he momentarily pulls back. "So tell me. What's the context of all this?" He says, raising his eyebrows at Eberhard as he waits for his answer.
"I wouldn't be opposed to such a juke, perhaps, even admittedly a bit curious to see if it was merely a fluke? Lay it on me, you kook." He retorts, dancing his way over to the man and moving to kiss him, feeling him pull back and hearing his question, meeting his gaze, "Ein herzliches willkommen?" He answers.
"Ah, here we go. Everhard, did you know that you're easy like Sunday morning?" He asks, before Eberhard moves closer, meeting his gaze as he hears the other man's answer. "Ist das alles?" He questions further, raising his eyebrow slightly as he studies Eberhard.
A twitch of a smirk develops onto his lips as he hears Emery's question, "That's why I'm easy. I'm easy like Sunday morning, why in the world would anybody put chains on me?" He sings deeply and melodically, a smile twitching onto his lips at remembering the song, moving his thumb gently across Emery's lips, "Ist das alles, was du willst?" He questions back, studying the man he had been close to for so many years, and apart from for almost as much. "Ich habe dich vermisst."
"Ah, maybe because I've paid my dues to make it, everybody wants me to be, what they want me to be?" Emery muses, chucking a bit before he looks back up at Eberhard, before he feels the movement of his thumb across his lips. "Mhm," Emery says, a tiny smirk flitting across his lips. "Hat mich auf welche Art verpasst, Eberhard? In the Eberhard way, or the Everhard if you're nasty kind of way?"
Eberhard holds his grin as he hears the next lines of the song, "I'm not happy when I try to fake it! No!" He sing counters, hearing his response to his question, nodding in confirmation at the one asked back to him, "Vielleicht sind sie ein bisschen einig?" His gaze flitting down to his lips, noting the small smirk, causing him to repetitively click his tongue a few times, "Nun, Letzteres ist sicher. Sie haben das früher bequemerweise aus Ihrem mündlichen Lebenslauf gestrichen, was für eine Schande." He says, moving his grasp along his neck as he pulls him into a deep, explorative kiss.
Emery chuckles a bit more at the sung line, before he hears the question, and raises his eyebrows a bit, closely studying Eberhard as he listens to Eberhard's statement. "Well, Eberhard Everhard if you're nasty Vennett, let's just say that I missed you in the latter way, too," he says, before moving into the deep, explorative kiss.
A toothy smile graces Eberhard's lips as he lets out a little chuckle at Emery's words, reveling in the sensations of the kiss feeling a sense of familiarity laced with a freshness, he notes before quickly turning the kiss more passionate, wanting more he swiftly works on removing his shirt, throwing it carelessly onto the floor, breaking the heated kiss. His blue-green eyes almost electric, "Oh, did eweee?" He ponders aloud, throwing his shirt off, "I do believe I'm going to have to withhold you from using that name, until you produce the particular evidence that you fit such a prerequisite and can rightfully reclaim." He declares, wrapping his arms around Emery's neck, leaving hot kisses along it, and down his chest, "Rules are rules, after all young man." He deepens his voice further, wagging his finger at the man, indulging in another fervent kiss, "The backbone of our civilized society, a man that can not adhere to such principled disciplines is most certainly an eternally damned soul." He continues the words, pulling them from the impassioned speech he heard from Headmaster Franklin, one too many times, moving his hands to undo his pants, continuing the kiss, relishing in it and deeply craving more from the man.
Emery indulges in the heated kiss before they break apart, as an almost smile tugs at his lips at Eberhard's comment. "Ah, don't boar me, E," he says flatly, even as a small spark of amusement dances in his eyes. "Oh, yeah, Everhard?" He breathes, in between heated kisses exchanged with the other man, hearing the impassioned Headmaster Franklin speech, a wider smirk tugging at his lips. "What are you going to do about it, Eberhard, when I've already eternally damned my soul many times over?" He moves to work at assisting Eberhard in removing his pants before undoing his own, leaving heated kisses along Eberhard's body as he sinks down to his knees to begin his practiced motions.
"How else can I impress ewe?" He makes a subtle exaggerated boar noise, in between heated kisses, pushing the man against the island at the use of the name again, and giving him a playful slap along his face and a harder one along his backside, wagging his finger disapprovingly at the man, despite the gleam of amusement playing in his gaze, going into the speech as he kisses along his body, hearing his question and amused smirked pulling at his lips, "Ah, well, what's one more for ewe." He agrees, his voice low and seductive along his ear, "Genießen Sie die Fahrt." He lowly groans, as he leans back, bracing himself as he feels the expert sensations washing over him, carressing his hand along Emery's face, and running his hand through his hair as he enjoys the motions, pulling on his hair once he feels the sensations become especially overpowering not intent on reaching such a peak any time soon, he lifts the other man up from his knees, pulling him into a ravenous kiss, his hand working skillfully along him, before pushing him onto the dining room table, swiftly falling to his knees to continue his prior motions with much more zest, his blue-green eyes meeting Emery's own as he does so.
"Mm," Emery muses, in between heated kisses, feeling the sharp slap along his backside, "surprise me." He then gives Eberhard a sharp smack along his backside before moving to turn the tables and push Eberhard against the island, bringing him into a fervent kiss once again. "Das werde ich," he growls back, before getting down on his knees to begin his motions before he's pulled up and pushed onto the dining room table, pleasure coursing through him at the sensations, but finding something...unsettling about the eye contact, and so he pushes Eberhard up from him, moving to then push Eberhard against the table, roughly kissing him as he begins to once again work skillfully against him, picking up from what he had begun earlier.
Eberhard lets out a light laugh as he's pushed onto the table, letting out a low groan at Emery's motions, before a grin develops onto his lips as he hears the song playing softly in the background, recognizing as the Primal Scream song, letting out another amused laugh, "Willst du immer noch, dass ich singe?" He hums, in between groans of pleasure, as he winks at Emery before pushing himself off the table and Emery roughly back against the island as he bends to grab his phone, moving to turn the the volume up, and loop the song, turning back to Emery with a devious smirk on his lips, wrapping his arms around his neck and kissing him with a ferocity, ""I'm trippin' on your love, I'm trippin' on your love." He sings deeply, humming the tune of the song, moving his hips along to the beat and along Emery, pulling him along, back to the table as he continues his hungry kisses along his body, moving to push Emery hard against the table again, pushing the dishes from the dinner off carelessly, climbing on-top of him, moving along to the beat and against Emery, "Bond so strong between us, bridge between our souls, lifts me like a bird of prey, heals the wounded boy." He seductively sings along Emery's ear as he continues to skillfully move along him, pulling him into a consuming kiss.
Emery continues his motions until he he hears the song begin to play in the background softly, causing a half smile to play at his lips in spite of himself as a chuckle rolls from his lips. "Miss a free performance from the shining star of Charleroi? Come on, Eberhard, my mind has not gone so much that I'd pass up an opportunity like that," he muses, his half smile widening a bit as Eberhard turns the volume up, his own smile taking on a devious glint as he sees Eberhard's, moving to furiously kiss Eberhard as he's aroused by both his motions and his singing, assisting in carelessly pushing the dishes as he gets caught up in the moment, joining in with Eberhard in spite of himself to sing, bridge between our souls, lifts me like a bird of prey, heals the wounded boy," along with him, their voices joining together melodically as they did when they were in their choir classes Chareleroi, moving in to the consuming kiss, feeling a fire within him as he indulges in it.
A bright grin plays on Eberhard's lips as he hears Emery join in with him, the sound of their voices melding and harmonizing causing a strong shiver to course through him, as he bites his lip, his brilliant blue-green eyes shimmering as they meets Emery's alluring blue eyes, gazing deeply into them, as he continues his energized and hungry expert motions against the man meeting his pace perfectly, reveling in the immense pleasure from the sensation of being connected to him once again. The realization and sensations flooding his body, mind, and soul, not focused on anything in the heated exchange but Emery and the way their body's were so intoxicatingly in tune. An amused laugh rolling from him as he feels the roll, changing their positions, his back hitting the table hard, but not minding the sensation at all, as he wrapped himself tightly around Emery, pulling him into a fiery wild famished kiss, craving to have more of him, all of him.
Emery allows himself to get caught up in the melodic intertwining of their voices, the deep way Eberhard was looking into his eyes causing something to strike once again inside him, though this time, it is dulled by the burning fire and pleasure inside of him as he feels the connection between him and the other man and just how in tune they were, and he moves hungrily into the firey, wild kiss, feeling completely ignited by it before he ensures that Eberhard is ready for what is to come next before he expertly and intensely moves his body against Eberhard, the entire experience utterly euphoric, continuing with intoxicating synchronism until they reach a mutually gratifying destination, the experience unlike anything quite like anything...since the last time he and Eberhard were together, he realizes, with that same strike of a feeling returning to him as he pulls apart from Eberhard, studying the other man for a brief moment, truly taking in seeing the lamb tattoo in full view for the first time after all those years, and in the moment, it all just becomes too much. He moves to throw his clothes back on quickly, running his fingers through his hair, before turning to look back at Eberhard, a part of him wanting to stay longer, to fully indulge in their reunion, but too much of him in the moment wished to go, and so he gives Eberhard a quick two fingered salute before turning towards the door. "Got somewhere I have to be. See ya, E. Don't you forget about me." He sings the last part to the tune of the song by the same name, before putting his jacket back on him and closing the door behind him, lighting a cigarette once he's outside and taking a deep drag of it before walking out into the night.
Eberhard indulges deeply into the euphorically intoxicating synchronism, not holding back whatsoever, yearning to give himself wholly to the heated experience, to Emery, freely letting his ecstatic sounds of pleasure flow from him, until he feels himself reaching his peak, intensely holding Emery's gaze, expertly moving against him so they would arrive together. His efforts soon paying off as they reach a mutual release, the experience causing a euphoric unparalleled transcendence over him. He lies back onto the table, spent, his breathes heavy as he works to overcome the weakness he was feeling, in the moment, watching Emery's gaze fall onto his tattoo, a smile twitches onto his lips, as he eyes flit to it's match, tracing over it, "Du hast es behalten." The sight causing an immense warmth to flow through him, he leans in and kisses over the tattoo gently, pulling Emery into a deep kiss, moving his hand over his heart, allowing Emery to feel the beat of it, as he moves to caress his tattoo, reveling in the moment and sensation before he's caught off guard by the unexpected breaking of it. Another shiver striking through him as he watches Emery quickly scramble off of him and redress, a hurt coursing through him at how he seemed not able to stand to be around him any further, he swallows harshly a lump developing in his throat in the moment, yearning to grab him, for him to stay a bit longer, but not having the will to do so in the moment, not when that wasn't what he wanted, again. He places a smile onto his lips, nodding his head, giving a small laugh as he clears his throat, "Yeah, right, of course. In a while, crocodile. D-Don't be a stranger, ewe," He says back, watching him leave, moving off the table with a huff and moving to fix himself a strong drink, before he even thinks on beginning to clean up.
- COMPLETE -
0 notes
Text
Twitch
I got an anon yesterday wanting to know how I separate meshes and some of my friends want to learn to frankenmesh so in about an hour or so I’ll be streaming and trying to teach how to make CC and answering questions.
I will post a link before I start just wanted to give y’all a bit of a heads up.
Disclaimer: I don’t claim to know the only or best way to make CC. Nor do I have all the answers. I’m just going to show y’all how I do things and do my best to help those who want to learn :D <3
10 notes
·
View notes
Last Seen Blogs

sustainablepossibilities
Sustainable Solutions to Climate Change

hyaluroliftblog-blog
Hyalurolift

kimswexler
sunk costs

ralhiel
Cosmic

userdanewhitman
Open your eyes like I opened mine