#OoaK jewels
Text
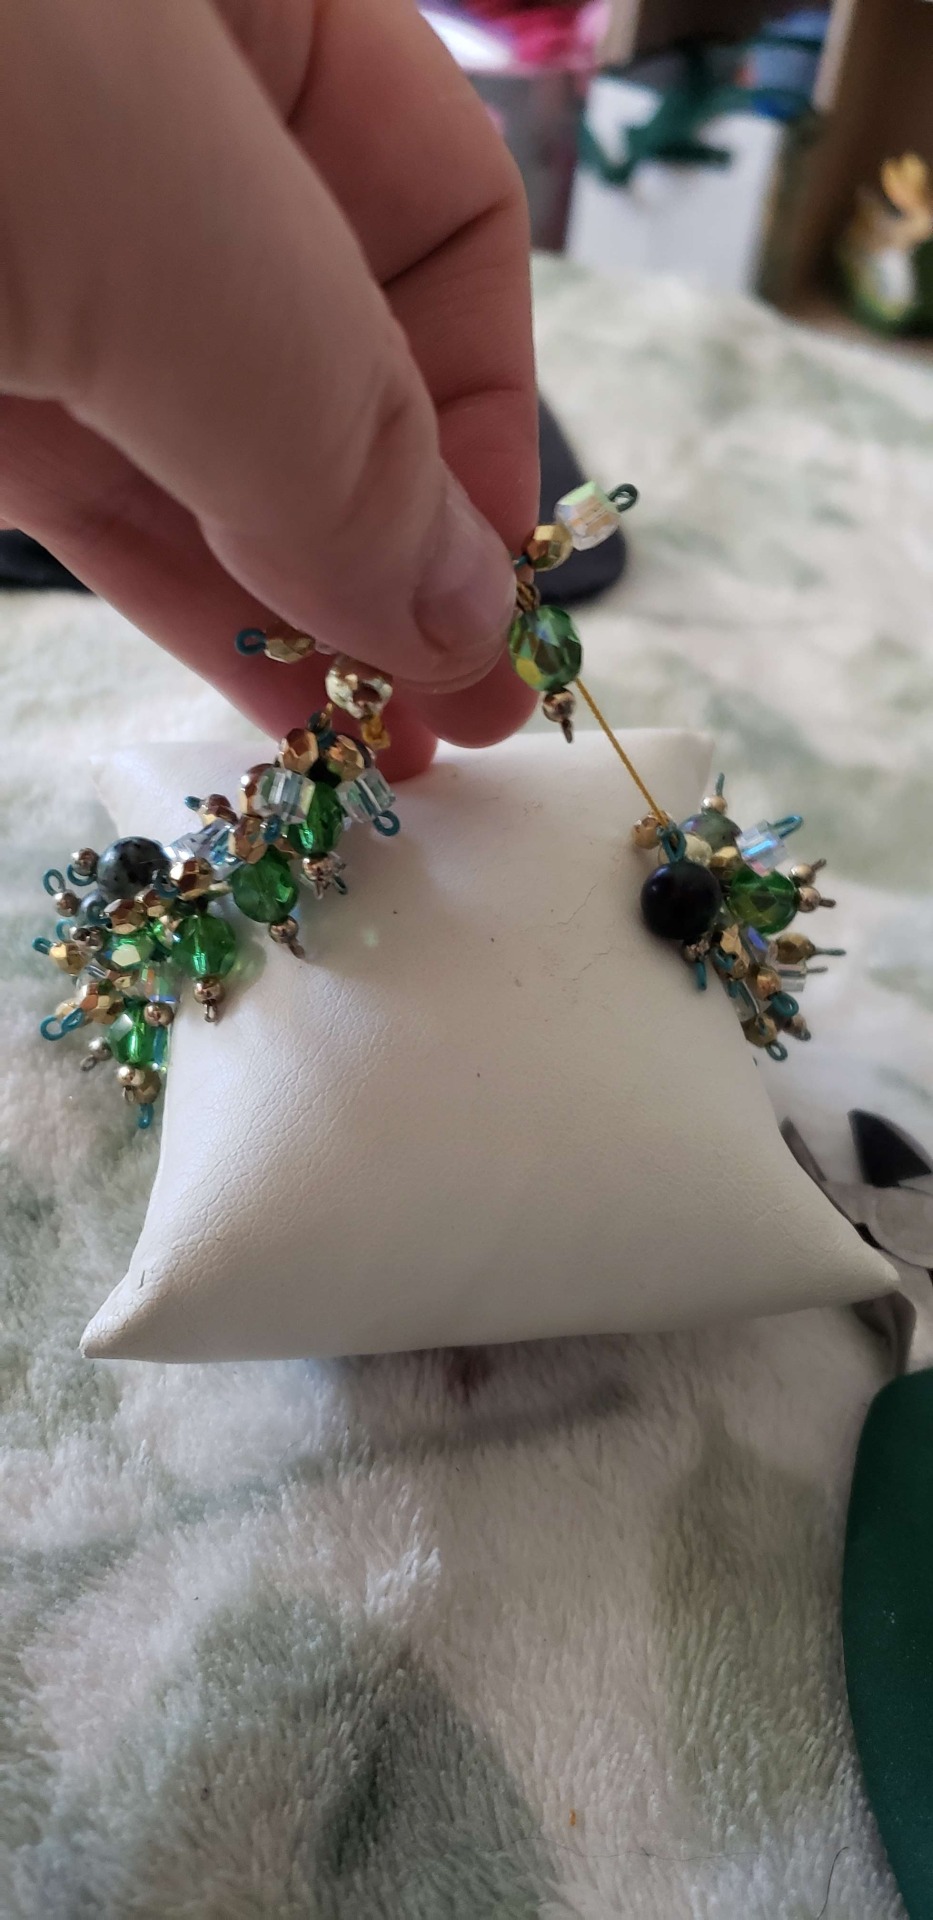
How it started:

How it finished:
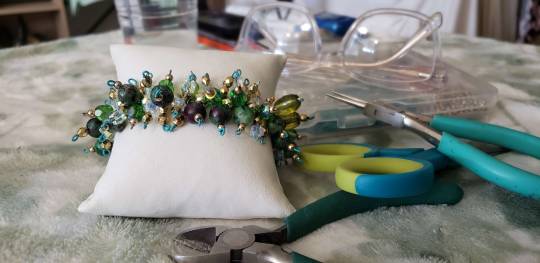
Hand bent wire, semi-precious stones, Swarovski crystals, beads, and a whole lot of finger pain.
Have some deets. BECAUSE I SAID SO!
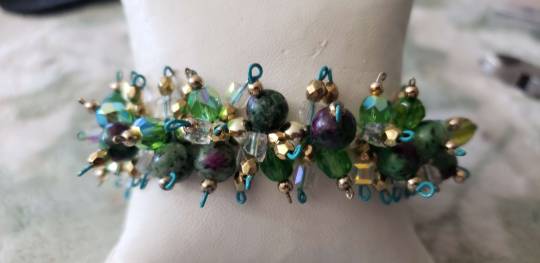
Oh, you want to know how it wears?

Keep in mind, I do be having some thick wrists, which is why I made it with elastic.
It's an ease of use thing.
#jewelry#hand made#made by me#OoaK jewels#green#Swarovski crystals#Semi-precious stones#took me all day#my fingers hurt
3 notes
·
View notes
Text
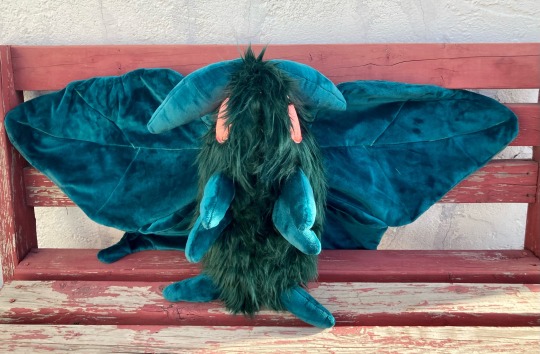

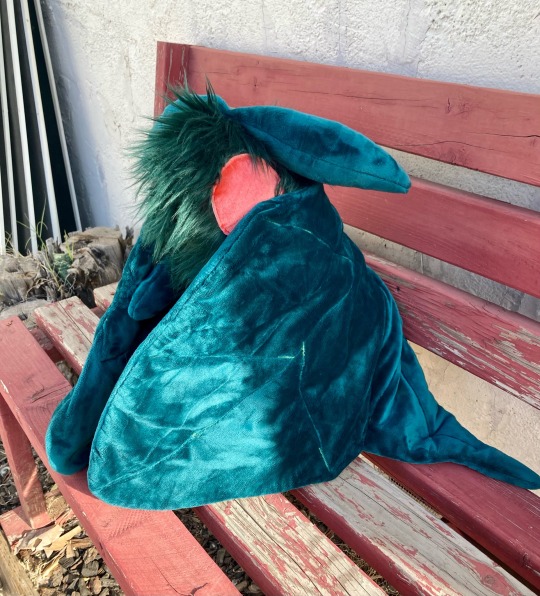
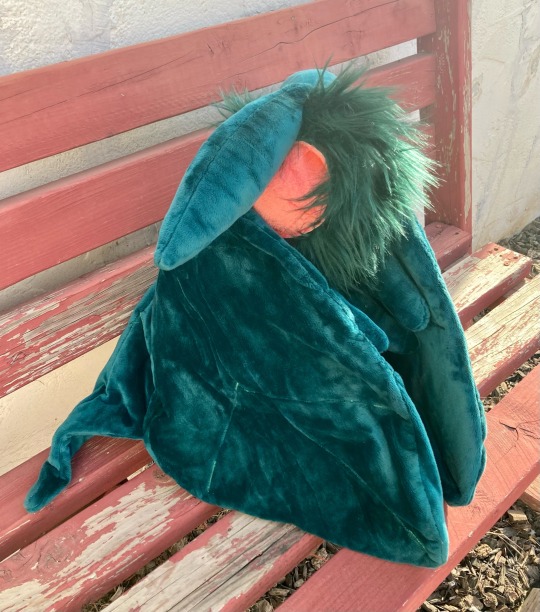

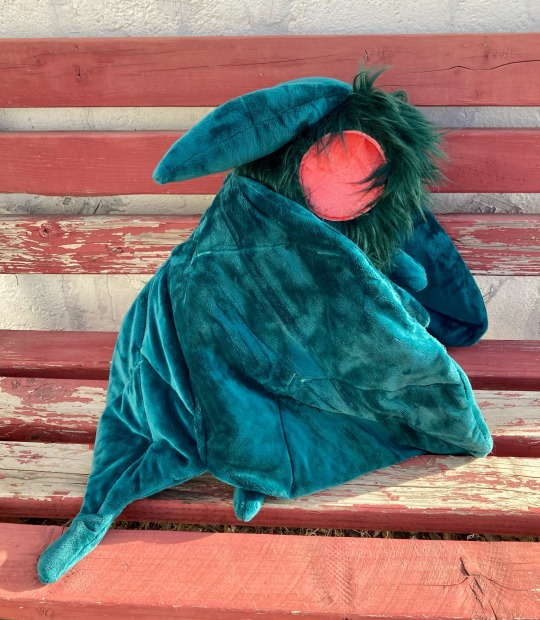


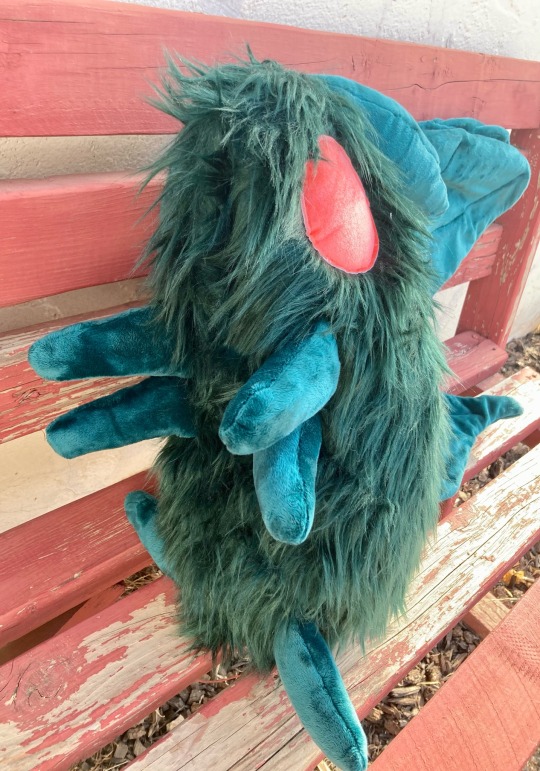
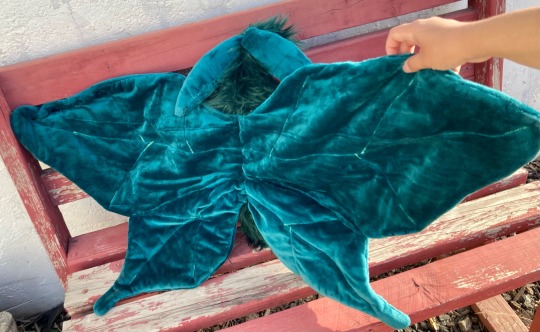
I made a giant moth plush. The moth is 18 inches tall. The wingspan is 48 inches long. The fabric is faux fur and faux rabbit fur. Has a weighted bottom. The moth is perfect for anyone who loves insects, likes all things of the night or for gifting friends and family. For sale here.
#handmade#kawaii#moths#mothman#moth#emerald green#jewel tones#cottagecore#custom plush#ooak#one of a kind#emerald#handmade plush
23 notes
·
View notes
Text
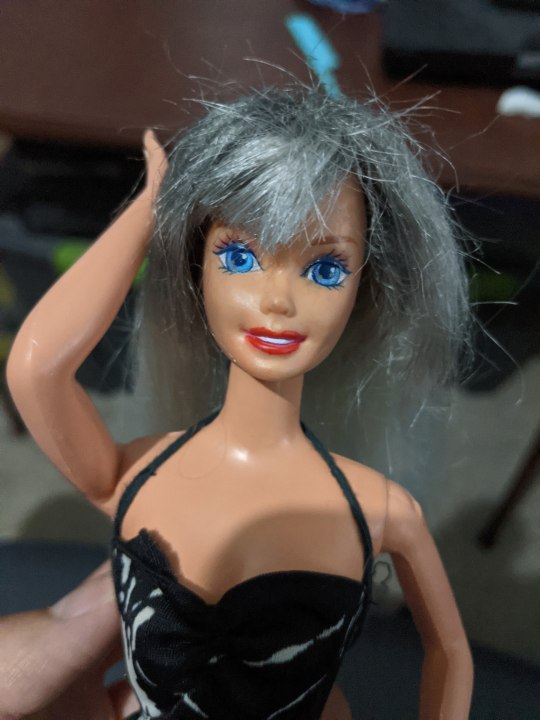


Gave my shorter hair Jewel Hair Mermaid Barbie silver hair w/ black highlights and red lipstick, naming her Carrie-Anne Marie. It started as just giving her black roots but it eventually evolved into this.
22 notes
·
View notes
Text
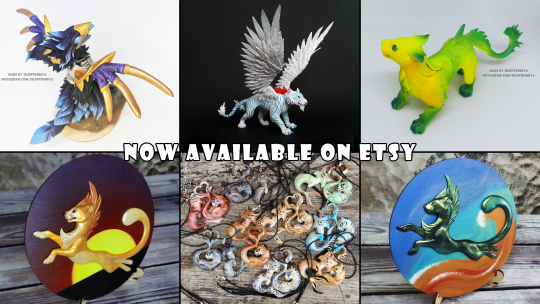
At the end of 2023, I put some of my projects up for re-sale on Etsy. You can see them in this image and if you are interested in any of them, you can find these works here.
I accept payments through Etsy listings or through PayPal invoices. If you want to work through PayPal, then I will give you a 10% discount on the prices that you will see if you click on the link above (this is the general cost of Etsy commissions for me, so I'll be happy to remove this part from the price). In addition, if you are interested in purchasing several works at the same time, then there is a chance to save on shipping ;)
I don't visit Tumblr every day, so if I don't read and answer your message/comment for a couple of days, don't worry - that's normal. If you want to contact me quickly, it is better to write to me by email: [email protected] . Thanks! ^^
In addition, I have interesting news for those who like my art and who would like to purchase something for themselves. In 2024, I plan to offer at least one finished work per month for sale. Ready-made works have some advantages over custom ones, such as:
- you immediately see what you are buying
- there will be unique works of creatures, the design of which I myself came up with
- by the way, having bought such a sculpture, you can not only put it on a shelf, but also use this creation as your character (I would be interested to see!)
- there will also be sculptures based on World of Warcraft, the cost of which will be less than if such sculptures are made to order
- dispatch within a few days
- I think I got a little carried away with describing the advantages, so that’s all! :P
#silentkimiya#handmade#sculpture#figurine#figure#art#ooak#polymer clay#airdryclay#bas relief#low relief#neck pendant#anzu#raven god#raven lord#raven#jeweled protector#tiger#ooakartist#etsy#etsy update#etsy sale
3 notes
·
View notes
Text
i love doll customization videos so much, they’re so relaxing and all of these customizers create the most amazing designs for their dolls
#moonlight jewel is prob my favorite#pls rec more if you know of any#there was also someone who made pidgin dolls with that 20s style eye makeup that i found on yt shorts#OH#and they don't specifically make just dolls but kaypea creations makes ooak creatures and mixes animals together to make new ones#and they are so fun to watch
9 notes
·
View notes
Text
instagram
NEW handmade statement necklace! Hand-fabricated Argentium silver, Tiffany stone, raw kunzite crystal, and CZ. Chain is handmade link by link too. Available now at https://ifutzwithfire.etsy.com/listing/1553909422
#artisan jewelry#handmade jewellery online#handmade jewelry#jewelry#ooak jewelry#queer artist#queer owned business#silver jewelry#shop small#jewelry designer#statement jewelry#pink aesthetic#pastel#purple#slow fashion#bespoke jewellery#bespoke jewelry#custom jewelry#indie jeweler#indie designer#silversmith#silver necklace#Instagram
1 note
·
View note
Video
youtube
I Made a LIFESIZE BARBIE Doll
0 notes
Text
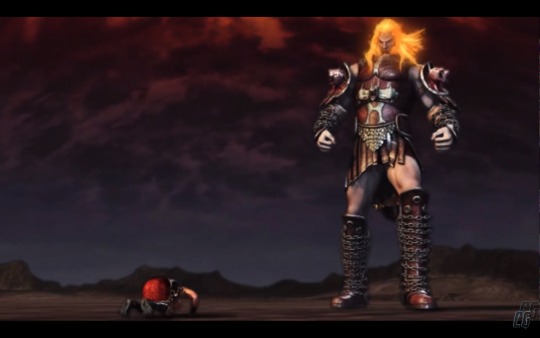
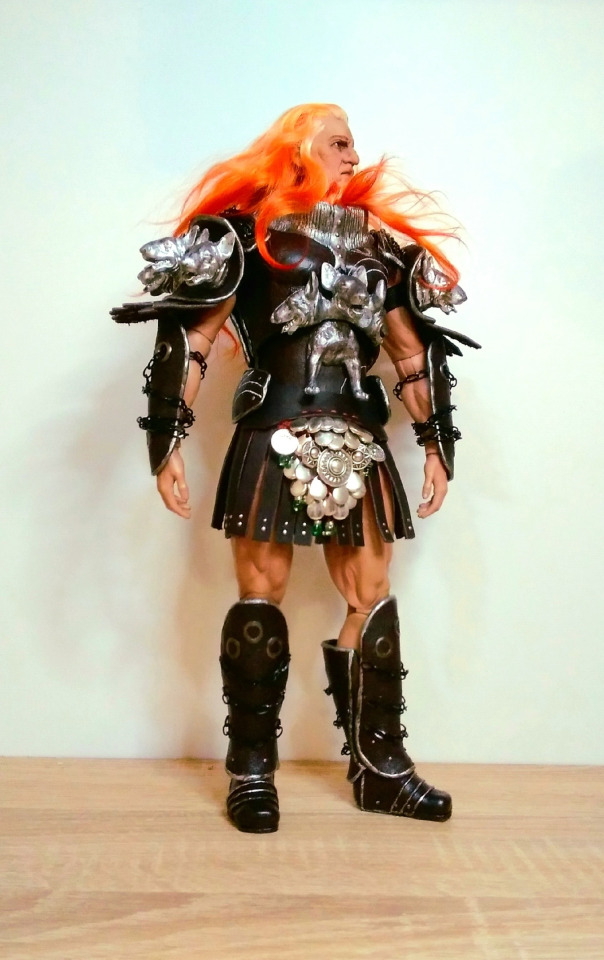
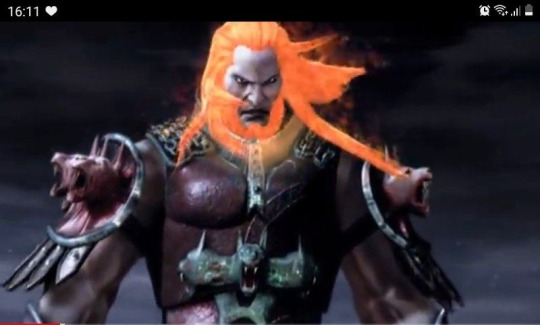
Give me God of War!! (Ares OOAK, Part 2)
Just a reminder that there was Part 1 of this madness.
OKAY
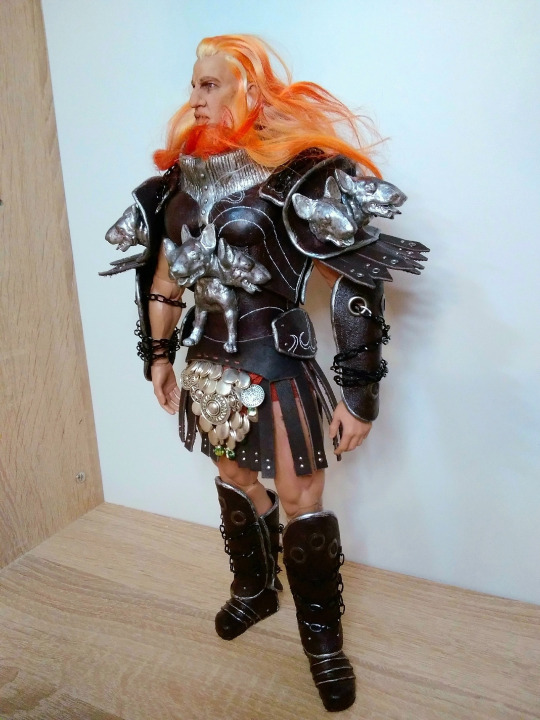
I wanted to wait until I finish sword and spider legs before making a post, but there are three days after finishing the whole armor and I can't wait, I am screaming about Ares's supremacy.
Now I can say, it was hard. And the most hard thing was finding a balance. There are differences between Ares's 3D models from the different years, even in color palette. And I wanted to be as much close to the first game design as it possible. Some features were fully recreated from GOW1, some others I found more good at latest model from GOW3 and reworked them according to it. So at the end we have a good symbiosis I think.
Now let's a take a bow and look a bit closer at the mess under the cut.
Preparatory process
Until eyes are frightened, you can't do anything. To be honest I had no idea from where to start, the plan sounded like a "How to draw an owl" tutorial. Complexity of his armor scared me as hell, and after spending some time with drawings, where I tried to figure out a hook and loop system, which should attach parts to each other, I gave up and started to make his scaly iron belt, it felt more easier. YEAH.
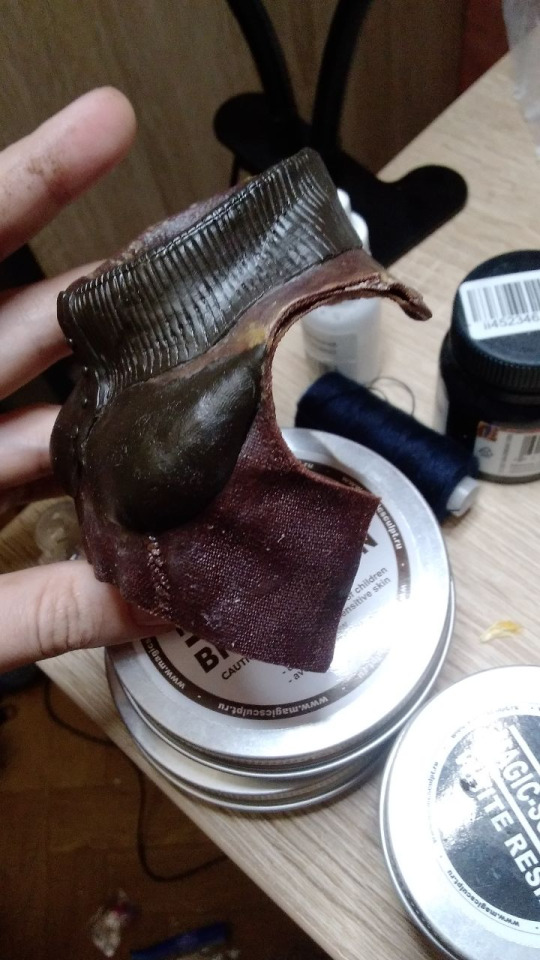
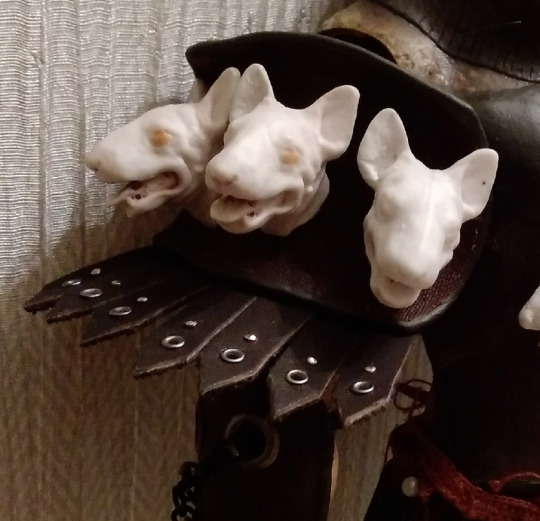
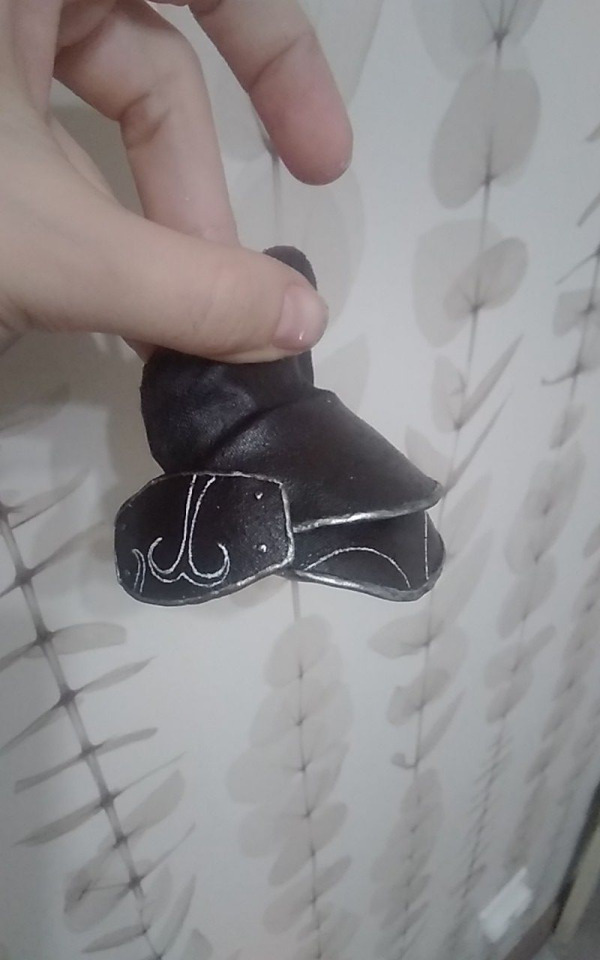
Iron belt
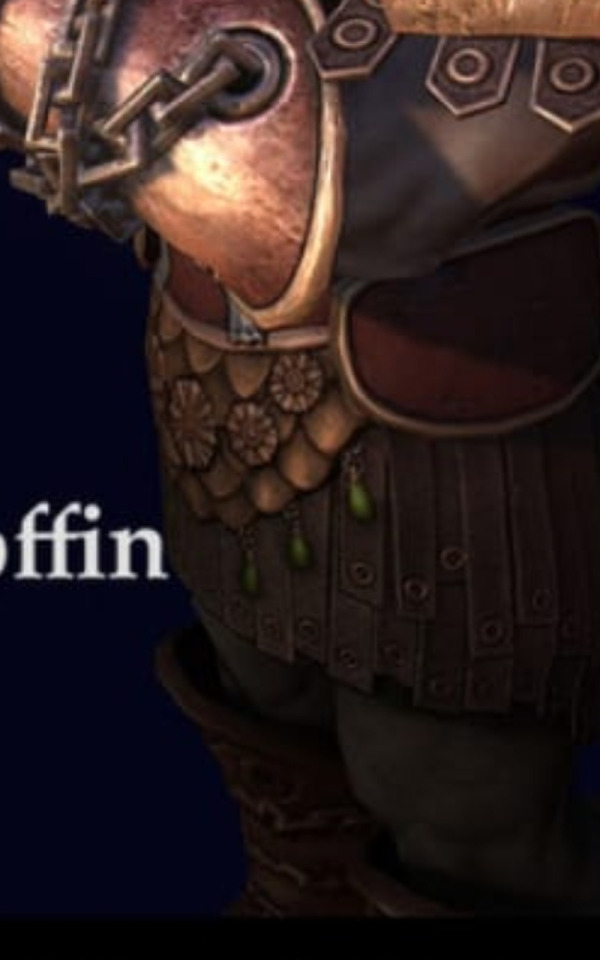
You can see it at the screenshot. Well, one of the versions. Seems, it has no purpose beside decorative, I mean, maybe it can protect the groin, but eh, not really, honestly. At GOW3 model of dead Ares it became more detailed with round flower-like pendants and a little green jewel drops, but also it became golden as all metallic elements. I decided to make everything silver, but anyway, belt is very beautiful and I headcanon it is the same belt, which Ares gifted to his daughter Hippolyte in the past.
I weaponised myself with the smallest crochet hook and red thread and started to knit. WHY KNIT YOU ASK?? I don't know, it is easier for me than sewing all these scales %) Maybe they represents some fishy motives? (His connection with Aphrodite). Or serpent? (One of Ares's children, who was killed by Kadmus). Maybe green jewels is a hint to his mother Hera, because she loves emeralds. Who knows.
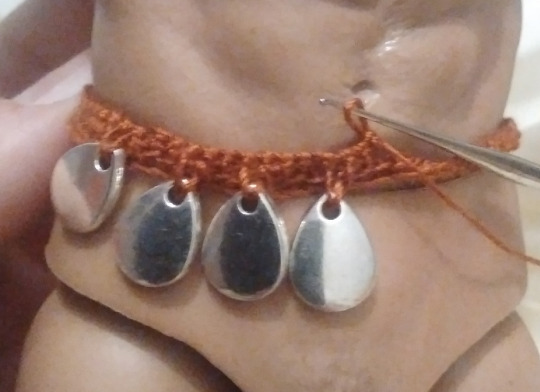

Scales, flowers, suns, glass drops.. If I were Ares, I'd present it to my beloved warrior daughter too.
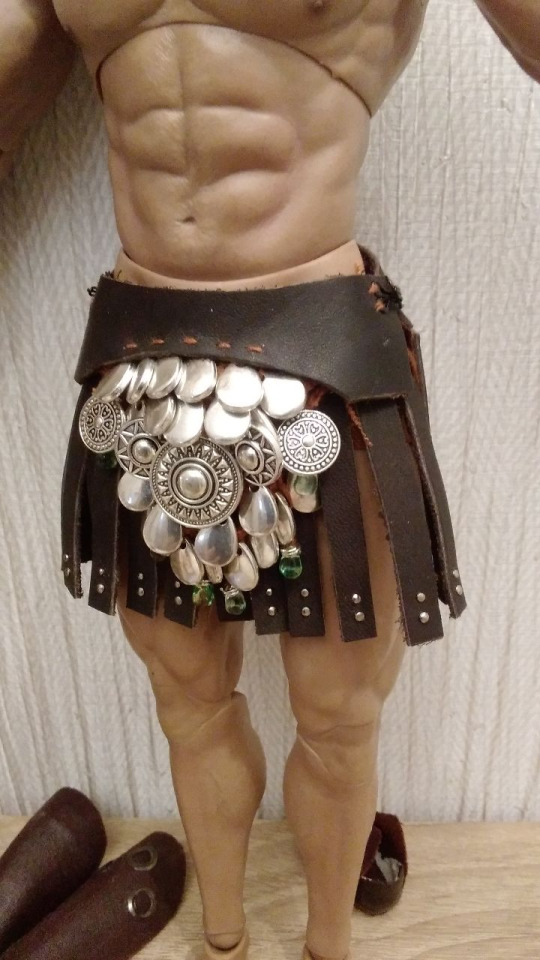
Pteruges
As an example of the true manliness, Ares wears a skirt of course. He is not a barbarian, who hides his beautiful freckled thighs in the pants! How dare we to judge..

The easy part was to make a leather stripes and pierce them with the rivets (little nails, which I cut after this to left a head only). The hard part (which I had a chance to feel over and over again) was to figure out how to attach it to the body and hide all of the fasteners, and how to let stripes flow on his thighs and how the hell it should cover his.. godlike butt, I can't believe I wrote this.. %)
ANYWAY, A MONTH LATER I decided to make it a single piece with the iron belt, by creating a two-part wide leather base, attach knitted waistband to it, then join the each stripe to the separate piece of cloth to make them movable, then attach this cloth to the leather and sew some hooks.
Aaaand the final result!

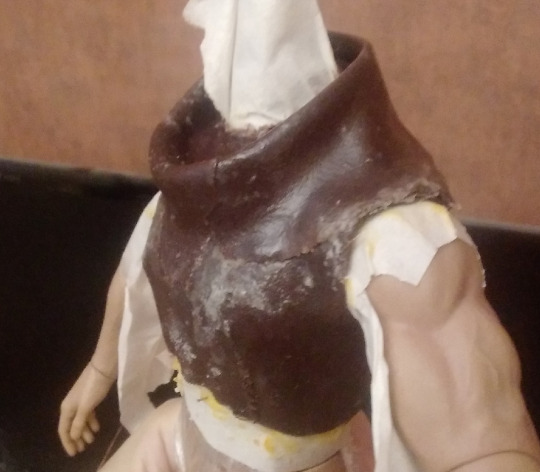
Cuirasse
I just say I literally hanged up myself with it. Here will be ranting...
Let's just think that it is not enough just to recreate appearence. In making 3D you can ignore some aspects like hidden straps and strings, which keeps armor conjoint on the human body. But how to make it wearable to the doll body, which is not soft and has a stable reliefs? How to make armor firm and shaped, but not completely firm, so it can be taken off from the body? Yes, my wish from the beginning was to make whole armor with a possibility to take it off and send nudes dress Ares in different outfit, which i will also make someday. How to make it light, so the doll can stand by itself? How to make it textured, to make it looks rough, to imitate metal or at least used condition? How to make metal parts without using a metal?
OKAY, WE NEED TO BE CANON - I thought and it was a day I decided to not invent armor, but use an experience of the hellenic people, who was smarter than me, I guesse. Because long time ago these people invented Linothorax - composite armor made of laminated linen fabric.
____
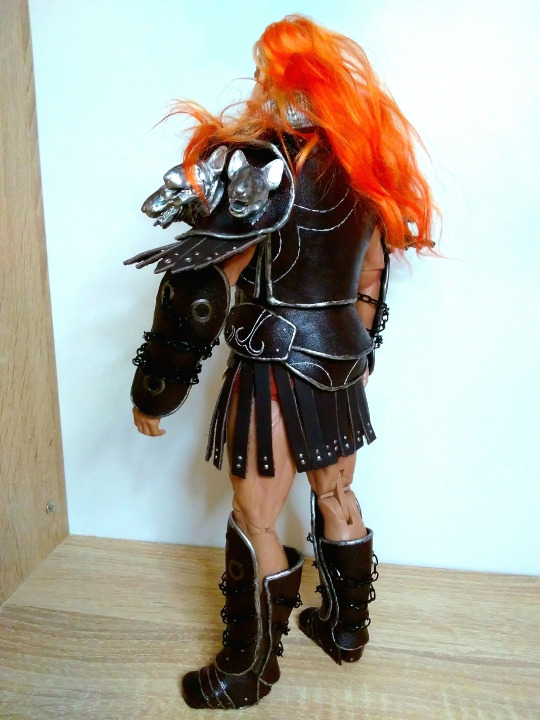
First of all, I splited Ares's cuirass to the segments: chest+collar segment, belly segment, spine segment, which emphasizes Ares's love to hunching over a little, and a waist-and-lower segment. Plus cuirasse has chained shoulder straps and side straps.
Well, when you have all elements, it is easier to imagine a complete piece. After that you just buy fabric, glue, chains, 27 hours for your day, new eyes, paint and other stuff. You wrap the body with the film and tape to protect it and start to glue.
And here it is time for me to shut up, I know, you are here to watch a process, not to read an essay.
I started from the front pieces of course. You imagine a pattern, you cut it, you glue it to hold the natural body forms as close as possible.
Collar was formed right here. Gladly we can remove Ares's head when we want to do it...

Waist piece (eheh, spider butt (͡° ͜ʖ ͡°) ) and first attempt to assemble the cuirasse. Here I literally lost my last brain cells and bravery, stopped the process and didn't make straps until the last week.

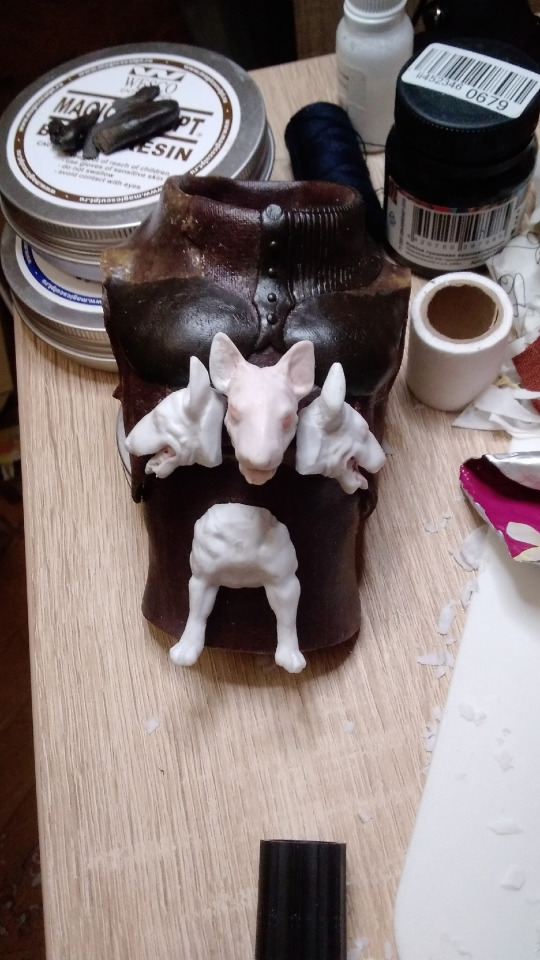
Anyway A MONTH LATER!!11 after the first assemble I started to sculp a relief of the reinforced chest and the metallic collar. Also we can check how's our decapitated dogs doing. Here you can see a belly piece of the cuirasse, which needed it's own dog decor. I was that meme boy with a knife, yeah..
Seemed they doing great! I felt that and decided to finish arm armor.
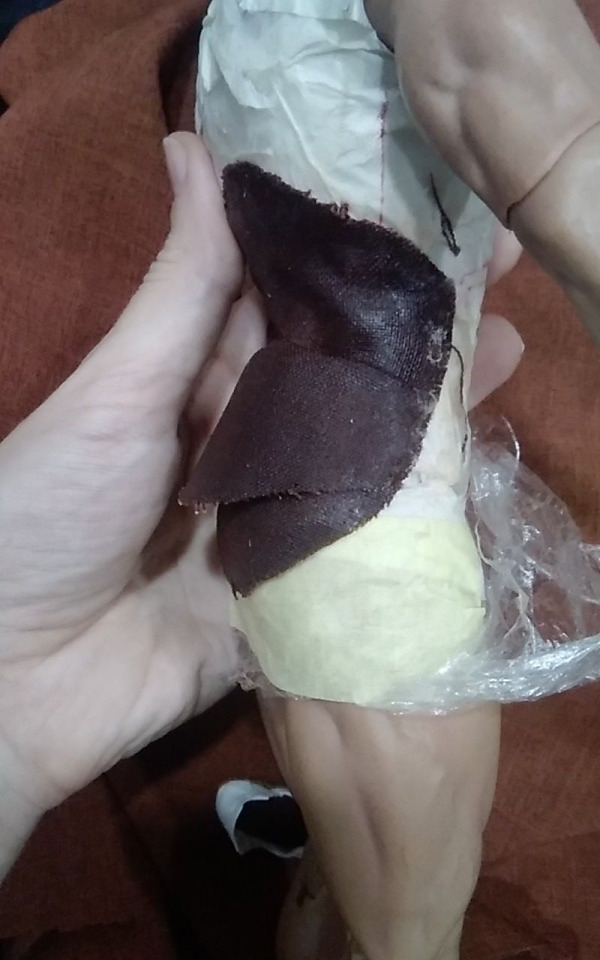
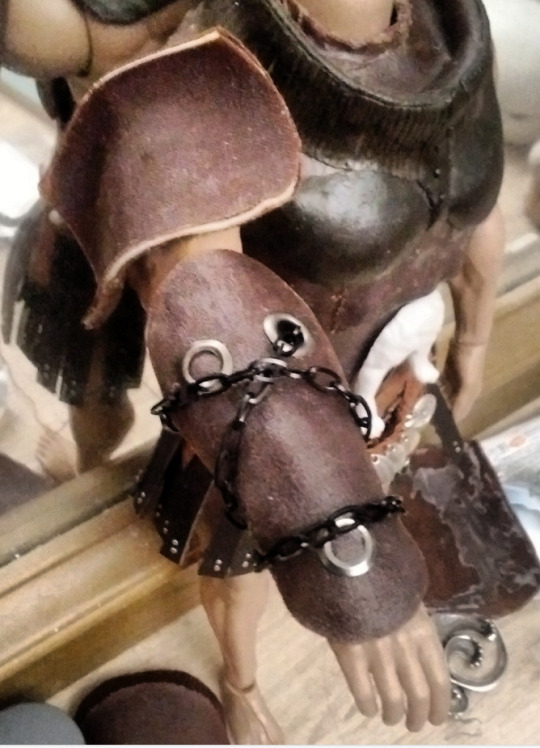
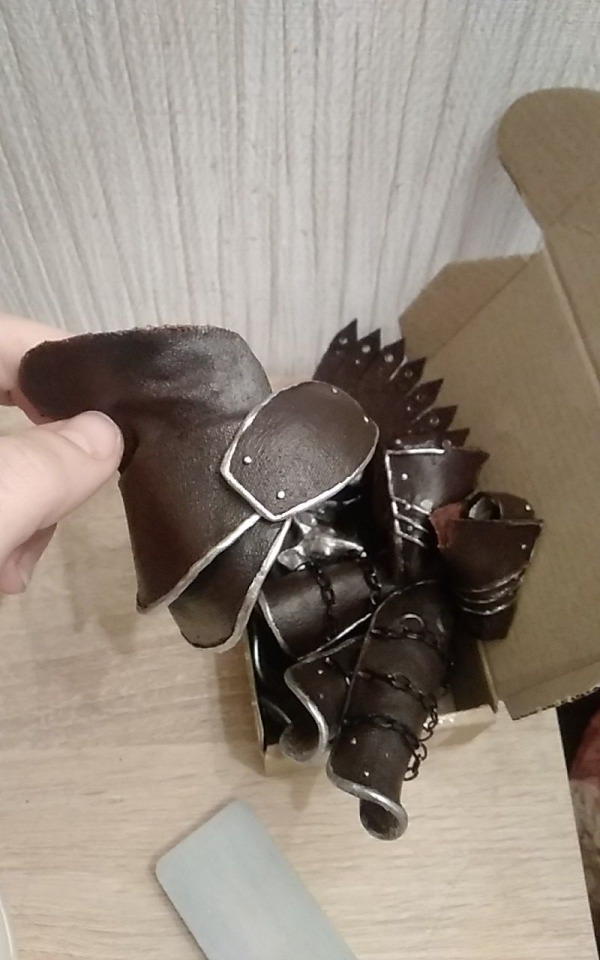
Shoulder pads and bracers
Thankfully making them requires the same process: cut a pattern, glue it, repeat for each arm. Here is close ups of the leather "feathers" pierced by rievets, chained bracers (I am very proud that I recreated it fully like at the Ares model. Bracers has no other strings and stays at arm only because of the chains) and shoulder pads as a base and as a complete, fully Cerbered piece. Actually this part wasn't really difficult, I've just delayed the inevitable.

Boots
The first GOW novel says he weared sandals!!! Bloodstained SANDALS! But this novel was written much later, so we are making rocker boots. ᕕ(シ)ᕗ HEY!, we are laughing here, but Ares is smart, Ares don't want to break his toes by kicking someone's helmet! Maybe after having some experience %)))

Well, as I said in my previous posts, his boots was the most agressive part his armor. Heel and shoes toes should be firm, but sole should stay soft. Also the whole construction of the boots should looks monolite with the greavers which cover up the layers of the material above the ankles.
Don't forget about the chains and double emotional damage, because there is two legs!
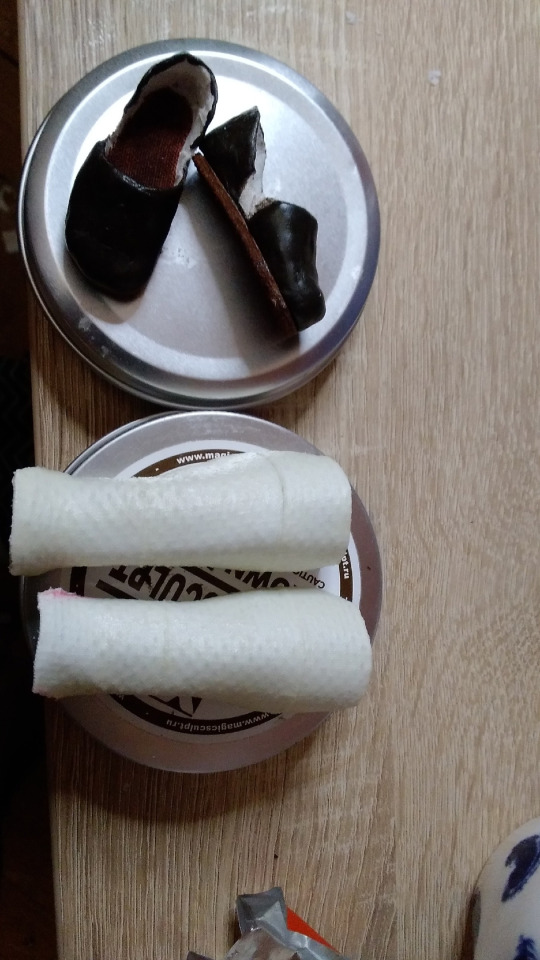


A little more damage as a person you receive, when you understand that you need to process each edge of each piece, because all armor pieces has visible layers. And only after that you can paint everything, draw Ares's assymetrical ornaments and dress him up.
That's how we reach the end.
Here he is. O defence of Olympus, father of warlike Victory, ally of Themis, stern governor of the rebellious, leader of righteous men.
Kratos's yes-homo partner and his personal most vieceful enemy.
Ares! God of war!


Thank you everyone for your patience while reading this duvet cover.
See ya in Part 3, Skeletor will return soon with a sword, spider legs and normal photos. And stay tuned, I will post some portraits next time!

#ares#ares god of war#kratos#kratos gow#god of war#gow#god of war ragnarok#gowr#ooak doll#ooak#action figures#upn the sky handycraft
21 notes
·
View notes
Photo
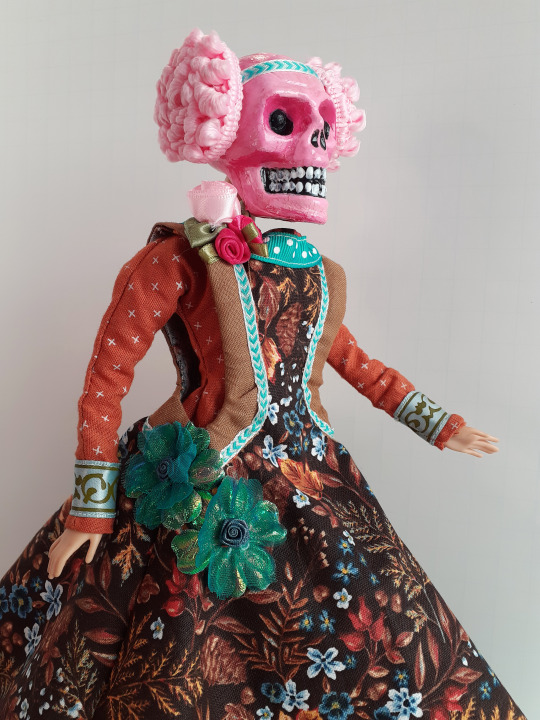
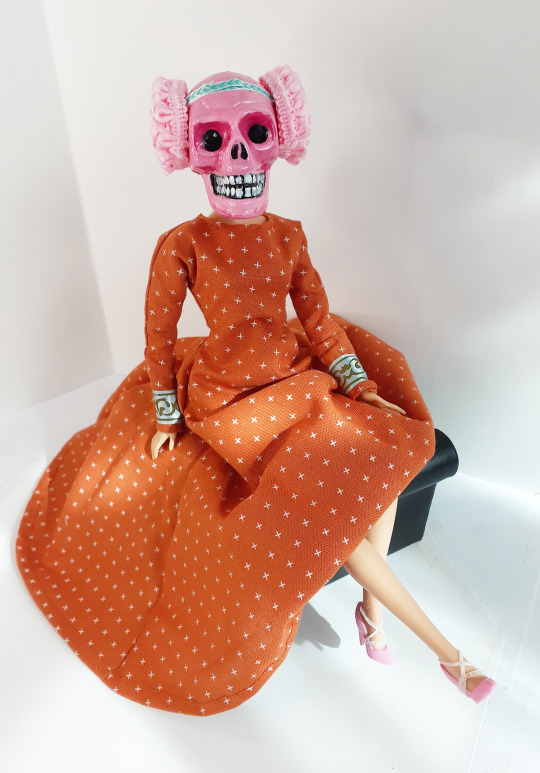


Another one of my favorite creations! My sister @drzime helped out with this one; she painted the skull, chose some of the fabrics, and made the headdress.
I fused another thrifted Halloween decoration with a thrifted headless Barbie, painted her, and jeweled her (and her head can fully turn!).
https://www.etsy.com/listing/1468724559/ooak-rescue-doll-poppy-grim
60 notes
·
View notes
Text
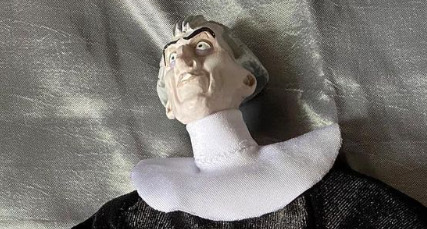
My OOAK Frollo doll, start to finish...
Just thought I’d upload the entire process here; sorry if it seems repetitive of me, as I have posted pictures of this here before. It’s more so for my own record really, as it’s just super easy and convenient to put on multiple images onto one post here, or anyone who’s interested.
Please note this is for my newest version, I have made others in the past using different doll bodies, fabric and head sculpts- some turned out better, some not, but all part of the experimenting, construction process.
Body: A Monster High Deuce Gorgon doll. I chose this because of the good articulation, good hand sculpts and it is the right size body to fit my head sculpts. Had to just trim the head peg and stabilize it by wrapping some string coated in PVA glue around it, as the weight of the head makes it flop down otherwise. It doesn’t have as much head movement as it used to, but it does have a little.
In hindsight, one wonders if could be attached with magnets somehow, perhaps, but not sure. In the end it was attached with hot glue.


Head sculpts. I ended up using the one of the left. Made from super sculpey clay. The one on the right was originally on a different body, hence the different skin colour to match.

Purple trousers/Hose - made from purple stretch fabric- the same material used in swimwear.
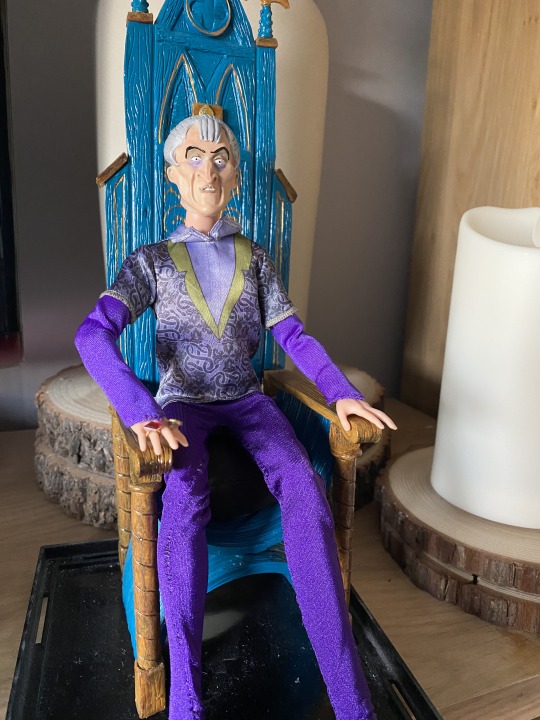
I kept the top which came with the Monster High doll, as it has a nice brocade sort of pattern on it. I just dyed it purple, and made and attached the purple sleeves. Lets face it, no one knows wtf he wears under there,
Tricky part, the shoulder-piece.

Black velvet fabric with red braid /edging cord, and red ribbon stripes for the pauldron stripes. Back-piece of the purple stretch fabric. On the underside I made a pocket in which I inserted craft wire to hold the shape.
Finished with adding black cord around the edges to neaten it up, and glued on two red diamonds adhesive plastic craft jewels.

At this point I also made the white collar, the square shaped top sewn on. The circular base is so it stays in place. And also sort of resembles the collar and bib worn by nuns. Frollo Wasn’t a priest in the animated version that Disney did, but they sure sneaked in some clerical looking attire.
And Finally...
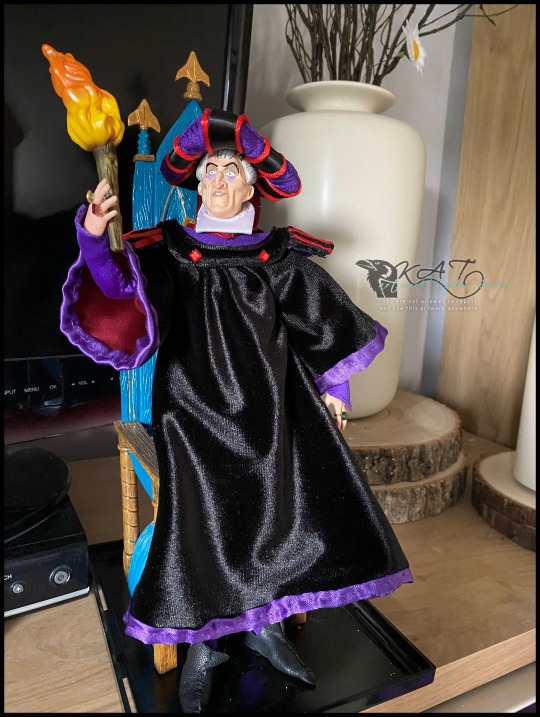

I has dagger too.

#frollo#disney#disneyvillian#ooakdoll#ooakfrollodoll#art#craft#judgefrollo#the hunchback of notre dame#my artwork#claudefrollo#disneyedit#toys and figures#toy photography
52 notes
·
View notes
Text
So, my best friend (hi) and I have been talking a lot about Jax/Holt over the past few days ever since I got them also obsessed with Monster High. And we (by that I mean I) decided on who our "main cast" would be for our version of Monster High. And that cast is:
Jackson/Holt, Deuce Gorgon, Clawd Wolf, Clawdeen Wolf, and Draculaura!
So, I've decided to redesign all of them! Save Jax/Holt, because I redesign them too often anyways. So I'm going to start out with Clawdeen, since I had the most inspiration for her! And I've decided to share a bit of my creative process here as well, so if you're interested, continue reading!
Starting out with the first step I take in a redesign: the concept sketch.
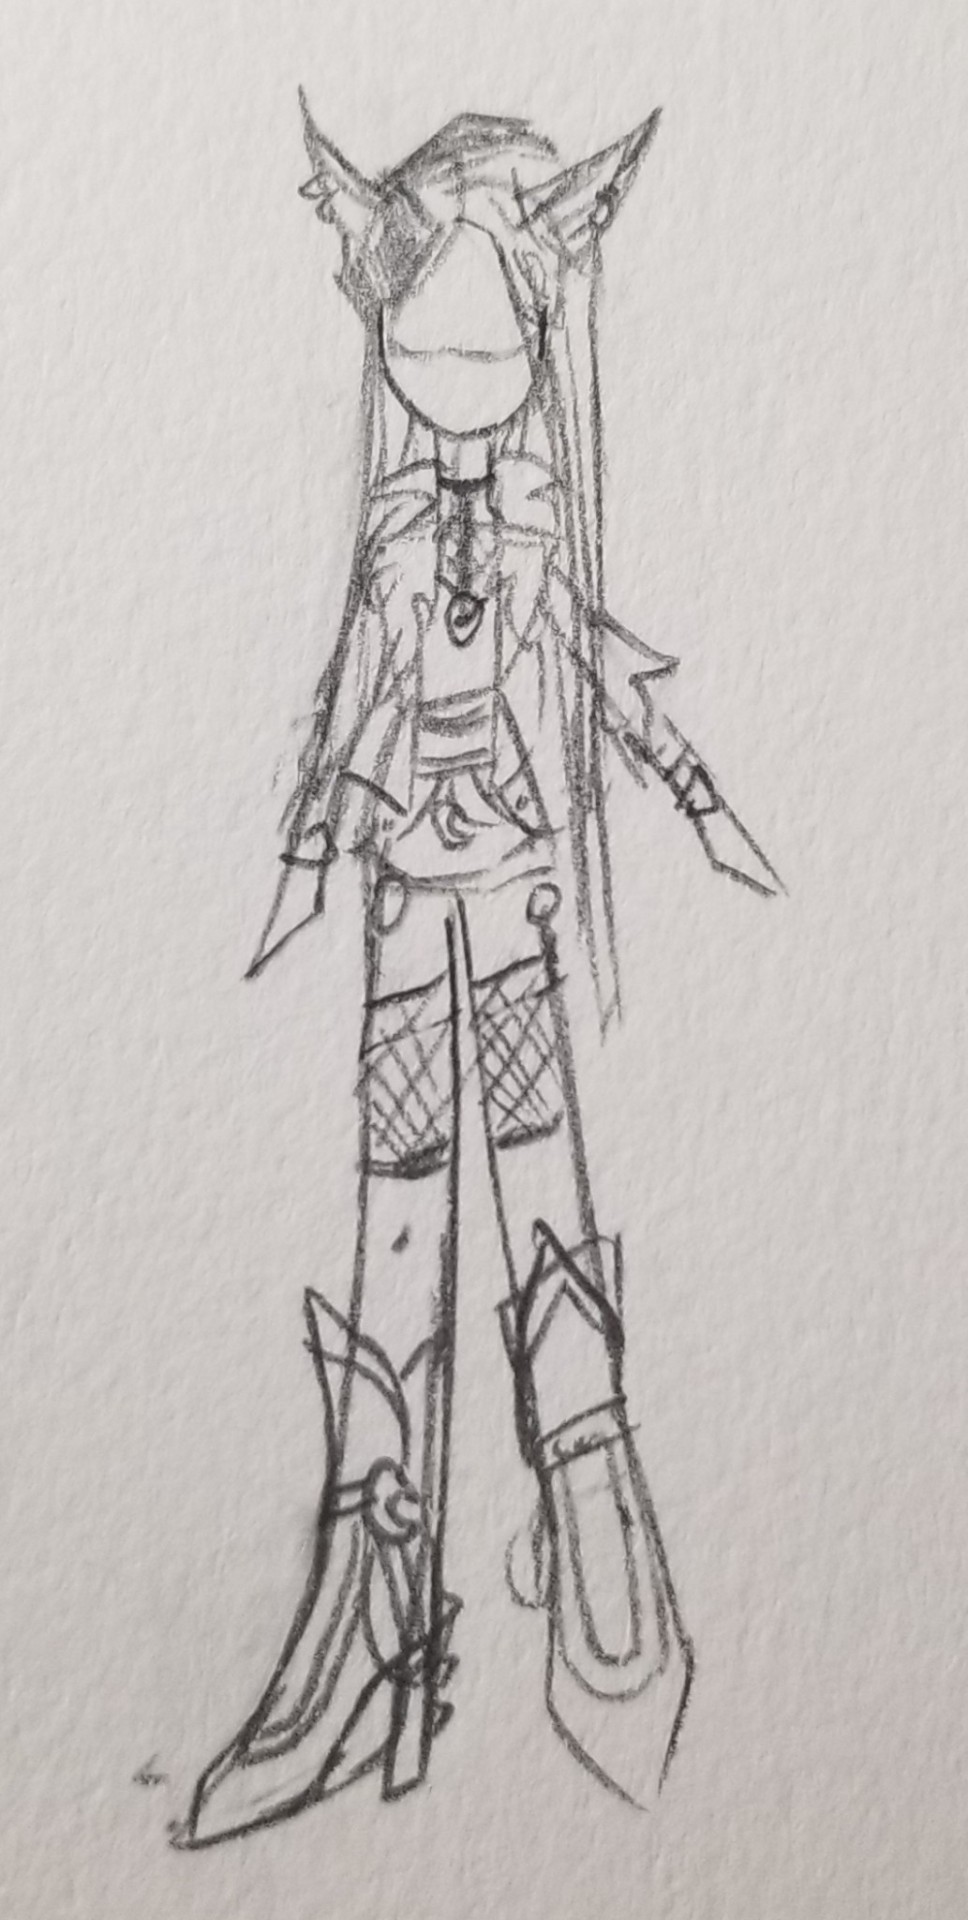
This is usually a tiny, tiny sketch somewhere in my sketchbook mapping out the basic design. I took heavy inspiration from Moonlight Jewel's OOAK Clawdeen doll, Haunt Couture Clawdeen, and Wave 1 Clawdeen. I don't usually map in colours here, I keep those bouncing around in my brain.
The next step I take is: the headshot.
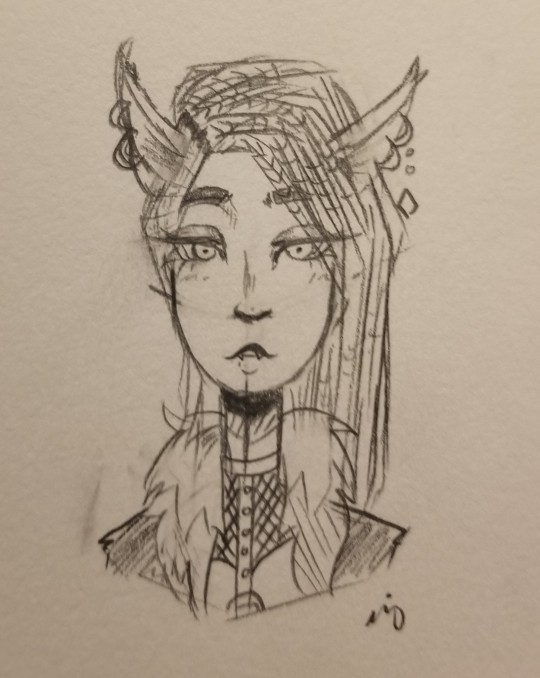
Pretty simple. I get a feel for how I want the character's face to look. Most of the time I use what I've coined the "Pinterest girl stare"; ie, no readable expression. I changed Clawdeen up a little bit in the final, but I still like this bust!
Next, I finally start on the full body ref!
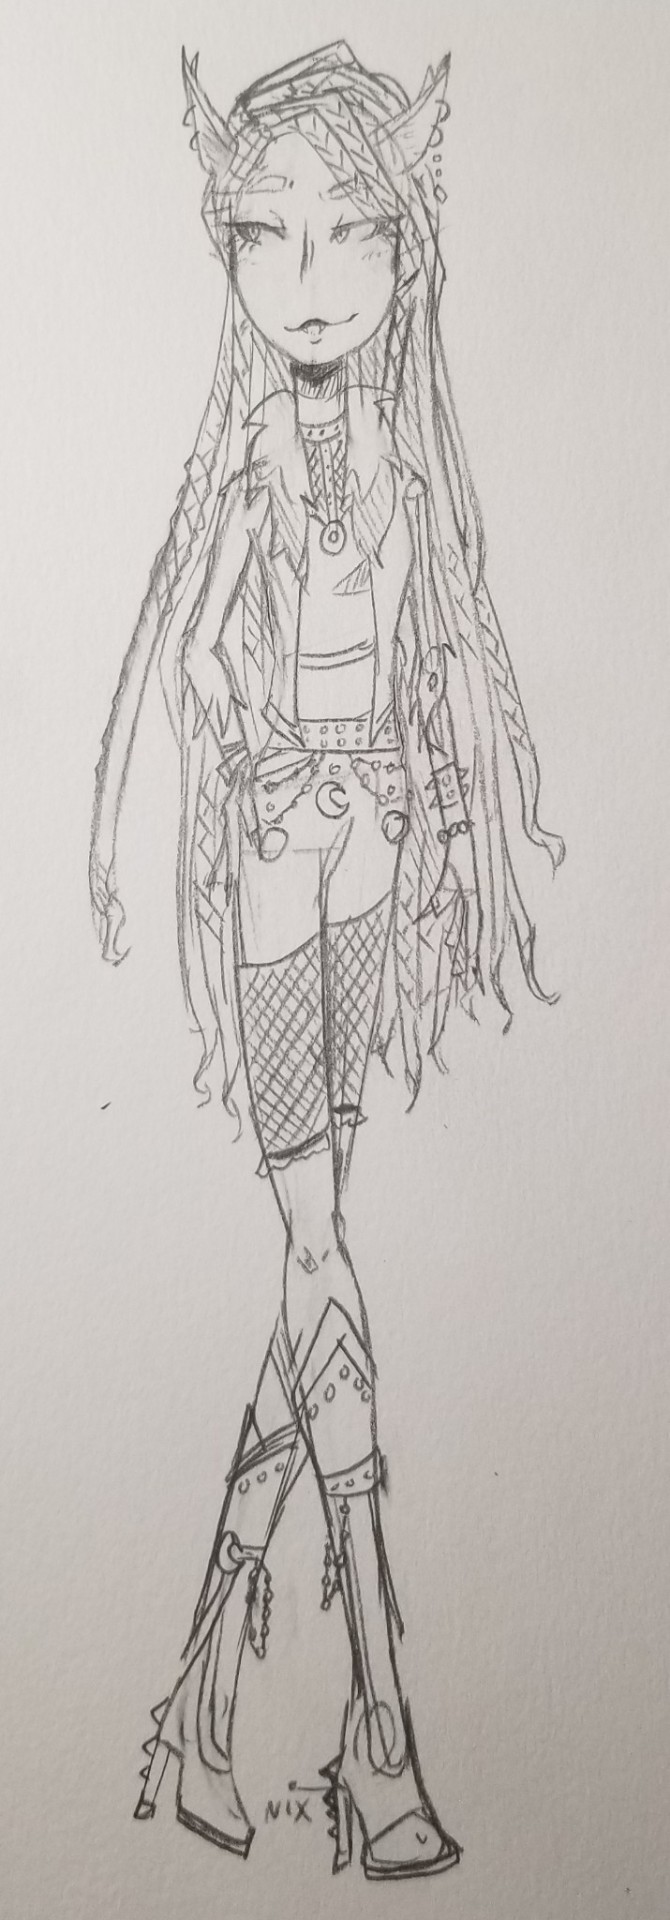

I lumped the sketch and lineart together for simplicity's sake. The lineart is where I add most of the finer details, crosshatching, and decide what I do or don't want. Ex: I ended up cutting the ruffles off the end of her fishnets. You might also notice I didn't ink the chains on her belt- that's because I knew at this point that her pants would be black, so I wanted to ink the chains in white later. (Her hair was super fun to do here btw!! I love drawing undercuts and I love drawing braids, so it's a fun culmination of both!)
And once it's coloured, we have the final design!
Overall, I think she turned out great! I've always loved how freaky fab Clawdeen looks in green, and ofc neon green is my fave colour. I'd sell multiple of my organs to have this as a doll.
Hope you love this redesign, and stick around for the next part!! 🦇💕
#monster high#hee ho ha ho im a funny lil art man#monster high fanart#monster high redesign#clawdeen wolf#monster high clawdeen wolf#clawdeen#ghoulboss!!#love how she came out...#she was literally so fun#I'll probably design casual fits for the main 5#but thatll be later LMAO#her shoes are basically just boot-versions of her haunt couture shoes#because id kill for those shoes actually#gasfright gatecreep ghoulboss#anyways enjoy ur food clawdeen lovers <33
7 notes
·
View notes
Text
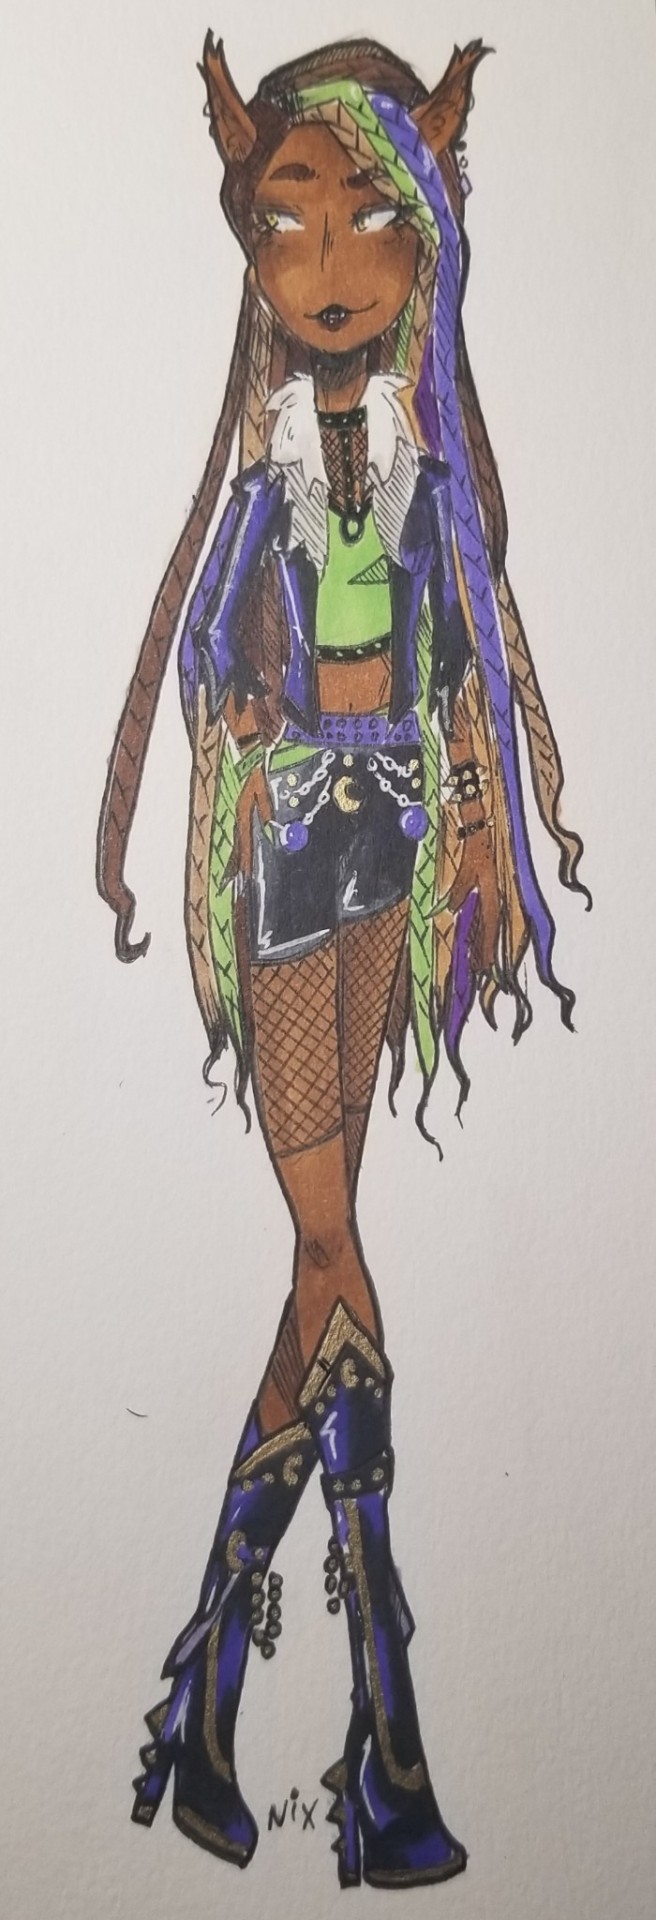
MOAR JEWELS!
While waiting for my custom printable for the 50/50 to arrive, I have been working on holiday exchange things. For dolls. Because. So, once again, walk into the land of camera skills that totally rock (*snorts, holding back laughter*).
BEHOLD! 1:6th scale shenanigans!

Click the pictures. They are much better when you can see them in true cinematic horror. Also, they are clearer. (Not really.)

Yes, yes, I am working on a custom doll. Ignore the sanding marks. It's a WiP... mah doll back and forth. Mah doll back and forth....
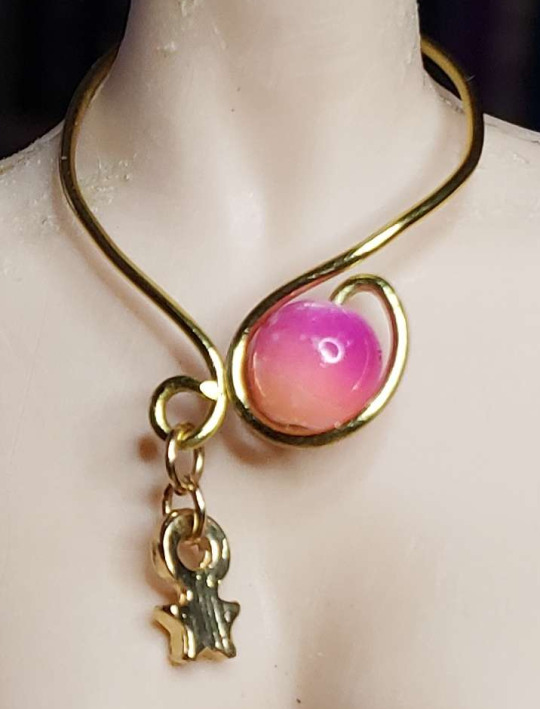
Okay, shakey hands struck again. You get the idea. Most close with S clasps, but some are just wraps. Because.
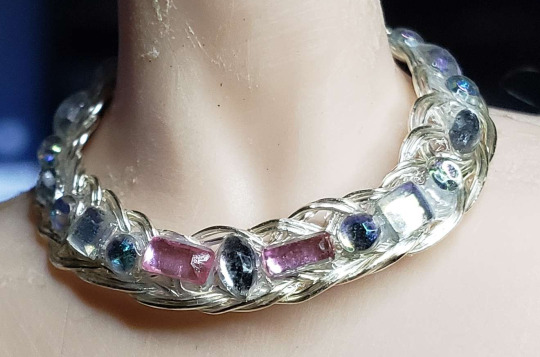
Okay. The glaze on that one is still drying. The light was fading! I needed picts!
Never mind. Into the 1:4 & 1:3 scale stuff!

Another. Another!
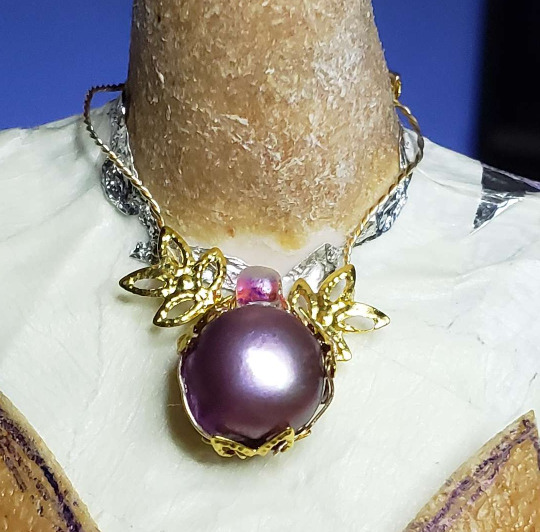
I swear it looks much better in person!

Sometimes I wonder why I try to photo silver against an aluminum foil base for my gown designs. Like a fool.
Answer: Hands.
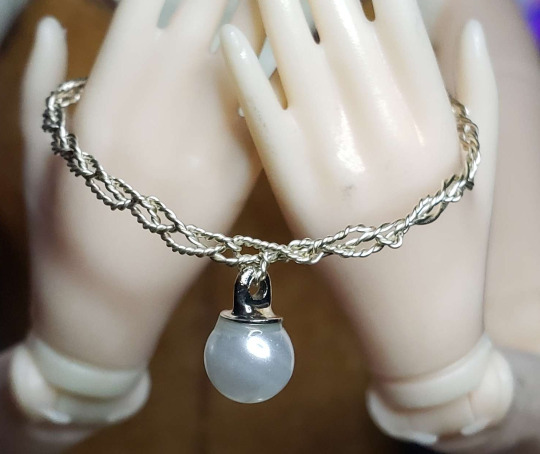
This one is not so bad, I think. Also, that one above making me think of a Crown of Thorns sort of necklace... or head piece. The Inspiration!

Magical purkle orb like thing! Bingy blingy bling bling.
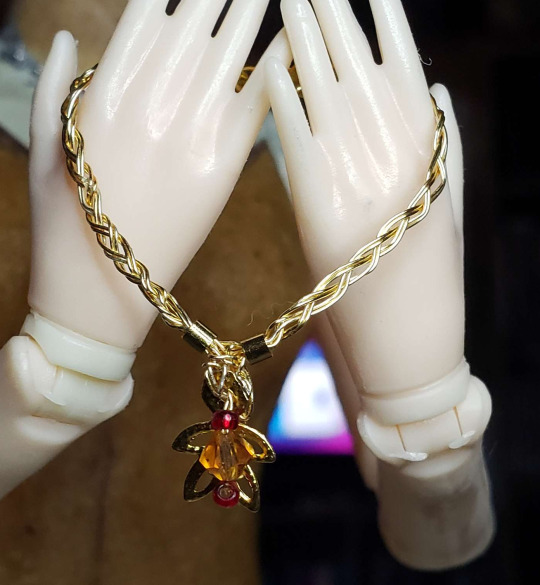
MWAHAHAHA. I really should get the rose gold and copper wire. I wonder if they make it in onyx finish..?
#dollblr#dolls#doll#toy#1:6#1:3#1:4#play scale#jewelry#hand made#made by me#OoaK#gold#silver#wire work#jewels#sparkles#accessories#finishing touches#Holiday exchange
46 notes
·
View notes
Text
Idk what to call this:
💖 have!
G3 Lagoona
JH Sunny
RH Daria* (eyeswapped)
RH Lila
RH Meena
RH Sabrina
RH Sheryl* (OOAK Elise)
SH Heather
SH Luna
SH Natasha
SH Nicole
SH Shanelle
❤️ next on the Wishlist!
G3 Frankie (Kmart dogged me so hard on this)
G3 Draculaura (see above)
RH Emi
RH Georgia
RH Vanessa
SH Eliza (if only she wasn’t 100+ AUD)
SH Glitch
SH Zooey
SH twins
💛 someday?
RH Delilah
RH Jewel
RH Karma
RH Kia
RH original six, esp Sunny
RH Cheer Poppy or Sunny
RH Robin costume ball
RH Tessa
2 notes
·
View notes
Text
Series 5 of Rainbow High is absolutely killing it. I’m hesitant about Coco though... I’m just.... not super huge on athletic wear.... though I always say that and then like Nicole she’ll probably end up on a display stand in my room ‘cause I like her so much... I do want to try and play with her hair, but Delilah’s albinism, and Jewel’s vitiligo they’re some of my favourites. it definitely makes me want to make an ooak with a portwine stain. it might be a niche thing but my mom has it and I always wanted to work it into a design...
3 notes
·
View notes
Link
Check out this listing I just added to my Poshmark closet: Handcrafted Paper Fig Sea Shell & Coral Embellished W Rhinestone Heart & Pearls.
0 notes
Text
New pendant combining textured silver, a bezeled Amazonite gemstone, and torch-fired vitreous enamel!
#artisan jewelry#handmade jewellery online#handmade jewelry#jewelry#ooak jewelry#queer artist#queer owned business#silver jewelry#shop small#jewelry designer#gemstone jewelry#torch fired enamel#enameljewelry#vitreous enamel#silversmith#metalsmith#jeweler#indie jeweler#indie artist#artist life
0 notes
Last Seen Blogs

acp-elevation
ACP - Building Designs
skeleb0yposts
pretty boys dont eat

newfriendrequest-archive
just click approve
birdsagainstgravity
Gravity Machine Broke

totallynormal-blog
johnny poppalodopolous