#I learned how to buttonhole stitch
Text
I have my pattern pieces all cut out, but now I have to wait for my fABRIC TO GET HERE, SINCE IT’S VACATIONING IN PENNSYLVANIA
#it’s actually gotten here really really fast#theoretically it’s going to be delivered today#but I want to sew all day today since there’s no one in the house and I can make sewing machine noises#and now I have to wait until probably late tonight for box#BUT. that is the price we pay for clearance fabric#I am attempting to sew clothes which has proven difficult#as I am a Halfling trying to equip Human armor#so the proportions are wrong#I gotta adjust for FAT but SHORT#but I think I almost got it. the first one I made turned out good#it’s just too tall in the shoulders.#but now that I know to compensate for that I can make the next one better#it’s a corset top btw#I learned how to buttonhole stitch#….. you know. I could make one with fabric scraps and sew patches onto it………#lazy witchblogging
21 notes
·
View notes
Text

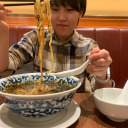
I learned how to buttonhole on some old ass scrap fabric
#only took my 9 tries to get it lmfao#my machine doesn’t have a one step it has a 4 step which is objectively more annoying#I think I should lower my stitch length and get a better fabric pen but other then that I’m cruising#Walt talks
0 notes
Note
Any tips on learning to make buttonholes? I've been putting it off for.... *checks notes* like three years.... but better late than never and all that. I don't have any fancy machines so I gotta do it by hand but that seems right up your alley.
Thanks!
It IS up my alley, yes, I do most of my buttonholes by hand!
I'm actually part way through filming an 18th century buttonhole tutorial, but I expect it'll be a few more weeks before I finish that and put it on the youtubes, so in the meantime here's the very very short version. (The long version is looking like it'll probably be about 40 minutes maybe, judging by how much script I've written compared to my last video?)
Mark your line, a bit longer than your button is wide. I usually use a graphite mechanical pencil on light fabrics, and a light coloured pencil crayon on dark ones. (I have fabric pencils too, but they're much softer and leave a thicker line.)
You may want to baste the layers together around all the marked buttonholes if you're working on something big and the layers are shifty and slippery. I'm not basting here because this is just a pants placket.

Do a little running stitch (or perhaps a running backstitch) in fine thread around the line at the width you want the finished buttonhole to be. This holds the layers of fabric together and acts as a nice little guide for when you do the buttonhole stitches.

Cut along the marked line using a buttonhole cutter, or a woodworking chisel. Glossy magazines are the best surface to put underneath your work as you push down, and you can give it a little tap with a rubber mallet if it's not going through all the way.

I'm aware that there are some people who cut their buttonholes open using seam rippers, and if any of them are reading this please know that that is abhorrent behaviour and I need you to stop it immediately. Stop it.
Go get a buttonhole cutter for 10 bucks and your life will be better for it. Or go to the nearest hardware store and get a little woodworking chisel. This includes machine buttonholes, use the buttonhole cutter on them too. If you continue to cut open buttonholes with a seam ripper after reading this you are personally responsible for at least 3 of the grey hairs on my head.
Do a whipstitch around the cut edges, to help prevent fraying while you work and to keep all those threads out of the way. (For my everyday shirts I usually do a machine buttonhole instead of this step, and then just hand stitch over it, because it's a bit faster and a lot sturdier on the thin fabrics.)

I like to mark out my button locations at this point, because I can mark them through the holes without the buttonhole stitches getting in the way.
For the actual buttonhole stitches it's really nice if you have silk buttonhole twist, but I usually use those little balls of DMC cotton pearl/perle because it's cheap and a good weight. NOT stranded embroidery floss, no separate strands! It's got to be one smooth twisted thing!
Here's a comparison pic between silk buttonhole twist (left) and cotton pearl (right). Both can make nice looking buttonholes, but the silk is a bit nicer to work with and the knots line up more smoothly.

I've actually only used the silk for one garment ever, but am going to try to do it more often on my nicer things. I find the cotton holds up well enough to daily wear though, despite being not ideal. The buttonholes are never the first part of my garments to wear out.
I cut a piece of about one arm's length more or less, depending on the size of buttonhole. For any hole longer than about 4cm I use 2 threads, one to do each side, because the end gets very frayed and scruffy by the time you've put it through the fabric that many times.
I wax about 2cm of the tip (Not the entire thread. I wax the outlining/overcasting thread but not the buttonhole thread itself.) to make it stick in the fabric better when I start off the thread.
I don't tend to tie it, I just do a couple of stabstitches or backstitches and it holds well. (I'm generally very thorough with tying off my threads when it comes to hand sewing, but a buttonhole is basically a long row of knots, so it's pretty sturdy.)

Put the needle through underneath, with the tip coming up right along that little outline you sewed earlier. And I personally like to take the ends that are already in my hand and wrap them around the tip of the needle like so, but a lot of people loop the other end up around the other way, so here's a link to a buttonhole video with that method. Try both and see which one you prefer, the resulting knot is the same either way.


Sometimes I can pull the thread from the end near the needle and have the stitch look nice, but often I grab it closer to the base and give it a little wiggle to nestle it into place. This is more necessary with the cotton than it is with the silk.
The knot should be on top of the cut edge of the fabric, not in front of it.

You can put your stitches further apart than I do if you want, they'll still work if they've got little gaps in between them.
Keep going up that edge and when you get to the end you can either flip immediately to the other side and start back down again, or you can do a bar tack. (You can also fan out the stitches around the end if you want, but I don't like to anymore because I think the rectangular ends look nicer.)
Here's a bar tack vs. no bar tack sample. They just make it look more sharp, and they reinforce the ends.

For a bar tack do a few long stitches across the entire end.

And then do buttonhole stitches on top of those long stitches. I also like to snag a tiny bit of the fabric underneath.

Then stick the needle down into the fabric right where you ended that last stitch on the corner of the bar tack, so you don't pull that corner out of shape, and then just go back to making buttonhole stitches down the other side.
Then do the second bar tack once you get back to the end.

To finish off my thread I make it sticky with a bit more beeswax, waxing it as close to the fabric as I can get, and then bring it through to the back and pull it underneath the stitches down one side and trim it off.


In my experience it stays put perfectly well this way without tying it off.
Voila! An beautiful buttonholes!


If you want keyhole ones you can clip or punch a little rounded bit at one end of the cut and fan your stitches out around that and only do the bar tack at one end, like I did on my 1830's dressing gown.

(I won't do that style in my video though, because they're not 18th century.)
Do samples before doing them on a garment! Do as many practice ones as you need to, it takes a while for them to get good! Mine did not look this nice 10 years ago.
Your first one will probably look pretty bad, but your hundredth will be much better!
Edit: Video finished!
youtube
And here's the blog post, which is mostly a slightly longer version of this post.
#ask#buttonholes#sewing#hand sewing#sewing tutorial#I've been procrastinating on the video this week#I want it done! I don't want to work on it I want new projects! I want to cut out more gloves!#currently forcing myself to do the last few buttonholes on these pants and then maybe I can cut out new gloves? as a treat?#but I hope I get some filming done tomorrow too
3K notes
·
View notes
Text
Project: crocheted top
Thanks again to everyone who gave me good crochet 101 resources last year! I've been having a blast learning how to crochet.
Introduction:
I finished this top a while ago. It's kind of improvised, containing various stitches and squares I found in library books. The yarn's a beige cotton I had in my stash.
I used this project as a challenge to try out as many different techniques and stitches I could think of, making it a great learning experience.
The project:
The shape's a very simple T-shape, with buttons at the shoulders to make it easier to slip over my head. It's basically a tube body with a rectangle at the top for sleeves.
I started out by making enough squares for the bottom lace to fit around my hips. Once those were attached together into a circle, I evened out the edge with (US) single crochet stitches while also adding a tiny bit of shaping. I then started my tube for the body, which consists of a strip of lace and a double crochet flower pattern.
Once the tube reached where I wanted the sleeves to begin, I made enough squares to fit the width of the tube plus four extra squares (one for the back and front of each sleeve). I wanted to try and see if I could turn a square into a triangle, so two of those squares ended up being triangles in the front of the top.
Once all that was attached, I built up the rest of the sleeves and the neckline and worked buttonholes into the final rows.
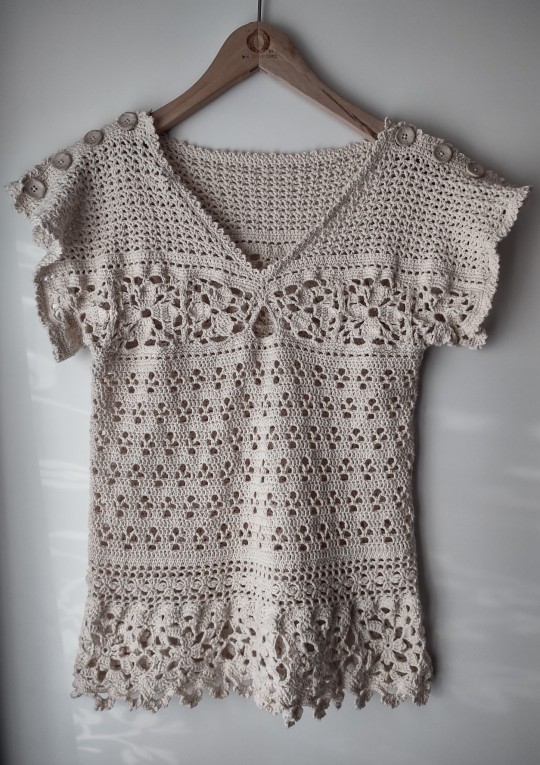
[ID: a crocheted T-shaped top with short sleeves hanging from a wooden hanger in front of a white background. The top is made with beige cotton yarn and consists of multiple different types of floral lace and and squares. Four beige buttons sit at the top of each shoulder.]
Conclusion:
I fell in love with the versatility of crochet! It's such a cool craft if you love improvising as much as I do.
When I struggled making my first chain a year ago, I never thought I'd be creating something like this any time soon. Now when I look at this top, I can already see multiple things I would do differently next time.
That's the beauty of learning new things. If you allow yourself the time and kindness needed to practice and to learn from your mistakes, you'd be surprised by what you can do.
#wasteless crafts#project#diy#crochet#yarn crafts#crochet top#granny squares#check out your local library's craft section if you can#you'd be surprised what you'd find
540 notes
·
View notes
Text
I have stated in the past that one of the keys to sewing well is learning how to deal with mistakes
because you will always make mistakes
Granted, what you consider a mistake may change as your skills advance
but no amount of advanced skills will eliminate mistakes
It's fine.
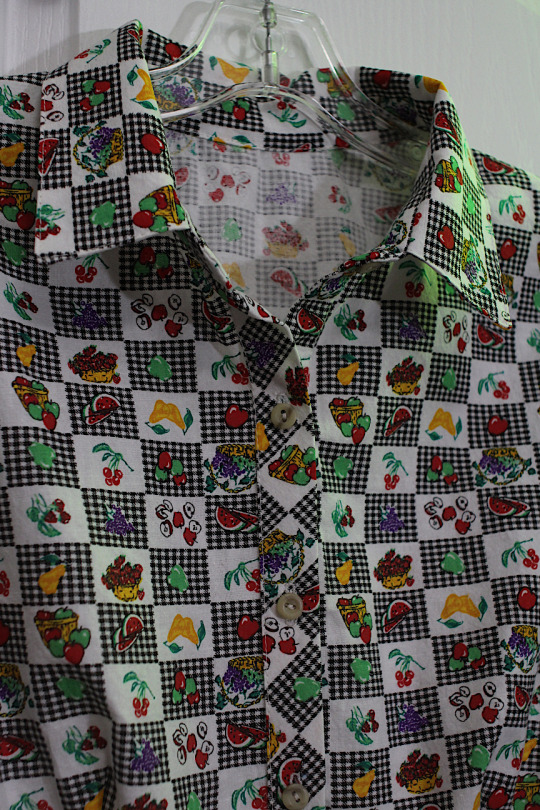
I say this because I finished a shirt yesterday--or, rather, thought I had finished it yesterday, and I was so thrilled with how I did pattern matching where the front bands attached to the shirt fronts...that I failed to notice how the rest of the prints would align

Now, I understand that some people may not see this as a mistake. I have seen garments on pattern envelopes with similar print repeats on either side of a seam or opening, and I have no problems with that. This, however, is something I deeply dislike in things that I make.
I despaired, thought about it a while, and realized that I had enough of this fabric left that I could, with fiddliness and annoyance, remove and replace the upper front band. I had to cut and remove a lot of stitching, and work around the buttonhole in the neck band that I refused to remove, and there are awkward elements present now, but no-one is ever going to get close enough to see, and now I have a shirt that is obnoxious in a fun way instead of a "You Made A Mistaaaaaaake" way
Some mistakes you live with, and some you rip apart and stitch back together.
165 notes
·
View notes
Note
In one of your old fics (bit of a throwback), you added a thing about rhett wearing too small jeans because the larger size was too long in the leg (and it made his ass looks amazing). I recently learned how to tailor pants, and it's super easy to shorten the lenght. But i think i would keep that knowledge to myself, because rhett's ass belongs in too small jeans! ;)
I would also stitch little flowers on his shirt's buttonholes but that neither here or there (he won't say it but Rhett absolutely loves them)
Omg, I'm still on that headcanon, too! I wish I could remember the fic I first mentioned that in 😭
There's something wonderful about watching a man jump around his bedroom, struggling to get his jeans over the swell of his ass and thighs. Just barely able to squeeze himself into the fabric, muttering under his breath about how he hates the folks who decided to create these specific sizes of jeans. You absolutely could convince him to buy the size that properly fits him and tailor them to his size, but how are you meant to do such a thing when you get to see that five days a week?
He doesn't realize you've put the flowers on his shirt until he's out in the field, and one of the hands points it out. Breaks out into this big, dumb grin as he admits that, yeah, he knows exactly who did that. Now he's buying himself new shirts more often, just to see what kind of flowers will appear next 💐
22 notes
·
View notes
Note
I just saw your Barbie jacket and fell in love, such beautiful work!
I want to get into sewing but have no idea where to start, do you have any tips?
Yes! FYI, I had the privilege of learning to sew at a really young age, around 10-12, thanks to 1) learning the basics from my mum 2) having a second-hand sewing machine I could futz around on as I pleased. But I truly think anyone can learn to sew, it does not have to be a childhood skill.
If you want to try it out before committing to buying anything except fabric, there are almost always community or adult education classes or courses that can teach you basics on their machines. Depends where you live but you might find them through your local community college or high school night class, library, YMCA/community centre, or even by asking at a fabric/craft store.
I highly recommend taking a couple of classes if you're a complete beginner - they can teach things like laying out and cutting patterns, threading a machine, the basic stitch and finishing options, etc. Often they can also teach you how to use your own machine, if you've bought one but you're a beginner.
If you want to try at home, at minimum you will need:
A basic sewing machine - you can very often find good second-hand machines online (ebay, craigslist, local buy/sell Facebook pages). Mine is a Janome and I've had it for almost 20 years, but the old 70s steel Singer machines are fantastic in terms of longevity.
A pair of reasonably sharp fabric scissors. You do not need to pay a million dollars for the best scissors, but going up a level from basic craft scissors, and keeping them only for cutting fabric (no paper) will make your cutting-out experience a lot easier.
A packet of sewing pins. For pinning down patterns and seams. I like the glass-head pins since they don't melt if you iron over them.
A tape measure for measuring yourself and checking your seam width, hems, etc.
An iron and ironing board (or table with a thick towel laid down, if space is a real problem).
A flat surface to lay out and cut your fabric - dining table or floor both work fine.
A needle for hand-sewing - to sew on things like buttons.
A box of empty bobbins to wind your bobbin thread onto.
In terms of patterns - there are a huge range of indie pattern companies online now (meaning they're not the big commercial patternmakers like Butterick). Most often, you can buy their patterns as a PDF and print it out on your home computer. In all honesty I much prefer indie patterns to commercial - they're often a lot more up to date with style, and usually not as expensive - but they can also be limited in terms of sizing, the range of style options, and some people really like a printed paper pattern instead of having to print your own. I recommend Papercut Patterns as an indie option that's great for beginners.
Indie instructions can also sometimes be a bit confusing (I find Etsy patterns the worst for this) although often you can email them and ask - or Google "[name of pattern] sew along" for a video tutorial. You can also find step by step video or blog post tutorials for pretty much every sewing technique, including things like putting in a zip, sewing buttonholes, etc.
Once you've picked your pattern, you'll obviously need fabric. There are a million people online who espouse the virtue of sewing with old bedsheets from thrift stores; in all honesty I don't love doing this because 1) I get a huge amount of joy from beautiful fabrics 2) if you want to make things that look 'professional'/store-bought, bedsheet cotton is not always your best friend. BUT it is probably the cheapest option for fabric, and a very good way to start or to test that a pattern fits and you know how to make it before you cut it out in the nice linen that cost $30 a yard. Using thrifted fabric is also obviously really eco-conscious, although a lot of fabric stores (especially independent ones vs chain stores like Spotlight or Joann) make a point of selling 'deadstock' fabric - fabric leftover from a clothing designer's run.
That's probably enough to start, honestly just fuck around and have fun with it, screw up a few times, lean into the imperfection. I still regularly scrap projects that aren't working for me, no shame in doing so as long as you're enjoying yourself!
30 notes
·
View notes
Note
wait, do you have advice/resources for beginning to sew clothes? i self drafted a totebag and have made a few small bags, but am hoping to branch out
Make mockups; do lots of test fittings throughout the process; finish your seams; clip your corners and curves; stitch the most visible and trickiest bits by hand, not machine (unless you're good enough with a machine!); learn the main properties of different fabrics; when you really wanna hold your fabric in place nicely, baste rather than pin; adjust the fit via triangles and curves; it's only fabric; it's okay to fuck up; accept that you WILL fuck-up and WILL have to undo and redo things and that that is OKAY.
^ Some things I personally have benefited from and wish I'd learned earlier!
Seriously, though — I should preface by saying that I myself am also a beginner. I follow some really brilliant costumers and cosplayers here on tumblr, and I am nowhere NEAR their level. (And I would welcome any advice/resources more experienced clothes-makers would like to share!) It's only in the last few years that I've gotten more into sewing, starting mainly with alterations of existing clothes and then moving into making things from scratch. I've figured out a lot just via trial and error — as well as by taking existing garments apart and looking at how they're made.
But, honestly, my main resource has been YouTube. There are tons of tutorials on there for specific techniques and garments, of course, and I do watch those. But I've also learned a LOT from the more entertainment-focused sewing content — the ones where the sewist isn't really trying to teach you how to make something, just making something cool and showing how they made it. There's so much knowledge to be gleaned just from watching them work and listening to them talk about why they used a certain stitch, how they resolved a fit issue, etc.
Some favorite creators include:
TheClosetHistorian: Makes stunning vintage and high-end fashion; big proponent of drafting your own patterns, and has tutorials on how to do so as well as on things like darts and seam finishing. Plus I find her voice and aesthetic very soothing.
Bernadette Banner: Focuses on using period-appropriate methods to create her garments (mainly 19th and early 20th c.), which means a lot of hand sewing. I've picked up a lot of hand-sewing tips and tricks from watching her work.
Vincent Briggs: Mainly 18th century garments, with very excellent tutorials on decorative buttons and buttonholes in particular. And how to make an adorable leaf-kerchief!
Morgan Donner: All-around crafter with a particular focus on medieval garments and other aspects of medieval culture. Does lots of non-sewing craft content I enjoy as well.
Rachel Maksy: Less focused on technical sewing skills and more so on costume making and other crafting, but she's very inventive and fun to watch and shows a lot of creative problem solving.
And a few specific tutorials:
Circle skirt drafting by Mariah Pattie
Making a split-side adjustable skirt by Ash L G
Seam finishing by Evelyn Wood
There are honestly too many good channels to list... Sewstine; The Stitchery; Nicole Rudolph; Shannon Makes...... Beyond the sheer entertainment value, what I really love about watching all of these creators is that each of them has their own particular specialties, preferred ways of doing things, etc. Some of them went to fashion school, some are self-taught. Some are very technical and precise, some of them work organically and messily. And I think that just as the measured, detail-oriented approach of someone like Bernadette Banner offers much instruction, so too (in a very different way) does the chaotic approach of someone like Micarah Tewers, who perhaps can make garment construction seem less intimidating by demonstrating that you don't have to precisely follow a step-by-step guide.
Right now, I'm almost done (SO CLOSE TO DONE) making a skirt. It's not a crazy difficult skirt, but it does have pockets, pleats, gathers, a zipper, an attached waistband with elastic, and a plaid pattern to consider the direction and matching of, so it required thought and planning. I had originally been planning to make the whole skirt using a hand-me-down McCalls pattern, but then decided I didn't like the fullness of that skirt, so I took only the pockets from that pattern and drafted the skirt itself using the circle skirt tutorial linked above. I used a quarter-circle with a 175% waist measurement for the front half, which is pleated, and a 150% waist measurement for the back half, which is gathered. I did frequent test fittings and had to take apart and redo a couple things. And whenever I wasn't exactly sure how to do something, I'd just Google it and find lots of help.
Like I said, some of my mutuals on here are far better at this than I am, and I feel a little silly talking about my skirt like it's some grand accomplishment and a little unqualified to offer resources/advice. But I guess I'm hoping that my experience can still be helpful precisely because I am still a beginner and am very much still in the phase of figuring it all out. And my method is basically to take in information and inspiration from a lot of different sources, find the courage to try things out, learn from my mistakes and try try again.
Congrats on your tote bags, anon, and best wishes on your sewing journeys to come!
7 notes
·
View notes
Text
a sewing experiment
OKAY
I've talked before about how frustrating clothing quality is nowadays.
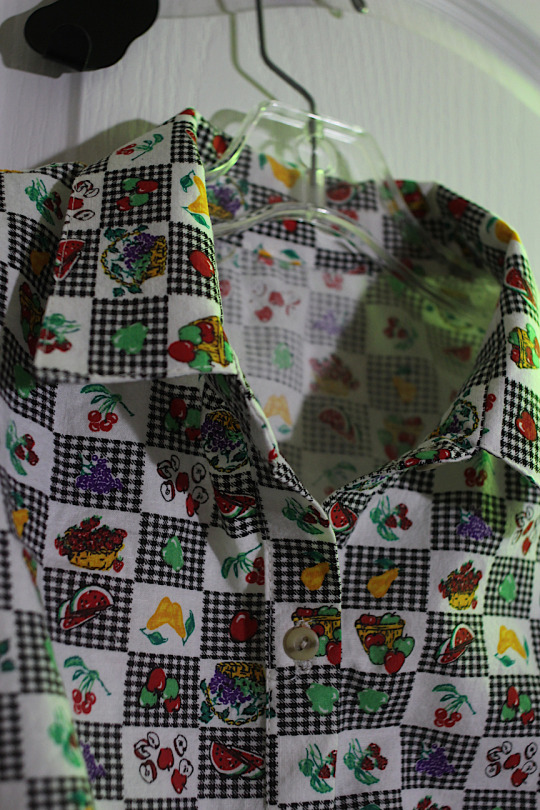
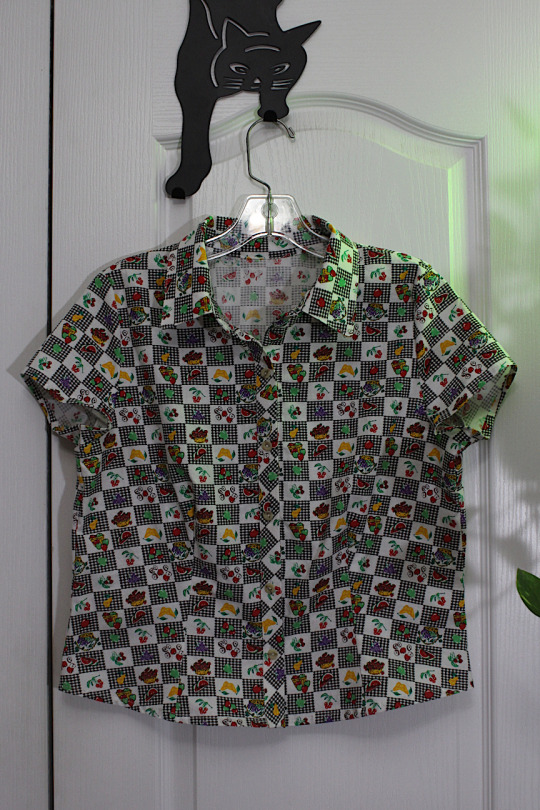
The shirt we're talking about today is by Denim & Flower, a brand with great patterns and soft material that I generally like. This shirt is about $40 full price.

Look at this!!! Raw edges between every button and buttonhole. The first time it went through the wash the whole thing frayed like crazy...
There wasn't enough fabric to do any kind of hem on most of the sections, so I decided to do an experiment. Each side gets a different fix, and we'll see which held up better after a few washes
Under the buttons I did an overcasting stitch on my machine


(My phone did not want to focus) This is going to fray a bit more as I didn't get too close to the edge, but it was WAY faster than the other method so we're gonna give it a shot
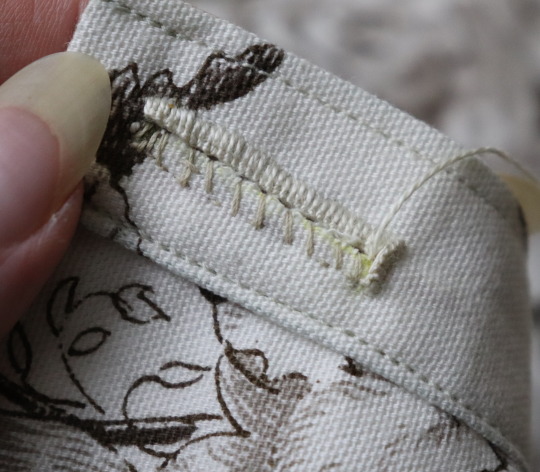
Under the button holes I basically just did an overlocker stitch by hand


It was fiddly as hell, but didn't take too long all things considered. I expect this'll hold up pretty well, it really does look just like a machine overlock.
So we'll see! I'll make sure to update this post once I have some results. I love learning how to make garments last longer and hopefully someone else can find this stuff useful!
#my post#In another life I'm a full time crafting blogger#What growing up pre social media does to a mf#Sewing#Crafting#Please tumblr don't eat this
4 notes
·
View notes
Note
is there a specific name for the shaped weaving technique you've been using lately? it's so gorgeous and has such life to it!
Aww, thanks so much!
I don't know of a specific, distinct name for the thing I've been doing- it's a mashup of a few different techniques I've learned from different sources. I've been referring to these pieces vaguely as just "weavings" for lack of a better term, but I'm sure some people might not consider them weavings!
One area I draw from is needleweaving- actually, two different techniques that use that term. One involves very small-scale weaving with a needle and thread to create raised or floating areas of stitch anchored to a base cloth, similar to darning. (Here's a little visual.) The other is a type of drawn-thread embroidery, where you remove selected threads from the base cloth and stitch over/around the remaining threads to create an openwork pattern. (More here.)
The other main area I draw from is coiling, which is more commonly done as a basketry technique in three dimensions- that's how I learned it initially. Instead of stitching over a coil of material to build it up into a basket, I lay out shapes with long pieces of yarn and stitch over them (usually in a blanket/buttonhole stitch) to build them outward in two dimensions. Working with threads stretched over a board allows me to maintain the tension needed to keep the piece flat.
I'm currently working on a post with photos to describe my process a bit better! And also exploring incorporating other materials and objects into these weavings.
11 notes
·
View notes
Text
Kids Cardigan | PDF Knitting Pattern | Cedarwood Kids Cardigan Knitting Pattern | Top Down Cardigan | 0-14 years
Learn how to knit the Cedarwood Kids Cardigan with this beginner friendly knitting pattern.
The pdf tutorial has lots of photos and step by step instructions to help you through your project.
This cardigan is worked flat in garter stitch, with raglan shaping and from the top down.
The buttonholes are knitted at the same time as the body of the cardigan.
The cardigan edges are knitted in I-cord.
https://www.etsy.com/listing/1066673682/kids-cardigan-pdf-knitting-pattern

https://pin.it/6Yzn6MS
0 notes
Text
Digital Sewing Machine This machine has a reverse button
Brother CS5055 vs CP60X Tension settings are never one-size-fits-all. And you don't get automatic tensioning at this price. Only by testing it on bits of fabric before sewing on your project will you know what works. If the machine is not threaded correctly or the bobbin is in the wrong position, you will have problems that will not be solved by resetting the tension. Learn how to thread these new Brothers appropriately or you'll have issues and the tension may appear to be off. The machine is normally set at 4, which is for medium weight cotton fabrics. From there, you must understand how to create tension.
Yes, with the proper settings, it can sew denim. I haven't stitched velvet yet, but it has several options for sewing thicker stuff. I'm now sewing outdoor cushions with it, and it's doing a great job with the fabric. I've also sewed vinyl and it performed admirably.
Digital Sewing Machine This machine has a reverse button, a clear LCD screen, and a work area lighted by extremely bright LEDs. Seven excellent sewing feet are also provided to aid you in completing a variety of stitching techniques. The CP60X will have you making DIY items and clothing in no time thanks to its sophisticated needle threading mechanism that makes threading simple, Quick-Set bobbin, and extremely bright LED work area lighting. NEW AND IMPROVED NEEDLE THREADER: The automatic 2-step needle threader reliably puts the thread through the needle and is now simpler to operate than ever. ACCESSORIES INCLUDED: The CP60X has 7 sewing feet, among other features. Any other usage or sale of this device nullifies the warranty because it is only designed for sale in the US at 120 volts. Durable metal frame construction: Your machine can handle any project, from thick denim to heavy quilts, thanks to its sturdy metal frame and high-quality construction. A fixed needle bar keeps the needle in place while you work, enabling neater stitching and straighter lines.The CP60X computerized sewing machine offers a broad range of capabilities in a small yet sturdy package. The CP60X has 60 built-in stitches, including seven different types of one-step auto-size buttonholes. With the simple stitch picker and clear LCD screen, choosing your stitch is as simple as pressing a button. With the outstanding feed mechanism and fixed needle bar, stitching denim, tweed, and other thick fabrics is practically straightforward. Use drop feed dogs, experiment with free-motion sewing, or use the free arm feature to make stitching narrow jeans, cuffs, and sleeves simple.
Fixed needle bar and metal frame: Your machine can handle any job because of the sturdy metal frame structure, and the needle is held in place as you work for cleaner stitching and even lines. The CS5055 computerised sewing machine is the ideal package for both novice and experienced sewers. Choose from a variety of 60 built-in decorative stitches, including 7 varieties of auto-size buttonholes, using an LCD display screen to add adorned, unique touches to your clothing. With the outstanding feed system, stitching denim, tweed, and other thick fabrics is practically straightforward. For cleaner finishing, a fixed needle bar minimises movement during stitching, and a sophisticated needle threading system makes threading simple.
0 notes
Text
How to Sew using a Sewing Machine
When I turned 13, my stepmom, Cassandra, got me the best birthday present ever (still, to this day, I feel), a sewing machine! I immediately taught myself to sew and over the next 27 years, created everything from tiny little purses to huge Victorian ballgowns. I want to impart my passion to others and I hope I can spark the creative juices for someone else, no matter their age.:) This Instructable will serve as an introduction to sewing with a sewing machine. I'm aiming it for an absolute beginner, and am writing this as a really basic lesson. If you're a beginner, and a step isn't clear enough, please let me know. p.s. There are already several good instructables on how to thread a sewing machine, so I won't be including that part.

Tips on Acquiring a Sewing Machine
If you already have a machine, it's imperative to make sure it's been recently serviced. Doing this will ensure your mechanics (such as the Bobbin Tension and Feed Dog — the mechanism that moves the fabric when sewing) are in proper working order and any abnormality in sewing will be "pilot error", which can be corrected through practice. If you haven't been gifted a machine and are looking to purchase your first machine, here are some hints to help you choose the right one.
Start by finding a reputable sewing machine repair shop. Often they will be attached to a dealership (just like cars!). If you can find an independent repair shop, and you have a good rapport with the mechanic, you might be happier. This guy (or gal) will be straight about repairs and won't tell you to give up your old machine to buy the latest model. Also, s/he will be a good source for acquiring a good, used machine if you're on a budget. If, on the other hand you find that your local sewing machine dealer is fabulous, by all means, use your best resources and go for it.
Get a machine with all-metal parts. Many cheaper model sewing machines have plastic pieces. These parts are the ones that will invariably break first. Replacement of the parts may be cheaper, but you'll end up spending far more for the labor to install new plastic parts that will break again. (SIDE NOTE: my stepmom bought me a Sears Kenmore 12-stitch: all-metal parts. It's still running strong, with only the occasional tune-up, for almost 30 years!). If the choice is an all-metal, simpler sewing machine with "only' 12 stitches and a machine with more bells and whistles (and plastic parts) for the same price, invest in the first machine.
When you're first starting out, consider a basic model. In all honesty, you're likely to never require more stitches than those included with the basic 12-stitch model. If, down the road, you find your sewing becomes detailed enough that you need a more complex machine, look for a machine that'll fit those specific needs. You can then keep your first machine as a workhorse, to just do crafting, or buttonholes, or whatever. Or, you can gift your first machine to a non-profit, like your local Girls & Boys Club.
Fabric Definitions and a Good Fabric Choice to Start With

What makes a good seamster will be familiarity of medium. The most important part about knowing how to sew on a machine is learning how to manipulate the fabric as it goes under the needle. This is where fabric choices come in.
I'll start with some definitions:
WEIGHT: Fabric come in several "weights". Generally, you have lightweight (feels thin to the touch, mostly sheer enough to see your hand through them, you can fold it many times without creating much girth — most often used for curtain sheers), midweight (feels more substantial, folding creates some girth — most often used for clothing) and heavyweight (thick, folding will create substantial girth — most often used in home decorating, like upholstery)
The STRETCH TEST: Fabric can also have stretch. How to tell a fabric stretch (or non-stretch) is by stretching it both lengthwise and widthwise (all fabric will have some amount of stretch on the diagonal, also called the bias). Non-stretch fabric will have little give on both the length and width.
FIBER CONTENT: This means what makes up the fabric. Natural fibers can be cotton, silk, linen, bamboo. Polyester and Nylon are examples of manmade fabrics.
Start with a medium-weight, non-stretch fabric made from natural fibers (like cotton).
You'll want to choose a fabric that has thin stripes that are about a half inch to an inch apart. The stripes should run down the fabric, not from selvage (the finished edge on the side) to selvage. Have at least a half yard (18") of it.
Practicing Straight Stitches — Learning to Sew
You can start learning how to manipulate the fabric by first sewing in a straight line.
Take your fabric chosen from Step 2 and cut a 8" wide strip that is 18" long. Fold it in a half and make a crease (you can use an iron to create a more firm crease) at fold.
Thread your machine (consult your manual or the other Instructables for this step).
For this first bit of sewing, you can use a needle for mid-weight, woven fabric. (As for choice of needles, look to eventually having a variety of needles. Several things can determine the type of needle to use, such as the fabric choice or the type of stitch. When you're doing regular sewing, the fabric's weight determines the needles' size, and the type of fabric determines the shape of the needle's point.).
Choose a medium stitch length, usually 2 1/2 or 3 (consult your manual for this, as well, since stitch length varies from machine to machine. Some have a knob, others have a multi-stage switch)
Set your machine to Straight Stitch, which is usually the first stitch in your list
Begin with the Needle in the highest position (you should always start and end with the needle in this position) and draw up Presser Foot.
Draw out your Top and Bobbin Threads about 6 inches back from the Feed Dog. When you begin your first stitch, make sure you are holding onto your Top and Bobbin Threads, as they can be "sucked" into the machine on the first few stitches.
Place your fabric under the Needle, positioning it so the Needle will enter the fabric at a stripe near to the crease.
Bring down the Presser Foot (It's very important to have the foot down when sewing, since its down position is what creates the friction for the Feed Dog to move the fabric along as you sew) .
A helpful hint when you're first learning (or if you find you need precise needle placement) is to hand-guide the first stitch in your fabric layers. To do this, use the Hand Wheel to lower the Needle into your fabric layers. Once you are more familiar with your machine, you can generally eyeball needle placement.
Put your fingers on your fabric, so as to guide it, down the stripe, under the Presser Foot. Press down gently on the Foot Pedal and start sewing. This is where your training begins, to teach your fingers how to touch, grasp and hold your fabric layers as they are sewn together. Practicing "step h" over and over, using different fabrics, of different weights, with stretch and non-stretch, will get you familiar with how each type of fabric will need to be worked with.
Stop the Needle when it's in it uppermost position and draw up the Presser Foot (use the Hand Wheel, if necessary). Gently pull out your fabric, cut your threads (make sure to leave at least 6" of Top and Bobbin Threads hanging back, so you can have a "start" for your next bit of sewing). Check Your Work
Check Your Work

So, you've sewn your (first?) seam! How did you do? Let's check and troubleshoot it:
Speed: Did you notice if you sped up and slowed down alot? Totally reasonable as you get used to how the Pedal Foot operates. You want to maintain a constant speed throughout the stitching of a seam. Maintaining a constant speed will create even stitches. Don't worry if you're slow at first; you just need to be at one speed. It's okay to stop and start, just get to one speed. Eventually, you can increase your constant speed, until you are pedal-to-the-medal.
Stitch Length: Is it even, or are some of the stitches longer than others? If the later is true, and you're maintaining speed, then you may be pulling at the fabric layers as they're been stitched together. Make sure you are letting the feed dog do its work and your finger are simply guiding the fabric under the pressure foot. b. Straight on the Stripe: Were you able to sew right down the stripe or is your seam a little offsides? This will simply take practice. Keep practicing until your fingers nimbly guide the fabric straight as an arrow.
Other Hints to Help You Sew
Other factors can be a help or hindrance when sewing. Here are a few:
Where to sew — Workstation Lighting: Make sure you have bright lighting available on your sewing area. Most machines will come with a "sewing light". This is a great start, but you should also invest in a gooseneck lamp that can direct more light at your Presser Foot. Position it behind and to the right of your machine, with the light directed to the sewing surface and not into your eyes at all. Additionally, if possible, have a decent room light on, so you won't be blinded by the contrast of a well-lighted work space and a dark room.
Where to Sew- Machine placement: Have your machine on a surface that is comfortable to work at. Too high and your shoulders and neck will cramp up. I like to have my machine at the same height as a computer keyboard should be, or possibly a little higher.
Where to Sew- Surface: Make sure the surface will be stable enough to handle the up and down action of the needle. If you have a very large table (like a dining room table), try to have your machine close to a table leg, where there's more stability. also, make sure the surface isn't slippery, or else you may find your machine "travelling" as you sew.
Use of pins: If you want to use pins to hold fabric pieces together, get into the habit early of removing them before sewing with your machine. More often than not, you'll be able to sew over a pin with no problem, but on those rare occasions when your needle hits a pin right on, the results could be disastrous.
Almost always wash your fabric before you start cutting and sewing a bag for a bag. Most fabrics come with "sizing". By washing your fabric, you'll wash out the sizing and your fabric will show it's true shape, often much more supple and sometimes shrinking (very likely when your fabric is 100% natural fibers).
HAVE FUN! Really, if you're not having fun, you'll never put in enough time to get good at sewing. Don't be discouraged if you first few attempts seem like complete dreck. They're not, they're the things you've made that'll get you to understand what works and what doesn't.
Nothing is a waste of time, it's a chance to learn!
0 notes
Text
There is this new book I need to buy 👀
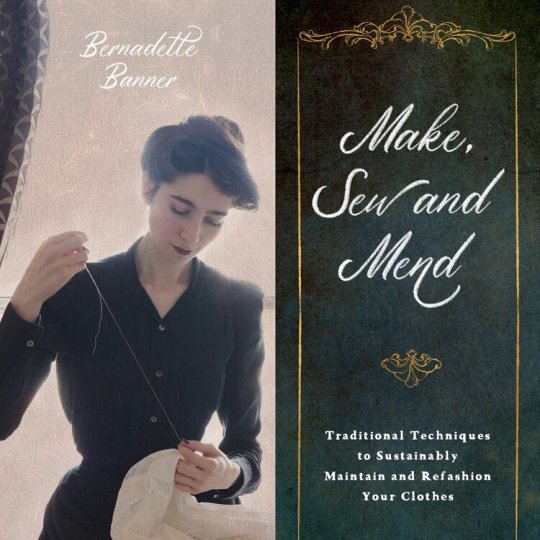
“Make, Sew and Mend: Traditional Techniques to Sustainably Maintain and Refashion Your Clothes”
Forthcoming publication from Page Street Publishing, now available for pre-order via Amazon, Book Depository, and most large book retailers.
“As people learn the environmental and economic toll of fast fashion, they are turning toward more sustainable fashion practices like mending. From running and herringbone stitches to basting, pleats and buttonholes, Bernadette breaks down techniques with step-by-step photos to show people with any level of sewing skill how to achieve the most lasting results for every stitch.
Whether readers are looking to build and maintain a vintage wardrobe or merely want to phase out fast fashion in favor of more sustainable practices, Bernadette has the basics covered for every kind of seamster.”
COMING MAY 17 2022
280 notes
·
View notes
Text
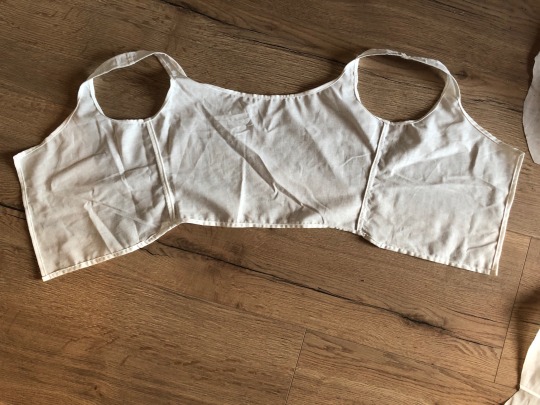
Making an early 1900s corset cover
Hey everyone, I’ve been absent for so long and that has many reasons, my studies are definitely taking up so much more time than I had anticipated. I feel like I should mention that I am not studying dress history, so like I always say - costuming is a hobby of mine but please be aware that I might not always be 100% correct about things. But I am minoring in art history where we do occasionally talk about costumes so... it’s something? Anyways, a while ago I made a corset cover that I forgot to take pictures of when it was finished, so now I’m doing that. But first, this is what I was roughly going off of:

Having made some more complex things before I thought hey, this can’t be that hard? It’s basically just a bodice shaped piece of fabric with ruffles on. And surprisingly, I wasn’t that far off from the truth. I still severely underestimated the time that it took to sew all of those six pieces of ruffles on. That being said, here’s where I started:

Please excuse the fact that it’s not ironed, I was making it kind of in a rush.
I did make a mockup first that I tried on and made sure everything fits, but didn’t take a picture. Here you can see the mock up parts cut out of fashion fabric. I got out my french curve for the first time and was totally expecting to fail but it worked out really well! I used it to draw in all the curved lines. The reason only the back is curved and not the front is because I wanted the back to sit flat while the front would be gathered with a string and tied in the front, to help create that pigeon breast silhouette without having the back be puffy as well. As you can see, for that to work I’ve had to adjust the length of the side edges in the front so they had the same length as the curved ones.
So then I sewed all the edges together and cleaned them up right after so I wouldn’t have to do that later when it’s done.

I then cut out some rectangular strips for the ruffles and folded over and stitched all edges but one - the one that would be ruffled. Instead, I did a running stich that I could pull on to gather it, and then machine stitch it to the rest. Here’s where I began to struggle: I didn’t really know how to attach the ruffle so it would look nice. I didn’t necessarily want the stitches to be on top, so I initially stitched it upside down to the fold it over but that didn’t work at all, so I had to take it all out again and just stitch it down normally.

I kind of just eyeballed where I wanted the ruffles to go, used a ruler to rougly make sure the ruffled pieces are the same length and tried putting them all about three centimeters apart. I do like how the ruffles curve up on the sides, I thought the finished piece looks so much better like this.

Like I said, I wasn’t super happy with the top stitching, and since I had some white ribbon left I used that to cover it up.
Then it was time to insert the string, aka that same white ribbon. I originally wanted to add a separate channel for that but I thought maybe I can just use the cleaned up edge for it. I used a bobby pin to get that ribbon through this makeshift channel but it worked.
So then I added the buttons and made little “buttonholes” out of thread and sewed five buttons in place.
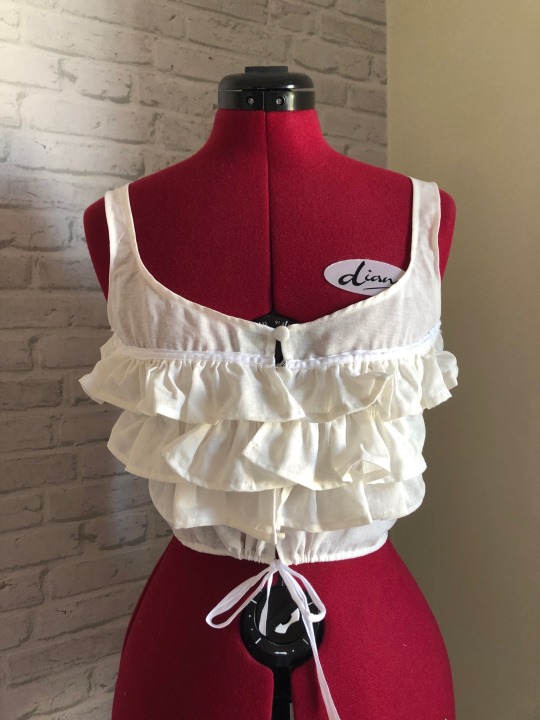

Here’s the finished piece. And you know what the ironic part is? It doesn’t fit me over a corset. And I have nothing but my own stupidity to blame. Thing is, I made this in order to wear under a dress that I’m going to make at some point, and I’m not really planning on wearing a corset with it (I want to modernize it a little), so I wanted something to help with the silhouette. So I never took my measurments in a corset, and I thought if I leave a little wiggle room it’ll be fine. No, learn from my mistakes and take your measurments! It’s not that big of a deal though because I did make it specifically with that dress in mind and having it fit over a corset would’ve just been a nice plus. And if I really try I can make it fit, it’s just a tiny bit small.
So, long story short, corset covers are great and not hard to make if you don’t make these obvious mistakes.
#fashion#historical fashion#fashion history#victorian#edwardian#sewing#edwardian fashion#victorian fashion#corset cover#mysewingadventures
113 notes
·
View notes
Text
Intro
I started to learn how to make needle lace on 2-22-22 and figured I would document the processes here! I have written a bit about the kind of lace i make and listed the resources I have used so far and a bit about them below. If you are a more experienced needle lace maker please drop any recommendations you have!
Table of Contents:
1. What kind of lace do I make?
2. Tutorials
3. Patterns
4. Thread
5. Blog Tag Guide
1. What kind of lace do I make?
I make what is best described as modernized Western European needle lace or couched cordonnet. It is 'true lace', meaning it's not made by working into a preexisting fabric or thread foundation/ground material*.
It is made with a base of a cordonnet- thread/s used to make an outline. The cordonnet is couched to a temporary backing. Couching is a stitch that works from the back of the backing, goes over the corrdenet (not through it!) that allows the lace to be stabilized during the making process but is fully removable from the backing once finished. Once couched, A needle is used to make knots, mostly butthole stitches, that fill in the gaps of the cordonnet and go over the cordonnet to seal everything in.
I am partial to the geometric designs of Reticella- a cutwork lace- but don't use true Reticella techniques for my full pieces. Most of the techniques I use are adapted and modernized from Reticella, Punto in Aria, Kenmare lace, and general modern buttonhole needle lace techniques.
While I started learning lace-making a little while back, I am still a beginner. Lace is time intensive so I have made 4 pieces total. I still have a lot to learn but am loving it!
*not that laces that are made with fabric or thread foundations are not real lace, just not classified as 'true lace'. While I don't love the term, I haven't heard another one that communicates the same idea. The term needlepoint lace is also sometimes used to refer to 'true lace' but only ones made with a needle. It is also easily confused with the much more popular canvas work- Needlepoint embroidery, so I choose not to use this term for clarity's sake.
2. Tutorials:
I started with Michael Dennis's Needle Lace Made Easy Tutorials. I have a hard time following written instructions so these videos were perfect for me.
Lynxlace has a ton of information on a wide variety of types of lace. The website is from 2011 and is only avable through way back machine now, so it doesn't have the most accessible design and some of the diagrams are a bit hard to follow, but the amount of info here makes up for it.
ENCYCLOPEDIA OF NEEDLEWORK By Thérèse de Dillmont was published in 1884 but has a lot of info and good diagrams.
LACEIOLI is a lace-making forum. While it is now only accessible through way back machine, there is still a lot of helpful info to get yourself oriented. It seems that they were in the process of moving forum hosting platforms so try laceioli.org too.
RSN Stitch Bank is an AMAZING guide on various stitches for several types of Needlework. Highly recommend.
3. Patterns:
Needle-made laces by Thérèse de Dillmont has been my go to collection of patterns so far.
The Antique Pattern Library has a good collection of patterns, photos, and books on need lace (and other arts and crafts). Everything here is public domain.
Internet Archive also has patterns, books, and photos of needle lace. The site is easy to navigate and allows you to filter your results.
Les Singuliers et Nouveaux Portraicts by Federico de Vinciolo has beautiful designs for needle lace and filet lace. Pretty complex but worth a look even if it's just to admire the designs.
4. Thread:
Coats Crochet Red Heart Fashion Crochet, Thread Size 3, White. It's cheap and quite a large thread size for lace making. However, I found it a good starting thread to try out the craft.
DMC 167G 20-Blanc Cebelia Crochet Cotton, White, Size 20, White. It's a very nice thread, tightly woven, and smooth. I have had very few problems with fraying so far. I wouldn't go much smaller than this until you are well-practiced with the craft.
Handy Hands has a good thread size guide which I found helpful.
5. Blog Tag Guide:
#learning guides: I try to include references for stitches and techniques on detail posts. If you're looking to replicate a stitch I've done look here.
Pattern: I tag all of my posts with what pattern I am using. It is the name of the book/site and the pattern number/name. For links to the books/sites check the pattern list above. Below are all of my pattern tags.
#Needle-made laces p28 #Needle-made laces p51
Project Tags: If I make something without using a published pattern I tag it with the name I have dubbed the project.
#palmette-lotus chain
#not lace: sometimes I post things that aren't lace but are not too far removed from fiber arts. If you want to browse them or filter them out, use this tag
Museum Tags: If I post a photo of a piece that is in a museum, I include the museum name in the tags. I also include a link to the museum's online collection/database entry for the piece if I can.
#Museu del Disseny de Barcelona
#needle lace#lace making#crafts#fiber art#textile art#chrochet#doily#handmade#tatting#art#fashion history#learning guides
39 notes
·
View notes
Last Seen Blogs

ostentatiousbarnacles
forest s. rigby

fitnessadvisor-101
fitnessadvisor101

aurorasmirrorball
[aurora🇮🇪]
tamaki-yamada
TAMAKI yamada

xxxmariamxxx1
مريم/meryem