#Easier way of downloading the sims 3 cc
Text
Easier way of downloading the sims 3 cc

#EASIER WAY OF DOWNLOADING THE SIMS 3 CC INSTALL#
#EASIER WAY OF DOWNLOADING THE SIMS 3 CC MOD#
#EASIER WAY OF DOWNLOADING THE SIMS 3 CC DOWNLOAD#
#EASIER WAY OF DOWNLOADING THE SIMS 3 CC INSTALL#
txt files – files you DON’T move into the Mods folder – with more information for you to read.Īs a side note: it’s good to read those files anyway because you’re more likely to successfully install the CC! Those files will often have directions telling you to move the specific files that you’re actually wondering about – like the.
#EASIER WAY OF DOWNLOADING THE SIMS 3 CC MOD#
This is an easy mistake to happen when the mod package is contained in ZIP files because CC creators often include. There is another way to not have all of the required files for the CC to work: sometimes, you can accidentally miss some of the downloads in a CC file by thinking that they don’t need to be included. Go to the additional mesh or CC file you need, add it to your Mods folder, and then it should start running! If there is, you don’t have to delete the file you just downloaded as long as the mesh they link to still exists and works. Read over the description of the CC file you’re looking at to see if there is a separate file that you have to download. Next, go to your Electronic Arts folder on the desktop and navigate to your Mods folder or directory. We all know how complex those files names can be! This is so you don’t forget what file you’re going to search for in your files, just in case the file name is impossible to remember. If you have a MAC, hold down Shift/Command/3 (if you have the Touch Bar, hold down Command/Shift/4) then save it or paste the screenshot into a graphic program like Adobe Photoshop or good ol’ Microsoft Paint. With this mod, players can make preserves and jams as they could in The Sims 3 and build the Canning skill all without having to pay for The Sims 3 Store content. Icemunmun is back with more The Sims 3 to The Sims 4 conversions this time with a converted Grandma's Canning Station. Take a screenshot of this notification by holding down CTRL and PRT SC at the same time on a PC. 2 The Sims 3 - Grandma's Canning Station. At least it takes the guesswork out of it! You’ll see a notification pop up on your screen letting you know that a specific file is preventing Sims 4 from launching. Your game won’t be able to start unless you delete that file. This is another ideal scenario because it is the easiest way to know what specific Sims CC file isn’t working without you having to do any extensive backtracking of your recent downloads. Another awesome website for you to go to for finding stuff for The Sims 4 is tumblr because sims creators are constantly reblogging different clothing creations for you to download.Corrupt files: The Sims CC file is corrupt or broken There are also websites like where you can easily find safe mods for you to download. This website has thousands of options and at first is pretty intimidating because there are a lot of ads, but if you look past the ads you can find so many goodies. The absolute best way that you can find cc clothes is to find websites that have tons of options and are totally safe like which is one of the best.
#EASIER WAY OF DOWNLOADING THE SIMS 3 CC DOWNLOAD#
There is a lot of confusion for new players in how you find these items, and which websites are safe to download from which can stop people from using custom content all together. Before we can jump in to the individual cc clothes items that you need, it’s important to discuss places that you can find awesome clothes for your game.
1 note
·
View note
Text
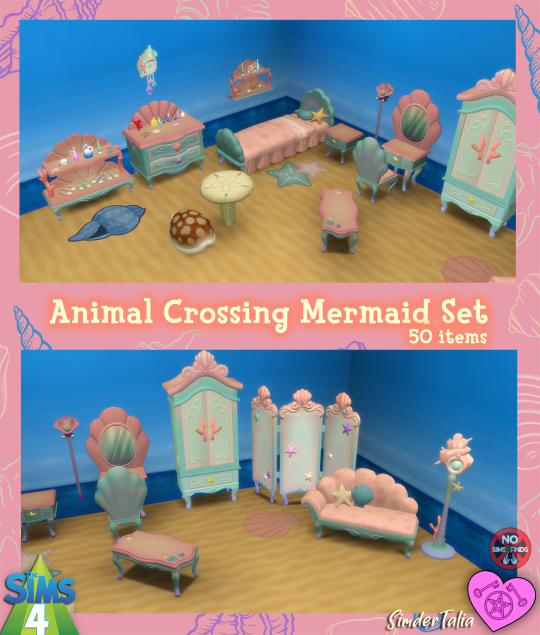
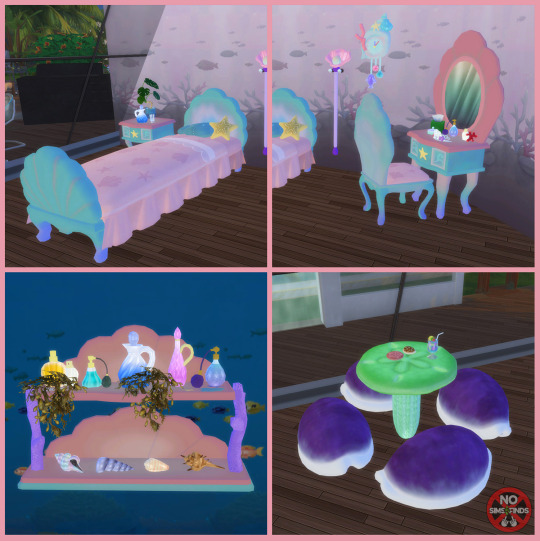
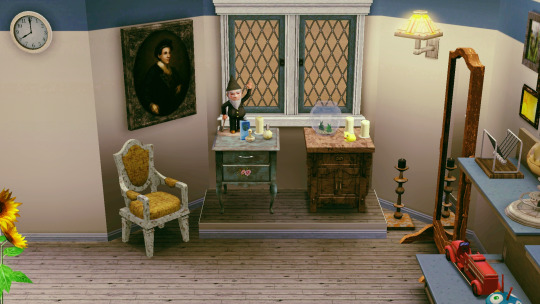
🐚 ACNH Mermaid Set 🧜♀️
50 items | Sims 4, Base game compatible.
Type “ACNH Mermaid” into the search query in build mode to find quickly. You can always find items like this, just begin typing the title and it will appear.
Always suggested: bb.objects ON, it makes placing items much easier. For further placement tweaking, check out the TOOL mod.
Use the scale up & down feature on your keyboard to make the items larger or smaller to your liking. If you have a non-US keyboard, it may be different keys depending on which alphabet it uses.
Remember that you can resize items in game with your keyboard! Note that if you have a non-USA keyboard, that it may be different keys, but it still works.
I hope you enjoy!
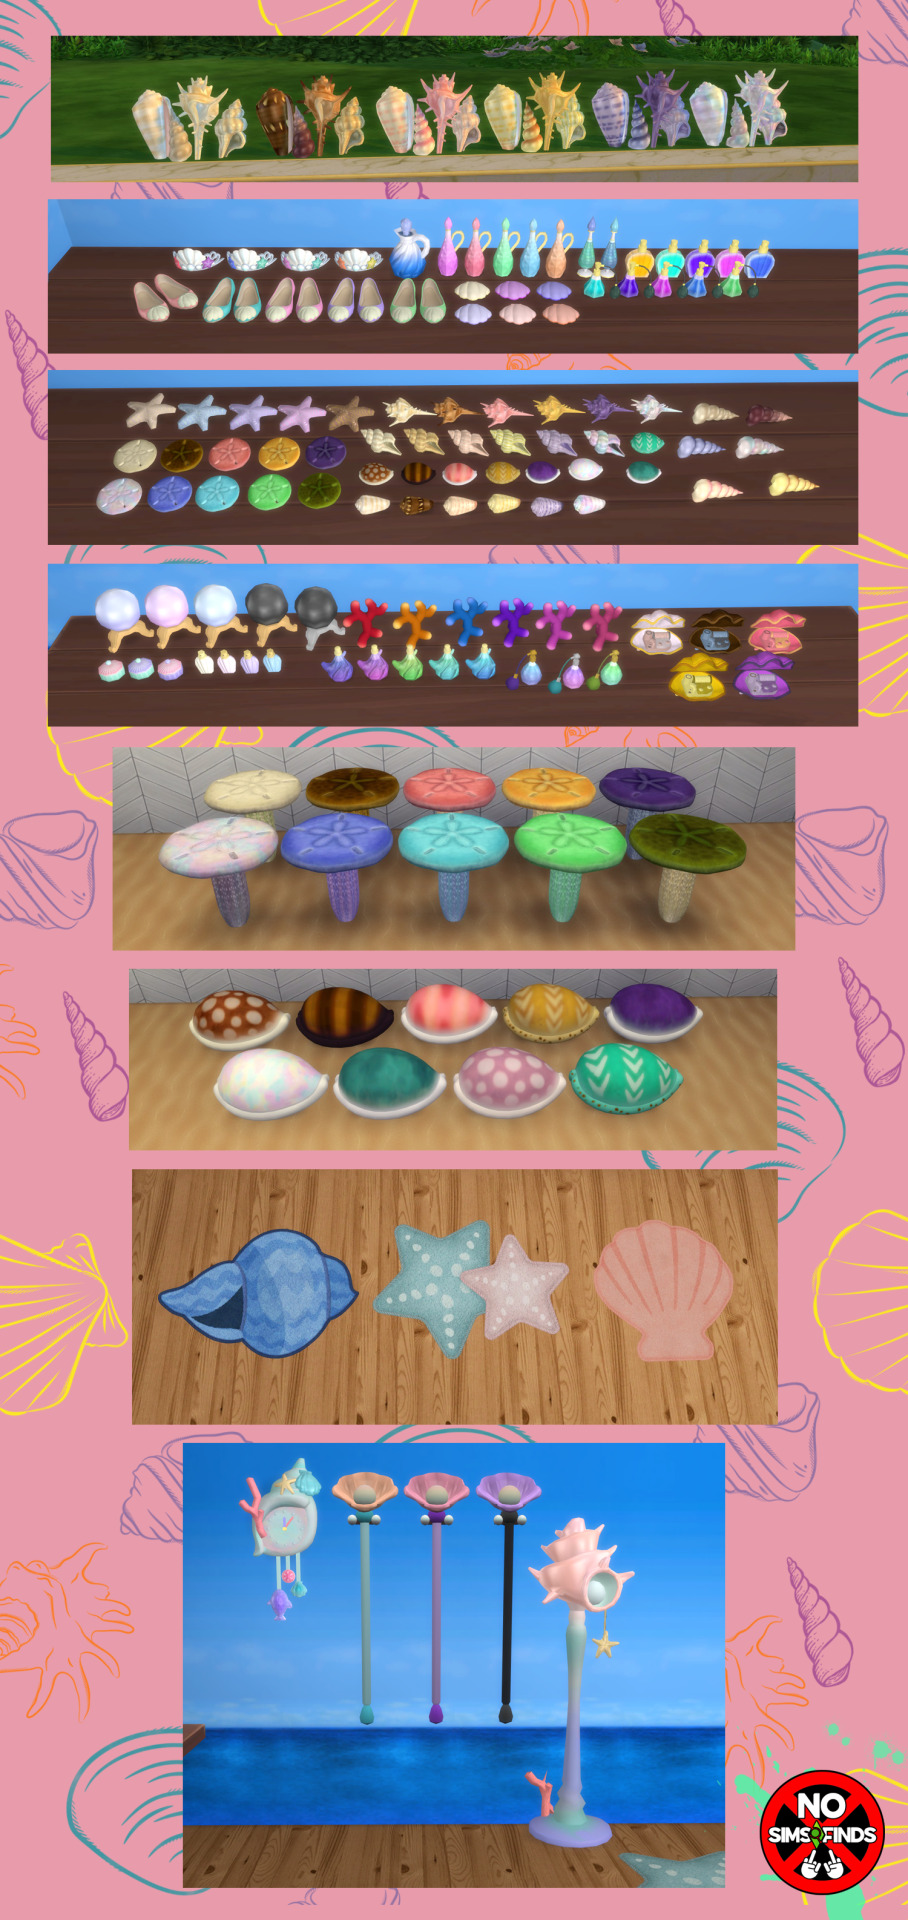
Set contains: (Buy Mode)
-Bed | 1 swatch | 2420 poly
-Chair | 2 swatches | 1226 poly
-Coffee Table | 1 swatch | 2406 poly
-Divider | 1 swatch | 2388 poly
-Dresser | 1 swatch | 1671 poly
-Fainting Sofa | 1 swatch | 2347 poly
-Fountain (I forgot to get pics 🙃) | 18 swatches | 2690 poly
-Lamp (functional, turn brightness down) | 1 swatch | 1217 poly
-Nightstand (made by me) | 1 swatch | 628 poly
-Rugs (cone, scallop, & starfish) | 1 swatch each | 630, 558, & 994 poly
-Sand Dollar Table | 10 swatches | 2204 poly
-Seashell Arch (I forgot to get pics 🙃) | 6 swatches | 3589 poly
-Seashell "Screen" | 6 swatches | 2410 poly
-Seashell Seat | 9 swatches | 1188 poly
-Shelf (floor) | 2 swatches | 1506 poly
-Shelf (wall) | 2 swatches | 690 poly
-Vanity Table | 1 swatch | 901 poly
-Wardrobe Closet | 1 swatch | 1208 poly
-Bottle 1 | 5 swatches | 186 poly
-Bottle 2 | 7 swatches | 227 poly
-Clock | 1 swatch | 1882 poly
-Compact | 6 swatches | 220 poly
-Coral Decor | 6 swatches | 618 poly
-Cowrie Shell Decor | 11 swatches | 1180 poly
-Crown Decor | 4 swatches | 1212 poly
-Crystal Ball | 5 swatches | 298 poly
-Music Box | 5 swatches | 1077 poly
-Perfumes 1-6 | 3, 4, 5, 2, 5, & 5 swatches | 208, 93, 280, 175, 88, & 210 poly
-Sand Dollar Decor | 10 swatches | 1716 poly
-Shell Decor 1-4 | 6 swatches each | 494, 484, 1024, & 462 poly
-Shoes Decor | 5 swatches | 800 poly
-Starfish Decor | 5 swatches | 274 poly
-Trinket Box | 3 swatches | 78 poly
-Wand Wall Decor | 3 swatches | 748 poly
Build Mode: 1 swatch each
-Floor Pastel
-Floor Sand
-Floor Underwater
-Wall Pink
-Wall Sea Horizon
-Wall Underwater
I offer anyone who wants to, to add proper vertex paint to the lamp item. My vertex paintbrush in Blender doesn't work the way it is supposed to, no matter what I try. If anyone wants to add the vertex paint I will update the file with the fixed version & credit to the person who added it. Without this paint on the mesh, the whole item illuminates strangely when turned on, so turning the brightness down can remedy that issue until it is fixed. I am also working on figuring out why I'm having this issue in Blender.
📁 Download all or pick & choose
(SFS, No Ads): https://simfileshare.net/folder/198833/
📁 Alt Mega Download (still no ads): https://mega.nz/folder/RspmSYRS#sjQNNOMvBK3CdKgt3E3IeA
📁 DL on Patreon
Will be public on September 4th, 2023
Happy Simming!
✨ Some of my sets will be early access from now on. If you like my work, please consider supporting me:
★ Patreon 🎉 ❤️ |★ Ko-Fi ☕️ ❤️
Thank you for reblogging ❤️ ❤️ ❤️
@sssvitlanz @maxismatchccworld @mmoutfitters @coffee-cc-finds @itsjessicaccfinds @gamommypeach @stargazer-sims-finds @khelga68 @suricringe @vaporwavesims @mystictrance15 @public-ccfinds
#s4cc#ts4cc#sims 4 mermaid#sims 4 nautical#sims 4 vacation#sims 4 fantasy#sims 4 underwater#sims 4 furniture#sims 4 bed#sims 4 nightstand#sims 4 vanity#sims 4 table#sims 4 shelf#sims 4 arch#sims 4 wedding arch#sims 4 lighting#sims 4 lamp#sims 4 seashells#sims 4 seashell#sims 4 sea#sims 4 perfume#sims 4 bottle#sims 4 coral#sims 4 nature decor#sims 4 shoe clutter#sims 4 crown#sims 4 jewelry clutter#sims 4 music#sims 4 music box#sims 4 shells
566 notes
·
View notes
Text
ULTIMATE Realistic Functional Shops Mods in The Sims 3 | Guide and Tutorial
youtube
Hey, everyone! Back again with another in depth tutorial. From my poll, a Functional shops guide was second popular to Family Gameplay.
This guide isn't going to be as long, hopefully! And we don't really have many mods, at least nowhere near as many for the other guides I've done. This guide is pretty simple, and I'll show you in the video how to get everything set up. I picked the systems that are the easiest to set up, it's a combination of other simmer's processes, with my own tweaks for added convenience. I mainly focus on Aesthetic and Functionality, as nothing should take away from your immersion in game. So I feel like I've done my best to come up with these easier systems. I've been playing like this for years so I'm super excited to show you all how to make literally any shop functional in the sims 3!
So what I'm going to offer are many ideas to maintain the consistency and look of your lot without losing functionality of that lot.
We are going to try and keep this guide simple and to the point. This guide will include:
Store objects and how to install them.
Modded Objects - For functional stores and Fashion stores.
How to set up Functional grocery stores.
How to set up functional stores in general, minus Fashion stores.
How to Set up functional Fashion stores.
Fashion Lots you'll want to make.
How to combine the Fashion stores with Consort Dress Code mod.
Miscellanous functional mod objects and cc sets you can buy for your stores.
Store Objects and How to install them:
The first thing we are going to need are the actual store objects. I recommend getting all of them from here.
I also use these few ones from Blam's EA Store.
Chocolate fountain
Pet shop
Then you want to get these store fixes here.
I'm going to show you how to install them it is super easy.
All the store objects should go into your mods folder.
I recommend merging everything and backing up the individual files on another drive.
All store mods should also go in your mods folder.
This is your Overrides folder if you're not using CCmagic.
If you are using CCmagic then this is your Packages folder.
Now copy the CCmerged file from your mods folder and paste that file in your Documents > Electronic Arts > The Sims 3 > DCBackup folder.
Never remove it.
This is where the data for the store objects are stored, without them your game will throw you a lot of errors when attempting to use those store objects.
That's it!
Now we can move on to the fun mods that change your game in powerful ways.
Modded Objects for Functional Stores and Fashion Stores
Ani's Savvier Seller - This is what you will use for 95% of functional stores in your game.
Ani's ITF Stands - This is what you will use for the remaining 5% of functional stores, to be able to shop for new outfits.
Ani's Shop for clothes (MUST Have either this mod or ITF stands, cannot have both) - This is an alternative option for those who do not have ITF. You cannot have both in your game.
Ani's Ration Box - For our functional Grocery stores. This mod adds a scripted object where when placed in your inventory and opened, 10 random ingredients will be placed in your inventory and the donation box will disappear. This mod is also working with custom ingredients as well. So you will always get a random assortment of items. The items are cheap in game so you can buy multiple in one shopping trip and get a random assortment of 100+ ingredients in your inventory.
Kwimi's Ration Box Overrides - Download this is you want to use EVERYTHING in the ATS3 Grocery set.
My edit to Kwimi's overrides - Download this is you want my edit of Kwimi's overrides. I hid all of the single objects from the ATS3 set, as it wouldn't make sense to put them in my builds. You can ONLY have either my edit or Kwimi's overrides, pick one or the other.
My collection file for functional shops mods - Download this if you want to be able to find all of the modded objects we will be discussing in this guide, including the bulk objects from ATS3 grocery store.
ATS3 Grocery store set - If you download the full set, then get Kwimi's overrides. If you only download the bulk objects (x3, x4, etc) then get my edit of Kwimi's overrides.
https://aroundthesims3.com/objects/room_downtown_24.shtml
https://aroundthesims3.com/objects/room_downtown_25.shtml
ATS3 Savvier Seller Sets - You can download whatever you want from these sets.
Consort Dress Code Mod - For more dynamic attire in town.
https://modthesims.info/d/477049/dresscode-by-consort.html
Transmogrifier - Allows you to copy the script (function) of an object and paste it onto another object.
How to Set-Up Functional Grocery Stores
First, I have to show you how to set up Savvier seller in general. It works the same as Savvy Seller store content, so this won't be a huge learning curve for you guys!
Place down a savvier seller surface on a community lot. This should be a lot sims will want to visit so you can call this a hangout lot.
Then a counter with a savvier seller register.
Now place an object on the SS surface.
Now leave Build/Buy mode, and stay in Paused mode.
Now you ctrl-shift click the SS register, name it w/e you'd like.
Now ctrl-shift click the SS surface and link it to the register that you just named.
Then enable restock from inventory and restock from buy mode.
This allows all objects you place on the surface to be restocked from the build/buy mode catalogue. This still works when you hide the objects from the catalogue as well.
You can now set the open and close times, mark up or down prices, employee, owner, etc.
You do not have to set an owner. You can make a random townie the owner, or yourself if you want to own your own functional store. The money will go into your sims inventory after every purchase. We will get more into that later.
NOTE: That NRAAS register won't assign a sim to these registers, which means you have to manually pick one. This can cause issues if you don't want a townie to use it. So I recommend creating a household of 8 savvier seller YA sims, you don't need 8 stores in your game, but this makes it really easy to find those sims when manning the stations, without sacrificing townies you actually want to interact with and see around town. Just make their last names Savvy, for convenience.
The savvier seller mod alone makes basically everything in your game buyable.
Flower shops, Weed shops, Arcades with functional prizes, Museum gift shops, Art stores, Furniture stores, Candy Stores, a new kind of bakery (that sells custom food cupcakes, etc instead)!
When I say everything I mean everything!
So now that you've got your new functional shop systems installed, and you know how to generally set it up, I'm going to show you how to make a functional Grocery store.
I used to go into the RH buy everything from the store, and individually set them up one by one on shelves, make the inventory items restoackable from the inventory then start shopping.
This was such a long process, and also broke my immersion because I did not want to see a peice of shrimp on a random shelf in a grocery aisle!
So with Kwimi's genius idea, she created overrides for ATS3 grocery store items. To be used along side Ani's Ration box mod.
This mod gives you a random selection of 10 ingredients in game, whenever you open it, you'll get a random assortment. This mod is compatible with custom ingredients as well!
So now, I can set up these items on grocery shelves, which looks more realistic for my build, and actually add ingredients to my sims inventory, whenever I choose to open the boxes.
In the video I also show you that I transmogrify the savvier seller ATS3 shelves into the Flirtyghoul shelves converted by Martasimbook, and it worked.
However, as Kwimi noted herself, us simmers still like to shop for specific items instead of randomly hoping for the right ingredient without entering the RH.
I'm going to try to alleviate this issue.
Start with creating a Deli section, for just the meats.
A seafood section, for just the fish.
Then use the Store fruit and veggie stand object for the produce section.
Now you can place all the meats you can buy from the Grocery RH on the SS surfaces in the meat section. Do the same for the seafood section.
You don't need to do any set up for the produce stands. The object will randomly refill it's own inventory every day with new produce options!
Now, whatever else you miss you can just buy the remainder from the RH itself.
Personally, I like shopping for things at random, I don't necassarily want that to be user directed, unless there is a special event, like Thanksgiving, so I have to buy a roast.
I like to imagine that everything isn't going to be available to me with the donations boxes and produce stand because it's sold out or not in season, etc.
I also like to imagine that my sim is shopping for what THEY want specifically, just like the townies are, without it being user directed.
NOTE: Combined with my ULTIMATE Realistic Food overhaul, there are still hundreds if not thousands of recipes I can put together in game with the ingredients that are randomly bought.
However, I can still specifically shop for certain meats and seafood which is what I'll more than likely want for most of the custom recipes I put together in game.
Although, with the meshes it's implied the ingredient was in the food, so you don't actually need them.
So this makes grocery stores so much more fun and less stressful to set up in game. It's a way less tedious process.
The result leaves the lot itself looking very realistic, so I don't have to sacrifice Aesthetic for functionality.
Which is what I really care about.
The best part is you can make pantries actually functional in your sim's home. By placing what you bought on the shelves, as the ingredients won't go bad until AFTER you open the box and the food is placed in your inventory.
You can also add custom snacks and foods to a storage unit in the pantry as well and take out whatever your sim wants to eat in between meals for that day. Try finding a close pantry object, and transmogrifying it into a storage chest from WA. You should now be able to click on the pantry to place or remove custom food you've bought out and about!
How to set up Functional Stores in General
All links will be at the end of the Guide with the Misc Script objects & cc sets section!
Now I will tell you how to go about other kinds of Functional shops in game.
For flower shops, I want to recommend the flower arranging mod. You can set up savvier seller with the bouqets you make, as well as cc plants. So if you want to own a flower shop, you actually have something pretty interactive to do during the day while your customers shop.
For furniture stores, you mainly want to focus on the Savvier Seller rugs and shelves. Shelves for misc decor, and rugs for furniture like couches, beds, kitchen sets, etc.
However, it's important to note that when you have a lot of cc, this option isn't exactly reasonable, so I typically like to set up
bed and mattress stores
vase and decor stores
children furniture stores
Appliance stores
This is much more manageable if you're like me and have a lot of cc. It makes shopping a lot more fluid for being able to actually put those products in my home from the buy mode family inventory (which is where all objects that can't go into your inventory will go).
Everything else that I get from the catalogue or collection folder's can be tossed in as something I ordered online.
Pro tip: Consider using StudioPap's moving boxes in the room until you actually put the room together. I always use them when moving in or out, and changing a room around like a sim aging up and needing a more mature room. You could also use savvier seller to immersively sell what you're not going to use anymore in a yard sale. Alternatively, moving all items you want to sell to your family invetory then using NRAAS Consigner selling them at a consignment register! The yard sale can be set up in a big park instead of your home lot for convenience. I love seeing the boxes and re-decorating that part of the room. It adds a very dynamic roleplay feature to my gameplay!
For Electronics stores, with Arsils custom phones and backpacks, you can actually replace the cellphone you are using by following the guide in game. Use the ATS3 purse set alongside the mod for more functional cell phones to buy!
So when buying cellphones at something like an Apple store this can actually be functional. You can also set up more computers, laptops, TV's, and the store object ipad as well.
For specific niche stores, consider the Sewing and knitting mod, with the patch version for both to work in game. You can set up a really pretty etsy shop, and just like with the flower shop, you can actually work at the store location and have an active career. Showing some love to our small business simmers out there!
For functional book stores, instead of the rh, just buy the books from the RH and place them on savvier seller surfaces. To get the best look I use this table for it, and a pile of books using OMSP, to make it look like your sim is randomly selecting a book from the pile.
For weed shops, you can now use the buds that come with MD Vile ventures mod, and set them up on savvier seller surfaces to sell them like that instead.
For beach shops you can use Arsil's sunglasses, and Ani's ITF stands for custom bikini's. TS spray tan and sunscreen mod.
For food stores, like bakeries and coffeeshops, you can use custom food from various places and ATS3 custom drinks, specifically the coffee's and energy drinks. Just set them up on savvier seller shelves and enjoy.
You can even make much more specific shops as well, like smoothie shops, sandwhich shops.
Liqour stores using Dina Dine and ATS3 liqour sets.
Tea shops, with ATS3 and Ani's tea sets. Don't forget the store tea set, and modded tea set without the table!
Toy stores, using various cc toys, and fidget spinner. Olomaya crayons, puzzles and coloring books.
For Makeup stores, consider Arsil's Lipstick mod, (you can also put this in a fashion store).You can also use PJ's Deodarant mod in these stores. And cc functional perfumes (must have glass blowing store object, but if you've been following this guide then you already have it).
For car dealerships, add the savvier seller car spot object and set up as many cars as you'd like to buy from. I like making at least 2 car shops. 1 is an expensive car dealership. Another is a junkyard where you can buy the cheaper cars.
For Bike Shops, this can be actual bikes and/or mopeds and motorcycles. Just place them on a savvier seller rug and recolor it to your liking.
Pro-tip: You can also make a semi-functional car mechanic shop by Transmogrifying the fixer upper car into the current car you own either on the car mechanic lot or on your home lot. Then binding a custom car mechanic career to the EA science career so they will actually interact with the car on that lot.
Some more items you can add to Grocery stores, PJ Bubble Bath, PJ card stand, PJ pet bowl, Olomaya's smoking mod for the cigarrette's and vape.
For Pet stores, you can add PJ pet bowl items, and various pet toys and furniture that came in pets.
I don't typically place the Graham's pet shop register on these lots, I'll use a pet pantry for those, with deco animals in their crates to simulate where you'd actually be getting the animals from.
For Art supply stores, Consider PJ painting supplies, Lyralei journal, Zoeoe's scribbling pad fixed, cc art easels, UNI sketchbook, street art kits, crayons from Olomaya and Arsil. And the drafting tables that came with Ambitions.
For Music Stores, Consider the ATS3 music store set, and selling actual instruments.
For the Movie theater, Consider selling custom snacks. Adding the store popcorn machine. Selling action figure dolls to buy after viewing the movie. And a claw machine, to win prizes for your date!
For Sex Shops, consider adding passion condoms, and sex toys that come with the mod. I also include deco vibrators and dildo's, fleshlights, etc, as something you can buy from savvier seller, they aren't functional but they imply things. The passion mod altogether makes this implied action functional, so it works out fine.
For convenience stores, to make them more functional you can add the petrol system mod gas stations, and refill your gas at these stores, you can also sell Arsils bag of chips and these variations, and arsil's gum. With various custom snacks and foods to eat.
You can make asian themed convenience stores as well.
For Sports Shops, this is completely seperate from the Gym lot. Consider TS Yoga mats, Olomaya's Get pumped items, The chin-up bar from showtime. Arsil's excercise bike. Treadmill. Strength training. The various basegame throwable items like the football, more items from this ATS3 set. And the punching bags with the same WA martial arts object script. Also, sell olomaya's healthy snacks on this lot as well, these items boost your workout routines.
And well, you get the gist! You can virtually make any store idea you have in game functional. You could even transmogrify cc surfaces from savvier seller surfaces in game instead for a much more cohesive look to your build. Keep in mind, this may not always work, but for the most part it does, just wanted to throw that disclaimer out there!
How to Set up Functional Fashion stores
But what about fashion stores? How do we make those functional?
Using Ani's ITF stands.
These add very intuitive ITF stands to your game where you and townies (when changing the xml settings) can shop from.
NOTE: You do need ITF for this to work, however, if you don't have ITF, Ani's shop for clothes mod will do just the trick. It's not as extensive as the ITF stands, but you'll still be able to shop for new outfits on community lots. I also believe the Shop for clothes mod is compatible with NRAAS Dresser, but the ITF stands mod is not.
This is because the ITF stands mod replaces the plan outfit interaction from the dressers in game which breaks some key components of NRAAS Dresser. With both mods installed I also wasn't able to save my new outfits, either. So learn from my mistakes.
The ITF stands mod increases the amount of outfits you can have per category, which was my favorite feature of the NRAAS Dresser mod, so when I read extensively what both mods changed I realized I didn't even need NRAAS Dresser anymore, anyway.
So I personally like to give my active household 7 everyday outfits. I just change their outfit using the dresser in the morning before they leave the house.
You can open up Ani's ITF stands mod using S3PE, right click the xml file, open it up in notepad, and set autonomy to true, then save. So now townies will autonomously shop for new outfits in your game. This isn't as intrusive as you think. In my game, they will replace their outfits. I also notice that when they are shopping from a pedestal the same age and gender as them they will wear the custom outfit I set for that mannequin. So it's a fun way to auto style your town without having to individually change all the townies outfits yourself, sometimes I still will do this, but I catch the townies that haven't shopped for clothes by themselves yet, so it cuts down this work for me by a lot!
Performance tip: So I want to tell you guys a pro-tip that I figured out in my own playtest of the fashion stores. I tried to set up custom outfits for every age and gender in a store and my game consistently crashed everytime I tried to go back in game and continue the build.
This is because all of those cc outfits for all genders and ages overloaded the lot.
But I was able to make stores for the elderly, both genders, without crashing. A store for YA and Adult men. Same for YA and Adult Women. A store for Teens, sometimes I make two stores for both genders or split one store up with both genders. A store for kids, both genders.
This allowed me to add at least 8-10 ITF stands with custom cc outfits on each of these lots without crashing. This also led me to more optimized lots as since I'm only focusing on one specific theme and age group, the lot could be a lot smaller. One day I might do speedbuilds on this and upload it to the community.
Alternatively, if you want to add all the age groups and genders on one lot, consider only adding one of each, the best theme for this build would be a thrift store, which I've made several times in game myself without crashing.
Fashion Lots you'll want to make (I keep these around 20 x 20 lot size, they can fit basically anywhere in my worlds with very little issues): Just set these lots as visitors allowed. It'll push all kinds of sims to these lots randomly through out the day.
It's important to note that I won't create fashion stores for every age and every gender, for every outfit category. I mainly focus on the outfits and age groups that would bother me the most. I revamp all of my households before starting my gameplay, so I've given everyone in my world a default cc outfit to start with. The attire for ages I don't create lots for either wouldn't bother me at all if it were missing, or the age group is more manageable in the world population where I can change their attire right then and there on the spot. My CAS runs pretty fast considering how much CAS cc I have so I don't mind this process at all.
Everyday Wear: You can make 4 outfits each of the either the age groups or genders without crashing on the lot for everyday wear.
A store for the elderly, both genders. 4 men, 4 women.
A store for the men, YA-A. 4 YA, 4 A.
A store for the women, YA-A.
A store for teens. You can either make one for each gender, which makes 2 stores and 8 outfits. Or 1 store for teens in general, 4 female teen and 4 male teen outfits.
A store for kids, both genders or 2 stores for each gender.
Athletic Wear:
Sports shop. YA-A, both genders, 2 each. I'll put these on the same lots where I sell all the scripted objects.
The other ages don't bother me.
Sleepwear:
A store for the elderly and kids, both genders. 2 outfits for Elderly Female, 2 for male. 2 for female kids, 2 for male.
A loungerie store, Victoria's secret. For female YA-A.
A Nike or sneaker store. For male YA-A.
Other ages don't bother me.
Formal Wear:
A wedding store. For male and female YA-A, 2 each.
Other ages don't bother me.
Swimwear:
Beach shops. YA-A, both genders, 2 each.
Kid's Beach shops. Both genders, 2 each. I also include functional pool floats to this store for more fun.
Other ages don't bother me.
Outerwear: will typically only get it's own fashion store for vacation worlds. I love creating themed outfits to the mannequins for vacation worlds. I'll show you how I do this in the next section.
How to combine the Fashion stores with Consort Dress Code mod
Once you enable the autonomous interaction in the xml's of Ani's mod, townies will autonomously buy outfits from the mannequins. The townies will replace their ONE and only outfit in that category.
They will not create more outfits like you the player would. This is great news for optimization as too many outfits for each category on every sim in the world would create lag, and it wouldn't even be neccassary since townies can't autonomously change their outfit numbers for each category, anyway (NRAAS Dresser does this but it caused lag, that's how I know).
So, when they do shop for that outfit on the mannequin, it's only going to be one outfit and you will see them in that outfit for the rest of the savefile or until they shop from another mannequin with a different outfit.
This is where I use the seasonal lot marker to my advantage.
I place down the ITF stands for every season, I DO NOT place the stands down on the default setting, the objects will obviously conflict.
This means all I have to do is create seasonal outfits on the mannequins each new season, and within a couple of sim days you'll start to see random townies walking around with these outfits on.
This is why breaking the fashion stores down by gender and age really matters.
As, the townies will be wearing a bunch of different cc outfits you set up in the store instead of, for example, all elderly women wearing the same exact outfit.
Because I also use the Consort dress code mod, I need to leave some slots open to get the most out of my roleplay.
The dress code mod will automatically change the sims outfits to the outfit number for the category, but you will have to set that outfit up.
It's a pretty lightweight script, you shouldn't feel it in your performance, assuming you've optimized your game altogether.
Basic outfit numbers by Category:
Everyday Wear: 7 outfits (Mon-Sun), Townies get 1.
Athletic wear: 2 outfits (basic workout, ballerina/dancer), Townies get 2 (if they enter lot with dress code script).
Sleepwear: 2 outfits (Basic pajamas, towel set, sometimes a 3rd one for sexy loungerie), Townies get 2 (if dress code script is present).
Formal Wear: 2 outfits ( Fancy event, Party outfit), Townies get 2 (if they enter lot with dress code script).
Swimwear: 1 outfit, Townies get 1 outfit. I just change the bathing suit after 1 sim year if I get bored of seeing it.
Outerwear: 3 outfits (Winter, Summer/Spring, Fall), Townies get 3 (if dress code is present).
Career wear: 2 (work and school if present), Townies get 2, 1 is their actual work outfit and the second is if I need it for something like school.
Consort Dress Code mod rules I follow:
Whenever I place the dress code script on a lot I stick to these rules to get the most cohersive experience.
Career attire outfit #2 For teens and Kids is their school uniform if I set that up.
Athletic attire outfit #3 For teens and Kids is their school workout uniform if I set that up.
(This is why I left Athletic attire slot 3 open above)
Protip: You can use MC to copy the outfits for every sim the same gender and age as the sim you selected to speed this process up for schools!
Athletic Attire Outfit #2 For YA+ for dance studio's.
Formal attire outfit #1 For Adults in their banquet, fancy restaraunt attire.
Formal attire outfit #2 For Adults in their party outfit for dance clubs.
Formal attire outfit #3 For everyone, this is for funerals. I throw a general party in formal attire on an open graveyard RH lot with the dress code script on it. This is why I leave this outfit slot open.
Sleepwear attire Outfit #2 For everyone, using ATS3 towel set. I will also set these up in my residential bathrooms.
So this is how I optimized it altogether which gave me more dynamic variety with NPC's changing their looks.
Now let's talk about outerwear for Vacation worlds.
Camping world fashion store, Outerwear slot 2
Beach town Fashion store, Outerwear Slot 2
Snow world Fashion Store, Outerwear slot 1
France or Monte Vista, romantic get away kind of worlds, Outerwear Slot 3.
I leave these as the outerwear outfit slots because it's more manageable and easy to change since I only use 3 outfits in this category.
That way I won't ruin the everyday wear I've already set up for my active sims when they return back home, and I can easily change their outerwear again since it's only 3 outfits.
I can also switch up between the outerwear and everyday outfits when I'm out with my sims. My months last 28 days in game, but I will turn off aging and seasons to extend that season for an extra month or 2. So by the time the new season comes around, I'm excited and ready to go shopping for my sims new season wardrobe!
I also will use the consort dress code mod on many of the community lots in those vacation worlds so that all townies will typically look the part. Most of the time this won't be necassary as I have again already revamped those townies to fit the aethstic of the world.
I set these up on community lots like coffee houses, dive bars, shopping strips, movie theater, etc. It just gives me another way to see my townies in different outfits. You can also do this in Homeworld.
The only vacation worlds I won't have to do this are the snow worlds, christmas themed worlds, as townies will autonously change into their snow attire when outside anyway.
So, instead I make sure my townies are wearing winter themed outfits for the inside of community lots to make sure the whole aesthetic fits together.
Miscellanious Script OBJS & CC sets
Functional scripted objs that were recommended in this tutorial:
Fidget spinner
PJ Deodarant
PJ Bubble bath
PJ Card stands
PJ Painting supplies
PJ Pet Bowls
TS Spray tan
TS sunscreen
TS Yoga Mats
Olomaya's activity table
Olomaya's Coloring Book
Olomaya smoking mod
Olomaya Get pumped
Olomaya Family snacks
Passion mod condoms and strap-ons (On LL needs registration and I can't link it since I have hate watchers. Sorry!)
Flower Arranging Mod
Knitting
Sewing (don't forget the patch)
Arsils custom phones and backpacks
arsil's lipstick
arsil's sunglasses
MD Vile Ventures (Can't link it, I have hate watchers, sorry!)
Ani's Tea mod
Tea Set without table
Lyrlei Journal
Zoeoe Scribbling pad fix
Petrol Station
Arsil's Gum
Arsil's Bag of chips and variations.
CC Sets that were recommended in this Tutorial:
cc Perfume
Moving Day boxes
ATS3 Custom Drinks
DD sandwhiches
DD Beer
ATS3 functional liqour bottles
ATS3 Tea sets
More Functional Toys
ATS3 Music Store set
Asian Themed Conveniene store set
ATS3 Produce Set
Functional cc gas stations for the Petrol Mod
ATS3 Towel Set
ATS3 Sports set
Punching Bag
ATS3 What's in my bag.
145 notes
·
View notes
Text
— #simblr gratitude day
dear simblr community,
hello! i'm going to be sappy. i just want to say that i really enjoy this corner of tumblr, and i look forward to reading everyone’s stories, seeing pretty screenshots, laughing at jokes only simmers would make, and the kindness i’ve seen extended from the people i follow and have had the pleasure of being mutuals with. and, modders, i didn’t forget you!! thank you for making this game better where it needs to be! this is a general post, because i want everyone to feel included today! consider yourself tagged, because you are. ❣️ (heart emoji)
to the storytellers:
hi, there are so many stories on here that inspire me to be a better storyteller. whether it’s the people i’ve talked to about writing, plot, or character development, or lurking afar during a sleepless night while going through someone’s backlog, or seeing the cool and fun ways we use the video game(!) medium to tell stories, i appreciate every single one of you. whether the story is slice-of-life, fantasy, royalty, or something i haven’t discovered yet, i’m glad you’re telling your story/stories. and if i haven’t read your story yet, i will soon!!
to the funny simblrs:
thank you for keeping this place alive with laughter. seriously the amount of times silly jokes have crossed my dashboard that made my day brighter are countless. whether we joke about the game’s numerous bugs and glitches, references to townies we love to hate (or hate to love), or things that are simblr specific, i appreciate you.
to the casual players:
y’all are stronger than me!! if you play vanilla, vanilla-lite, or modded and are happy to play through legacy and bachelor challenges, or share your sims for the sheer joy of sharing your sims, you are a pillar in this community! you keep this place collaborative and fun! please keep sharing your gameplay!
to the blender users (+ pretty picture people):
hi i adore your work. the use of lighting and composition and posing and all of the things you learned to make visuals for my eyes to feast upon? thank you!!! these are all things i’m still learning to do, so i really do love seeing it on my dash so i can take notes. keep posting them!!
to the modders:
hi! thank you for making free recolors, free poses, free builds, free meshes, etc. made available to keep this hobby alive!! some of my favorite cc i have ever downloaded has been really niche cc—so if you’ve been doubting making that jester cc set or trash bag dress please do it. obviously, my examples are very silly but i’m being genuine!! i am a cc hoarding dragon and my collection is forever-growing, so continue making pretty things for my sims to wear, useful things to shove into lots, and poses to make my story-telling hobby a smidge easier thank you !!
okay, sappy time is over!! it’s impossible for me to know every single one of you, but to everyone i do know (or have chatted with, or am mutuals with, etc) you have been a fun and positive place for me to hang out online which is so rare in this age of the internet. keep doing that. and to anyone i don’t know yet, don’t be shy!! even if it’s not to me, the best way to become apart of this community is to engage in it—whether it’s sending an ask, replying to someone’s post, or joining a discord server! i promise you will have fun here!
<3 ok bye
72 notes
·
View notes
Text

i didn't have a tutorial yet... so i made one lol. its longer than i wanted it to be, but i wanted to make sure it's easy to follow for people who've never made cc or have no experience with photo editing software, and fully explain my process. it's by no means hard at all though lol, i guarantee you making skin details is the easiest thing aside from recolors and if you want to learn this is a good place to start :-)
for people who are more experienced than that, and want to know specific things-- i've sectioned everything so it should be easy to skim through until you find what you need!
requirements.
this tutorial will only require sims 4 studio (free) and photoshop (not free) or gimp (free). i pirated photoshop 2022 myself. any version will do but i think 2022 just has nice new features for making content! if you don't want to buy or pirate, gimp is a similar alternative.

1.1 how to find skins to use as a base.
in case you don't have (a) skin(s) in mind to use for your skinblend, my tip is to download as much random ones as you can find. this way you have a lot to choose from and it's easier to get an idea of what you want.
go-to creators for maxis match skins: heihu, madmono, pyxiidis, faaeish, miikocc, emmibouquet and stretchskeleton.
creators for maxis mix/alpha skins: sims3melancholic, obscurus, ddarkstonee and pralinesims.
creators for maxis mix/alpha skins that only allow editing for private use: northernsiberiawinds, remussirrion and thisisthem.
go into cas and try them all out. if you like a part of a skin, write down which skin it is and what part(s) you want to use of it from which swatch if it has multiple.
for example, i almost always use one or two skins for just the nose shape, one for the eyebags, one to three for the lips and one for the basic shading of the face. don't be afraid to use the opposite style skins of what you're going for, you can always add or erase details.
1.2 exporting the skins.
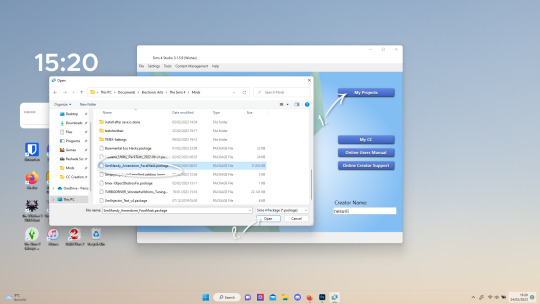
now we're gonna export the skins with sims 4 studio. click on "my projects" (1) and navigate to whereever you have the skins you want to use, and select one and click "open" (2).
the colored little boxes in the top right are the swatches. click whichever swatch you wanted to use something from (1), then click the "export" button (2). you'll get a window to save the exported skin now.
tip: i highly recommend making an organized folder for your skinblend, to have all your files together and easy to find. if you haven't made it already you can easily do so within this window.
i put mine in a folder called "resources" in a folder named "unnamed skin" for example.
name the exported skin file (3) and make sure the "save as type" is set to .png (4).
after saving the file, you can just click "cancel" on the bottom right to go back to sims4studio's starting screen. if you have multiple skins you want to use, repeat the above process for all the other skins to export them too.

2.1 opening the exported files in photoshop/gimp.
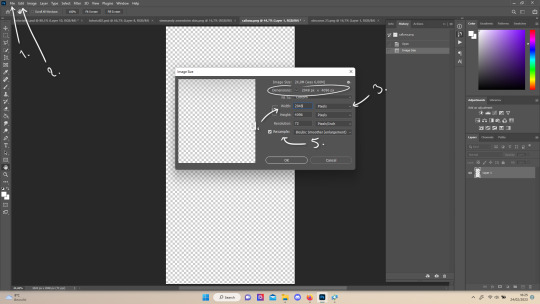
open your program of choice and click on "file" from the top bar (1) and then "open..." and navigate to the skin files. you can left click and hold down your CTRL key to select multiple at once to open.
we have to layer them all in one file, but before we do that we have to check if they're all the same size.
note: some skindetails might be 2048x4096, others may be 1024x2048. unless you want your skin to be compatible with the HQ mod, you should just opt for 1024x2048, as without the mod both resolutions look identical. the bigger one will just make your fize unnecessarily large.
click "image" at the top bar (2), then "image size". it'll say the size at dimensions. if it's at the size you want it to be at, just exit the window.
if you need to edit it, select "pixels" from the dropdown menu (3), and put in 1024 for width and 2048 for height OR 2048 for width and 4096 for height. if you're sizing up select "bicubic smoother (enlargement)" under resample (5).
repeat this for every skin you opened.
2.2 layering the skins together.

copy and paste all the skins individually onto one by selecting them with CTRL + A and CTRL + C on your keyboard, and pasting them into one of the other opened skins with CTRL + SHIFT + V. you can then close all the other tabs.
the file now has multiple layers. you can rename them by double clicking the layer name. this makes it easier to keep track of whats what. you can reorder them as well by dragging them with your mouse. put the skin you want to use as base (for the general facial shading, highlighting) at the bottom.
tip: i recommend making all white and all black background layers to see the skins better. you can do so by pressing D, then CTRL + SHIFT + N. for the white layer then press CTRL + BACKSPACE and for the black layer repeat the first two steps and then press ALT + BACKSPACE. now there should be two new layers in black and white. drag them to the bottom of the list. i prefer using white so i put black last.
2.3 changing the opacity in parts of the base skin layer.
to make ea's preset details (cheek/nose bridge sharpness, dimples) come through your skinblend, you need to change the opacity of the base skin sometimes. alpha skins tend to be fully opaque but maxis match skins are usually already transparant enough.
hide all the layers aside from this base layer by clicking the eye icon next to the layer names. you can see the transparancy with the visibility of the grey-white blocks or if you find it easier you can also unhide the black background to see it instead.
to change the opacity, you can either edit the entire layer's opacity (1) or use the eraser tool (E key) to add transparancy at specific parts.
if you have photoshop 2022, turn on vertical symmetry (+). if you don't have it, you can choose to edit only one side of the skin and mirror it later or do both sides and embrace some asymmetry.
i selected the eraser (2) and set the brush size to about 200px and 0% hardness. the opacity of the brush i set to about 10% (3). i used the eraser on the lower cheeks, the nose bridge and tip and the bottom of the chin. i also erase the upper eyelid 100%, cause i prefer to have eyelid freedom :p. it then looks like the above! this will very subtly let through details, if you want more you should make it more transparant.
2.4 optionally: editing out freckles, pores and/or eyelashes.
your base may have pores, freckles or moles you want to get rid of. to smoothen everything at once, click "filter" at the top bar (1), "noise" and then "reduce noise". i only edit the strength and sharpen details setting (2), this setting erased the pores and most of the freckles for me while keeping the details looking sharp, but you likely have to adjust it a little cause it depends on how large/fine the details are.
the remaining freckles, pores and eyelashes i remove by using the smudge tool, with 0% brush hardness and at 25% strength. (3) brush size depends on the size of the details. i just go over it in circular motions until the freckle or whatever it is has been blended away without pixelation.

for this part i'm going to only show how i do the nose as an example, however it works the same for editing in eyebags, lips, jaw lines or whatever you want to add in too.

unhide the layer of the skin you want to use a part of, and hide the base layer.
if you are going to use multiple parts of that skin (for example, you want both the nose and the lips of that skin), duplicate the layer by right clicking the layer name and choosing "duplicate layer...". then hide the duplicated layer. it's easier to edit one part at a time.
use the selection tool (M) to select the part. press CTRL + SHIFT + I and then DELETE. press CTRL + D to unselect. should look something like the above.
use the eraser tool (E) at a moderately small size like 30px~ with about 30% hardness and 100% opacity to erase around "hard lines", like the nostrils in this case and the bottom of the nose. the nose bridge has "soft lines", so if you were to use a hard brush for that, the shading of the nose bridge would look far too harsh and unblended.
for the soft lines, set the eraser tool at a bigger size like 100px~ with 0% hardness and a lowered opacity between 15-45%. erase soft lines "gradually", so the shadows blend in with the layers underneath it. should look something like the picture above.
always look at the newly added part with both a black and white background to see if there's anything you need to erase more. then look if it blends in properly with the layers underneath. if it's too dark or light, you can click on "image" on the top bar, then "adjustments" and "brightness/contrast", and lower or raise the brightness until it blends in better.
i'm using two separate skins to make the nose, so i've repeated the process above for the second nose skin, then used the method of step 2.3 to erase certain parts and make other parts more transparant / blended in. as you can see above, it's now the perfect offspring between the two noses i used.
note: for a maxis match nose, you'll want to avoid a completely opaque nose, mainly at the nose bridge it should be more transparant. i always make sure the lips and eyebags are fully opaque though, unless you're going for a vanilla type of skin it doesn't look good transparant.

at this point, i like to save the file with the white background layer on and see what it looks like in sims 4 studio. this gives you a better idea of what it looks like on sims and what you may want to change or add. press CTRL + SHIFT + S and name your file, and set the file type to .png.
open any skin or skin detail cc file just like in step 1.2, and instead of exporting anything, click "import". now navigate to the file you just saved, and open it. the sim model now displays what your skin looks like. should look something like the above! you can click cancel after you've looked enough, so you don't have to worry about ruining the original cc file.

maybe you're happy with the skins current state... but in case you want to add or change some things, here's a step by step how i do it.
5.1 drawing shadows & highlights.
as you probably have noticed, everything needs to be done in greyscale, so select black (for shadows) or white (for highlights) in the top right colored box. make a new layer (CTRL + SHIFT + N). select the brush tool (B) and set the brush at about 0px with 100% opacity. draw the shape of the shadow or highlight where you want it. make sure to make a new layer for every shadow and highlight!
now you can either use the smudge tool to blend it out, but i prefer using "filter" from the top bar, "blur" > "gaussian blur". i just play around with the radius until it's blended out but still has some shape to it. it depends on how small or wide and blended you want it to be.
then i use the eraser to shape the shadow/highlight further. for example, i want the shadow in this case more blended out towards the eye, but harder towards the forehead and nose, so i use the eraser on that side. lastly i change the layer opacity to make the shadow/highlight less dark/light. my preference lays with subtle details, but of course you can make it as contrasted as you like!
5.2 drawing small details.
to draw your own details, use the brush in 1-3px brush size, 100% opacity in black. i can't help you here cause it's just drawing where you want and then blending it out with the smudging or blurring tool where needed, and using the eraser at lower opacity to blend it in.
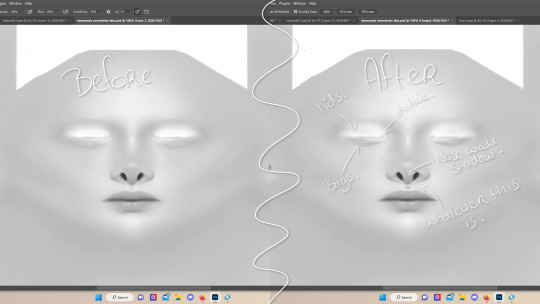
to give you some ideas, i usually draw some details on the nose like sharper nostrils or a nose wall, some texture on the lips and the eyebags. i like using reference pictures of real peoples skins to see where and how to draw things. before and after pictured above! (i'm so proud of these eyebags yall T-T)
5.3 adding other creators cc skin details.
if you don't like drawing things yourself or know just the right cc skin detail your skin needs, you can also use other creators' skin details on yours.
maxis match + mix details: pyxidis about face, miikocc face kits, okruee face details, sammi-xox face details, lamingtonsims face details.
maxis mix + alpha details: detail overlays by obscurus-sims, ddarkstonee & sims3melancholic
like in step 1.2, just open the file in s4s and export whatever swatches you want to use. remember to make sure the resolution of the file is the same as your skin's before copy and pasting it on your skinblend! and remember you can lower the opacity layer for these too.
5.4 mirroring your skin.
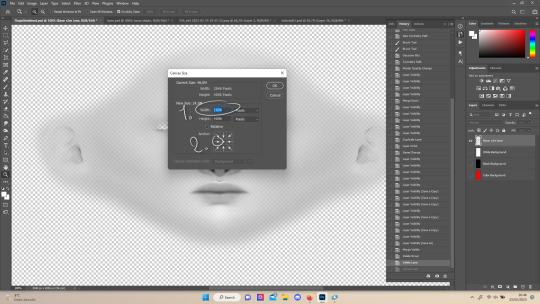
if your skin isn't mirrored/symmetrical yet, save your file as a .psd and then right click the layers, click "merge visible", press CTRL + ALT + C, and set the canvas width to half what it is now (either 1024 or 512). (1) click the arrow in the left middle if you want to mirror the left side, or the arrow on the right middle for the right side. (2) press "ok".
press CTRL + A, then CTRL + X, then CTRL + SHIFT + V. delete the layer beneath the active one (it's empty). then press CTRL + ALT + C again, and put the canvas width back to the original (2048 or 1024). select the same arrow you selected before, and click "ok".
press CTRL + A again, then CTRL + C. now click "image" from the top bar, "image rotation" and then "flip canvas horizontal". now press CTRL + SHIFT + V .... and voila, your skin should now be mirrored.
note: ik there's a ridiculous amount of steps for such a simple thing so i feel like there's probably a much faster way to do this, but i hate following tutorials and guides (the irony) so this is just the way i taught myself lmao
5.5 last test & optional last touches.
at this point, i'm done with the skin. i erase everything aside from the face if the skin still has a full body texture cause i prefer face-only skinoverlays. i always save as .psd and .png, .psd is to edit it later on if need be. once again import your skin into s4s like in step 4, and see if you're happy with the skin. if not, just keep editing whatever you need!
i also like to add alternate versions of the skin lastly here. some examples: a soft nose or hard nose bridge (justice for flat soft noses, simblr loves to erase them lol), different eyebags, lighter or darker lip option, version with eyelid overlay or without.

6.1 creating the package file.

to make the package file for your skinblend, open s4s and select "create cas standalone" and then click "cas". (2) now select "skin detail forehead" from part type (3), click the most left forehead wrinkle and click "next" (4). name the skin file whatever you want, you can always change it later!
click "import" and open your skin file. and voila! you're pretty much done!
6.2 editing the age, gender & occult flags and category.
right now your skinblend is only available for young adult to elder sims, and not for aliens and werewolves, so you probably want to change this. go to "categories" (1) and check the boxes you want under "age & gender flags" and "occult" (2). you don't need to change any of the other things.
if you wish to change the skin detail slot it's in, you can change it at "outfit type". most people use either forehead or mouth crease, but you can use any of the ones that start with 'skindetail'.
6.3 adding swatch colors, thumbnails or additional swatches.
if you want, you can add multiple swatches (1). you can also edit the color of the swatches (2) and upload a custom thumbail with 104x148px resolution (3), make sure to upload for both male and female frames.
6.4 editing the sorting layer.
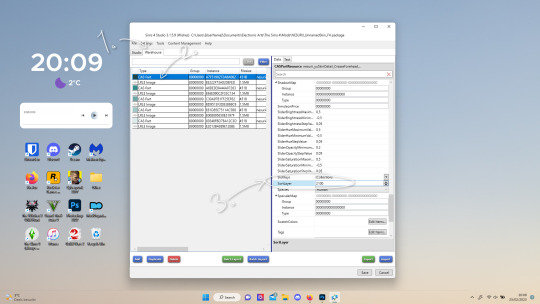
it's not the end of the world if you don't do this, but you may run into some skin details or freckles/moles that won't display on top of your skinblend if you don't edit it :).
click on the "warehouse" tab (1), select the first "cas part" (2). scroll down on the right to find "sort layer" (3) and put in 2100. you're gonna want to change this for each cas part individually.
now just save your file... and try it out in game!
if you need any help or have any questions please comment below <3 feel free to tag me in the end result if you want too.
(my end result)
246 notes
·
View notes
Text
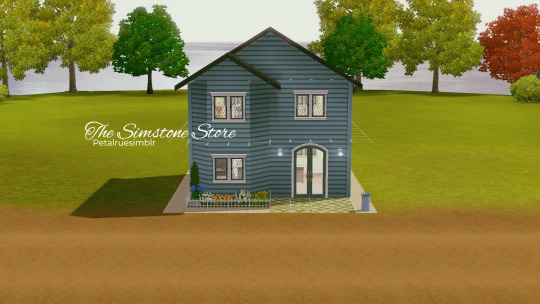
The Simstone Store
Download Link:
Sim File Share | MTS (for approval)
Description:
Welcome to The Simstone Store, where treasure awaits at every turn! Our thrift shop specializes in offering a diverse array of used and second-hand furniture, lamps, knick-knacks and various household items, all at incredibly affordable prices. Whether you're searching for unique decor pieces to spruce up your home or seeking practical essentials without breaking the bank, we've got you covered.
But that's not all – at The Simstone Store, we also provide convenient services for those looking to part ways with their pre-loved belongings. Bring in your gently used items and we'll help you find them a new home. Once sold, you'll receive a cut of the proceeds, making decluttering both easy and rewarding.
Visit us today and embark on a thrifty adventure filled with hidden gems and endless possibilities!
Details:
Price: 28,940
Lot Size: 10x10
Version: 1.42
Store Content: None
CC Used: None
Packs Needed: The Sims 3, Ambitions
File Type: Package
Hello! I created this lot a long time ago when I wanted to place a consignment store in Sunset Valley but didn't really liked the premade lot EA provided because it was too big and a consignment lot was not a priority for my active family at the time.
Click on the Keep Reading below for more information and pictures on this lot.
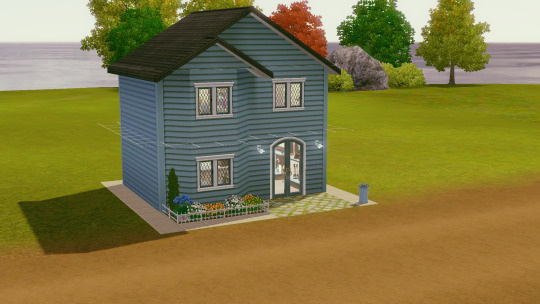


I cleaned this lot of CC clutter and kept it strictly for Ambitions expansion pack, which is required for the consignment lot to work in your game.
This is a flat lot with a size of 10x10, making it easier to place in any world or flat surface.
For some reason, this lot is popular with inactive sims and it can get a little crowded. So I removed anything that requires them to linger in that small space (television, radios, gaming tech) except for the small bookcase in the corner. I placed two couches upstairs for them to use and it's mostly decor on the second floor with a "dressing room".
This lot has been play-tested and I've used it in all my saved games. Let me know if you experience any problems on your end.
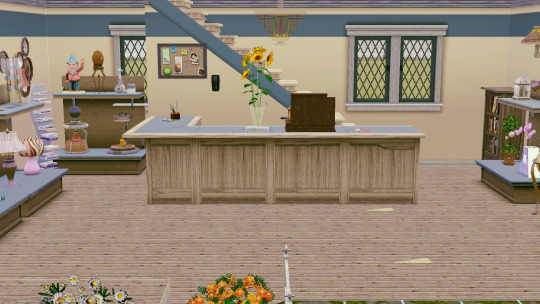
1st Floor:
Consignment Register
The Sims 3 and Ambitions Clutter: Kitchen items, old end tables, mirrors, paintings, lamps, books and knick knacks
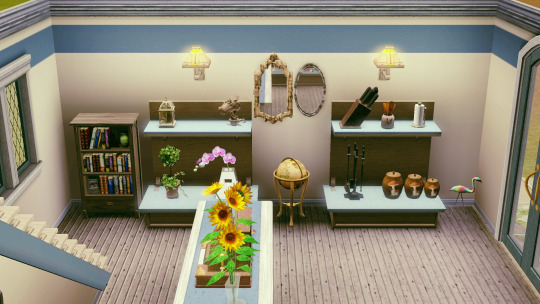
2nd Floor:
Clothes Rack
Dressing Room
Couches
Mirrors
#petalruesimblr#the sims 3#ts3#ts3 simblr#sims 3 download#sims 3 lots#sims 3 screenshots#ts3 download#ts3 screenshots#ts3 simmer#the sims 3 consignment lot#ts3 consignment lot#sims 3#ts3 community#the sims 3 consignment store#ts3 consignment store#Community Lot
20 notes
·
View notes
Text
Been working hard on my Sims 4 Discord server... It's been a ton of work getting my CC & CC finds uploaded to the server... but I really love the way things are looking & turning out! ---pls come join me!!! <3
_tons of CC
_large sims community
_moderator opportunities
x_currently working on switching over the CC posting channels to forum channels so members can find stuff easier.
!_we welcome CC creators to join & post their CC (external download links are fine)! ask if you'd like to separate your CC in your very own forum channel!
#ts4#sims 4 cc#sims 4 discord#discord#discord server#server invite#discord server invite#the sims 4#ts4cc
58 notes
·
View notes
Text
How to make regular TS4 clothing compatible with digitigrade legs: PART 1
This tutorial assumes you're converting for my digitigrade leg mesh used in my satyr legs and werewolf override, but it should also apply to any other funky-shaped legs you might want to do this with. Useful either if you want your digitigrade sim to be able to wear a piece of vanilla maxis clothing, or for converting cc (please get permission from the creator where applicable before doing so, especially if they make their own meshes).
I'll do my best to make this tutorial accessible to relative beginners, but I'm assuming that you already have some basic blender knowledge. If you don't, there are a lot of good tutorials that explain its clusterfuck of an interface better than I could, so I recommend finding a few of those and familiarizing yourself with the software before you continue.
You'll need Sims 4 Studio, blender, and potentially an image editor like gimp or CSP (anything that can handle transparency) depending on the clothing.
This first part will cover shorts and anything else that ends above the knee (along with some extra s4s stuff like category settings and CAS thumbnails that I do to make them look better and behave properly in-game); next section will cover long loose pants which is a somewhat different process, as well as cuffed pants, skintight leggings, and other things that might require some heavier editing and altering of the shadow map, UV, and textures.
Getting Started
Digitigrade base meshes are available for download here. Please don't reupload them unaltered, and I highly recommend not changing the edited part of the leg mesh (knees down, basically), or it may mess up their ability to match up seamlessly with other digitigrade leg parts. The most effective way to use them is to append them to the project you're working on and frankenstein them onto your mesh as needed rather than modifying the blend files themselves, especially if you're making WW parts since these don't include Turbodriver's rig.
Mesh Editing For Shorts
Shorts, miniskirts, and anything else that ends above the knee are great because you don't need to do much, if any, actual sculpting, and once you know how it's relatively quick to do.
To start, export the mesh for the shorts you want to convert the same way you did the legs, all LODs. If you're converting cc, it's possible the original creator won't have made proper LODs (some don't because it's incredibly tedious, but it's good practice and improves visuals and performance in-game), and if that's the case you might want to make some LODs, but I won't tell you how to live your life.
For this, I'll be using these base game vanilla shorts, since I need to convert them anyway. Because when I think of satyrs, obviously I think of khaki shorts.

Yeah.
Append the digitigrade leg mesh via File>Append. navigate to where you put the legs, pick the mesh you want (make sure the one you're importing is the same LOD and frame as the mesh you're altering), select the object folder, and import s4studio_mesh_1.
You'll end up with a situation that looks something like this. Do not be alarmed.

I don't know why it imports these things along with the mesh (there's a non-zero chance someone will yell at me for doing it wrong and it's not supposed to be like that) but in my experience you don't need any of it, so deselect the mesh and delete everything else that imported.
At this point, to make things easier on yourself, you'll want to hit numpad 3 for orthographic side view, set viewport shading to solid, and hit alt+Z to toggle x-ray view.
Take note of how many objects make up your mesh. For most maxis shorts (and probably a lot of cc ones) there are three that divide up the legs, and it's important that you maintain that number and don't remove/replace any of them, otherwise the mesh will be broken once you import it to S4S. It's finicky like that.
Select the digitigrade legs and go into edit mode, then select everything up to here:
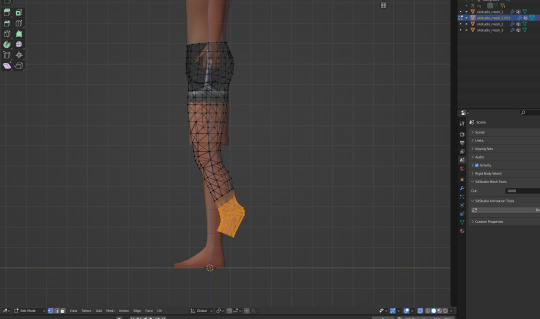
Separate this bit into a new object (P>Selection), then go back to object mode. Select the separated lower leg bit you just made, then select the lowest piece of the vanilla leg (select them IN THAT ORDER, very important), and hit ctrl+J to join them into one object. Go to edit mode for the newly joined leg bits, and delete the vanilla part, leaving only the lower piece of the digitigrade leg. If you've done everything right up to now, your mesh list will still look like this.
or whatever it looked like when you started, plus the one appended mesh.
Now go back to the main digitigrade mesh and select up to here:

separate it and repeat the process you just did, replacing the next leg segment up.
Now go into the topmost part of the vanilla shorts, and select only the leg part and delete it (it's almost always detached from the shorts in vanilla clothes and very easy to select, but with cc this might be a mixed bag and could take more time/effort to do). At this point you should have only the digitigrade leg and the shorts themselves.
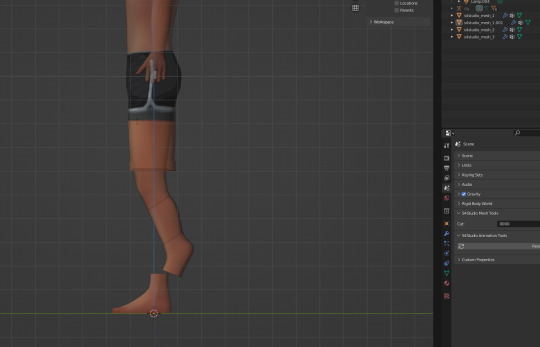
You now want to go back to the uppermost section of the digitigrade mesh and delete most of the top part of it, trimming it down so that the leg ends just inside the shorts.
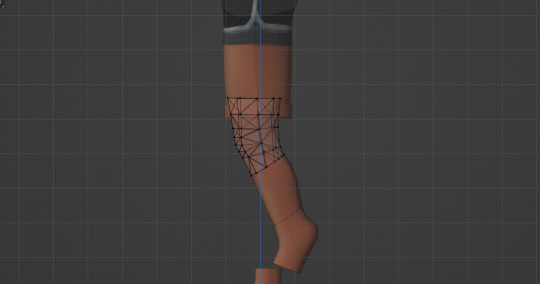
For a lot of shorts and skirts, especially shorter ones, this is all you'll have to do, but in this case I'm going to move those very top/front vertices back a tiny bit, just to make sure there won't be any clipping during animations. I also like to switch viewport shading back to material preview mode at this point to make it easier to see if there are any bits poking through that shouldn't be.

At this point you join the upper legs and shorts like you did with the other two segments (again selecting the digitigrade mesh first and the vanilla shorts second) and by the end your objects list should be back to this:

Now you're done, you can save and import to S4S. the digitigrade legs are already weight painted and have their UVs set up and everything so you don't need to do anything more to them, they'll just work, and as long as you don't edit the mesh or uvs they should blend seamlessly with the goat hooves and/or werewolf paws just like the naked leg.
Now do the same thing for the other three LODs. Maybe while singing a sea shanty to stave off the tedium (personally I like listening to podcasts while I do batches of these, it's kind of like knitting for people who love eye strain take breaks from your computer, kids).
S4S Categories/Thumbnails
The three main things you want to do with any digitigrade conversion are disable it for random, restrict opposite frame, and uncheck all occults. That should prevent any broken leg situations. Don't forget to apply to all swatches (I say this because I forget about 30% of the time and end up having to go back and fix it).
At this point, you don't have to do anything more. The clothes will function as they should in-game. If you want nicer looking thumbnails though, and you have the digitigrade werewolves override, there's one more thing I like to do.
Make sure all the thumbnails are blank and check only the werewolf occult in the categories tab, then save and load up the game. Find the clothing you just made in CAS (it will probably show up by default on werewolves of whichever gender you made it for) and cycle through all the swatches to generate new thumbnails that look like this:
instead of this:
Once all the thumbnails are generated, exit the game and export them all (if some of them appear blank, restart S4S and they'll usually show up), uncheck the werewolf occult, clear the thumbnails again, and re-import the werewolf ones. This ensures they won't randomly switch back to the human ones. And it's way faster and easier than making your own custom thumbnails with screenshots and cropping/editing, which is important if you're doing a large amount of these things.
And voilà, you've got your own digitigrade-compatible clothes. I'll be updating the tutorials as needed for clarity/any information I forgot to include, so please message me if something doesn't make sense or I need to go into more detail on something, and I'll edit it with more/better info. I also entirely learned this through trial and error, so if there's a better way to do any of it that you happen to know, tell me that too, this is just the best way I've worked out to do it.
40 notes
·
View notes
Text
Get To Know You - Sims Style
Thank you to @descendantdragfi and @bioniczombie for tagging me 💙💙💙
What’s your favorite Sims death?
I haven’t had any sims die recently, but I do have one wild story from several years ago.
When my 2nd Gen heir Maya and her sister went off to university, they stayed in the sorority house. The general university shenanigans were taking place (sims not cleaning up after themselves, piles of laundry everywhere, etc.), but I didn’t realize some of their roommates weren’t eating... until it was too late 😬
THREE (3) girls in the dorm died in one night! Two of starvation and the third from thirst (idk how she became a vampire). Since they all died so close together, the Grim Reaper just hung around the dorm until he reaped all of them. I had Maya collect their tombstones and take them back with her to Lucky Palms when the semester ended. Now they’re all resting in the mausoleum, hopefully in peace lol.
Alpha CC or Maxis Match?
Maxis-match with some alpha pieces here and there. Though I feel like the line between what’s considered maxis-match and what’s considered alpha in TS3 is way more blurred that in TS4.
Do you cheat your sims weight?
Rarely. Some of EA’s premades are just so skinny sometimes!
Do you move objects?
All. The. Time. I can’t remember a time where I’ve played or built without it on. It makes it so much easier to squeeze sitting chairs or plants or floor lamps into tight corners and make nice collages of different wall art that overlap each other a little.
Favorite Mod?
Gosh there are so many mods that I absolutely love, and lately the TS3 modding scene has been putting out banger after banger, but my most recent favorite mod is @thesweetsimmer111′s More Toddler Interactions! I love being able to feed toddlers outside of the highchair and actually give them baths. And Savanita’s animations are always so cute!
First Expansion/Game Pack/Stuff Pack?
The Sims 3: Showtime! (crazy, I know lol)
Do you pronounce live mode like aLIVE or LIVing?
ALIVE. Idc if it’s the wrong pronunciation, I’ve committed to it 😤
Who’s your favorite sim that you’ve made?
Probably my test sim, Leia. I created her from scratch and use her to test my mods and any CC I download, but lately I’ve been thinking of actually playing out her life. She’s also the adult sim in my Yoga Mod cover photo. Here she is!
Have you made a simself?
I did a few years ago, but I never got around to playing her. I wonder if I still have my simself’s household somewhere...
Which is your favorite EA hair color?
I haven’t used an EA preset hair in 10,000 years, but I guess the black one isn’t too terrible.
Favorite EA hair?
The braids from The Sims 3: Island Paradise!
Favorite life stage?
I feel like Young Adult is a boring answer, so I’ll say Teens lol.
Are you a builder or are you in it for the gameplay?
Mostly gameplay (and testing mods/cc :p). When I build, it’s usually remodeling the interior of an already existing build.
Are you a CC creator?
Yes!! I started with TS4 to TS3 conversions, but I’m also a modder now 😁
Do you have any Simblr friends or a Sim Squad?
The Sims 3 community on Tumblr is pretty small, and I feel like we all know, follow, or are in a Discord server with each other (shoutout to the TS3 Creator’s Cave members!!). So, in a way, we’re all in the same squad ✌
Do you have any sims merch?
Unfortunately, no.
Do you have a YouTube for sims?
No.
How has your “Sims style” changed throughout your years of playing?
I used to exclusively play with families and progress through a few generations, but recently, I’ve been playing with more single sims to experience parts of the game I hadn’t really touched on before. I’ve also gotten a lot better at avoiding “same face” syndrome when I give existing sims a makeover or make them from scratch. Getting more comfortable with custom sliders has definitely helped with that too.
Who’s your favorite CC creator?
There are a ton of creators whose content I absolutely love, so I won’t be able to name everyone, but here are a few:
@aroundthesims, @anitmb, @aisquaredchoco, @bioniczombie, @chazybazzy, @deniisu-sims, @danjaley, @enable--llamas, @echoweaver, @faerielandsims, @franglishetchocolat, @flotheory, @givresims, @grandelama, @greenplumbboblover, @ifcasims, @ilvansims3conversion, @jamiegirlposts, @jazzysimlife, @joojconverts, @justmiha97, @kotajose, @lazyduchess, @martassimsbookcc, @monocodoll, @mspoodle1, @nectar-cellar, @nightospheresims, @ninaaposts, @olomayasims, @omedapixel, @pandelabs, @phoebejaysims, @pixelfrogslegs, @plumbdrops, @poisonfireleafs, @potato-ballad-sims, @potatobuttcheek, @puffkins2000, @rstarsims3, @simbouquet, @simsdeogloria, @sim-songs, @simtanico, @sweetdevil-sims, @tasteslikefridge, @technicallyswagpizza, @teekapoa, @theplumdot, @thesweetsimmer111, @xiasimla, and @zoeoe-sims!
And that doesn’t even get into all of the talented TS3 creators over on Mod The Sims or NRAAS!
How long have you had Simblr?
Going on 5 years now. At first I was just reblogging other creators’ content so I could put it in my game, but then I started doing my own conversions in late 2019, so this blog became my simblr and I continued reblogging CC on @twinsimmingccfinds.
How do you edit your pictures?
Gimp 🧍♀️
What expansion/game pack is your favorite?
The Sims 3: Seasons! I love watching the seasons change, the holidays, the festivals, and the feeling of progression. I also love snow and the winter season in real life, especially when I was younger, so seeing my sims going about their day in a snow covered world is very nostalgic for me.
Most people have probably been tagged by now, but if you haven’t been tagged yet, I just tagged you 😉
36 notes
·
View notes
Note
Hey Alexis. I have to say your Darlington legacy is amazing and Zelda is the cutest and I love her story, and omg don't get me started on Antoine. I want to start the decades challenge myself, I’ve tried and failed before, but reading your story is making me want to do it. BUT, how? I’m not asking for a long detailed explanation, but more like your top 5 ways or something, you used to start it? Mods, cas-blogs, etc? And only if you got the time and of course want to share it with us/me?<3
Hello, there! Thank you so much for the kind words! And I’m incredibly glad to help. The Decades Challenge is a bit of a beast compared to other sims gameplay. It takes a little more research, effort, and organization to make it really enjoyable. So if I can push a few people deeper into historical sims life I’m happy to do so 😉
A key point before we get in resources below the cut (because prepare for paragraphs babes), how do you want to play the decades challenge? Do you want to stick to the original challenge? Do a version with more realistic aging? Just play casually for the gameplay? Have a meticulous storyline planned out (ahem 👀)?
In case it isn’t super clear, I’m not playing the decades challenge anymore. I have used it as a jumping off point for storytelling. Truly, I play the game very little. Usually I try to recreate the story posts in gameplay for myself but I do not try to achieve any of the challenge goals or gameplay rules (although I do have my own rules).
For this reason, I am not the best resource on gameplay mods. There are some mods that I’m dimly aware of that make the challenge more fun, like those by @janesimsten and this mod which I used a lot in the 1900s.
That being said, there is a lot of freedom in the the historical simblr community to craft the experience that you want. You can always try one idea and change it as you go. When I started the Darlingtons it was meant to be about 50/50 gameplay/storytelling with randomized death rolls and challenge goals. Then, I realized what I enjoyed and leaned further into that. I think this is the key to sticking with the challenge, because otherwise it’ll just feel like checking off boxes and you’ll give up sometime around 1900.
So without further ado, let’s get on down below the cut:
First and foremost, and I cannot stress this enough, start a mod organization system from day one. Playing historically requires a good deal of CC and if you don’t organize at the beginning, it gets very very difficult to sort stuff out later. This can easily make historical simming overwhelming and frankly, unenjoyable. I personally would start with a clean mods folder. Keep this separate from your regular (modern) mods as well. I have three mods folders, one for regular (modern) gameplay, one for building vanilla, and one for the Darlingtons.
For the Darlingtons, I have everything organized by mods, CAS, and then BB. Within these folders I organize by decade. That way when I enter a new decade it is easier to pull things in or out. I also have a folder on my desktop for subsequent decades CC, so if I ever find anything that isn’t easy to save on my Pinterest (more on that later), I download it then and there, and put it into the appropriate folder. Then when I hit a new decade I already have a bit of a CC collection going.
Now for finding CC, I am really not the best resource on BB stuff. I just don’t download a lot of it, and what I do is usually super specific or things that I see others using regularly. There are a couple of pieces of mainstay BB CC that I use consistently, and I’ll be glad to point you in the direction of those if you see something you’re interested in. However I don’t really have a central resource on BB they way that I do for CAS. So without further ado (because CAS is really why we’re here for historical simming, isn’t it?)….
Lookbooks, lookbooks, lookbooks. Seriously. Pixelnrd’s lookbooks we’re one of my first references, and I find them so helpful that they’re the reason I started to make my own. Just looking at a couple lookbooks can be much quicker and easier than scrolling through pages and pages of CC. But if you’re willing to go a little deeper down the rabbit hole, @twentiethcenturysims has truly made the resource to end all recourses. Their CC is categorized by decade for easy scrolling, and they also have a lookbook tag if you prefer to get your CC that way.
Now, and this is a personal one, I have used Pinterest SO much for this legacy I cannot even stress it enough. I have two boards: one for poses and one for CC. The poses one is a whole different beast, so if you ever want an answer for poses and storytelling please send one. But I’ll refrain from diving down that rabbit hole right now too.
My Pinterest CC board is organized like my mods folder, by decades. I also have a board for BB, general mod finds, hair, and (this one helps me a lot) CC that I have already downloaded so when I do lookbooks or get a WCIF, the link is already there for me.
These boards serve two purposes. Whenever I find a piece of CC that I like, I do not have to download it immediately. I save it to the appropriate decades board and it’s there, waiting for me, whenever I reach that era. This makes the hunt way easier, and also makes me SUPER excited to get to the next decade because I already have CC that I can see the characters in.
Secondly, Pinterest is an amazing resource in and of itself. Once it “learns” what you’re looking for, Pinterest will pull CC from all over the internet, including stuff that I’ve never seen in people’s lookbooks or the resources listed above. Then it’s an easy click to save this link for myself for later.
So scrolling through Pinterest then turns into a sort of inspiration board as well. This is a broader point regarding the tendency of people to quit the decades challenge: find what inspires you to do it and what makes you excited for the next decades.
For me, part of this is the storyline and seeing my characters reach the next plot that I’ve written for them. But much simpler, it’s the clothes! I’ve always been into fashion history and historical CC is actually how I found this community in the first place. So often if I’m tired out with writing or editing I’ll just go look through Pinterest for new stuff or scroll through my historical inspiration blog (which is linked in my pinned post if you’d like to check it out).
But above all, honestly, just don’t take it too seriously. Sometimes I see rather stringent calls for fashion accuracy or anachronisms but like…it’s your game. Start whenever you’d like, play however you’d like, for as long as you’d like. Hopefully this just gives you a bit of a framework for making that happen ❤️
#ask#answered#probably about 4x the answer that was necessary 😅#but y’all know me#why use two words when 10 will also work?#WCIF#resources
31 notes
·
View notes
Text
A Sort of Permanent Fix for Counter Texture Glitch
The Issue: This is a known and very old issue that plagues mainly counters, mostly cloned and created with TSRW. When you extract a counter from sims3pack as a package file, it seems to revert to the original counter's texture while switching between its modules.
The Fix: Is as easy as making a small change using a program called Texture Tweaker 3.
The Limitations: Unfortunately, not all counters play nice, and this only works for some of the counters. If TT3 gives an "Unhandled Exception" error with the opened package, this method will most likely fail. Also this doesn't fix the glitch "Cannot change style" which seems to be the case for counters from the Store. You still need to implement the fix in this post and reset textures in-game if it occurs.
I accidentally found out about this method while doing it the hard way by cloning a base game counter with s3oc then transfering the meshes and textures, renumbering etc. all the usual stuff. The method I'll detail is much easier.
All you need is Texture Tweaker 3. The pdf I linked has a basic tutorial and the download link for the tool; you won't miss it ;) After you download and get familiar with the tool, continue as follows:
Open TT3 and open the cc counter or island you extracted as a package. You will see this:
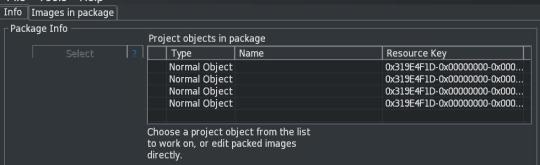
Click on one of the Normal Objects in the list then hit Select. -If your package has a KEY Resource, the Name field will also be visible e.g CounterBaseModern- Next switch to the tab that says CASt Presets which would appear after you hit Select. Here your focus is needed in Patterns preview section.
Click on the pencil shaped button near e.g. PatternA. A window will appear, you can change patterns and colours here. If you change anything and hit OK, the Commit button in the presets section should be activated.
But if you don't want to change anything you need to simulate the change. Easy way to do it would be, disabling and re-enabling, say, PatternA via its checkbox. And then Commit your changes. If you get a warning of "This Diffuse TXTC cannot accommodate Pattern A." hit OK. Do it for every following warning. I can't find any reference to this warning, nor I know why it happens. But it never caused me any issues.
Now go back to info section select the next object and repeat this for every object in the project. You only need to 'change' 1 pattern for every object. Save your package or Save As to be safe if you like. And see the results in game.
Further babbling: A proper way to avoid this issue would be using s3oc instead of TSRW to clone objects. I honestly only use it for testing purposes and exporting meshes. I especially don't like how TSRW handles textures. The main issue with counters is that the textures are still linked to the original object's textures. In most cases it's counterBaseModern (counterModernSuite). For visual explanation, I opened my example package in s3pe and took a screenshot before and after I made the changes in TT3. Here, see for yourselves.
As you can see in the before image, the Pattern A texture is actually solidColorS2_1 but it's still referencing the pattern marble01Med_1 which is the pattern used in the first preset of counterBaseModern AKA Real Flat Counter. In the after image, it's referencing the right pattern with the right values for that pattern.
Hope that was helpful. It's a bummer that it doesn't work with every counter that comes in a Sims3Pack, yet it is something. And hopefully we can find a solution to "Cannot change style" issue as well. Happy simming.
54 notes
·
View notes
Text

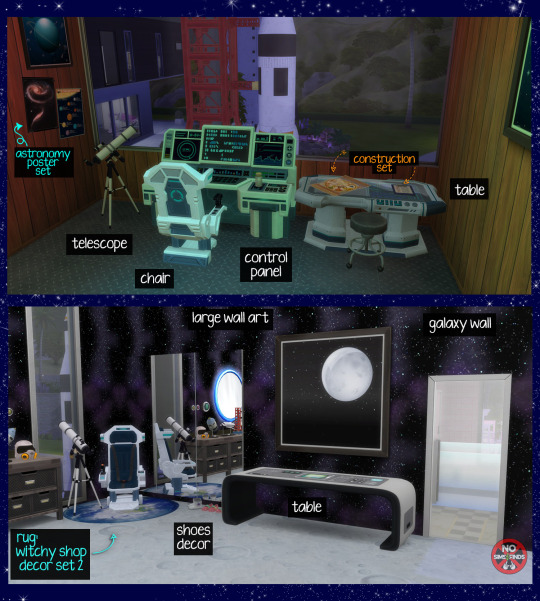


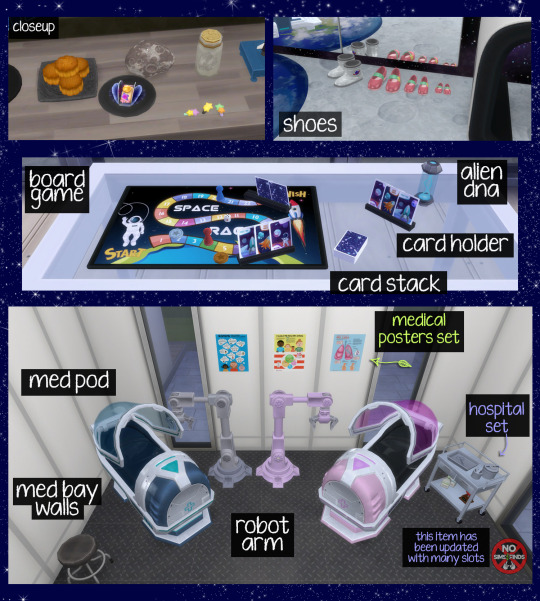
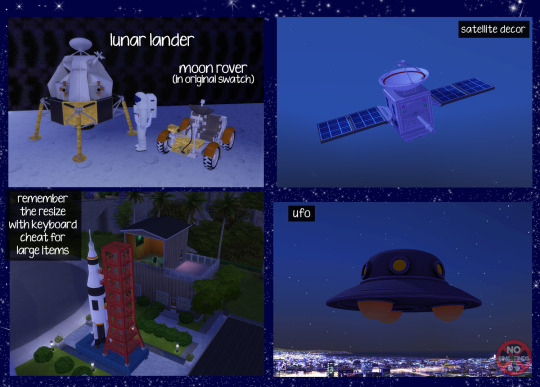

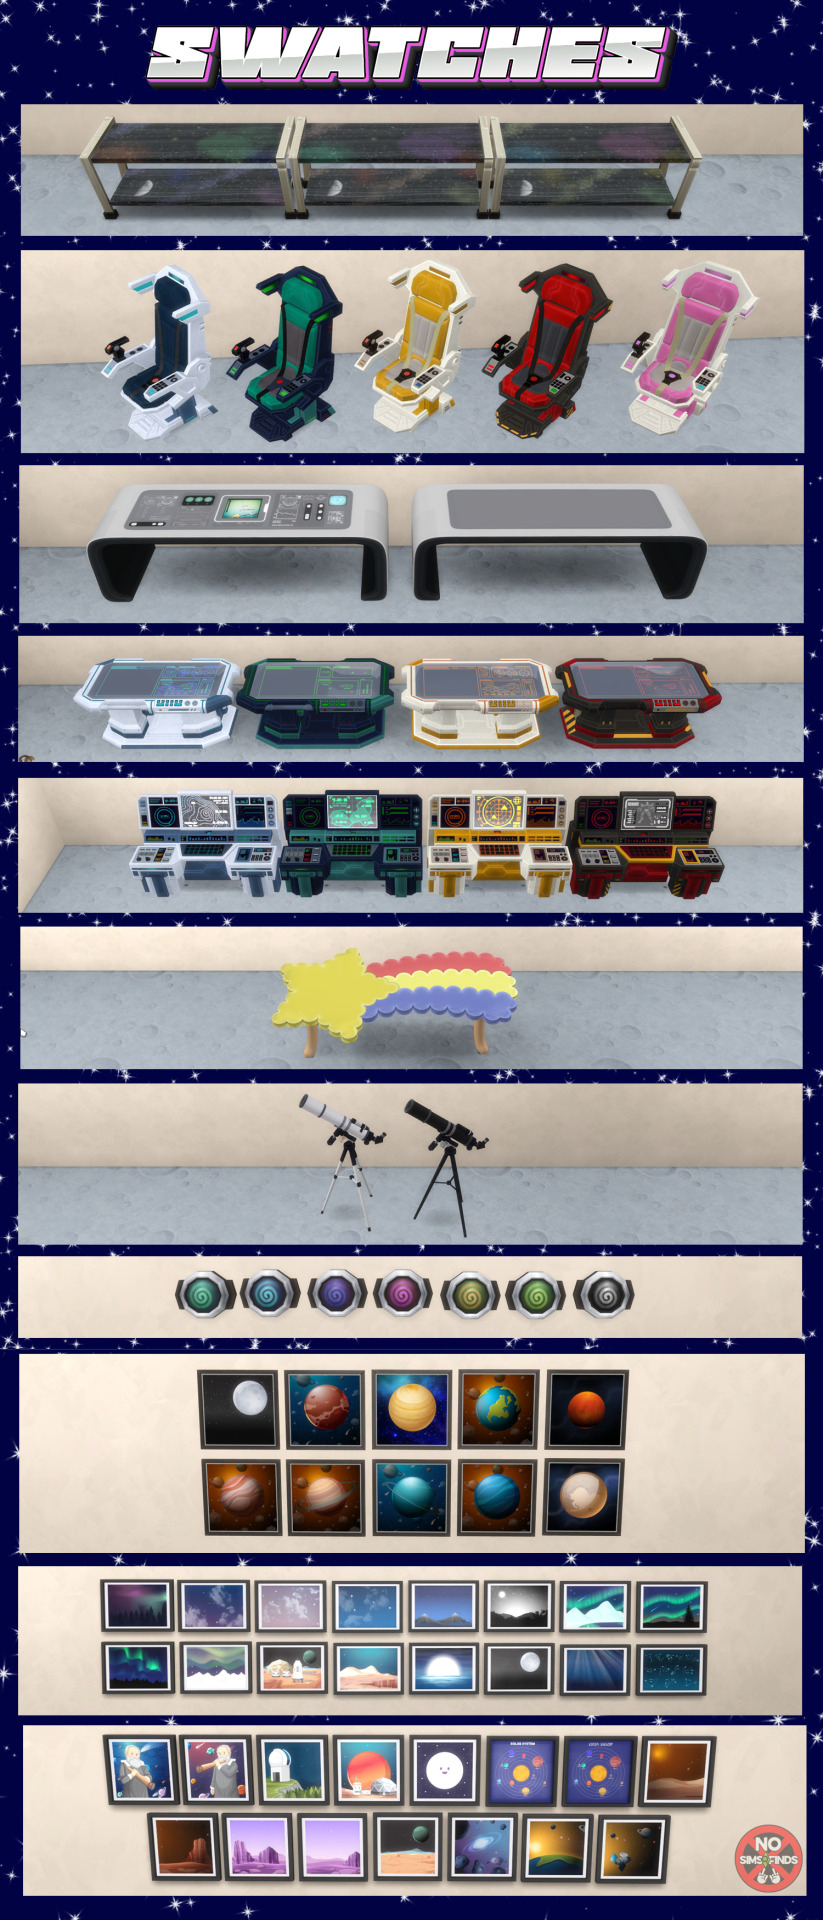

🚀 ACNH Space Enthusiast Set 👽
52 items | Sims 4, base game compatible - As usual, all original swatches included with lots of extras added by me! ☺️💗 Not all items are from ACNH. Please keep in mind some of the items are high poly if you have an older computer. The mooncake plate item is going to be shared publicly on my Tumblr today, since it is a cultural related item for a soon upcoming holiday.
Type “ACNH Space” into the search query in build mode to find quickly. You can always find items like this, just begin typing the title and it will appear.
Always suggested: bb.objects ON, it makes placing items much easier. For further placement tweaking, check out the TOOL mod.
Use the scale up & down feature on your keyboard to make the items larger or smaller to your liking. If you have a non-US keyboard, it may be different keys depending on which alphabet it uses. (The launch pad item is made smaller like the models, so it can be upscaled to fit. Other items like the UFO are made larger and can be down scaled the same way.)
I hope you enjoy!
Set contains:
-Alien DNA | 8 swatch | 586 poly
-Alien Plant Pot 1 | 9 swatches | 972 poly
-Alien Plant Pot 2 | 9 swatches | 1494 poly
-Alien Plant Pot 3 | 9 swatches | 992 poly
-Alien Plant Pot 4 | 9 swatches | 3702 poly
-Artificial Intelligence Music Player (functional radio) | 5 swatches | 828 poly
-Chair - Console | 5 swatches | 1202 poly
-Confidential Files (english & simlish) | 2 swatches | 144 poly
-Control Panel (table) | 8 swatches - 2 screen swatches for each table color | 2300 poly
-Cosmic Board Game | 1 swatch | 828 poly
-Cosmic Cards | 1 swatch | 54 poly
-Cosmic Card Holder | 11 swatch | 216 poly
-Helmet Decor | 5 swatches | 1110 poly
-Launch Pad | 1 swatch | 2362 poly
-Lunar Lander | 1 swatch | 4804 poly
-Med Pod Decor | 5 swatches | 2414 poly
-Meteor Jar | 2 swatches | 1328 poly
-Meteor Rock | 2 swatches | 1152 poly
-Mooncake Plate | 3 swatches | 1154 poly
-Moon Rover | 2 swatches | 4809 poly
-Moon Wall Lamp | 2 swatches | 482 poly (this item has the same vertex paint issue as the other lams I have made. Turn down the brightness if the object looks too bright)
-Robot Arm | 7 swatch | 1586 poly
-Satellite | 2 swatches | 2384 poly
-Satellite Model | 2 swatches | 2508 poly
-Shoe Rack / Table | 3 swatches | 214 poly
-Space Boots Decor | 1 swatch | 820 poly
-Spaceship | 1 swatch | 3184 poly
-Spaceship Model | 1 swatch | 3308 poly
-Space Shuttle | 1 swatch | 2350 poly
-Space Shuttle Model | 1 swatch | 2432 poly
-Space Suit Decor (adult & child versions) | 1 swatch each | 1198 poly each
-Space Tacos Decor | 1 swatch | 310 poly
-Starship Table | 2 swatches | 756 poly
-Table | 4 swatches | 2409 poly
-Telescope | 2 swatches | 1238 poly
-Twin Star Clock Radio | 3 swatches | 2388 poly
-Twin Star Clock Wall | 4 swatches | 1204 poly
-Twin Star Hairclip Decor | 3 swatches each | 934 poly
-Twin Star Kid's Desk | 1 swatch | 1994 poly
-Twin Star Shoes Decor (adult, child, & toddler versions) | 1 swatch each | 792 poly each
-UFO | 1 swatch | 3172 poly
-Wall Art (Large) | 10 swatches | 92 poly
-Wall Art (Medium) | 16 swatches | 50 poly
-Wall Art (Small) | 15 swatches | 50 poly
-Wall Button | 7 swatches | 146 poly
Build Mode:
-Wall Med Bay | 1 swatch
-Wall Galaxy | 2 swatches
-Wall Alien | 2 swatches
-Moon Floor | 5 swatches
As always, please let me know if you have any issues! Happy Simming! 💗
📁 Download all or pick & choose
(SFS, No Ads): HERE
📁 Alt Mega Download (still no ads): HERE
📁 DL on Patreon
Will be public on October 8th, 2023
As always, please let me know if you have any issues! Happy Simming!
✨ If you like my work, please consider supporting me
★ Patreon 🎉 ❤️ |★ Ko-Fi ☕️ ❤️
★ Instagram📷
Thank you for reblogging ❤️ ❤️ ❤️
@sssvitlanz @maxismatchccworld @mmoutfitters @coffee-cc-finds @itsjessicaccfinds @gamommypeach @stargazer-sims-finds @khelga68 @suricringe @vaporwavesims @mystictrance15 @public-ccfinds
#s4cc#ts4cc#sims 4 space#sims 4 maxis match#sims 4 outer space#sims 4 moon#sims 4 buy mode#sims 4 furniture#sims 4 table#sims 4 desk#sims 4 plants#sims 4 spacesuit#sims 4 helmet#sims 4 clothing clutter#sims 4 shoe clutter#sims 4 clock#sims 4 radio#sims 4 object#sims 4 build mode#sims 4 floor#sims 4 wall#sims 4 walls#simdertalia
466 notes
·
View notes
Text
Tag game for historical simblers!
1. What has been your favorite period to play in or which one are you most excited for?
So every time I try to play the decades challenge, I’ve never actually gotten past the 1890s, so currently that’s my favorite period by default. But I’m very excited for the 1920s!
2. Do you have a favorite piece of historical cc? (CAS or BB)
I can’t choose a favorite piece but I currently have almost all the 1890s stuff from @vintagesimstress and @gilded-ghosts! I don’t really have any BB content except for this typewriter.
3. Who is your favorite sim currently?
Not much competition yet, so I’ll say my founders Horace and Vanessa. But I’m further ahead in gameplay than posts and their daughter is currently one of my favs for storyline purposes.
4. What is your favorite world?
For historical gameplay, Brindleton Bay and Henford-on-Bagley. Good out of the way lots that make it easier to imagine it being set in that time period. In general, I tend to build and play in Oasis Springs the most.
5. Are you more gameplay or story focused?
I like to try and be a balance of both. It’s more gameplay right now since they’re just starting out but will get more story focused as we get passed the 1900s.
6. Do you like to play with pets in your historical saves?
Sometimes. I kinda wanna get the Elswoods a dog when their kids get older and I almost had the Emorys take in a stray. It depends on how many sims I’m trying to juggle.
7. What’s your biggest immersion breaking pet peeve with the game?
Oh boy, where do I start: Random townies showing up at my door (or breaking into my house) in their randomly generated outfits, random phone calls, AUTONOMOUS PHONES! (I really need to download the mod that stops them)
Also beyond historical gameplay, when sims that are supposed to live far away show up.
8. What’s your favorite in-game historical item? (CAS or BB)
Vampires, cats and dogs, and get together have a lot of nice furniture that fits with the period. And all the woodworking stuff you can make and the cross stitch from Cottage Living. Also that one base game oil lamp I put everywhere.
For cas, I mainly use cc, but the men’s cottage living bathrobe, that one victorian dress from Get Famous, and the cottage living lace up shoes and vampires boots.
9. What would you like to see as a new pack or asset to the game?
I’d like to see more afterschool activities for kids and teens. Maybe chorus, dance classes, art club, ect... In general, it’d be nice to have more activities for kids since they only have scouts or drama club and like 10 variations of the crafts table. People always say they want a band pack and while I don’t really care for an entire pack new instruments like a flute, drum set, maybe even a harp (With variations for adults and kids)
10. What pack do you think is invaluable as a historical simmer?
Cottage living. Pretty world, not much modern stuff to get distracted by. Areas of Windenburg and Britechester are nice to.
11. Do you have a favorite mod to enhance historical gameplay?
Not exclusively historical but MCCC, PandaSama’s realistic childbirth, and woohoo wellness and pregnancy overhaul
12. What’s your ideal family size for playing?
5 is ideal. Not too many sims to the point that it’s overwhelming trying to make sure no one dies or sets the house on fire, but also enough so it doesn’t get boring and you can switch between them.
13. Do you use poses?
Always.
14. Do you use overrides?
No.
15. Do you, or did you, play off-the-grid during your gameplay?
No. I tried, but I found that it got too annoying and some of the stuff I felt should work off the grid didn’t, so I took it off.
16. What life span do you play on?
Normal.
17. What inspired you to start playing historically?
It was seeing other people’s historical gameplay and lookbooks and downloading a bunch of victorian era cc and wanting to use it somehow, as well as suddenly wanting to play with Cottage Living and start a family farm!
Thank you @aheathen-conceivably and @bardish-cryptid for tagging me in this! I tag anyone who wants to do this 🎊🎊
10 notes
·
View notes
Text

1. I can’t send an ask/DM to this blog and I have a question/wcif.
This ‘sideblog’ is meant to be a gallery only. You will only find ‘posts’ in the dashboard view, not on the actual blog.
🍀 Pease send all questions to my main blog @catharsim !! 🍀
2. How do I navigate the gallery?
You can use the arrow buttons to help you. There will be indicators in a white bubble that show whether the lot is Early Access or a Commission. The download links will be updated when it becomes released to the public.
3. In the gallery, it has no download link to houses marked as ‘Commission,’ how do I get those houses?
I do not and will not ever post my commissioned houses for public download. They are in the gallery as a portfolio. You may feel free to commission a similar house of your own from me, though!
4. What are the different tiers of your Patreon?
Everything is listed here
5. How long is your Early Access period?
I release my lots 3 weeks early for Patrons.
6. What is your TOU on publicly released builds?
- Please do not claim my builds as your own or reupload.
- Feel free to edit my builds to your liking but keep them for personal use only.
- Do not use my lots as a base for your own shared builds.
- If you'd like me to see you using my lots, tag @cloverbuilds or @catharsim on Tumblr!

1. What is the process like?
My process for commissions is as follows:
You send me a direct message on Tumblr and we discuss what you want. This is when you would show me reference images. if you have a blueprint of the house, that’d be outstanding. It makes it a lot easier on me!
I get to work and may ask questions along the way about general opinions on the house, if any problems arise, etc.
I show you a finished product in pictures of the interior and exterior for approval.
Payment transaction via purchase of a Commisioner subscription on my Patreon. You will be charged the day you pledge and then charged the same day each month. You can end your subscription or change to a lower tier before you are charged again. If you’d like to keep your Commissioner access, you are entitled to one build per month!
I send the house to you via SimFileShare
2. What is included in the price for a standard commission?
The standard pricing of the Commissioner tier is $12. This is for residential homes up to four bedrooms. If you would like to commission a larger build or a community lot, DM me and we can discuss other payment methods like Paypal.
Do you take commissions for Sims 4?
No I don’t sorry. I dont play TS4 enough to be good at building, so I stick with what I know - which is TS3.
Will CC come with the house?
I try to use very minimal CC in builds I’ll be sharing with someone else. But the cc I do use will be included in the file because I know how annoying it is to copy and paste links or track it down yourself.
I know there is controversy about this but I don’t have the time to track down every creator’s TOU. Honest to God I’m not trying to make money off other’s creations, I’m just trying to make it easier for people to have access to pretty houses. If someone specifically does not want their stuff included in a folder, feel free to message me and I’ll oblige.
Will your furnish the home for me if I pay extra?
All my CC is in .package format and therefore will not transfer with the lot when exported. Tracking down each piece of cc for a fully furnished house is a nightmare even for the most organized person. So sorry, but no.
Are there any rules once I get the build?
Yes and no. It’s yours, you paid for it. Feel free to edit it, never use it, burn it down, go nuts. The one thing I ask is please do not reupload it or claim it as your own. I put a lot of time into my builds and I would like credit given where it’s due. Thank you! <3
9 notes
·
View notes
Text
Embossed 16 Wall With White Trim, Templates and Tutorial

Embossed 16 Wall With White Trim package
http://www.simfileshare.net/download/4138512/
Embossed 16 Wall With White Trim.zip
http://www.simfileshare.net/download/4138511/
How I make Multi Different Recolours Copies of my Walls and Floors.
EG: White and Wood Trims
With cheats to make it so much easier
Nothing on how to setup or name your package etc.
Trims: White and 2 wood colours by EA ready to use to base
Wall template Plain Top and Bottom Trim.zip
http://www.simfileshare.net/download/4138506/
Wall template Plain Bottom Trim.zip
http://www.simfileshare.net/download/4138505/

The First thing is set up my Palette I want to use:
Or Use Sims 4 Studio export cheat to get your wall or floor swatches to use.
In photoshop have my 66 colours in a palette
In Sims 4 Studio, I have 3 palettes which I use to import through tools TAB
Plain 66 swatches
66 Swatches Which has 2 tabs. White and Colours
66 Swatches Which has 2 tabs. Brown and Colours
That way do not have to import the same colours. One at a time into my package.
I set up a batch recolour action in Photoshop using the following Tutorials.
I admit that it took a few goes to get it right to work properly.
eg: Have the whole wall with or without trim borders the same colour
I colour most things: 75% in Linear Burn and Preserve Transparency ticked
I only use Short renaming for all 3 sizes but put each in separated named folders.
Be careful as not all walls and floors are named the same to be imported in Sims 4 studio with the cheat.

Now this is where the Bulk Rename Utility is used to rename the Medium and Tall swatches. In walls it is only the word short which has to be replaced. I use the same package each time. If you do not check the naming of the swatches to be imported by the S4S cheat it may not import
Check the naming of the floor swatches and again use Bulk Rename Utility to change name to the right naming to import.
Tutorial by Frolicking Gnomes
Batch Recolor Tutorial #1 // Dozens of Sims 4 Recolors at a press of a button!
In this mini tutorial series, I will teach you how you can use photoshop to make recoloring objects, clothing and everything in-between a literal snap! After a one-time set up, you can press a button to automate and batch your recolors!
https://www.youtube.com/watch?v=j57qnwMTcHo
Hi Frolicking Friends! I have since created an updated version of this tutorial that uses gradient maps which are way easier to work with! You can do layering and way more complicated batch recolors with not as much work! You can check it out here!
New Improved Gradient Map Recolors & Custom Overlays! (Sims 4 How To Recolor Tutorial)
ecoloring using color palette gradient maps is the new, easiest way to create your own unique recolor CC! I will show you just how easy it is to set up a batch action in photoshop so that you can create all the beautiful recolors in just the press of a button! I'll also show you how to create custom accessory overlays to take your outfit customizing to a whole 'nother level!
https://www.youtube.com/watch?v=2Q6D4UE6f4A
By watching the above tutorials. Made a photoshop action to paste.
Very simple
Open what I want to paste
Then open all the swatch files I want paste on to.
Select all item to paste. Copy. Use paste in place. Check paste placement.
Again select all what I want to paste.
Copy
Close
Then use Automate > Batch > Select the paste action you made.
Resources Used:
Sims 4 studio
Bulk S4S Import Export Cheat Tutorial
https://charlypancakes.tumblr.com/post/643211840117194752/sims-4-studio-batch-exportimport-cheats#:~:text=Go%20back%20to%20S4S%20and,in%20the%20top%20right%20corner).
Photoshop
Action Tutorial
https://www.youtube.com/watch?v=j57qnwMTcHo
Bulk Rename Utility
https://www.bulkrenameutility.co.uk/Download.php
#Sims 4#S4S uploads#WickedOldWitch#Wallpaper#Tutorial#Build and Buy#Walls And Matching Floor Sets#Mixed Walls#Mixed Floors#Walls Templates#Walls and Floors Embossed
1 note
·
View note
Note
Ciao! 😎 5, 9, 12, 29 for the simblr ask game
Ciao!
5. Current favorite mod?
Though I don't really build at the moment (I reaaally need to finish my monster of a farm for Al), TOOL is and always will be my fav (tied with BBB).
9. What type of CC can you never resist downloading?
Any type of clutter! I'm a big clutter hoarder/user. If I have to be more specific, I'd say anything kitchen or bathroom related (I have a strange passion for toilet paper CC)(plus food that I can put all around the kitchen - house, if the sim I build for is kind of a slob - without it going bad in two second). I also LOOOOOVE plants.
Face details and hair are also high on the "must download" list.
(plus anything slutty, but it's for scientific experiments!)
12. A lot of people talk about what’s NOT in the sims 4 that they wish was, but what is your favorite feature that IS in the sims 4 (from base game or a pack)?
Um... I suppose the cheat codes? I would die without MOO!
29. What gameplay/CAS/BB feature would you like to see added/changed in the game?
A colour wheel for both CAS and BB items! Or even better: custom collections like in the Sims 2/3; would be way easier to build and organize all that CC ^^
0 notes
Last Seen Blogs

jsnowcreations
J. Snow Creations

charitydingle
we told you this was melodrama

campingwiththecharmings
OMGWTFPOLARBEAR

freelyhauntedqueen
Miss M

arch-knightinsourarmor
MOVED: h0pefall