#8er
Text
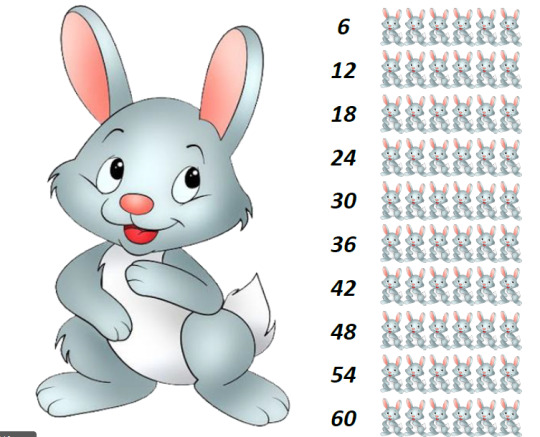
6'ŞAR RİTMİK SAYMA (ÇUBUK PUZZLE)
6’ŞAR RİTMİK SAYMA (ÇUBUK PUZZLE)
6’şar ritmik saymayı eğlenceli bir puzzle ile yapmaya çalıştık. Bu seride 1’er, 2’şer, 3’er, 4’er, 5’er, 6’şar, 7’şer, 8’er, 9’ar, 10’ar ritmik saymalar yer alacak. Etkinliklerin devamı için abone olmayı ve beğenide bulunmayı unutmayın.
Videoda yer alan etkinliğe ulaşmak için;
6’şar sayma ön
ritmik sayma arka
View On WordPress
#10ar#10ar ritmik sayma#1er#1er ritmik sayma#2şer#2şer ritmik sayma#3er#3er ritmik sayma#4er#4er ritmik sayma#5er#5er ritmik sayma#6şar#6şar ritmik sayma#7şer#7şer ritmik sayma#8er#8er ritmik sayma#9ar#9ar ritmik sayma#BakBi#bakbi yapbi#count#count by one#count by ten#count by three#count by two#counting#doğal sayı#etkinlik
0 notes
Photo


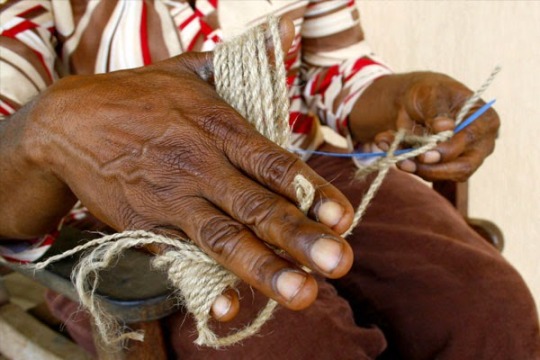


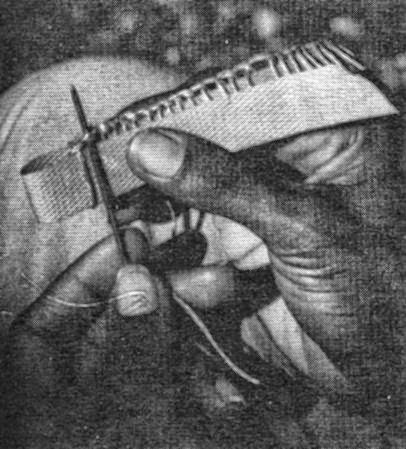
How to Make a Bilum
Step-by-Step-Instructions for GOROKA-Bilums & SIMBU-Bilums:
https://drive.google.com/drive/folders/1qb-VMFC5uDFv3j3_DzUz6c1OxPkbKJSv
[This originally appeared in the Lik Lik Buk, a populist development guide produced in Papua New Guinea in the mid-1980s -A]
The bilum is a traditional PNG string bag. Bilums come in a variety of shapes and styles and are made for different purposes. Bilums are made to carry food, to carry babies in and to use for leisure. People can identify a person just by the creative design or style woven on the bilum. Despite the many different aspects and purposes of bilums they all are made from the same basic weaving method. Bilums are worked by forming rows of a special knot around a strip which today is usually made of plastic packing strips but previously people used coconut and pandanus leaves to make these strips. The strips are used to determine the size of the stitches and help to make the job of holding hte stitches easier. The string is owrked in short lengths as all of the string yet to be used is fed into the existing knots. When the string runs out a new length is tied on to the end. You will need (beginner): 1. Some coloured string 2. Cut a piece of plastic strip about 60cm or more to form the base row. 3. Cut the other plastic strips about 30cm long. These should be the same width (about ½-1 cm)as the longer strip. 4. A pair of scissors 5. One or two needles larger and longer than sewing needles (darning needles). Some people use old spokes from an umbrella. (Traditionally: bones of the Flying Foxes ) Method: 1. Make a loop around the plastic strip and tie with a slip knot. Pace one end of string on the front of the plastic strip (that is the side facing you) and hold it down with your thumb at the front and with your forefinger at the back of the plastic strip. 2. Pull the working end over the top and then behind the plastic strip creating a loop at the top of the plastic strip. 3. The working end is brought under the plastic strip and is fed under the other end of the string so that the plastic strip now has a circle of string around it. This mesh must be kept loose enough to be able to feed the subsequent stitches into the loops of the previous ones. 4. The working end goes over the loose end into the top loop from the left side to the right side. It is imortant that the points where the stirng crosses over are kept at the bottom and top of the plastic strip. The working end foes behind the plastic strip and is fed from left to right into the bottom loop. 5. Repeat the procedure until you reach the required length which will be the half the circumference of your bilum. Subsequent Rows Bilums consist of a spiral of rows of meshes. 1. Bend the plastic strip backward (away from yourself) and work the stitch in the normal way but over the two palstic strips instead of one. 2. Turn the pastic strip so that the back is now facing you. Make the next stitch over the one plastic strip in the following manner. 3. Take the working end and go over the plastic strip at the front and into the previous stitch at the back from left to right and then into the loop of hte stitch on the rprevious row. Pull the string behind the front plastic strip. Continue until the second row is the same length as the first row. These two rows mae the base of the blium. (if the plastic strip is short slip another strip in). 4. All subsequent rows are made in the smae manner. 5. Continue the procedure until you have 18-20 rows (medium size bilum). Mouth of the Bilum 1. Get a new piece of string and join it to the ned of the string that you used for making the body of the bilum. 2. Hold the top of the bilum facing you so that you can clearly see the top edge of the stitches forming the top row. 3. Skip the last working stitch of the body of the bilum.Count three loops to the front and feed the string into the thuird loop from left to right. Make a knot. Count three loops and feed the string into the third loop from left to right. From right to left push the string into the knot that you made. Bring the string back towards you forming a circle. 4. Count another three loops in front and feed the string into the third loop. Bring the string back and feed it into the previous circle. Continue around the mouth of the bilum. 5. When the two ends meet feed the last stitch into the first stitch to form a continuous chian. To finish tie a knot and cut the extra string. Handle Bilum handles are sometimes made separately from the bilum and then joined on. Others are made straight from the side of the bilum. There are many styles but the simplest uses the same basic stitch as in the body of the bilum. 1. Use a shorter plastic strip and make about 8-10 sitthces. 2. Use a second plastic strip. Make the next row using the same stitch. 3. Continue making rows until you reach the length of the handle you want. Joining the Handle to the Bilum 1. Hold the Bilum up and from the way it hangs judge where the sides are. The handle must be attached to these points so that the bilum when it is carried will be evenly balanced. 2. The handle and the body of the bilum are joined together by looping stitches. It is important that the joining stitches are made into the first row of the bilum not just into the finishing edge of the mouth of the bilum so that your join is strong. 3. When finished, secure with a knot. Styles and techniques for different patterns are constantly evolving in PNG. This method described above is for a very basic one-colour bilum. Colours can be added by joining different coloured strings to your working string or depending on the complexity of your design are worked in by a method too complicated to explain here. Far better when you have mastered the basics to have someone who know how to show you. Contributor: Joy Sahumlal, ATDI, Unitech, Lae, MP. Url:
http://alex.golub.name/porgera/bilum.html
Step-by-Step-Instructions for GOROKA-Bilums & SIMBU-Bilums:
https://drive.google.com/drive/folders/1qb-VMFC5uDFv3j3_DzUz6c1OxPkbKJSv
#bilum#bilums#noken#Tragenetz#Tragenetze#Tragetasche#Tragetaschen#sac de transport#sacs de transports#carry bag#carry bags#carrying bag#carrying bags#carrying net#carrying nets#Schlünge#8er-Schlünge#8er#Achterschlünge#Papua-Neuguinea#Papouasie-Nouvelle Guinée#Papua-NewGuinea#selbstgemacht#do-it-yourself#diy#handgearbeitet#handgeknüpft#hand-made#handmade#Achterschlingen
0 notes
Note
WE'RE IN THE SAME TIMEZONE RN !!!!!! om not adjusted yet tho </3
WAIT FR THATS CRAZY???
#gmt +8ers win#ALSO THE NOT ADJUSTING YET IS SO REAL AKDHSJHD#im going home today but one hour faster than my usual place was jarring for me#WHILE U LITERALY LIKE WENT TO A PLACE WITH A WAY BIGGER HOUR DIFFERENCE SO ITS UNDERSTANDABLE#asks#mourn 🌧️🐈 !#HOPE U HAVE FUN IN HK :3
2 notes
·
View notes
Text
If you were a time signature what would you be
12 notes
·
View notes
Photo


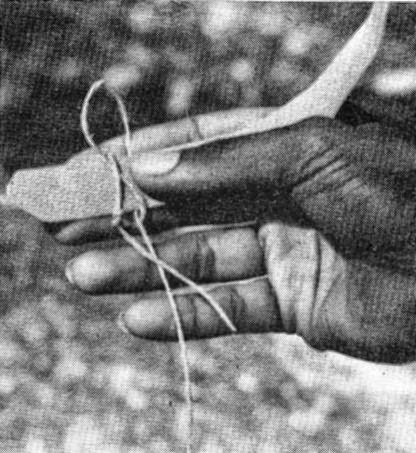
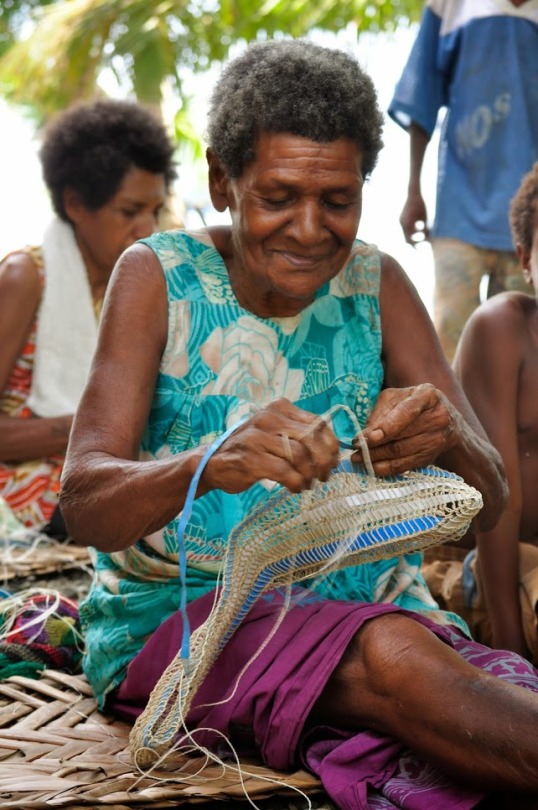
How to Make a Bilum
Step-by-Step-Instructions for GOROKA-Bilums & SIMBU-Bilums:
https://drive.google.com/drive/folders/1qb-VMFC5uDFv3j3_DzUz6c1OxPkbKJSv
[This originally appeared in the Lik Lik Buk, a populist development guide produced in Papua New Guinea in the mid-1980s -A] The bilum is a traditional PNG string bag. Bilums come in a variety of shapes and styles and are made for different purposes. Bilums are made to carry food, to carry babies in and to use for leisure. People can identify a person just by the creative design or style woven on the bilum. Despite the many different aspects and purposes of bilums they all are made from the same basic weaving method. Bilums are worked by forming rows of a special knot around a strip which today is usually made of plastic packing strips but previously people used coconut and pandanus leaves to make these strips. The strips are used to determine the size of the stitches and help to make the job of holding hte stitches easier. The string is owrked in short lengths as all of the string yet to be used is fed into the existing knots. When the string runs out a new length is tied on to the end. You will need (beginner): 1. Some coloured string 2. Cut a piece of plastic strip about 60cm or more to form the base row. 3. Cut the other plastic strips about 30cm long. These should be the same width (about ½-1 cm)as the longer strip. 4. A pair of scissors 5. One or two needles larger and longer than sewing needles (darning needles). Some people use old spokes from an umbrella. (Traditionally: bones of the Flying Foxes ) Method: 1. Make a loop around the plastic strip and tie with a slip knot. Pace one end of string on the front of the plastic strip (that is the side facing you) and hold it down with your thumb at the front and with your forefinger at the back of the plastic strip. 2. Pull the working end over the top and then behind the plastic strip creating a loop at the top of the plastic strip. 3. The working end is brought under the plastic strip and is fed under the other end of the string so that the plastic strip now has a circle of string around it. This mesh must be kept loose enough to be able to feed the subsequent stitches into the loops of the previous ones. 4. The working end goes over the loose end into the top loop from the left side to the right side. It is imortant that the points where the stirng crosses over are kept at the bottom and top of the plastic strip. The working end foes behind the plastic strip and is fed from left to right into the bottom loop. 5. Repeat the procedure until you reach the required length which will be the half the circumference of your bilum. Subsequent Rows Bilums consist of a spiral of rows of meshes. 1. Bend the plastic strip backward (away from yourself) and work the stitch in the normal way but over the two palstic strips instead of one. 2. Turn the pastic strip so that the back is now facing you. Make the next stitch over the one plastic strip in the following manner. 3. Take the working end and go over the plastic strip at the front and into the previous stitch at the back from left to right and then into the loop of hte stitch on the rprevious row. Pull the string behind the front plastic strip. Continue until the second row is the same length as the first row. These two rows mae the base of the blium. (if the plastic strip is short slip another strip in). 4. All subsequent rows are made in the smae manner. 5. Continue the procedure until you have 18-20 rows (medium size bilum). Mouth of the Bilum 1. Get a new piece of string and join it to the ned of the string that you used for making the body of the bilum. 2. Hold the top of the bilum facing you so that you can clearly see the top edge of the stitches forming the top row. 3. Skip the last working stitch of the body of the bilum.Count three loops to the front and feed the string into the thuird loop from left to right. Make a knot. Count three loops and feed the string into the third loop from left to right. From right to left push the string into the knot that you made. Bring the string back towards you forming a circle. 4. Count another three loops in front and feed the string into the third loop. Bring the string back and feed it into the previous circle. Continue around the mouth of the bilum. 5. When the two ends meet feed the last stitch into the first stitch to form a continuous chian. To finish tie a knot and cut the extra string. Handle Bilum handles are sometimes made separately from the bilum and then joined on. Others are made straight from the side of the bilum. There are many styles but the simplest uses the same basic stitch as in the body of the bilum. 1. Use a shorter plastic strip and make about 8-10 sitthces. 2. Use a second plastic strip. Make the next row using the same stitch. 3. Continue making rows until you reach the length of the handle you want. Joining the Handle to the Bilum 1. Hold the Bilum up and from the way it hangs judge where the sides are. The handle must be attached to these points so that the bilum when it is carried will be evenly balanced. 2. The handle and the body of the bilum are joined together by looping stitches. It is important that the joining stitches are made into the first row of the bilum not just into the finishing edge of the mouth of the bilum so that your join is strong. 3. When finished, secure with a knot. Styles and techniques for different patterns are constantly evolving in PNG. This method described above is for a very basic one-colour bilum. Colours can be added by joining different coloured strings to your working string or depending on the complexity of your design are worked in by a method too complicated to explain here. Far better when you have mastered the basics to have someone who know how to show you. Contributor: Joy Sahumlal, ATDI, Unitech, Lae, MP. Url:
http://alex.golub.name/porgera/bilum.html
Step-by-Step-Instructions for GOROKA-Bilums & SIMBU-Bilums:
https://drive.google.com/drive/folders/1qb-VMFC5uDFv3j3_DzUz6c1OxPkbKJSv
#sac de transport#carry bag#carry bags#Tragetaschen#Tragetasche#Bilum#Bilums#Noken#Papua-Neuguinea#Papouasie-Nouvelle Guinée#Papua-NewGuinea#Achterschlung#8er-Schlung#knüpfen#geknüpft#geschlungen#Schlingen#8er-Schlingen#Achter-Schlingen#Achterschlünge#sacs de transport#Tragenetz#Tragenetze#carrying bag#carrying bags#carrying net#carrying nets#carry net#carry nets#Behältnis
2 notes
·
View notes
Note
⌦ H∈y th∈r∈ Q∈nhi1⚳⚳ ... Nic∈ 0)-f y0)-u t0)- b∈ a sss0)-cia1 ... m∈dia ... manag∈r h∈r∈⚳⚳ ... R∈garding y0)-ur 1ack 0)-f b1u∈ t∈xt: I at∈ it ... a11⚳⚳ ⌫
duuuuuuuude w8yd you do t8at... t8at was my blood color man
1 note
·
View note
Text
TODAY'S ANTHEM #445
1 note
·
View note
Photo

work for em-8er - xmas skin design
merry christmas !!
2K notes
·
View notes
Text

weeeee I'm on a top 8er
15 notes
·
View notes
Text
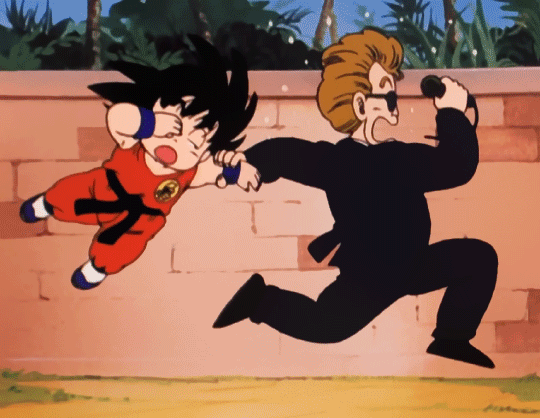
7 Underrated Dragon Ball Characters
Honorable mention, Launch. She's one of my favorite Dragon Ball characters, but Toriyama never evolves Launch beyond her gag, and then he forgets all about her. Unlike most USians, I started with OG Dragon Ball, and enjoyed the found family dynamic that Goku developed after Grandpa Gohan (who ironically is his father figure) died. Roshi is like his grandpa, Bulma his big sister, Krillin his best bro, and Launch his mother. She cooks, cares for the boys, and handmakes them their cute little World Tournament suits. It seemed like she was going to be a major supporting character, but instead she circles the drain doing one of three things until she's just finally gone 1) getting molested by Roshi 2) shooting people impervious to bullets 3) crushing on Tien
Launch deserved better

Android 16

The only reason he's not higher on this list is because he's not as underrated as the others. Plenty of people like 16 ofc, he's a good character, but in universe he gets nothing but disrespect. Y'know the guy who saved the world by helping Gohan go beyond Super Saiyan? He's on the same tier as Farmer w/shotgun in terms of getting wished back to life. Yamcha would rather give his girlfriend a nice necklace
Super goes a step further in erasing his existence by giving his character traits to Park Ranger 17. And I'd say this was a nice homage to 16 if Super wasn't Super
World Tournament Announcer
The Nameless Announcer. One of the few normies to know about Dragon Team, he's an in-universe Dragon Ball stan. He's also the first character in this entire franchise to go from mustache-less to mustache
Yajirobe

Yajirobe's honestly so cool. He 1 shot Cymbal, then COOKED AND ATE HIM, which is probably the darkest thing to happen in Dragon Ball and actually makes Buu a Yajirobe clone. He was also the equivalent to Tien and Goku on release, being as strong as they were during the 22nd World Martial Arts Tournament.
Except, unlike Tien and Goku, he's a total slacker and was probably this strong naturally, or at least very close. For context, 21st World Tournament Goku was equivalent to Roshi, who could blow up the moon with ease
Oh and he was instrumental in defeating Geets, that's cute of him too
Dr. Gero

One of my fav villains, this fucker here, he fucks. He created best girl (18) best twink (17, sorry not sorry Future Trunks), two very good boys (8er and 16), the most perfect it/its, 19, who had one of Dragon Ball's best beatdowns, and was plenty compelling and terrifying on his own. How is this absolute fucker not in every Top 10 or at least every Top 20 villain countdowns?
Kami
Surely God will be important?
Yamcha
The world's first meme. He gets twisted as useless by people who think Dragon Ball was ever about anyone but Goku doing anything and dunked on for almost everything he does. Yamcha isn't the kinda guy getting mad about this hate tho, he's actually laughing. He's an easygoing himbo that just wants to chill and exposit, but will absolutely throw down whenever needed.
The most pathetic he EVER got was when he made his hair look like Vegeta's, and you really can't blame a bro for trying
Chi-Chi

The hate this woman gets... it's definitely less than it used to be, but for someone Goku and Gohan very clearly loves, the fanbase despises her. And why? For not wanting her FOUR YEAR OLD to fight planet busting monsters? Yes, I know, the world needs that four year old to fight monsters, but if that were your kid, would you be ok with that? Would you say bye son I love you and remember to hold your intestines in if the alien demon from another world blasts open your stomach?
#yellow hair launch says acab#dragon ball#dragon ball z#launch#launch dbz#launch dragon ball#android 16#yajirobe#world Tournament announcer#world martial Arts Tournament#Chi-Chi#yamcha#dr gero#kami#kami db#launch db#red ribbon army
57 notes
·
View notes
Text
1'ER RİTMİK SAYMA (ÇUBUK PUZZLE)
1’ER RİTMİK SAYMA (ÇUBUK PUZZLE)
1’er ritmik saymayı eğlenceli bir puzzle ile yapmaya çalıştık. Bu seride 1’er, 2’şer, 3’er, 4’er, 5’er, 6’şar, 7’şer, 8’er, 9’ar, 10’ar ritmik saymalar yer alacak. Etkinliklerin devamı için abone olmayı ve beğenide bulunmayı unutmayın.
Videoda yer alan etkinliğe ulaşmak için;
1’er sayma ön
ritmik sayma arka
View On WordPress
#10ar#10ar ritmik sayma#1er#1er ritmik sayma#2şer#2şer ritmik sayma#3er#3er ritmik sayma#4er#4er ritmik sayma#5er#5er ritmik sayma#6şar#6şar ritmik sayma#7şer#7şer ritmik sayma#8er#8er ritmik sayma#9ar#9ar ritmik sayma#BakBi#bakbi yapbi#count#count by one#count by ten#count by three#count by two#counting#doğal sayı#etkinlik
0 notes
Note
this is an ask i am asking you 🫡


here the chuuyas for your blog

bonus yuuko
KRHRGRGFRGF#GFR-8ER#0UGRE#0GRG#F'WF'GOWEF'OUGD'OUGEW'DPGWQ'DPQW'DP'QWHD'QWHSOUGWQSOUG'WGQUUWGQ'UWGGYDWQF9YF9Y[DQWFYDW9FYWD9FGUWDQG0UDWQ0UGG9UUUO9GDW
AETHER THANKS SOSO SOSOSOSOSOSO MUCH SHGRGRGR
#bungo stray dogs manga#chuuyabsd#i love him#bsd art#nakahara chuuya#bungou stray dogs#bungo stray dogs#bsd#chuuya#chuuya au#yuuko au#evermore answers#au asks
17 notes
·
View notes
Text
Another day, another 8er:


#elitebimmers#bmw#bmwlife#bmwlove#bmwrepost#bimmer#bimmers#бмв#elite#photooftheday#bmws#bmwgarage#bmwclub#бмвклуб#бмвжизнь
74 notes
·
View notes
Text
... i u8. i cant find t8e Empress. i need to give 8er back t8e palm8usk, but s8es not in t8e t8rone block nor is s8e in 8er respiteblock.
u8m. w8at do i do
12 notes
·
View notes
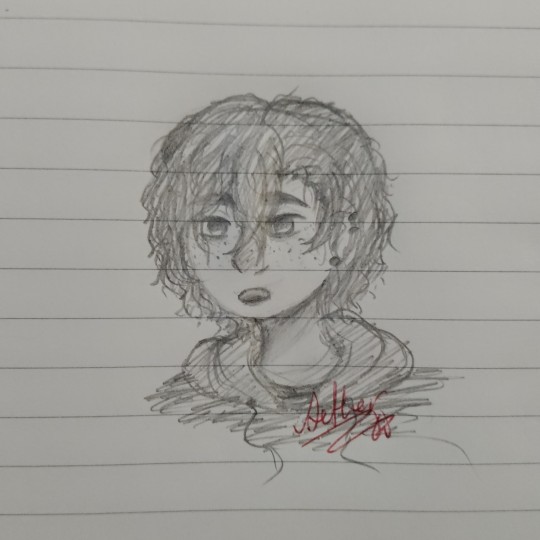
Photo

character designed for em-8er, game in development !
2K notes
·
View notes
Last Seen Blogs

acjense-blog
But I knew him...

louisianagardeningguru
LouisianaGardeningGuru

mcdolann
gday

stkoor
Stkoor

andriushka84-blog
Без названия