#2d animation tutorial
Text

Animate DTIYS with tutorial!
Meet Petals and Antenna 🌸 🍃 I’m hosting my first DTIYS challenge, aimed at 2D animation beginners or illustrators who want to try animation, check out the tutorial!
(The main challenge is on Instagram, but of course, you can share it here too! Though I gotta be honest, I still don't know exactly how Tumblr works, so I may not see it, but tag me or send a message or something please! And I'm sorry I feel so boomer lol).
Guidelines
- Animate (or draw) Pet and Anty (one or both)
- You can follow the tutorial or make a crazy sakuga, however you want!
- I’ll share them until June 15th
With all the AI stuff going on, I am in a pretty bad mood regarding art; so much disrespect toward artists is disheartening. To counteract that, I decided to host my first challenge with an animation approach! Starting 2D animation can be daunting, hopefully this challenge and tutorial gives you an easy introduction and gets you pumped about what you can accomplish!
Cheers 💕
#dtiys#animation tutorial#animators on tumblr#2d animation tutorial#animation for beginners#2d animation#animation#gif animation#marianarira#beginner animation tutorial#artists on tumblr#dtiyschallenge
96 notes
·
View notes
Text
youtube
I made a tutorial, partially so I remember how I did that aesthetic. Partially because maybe this is interesting for other people as well. ☆
How do color your animation super quickly in After Effects!
#tutorial#youtube#after effects#animation tutorial#2d animation tutorial#animator#editing#color#recording is weird next time ill write a proper script
27 notes
·
View notes
Text
Been going through a lot of animation reels this past week and a bit and one prevailing thing I noticed was that a lot of animators either struggle with, or completely disregard, the timing and pacing of their frames.
Timing and spacing is (to me) utterly essential to create some nice, smooth and well flowing animation, otherwise it can look very jittery, jumpy, volume will fluctuate greatly and won't look too good.
This clip here should help show you how I place my keys, breakdowns and inbetweens to get some nice movement. (I wish I had room for timing charts!)

As you can see from the timeline grab here, a lot of this is on 3's, with a few 2's here and there. Even some 4's to help ease. With proper placing of frames even 3's and 4's can look smooth!
AND, if you have toon boom, and you wanna have a deep dive into this file, I've attached it below so you can really have a good look!
4K notes
·
View notes
Text

'ello folks, my Cleanup tutorial is finally done and out!
hope you find it useful
#Animation#Tutorial#Advice#Lesson#The Lion King#simba#animation#Disney#character design#how to#2D#traditional animation#frame by frame#Adobe#Photoshop#Animate#Flash#After Effects#Premiere#Video#Film#Drawing#Tips#Gestures#cleanup#lines#krita#toon boom#procreate#tvpaint
1K notes
·
View notes
Text
#2d animation#2d animation tutorial#2d animation blender#2d animation software#2d animation short film#2d animation course#2d animation video#2d animation after effects#2d animation vs 3d animation#2d animation apps for android#2d animation apps#2d animation adobe#2d animation anime#2d animation after effects tutorial#2d animation android#cartoon
1 note
·
View note
Video
youtube
In this video, ZeBirdBrain explains how and why we included the construction lines in the LACKADAISY pilot. There’s also a lot in here about the cleanup process in general.

Ze is our crew’s well-known, resident Toon Boom Harmony wizard! Whether you’re a beginner with animation software or an experienced animator, chances are Ze’s got some advice and tutorials you’ll find useful in her YouTube catalog.
#lackadaisy#lackadaisycats#zebirdbrain#harmony#toon boom#animation#2d animation#indie animation#lackadaisy film#tutorial#lackadaisy pilot
1K notes
·
View notes
Text


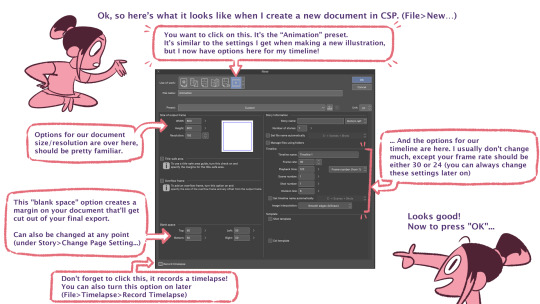

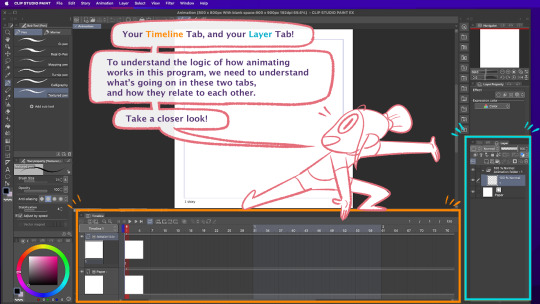
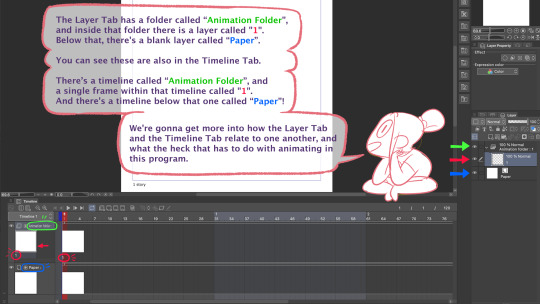
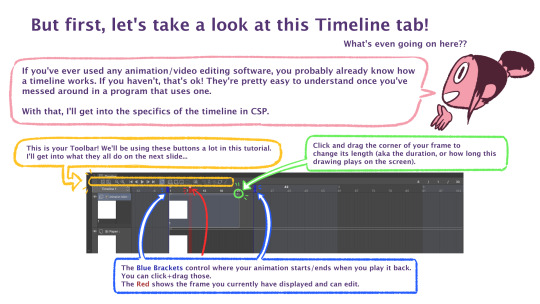

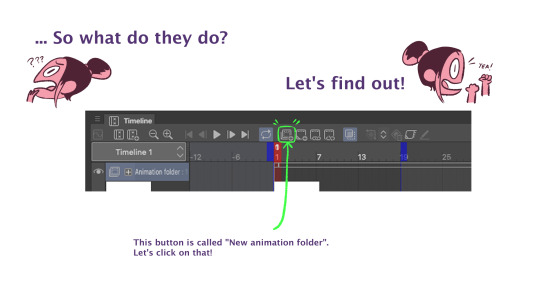
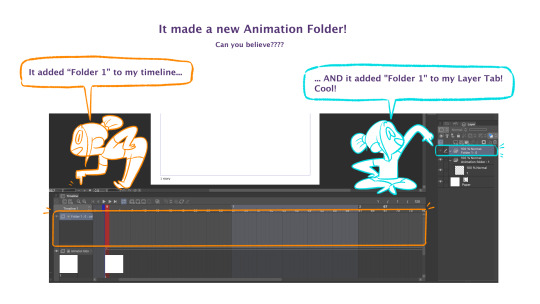

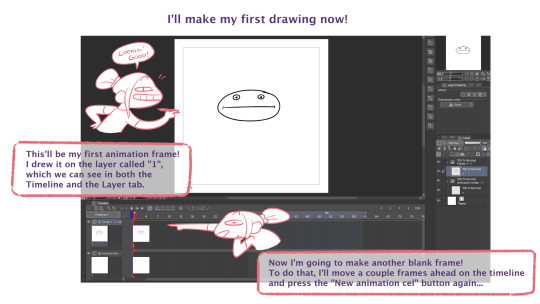
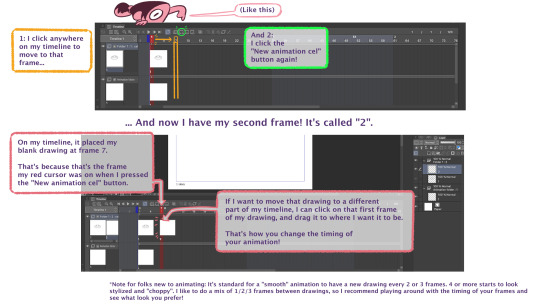
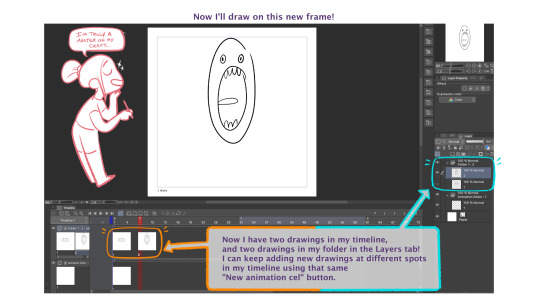

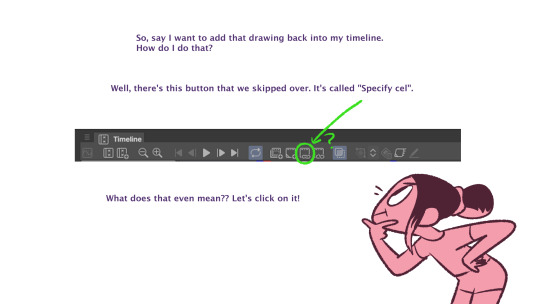
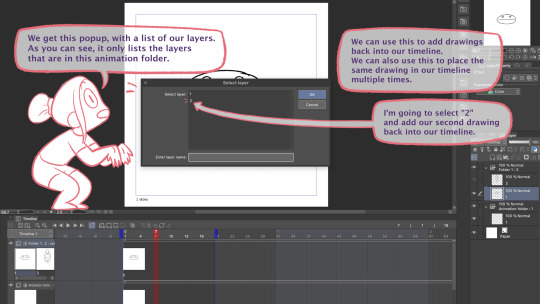

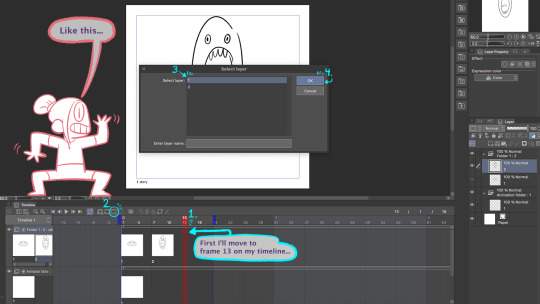
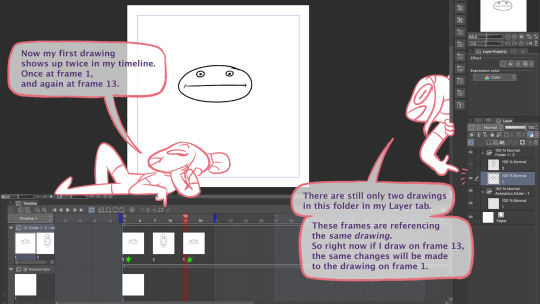
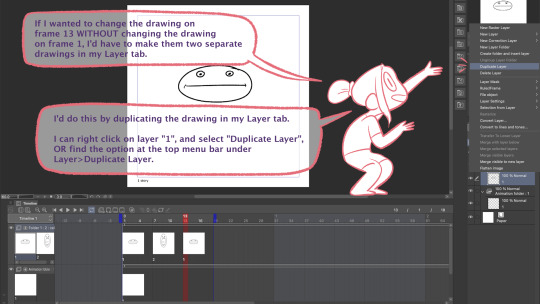

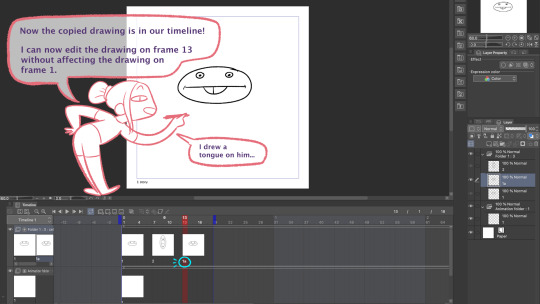
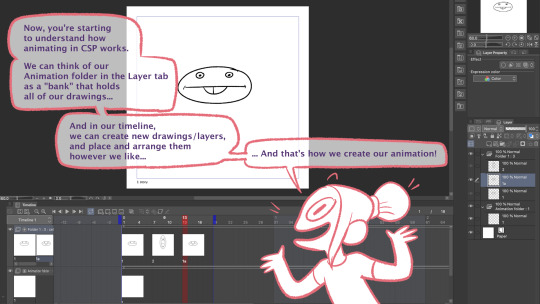
Part 1 of my tutorial for how I use the animation tools in Clip Studio Paint! I had to split it into 2 posts because it's over 30 images.
Hope it's helpful!
Link to Part 2:
799 notes
·
View notes
Note
Hey David... I wanted to ask if you had any videos to recommend about digital painting... basically videos on how you do your thing or started. I also tried out the brushes and everything else you shared the other day, they're awesome thank you so much.
Yaaay, I'm happy you enjoy the brushes!
As a starter, I recommend this video by Feng Zhu's FZD Design Cinema:
youtube
His channel contains videos covering concept art, thumb-nailing, storyboarding, digital design and world-building. Definitely check it out.
And in terms of animating in Clip Studio Paint, these videos by Lemoncholy are a good introduction:
youtube
youtube
148 notes
·
View notes
Text

I made this Extremely Basic mouthchart for my students to help them learn what Basic shapes are associated with what sounds. Made with 2d builds in mind, as thats the most common 2d work in my area.
Every single project has its own show style regarding lipsync, so this NOT the be-all-end-all. You and your projects arent beholden to these suggestions, theyre purely a jumping off point.
Happy animating!
#animator#animation#2d animation#animation tutorial#character animation#hand drawn animation#digital animation
878 notes
·
View notes
Text

(instagram)
Tutorial in After Effects under the cut.
ALRIGHT let's get into it. Straight to the point, no nonsense tutorial.
• Create a new composition 1080px x 1080px, let’s call it Design.
• Write some text, turn it into shapes (right-click → Create → Create shapes from text).
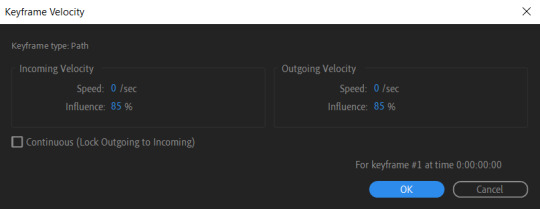
• Animate the path so the text stretches like so in a few seconds time. When animated, right-click on a keyframe and select Keyframe velocity and change coming & going velocity influence to 85%:

• Create another new composition and call it FX. Add your Design pre-comp in this composition.
• Add a new Solid layer on top, call it Displacement map. Now we’re gonna add a bunch of effects on that solid layer.
• First add Gradient Ramp. Make it so the white color would be on the right side (End of Ramp) and black would be on the left side (Start of Ramp);
• Next add a Tritone effect and change the Highlights color to black and Midtones color to white.
• Add Fast Box Blur and change Blur Radius to 100.
• Then it’s time to add Fractal Noise effect, and change Fractal Type to Swirly, Noise Type to Spline. Then bring down the Transform panel and uncheck Uniform Scaling, make Scale Width 60, and change Scale Height to a very high number, such as 10000.0.
• Add a keyframe to Evolution at the beginning, and the second keyframe at 2 seconds rotating the slider for one rotation. Add an expression loopOut() on these keyframes so it loops.
• And lastly change the Blending mode to Overlay (at the bottom of the effect).
• The last effect we’re gonna add is Turbulent Displace. Change Displacement to Twist, Amount to 150, Size 130. Add the same keyframes to the Evolution as we did previously on Fractal Noise and loop them with the same expression.
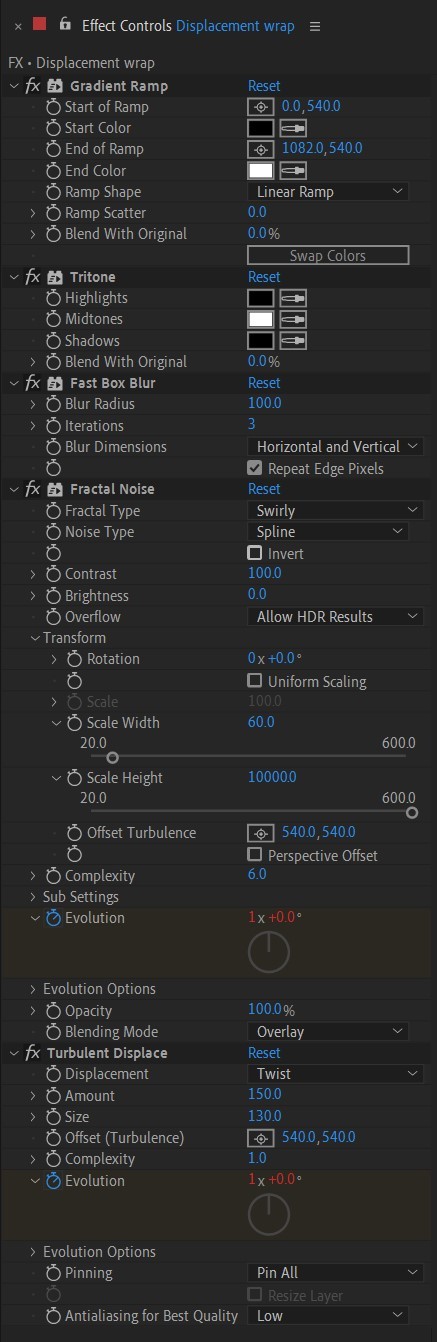
So far your work should look something like this:

• Then it’s time to add colors! Create another new composition, add your FX pre-comp to it, add a background with a new solid layer (CTRL + Y).
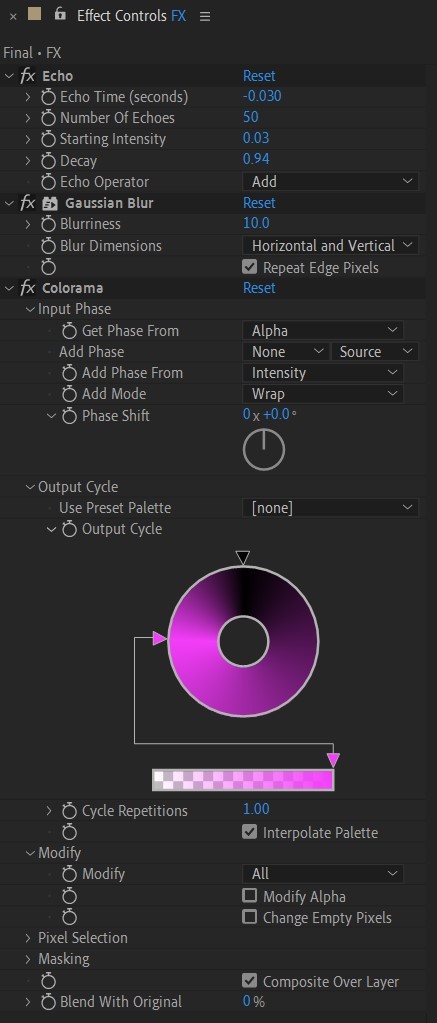
• Then add Echo effect to your FX pre-comp, change Echo Time to -0.030, Starting Intensity to 0.03, Decay to 0.94.
• Next add Gaussian Blur effect, make the Blurriness 10.
• Add Colorama effect, change Get Phase From to Alpha. Then go to Output Cycle and change the color presets (Use Preset Palette) to let’s say Solarize Red (it doesn’t really matter, we’re gonna change the colors, we just need it to have two sliders instead of a lot). Then grab a bottom slider and put it on the left side and choose the lighter color you want. I chose pink.
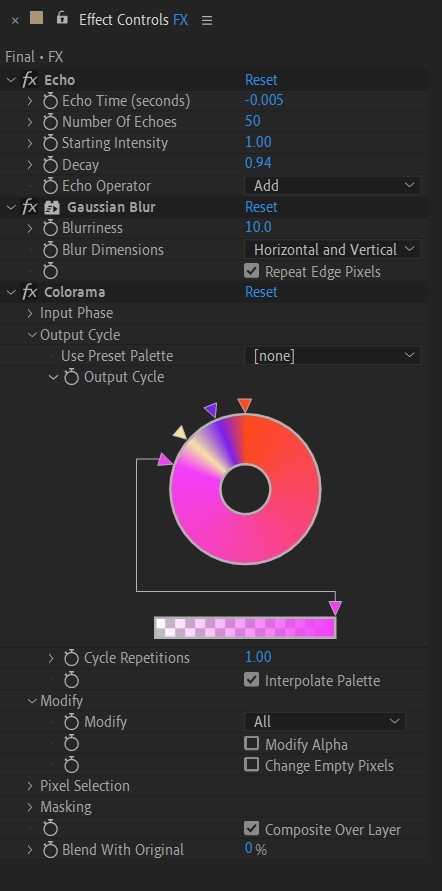
• Now duplicate your FX pre-comp. We’re gonna change some parameters on the effects.
• So the first thing you want to do is change Echo Time to -0.005, Starting Intensity to 1.
• On Colorama go to Modify and uncheck Modify Alpha. Then go to Output Cycle, and add more colors like you see in the screenshot.
• Duplicate your FX pre-comp one more time and delete all the effects on it.
• Last thing to do is add an Adjustment Layer (Ctrl + Alt + Y), add the Noise effect, and make the Amount of Noise 15.0%.
• And you're done!
#art tutorial#tutorial#friday#art#motion design#artists on tumblr#tips and tricks#art tips and tricks#tips#artwork#digital art#gif#animation#visual art#loop#gif tutorial#learn after effects#illustration#2d animation#infinite loop
31 notes
·
View notes
Text
I work as an animator in the anime industry!
The first thing I need to do for LO (Layout; the process animators in Japanese animation do) is perspective.
I made a tutorial on the Clip Studio Paint tools that make my job efficient (or possible even)
Check it out:
The Clip Studio Paint Tool I Use As An Anime Animator
youtube
https://youtu.be/g70I0wbObuQ
#anime animator#Animation#sakuga#anime tutorial#animators on tumblr#2d animator#アニメーター#アニメーション#アニメ#レイアウト#Youtube
127 notes
·
View notes
Text

Animation - Timing Charts / 12 FPS
Most animations typically use 12 FPS in a 24 FPS video format, which causes each frame of the animation to repeat.
1 Second = 12 frames
1 Frame = 0.08333... seconds
1 Keyframe every 6 frames
2 Timing charts = 1 second
-
I prepared a second example to notice that although the timing charts have different effects, the time that the animation takes place is exactly the same.
-
Download on:
Gumroad
Blogger
Payhip
#animation#animation tutorial#2d animation#animated gif#animated#frame by frame#anime#cartoon#keyframe#how to#how to draw#gif#tutorial#art tutorial#keyframes#anime gif
178 notes
·
View notes
Text
For anyone struggling with Procreate Dreams, check out this tutorial video. I’ve seen a number of people complain Procreate doesn’t have key features like Onion Skins or Mask Clipping, and that’s simply not true. You just need to reorient yourself with where they are and how to access them. This short video goes into detail on where these features are and how to use them.
youtube
#procreate dreams#procreate#animation#2d animation#dreams#procreate animation#procreatedreams#procreate tutorial#tutorial#Youtube
13 notes
·
View notes
Text
Orthographic projection to animation: how to make a 3D guide and turnaround from front and side views.

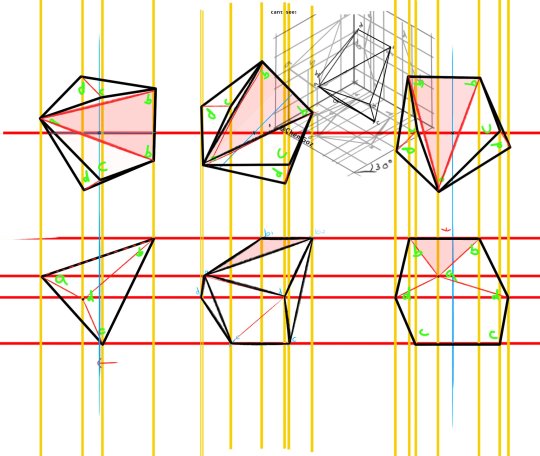
It's simpler than it looks (promise)
(Originally posted to twitter on November 2021. Original posts: 1 & 2)
Descriptive geometry is something I found revolutionary, and despite its main use being in architecture, I was surprised in all my years of researching animation as a hobby I had never found it used to construct shapes. This is, of course, because drafsmanship is the main fundamental skill required in the field, rather than technical construction. Either way, eventually I did find the use of a top-down view of a figure as a known trick in the animation world. Now, just a matter of figuring out how to get an accurate top-down view, right?
Here are my notes!
If you find this useful please support me by following my twitter. I'm trying to get it off the ground and would love to share more things like these in the future.
In a projection like this, you start with your side view and front view aligned side to side on a square grid. The bottom left corner is where your top-down view will go, while the bottom right only has a 45 degree line.

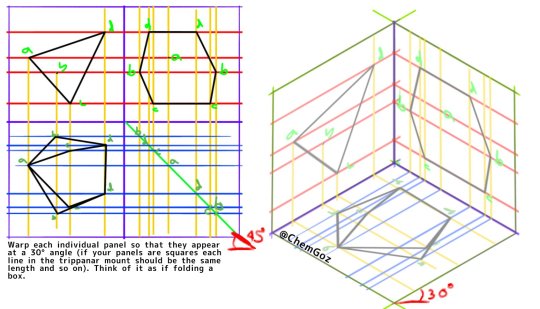


Pretty cool, if maybe overcomplicated ;)
Program: IbisPaint
#animation#geometry#descriptive geometry#2d animation#turnaround#art#design#architecture#tutorial#ChemGoz Tutorial#animation trick#animation tutorial#art tutorial
8 notes
·
View notes
Text
Quick summary of the workflow for my animations
(using my P3P gif as an example)
#speedpaint#timelapse#tutorial#p3p#persona 3#persona 3 hamuko#artist on tumblr#2d animation#motion graphics#animation#hamuko arisato#kotone shiomi#minako arisato
131 notes
·
View notes
Text
We make blog posts for artists!
We have a bunch of blogs that are nice and ready for you to read! Pixel Art, Vtubers, Tutorials, and more!
Click the link under each image to read up!
And there’s plenty more where these came from!

Pixel Art Showcase
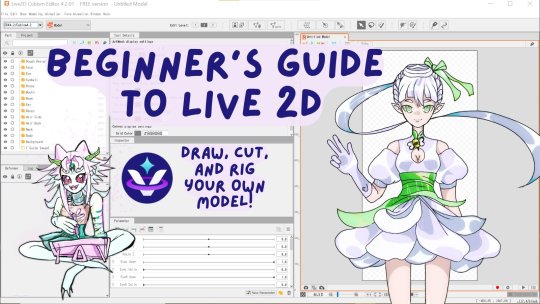
Beginner’s Guide to Live 2D

Writing Lore for your Original Characters

How to Draw: Animal Characters
#unvale.io#unvale#art tutorial#art resources#vtuber#animal characters#lore#writing#pixel#pixel art#live 2d#virtual youtuber#ocs#original character#original art#artists on tumblr#creatives on tumblr#blog#blog posts#artist blog#check out our guides and blog posts!!!#we put a lot of care into these :D
30 notes
·
View notes
Last Seen Blogs

lulzie
Typically me
abibleverseaday
A Bible Verse A Day

termsandconditions33
SissyOlivia

satinspandexandy
Andy