
roselollipop
RoseLollipop
Heather R.G. Norman: Games Dev./Artist, Ex-Student of 'SAE Qantm'
39 posts
Don't wanna be here? Send us removal request.
Last Seen Blogs

rev-1832
Did someone say rebellion?

jayanthitbrc
Untitled

wirralcounsellingassociation
Wirral Counselling Association

mysuperlaserpiss
Team Dark? Haha more like Team Dork.

ilovetaylorswift13paulsidoti13
Untitled
Text
Summary of Self-Care Recommendations
[’The Self-Care Toolkit’ Facebook Page - Pinned Post]:
"The Book of Overthinking" - by Gwendoline Smith 🧠 (Learn CBT for the Tools to Analyse your own Unhelpful Thinking Patterns & Correct them) [This, naturally, can also apply to other people's words/behaviour]
undefined
youtube
-------------------------------------------------------
You may want/need to speak to a Psych. There are different types [In order from ‘Day-to-Day’ to ‘Serious Help Needed’]:
"Psychologist" (Talk Therapy)
"Clinical Psychologist" (Cognitive Behavioural Therapy)
"Psychiatrist" (Talk Therapy & Medications)
Openground MBSR Course 🌿 [Facebook Page] (Learn Mindfulness Meditation Practices to Develop Emotional Resilience/Self-Discipline)
Live a Healthy Lifestyle (Good Sleep Routine, Healthy Food, Good Hygiene) 💤🍳💧
Find a Sports Hobby you enjoy/are passionate about to motivate you to Exercise Regularly 💪 (To help stay Mentally & Physically Healthy) [Option: Try to use Flexibility/Workout Apps regularly 📱 &/or if possible, Learn Self-Defence 🥋]
🛄 Develop Anti-Stress Strategies & Create a Coping Box/Bag - Collect physical items that positively engage your senses, remind you of anything that makes you feel happy, relaxed, comforted or motivated, or that can at least be used as visual reminders of other stress strategy activities
Memorize your anti-stress strategies so that they're always with you (even if the Coping Box/Bag itself isn't)
[You could include a notepad or printed pages of the CBT Thought Viruses, Flashcards (Reroute Thoughts/Affirmations) & Mindfulness Meditation Practices]
undefined
youtube
-------------------------------------------------------
Go on Outing/to Social Event, Get Outside for the Sun & Fresh Air 🎉🏞️ (R&R = Relax and Recharge regularly to not Burnout)
[👨👩👧👦 Try to only socialize with people who are positive influences on your life. Keep your distance from (or cut out, if necessary/possible) difficult/poisonous people - & always make a point of keeping people around you 'in the loop' asap about what's happening around or with you socially so that there are no misunderstandings & so that their lack of awareness can't be taken advantage of by troublemakers. Always be willing to hear out both sides of a social conflict. The first person who talks isn't always the one telling the truth (Even if they seem quite convincing in how they sound & behave, this might be an act) - And in some situations (not all), both may be lying or telling half-truths]. If you don't care or don't know for sure, it's best to remain neutral & behave the same as usual. That way, the potential liar(s)/manipulator(s) - whoever they are - don't get what they want from you through trickery. If you do care, then investigate impartially so you can decide what to think for yourself (Carefully, like a detective)]
undefined
youtube
-------------------------------------------------------
To Aussie targets/victims & bullies alike, or anyone who is putting up with personal issues they don’t know how to deal with, look at: CCI - Self Help Resources for Mental Health Problems. It might help you. (These workbooks can help everyday people too, not just people with diagnosed mental conditions) [Why for the bullies? Because I understand - from researching psychology - that bullies bully as an ineffective coping strategy to try and counteract - or at least distract themselves from - their personal issues (Them blaming their targets/victims by claiming: 'They deserve it’ is just the excuse that they use to cover up this fact)]
Stay safe & get/stay well 👍🏻
- Heather RG Norman, 2022
-------------------------------------------------------
<– BACK
#selfcare#productivity#worklifebalance#mentalhealth#healthylifestyle#healthandwellness#health#physicalhealth#therapy#stress#stressrelief#stressstrategies#copingwithstress#advice#adviceforlife#adviceforsuccess#wisdom#survival#survivalskills#lifeskills#socialskills#socialstress#bullying#bullyingawareness#bullyingprevention#psych#psychologist#heather.r.g.norman
0 notes
Text
Short Thought Quotes
"The true proof of 'how good a person is' isn't in what they have or who they're with, but who they are and what they can do" - HRGN, 2021
-------------------------------------------------------
<– BACK
#personal thoughts#journal#publicjournal#deepthoughts#deepthinking#heather.r.g.norman#revelations#personal experiences#hindsight#experience#wisdom
1 note
·
View note
Text
AFL's History of ‘Tough Guy’ Issues with Severe Consequences
I can't believe that AFL players are still expected to go out on the field without protective equipment. Say no to unprotected body bashing! American Football players wear protective equipment, military soldiers wear protective equipment, pro fighters wear protective equipment and medieval knights and the Roman gladiators were known for their armour.
Anybody who says that AFL players are pansies if they request protective equipment for the sake of their physical health might as well claim that the knights of old, gladiators, military soldiers, pro fighters and American football players are all pansies for wanting to minimize the effects of impact. Ramming into people counts as a form of attack. They have every right to view it as a sport of war, in my opinion. Gladiators deserve armour!
- Heather RG Norman, 2021
--------------------------------------------------------------
<– BACK
#AFL#football#AFLPlayers#unprotectedbodybashing#protective equipment#armour#physicalhealth#physicalhealthinsport#sport#bodybashing#protectionshaming#toxic masculinity#australian culture#journalofthoughts#protection#shaming
0 notes
Text
Organising & Finding Balance in Life
I have been trying to organise and find balance in my life for years now. To have enough break time to relax and do things purely for fun - so that I don't burn out regularly &/or damage my health - but to also make consistent progress to satisfy my passionate, ambitious side and work towards a future I can see and would like for myself. There's also the fact I see two sides to my future to balance between: Games Development & Ballroom Dancing.
The app I use the most for organising my days is Remente. This mobile app is a handy to-do-list and journal rolled up in one. With this, I can make notes on my progress as I go.
While keeping track of what I do each day, I have noticed a pattern over time. On my most productive days, I can do up to six tasks a day - assuming that most tasks are thirty minutes to an hour long (I sometimes spend longer than intended on some tasks. It happens both intentionally and by accident).
However, if I try to keep this up for more than two days in a row, I crash due to the amount of effort I put into each task each day. When this happens, I can barely do anything the day after. I intend on changing this in future, as I make progress in balancing my life and continue to prioritize my health regularly, however this is at least my current state of mind and body for now.
My mother had said to me recently that it's actually quite normal for people's productivity to shift up and down throughout the week anyway (despite their best efforts). So no one should worry too much about that.
So, therefore, I've decided to intentionally plan my week out this way. Two days of working hard (doing six tasks max), one or two days rest (where I don't expect myself to do anything in particular), and repeat.
I should make a habit of checking the time more regularly &/or using my phone's countdown timer to make sure I don't go overtime on tasks (resulting in other tasks not getting done) unless I choose to intentionally.
If I want to do something new, I should switch out one of my current tasks - that's of a similar nature to the new task - in order to make room for it (I can switch the old task back in later if I want or need to for whatever reason).
Having around the same number of tasks of a similar nature each (e.g.: Games Dev. Goals vs. Ballroom Dancing Goals) is how I'm trying to balance the two sides of my life.
I'm also finding that trying to keep the order of tasks the same each day - as much as possible - makes it easier to get into a productivity flow (as the order of transitions between tasks becomes a habit in itself).
I have been testing out whether or not some of my current tasks could fulfill more than one requirement at once. If they can, and I take this into account, I could save time and energy for other things (e.g.: Stretching in Online Ballet Classes feels similar to Movement Mindfulness Meditations = Ballet/Dance as a Mindfulness Activity?)
It depends on the individual, however, I've read in the past that people should plan to try and do three tasks each working day and go from there. It's all about consciously, intentionally experimenting within your limits.
If a person pushes too far past their limits (like I did in my uni days), there would naturally be negative consequences for that that they'd need to overcome. As a physicist would say: "Each action has an equal and opposite reaction". This seems to be a true fact of life in general - not just a law of physics.
- Heather RG Norman, 2021
--------------------------------------------------------------
<– BACK
#organizing#balancedlife#breaks#task list#to do list#journal#personal journal#daily life#workaholics#passion#ambition#consistent#multipotentialite#health#healthylifestyle#physics#physicsislife#expectations#productivity
0 notes
Text
My Journal of Thoughts
Here are some personal ponderings that have gone through my mind and that I wish to express:
Short Thought Quotes
Written Blog Thoughts:
Entry 4 - Summary of Self-Care Recommendations (’Self-Care Toolkit’ Facebook Page)*
Entry 3 - AFL's History of ‘Tough Guy’ Issues with Severe Consequences
Entry 2 - Organising & Finding Balance in Life
Entry 1 - Being Targeted &/or Bullied Throughout My Life: The Reasons Why
-------------------------------------------------------
<– BACK
#personal#thoughts#personalthoughts#journal#publicjournal#deepthoughts#deepthinking#heather.r.g.norman#revelations#personal experiences#hindsight#experience#wisdom
1 note
·
View note
Text
Being Targeted &/or Bullied Throughout My Life: The Reasons Why
I forgive myself for not knowing better. It was the cult that brainwashed me into thinking that I couldn't be considered to be a 'nice person' and standing up for myself at the same time without being unethical or nasty - That you should 'turn the other cheek' & ignore how badly people treat you. That you should never 'stoop to their level'. They only see it as weakness, despite how much strength is truly required to endure it rather than 'lash out' or defend yourself in response.
Dr. Phil says: "You teach others how to treat you". Thanks to the religion, the old me from years ago intentionally let them walk all over me with the justification in mind that that made me the nicer and so therefore the better person.
If people behave in a territorial, insecure, animalistic way, I've found out a while back that the only way to get through to them is to speak to them in the same language as them. They don't respect you otherwise. They only misinterpret it as weakness. That doesn't make me one of them, however. If I learn a different language, that doesn't automatically make me a native speaker of it.
It's ok to come across 'nasty' if it's purely in self-defence against someone who is attacking you &/or others - as long as what you're saying is necessary, fair and true. It's worth the risk of coming across 'nasty' as long as you truly believe you can't stand up for yourself or others any other way - And unfortunately, I believe and have learnt that there are situations with certain personality types, where it can't be avoided due to them having and acting on bad intent. Either these desperate acts are in order to overcompensate for their insecurities or due to an exaggerated sense of self-importance due to being spoilt or not being emotionally intelligent enough to see past themselves.
It's the person's intent that determines whether a person is a 'good person' or a 'bad person' and everyone has a right to stand up to an attacker of the innocent - Whether it's verbal or physical abuse, it does matter who starts it. The starter of a fight is the aggressor. The one with an agenda to bully others into submission so they can force their way or to lie to other in order to manipulate people into helping them (As they know deep down that what they're wanting others to do isn't fair &/or isn't something others would say or do voluntarily if they knew the truth).
I forgive them for their weakness not because I feel they deserve it - I don't. But because a grudge only hurts the one choosing to hold it (At least a majority of the time that they keep it with them) and they simply aren't worth the energy that's required to keep that grudge going. To take up that much of a person's mind isn't something they deserve.
For their insecurities, their lack of morals & their sheer desperation, I forgive them and pity them. I know it isn't truly personal, but a reflection of their own lives and unhealthy thought patterns.
More importantly - once again - I forgive myself for not knowing better. I was a victim of circumstances out of my control and would have become a stronger person sooner if I had been born under different circumstances.
If I had been born in an environment that doesn't expect unreasonable, 'perfect' behaviour based on unrealistic expectations (that don’t take other people’s behaviour into account at all), discourage social interaction with 'worldly people' (which in itself, is self-sabotaging and leaves oneself vulnerable through silence and isolation) and doesn't harshly and narrow-mindedly judge the necessary, natural behaviour to defend against an attacker, I wouldn't have been as much of a target or victim as I was throughout most of my young life.
I would have stood up for myself more and would have spoken up more in general. I know I have always had the strength to do so since I was a small child. However, I felt that I couldn't as I was convinced throughout my school life that it was wrong, immature, and that it should be seen as beneath me to even respond - let alone react to aggressive behaviour.
'Respond' = Intentional/Consciously Deciding (Based on who you are & what you believe)
'React' = Unintentional/Instinctual Self-Defence via the Subconscious Mind taking over (Everyone has this - and this part of the mind, if or when triggered, seems to have no concept of right or wrong - only survival)
I feel we must all endeavour to develop the self-discipline to remain in control of our own minds as much as humanly possible & to not let this innate side of ourselves to be used against us in any way (E.g.: Regularly do Mindfulness Meditation &/or a Martial Art or other sport that encourages/requires the development of self-discipline).
I have given it plenty of thought in the past out of the principle of the thing. If there was truly something I had done wrong without realizing it that might have provoked it, naturally I would have wanted to find out in order to correct it so it wouldn’t happen again. However, even after plenty of self-analysis, there was nothing. Just the sole fact that I have always tried to be the best version of myself.
To people that don’t feel ‘good enough’, that would be seen as a bad thing, making me a threat in their eyes for them to attack and badmouth. Unfortunately, there isn’t anything I can or want to do about that. I have every right to try my best in life and I shouldn’t ever have to apologise for that.
So, with nothing else to do, I just felt sorry for myself - the innocent victim - instead, knowing that I hadn’t done anything wrong and reaching the conclusion that the only reason why I was being mistreated was because they felt jealous and intimidated by who I was, who I could become, and wanted to discourage people from having to do with me out of fear of ‘looking bad’ in comparison to me.
A.K.A: They were using me as someone to take their personal issues out on with the excuse that they think I’m better than them &/or luckier than they are (and they view that as fact rather than their own opinion), so therefore, I ‘deserve’ to be sabotaged in life and ‘brought down a peg or two’ with their lies. That that’s them ‘levelling the playing field’ and ‘making things fairer’ for themselves in an unfair world where they think they’re so unlucky and disadvantaged in comparison. Very logical, very calculating, very intentional - and extremely insecure.
The best revenge, as they say, isn't revenge at all, but is to simply not give up on living well, to always aim to be the best version of yourself (because that is ok to do - especially in terms of personality) and to always find reasons to genuinely be happy - which I always have done and always will set out to do. That’s how haters lose.
- Heather RG Norman, 2021
--------------------------------------------------------------
<– BACK
#revelation#thoughts#mentality#bullying#targeted#religion#organized religion#dr phil#good person#bad person#dominance#instinct#selfishness#moral sense#ethics#positivity#human condition#weakness#desperation#insecurities#unethical#wisdom#hindsight#experience#victim#victimized#innerstrength#respond or react#self discipline#haters
0 notes
Text
C# Unity Revision Notes - Part 2: Different Types of Operators
Operator [Programming] - A symbol that tells the compiler to perform specific mathematical or logical manipulations
Compiler - Converts high-level programming languages [The last tab (4): ‘Assem/Interp/Compiler‘ has the most relevant information] (That use human words) to low-level programming languages/machine code [E.g.: C# down to Binary Code (Uses 0′s & 1′s)]
--------------------------------------------------------------
The Main Operator Types are:
Arithmetic Operators [Maths]:
+ (Plus) - (Minus)
* (Times) / (Divide)
% (Modulus)
++ (Add 1 each Time) -- (Minus 1 each Time)
Relational Operators [Comparisons]:
== (Are they equal?) != (Are they NOT equal?)
> (Is the left value greater than?) < (Is the right value greater than?)
>= (Is the left value greater than or equal to?) <= (Is the right value greater than or equal to?)
Logical Operators:
&& (And - If both are true...)
|| (Or - If either are true...)
! (Not - If the opposite is true...)
Assignment Operators:
= (Assign value)
+= (Adds the two variables then assigns to the left variable)
-= (Subtracts the right variable from the left, then assigns to the left variable)
etc.
--------------------------------------------------------------
A programmer can access components within Unity using the ‘Dot Operator’ (’.’) and can control these components through scripts. Using the ‘Dot Operator’ is the equivalent of typing up an address (E.g.: ‘Country.State.Suburb’) - or opening up files to access files within.
For example, in the line of code below (Figure.1), the programmer asks Unity to find the renderer of the GameObject the script is attached to, access the ‘material’ of the GameObject within the renderer, then access the ‘color’ sub-category within the material. Once the color of the GameObject is found, the programmer can change the color of the material on the GameObject to red using the ‘Assignment Operator’: ’=‘.

Figure.1 (Change-Material-Color.jpg, 2020).
Extra Notes:
Boolean Values: 1 = True, 0 = False
Use ‘Debug.Log’ to get the Unity console to display any variable/result - for testing purposes
Leaving comments within scripts is a way for programmers to quickly communicate with one another about how each script works
Use ‘//’ to leave a one-line comment within the script, or use ‘/’ + ‘*’ before a comment & ‘*’ + ‘/’ at the end of a comment if it takes up multiple lines
The below screenshot shows an example of the two different ways comments can be written within a script [Comments in the image = green text]:
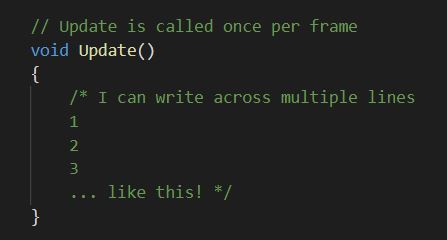
Figure.2 (CommentsExample.jpg, 2021).
--------------------------------------------------------------
References:
Change-Material-Color.jpg [Screenshot] (2020). Norman, H. Perth, Australia
CommentsExample.jpg [Screenshot] (2021). Norman, H. Perth, Australia
--------------------------------------------------------------
<– BACK
#gamesdev#gamesdevelopment#gamesprogramming#C#csharp#programming#scripting#unity#unitygameengine#heather.r.g.norman#roselollipop#roselollipop.artist#revisionnotes
0 notes
Text
C# Unity Revision Notes - Part 1: Variables & Functions
‘Scripts’ - are considered to be ‘Behaviour Components’ within Unity. They are applied to GameObjects & can be seen within the ‘Inspector’ (Unity UI). Whatever ‘instructions’ are typed within a script attached to a particular GameObject, apply to that specific GameObject. The act of typing up a new script or editing an existing one is called scripting (A.K.A: Programming).
‘Statement’ - A single line of code (that ends in a semi-colon - in C#).
‘Variables’ - represent/hold information (like ‘digital boxes’). There are different types of variables that hold different types of information:
Variable Types:
int = ‘Integer’ - Whole numbers
float = ‘Floating Point Numbers’ - Decimals
bool = ‘Boolean’ - True or False
string = Words/Sentences - e.g.: ”Hello World!”
char = ‘Single Characters’ - e.g.: ‘A’
Just below (Figure.1) is an example of how a variable is typed up in C#. One starts by specifying the variable type, then gives the specific variable a name, then assigns information (data) for it to hold using the ‘Assignment Operator’ (’=‘). Variable names should be written in ‘camelCase’.

Figure.1 (VariableStructure.jpg, 2020).
Establishing the variable type and the name of the variable is the ‘Declaration’ of the variable. The ‘Initialization’ of the variable is once the variable is has been assigned specific information to be used within the script (Figure.2).

Figure.2 (Declaration&Initalization.jpg, 2020).
--------------------------------------------------------------
‘Functions’ - (also known as ‘Methods’) - are blocks of code dedicated to a particular purpose which can be called from other parts of your code. They take in variables to use and ‘return’ variables (as results) after Unity is finished performing the tasks that make up the function. [‘Void’ type functions are the only functions that don’t return anything (The word ‘Void’ itself means ‘nothing’)].
As functions can be ‘called’ more than once, they are a great way to optimise code. If a programmer reuses code that has already been typed up as much as possible, then that saves them time and effort typing up new code.
The Basic Structure of All Functions (Figure.3):
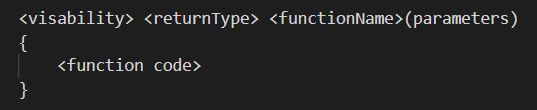
Figure.3 (FunctionStructure.jpg, 2020).
‘Visibility’ refers to whether a function is set as ‘Private’ or ‘Public’ (Both variables & functions can be ‘public’ or ‘private’. If not specified, they are ‘private’ by default. Public functions/variables are accessible within other scripts and within the Unity Editor)
The ‘Return Types’ to choose from are the same as the variable types (+ ‘Void’)
The ‘Function Name’ should be a name that indicates what the function does for the sake of clarity (& should be done in ‘PascalCase’).
‘Parameters’ - What ‘outside’ info needs to be fed into a function just before it’s called in order for it to work (In the form of values &/or references)
One can call a function simply by typing the name of the function and adding curly braces for the parameters that are needed. If there aren’t any, then they’re left bare (E.g.: FunctionName();) (Figure.4).
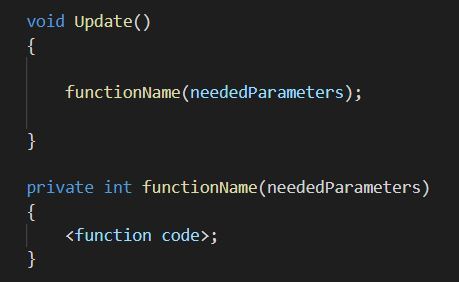
Figure.4 (CallingFunction.jpg, 2020).
A function that has a result requires a declared variable to hold this end result within, before this information can be sent out to other parts of a script using a ‘return statement’ at the end of the function. (One can call a function within another function).
Here are some examples of specific functions that already exist with Unity from the beginning and their purposes: (Figure.5).
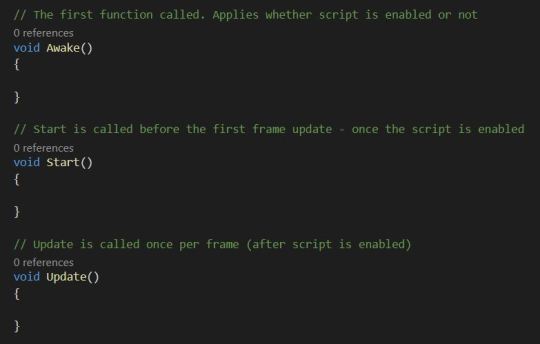
Figure.5 (ExampleFunctions.jpg, 2020).
--------------------------------------------------------------
References:
CallingFunction.jpg [Screenshot] (2020). Norman, H. Perth, Australia
Declaration&Initalization.jpg [Screenshot] (2020). Norman, H. Perth, Australia
ExampleFunctions.jpg [Screenshot] (2020). Norman, H. Perth, Australia
FunctionStructure.jpg [Screenshot] (2020). Norman, H. Perth, Australia
VariableStructure.jpg [Screenshot] (2020). Norman, H. Perth, Australia
--------------------------------------------------------------
<–BACK
#gamesdev#gamesdevelopment#gamesprogramming#c#csharp#programming#scripting#unity#unitygameengine#heather.r.g.norman#roselollipop#roselollipop.artist#revisionnotes
0 notes
Text
C# Programming (Unity)
Back in university, there wasn’t really enough time for me to go over everything within the beginner/intermediate level of games programming properly. The nature of university life meant that I had to focus on fulfilling the specific requirements of my assessments and getting them done quickly.
In my opinion there is no such thing as understanding your fundamentals too well, so I plan on writing up blogs to thoroughly go over the basics of C# programming for Unity and make my way up. That way, although I’ll be going over things I already know, if I have missed anything I’m bound to come across it along the way (and extend past where I got up to with time).
My ‘C# Unity Revision’ Blogs:
+ C# Unity Revision Notes - Part 1: Variables & Functions
+ C# Unity Revision Notes - Part 2: Different Types of Operators
--------------------------------------------------------------
<–BACK
#gamesdev#games development#gamesprogramming#c#csharp#programming#scripting#unity#unitygameengine#heather.r.g.norman#roselollipop#roselollipop.artist#revisionnotes
2 notes
·
View notes
Text
My Creative Journal
- - - My Contact/Info Links - - -
- - - My Journal of Thoughts - - -
Here is where I’ve decided to upload my research & development blogs, creative blogs, etc. throughout my ‘post-uni’ life: [Uni blogs are further down].
+ C# Programming (Unity)
#xyz#heather.r.g.norman#roselollipop#roselollipop.artist#generalist#gamesdev#artist#gamesdevelopment#gamesdesign#animation#digital art#gamesprogramming#gamesaudio#audio#music#creativejournal
1 note
·
View note
Text
Blog02-Twin-Stick Shooter: Level Functionality
This second blog on the twin-stick shooter prototype game will be a summary of how the project was finished off.
My first task since the previous blog was to create a health system for my character. I was following along with Code Monkey’s (2018b) tutorial on how to make one, however, this way of creating a health system was more complicated than it needed to be for my project, so I decided to create a simpler health system based off of a mixture between that, another of Code Monkey’s tutorials and Alexander Zotov’s (2017) tutorial instead.
Here is one of those tutorials: How to create a basic health bar:
youtube
After the basic health system was finished, I needed to set up how the health points would be taken from the player’s character or enemies. So, naturally, I made it so the character and enemies take damage when they come into contact with bullets. (Enemies can accidentally shoot each other in this). In order to do this, I had decided that I needed to use ‘OnCollisionEnter2D’, however I ended up using ‘OnTriggerEnter2D’ instead as my first idea on how to go about it wasn’t working (with how I had things set up for my game specifically) for some reason and I needed to move onto the other requirements quickly.
This is the tutorial I looked at on how to use ‘OnCollisionEnter2D’:
youtube
While I was working on the health system, I was also writing up a script for the enemy’s artificial intelligence. The main tutorial that I followed in order to do this was another tutorial from Blackthornprod:
youtube
This tutorial doesn’t have the enemy move with physics, isn’t as simple and clear as it could be and doesn’t have everything that I felt was needed for the enemy AI script, so - naturally - I made alterations to what was shown in the tutorial.
I changed the script so that the enemy uses ‘Rigidbody.Velocity’ to move (like the player’s character).
I had the distance between the enemy and the character calculated first and held in a variable called: ‘distanceBetween’. This was so that I could simply use the variable name whenever the results of this calculation were needed rather that repeating the same calculation over and over again throughout the function (This means there’s less code & it’s clearer).
I made it so the enemy could only see the player if the player was within the enemy’s sight distance and gave the enemy a different objective for if they can’t see the player (Can see = kill player, can’t see = continue heading to duck pond to hunt).
I then added a ‘Death’ function within the Health script that checks for which game object the script is attached to (player or enemy) and whether the character’s current health has reached zero (or below - just in case). It then either loads a basic main menu I created and saves the current score as the highscore (player) or adds to the current score and destroys the game object (enemy).
Here are a couple of the tutorials I looked at in order to make a scoring system for my prototype game:
Using Static Variables:
youtube
Using ‘PlayerPrefs’:
youtube
The scoring system was the last thing I worked on before it needed to be submitted, so I didn’t have much time left and had to rush through it. This meant I had left smaller details out and hadn’t had time to work out last minute problems. In future I will try to allow for some extra buffer time before the due date - especially seeing as programming required a calm, rational mind to do the work properly. I was advised to try to keep all the contents of a particular script together in future, rather than allowing them to cross over with other scripts - if possible. (General rule: ‘One script, one purpose’).
<--BACK
0 notes
Text
My Contact/Info Links
Links to my social media websites & other websites:
ARTIST:
Artist Facebook Page
Artist Instagram
My Online Portfolio
LinkedIn
PERSONAL:
Personal Facebook
Personal Instagram
Twitter
BOTH:
YouTube Channel
Pinterest
--------------------------------------------------------------
<– BACK
1 note
·
View note
Text
Blog01-Twin-Stick Shooter: Top-down 2D Character Controller
The first prototype game of three to be made within the ‘Unity’ game engine this trimester would be a ‘top-down twin-stick shooter’. My main goal for the first two weeks was to create the 2D character controller itself so that the movement of the character could be controlled with the keyboard and the mouse could be used to aim a weapon. I also intended on setting up the player’s health so that when the character comes into contact with an enemy, they lose points and to set up a health bar which would reflect how many health points the player had left.
There are multiple ways that a game object - such as a game character - can be moved around the game world. This video below shows the different ways it can be done within Unity and the differences between them:
youtube
When I spoke to one of my lecturers, he reminded me that ‘Transform.Translate’ (or using ‘Transform.Position’) doesn’t actually ‘move’ a game object, but ‘teleports’ it to new coordinates. This is a quick, easy way to make a game object appear as though its moving, but because it isn’t really, physics aren’t applied to it when it’s first acted on. Doing things this way can cause odd situations like game objects appearing to ‘move’ into or through other game objects because they didn’t technically come into contact with one another when one of them changed locations. This way is only useful when one knows that the game object they will be ‘moving’ doesn’t need to collide with anything or be affected by gravity.
‘Rigidbody.MovePosition’ is similar to ‘Transform.Position’ in the sense that one is simply giving the object new coordinates - It doesn’t add velocity or change the velocity. However, it does recognise and interact with colliders between its original position and new position per fixed update as long as the rigidbody isn’t set to kinematic (which means it doesn’t use physics at all).
He also said that ‘Rigidbody.AddForce’ is considered to be the most realistic way of moving a game object, however it’s more complicated and requires more tweaking to get the desired movement.
‘Rigidbody.Velocity’ allows one to move a game object with physics, however, isn’t as realistic as it just simply changes the velocity directly. This is a good way of actually moving something with physics, and at the same time, make it easier to control how an object moves. This is the way I decided to have the player control the character.
youtube
I then looked up how to get the weapon to aim in the direction of the mouse and fire using the left mouse button:
youtube
For some reason, despite following along with the tutorial, the projectiles were being spawned with the wrong rotation as well as would travel in random directions that didn’t link up with where the weapon was pointing at the time.
I had asked for help, and it turns out that the projectile script had been written in a way that meant that the calculation had a double up. ‘Transform.Translate’ - by default - uses a game object’s local transform information, however, what was needed was for the projectile to move based off of the world space’s coordinates. So, therefore, ‘Transform.right’ (also local) needed to be replaced with ‘Vector2.right’ (global).
I am concerned that moving the weapon with ‘transform.rotation’ may cause some issues in future. I’ve been trying to keep the character controller physics-based, however, setting the game object’s transform rotation directly (like in the tutorial) isn’t consistent with this goal. I may look into another way of doing this later in the project (e.g.: using Hinge Joint 2D). I will next look into setting up the player’s health and health bar as I’d planned.
References:
Blackthornprod (2018). HOW TO MAKE A 2D RANGED COMBAT SYSTEM - UNITY TUTORIAL [YouTube Tut], Retrieved February 8, 2019, from: https://www.youtube.com/watch?v=bY4Hr2x05p8
CodeJunkies (2018). Unity 2D - 8 Direction Player movement using Physics [YouTube Tut], Retrieved February 8, 2019, from: https://www.youtube.com/watch?v=km-04aUJy4o&t=99s
Unity3d College (2017). Unity 101: 5 ways to move Unity3D Objects [YouTube Tut]. Retrieved February 8, 2019, from: https://www.youtube.com/watch?v=tNtOcDryKv4&t=194s
<--BACK
0 notes
Text
Blog02-1st Try at a Random Dungeon Generator
This is a blog detailing how the random dungeon generation tutorial series (3 videos) that I was following for my twin-stick shooter prototype game went for me: the problems that occurred, my successes and failures.
youtube
Despite following the tutorials, the random dungeon generator wasn’t working. No tiles would spawn. Rather than having to try to search through what was done in my project versus the YouTuber’s, I decided to start it fresh, hoping that if I redo the steps I would find out what I did wrong or at least notice more the second time around. This worked well. I was able to make progress past my first time trying it and successfully spawn random tiles that would make up the game’s level.
youtube
The next problem was that the random dungeon generator was spawning too many tiles one time around and too few another. I wanted more control over how many spawned. I had given it a go myself; trying to alter the tile spawner script, but it appeared to be ignoring my current tile count variable. I ended up asking a lecturer for some help with this. He ended up recommending a static variable in order to make sure that all copies of the spawner script would have the same number of tiles remaining before it would stop. I feel I may have also put the count variable I tried within the wrong if statement brackets.
youtube
I didn’t have time to fix the gaps that were left open during some level spawns. In the tutorial, there was a closed gap tile with no openings to plug up the rooms with spare gaps at the end. For me, they would spawn in some situations where they were needed, but not others. I feel that if I had added a condition to that if statement: that if the spawn point detects no other spawn point in its location after a certain length of time, a closed gap tile should be spawned, then this may have fixed the problem. I didn’t have time to try this out.
In the end there wasn’t time to get the random dungeon generator fully functioning, however I don’t regret giving it a go as I have a better idea of how it can be done now that I have tried.
As touched on in the last blog, I had relied to much on finding solutions that others had already come up with on different websites and different video tutorials and didn’t think up my own ideas enough. In future, I’ll go about my scripting research in this way:
Research into how people go about a particular task
Try to use this as inspiration for coming up with my own ideas/plan as to how to go about it
Write up a document on the details as to how I want to try and get the scripts to behave and interact with each other (plus, colliders/triggers/tags etc.)
Look up multiple tutorials that will help me towards my new goals
References:
Blackthornprod (2018). RANDOM DUNGEON GENERATOR - EASY UNITY TUTORIAL - #1 [YouTube Tut], Retrieved October 14, 2018, from: https://www.youtube.com/watch?v=qAf9axsyijY&list=PLBIb_auVtBwA-qr2-WnWX0LjZXkqKu5Aj
<-- BACK
0 notes
Text
Blog01-The Start of a Twin Stick Shooter
At the very beginning of the twin-stick shooter project, I had taken a look over the requirements of the Unity prototype game and made a summary version of a game design document in order to write out the details of what I planned on doing. (This was in terms of game design only, not the details of how I planned on having the scripts behave & interact with one another). I decided to make a forest dungeon where the dense trees would act as disguised walls to prevent the player from roaming around outside the level.
After doing the planning for this, I looked up different Unity tutorials on YouTube to find out how others have gone about things and followed along with some of them. One of the things I looked up was how to make a random dungeon generator. This wasn’t a part of the requirements, but I was excited to give it a go.
Unfortunately, the random dungeon generator ended up taking longer to try out than I anticipated, so I eventually had to leave it and move on to the necessities of the project. I should have left the random dungeon generator until I had completed the base requirements first. Prevention is easier than trying to get myself to move on while in the middle of a task, however I still need to work on ‘temporarily giving up’ where I can.
I used the level tiles to construct a level by hand as the random dungeon generator was still generating levels with openings into the nothingness of the 3D scene.
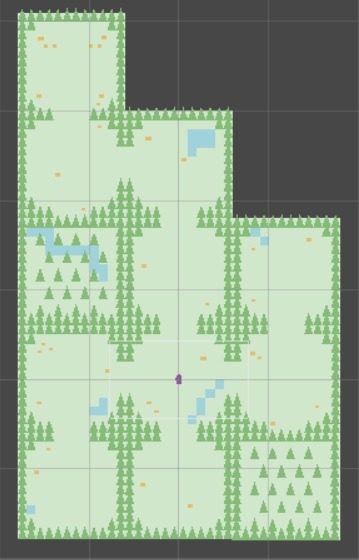
Figure.1 (HRGN-MyLevel-Handmade.jpg, 2018).
I had created all of the greybox sprites within Unity itself using the primitive shapes Unity has in order to save time. I had a small, brown rectangle, a medium-sized, yellow oval and a giant, white diamond to represent the three different monsters I was spawning into the scene. They each had different speeds and different attack levels depending on the monster type. While the enemies were overlapping with the player, they would each seep away the player’s health points.
I also created trees, large and small rocks and a water block that I could use duplicates of to create rivers. These were going to be used as obstacles to get around within the level. I was tempted to have the internal obstacles randomly spawn upon each tile - which involves a similar process as the random dungeon generator I tried and the enemy spawner, however I was able to stop myself from acting on it when I didn’t have the time for it.
youtube
The enemy spawner script that I had tested on a single tile had to be altered for my larger dungeon as there were now multiple enemy spawners (one for each tile - except some) in the scene at once. The problem was that all the enemy spawners would spawn enemies regardless of how close or far away the player was. This wouldn’t be very realistic and would mean there would be an overwhelming number of monsters after the player all at once.
I wanted some areas of the level to be safer or to at least limit the number of enemies spawning by stopping more monster from being spawned as long as the player doesn’t disturb ‘the hive/nest’. I decided to add copies of a trigger zone that took up the whole of a tile onto the enemy spawner game objects and added to the enemy spawner script so that if the player entered a particular trigger zone, enemies would spawn at that spawner, and if the player left the zone, the enemies would cease to spawn (although the monsters the player has disturbed will continue to come after them). I was able to think of this and get it working successfully without the use of tutorials.
The player is a purple oval with a crosshair for aiming. It took me a while to find a tutorial that explained how to make it so that the crosshair would follow and rotate around the player, but I eventually got it working.
youtube
I had misread the assessment documentation and had ended up setting it up so that the arrow keys controlled the crosshair and the WASD keys controlled the character. I need to double or even triple check details like these as I go along in future - just to be safe.
References:
Blackthornprod (2018). RANDOM MAP GENERATOR - EASY UNITY TUTORIAL [YouTube Tut], Retrieved October 14, 2018, from: https://www.youtube.com/watch?v=D4EOgZyNk-k
CouchFerret makes Games (2018). Unity Crosshair and Aiming in a Top Down Game - Tutorial [YouTube Tut]. Retrieved October 14, 2018, from: https://www.youtube.com/watch?v=WdqCbydJ8xk&index=6&list=PLM83Z6G5iM3mnAd3MVJeZh7b7ilHd73V5
HRGN-MyLevel-Handmade.jpg [Image] (2018). Perth, Australia: Norman, H.
<--BACK
0 notes
Text
SAE Blogs (Uni: 2016-2019)
+ SAE Blogs (Games Development) +
-------------------------------------------------------------------------------
+ GAM111 Blogs (2019): +
Blogs for the ‘Scripting for Game Devs’ Unit:
+ Blog01 - Twin-Stick Shooter: Top-down 2D Character Controller
+ Blog02 - Twin-Stick Shooter: Level Functionality
+ GAM111 Blogs (2018): +
Blogs for the ‘Scripting for Game Devs’ Unit:
+ Blog01 - The Start of a Twin Stick Shooter
+ Blog02 - 1st Try at a Random Dungeon Generator
+ SAE Blogs (Animation) +
-------------------------------------------------------------------------------
+ ANC220 Blogs (2018): +
Blogs for ‘Animation Studio 2′ Unit:
+ Blog01 - Project Management (18T1-ANC220)
+ Blog02 - Transferrable Skills Meeting Reflection (18T1-ANC220)
+ Blog03 - Getting to Know Adobe Flash/Animate
+ Blog04 - Basics of ZBrush
+ ANC220 Blogs (2017): +
Blogs for ‘Animation Studio 2′ Unit:
+ Blog01 - 3D Animation Pipeline & Process
+ Blog02 - The History of Animation
+ ANI210 Blogs (2017): +
Blogs for ‘Animation Studio 1’ Unit:
+ Blog01 - Greybox of Control Room/ BPS Geometry
+ Blog02 - Underwater Scene (Part A - Research/Planning)
+ Blog03 - Creating a Terrain - Basics (UE4)
+ Blog04 - Reflection on Transferable Skills Meeting
+ Blog05 - Coping Under Pressure
+ ANI210 Blogs (2016): +
Blogs for ‘Animation Studio 1’ Unit:
+ Week 3 - Blog 1 - Iterations
+ Week 3 - Blog 2 - Planning & Scheduling
+ Week 3 - Blog 3 - Publishing on Tumblr
+ Week 7 - Blog 4 - XRef in 3DS Max
+ Week 8 - Blog 5 - Sketchfab
+ Week 8 - Blog 6 - Modular Assets
+ Week 8 - Blog 7 - Treatment & Concept Art Iterations
+ CIU111 Blogs (2016): +
Blogs for ‘Overview of Industry’ Unit:
+ Week 1 - Entrepreneurship & Intrapreneurship
+ Week 2 - Residencies
+ Week 3 - Copyright
+ Week 4 - Secret Interview Techniques/Social Networking
+ Week 5 - STEM Woman & Sexism
#xyz#heather.r.g.norman#sae blogs#uni blogs#games development#animation#digital art#roselollipop#roselollipop.artist
1 note
·
View note
Text
Blog04-Basics of ZBrush
As this tutorial is for those who have never used ZBrush before or have used it very little, I will show you an image of the ZBrush user interface with text I have typed over the top pointing out (and for some, describing) the basic elements within. This image will act as a summary of some of the essential ‘need-to-knows’.
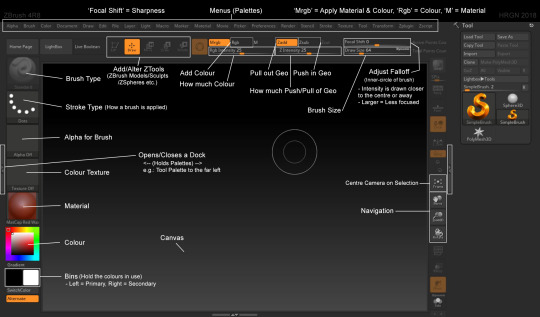
Figure.1 (HRGN-ZBrush-UI-Basics_v2.jpg, 2018).
When you first open up ZBrush, it will have a blank canvas. To start, either import a ‘Tool’ (which is what ZBrush calls the geometry you work with) by clicking the ‘Load Tool’ button under the Tool Palette to the far right (You’d probably be importing a 3D model that you had made in a 3D software like Maya or 3DS Max if you were choosing this option). Or, to create a ‘ZTool’, click where there is a large ‘S’ image within the Tool Palette. It will be the top left icon at the bottom of that palette. ZBrush will show a variety of primitive 3D meshes to choose from. Once you’ve selected one, it will replace the ‘S’ (for ‘SimpleBrush’) with whichever 3D mesh you chose. Click and drag on the canvas to add a copy of that particular tool. To ‘Clear Canvas’, press ‘Ctrl’ + ‘N’. Press the ‘Edit’ button (or ‘T’) to work on a 3D tool that’s on the canvas.
[The ‘Draw’ button allows you to add new 3D tools or to draw using SimpleBrush. SimpleBrush is used for drawing/painting in 2.5D]. ‘Edit’ = 3D Canvas, ‘Draw’ = 2.5D Canvas.
This is how to move around in 3D:
Rotate = Left Click on Empty Space & Drag (or within outside boarder if zoomed in on a tool)
Pan = ‘Alt’
Zoom In & Out = ‘Alt’ + ‘Click & Drag’ + Let go of ‘Alt’
If you use a graphics tablet, these hotkeys may be useful:
Make Brush Bigger Size = ‘]’
Make Brush Smaller Size = ‘[‘
Go up Subdivision Levels = ‘D’
Go down Subdivision Levels = ‘Shift’ + ‘D’
Add Subdivision Level = ‘Ctrl’ + ‘D’
[To Assign a Hotkey: Hold ‘Ctrl’ + ‘Alt’ & Click on Button, then press a key to assign it]
References:
HRGN-ZBrush-UI-Basics_v2.jpg [Image] (2018). Perth, Australia: Norman, H.
Marshall, J. (2015). Introduction to ZBrush 4R7 [Pluralsight Video Tut]. Retrieved March 27, 2018, from: https://app.pluralsight.com/library/courses/intro-zbrush-4r7-2090/table-of-contents
<--BACK
0 notes