
Last Seen Blogs


claysbeatings
And here's a little present from Jesus!

nexdarkworld
The World That Never Was

tamiddyinyourcity
stop being an asshole

mathink
in_Logic
Text
Homemade Lemonade Recipe

Indulge in the ultimate refreshment with our Homemade Lemonade recipe. This simple and classic beverage combines the zesty goodness of freshly squeezed lemons with a perfectly balanced sweetness. With just a few ingredients, including fresh lemon juice, sugar, and cold water, you can create a thirst-quenching drink that’s perfect for any occasion. Customize the sweetness to suit your taste, garnish with lemon slices and mint leaves for elegance, and serve over ice for an extra chill. Elevate your summer gatherings or enjoy a sip of sunshine anytime with this homemade lemonade that captures the essence of citrusy bliss.
Certainly! Here’s a simple homemade lemonade recipe:
Ingredients for Homemade Lemonade:
• 1 cup fresh lemon juice (about 4-6 lemons)
• 1 cup granulated sugar (adjust to taste)
• 5 cups cold water
• Ice cubes
• Lemon slices for garnish (optional)
• Fresh mint leaves for garnish (optional)
Instructions for Homemade Lemonade:
Juice the Lemons:
• To make it easier to juice the lemons, roll them about on a surface.
• Cut the lemons in half and use a juicer to extract the juice. You can also use a citrus reamer or handheld juicer.
Make Simple Syrup:
• In a small saucepan, combine 1 cup of water with the granulated sugar.
• Stir the sugar and heat over medium heat until it completely dissolves.
• Remove from heat and let it cool. This is your simple syrup.
Combine Lemon Juice and Simple Syrup:
• Pour the simple syrup and the freshly squeezed lemon juice into a pitcher. Mix thoroughly by stirring.
Add Cold Water:
• 5 cups of cold water should be added to the pitcher. Depending on your preferred level of flavor, add additional water if you’d like a softer taste.
Chill:
• To enable the flavors to mingle and the mixture to cool, place the lemonade in the refrigerator for at least one or two hours.
Serve:
• Once chilled, give the lemonade a good stir before serving.
• After adding ice cubes to glasses, top the ice with the homemade lemonade.
Garnish (Optional):
• Garnish with lemon slices and fresh mint leaves for an extra touch of freshness and presentation.
Enjoy:
• Serve your refreshing homemade lemonade and enjoy!
Feel free to adjust the sweetness and tartness to your liking by adding more sugar or water. You can also experiment with variations by adding a splash of sparkling water for a fizzy version or mixing in other fruit juices for added flavor.
Homemade Lemonade Recipe by I Home | Masalamingles | 2023
Explore the Best Refrigerator Online!!!
Keep Following Masala Mingles to stay updated with more interesting recipes !!
Explore the best recipe: Home | Masalamingles | 2023
#instagood #homemade #cocktails #everythingislove #masalamingles #fresh #explorepage #carter #refreshing #lemonadebraids #foodphotography #sarilemon
#instagood#homemade#cocktails#everythingislove#masalamingles#fresh#explorepage#carter#refreshing#lemonadebraids#foodphotography#sarilemon
0 notes
Text
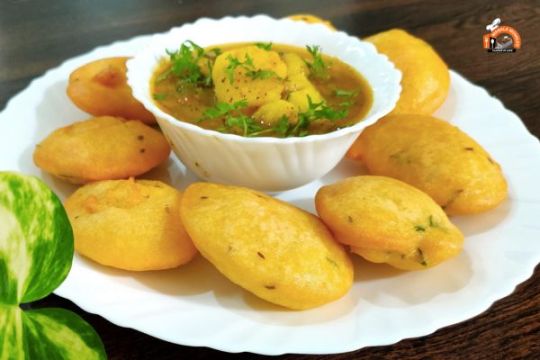
Chaula Bara Recipe
In Western Odisha, chaaul bara, or challa bara, is a well-known street snack. It has a crispy outside and a fluffy, soft interior. It pairs well with two varieties of specialty chutneys: Patalganta chutney (tomato chutney) and Tentel Jhol (Tentuli Jhola, or tamarind water). The combination of hot Baras dipped in tamarind water and tomato chutney is divine.

Here’s the mouthwatering Chaula Bara Recipe,
Ingredient for Chaula Bara Recipe
Regarding Chaula Bara:
Rice, parboiled: 2 cups
½ a spoonful of urad dal
¼ teaspoon of carom seeds
½ teaspoon of cumin seeds
1 medium onion, chopped
3–4 chopped green chilies
1- inch of chopped ginger
Diced coriander leaves: 2 teaspoons
Curry leaves: 2 chopped springs
1/2 teaspoon of baking soda
Warm water
Add salt to taste.
Deep-frying oil
Procedure For Chaula Bara Recipe:
In boiling water, wash and soak the rice and urad dal for six to seven hours, or overnight.
Add a small amount of water and grind to a thick, smooth batter. Stir it for a while until the batter becomes light.
Next, thoroughly mix in the chopped onion, cumin, carom, baking soda, salt, chopped green chili, ginger, coriander, and curry leaves.
In the meantime, warm up enough oil in a heavy-based pan for deep-frying. When the oil is hot, delicately drop a spoonful of batter into it with care. Proceed in the same manner with the leftover batter.
Continue to fry until the color turns golden. Cook the opposite side after flipping. After all of the Baras have turned a light golden color, remove them to absorbent paper to drain any remaining oil.
Regarding Tomato Chutney:
2 medium tomatoes, chopped
2 green chilies.
Ginger: ½ inch
2 cloves of garlic
Chopped leaves of coriander: 1 tablespoon
Chop 1 tablespoon of mint leaves
A one-third spoonful of powdered Kashmiri red chili
Add salt to taste.
Procedure Tomato chutney:
Put all of the ingredients—chopped tomato, green chili, ginger, garlic, pudina leaves, and coriander leaves—into a blending jar and use one tablespoon of water to combine them into a smooth paste.
As necessary, add more water to adjust the consistency. Next, thoroughly combine the red chili powder and salt.
The tomato jam is prepared.
Regarding Tentuli Jhol :
2 teaspoons of tamarind pulp
2-3 chopped green chilies
Chopped garlic, 3-4 cloves
1/2 teaspoon of chili powder
Add salt to taste.
1 tablespoon of sugar, optional
2 tablespoons of refined oil
Panchphoran: 1 tablespoon of black cumin seeds, cumin, fenugreek, mustard, and Saunf.
Curry foliage: 1 stem
Water when needed
Chopped coriander leaves: 1 tablespoon
Procedure Tentuli Jhol:
For fifteen minutes, soak the tamarind pulp in water. After mashing the pulp with water, take out any remaining pulp and seeds.
Pour the water into a bowl and dilute it with a small amount of ordinary water as needed.
Add the chopped garlic, ginger, and green chili to the tamarind water along with the sugar, salt, and red chili powder.
Then, add two teaspoons of refined oil, curry leaves, and panchphoran to a hot pan. Finally, add this tadka to the mixture of tamarind and water. Top with chopped coriander leaves.
Enjoy your evening with chaula bara served in a green leafy dish or dana with tomato chutney and tentel jhol.
Explore the Best Refrigerator Online!!!
Observation:
Rice that has been parboiled is often used to make challa bara. You can also prepare with any type of rice if you don’t have par-boiled rice.
In tentuli jhol, tadka is not required. It tastes fine without tadka as well.
It is possible to fry the chaula bara again to give them extra crunch and color.
Keep Following Masala Mingles to stay updated with more interesting recipes !!
Check The all-time favorite drink of all: https://masalamingles.com/homemade-lemonade-recipe/
#food#foodblog#odishafood#odishaauthenticity#streetfood#masalamingles#westernodisha#streetsnacks#foodlover#cooking
0 notes
Text
Caprese Skewers
Certainly! Caprese skewers are a delightful and easy-to-make appetizer that showcases the classic combination of fresh tomatoes, mozzarella cheese, and basil. Here’s a simple recipe for Caprese skewers:

Ingredients:
Cherry tomatoes
Fresh mozzarella balls (bocconcini)
Fresh basil leaves
Extra virgin olive oil
Balsamic glaze (optional)
Salt and pepper to taste
Wooden skewers
Instructions:
Prepare Ingredients:
Wash the cherry tomatoes and basil leaves.
Drain the mozzarella balls if they are stored in liquid.
Assemble Skewers:
Take a wooden skewer and thread on one cherry tomato, followed by a basil leaf, and then a mozzarella ball.
Repeat the pattern until you fill the skewer, leaving a little space at each end.
Arrange on a Platter:
Arrange the prepared Caprese skewers onto a dish for serving.
Season:
Drizzle extra virgin olive oil over the skewers.
Optionally, you can also add a touch of balsamic glaze for extra flavor.
Sprinkle salt and pepper to taste.
Serve:
You may either serve it right away or put it in the fridge to be served later.
Presentation Tip:
Arrange the skewers on a bed of fresh basil leaves or on a decorative plate for an appealing presentation.
Variations:
You can get creative with the presentation by serving them in a spiral on a round platter or in a zigzag pattern.
You can also drizzle a bit more olive oil or balsamic glaze on top just before serving.
Caprese skewers are not only delicious but also make for a visually appealing appetizer, perfect for parties, gatherings, or any occasion. Enjoy!
Caprese Skewers Recipe by I Masalamingles.com
Explore the Best Fridge Online!!!
Keep Following Masala Mingles to stay updated with more interesting recipes !!
Check your next recipe- https://masalamingles.com/vegetable-stir-fry/
#caprese#food#mozzarella#foodporn#capresesalad#italianfood#foodie#instafood#pizza#salad#yummy#foodphotography#basil#foodblogger#delicious#foodlover#italy#healthyfood#homemade#foodstagram#tomato#tomatoes#love#burrata#dinner#cheese#lunch#pasta#italia#summer
0 notes
Text
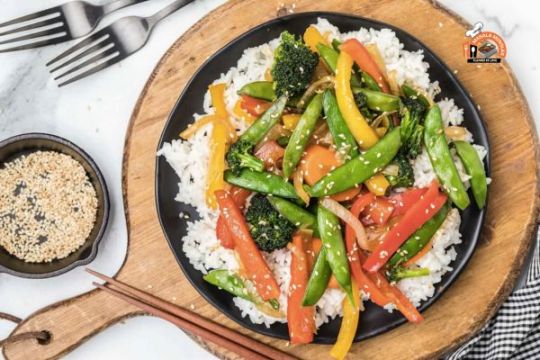
Vegetable Stir-Fry
“Indulge in the vibrant flavors of a quick and easy vegetable stir-fry, a delightful blend of colorful veggies wok-tossed to perfection. This versatile recipe features a savory soy and sesame-infused sauce, creating a wholesome and satisfying dish that pairs perfectly with rice or noodles. Elevate your weeknight dinner with this nutritious and delicious vegetable stir-fry – a feast for the senses that’s simple to prepare and sure to become a family favorite.”
Certainly! Here’s a simple and delicious vegetable stir-fry recipe for you:
Ingredients for Vegetable Stir-Fry:
2 cups of mixed vegetables (broccoli, bell peppers, carrots, snap peas, mushrooms, etc.), chopped
1 tablespoon vegetable oil
2 cloves garlic, minced
1 tablespoon ginger, minced
1 tablespoon soy sauce
1 tablespoon oyster sauce (optional)
1 teaspoon sesame oil
1 teaspoon cornstarch (optional, for thickening the sauce)
Salt and pepper to taste
Cooked rice or noodles for serving
Instructions for Vegetable Stir-Fry:
Prepare the Vegetables:
Clean the veggies and cut them into little pieces.
Heat the Pan
In a wok or big skillet, heat the vegetable oil over medium-high heat.
Add Aromatics
When the oil is hot, add the minced ginger and garlic and sauté for 30 seconds or more, or until fragrant. Take care not to scorch them.
Stir-Fry Vegetables:
Add the mixed vegetables to the pan. Stir-fry them for 3-5 minutes until they are slightly tender but still crisp.
Make the Sauce:
In a small bowl, mix together soy sauce, oyster sauce (if using), and sesame oil. If you want a thicker sauce, you can add cornstarch to the sauce mixture.
Combine Sauce with Vegetables:
Pour the sauce over the stir-fried vegetables and toss everything together to ensure the vegetables are well-coated in the sauce.
Season and Adjust:
To suit your taste, use more or less salt and pepper. Taste and adjust sauce or flavor as needed.
Finish Cooking:
Continue to stir-fry for an additional 2-3 minutes until the vegetables are fully cooked but still vibrant in color.
Serve
Serve the stir-fried vegetables over noodles or cooked rice.
Feel free to customize the recipe based on your preferences, and you can also add proteins like tofu, chicken, or shrimp if you desire. Enjoy your delicious homemade vegetable stir-fry!
Jharkhand Traditional Dish by I Masalamingles.com
Explore the Best Fryer Online!!!
Keep Following Masala Mingles to stay updated with more interesting recipes !!
Check your next interesting recipe- https://masalamingles.com/caprese-skewers/
#veggiestirfry#stirfry#stirfryveggies#friedrice#veggies#vegan#veganfood#chicken#stirfryshrimp#mashedpotatoes#stirfriedbeef#wings#lobster#steak#roastbeef#oysters#calamari#chickenbreast#fishsnapper#crablegs#oxtail#riceandpeas#samevariety#stewbeef#curry#fried#jerkchicken#stewchicken#barbecuechicken#healthylifestyle
0 notes
Text
Dhuska
Dhuska is a popular dish in the Indian state of Jharkhand. It is a deep-fried, savory rice pancake often served as a snack or breakfast item. Here’s a simple recipe for making Dhuska:
Ingredients:
1 cup rice (preferably parboiled rice)
1/4 cup chana dal (split Bengal gram)
1/4 cup urad dal (split black gram)
1-inch ginger, finely grated
2-3 green chilies, finely chopped
1/2 teaspoon cumin seeds
A pinch of asafoetida (hing)
Salt to taste
Water, as needed
Oil for deep frying
Instructions:
Soaking
Rinse the rice, chana dal, and urad dal together and soak them. Soak them for four to six hours, or overnight, in water.
Grinding
Drain the soaked rice and dal and grind them together into a smooth batter. Add water as needed to achieve a thick, pancake batter consistency.
Seasoning
Add grated ginger, chopped green chilies, cumin seeds, asafoetida, and salt to the batter. In order to equally blend the components, mix thoroughly.
Fermentation
Allow the batter to ferment for about 4-6 hours or overnight. Fermentation helps in making the dhuska more flavorful and gives it a slight tanginess.
Deep Frying
Heat oil in a deep pan for frying. Drop spoonfuls of the batter into the hot oil, making small pancakes. Fry until both sides are golden brown and crispy.
Draining Excess Oil
Remove the fried dhuska using a slotted spoon and place them on a plate lined with paper towels to absorb any excess oil.
Serve
Dhuska is typically served with chutney, yogurt, or any sauce of your choice. You can also enjoy it with a cup of tea.
Remember, you can adjust the spice levels and other ingredients according to your taste preferences. Enjoy your homemade dhuska!
Jharkhand Traditional Dish by I Masalamingles.com
Explore the Best Pan Online!!!
Keep Following Masala Mingles to stay updated with more interesting recipes !!
Check Next- https://masalamingles.com/15-must-haves-authentic-food-of-odisha/
#dhuska#jharkhand#food#jharkhandfood#ranchi#foodblogger#foodiesofindia#homemadefood#foodie#instafood#streetfood#tasty#biharifood#streetfoodindia#foodranchi#mumbaidiaries#foodphotography#chilka#yummy#ranchifoodblogger
0 notes
Text
Uttapam
Uttapam is a popular South Indian dish similar to a dosa but thicker, typically topped with various vegetables. Here’s a simple recipe for making uttapam at home:

Ingredients:
For the batter:
2 cups idli rice
1/2 cup urad dal (black gram)
1/4 cup chana dal (split chickpeas)
1/2 teaspoon fenugreek seeds
Salt to taste
For the topping:
Finely chopped onions
Finely chopped tomatoes
Finely chopped green chilies
Finely chopped coriander leaves
Grated carrot
Chopped bell peppers (optional)
Oil or ghee for cooking
Instructions:
Prepare the Batter:
Rinse the idli rice, urad dal, chana dal, and fenugreek seeds thoroughly in water.
Soak them in enough water for about 4-6 hours.
Grind the soaked ingredients to a smooth batter. Add water as needed.
Add salt to the batter and mix well.
Allow the batter to ferment overnight or for about 8-10 hours. The batter should rise and become slightly fluffy.
Prepare the Toppings:
Chop the onions, tomatoes, green chilies, coriander leaves, carrots, and any other vegetables you’d like to use.
Make it:
Heat a non-stick griddle or a flat pan on medium heat.
Grease the pan with a little oil or ghee.
Pour a ladle full of batter onto the center of the pan and spread it in a circular motion to form a thick pancake.
Sprinkle the chopped onions, tomatoes, green chilies, coriander leaves, grated carrot, and any other toppings of your choice on the uttapam.
Spoon a small amount of oil or ghee over the vegetables and the uttapam’s edges.
Cook until the edges start to turn golden brown, and the bottom is cooked. Flip the uttapam and cook the other side until it’s golden brown and cooked through.
Serve:
Remove the utta-pam from the pan and serve hot with coconut chutney, sambar, or tomato chutney.
Savor the home-cooked uttapam! You are welcome to alter the toppings to suit your tastes.
South Indian Food I Masalamingles.com
Explore the Best Chopper Online!!!
Keep Following Masala Mingles to stay updated with more interesting recipes !!
Check next- https://masalamingles.com/paneer-chinese-mushroom-dosa/
#uttapam #southindianfood #dosa #foodie #indianfood #food #foodphotography #idli #southindian #foodblogger #breakfast #healthyfood #homemade #instafood #foodlover #uttapamlover #healthy
0 notes
Text
Paneer Chinese Mushroom Dosa
It seems like you’re interested in a fusion dish that combines elements of Indian, Chinese, and South Indian cuisine. Creating a Paneer Chinese Mushroom Dosa involves incorporating paneer (Indian cottage cheese), Chinese flavors, and mushrooms into the traditional South Indian dosa. Here’s a basic recipe to help you get started:

Ingredients for Paneer Chinese Mushroom Dosa:
For Dosa Batter:
2 cups rice
1 cup urad dal (black gram)
Salt to taste
For Paneer Chinese Mushroom Filling:
200g paneer, crumbled
1 cup mushrooms, finely chopped
1 onion, finely chopped
1 bell pepper, finely chopped
2 spring onions, chopped
2-3 cloves of garlic, minced
1 tsp ginger, grated
2 tbsp soy sauce
1 tbsp chili sauce
1 tbsp tomato ketchup
Salt and pepper to taste
2 tbsp oil for cooking
Instructions for Paneer Chinese Mushroom Filling:
For Dosa Batter:
Soak the rice and urad dal separately in water for at least 4-6 hours.
Grind them separately to a smooth paste using enough water.
Mix both the batters together, add salt, and let it ferment for 6-8 hours or overnight.
For Paneer Chinese Mushroom Filling:
Heat oil in a pan and sauté garlic and ginger until aromatic.
When the onions are transparent, add the chopped onions and simmer.
When the mushrooms release their moisture and turn golden brown, add the chopped ones and continue to simmer.
Add bell peppers and cook for a few more minutes until they are slightly tender.
Add crumbled paneer, soy sauce, chili sauce, and tomato ketchup. Mix well.
Adjust the amount of salt and pepper to suit your taste.
Add chopped spring onions and cook for an additional 2-3 minutes.
Remove from heat and set aside.
For Making Paneer Chinese Mushroom Dosa:
On medium heat, preheat a nonstick dosa tawa (griddle).
Pour a ladleful of dosa batter onto the center of the hot tawa and spread it in a circular motion to make a thin dosa.
Spoon a small amount of oil onto the dosa’s top and sides.
Turn the dosa over when it has cooked through on one side.
Place a portion of the paneer Chinese mushroom filling in the center of the dosa.
Fold the dosa over the filling to form a semi-circle or roll it if you prefer.
Repeat the process for the remaining batter and filling.
Serve the Paneer Chinese Mushroom Dosa hot with coconut chutney or any sauce of your choice. Enjoy your delicious fusion dosa!
Paneer Chinese Mushroom Dosa by I Masalamingles.com
Explore the Best Tawa Online!!!
Keep Following Masala Mingles to stay updated with more interesting recipes !!
Check next- https://masalamingles.com/uttapam/
#paneerdosa#dosa#southindianfood#foodie#food#southindian#indianfood#idly#chutney#peanutchutney#spicydish#cutmirchi#chutneys#latenightsnack#raagidosa#chai#aloobajji#punugulu#idlysambar#mangolassi#podidosa
0 notes
Text
Mushroom Manchurian
Certainly! Mushroom Manchurian is a delicious Indo-Chinese dish made with deep-fried mushrooms tossed in a flavorful Manchurian sauce. Here’s a simple recipe for you:

Ingredients for Mushroom Manchurian:
For Mushroom Balls:
250g mushrooms, cleaned and chopped
1/2 cup all-purpose flour
1/4 cup cornstarch
1 teaspoon ginger-garlic paste
1/2 teaspoon black pepper powder
Salt to taste
Water for batter
Oil for deep frying
For Manchurian Sauce:
1 tablespoon oil
1 tablespoon finely chopped garlic
1 tablespoon finely chopped ginger
1/2 cup finely chopped onions
1/4 cup finely chopped capsicum (bell pepper)
2 tablespoons soy sauce
1 tablespoon chili sauce (adjust to taste)
1 tablespoon tomato ketchup
1 tablespoon vinegar
1 tablespoon cornstarch mixed with 2 tablespoons water (cornstarch slurry)
1/2 teaspoon sugar
Salt to taste
Spring onions for garnish (optional)
Instructions:
For Mushroom Balls:
In a bowl, mix all-purpose flour, cornstarch, ginger-garlic paste, black pepper powder, and salt.
Gradually add water to make a smooth batter. It should have a thick coating consistency.
Dip the cleaned and chopped mushrooms into the batter, ensuring they are well coated.
Heat oil in a pan for deep frying. Fry the battered mushrooms until they are golden brown and crispy. Remove and set aside on a paper towel to absorb excess oil.
For Manchurian Sauce:
Heat 1 tablespoon of oil in a pan. Add finely chopped garlic and ginger. Sauté for a minute until they are fragrant.
Add finely chopped onions and cook until they become translucent.
Add finely chopped capsicum and cook for a couple of minutes until it becomes slightly tender.
Add soy sauce, chili sauce, tomato ketchup, vinegar, sugar, and salt. Mix well.
Pour the cornstarch slurry into the pan and stir continuously until the sauce thickens.
Add the fried mushroom balls to the sauce and toss until they are well coated with the Manchurian sauce.
Garnish with chopped spring onions if desired.
Serve hot Mushroom Manchurian as a starter or with fried rice/noodles. Enjoy your delicious homemade Mushroom Manchurian!
Mushroom Manchurian by I Masalamingles.com
Explore the Best Pan Online!!!
Keep Following Masala Mingles to stay updated with more interesting recipes !!
Check Next- https://masalamingles.com/paneer-chinese-mushroom-dosa/
#foodlovers #manchurianrecipe #hakkanoodles #paneer #delhifood #foodblog #chillipaneer #delhifoodie #schezwan #zingyzest #chineseplatter #delhistreetfood #soup #instagood
#foodlovers#manchurianrecipe#hakkanoodles#paneer#delhifood#foodblog#chillipaneer#delhifoodie#schezwan#zingyzest#chineseplatter#delhistreetfood#soup#instagood
0 notes
Text
Strawberry Shortcake
Certainly! Strawberry Shortcake is a classic and delicious dessert. Here’s a simple recipe for you:

Ingredients for Strawberry Shortcake:
For the Shortcakes:
2 cups all-purpose flour
1/4 cup granulated sugar
1 tablespoon baking powder
1/2 teaspoon salt
1/2 Half a cup of chilled, unsalted butter, divided into little pieces.
2/3 cup milk
1 teaspoon vanilla extract
For the Strawberries:
4 cups fresh strawberries, hulled and sliced
1/4 cup granulated sugar
1 teaspoon lemon juice
For the Whipped Cream:
1 cup heavy cream
2 tablespoons powdered sugar
1 teaspoon vanilla extract
Instructions Strawberry Shortcake:
Preheat the oven:
Preheat your oven to 425°F (220°C).
Prepare the strawberries:
In a bowl, combine sliced strawberries with sugar and lemon juice. Toss gently to coat the strawberries in sugar, then set aside to let them release their juices.
Make the shortcakes:
In a large mixing basin, stir together the Sugar, Flour, baking powder, and salt. When the mixture resembles coarse crumbs, add the cold, cubed butter and cut it into the dry ingredients with a pastry cutter or your fingertips.
Add the vanilla extract and milk. Mix until barely incorporated. Keep in mind that the dough should be somewhat sticky and avoid overmixing it.
Place the dough onto a surface dusted with flour. Work the dough lightly several times until it comes together. Pat dough to a thickness of about 1 inch.
Cut the dough into the shape of shortcakes using a round biscuit cutter. Transfer the rounds to a parchment paper-lined baking sheet.
Bake the shortcakes for 12 to 15 minutes, or until they turn golden brown. After letting them cool a little on the baking sheet, move them to a wire rack to finish cooling.
Make the whipped cream:
Beat the heavy cream, powdered sugar, and vanilla extract together in a refrigerated basin until stiff peaks form.
Assemble the Strawberry Shortcakes:
Cut the shortcakes in half lengthwise. Spoon a small amount of the strawberry mixture onto each shortcake’s lower half. Place the other half of the shortcake on top after dolloping a good amount of whipped cream on top.
Serve:
Serve the strawberry shortcakes immediately and enjoy!
This recipe makes a delightful and classic Strawberry Shortcake. Feel free to adjust the sugar quantities based on your preference, and enjoy this delicious treat!
Special Drink by I Masalamingles.com
Explore the best Oven online!!!
Keep Following Masala Mingles to stay updated with more interesting recipes !!
Check next: https://masalamingles.com/cheesecake/
#strawberrycake #strawberry #cake #birthdaycake #chocolatecake #cakes #cakesofinstagram #cakedecorating #dessert #chocolate #cakestagram #strawberries #foodie #vanillacake #homemade #birthday #cupcakes #baking #cakedesign
#strawberrycake#strawberry#cake#birthdaycake#chocolatecake#cakes#cakesofinstagram#cakedecorating#dessert#chocolate#cakestagram#strawberries#foodie#vanillacake#homemade#birthday#cupcakes#baking#cakedesign
2 notes
·
View notes
Text
Kurkure Momos

Indulge in the irresistible fusion of Flavors with our Kurkure Momos recipe. These crispy delights feature a delectable soya keema filling seasoned with aromatic spices, encased in a crunchy coating of cornflakes. With a step-by-step guide, learn how to assemble, batter, and fry these unique momos for a delightful snack. Serve with a sprinkle of chat masala, paired with sliced onions and zesty schezwan chutney, and elevate your snack game with this innovative and mouthwatering dish. Perfect for gatherings or as an appetizer, Kurkure Momos are sure to be a hit among family and friends.
Ingredients for Kurkure Momos:
For the Filling:
1/2 cup Soya keema Granules / Nutrela
1 cup Water (for soaking)
2 tbsp Butter
3-4 cloves Garlic, finely chopped
1 inch Ginger, grated
2 small Green Chili, finely chopped
1 medium Onion, finely chopped
2 tbsp Carrot, finely chopped (optional)
1/2 tsp Salt
1/2 tsp Black Pepper
1 tbsp Schezwan sauce
1/2 large Cabbage, grated
For the Dough:
1 1/2 cups Maida
Salt, to taste
Water, as required for kneading the dough
For the Batter/Coating:
1/2 cup Maida
1/2 cup Corn flour
1 tbsp Kashmiri Red Chili Powder
1/2 tsp Garam Masala
1 tsp Chat Masala
1/2 tsp Pudina Powder
Salt, to taste
Black Pepper, to taste
Water, as required
1 cup Corn flakes, crushed
Recipe Steps for Kurkure Momos
For the Filling:
In a mixing bowl, combine water and soya keema granules. Soak for 15 minutes.
In a preheated kadhai or wok, add butter, garlic, ginger, and green chili.
Squeeze excess water from soaked soya granules and add to the wok.
Cook for 2 minutes, then add onions, carrots, salt, pepper, schezwan sauce, and cabbage.
Cook for an additional 2 minutes. Do not overcook. Set aside.
For the Dough:
In a mixing bowl, add maida, salt, and water to make a normal dough. Give it ten minutes to rest.
Split the dough into more manageable pieces. Form each part into a little round.
For Assembling the Momos:
Flip the rolled dough, sticky side up, and place a tablespoon of the filling in the center.
Gather the sides and edges, bringing them closer to seal it. This creates a braided mono.
For long momos, follow the same steps and join the two open sides, pinching to create a folded design.
For Making the Batter and Coating:
In a large mixing bowl, place crushed cornflakes.
Combine maida, corn flour, Kashmiri red chili powder, garam masala, chat masala, pudina powder, salt, and pepper.
To create a thin batter, gradually add water.
Dip the momos in the batter and coat with crushed cornflakes.
For Frying:
Heat oil in a deep-frying pan on medium-high flame.
Fry momos in batches until golden in color.
Remove on a kitchen towel to absorb excess oil.
To Serve:
Sprinkle chat masala and serve kurkure momos with sliced onions and schezwan chutney.
This recipe makes a delightful and classic Strawberry Shortcake. Feel free to adjust the sugar quantities based on your preference, and enjoy this delicious treat!
Kurkure Momos by Masalamingles.com
Explore the Best Air Fryer Online!!!
Keep Following Masala Mingles to stay updated with more interesting recipes !!
Check next: https://masalamingles.com/pani-puri/
#kurkuremomos #momos #momoslover #foodblogger #foodie #foodphotography #momo #tandoorimomos #delhistreetfood #kurkure #food #streetfood #momolover #foodstagram
#kurkuremomos#momos#momoslover#foodblogger#foodie#foodphotography#momo#tandoorimomos#delhistreetfood#kurkure#food#streetfood#momolover#foodstagram
0 notes
Text

Stuffed Bell Pepper
Of course! This easy and tasty recipe for stuffed bell peppers is provided:
Ingredients for Stuffed Bell Pepper:
1. Four big bell peppers, any hue
2. 1 pound (450 grams) turkey or ground beef
3. 1 cup of brown or white cooked rice
4. 1 cup of rinsed and drained black beans
5. 1 cup of fresh, frozen, or canned corn kernels
6. 1 cup of tomatoes, chopped
7. 1 cup of shredded cheese, either mozzarella or cheddar or to taste
8. half a cup of finely chopped onion
9. 2 minced garlic cloves
10. 1 teaspoon of cumin
11. 1 tsp of chili powder
12. Half a teaspoon of paprika
13. To taste, add salt and pepper.
14. 1 cup of marinara or tomato sauce
Instructions for Stuffed Bell Pepper:
• Preheat your oven to 375°F, or 190°C.
• Slice off the bell peppers’ tops, then remove the seeds and membranes. Cut a little piece off the bottom if necessary to make the peppers stand straight.
• Brown the ground beef or turkey in a large skillet over medium heat. Remove any extra fat.
• Add the minced garlic and diced onions to the skillet and sauté until the onions are tender.
• Add the diced tomatoes, cumin, chili powder, paprika, black beans, corn, cooked rice, and salt and pepper. Simmer for a further five minutes to let the flavors combine.
• After turning off the heat, stir in half of the cheese shreds.
• Gently press down to put the filling of the meat and rice mixture into each bell pepper.
• The filled peppers should be put in a roasting tray. Drizzle the peppers with either marinara or tomato sauce, then scatter the remaining shredded cheese on top.
• Bake the baking dish in the oven for 25 to 30 minutes, or until the peppers are soft, covered with foil.
• After taking off the foil, bake for a further five to ten minutes, or until the cheese is bubbling and melted.
• Before serving, let the stuffed peppers cool for a few minutes.
• Serve these flavourful stuffed bell peppers with your preferred condiments or a side salad. Savor your food
• Rich smoked salmon, creamy cheese, and fresh garnishes come together to create a visually stunning and highly popular smoked salmon plate. Enjoy your food!
What's Next: https://masalamingles.com/mini-quiches/
#stuffedpeppers #food #peppers #dinner #homemade #bellpeppers #foodie #yummy #foodblogger #foodstagram #cheese #healthyeating #lowcarb #healthyfood #crockpotstuffedpeppers
#stuffedpeppers#food#peppers#dinner#homemade#bellpeppers#foodie#yummy#foodblogger#foodstagram#cheese#healthyeating#lowcarb#healthyfood#crockpotstuffedpeppers
1 note
·
View note
Text
Classic Mojito

Certainly! Here’s a classic Mojito recipe for you
Ingredients:
• 2 oz (60 ml) white rum
• 1 oz (30 ml) fresh lime juice
• 2 teaspoons sugar (adjust to taste)
• 8-10 fresh mint leaves
• Soda water (club soda)
• Ice cubes
• Lime wedges and mint sprigs for garnish
Instructions for Mojito:
1. To begin, muddle the sugar and mint leaves in a glass. To unleash the taste of the mint leaves, gently crush them with a muddler or the back of a spoon.
2. Pour some new lime juice into the glass. You can alter the amount of sugar if you like a sweeter flavor.
3. Pour in the white rum over the mint and lime mixture.
4. Fill the glass with ice cubes.
5. Top off the glass with soda water (club soda) to your desired level.
6. Stir the ingredients gently to combine them.
7. Add a lime slice and a mint sprig as a garnish to the mojito.
8. Optionally, you can add a straw for easier sipping.
Enjoy your refreshing Drink responsibly! Feel free to adjust the ingredients to suit your taste preferences. Cheers!
Check Next: https://masalamingles.com/mini-quiches/
#mojito #cocktails #drinks #mojitos #cocktail #drink #bar #food #summer #foodie #bartender #rum #mint #instagood #love #mojitotime #mocktails #mixology #happyhour
#mojito#cocktails#drinks#mojitos#cocktail#drink#bar#food#summer#foodie#bartender#rum#mint#instagood#love#mojitotime#mocktails#mixology#happyhour
0 notes
Text

Mini Quiches
Certainly! Mini quiches are a delightful and versatile dish that can be served as appetizers, snacks, or even as a part of brunch. Here are Simple recipes for Mini Quiches:
Ingredients for Mini Quiches:
For the Quiche Filling:
• 4 large eggs
• 1 cup milk (whole or 2%)
• 1/2 cup heavy cream
• Salt and pepper to taste
• 1 cup grated cheese (such as cheddar, Swiss, or Gruyere)
• 1/2 cup diced cooked ham, bacon, or sautéed vegetables (spinach, mushrooms, onions, etc.)
For the Quiche Crust:
• 1 1/2 cups all-purpose flour
• 1/2 cup unsalted butter, chilled and cubed
• 1/4 teaspoon salt
• 3-4 tablespoons ice-cold water
Instructions:
1. Preheat the Oven:
• Preheat your oven to 375°F (190°C).
2. Prepare the Quiche Crust:
a. Place the flour and salt in a food processor.
b. Add the cold cubed butter, and pulse until it resembles coarse crumbs.
c. Gradually add the ice-cold water, one tablespoon at a time, pulsing until the dough starts to come together.
d. Turn the dough onto a floured surface, knead it briefly, and then roll it out to about 1/8-inch thick.
e. Using a round cookie cutter or a glass, cut out circles slightly larger than the openings of your mini muffin tin.
f. Press the circles into the greased mini muffin tin to form the crusts.
3. Prepare the Quiche Filling:
a. In a bowl, whisk together the eggs, milk, and heavy cream.
b. To taste, add salt and pepper for seasoning.
c. Stir in the grated cheese and your choice of diced ham, bacon, or sautéed vegetables.
4. Assemble and Bake:
a. Spoon the quiche filling into each crust in the mini muffin tin.
b. Bake in the preheated oven for about 15-20 minutes or until the quiches are set and the crust is golden brown.
c. Allow the mini quiches to cool briefly before removing them from the tin.
5. Serve:
• Serve the mini quiches warm as appetizers or snacks. They taste great at room temperature as well.
Feel free to customize the filling with your favorite ingredients to make these mini quiches your own. Enjoy your delicious homemade mini quiches!
Check New: https://masalamingles.com/stuffed-bell-pepper/
0 notes
Text
Chicken Enchiladas

Of course! Here’s a quick and tasty recipe for enchiladas made using chicken:
Ingredients for Chicken Enchiladas:
For the Chicken Filling:
• 2 cups cooked shredded chicken (you can use rotisserie chicken)
• 1 cup black beans, drained and rinsed
• 1 cup corn kernels (fresh or frozen)
• 1 cup diced bell peppers (any color)
• 1 cup diced onions
• 2 cloves garlic, minced
• 1 teaspoon ground cumin
• 1 teaspoon chili powder
• Salt and pepper to taste
• 1 cup shredded cheese (Blend, Monterey Jack, or Cheddar)
For the Enchilada Sauce:
• 2 tablespoons vegetable oil
• 2 tablespoons all-purpose flour
• 2 tablespoons chili powder
• 1 teaspoon ground cumin
• 1/2 teaspoon garlic powder
• 1/2 teaspoon onion powder
• 1/4 teaspoon cayenne pepper (with extra heat/optional)
• 1 can (14 ounces) crushed tomatoes
• 2 cups chicken broth
• Salt to taste
For Assembling:
• 10-12 flour tortillas
• Additional shredded cheese for topping
• Chopped cilantro and sliced green onions for garnish (optional)
• Sour cream and guacamole for serving
Instructions for Chicken Enchiladas:
1. Turn the oven on to 375°F, or 190°C.
2. Add the onions and garlic to a big skillet and cook over medium heat until they are transparent.
3. To the skillet, add the shredded chicken, black beans, corn, diced bell peppers, chili powder, ground cumin, salt, and pepper. Simmer for a few minutes, or until the mixture is completely blended and the vegetables are soft. Take off the heat and place aside.
4. Heat two teaspoons of vegetable oil in a saucepan over medium heat. Add the flour, onion, garlic, ground cumin, chili powder, and cayenne (if using) and stir. Simmer for one to two minutes to form a roux.
5. Add the chicken broth and smashed tomatoes gradually while whisking. Stirring often will cause the sauce to thicken. Add salt to taste to season. Take off the heat.
6. Pour a tiny bit of the enchilada sauce into the baking dish’s bottom.
7. Fill each tortilla with a spoonful of the chicken mixture, roll them up, and put them seam-side down in the baking dish.
8. Make sure the rolled tortillas are fully covered with the leftover enchilada sauce.
9. On top, scatter the crumbled cheese.
10. Bake for 20-25 minutes, until the cheese is melted or bubbling in a preheated oven.
11. Take the enchiladas out of the oven and allow them to cool for a few minutes before serving.
12. If desired, garnish with sliced green onions and chopped cilantro. She was accompanied by guacamole and sour cream on the side.
Enjoy your homemade chicken enchiladas!
Check Next:
Healthy Smoked Salmon Platter | Masalamingles |2024
#enchiladas #mexicanfood #tacos #food #burritos #foodie #nachos #mexican #comidamexicana #delicious #chicken #yummy #guacamole #mexico #dinner #quesadillas
0 notes
Text
Smoked Salmon Platter

Yes, here’s a quick and delectable recipe for a platter of smoked salmon. This platter is ideal for any special occasion, breakfast, or appetizer.
Ingredients for Smoked Salmon Platter:
Smoked Salmon: 200g – 300g, thinly sliced
Cream Cheese: 1 cup, softened
Red Onion: 1 small, thinly sliced
Capers: 2 tablespoons
Fresh Dill: 2 tablespoons, chopped
Lemon: 1, thinly sliced
Bagels or Bread of your choice
Cherry Tomatoes: for garnish (optional)
Radishes: for garnish (optional)
Cucumber: thinly sliced, for garnish (optional)
Instructions for Smoked Salmon Platter:
1. Get the cream cheese ready.
Combine the softened cream cheese and finely chopped fresh dill in a bowl. This will give the cream cheese a zesty new taste.
2. Put the Platter Together:
Arrange the slices of smoked salmon onto a serving dish.
Arrange the cream cheese infused with dill on the platter’s side.
Arrange the lemon slices, capers, and thinly sliced red onions on the dish.
3. Accessory:
Garnish the cream cheese with fresh dill for a pretty effect.
Add some extra color and freshness to the tray by garnishing it with cucumber slices, cherry tomatoes, and radishes.
4. Serve:
Present the smoked salmon platter beside your preferred bread or bagels. To add more texture, you can toast the bagels.
5. Extra Advice:
For people who prefer more flavor, think about serving extra condiments on the side, such as horseradish, mustard, or pickles.
Before they dine, give your guests lemon wedges to squeeze over their smoked salmon.
Rich smoked salmon, creamy cheese, and fresh garnishes come together to create a visually stunning and highly popular smoked salmon plate. Enjoy your food!
Smoked Salmon Platter I Masalamingles.com
Check more: https://masalamingles.com/chicken-enchiladas/
#smokedsalmon#salmon#food#foodie#breakfast#instafood#healthyfood#brunch#avocado#foodstagram#yummy#foodphotography#delicious#fish#smoked#bagel#lunch
1 note
·
View note
Text
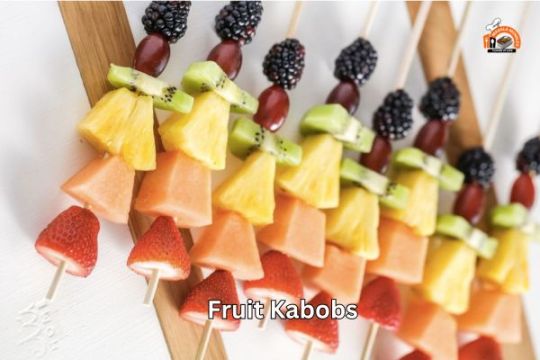
Fruit Kabobs
Of course! Fruit kabobs are a tasty and vibrant delicacy that may be eaten for dessert or as an appetizer. This is a basic fruit kabob recipe:
Ingredients:
Assorted fruits (use a variety of colors and textures):
Strawberries
Pineapple chunks
Grapes (red or green)
Kiwi slices
Watermelon cubes
Cantaloupe or honeydew melon balls
Wooden skewers
For the optional glaze:
1/4 cup honey or maple syrup
2 tablespoons lime or lemon juice
Instructions:
Get the Fruits Ready:
Clean and wash every fruit.
Slice melons and other larger fruits into bite-sized pieces.
After hulling, cut the strawberries in half.
Put the Kabobs together:
Thread the fruits onto the wooden skewers in a colourful and appealing manner. You can arrange the fruits in any way that suits your tastes.
Prepare the Glaze (Selective):
Combine the lime or lemon juice with honey, maple syrup, or both in a small bowl. This will give the fruit kabobs a hint of sweetness and citrus.
Apply a glaze brush (optional):
If the glaze has been prepared, drizzle it over the fruit kabobs to add even more flavor.
Serve:
Place the fruit kabobs onto a plate for serving.
If you would like them cold, place them in the refrigerator for a little period before serving.
Have fun:
The fruit kabobs are prepared for consumption! They provide a refreshing and healthful snack or dessert for any occasion.
Feel free to alter the recipe by substituting different glazes or adding other favorite fruits. Play around with the combinations and use your imagination!
You can modify the sweetness, saltiness, or coconut flavor to suit your tastes. This recipe for coconut rice is adaptable and goes well with many other foods.
Check Next: https://masalamingles.com/delicious-spring-roll-recipes/
#fruitkebabs#fruit#kebabs#dirumahaja#jktfoodies#infokuliner#makankenyang#jktfoodbang#kebabbuah#saladbuah#kebab#kebabfrozen#kebabpisang#kebabdurian#kebabdaging#bekasitimur
0 notes
Text
Coconut Rice
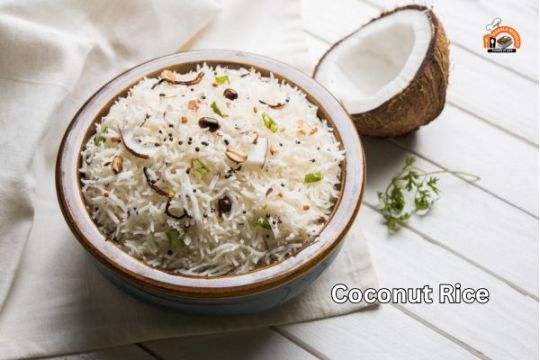
Of course! A tasty and fragrant dish well-liked in many cuisines is coconut rice. This is a basic rice recipe made with coconut.
Ingredients for Coconut Rice:
1 cup long-grain white rice
1 3/4 cups coconut milk
1/4 cup water
1 tablespoon coconut oil or vegetable oil
1 teaspoon sugar
1/2 teaspoon salt
Optional: shredded coconut for garnish
Instructions for Coconut Rice:
1. Clean the rice:
Rinse the rice under cold water until the water runs clear. Rinsing the rice not only prevents it from becoming overly sticky but also aids in removing any excess starch.
2. Mix the ingredients:
Rinse the rice and add the coconut milk, water, coconut oil, sugar, and salt to a medium-sized saucepan.
3. Heat up to a boil:
Transfer the mixture to a boiling point by placing the saucepan over medium-high heat.
4. Reduce:
After bringing it to a boil, lower the heat to a simmer, place a tight-fitting lid on top, and let it cook for 18 to 20 minutes, or until the rice is soft and has soaked up most of the liquid.
5. Lightly fluff the rice:
Once the rice is cooked, remove the saucepan from heat and let it remain, covered, for an additional 5-10 minutes. Next, use a fork to separate the grains in the rice.
6. Serve:
Place the rice with coconut on a platter for serving. Shredded coconut can be used as a garnish to give it more taste and texture.
7. Have fun:
You can serve the coconut rice as an accompaniment to your preferred main entrée, such as grilled chicken, fish, or curries.
You can modify the sweetness, saltiness, or coconut flavor to suit your tastes. This recipe for coconut rice is adaptable and goes well with many other foods.
Check next: https://masalamingles.com/balsamic-roasted-vegetables/
#coconutrice#foodie#foodphotography#food#coconut#rice#naijafood#foodstagram#africanfood#jollofrice#yummy#nasilemak#instafood#homemade#friedrice#homecooking
0 notes