
lundsandbyerlys
Good Taste
A celebration of food
1713 posts
Don't wanna be here? Send us removal request.
Last Seen Blogs

andresmejerlaw
Andres Mejer Law

divorcedcaejose
part 5 hater

growinguparo
Growing Up Aro

i-am-mldy
am I chronically online? thats up to God

punkcelebrities
Punk Celebrities
Photo

Endive Bites
Fresh, crunchy endive leaves with a creamy, cheesy filling, topped with charred corn and chili-infused honey.
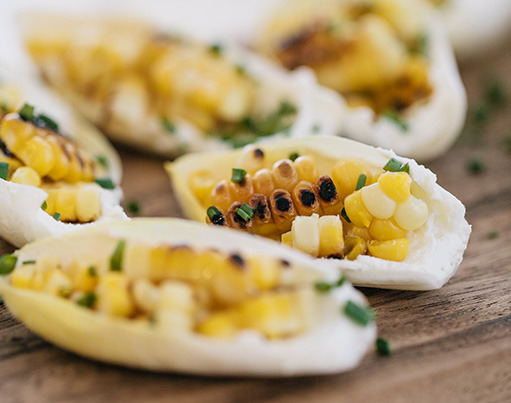
Makes about 20 bites
Preparation time: 45 minutes
Ingredients
2 heads baby Belgian endive
2 ears of corn
4 ounces goat cheese
2 ounces cream cheese
2 tablespoons chili pepper-infused honey (such as Mike's Hot Honey), divided (can substitute regular honey)
2 tablespoons chopped chives
Directions
Separate the endive into individual leaves. Set aside.
Char corn on grill or hot cast iron pan. Allow to cool slightly, then cut kernels off the cob and set aside.
Mix together goat cheese, cream cheese and 1 tablespoon honey.
Spread a spoonful (about 1 tablespoon) of the cheese mixture into each piece of endive.
Top with a spoonful (about 1 tablespoon) of charred corn.
Garnish with a drizzle of the remaining honey and sprinkle with chives.
#cheers#appetizer#appetizers#easy appetizer#easy appetizers#easy apps#goat cheese#cheese#corn#grill#endive#corn side dish#party appetizers#NYE apps#summer apps
29 notes
·
View notes
Photo

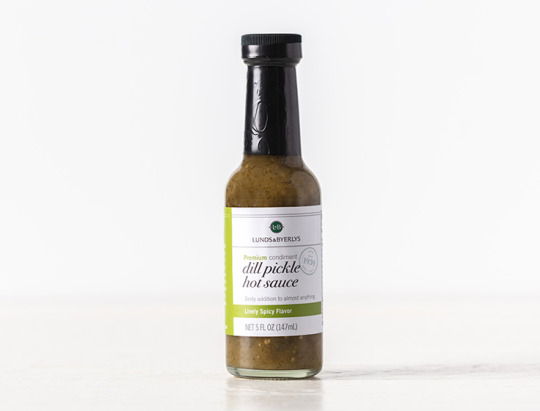
L&B Dill Pickle Hot Sauce
Looking to bring a bit more flair to your next picnic or party? Try our new L&B Dill Pickle Hot Sauce! We combined tangy dill pickle with kicky jalapeño peppers and just a hint of garlic to create a truly unique, flavorful hot sauce that can be used just about anywhere.
Try it sprinkled on deviled eggs, as a topping on hot dogs, burgers and fried chicken or add a dash to your Bloody Mary. It’s the perfect accompaniment to your favorite summer fare. Mix it into your condiment rotation for your next summer barbecue!
27 notes
·
View notes
Photo

Weeknight Skillet Shrimp & Veggies
This garlicky shrimp dinner cooks up in a snap, making it a great go-to weeknight meal. If you want to save time and kick the heat up, just pick up our Butchers Kitchen Dragon Breath Shrimp Skewers, which are marinated with sesame oil, Louisiana Fireball Cajun Spice Blend, Tabasco Sauce, garlic, cumin, poblano peppers, dried Arbol peppers and red pepper flakes. They come seasoned and ready to grill! Look for them in the Meat & Seafood department and skip Step 2 in the directions below.
4 serving
Preparation time: 30-45 minutes
Ingredients
1 pound uncooked medium shrimp, thawed if frozen, peeled and deveined (tail shells removed)*
2 teaspoons cooking oil
1 tablespoon minced fresh garlic
1 tablespoon grated fresh ginger
¼ cup dry white wine or chicken broth
1 pound fresh asparagus spears, trimmed and cut into 1-inch pieces
¼ cup finely chopped green onions
2 cups cooked wild rice
Directions
In a large nonstick skillet, cook shrimp in hot oil over medium-high heat for 2 minutes.
Add garlic and ginger; cook 1 to 2 minutes more or until shrimp are opaque, turning occasionally.
Remove shrimp from skillet; set aside.
Carefully add wine and asparagus to hot skillet. Cover and cook 2 to 3 minutes or until asparagus is crisp-tender.
Add shrimp, green onions and wild rice to skillet; stir to heat thoroughly.
*If using cooked shrimp, skip Step 1 and add cooked shrimp as directed in Step 4.
#Make It Tonight#Dinner for two#shrimp#asparagus#wild rice#skillet#family skillet#dragon breath shrimp#wild rice recipes#quick shrimp#summer weeknight
18 notes
·
View notes
Photo
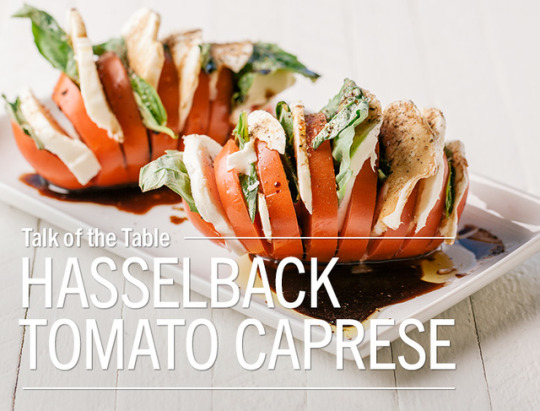
Hasselback Tomato Caprese
The name Hasselback comes from a restaurant in Stockholm, Sweden, named Hasselbacken, where the recipe for Hasselback potatoes was first introduced in the 1940s. That simple dish involves slicing whole potatoes and baking them so the outsides become crisp and brown while the insides stay soft and creamy. We like this technique so much, we decided to try it with one of our favorite summer garden vegetables – the tomato. It’s a wonderful way to turn simple tomato salad into a work of art!
youtube
2 servings
Preparation time: 15 minutes
Ingredients
2 Roma tomatoes
8 ounces fresh mozzarella
One bunch fresh basil
2 tablespoons balsamic vinegar
2 tablespoons olive oil
Salt and pepper, to taste
Directions
Cut quarter-inch slices into the tomatoes, but not all the way through.
Cut the mozzarella into similarly thick slices and tuck those into the tomato slices.
Tuck a leaf of basil in between each slice.
Drizzle with balsamic vinegar and olive oil; sprinkle with salt and pepper to taste.
Source: wiseGEEK
#Talk of the table#tomatoes#caprese#basil#mozzarella#mozzarella recipes#tomato recipes#hasselback#videos#video#summer sides
22 notes
·
View notes
Photo

Appetizer idea: Grilled Bacon & Brussels
This tasty appetizer is enough to convert anyone into a Brussels sprouts lover!
Heat your grill to medium-high and soak bamboo skewers for about 20 minutes. On each skewer, weave one piece of bacon around three sprouts. Grill for 10-12 minutes, turning 2-3 times. Serve hot.
Pairs well with a Deschutes Fresh Squeezed IPA.
#bacon#brussels sprouts#appetizers#grill#cheers#cheers!#grilling#easy appetizers#IPA#summer happy hour#bacon recipes#grilling recipes#bacon wrapped#summer grilling#grill skewers#grilled appetizer#kabobs#summer apps
22 notes
·
View notes
Photo
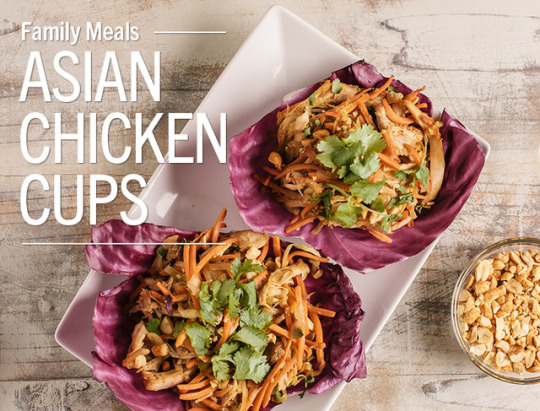
Asian Chicken Cups
These flavorful chicken cups are made easy with Lunds & Byerlys Pulled Chicken.
youtube
4 servings
Preparation time: 15 minutes
Ingredients
1 tablespoon cooking oil
2 cloves garlic, finely chopped
1 (10-ounce) bag coleslaw mix
1 (8-ounce) bag shredded carrots
4 green onions, chopped
¼ cup hoisin sauce
2 tablespoons soy sauce
3 cups chopped or pulled Lunds & Byerlys Rotisserie Chicken
Red cabbage leaves, for serving
Optional toppings: Fresh chopped ginger, chopped peanuts or cashews, chopped cilantro, sriracha sauce.
Directions
In a large nonstick skillet, heat oil over medium heat. Add garlic, coleslaw mix, carrots and green onions. Cook, stirring occasionally, until veggies soften slightly.
Stir hoisin and soy sauce into veggies and cook for a minute or two.
Stir in the chicken until heated through.
To serve, spoon the chicken into cabbage leaves and add desired toppings. Delicious with fresh mango or pineapple!
#Family meals#lettuce wraps#Rotisserie Chicken#Asian#RCR recipes#pulled chicken#video#videos#pulled chicken dinners
14 notes
·
View notes
Photo

Adding Color To Your Outdoors Is Easy
It may not be official yet, but in our eyes, summer has most certainly arrived! That means warm days outdoors, backyard barbecues and time spent on the patio. Give yourself a great view to enjoy while you soak up the summer sun. Decorate your porch or patio with hanging baskets and decorative planters for a fresh and fabulous facelift in minutes.
Patio planters. Simply set these collections of flowers and foliage anywhere you want to add outstanding color and texture to your scenery. Pick up ready-made planters that are handcrafted by Bachman’s designers and place them next to your patio furniture, at the ends of your walkways or flanking your front door. These are available in all shapes, sizes and colors to help you coordinate with your existing outdoor décor.
Hanging baskets. Elevate the beauty of your outdoors even more with the addition of hanging baskets. These decorative displays create visual interest at eye level and can really wow with their overflowing flowers. Available in petunias, calibrachoa, impatiens, begonias, geraniums and more, hanging baskets offer prolific blooms in wide-ranging hues. Brighten your space with beautiful shades of pink, purple, red, yellow and colorful combinations.
Happy summer from Bachman’s!
9 notes
·
View notes
Photo
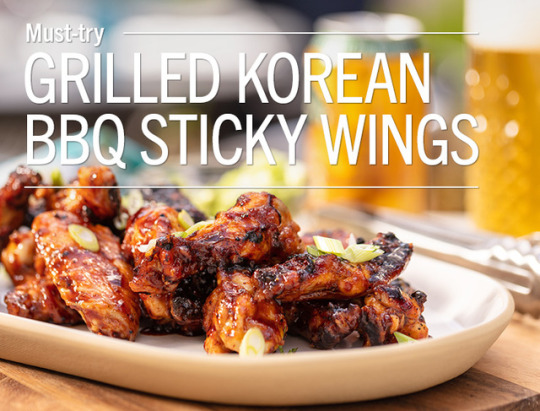
Grilled Korean BBQ Sticky Wings
In the Twin Cities, wings are the ultimate happy hour food. And the stickier, the better: getting sauce all over your hands and face is pretty much our favorite after-work bonding ritual.
We created this recipe with that in mind. The wings are grilled ‘til they’re smoky and lightly charred, and then coated in a tangy, sweet, perfectly sticky BBQ sauce — they’ll give your napkins a new sense of purpose! Fair warning: We put a good amount of spicy gochujang in the BBQ sauce, so it’s got a nice kick. But it’s a “Minnesota nice” kick, so it won’t burn your lips off.
youtube
These wings also make a fantastic weekend barbecue appetizer. Once you’ve prepped the sauce, they come together in minutes, so you can throw them on the grill when folks arrive, and then let them nibble and gnaw while you get dinner together. If you’re going to a friend’s place for the barbecue, you can prep the sauce and the wings ahead of time, so they’re ready for the grill when you get there.
Our tips: The Korean BBQ sauce tastes fantastic with a Summit Keller Pils — it’s got just enough malty sweet and honey notes to handle that gochujang. And, if you have extra BBQ sauce, it’ll keep in the fridge for up to two weeks.
4 servings
Preparation time: 20 mins
Cook time: 20 mins
Ingredients
For the Korean BBQ Sauce:
½ cup tamari or soy sauce
½ cup brown sugar
1 tablespoon rice vinegar
¼ cup gochujang sauce
2 tablespoons ginger, grated
2 cloves garlic, grated
1 teaspoon sesame oil
1 teaspoon honey
1 teaspoon black pepper
½ tablespoon cornstarch
1 tablespoon water
For the wings:
2 pounds chicken wings
Salt and pepper to taste
¼ cup scallions, sliced for garnish
Directions
To make the Korean BBQ Sauce: In a small pot, combine all ingredients except the cornstarch and water. Bring them to a simmer over medium heat for 10 minutes.
In a small bowl, whisk together the cornstarch and water to make a slurry.
Whisk the cornstarch slurry into the barbecue sauce, and boil it until it thickens, about 2 minutes.
Remove the barbecue sauce from the heat and transfer it to a canning jar or another heatproof container. Set aside.
Prepare grill to high heat.
To make the wings: Pat the chicken wings dry with a paper towel, and then season them lightly with salt and pepper.
Grill the wings until they’re slightly charred on all sides and the internal temperature has reached 165 º F on an instant-read thermometer, about 15-20 minutes.
Brush the wings with a little barbecue sauce and cook for another 1-2 minutes.
Remove the wings from grill to a large bowl, and toss them with more barbecue sauce.
Garnish the wings with fresh scallions and serve hot.
#korean food#korean wings#bbq#grilling#hot sauce#wings#chicken#wing recipes#picnic#summer#appetizer#video
44 notes
·
View notes
Photo
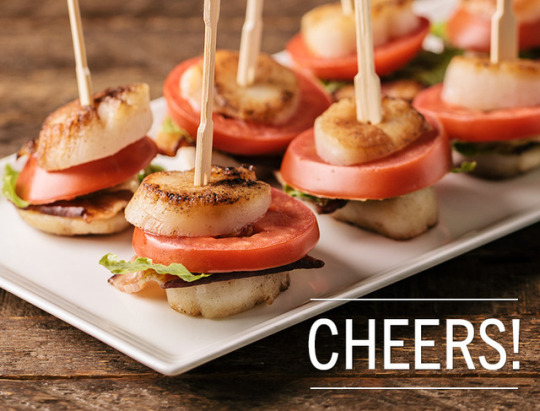
BLT Scallops
An appetizer-sized twist on your favorite BLT sandwich! Delicious served with a French rosé.
youtube
Makes 12 scallop BLTs
Preparation time: 15 minutes
Ingredients
2 teaspoons olive oil
2 teaspoons unsalted butter
12 Fresh Wild Caught Sea Scallops
4 slices cooked bacon, cut into 2-inch pieces
2 Roma tomatoes, sliced
Romaine lettuce, cut into 1-inch pieces
Directions
Heat the olive oil and unsalted butter over high heat in a frying pan.
Once hot, add scallops and sear for 1 ½ minutes on each side.
Remove scallops from pan and let rest for 5 minutes.
Cut the scallops in half horizontally.
On one half, layer 1 piece cooked bacon, a slice of tomato and a piece of romaine lettuce.
Top with the other scallop half and serve.
#Cheers!#Rosé#scallops#blt#bacon#paleo#bacon recipes#holiday appetizers#NYE apps#easy holiday apps#video#videos#valentines day#summer bacon
23 notes
·
View notes
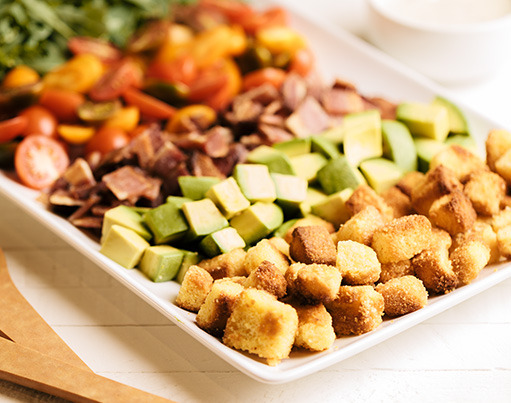
Photo

BLT Salad with Easy Cornbread Croutons
Sweet, crunchy homemade cornbread croutons pair perfectly with the salty bacon! This deconstructed salad features all the individual BLT ingredients separated on a large platter, so everyone can assemble and dress their own salad as they please. Great for parties!
4-6 servings
Preparation time: 30 minutes
Ingredients
1 package L&B Bacon, cooked and chopped
1 (10-ounce) package cherry tomatoes, halved
1 (5-ounce) package arugula
1 avocado, large dice
L&B Cornbread
Annie's Naturals Organic Green Goddess Dressing
Directions
To make the cornbread croutons, cube L&B Cornbread and bake for 10 minutes at 350 F, until lightly browned and crunchy.
Lay out all the ingredients separately on a serving platter so guests can assemble their own salads. Serve with Green Goddess dressing on the side for drizzling.
11 notes
·
View notes
Photo
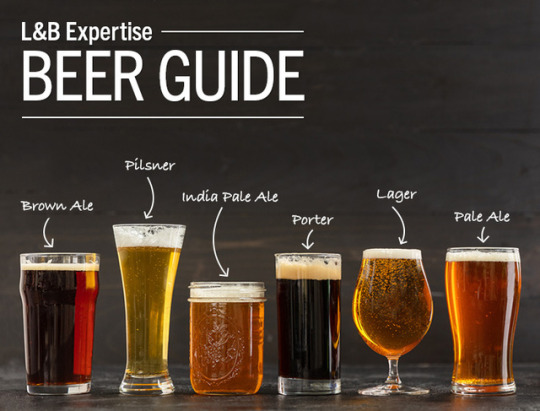
L&B Beer Guide
We live in such a great place to drink beer. There’s so much fantastic craft beer being made here — Able, Dangerous Man, Enki, Fair State, Fulton, Indeed, Surly, and Tin Whiskers, just to name a few. And nowadays it feels like a new brewery or taproom opens every few months or so.
All that variety is thrilling, whether you’re a beer expert, enthusiast, or dabbler. Beer has all the complexity of wine at a lower price point — so it’s a fun drink to explore. And like wine, it pairs beautifully with food. Of course, if you’re just getting into beer, figuring out what you like is challenging enough, without adding in food pairings. We’re here to help with both!
In this guide, we’ve provided general tasting and pairing notes for a handful of the most popular lagers and ales. You’ll see that we refer to a couple of beer terms throughout the guide: Alcohol by Volume (ABV) and International Bitterness Units (IBU).
ABV is generally listed as a percentage, and it tells you how much of your beer is alcohol. Basically, the higher the percentage, the boozier the beer. That’s a handy thing to know when thinking about pairings — you might like to go for a lower ABV at lunch, for example.
As you might expect, IBU measures a beer’s bitterness from hops on a scale of 0 to 100 (0 is not bitter at all and 100 will blow up your taste buds). If you know where your tastes fall on that scale, IBU can help you choose a beer, but it can also be a deceptive number. For example, a stout’s relatively high IBU can be balanced out by its malty sweetness!
Lager (ABV 2.5 to 5.1 %, IBU 5 to 15)
Lagers are light yellow in color, and they have a mild flavor — crisp, clean and very smooth. With their low ABV, they’re a perfect mid-day brew. Drink a lager when you feel like a beer with lunch, but you’ve got stuff to do in the afternoon.
Pairings: We like a lager with lighter fare: think fish tacos or a club sandwich on the patio.
Pilsner (ABV 4.1 to 5.1%, IBU 30 to 45)
Pilsners are golden as straw. They’re as smooth and clean as a lager, but with a little more personality. Pilsners have a little more hops, and they can also taste lightly malty, like a slightly sweet biscuit.
Pairings: Pilsners also have a crisp, medium body that’s really nice with lighter meals. We pair it with dishes like chicken salad and grilled salmon with asparagus.
India Pale Ale (ABV 6.3 to 7.6%, IBU 50 to 70)
This beer’s pale, golden hue belies its gonzo hops. India pale ales taste amazing — big intense hops, full of citrus and herbaceous, with a nice dry, crisp finish. They’re on the boozier side, so treat them like cocktails; sippers rather than quaffers!
Pairings: Because India pale ales can tend toward strong and bitter, we’d recommend pairing them with something equally flavorsome, like a spicy chili, andouille sausages, or blue cheese. Chinese food? Yes!
Pale Ale (ABV 4.4 to 6.1%, IBU 30 to 50)
A golden or copper blond beer, pale ales are hoppy — though less so than their cousins, the India pale ales — and their flavor can vary from mild hops to wildly complex and floral. With such a variety, pale ales are fun to taste in a flight.
Pairings: With all those floral notes and a light bitterness, pale ales are natural for seafood. Serve them with everything from linguini and clams to grilled herring.
Brown Ale (ABV 4.2 to 6.3%, IBU 24 to 45)
As the name suggests, brown ales have a dark, caramel color and they taste malty — nutty, sweet, with a lovely, light bitterness. They’re incredibly easy to drink, and so while not too boozy, a little dangerous.
Pairings: We like to pair brown ales with heartier foods and rich flavors, like French onion soup, smoked salmon, or pot roast.
Porter (ABV 7 to 12%, IBU 35 to 50)
Porters are deep, dark brown, and full bodied. They taste like dark chocolate — a little cocoa sweetness with just a hint of sharp, bitter hops. They’re so thick, you can’t drink a ton of them, and that’s a good thing because they have the highest ABV of any of these beers.
Pairings: That boozy quality is one reason to pair Porters with food — the other is that they provide great ballast for super flavorful or spicy foods. Serve a porter with chicken enchiladas or Korean barbecue. Oh, and chocolate cake!
20 notes
·
View notes
Photo

Shake Shack Pie Oh My Concrete
Shake Shack is a fast-food chain known for its delicious burgers and hot dogs, but is especially loved for its signature Concretes. Made with fresh-made frozen custard and blended with chunks of tasty mix-ins, they're a must-have for summertime. And now Shake Shack has shared their exclusive Concrete recipe so you can make these creamy frozen treats at home!
Frozen Vanilla Custard
The master recipe for most of the Shake Shack Concretes.
Makes about 1 quart
Preparation time: 45 minutes + chilling time
Ingredients
5 egg yolks
½ cup sugar
1 ½ cups heavy cream
1 ½ cups milk
Pinch of salt
1 teaspoon good quality pure vanilla extract
Directions
Put the egg yolks and sugar into a heavy medium sauce pan and whisk until smooth. Whisk in the cream and milk. Cook over medium heat, stirring frequently with a wooden spoon, until the custard reaches a temperature of 170 F on an instant-read thermometer or is thick enough to coat the back of the spoon.
Strain the custard into a medium bowl. Stir in the salt and vanilla. Set that bowl into a larger bowl filled with ice, then stir the custard frequently until it has cooled. Cover the custard and refrigerate until completely chilled, about 4 hours.
Churn the custard in an ice cream maker following the manufacturer's instructions. Scoop the custard into a quart container with a lid, cover and store in the freezer for at least 2 hours, until firm. Custard can be kept up to a month in the freezer.
Pie Oh My Concrete
Delicious made with your favorite pie! We used L&B Blueberry Pie in this recipe, but L&B Pecan Pie would be equally fantastic.
2 servings
Preparation time: 30 minutes + chilling time
Ingredients
3-4 scoops Frozen Vanilla Custard (see recipe above)
1 slice L&B Blueberry Pie, cut into ½-inch pieces
1 cup whipped cream, optional
Directions
Spoon the frozen vanilla custard into a medium bowl. Add the pie. Cover with plastic wrap and transfer the bowl to the freezer for at least 15 minutes and as long as 2 hours.
When ready to serve, gently mash ingredients together with a wooden spoon until just combined. Spoon the Concretes into 2 dessert dishes, top with whipped cream, if desired, and serve.
Recipe source: Shake Shack Recipes & Stories
#ice cream#finishing touch#dessert#custard#shake shack#blueberries#pie#pies#bakery#summer dessert#frozen#frozen treat#frozen dessert#summer desserts
27 notes
·
View notes
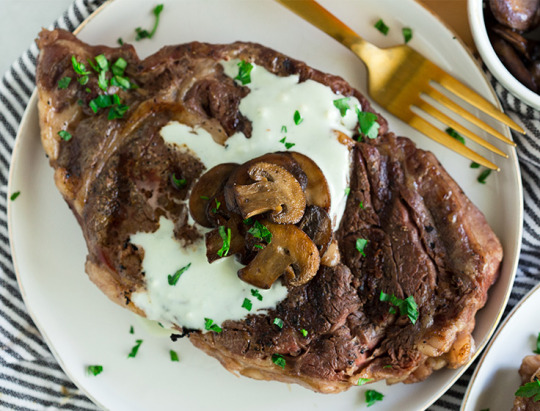
Photo

Sous Vide Rib Eye & Gorgonzola Sauce
Twin Cities food blogger greens & chocolate shares her recipe for perfectly cooked, sous vide rib-eye steaks.
Before hearing about sous vide from friends, I never really understood how it works. After some research, I realized it’s actually quite simple, and it has quickly become my favorite way to perfectly cook a steak. So let me break it down for you.
Basically, sous vide is the process of placing food in a vacuum-sealed container and cooking it in water.
I admit, this doesn’t sound very appealing. What IS appealing, however, is how precise and accurate you can get your food to cook. This is particularly great when cooking steak because not only can you get it to the exact doneness that you prefer, but it’s cooked to that temperature evenly throughout the steak.
Of course, no one really wants to eat a steak that has been completely cooked in water. The best way to solve that problem is to heat your grill or grill pan to high and sear the steak for a minute on each side to get the sear marks and grill flavor.
In this recipe, I kept the sous vide process and seasoning super simple. Salt and pepper and a couple cloves of garlic are all the steak really needs. If you want to get a little fancier, you can throw a few sprigs of herbs into the vacuum sealed bag with the steaks, but it’s definitely not necessary.
During the last half hour of the steaks cooking, you’ll prepare some sautéed mushrooms and a gorgonzola cream sauce, both of which could not be easier.
These sous vide rib eyes would be the perfect way to impress dad this Father’s Day. You’ll wow him with an amazing steak, and he’ll love hearing about this new way to cook meat. Paired with his favorite beer or beverage, what more could he ask for?!
4-6 servings
Preparation time: 10 minutes
Cook time: 2.5 hours
Ingredients
2 16-ounce rib-eye steaks
2 cloves garlic, sliced
Salt and pepper
3 tablespoons unsalted butter
8 ounces sliced mushrooms
1 tablespoon red cooking wine
3 cloves garlic, minced
½ teaspoon salt
Gorgonzola Cream Sauce:
1 cup heavy cream
1 cup crumbled gorgonzola
½ teaspoon salt
¼ teaspoon pepper
Special equipment: sous vide precision cooker
Directions
Place the precision cooker in a water bath and bring the water to temperature. For medium-rare steaks, set the precision cooker to 129 F, for medium set the precision cooker to 134 F, and for medium-well set the precision cooker to 145 F.
While the water is coming to temperature, season the steaks with salt and pepper.
Place the steaks in a vacuum-sealed bag along with the sliced garlic.
Place the vacuum-sealed bags in the water bath for 2 hours.
When the steaks have about 30 minutes left, begin making the mushrooms and gorgonzola cream sauce.
In a large skillet, add the butter over medium heat.
Add the mushrooms and cooking wine, and cook until golden, about 10-15 minutes.
Add the garlic and salt, and cook another 1-2 minutes and remove from the heat.
In a small pot, combine the heavy cream, gorgonzola cheese, salt, and pepper over medium heat.
Cook until the cheese has melted, whisking frequently.
Heat a grill or grill pan to high heat.
Once the steaks are finished cooking, remove them from the vacuum-sealed bags.
Place the steaks on the grill and sear for 1-2 minutes on each side.
Serve the steaks topped with mushrooms and gorgonzola cream sauce.
5 notes
·
View notes
Photo
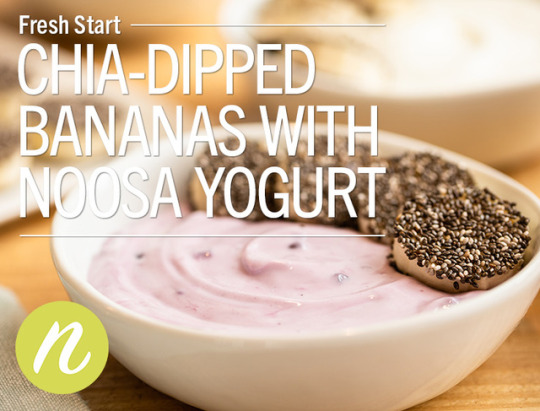
Chia-Dipped Bananas with Yogurt
Yogurt is such a nice, easy way to start the morning — but if you’re eating it every day, it can be fun to mix it up a little. That’s just what we had in mind when we put together these little yogurt cups with the pretty chia-dipped bananas.
First of all, we’re starting with a great yogurt product. We’re really proud to carry Noosa because it’s made with nothing but whole milk, active cultures, a touch of honey and fresh fruit purée. It has a thick, velvety texture and a lightly sweet, delightfully tart flavor we really enjoy. In this recipe, you can use any flavor you like, but we like it with blueberry yogurt.
Bananas and yogurt are a natural combination. We’ve dipped the bananas in chia seeds to make crunchy, soft medallions. They look so cute, but they’re also packed with nutrients. The banana brings loads of potassium and magnesium; the chia is a super food, filled with Omega-3 fatty acids, protein, antioxidants and fiber. Add all the protein, healthy fats, and calcium in the yogurt, and good morning, healthy!
Best of all, this breakfast treat comes together in minutes. You could also take it to work with you, and have it for snack — a little energy boost to get you through the afternoon!
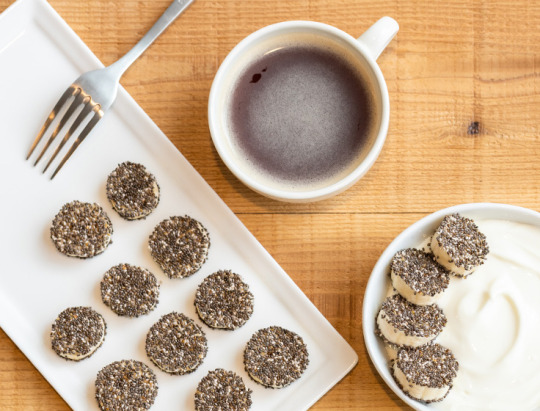
Makes 2 servings
Ingredients
8-ounce container Noosa Yoghurt, divided
2 tablespoons chia seeds
2 medium bananas, sliced into 12-14 rounds each
Directions
Gently stir the yogurt to combine fruit. Divide it into 2 small bowls.
Place chia seeds on plate. Gently press both sides of banana slices into chia seeds.
Arrange the chia-dipped bananas on top of the yogurt.
13 notes
·
View notes
Photo
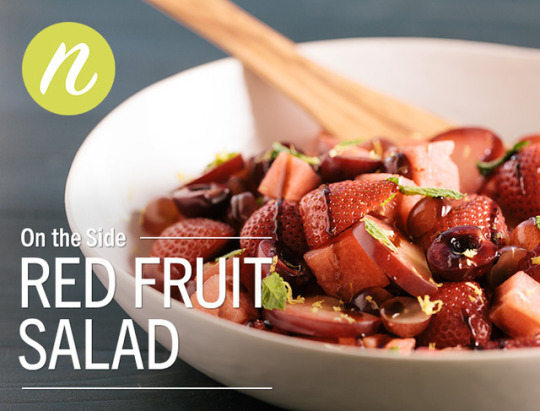
Red Fruit Salad
This gorgeous fruit salad combines all your favorite red fruits into one delicious bowl!
4-6 servings
Preparation time: 20 minutes
Ingredients
1 cup cherries, pitted and halved
1 cup strawberries, quartered
3 plums, pitted and chopped
2 cups red grapes, halved
1 teaspoon lemon zest
Fresh mint leaves
1-2 tablespoons balsamic glaze
Directions
Combine all the fruits in a bowl. Top with lemon zest and drizzle with balsamic glaze. Garnish with fresh mint leaves.
#fruit#fruit salad#cherry recipes#plums#strawberries#grapes#eat clean#Nourish#Nourish Recipes#4th of July#cherries#patriotic#summer salad#picnic#picnic side#summer strawberries#berries#summer berries#fresh sides
14 notes
·
View notes
Photo

Baked Lemon Raspberry French Toast
This wonderful French toast casserole from Twin Cities food blogger greens & chocolate is a delicious alternative to cinnamon-infused French toast, with fresh lemon flavor that’s perfect for a springtime brunch. The best part? You can make it ahead of time and just pop it into the oven in the morning!
youtube
Ahhh brunch. Just seeing the word brings images of bottomless cups of coffee, cinnamon rolls, quiches and perhaps a mimosa or two to my mind. There’s no better way, in my opinion, to start a weekend day than with these things.
While I definitely appreciate the fun and convenience of going out for brunch, sometimes I really don’t want to get out of my PJs and leave the house on Sunday morning. Plus, brunch is usually about the same time as my son’s first nap, which is really inconvenient! But really, it’s the whole getting out of my pajamas thing that is the biggest barrier to me going out for brunch.
So instead, I like to cook something special for my husband and I for weekend brunch. What better way to make up for our boring weekday breakfasts than with a fun brunch?
I love French toast casseroles for so many reasons. One, because it’s almost like eating dessert for breakfast. French toast casseroles are super similar to one of my favorite desserts, bread pudding, just with less sugar, but we can make up for that with powdered sugar and maple syrup, right?
I also love them because they can be made the night before, leaving minimal prep the morning of. This one is no different. All you need to do once you get out of bed is let it sit out for about 30 minutes, then pop it in the oven for 45 minutes, and you are the queen (or king!) of brunch. No getting dressed necessary.
This Lemon Raspberry French Toast Casserole is THE perfect springtime brunch dish – especially for Easter! The bright flavors of the lemon and raspberries are a fun change from the typical cinnamon notes in French toast. I topped ours with powdered sugar but I think it would also be great with a light drizzle of maple syrup.
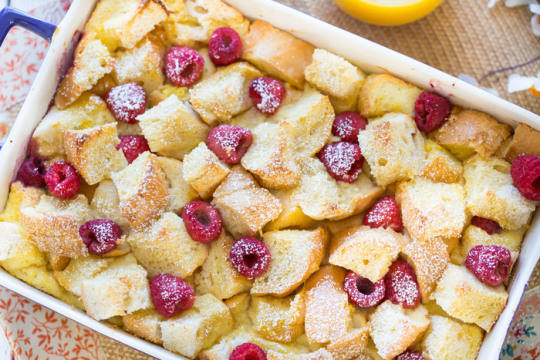
Baked Lemon Raspberry French Toast
8 servings
Preparation time: 1 hour 30 minutes, plus overnight refrigeration time
Ingredients
1 pound loaf French bread, cut into cubes
2 cups fresh raspberries, divided
3½ cups milk
6 eggs
⅓ cup pure maple syrup
2 teaspoons pure vanilla extract
1 teaspoon lemon extract (optional but delicious)
Zest from 1 lemon (about 1 tablespoon)
Juice of 1 lemon
Directions
Grease 9x13” baking dish with cooking spray.
Place half of the cubed bread in the bottom of the baking dish, top with half of the raspberries, then repeat with remaining bread and raspberries.
In a bowl, whisk together milk, eggs, maple syrup, extracts, zest and lemon juice.
Pour mixture over bread and raspberries.
Cover with plastic wrap and refrigerate overnight.
On the morning of, remove from refrigerator and let sit for 30 minutes.
Heat oven to 350 F.
Bake for 35-45 minutes, until lightly golden and cooked through. Cover with foil for the last 10-15 minutes to prevent the top from burning.
Sprinkle with powdered sugar and serve with maple syrup. Enjoy!
#Must-try#brunch#recipes#greens & chocolate#french toast#lemon#raspberries#Easter#Mother's Day#Mothers Day#raspberry recipes#easter brunch#video#videos#spring brunch#holiday brunch#brunch for a crowd#brunch faves
132 notes
·
View notes
Photo

Maple Dijon BLT Sliders
The secret to these irresistible mini BLT sandwiches is crispy bacon coated with a sweet and tangy maple Dijon glaze.
youtube
6 servings
Preparation time: 30 minutes
Ingredients
For the Maple-Dijon Glazed Bacon:
¼ cup pure maple syrup
1 tablespoon Dijon mustard
8 cracks coarsely ground fresh black pepper
1 pound sliced bacon
For the BLTs:
12 slider buns, toasted
2 ripe Roma tomatoes, sliced
½ head iceberg lettuce
1 cup mayonnaise
Directions
Heat oven to 400 F.
Whisk together syrup, Dijon and black pepper.
Lay bacon on a baking sheet and bake for 15 minutes.
Remove bacon and any grease that has accumulated. Pat bacon dry with a paper towel.
With a pastry brush, brush bacon with syrup mixture until completely coated.
Return to oven and bake for an additional 5-7 minutes until bacon is glazed. Remove from oven and cool.
Assemble BLTs: Spread mayonnaise on the buns, then add lettuce, tomato and bacon.
15 notes
·
View notes