#sometimes 10mb is not enough
Text

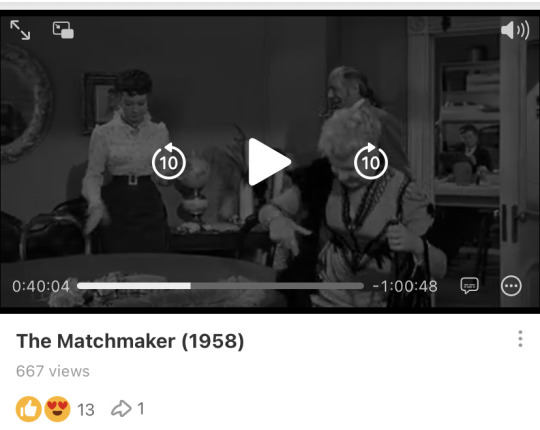
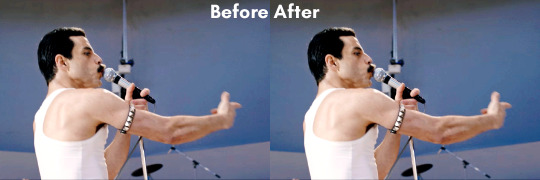
HYUNJIN ✦ STEP OUT 2024
#hwang hyunjin#stray kids#bystay#createskz#hyunjinnet#*mine#l.gif#dreamytag#melontrack#usersemily#userlau#usermoonjuice#usersa#usertsu#sometimes 10mb is not enough#anyways i love the concepts for this step out#especially this part — so pretty 🤍
719 notes
·
View notes
Text
people who comments 'oh i wish op would include this or that in this gifset' or 'it's a shame gifset ends here, there's some interesting stuff right after that' or something like it. you never made a gifset yourself huh. it's not as simple sometimes. sometimes there's not enough frames for a one gif it will look choppy and weird, you have to either cut it off or add it to another shot, if you really want to include it. and even tho now you can make a set that is more than 10 gifs you also don't want to make it to too long and look endless. you also need to maintain some sort of harmony (at least for me it's very important, i am a very visual person)
and with all that you also need to stay under 10Mb per gif. and while that is a huge number and ridiculous compare to times when i started making gifs here and it was 500kb... sometimes even that is not enough (especially the bigger gifs are) so you have to make decisions to not include something or at least not in full length
gifmaking takes a lot of time and pretty gifs believe it or not takes also some skill. and btw no one pays us gifmaker for it, we just take time of our life to make things and post it here. and also no one freaking reblog anything anymore which makes it for us gifmakers extremly hard to exist
63 notes
·
View notes
Note
Tell us your secret! What’s your process for making such gorgeous gifs?
hi!! first of all thank you SO much for the compliment 🫶🏻🫶🏻 it means the world to me that you guys like the things i do!
Now for the process: How i make the basic gif
I get my source material from the best quality i can! (1080p or 2160p if im lucky) I wouldn't say that this is a *must do* and that you can't gif things of lower quality and make it look good bc that would be a lie! But the more pixels the better!
I choose the scenes trim them down and select on photoshop -> archive -> import -> video to frames
When I have the frames (the amount of frames truly varies if you have more than 90 frames you would probably need to make your gif more small in terms of size, or with less light/colors, etc) i set the time of the frames to 0,05 (if it's a really short gif i put it at 0,1 or sometimes if it's a really short gif at 0,2 - usually if i want to use it in an edit and i need to make it last longer to have multiple gifs of the same time-)
Then I convert to the frames to timeline and select all the layers of the gif and convert them to smart object
MOST IMPORTANT PART: It doesn't matter if your gif is 1million pixels or 2 the sharpen is and will always be your best friend and it is a little tricky at the start but once you find the way you like it it would be the love of your life! I will give you my sharpening adjustments: I select the smart object i have and then I go to filters-> sharpening -> smart sharpen Here i go with amount: 500 and reduce noise: 0,5 or 0,3 (the first one really works with lower quality things and yt videos!). Then I duplicate the smart object with the filter and change the sharpening to 60px and 10, and to finish it of this one I reduce the opacity to 60% or 70%
Then here comes my fav part that is coloring and making your gifs feel alive! I use curves and base all the rest in this adjustment layer. I usually take the thing in letter D and place it in a lighter place so then the curves make the gif brighter and changes the colors (for the color part if you have a gif that the predominant color is more to the warm colors then this tool will make the blue curve more prominent and the other way around). I usually don't like my gifs to be in the red side, specially the red that comes with warm lighting like with candles so when i click on the lighter part of the gif that it's on the res hue it will bring my blues and greens more prominent than the red one. Then I just play around with the curves. The RGB curve is for all lights, where the H is signally is the lighter part of the gifs, the I is the like kind of all lights combined, and the J is the dark parts (shadows and those things).

Then I add a Brightness and Contrast adjustment layer and I put the contrast to 100%.
And then I make colors pop out with selective color (This also helps when you make a dark gif v light to play with the black parts to prevent their pixels to show, by adding % to the black, this also helps with the size of the archive, it usually brings it down that it's important sometimes bc tumblr has a limit of 10mb :/) and if it is not enough I use Hue and Saturation!
And last but not list I export the gif (export-> save for web) and the configuration where it says usually diffusion by default i change it to pattern! And then I save it! C'est Fini!
That's the most basic thing I do, specially when I need yo make quick gifs! But I do tend to add more things if I have the time, or it's a more complex gif. But this is how I made the last riverdale ones!
#ask#anonymous#tutorial#ps tutorial#photoshop tutorial#gif tutorial#im so sleepy sorry if this is a little bit of a mess#i can clarify things if you send more asks!
23 notes
·
View notes
Note
What actions and settings do you use for your gifs? They look so nice and clear, without any grain or static!
oh thank you! honestly I don't use any actions at this point, I just make sure I make gifs from the highest quality files I can find so they look good for those 540 px gifs. then I try to adjust my psd to fit the scene I'm giffing and in a way that the colors aren't too different from each other to help keep it cohesive with the limit of 256 colors on ps, the more colors you have on your gif the harder it will be for it to be clean because of the 256 limit. also tumblr has a 10mb limit but gifs with a lot of frames and closer to 10mb tend to be more grainy (can't really tell you why tho it's just something I've noticed) so if you do want to make more colorful gifs it's a good idea to keep them as light as possible on the number of frames. oh and before saving the gif I usually sharpen it a bit with smart sharpen to help it be a bit more clear (but this REALLY depends on the file you're using, but def something I've used while giffing xena and buffy).
other than that I use vapoursynth to help me cut the scenes I want etc prior to importing it to ps, you can find a tutorial for it here. it's the fastest method I've found for scene selection and what I've been using for the past 4(?) years or so, it's pretty intuitive once you get used to it and you can resize your scene on it before importing it to ps which saves a lot of time. but keep in mind that this isn't a magical tool and without the stuff above it will be hard to make clearer gifs.
so to recap:
make sure the file you're giffing is the highest quality you can find (specially if you plan to do 540px gifs)
make sure the colors are cohesive in your gifs since 256 colors is the max for gifs (2 major colors that contrast each other is fine btw, more than that can become too noisy though.) I can't stress this one enough! to me it's even more important than highest quality files because most of the time if the colors are nice people won't notice if it's grainy or not, but nice colors also make the gifs look higher quality than they really are (this can be tricky depending on the scenes you're giffing tho and I hate to say it but it's something that comes with practice, color theory helps a lot tho)
if possible, try to avoid making heavy gifs (close to 10mb) as it can compromise the quality of your gif (sometimes you just gotta say fuck it tho bc the gif won't work with less frames)
try using smart sharpen and see if it improves your gif! (my usual settings are | Amount: (varies depending of the scene) | Radius: 0,3 (I never change this one) | Reduce Noise: 0 (really don't recommend using this because it will blur out your details but it's up to you)
#I wish I could give more tips when it comes to coloring but it's something that it's very intuitive for me at this point and it's hard to#explain for me because I don't think about my thought process when I'm doing it I just do it yk askdjh#but it's definitely something that came with practice! also painting etc is something that improved that for me because I know which colors#go well together and which ones should be toned down for the most part - I still make mistakes sometimes but yeah#sorry that's very long but I hope it's helpful! if you want me to explain anything in more detail lmk#ask
8 notes
·
View notes
Text
I got a hard time believing SI = empathy.
Sounds more like...doubts. Internal questions about orders and their nature (priorities, environment, parties involved, future objectives and consequences). Androids are basically computers with a estimation/calculation speed above average (humans), maybe this also helps with SI boost. They think...fast. Sometimes too fast it messes everything up, too much shit at the same time only cuz they can. The moment u lose a lil bit of this power of balance for a milisec while everything is running too fast and lotta thing at the same time is enough to fuck everything up in chain reaction - some stuff more controlled/contained than others.
I think I've already said that...just sayin' again.
I gonna establish something for now (for me ofc): more SI the android got, more these internal questions come outta control. Their system get messy, modified, some controls related to that probably get outta control or maybe just enhanced in a way - like something U've always seen as X cuz you're programmed to see as X and your nature don't let u understand something that ain't mean that X, but now with the internal questioning u start seeing other povs of this X, other ways of thinking androids weren't programmed to.
Doesn't make much sense cuz depending on model they're indeed made to see things from different POVs, but they shouldn't have true meaning. With SI now it starts having meanings - for the android. What they ain't supposed to have.
I see SI often represented as those encrypted files 😂 or like opening binary stuff, everything getting "corrupted" and shit. Bad news: if u open an android (default) in a terminal everything u gonna see is these bunch of symbols if u're trynna open 'em "consciousness". Yea, baby. U can't just open an android AI with your mom's PC. Shit needs a translation.
But oh...pieces altered by SI I doubt a translator gonna help (that's CyberLife for ya, baby). Also, I think SI - especially after deviancy, makes the whole thing "heavier".
Like, imagine we got a 10MB binary file. Imagine this is the default android. U open it and it's...binary. Weird symbols and shit, maybe few strings if u're lucky of finding scripts for self-testing, tools etc. Now imagine SI + deviancy get this whole thing and these bunch of symbols and letters (they're bytes representation) just, idk, they just multiply themselves for whatever reason, not cuz of a external shit injecting bytes but the software on it's own went to shit. Believe me: androids as full admin is ain't no joke.
Now this 10MB file is now 500MB 😂
This is just a illustration, btw. Ain't exactly what happens.
Geez the rambling. I'll stop here, eat something and deal with my college exams. Have a awful nice day.
3 notes
·
View notes
Note
how does one go about making gifs? ive always wanted to try but i have no idea where to start.
Well the way I do them is super basic. I make no-nonsense gifs with minimal to no editing - but I suppose that’s helpful if you just want to get into making simple ones!
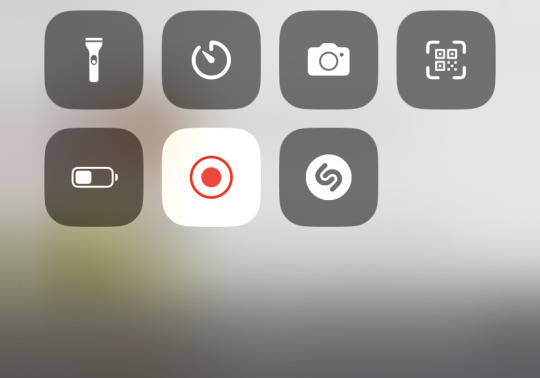
I do all of it on iPhone, so it’s gonna be iOS specific, but as long as you have a decent screen recorder on whatever device you’re using, you shouldn’t need to download any videos.
Downloading videos is mostly done to avoid quality drops if your wifi isn’t very good. I personally screen record all my clips because cannot tell the difference between gifs made from screen recorded videos versus downloaded videos, and I just don’t have the time/space to be downloading full videos that can be potentially two hours or more. Screen recording also helps you get around copyright problems if you’re trying to download videos from YouTube. It’s a personal preference thing and if people shit on you for screen recording then they need to get a life.
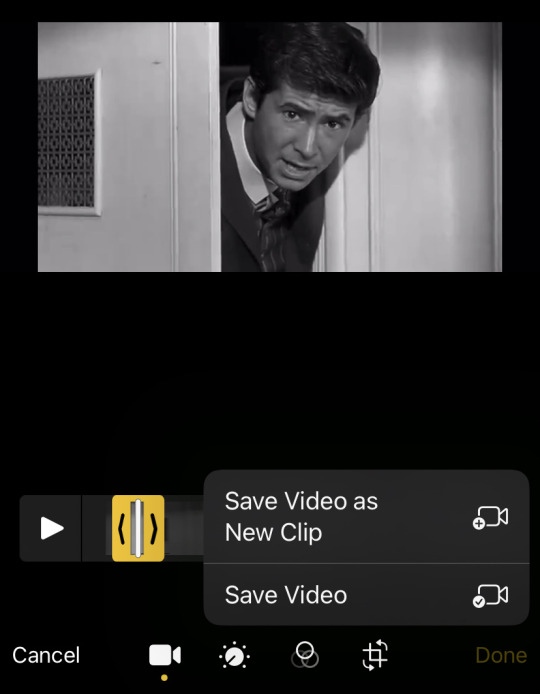
The first thing I do is find a movie/show that I want to select clips from. I’ll do a quick example with a shot from The Matchmaker (1958) because I could do with some gifs of that movie.
First thing I do is find it in the highest quality I can, put my phone on horizontal & full screen (so you can get the biggest resolution you possibly can) and record a reasonable sized segment I want to make gifs of. Have some buffer space so you’re not fiddling with pauses, and record long enough to maybe get one or two good gifs out of a few minutes of recording.
Once I’ve done that, I trim the video to just be the parts I want to make into a gif. Usually something between 2 and 7 seconds helps to keep the upload size for Tumblr below 10MB, but the more colours/higher the definition the bigger the file will be regardless of runtime, so be aware. Always save as a new clip so you can keep reusing your initial screen recording.
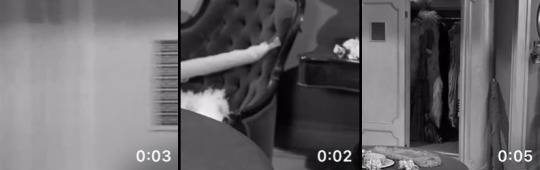
I’ve got three clips here I wanna make into gifs.
Now I go to the best website ever, ezgif to actually rotate (crop sometimes) and convert video into gifs. It’s 100% safe and a shit load better than the native iOS gif making tools.
I’m sure there are better ways of doing this with editing software on your computer, but a) I’m too lazy for that and this works just fine for making gifs for your blog, and b) you wanted a beginner tutorial and this is something fun you can play around with if shit like Adobe AE is too daunting/expensive.
You wanna click this option:
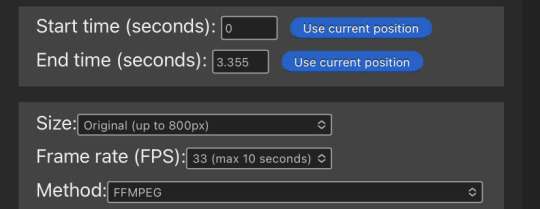
And then use the following settings (the seconds are just the maximum length of the clip I chose, feel free to play around with those to shorten your clip more if you didn’t quite get it accurate the first time.)
The size and frame rate options here WILL make the largest file option available, but it will look the best. Lower them if you are okay compromising quality for file size, or shorten your gif if you are okay compromising length for quality.
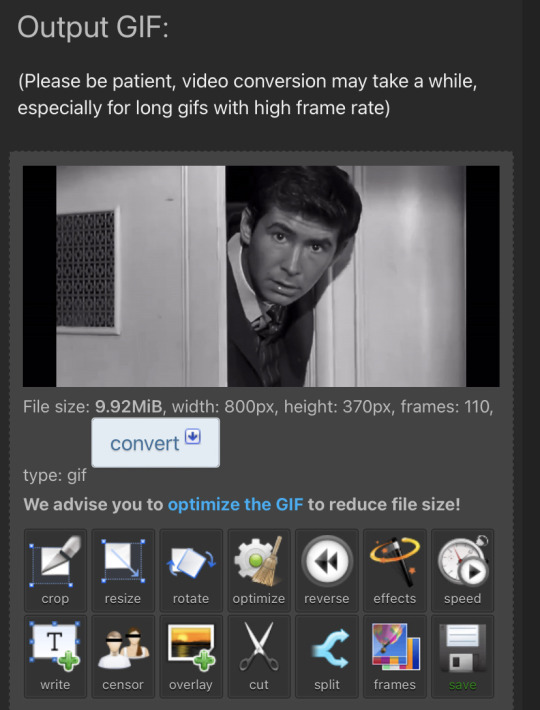
The fire size here is JUST under Tumblr’s file limit. 10.00MiB will always be too big for Tumblr. I find optimising a gif often makes the file size BIGGER 🙄 but try it if you want. There are a lot of decent options here for a simple gif tool :]] I’m just gonna quickly crop the black bars out.
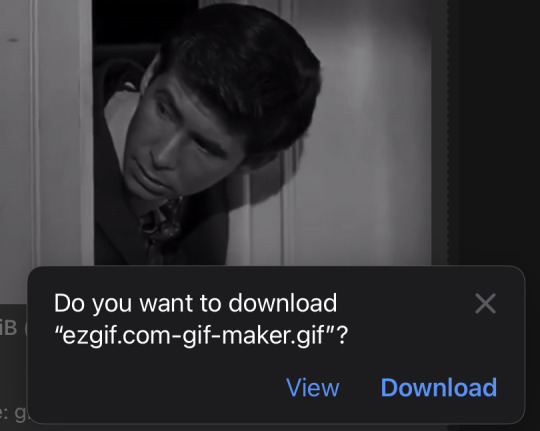
To download it, I always hit the save button and open it in View so it’s in its own tab. Then I just save it from there.
And that’s how I do it :]]
5 notes
·
View notes
Note
Hello! When I try to upload my own audio to here it always says it's too big, but it's just a three minute song from various anime. How do you pass this issue or make the file smaller?
The issue is that tumblr has a file size limit of 10mb and most high quality mp3s now are usually past that. (sometimes just barely too, like 10.3mb :/)
If I run into this I use Audacity (I have the full software because it came packaged with another program I bought so I'm not sure if the free version of Audacity can do this) to export it to a lower kbps to change the file size
If you ever see an MP3 file that says something like "320kbps" that's gonna be a large file size. When I convert it I usually set it to 128kbps and usually reduces it enough to take care of tumblr's size limit. Before you upload you can always check what the properties of your mp3 by right-clicking it and selecting "properties" to see what's going on.
#and tumblr so far only accepts mp3 formats#so things like .wav or .flac it wont accept so make sure you download it in the right format too#anyway if you've ever wondered why some of the music has bad sound quality it's because it was converted down#or it was the best I could get#anon
8 notes
·
View notes
Text
How To Transfer More Than 3GB on MTN
MTN is one of the leading mobile network operators in Nigeria and other African countries. It offers reliable, fast, and affordable data services to millions of customers. However, sometimes you may have more data than you need, or you may run out of data when you need it the most. In such cases, you may want to share your data with someone else or request data from someone who has enough.
But how can you transfer more than 3GB on MTN? Is it possible to share data on MTN without any limitations? What are the benefits and risks of MTN data transfer? These are some of the questions that many MTN users have, and this article will answer them all. By the end of this article, you will know how to transfer more than 3GB on MTN using different methods, such as USSD codes, SMS, and the myMTN app. You will also learn how to request data from your friends on MTN, how to activate the MTN data-sharing service, and how to avoid common pitfalls.
How To Transfer More Than 3GB On MTN Using USSD Codes
One of the easiest and most popular methods to transfer data on MTN is using USSD codes. USSD codes are shortcodes that you dial on your phone to access various services and features. To transfer data on MTN using USSD codes, you need to follow these steps:
- Dial *131*7# on your phone. This will open the MTN data gifting menu, where you can choose different options to share data on MTN.
- Select option 2, which is “Transfer from Data Balance”. This will allow you to transfer data from your existing data balance to another MTN number.
- Enter the recipient’s MTN phone number. Make sure you enter the correct number, as you will not be able to reverse the transaction once it is completed.
- Select the amount of data you want to transfer. You can choose from 10MB, 50MB, 100MB, 200MB, 500MB, 1GB, 2GB, or 3GB. The maximum amount you can transfer in a day is 3GB.
Confirm the transfer by typing 1. You will receive a confirmation message from MTN, and the recipient will also receive a notification message.
How to transfer more than 3GB on MTN using USSD codes
If you want to transfer more than 3GB on MTN using USSD codes, you need to use a special code that is not available on the MTN data gifting menu. This code is 3128#, and it allows you to transfer up to 5GB of data in a single transaction. To use this code, follow these steps:
- Dial 3128# on your phone. This will open the MTN data share menu, where you can transfer data from your data balance to another MTN number.
- Choose the option of “Transfer from Data Balance”.
- Enter the recipient’s MTN phone number.
- Select the amount of data you want to transfer. You can choose from 4GB or 5GB. The maximum amount you can transfer in a day is 5GB.
- Confirm the transfer by typing 1. You will receive a confirmation message from MTN, and the recipient will also receive a notification message.
How To Transfer Data On MTN Using The myMTN App
The myMTN app is a mobile application that you can download on your phone to access various MTN services and features. The app allows you to manage your account, check your balance, buy data, and share data on MTN. To transfer data on MTN using the myMTN app, you need to follow these steps:
- Download the myMTN app from the Google Play Store or the Apple App Store and install it on your phone.
- Open the app and register with your MTN phone number. You will receive a verification code via SMS, which you need to enter on the app to complete the registration.
- On the app’s home screen, tap on the “Data” icon. This will open the data menu, where you can see your data balance and buy data bundles.
- Tap on the “Gift Data” icon. This will open the data gifting menu, where you can choose different options to share data on MTN.
- Tap on the “Transfer Data” icon. This will allow you to transfer data from your data balance to another MTN number.
- Enter the recipient’s MTN phone number and the amount of data you want to transfer. You can choose from 10MB, 50MB, 100MB, 200MB, 500MB, 1GB, 2GB, or 3GB. The maximum amount you can transfer in a day is 3GB.
Confirm the transfer by tapping on the “Send” button. You will receive a confirmation message from MTN, and the recipient will also receive a notification message.
How to Share More Than 3GB Data Daily On MTN With An Auto Clicker App
Disclaimer
Before we proceed, we would like to warn you that this method may not work for everyone, and that it may violate the MTN terms and conditions. You should use this method at your own risk, and we are not responsible for any consequences that may arise from using it. This method is for informational purposes only, and we do not encourage or endorse any illegal or unethical activities.
What You Need
To share more than 3GB data daily on MTN with an auto clicker app, you will need the following:
- An Android phone with an MTN SIM card that has enough data to share.
- The myMTN app, which you can download from the Google Play Store. If you already have it, make sure it is updated to the latest version.
- The Auto Clicker app, which you can download from this link. This app will help you automate the data transfer process and bypass the MTN data transfer limit. If you are an iOS user, you can check the Apple App Store to see if you can find a similar app, but we cannot guarantee that it will work.
How It Works
The auto clicker app is a tool that allows you to set up a series of taps on your screen, and then run them automatically and repeatedly. You can adjust the speed, duration, and location of the taps, and also set them to run indefinitely or for a certain number of times. By using this app, you can trick the myMTN app into thinking that you are manually transferring data, when in fact you are doing it automatically and rapidly.
How To Transfer More Than 3gb On MTN - Step By Step Guide
Here are the steps to follow to share more than 3GB data daily on MTN with an auto clicker app:
- Open the myMTN app and log in with your phone number. You will see your data balance and other options on the home screen.
- Tap on the “Data” icon, and then tap on the “Gift Data” icon. You will see the data gifting menu, where you can choose different options to share data on MTN.
- Tap on the “Transfer Data” icon. You will be able to transfer data from your data balance to another MTN number.
- Enter the recipient’s MTN phone number and the amount of data you want to transfer. You can choose from 10MB, 50MB, 100MB, 200MB, 500MB, 1GB, 2GB, or 3GB. The maximum amount you can transfer in a day is 3GB.
- Tap on the “Send” button. You will see a confirmation page, where you need to tap on the “Confirm” button to complete the transfer.
- Do not tap on the “Confirm” button yet. Instead, open the auto clicker app and set it as follows:
- Click interval: 1 millisecond. This is to enable the auto clicker speed to be insane. Your device will hang immediately you start it, so be prepared.
- Repeat mode: Indefinite. This is to make the auto clicker run continuously until you stop it manually.
- Click position: Single. This is to make the auto clicker tap on one spot only, which is the “Confirm” button on the myMTN app.
- Drag the auto clicker pointer to the “Confirm” button on the myMTN app, and then tap on the play button on the auto clicker app. This will start the auto clicker, and it will tap on the “Confirm” button repeatedly and rapidly.
- Wait for the auto clicker to run until it changes to successful. This may take a few minutes, depending on the amount of data you are transferring and the speed of your network. You will see a confirmation message from MTN, and the recipient will also receive a notification message.
- To stop the auto clicker, tap on the stop button on the auto clicker app. You can also exit the app or turn off your device to stop it.
- Repeat the steps above for each recipient you want to share data with.
How Much Data Can You Transfer
By using this method, you can share more than 3GB of data daily on MTN with an auto clicker app. The maximum amount of data the auto clicker can make you transfer is 15GB i.e. 3GB x 5. The recipient will receive the 3GB data three times instead of just the traditional 3GB once daily limit. However, this also means that you will lose 15GB of data from your data balance, so make sure you have enough data to share and that you need to share that much.
Pros And Cons - How To Transfer More Than 3GB On MTN
This method has some pros and cons that you should consider before using it. Here are some of them:
Pros
- You can share more data than the MTN data transfer limit, which is 3GB per day.
- You can help your friends and family who need data, especially in emergencies or when they have no access to buy data.
- You can enjoy more data services and features with your friends and family, such as browsing, chatting, streaming, gaming, etc.
Cons
- You may lose a lot of data if you transfer too much data to others, leaving you with insufficient data for your own needs.
- You may damage your device if you use the auto clicker app for too long, as it may cause your device to hang, overheat, or drain the battery.
- You may violate the MTN terms and conditions, and risk getting your account suspended or banned.
Conclusion
In this article, we have shown you how to share more than 3GB of data daily on MTN with an auto clicker app. This is a creative and clever way to bypass the MTN data transfer limit, but it also comes with some risks and drawbacks. You should use this method at your own risk, and only when you need to share that much data. We hope this article has been helpful and informative for you. If you have any questions or feedback, please let us know in the comments section below. Do well to share this article with your friends and join our Telegram channel and group for more interesting updates. Thank you for reading.
Read the full article
0 notes
Text
GIF Tutorial for Beginners
People keep asking me to teach them how to make gifs and I end up writing them long confusing messages, so I figured maybe it’s time to just write up an actual clean tutorial instead! This is supposed to be for total beginners! (Or people who want to switch to a new process that I’ve curated and streamlined over 8 years of making gifs.) I’ll try to keep this as barebones as possible, and won’t include all the advanced stuff I usually add. I hope it’s easy enough to follow, and I’ll include some links at the end for more stuff. I really do think it’s better to make a few simple gifs before doing more complicated stuff though, just to get used to it!
There will be three sections in this tutorial:
#1 Basics - How to make a gif in PS at all
#2 Sharpen - How to use sharpen/denoise filters in an easy way
#3 Colouring - Just a few very basic adjustment layers
What you need:
A video (most common formats should work, although .mkv doesn’t always)
Photoshop (I use PS CC 2018 - this one because I'm morally opposed to Adobe’s subscription model - but versions aren’t super different from each other)
In the end, you should hopefully be able to make something like this:
This is gonna be so long. Sorry. You can make a gif with just part #1! The rest is just to make it look better.
#1 Basics
If any of the tools/functions aren’t where they should be for you, your best bet is googling it, you might need to change something in your preferences!
Make sure to save your PS file... often. PS has a tendency to crash, especially on laptops.
First, you need to get the video file. I recommend a shorter video, a few minutes long, if it’s longer you might want to cut it into shorter parts beforehand. This is just because PS’s video import tool sucks.
I chose the Butter MV, specifically Jungkook’s body roll at 1:24 because that’s what I want to look at for the duration of this tutorial. No further questions, thanks.
1. Open PS, go to File > Import > Video Frames to Layers

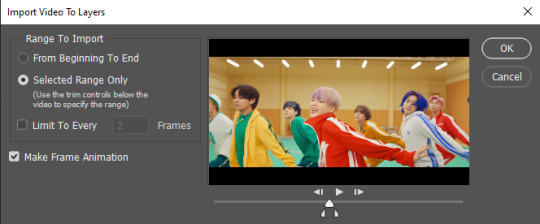
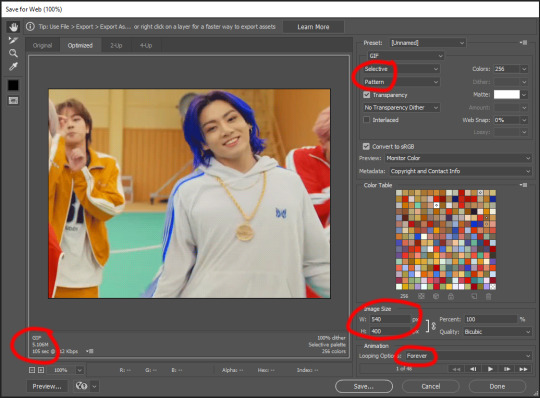
2. In the little pop-up, choose the part of the video that you want to gif. This will import every frame of the video into PS as a layer, so it has to be a relatively short part, or it’ll take ages (and gifs can’t be that big anyway). Now you can also see why it’s almost impossible to select the correct part if the video is too long.
The little controls at the bottom are for trimming, the one in the middle just for the preview. Make sure “Make Frame Animation” is selected! Then click OK.
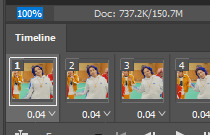
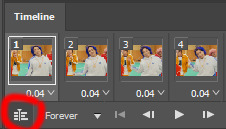
3. Now you have your layers, and you have a frame animation! On the right are your layers, that’s where we’ll apply the colouring etc. later on. On the bottom, that’s your timeline or frame animation - that’s what the gif will be in the end! So if you delete frames, the layers will still be there, but they won’t show up in the gif. If you click on a frame, you can see the little eye checkmark on the layer that’s currently visible.
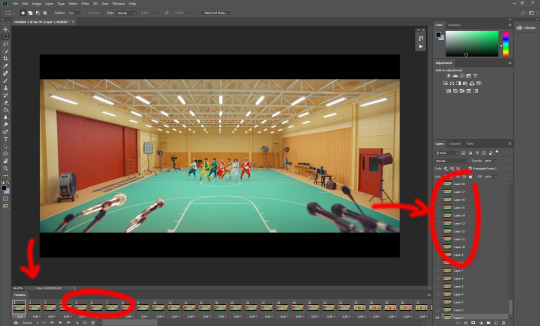
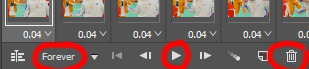
4. The timeline controls at the bottom that are relevant right now: set to “forever” so the gif will loop, you can play the animation with the play button, and you can delete the selected frame(s). The number on each frame is the speed of the gif, depending on the video I usually set it to 0.05 or 0.06 (photoshop lies to you when you play the animation, the only way to test this is to open the finished gif, preferably on tumblr or wherever you want to upload it).
5. As you can see, the animation starts a bit before the actual part that I want, so go ahead and delete all the frames in the animation that you don’t want! You can delete the corresponding layers too if you want, to make the PS file smaller, but it has no influence on the gif. (Hold Shift to select multiple frames as usual)
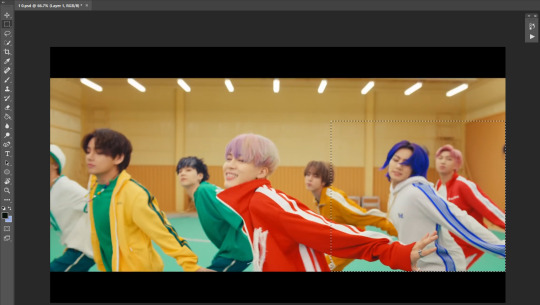
6. Next, we’re gonna crop the gif however we want! You can do this with the crop tool in the left sidebar, but with gifs like this where there’s a lot of moving parts, I sometimes just use the selection tool in the left sidebar, like so:
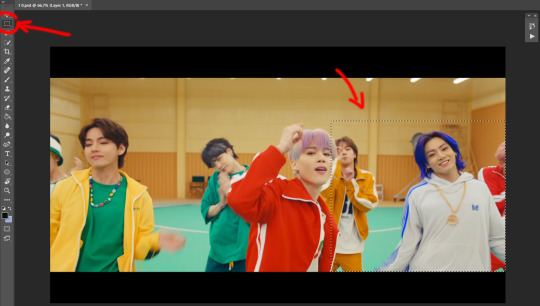
When you click on different frames, the selection stays, and you can check to make sure Jungkook doesn’t suddenly go out of frame if you crop it like that!
At this point, make sure the selection/crop isn’t smaller than you want the gif to be! For tumblr, what matters is the width (in pixels) of gifs. In the end, the width dimensions on tumblr should be 540px (1 gif per row), 268px (2 gifs per row), or 177/178px (3 gifs per row). Anything else will lead to very shitty resizing!
For this gif I’m going full sized, meaning 540px wide, so I made sure my selection isn’t smaller than that.
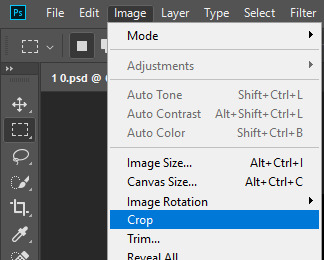
Then just go to Image > Crop, and it’s done!
7. Check to see if this is what you want, then resize: go to Image > Image Size to resize the picture. Make sure the little “link” between Width and Height is active (to keep the same aspect ratio), then set the width to 540px or whatever you chose. I always set the resample option to Bicubic.
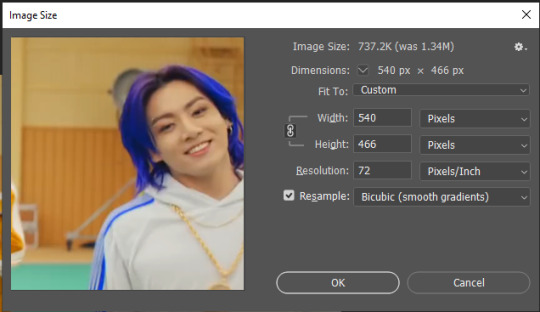
Once that’s done, set the zoom to 100% right above the timeline, to see what it really looks like.
Almost done! A little note about the sizing: width is the important part for tumblr, but if you want to make a whole gif set (especially with more than 1 gif per row!!!) make sure to make all the gifs the same height, otherwise they won’t line up and tumblr will do whatever it wants.
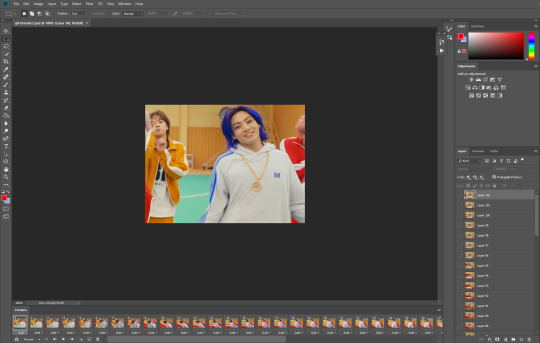
I ended up making mine 540 x 400 and ended up with this:
8. Time to save the gif!! Go to File > Export > Save for Web (OR just use the shortcut Ctrl + Shift + Alt + S) (or whatever it is on Mac).
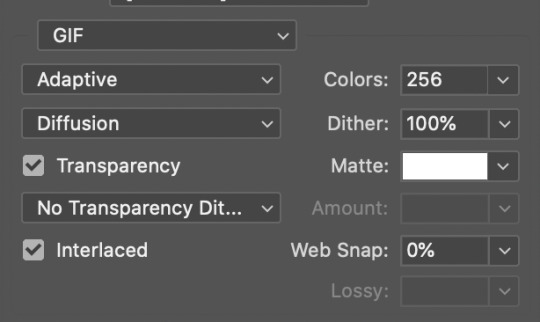
In the pop-up, you can change things about the gif, but most things should already be the way you want it (Image size, Looping option forever). Selective should be the default, just like the rest.
You can choose between Pattern and Diffusion, some gif makers swear on one or the other, I go back and forth.
On the bottom left, you can see the size of your gif. Keep an eye on that! I believe Tumblr allows every single gif to be up to 10mb, but I try to keep mine under 5mb or close to it, because I think tumblr adds compression if it gets closer to 10mb?? Anyway back in my day you couldn’t upload anything over 1mb. You’ll never know our struggles.
Then just save it, and that’s it, you made a gif! Well done!! Here’s the end result:
:)
#2 Sharpen
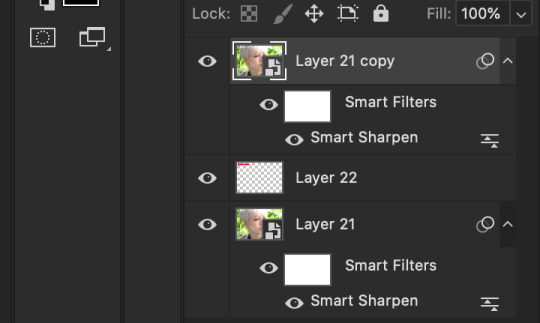
There are countless ways out there to make gifs as smooth and clean as possible! Here I’ll show you the easiest way, but it also provides a good basis for other methods. The main difficulty is that you you need to sharpen the layers, but you don’t want to 100 layers one by one. So what we’re gonna do is convert the layers into a Smart Object, which functions as one layer!
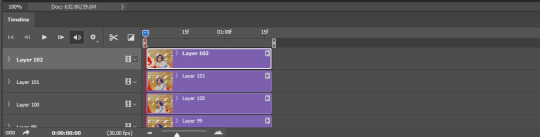
1. Convert the frame animation timeline to a video timeline with the little button right underneath on the left:
It should look like this, and I’m sorry but I can’t explain this one because I’m not an expert here, but you can just ignore it:
2. Select all layers: Select > All Layers, or just manually.
Then right click on the layers > Convert to Smart Object. Now there’s only one layer left, but don’t worry, the frames are still there!

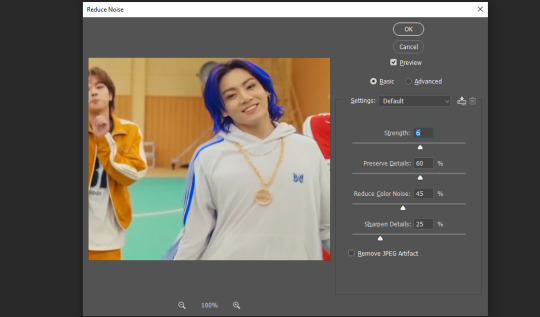
3. De-noise! It reduces noise, takes away some of that grain. More necessary in some videos. It also makes it less sharp, so I do this one first. Filter > Noise > Reduce Noise

My default settings are, Strength: 6, Preserve Details: 60, Reduce Color Noise: 45, Sharpen Details: 25, Remove JPEG Artifact: No. But you can play around, especially with the strength, and see how the little preview looks. Don’t apply too much of it! Or it will look weirdly smooth with no details in the end.
4. File > Sharpen > Smart Sharpen.
Settings: I usually have mine at Amount: 500, Reduce Noise: 5, and Radius at either 0.2 or 0.3, depending on the video. I’ll actually do 0.3 here, because I find it a bit blurry otherwise. If you sharpen more, it can quickly get grainy.
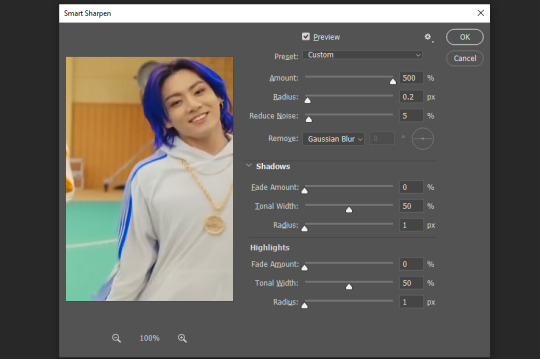
The difference isn’t huge, but here’s a little before and after denoise & sharpen:
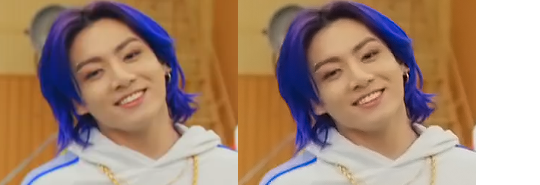
5. Technically you can just save it as a gif (save for web) as shown above now, or you can convert it back to a frame animation, which I’d recommend especially if you use certain other sharpening methods (I’ll show you how to convert it back at the end of the colouring part), but for now, let’s go straight to the next part:
#3 Colouring
Now, you CAN do this part right after part #1, still in frame animation, without a smart object. I prefer it like this because sometimes PS acts weird, but if you want to skip the smart object stuff: select all frames, and add the adjustment layers at the very top, above all the other layers. (It only affects selected frames; and it only affects the layers under it.)
The adjustment layers should be above the layer tray, and these are the ones we’ll use today: Brightness/Contrast, Curves, Vibrance, Color Balance, Selective Color.
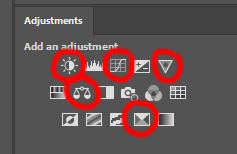
All of these are optional! You can do one, or all, or any combination. This is just the very most basic for me to get a gif to a point that I like. I’d recommend sticking to these for a start, but once you get the hang of it, definitely feel free to play around! It’s fun! Every gif maker has different preferences here, too, so there’s tutorials for everything.
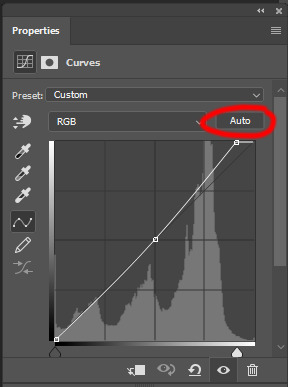
1. Curves: Just click Auto, tbh. You can play around, but Auto works fine for me as a start, just to brighten or darken some parts as a base.
2. Brightness/Contrast: Usually videos are a bit dark, and contrast can help to make it seem sharper AND cut down on gif size, so I usually just up both of them a bit (but not too much! Or it’ll look cheap). Here I put them at B: 19, C: 23

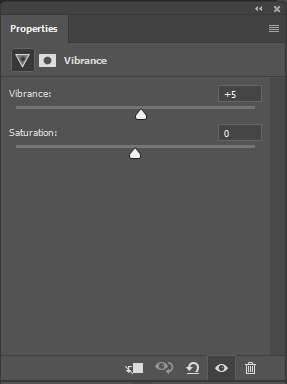
3. Vibrance: I love very vibrant and colourful gifs, so I usually up the vibrance (and sometimes the saturation). This one is already very vibrant, so I only put +5, but if you try to colour, say, a very moody tv show, this can help wonders, especially if you want to work with the colours more later.
If you prefer less vibrant gifs, you can also lower the values here!
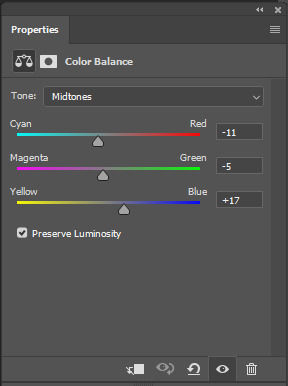
4. Color Balance: getting a bit more complicated now. Often, videos will have a slight yellow or green or blue tint, and this is where you can correct that. This video is a bit yellow, so I added +17 Blue. It was still too warm, so i added -11 Cyan as well. This neutralized the yellow tint, but I wanted some of the reddish tone back, so I added -5 Magenta. I usually do a similar process like that, depending on the tone.
Instead of Midtones, you can also do this for Shadows and Highlights individually.

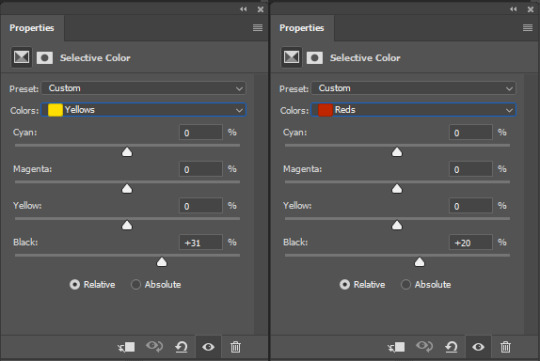
5. Selective Color: now this is the most complicated, but also the most fun to play around in my opinion! Be careful here, if you do something too extreme it’ll look like shit or make the gif super grainy. I some rough goals in mind here: make the blue hair as blue as possible, make their skin tone a bit less pale, and enhance the black and white (which I always do).
You choose a colour at the top, and then add or subtract cyan/magenta/yellow/black values for that colour.
Skin tone: yellow and red. For this gif, I just added black to both, making them darker. Sometimes, if you change one or both those colours for a different part of the gif (for example, if I wanted to make the background less yellow, I’d subtract yellow from the yellows - but then I’d add yellow to the reds, to make the skin tone natural again.)

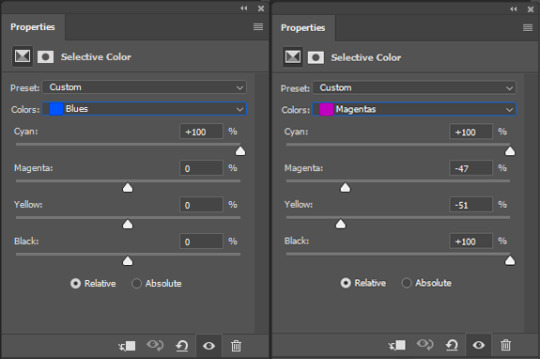
Blue hair: Just ramp up the cyan for the blues. Be careful with putting anything to +100, but here it’s already so bright that it should be fine. His roots are more purple, so I changed the magentas by adding cyan and black, and subtracting magenta and yellow. It’s not super clean, but fine for our purposes.
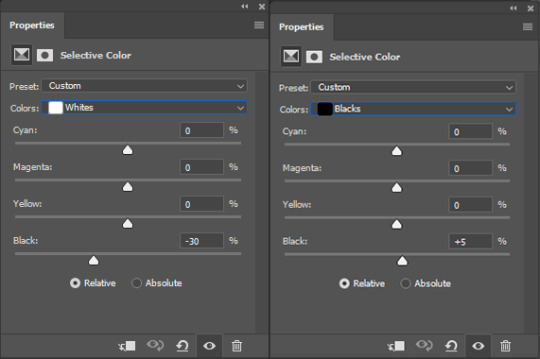
Black/white: depending on the gif, I often either add or subtract black to the whites. Adding makes the highlights less blinding, a bit darker, and flatter (I like to do that if one side of the face is bright white in the sunlight, for example). Subtracting creates contrast, makes it brighter, can wash it out. It can also lessen the gif size, and here it’s mostly just the tracksuit instead of important details, so I subtracted black. For the blacks, I almost always just add a bit of black, to make it more intense. Just like adding contrast, this can make the gif seem sharper and less grainy.

And done!
6. You could just save it as gif now, but as I said, I prefer to convert it back to frame animation timeline first, if only because I like to let it play through before I save it, and it works better for me there than in the video timeline.
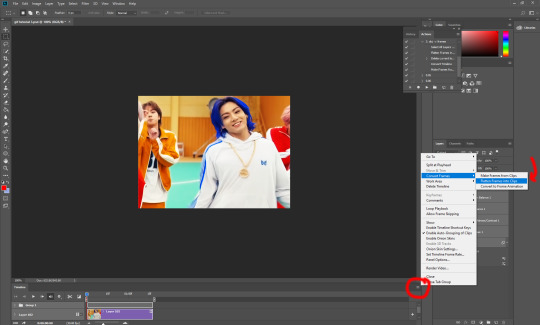
Select all frames, then click the little menu on the top right of the video timeline > Convert Frames > Flatten Frames into Clips
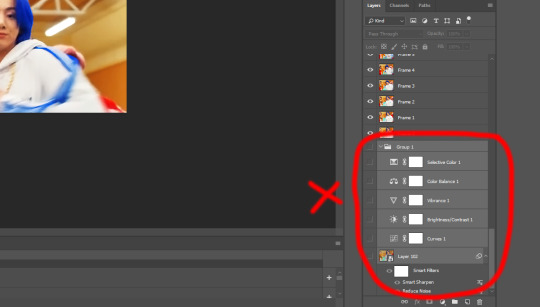
7. When you scroll down to the bottom of the layers now, the old smart object + adjustment layers should be at the bottom, under all the new layers. Delete the old ones, we don’t need them anymore.
8. Convert the timeline back to frame animation, by clicking the little button at the bottom left of the video timeline:
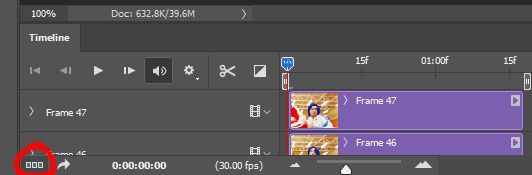
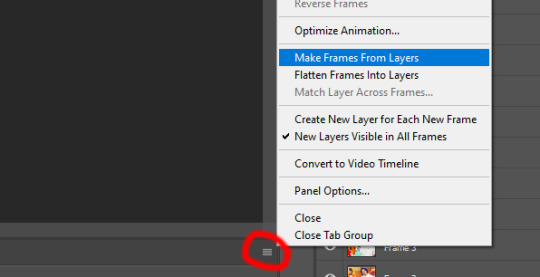
9. Click on the menu top right of the timeline again > Make Frames from Layers
10. Now, just some potential cleaning left to do. Sometimes, there’s a doubled or empty frame or layer at the beginning or end, just delete those as necessary. The timing of the frames is probably off, too, just select all frames and set the delay time to 0.05 (or whatever).
Now your done! Save as gif, and you should get this:
I included some bonus links and tips after this but tumblr ate that whole part so I guess it’s going into a separate post. (Here is is)
Anyway, I tried to make this as easy to follow as possible for beginners, but feel free to send me an ask for clarification anytime. Hope this helps, now go make gifs and have fun!!
#photoshop#tutorial#gif tutorial#ps tutorial#btsgif#*#*tutorial#this took so much longer than i expected i'm not giffing for at least a week now
225 notes
·
View notes
Note
Hi! May I ask you what program do you use to edit your gifs? I'm dying to create some myself wtih added lyrics but I've zero knowledge how to do that best. Like make them look cool ;P , but also how to make them small enough to upload them to Tumblr while still keeping a good quality. Thank you so much in advance, Timebird84/Connor-sent-by-CyberLife.
I use PhotoShop, because I'm basic and I need things to be easy and PS looked to be the easiest option to use 🤣
There's probably better (and cheaper!) options out there but honestly, I've gotten so used to PS now that I don't see myself changing any time soon.
As for quality, I can sometimes spend hours making gifs in PS, making them look nice and crisp, only to upload them to tumblr and they lose so much quality. It's got something to do with pixels and dimensions but I haven't learned the magic formula as of yet. Tumblr also has an individual gif limit of 10MBs which is a decent amount to play in!
I'm extremely amateur, everything I've learned about making gifs I've learned from tutorials, and I've still got so much to learn myself, but if you ever have questions feel free to message me and I'll try to help as much as I can!
11 notes
·
View notes
Note
Again this year, I thoroughly enjoyed your October gif extravaganza! It’s a lot of work and it’s appreciated!
Glad that you enjoyed! And thanks for going out of your way to send a nice message.
I don't really have a terribly good reason to keep doing it the way I do other than what has become a sort of tradition. Sometimes I set these challenges for myself that don't always amount to much except personal satisfaction that I'm able to do it. That and the free time allow it to be possible.
I have been able to enjoy it a lot more lately though because making gifs has gotten far easier in the last couple of years. Quality of sources is always improving and tumblrs max size is 10mb now. Being able to make a 20 frame gif used to be really difficult and now you can make 300 frame gifs easily. It seems like it doesn't need to get any bigger than that for gifs ever, because you may as well just post a video. Also, my dumb brain was working well enough that I figured out ways of automating parts of the gif making process that I hadn't before, namely setting actions to hotkeys. It probably cut the time it took me to make an average gif or cap in half.
17 notes
·
View notes
Note
how do you keep your gifs below 8mb? and with really good quality?
hello. first of all, the tumblr maximum gif size is 10mb and i always go as far as there when i need to! first of all, i hope you're using the correct tumblr dimensions, i've seen a lot of new giffers use like... whatever dimensions they think of and i don't get it
540x width for one row gifs
268px width for two rows gifs
177px 178px 177px width for three rows gifs
i've heard a lot of people lose quality when their gifs are over 5mb or something but this doesn't happen to me. on mobile, everyone's gifs look bad sometimes so to check how your gifs look here, you have to check them on desktop. i basically use the highest quality files i can find, and delete as many frames as i can to lower it to 10mb. i don't do something specific with my coloring for them to be under 10mb. 10mb is high enough for very big gifs! i hope it works for you ❤️
21 notes
·
View notes
Text

For this gif tutorial I’m going to try to keep it as basic as possible, I may add a few tips for coloring at the end, but for the most part this is going to be how I make my basic gif. Also I’m not going to use my vapoursynth to process the video beforehand, just because I know not everyone uses it and it’s harder to learn. This is going to be just a downloaded mp4 video through the gif process. Don’t let the idea that this is a BASIC TUTORIAL fool you, I’m going to try to teach you a lot of things. It’s gonna get wordy, but i will try my hardest to keep the process easy. I’m just going to explain what things do instead of having you just copy + paste my method and not know what it means. okay? okay.
Before we start though, if you plan of giffing live stages you either need to accept the they will not be super crisp and clear OR learn how to use avisynth/vapoursynth to resize the videos without quality loss.
If you just want to gif music videos or variety shows then this should still give you HQ gifs.
Other notes:
try to ONLY use 1080p and up video if possible, maybe 720p if you’re really desperate, but anything under that... it’s not going to look good at all, so try to avoid using them.
The Photoshop I am using is PS 2020, so all my screenshots will be from that version and with my weird set up. But I’ve been using pretty much the same method since cc 2015 so other than the fact that some placements and names are tweaked, it’s the same. (If you can’t find something on your version shoot me an ask and I’ll try to help! And asks I get on this tutorial I’ll link HERE for future reference)
CUTTING VIDEO
To cut videos I’ll just use my quicktime player.
I use edit > trim to select the portion of the video I plan to gif and save that as it’s own new mov file.
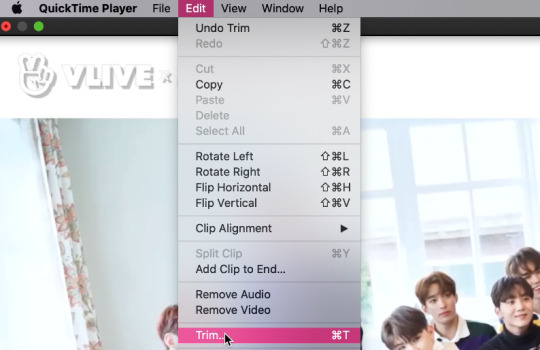
which pops up this tab

that you just slide until the part you want to gif is selected

then just save it as a new video and your done with part 1
ENTER PHOTOSHOP
Now what we’ll do is open our photoshop and import that clip into layers
FILE > IMPORT > VIDEO FRAMES TO LAYERS and select your video.
A small pop up will appear to show the clip you’re opening, you can trim it further here or just keep going by clicking okay
my setup is weird for drawing BUT you should have it looking remotely like this:

The things you will DEFINITELY need to see are TIMELINE, LAYERS, ADJUSTMENTS. If you don’t have these sections you can add them to your screen by clicking on the WINDOW tab at the very top menu bar and clicking on them

LAYERS - this is pretty self explanatory but each row is a layer in the gif. the more layers the bigger the gif will end up, the longer it plays. So bigger clips will have more layers and end up as larger gifs in the end.

TIMELINE - This is where you can edit the gifs timing (make it faster or slower)
We’ll be doing a bit of work with it so it’s important to know it well
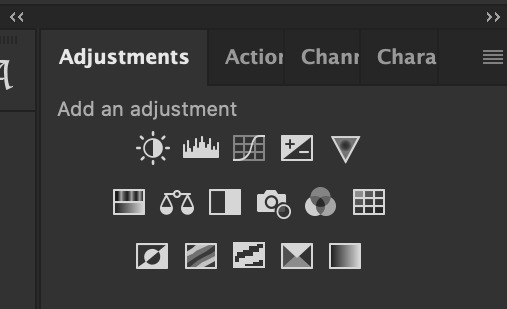
ADJUSTMENTS - Best friend and worst nightmare. this is where ALL the tedious recoloring is done. VERY rarely would you not use these. 99.9% of kpop things are filmed through a green or blue lense so you’ll want to fix that to not have ghost idols
So, Let’s make a gif
Step 1 - In the top right corner of your timeline is a set of lines, click there and then click SELECT ALL FRAMES

under each frame is a time stamp (this video’s is 0.04) this decides how fast each clip goes by, or how quickly the gif moves. Personally I prefer slower gifs, but I say anywhere between 0.04-0.06 is a decent speed.
Step 2 - with all the frames selected, click on the small down arrow next to any of the frames and change the speed to your liking. (I’m going to use .06)
Step 3 - in that same tab of lines we’ll now click CONVERT TO VIDEO TIMELINE, which will change our Timeline to look like this:

Step 4 - Back in our very TOP menu we’ll click SELECT > ALL LAYERS, then on the TOP menu click FILTER > CONVERT FOR SMART FILTERS (this might take your computer a minute since our File is still pretty large.) Now our Time line will look like this:

Step 5 - Sharpening
This one is VERY MUCH something you’re going to have to play with to get your settings to be how you like them. It’s also where I’d use topaz adjustments, BUT since I said we’re doing basic PS gif we’re just going to be using smart sharpening. SO:
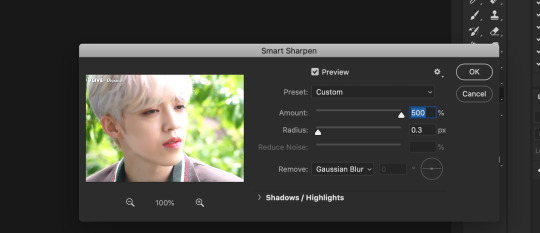
in the TOP munu again, click FILTER > SHARPEN > SMART SHARPEN
A pop up window will appear and you can edit the settings to your liking. Mine:
Step 6 - Resize your gif or crop it to tumblrs standards: big singal gifs have a 540px width || Two gifs use 268px || and three gifs use 177/178px
To do this we’ll use the crop tool and type in our dimensions in the menu bar:

and then crop to your liking. (this doesnt resize the gif it just crops to the correct ratio so we still have to shrink the gif)
Next, we’ll resize the gif to that size in the TOP menu click IMAGE > IMAGE SIZE a pop up menu will appear and you’ll type in your resize ratio and click enter.
Now technically thats a gif. it’s TECHNICALLY done. but mine is white washed and there are words on it that I dont want so onto the coloring and blurring.
First I’m going to show you how I blur text on gifs. because text is EVERYWHERE in kpop content and it’s hideous and I hate it. so lets kill it.
BLURRING LETTERING
First we’re going to add a new blank layer to our LAYER TAB by clicking the little box with the + inside at the bottom
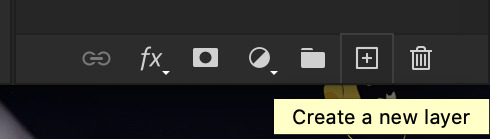
Sometimes doing this can mess up the timeline’s selection but its SUPER easy to fix so lets do that.
So in our timeline we have these two bars on each side that select what part of the gif will play. this is also where you can readjust your gif if it has extra frames at the end, or it ends up being too large and you have to make the gif smaller to save it. Just click and drag the bars back to where our gif actually ends, and all is fixed!

Now on our new layer we’re gonna take a paint brush (one of the ones with a lot of fade NOT the solid circle ) and paint over where the words are like so:

MAKE SURE ITS ON OUR BLANK LAYER AND NOT THE GIF LAYER!!
I know it looks stupid but trust me okay.
Now in your LAYER tab we’re going to duplicate our gif layer by right clicking on it and selecting duplicate.
Then we’re going to drag the new gif layer so that it’s above the paint layer in our LAYER tab :
Now, right click on the top gif layer and select CREATE CLIPPING MASK. it should put a little down arrow to the left of the picture, toward the paint layer. This means the gif is ONLY visible where that paint is now.
So we’re going to click on FILTER in the TOP menu again (while we still have that top gif selected!) and Go to BLUR > GAUSSIAN BLUR. a pop up menu will appear and you can just drag the radius until the text is as blurry as you want it to be. (also IF you missed part of the text, you can just go add more paint to your paint layer and it will blur wherever you paint!)
so now my gif is like so:
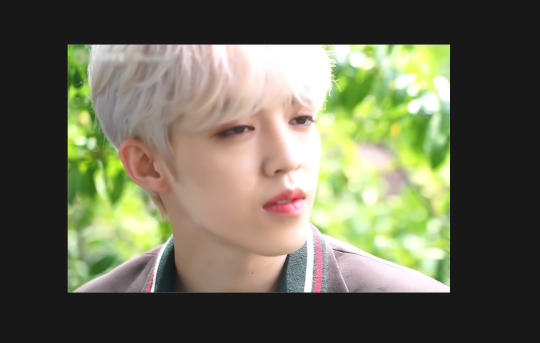
So now we’ll color him, because he’s pretty washed out.
ADJUSTMENTS
This is where I’m going to be the least specific about what I do and more about what tools do, so that you can learn how to color things the way you like them!
The Adjustment tab on Photoshop has 16 options but I’m really only going to talk about 6 of them. We’ll do it in order though. All the actual adjustment tools will open in the PROPERTIES tab
Brightness / Contrast - Pretty self explanatory, but definitely should be toward the end of your coloring, as if can effect the quality a lot. Small adjustments do A LOT so don’t go crazy,
Levels - Levels is all about the balance of how dar or light your gifs will be if you adjust in the RGB layer it will adjust for the entire image, but if you change the selection to RED/GREEN/BLUE it will adjust just those colors hues. Also there are three small droppers to the left of the graph. using those you can select which part of the gif you want the image to recognize as the lightest/darkest part of the gif, and the tool will adjust the gifs coloring to that point. ( play with those droppers! magic happens i swear!)
Curves - Kind of like levels but instead of how light or dark the entire image is it works more on contrast. REALLY play with the curves options, i’m sure most things you can do with other tools can also just be done in curves if you’re patient enough to learn
Vibrance / Saturation - Vibrance will make duller parts of an image higher contract and brighter and saturation will make everything a more neon shade. or in reverse lowering vibrance will dull out the things that were already neutral and saturation will dull out the more vibrant parts of the image (usually reds)
Color Balance - Good for fixing tones. so if a live stage is SUPER BLUE!!!!! you can readjust and calm down the blues to dull them out or get rid of them completely. Again play with this its insane what it can do
Selective Color - adjusts the different colors in your image without touching the other colors. if you wanna touch the reds, make them pinker but not change the blues and greens, you do it here
If you want MORE drawn out explanations of what each of the 16 adjustment layers do here and here are actual articles you can look at. But it’s all about practice. playing with all the adjustments alone and together. Finding out what you like to do!
Now when you gif is ALLLLL colored and you’re ready to save it we do FILE > EXPORT > SAVE FOR THE WEB and a whole new window of options pops up. I’ll give you two examples of how to play with those options and then we’re done!

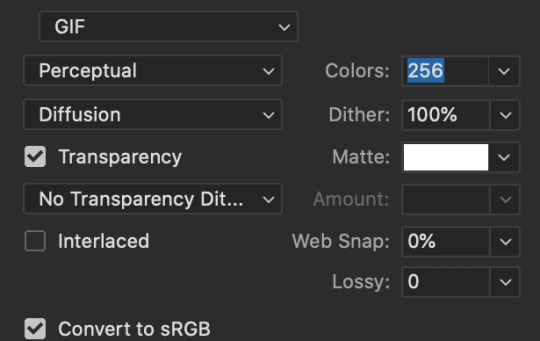
keep in MIND tumblr’s gif limit is 10MB which is pretty huge now, but still watch your gif size!!!!
AND SAVE your done!

I hope this was helpful! Let me know if you have any questions,again I’ll have an ask tag for it and it’ll get linked HERE if people end up needing help!
Happy giffing!!!
#drm.pst#drm.txt#Gif tutorial#this is LONG okay please be aware of that before you open it#als i did NOT reread it because it took me 3 hours to type out so it's probably a grammatic nightmare#BUT i'm JUST under a new milestone so i'm gifting this early because i had the patience to do it today lmao
97 notes
·
View notes
Note
Hi, I was curious as to how you deal with Tumblr's 10mb upload limit on .gifs. Your gifs always seem to get the quality to file size ratio just right 👏
the limit is 10mb? i thought it was 5 if you don’t want your gifs to get really compressed and for the gif to work on mobile...anyway yeah i work under the assumption gifs should be under 5mb and i try to contextually juggle amount of colors, framerate, and length of the gif. 64 colors is often good enough, sometimes 32 can be passing (although i always prefer 256 or 128, to be honest)
51 notes
·
View notes
Text
My GIF making process!

I’ve been asked many times for a tutorial, but because I get really detailed, I always get overwhelmed by the idea. But I finally decided to buckle down!
Just so you know: I don’t use PSDs in this, and I don’t import layers to frames or anything like that. I like the hard way—at least in gif making, I believe you get higher quality gifs. Join me as I show you how to make gifs by loading videos directly into the Photoshop timeline and my coloring and sharpening techniques.
Tools used:
Mac OS X (only necessary for the first step, and there are other ways around it with a PC)
Adobe Photoshop
YouTube Purchases (any streaming service will work)
Topics covered:
Obtaining the Source Material
Loading the video file into Photoshop
Prepping, Cropping, and Resizing the Media
Adjustment Layers
Sharpening
Exporting
Obtaining the Source Material
There are a few different methods for obtaining video to work with. Proper YouTube videos are nice, but finding any major motion picture in that format is difficult, if not illegal.
Once I realized I could get really great quality video by doing screen recordings from streaming services, I stopped worrying about finding (and pirating) high resolution video files. So now, I just go to whichever streaming service I need to, pick out the movie or show, find the spot, and record small snippets.
Mac screen recording instructions:
On a Mac, Command+Shift+5 will bring up the screen recording dialogue.
Resize the frame of what you want to record within the browser.
Go to a second or two before, press the “record” button, and then begin playing the video, remembering to keep your cursor out of the recording box.
Use the Space bar to pause your video when you’ve gotten the snippet you need. Stop the screen recording by clicking the ⏹ button that is in your menu bar at the top of the screen.
Important: when the recording appears in the bottom right of your screen, click on it, and then trim the video on either end. This will help your computer convert the video file to the type that can be opened by Photoshop.
Click “done” and it will appear on your desktop, ready to be used!
PC Users: ??? Here’s a Google search I did for you
Loading the video file into Photoshop
Lots of people use this process for making gifs (a great tutorial!). I didn’t even know it existed until last summer, when I’d already been giffing for years. I wish I could still do something like that with these screen recordings, but the files are absolutely HUGE, especially on Macs with double retina displays, which actually increase the dpi by a lot. Making screencaps of them fills up my hard drive, almost immediately—even when I’ve got 20 gigs of free space to work with. So what do we do? We just. Open the file. In Photoshop. Et voila!
You can do this with any type of video, not just screen recordings.
Prepping, Cropping, and Resizing the Media
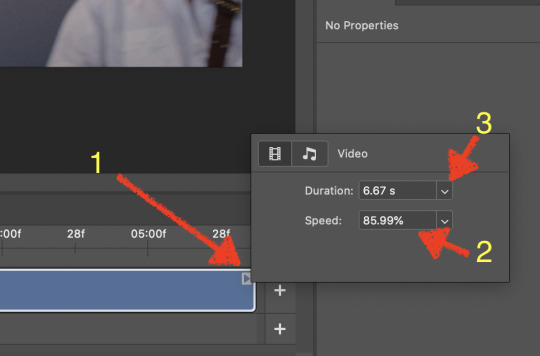
When Photoshop loads your videos up, it makes the video hilariously fast (something about frame conversion). You must slow it down for it to look natural. THIS MUST BE DONE BEFORE YOU RESZE. Your Photoshop timeline window should be at the bottom of the screen. See that little triangle in the top right of the video?
Click on it, and a menu will appear to change speed and duration.
Change the speed first- usually between 80-85% will seem realistic. (I actually went a little faster than I usually would on this at almost 86%—I don’t recommend this)
Press the button next to duration and pull the toggle all the way to the far right (if you don’t do this, full length of the video will be cut off).
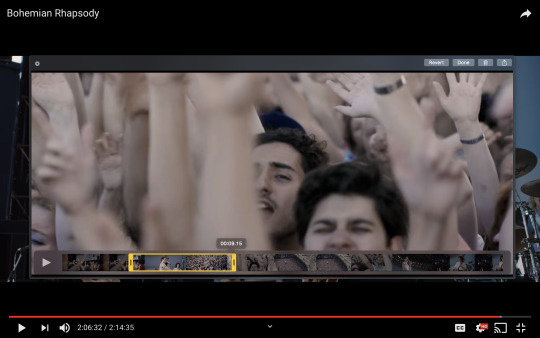
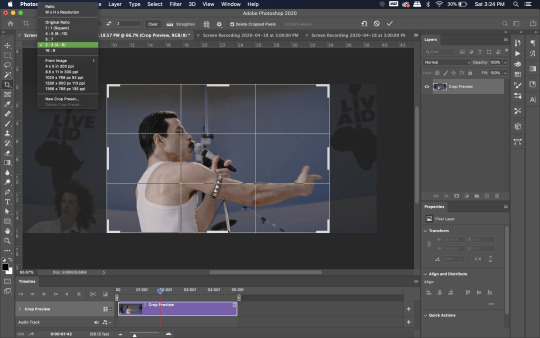
Now you’ll want to crop it. Ever since Tumblr upped its GIF size limit, I have been playing around with 7:5 ratios, but let’s go with 3:2 for now. Use the Crop tool, pick out 3:2 in the top left (it may say 2:3, but you can switch that) and then find the most suitable spot in your gif for that. Hit enter on your keyboard.
Some things to keep in mind when cropping:
Most videos come in 16:9 ratio (BoRhap is even wider). If it’s a wide shot, you’ll need to do the full 16:9 to not lose anything. Of course, experiment and find what’s right for you!
As you can see above, I moved forward in the timeline and made the crop to a point in the video when the broadest movement was happening.
Certain videos WILL have a black or red bar that may be imperceptible until you’ve already exported the gif. Just crop in a little tighter on top and bottom to avoid them.
Now you’ll need to resize your gif to be the correct size for Tumblr. If you don’t use Tumblr’s exact dimensions, your gifs (as uploaded) will appear blurry or pixellated. We’re doing a full-width gif here, which is 540px. On a Mac, I use Command+Option+I (for “Image Size) to open the resize dialogue. You can also find it under Image->Image size...
Make sure to also have “Resample” checked. Lately I’ve been playing around to see if different options are better. Most GIF makers use “Bicubic Sharper (Reduction)” and they are not wrong to do so. I’ve just been unhappy with it lately, so I have been trying this other setting out, “Bicubic (smooth gradients)”.
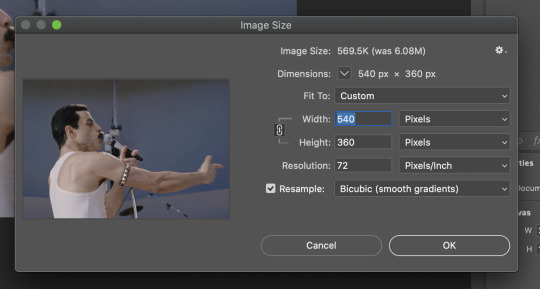
Click OK. A dialogue may come up that asks if you want to convert to a Smart Object. The answer is yes, okay, do it. The only major caveat is that you can’t go back and change the timeline speed. That’s why we did it first. But you can preview the speed now that it’s smaller, and if you don’t like it, use Command+Z (or “Undo”) and go back a couple steps to get the speed you like.
You may find, especially on a Mac screen (and possibly other displays), that at 100% your gif looks too small to be 540px. That is the curse and blessing of working with super-high resolution hardware. Zoom in to 200% and proceed about your business. This is what it will look like on Tumblr.
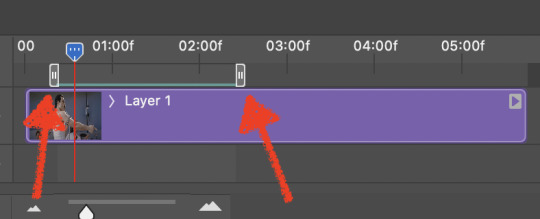
You may find it helpful at this point to begin by defining the beginning and end of your gif by moving around these bumpers. It’s safe to keep gifs under 02:00f in length. Under half of 01:00f will be way too short. (I tend to overshoot in length and then trim the beginning and the end once I see how big the gifs are upon exporting.)
Adjustment Layers
Now the creativity and fun begin!
There are a LOT of ways to get creative here. I’m going to keep it simple, very simple, but I strongly recommend opening up a new adjustment layer of each type and trying to figure out what each does!
You’ll find the adjustment layer menu at the bottom of the Layers window.

Curves
There are a lot of ways to make Curves work for you! It can do the job of Brightness/Contrast, it can do Levels, it can do Color Balance! We’re going to use it mainly to help with brightness here, but also to level out some of the tones. One of the quick tricks you can do is use the droppers on the left side of the Properties window. There are three- one with a white tip, one gray, one black. These can help define what your white tones are (and whether they need to be more of one color or another), and so on with your blacks. Sometimes it works, sometimes it doesn’t; in this case, I think it doesn’t:
That looks totally blown out and somehow also too dark!
So instead, we’re going to use that little hand with the finger pointing out and some arrows pointing up and down. This lets you define which sections you want to get brighter or darker, and how much. It doesn’t do color correction. In the example below, you can see I dragged up on a white spot and down on a dark spot. Then, I moved points around on the curve itself to refine (which the gif here doesn’t show...).
Vibrance/Saturation x2
Next, I’ve been using @gwil-lee‘s Vibrance/Saturation trick (I know you said you learned it from someone else, but I learned it from you!).
Create a Vibrance Adjustment layer, bump the values up a bunch, and then change its Fill to somewhere between 2-9%. Change the Blend Mode to Color Burn. Then make a copy of that layer keeping everything the same, but make it Color Dodge. I can’t quite define what these do, but it makes it punchier!
Color Balance
Most people are familiar with this. For this gif, I’m going to make the shadows more Cyan/Blue and the highlights more Red/Yellow. Just a few points each.
Exposure
I brought the Exposure up a bit, but not enough for you to need to read about, haha.
Selective Color
Here’s where you make fine adjustments to colors. This particular scene is extremely simple, color-wise, so keep it simple. I’m going to bump up the cyans/blues, take up the black by just a point or two, and maybe bump up the yellows and reds a tiny bit. (And as always, remember, the “opposite” of cyan is red, the opposite of magenta is green, and the opposite of yellow is blue. CMY/RGB!)
I think at this point I’m going to call it with the adjustment layers. You can go absolutely hogwild with more of them! But at this point, I’m ready to start sharpening!

Sharpening
I do three sharpening filters these days. These are all under Filter->Sharpen. Make sure your media layer (default called Layer 1) is selected as we go through this! (Also, this can really take a toll on your processor, so don’t say I didn’t warn you.)
Sharpen- This layer does the basic job
Smart Sharpen (Amount: 10%, Radius: 10, Reduce Noise: 4% Gaussian Blur)- This layer gives texture
Smart Sharpen (Amount: 500, Radius: 0.3, Reduce Noise: 12% Gaussian Blur)- This layer gives refined sharpening and smoothing
Fiddle with these as needed! Let your gif play all the way through- this may go slowly as your processor works on it. Make sure the beginning and end points make sense.
Exporting
After You’re going to have to use File->Export->Save For Web (Legacy)... or use the shortcut of Shift+Option+Command+S. This could take some time for the dialogue to pop up! Be patient.
In my opinion, these are the best gif export settings for crisp edges and no noise:
Now you see how big the file is in the bottom left. Tumblr won’t let you upload anything bigger than 10MB and it’s safer to stay under 9MB, in my experience. When your gif is too big, you have a couple options. You can close the dialogue and change the length of your gif.
OR, you can uncheck “Interlaced” and bump up the lossy to 1 or or more. This will create noise. Sometimes, that’s a good thing!
Here’s without lossy:
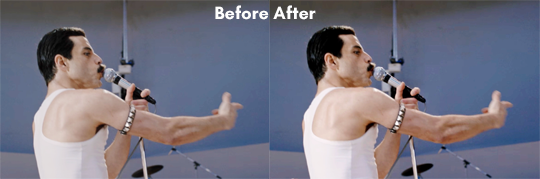
Here’s WITH lossy: (Honestly in a fast moving gif like this, it’s almost imperceptible, but I can see it!)

And now that I’ve exported, I can see what there’s a little black line on the bottom! So I’m going to trim that off and call it good! You can see the full gifset here.
Hope you enjoyed! Reblog if you try this out or learned anything. Feel free to reach out with questions any time!
310 notes
·
View notes
Note
hi, its true that tumblr doesnt support gifs bigger than 3mb? cause i saw this in some tutorials, saying that we have to stick up to this size or else they wont move. And i recently posted gifs bigger than that and they're moving, so... And also, size has something to do with the number of frames? For example, 30 flames doesnt look enough for long gif movements, they keep short, if you know what i mean. And gifs with 60 frames (like the one that i did) spends more time "playing" yk. Like big size gifs means that they're have more frames and vice versa?
ahh tumblr changed the gif size limit recently i think to like. 8mb or 10mb? smth like that! a lot of tutorials were made before the limit was changed, that’s why you see everyone saying 3mb limit.
you’re pretty right in your assumption about bigger gifs having more frames, but in general, lot of things contribute to gif size, frames being one of them. color, pixels, frames, etc. all contribute to the gif size, so sometimes you might have a large gif with very few frames. but yes more frames equal a larger gif size!
4 notes
·
View notes
Last Seen Blogs

agadjel
Untitled
tziva-zanzibar
TZIVA

natddrawing
Natd_drawing

blog-healingherbs-universe-blog
Untitled

ocdisgusting
How are you capable of moving in my stopped time