#sims 4 studio tutorial
Text
Viewing Your Giant CAS Closet by ANY Theme/Style
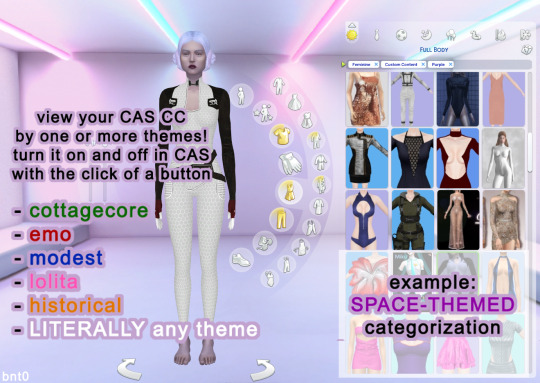
do you want to be able to switch between viewing your grunge and lolita cc in CAS? maybe you made a fairy and you want to limit their closet to your cottagecore and plant themed cc? or maybe you just really want to track down that specific victorian era dress you downloaded...
i figured out an easy way to view cc in CAS by ANY themes or styles you choose and i wanted to share bc i haven’t heard of anyone else who does this! i have 40gb of CAS cc of all styles and this helps me find the cc i need for any style of sim.
the simple explanation is below the cut and requires a basic understanding of how to change tags for an item in sims4studio, as well as viewing items in CAS by tag. if you don’t know how to do either of these, i am linking an in-depth beginner’s tutorial here and i’m always open for questions :3
ps this doesn’t work for certain categories (skin details, tattoos, body hair, scars)
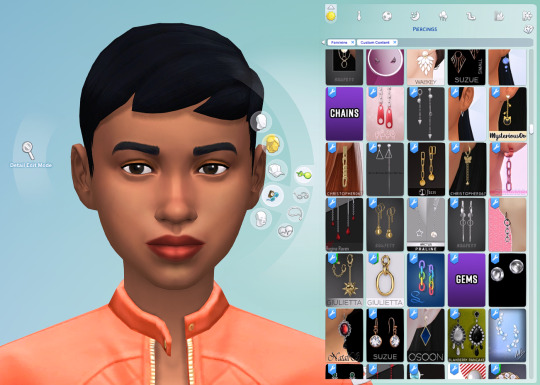
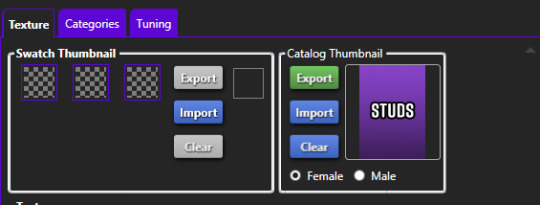
basically, in sims4studio, instead of tagging individual swatches by their actual color, i use the color tags to sort items based on theme(s). each color corresponds to a theme or style, or even multiple styles.
the colors available in CAS are red, orange, white, black, blue, yellow, pink, brown, green, purple, and gray. i have a sticky note on my computer that lists the colors and the themes/styles i organize by and i actually assign multiple themes to some colors. for example, i color tag space-themed cc as purple, or emo and vampy cc as black and apply to all swatches for that item. in CAS, when i want to view space cc, i check purple and custom content and i can see all my space cc. even better, swatches can be tagged as multiple colors and you can view multiple color categories in CAS at once. the result is a quick and easy customizable CAS closet
some categories you can organize by: historical, goth, y2k, fairy, fantasy, grunge, island, kfashion, basics, lolita, modest, western/cowboy, etc. literally whatever categories help you the most!
#this is long-winded but i didn't want to confuse people :)#i swear it's so helpful#sims 4 tutorial#sims 4 studio#sims 4 studio tutorial#s4 tutorial#sims 4 tut#ts4 tutorial#sims 4 cc#sims 4#long post#s4s tutorial#zzz#bnt0resources
159 notes
·
View notes
Text
Tutorial for Simplifying Changing Warehouse Info For Multiple Swatches Simplified: Sims 4 Studio
Hi everyone!
I have some exciting news - to me anyway, and I hope for you 😁
I recently had my tutorial approved on the Sims 4 Studio website!
This is for creators who use Sims 4 Studio, and anyone else who may wish to alter existing .package files.
Changing Warehouse Info For Multiple Swatches Simplified | Sims 4 Studio
Intro:
WHY I MADE THIS TUTORIAL
The purpose of this tutorial is to help creators and simmers alike simplify and speed up how to change information in the Warehouse tab in Sims 4 Studio for multiple swatches, especially if you have more than one section that needs adjusting, like Composition Method and Sort Layer for CAS items.
So, let’s say you’ve created an entire package with 15 swatches and have saved your package. Then you realize, OMG I forgot to change something in Warehouse mode and now have to go in and change each swatch separately. (cue dramatic music)
I don’t recommend this for only a few swatches, though, because, while helpful, this is not a one shot process, but it will save time for those packages with several swatches that require fixing/changing in the Warehouse tab.
Changing Warehouse Info For Multiple Swatches Simplified | Sims 4 Studio
2 notes
·
View notes
Text
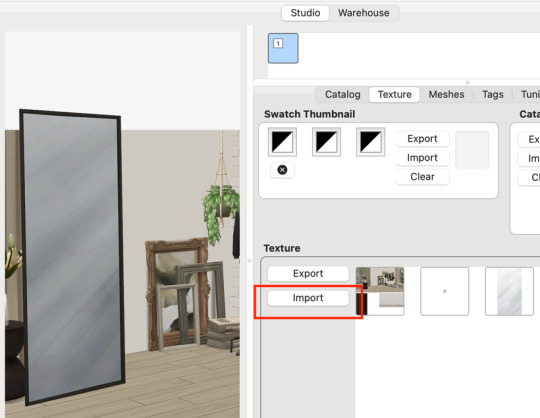
Batch Edit CAS Display Index w/ S4S v3.2.0.8 (Star) and newer

I was looking around S4S full changelog until my eyes caught something interesting 👀
+ Added a batch edit menu to folders in My CC
+ Added a batch edit option to set the CAS Display Index of all packages in a folder.
🆕 + Added another batch edit option to My CC Folder menu - "Change Display Index (sorted by package name)"...
Previously, the only way you can group CC creators together is if you edit their CAS display index per packages in S4CASTools. Now, with the new S4S update, you can do so with the batch edit feature in one go!
🆕 With the S4S v3.2.1.3 update, there's now an option to change all CCs in a folder to your assigned display index number, sorted by package name. If you're looking to sort your CCs alphabetically, now you can! More details later.
⚠️ Do note that for every batch fix you do, it will create a backup folder with all the unedited files stored in \Documents\Sims 4 Studio\Batch Fixes, which can bloat your storage quickly. Do your batch fix in small batches, regularly check in-game if it works correctly, and continue. You might need to delete the backup files in the Batch Fixes folder if you’re no longer using the unedited files.
Process below:
01. Have the most recent Sims 4 Studio (Star) installed.
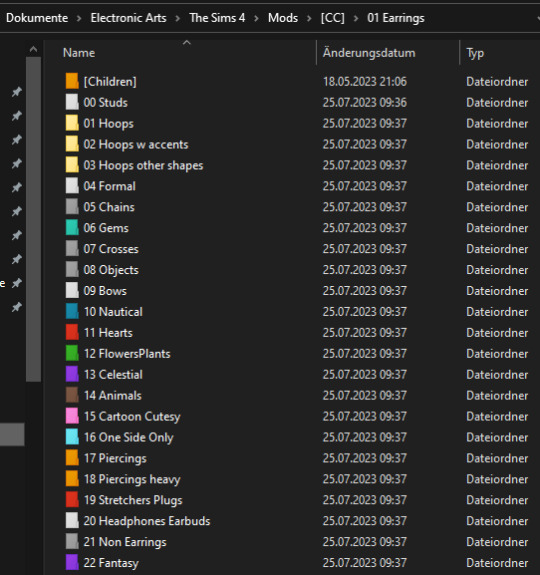
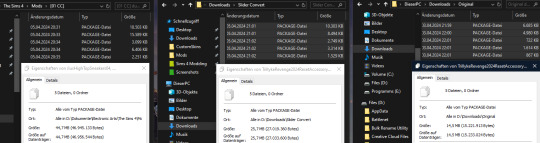
02. Separate files into folders based on creators. Here I have Gorillax3 & clumsyalien's ccs into their own respective folders:
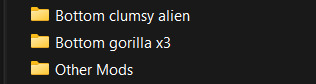
Whatever packages you put in a folder will all obtain the same CAS display index value. So if you want to have specific style of CCs sorted together, put them all in the same folder.
It's also recommended that you rename the folders to include the CAS display index value you plan to assign, so that it's easy to do batch edit again when new CCs are added into that folder.
03. Go into My CC, right click a folder, and it will show you the option to batch edit CAS Display Index & another one to sort by package name.

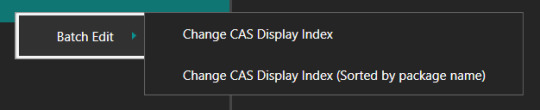
If you choose the first option: all packages in that folder will be assigned the same display index value.
Example: packageA to packageD will all be assigned 70 as its CAS display index.
If you choose the 2nd option (Sorted by package name): each package will be given the display index value you assigned + decimals so that it will be sorted alphabetically.
Example: packageA is assigned with 70 - packageB: 70,001 - packageC: 70,002 - and so on.
If you're looking to sort your CCs alphabetically or by release date (e.g. QRsims's / Rusty's CCs), the 2nd option will be best for you :)

extra info to keep in mind: it seems that if you number your creations, it will be sorted by how they're sorted in the My CC list, and not from the explorer itself. So N6 will be given a higher display index than N21.
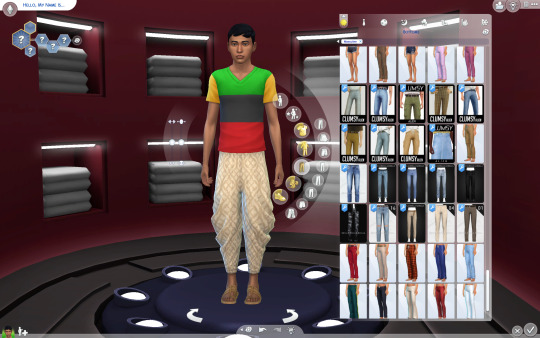
04. Once you've clicked the option, it will ask you which folder you're doing the batch fix on & the backup folder, and ask you what value you'd like for all packages in that folder. I set clumsyalien's folder to 70 and gorillax3's to 75.

There's no restriction on what value you choose. All that matters is that CAS CCs with lower CAS display index value will show up higher in the catalog than CCs with higher CAS display index value.
05. Click OK and it will tell you which files has been edited. Once you've successfully edited your files, you'll get a nicely sorted CAS CCs to browse :) Results are below:
Enjoy and happy sorting! :D
@thefoxburyinstitute
2K notes
·
View notes
Text

So you want to make a sims render: a beginner's guide
But what does that even mean? What do you need to start?
To get started with sims renders, you'll need the following programs:
Blender 3.6 - to render your sims
Blender 2.7 - to export poses, accessories and objects from s4s
Sims Ripper - to rip your sims to prepare them for blender
Sims 4 Studio - to export poses, accessories and objects for your renders
All of these programs are FREE to download and use!
Blender outputs fantastic renders depending on your settings, but you'll probably want to edit them after the fact.
For editing, I recommend:
Photoshop
GIMP
Photopea
I'll be posting editing tutorials in Photoshop, but any of these programs will get the job done.
Stay tuned for in-depth tutorials on using Blender, Sims ripper and Sims 4 Studio!
#salemsims tutorial#render school tutorial#sims 4 render tutorial#sims 4 blender tutorial#blender#sims ripper#sims 4 studio#resources#ts4#sims 4#sims
279 notes
·
View notes
Text
How to create visual "custom categories" with the new Sims 4 Studio Batch-Edit
As discovered by @vyxated Sims 4 Studio now supports batch-changing the Display Index number which allows you to easily sort your CC (see post here)
Using that, you can create visual "custom categories" for any existing category to sort your CC into smaller groups that share a thematic.
━━━━━━ ・❪ ☾ ❫ ・ ━━━━━━
Step 1: Creating folders
First you need to sort your CC into whatever categories you want.
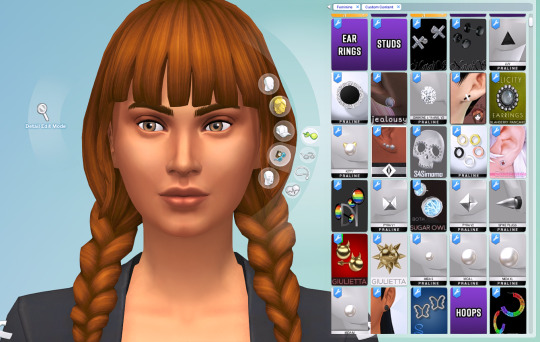
I am sorting my earrings.
( I use Folder Painter to get colored folders)
━━━━━━ ・❪ ☾ ❫ ・ ━━━━━━
Step 2 (Optional): Creating dividers
I highly recommend you to make some sort of divider for your categories (basically like my TidyCAS).
For that, in S4Studio start out by cloning any basegame CAS item.
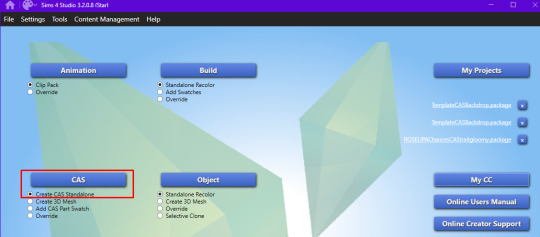
I usually always use the sunscreen facepaint, but it doesn't really matter, you shouldnt use smth with a mesh.
Or you can download this file and place it in Documents\Sims 4 Studio\Mods.
It has no texture, is enabled for a lot of things and disabled for random.
IMPORTANT: For every new divider you want to create, you have to clone the CAS item from S4Studio again. You cannot simply duplicate your divider CC and simply change it.
Save it as the number and name of your category. For me it would start with "00 Studs".
In that file, first import any type of custom thumbnail you want to use to display the category name.
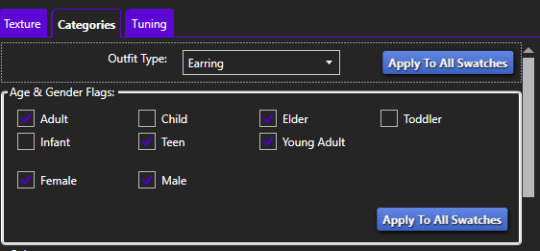
Then, change the category to whatever category you are working on and enable it for all ages, genders, fashion choices & outfit types you want and disable it for random.
Now if you want, import an empty texture to get rid off the sunscreen, but since you won't apply that CC, it won't matter.
Download the empty texture here
Make sure to place the dividers OUTSIDE your sorted folders.
━━━━━━ ・❪ ☾ ❫ ・ ━━━━━━
Step 3: Batch processing in S4Studio
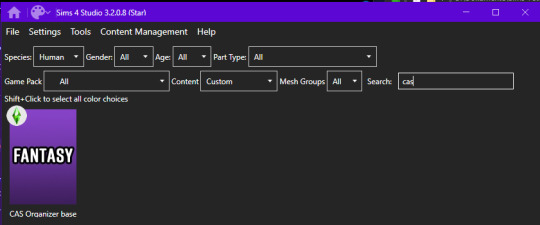
Now you want to batch process your folders in S4Studio.
First click on "My CC" and let it load.

Now right click your first folder and select "Batch Edit - Change CAS Display Index"
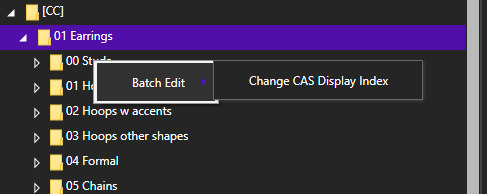
In the next window, press "Run".
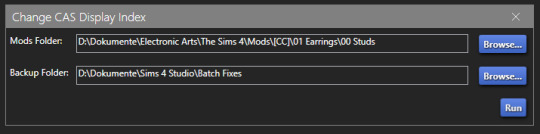
Then, enter whatever number you want to start with.
The smaller the number, the higher up the content is. You can go into negatives and the limit is a veeeeeeeeeery high number.
If you just want to sort some normal CC, I recommend starting with 0 simply.
For the next folder I then always go up by 10, so 0-10-20-30-etc.

Then press "OK".
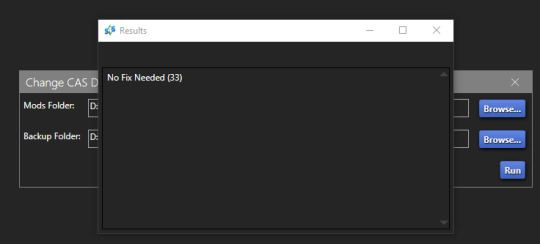
You will then get a popup with all your changed files (I sorted mine before so it's non lol)
Note: Keep in mind that it does not sort your CC alphabetically.
Apparently it's by last modified date.
━━━━━━ ・❪ ☾ ❫ ・ ━━━━━━
If you have done step 2:
Step 4: Sorting your dividers
Lastly you want to make sure that your dividers show up at the beginning of the custom categories.
Open up your divider in S4Studio again if you closed it.
Click on "Warehouse", select the "CAS Part" and on the right in the "Filter" field search for "display".
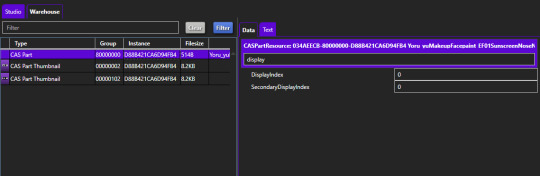
Under "DisplayIndex" you now want to input a number that's before your category.
My category starts at 0, so I will change it to -1.
If the category starts with 10, I input 9 and so on.
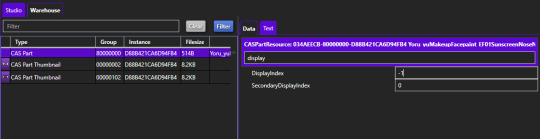
"SecondaryDisplayIndex" is swatch order, so it doesn't matter here.
Then just save it.
━━━━━━ ・❪ ☾ ❫ ・ ━━━━━━
And that's it!
@thefoxburyinstitute
#ts4 tutorial#ts4 resources#tutorial#sims 4 studio#sims 4 tutorial#s4 guide#ts4 guide#sims 4 cas#sims 4 organazation#ts4 cas#yorututorials
328 notes
·
View notes
Text
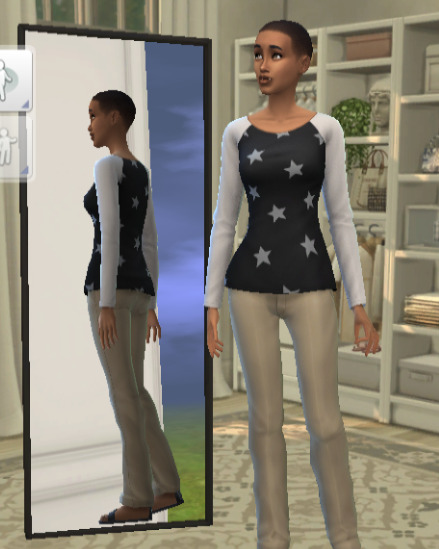
Tutorial: How to Make a CAS Background With Functional Mirror
Overview
This is something that has been highly requested so I hope this tutorial will be helpful for the sims 4 cc community!
This tutorial will have 2 parts for creating 2 different types of CAS "room" backgrounds. Part 1 (The Easy Way) uses a template I created for you to use your own 2D images/screenshots with a simple rectangular mirror. Part 2 (The 3D Room) will result in a better quality background, but it’s not a beginner friendly project so I don’t recommend trying it if you’ve never made any cc before. I will not cover the basics of cc making here, only what’s relevant to making a CAS bg using my template specifically. The Sims 4 Studio forum has a ton of great tutorials for everything else.
In my own research & experimentation, I noticed that (as far as I can tell) EVERY other CAS room with a functional mirror seems to be derived originally from LittleDica's CAS room [link] I want to acknowledge credit to LittleDica for their CAS background which I studied as a reference. But to be clear this tutorial and my templates are NOT derived from another creators' work; I created mine from scratch and it took a lot of time and effort. My version is much more simple and more compatible with Sims 4 Studio because there are no extra mesh groups or diffuse maps. I also made a great effort to make the reflection in the mirror more realistic for the size of the room. I hope you will be able to use this resource to create your own beautiful CAS backgrounds! ♥
Also in case you missed it, you can download my CAS background used in the preview [here] (it is slightly different from the template package.)
Requirements:
Sims 4 studio
Image editor (Ideally photoshop)
my templates (attached below)
—————
Part 01: The Easy Way
The easiest way to create a CAS background with mirror is to use my attached templates.
The PSD template is the best option, but for those of you that don’t have Photoshop, there is a PNG version as well.
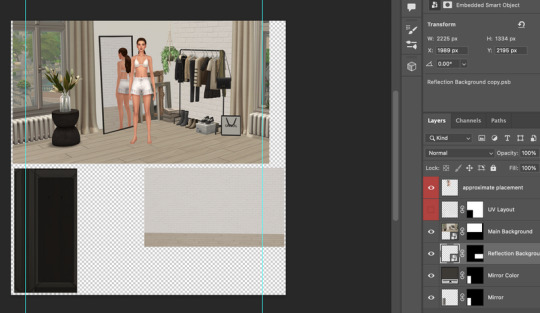
You will need 2 images; one for the main background, and one that will be reflected in the mirror. The large top area is the main background, and the smaller rectangle at the bottom is what will be reflected in the mirror behind your sim.
In the image editor, paste your images and resize them to fit into the outlined areas.
For framing your screenshots, it’s important to understand that the mirror is actually just floating in space in front of a flat background. That means you’ll have to fake the perspective a bit and that may require some trial and error to get right. I recommend taking multiple screenshots at a variety of angles so you have options to work with. Use the model sim as a guide to help you with placing your background image. (Don’t forget to hide the model sim and UV layout when you’re done!)
Save as .PNG or .DDS and import it into the template package in Sims 4 Studio.
That’s it! My goal was to make it super easy for you. Remember to only use one CAS background in your mods folder at a time since it's an override. Also note that it is not compatible with 'cas blob remover' since the instance for the dropshadow is now used as the mirror.
TOU — PLEASE READ:
I give permission to the Sims community to use my template files and modify them as needed to create your own CAS backgrounds. This took months of work, researching and experimenting, so please respect the effort I put into creating this resource by agreeing to these simple terms:
Don’t re-upload my files.
Don’t claim my work as your own.
If you use my templates for your cc, please share credit with my username (Lijoue) and link to my Patreon page.
If you make any money from cc created with my templates, please consider making a donation via my Patreon. It is greatly appreciated.
download template files here
Part 02: The 3D Room
to be continued…
This part will take more time to finish because there’s a lot more steps involved in creating a 3D CAS room. In the meantime, the template should be enough of a starting point for those of you that already know how to make cc objects, since I already handled the hardest parts. Just understand that the mirror reflection is not automatically calculated, meaning that if you move the mirror in the mesh, you will need to change the Mirror Plane Normal and Mirror Plane Offset in S4Studio Warehouse to match the new angle or position. Otherwise it may look unrealistic or worse, it could reflect the eerie wasteland world that the CAS room is set in. (pictured below)
#sims 4 creator#sims 4 tutorial#the sims cc#ts4 maxis cc#maxis match cc#sims 4 maxis match#ts4 tutorial#sims 4 studio#ts4 custom content#ts4 cc#cas backgrounds#sims 4 cas
127 notes
·
View notes
Text

The making of of the loading screen for the therapy game 🎮
Pics above and below edited by imagechef

Draft from photo studio
And the screenshot edited with incollage

#incollage#photo studio#imagechef#therapy game#underwater love#sims 4#simblr#ts4#sims 4 edits#windenburg#windslar#sims 4 tutorial
46 notes
·
View notes
Text
youtube
How to convert toddler hair to Infant
I received a request to make a tutorial to teaches to convert of toddler to Infant hair.
This video is subtitled, if necessary you can activate the subtitles, for English or Portuguese
Tell me in the comments if you want me to make more videos like this, because your opinion is very important to me.
Please if you like click in “Like” and if you want to be aware of new videos subscribe to my channel.
Thanks! 🙂
_________________________________________________
Twitter | Facebook | YouTube | Instagram
Support my work on Patreon | Follow me on CurseForge
___________________________________________________
#sims 4#age conversion#video#video tutorials#hairstyle#blender#sims 4 studio#kiarazurk#patreon#infants#ts4 infants#infants hair#Youtube
39 notes
·
View notes
Text
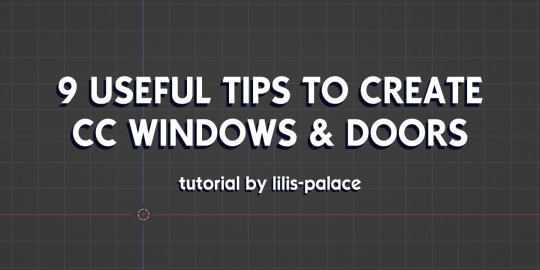
9 Useful tips to create CC windows & doors
1. The thickness of the wall is 0.75 m in either ways in blender which means the total thickness is 1.5 m
2. Best tutorial for wall cutouts
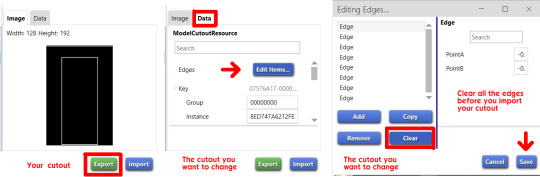
3. If more windows need the same size of cutout, export yours, then go to the new file, clear all the edges first and then export the .binary file.
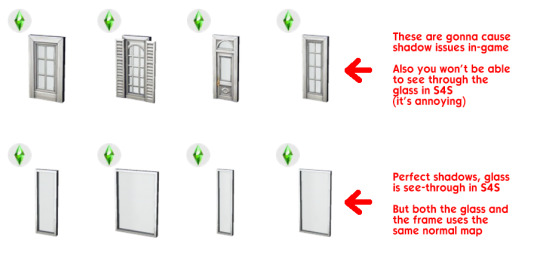
4. If you don't want shadow issues, use these windows:
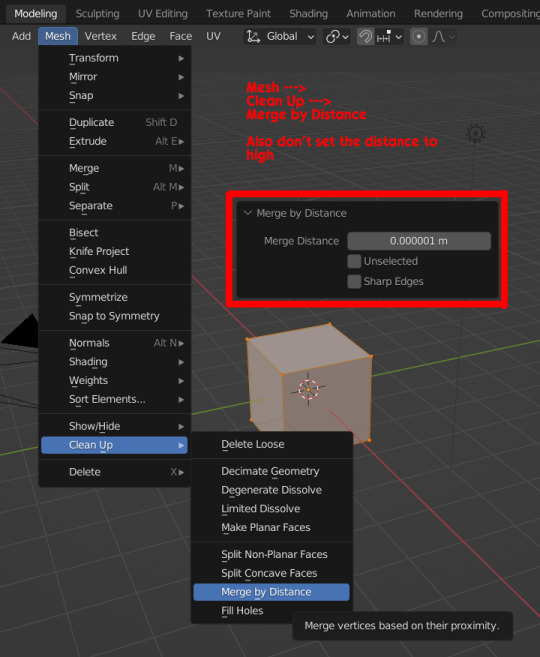
5. Please remove the doubles when you make a shadow LOD. It reduces the poly-count but has no effect on the shadows in-game.
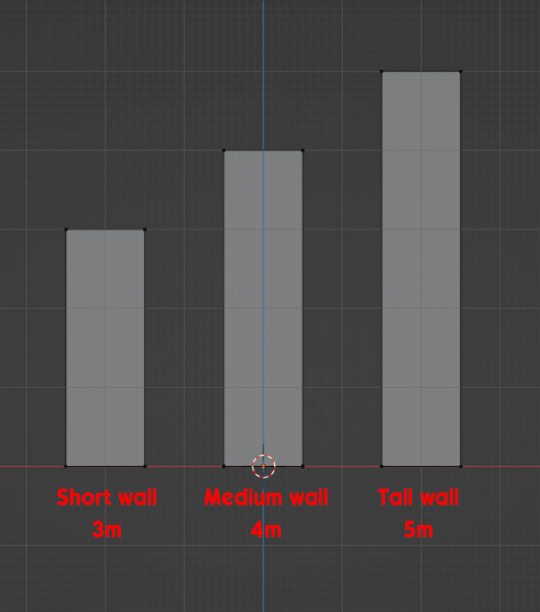
6. Wall heights: Short-3m, Medium-4m, Tall-5m
7. The thickness of the ceiling/floor is 1.5 m in blender. If a window/door/anything goes above this line, it'll go trough the ceiling.
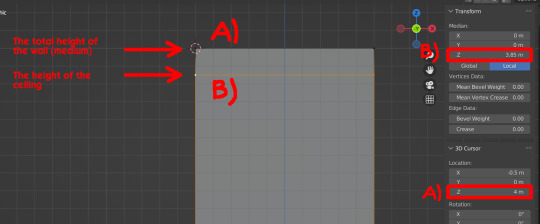
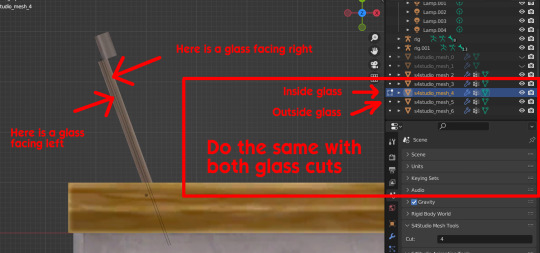
8. Tips for open windows/doors. The middle part of the mesh changes it's shading according to which direction you're watching it from. The opened part of the window or door should be there.

9. Tips for open windows/doors. Double and flip direction to the open part of the glasses. If you do so, the glass will be visible from all directions. Do this with both glasses.
Creating windows and doors for the first time might be scary, but once you figure out how to, you realize, it isn't that hard. I made this tutorial to make this process easier for you.
Thanks for reading and feel free to add more!
131 notes
·
View notes
Text
youtube
[Outdated video]
Sims 4 Studio Tutorial: How to Mod the Phone Icons + Wallpapers
This tutorial for the Sims 4 Studio will teach you how to mod the Social Bunny Phone Wallpapers in The Sims 4!
-------
[Resources:]
1) Sims 4 Studio: https://sims4studio.com/thread/29786/sims-studio-windows-star-open
2) GIMP Image Software: https://www.gimp.org/downloads/
3) Serra's Icons Mod/Resource: https://www.patreon.com/posts/phone-ui-77783967?
4) Channel4Sims-cc BTS Wallpapers Mod (used as reference): https://channel4sims-cc.tumblr.com/post/702990640005496832/ts4-bts-phone-wallpapers-override-sul-sul-its
5) Wallpapers Template: https://www.patreon.com/posts/sims-4-studio-82276712
-------
Want the finalized cc made in this video? It's available on CurseForge! https://legacy.curseforge.com/sims4/mods/grid-phone-wallpaper
-------
Special thanks to these two wonderful creators for sharing their resources! @channel4sims-cc @xosdr
52 notes
·
View notes
Text
youtube
How to Dupe Real Onesies as Sims 4 CAS Onesie
This is the same process I used to make these Space Onesies.
#the sims 4 custom content#sims 4 studio#the sims 4 tutorial#the sims 4 cas#the sims 4 infants#the sims 4 custom clothing#cc finds#ts4 infants#sims 4 infants#Youtube
43 notes
·
View notes
Note
for anyone confused or can’t open their files, here are the steps!
press my projects, it will then open your files
click on some piece of cc you’d like to convert into infant cc
press open and boom! you should then be able to follow the steps that have already been provided to you :)
PSA !!!!
thank u anon ur literally a god. with this knowledge nothing will be able to stop any of us we can all go equally crazy enabling every last skin detail to our hearts content 😈 so so so pumped
15 notes
·
View notes
Text


SIMS 4 - BATCH FIX FROM SIMS 4 STUDIO FOR EYES FOR THE INFANT PATCH
You can read and follow the fix here, or click on the blue title above to also see it on my Patreon so you can save the instructions more easily. Completely free, as always. 🥰
----------------------------------------------------------------------
This is exciting and will make your life so much easier! You can perform this fix yourself, which doesn't take long (seriously it's just a few minutes if you don't have S4S already, or seconds if you do, depending on the amount of cc you have), or you can choose to wait for your favourite creators to update and upload their new files.
This first part is for those who don't already have Sims 4 Studio's latest version. I always download the current beta version for the most up-to-date processes. Also, some people may have issues with the immediate installer, like me, so I recommend downloading the zip version. The images attached to this post will help you follow along.
S4S Links:
WINDOWS
MAC
During installation you may have to tell your antivirus software that Sims 4 Studio is trusted, and continue on. It's very safe and I haven't heard of anyone having any problems, ever. Once that's done, open the program, go into Settings and make sure S4S points to wherever you keep your files.
Be aware that it may take a few moments for it to sync up to the packs you own and your file locations, which always happens after the program updates with game updates.
Now for the actual fixing:
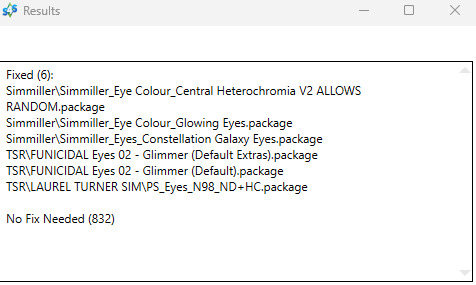
Click on Content Management > Batch Fixes > CAS, then go to the bottom of the list (you may have to scroll) and click on Update Eye Colors for Infants (Infants Patch), and let it run. This could take 2 seconds or a few minutes, depending on your computer and how many sets of custom eyes need fixing in your Mods folder.
Not only does Sims 4 Studio fix your files, it also keeps the original files in a Batch Fixes folder for you!
When Sims 4 Studio is finished running the batch fix, you will see a popup telling you what was accomplished, and you're good to go!
CREATORS: Once you're finished with the Batch Fix, remember to upload the new package(s) for your downloaders!
---------------------------------------------------------
The S4S team deserves our respect and admiration for their outstanding commitment to this program and for making it in the first place. As a creator, I would be lost without it. Feel free to go over and give them some love. 💕
#ts4 update#sims 4 update#sims 4 studio#infant fix#ts4 infant fix#sims 4 infant fix#ts4 tutorial#sims 4 tutorial
21 notes
·
View notes
Text
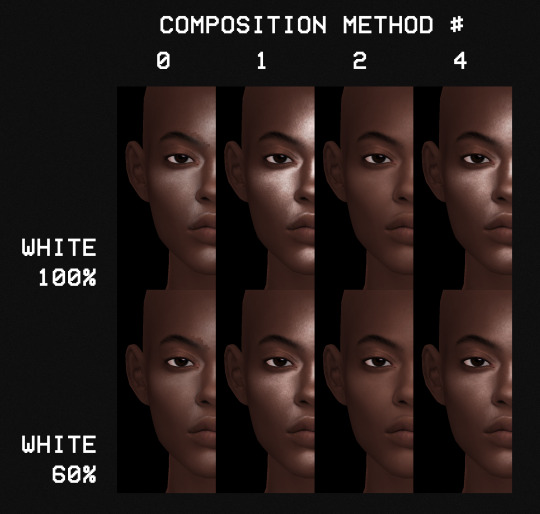
Composition Method - A Visual Guide
Composition method, in short, determines how the texture of your makeup, skin details, or tattoos show up on the skin. The best way to understand how it works is to look at how they are set up (for makeup, tattoos, etc.) via S4S.
To make things easier to remember, I made this quick guide showcasing each composition method setting and how they look for different types of texture :]
As composition method 3 is used for overlays/skin details, I didn't include them here.


#vyx.resources#tutorial#ts4 tutorial#ts4 resources#sims 4 studio#pretty sleepy so I'll just add the descriptions & observations in the future#a treat for the anon :-)
203 notes
·
View notes
Text
Tutorial: Converting all types of CAS CC to work with color sliders (+ how to disable it)
This enables CAS CC to work with Color Sliders for Hair, Clothes, & Accessories by thepancake1 and @mizoreyukii.
Since S4 Studio only let's you batch convert hairs and update makeup for compatibility, I present to you: TS4AlphaConverter_2_2_0_0 by CmarNYC.

Keep in mind that enabling CAS CC for color sliders will increase the file sizes of your .package files!
Sliders will also always affect all the texture, i.e. you can't exclude accessories like buttons or zippers, so some textures might not work well.
Also check out this tutorial: Fixing slider compatible CAS CC with broken textures

💜 Requirements:
Color Slider mod
TS4AlphaConverter_2_2_0_0
CAS CC you want to enable
Featured CC by @trillyke @daylifesims @jius-sims @magic-bot
💜How to enable CC for color sliders
1. Download the required program, mod and CC you want.
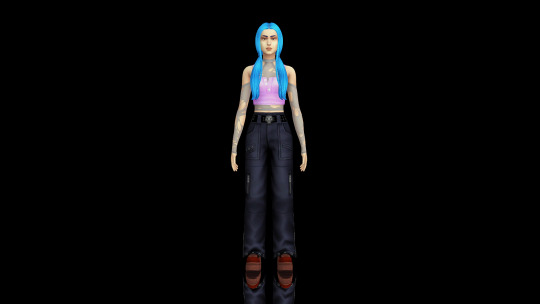
This is my outfit before sliders:

2. Open up Alpha Converter
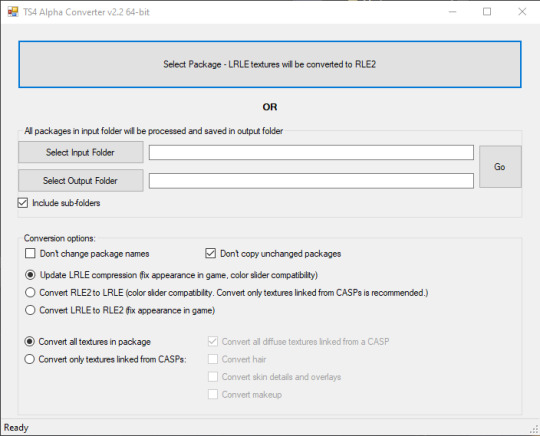
3. For enabling sliders, you can only use the folder option and not single files:
Select your input folder which contains the .packages you want to enable.
Then select your output folder where you want to save the new files.
"Include subfolders" is handy if your CC goes into more folders inside your input folder. It will reproduce the same file structure.
4. I would recommend enabling "Don't change package names" so you can just replace your input files directly, otherwise it adds "_Fixed" at the end of the filename.
I will also leave "Don't copy unchanged packages" checked.
5. Next we will select "Convert RLE2 to LRLE" to enable color sliders. I will explain the others later.
It then enables "Convert only textures linked from CASPs" which is good, e.g. it will only target actual CAS CC textures then and no Build & Buy for example.
Leave "Convert all diffuse textures linked from CASP" checked if you want to convert all types of CAS CC.
6. These are my finished settings:
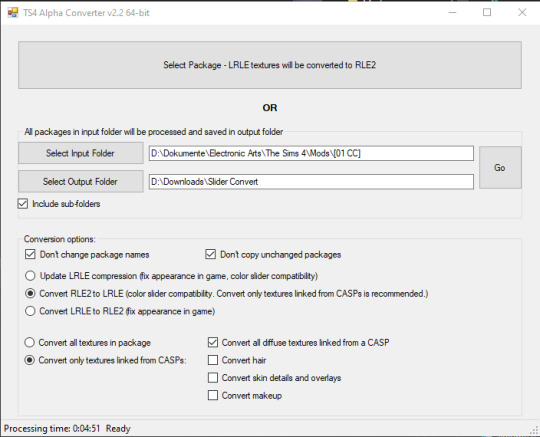
7. Press "Go". It will then take a while depending on file amount and swatches, as it will have to go through textures one by one.
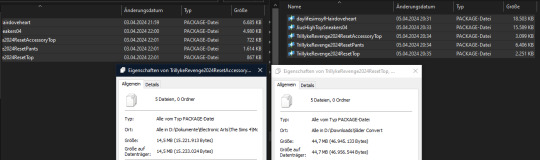
8. Check your finished files. The file size should be bigger, in this case it went up by 30 MB for only 5 files.
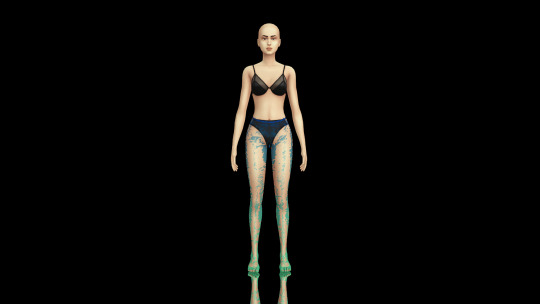
This is how the outfit looks after applying sliders to all pieces:
💜 How to disable CAS CC for color sliders
This time select "Convert LRLE to RLE2". You can leave "Convert only textures linked from CASPs".

2. Press "Go" and let it do it's thing.
3. As you can see, the file size went down again (middle), but it is not the same size as from the original file (right).
You will no longer be able to use sliders on the CAS CC piece, except transparency, which always works.
💜 Fixing slider compatible CAS CC with broken textures
If some of your CAS CC displays huge areas of missing, pixelated textures there is an issue with compression.
I don't know how and why this happens, but check out * this tutorial * on how to fix it.
@thefoxburyinstitute @maxismatchccworld @emilyccfinds @sssvitlanz
#yoru tutorials#ts4 tutorial#ts4 resources#tutorial#Sims 4 tutorial#s4 guide#ts4 guide#Sims 4 studio#Sims 4 cas#ts4 cas#color slider#cmarnyc#thepancake1#mizoreyukii
64 notes
·
View notes
Text
DDS Textures in Newer Photoshop Versions and NVIDIA Texture Exporter for Sims 4
There is probably already something out there explaining this or maybe this falls under self explanatory, but since it admittedly did take a bit to get this sorted myself. I thought it might be a good idea to make a tutorial/post covering it.
The Sims 4 uses DXT5 and 8-bit-per-channel sRGB compression for the textures. The latter being primary for make-up as well as eyebrows and skin details. Though some older cc (pre-Dec 2020 update) maybe using DXT5. In my experience, updating theses textures to the 8-bit-per-channel sRGB compression or LRLE images matters more so to makeup and skin details than eyebrows (If there is a notable difference let me know). Which the Sim 4 Studio does have a batch fix to update makeup files.
Continued under the read more as it got long.
@maxismatchccworld @emilyccfinds
Unless you are using the Color Slider Mod by thepancake1 and MizoreYukii. The mod requires the use of LRLE images to allow for the use of sliders to customize the color of CAS items. I will note here, that Sims 4 Studio does have a batch fix for Hairs to update for compatibility for the mod, but not clothing. If you want more on that mod it'll be best to check the posts over at the patreon. I'll include links at the end.
Moving on, in order to edit dds files in Photoshop you need a plugin for the format. For Sims 4, its the NVIDIA plugin, which has both a legacy version and the NVIDIA Texture Tools Exporter. If your using older Photoshop versions (Photoshop 5.0 to CS6) the legacy plugin is the one you want. However, if you are using the newer/newest version the NVIDIA Texture Tools Exporter is needed.
The legacy version will run in the newer versions, but is buggy and can cause different issues from crashing to causing artifacts in the texture.
With that noted, it is also a good idea to check if you have the legacy or dds64.8bi file installed in your plugins. It shows up is the file options bar when as D3D/DDS and should be located in the *"Drive:\Adobe\Adobe Photoshop "year version"\Plug-ins\File Formats" or "Drive:\Adobe\Adobe Photoshop "year version"\Required\Plug-ins\File Formats" depending on where you installed it.
*Drive is usually C:\, so "C:\Adobe\Adobe Photoshop "year version"\Plug-ins\File Formats". However, the exact install location can vary. For example, at time of writing my Photoshop is installed to "F:\Adobe\Adobe Photoshop 2023".
The NVIDIA Texture Tools Exporter has both a standalone application and the Adobe Photoshop plugin. If you are just wanting to edit Sims 4 textures, you only need the plugin. Make sure Photoshop is closed before trying to install.
You may be asked to uninstall any older versions of the plugin on trying to install the newer plugin tools. Simple way to to do this is to go to the Apps and Features under Apps in your settings and searching NVIDIA. Then looking for the NVIDIA DDS Utilities and/or NVIDIA Texture Tools for Adobe Photoshop.
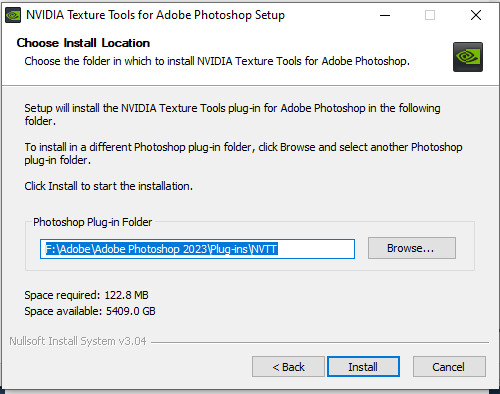
It will also ask where you want to install the resources. Typically, this will be at "Drive:\Adobe\Adobe Photoshop "year version"\Plug-ins\NVTT". This can be changed, but is not recommended.
Once installed, when you try to open a dds image you should see this window;
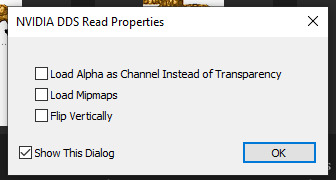
Check the "Load Alpha as Channel Instead of Transparency" and then hit OK. This makes the Alpha (this effects how the texture appears on the mesh) a separate item in the channels tab.
You should now be able to do whatever recolors or edits to the texture and alpha.
On saving, you may need to flatten the texture or use the "Save a Copy" option. Then make sure the Save as Type reads "DDS - NVIDIA Texture Tools Exporter (*.DDS;*.DDS).

Name your file what you want and try not to overwrite texture files often to avoid any issues. Hit save and this window should appear;

As this is a hair texture and I am not saving it to be Color Slider compatible, it'll need to be saved using the "BC3 RGBA 8bbp | interpolated alpha" option.
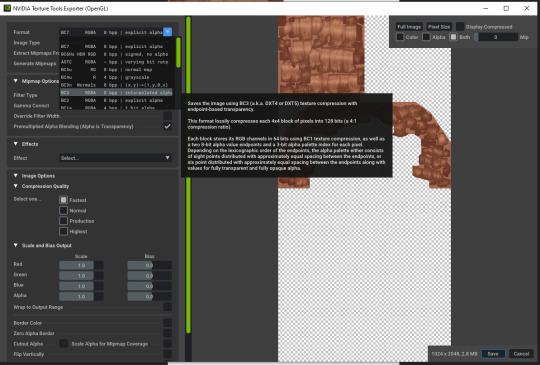
If I were to save it as an LRLE, it would need to be the "8.8.8.8 BGRA 32bbp | unsigned" option instead.

After picking the option needed for the texture, hit save. You should now be able to import the texture back in Sims 4 Studio.
Other things, to note are that if you try to import a texture to a file and its the wrong compression Sims 4 Studio with alert you to this. A pop up like this will show up giving you the info about what is needed;
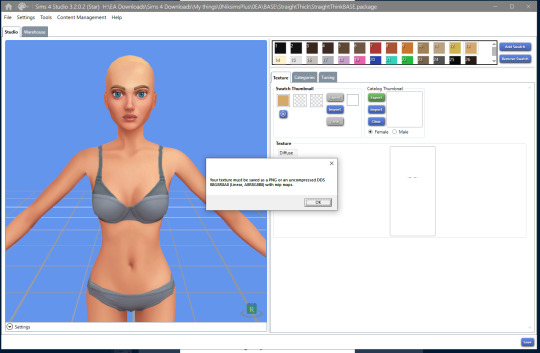
In this case, the file attempting to be imported is DXT5 rather than an LRLE. This just means going back into Photoshop and choosing the correct compression option in the NVIDIA Texture Export window and re-saving the texture.
Also depending on if you are doing texture editing for other games (such as the Dragon Age series), you may also have the Intel dds plugin. As such on opening a dds file you may get this pop up instead;

Again, just make sure to check the "Load Transparency as Alpha channel" option. Then hit OK.
I have not had any real issues with having both installed, but if you do its just a matter of removing the IntelTextureWorks.8bi from the File Formats folder while working on textures for the Sims 4.
LINKS
Sim 4 Studio (Open Beta)
NVIDIA Texture Tools
NVIDIA Legacy Tools
Intel Texture Works
Color Slider Mod
4 notes
·
View notes
Last Seen Blogs