#shitty tutorial
Text
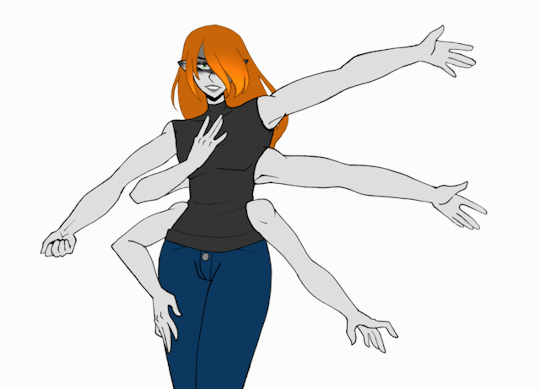
SFM to Daz3d
I’m a very happy cat I’ve figured out how to get SFM models into daz. It’s a bit of a process but of all 3d programs I prefer daz3d. IMO it’s streamlined posing and iray render ability trumps all
Since I spent DAYS on this, I’ma share how to do it cause my memory I’ll forget(also others could probably use it. also gunna be long)
You need(not up for debate lol)
~ A SFM Model
~ Blender
~ Daz3d & Genesis 8( male or female which ever your SFM model is
~ This Blender plug in: (clicky me) for those who don’t know how to dl from github. Download the top one, the SourceIO.zip its 10.1MB
~ art program to make the cut out textures(like hair, clothing hems etc)
~ Time, cause this takes a hot minuet.
**Set up**
1) In Daz open a new file, load a gen 8 figure(this works for all figures). Do not pose, do not change it’s shape nor add anything to it. Go to Parameters - General - Mesh Resolution. Change resolution lv to base, and shange subdivision vl and render subd level to 0
2) make sure whole figure is selected. Go file - export. Use the drop down; choose blender, change scale to 1%. Make sure your xyz is xyz, daz usualy has it xzy. If they are not checked, check “Ignore invisiable nodes” , “ Write UV ccordinates”, “ Write Normals/ faces/ polylines/ seperateobjects” , “ Write Groups” , and “write surfaces”.
3) DL the blender plug in(should have your SFM model as well)
4) In blender (i’m using the most recent version 3.5.0) Go edit - preferences - add ons. Install your add on. When it’s installed hit the check box to enable it.
**Getting the model ready**
1) Clear your blender scene. Import your exported Daz model. (make sure scale is 1, clamp bound is 0, forward axis is -z and up axis is y.)
2) Import your SFM Model( thanks to the plug in there will be a new import option called Source Engine Assets. From there you want the very top option “Source Model(.mdl)
3) Pose/ rotate the SFM model to match the stance of the Gen 8 model. Get as close as you can. The most important things you need to line up are the feet/ the top lip/ the fingers.
4) apply the skeleton to the model. Select the model, go to Modifier properties - the skeleton and apply. (this applies the pose to the base mesh so you can edit the mesh)
5) hopefully your model has body gruops where nothing is really connected or this part will suck. In edit, you want to seperate by selection: the top teeth, the bottom teeth, the eyes( seperate a left and right. not together), the tongue, any dangaly bits like belt straps, eyelashes(trust me).
5) still in edit take the lips and manually seperate them a bit. If you don’t you wont be able to open the mouth in Daz.
6) go back to object, select all(minus what you just seperated and the hair) and join it. Go back to edit. Select all, go to mesh - clean up - merge by distance. Now fine tune your mesh in edit and sculpt. Don’t be afrade to subadize, once or twice to get better fits. daz can handel it. You want to make sure the the SFM models top lip and eyes perfectly( or damn near close) match the height of the daz model.
**Import into Daz**
1) make sure to save all textures as pngs(everything even the normals).
2) export the model n bits as objs. Select a part to export, make sure “limited to selected only” is checked, scale is 1, forward axis is -z and up axis y. Also check “UV coordinates”, “Normals”, and Materials export.
3) go to Daz, load a gen 8 figure(same gender as what you exported).
4) Import one of the body parts of your new obj(just do the main body for now). Settings you want are: scale 10,000/ x,y,z/ read uv/faces/polylines/groups/surafces and material libary.
5) in the viewport/scene tab, which ever. select the obj, go to edit - object - fransfer utality. Your source is Gen 8, the target is the obj. No templates or item shapes needed.
**weight/mesh fixing**
1) hide the gen 8 figure. In the scene tab(has to be here as selecting the obj in the viewport will only select gen 8 not the obj, unless you want to go through the truble of making all parts of gen unslectable) start with the hands as figures with longer than avearge nails can pose issues. Lets do the left hand pinky 3(the tip of the finger).
2) go to gemoetry editor(tool settins, might have to add the tab from window - panes). Left mb to select mesh, hold control to add, and alt to deslect. if any part of the objs left pinkey tip is connected to any other finger, select it. Set targt group to face: choose group “Lpinkey 3″ and hit assign to target group. Contraz you just changed which group that part of the mesh is grouped under. Do the rest of the model fixing what needs to be fixed. (a good way to see is to just hover over different parts in the viewport)
3) now go to Node weight map brush. with that pinky tip still select, click general weights. Go over the pinky with the brush your mouse has turned into. Red means full follow, blue/purple/yellow means different degrees. since this is the pinky you want the tip to be fully red. Repeat for the rest of the hands/feet/face. Face will be a bitch. Best way to do this over all is to SLIGHTLY change the gen 8 pose so you can see if anything weirdly distors. face takes a lot of time espically the eyes and mouth corners. have fun lol.
4) import your other attachements(same import settings as the body part we just did). The eyes, the top/bottom teeth, hair/ one obj for each dangly bit. Parent them to the parts they go. (obj top teeth gets parented to gen 8 top teeth, and so on and so on. Also might need to move around a bit/scale up or down).
*Dangely bits, select each one, go to simuation settings - add dforce dyanic setting. With bit still select go to create and make a new dforce modifier weight node. Select the node, go back to node weight map brush. Add map “dforce simultation: influence weights. Use control to remove the weight paint from the portion of the bit that is touching the main obj model. This way you can use simulation to move the bits around after posing.
**Textures**
1) lets start with the main obj we imported. select it and go to surfaces(little drop down to see all the materials). apply the corrosponding material and normal to the model, do turn off glossy layered weight, unless the piece is supposed to be metal/glass.
2) cut. Any base materal with empty white space needs to have a cut out created. open the base materal in your art program of choice. (I’m using clip stuido but this can be done much easier in photoshop. Simply turn the white background black and the colored bits of the texture black. Save, and apply to the corrosponding cut out.
Your finally done. It’s a process, like I said but I do not have SFM or poser and I prefer Daz for all things rendering/posing. (don’t think i need to say it but do save as a scene because otherwise you’ll have to do all that work again)
#blender#sfm#Daz3D#shitty tutorial#Genesis 8 model#transfering things between these 3 programs is harder than it needs to be#BUT it can be done#just you know it takes a while
3 notes
·
View notes
Text
talk shit about garten of banban all you want but this fucked up bird has had more of an impact on me than the entire poppy playtime franchise

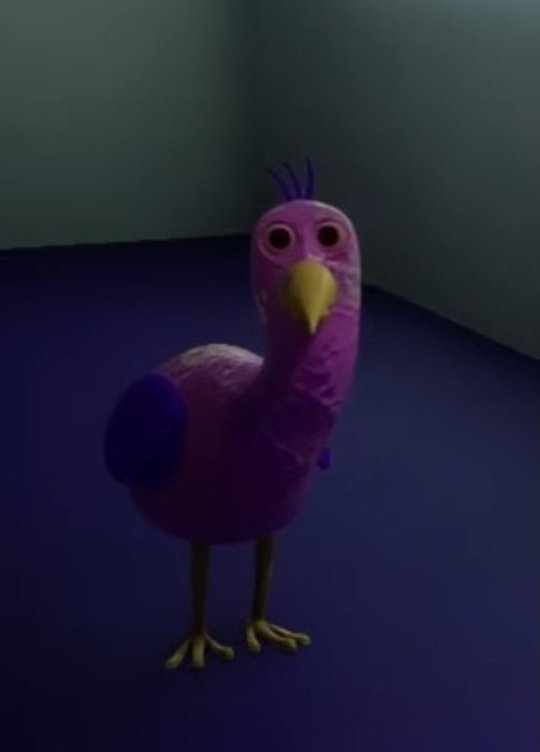
#garten of banban#poppy playtime#so tempted to watch a 10 minute long unity tutorial just to make my own shitty mascot horror game#like i have designs for the characters. i could do it
2K notes
·
View notes
Note
hey, i see you have been answering!! so i just wanted to say i LOVE your art, i just love how effortlessly swift your lines look + i enjoy the colors you use.
i was wondering if you had a specific process when rendering the artwork cuz i would be interested&honored to see/know!!!
much love and have a nice day!
Hi anon and thank you!
Here's the general workflow of how I colour in CSP. I usually spend most of my time on lineart, as I enjoy it most, so I keep my rendering simple. Sometimes I skip some of the steps below :)
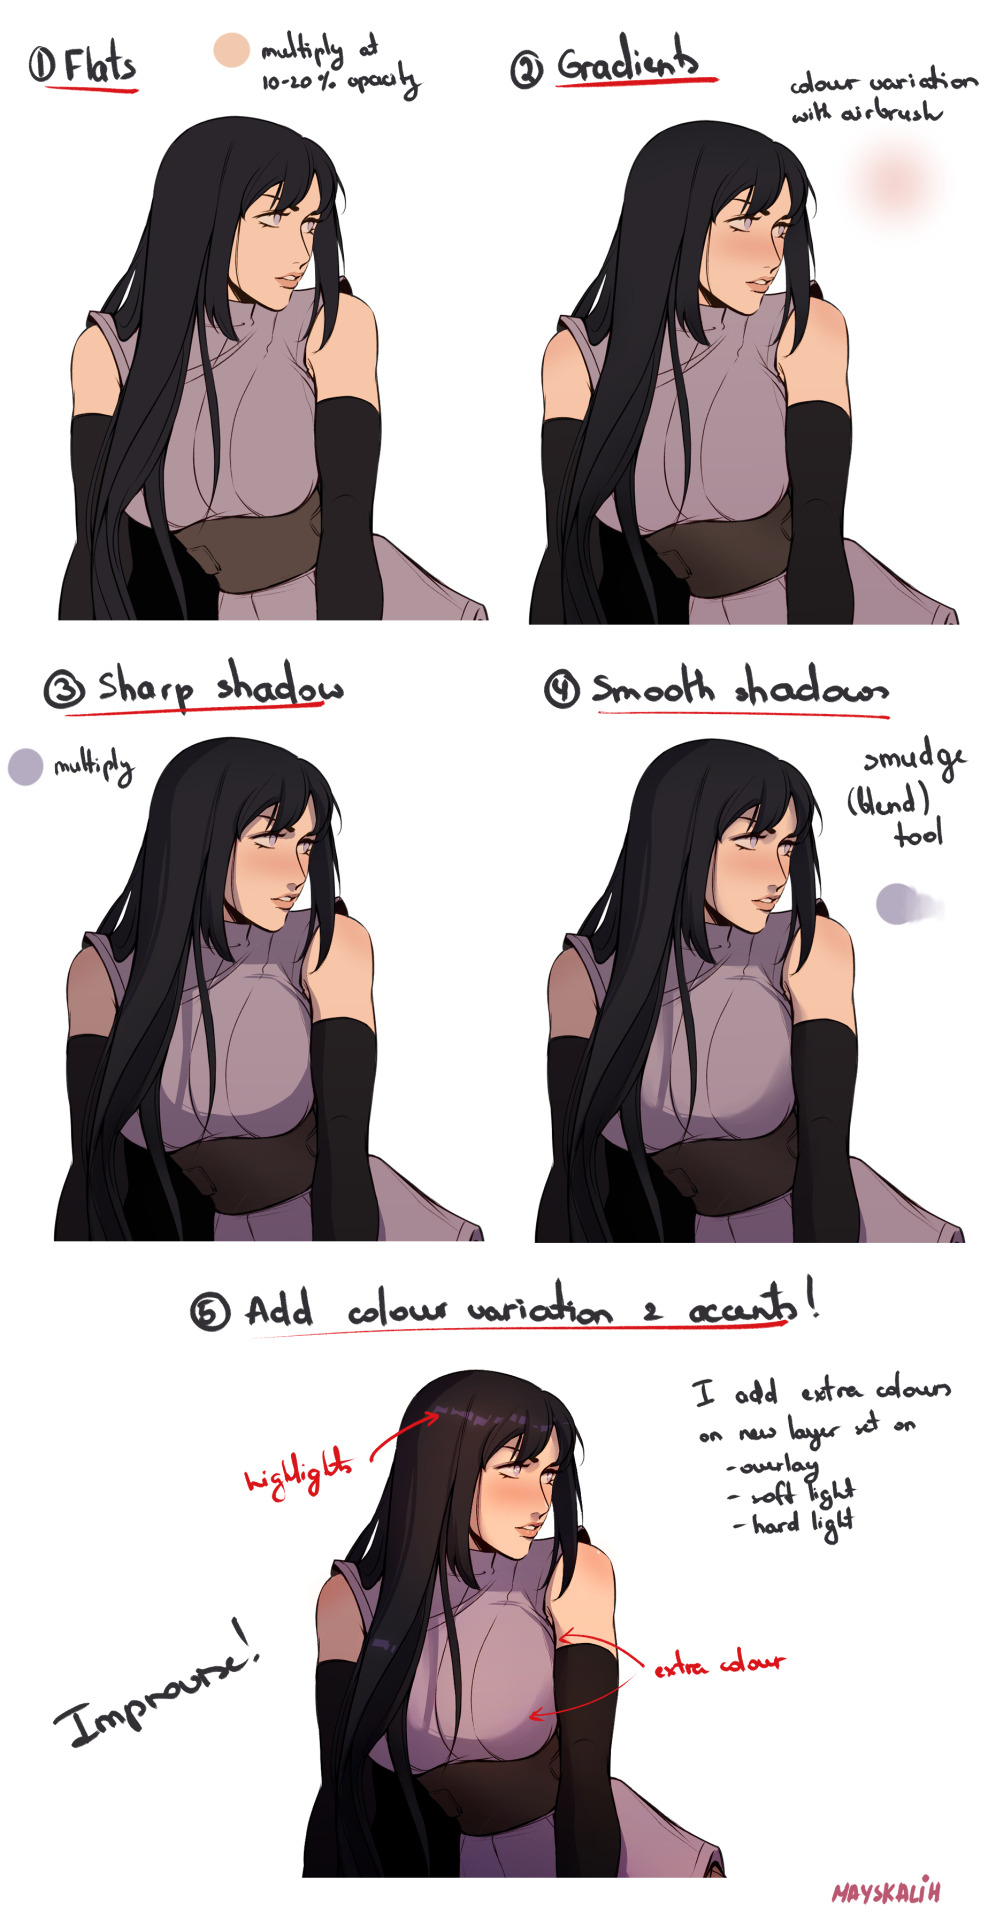
Step 1: flats. I add a 'Multiply' layer on top at 10-20% opacity and fill with single colour, usually peach-y one since I like my colours to be warm.
Step 2: gradients. Here I add some variation to the flat colours. I use airbrush for this, or sometimes low-opacity brush that allows colour mixing (Magda). I add blush and gradients to hair and clothing using similar but darker colours.
Step 3: shadows. I use solid round brush (G-pen) and just block in shadow areas on a separate layer set at 'Multiply'. Sometimes I use different colour for skin/clothing/hair.
Step 4: smooth parts of shadow where needed. Not all shadows are sharp and I use Blend tool to soften some areas.
Step 5: adding colour variety. Essentially, I improvise and play with adding different colours until I like it (or hate it and delete everything). I use 'Soft light' and 'Hard lights-out add different colours, usually with airbrush. And add accents (reflections) on 'Overlay' layer.
Hope it helps! Here's the time-lapse:
203 notes
·
View notes
Text
Relationship where we get all dressed up and put on our fanciest clothes together just because
#wlw#wlw mood#sapphic#sapphism#lesbian#i am not immune to the feeling wearing a pretty dress for an Occasion gives me#makes me want to put on my pretty clothes all the time#like just dress up with me for no reason#wear your fav suit while we eat macaroni out of the pan#put on your best dress to sit and play a game with me#lets dress up and awkwardly follow a youtube dance tutorial in our shitty little living room for no reason#im gay and i like sleeping
71 notes
·
View notes
Text
i think boombox and a personalised biograft would be the best duo ever like cmon . green trans person with giant speaker shows up to the phight with a rewired beyond repair biograft model covered in sheet stickers and graffiti
#biograft phighting#phighting!#phighting roblox#phighting boombox#just a silly thought yk :]#i think boombox would find a shitty utube tutorial and go from there in like . actual reassembling of the biograft#i think they would give it a bunch of silly features too . obviously
15 notes
·
View notes
Text

I will get a good grade at Mordecai, which is both reasonable to want and possible to achieve.
#i actually tried (and failed) to follow tracey's tutorials#alas.#i suck at clothes#anywya.#Lackadaisy#gunman cat tag#trying to imitate other peoples styles (failed)#but honestly if i drew him in *my* style he wouldnt look like him. i mean#he barely does here anyway#i also did a bunch of shitty ass sketches before this one which I have decided is. decent enough to post#i love him so much tho...#i had to... draw... the strangely attractive cat...
78 notes
·
View notes
Text
This looked way cooler in my head...Mostly cause it was way cooler before I decided to try and tween it
...It didn't work our well...Tranformations weren't working on different layers and yknow what? I don't want to drive myself insane all night trying to make this work when it just won't, so fuck it. This is what we got
Edit! I'm not done, here's another more cut up attempt
No I don't know what's wrong with his bottom left arm either but I tried man that's gotta count for something
#my art#this sucks#tweening sucks#he was supposed to be way more spidery and cooler but god decided no#proship safe#antis dni#I'm gonna have to cut up all the arm and hand bits I know#but it would have been less shitty if it just#let me use the tranform tool#but for no reason it decided not to let me#I tried everything from every tutorial and nothing worked
8 notes
·
View notes
Note
Out of genuine curiosity, what's your process for drawing Yautja faces? It's been like, over a year since I've drawn any and I'm completely out of touch with it and I love the way you do it @-@
Thank you! Tbh I’m terrible with explaining tutorials and a lot of times I don’t follow this process myself when sketching, but to get it the most accurate I simplify the face

I usually start with the brows since that’s a very prominent facet to their faces, and then the mouth. It’s easy for me bc they don’t have noses and those are hard to draw O~O

After I draw on the mandibles over their face. I know, terribly summarized but that is basically my process.


Lastly I draw the dome of their heads and the dreads that protrude from the sides.

Sorry I’m not the best with this and I’m sure there’s better tutorials out there from more skilled artists, but my advice is to simplify and break down the parts of their faces :)
#predator#yautja#my art#tutorial#a shitty one#fanart#doodle#can u tell I don’t actually know what I’m doing#monster#alien vs predator#teratophillia#monster fucker#slasher#how to draw a yautja#terribly
328 notes
·
View notes
Text
i wish i wouldn't do this to myself. why do i buy games on steam and then not play them for a while and then hate them and request a refund way outside of the refund time window
#qktalks#this is about sonic frontiers . imso fucking sorry#the game LOOKED awesome it looked fun. the beginning is terrible i feel pained to even say it#feels clunky. won't stop FUCKING bothering you with tutorials#killed the first boss and the game literally said ''hey it dropped something. that's important btw. pick it up. don't forget to pick it up'#i am playing a video game. what else am i going to do.#it definitely feels like breath of the wild if it constantly bothered u like every ten feet with reminders#imso sorry sonic frontiers. u had sm potential. u Have so much. i am simply a whiny bitch#also the game looks . surprisingly bad ?#i thought it would look a lot better. it doesn't look shitty by any means but it also doesn't .....look good#the voice acting at the beginning too leaves ...smth to be desired#i have a mutual (hi parker) who loves sonic parker if ur reading this im on my hands and knees begging for forgiveness /silly#this is my first sonic game so maybe it was just not the best first choice ? idk#still love u sonic ur a silly little guy#actually the refund window is 14 days and i've had the game for 16 days ......... so maybe i can still make it#maybe . idk#steam please . i got it on sale i got it half off please just give me my $30 back.im hungry steam#<- lives with her parents and does not buy the food
14 notes
·
View notes
Text
Despise coding tutorials that spend 30 minutes explaining what a videogame or coding language is
I Don't Care
How Do I Create A Window
#andndjfjffjfkvjvk#3:<#“i hope you're a little familiar with c++”#NO BITCH ITS WHY IM WATICNG YOUR SHITTY TUTORIAL#like for python and java i had to create the actual perameters for the game window#DO I NEED TJAT FOR C++ OR ARE YOU JUST LAME#RAAAAA#qrb#real?#im mad#coding#c++
8 notes
·
View notes
Photo

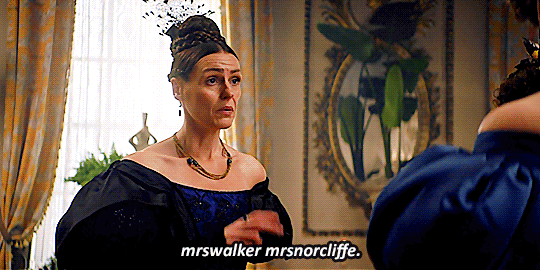
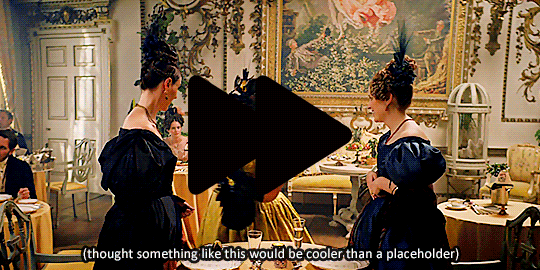

Live Wives Reactions · Gentleman Jack s02e02
#live wives reactions#gentleman jack#gentlemanjackedit#suranne jones#sophie rundle#joanna scanlan#anne lister#ann walker#isabella norcliffe#perioddramaedit#weloveperioddrama#mine#usergif#thank you for the tutorials#but this is pretty shitty#I'M SO SORRY#dunno how to funny#probably not a good day to post this#whatever this is#but i can't look at it anymore XD
378 notes
·
View notes
Text
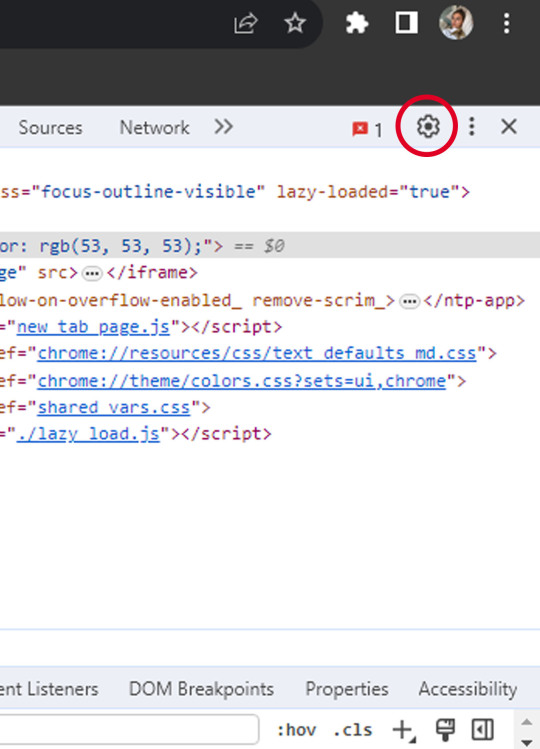
So this is actually an answer to @lord-aldhelm but since it might be helpful to someone else I thought about sharing it here :p
How to take higher quality screenshots using Google Chrome;
disclaimer: I did this to take screenshots on Netflix, however I did edit the pic a bit afterwards.
First, click on these 3 dots then on More tools>Developer Tools

This thingy will open and there you have to click settings. The window will change and from the side menu open the one named 'devices' - Click on "add custom device" aaand write down these values (though choosing the 'desktop' option or not might not be of use.)
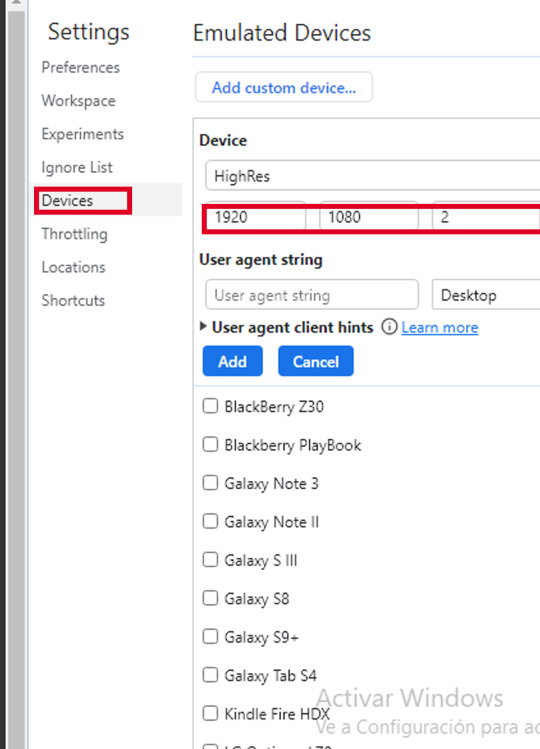
Once you're done setting it up, open the window you want to take a screenshoot from (in this case, I'm using my own previous screencap) then you can access this tool by pressing ctrl + shift + M (on windows at least, but google will show you what's the shortcut for your device) - make sure it says 'HighRes' (or however you named it) next to dimensions then click the 3 dots and from the drop down menu click 'capture full size screenshot'

The screenshot will be downloaded automatically and you will find it wherever your downloaded images go (;
Side note: you can take screenshots on full screen too, if you're trying to capture something from Netflix for example (:
#I feel like maybe everyone knew how to do this but me#still have this shitty tutorial I did because I couldn't find the one used yesterday hehe#how to take better quality screenshots#tutorial#screenshots tutorial#?#idk how to tag this#my edits
12 notes
·
View notes
Text
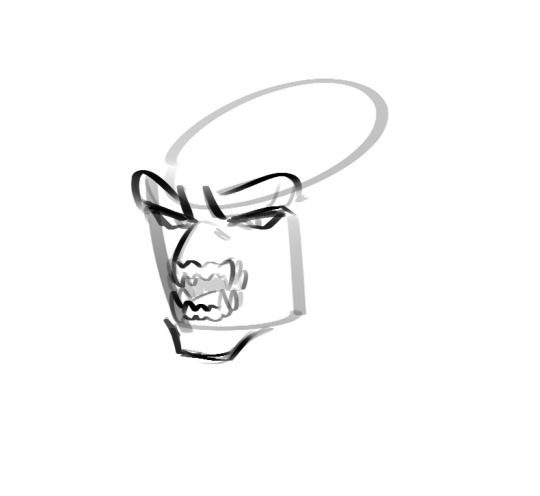
Okay so i got sick of not figuring out how to draw megatron so i made a super SUPER shit tutorial for his face. He’s got different designs across IDW and indivual artists but this is like a basic overall he’s made of these shapes and and stacked like this. Once I figure out how to draw his body it’s over for you bitches his tag will be FILLED with porn. Anyway images and the text in them transcribed will be below the read more!
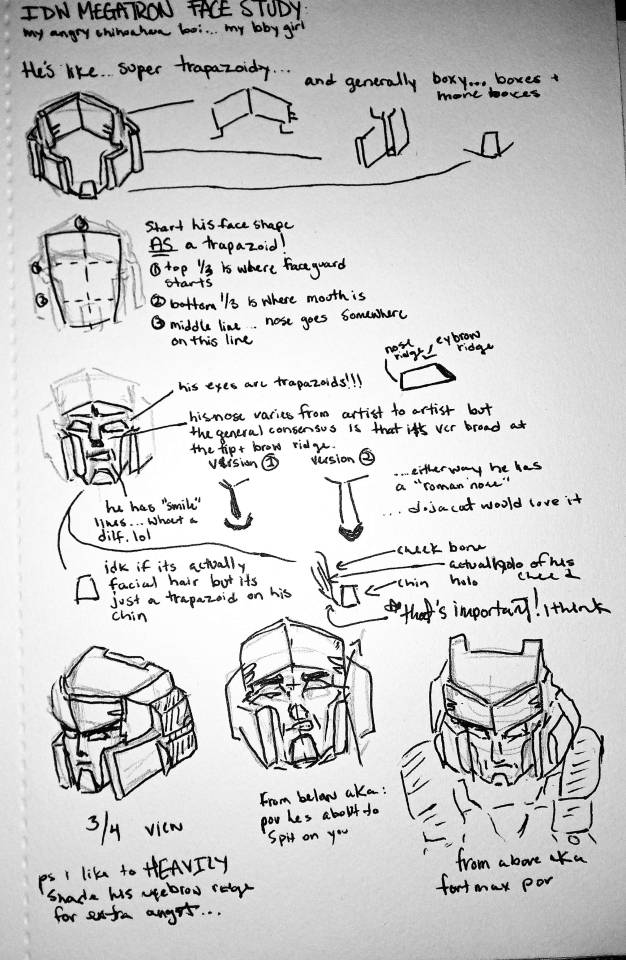
This is an overview of the whole page i did. My hand hurts. Thank you.

“He’s like... super trapazoid-y...” “And generally boxy... boxes + more boxes” (wow such cube)

“start his face shape AS a trapazoid!” (idk why but like my art teacher in higshchool was like starting all faces as circles/whatever cone thing you learned on deviantart will make all your faces look the same and she was RIGHT. Megatron has a trapazoid-y face shape and starting as a trapazoid helps a ton!)
“Line 1: top 1/3 is where the eyebrow ridge/ where helmet covers forehead”
“Line 2: bottom 1/3 is where his mouth is” (i suggest giving him those little frowny lines. it adds character and also makes him extra sexy)
“Line 3: the middle line... the prime meredian. His nose goes somewhere on this line”
“his eyes are trapazoids!!!” (oh my god!!)
“nose ridge” “eyebrow ridge” (they define the inner and upper lines of his eyes)
“his nose varies from artist to artist but the general consensus is that it’s very broad at the tip + brow ridge” “...either way he has a roman nose”
“He has “smile” lines... what a dilf lol”
“idk if it’s actually supposed to be facial hair but it’s just a trapazoid on his chin”
(me labeling his chin) “cheek bone” “actual hollow of his cheek” “chin” “that’s important [line pointing to his jawline showing where this cheekbone meets his chin and how it starts going back]... I think”

“3/4 view”
ps. i like to HEAVILY shade his eyebrow ride for extra emphasis + angst”
“from below aka POV he’s about to spit on you”
“from above aka POV you’re Fort Max”
ANYWAY THANKS SO MUCH FOR READING THIS ALL THE WAY THROUGH. If this helps you draw him better feel free to drop by my kofi and buy me a coffee. I’m not broke or in desperate straights or anything so no pressure.
If you want I’m willing to do face tutorials for other characters (i’m proud to say i have G1 starscream down pat) so I’ll do a page like this for some others for a price we can negotiate (probably like.... $5-$15 depending on how complicated they are and whether or not it’s tfp predaking)
31 notes
·
View notes
Text


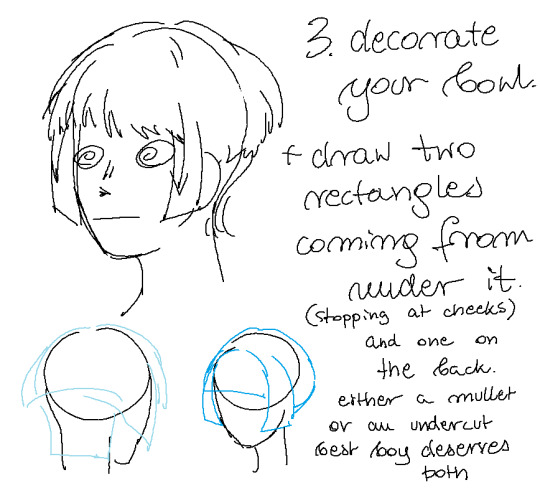

#a shitty akechi hair tutorial made in mspaint that no one asked for you are so welcome~#akechi touma#this is /j#saiki kusuo no ψ nan#tdlosk#saiki k#doodle#tutorial (not rlly)
165 notes
·
View notes
Text
Bro what kind of drugs do they lace slime tutorials with
#I’ve only just gotten back into watching shitty bootlegs of musicals#and by god they’re addictive#I started watching mean girls (with Erika henningsen because she’s my queen atm)#and now I’m on like my 4th slime tut and it’s nearly midnight#god i missed this#musicals#slime tutorial#mean girls#erika henningsen#broadway
4 notes
·
View notes
Text
As @just-a-douglas-simp-existing requested, here's a tutorial on how I like to draw eyes, or more specifically, a simple eye
But firstly, here's some tips:
One of the most important tips i can think of is definitely try not to push too hard with the pencil, even tho I've had practice with drawing eyes this way, I always end up making mistakes, so i highly recommended using the pencil lightly and gently
Practice makes perfect, just a lil bit of practice can improve any drawing ✨
No need to rush, just take your time, we're not in a time limit or anything so you can also relax while drawing 💕

1) Stumpy hill (top of the eye)

2) Slightly bent line underneath

3) Add the caruncle of the eye and slightly thicken the lines with a lil flick at the end

4) ✨Eyelashes✨, ngl this part was hard, I'd definitely say that practice is key for this part

5) Some extra smaller looking lashes, this part is optional btw, sometimes i add them and other times i just stick to the lashes in the 4th step
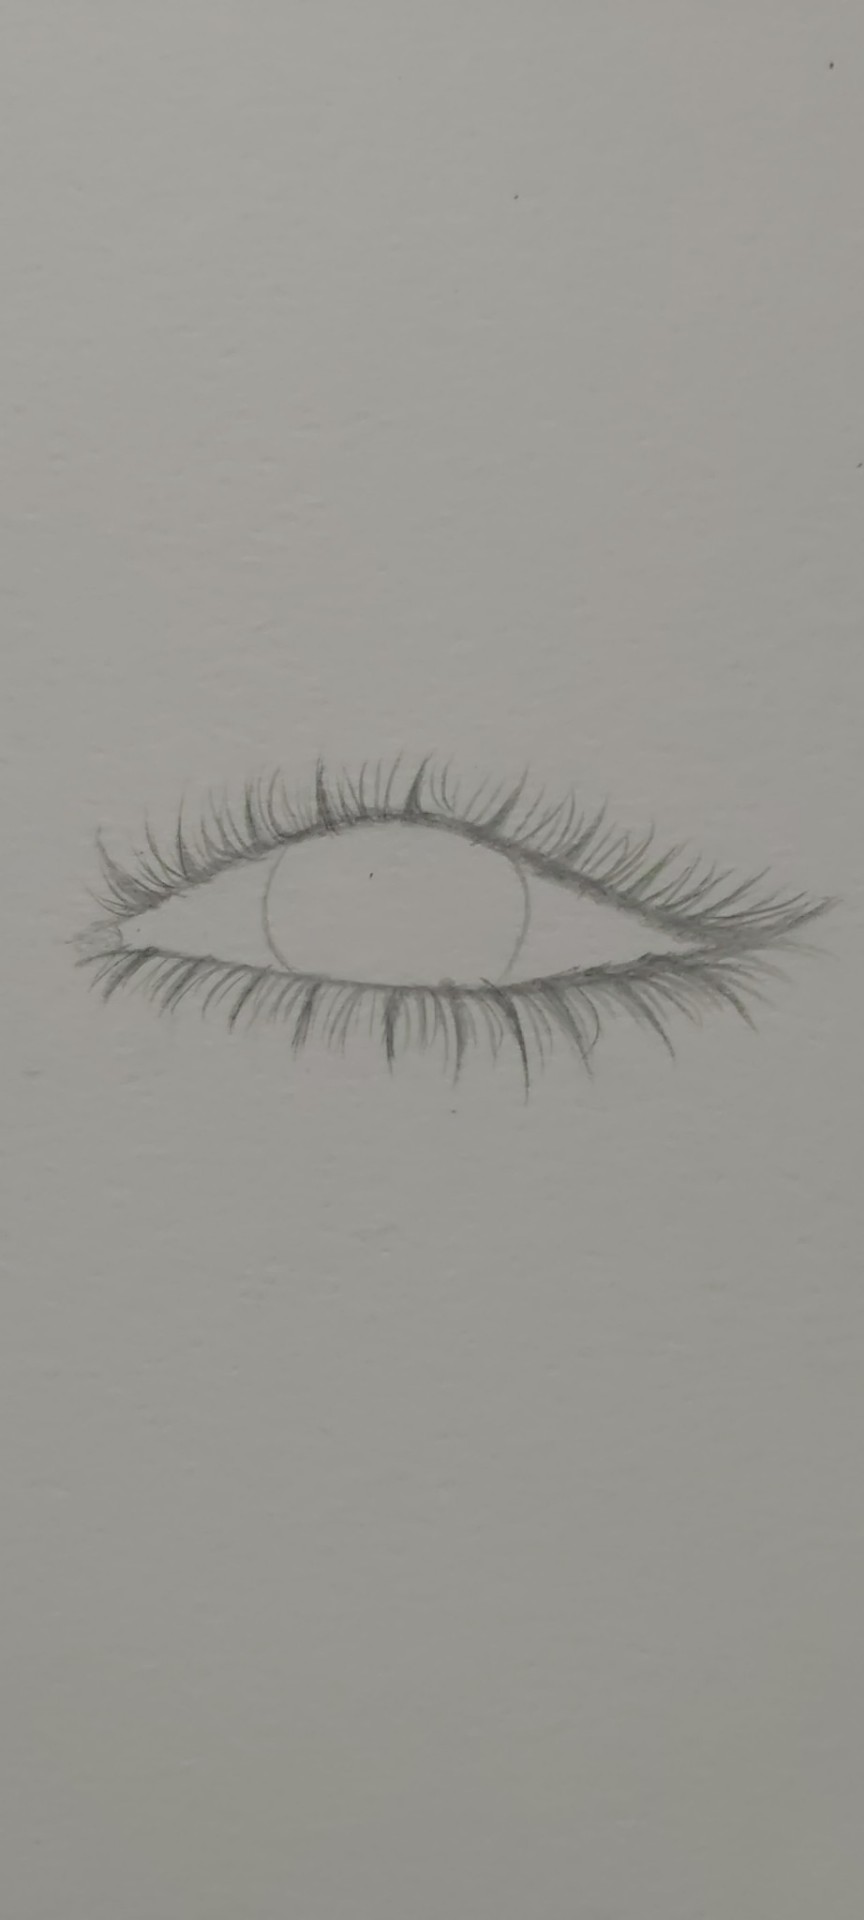
6) 2 lil curvy lines for the iris✨ also, try not to make the iris a full circle cos parts of it are covered by the eyelids (hopefully this makes sense ; ;)

7) Some shading to the iris, i did some light strokes at the top and a little around the sides, then used my finger to carefully smudge the strokes to make a gradient look, also the shading can be as light or dark as you want it to be ofc

8) 🖤✨P u p i l✨🖤 honestly this part is pretty self-explanatory lols
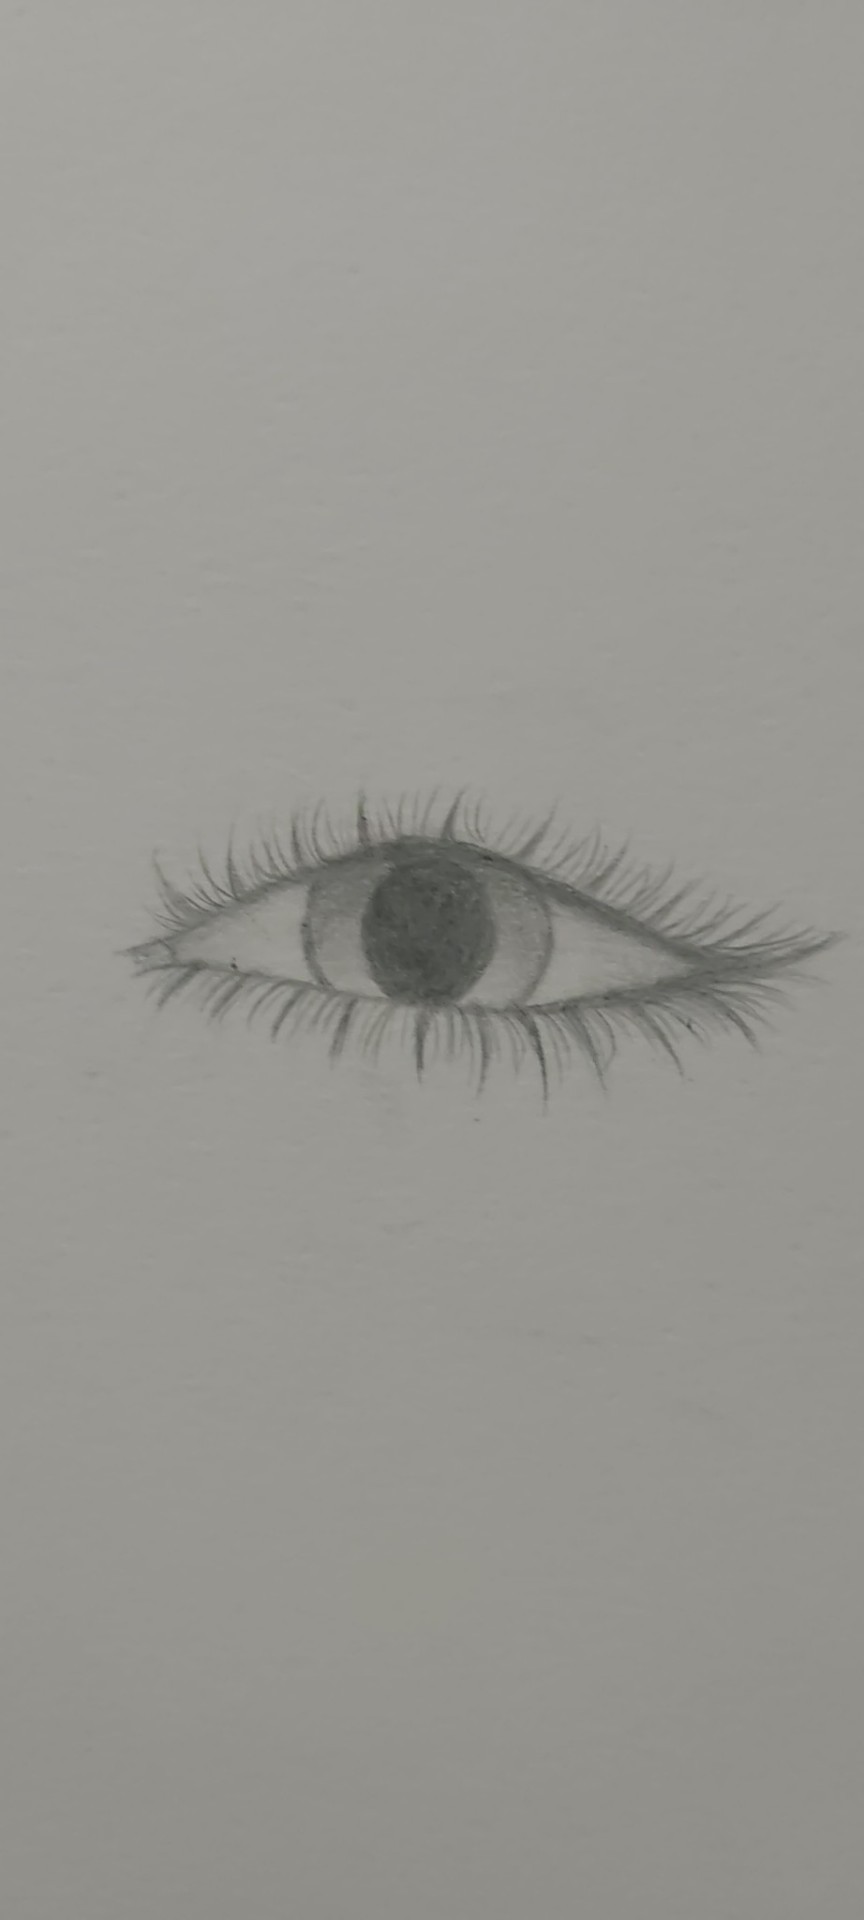
9) Tiny bit of shading on the sclera, this part is also optional btw
Now you can leave it like this now if you want, but if you're like me with no resistance, you can take a white pen and just-
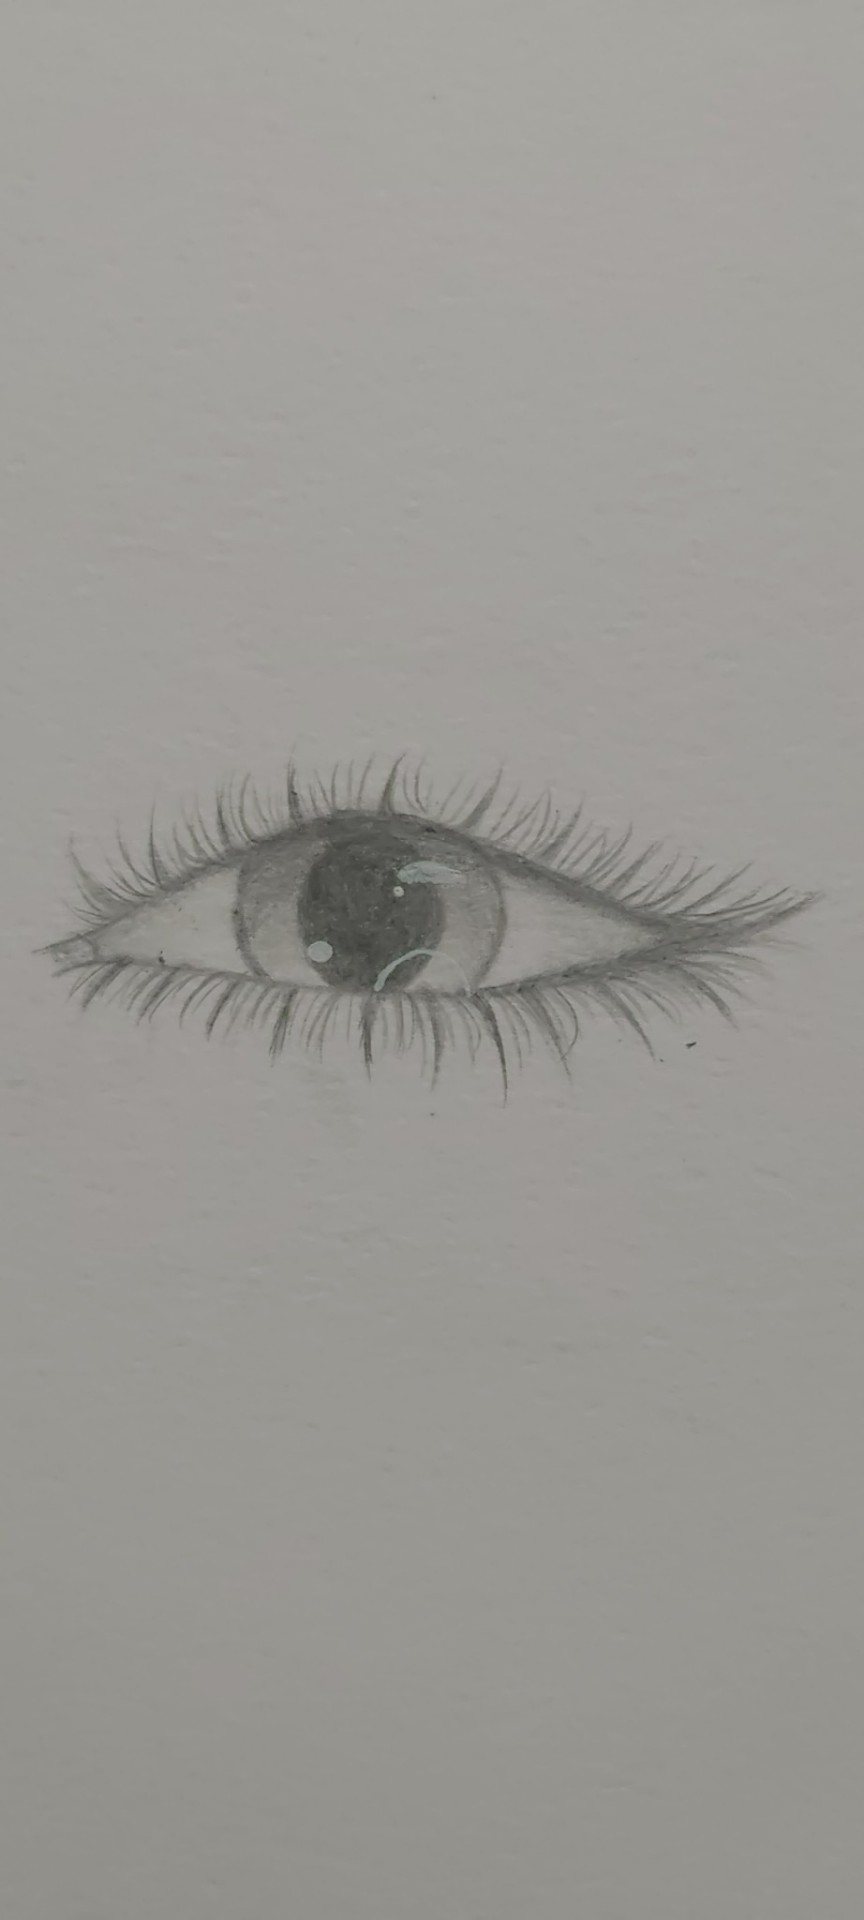
👁✨B o o m✨👁
I hope this was easy to understand ;v;
Also just a quick note, you absolutely don't have to make your eye exactly the same as mine if you don't want to ofc, for example, you may want to make the pupil a different shape or even colour and that's absolutely fine, this is your drawing at the end of the day, and this is just a tutorial, so feel free to experiment with different additions to the eye 💖
Plus if anyone wants any more tutorials theennnn.. you can let me know ✨
20 notes
·
View notes
Last Seen Blogs

athernearme
Untitled

ashthedragon
Ashburrimientos Dragónicos

loversofleon
leon fan club

thegendermonger
Untitled
ts-pokemon-au
TS Pokemon AU