#photoshop actions
Photo


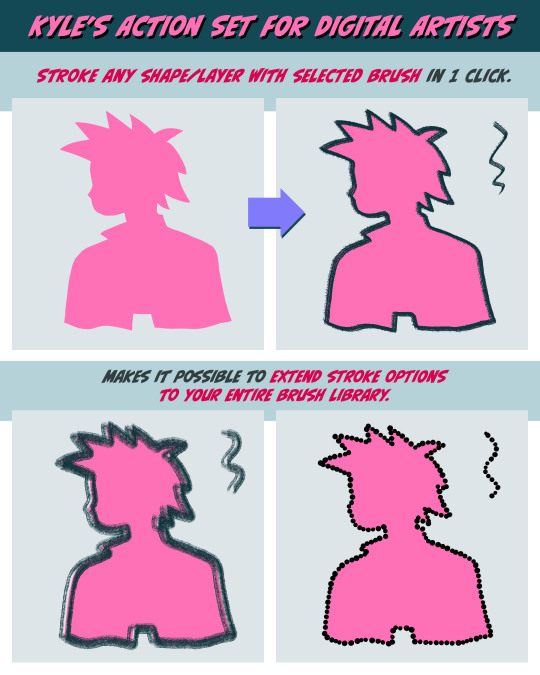

It's here! 44 actions for digital artists that will save you time and make digital drawing and painting easier and more fun: https://kyletwebster.gumroad.com/l/khofnyBlack Friday/Cyber Monday sale: save $2 - the full set is just $5! Please spread the word - share this with your friends! Thanks.
#digital art#photoshop#illustration#digital illustration#photoshop actions#kyle t. webster#kyle webster
3K notes
·
View notes
Text
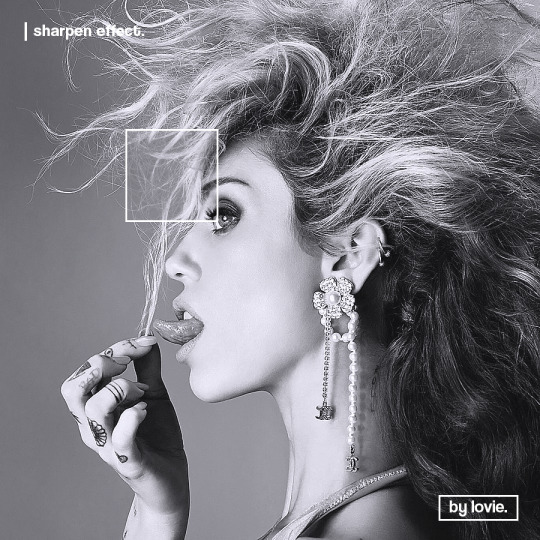
FREEDOM SHARPEN ACTION by @loviestudio
This action was made in Photoshop CC, and it will work better on it!
CONTENT
1 Photoshop action file (ATN) with the sharpen effect.
TERMS
Like and/or reblog to help a creator.
Don’t repost, re-upload or put it on packs and/or google drive. Don’t claim my resources as your own.
Don’t use my resources as a base or copy them.
Credits are not mandatory, although I’d love to see your edits!
My resources are free for personal/non-commercial use only. For commercial use, you must pay for the download. If you paid for the download, you are authorized to use it commercially. Reach out to me for more info or if you have questions about my resources license.
Follow me for more resources! ♡
This is a free resource, but you can buy it with points on DeviantArt to help out a creator or download it for free on Ko-Fi. Thank you!
#dailyresources#chaoticresources#allresources#completeresources#dearindies#photoshop resources#rp resources#rph resources#indie rph#rphelp#resources#photoshop action#actions#action#sharpen action#action: sharpen#free resources#free#ps resources#psd resources#sharpen actions#photoshop actions#free: actions
57 notes
·
View notes
Text

exactly what it says on the tin title! after watching @skittlesplays manually resize hundreds of recolor files on stream (and trying to do it myself...), i decided that the only solution when it comes to editing textures for ts2 was... photoshop! here are 9 photoshop actions geared towards 4t2 conversions, but hey, maybe you could use them for other stuff too 💖
i made these for personal use and have been using them on and off for the last few months, so i suppose you could say they've been sufficiently tested... the actions included aren't final though, i might go back and add a few more as my areas of expertise expand 😅 more info and instructions under the cut, long post warning! 👇🏽
DOWNLOAD: SFS | MF 📄
if you encounter any issues with these actions, please do reach out to me and i'll try my best to help! or if you'd like to add on to them, edit them, etc. in any way, please feel free to 😀
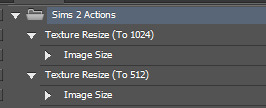
How to Install These Actions
open up photoshop and click on the big 'play' button in the corner. that's the actions tab. then click on the little down arrow and 4 lines in the corner of that subwindow.
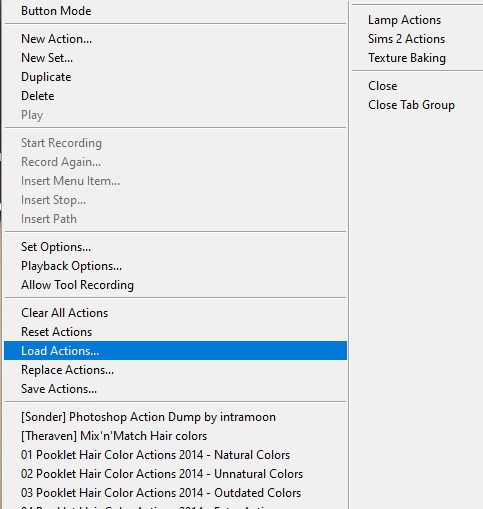
select 'load actions' from the list, and navigate to wherever you've installed my .atn file! then that's it, you've got them installed, easy-peasy.
How to Use These Actions (1 at a Time)
open up the texture that you want to edit in photoshop; for this example i'm using a dress i'm 4t2'ing from the throwback fit kit. now it's time to decide which action you're gonna use to make this texture compatible with ts2!
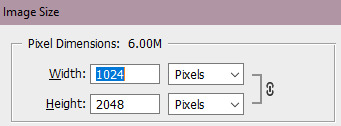
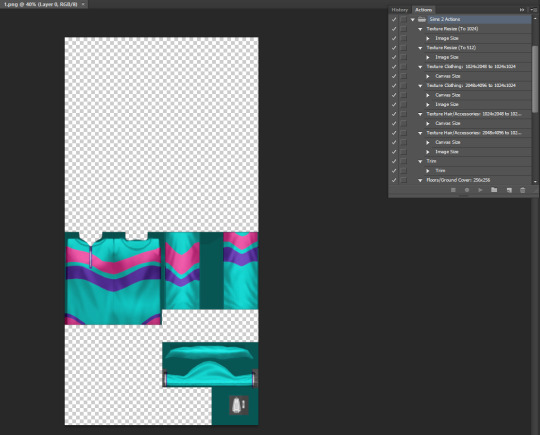
as the texture is 1024 x 2048, i'm gonna use the 'texture clothing: 1024x2048 to 1024x1024' action to downsize it.
ta-da! now it's a reasonable size!
How to Use These Actions (Dozens at a Time)
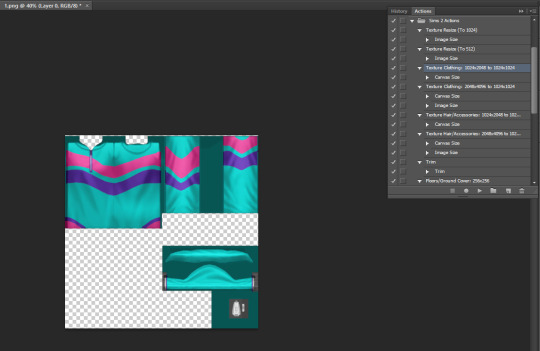
now for what this set was really made for: editing a ton of textures at a time! just go to file -> automate -> batch...

and navigate to the textures you'd like to batch-edit. here's a few things you should probably keep in mind:
- checking 'include all subfolders' will edit ALL the textures from that filepath onwards.
- if you set your destination as 'save and close' as pictured, all your files will be autosaved after the action has been run.
- so if you don't want to live on the edge, like me, and are afraid of running the wrong action, just open up one of the files you're batch-editing and check which action should be run on it before you do the other files.
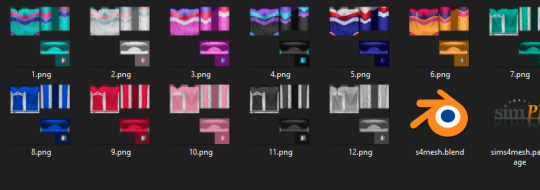
and behold! all of my textures have been cut down, and a bunch of my time saved 😎
Examples of Stuff Each Action Can Be Used For
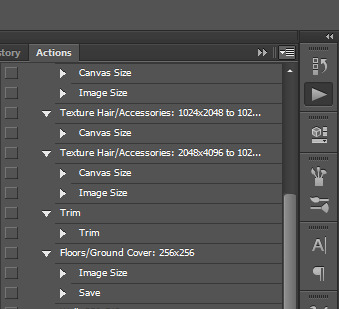
in case you were curious! the first two actions, i mainly use for objects. a lot of ts4 cc creators have their texture sizes set to 2048x2048 or even more, which is way more than (my) ts2 can normally handle. i mean, that much for a candle? geez! so these two actions are used to cut down those textures and not kill your graphics cards.

these are for cas stuff, like clothing, hairs, and accessories. alpha creators tend to have larger texture sizes, but ea's are almost always a cool 1024x2048. just make sure you check before you run the actions!

trim is... i honestly can't remember the last time i used trim, just... if you need it, it's there
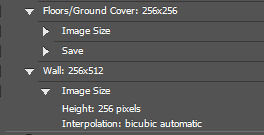
the last two actions are for floors and walls! floors are set to autosave as .bmp; walls are up to you. the texture sizes are made to match homecrafter's.

and... that's about it! lol. i know this isn't normally what i post, but i figured that since a lot more people are getting into 4t2 converting recently, these actions might help y'all.
have a great day, have a fun time simming, and keep being awesome guys 😘
129 notes
·
View notes
Text
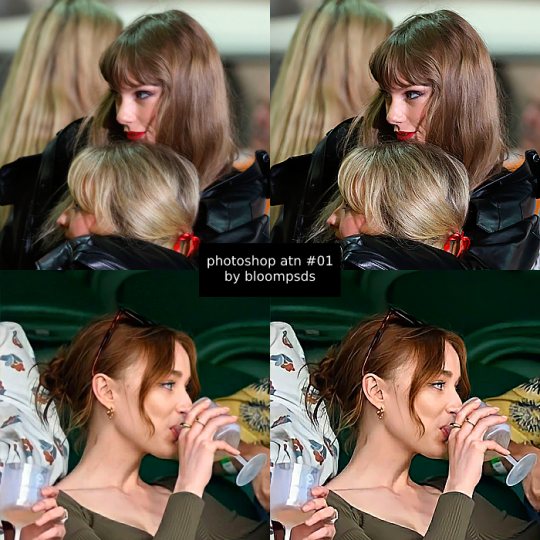
photoshop atn, number #01.
This is a action sharpen with noice reducer that can works with almost any kind of photo. I also use this one in screencaps edits that I make, but I always modify to let the sharpen in the way I like it.
The action comes with the modifications that I am used to turn on and off, when I need, so you can adjust!
Like or reblog is it was useful.
Follow me for more contents.
#yeahps#itsphotoshop#completeresources#dailyresources#sharpen#sharpen action for icons#sharpen atn#sharpen actions#photoshop action#photoshop actions#coral#allresources
128 notes
·
View notes
Text

137 notes
·
View notes
Text
one of the tags I see/asks I get the most related to GIF making is “how do you GIF that fast?”
I’m by no means the fastest creator out there & it’s not a speed test anyway, even if it feels like it sometimes. that being said, I’m obsessed with efficiency & my neurospicy brain doesn’t like monotony. if there’s a way to automate what I don’t like so I can skip to the good part, I’ll find it.
there are a bunch of things I do that have streamlined my process over the years, but if I had to choose only one? creating actions.
the moment you find settings you like (sharpening, sizing, etc.), make. an. action. I don’t even want to think about all the hours I wasted before I figured out how to make them.
I created actions for the two GIF sizes I use the most: full size (540x390) & half size, or two GIFs side by side (268x400).
with one click in Photoshop- let me repeat, ONE- the following is immediately applied:
play speed is slowed (makes GIFs look better)
my video is converted to a Smart Object
my video is cropped
my video is resized
my sharpening is added (3 in total)
my noise layer is added
my watermark is added
my subtitle text is added (I still have to add the text, but the text box with the font I use is ready to go)
the adjustment layers I use the most are added, including Curves, Levels, Color Balance, Selective Color, Brightness/Contrast & Vibrance (after my action has run, I’ll manually add coloring presets I’ve already created from previous episodes, shows, etc. & tweak them as needed. no reason to reinvent the wheel)
with all the repetitive work done for me, I can focus on the thing I love most: COLORING 🌈
it’ll take a minute to learn how to create your own actions, but I swear it’ll change your life!
#gif making w/ mor#mor answers#photoshop#gif making#photoshop actions#if anyone’s interested in tutorials etc let me know!
61 notes
·
View notes
Photo
i’ve updated my giffing process (tutorial coming soon i promise lol) so i’ve also updated my previous action pack to reflect those changes! quick shoutout to @redbelles for literally changing my life love u meg you giffing queen
this pack includes two actions for that will take you all the way through sharpening after you’ve cropped and resized and a save action 💜
If you download, please like or reblog. Explanations for each action are under the cut, and as always if you have any questions please let me know!
do not re-upload/claim as your own.
action pack
note: the two sharpen actions operate under the assumption you are cropping with ‘delete cropped pixels’ UNCHECKED and have cropped and resized your file before using them
if this does not apply to you, see my other pack which contains the same sharpen settings but gives you the additional scripts action
i. sharp & sharper: both of these actions are meant to be used directly after you have cropped/resized your image. it converts your frames to a smart object & sharpens them.
iii. save: this action is meant to be used directly after you have finished coloring. it converts all visible layers to a smart object, converts back to frames and then sets timing to 0.05 so that all you have to do is then export the gif.
#mine:resource#dailyresources#allresources#usersource#completeresource#photoshop resources#gif resources#photoshop actions#gif actions
203 notes
·
View notes
Text
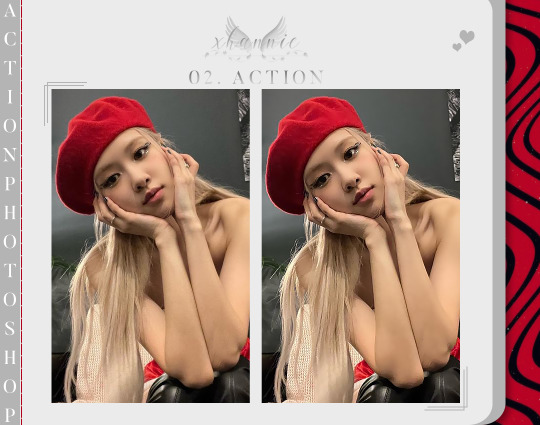
02. Action © xHannie
Don't copy, redistribute or modify and claim as your own. Don't repost or post to public folders. Don't use as a base for new actions. Any problem, contact me. If you download, don't forget to like or reblog to encourage my work.
DEVIANTART | PAYHIP | KO-FI
DOWNLOAD: follow me + like or reblog and send me ask with “02. action, please”. Empty accounts or accounts with only reblogs will be ignored. You must have an active blog to receive this action.
#xHannie#action#actions#sharpen action#action sharpen#sharpen#atn#photoshop action#action photoshop#photoshop actions#actions photoshop#resources#photoshop resources#resources photoshop#photoshop#photopea#photopea action#action photopea#action for icons#action for edits
45 notes
·
View notes
Text


Sofiims Scenery Photoshop action
Just a quick action I made so I can edit scenery photos faster (even ts3 ones on my blog are edited with it so it works well for it too). What it basically does is color correct so the photos look a bit warmer and pushes the contrast and lights. It also has some sharpening action and noise.
Things to keep in mind:
This was made with Photoshop 2021.
It's an .atn file not a .psd. To install: open photoshop and double click the .atn, it should automatically install where the rest of your actions are; hit play and enjoy!
DOWNLOAD (simfileshare) | DOWNLOAD (dropbox)
33 notes
·
View notes
Text

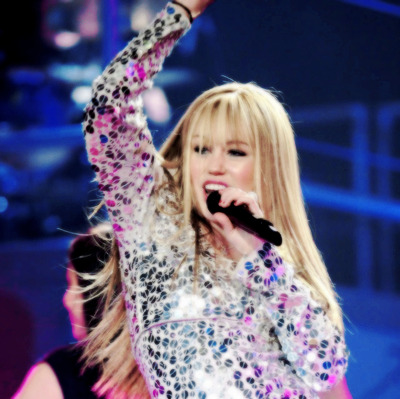


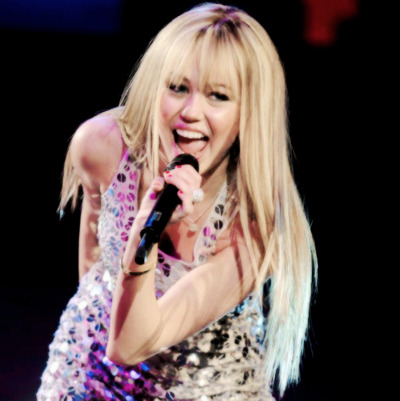
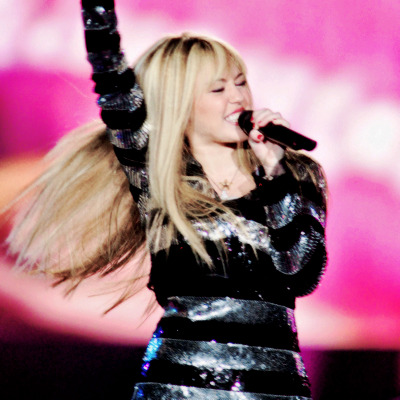


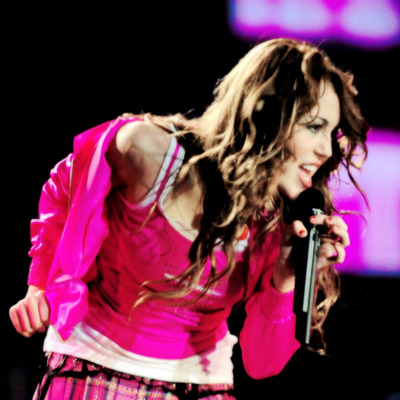

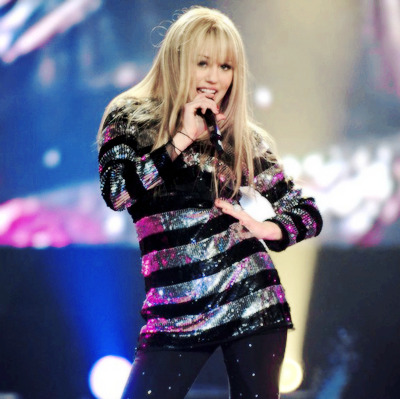

Miley Cyrus/Hannah Montana at Best Of Both Worlds 3d concert (2008)
~If you download please like or reblog:)~
#miley cyrus#hannah montana#miley cyrus icons#hannah montana icons#hannah montana icons psd#miley cyrus icons psd#hannah montana 2008#hannah montana 2008 icons#miley cyrus 2008#miley cyrus 2008 icons#miley cyrus concert icons#hannah montana concert icons#icons#icons psd#psd icons#ap actions#photoshop actions#photoshop actions icons
21 notes
·
View notes
Photo
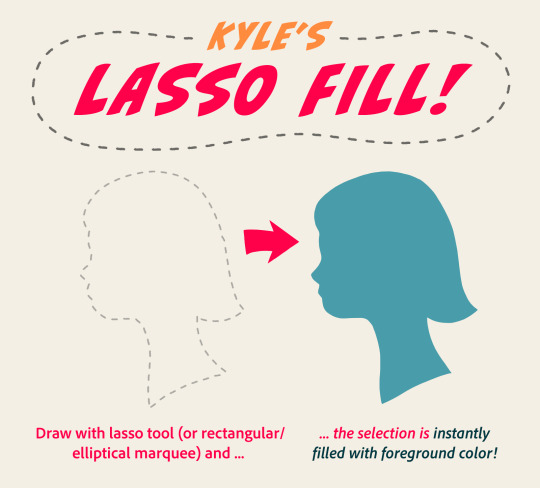
Draw faster than ever with the lasso tool in Photoshop! Make a selection and it will instantly fill with your foreground color - works equally well with the rectangular and circular selection tools AND works on layers with opacity locks! Get it here: https://kyletwebster.gumroad.com/l/amxeq
#photoshop#illustration#drawing#digitalart#lasso tool#kyle t. webster#kyle webster#photoshop actions#plugin#photoshop plugin
76 notes
·
View notes
Photo

✨Shiny✨
This is just a very simple photoshop action to make your sims look slicked up, sweaty, and slathered in baby oil. I wouldn’t recommend it for gameplay pics, but I’m not the boss of you - do what makes you happy 🤷🏾♀️
The psd isn’t merged, so you can adjust the levels to what looks best on your sim’s skin tone.
Download
33 notes
·
View notes
Photo

Action Set 8 - Colors | Three different coloring edits (coral, green, blue).
Download on deviantart | Please like this post if you download.
Please do not redistribute these actions.
2 notes
·
View notes
Text


— SHARPEN ACTION #01, BY BLOOMPSDS.
This is a sharpen action for photopea, it may look totally different in photoshop. Like or reblog if you downloaded. PLEASE, don't repost and don't even claim as yours.
#yeahps#itsphotoshop#action#photoshop actions#completeresources#atn#photoshop atn#sharpen actions#sharpen atn#coral
118 notes
·
View notes
Text

#bbc sherlock#sherlock#sherlock holmes#photoshop action#barachiki brand new#photoshop actions#I had a few of these designy ones I put together.#They are fun to do!
114 notes
·
View notes
Text
CuriousB's Any Colour You Like as a Bulk Action for Photoshop
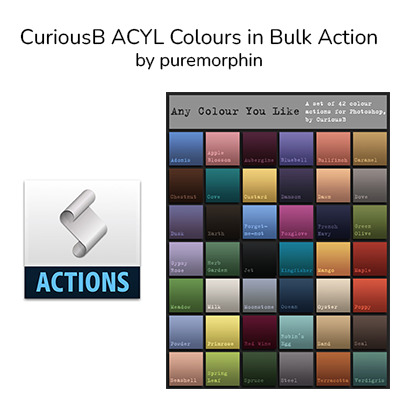
Download via SimFileShare
I made a Photoshop Bulk action that will run all the colour actions in CuriousB's Any Color You Like. This will save you heaps of time when recoloring objects for The Sims! You will need to have that action pack installed for this action to work - download it via this SFS reupload.
Steps for using my Bulk action
Install CuriousB's actions simply by double-clicking the file while Photoshop is open
Install my Bulk action
Create a folder on your desktop called ‘Applying Color Actions’
Put a copy of your base texture in that folder
Open it in Photoshop
Duplicate the base layer, flatten, and save (this makes the Revert option in File menu not be greyed out, which is important for the bulk action to work)
Run my Bulk action
The files will automatically be named in the format
"CuriousB ACYL 1 Adonis" so you can run other actions and the files will not be overwritten.
#ts4#ts4 resource#ts4 photoshop#the sims#sims color action#sims bulk color action#curiousB#photoshop actions
4 notes
·
View notes
Last Seen Blogs

rynrising44
Ryn_around_the_Rosey

miststyle
infinity.
bittyshawls
Bitty'sTidbits

mystcr
chocolate

oppai-oppai-licious
oppai-licious