#mod jeido
Note
Did they change the weekly missions? No more twsttunnes?
That's correct! They removed the twsttunes, but at the moment, only from the JP game. The EN weekly missions are still the same.
The JP game replaced the 3 and 5 twsttunes with 5 and 10 Collect/Gauntlet battles
~🐬
47 notes
·
View notes
Note
"Hey, Jade, I found these at Sam's shop and I thought of you!" They say as they hand Jade a bag of those mushroom-shaped chocolates

"Delightful!" Jade happily took the bag off your hands and immediately dug in, the number of chocolates in the bag very quickly disappear into his large maw. And yet somehow while he chowed down on the snack, he was able to maintain that air of dignity that he always carried himself with.
"A meager tidbit, yet it should tide me over for half an hour." He nods, satisfied. "How kind of you to think of me. Now, speaking of mushroom-shaped chocolates, were you aware that you can make chocolates with mushrooms as an ingredient, as well?"
Jade pulls open a notebook that he had on his desk, flipping to a page with a red tab and tapping the words written there. "Yes, dehydrate your choice of mushrooms and grind them up, then add them to your melted chocolate. It adds a nice savory taste to the sweetness."
He chuckles, placing the notebook back on his desk. "I wonder if Sam-san would have that available, or if I would have to experiment myself...?"
23 notes
·
View notes
Text
Buddy Bonus Calculator Update
With Crowley's HP Regen (Continuous Heal) that affects not only himself, but also his chosen ally, the Buddy Bonus Calculator needed updating.
And then before I could finish the post on Crowley's HP Regen, the game dropped Chef Grim for the anniversary with heals on both his spells.
This is now the updated sheet:
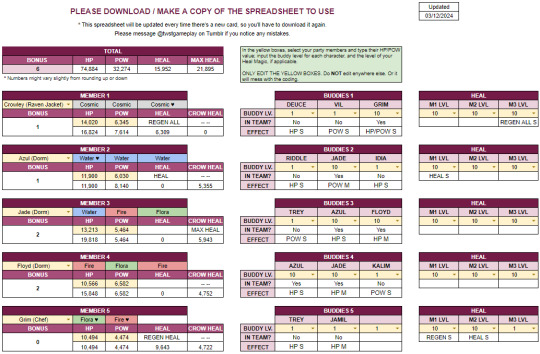
As before, the yellow squares can be edited once the worksheet has been downloaded.
The left portion is similar to before, with the addition of a "Crow Heal" box. Since Crowley will not only heal himself but also the ally that comes with him, there will always be an "optimal" person to pair with him. The Crow Heal box will show
How much HP they will regenerate in total if they are chosen alongside Crowley's heal, and
Whether or not they would net you the highest possible heal out of the 4 cards.
The center portion (no change) allows you to add the buddy levels of the cards you choose. The Yes/No and HP/POW will automatically appear when the cards are decided.
The right portion now allows you to add the magic levels of your card. It will also state which magic has the Heal effect, so theoretically, you only need to change the level of the Heal magic to affect this chart.
The total box at the top now shows the Heal you should expect to get, and the "Max Heal" you could possibly get if Crowley is paired with the optimal card in the team.
Hope this is beneficial to your team building, good luck and happy team building!
~🐬
47 notes
·
View notes
Text
Guest Room Cleaning Drop Rate
Welcome to another too-many-numbers post with Mod Jeido.
If you're interested in some of the other posts, there's this one on Gauntlet drop rates, this one on ATK UP/DMG UP differences, and this one on Curse and Evasion activation rates.
We spent the last 6 months collecting gifts and adding to a spreadsheet in order to figure out approximate drop rates. These aren't absolute, but they're probably the closest we'll get without asking ANIPLEX directly.
I'll go more in-depth under the cut, but generally, these were the drop rates we saw for each category:
Stickers: 37.8%
Honey: 27.2%
Notepads: 12.3%
Textbooks: 8.5%
Gifts: 7.4%
Shards: 4.3%
Grimoires: 2.6%
We collected both from JP and EN and combined it for the percentages above, since it should be the same rate regardless. The analysis under the cut will delve into a little more detail. Please take each number as an "approximate" value, as some may be rounded.
~🐬
STICKERS
Stickers were the most common drop at 38% of ALL drops. There are five types of stickers: Stylish, Basic, Elegant, Pop (Cute), and Unique. These are the respective stickers for each theme.
We had a total of 649 stickers (198 from JP, 450 from EN).
We found that each sticker type had an equal chance of appearing (20%) given that a sticker was dropped.
Overall, any single sticker type has a 7.4% chance of appearing based on all possible drops.
HONEY
Honey made up 27% of ALL drops. There are three types of honey: Phial (S), Jar (M), and Jug (L) of Blooming Honey.
We had a total of 466 honey drops (149 from JP, 317 from EN). We found the following to be the approximate drop rate of each type of Honey:
Honey S: 65% of all honey drops. Approximately 17% of all possible drops.
Honey M: 25% of all honey drops. Approximately 7% of all possible drops.
Honey L: 10% of all honey drops. Approximately 3% of all possible drops.
NOTEPADS
Notepads made up 12% of ALL drops. There are four types of Notepads: Red, Blue, Green, and White. These are for Fire, Water, Flora, and Cosmic magic, respectively.
We had a total of 211 notepads (76 from JP, 135 from EN).
We found that each notepad type had an equal chance of appearing (25%) given that a notepad was dropped.
Overall, any single notepad type has a 3% chance of appearing based on all possible drops.
TEXTBOOKS
Textbooks made up 9% of ALL drops. There are four types of Textbooks: Red, Blue, Green, and White. These are for Fire, Water, Flora, and Cosmic magic, respectively.
We had a total of 145 textbooks (52 from JP, 93 from EN).
We found that each textbook type had an equal chance of appearing (25%) given that a textbook was dropped.
Overall, any single textbook type has a 2% chance of appearing based on all possible drops.
GIFTS
Gifts made up 7% of ALL drops. There are 23 types of gifts, which are unique to each NRC student.
We had a total of 127 gifts (45 from JP, 81 from EN).
We found that each gift type had an equal chance of appearing (4.3%) given that a gift was dropped.
Overall, any single gift type has an 0.4% chance of appearing based on all possible drops.
SHARDS
Shards made up 4% of ALL drops. There are three types of shards: Starshards, Sunshards, and Moonshards. These give refills for AP/LP, RP/GP, and BP/EP respectively.
We had a total of 73 shards (23 from JP, 50 from EN).
We found that each shard type had an equal chance of appearing (33%) given that shards were dropped.
Overall, any single shard type has an 1.5% chance of appearing based on all possible drops.
GRIMOIRES
Grimoires made up 3% of ALL drops. There are four types of Grimoires: Red, Blue, Green, and White. These are for Fire, Water, Flora, and Cosmic magic, respectively.
We had a total of 44 grimoires (16 from JP, 28 from EN).
We found that each grimoire type had an equal chance of appearing (25%) given that a grimoire was dropped.
Overall, any single grimoire type has an 0.7% chance of appearing based on all possible drops.
45 notes
·
View notes
Note
Hello, I was hoping if you could have any info on the total amount of Rabbit Ears needed for upgrading R Silver Rabbit Costume and SR Ortho Rabbit Gear spells, please?🙏
Here you go:

These have been the same numbers for the other hometown events as well.
~🐬
26 notes
·
View notes
Text
Mod Jeido's 12th NRC Exam Results

Another round of NRC Unified Exams have come and gone and I eked by the S5 threshold by the skin of my (very sharp moray) teeth.
I'll go into detail on my teams and strategies that helped me get to this score. Hopefully this can be of use for others who are looking for reaching the higher scores. I wouldn't have been able to make this happen without the crowdsharing of teams online and really good support cards.
Here are my individual scores for each test:

Before, in order to get a score of SSS (110k) you would need an average of 22k in each test. Now, in order to reach S5 (160k), you would need an average of 32k. Once again, I would be relying heavily on my defense test scores.
My teams will be placed below under the cut for length. All battles were done using the Extra tier difficulty.
I hope everyone did great in the 12th NRC Exams!
~🐬
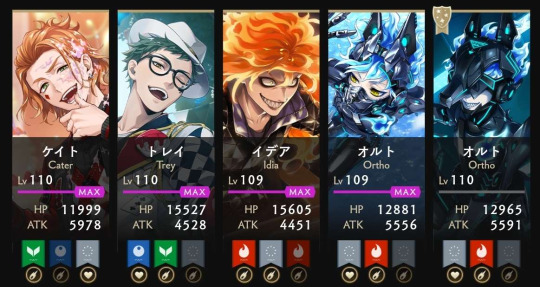
FIRE ATTACK TEST - 30413
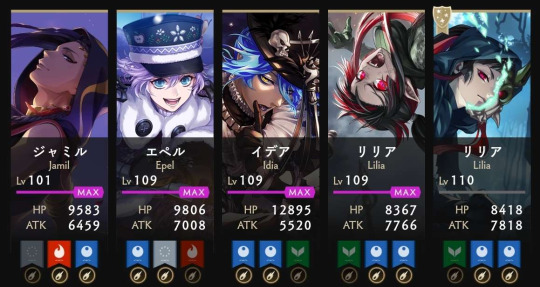
In order to cross the 30k threshold for the Attack tests, it's imperative to finish on Turn 5. I was stuck at 29k for most of the exam session, but at the urging of a few other exam takers, I tried this team (specifically double Lilia) to my success. The levels and magic chosen are shown as above. Each character has max magic and buddy levels.
A few key points about this team:
Jamil and the two Lilias needed to be activated by themselves. This is because Jamil's ATK UP L and Lilia's DMG UP L are on their M3s and only last one turn. If RNG is unhelpful and you cannot activate both Jamil's spells at the same time, then you would not get the boost. The same goes for Lilia 1 and Lilia 2.
Similarly, Epel's M1 has an ATK UP M for 3 turns. As long as it is activated before his M2, then his M2 DUO with Idia will be boosted.
Other teams I tried that still got me scores over 25k (All Lv. 100+):
― Dorm Azul, Boa Epel, Masq Idia, Dorm Ortho, Support Dorm Azul
― Dorm Kalim, Dorm Jamil, Masq Idia, Dorm Ortho, Support General Lilia
WATER BASIC TEST - 31279
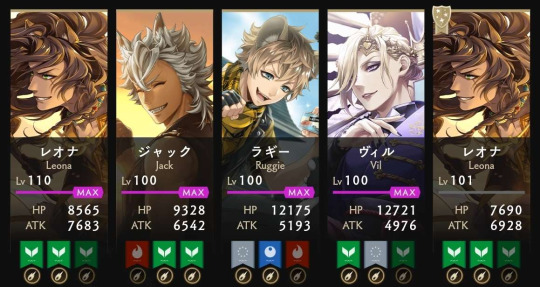
Despite all the new cards that have appeared, this feels like an "old faithful" combination that still has not steered me wrong. The levels and magic chosen are shown as above. Each character has max magic and buddy levels.
A few key points about this team:
Since this is a basic test, the number of DUOs is key. Since these are heavy hitters, I found I had depending on which of the non-DUO cards that appear first, I would either have to finish on Turn 3 or Turn 4.
At first I was using a Lv. 110 Leona but found that I would have to end on Turn 3 in order to be able to use all 5 DUOs, and RNG was just not playing nice. So I found someone who hadn't leveled him up all the way and this helped me stretch it to T4, given that neither of the Leonas' M1s showed up.
My Vil/Support Leona DUO combo was hit by the foe Jack's ATK DOWN which sincerely helped me as well. Sometimes debuffs aren't terrible, especially when you need to try to stretch it to T4.
Other teams I tried that still got me scores over 25k (All Lv. 100+ unless stated):
― Dorm Malleus, Dorm Silver, Dorm Sebek (Lv. 95), Dorm Lilia (Lv. 95), Support General Lilia
― Bday Riddle (Lv. 85), Dorm Leona, Dorm Azul, Dorm Vil, Support Dorm Leona
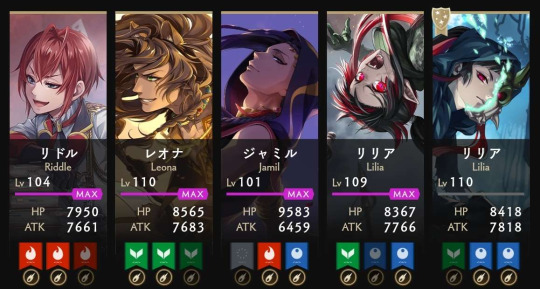
FLORA DEFENSE TEST - 37031
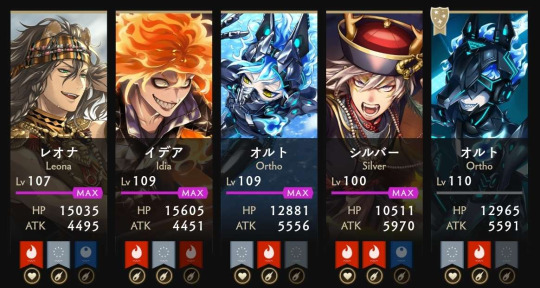
Once again, Heartslabyul on a Defense test becomes the most frustrating out of all the tests. Three out of the five have Curse to block heals, and when you're running three cards that have continuous heals, this can be very detrimental. This score was the result of successfully activating every single heal except one turn of my Ortho's continuous heal. The levels and magic chosen are shown as above. Each character has max magic and buddy levels.
This team gave me a total HP of 77,757 with an additional 43,986 in healing. I was able to end this battle with 64,991 HP left.
A few key points about this team:
Whenever possible, I would make sure to activate Leona's continuous heal on T1. Depending on the magic I had available at the time, I either would have paired him with Idia's debuff removal (if it looked like the foe had Riddle, Cater, or Trey showing up first), or Silver's M2. For Extra, at least one DUO would be necessary for me to kill on Turn 5.
Ideally, both Cerberus Orthos should be activated at Turn 2. However, this is not always possible, nor is it practical. Each one of Ortho's heals does a 6k+ single heal (along with setting up a continuous heal) so if I hadn't taken more than 13k in damage, it would have been wasting some precious HP points.
In the case of this score, I activated the support Ortho on T2 and my Ortho on T3. I was hedging my bets that I may get a debuff on T2, so I could use Idia's M1 to help mitigate that.
Luckily, this score was successful (after many many many many many unsuccessful tries) because I was only hit with a debuff on T5, after all my heals had successfully activated. Only the last little bit from my Ortho's continuous heal that was activated on T3 was not counted.
COSMIC DEFENSE TEST - 31397
I was able to get a score surpassing 30k fairly quickly, so I didn't spend that much time on Cosmic this time around. Since there are no type advantages, I went with another "old faithful" team that I knew would produce results. The levels and magic chosen are shown as above. Each character has max magic and buddy levels.
This team gave me a total HP of 86,892 with an additional 23,889 in healing.
A few key points about this team:
This test had no Curse, so it was a rather leisurely Defense test. But, as always, I would always try to activate both Cerberus Orthos' M1 heals on T2. Since this was Cosmic and there were no advantages, I would have lost enough HP during T1 that I would not have lost any healing to maxing out my HP.
Because this was a Cosmic test, however, I would need to use all 4 DUOs that I had brought into the test in order to kill by T5 and getting a high score.
OMNI ATTACK TEST - 29898
While it stings a little that I was unable to get above 30k here, this test was my last ditch effort to get my score above the 160k threshold for S5. The levels and magic chosen are shown as above. Each character has max magic and buddy levels.
A few key points about this team:
Similar to Fire Attack Test, Jamil and both Lilias needed to be activated individually with both their spells at once. Unfortunately, this wasn't always possible, since Omni tests can hit you with something you're weak against when you're not expecting it.
Hitting a few neutral elements was unavoidable, but as long as I didn't hit any disadvantages, I knew I would be able to finish on T5.
Originally I had some heavy hitting DUOs on my team instead of Dorm Riddle and Dorm Leona. For example, at one point I was using Dorm Rook and Boa Epel. I was trying to leverage their M1 boosts, but to no avail.
One person on discord commented that they threw in Dorm Riddle and Dorm Leona into their team in order to just hit hard with four total double attacks and they were able to increase their score. So I tried the same thing here, and while I wasn't able to get over 30k like i was hoping for, it did get me the 926 points I needed to get over the 160k threshold.
26 notes
·
View notes
Text
[JP] 3rd Anniversary
March 10th 16:00 - March 24th 23:59 (JST)

Twisted Wonderland's 3rd Anniversary Campaign has begun! With this event, the players are receiving a brand new SR Ceremonial Robes Grim card!
Information found below:
NEW FEATURES
Grim Card Requirements
Stamp Card Info
Shop Info
NEW FEATURES
We'll be getting the following new functions:
Part 1 (Beginning 10 Mar):
Card Limit Break Bonus - As you limit break the cards, you'll gain additional bonuses.
First Limit Break (SSR only): Unlock furniture recipe for a Photo of the card. There are two: Pre- and Post-Groovy. (Min Room Rank of 8 required; Card must be groovified for Post-Groovy Photo) Card Character can interact with the Post-Groovy Photo.
Second Limit Break: Spare Key. Use this to keep a specific card character in your guest room. (Min Room Rank of 12 required; Cannot invite different outfits of the same character)
Third Limit Break (SSR only): Unlock Magic 3. Select two of the three magic options to use in battles.
Fourth Limit Break: HP/ATK Increase, Obtain a new title, and (SSR Only) Card Icon Frame change
Special Lessons / Skip Class - Special Lessons will give more Card Level EXP than usual and can be done 10 times a day. All Other Lessons (History/Flight/Alchemy) will have a Skip Function available and can be skipped 10 times a day.
Guarantee of Rate Up Character on 200th Summon - 200th Summon (2nd Pity) will guarantee the Showcase Rate Up card. In the case of the Permanent Showcase, or a Birthday Showcase (no Rate Up, or only one SSR), the guarantee is still at the 100th Summon. In the case of multiple Rate Ups in one Showcase, the 200th Guaranteed summon will be a random card out of the group of Rate Ups.
Other Changes
The shop layout will change to accommodate descriptions for cards and furniture.
Theme Stickers will be available in the Room Medal Shop.
The wall decoration layout will change to allow wall decorations to be higher or lower.
On the card status screen, the max stats (MLB and Max Friendship) and max magic stats can be seen.
Part 2 (Beginning 16 Mar):
Visiting friends' guest rooms - Visit a friend's guest room and leave a "like." Leaving a "like" will reward you with room medals. "Likes" can be given up to 5 times a day. There will be an option to visit a random guest room.
Change the Guest Room Background Music - BGM can be purchased in the Guest Room BGM Shop. Min Room Rank of 10 required. New BGM may be unlocked as the story is cleared.
Guest Room Character Lines Voiced - The character lines that are spoken during Idle, Invites, etc., will now be voiced.
Other Changes
An increase in drop rates of SSR crystals in the Collect Battles.
Some Collect Battles' difficulties will be adjusted.
The combination of possible reward drops from Collect Battles will be adjusted.
Part 3 (Beginning 18 Mar):
New Cumulative Missions - Missions regarding cards/lessons/exams will be added to the Missions tab.
Added Titles - A new title will be available when 10 cards of a character has been collected.

Grim Card Requirements
Grim is a temporary card and will disappear if you don’t complete some requirements:
Collect 500 Tuna Cans [2023]
Read 「3rd Anniversary」 Event Story Episode 2
The Tuna Can [2023] is an event drop and you can get 1, 2 or 5 randomly by completing lessons (History, Flying or Alchemy). You can see how many you have on the bottom of the Event Page. Left is how many you have right now (so if you spent some, the number is lower), right is how many you have collected until now (this is what you need to make Grim permanent).

To quickly go to Grim’s lessons from the event page, click on the Lesson button on the Main Event page or go all the way to the right on the Lesson Page, right after Diasomnia.
When you click on Grim’s card to level him up, you’ll get a message reminding you that he isn’t permanent yet, so items and madol spent on him will also disappear if you don’t make him permanent in time. Just click the black button to proceed.
One of the missions is to level up one of Grim’s magic to Lv.5 and we suggest you start with his M1 if only to complete the missions faster, because you use Tuna Cans to level up magic and the amount needed for each magic is different. (To level up magic, just click on the 4th tab: 魔法Lv)
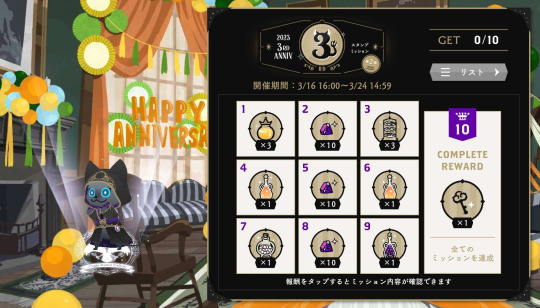
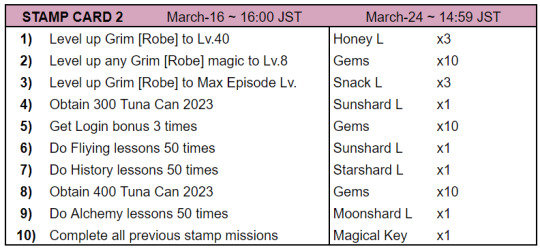
Stamp Card Info
On the bottom left of the Event Page you’ll see a Stamp Icon, click there and complete some missions for rewards.
The event ends on the 24th, but the First Stamp Card only goes until the 16th 14:59 (JST), so pay attention to the time limit.


The Second Stamp Card goes until the 24th 14:59 (JST)
Shop Info
In Sam's Shop, you'll find the following shops:
Anniversary Medal Shop

Extra Robe Grim copies will be available in the shop after you collect 500 Tuna Cans and make him permanent.
Anniversary Medals are obtained by pulling/rolling on the Anniversary Showcase. You get 1 medal per roll (10-roll = 10 medals), so you’ll need to roll 100 times to grab that beautiful Anniversary Magical Key and 150 rolls to get the Limited Rerun SSR Magical Key and choose any of the already released Birthday Boy SSRs, Union Birthday SSRs, and Event Rerun SSRs.
Tuna Can Shop
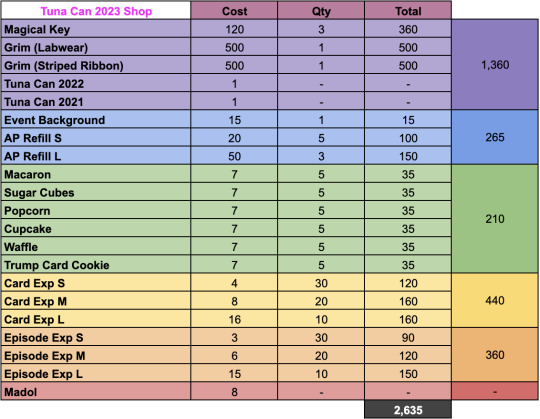
The Event Background will be available in the shop after Mar 18th 0:00 (JST)
Magical Key (Anniversary) Shop
The Magical Key (Anniversary) Shop has a list of all Birthday Boy and Union Birthday SSR Cards. Keep in mind that you can only pick one from the Magical Key (Anniversary) Shop
Magical Key (Limited Run SSR) Shop
The Magical key (Limited Run SSR) Shop has the following Event Rerun SSR cards:
Beans Azul
Groom Ace
Groom Idia
Halloween Cater
Halloween Jade
Halloween Vil
Gala Leona
Stargazer Deuce
Camp Ruggie
Halloween Riddle
Halloween Rook
Halloween Silver
Keep in mind that you can only pick one from the Magical Key (Limited Run SSR) Shop
Anniversary Pack Shop
For 200 Paid Gems, you can get a pack with the following:
1 Magical Key (10-Set)
10 AP Refill L
10 of each elemental Grimoire
20 of each elemental Textbook
100,000 Madol
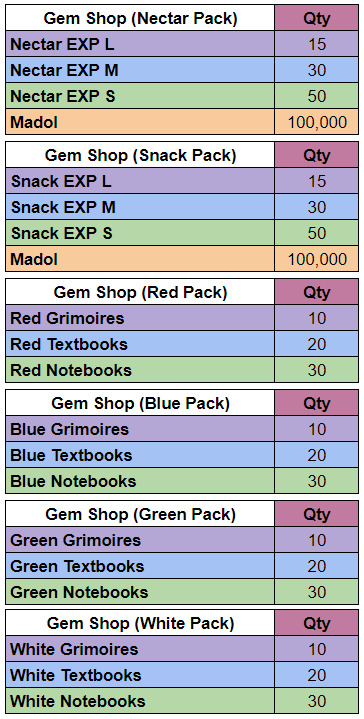
Gem Shop
Other Anniversary Packs are available in the usual Gem Shop for 50 Gems apiece:
188 notes
·
View notes
Text
Cosmic Basic SSS GET!
Ever since the JP 3rd Anniversary, the SSS Cosmic Basic score has been in our grasp. This post shows some of the first people who were able to achieve that hard-pressed score.
I took and used the team shown in that post to attempt it myself over the course of the past year to no avail. My Boa Epel wasn't MLB'd, so I was just lacking a little something.
So, with the 4th Anniversary, I decided to get the final copy of Boa Epel, raise his friendship to get him to Lv. 109, and go for it again!
(Lv. 109 for Epel, Rook and Idia instead of Lv. 110 because reasons)
The team composition and details are below the cut!
~🐬
Each Spell has been raised to Lv. 10. Buddies are all at Lv. 10. Kalim has the capability to go to 101, which I would have used if I hadn't been successful with this build.
Lo and behold!

A 20k score just barely scraped by.
This was a 3 turn kill, as follows:
Jamil and Kalim DUOs.
Epel's M1 raises his ATK, which will be crucial for turn 3. Rook's DUO hits.
Idia's DUO is debuffed by Leona, but this turns out to work in my favor, bringing the foes HP to just 332 HP. Epel's DUO overkills just enough to bring me past the 20k threshold.
Using the Buddy Bonus Calculator, we can see that the total ATK/POW of the team was 36,596.

This is in line with the ATK/POW of the teams shown by CECIL from the other post. This excludes the boost in ATK that Epel gets by activating his ATK, however.
I'm happy to finally be able to join the others who have successfully gotten SSS on Cosmic Basic, and I hope to be able to experiment with other teams to get there again next time, too!
24 notes
·
View notes
Note
hello!! just wondering if you guys know the specific nodes in the maps of the new crowley event that contain the gems/ssr perfume?
I'm glad this got asked before we got too far in so I could jot it down as I went along! Since the treasures cannot be gotten more than once, it's easy to miss which one gave which rewards.
The locations of the Gems and Perfumes of each Stage is under the cut
~🐬
Heartslabyul
Savanaclaw
Octavinelle
Scarabia

Pomefiore
Ignihyde

Diasomnia

#twst#twisted wonderland#mod jeido#twst gameplay#twst jp info#twst event info#i find it personally hilarious that crowley gets mike wazaowski'd on the dia map
34 notes
·
View notes
Note
Hello! I want to know if players get something if they clear all tsum lessons?
If you clear all the challenges, you'll get the following title to add to your player profile:

There is a second one you get if you just finish the story as well.
~🐬
21 notes
·
View notes
Note
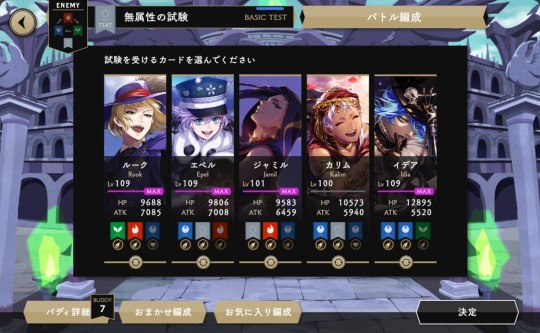
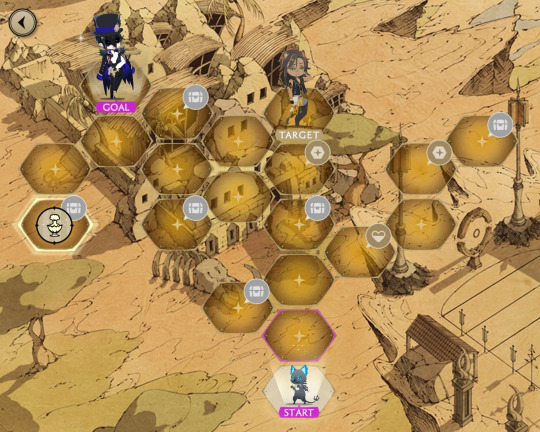
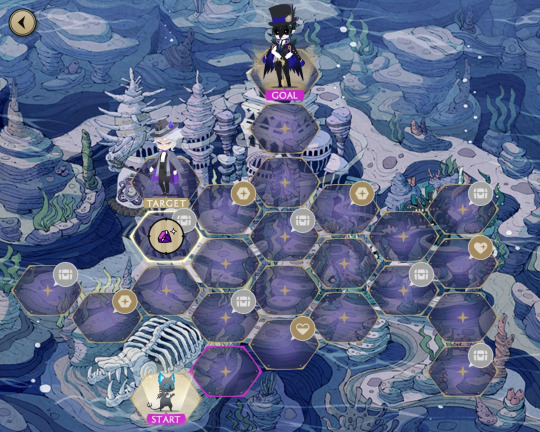
hi !! i was wondering if you guys could do a tutorial on how to counter book seven’s latest update? i’m having troubles in this little hexagon part (?) where you travel with general lilia and encounter parts of fighting using your chosen five characters’ cards. what happens when all my well built cards run out of hp? i could barely fight them off 😭 thank you all in advance!
For the first Battle Map you encounter, you can select three of your cards, but the other two must be Silver and Sebek. You'll also be given General Lilia at Level 70, Magic at Level 10/10 as a support card to choose if you'd like, even if you don't select him as one of your character choices. The second Battle Map is similar, with ten total characters, of which Silver and Sebek must be two, and General Lilia is an available support character.
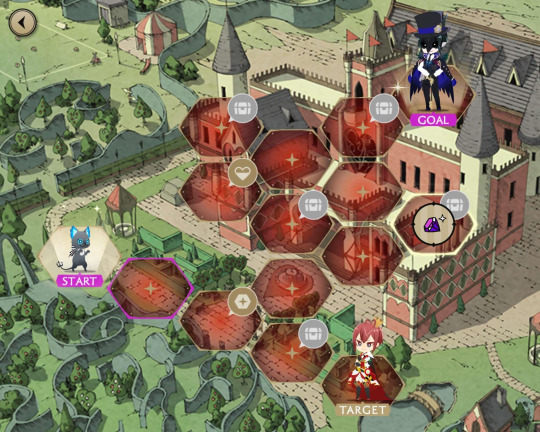
The general rules of the Battle Map are as follows:
Clear the Battle Map by moving along the spaces on the map.
To proceed to the next space, Misthium is required. One space uses one Misthium. Misthium recovers over time.
Some spaces give map effects to your side of the field. These will carry on for the rest of the Battle Map.
On the Battle Map, the HP of your cards will carry on to the next Battle. All received damage is evenly distributed among your cards used. If you are defeated, all cards' HP will fall to 0.
Cards can Recover on certain spaces, or with retry tickets, or gems. Cards that have 0 HP cannot be used in battles.
Retry Tickets, which can be bought in Sam's shop, will restore the HP of up to 5 cards that have been depleted.
Every space with a Crest will be a battle. A crest of the Silver Owls means will turn into a Draconia crest once the battle has been won.
The following crests are found on the map:


Map Effects: Some will say (BOSS) which means that it will take effect during the final boss fight. Otherwise, the map effects will help you in your battles.
Reward: These can be picked up on tiles with the treasure chest icon. However, you won't receive the reward until the battle map is completely cleared.
Story: Some spaces will continue the actual storyline of the Chapter, while others will have small side snippets.


There are Recovery spaces (half-filled heart icon) and Revive spaces (heart with plus icon). Recovery will heal 50% HP to five randomly chosen still available damaged cards, while Revival will give 50% HP to three randomly chosen knocked out cards.
Tips for crafting your team for the Battle Map:
Select characters that have good synergy together. Either by knocking out the enemy faster with DUOs, or by healing mid-match, or by increasing your base HP with the buddy bonus.
Aim to maneuver your way around the map and gather the map effects before too many battle encounters. Use the recovery spaces only when you absolutely need to recover your strongest cards.
Mix up your teams to have both your strongest cards and your mid-tier cards to let the mid-tier cards take the impact of the damage battle after to battle, but make sure to give yourself enough HP to succeed in the battles.
~🐬
86 notes
·
View notes
Note
Hello! So I’ve level 110 and groovified one of my cards before the anniversary update today in EN, and I was looking forward to the stat boost from uncapping 4 times. But when I checked today, it looks like my card’s stats match the “ungroovy” max stats rather than the full maximum that it should be? I checked some of my friend’s cards and theirs are the same way. Is this a bug or am I missing something obvious?
It looks like it is a bug of some sort.
I checked Robes Ortho in both JP and EN and saw that same discrepancy:
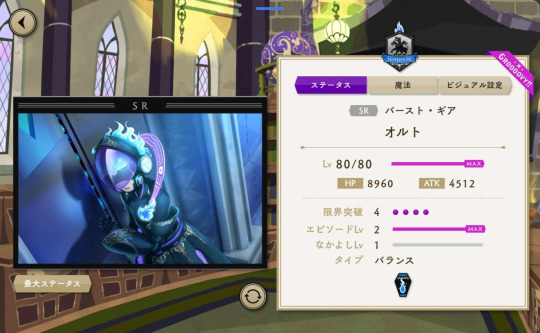

But my Robes Ortho were already max level, so I looked into an EN card that I could level up to match my JP account. I picked Lab Lilia and leveled him up from 57 to 60:


This time, they did match and both had the 20% boost. So, it seems that in order to show the boost in HP/ATK, the card itself needs to be updated in some way. This means that max level cards (like your Lv 110 cards) won't be able to be updated.
This may be a visual glitch only, but it may also actually be affecting the strength of the cards. Best course of action is to alert the devs using the form on the official website, so that they can fix the bug in a timely manner.
~🐬
22 notes
·
View notes
Note
Hey is there any info when the new features gonna be available for the Eng server?
Or do you can guess a certain time?
Well, so far the new features have been rolled over to the EN server during Anniversary events, including half-anniversary.
Since the 1.5 and 2nd Anniversaries caught up the EN server to the JP 3rd Anniversary quality of life changes, it may be a good assumption that 2.5 (if we have one) and 3rd Anniversaries may see the QoL changes we've seen up until the 4th Anniversary.
However, this is all speculation. EN is on its own schedule, and they could decide to drop everything tomorrow if they so wished. We'll just have to be patient and see when the new features come!
~🐬
14 notes
·
View notes
Text
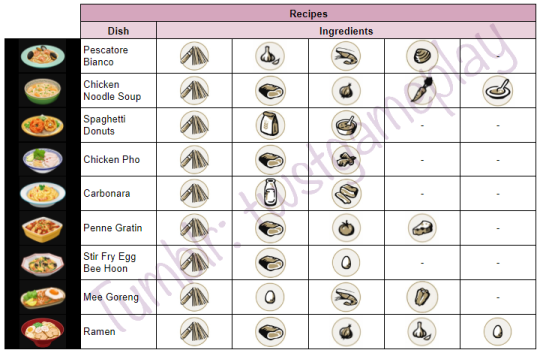
[JP] NRC Master Chef: Oodles of Noodles
From Jan 27, 16:00 - Feb 7, 14:59 (JST)

Event Info
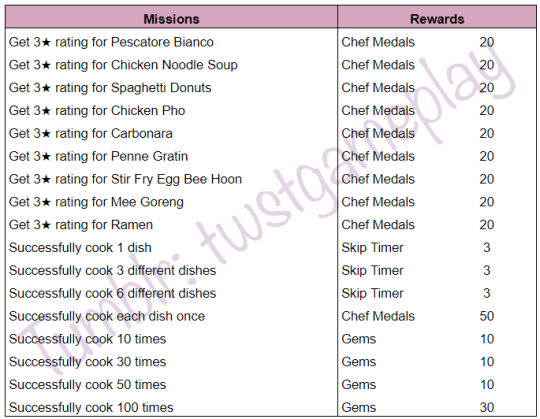
Send the boys on expeditions to gather ingredients and cook to receive Chef Medals.

The last 2 ingredient spots unlock by collecting 100 and 300 Chef Medals, respectively.
Apprentice Chef SR Floyd and Sebek have drop bonus of 20%, so take them with you if you have them.
There’s 3 quality types for ingredients: Gold > Silver > Bronze. The higher the ingredient quality, the better the score you’ll receive when cooking. It’s better to start cooking with low rate ingredients first, to build up skill.
Expedition durations are: 20, 60, 150 and 360 minutes. The only thing that changes is the quantity of ingredients you get, quality isn’t affected.
Recipes, Missions, Shops, and Skip Timer Info under the cut
Recipes Info
Remember to start cooking with bronze ingredients (to level up your dish skill) and gradually add in silver and gold ones.
Missions Info
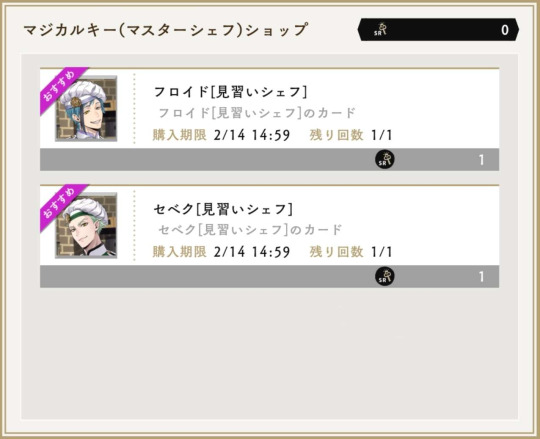
Shop Info

The Master Chef SR Key can be used to exchange for either Apprentice Chef SR Floyd or Apprentice Chef SR Sebek. The cards can also be obtained on the gacha event banner.
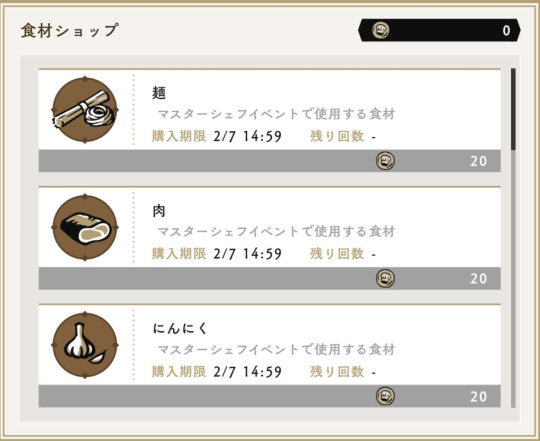
In addition, there is an Ingredients Shop that provides Bronze ingredients for 20 Master Chef medals each.
Skip Timers
Skip Timers can be obtained from event missions and also purchased in the usual Gem Shop (not the event shop). When you come to this screen of the Ingredient Procurement screen, you’ll see two golden buttons.

The middle left gold button will give you the option to spend a certain amount of Skip Timers to lower the time necessary to procure ingredients.
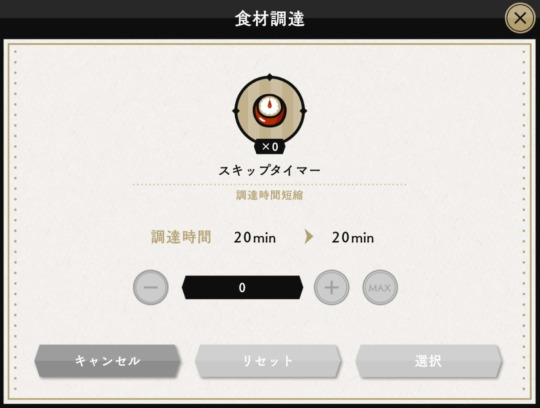
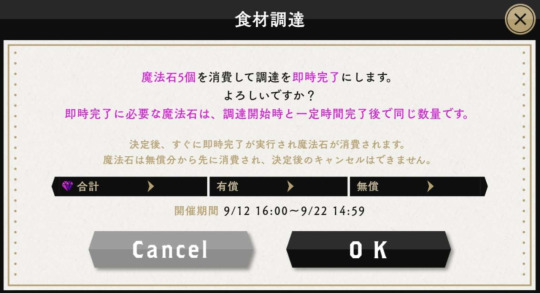
The middle right gold button will give you the option to spend gems to completely skip the procurement time.
Skip Timers will stay in your inventory after the event is over and can be used for future Master Chef events!
117 notes
·
View notes
Note
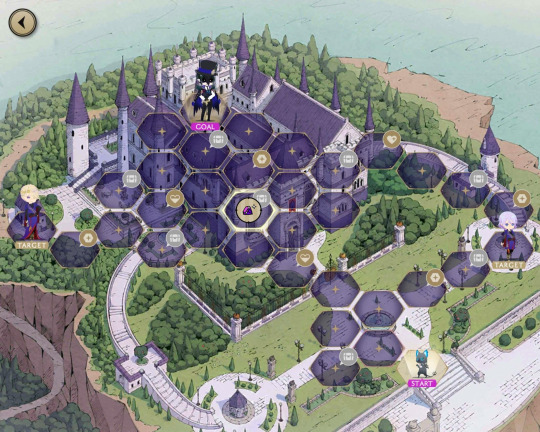
Do I have to clear all the spaces on the map to complete the missions for the event?
Not every square, but each section has three missions
Clear the map (get to Crowley beat him)
Defeat the labeled targets and clear the map (Targets are the other chibis on the map)
Clear X squares and clear the map (the X depends on the section)
For example, Heartslabyul has 15 squares, but X=10 for its mission. Diasomnia has 45 squares, but X=40 for its mission.
(Thanks to this ask, I realized that the missions image in our event post had a copy paste issue, so I've updated it!)
So you'll want to clear as many squares as needed for that third mission, and defeat the Targets along the way to Crowley!
~🐬
14 notes
·
View notes
Note
Hello mods! I play on EN server, and I got the SSR Grim card recently, but forgot to buy his paw candies from the event shop. As far as I know, the only way to get his candies is from event shops.
Is there any other way to get the candies, like Grim being a new addition to the Lab roster in the future? Or will I have to get the candies each anniversary and save up to groovify his SSR? TvT
Hello! Luckily for you, the Multi-Dorm Training Camp has just started. If you select Grim as one of the students, then you'll be able to get 2 paw candies.
The next time you can get Grim candies will most likely be when he’s added to the Alchemy section, aka the next anniversary. EN’s anniversary is in 2 months, so you can level his card and spells while waiting.
Afterwards, you can obtain Grim candies from alchemy.
~ 🐙&🐬
24 notes
·
View notes
Last Seen Blogs

3-birds-of-rhiannon
-she rules her life like a bird in flight-

orchid-mantis-petals
_Lu_Lu_

anastasia-ivanov-petrova
Dreamer

srchrmstrng
BeckFreen

a-pervert-guy
I like this!!!