#messing around with photoshop filters. its great !!
Note
hey! in your edits you do this really great text thingy (like the KILLER one in the elektra red white blood edit or LADY OF TIME & SPACE in the ciri edit). would you mind sharing what the style or whatever is called so i can look up a tutorial/giving a quick tutorial yourself? i've used something similar––liquify in after effects––but im new to photoshop and can't figure out how you got it to be so varied and shaded and like. realistic. thanks!
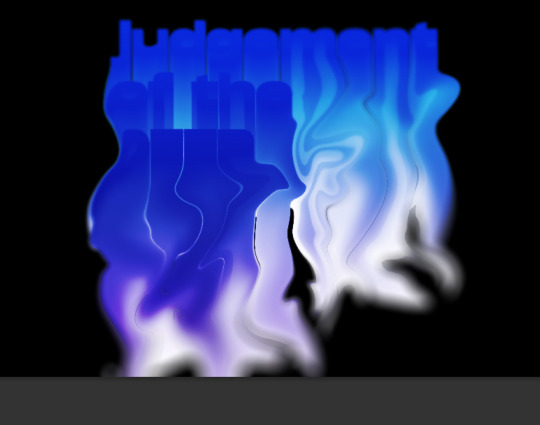
its exactly the same thing!! its under filter > liquify.
i only realised halfway through this that i used a terrible example because you cant read shit, but it does the job. just be careful w the areas you liquify and blend lmao
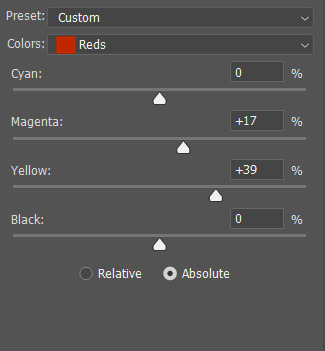
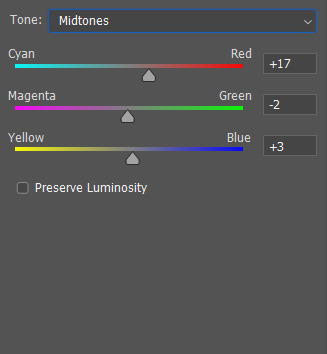
first off i use blend modes in illustrator and then dump that in photoshop and use the liquify filter. no real method to that. as the professionals say. mess w it until its all wiggly and shit
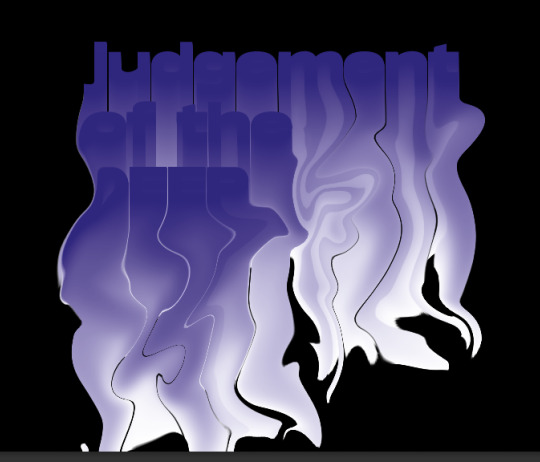
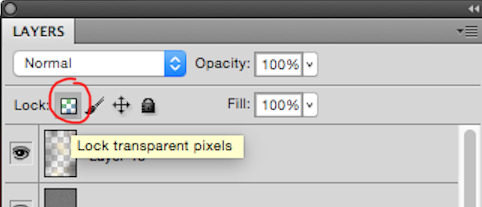
then in layer styles add a gradient overlay
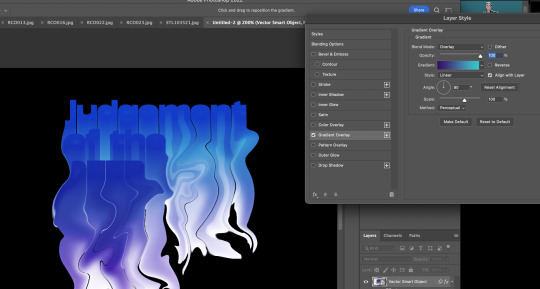
then i personally like duplicate the layer, add a few blurs to the outside edges of the layer at the bottom and then lower the opacity slightly of the unblurred layer on top.
sometimes, i rasterise it and use a very soft smudge brush set to low strength to just. drag it around slightly more
9 notes
·
View notes
Text
(You can find the set that this gif belongs to here 💙)
From planning to posting, share your process for making creative content!
To continue supporting content makers, this tag game is meant to show the entire process of making creative content: this can be for any creation.
RULES: When your work is tagged, show the process of its creation from planning to posting, then tag 5 people with a specific link to one of their creative works you’d like to see the process of. Use the tag #showyourprocess so we can find yours
I was tagged by @aheartfullofjolllly. thank you so much Pat! it was really fun to reflect about my own process 💗 You can find her post here and @lan-xichens' post that started it all here :)
Also thank you @huigusu 🥰 (who tagged me for my nie brothers set) I'll get to that one in a few days!
Now Pat gave me two sets to chose from to show my process, so obviously I chose the more complicated one :P
I only work in Photoshop CC 2018. I know that there are programs out there for easier cutting and sharpening but I have only just figured out how to do that in PS and I am too lazy to figure out any other programs right now xD
1. Idea and Planning
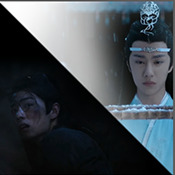
This set, like most of my sets with lyrics started with me reading the poem, clutching my heart and going "oh shit this fits my favourite characters!!". The idea actually started with me thinking that the first stanza of the poem would go really well with wwx during the burial mounds arc. Then I realized that the last stanza fits lwj better than him and from there came the idea to contrast the both of them next to each other. This is when I realized I wanted to do a dark-light contrast set, though I did not know that I would go with red and blue at that time. My idea in the beginning was just to do a black and white set
I was really impressed by how Pat said that she plans her sets around exact timestamps. Because I don't do that at all ^^ I just get ideas for which scenes would fit (in this case the wwx burial mounds scenes and lwj's kneeling and punishments scene) and then I watch the scenes to narrow them down.
Back when I made this set, I still used a screenrecorder (AceThinker Screen Grabber Pro to be precise. They have a test version that allows you to record up to 3 minutes) and recorded the scenes I needed from Netflix. This worked well enough but now I have the entire show saved on an external drive and it makes a world of difference when it comes to gif sharpness
Now, in this case I had to repeat this step once because when I was almost finished, I realized that I wanted a gif for the lwj corner but let's pretend I didn't do that and that's the way this gif was always going to look because otherwise this post will be way too long ^^
2. Creation
Short disclaimer: The creation process for this gifset was anything but linear. Multiple effects I used here were things I had never tried before. I just had a vague idea and tried to realize it through trial and error. So whenever I say "then I did xyz", it is implied that I ultimately went back to that step several times and changed stuff ^^
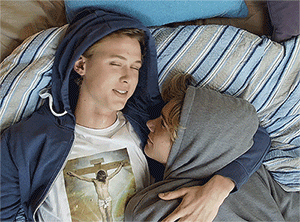
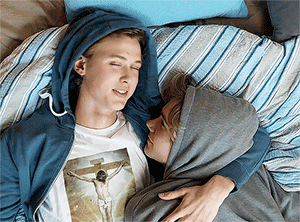
I started with the Wei Wuxian part of the gif. I usually use a frame rate of 0,06 (with some variation depending on gif length and size). I work in timeline so I converted all the layers to a smart layer. Then I resized the gif into a square, leaving big chunks of the gif empty (as can be seen below.) I flipped the gif horizontally, so he is looking inwards. This was simple because I felt it fitted the composition better. Then I imported the Lan Wangji part of the gif, again with a frame rate of 0,06. (Image 2)
After that I created a layer for masking in a separate PS document by rotating a square until it was point down (is that a rhombus?). I sized it to match my gif (540x540 pxl) and copied it over. (Image 3) a bit of masking magic and ta da! There's the basic layout (Image 4)
I put a layer of solid black behind wwx to get rid of the transparent bits (Image 5) and then started adding more white and black to both sides by adding solid whit and black layers that i put masks on and changed the opacity as i needed (Image 6)


("reading" direction: from the upper left to the lower right corner)
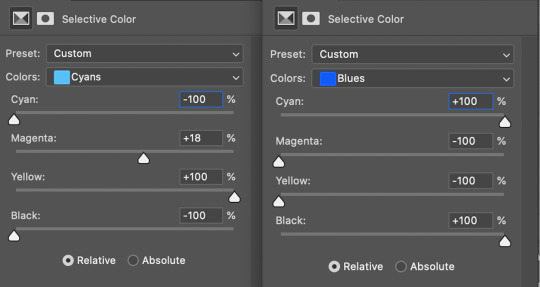
Then I fiddled with the colours a bit. The first thing I always do is using the curves layer to get more contrast. Then I use the colour balance tool and the selective colouring tool to get rid of that cql-typical cyan tint after that it's just trying to have it look "natural" while the colours still fit the overall scheme. This was difficult here because wei Wuxian’s side of the gif was very dark and when i turned up the saturation to see which colour dominated it was a very weird mixture of multiple colours. That's when i decided that I'd just go with red on his side, since lwj's side was already so blue and those to look great as contrasts.
After that just came a lot of fiddling with selective colour layers and brightness and contrast unti I has happy. There really wasn't much to it ^^. (Image 1)
After that I added the text. I knew I wanted the two lines to for a square of some kind. So I tried different fonds until I arrived at the one below. The two lines are in seperate layers so I could move them around and change the spacing between the letters until I was happy with the layout. I also changed the layer mode for the text to "difference" (is that what it's called in english? my PS is set to german sorry ^^), keeping their colour white. (Image 2)
I originally hadn't planned adding anything else but I felt like the gifs (plural because I switched between the gifs of this set) was still kind of empty and lacking, so I added the tear down the middle (a tutorial for that is either coming up later or already posted. I recently got an ask for this :)) (Image 3)
It still felt empty after that, so I tried different overlays. Okay no, first I wasted a lot of time on different free image sides but then I tried out different ones until I chose the one you can see in the finished gif. I liked that one because a) I felt the round shape was a nice contrast to all the straight lines already there and b) because once I applied a black and white filter to it and switched the layer setting to "difference" (again, i hope this is the correct translation) it looked a bit like a moon. (Gif at the top)
("reading" direction: from left to right)
And that's it! :)
Although in general, these gifs took so much fiddling! I went back and forth between them a lot and sometimes almost redid the entire thing because I had no idea what I was doing in the beginning and by the time I noticed an error, the only way to fix it was ti redo everything. So yeah, this set definitely is the the one that took me the longest out of all the ones I've posted so far.
3. Posting
I save all my gifs to my drafts first to see what they look like put together and to check if they look any different on mobile. Usually i do this several times and change stuff until I'm happd enough with it to hit post. Once i am happy enough, i can't hold back. Doesn't matter if it's at a time when nobody is online, i hit post 😅
And that's it!
Tagging:
@lanwuxiann for this gifset (I adore it so much. I've looked at it and read it severat times since you posted it and the poem just kills me every time!)
@suibianjie for this gifset (The combination of static images and gifs in your gifs is always absolutely perfect! This one is only my favourite of yours because the light coming from behind wwx is just so pretty!!! ^^)
@sweetlittlevampire for this piece (It was soooo hard to pick a piece of yours because I have so many favourites! But this one is just so out if this world, I want to know how you worked that magic :D)
@wei-gege for this set (sparkling shijie! 😭 that set is so incredibly beautiful! I love how you matched the colour of the overlay with her dress!)
@purplexedhuman for this set (your gifs are always incredible! I chise this one because it showcases both your colouring skills and some really intricate effects)
If any of you have already been tagged or don't have the time or energy for this, obviously no pressure to do this at all! 🥰
(btw, I originally tried to place the actual text of this under a "read more" cut but somehow it always messed with the order of the images, so this ended up as a rather long post. sorry!)
39 notes
·
View notes
Photo
so here’s my disclaimer: I hardly know what I'm doing. This is my glued together homemade giffing method that I’ve created over months of just random experimentation and bits and pieces from all kinds of tutorials. there are probably better or more correct ways to do a lot of these things! this also isn’t a completely universal tutorial, some of the specifics are geared towards giffing skam, specifically skam france.
I gif in photoshop cc 2020 on a macbook. Some things like keyboard shortcuts and little things about the photoshop interface will probably vary if you are on a pc/ other version of photoshop!
this is very long and very unprofessional, but I hope there is something in here that someone will find helpful!
we’ll be going from this:
to this:

up to date as of October 25, 2020
downloading clips
selecting what part you’re going to gif
cropping
my action for resizing, converting to a smart object, and sharpening
coloring
exporting and setting the delay
tldr tips
1. downloading clips
4k video downloader (which you can get for mac or pc here) is great for things posted to youtube, especially from skam france because all the clips are on their youtube with no weird geoblocks or anything! it’s really easy, you just have to open the clip in youtube, copy the link, and go into the program and hit paste link. I like to put on smart mode first and set the destination folder so all my clips go into the place I want.
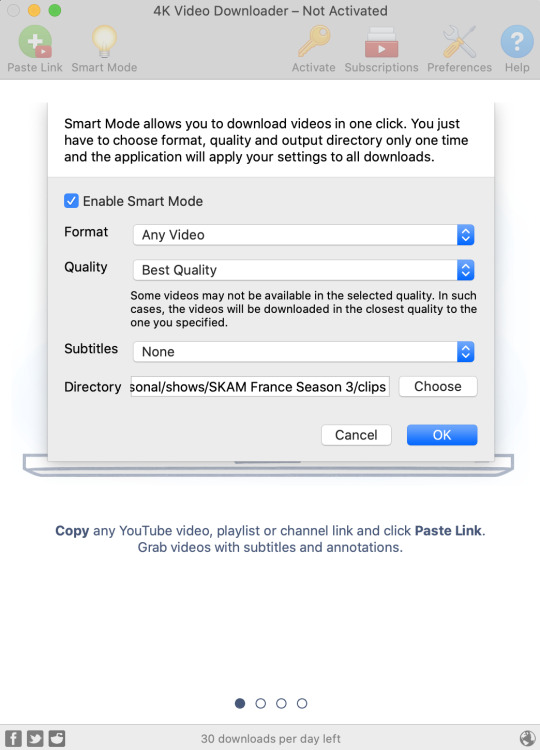
There is a 30 video per day download limit, so if you’re thinking you really want to gif lots of stuff from the show, and want a big chunk or a full season it’s definitely worth hunting for a mega or google drive with full episodes to download because it’s just less hassle! I might come back to this post later and compile a list of all of those, but for now if you type “[remake] no subs google drive” or “[remake] no subs mega” into a google search, you’ll probably find something! the all of skam website has no subs for several remakes, but not all!
If you don’t have enough space on your computer to be keeping full seasons, I know there are methods to get screencaps without having to download (generally for giffing movies and regular tv I think this is a common method), but I’ve never done it so I’ll redirect you to this tutorial that explains it! you should probably just go there for the whole thing tbh it’s much more coherent than this, but I digress.
2. selecting the piece of the video you want to gif
now that you’ve got your episode or clip you’ll want to just open it in photoshop! if you go the screen capping route the way to do that is a bit wonky, so you can keep following the tutorial I linked above and join back in here at coloring if you like!
if the timeline at the bottom doesn’t pop up automatically you can go to window > timeline and turn it on! now you can use the scrubber bar thing to find the moment you want to gif!
The advantage of this over screen capping is you can scrub with more precision. the arrows circled in blue below let you jump only one frame, where in screen capping I'm pretty sure you can only go by ten second or one minute intervals.
I usually drag the scrubber as close as I can to the start of the shot/moment I want to use, fiddle with the arrows circled in blue below to jump forward or back one frame at a time until I'm at the first frame I want. I move the left grey handle to the scrubber and then I hit the play button and let the whole shot/moment play. Pause and repeat the shuffling with the arrows until you’ve landed on the last frame you want to use and move the other grey handle.
the moment you want to use should be between your handles (it’ll look like what I have circled in red), and if you hit play, you should see the thing you want to gif playing on loop above the timeline. the speed will probably be weird, but we’ll deal with that at the end.

now I recommend doing command or control + s to save your gif as a psd (photoshop document). this is a working, editable file which means if photoshop crashes you can open your file right back up and keep working as long as you’re hitting command or control + s at regular intervals as you work. later we’ll go through exporting in gif format that can actually be uploaded to tumblr.
3. cropping
next I crop out any logos or black space at the top and bottom. Just click on the crop tool on the lefthand side of the screen, drag the edges and hit enter when you’re done. you can of course crop out more than just that, but regardless of what you crop out, now is the time to do it.
you can set an aspect ratio for your crop at the top of the screen if you’d like to be positive that all the gifs in your set will be the same:

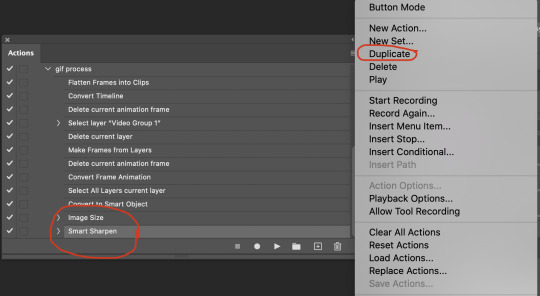
4. my trusty action: resizing, converting to a smart object, and sharpening with one click
Now is when I use an action I made that does all the resizing, converts to a smart object, and sharpens. I’ll take you through the steps so you can conceptually get what’s going on, but I highly recommend using the actions window to record your process as you follow along so you have this action as well. It easily shaves at least 5-10 minutes off of the whole process, and these steps will be the same every time.
here’s how you make an action: go to window > action and open the action panel. click the plus symbol to start recording a new action:
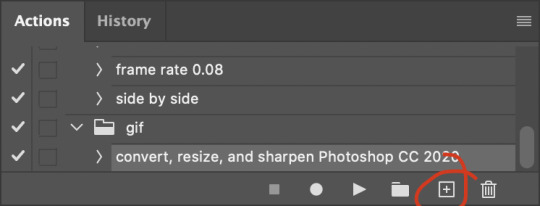
in the window that pops up, give it a name and hit record:

now just continue with the steps below, and it will save them!
first you flatten frames to clips (I think it says flatten to layers on older versions of photoshop). this is in the menu at the top right corner of your timeline:
next you convert to frame animation by clicking on the symbol in the bottom left, circled in red:
if there is more than one thing in the frame animation, delete the extra one. you don’t need to keep the last one but it won’t let you remove it until there are other frames in there. also go into your layers and delete video group 1 and its contents. don’t ask me why these steps are necessary, I don’t really know, but I’ve noticed it sometimes gets wonky if you don’t do this:

now you want to make frames from layers and delete that first frame that was there before:
then we return to the timeline:
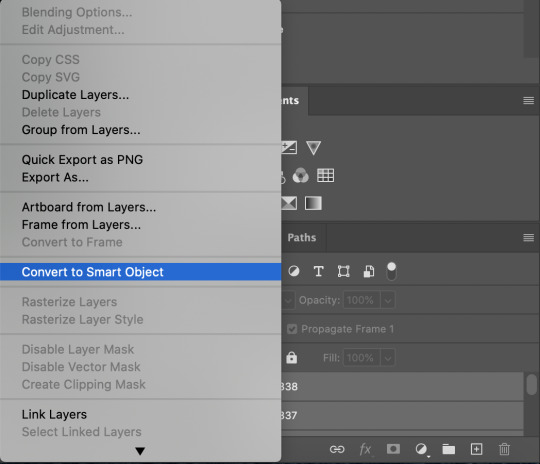
use command + option + a (control + alt + a for pc I'm pretty sure) to select all layers and then right click within your layers window and select convert to smart object. It’s important to convert to smart object after you go back to the timeline, or the gif won’t move:
next I resize. gifs for tumblr should be 540 pixels wide. for recording your action you should just go into image > image size and only change the width to 540 in case you ever have gifs cropped to different aspect ratios. don’t touch the height, let constrain proportions figure it out!

now, here’s what our base gif looks like, no sharpening, no coloring:
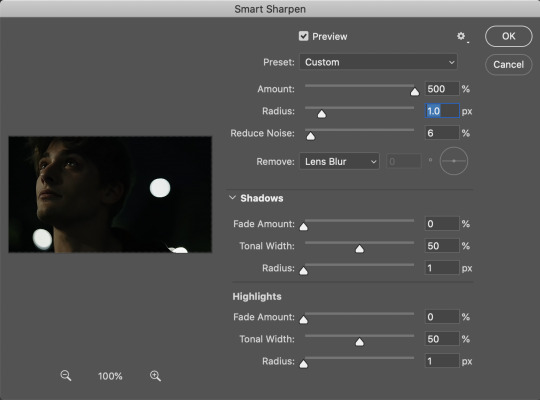
now to sharpen. go to filter > sharpen > smart sharpen. this is up to personal preference, but my go to settings are:
this is what we have after sharpening:

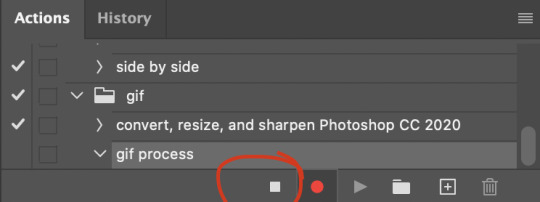
now is when you can stop recording your action.
just press the stop button in the action window:
this action is pretty much universal and after I select the moment the gif will be and crop however I want, I use it on every gif I make! so although this initial setup is tedious, now you’ll never have to do these steps again, and the process is magically much quicker.
5. it’s time to jump into coloring!
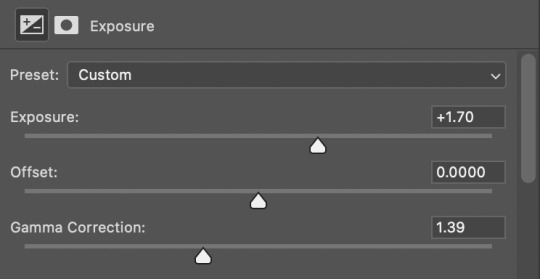
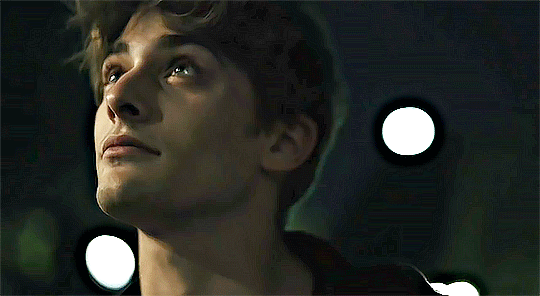
I typically start with exposure and sometimes some brightness/contrast. with really dark gifs like this, you kind of have to make it worse before you make it better. I did this:
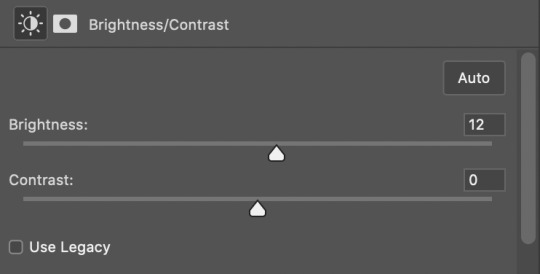
now the gif looks like this:
we have some static and some ugly bits, and this is where selective color comes in to fix it! boost blacks like this:
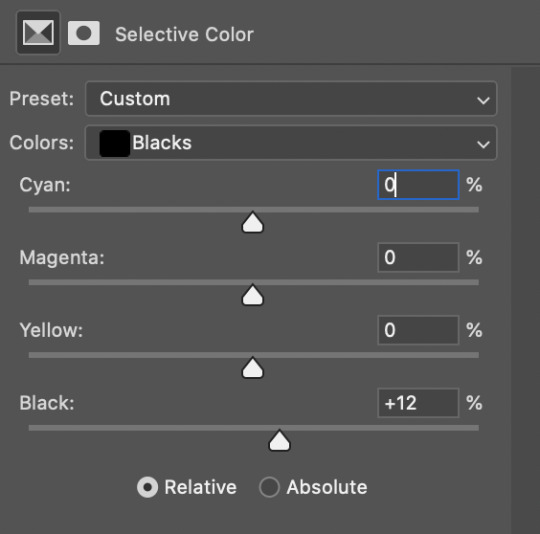
and now your gif looks like this:

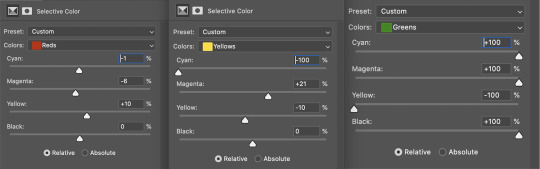
the skin tone is looking a little sickly and weird, so I go into the yellows and reds in my selective color layer to fix it! I also messed with the greens here because I didn't want color in the background (that part is totally optional and just up to your preference):
now we have this:
to really take the color 100% out of the background, I did one more separate selective color layer for cyan (again, I just felt like it but this is optional!):

and now the finished gif:
there’s lots of fun extra things you can add like text and tints and overlays and all that I won’t get into, but feel free to reach out for help on those types of things!
this gif was certainly not the most complicated to color. some ridonkulously dark clips (*cough cough* vendredi 20h27 *cough cough*) take tons and tons more effort than this and a lot of the time you’ll want to use color balance layers and vibrance layers and all of that to mess with your coloring.
with all of this coloring business, I really just learned by doing. I don’t know all the technical purposes of each type of adjustment layer, and I tend to stay away from curves just because I find them confusing and annoying. The bottom line is that you should always experiment and find out whatever coloring works for you and run with it! I’m sure every gif maker you talk to does things at least a little differently!
I highly recommend taking the time to go through all the types of adjustment layers and just move the sliders around to see what they do! That’s honestly one of the best ways to learn and decide what you like!
6. now to export and adjust the delay!
the keyboard shortcut for exporting on mac is command + option + shift + s, control + alt + shift + s for pc, otherwise you can go to file > export > save for web
my settings are here:
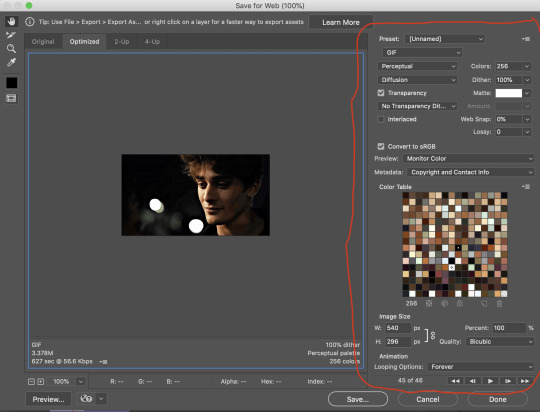
the settings only need to be configured once! otherwise just hit save and follow the pop ups to choose where to save and what name you want to give your gif. Since you saved as a psd way back, that will be the name it’s automatically given, but call it whatever you want!
then I adjust my delay by opening the gif I just exported (not the psd, the .gif file) and using one of my delay actions. I’ve made an action for each delay between 0.05 (real time) and 0.08 (really slow mo for certain super short shots, typically for more ~artsy~ sets).
all my action does is select all frames:
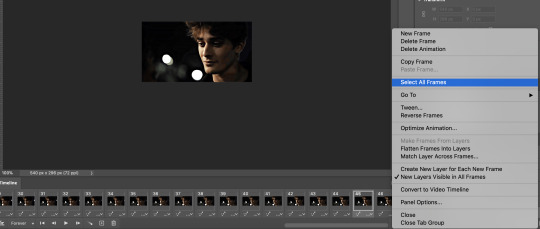
adjust the delay (which will differ based on whether you want them slowed down and by how much):

for reference, this is a 0.05 delay:
and this is a 0.08 delay
now you just export the same way you did before!
remember if you’re recording this as an action, you don’t want to touch the file name, just say yes when it asks if you want to replace the file. if you always save your gifs to the same place, your action will now enable you to override any gif with the incorrect delay with the correct one with one click!
7. tldr: the main tips
for downloading 4k video downloader works well for non geoblocked youtube videos, the all of skam website is another place you can look to download with no subs, here’s the screen capping method if you don’t want to download
The main way I combat dark lighting is to bump exposure to the right, gamma correction to the left, and then enhance black in a selective color layer. The amount of these three adjustments will vary gif to gif. I know lots of people use curves, but I find them really confusing for some reason, so this is my method! As my graphics teacher likes to say: there are always at least 3 different ways to reach the same result!
there’s a little bit of additional coloring on this one, but here’s another before and after example so you can get an idea of how those steps get you a better lit result without making the lighter parts super over exposed:

besides those three steps, you have free rein to use the other selective color channels, as well as color balance, vibrance, hue/saturation, etc. to restore color that was lost or to change the colors altogether! mess around with it and have fun experimenting!
7a. bonus coloring tip:
sometimes you can make use of selective color to completely alter an isolated color in your gif. You can get very adventurous with this, but here's a simple example of changing blue tones to teal (I got away with these gifs being longer because they were in rows of two in the set I posted them in. I'm too lazy to trim frames so I can put them here at 540 px without going over the 10mb limit so just ignore the quality ok):
7b. actions, actions, actions!
if you find yourself doing a certain thing over and over, always record it as an action. the amount of time they will save you is honestly really impressive.
You can duplicate actions, so, for example, if you have different sharpening preferences for different shows or scenes, you can duplicate your gif process action and go into the steps, double click smart sharpen, and alter it however you want!
This could also be good to do for the different widths for tumblr if you ever do sets with rows of two or three! Duplicate actions is also how I made my actions that set delay at 0.05, 0.06, 0.07, and 0.08!
when in doubt, always make an action! it’s worth minimizing the tedious bits of the process as much as possible so you can focus on the fun part of seeing your awesome gifs come to life! any little task you find yourself doing often, make an action!
and for now that’s all I have. if any of this made no sense, if you want to suggest a correction or addition I could make, if you’re ever curious how I did something on any gifs I post, or if you have any other sort of questions, feel free to send me an ask or a dm! if I can’t answer your questions I’ll be happy to try to direct you to someone who can or a tutorial to help! again, I'm no expert, not even close, but I hope at least one person will find one thing in this mess that helps.
#this got . so long omg#mystuff#mytutorial#gif tutorial#tutorial#resources#fellow gif making peeps feel free to correct me or give input on how to improve or add to this tutorial!
31 notes
·
View notes
Photo

@beomgyutie was asking me about giffing with topaz and i couldn’t find a tutorial that was similar to how i gif and me being me i decided to be Extra and just make a whole tutorial for it! tutorial under the cut
things you will need:
photoshop (i’m using photoshop cc 2018, but i’ve used this same/similar process on cs6)
topaz plug ins clean and denoise downloaded and installed
downloaded video to gif in the highest quality you can find
side note: i’ve seen people say “don’t bother giffing something if it isn’t at least 720p”, but like that isn’t always practical or possible. so just find the video in the highest quality you can
.ts files are the way to go for giffing live stages! you can find a really great guide for how to find .ts files here.
one of the main things that determines gif quality is the video quality of what you’re giffing, so it’s important to use the highest definition you can!
if you’re interested in seeing my vapoursynth process you can see it here! the tutorial i used to learn how to use vapoursynth has been deleted, so if you would like a more detailed explanation let me know!
also i did not include how to add text or how to blur out part of a gif, so send me an ask if you’d like help with it!
all right so here we go:
1. figure out which part(s) of the video you’d like to gif! people do this in lots of ways; i usually watch the video through then make notes of what time stamps i want to gif.
2. open up photoshop and go to file -> import... -> video frames to layers
3. this window will pop up with your video! use the little slider things i’ve circled in red to select where you want your gif to start and end. don’t worry about it being too exact; we’ll narrow it down further in a minute. make sure that the limit to every x frames box is NOT checked!

4. it will create a frame animation from the clip you’ve selected. now you can trim the gif down even further and get the exact moment you’d like to gif by deleting frames from the beginning and/or end of the animation. i usually aim to have between 60-80 frames in a gif. keep in mind that bigger gifs mean bigger file sizes, so if you’re going for a big gif it might be best to go with fewer frames. (ex. if you’re making a gif that’s 540px by 400px, aim for 60 frames to help keep the file size down)

5. tbh it doesn’t matter when exactly you crop your gif in the process, but i usually crop and resize it at the beginning. i ended up cropping this gif again at the end too, so it really, truly doesn’t matter when you crop it.
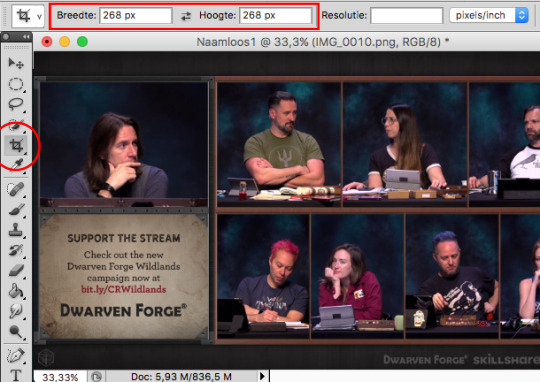
you’ll also want to make sure your gif fits the current tumblr sizes for photosets which you can find by googling. the main ones i keep in mind are 540px wide for one gif per row and 268px wide for two gifs per row. for posting purposes, the height is not as important as the width, so don’t worry too much about the height.
you can crop the gif to whatever looks good to you then go to image -> image size and change it to the appropriate width. make sure you’ve clicked the little chain/handcuff looking button so your height will also be adjusted to maintain the height to width ratio!

6. next we’ll need to convert the frames into a smart object in order to sharpen and use topaz. click on the three bars just above your frame animation to select all frames, and also select all of your layers by using shift + click on the first and last layers (you can see the layers in the bottom right corner of the second image). you’ll want to make sure every single layer and frame is selected, otherwise part of the gif won’t be converted into a smart object.

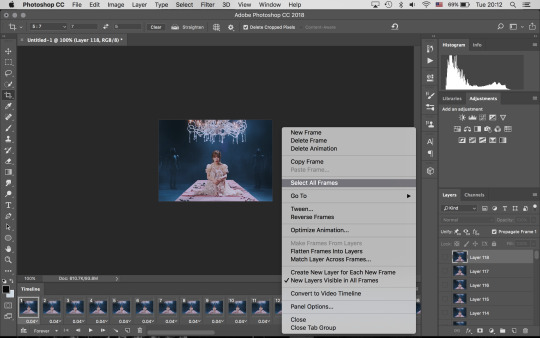
7. convert frame animation to timeline animation by clicking this button i’ve circled in the bottom left corner

you’ll want to make sure the blue play head button thing is at the very beginning of the gif before continuing

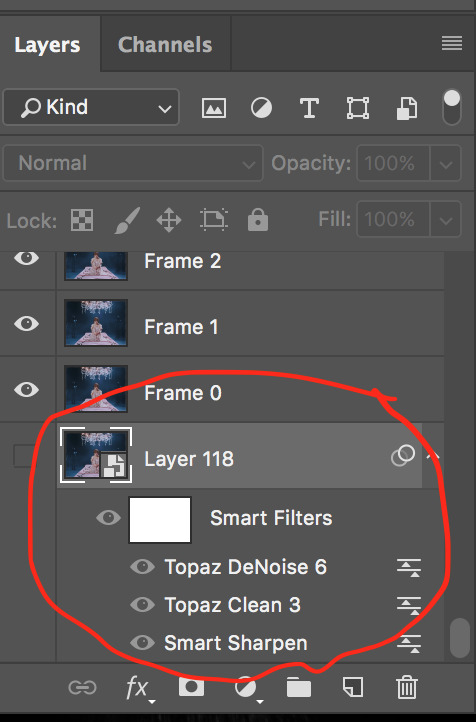
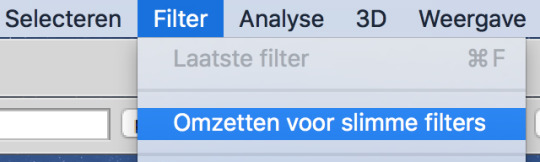
8. click filter -> convert for smart filters and your smart object will be made!
9. next we’ll use smart sharpen to sharpen the gif. go to filter -> sharpen -> smart sharpen, and this window will pop up. these are the settings i use for every gif, unless it is a lower quality video in which case i will turn down the amount percent

10. now it’s time to use topaz! i always start with topaz clean for whatever reason, but regardless you’ll go to filter -> topaz labs -> topaz clean. there are two settings i choose from that i’ve saved as presets. for this handong gif i chose the first settings. you can compare the settings with the unedited version by clicking the original button at the top of the preview window.


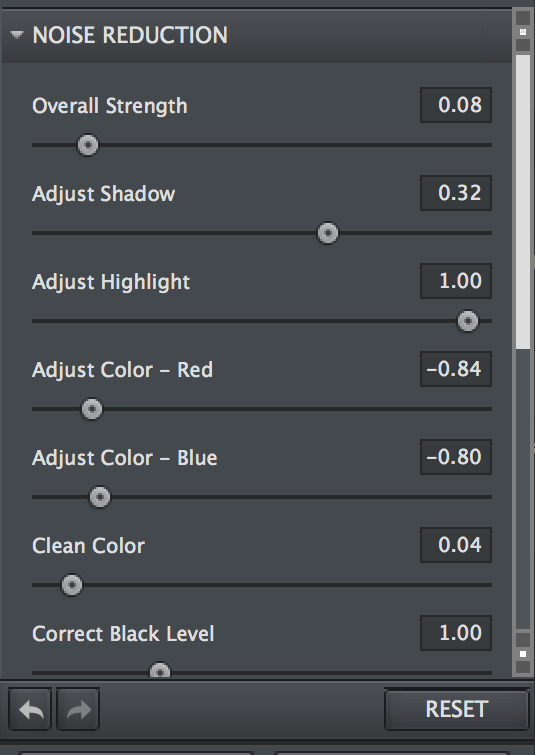
11. next up is topaz denoise! same process as before: filter -> topaz labs -> topaz denoise. i always use these settings but adjust the overall strength. i usually end up somewhere between 0.03 and 0.05.

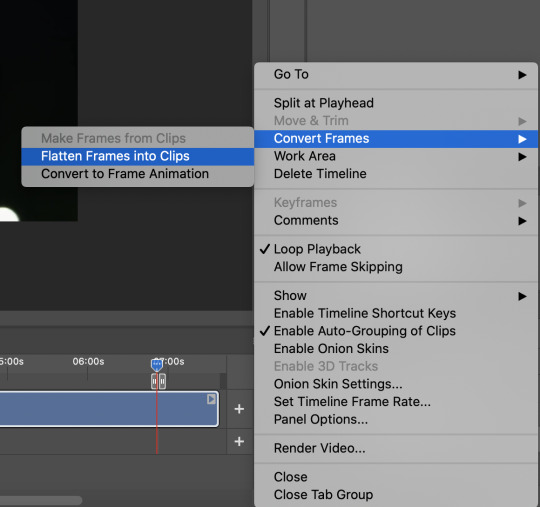
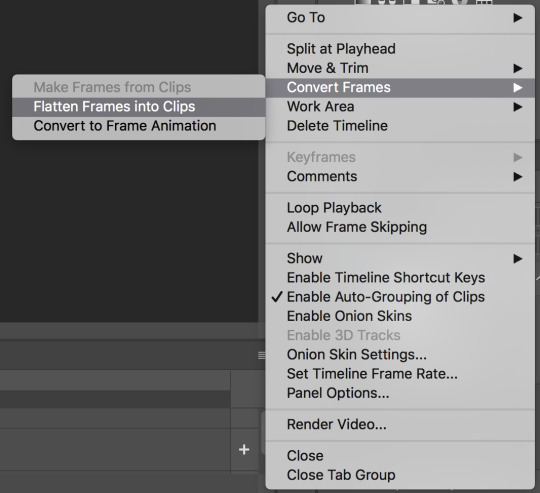
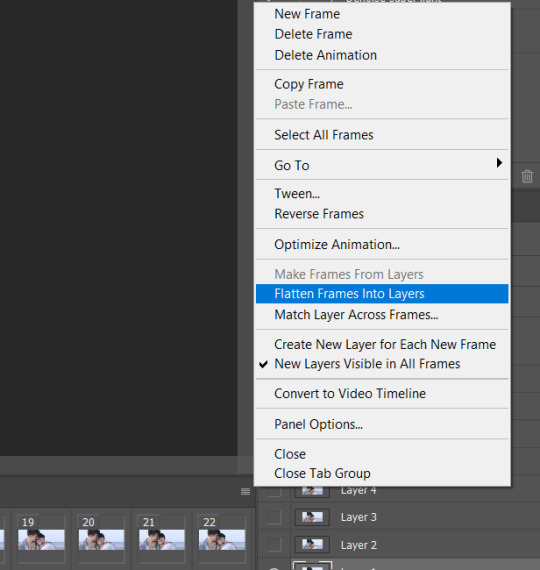
12. now we’ll click on the three bar menu again and select convert frames -> flatten frames into clips. do NOT touch your computer while it’s processing!! topaz is a finicky creature, and we cannot upset it while it’s working. there’ll be a progress bar so you can have an idea of how far along it is in the process. it does take a while, so be patient!
13. the process of flattening frames back into clips creates an extra layer that we don’t need, so go ahead and delete the layer where you can see all the smart filters we’ve just applied listed. it will be at the very bottom of the layers list, and also the only one labeled layer (you can see the rest are called frames now) as well as the only one that’s hidden (aka it doesn’t have the little eye icon to the left of its name)
14. for the moment we’ll still be in timeline animation, so we’ll want to click on the three squares in the lower left corner to go back to frame animation

15. you should only see one frame in the animation window for now. click on the three bar menu again and select “make frames from layers” and we’ll have all of the frames we started with back except this time with sharpening and topaz-ing!
16. using the three bar menu again, you can select all frames then adjust the delay between frames (aka the timing!). once the frames are selected, click on the little arrow next to the number underneath one of the frames (doesn’t matter which one as long as they’re all selected). then you can choose a preset time or enter your own. my gifs are usually 0.04, 0.05, or 0.06. for this handong gif, i went with 0.05.

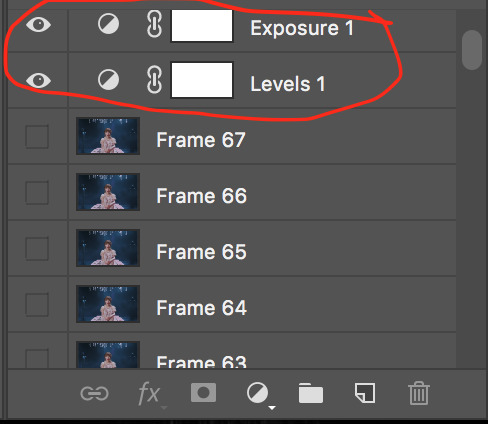
17. now you can add coloring! i’m not really going to get into how to color, but you can either find psds (aka premade colorings) that creators have shared on tumblr as a starting point or just mess around with different editing layers (like levels, selective color, curves, etc) until you land on something you like. when coloring while in frame animation make sure you drag the editing layer to the top of the layer list so the coloring is applied to all the frames!
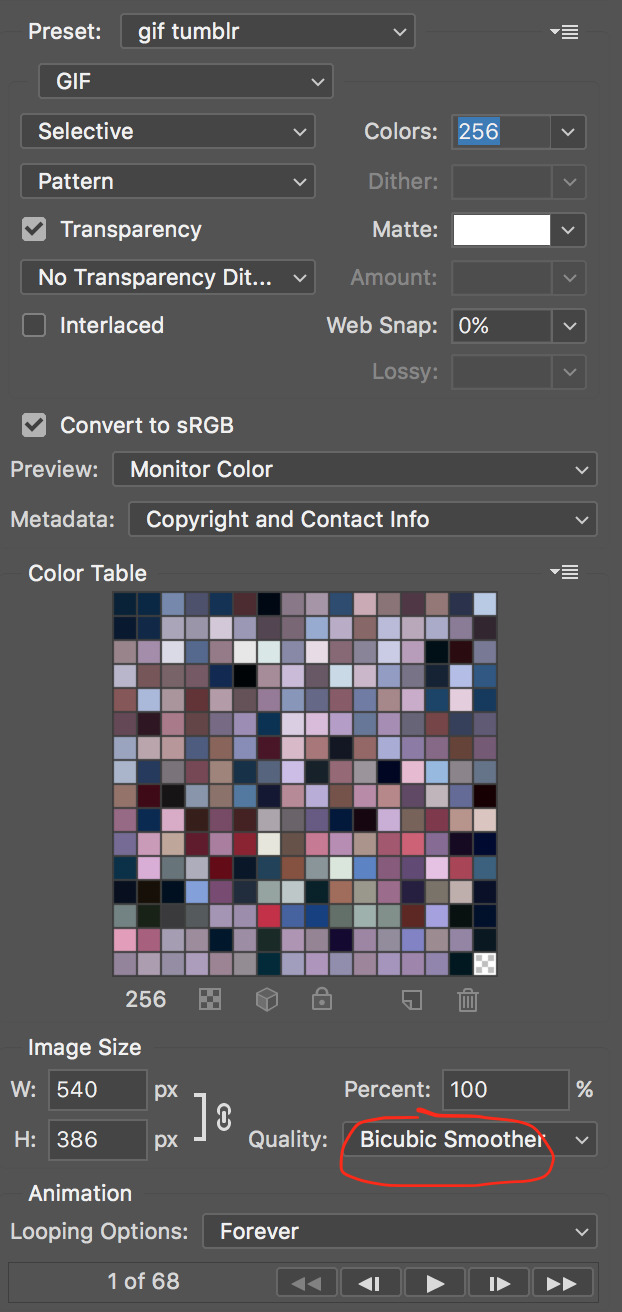
18. now we can export the gif! i use save for web and these settings. sometimes i will change the quality (circled in red) from bicubic smoother to bicubic sharper, but i usually leave it on bicubic smoother
19. and now you can upload it to tumblr and you’re done! here’s the final result without text

let me know if you have any questions!
#gif tutorial#mine#tutorial#i'm not the best gif maker in the world but i'm pretty happy with how my gifs turn out so yeah#also i am v sleepy so i hope this makes sense ;alksdjf;aslkdjfas#giffing info
57 notes
·
View notes
Text
part II: creating gifs in photoshop
how to make critical role gifs (a tutorial)
masterpost || part I
The method I use for giffing is the > Load files into Stack method. What this means is that you take screencaps of videos and load them into Photoshop to convert them into frames. In this part I'll teach you how to make gifs in Photoshop using screencaps.
NOTE: my Photoshop is set to Dutch but I explain everything in English in text (also because of context clues I’m sure most of it will be self-explanatory anyway).
what you’ll need:
Photoshop (I use an old CS5 version).
Screencaps to make gifs from.
(if you don’t have photoshop maybe take a look at this list)
loading files into stack
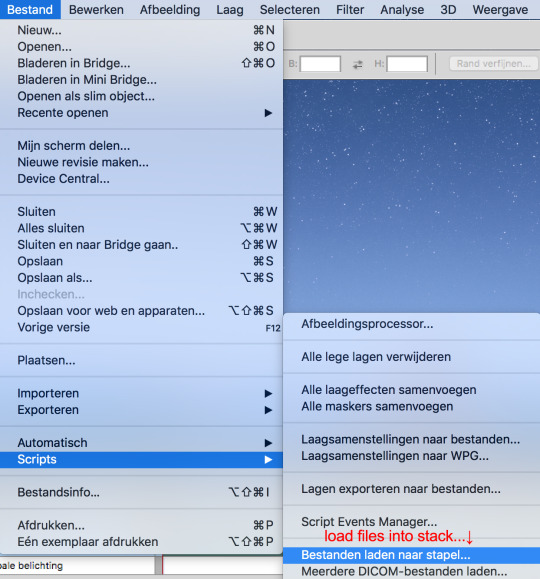
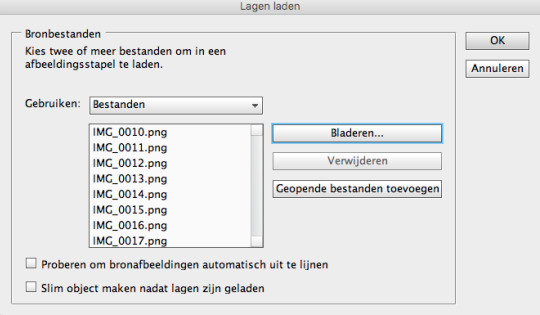
The first thing you need to do is open the screencaps in Photoshop but because we want them all in one file we don’t just go to File > Open and select them. Instead we do this:
Go to File > Scripts > Load files into Stack
Click Browse
Select all the screencaps you want to use for your gif
Click Open (I typically use anywhere between 50 and 150 screencaps in one gif)
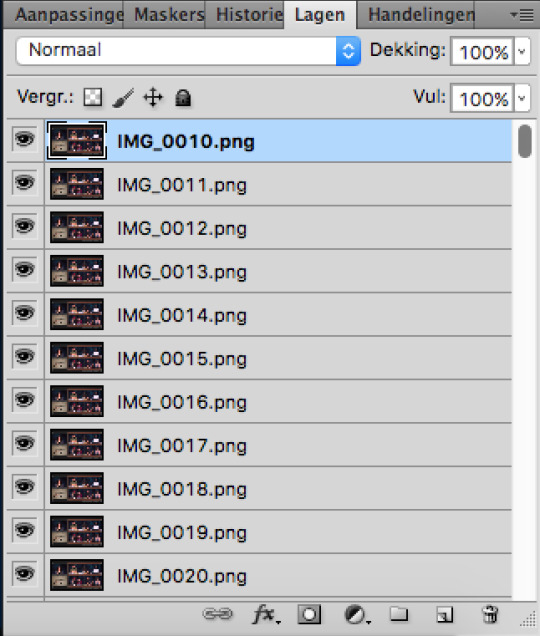
Click OK and wait for them to load (each screencap will load as its own layer which will make it a lot easier to make small adjustments)
Once it has finished loading your layers should look something like this
making frames from layers
Go to Window > Animation (or Window > Timeline depending on what ps you use) and make sure it’s checked
Your Photoshop should look like something like this
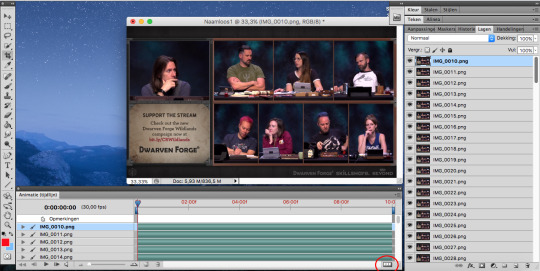
Click on the three white boxes on the bottom circled on the image above (Create Frame Animation or Create Video Timeline)
Your animation window should now look like this

In the top right corner of the animation window you will find an arrow pointing down with lines next to it (circled in the image above)
Clicking on it will reveal a list
Click Make Frames from Layers
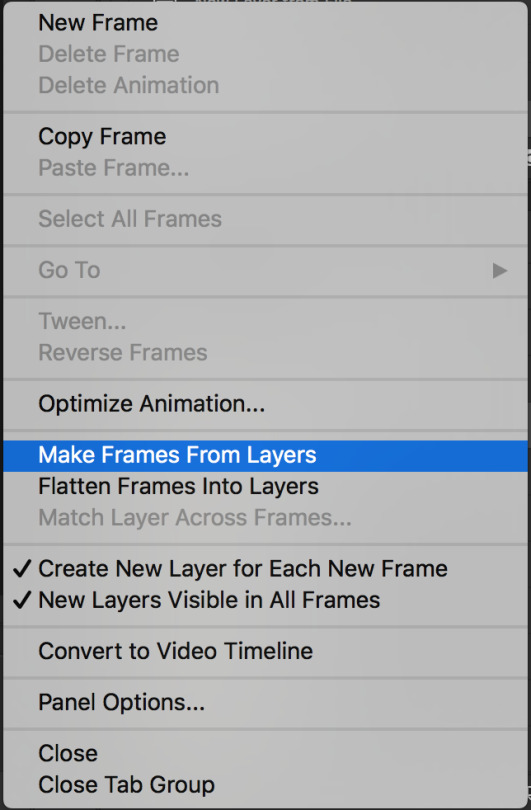
Your layers will appear as frames in the animation window but they will be arranged backwards
Click on the same icon again (arrow pointing down next to the lines)
Click Reverse Frames
Your gif will now play correctly if you press the play button in the animation window (bottom left)
cropping
We have our base but it’s obviously way too big to properly work with and I want to focus only on Travis’ face. To know what size to crop to you have to understand Tumblr dimensions; this image is a clear and easy reminder of what they are.
Note: height is less important and can be messed around with more than width. If you upload a gif that doesn’t follow the width dimensions tumblr will resize it and you will lose some of your quality.
Most of the time the gifs I make are 268px by 268px though I would recommend you play around and find your own preferred sizing after you get a bit more comfortable.
Select the cropping tool on your tool bar
Enter the dimensions you want where it says Width and Height
Crop the image
timing/looping
The timing of your gifs helps control how fast or slow your gif moves.
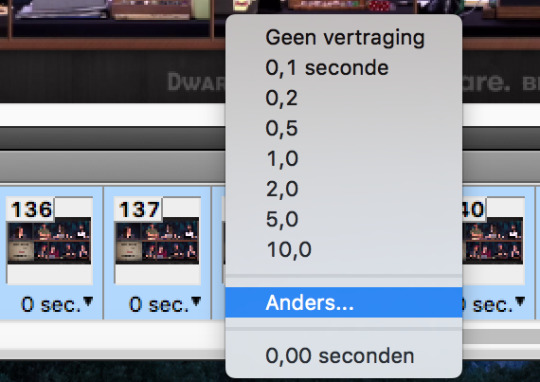
Click on the arrow pointing down next to the lines again (top right corner of the animation window)
Click Select all Frames
Click where it says 0 sec. on any of the frames
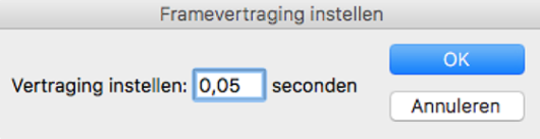
Click Other...
Set Delay 0,05 seconds
(0,05 or 0,06 is what I have found works the best for my screencaps; if you use a different method for getting screencaps or want to speed up or slow down your gif you could change this to whatever you prefer)
Click OK
Next we’re going to change the looping setting to make sure your gif doesn’t stop after playing one time.
Click on where it says Once in the bottom left corner
Select Always
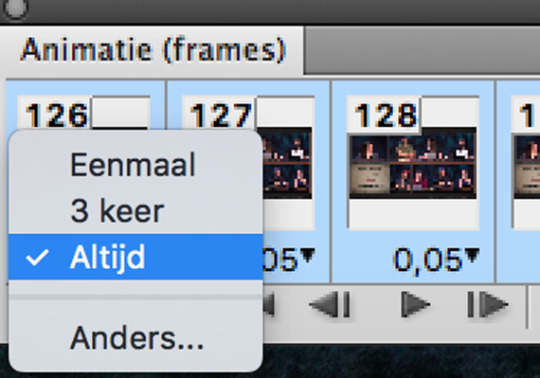
My gif now looks like this:
At this point you should delete any of the frames you don’t want to keep in your gif (select a frame you wish to delete and click the little trash icon on the bottom of the animation window). I have a tendency to use a few more screencaps than I actually need to because I want to make sure I get the exact moment I wanted and now is the time to get rid of any excess ones.
Go through your gif, let it play a few times and figure out if you want to delete a few frames here and there (I only ever delete frames from the beginning or the end so as not to mess up the flow/smoothness of the gif). This is the last chance you’ll have for this.
convert for smart filters
Congrats you have made a basic gif! If you’re like me you maybe want it to look a little bit prettier and a little more polished though. The main ways to accomplish this is to sharpen and to mess around with the colouring a bit.
Now there’s a lot of different ways you can go about this but I like to do it with my frames/layers converted for Smart Filters so that I don’t have to go through every frame one by one.
Go to Select > Select all Layers
Select all Frames (arrow pointing down next to the lines > Select all Frames)
Click on the rectangle in the bottom right of the animation window
Go to Filter > Convert for Smart Filters
Your animation window and layer panel should look something like this

Check if your gif still plays when you press the play button in the animation window just to make sure nothing went wrong. If it is not playing go back (Edit > Step backward) until you can see all your frames and layers once more and try again
sharpen
Now we can sharpen the entire gif in one go. You can use an action if you have one but if you don’t this is the easiest way to easily sharpen your gif.
Go to Filter > Sharpen > Smart Sharpen
Copy the settings on the image below (you can play around with the radius if you’d like; 0,3px also works)
Click OK
My gif now looks like this:

colouring + resources
This is where you can play with the colouring a little bit if you wish to. Either you can use a PSD (a pre-existing colouring) or create your own colouring. When using a PSD created for another show please keep in mind you will probably have to do a lot of adjusting because of the way cr is filmed.
Here are a few tutorials on basic colouring in Photoshop: one, two, three.
And here is a list of places that offer some great PSD’s to download:
drunkandcoloring
flawless-psds
itsphotoshop
psdsfaves
For my own colouring I usually play around with Curves, Levels, Selective Colouring, Vibrance and Color Balance.
If I get to it I will clean up my own critical role PSD’s and upload them for public use and insert a link here.
text
Though not needed for this specific gif a lot of Critical Role gifs do depend on subtitles. Here there is a quick and easy tutorial on subtitles for anyone who needs help using the Text tool.
save for web and devices
Your gif is smooth, the colouring looks great and now it’s time to share your labor with the rest of the world. Saving gifs is a little different than saving other files because we want them to move when uploading. If you were to simply click save right now you would have a nice PSD file that doesn’t move and you can’t upload anywhere. That’s where saving for web and devices comes in.
Go to File > Save for Web and Devices
A window should pop-up, again there is a lot of room for messing about and finding what works for you; but these are the settings I always use with a quick explanation

I use Selective and Pattern from the dropdown menus highlighted. From what I gather Adaptive and Perceptual are good options for the first one as well (all the others are less so). I like the look of Pattern better because it arranges the pixels in a pattern which I personally prefer but both Diffusion and Noise are fine too. Always pick the highest number of Colours (256) for the best quality gif.
Make sure the box next to Convert to sRGB is checked to keep the vibrance intact.
Looping options: Forever. To keep your gif looping endlessly instead of stopping after one time.
Gif size! Who even knows what the Tumblr gif size limit is anymore; it’s 5MB after compression but then sometimes people are fine uploading 7MB gifs and others struggle with 6MB gifs. Personally I hardly ever go over 4MB but hey, let me know if you understand it.
To save click Save... (rather than Done)
And you’re done!
This is the end result:
If you have any questions or comments or remarks please feel free to contact me. Hopefully this was somewhat helpful! :))
9 notes
·
View notes
Text
Hello, My Alien! || Part 4: We Have A Problem
Taehyung X Reader
Y/n is traveling to Terran-03 to find her soulmate, Taehyung who is also from her home planet. Two aliens in one roof, what could go wrong?
Fluff, a dash of angst, crack, and alien things
Hello My Alien Masterlist
You wake up in your little folding bed tucked in the space under the stairs of the shared dormitory. The large edifice did not happen to have a spare bedroom, which prompted some of the dorm inhabitants to offer their rooms for you. You, of course did not want to impose and chose this makeshift quarters instead. Lying still on the bunk, you note that none of them are up at this hour. The nearest star has broken the horizon and your digestive pouch grumbles.
Before you could sit up, a string of heavy footsteps rattle the ceiling of your makeshift quarters. Soon, the divider is ripped open and reveals Jimin, holding his communicator device.
"Hey, Harry potter, wake up."
"Good morning, Jimin. I have been awake for 36 minutes." You answer him from your folding bunk.
"Management is coming over and you're not supposed to be here." He yells, running back up the stairs, possibly to wake everyone up.
You take a moment to understand this recent information. Management?
Deciding to start your day, you fold the single-sized bunk and stow it away between a shelf under the stairs. A small pile of male-sized sweaters and sweatpants are stored in one of the shelf holes. Taehyung decided that the clothing you brought are not earth-appropriate and had promised to take you shopping for your own.
Stepping out of the spandrel closet, you hear all 7 inhabitants scrambling down the stairs and then spreading to the common room and the kitchen to sort their mess out.
"Hey so we have a problem.." Taehyung slides in next to you.
"3 minutes!" Seokjin yells from the kitchen.
"What's going on?" You ask.
"People from the company are coming over, and we aren't allowed to have guests in the house."
"...I see. Do you want me to dematerialize?" You ask.
"I don't know a safe place for you and we don't have time to look for one."
"Should I use my computer's cloaking feature, then?"
"Y-you have a cloaking feature?!“ The look on Taehyung's face is both of surprise and relief.
"Yes, but its only for one time use." You tell him.
"Great, how long does it last?"
"One Terran hour, at most."
"THEYRE HERE!!!" Seokjin's voice rattles the whole house.
"Go, go! I'll sort out the spandrel closet. You can stand there..." Taehyung points at a wall beside where the entertainment plate was mounted. He quickly tosses the stack of clothes in the washing equipment.
The main door opens, revealing a whole team of people, dressed similarly, and are carrying all sorts of tools. You press your invisible figure against the wall when one of them passes directly in front of you.
"Hey boys. Routine inspection. You know the drill." A bossy man sits on the couch, prompting the rest of the dorm inhabitants to sit down as well.
"Come on, Jun-ho, don't you trust us?" Seokjin pipes in laughing a little too loud, causing suspicion to arise on the authoritarian's eyes. Yoongi and Namjoon shuts him up.
"There's something in the tabloids for you..." Jun-ho comments, passing a digital pad to Taehyung. You wish you could go over and see what it is, but the cloaking system can only be reliable when you stand very still.
"This looks photoshopped, come on." Taehyung whines. The rest of them gather around the digital pad squinting at whatever the display is.
"That's not the point. The point is that, were you or were you not out with someone last night?"
You swear under your breath.
"No! I was here the whole time!" Taehyung lies. He's a great liar, you note. Lying in your home planet was rare as it is considered illogical.
"Well, you better make sure of that." Jun-ho pushes.
"Manager-nim, Taehyung is telling the truth. The picture is obviously photoshopped. This photo belongs in a supernatural website than in a gossip column." Namjoon passes the digital pad back to Jun-ho who was still eyeing them suspiciously, and continues to do so for a whole Terran minute.
It was almost unnerving how Jun-ho's eyes stare holes into their seven skulls. He almost looks non-Terran.
"Aren't you gonna offer me a drink?" Jun-ho makes himself comfortable, leaning back and crossing his legs.
"Sure. Banana milk...?" Jungkook offers.
"You actually drink that shit?" Jun-ho cusses unnecessarily.
Throughout your three day stay, these six locals have been nothing but nice to you. Some of them may be standoffish, like Yoongi and Jimin, but they would never be rude to you. Which is why Jun-ho's behavior makes all of them uncomfortable.
Taehyung occasionally checks his watch while bouncing his leg against the floor. If his timer was accurate, your cloaking will only last for the next 12 minutes. The maintenance team are packing up their tools on the foot of the stairs. Jun-ho decides to take a walk, to inspect the compartment under the stairs. He takes a peek around the shelves, tapping here and there. If he noticed something, he didn't show it at all.
"Thanks for your patience boys. We're only doing this for your welfare." He stands in front of the tv, a little to the right and he'd be directly behind you. Your wrist computer counts down to the cloaking's last minute as the maintenance team filters out of the room.
The door shuts and everyone exhales, including you. The cloaking expires, making your figure gradually fade into visibility.
"We can not go through that ever again. I will literally die." Hoseok collapses on the couch.
"We wont. Because she's leaving. Tonight. Right, Taehyung?" Jimin sharply calls Taehyung's attention.
"Wait, really? Did your beacon respond?" Taehyung asks, a little crestfallen at the notion of you leaving.
It was rich of you to note Taehyung's lie to Jun-ho when he was protecting you when your own lie about the beacon had no logical reasoning wharsoever. You didn't realize you were a burden to these six Terrans, and to Taehyung, who has become more Terran than your own species.
"No.. It hasn't responded." You lie. Again.
"Oh, that's fine.." Taehyung answers, looking relieved.
"Fine? Nothing is fine! Management is literally breathing down our necks and you all couldn't be more obvious that you're hiding some alien in the house! What if the next inspection wont be announced, then what?! As if that's not enough, we have a dating scandal looming around!" Jimin bursts.
For a minute, all eyes were moving from you to Taehyung and Jimin. Taehyung finally spoke.
"Is this what you all think? Do you agree with Jimin?"
The silence extends. And then, a muffled noise of your knees dropping, bowing deeply.
Keunjeol.
"My sincerest apologies for causing discomfort to you all. You have shown me nothing but kindness." You speak, voice muffled under your weight.
Taehyung pulls you up by the arm to pull you upstairs to his room.
"Tae, we need to be at the office by 8." Namjoon reminds him, standing at the foot of the stairs. Taehyung offers no answer.
"Give me your transporter." Taehyung demands.
"Are you sending me away?" You ask. Tears threatening to fall.
"What? No. We're moving. You're staying with me. Give me the transporter."
You pass him the cylindrical device, letting him input coordinates to a location not far from here.
"Ready?" He holds your hand and presses the launch button as soon as you nod.
You realize that the photo Jun-ho was showing them earlier was the photo taken in the middle of you and Taehyung dematerializing in the dark alley. The flashing in the corner of your eye was probably the photographic device going off.
You materialize in a large room, more furnished than the ones in the dormitory.
"This is my apartment. You'll be staying here for now, until your beacon responds." Do not leave this place alone. I have to go to work right now but I'll be back soon. I'll bring you some stuff. Shame we cant go shopping together anymore." He sighs.
After he gets dressed, Taehyung leaves you in his apartment. You distract yourself with the books on his shelf, and the magnificent view of the metro from so high above the ground.
Soon, you feel yourself getting drowsy. You let yourself lie down on the foamy flooring. Its so much fluffier than your folding bunk back at the dormitory. You sleep a dreamless sleep for an unknown set of time. Converting Terran time sure is exhausting.
------
"Why are you sleeping on the carpet?" A familiar deep voice wakes you from your slumber.
"Who the hell is she?!" Another voice, an unfamiliar one, shrieks at you.
4 notes
·
View notes
Text
how i edit my gifs: a tutorial
for @prometheuswelsh and anyone else who might be interested!
my process for sharpening changed a bit because i’m now using vapoursynth (thank you @inkorns for linking me that tutorial and motivating me to learn!) but this is what i’ve done for all my gifs up until two days ago basically
1. Sharpening
This is my starting point after loading frames into stacks and cropping. I make my gifs using the frame view instead of video timeline because that’s how I learned and I am very happy with it. I select the timing (usually it’s 0.04 or 0.05) and delete any frame that I don’t need by replaying the gif a few times. After that I can start editing.

I begin by sharpening every frame with smart sharpen by selecting the first frame from the timeline and its corresponding layer from the layers tab and then applying the filter. These are the settings I use:

Once it’s done, I repeat the process for frame #2 and layer #2 (you can use ctrl+alt+f and it will apply the last filter you used) and so on. It would be a very long process BUT actions exist! Basically photoshop allows you to record a series of actions and replay them whenever you want. Make sure you can see the actions tab by going to window > actions. You can also download a sharpen all action instead of making your own, I found mine by searching here on tumblr. This is a tutorial on how actions work and how to make one. It’s not a necessary step but it saves a lot of time from manually sharpening every frame.
The most important thing about actions is that they work by reading the names of the layers (es. the action knows to select frame #2 and “layer2″ after sharpening the first one), so you need to make sure that your layers are properly named. Now this won’t happen if you just load them into stacks, so right before sharpening you should flatten frames into layers from the timeline menu.
This will link your frames to copies of your layers which will be automatically named layer1, layer2 etc. You can then delete your old layers with the wrong names and use your action, making sure to start with frame 1 and layer 1 selected.
I have been using topaz clean and denoise for some of my gifs. I haven’t found any links so I just used the trial version which is going to expire soon for me so goodbye to that, but they are other filters to make your gifs look smoother and more hd. This is also not a mandatory step so I won’t go into detail, but they work the same way sharpening does.
2. Coloring
I always start with fixing the lighting by using curves and levels. This is the gif I’m going to color, right after sharpening and before adding any adjustment.
I like my gifs to have some contrast and this one looks a bit flat, so I want to make the shadows darker and the whites lighter basically. Make sure you have the topmost layer selected so that your new adjustment will be added on top of all the other layers.
-Curves
As you can see, I have added two points to the curve. It’s hard to explain how this works but basically moving the curve above the diagonal background line will make things brighter and below darker. If you move the left side of the curve you’re modifying the shadows, if you move the right you’re modifying the lights. Most of my curves tend to look like this unless the gif is already very bright, and then I won’t brighten the lights but just darken the shadows.
-Levels
They also allow you to change the contrast of your gif in a slightly different way. These were my settings:
The more you move the first black slider to the middle, the darker your shadows will get, for the white one it’s the opposite. The middle slider regulates the brightness of midtones and I find it very useful, and it’s the only thing I changed for this specific gif.
As for the output levels slider, it works the opposite way. If you move the black arrow it will make the shadows less dark and vice versa. This is useful if you need to make your gif look more muted or lower the contrast, or if you have very bright spots.
Once I have applied these two adjustments, my gif looks like this:
It’s already a lot better, but I want it to be more vibrant and colorful.
-Selective color
The first thing I edit when I make gifs with people in them is skin tone. It often looks too light or too red, and it’s a great starting point to color. By using selective color you can modify the way a certain color looks in your gif. Usually skin tones fall under reds, so I start with them. These are my red settings for this gif:
As you can see I have added a lot of yellows and magentas. What that does is it adds a pop of color and saturation to the skin tone. I always try to have more yellow than magenta or else they’ll end up looking sunburnt as heck. If the end result is too much I’ll lower the blacks.
Sometimes though you’ll notice that doing this won’t change the skin tone too much: this usually happens when the gif is very bright or weirdly lit, and the skin won’t fall under the reds category. You can use neutrals instead, but it will be less precise and color more than just the skin parts.
While I’m messing with selective color I’ll often change the whites and blacks as well, especially if there are weird colored reflections or lights that are messing with the overall coloring. I didn’t for this gif, but I did open the blues tab and crank cyan all the way up to add more color to the ocean behind.
This is my end results after selective color:

It’s good, but it still feels a little too yellow and cold, so I will play around with color balance.
-Color balance
This adjustment allows you to affect the way midtones, shadows and highlights look. It’s very effective for coloring gifs a certain tone and I use it a lot, but it’s not as precise as selective color is. it changes the way the whole gif looks instead of just a certain color, so be aware of it. Basically what I do is I just move around each slider until I like what I see. For this gif I barely touched shadows and highlights, but I did edit midtones to make them warmer and redder. These are my final settings:
I usually like having more red/magenta/yellow for highlights and midtones, while bluer/more cyan tones for the shadows. Of course it varies from gif to gif but that’s my go to.
Now my gif looks like this:
I am happy with it so I save by going to file > save for web and devices. I try to use adaptive and diffusion as my settings but sometimes noise looks better or it’s too big and I switch to selective.
Other layers I often use are vibrance, but I try not to mess with the saturation slider because it makes everything look to red so I just stick to the actual vibrance slider, and brightness which is a quick way to make your gif look brighter and I will sometimes use it when I’m not happy with how my curves and levels turned out.
21 notes
·
View notes
Note
Hello! Could you share some psds, our tips etc that you use to edit? :0 Thanks in advance!
hi!! i’d be happy to share some tips!! this might be a bit long, i think i went a bit overboard…… i hope it helps a bit though… !!! also im assuming you have access to a program that can open psd files. and i use photoshop so i’m not sure this will be very helpful unless you have access to it or a program with similar capabilities..
i’ve made up a few examples (using the so what mv bc i just edited that) of how i usually go about editing, you can find the file here but i’ll explain a bit here as well!
0 : psd & general stuff
i feel kinda weird about this but i’ve included my psd in the attached file... if you’re going to use it i dont mind but please don’t say that you made it yourself, and a credit would be nice but i guess it’s not strictly necessary.
first of all, i pretty much always use the same psd with very minor adjustments. i do this to try to maintain a similar look to all of my edits & because i like this psd (i’ve been evolving it with minor adjustments every so often for years…). i always edit below the psd (as in the psd is applied over all the layers of my editing) and i usually edit with the psd on (i used to edit and then put the psd on after and that took so much longer because i couldnt see how the psd was affecting the way the image looked as i was working..)
this is basically how all of the psd files for my graphics look (usually with more descriptive names rather than numbers though), where each of the numbered groups is a graphic panel...

1 : colour correction
i basically start off by trying to normalise(?) the image as much as possible (trying to return the colours to what they would be naturally, without colour correction/filtering…)
first i use curves!!! curves are a lifesaver for me. most images/screencaps will have some kind of colour correction / filtering, i use curves to (somewhat) remove those effects. if you go here, i use the method described as “remove colour cast using auto colour” (except i basically ignore the steps 4/5)! sometimes this works, sometimes it doesnt… if the result isnt quite right i lower the opacity on the curves layer until it looks right to my eye.
if the image is still too bright/dark i add another curves layer with auto set to enhance brightness and contrast! and i again use opacity to make this look more natural!
if the image is still looking unnatural (usually this occurs on especially dark images, and the problem areas are usually on faces…) i use colour fill layers set to soft light or colour balance layers to adjust the colours until the image looks more natural? you can see this in group 8. yves face has a blue discolouration on it (if you untick the colour fill & balance layers you should see what im talking about), to counteract this i added a yellow/red layer and set it to soft light & then added a colour balance layer to make the image a bit more yellow/green. overall the image doesnt look exactly natural, but the colours are more smooth and i’d probably lean into the yellow/green tinge if i was making a graphic with this image!
2 : selecting subjects
there are so so so many ways to extract people or objects from images. i vary the method i use depending on the image in question and the effect im going for. i’m not going to explain every method because you can google “how to cut out an image in photoshop” and get some pretty good tutorials on how to do it in lots of different ways.
recently i’ve been using “select subject” (described here). you’ll likely have to clean up the selection using other tools such as lasso & selection tools, and it helps if you cut out a smaller square/area around the subject before trying to use the select subject tool. theres an example of this in group 9.
another method i use is selecting a range of colours from an image using “colour range” (described here). i use this to both change colours in an image and to remove backgrounds that are of a (relatively) uniform colour. you can see an example of this in group 10, i isolated the fire from the dark background by selecting the shadows & then inverting the selection but because olivia hye was also quite dark i had to select her separately.
theres no real easy or quick way to cut out things, it takes time and effort if you want it to look neat. but it really depends on how you want it to look and basically just practicing is the most important thing… over time it will get more straightforward and you will understand how to cut out different things depending on the image..
3 : colours & textures
probably my favourite part of editing! the fun bit!!
i’m not going to explain much of this right now bc i’m exhausted & i’m not sure how detailed this should be. but if you have specific questions i’ll be happy to try to answer them!!
anyway here are some basic notes on my editing style:
if i’m editing a music video i try to use other caps as textures, you can see this in groups 11, 14 & 15.
i like to layer different caps as seen in group 12
i use colour fill layers set to different blending modes (i mainly use soft light, color/hue, screen and multiply) as seen in basically all of the examples
i havent really put in any examples of this here but i use selective colour & hue/saturation adjustment layers to change/enhance specific colours
i have this one texture that i put on basically all of my edits, i’m not sure why but i like the way it looks... its in the “PSD + TXT” folder and its set to soft light & i put it on top of the psd bc otherwise the psd messes with the smoothness of the texture
(fyi,,, i shrunk the image size just so the file size wouldnt be too big and so the sitting kimlip is bigger than the cap it came from bc of that; the mv was in 4k so the caps were HUGE)
4 : other tips/notes......?
don’t get discouraged if you find it difficult at first
i’ve been editing for years and i’m still not that great and i find it hard sometimes but i do it for fun. i make probably 3 times as many things as i end up posting because i enjoy it and because i use it as an artistic outlet.
i hope someone found this useful? i think i went way overboard but i thought it was better to be thorough !! anyway i hope you have fun editing ! its always great to have more creators in the tumblr community!
8 notes
·
View notes
Text
(just another) Gif Tutorial
I’ve been recently asked to make a tutorial of how I make gifs, so here goes nothing I guess. This is the easiest method for me, personally, so you may find some another tutorial which seems easier or better for you. Suit yourself :)
This is also a very image heavy tutorial with as much detail as I could get into. Feel free to ask questions if you have any.
My final products:
You’ll need:
Photoshop
I use CC but I guess any version with timeline can do? But I'm not sure so I'm just gonna say use CC.
download links
Handbrake
I use handbrake to make a separet video for the specific scenes, so I don't have to open the whole movie or episode in Photoshop - it would be too long. It is also a great software if you have to convert it from mkv to mp4, because mp4 is the only file format Photoshop can open without trouble.
download
Basic Photoshop knowledge (??)
Clipconverter
If you use a video from youtube or any other site this is my favourite to download it from.
Step 1 - Choosing the scene
This is by far the hardest part! I always try to choose scenes that are well lit and bright, they are easy to work with not like dark scenes, which are a mess. I usually bookmark scenes while watching a movie or show (if you use KMPlayer, just hit "p" on your keyboard and it will bookmark it), or just skip through the whole thing, looking only for bright scenes. After I have the scene I want to color I do the following:
Open the movie in Handbrake. Click on "chapters" in your menu and change it to "Seconds". Now type in the timeframe your scene is in.
For example, for this tutorial I used scenes from The Last Jedi. The one where the Falcon is flying starts at 02:14:30 and ends at 02:14:34 (it depends on your copy, though). PICTURE Now, go to "Video" and change the settings according to the image. Then give it a name (i named it "gif1" lol) and save it somewhere where you can easily find it. Click on “Start Encode” (the green button) and wait for it to convert it.
Congratulations! Now we can open Photoshop! :D
Step 2 - Opening it in Photoshop
You don't have to do anything spectacular, just open the video as you would open an image. It should look like this: PICTURE
Enable Timeline if you haven't already, it should look something like this. PICTURE Now, you probably have stuff there that you don't want to use in your final gif, so you have to delete it. I usually just slide that little blue thing (i don't know its name, i'm sorry lol) and then click on the scissor icon and delete the unwanted stuff. Don't worry if you leave something there, you can always edit it later.
Step 3 - Resizing/cropping
To resize your canvas, either use Alt+Ctrl+C or Image -> Canvas size... Use whatever size you want your gif in. I used 268px x 140px.
Great! Now click on your video layer and transfrom it (Ctrl+T). Before doing anything with it, click on the link on the top bar to maintain the aspect ratio. Now start resizing it by the corners. Edit it the way you want it.
Ps: It will probably say something about covnerting it to a smart object, whatever, just roll with it and click on ok.
Step 4 - Sharpening (my method)
Click on Filter --> Smart sharpen (settings)
Click on Blur --> Guassin blur (settings)
Now the fun part. It's probably over sharpened right now but don't worry Bob the builder can fix it. Your layer should look like this: PICTURE. Now click on that little arrow and line thing right next to the guassian blur. This should pop up PICTURE. Set the opacity around 50% and click ok.
Congrats, now your gif is sharpened!!
Step 5 - Coloring
I’m not getting into much detail here. Use a psd file ot make your own coloring. I posted some psds before and there are a number of resources on tumbr if you want to know how to make nice colorings :)
Step 6 - Saving
To save it just press down four buttons. Ctrl+Alt+Shift+S. A windoe will pop up where you can edit some settings Here are mine: PICTURE
And hat’s it! You’re ready to post your gif on this hellsite, good luck and, again, if you have any questions about this tutorial or anything at all, my askbox is open :)
230 notes
·
View notes
Note
How do you make these icons? I'd hate to be a bother if you've already mentioned this but I've just recently came across them.
hey no problem at all! I use Adobe Photoshop!! its a really great editing program, though it’s a bit pricey. some alternatives that I can think of off the top of my head are PicsArt (mobile exclusive, but it’s mostly free to use. I sometimes use it for quick simple edits), and even Paint Tool Said (I think this one works, though I’ve never used it. You’d have to play around with it!)
If you’re asking for the actual process I use to make them, it’s honestly quite a mess. I end up piling a bunch of filter layers on top of each other until I get something I like, then I color on top of it.
2 notes
·
View notes
Note
How did you make those drawing that mimic the dragon age tarot card look?
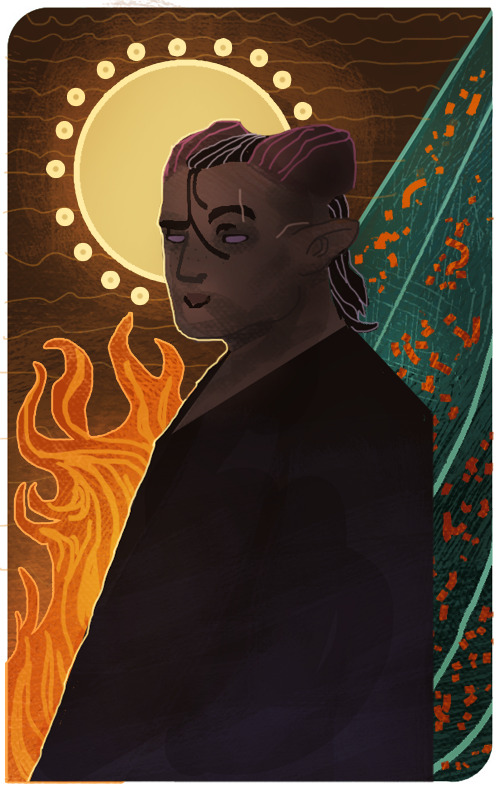
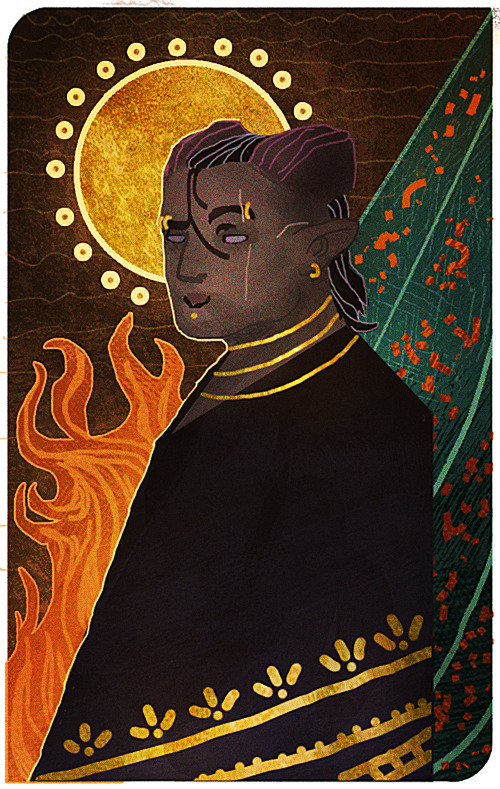
I’m sorry that it took me this long to reply, anon! There were some complications and illness that kept me away for a bit, but better late than never! I assume the drawing you’re referring to is the experimental card I made of my Inquisitor 4 years back?
It’s been a while since I worked on it, but I tried to dig up the old psd file to go through the layers and see what steps I made. The drawing itself was highly experimental, as I was completely new when it came to trying my hand at the DA:I card style. For the most part I decided to make the character and his anatomy very simplified, and rather focus on putting the details in the shading and background.
Let me show an example of what my drawing looks like without the added textures and extra overlay soft brush shading:
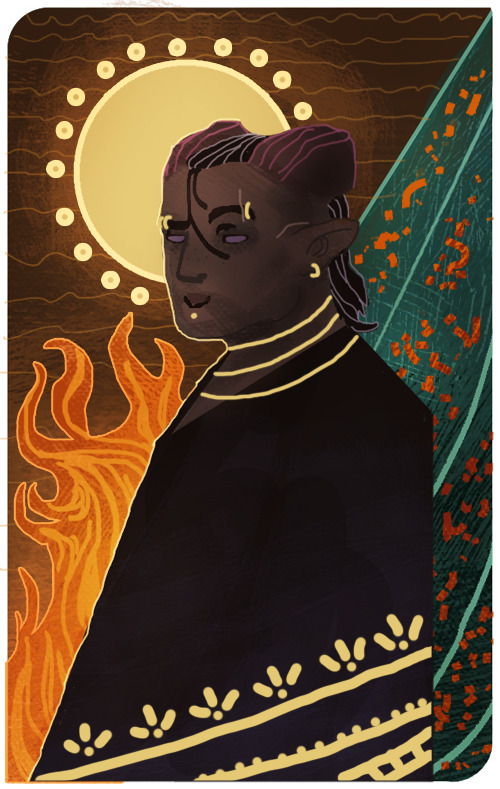
And here is the same drawing where the textures and shading are added:

But if there is one thing I’ve learned from both my own attempts and other artists, is that textures can sometimes make a very huge difference when it comes to that final touch. Whenever it’s from digital brushes or images that you’ve gathered. It’s no question that most of the work with these paintings lies in the drawing itself, but adding those final textures can really give it that ultimate DA:I card feel you’re looking for.
I’m not really experienced enough to give proper advice or tips on how to make these drawings, but for now, all I can recommend is studying the DA:I cards themselves, take inspiration from other artists, tarot cards in general, or patterns/paintings that can inspire what to use for the backgrounds. Another thing I personally like to recommend, is staying away from too much realism or overblending the image. The more the textures and those rough brush strokes are apparent, the more it adds to it. Keep it simplified, while the more detailed/realism stuff is kept to a minimum in comparison. But once again, this is my personal taste, and not the ultimate way to do this.
However, something I can add to my reply, is showing you guys a very quick, basic and simple way on how I generally go on with these paintings and how I add image textures. Please, rather look at these tips as suggestions on how to do it, as there are plenty of other and simpler ways to go about it. But since this will be a very long post filled with images, I’m gonna keep it under a cut, so that anyone interested can check it out there! Also keep in mind that I’m using Photoshop CS5 on an iMac for this.
First of all, I will apologize to everyone for the extreme low art quality, as I only have my computer mouse to draw with for this. Not to mention the extreme lack of balanced values that makes this more chaotic than it should. Make sure to always keep values in mind with these things, folks!
Anyways, I always start by making the drawing itself. Most of the work and style are put into this part of the process, as the image textures will just be extra flavoring.
Now let’s say that we want to add some fancy gold details to this drawing. We’ll be doing so by making a new layer over the drawing itself, then use a basic round brush to draw the shapes we want to be textured with gold. Wherever you choose to make something more detailed, or just make simple shapes with a single color, is all up to you.
Now I’ll be locking the layer by clicking the icon shown in the image below. It’s usually found over the layers, and make sure to keep the layer with the new shapes activated when you click it.
This will now make us able to draw on the shapes without going outside of them, so let’s use this to add some simple shading based on gold in general. This will add a bit extra once we apply the texture itself in the end. (References are your best friend here!) Also be aware that the colors you choose on these shapes will affect the end results once they are merged with the texture image. Here’s how it looks like after I’ve added some simple shading with a brush.

Now it’s time to add the extra gold texture itself. We’ll be doing so by first digging up your preferred gold texture image that you can either place or copy/paste into the psd file. Make sure the image is on a layer above the shapes we just added. Once that is done, we will right click on the layer with the image, and choose the option ‘Create Clipping Mask’

Now it should only be covering the shapes drawn in the layer below it. So now we can mess around with the image layer until it gives you a look you’re satisfied with. It’s mostly common to put the layer on Multiply or overlay, but try to experiment to see what you prefer. Also play around with the opacity of the layer, too! In this case, I set the layer to multiply and the opacity to 80%. I also adjusted the colors on the shape and the texture itself until I was satisfied.
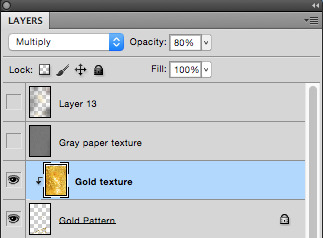

I also added a gold texture to the circle in the background by doing the exact same thing. Make a layer with the shape, add the gold texture image in a layer above it, right click it and choose ‘Create Clipping Mask’. Then adjust to your heart’s content. This layer is set to multiply with 100% opacity. Colors were adjusted until I was pleased with the results.

And this is basically how I add textures to my art in general. Sometimes the Clipping Mask isn’t even needed if you want to cover the whole drawing itself with it. However, another thing you can do to add a texture over a painting, is having the image on its own layer over the drawing, but instead of setting the texture layer to Clipping Mask, you add a Layer Mask by having the layer itself chosen, then clicking the icon shown in the image below.

The texture layer should now have a white page next to it that looks like this.

This layer will now only let you draw on it with either black or white. Basically what this means, is if you draw on the layer with black, it will “erase” the texture, so that you can draw on the spots where you don’t want the texture to show on the painting. If you want to bring the texture back, all you have to do is draw over the black again with white, and it will appear.
I added a final grunge texture to the background, using the same method as we did with the gold, but simply skipping the Clipping Mask part. Instead I added a Layer Mask and drew over it with black, so that the texture would only show on the brown colored part of the background.
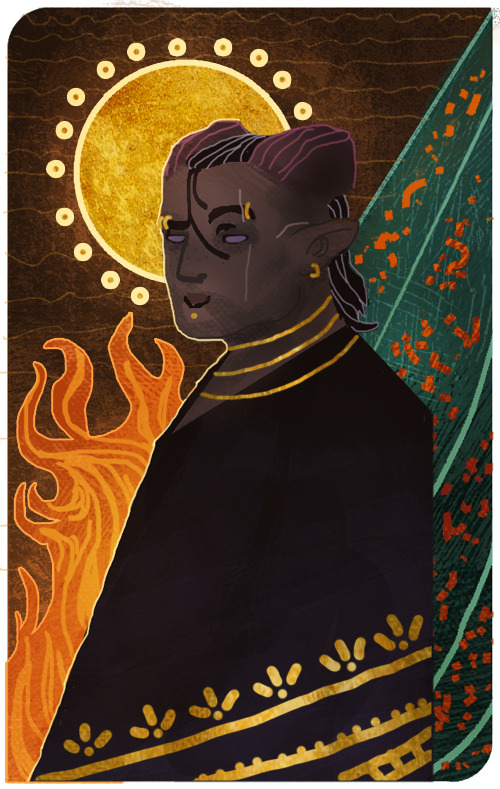
As a final touch, I added one more texture to cover up the whole image. It’s the same gray paper texture that I made and use for all my sketches or paintings in general. It can be found and downloaded here.The gray paper texture was set to overlay, and I darkened its values, as it tends to brighten up the drawing a bit too much when set to overlay.I also added a final layer on top of it all, setting it to overlay, and then draw with a soft brush to add some extra highlights and shadows to give it that final touch. Highlights were drawn with a very light/pale yellow, while the shadows were drawn with more dark brown tones. All in all, I used colors to match the ones used in the drawing.After all of that, this is how it finally looks.

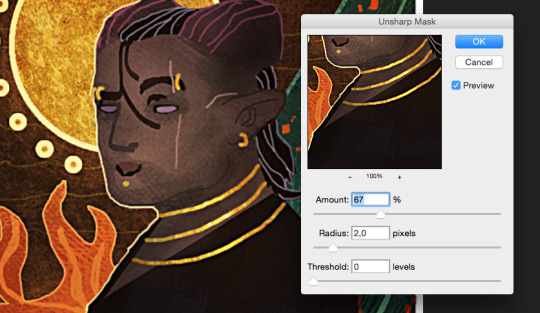
Now this last step is completely optional, but I’ll add it to this post, in case some people will find it useful. One final step you can do to give the painting that extra crisp, is to add Unsharp Mask.First you need to save the drawing as a png file, and then open that file, so that all the layers are merged into one image. From here, we will click on Filter, among the tabs found at the very top of the program. From there we will find and choose Sharpen, then Unsharp Mask. Here’s an image to make it more clearer.
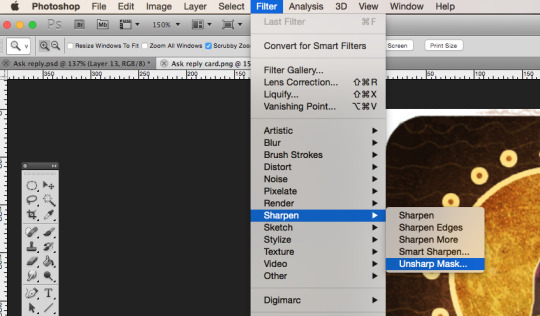
When you click Unsharp Mask, a little window will pop up, letting you adjust on three different sliders. Treshold will be on 0 levels, Radius will be on 2,0 pixels, while Amount is where we can adjust the slider to our liking. Usually it’s enough to keep it somewhere between 60-80%, but experiment and see what you prefer. Once you are done, click OK, and the changes will be added. Make sure to check the box next to Preview, to see what the changes look like before you click OK. When you resize the image to make it smaller, the unsharp mask effect can look pretty neat!
Aaaand one more optional final touch that we can add, is something called the Grain Texture. However, there is already a very great tutorial made that explains easily how to add it, so I’ll link to it here!
And FINALLY. After all these walls of texts and images, this is what the end results look like.
I apologize if my way of explaining these things is confusing and pretty bad. It’s always been a weakness of mine, so if any of you have any questions, don’t hesitate to ask! I’ll try to answer as good as I can.Other than that, I hope this is somewhat helpful to some of you. This is basically how I do things in most cases when I make art.I’m not sure how much this helped to answer your question, Anon, but hopefully it shed some light on some of it! If not, I can always try to make another tutorial some other time, once my health allows me the extra time.
Thank you so much for reading, and good luck with your art!
#Anonymous#Mieran replies#Tutorial#Long post#Anon#Ask#I'm sorry for the long post#And sorry if this whole thing is messy xD#I tried my best
29 notes
·
View notes
Text
hey it’s a tutorial on how i make gifs
its a long one
carly, what programs do i need?
what a good question! basically, you need a program to record video (if you’re making gifs of video games), a program to take frames of the video you recorded (or the movie or show you’re giffing because you can do that too, obviously), and a graphic processing program (it’s photoshop, you need photoshop)
also if you’re recording your own game footage you need a computer capable of running that game well. ideally you want medium to high settings at 60fps (this varies; like you want to record, say, skyrim at high settings and probably modded, but newer games like mass effect andromeda, just medium-high settings should be fine!)
for video recording, i strongly recommend:
nvidia shadowplay
i think you can only use this if you have an nvidia graphics card. it’s very good because it automatically records at 60fps and at up to 4k (so like it’s good for taking regular video for video purposes also) and it starts up very quickly (so when you hit record, it’s only a few seconds before it starts recording). in-game, you hit alt+f9 to start recording.
xbox game dvr
i used this for a long time and it’s perfectly satisfactory, and great if you don’t have an nvidia graphics card. it comes with windows 10. you need to go into windows settings and set the quality to High and the framerate to 60fps. the only drawback is that it takes a hot minute to start up the first time you use it in a gaming session (like 10-30 seconds) and there are some games it won’t open over (i had issues with both assassin’s creed odyssey and far cry 5). in-game, you hit ctrl+alt+r to start recording.
for frame-taking:
gomplayer
has a slightly imprecise method of screenshotting, that is you have to time your “burst capture” while the video is playing - you can’t find the spot you want, pause it, start your capturing, and then play the video to have it start at an exact moment. however it really captures every frame and i’ve never had any issues with it. best advice is to record more frames than you need to and delete the ones you don’t need in windows explorer or photoshop. to open the screen-capture window, you hit ctrl+g
potplayer
i used this one for a long time, too! it does what i said gomplayer doesn’t do, which means you can pause it and start screencapturing and it’ll start from where you paused it when you hit play. i’ve had a few issues with it not actually capturing every frame even when i have it set to do so. but that might be just me. to open the screen capture window, you hit ctrl+g
for graphic handing:
photoshop. specifically cs5 -- that’s what i’ve used for about half a decade. i’m sure a lot of the steps are similar in cs6 and cc but i’ve never used either of them and i can’t help you learn those.
that’s it. no other options.
okay great!!!!!!! you got ur software set up. now what???
if you want to make gifs of video games where you use your own footage, read this bit. if not skip down to the next header.
at the most basic level, with creative cropping, you don’t really have to do anything more than record the screen of the game you’re playing. for a lot of games, this is what you have to do (dragon age origins and 2, stardew valley, etc). HOWEVER. there are ways to get different shots in some games and i’ll take you through skyrim/fallout 4 and dragon age inquisition (and i think other frostbite engine games?) if you have questions about other games you’re welcome to ask!
bethesda products (skyrim and fallout 4 mainly)
bethesda is very nice and includes console commands that let you get some good cinematic shots in their base games. these are the same for both skyrim and fallout 4 because they’re the same engine.
tfc
your bread and butter, baby. this is “toggle free camera” or “toggle fly camera” -- it detaches you from your character basically, and you can fly around. if you are in third person when you enter the console command, your character will remain visible and you can take pictures of them. in first person, theyre not. (also, drawn weapons will disappear in first person). note that in fallout 4 third person, your character will continue to rotate/strafe as you move the camera.
you can add a 1 to the end of the command (tfc 1) and it will also freeze time. this is good for taking screenshots, not gifs
entering tfc again will turn it off
tm
‘toggle menu’ -- this turns off the hud, including the crosshair. this is. very important. you don’t want the menu in ur gifs ok.
it also hides the console window! so it may be a little confusing. but generally if the grass/water/dust is moving, the console window isn’t open.
typing tm again will reenable the menus
sucsm #
the default free cam is very fast and imprecise. i usually use sucsm 1 to slow down the speed at which the camera moves.
sgtm #
set global time multiplier. this one isn’t hugely necessary but i still find myself using it sometimes. default is 1. you can set it to, like sgtm .01 to basically freeze the game while you get the camera into position if you’re trying to capture an action. also sometimes if i think things are moving too fast or too slow i’ll change the timescale. MAKE SURE you set it back to 1 when you’re done!
i Heavily suggest, especially for skyrim, that you use an ENB if your computer can handle it. it makes the game look nice, but it also usually includes depth of field which i am an absolute slut for. if not, use the mod dynavision for a DoF effect (available for both skyrim and fo4!)
and then you just have fun with it. getting good shots takes some practice. play with it. i tend to record long sessions (~5-10 minutes) with a LOT of different shots to pick from when i watch it back.
frostbite engine (dragon age inquisition and mass effect andromeda, notably)
here’s where we use the Cinematic Tools, lads! these are a little more difficult. note that there are ct for a lot of games that i don’t play but i’m assuming they work the same. i’ve also never used CT in andromeda but it’s the same engine so they also probably work the same. so i’m mainly talking about DA:Inquisition.
OKAY SO. start the game. load ‘er up. you want to run origin and DAI as admin, and then once you’re in game, start the CT as admin, too. the controls window will open, and then another command prompt type window will open and hack into the matrix. you don’t have to do anything with it, but note that if you close the command prompt window, it will close the game.
okay! party time. there are lots of other tutorials on using the CT, btw, so if i don’t explain it sufficiently you can either ask me or look up other tutorials.
first, i usually take gifs of characters in DAI, which means i wait until cutscenes so we can see them talking or making faces or whatever. you can also do scenery gifs or whatever!
so we’re in a cutscene. first and foremost check “freeze time” and then “enable”. set up your shots. start recording. THEN uncheck “freeze time”. that’s all in the “free camera” tab of the CT and technically all you need. But wait, there’s more. we’ve got two other tabs!
in this tab, I most often use “depth of field” because we’ve already established that i love a strong DoF. all these things are a little hard to understand and mostly require a lot of messing around.
focus distance
pretty self explanatory -- it’s the distance from the camera that objects will be in focus. for portraits, i usually have it at 1.125.
blur factor
how blurry the stuff that’s out of focus will be. i usually set it somewhere between 4 and 7, though you can go higher or lower. dealer’s choice.
blur add
makes everything blurry regardless of focus. don’t use it.
blur filter
i almost always set it to gaussian 9 but it doesn’t make that much of a difference.
dof type
always set it to sprite
max blur
i absolutely do not know what this does and don’t use it.
near start/end
with this you can kind of expand “focus distance” to include more varied distances. i usually don’t mess with this and i suggest you don’t.
far start/end
most useful in outdoor scenes. usually it’ll be set to like 100, meaning that there’s a gradient way out to the most blurred parts. if you bring it lower, the gradient distance gets shorter, so the background gets blurrier closer to your focus. what i set it to depends entirely on the scene. just try messing with it and see what it does for you.
make sure you hit the green enable button on the left and Also tick “enable” on the DOF screen to use it.
this tab is a little more useful for screenshotting but i’ll include it since i’m going over the CT anyway. i have never messed with global fov or timescale BUT
shadowmap resolution
i usually set it down to 512 for smooth, soft, realistic shadows. otherwise they look kinda stripey.
resolution scale
NOT FOR GIFS. do not use this for gifs. but DEFINITELY do use it for screencaps. set it to two (i’ve had my computer freeze from trying to set it to 4, so like, be careful). it basically doubles the resolution of everything on screen and makes it very pretty but it’ll ruin your framerate so don’t try to record with it.
okay, I’ve got my footage, now what!
now we’re gonna open it in whichever player you picked.
GOMPLAYER:
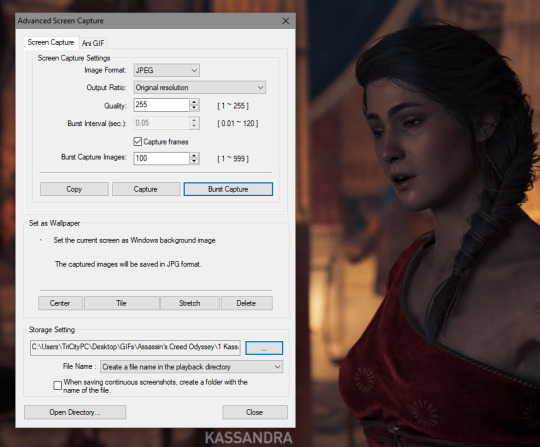
for gomplayer, you’re going to press ctrl + g to bring up the screencapture window. i Don’t remember what the original settings are, but you wanna make sure your quality is set to 255 (highest) and that it’s set to original resolution.
now the slightly hard part. you gotta hit “burst capture” while the video is playing, so it’s slightly imprecise. for that reason i have the number (burst capture images) set much higher than i’ll use, so that i make up for the imprecision. after you capture, go in and delete the frames you don’t need, either in windows explorer or after you’ve loaded them into photoshop.
POTPLAYER:
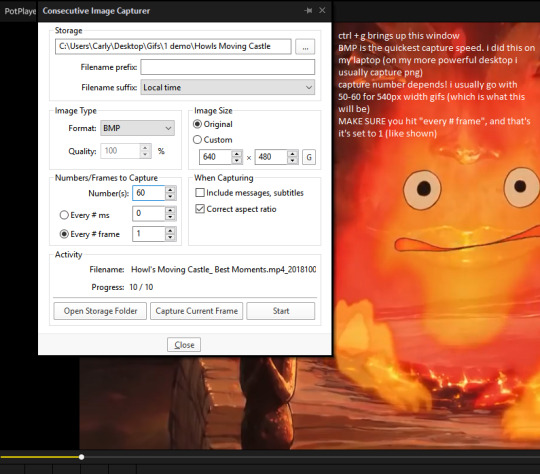
just pause your video, hit ctrl+g, copy my settings, click start, and then play your video. potplayer will capture every frame.
i should have mentioned this earlier but you have to have a folder to save your screencaps in. i usually organize by GIFS>game name># what its a gif of>a numbered folder for each gif in the set. but it’s up to you. just probably don’t save to your desktop or wherever the default location is.
AND NOW THE FUN PART!!
open photoshop!!! if it’s your first time here, go to window>animation so that you’ll. have the animation window open.
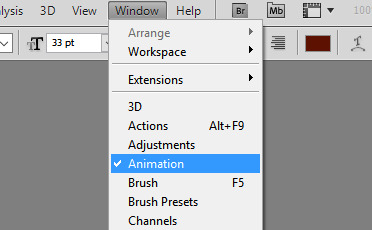
now go file > load files into stack > browse, and find the frames we just took. select em all. click ok.
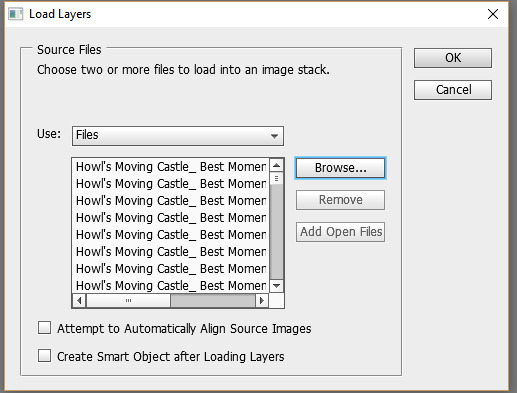
you’re probably going to start off in timeline view. we don’t want that yet. click the box in the bottom right corner that looks like multiple little boxes to switch to frame view.
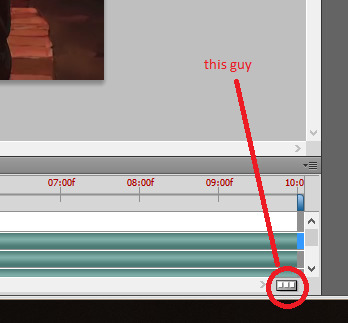
in frame view, click the menu box thing. and click “make frames from layers” and then “reverse frames”
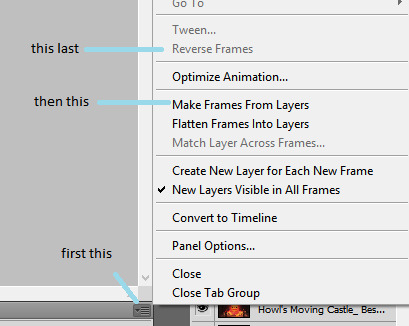
now select all your frames, and on any one of them, select the arrow next to “0.0 sec” (this is the frame delay). select “other”
what you set the frame delay to depends on what your footage frame delay originally was. if you’re using game footage, it was probably 60fps, in which case you should set the delay to 0.04 sec. if it was 30 fps, I usually go 0.06 to 0.08. play around with it and decide which you like best. there’s a play button so you can see how the delay looks before you continue.
now we switch back over to timeline view. so click the same button as we used to get to frame view.
now select all your layers, in the layer panel. right click on them and click “convert to smart object”
here is usually where I do my scaling/cropping. tumblr photoset sizes are 540px for full width, 268 for 2 wide, and 177 for 3 wide. KEEP IN MIND when making especially 540px gifs that the size limit is 3mb. so you can’t make them super tall or super long (time-wise).
the gif of calcifer i’m making is going to be 540x250. make use of set image size (ctrl + alt + i) and canvas size (ctrl + alt +c). set the width of 540 with image size and then crop the canvas to your desired height with canvas size.
okay! technically we can be done. this is what my gif looks like right now:
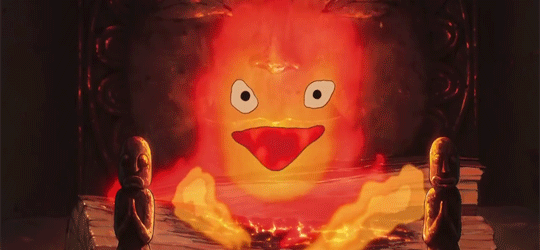
however i like to color and edit mine. yknow. here are my sharpening settings. I cannot help you with coloring because i’m bad at it. at best i will suggest you look at and download resource colorings from blogs like itsphotoshop
anyway, to sharpen: filter>sharpen>smart sharpen
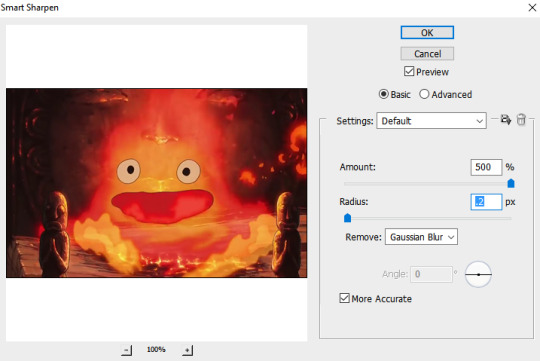
and then apply your coloring. and save with ctrl + alt + shift + s, or just file > save for web and devices. set your file type to GIF. two things to look at:
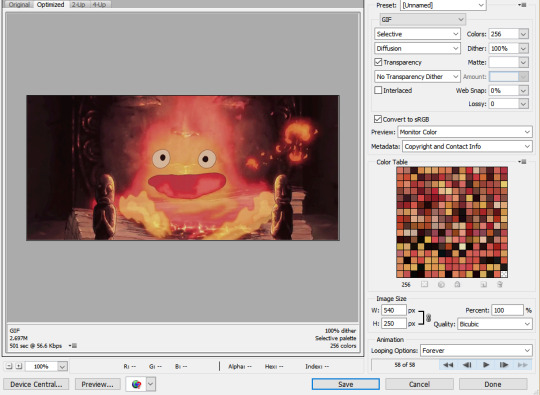
1) MAKE SURE YOU SET THE LOOPING OPTIONS TO “FOREVER”. i put this in caps because I am an idiot who messed this up all the time when i first started.
2) keep an eye on your file size!! if it’s over 3mb (mine, down in the left corner, says it’s 2.697, so it’s fine) then you can try to reduce the number of colors. but don’t go below 128 colors, because then it starts to look bad. instead you can try reducing the height or going back and cutting down the number of frames (so basically remaking the gif again :( ).
okay great, click save. save it. you’re done. here’s our calcifer.
and that’s it! i hope this made sense and like. absolutely ask if you have questions.
#i have been meaning to do this for. months. and finally got around to it these last few weeks!!!!#boy i really hope this all makes sense#carly tells tales#i'm not kidding this is really long. click read more at your own risk.
5 notes
·
View notes
Text
JJ’s how to gif using timeline animation instead of frames
So here it is. This is just the basics, It covers the set up and the steps to do it. I will perhaps do a part 2 in the future that covers how to use text and things like that. But if you’re interested in making gifs with timeline, master this stuff first:

OKAY I’ve gotten lots of asks about doing this so today we’re talking about how to make gifs using timeline animation and screen recording. I know lots of people use frame animation. I used to always make my gifs that way. This is just a way that I found worked better for me and was a lot faster and made gifs come out cleaner (making frame caps got real slow on my computer for some strange reason). ANYWAY so what you need for this, most importantly, is quicktime player. At least for the screen recording process. But if you are making gifs of short videos like youtube or something, you don’t necessarily have to record them with quick time as long as you download them. And then you need a video that’s playing somewhere, be it on a site or on a video player (i’m using VLC player in this tutorial).
First, I open the video I want to gif in VLC player. For this tutorial, it’s an episode of Shadowhunters in 1080p. I get the video to just a few seconds before the scene I want to gif (keep in mind you can do the whole scene, you’re going to cut it up later). Pause the video.
Then you right click on quicktime player (I keep it open in my doc to make things easier. I’m not sure of the mechanics of doing this part if you aren’t on a mac but I imagine you just need to have quicktime already open). So I right click and hit “new screen recording”
which will then give me a screen like this:
You’re going to hit that red dot. Don’t worry it doesn’t start recording right away. When you hit the red dot, this comes up:
I prefer to click and drag to select the area of the video to save me from having to trip/crop it later. But you can also just click anywhere to record full screen.
With the click and drag, I box the entirety of the video and nothing else like this:
Then I hit that “start recording” button in the middle. Make sure you click back to your video after you do this and actually hit play. And then just wait and let it record. Once you have everything you want, right click on Quicktime again and select “stop screen recording.”
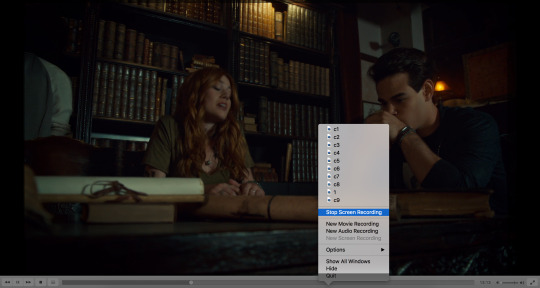
once you do that you’ll get a screen like this that opens the video you just created over the video you’re playing.
Now while still in Quick time I go up to the top menu bar and hit “edit” and then “Trim” so i can cut this file down. You want to not open HUGE files in photoshop and also want to avoid saving big files to your computer so being able to take some out is nice.
When I open it in trim, I just take off the stuff at the beginning where you could see me clicking around and the stuff at the end where you can see me stopping the recording.
Then I hit trim. And once that’s done I got to “file” and then “save” and save my clip.
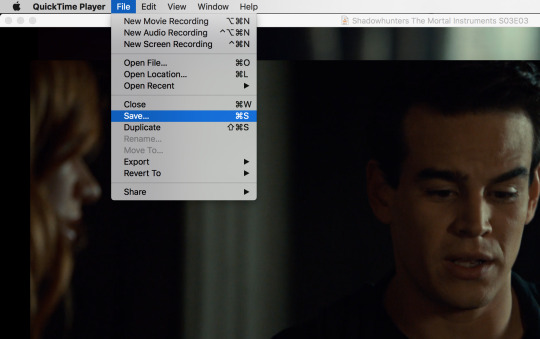

This probably feels like a WHOLE lot of steps. I swear it isn’t. It’ll begin to feel like one fluid thing once you’ve done it a few times.
Now onto the photoshop part. You’re going to open that entire clip you just made in photoshop. I usually just go find it in my files, and drag it over to photoshop to open it. And you will have a screen that looks like this:
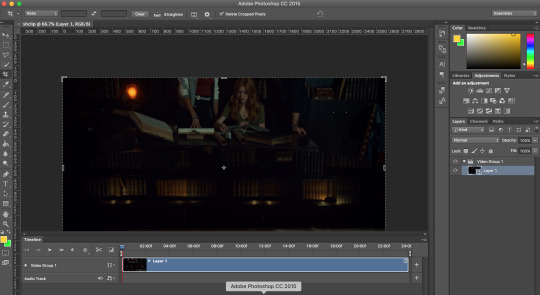
If you don’t have that timeline window there, just go up to “window” and select “timeline”

Now this is the most important step. Do NOT forget it. (Trust me I forget it at least once a day). You need to slow this clip down. Otherwise it’s going to move at a really fast speed in gifs. Usually anything between 40-50% works fine but feel free to adjust it depending on what you want. To slow it down, you’re going to hit that little triange in the top right corner of the video timeline:

This window will pop up right above it. Adjust where it says “100%” to say the percentage you want. For this, I’m going to use 50. Which is usually what I always use.
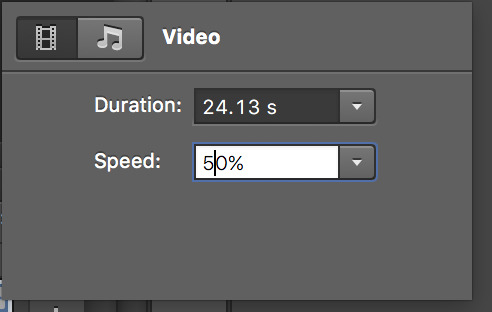
When you do that, it is going to actually keep the video length the same, but slow the frames down, which means you’re going to lose half your video. Have no fear it isn’t gone for good. Just zoom out on the timeline using this glider:
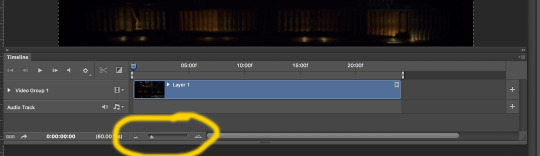
Then click on the video right at the end and drag it out to the right:

This should double your clip length and give you all your content back (NOW AT 50% FRAME RATE!)
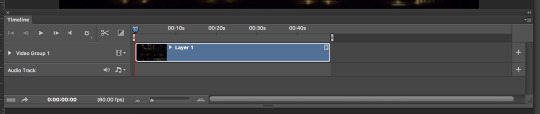
NOW is the part where you crop/resize your gif. MAKE SURE you do that AFTER you adjust the frame rate. Otherwise, if photoshop converts your content into a smart object (which it WILL ask to do when you resize) you will bypass the option to adjust the frame rate percentage.
So anyway now we crop based on what we’re going to gif. I’m just going to make a small gif of the three kids hanging out for this gif set. so I’m going to crop for that. But you can use the little slider at the bottom to move through the video if there’s something else you’re looking to crop to fit or whateverrrr.

That red line there is the thing I”m talking about. See how moving it changed what was on screen? Magic.
ANYWAY back to the kids:
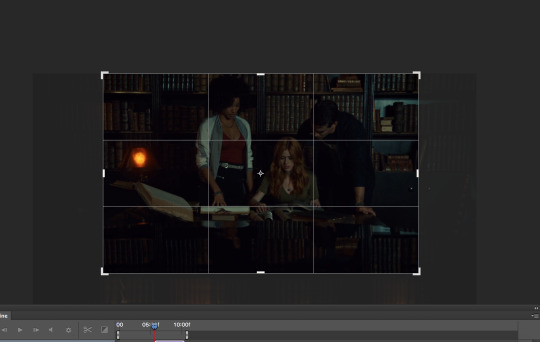
I crop to what I want first. Then go up to image, resize and resize it to the 268 dimension.
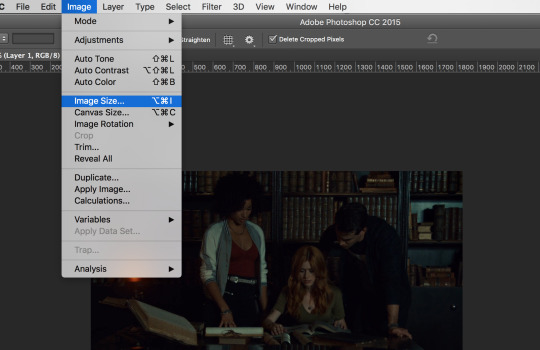
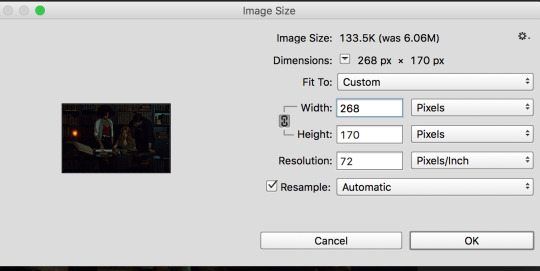
All I do is make sure the height is something larger than 150 because for this gif I want it to be 268x150. I can crop those extra 20 pixels out after. I hit okay to save it.
This is where the window pops up that asks if you want to convert it to a smart object. Tell it that’s okay by hitting “convert” and it’ll do its magic thing and convert your wHOLE video clip to a smart object.
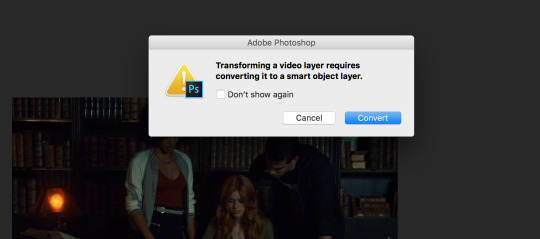
That step always makes it all tiny like this:
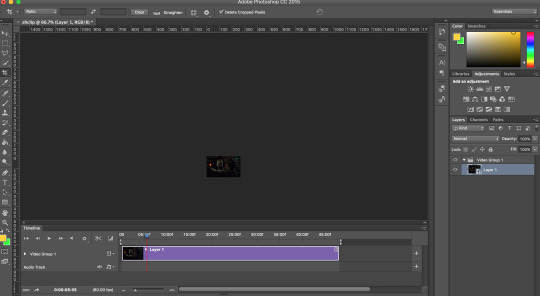
Just hold down command and hit the “+” a few times to zoom it back to normal size.
You don’t really need this step but here’s where I hit image again, and then canvas size to clip the height down to 150px
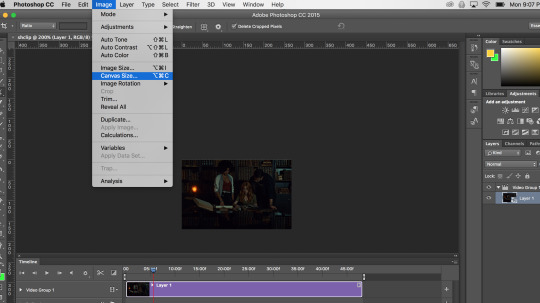
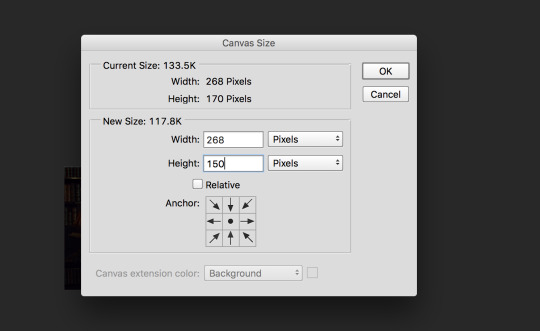
So now you’ve basically got a gif sized version of an ENTIRE scene. YAY. Or not yay. Idk what you want. Here’s the part where we gif it. FIRST lets add a coloring. You can use your own coloring or a psd or whatever you’re going to do. I’m just going to pop a basic coloring on this and get back to you when I’m done. BUT if you want a coloring tutorial I have one of those here
Okay coloring is added and now we’re back. Have I mentioned that the coolest part of giffing from a timeline instead of frames is that you can put the coloring in place once and it’s on the WHOLE scene? yeah it’s great. The same applies for sharpening. So we’re going to sharpen this mother. I do that by making sure the video is highlighted blue over there in the layers section, then hit “filter” “sharpen” and then “smart sharpen”
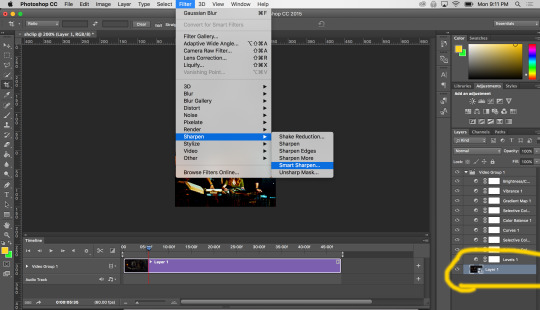
These are my smart sharpen settings if you want them:
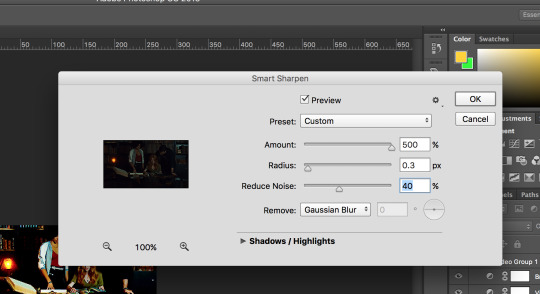
So now you have an entire scene, colored and sharpened and you’re ready to make it into gifs.
You do that by adjusting those little gray markers on top of the timeline. I’m going to move those gray things to the area i want to gif to make it easier
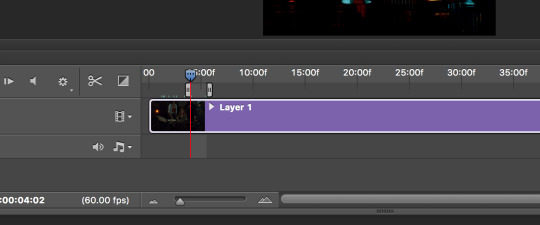
then use that same little slider as before to zoom back in so i can most accurately get the area i want:
That little red line is your friend. Use it to slide around and see what your gif is and align those little gray things with it when you have it where you want:
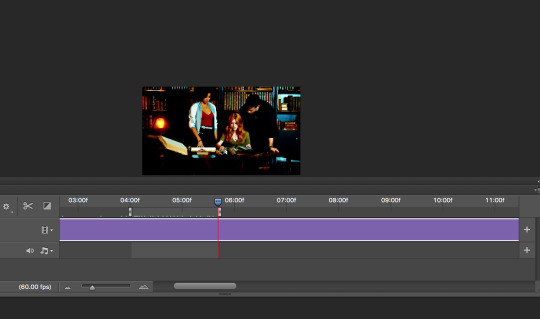
Unfortunately, I don’t have a secret to knowing how long or short it should be. You gotta sort of eyeball it and get used to it. You’ll notice when you go to save the gif, if it’s too big, you gotta go back in and make it shorter. So I’m just taking a guess with this gif length. But once I have that area selected. I’m going to hit “file” “export” “save for web"
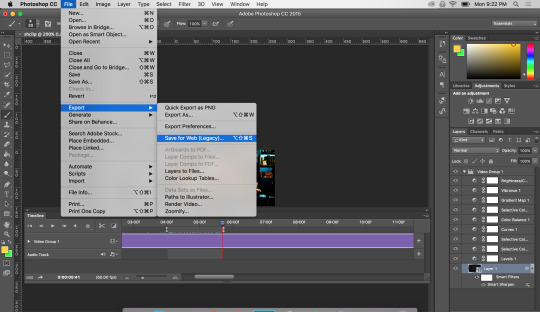
That will save ONLY the area I’ve selected and export it as a gif.
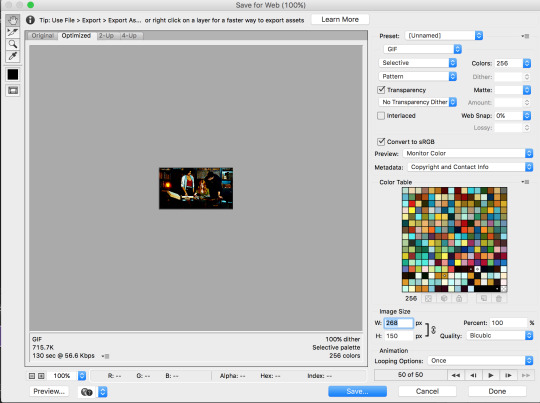
That opens this window. As you can see, my gif is only 715.7k and only 50 frames. So instead of saving it, I’m actually going to cancel and close this window and go back to the timeline and adjust those gray things to make it longer:
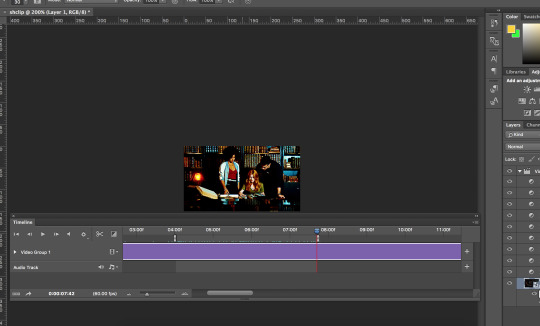
I basically just doubled the length since we know that 715.7k doubled is still nowhere near the tumblr gif size limit of 3GB.
Then I hit “file” “export” “save for web” again and get this window again:
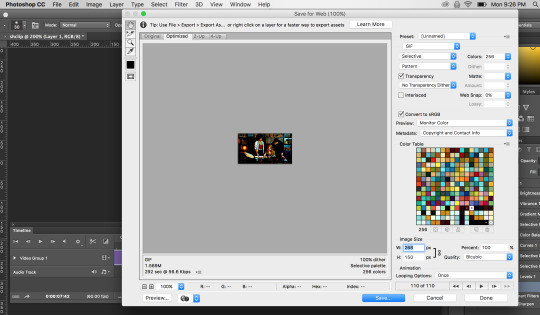
110 frames is probably way better than 50. Based on the size i can afford to make it even bigger but I’m not going to. Now you have to adjust those settings at the bottom so that it is set to start at the first frame instead of the last frame, and set to loop forever instead of once.
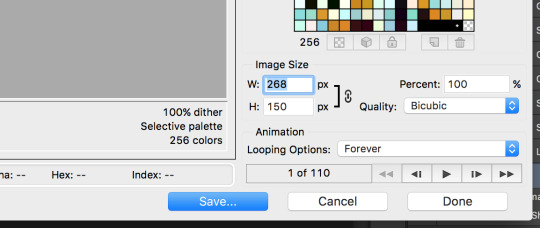
These are my save settings. You’re welcome to use those or whatever your own are:
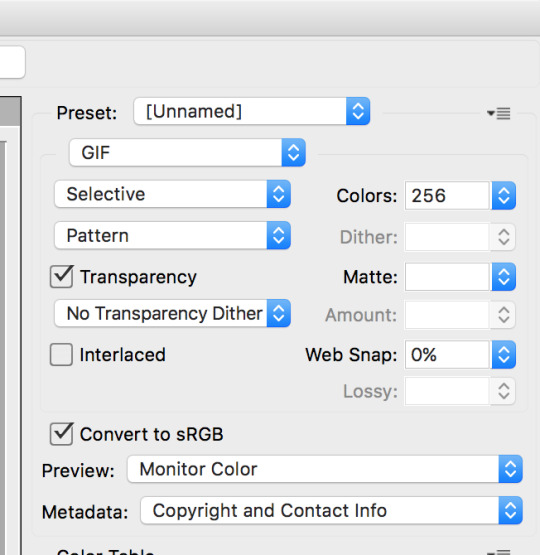
Then you just hit save and BOOM:

A clean gif with no choppiness and all of the frames in tact. THEN you can go back to your exact same open file and move those gray things around and gif another portion of the scene without changing anything:
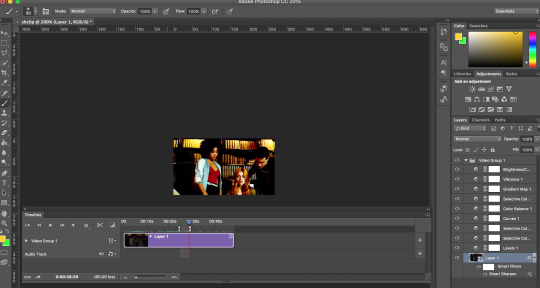
“But JJ, now they’re off center because you cropped it to fit the first shot.”
I know. All you have to do is hit the crop tool and then click anywhere on your gif. It’ll give you this:
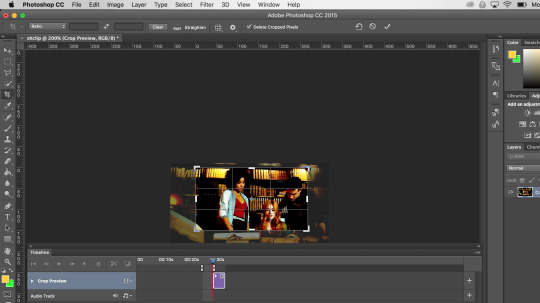
Now just slide the window to adjust it how you’d like
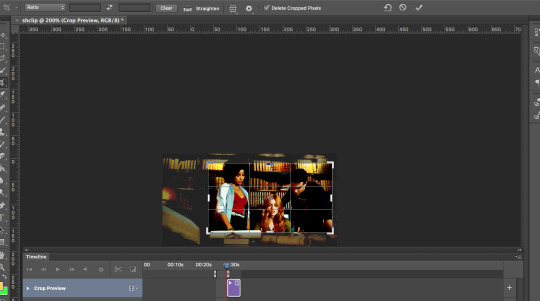
And then hit enter. Boom. ONE RULE do NOT resize that window. If you start pushing and pulling you’re going to fuck up the gif size and mess up your sharpening. Just slide it around to different locations. Don’t start adjusting the shape/size. If you need to make a bigger gif or smaller gif, reopen your file in a new window and size it that way from the get go or your sharpening will get all whacky.
Then just save your gif again and:
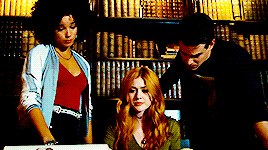
now you’ve got two gifs from the same scene, same coloring, same sharpening and you can just keep on going, sliding those gray guys around and saving like a saving machine. That’s all kids. Hope this worked and helped you a little. It feels like it has a lot of steps but it’s actually quite smooth once you’re used to it. Let me know if you have questions!
111 notes
·
View notes
Text
Process in creating my Rave Poster
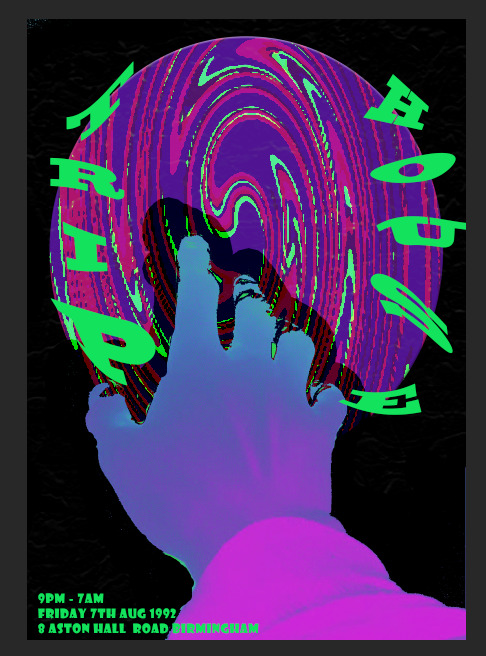
Last steps and processes
I created some texture onto the black background to make it have a vintage vibe to it, I did this by going to the tool called Bevel and Emboss under texture and had the style under bevel with the technique of smooth with a depth of 100% and the size of 8. This created a crippled-up paper look or when the poster has aged and created some texture, the purpose of this technique was to suggest to the audience that the rave poster is antique and valuable because the rave party was one of the greatest rave parties created.
For the last steps are the typography, I wanted the name of the rave party to be fitted well with the poster, I decided to experiment with different techniques that I know from my last project, this was the digital way of editing typography or hand-drawn typography or using the scanner from a printer and moving the piece of paper as a technique too. In my case, I used the tools provided from photoshop to edit the texts because I found them to be more legible and sharp than my handwritten texts or the scanner used. I mixed up the methods with each letter so that it can be fitted well around the earth, I did not intentionally surround the planet with the typography but I thought it fitted nicely together. The warp tool I used were rise and lower shell for the typography of “Trip House” and just mixed up every letter with different warp tools and different % settings to create a wavy type of text. I did not want to go over-board because I wanted it to be legible and not like the other typography I have seen for rave posters.
Lastly, I added a small text box with the same font at the “Trip House” for further details of the rave party event so that the audience won’t be clueless as where and when it is.
Overall Reviews
My overall review of my poster is that I believe it is nicely coloured for its theme. I like how I connected the multiverse project and the rave poster together simply and somehow added a bit of psychedelic art into it. I loved how my swirl turned out too, I didn’t intentionally wanted a swirl for my poster when I was thinking about but once I experimented with the tools from photoshop, I thought it would be a great idea to use it because it looks very detailed. The use of my typography was influenced with some of the music packaging from the Non-format analysis I did because I thought the use of typography from their art work was really nicely put together even if it was weird and out of place. Although some of their text was not legible but I created mine to be legible for its purposes.
I also asked my friend’s opinion and my eldest brother who is also studying Graphic Design in University, most of the comments received was about the colours and how trippy it was which I am grateful for. I believed the overall poster is a good poster for any rave parties and hopefully I will create some more in the future with a similar style.
Steps and processes
This is the original photo of the twirl effect, I simply took a picture of my table with a glitch effect filter from snapchat that I thought I would create something weird for my poster.
I created this swirl effect by placing my original image to an a4 document in photoshop and I have used the distort tool under the swirl effect by clicking to the tool called “Filter” on top of photoshop, I then played around with the percentage of the swirl and keep going back and forth until I found the ‘perfect’ swirl. After that, I changed the brightness and contrast to get a really vibrate swirl because I was going for a vortex type of swirl to connect with the current project called Multiverse.
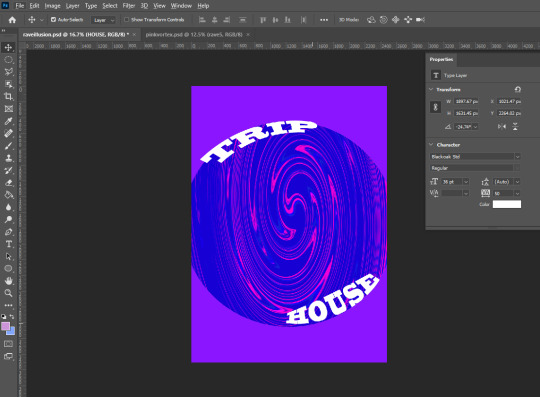
This was my first outcome but I thought the outcome was too simplistic and decided not to go for this one, the process was using the elliptical marquee tool to create a circle and then right click inside the circle you selected to press via cut the part you wanted to be inside a circle and I just deleted the original layer of the swirl to get rid of the background. I then changed the cover overlay of the circle to pinkish purple under ‘lighten’ I then added the text “Trip House” to simply connect with the idea of Psychedelic art from hippies using drugs of hallucination, my overall idea was a rave poster about a club that will make you hallucinate from the colours and the fun. I used the arch tool under the text to create that simple bended within the circle.
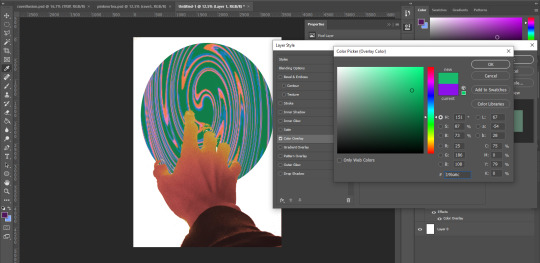
Since I did not like my first outcome, I decided to look through a lot of rave posters in pinterest, after some thinking and looking I seem to see that a lot of good rave posters that connects to multiverse have hands or metallic robots, I decided to add an image of a hand I found in Pexels.com and placed the image in my photoshop document and used the magic wand tool to delete the background and just keep the hand, I also deleted some parts of his fingers to make it look more like a vintage poster and I thought of that by thinking to delete some that is like the vortex is sucking up the hand. I messed around with the colour overlay to see what works well, I decided to use one of a rave flyers for a colour scheme so that I won’t waste time with the colours.
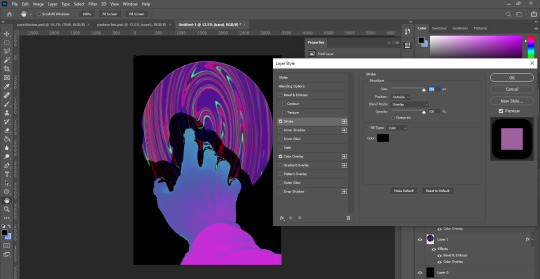
Furthermore, I added some details such as shadow work on the outside of the hand to make it look like the person is out of the universe trying to reach for the planet of rave and fun. I did this by going to the stroke technique tool and chose the outside layer and changed the opacity of the stroke so that we can still see some of the background from the planet that I made, I also lowered the stroke so that it won’t be too weird looking and I wanted most of the planet because it’s the main part of the poster.
0 notes
Note
A giffing tutorial would be great! I'm not at home atm and its been a while since i tried giffing so i dont have any specific qs to ask yet but i think i struggled with how to put them into frames? I think they sometimes froze and wouldnt move haha but yeah thx for much for the links and advice! I also rly struggled with finding good basic tuts so thats why i came to ask ^^
PLEASE DO A TUTORIAL ON GIFFING BC I SUCK AT IT SO MUCH PLEASE
fkdsjlfds alright!!! hopefully this is able to help u guys i know im not the best at explaining this but hopefully this will give you an idea :-) im going to do it using only photoshop (no kmplayer/vlc or any other software) and i use photoshop cs5 so depending on what version u have things might look a little different but it’ll be the same concepts!! anyway here’s a crash course in making a gif for the first time
1. get the video!!
this seems like a simple step i know but if u wanna just use photoshop and not any other software as well it’s a LOT easier if you download a shortened clip of the gif! usually i download clips between 3-10 seconds long in order to make sure i get the whole scene i want. the two best websites to trim and download into an mp4 in one step are clipconverter and video-download, they both work for youtube videos and vlive and a lot of major video websites! and of course downloading the highest quality of video available (preferably 1080p or 720p) will make your gifs look nicer
2. importing it into photoshop
file > import > video frames to layers ! i believe u need quicktime installed for this to work properly!

since your clip is already pretty short, you should be ok by just keeping it from beginning to end! if for some reason you were unable to shorten it or if you want to shorten it even more, you can select the range. dont limit the frames though! it will make the gif look choppy and less fluid!
3. adjust frames/timing
you should now see all of your frames in the animation bar at the bottom (if u dont see an animation bar go to window > animation and make sure its checked) and all of the frames as their own layers off to the right! on some part of the animation toolbar you should see something that looks like this:
when you click on the four lines with the arrow, you should see a list of options! play through the frames you have and determine if you need to delete any of them at the beginning or end and u can do so by selecting the frames u wanna delete and under those options select delete frames. once u have just the frames you want for the gif, select all frames and then on any frame click on that 0.04 with the arrow and for the delay, select “Other” and put in 0.05s (or whatever value u want but usually 0.05s looks the best once you save it!)
4. cropping

you can adjust the cropping size options at the top (it will look Something like this but it’ll depend on your version of photoshop!)

the width dimensions for tumblr are 540px for one gif, 268px 268px for two gifs next to each other and i Believe 177px 178px 177px for three gifs next to each other! so here i’ll assume i’m doing a 268px width gif and you can set the height to whatever you’d like. if you set the resolution to 1px/cm like it shows right there, it’ll automatically crop and resize the gif for you!
so at this point with the cropping and timing it’ll look something like this:

5. convert to smart object + sharpening
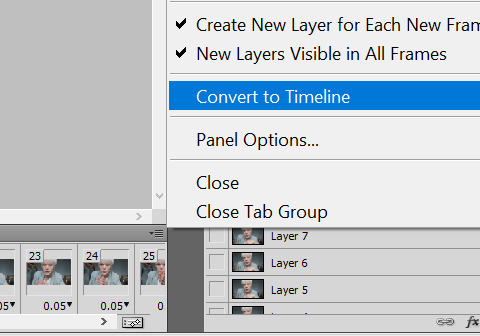
this might be where u had a problem with the frames freezing? so first using that menu in the animation toolbar convert to timeline animation! then, after this, select all of your layers on the righthand side and then right click convert to smart object!
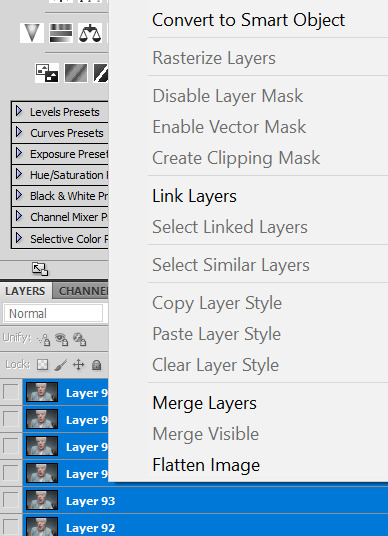
after u convevrt to smart object it should only show as one layer! u should still be able to preview and play through the gif, if it’s frozen then u messed something up with the timeline animation part! so to sharpen here were the settings i used to use:
filter > sharpen > smart sharpen

a lot of people use 500% and 0.3px … personally i never liked that but its up to u to play around with it!!
here’s what the gif looks like after this:
if you compare this to the one above this one looks much nicer!
6. coloring
ok honestly i dont even Know enough to give u a coloring tutorial but that’s pretty much the only step remaining for ur basic gifmaking! honestly a lot of the time i only use brightness/contrast and color balance unless im trying to make a compilation set where everything looks super different but it’s mostly up to u to try different things out and see what looks good :-) or! you can find psds online where other people have shared their coloring settings!
7. saving settings
honestly the only important thing is that ur gif Has to be under 3 mb or it won’t play right on tumblr! other than that u dont really have to worry about anything here as long as your settings look something like this
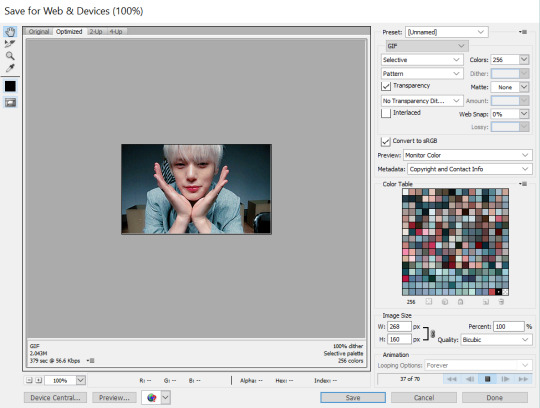
and then ur done! u have a gif! :-D

i know i use a lot of words fdmsfds but trust me once you’re able to get through it once you’ll be able to go through the whole process in minutes!! and there are lots of other ways to go about these methods as well (tbh i dont even really do this anymore) but this is a good starting point and as u can see the gifs look pretty nice (in my . humble opinion)
happy gifmaking !!! and again if u had any more questions about this or anything else let me know!!
#Anonymous#JFKDLSMFDSFDS why is this so long i barely even said anything.\#this is so funny i really dont know how to do tutorials
20 notes
·
View notes
Text
12 Best Instagram Story Apps to Create Amazing Content

Instagram stories have outdone their competitor Snapchat since copying the feature in 2016. Now, as of January 2019, there were 500 million active daily users on Instagram Stories.
It's the tool that influencers have stated that they get the most engagement from — allowing you to share content that disappears in just 24 hours, now with the option to turn them into highlights, a lifetime.
With so many brands using Instagram stories, how can you stand out?
The quality and content of your Instagram stories matter, but to create eye-catching stories, you'll need the right tools to do it.
I've listed the 12 best apps made for Instagram stories and trusted by professionals and brands alike.
This article will be covering the following topics to give you well-rounded advice to jump-start your Instagram story skills:
Best Instagram Story Apps for Videos
Best Instagram Story Apps for Graphics
Best Content Ideas for Instagram Stories
Best Brands with Amazing Instagram Story Content
Best Instagram Story Apps for Videos
1. VSCO
Available: for Android & IOS
VSCO is a personal favorite for influencers looking for filters and editing tools for images to post on their feed. Did you know they also offer video editing features for Instagram stories as well?
Hint hint, it comes with a paid account, but it's worth it. It helps to maintain your brand's aesthetics and gives it a professional touch that's up to par with Adobe tools.
2. Videoshop
Available: for Android & IOS The Videoshop app is ranked in the top video editing apps when it comes to Instagram video editing for stories and feed.
Simply add your recorded clip to the app and trim or resize your video. You can also add music, voice-over sound effects, slow motion, filters. Take it a step further and merger video or photos.
Once you've finished editing your photos or videos and share it on Snapchat, Instagram, Facebook, YouTube, Vimeo, Dropbox, Whatsapp or by email.
3. Filmmaker Pro
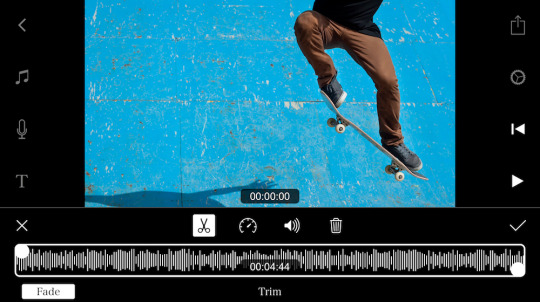
Available: for IOS
An iPhone app favorite for anyone who wants to edit videos a bit more technical than iMovie or Clips. Once you've uploaded your video to the app, you can edit videos in landscape (16:9), portrait (9:16) (Instagram story size), and square (1:1) (Instagram feed). You're not limited to videos, you can also edit photos for your Instagram stories.
Add a color gradient to your video, replace green screens with new backgrounds, add transitions, text, and audio (music and narration) -- with all these abilities, you have full control over your Instagram story’s final look. There is a monthly cost, but the features are worth it.
4. InShot
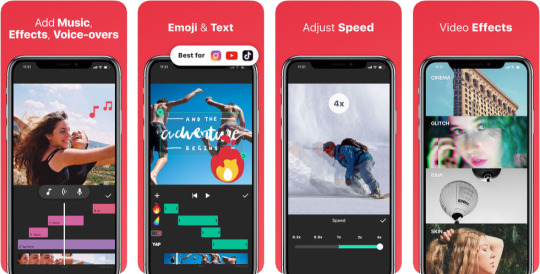
Available: for Android & iOS
You shouldn't be surprised to see the InShot Video Editor on our list of tools to use for Instagram stories. You've probably seen a few videos on social media with the watermark logo at the bottom right corner.
This app allows you to place your video in different ratios so you can easily resize, crop or take your design further and use a colored background, built-in templates or photo collages to make your video pop on Instagram.
5. Lifelapse
Available: for Android & iOS
Lifelapse is an alternative to Instagram's hyper-lapse, but the twist is you can also edit and create content-worthy animations, not to mention helpful tutorials, stock music, a built-in time, speed adjustments and much more.
6. Foodie
If you're a food brand or influencer and you're looking for an app that's made for you, Foodie is it. The name of the app alone is a winner. It allows you to add over 30 filters; editing tools specifically made for food images and videos allowing you to capture those yummy moments effortlessly.
It does have a few limits when it comes to editing like aspect ratio, so make sure to upload the video or image in the desired ratio you'd like to upload.
Need help with your social media marketing?
Book a free call to learn how our team of marketing experts can help you create high converting ads campaigns today!
Best Instagram Story Apps for Graphics & Tools
1. Canva
Available: Desktop, Andriod & iOS
This tool is a personal favorite of mine when it comes to creating content and Instagram stories for Wishpond's own Instagram.
Canva allows you to create graphics, videos, and GIFs all tailored for your Instagram story. Choose from several beautiful templates with an easy-to-use editor to drag, drop, filter, and design your Instagram story as you like.
2. Adobe Spark Post
Anything Adobe puts its name on either has a steep learning curve, is a creative’s go-to, is a gateway to exceptional content or all of the above.
That being said, if you're looking for something a bit more technical to get all the little details right, Adobe Spark Post is your app. It allows you to add not just filters but effects, sizing, coloring and editing tools on par with Photoshop and Lightroom. You can also convert photos into GIFs or videos ready to upload to your Instagram stories.
3. Wave.video

Available: Desktop version only
Wave.video falls smack in the middle of Canva and Adobe Spark Post. It's the tool you use if you're looking for an online video maker and editing tool that offers user-friendly experience with just the right amount of technical tools to give your video that finishing look.
Upload and export your videos with text overlay, effects, animations, and stunning transitions between the clips. You can also resize your video if you'd like to reuse it later for another platform.
The best thing about wave.video is that it has full integration with Facebook, Youtube, Twitter, Hubspot, Wistia, Dropbox, Google Drive, and Vimeo so that you can share or upload your videos in one click.
4. Font Candy

Available: Android and iOS Maybe you're looking for something not so technical, and just need to do something simple like adding text overlays to your videos or captions -- why not use Font Candy?
This app provides loads of fonts, editing, and adjustments like text curving, opacity adjuster, and shadow controls to design your Instagram stories.
5. Unfold
Available: iOS or Android
Unfold has been on the rise since 2017 and has been named by Refinery 29 as "the must use Instagram story app."
Choose from a wide range of Insta-worthy templates that allow you to seamlessly post aesthetically-pleasing content that fully align with your brand look and feel.
6. A Design Kit
Available: iOS
Created by the fantastic lifestyle and content creators, A Beautiful Mess, and A Color Story, so you know you're in good hands. A Design kit is a graphic designing tool perfect for IG stories.
It allows you to add stickers, textures, color, and font directly on your Instagram stories. You also have 120+ designs and templates to choose from so you can spice up your stories in style.
Bonus: CutStory
Available: iOS only
Have you ever gotten so caught up in the moment recording your Insta stories that your video ends up way longer than you expected? Don't worry; we've all been there.
Because Instagram only allows you to upload 15 seconds of video and 7 seconds to video-photos, that's where Cut Story comes in. It gives you the power to divide or section your long videos into a series of shorter clips.
Granted, Instagram does do this for you automatically when you upload a longer than a 15-second clip, but Cut Story gives you more control over where and when you cut your clicks.
Best Content Ideas for Instagram Stories
Sometimes coming up with content ideas for your next story can be a head-scratcher. Below is a list of 7 easy-breezy content ideas you can use for your own Instagram story!
Pick, choose, and reuse as you like:
1. Show Behind the Scenes
Give followers a sneak peeks at what goes on behind the scenes of your products or team. Show off your daily shenanigans so that followers feel a part of your brand. You don't have to go into details like your ingredients or retailers. Take a look at Vogue International as they showed followers around the office gave mini-tours or insight on their current or past projects.
Instagram Story Example:Vogue International
2. Give Product Updates
Keep customers updated on new product launches with your Instagram stories and save them in your Instagram highlights so they can re-watch the update in case they missed it.
Instagram Story Example:Herbivore Botanicals
Herbivore Botanicals is a skincare product company that prides itself on its plant-based products. They create a story every time a new product is launched. The story above is a cover of their in-store launch for their Prism Exfoliating Glow Potion.
3. Share A Story
If your brand covers stories or advice, you can use your Instagram stories to well, share stories and advice. This can be about your own brand story, customers, or other people in your industry. I find that The New York Times does a great job of creating short and engaging stories on local and international celebrities and activities.
Instagram Story Example:New York Times
4. Online Tutorials
Hubspot found that 72% of customers would rather learn about a product or service by way of video. The same goes for your Instagram stories. People consume videos or stories to learn about your products and your brand.
Instagram Story Example:Mike's Mighty Good
Mike's Mighty Good Noodles has a wide range of organic ramen noodles. To keep their foodie followers excited and engaged, they create step by step tutorial on delicious and easy dishes they can create at home. This can range to your typical crushed red pepper, shrimp and parsley ramen bowl or meaty beef ramen burger.
5. Post Interview & Tips
If you have interviews, add it to your story. This could be a short Q&A, detailed conversations, or highlights of things that stood out and made an impact with your viewers.
Instagram Story Example:Ted Talk
We've all watched a TED Talk or two. Well, if you're interested in seeing a series of 15-sec TED Talks, you can check their Instagram stories. They're mainly videos highlighting commonly asked questions for experts in the field.
6. Highlight Customers & Reviews
Over a third of Instagram users have used their mobile to purchase a product online, and 60% of users use Instagram to seek out and discover new products.
Instagram Story Example: Cesta Collective
When you add customer reviews and highlights to your Instagram stories, you allow shoppers to see real people enjoying or using your product. Customer reviews allow your shoppers to imagine the product as their own and build your brand’s credibility, making them more likely to buy one for themselves.
7. Brand/Influencer Collab
Let the world know about your collaboration with another brand or influencer on a product. 70% of Instagram users watch stories daily so if followers missed the update via your feed, adding it to your story allows you to increase exposure.
Instagram Story Example:Topo Designs
10 Best Brands with Amazing Instagram Story Content
Need more inspiration for your Instagram stories? I've got you covered. Here are Insta-worthy accounts that provide some of the best Instagram stories, highlights, videos, and ads.
1. Brit + Co
Overview: If you're looking for an account that is a shining example of having a solid brand identity and color coordination, look no further than Brit +Co. The aesthetics are consistent, and you can undoubtedly identify the brand on Instagram with or without a logo present.
Looking for a way to revamp your Instagram to reflect your brand? I found this guide by Hootsuite on How to Create a Unique Instagram Aesthetic that Fits Your Brand very helpful.
2. Oats Overnight
Overview: Oats Overnight, you might be giggling at the name, but the Instagram content is sure to amaze you. Their Instagram story/highlights made this list because it embodies a FAQ and makes the buyer's journey from awareness to purchase effortless.
Stories cover: Us v Them (comparing themselves to competitors), benefits, customer reviews, an easy buy-now option, and much more.
The key to a successful Instagram is to be mindful of the content you create and place for followers and potential customers to see. This means having a profitable Instagram strategy in place to capture them. Remember that your social media platforms are also marketing funnels.
3.Billie

Overview: Billie is full of fun, quirky, and oddly satisfying stories and content. They’ve built their following and sales on their online brand personality, which is what makes the brand so unique.
Sit down and take the time to figure out who or what is your brand's personality so it can shine easily through your stories. Hint: It can even inspire your next Instagram’s content ideas.
4.Huffington Post
Overview: Building a community around your Instagram is also another ingredient to Instagram success. Take Huffington Post; they use their stories to highlight topics and people who are important or relevant to their readers.
Wait, what do stories have to do with building a community, that's a pretty far reach?
When people first land on your page, the check three things: your bio, feed, and story highlights. Each of these speaks to your brand values and brand positioning.
If you post highlights that connect with your viewers, you're able to build a virtual rapport that sparks an interest, connection and adds a new follower to your account.
5.Harvard Business Review
Overview: If you're a writer or magazine that's looking for Instagram story content ideas, you can check the Harvard Business Review. They make mundane topics seem exciting and alluring with 15-second videos and graphics. You can go through and learn how to apply these ideas to your content.
6.Red Lobster
Overview: Red Lobster and Buzzfeed are two brands with foodie friendly Instagram story content and highlights. Each more delicious and tasty than the next. A critical insight is that they spend time providing quality images of their food not only in their feed but stories.
7.Equinox
Overview: Equinox is a fitness brand that knows how and what type of content engages followers. Their stories highlight the lifestyle of its core followers before, during, and after their workout, making them one of the best Instagram accounts to learn from for gym and fitness lifestyle content.
8.KL Polish

Overview: If you're looking for ideas on more product-focused Instagram stories, I found that this brand, KL Polish, has an effortless outline of product highlights.
Why does this brand make this list?
Simple: it has a unique method of showing off its product but in a way that still allows the viewer to feel that it's more about the customer than the brand. This type of Insta-marketing is always a plus because it translates to shoppers that the product is all about them.
9.Pottery Barn
Overview: Pottery Barn has numerous collections for every type of DIY home decorator. Instead of shoppers leaving their Instagram account to find collections, they can scroll through their stores or highlights and see what they'd like. From there the customer can either choose what they want to buy before moving on to the website or use the Instagram checkout feature.
10.Curated by Facebook
Overview: I recently found this account on my Instagram scrolling frenzies. It's an Instagram account for IG stories from brands around the world. Each IG story is selected by the Facebook and Instagram team themselves, so you know you're getting the best of the best when it comes to Instagram stories.
Conclusion
Instagram stories are essential to big brands. You can see a lot of marketers adding Instagram stories to their Instagram marketing strategy.
Now you have the tools to create professional and stunning stories up to par with these brands. Here are the 12 of the Best Instagram Stories Apps to Create Amazing Content:
1.VSCO
2.Videoshop
3.Filmmaker Pro
4.InShot
5.Lifelapse
6.Foodie
7.Canva
8.Adobe Spark Post
9.Wave.video
10.Font Candy
11.Unfold
12. A Design Kit
Did I miss a tool on this list, or do you see your favorite in the top 12? Drop a comment below and tell me why it's your go-to Instagram story tool.

Related Articles:
15 Awesome Examples of Instagram Posts that Drive Sales
20 Tactful Instagram Tips You're Missing Out On
How to Create a Winning Instagram Marketing Strategy
The Ultimate Guide to Instagram Marketing for Retailers and Brands
from RSSMix.com Mix ID 8230801 https://ift.tt/2mBMFTy
via IFTTT
0 notes
Last Seen Blogs

daybreak-tkler
Prince Of Tickles !!
stars-and-branches
Read banned books!
hypno-things
Hypnosis stuff
olivegrrace
Olive

caramelo-salado
En La Galaxia Este