#materialharvest
Text

0 notes
Video
Card of the day "Material harvest" this is for those that have been going through a rough time. This time is coming to an end and a new time of new beginnings is going to start. Ok guy I hope everyone is having a safe & happy fourth of July #Cardoftheday #empath #energyreading #materialharvest #Cardoftheday #happy4thofjuly #clairvoyant🔮 #clairgustance #clairsentience #clairaudient #oraclecardreadings #intuitvereadersofinstagram #yesandnoquestions #paidreadingavailablenow #followforfollowback #motivational #advice #consult #blessing #peace #oneofakind #smallbusinessowner https://www.instagram.com/p/Bzhj77rnQaa/?igshid=vpwmmxrdto5m
#cardoftheday#empath#energyreading#materialharvest#happy4thofjuly#clairvoyant🔮#clairgustance#clairsentience#clairaudient#oraclecardreadings#intuitvereadersofinstagram#yesandnoquestions#paidreadingavailablenow#followforfollowback#motivational#advice#consult#blessing#peace#oneofakind#smallbusinessowner
0 notes
Video
vimeo
Dealing with SIPs
Following up on Lana’s post, this slow-motion clip shows how the Structural Insulated Panels (SIPs) were processed after being dismantled and placed on the ground. The chunks were too bulky to be transported and thus had to be cut up into smaller pieces for easier handling and sale-ability, as Lana mentioned. The clip shows Brian from Construction Junction at work with a chainsaw. Once he finished, we helped load the pieces into the truck for them to be taken to Construction Junction.
#UDBS#UrbanDesignBuildStudio#weareUDBS#PROJECTRE_#projectrepgh#wearePROJECTRE#CarnegieMellonUniversitySchoolofArchitecture#CarnegieMellonUniversity#CMU#CMUUDBS#CMUSoA#SoA#SoAUDBS#SolarDecathlonHouse#DE_CON01#materialharvest#materiality#designfordisassembly#deconstruction#precedent#residential#design#HOME#RE_CON01#SIP#ConstructionJunction#DECONSTRUCTING BLIGHT#ScalingChange#submission
0 notes
Photo
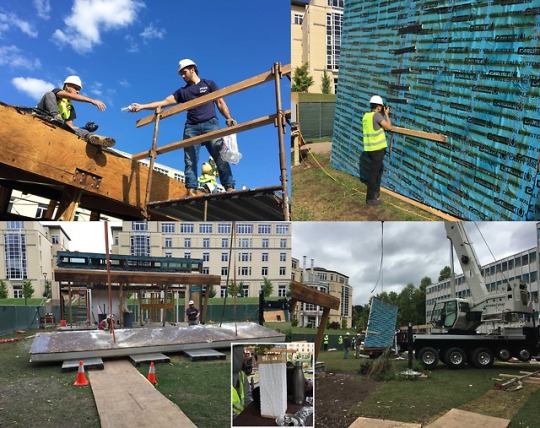
Building off of Lana’s comments in the previous post, learning to adapt became a common theme throughout the DE_CON 01 process.
On October 10th, we advanced work further in preparation for Crane Day. Pictured on the roof level is Kyle, working on the side of the roof with no scaffolding below; he was tied off for safety and relied on Tony (also pictured) and others to pass supplies back and forth. Kyle spent most of the day removing waterproofing and tar mastic sealant to make sure the roof SIPs would easily separate from the rest of the building. Below shows one of the roof SIPs after having been brought down on crane day. Although the panel itself separated easily from the frame, it took two tries to bring the first panel down safely. Initially, the pick points were attached to the plywood caps on the short sides of the panel. Due to the strength of the caps or perhaps the age of the panel, one side tore free when tension was applied and the group was forced to improvise. One team member from Rycon used a chain saw to cut four square sections (one shown in inset photo) out of each panel so that the crane straps could be looped through the entire panel.
The top right photo shows how the rear two of the three SIPs on the west side of the building were stitched together in preparation for disassembly. Srinjoy, Timmy (pictured), Ryan, and I spent part of the day making sure the SIPs on the east and west faces were completely free from each other. All that was to be left were the bolts attaching the SIPs to the structure, to be released immediately prior to removal by the crane. We were taught to be thorough in making sure there was nothing bridging the gap, as sudden disconnections during crane operation can be extremely forceful and dangerous. We found that all that was attaching most of the SIPs to each other were beads of silicone sealant instead of the splines that were initially designed. However, it seemed as though the rear two SIPs pictured did have a spline, so under instruction from our Construction Junction partners, we stitched them together to ensure they would not tear apart in mid air. As it turns out, there was no spline between these panels either - just a lot more silicone. Even after all of the visible bolts between the SIPs and the structure were removed, a steel angle not initially visible kept the rear-most panel from separating from the structure as the crane lifted the two panels together. The other panel tore off and the crane straps had to be lowered and adjusted for the panels to be lifted separately.
#UDBS#UrbanDesignBuildStudio#weareUDBS#PROJECTRE_#projectrepgh#wearePROJECTRE#CarnegieMellonUniversitySchoolofArchitecture#CarnegieMellonUniversity#CMU#CMUUDBS#CMUSoA#SoA#SoAUDBS#DE_CON01#RE_CON01#Deconstruction#NotDemolition#MaterialReuse#MaterialRepurposing#MaterialHarvesting#ZeroWaste#Detailing#Process#CraneDay#learning#observation#sip#crane#submission#adapt
0 notes
Photo
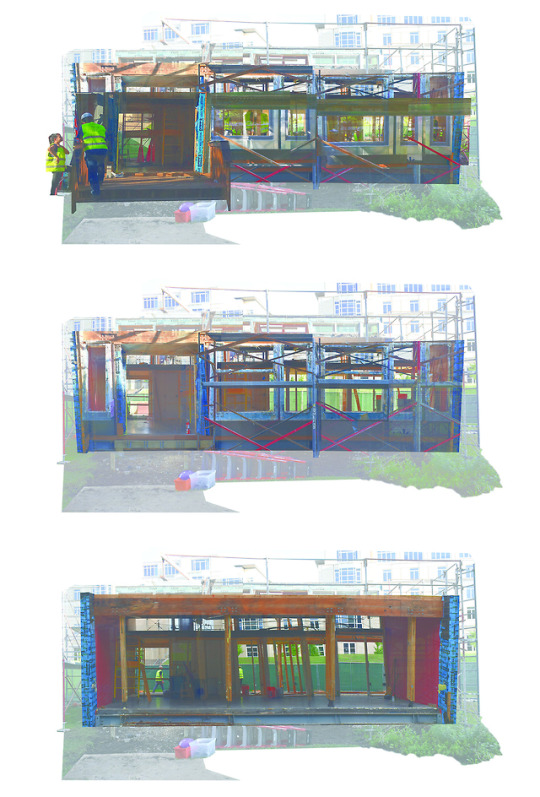
Adding on to Alex’s post, Yashwitha, Tim and I also worked on deconstructing RE_VIEW: SOUTHERN EXPOSURE during DE_CON 01. We removed the built in wooden shelving first from the interior, but mainly worked on the exterior components of the assembly. We began by removing the galvanized steel sun collars and cladding of the wall system, exposing the insulation foam and stripping the wall system to its skeleton. The windows were also removed in tandem with the cladding to ease the process of deconstruction. Once the wall system was stripped to just its framing modules with infilled insulation, we proceeded to remove the window bays separately by cutting it free of fastenings to the existing structure and floor.
All the components removed were stored and transported separately from the other materials we are harvesting so that this UDBS project can be reconstructed again in the future. One component of the system – the galvanized steel sun collars – have the potential to be integrated into the RE_CON 01 and RE_CON 02 prototypes. This is currently being explored by the studio.
#UDBS#UrbanDesignBuildStudio#weareUDBS#PROJECTRE_#wearePROJECTRE#CarnegieMellonUniversitySchoolofArchitecture#CarnegieMellonUniversity#CMU#CMUUDBS#CMUSoA#SoA#SoAUDBS#DE_CON01#RE_VIEW#SouthernExposure#DECONSTRUCTING BLIGHT#MaterialHarvesting#MaterialRepurposing#MaterialReuse#DeConstruction#legacy#learning#learningbydoing#care#place#material#process#solardecathlon#submission
0 notes
Photo
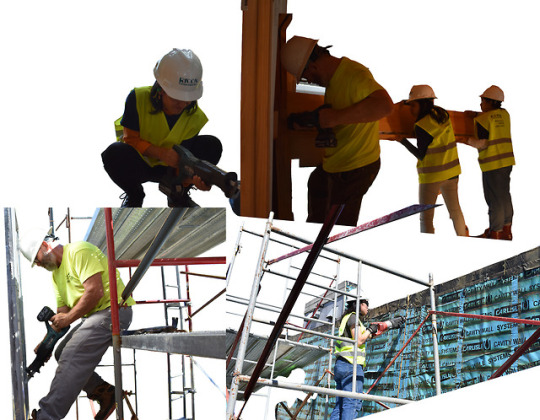
The Reciprocating Saw a.k.a. Sawzall a.k.a Tool of Mass Deconstruction
The reciprocating saw (also known as an oscillating saw or referred to by the Milwaukee Tool Company brand name Sawzall) was a crucial member of the deconstruction toolkit. Able to make quick and dirty cuts, it proved very useful for a number of applications where more delicate procedures were not an option. The ability to change the blade to suit different applications provided a versatility that allowed the deconstruction/processing of materials and assemblies, including windows, the polycarbonate panels, the plumbing system, and the structurally insulated panels (SIPs). It was used not only to cut material into smaller, more manageable pieces, but also to free materials from the assembly by cutting through screws and nails. The reciprocating saws used during the deconstruction process varied from cordless to corded to allow for more ease in use where convenient and were spread among different stations based on proximity to power and ease of use. And although too rough for more intricate details (ex. Southern Exposure previously mentioned in Yash and Gargi’s posts), the reciprocating saw was efficient where there was a significant margin of error and space around the cut to enable a safe cut that would not damage the surrounding material.
As we develop the design of RE_CON 01, my experiences using the reciprocating saw on DE_CON 01 are making me think more about the benefits of Design for Deconstruction (DfD). In proper DfD, assemblies should be easily disassemblable so that the components can be reused or recycled without much damage to the material; ideally, you should not need a reciprocating saw to deconstruct components of the building. Bolted or screwed connections that can be accessed with the proper tools are preferred over nailed, inaccessible connections. Reflecting on these experiences from DE_CON 01 will help the studio make intelligent decisions regarding details and assemblies as we get into the weeds with the RE_CON 01 Construction Documents set.
#UDBS #UrbanDesignBuildStudio #weareUDBS #wearePROJECTRE_ #PROJECT RE_ #projectrepgh #CarnegieMellonUniversity #CarnegieMellonUniversitySchoolofArchitecture #CMUSoA #CMU #CMUUDBS #SoA #SoAUDBS #CMUFMCS #DE_CON01 #RE_CON01 #RYCONConstruction #RYCON #BMRA #BuildingMaterialReuseAssociation #ConstructionJunction #Deconstruction #NotDemolition #MaterialReuse #MaterialRepurposing #MaterialHarvesting #ZeroWaste #Extraction #Tools #ReciprocatingSaw #Sawzall #learning #DesignForDisassembly #DFD
0 notes
Last Seen Blogs

katanagi
@ salvindagnyr

wicc-an-witch
witchy.

fortyeahteamfortress2
FORT YEAH TEAM FORTRESS 2

ademonsmaster
The Life of a Young Earl

floridaboiler
Boilermaker in Florida