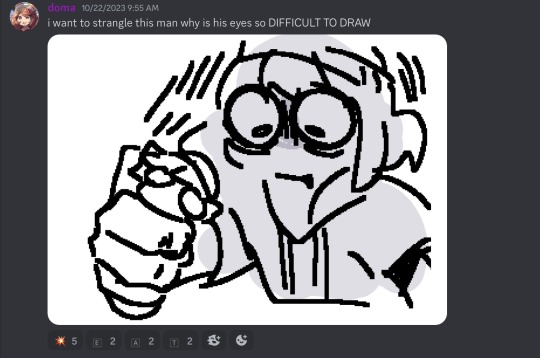
#i made at least 5 sketches
Text
wow i sure hope this guy doesn't lose himself in his desperate attempts to be a part of something. really would suck if he gave up all that makes him him in his frantic bid to be enough. wouldn't it be awful if -
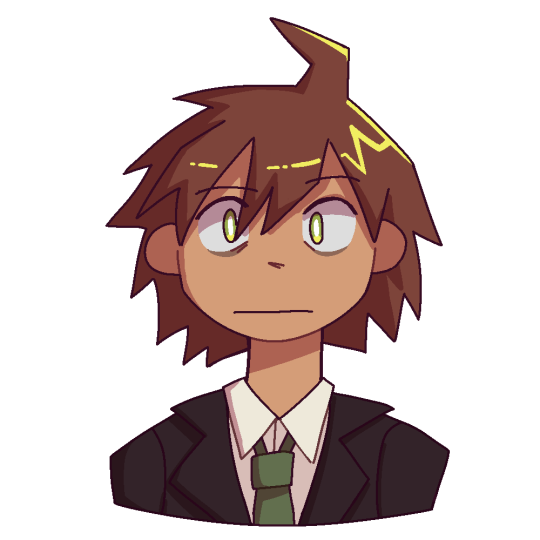
#me when i actually try to do digital art for the first time in#. a long time.#aside from 5 minute sketches i guess#made the mistake of flipping this last minute and oh god. oh fuck#going to blame that on lack of practice#i do like the colours at least. thats something#hinata hajime#hajime hinata#danganronpa
20 notes
·
View notes
Text


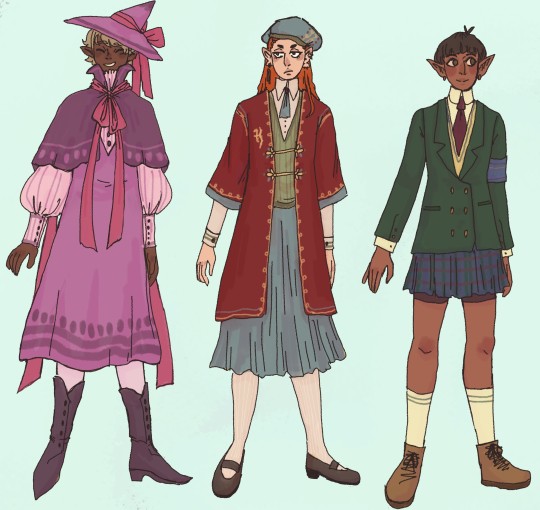
A few little sketches of some possible school uniforms for mage schools/learning centers for magic/etc. :0c Though because Nanyevimi is so scattered and disconnected, it'd actually vary much more by region (like not everywhere would have a cultural concept of what a suit jacket or neck tie looks like lol), so it's probably unrealistic for so many of them to follow too many traditional Uniform Conventions from cultures in our world, etc. But, still, fun to mess around with designs, and think about which would be most fun to wear/what school you'd go to just based off the clothing lol~
#I haven't felt well enough to do anything actually productive lately GRRRR.. evil health issues....#but I can sometimes at least draw while I lay on the floor with a heating pad and etc. lol.. so...#goofy little sketches. Still dislike that the ipad thing someone gave me is either like.. maybe the settings are just off OR possibly the#screen is slightly broken in some regard - so the pressure sensitivity does not work at all. thus all lines are blunt looking#instead of having tapered edges. which I KNOW can be a stylistic thing. like I think it's fine mostly#but sometimes shading looks weird for all of the lines to be the exact same size/width with like no variation lol#though since it's just little sketches it doesnt matter lol but still... hrmm... ever working out my strategy for how to use the ipad for a#art things/if I can ever get used to it/etc.#AAANYWAY... still so uniform obsessed.. and have been since I was a child. Like way before going to middle school and meeting#the people who like anime and get into school uniforms of that variety. I mean like... age 7 before even having any friends#and having zero popular media interests or outside influences that would make uniforms Trendy. but I would see like a 'private school#uniform' on a new story on tv or something or in a book and was just like OUGH... I Should Dress That Way#I used to go to thrift stores and find multiple seperate pieces that could be combined together to look like a school uniform#I had like 4 or 5 different 'uniforms' that I made myself in that way. My first outfit that I was ever allowed#to pick out for myself as my big First Day Of Middle School outfit was literally like school uniform inspired#(maybe mixed with a little goth.. like it was a school uniform sort of look but black and white with fishnet armwarmers lol.. plaid +#stripes pattern mixing my beloved... )#I think it's just the same way that I love apartment buildings because I'm infinitely fascinated with like.. observing human nature and peo#le displaying their psersonalities in little ways and how you can give 10 people the same exact identical space but each one will decorate#it completely differently just depending on their own tastes and reasonnig and etc. I love the idea of everyone in some setting#having to be in one specific set outfit BUT you can tell something about them by the little ways they customize it or what type#of accessories they wear or if they choose to button their shirt fully or not or etc. etc. I like the constraints of 'okay everyone has to#be in exactly the same uniform - NOW. give them their own unique style somehow despite this' etc. etc. like#yaaaayyyy.. I love thinking of little obscure details that convey personality. they have a little pin hidden on the inside of their#hat. their shoes are just like everyone else's but more worn out. they have a necklace barely visible beneath their collar. their tie is#always a little more askew that everyone elses. or even. the uniform is EXACTLY on model entirely clean crisp pristine not a single element#customized or out of place - which STILL tells you something about them. etc. etc.#ANYWAY.. yeahg.. struggling to get anything done these last few weeks so.. blam. poof. alakazaam. scratchy little sketches#of nothing very productive or relating to any other project in particular be upon ye
22 notes
·
View notes
Text

Old Sweet Flips sketch from June 2021 to celebrate TAZ Sapphic week beginning later this week :3c
#taz#the adventure zone#carey fangbattle#taz killian#team sweet flips#thats their ship name right...?#anw ooooof this cane around so quick i hope I can finish what i have planned#unfortunately had to trim down some ideas bc i do not have the time to fully execute them#what made me think 3 multi pages comics for three days was a good idea 😭 i simply do not have the time dnjddjd#but I do have the sketches for at least 5 days planned out and ready to be refined so I think I can get those done at least!! qoooo!#after this I should be able to get around to the requests I have in my inbox - which are also very exciting!!
32 notes
·
View notes
Text

Shelly!!
#pokemon reborn#pkmn reborn#shelly citra#my art#i love bug types fr fr#ok but shelly my beloved. love her#also funfact i used at least 5 colors for her hair help#i shouldve made a better sketch because this ended up looking better than i expected
31 notes
·
View notes
Text
look at my ancient sketchdump boy

'arthur what if i were a sorceror' 'in THAT outfit??? i don't think so'

thor and mrs thor from thor

rando ocs with forgotten names and backstories, pretty sure at least two of them are trans but i don't actually remember
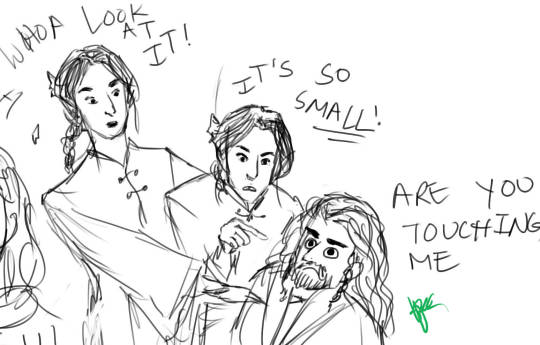
local elves harass thorin oakenshield, more at 11

guess who watched the guy ritchie sherlock holmes adaptation????? (it me)

aragorn and legolas attempting to blend in with ppl in modern times. failure is imminent 😔

a selkie!!!!! after she takes off her sealskin to party hard on oidhche feill i guess!!!
history??? more like HERstory 👏👏👏 #gottem #feminism

where the fuck is frodo
#birb still draws#birb's doodles#these are like. SO OLD. u wouldn't even know it#like 5 to 10 years old AT LEAST#MORE in some cases!!!! i didn't even know whcih fucking BRUSHES to use#those were dark days indeed#put em under a cut bc there are. SEVERAL lol#they made me laugh to look at them tho!!!#hope they'll give u a laugh as well!!! 🤣🤣🤣#lotr#bbc merlin#mythology#sherlock holmes 2009#ocs#got a whole medley here lmaooo 🤣🤣🤣#is this still an art blog?#or is it just a rubbish bin??#we just don't know#my sketches/doodles used to be SO much more. WIGGLY idk#the thorjane one esp has less stiffness than my CURRENT art#it makes me SO ANGRY#HOW DID I REGRESS. HOW.#thor 2011#ummm if u can't read my shit writing.........just ask#i'll gladly translate for u but none of it is actually important 🤣🤣🤣
16 notes
·
View notes
Text
When ppl in person realize i can draw, and i mention im writing, theyre like: oh are you making a comic? Then when i say no, it took me 30 days to do a 30 page 1 chapter comic last time I tried at 4-6 hours of work a day and ideally id like a turnaround of like one 30 page chapter per 1-2 weeks if i was going to do it long term so. No. I am not making comics any more.
Then theyre like: are u gonna illustrate ur book???
And while i deeply appreciate the sentiment. Its also like... well my good sir madam elder, do u typically... look for adult novels with illustration pages? I mean yes i love illustrations too but im not sure why id draw extra, when im already gonna probably make my own cover, and i want my books to be enough within confines of expected that ppl idk... give em a chance? Idk. Food for thought. Do i illustrate my book chapters mm
#rant#shdhdh#to be fair the person who asked me expected like a 100 page handwritten poem book with illustrations#not a 300-500 page novel when she asked if i was gonna do illustrations#i also like. for my Own indulgence. Considered a sexy Guide Book for my story universe. which is where yeah ALL my#goddamn character design sketches and map art and faerie illustrations and landscape art could go#since. i drew thousands of pictures when making lore lmao#but like. all that art is on paper. and i know itll take like 30 hours to 100 hours JUST SCANNING#pages individually one at a fucking time and saving tjem and. dear god the picture editing on them all#even withiut additional digital coloring is at least 5 minutes per picture. then who knows how many hours formatting a combined book with#all art. and thats before ANY text written. which is why i havent even made an art book. like of just art#hell its why i havent even backed up my 9 sketchbooks of traditional art from the past decade#its so much work its like 2000 pages of art. im just gonna let my family ancestors find iy if i get luxky#and its not desyroyed by the elements (like all my older art was ToT)#tldr my point is: i love love love art and i love the momentary joy it brings ppl i share it with#but as far as like Big output i prefer writing. its easier#art is fine wjen its like im paid to make 1 poster 1 flier 1 card one book cover etc#but ive never been commissioned to do like 20 illustrations ( i would tho! sounds like more money)#so like. on my own time for free as far as high scale takes days of work? id prefer to not do more art
2 notes
·
View notes
Video
youtube
another exorcist animatic time B) i actually cant stop making them its so much fun sghdhsf help
#natsume yuujinchou#matoba seiji#natori shuuichi#matonato#horrible exorcists#natsuyuu#pasc's art tag#made most of this in like 3 days in a sleep deprived state because i couldnt get it out of my brain and couldnt stop asdajk#but then proceeded to get stuck for 2 weeks on ONE LAST FRAME. i have at least 5 different rejected sketches for that one frame cuz i just#-couldnt get it to work dfgfdfh#this is such an exorcist divorce arc song tho ough#featuring the most inconsisent natori drawing known to man#exorcists
24 notes
·
View notes
Text
Do people like make analysis on how to approach working on art pages cause I've been meaning to make one for a loong time but I've been really critical of the stuff I make and what pieces I'm ready to show people.
I realize it's stupid to approach art pages like professional portfolios when I haven't made a single penny from my art once in my lifetime but I also like opening a page and seeing good stuff. But idk if this approach is gonna only make me anxious. Last time I tried having an art page was in like 2017 though, a lot has changed
#Also I make art with vagigas etc in them and every art platform people actually use wants me dead for yhat#Thinking aloud#I'd be happy to hear your thoughts if you have any on the topic though#Art#//rambles#Also for context by good art I mean art I like#There are 5 minute sketches I love and things I spent a few hours working on that I just hate#I like to think that's good because no matter the time spent I have the feel if a person with a certain taste will like it#But on the other hand again I'm a person doing free art on tumblr dot com and sometimes I just#want to draw a silly jester girl doing something silly but my brainworms say fuck you#And putting these ideas aside because the 5 sketches I made for this one thing all looked awkward. And there are like 7 more ideas#This is why if I ever make a art tumblr it'll be full of random non repeating OC girls at least I don't feel the pressure when I'm drawing#something that doesn't have a set in stone canon#Help mypost fell into tags again 🙏 I hate when that happens
3 notes
·
View notes
Text
Don't challenge yourself to more than 3 new things in a drawing, that way lies mostly suffering
#yeah#i can totally figure this thing out i know im very bad at#i made those conscious decisions and now im regretting more than half of them#i distinctly remember thinking at least 3 separate times lol#alex rambles#im gonna figure it out because ive put like 5 hours into this sketch#but omg am i cursing my past self something awful#and its super grey out uuuuugh
4 notes
·
View notes
Text
hmmm the v strong urge to draw That image of ncuti gatwa with the purple shirt as part of the pretty men series,,,,,,,,, someone stop me (I have exams 😔)
#my first one is literally next tuesday but my minds going hehe art but not in the right headspace to do it so i hate all my progress !!!#literally started the same piece 5 different times the other day and none of them seem right but i know ive gotta just. go with the vibe#only there are no vibes because im not in the right mind to be doing art as therapy its like im forcing myself to do it to procrastinate !!#anyways ive already opened the sketch but im making myself lock the app again so i cant revisit it until ive made some woh progress#at the very least before i go to sleep#this is my cue to get off tumblr isnt it maybe ill be back tomorrow maybe in a month idk !! slightly panicking !+
3 notes
·
View notes
Text
So I have a lot of sketches that never ever see the light of day online, as I keep a folder that I call my digital sketchbook and any time I want to doodle, I open a canvas, do whatever until I run out of steam, then toss it in there. It's pretty much entirely loose sketches, some character concepts, and lots of fursona art.
I've been thinking for a long time that I may start posting them to my kofi page and make them viewable by a membership tier, but I'm not sure what monthly payment would be fair to see some bonus art that's mostly sketches and may never get posted anywhere else (but isn't promised to be forever exclusive because I don't like to limit myself from sharing what I want. And I do post a little of it to my discord here and there. I just don't want to bombard my blog with all of them and generally don't feel like posting them all over online so I probably never will.)
#not putting 2 or 1 dollar bc after fees that's like almost nothing on the receiving end#to me thats just a tip jar amount not one that receives anything asdsgdhjf#I need at least some motivation to post the stuff or I won't bc it doesn't feel worth it at a certain point#anyway I genuinely just like. dont know what thats worth to people#obv feel free to vote even if you wouldnt be interested! i still value your opinion#think about it like if there was an artist that offered this that you really wanted to see it from and what you would pay for it#tbh i dont know what to tag this bc im not just rambling this time and it is art related#there's also the fact that I will not be providing a consistent amount of promised art for the tier every single month#like i will try to post at least one thing but the amount i draw varies wildly bc its just for fun and practice#so some months you may get like 5 or so full canvases of sketches and others you might get like two cropped ones with a few doodles yknow#ill try to make that clear on the tier description but i dont do membership stuff purely bc i cant promise consistent output of things :')#BUT you can also join and leave as you want#and like whenever you join every single post ive made to it will be viewable#so you can let it build up for a while then subscribe for a month or two or whatever suits you#thanks for your help!!
0 notes
Text
My art process takes days. For what reason you ask? Tiny brush. It’s the only way things will come out right when I draw
Mapleshade might actually just kill me fr fr
#art#wc#?#kind of#warrior cats#I’ve been staring at her pathetic soaked face for three days as I sketch out the rest of her body#oh yeah this is still the sketching process btw I usually sketch things at least 3x over#5 on the bad days!#it goes to simple shapes to somewhat more complex shapes to figuring out where the fuck the cat is#this isn’t even bringing in the way I did my older stuff#which was#lineless#it doesn’t look like it#but instead of lines I’d just#use the fill tool and expand it by a bit and then thicken or thin as I pleased with an eraser#I had to mainly block out the details on the main piece before I did the detail afterwards#basically I worked in reverse#colored before I lined#it’s stupid and it’s painful#and it made things really complicated
1 note
·
View note
Text
Holy SHIT am I proud of this. It took a day and a HALF to work on it. I really just wanted to draw a cool badass picture of Charlie in a cute dress, and somehow I ended up with my best piece I think I've ever done!!
To see the process, click the 'read more' below!
Otherwise:
Main blog over here
My Etsy Shop!
Originally, I wanted it to look more like a royal portrait, a good excuse to draw a pretty dress.
I adored the dress design, but it was an extremely flat image, so despite taking like. 5 hours to design it and work on it, I rethought my plan, switching to a far more dynamic pose.
I also made sure to add tons of flow lines, both from her hair, to her tail, to help bring the eye all around the canvas.
I did a billion sketches, but this is what I ended up on! Originally I had her right arm holding the pitch fork behind her back, but it just never looked right. I also took a risk and did a facial angle that has always been extremely hard to get right, and somehow I managed to make it look nice!
After adding the lineart, colors and all of that, I knew quickly I didn't want the angel to stick out as much as she did. I wanted her to fall into the background instead, since she was just on the border and I didn't want any attention really taken from Charlie. So I changed her shade to red, and from there I added more of the background details!
Okay I did leave some inbetween screenshots out but it's past my bedtime. I hope this was fun to look at, at least!
Final product once more!
#charlie morningstar#artists on tumblr#hazbin hotel#hazbin hotel fanart#hazbin hotel season 1#hazbin#vivziepop#cqart
1K notes
·
View notes
Text
i need friends
#like irls#i collect dead discord servers and inactive online friends easily#yknow i say this like i leave my house or make any effort to meet people#is this why i make fictional characters for everything#is it my psuedo social interaction#i mean i have work but everyone’s at least 5-6 years#older than me and it’s not like i hang out with any of them#well i got asked to go to a concert by these two guys but idk. seemed sketch#ugh idk. something something being left alone so much as a child has made me bad at forming attachments
1 note
·
View note
Text

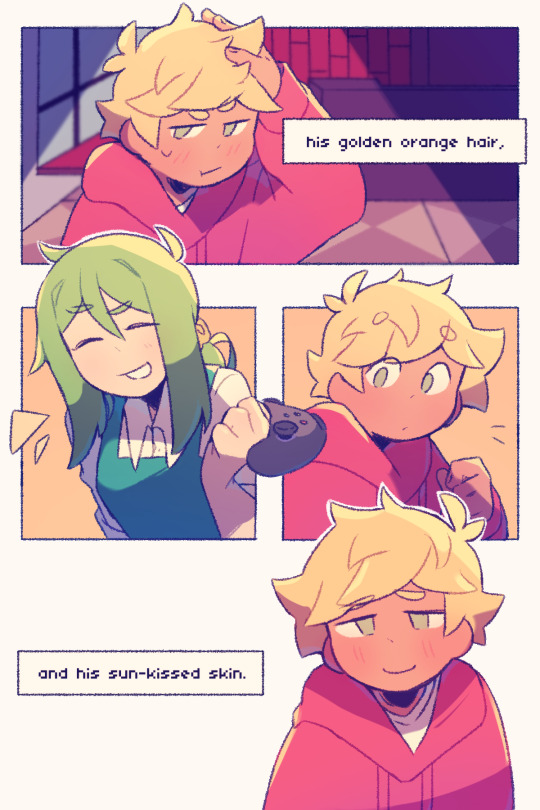

Her heart was beating in her ears like a marching band
-----------------------------------------
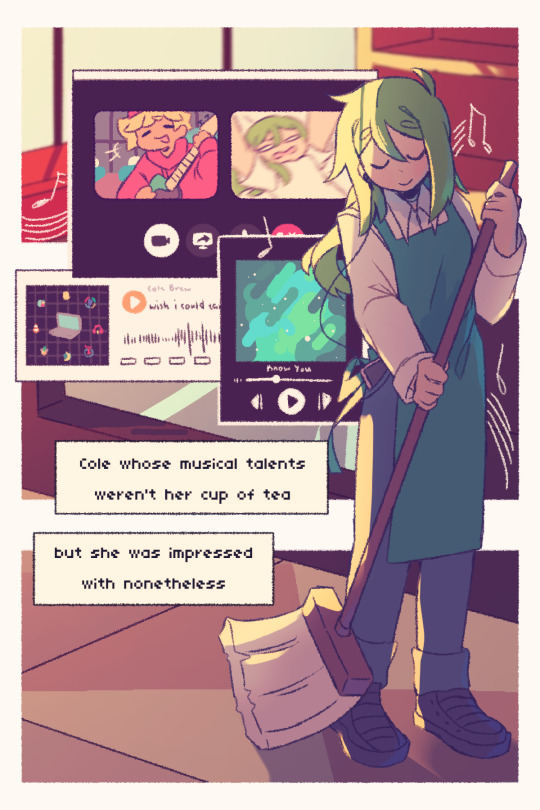
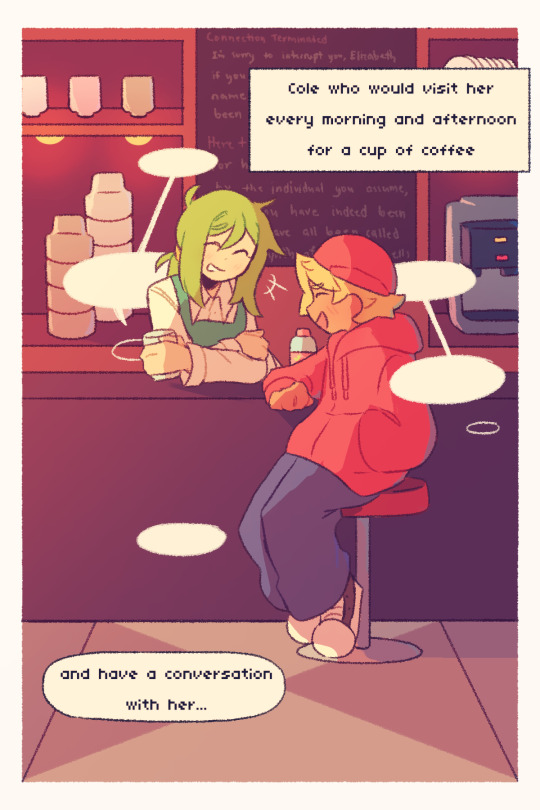
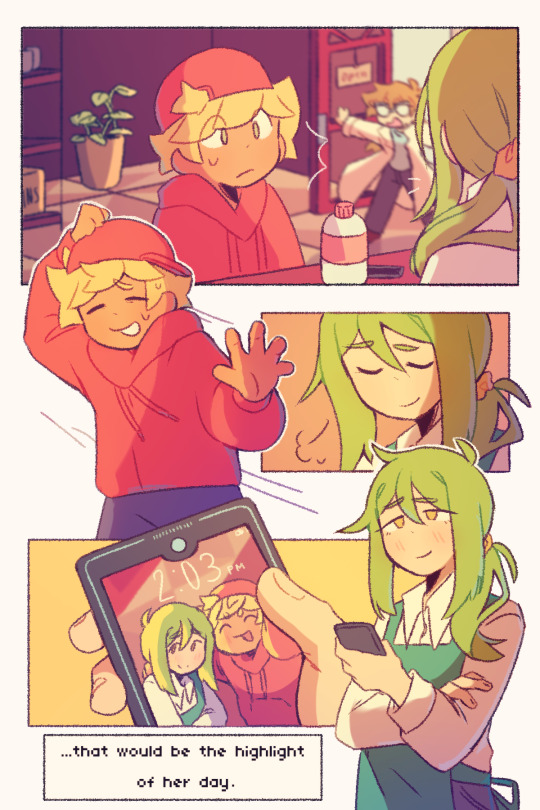
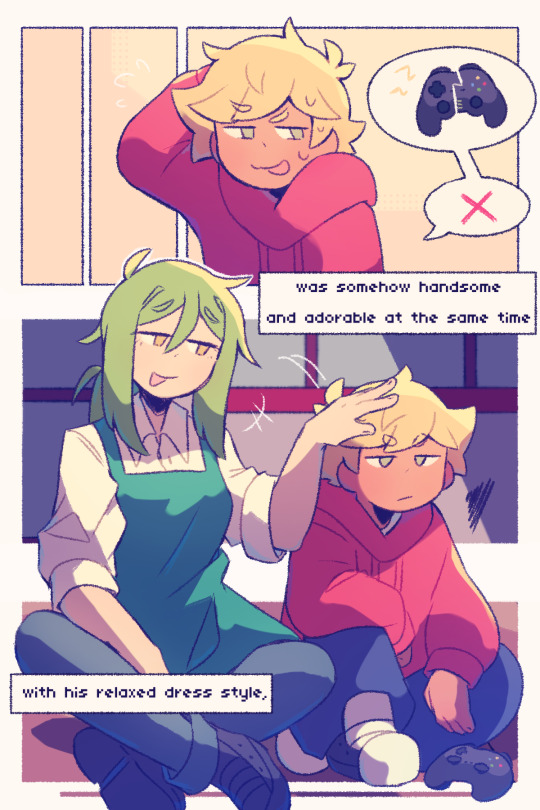
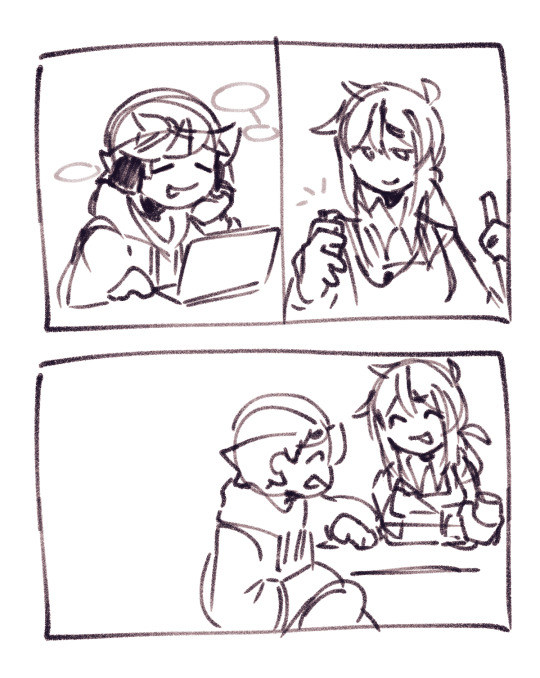
I’ve been getting back into drawing stuff for Rhythm Doctor again because of the Act 5 hype, so here’s a silly comic based on Mic Check by ReneeDekobora2042!! It was one of the first RD fics I read when I first got into the fandom, and probably one of the best (definitely up there with Clipboard Notes, victor if you’re seeing this hi LOL) so I thought it would be nice to make a short comic of one of my favorite parts. More ramblings & bonus doodles under the cut :]
I started working on this about a month an a half ago, and initially I just wanted to work on this as a small silly wacky fanart project that was supposed to look more like this

So like every sane artist I decided to make it harder for myself

Also some unused sketches based on the Rollerdisco Rumble Reprise custom level by Kabii!
These were my favorite panels during the sketching phase but I had to change the last couple panels to reference 2-3N instead because it made more sense timeline wise. Might render these someday tho because I'm still attached to them lmao
Last but not least shoutout to my discord friends for being there for my slow descent into madness (now if youll excuse me im going to go collapse now thank you for reading)


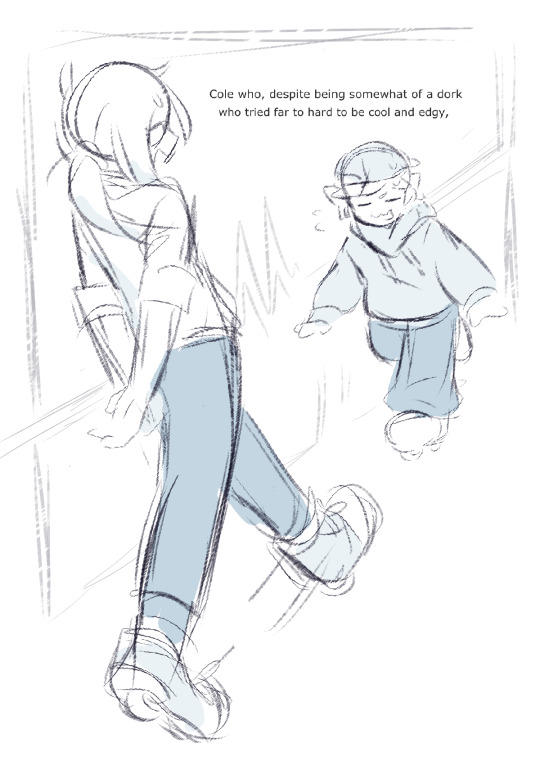
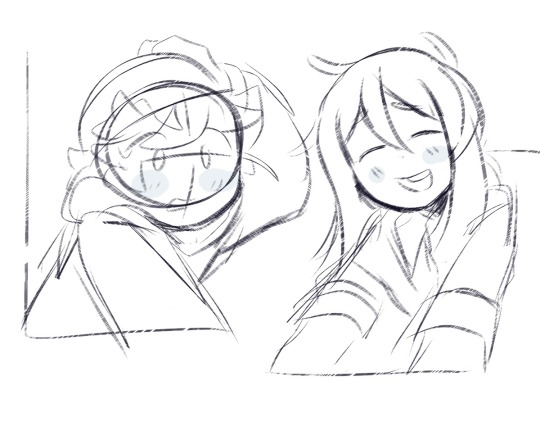
#rhythm doctor#nicole ting#cole brew#chiimo art shenanigans#usually im talkative in the tags but honestly ill jusdt#add them tomorrow im really tired LMAO#edit: hi im awake now time to start rambling!!!111!!1111!#bro the STRUGGLE i had to go through to make sure it was exactly 7 pages#i saw the opportunity and SNATCHED IT#somehow the hands werent that hard to draw#but i struggled on the eyes instead?????#art is fun#ive noticed liek#3 inaccuracies#no ones gonna notice so its fine lmao#cocole has taken over my life i swear#ive got some more cocole art that i might post sometime#im so normal about them fr#cocole
509 notes
·
View notes
Text
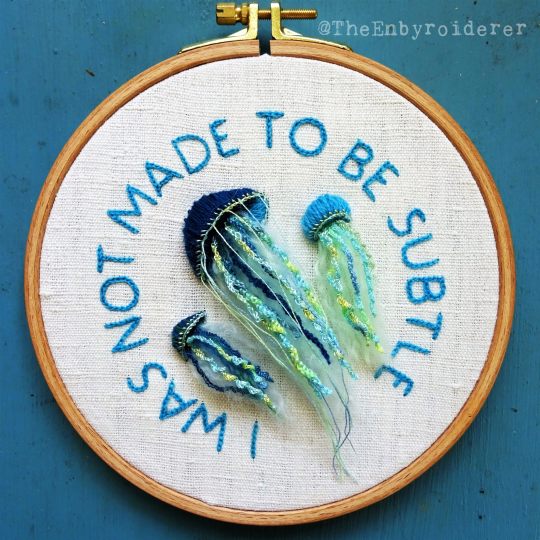

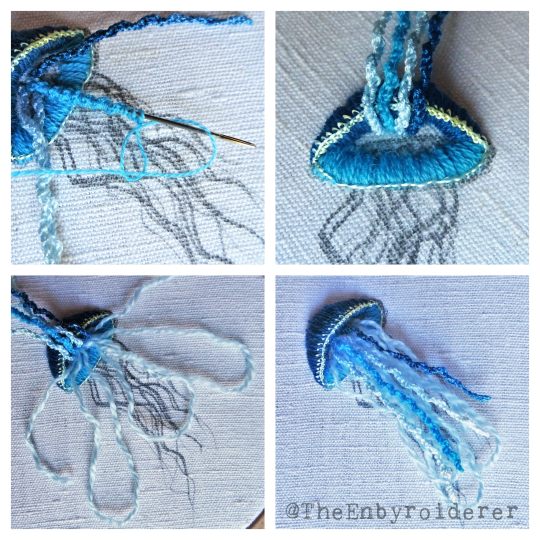
One more tutorial. I think this is the last one I have for now.
Here's how you stitch a 3D jellyfish. This is a more advanced tutorial. Prior experience with most of the stitches is recommended.
Materials: You'll need several needles, at least one shorter and one really long. I've used sashiko needles in three lengths, 4 cm, 5.5 cm and 8.5 cm. As for yarn, I think you can use whatever you have. Most of it can be done with six-stranded floss, but you'll need some thicker woolen yarn for the fluffy turkey stitch. I used fine d'aubusson (a fine wool embroidery yarn) for the body, six-stranded floss (2-3 strands) for most of the tentacles, a shiny silky embroidery floss for the edge of the body and a couple tentacles, and knitting yarn scraps for the turkey stitch.
Stitches: satin stitch, bullion stitch, padded satin stitch, buttonhole stitch, drizzle stitch and turkey stitch. Please look up stitch instructions on youtube, and do a bit of practice beforehand. This project is probably not a good practice run for these stitches.
Time: depends on the size of your jellyfish. I made quite a large one and it took me about 5 hours to complete.
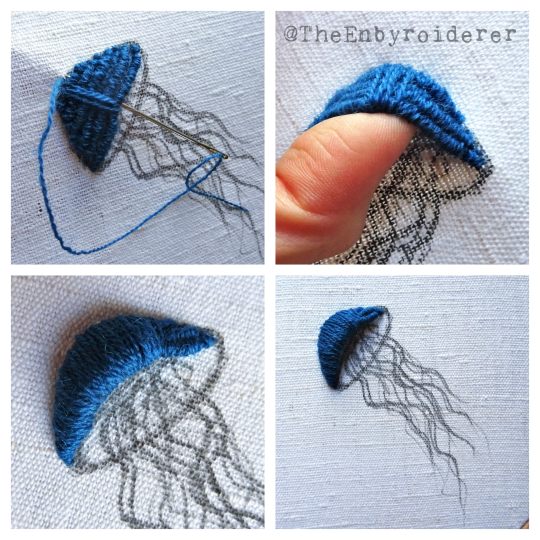
1. Make a sketch of your jellyfish. At least of the body. Fill this body from edge to edge with bullion stitch, make them a bit longer than the body is wide so that they are somewhat loose. You should be able to get a finger underneath the bullion, depending on the size of your jellyfish.
2. Then it's time to satin stitch the body. For this part it's important that the needle goes through the fabric as close to where it came up as possible. The goal is not just to make a 3D body, but to make it a hollow 3D body. Don't just stitch over the bullion, stitch around it. It's also important to not pull too tight. Bullion stitch of this lenght is rather malleable, so it's a bit tricky to keep the satin stitch even. Hold a finger in the hollow underneath the bullion as you pull the thread tight. This will stop it from getting to tight, as well as make sure you keep the hollow. As the stitching gets thicker the hollow will get smaller, but that's ok.
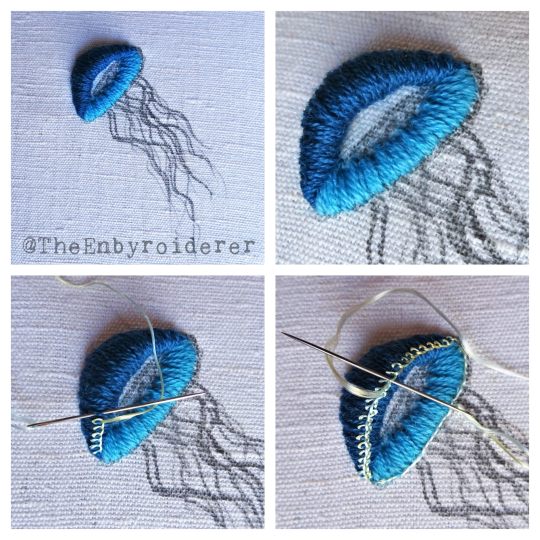
3. When the top part of the body is fully stitched it's time to do normal flat satin stitch for the bottom part, the inside of the body of you will. Leave an opening in the middle though, you'll need some space for the drizzle and turkey stitch later.
5. Now it's time for the tentacles. Start with the drizzle stitch, because the turkey stitch will just get in the way if you start with that... but do remember to leave space for the turkey stitch underneath the drizzle stitch. This is where you need the loooong needle. Pack as much drizzle stitch on that needle as you can. You'll notice that the drizzle stitch wants to rotate around your needle as it gets longer, do let it, that will just help you fit more stitch on there, as well as give the finished stitch a nice curl.
6. When you think you have enough drizzle you can move on to the turkey stitch. You will not need to do a lot of it. You'll probably overestimate how much you need, but that's ok, you can always give the fluff a bit of a haircut later. Do a few looong loops of turkey stitch, a little bit longer than your drizzle stitch. Cut the loops to slightly different lengths, otherwise you'll get a very blocky bit of fluff... tapered is better. Untwist the yarn and separate the strands, draw a needle through the strands to fluff them up.
7. As a finishing touch you can add some long and thin strands around the edge of the body.
#embroidery#3d embroidery#fiber art#needlework#embroidery tutorial#fiber art tutorial#3d embroidery tutorial#tutorial#jellyfish art#theenbyroiderer
756 notes
·
View notes
Last Seen Blogs
aoibaratraveler
big time procrastinator with a love of traveling

ombika2020
OMBIKA E-Commerce Services Private Limited
faith3i3
faith
miao-koneko
みあお

cloudgirlsinfo
Cloudgirls.info