#how to configure gpo
Text
GPO - Create Shortcut
GPO: Create Shortcut
Today’s tutorial will show you how to easily create a desktop shortcut from a shared folder on your server.
In this video, we will be demonstrating how to create a shortcut from a shared folder by using GPO on your server in just a few simple steps.
let’s to see video from our YouTube channel
Please check more videos for This Topic

View On WordPress
#active directory#AD#Backup and Recovery#Configuring Group Policies#Configuring Group Policy#Create and Link a GPO#Create GPO#create Group Policy and Link it to OU#Create Shortcut#Creating Active Directory Objects#Google AdSense#GPO#group policy beginner#group policy guide#Group Policy Management#Group Policy Object#Group Policy Objects#group policy step by step#group policy tutorial#how to configure gpo#how to configure group policies#How to create GPO#How to Install Active Directory In Windows Server#How to Promote windows server to Domain Controller#How to setup Active Directory (AD) In Windows Server#Hyper-V#Install and Configure Active Directory#Install and Configure Active Directory in Windows Server#Installing AD DS roles in Windows Server#Microsoft 365
0 notes
Text
Power Up Your Potential: A Guide to Power Distribution Units (PDUs)
In the world of data centers and server racks, reliable power distribution is crucial. Power distribution units (PDUs) are the unsung heroes that ensure your critical equipment receives the consistent and stable power it needs to function. Here at RackLink, we understand the importance of having the right PDU solution for your specific needs.

What is a PDU?
A PDU is a centralized power distribution device that provides multiple outlets for powering equipment within a rack enclosure. They come in a variety of configurations to suit different needs, from basic units with standard outlets to intelligent PDUs with advanced monitoring and control capabilities.
Choosing the Right PDU for Your Needs
When selecting a PDU, there are several key factors to consider:
Number of Outlets: The number of outlets you'll need depends on the number of devices you plan to power. RackLink offers PDUs with a variety of outlet counts to accommodate even the most demanding setups.
Outlet Type: Select a PDU with the appropriate outlet type to match the plugs of your equipment. Common outlet types include GPO (Australian three-pin plug) and IEC (international C13/C14 connector).
Mounting Options: Consider how you will mount the PDU within your rack. Many PDUs are designed for vertical mounting within a standard 19-inch rack enclosure.
Metered vs. Unmetered: Basic PDUs simply distribute power. Metered PDUs provide real-time data on power usage, allowing you to monitor energy consumption and identify potential inefficiencies.
Managed vs. Unmanaged: Unmanaged PDUs offer basic power distribution. Managed PDUs allow for remote monitoring and control of individual outlets, providing greater flexibility and control over your power infrastructure.
Benefits of Using PDUs
There are several advantages to using PDUs in your rack enclosures:
Improved Power Distribution: PDUs provide a centralized and organized way to distribute power to multiple devices.
Enhanced Safety: PDUs often include features like overload protection and circuit breakers to safeguard your equipment from electrical hazards.
Simplified Cable Management: PDUs help to reduce cable clutter within your rack, improving airflow and overall system organization.
Remote Monitoring and Control (Managed PDUs): Managed PDUs allow you to monitor power usage and remotely control individual outlets, streamlining power management and troubleshooting.
RackLink: Your Trusted Partner for PDU Solutions
At RackLink, we offer a comprehensive selection of high-quality PDUs from leading manufacturers. Our knowledgeable staff can help you select the perfect PDU to meet your specific requirements and budget. We also provide a range of PDU accessories, including mounting brackets and cable management solutions.
Browse our PDU selection at https://www.racklink.com.au/Power-Strips_PDUs/ or contact us today to discuss your PDU requirements.
Let RackLink be your partner in powering your potential.
0 notes
Text
AZ-800: Administering Windows Server Hybrid Core Infrastructure
This course teaches IT professionals how to manage core Windows Server workloads and services using on-premises, hybrid, and cloud technologies. This course teaches IT professionals how to implement and manage hybrid and on-premises solutions, such as identity, management, compute, networking, and storage in a hybrid Windows Server environment. AZ-800: Administering Windows Server Hybrid Core Infrastructure
This four-day course is intended for hybrid Windows Server administrators who have experience with Windows Server and want to extend the capabilities of their on-premises environments by combining on-premises and hybrid technologies. Windows Server Hybrid administrators deploy and manage hybrid and on-premises solutions, such as identity, management, compute, networking, and storage in a Windows Server hybrid environment. Docker y Kubernetes: Docker Swarm
Module 1: Identity services in Windows Server
This module introduces identity services and describes Active Directory Domain Services (AD DS) in a Windows Server environment. The module describes how to deploy domain controllers in AD DS, as well as Azure Active Directory (AD) and the benefits of integrating Azure AD with AD DS. The module also covers Group Policy basics and how to configure group policy objects (GPOs) in a domain environment.
lesson
Introduction to AD DS
Manage AD DS domain controllers and FSMO roles
Implement Group Policy Objects
Manage advanced features of AD DS
Lab: Implementing identity services and Group Policy
Deploying a new domain controller on Server Core
Configuring Group Policy
After completing this module, students will be able to:
Describes AD DS in a Windows Server environment.
Deploy domain controllers in AD DS.
Describes Azure AD and benefits of integrating Azure AD with AD DS.
Explain Group Policy basics and configure GPOs in a domain environment.
Module 2: Implementing identity in hybrid scenarios
This module discusses how to configure an Azure environment so that Windows IaaS workloads requiring Active Directory are supported. The module also covers integration of on-premises Active Directory Domain Services (AD DS) environment into Azure. Finally, the module explains how to extend an existing Active Directory environment into Azure by placing IaaS VMs configured as domain controllers onto a specially configured Azure virtual network subnet.
lesson
Implement hybrid identity with Windows Server
Deploy and manage Azure IaaS Active Directory domain controllers in Azure
Lab: Implementing integration between AD DS and Azure AD
Preparing Azure AD for AD DS integration
Preparing on-premises AD DS for Azure AD integration
Downloading, installing, and configuring Azure AD Connect
Verifying integration between AD DS and Azure AD
Implementing Azure AD integration features in AD DS
After completing this module, students will be able to:
Integrate on-premises Active Directory Domain Services (AD DS) environment into Azure.
Install and configure directory synchronization using Azure AD Connect.
Deploy and configure Azure AD DS.
Implement Seamless Single Sign-on (SSO).
Deploy and configure Azure AD DS.
Install a new AD DS forest on an Azure VNet.
Module 3: Windows Server administration
This module describes how to implement the principle of least privilege through Privileged Access Workstation (PAW) and Just Enough Administration (JEA). The module also highlights several common Windows Server administration tools, such as Windows Admin Center, Server Manager, and PowerShell. This module also describes the post-installation configuration process and tools available to use for this process, such as sconfig and Desired State Configuration (DSC).
lesson
Perform Windows Server secure administration
Describes Windows Server administration tools
Perform post-installation configuration of Windows Server
Just Enough Administration in Windows Server
Lab: Managing Windows Server
Implementing and using remote server administration
After completing this module, students will be able to:
Explain at least privilege administrative models.
Decide when to use privileged access workstations.
Select the most appropriate Windows Server administration tool for a given situation.
Apply different methods to perform post-installation configuration of Windows Server.
Constrain privileged administrative operations by using Just Enough Administration (JEA).
Module 4: Facilitating hybrid management
This module covers tools that facilitate managing Windows IaaS VMs remotely. The module also covers how to use Azure Arc with on-premises server instances, how to deploy Azure policies with Azure Arc, and how to use role-based access control (RBAC) to restrict access to Log Analytics data.
lesson
Administer and manage Windows Server IaaS virtual machines remotely
Manage hybrid workloads with Azure Arc
Lab: Using Windows Admin Center in hybrid scenarios
Provisioning Azure VMs running Windows Server
Implementing hybrid connectivity by using the Azure Network Adapter
Deploying Windows Admin Center gateway in Azure
Verifying functionality of the Windows Admin Center gateway in Azure
After completing this module, students will be able to:
Select appropriate tools and techniques to manage Windows IaaS VMs remotely.
Explain how to onboard on-premises Windows Server instances in Azure Arc.
Connect hybrid machines to Azure from the Azure portal.
Use Azure Arc to manage devices.
Restrict access using RBAC.
Module 5: Hyper-V virtualization in Windows Server
This module describes how to implement and configure Hyper-V VMs and containers. The module covers key features of Hyper-V in Windows Server, describes VM settings, and how to configure VMs in Hyper-V. The module also covers security technologies used with virtualization, such as shielded VMs, Host Guardian Service, admin-trusted and TPM-trusted attestation, and Key Protection Service (KPS). Finally, this module covers how to run containers and container workloads, and how to orchestrate container workloads on Windows Server using Kubernetes.
lesson
Configure and manage Hyper-V
Configure and manage Hyper-V virtual machines
Secure Hyper-V workloads
Run containers on Windows Server
Orchestrate containers on Windows Server using Kubernetes
Lab: Implementing and configuring virtualization in Windows Server
Creating and configuring VMs
Installing and configuring containers
After completing this module, students will be able to:
Install and configure Hyper-V on Windows Server.
Configure and manage Hyper-V virtual machines.
Use Host Guardian Service to protect virtual machines.
Create and deploy shielded virtual machines.
Configure and manage container workloads.
Orchestrate container workloads using a Kubernetes cluster.
0 notes
Text
provide you with an overview of the course and how it can benefit your career in the field of information technology.
During this webinar, you will have the opportunity to learn about the following topics:
• Manage and maintain a server infrastructure
• Design and implement identity and access solutions
• Install and configure servers
• Configure Hyper-V
• Deploy and configure core network Services
• Create and manage GPO (Group Policy Object)
The webinar will be conducted by our expert faculty members, who have years of experience in the industry and are passionate about sharing their knowledge with aspiring IT professionals like you. They will be available to answer any questions you may have about the course, career opportunities in the IT industry, or any other related topics.
This webinar will be held on 23rd May’23 and 1 pm-2 pm. and is completely free to attend. All you need to do is register at https://join.skype.com/xgclHxB2bFx7
Once you have registered, you will receive a confirmation email with all the details you need to join the webinar.
Don't miss this opportunity to learn more about our MCSE/MCITP program and take the first step toward your career in IT. We look forward to seeing you at the webinar!
1 note
·
View note
Text
Windows server 2016 internet explorer not working

#Windows server 2016 internet explorer not working update
#Windows server 2016 internet explorer not working windows
The policy (preference) applies as shown in the Resultant Set of Policy wizard. The settings I want to apply is to enforce a proxy and set address + proxy overrides. (User Settings > Preferences > Control Panel Settings > Internet Settings). You will now see the Internet Explorer Enhanced Security Configuration box. Using GPO to set preferences for IE-11 for the RDS users. On the right hand side click on the On link next to IE Enhanced Security Configuration.
#Windows server 2016 internet explorer not working windows
To disable IE enhanced security in windows server 2012 R2, launch the Server Manager, on the left hand side click on Local Server. When the IE ESC is enabled, you get pop-up all the time and you are asked to add every new url to the IE trusted sites zone. If you want to view a Web site that requires Internet Explorer functionality that has been disabled, you can add the Web site to the inclusion lists in the Local intranet or Trusted sites zones.
#Windows server 2016 internet explorer not working update
It seems that a recent update (December 2016) to my Windows 10. This enhanced level of security can prevent Web sites from displaying correctly in Internet Explorer and can restrict access to network resources, such as files on Universal Naming Convention (UNC) shared folders. I normally use Internet Explorer and Edge for browsing, but also have Chrome and Firefox. It is not recommended to disable IE enhanced security in windows server 2012 R2 servers because it can reduce the security and can potentially expose the server to attacks. These settings also reduce the exposure of your server to Web sites that might present a security risk. Internet Explorer Enhanced Security Configuration ( IE ESC) establishes security settings that define how users browse Internet and intranet Web sites. In this short post you will see the steps to disable IE enhanced security in windows server 2012 R2.
0 notes
Text
Res workspace manager admin guide

RES WORKSPACE MANAGER ADMIN GUIDE UPDATE
RES WORKSPACE MANAGER ADMIN GUIDE SOFTWARE
RES WORKSPACE MANAGER ADMIN GUIDE WINDOWS
How To: Build a Citrix VMHosted Apps environment
RES WORKSPACE MANAGER ADMIN GUIDE UPDATE
How to: Update Virtualized Application Part 1: App-V How to: Update Virtualized Application Part 2: Citrix Profiler Preload all application using a App-V Streaming Only infrastructure Options to Secure Access to your Terminal Server Environment How to: Reboot Script with Kemp Load Balancers How To: Autostart a Published Application/Desktop with more Published Applications/Desktops
RES WORKSPACE MANAGER ADMIN GUIDE WINDOWS
How to: Build a ThinBased-PC with Windows 7/XP Unattended installation of Citrix XenApp 6.5 Part 1 Unattended installation of Citrix XenApp 6.5 Part 2 Using RES Workspace Manager to secure your environmentĬitrix Load Balancing Policies XenApp 6.x explained Unattended installation Citrix Provisioning Services 6.1 Part 1 Unattended installation Citrix Provisioning Services 6.1 Part 2 Unattended Installation Citrix Provisioning Services 6.1 Part 3Ĭitrix Provisioning Services: To PXE or not to PXE Monitoring Citrix XenApp without installing a monitor agent Unattended Installation Citrix Provisioning Services Part 4 Reboot Script for XenApp/XenDesktop 7.x (for 24x7 environments)Ĭitrix Provisioning Services PowerShell Scripts XenApp 6.x Maintenance Shutdown and Start-up Scripts Multi Factor authentication with SMS Passcode without sending an (actual) SMS Unattended Installation scripts XenDesktop 7.x Part 1 Unattended Installation scripts XenDesktop 7.x Part 2 Unattended Installation scripts XenDesktop 7.x Part 3 Unattended Installation scripts XenDesktop 7.x Part 4Ĭonfigure Single Sign On (SSON) for Citrix Receiver Installing and configuring Citrix XenDesktop Linux VDA Unattended Installation scripts XenDesktop 7.x Part 5 Unattended Installation scripts XenDesktop 7.x Part 6 Unattended Installation scripts XenDesktop 7.x Part 7 Quick Post: Determine VDI datacenter location and perform actions based on location Migrating (persistent) VDIs from on-prem to Citrix Cloud What RDP GPO settings can do with your Citrix Server Terminal Server and the profile challenge
RES WORKSPACE MANAGER ADMIN GUIDE SOFTWARE
Part 1īasic Concepts of Terminal Server EnvironmentsĬan third party software solve your Terminal Server printing problems? The best Freeware Tools for your Terminal Server Infrastructure. Selecting a SBC product for your environment To Virtualize or Not To Virtualize with SBC The alternatives for Citrix Presentation Server Part One The alternatives for Citrix Presentation Server Part Two The alternatives for Citrix Presentation Server Part Three Preload App-V Application Scripting optionsĪpplication Virtualization Guidelines Part 2Īpplication Virtualization Guidelines Part 1īasic Principles of designing Citrix XenApp Environments Part 6īasic Principles of designing Citrix XenApp Environments Part 5īasic Principles of designing Citrix XenApp Environments Part 4īasic Principles of designing Citrix XenApp Environments Part 3īasic Principles of designing Citrix XenApp Environments Part 2īasic Principles of designing Citrix XenApp Environments Part 1īest practices for migration with SBC Infrastructures Where Microsoft Easy Printer configuration differs with Citrix Univeral Printing The two not much mentioned components in a PVS High Available infrastructureįairShare of Resources in RD Session Host XenApp 6.5 (Troubleshooting) Tips and Tricks Part 1 Selecting a Monitor solution for SBC/VDI infrastructures Part 1Ĭitrix Provisioning Services Design Part 2Ĭitrix Provisioning Services Design Part 1 Selecting a Monitor solution for SBC/VDI infrastructures Part 2 Load Balancing Citrix Delivery Controllers via a Load Balancer necessity?įailover (im)possibilities of XenDesktop 7.x Part 5įailover (im)possibilities of XenDesktop 7.x Part 4įailover (im)possibilities of XenDesktop 7.x Part 3įailover (im)possibilities of XenDesktop 7.x Part 2įailover (im)possibilities of XenDesktop 7.x Part 1 The Challenges of running Citrix Linux VDAsĭifferent NetScaler Gateways within a single portal solutionĬombining Citrix Sites within different domainsĬitrix Federated Authentication Service (FAS) Tips and TricksĬitrix Machine Creation Services Demystified Part IIIĬitrix Machine Creation Services Demystified Part IIĬitrix Machine Creation Services Demystified Part Iįailover (im)possibilities of XenDesktop 7.x Part 7 After the XenDesktop 7.13/14 releaseįailover (im)possibilities of XenDesktop 7.x Part 6 After the XenDesktop 7.12 release Different Desktop Name is shown to the user within the Citrix Portal
0 notes
Text
Citrix Virtual Apps and Desktops high DPI resolution issues
Case
You have one or more Ultra High Definition (UHD) screens (4K resolution) and you need to use these screens in a Citrix Virtual Apps and Desktops (VAD) session. When you launch a hosted app or desktop by using the Citrix Workspace App (CWA) client version CR 2206, you notice that the Citrix session screen rendering show very small fonts which make the session elements unreadable.
Full High Definition (FHD) is a resolution of 1920x1080P. Ultra High Definition (UHD) is a resolution of 3840x2160P. This means that there are more pixels per inch (PPI) - or Dots Per Inch (DPI) in a UHD monitor and this in turn provides a higher screen resolution.
This issue is by design and needs a configuration change when your Citrix VAD server infrastructure is version LTSR 1912. The following article provides more details: https://support.citrix.com/article/CTX460068/dpi-support-changes-with-citrix-workspace-app-for-windows-2206.
The current KB article provides guidance on how to resolve Citrix Virtual Apps and Desktops high DPI resolution issues.
Solution
Option 1: Reduce local screen resolution from 4K to 2K and set it below 1920x1080 pixels
This is only a workaround. By changing your screens' resolution from 4K (UHD) to 2K (FHD) resolves the small font issue in the Citrix VAD session.
Option 2: Uninstall the latest CWA CR 2206 version and use latest CWA LTSR 1912
By uninstalling the latest Citrix CWA client CR 2206 version and installing the latest CWA LTSR 1912 client, you override the changed behavior of the CR 2206 client and thus avoid having the small font issue in high DPI screens.
Option 3: Edit the CWA .ini local file and configure domain GPO
The high DPI setting provided by previous versions of the CWA client is no longer present from CWA CR 2206 onwards. According to Citrix the high DPI setting/policy is turned to on by default. To check the relevant setting in the CWA client configuration files in your local machine, navigate to %AppData%ICAClient and check the APPSRV.INI and WFCLIENT.INI configuration files, as shown below.
The same files can be found at $HOME/.ICAClient/ on a Linux local machine.

CWA on WINDOWS

CWA on LINUX
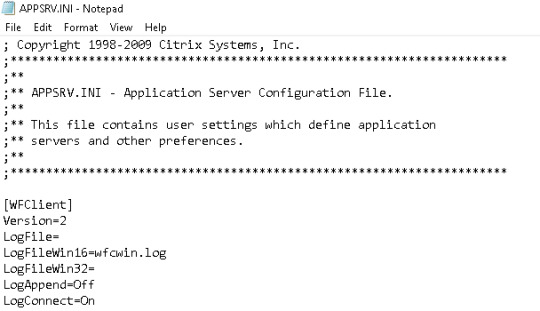
APPSRV.INI

WFCLIENT.INI
In the WFCLIENT.INI file set the following parameter. For the Linux CWA, refer to the following Citrix article for proper guidance on options and limitations: https://docs.citrix.com/en-us/citrix-workspace-app-for-linux/configure-xenapp.html.
DPIMatchingEnabled=TRUE
To complete the above client-side configuration, a server-side configuration is also needed which requires an AD Group Policy Object (GPO) to be configured for the DPI settings, as shown in the below screenshot from Citrix. GPO path is Computer Configuration --> Administrative Templates --> Citrix Components --> Citrix Workspace --> DPI.

As per https://support.citrix.com/article/CTX460068/dpi-support-changes-with-citrix-workspace-app-for-windows-2206, for best compatibility with CWA for Windows 2206, DPI matching must be enabled on 1912 LTSR Multi-session OS VDAs via the Windows registry using the key below.
Name: EnableDpiSupport
Type: DWORD
Value: 1
Location:
“HKLMSOFTWARECitrixGraphics”
Instead of manually changing the above registry key on all your VDAs, it is highly recommended to setup a GPO instead (see above description for details).
Also note that DPI matching is not supported with XenApp/XenDesktop 7.15 LTSR. Citrix recommends customers use CWA for Windows LTSR with these VDAs (see solution option 2 above). As an alternative, DPI matching can be disabled for CWA for Windows 2206 using a group policy.
Sources
https://support.citrix.com/article/CTX230017/configuration-of-dpi-matching-and-clientside-scaling-with-citrix-workspace-app-for-windows
https://support.citrix.com/article/CTX460068/dpi-support-changes-with-citrix-workspace-app-for-windows-2206
https://www.citrix.com/blogs/2018/01/09/making-sense-of-high-resolution-displays-and-dpi-with-citrix-graphics-remoting/
https://www.citrix.com/downloads/workspace-app/workspace-app-for-windows-long-term-service-release/workspace-app-for-windows-1912ltsr.html
https://docs.citrix.com/en-us/citrix-workspace-app-for-windows/1912-ltsr/whats-new/known-issues.html
https://docs.citrix.com/en-us/citrix-workspace-app-for-windows/1912-ltsr/whats-new/fixed-issues.html
Read the full article
#2206#2K#4K#Citrix#CitrixVirtualAppsandDesktops#CitrixWorkspaceApp#DPI#highDPI#LTSR#LTSR1912#smallfonts
0 notes
Text
Red x on network drive windows 10

Windows 10 Repeatedly Disconnects Network Drives - MCB Sys.
Mapped network drive may fail to reconnect in Windows 10, version 1809.
Windows 10 V1809: Network mapping broken - Born's Tech and Windows World.
Mapped Drive showed as disconnected - Windows 10 Support.
How to Fix Error Code 0x80004005 on Windows 10 and 11.
Mapped network drives don't work in Windows 10, version 1809.
Timeout mapping network drives at windows login - Windows 10 Forums.
Map a SharePoint Document Library as a Network Drive.
GPO Mapped Drive Issues on Windows 10 Clients - Server Fault.
Red X on folders, files or Hard Drive in Windows 11/10.
Solved: Network Icon has Red X But Everything Works.
Red X on folders, files or Hard Drive in Windows 10 - YouTube.
(solution) "This network connection does not exist" Win 10.
How to Remove Network Locations Mapped as Drives in Windows 8.
Windows 10 Repeatedly Disconnects Network Drives - MCB Sys.
On the Start menu or desktop, click Computer and then select Map network drive. Select the drive letter for the network drive you want to map. In the Folder field, enter the UNC path and then click Finish. Windows XP has several different methods to map a network drive, but the above steps use Windows Explorer to map the drive. Fixing this issue on the client side involves the registry change. Simply open regedit and locate KeepConn key in the registry: HKLM\SYSTEM\CurrentControlSet\Service\lanmanworkstation\parameters If not exist, create it in Reg_Dword, and set the time in seconds. For example, I set it as one day to keep the.
Mapped network drive may fail to reconnect in Windows 10, version 1809.
To avoid conflict, McAfee has disabled Avast and so the Avast "protected " files now have a red X next to them. Use the Avast Clear tool to totally uninstall Avast to avoid conflicting with McAfee. As stated, you do not need either of these. Windows Defender comes with Windows 10 and is part of the OS it is free and works as well as these Paid. Till now, the exact reasons for red x on files Windows 10 is unknown. But, when this issue occurs, it usually means that the file/folder/disk is not refreshing, updating, or syncing. If you are also bothered by this question, don’t worry! The Windows 10 red x on icons issue can be solved using different methods. 1.In Windows Explorer, a red X appears on the mapped network drives. 2.Mapped network drives are displayed as Unavailable when you run the net use command at a command prompt. 3.In the notification area, a notification displays the following message: Could not reconnect all network drives. The following link is an offical workground to solve.
Windows 10 V1809: Network mapping broken - Born's Tech and Windows World.
In the Group Policy Editor that pops up, go to Computer Configuration → Administrative Templates → System → Logon → Always wait for the network at computer startup and logon. Double click the latter and set it to "enabled". It will map and connect drives during logon process instead in than background when you on desktop. Spice (10) flag Report.
Mapped Drive showed as disconnected - Windows 10 Support.
Click the "Connections" tab; Click the Settings Option; If you see the "Use automatic configuration script" or "Use a proxy server…" check-boxes checked, STOP and talk with someone who is familiar with your network setup, making any settings changes with these configured will likely break something and render you unable to browse the internet. In our office we are running 3 Windows 10 Machines daily and a Windows Server 2012 Standard Server. In 95% of boots (not reboots) all mapped network drives are marked as not connected (red X) and when we double click on the drives, the connection works fine (opens share normally). One Windows machine has its Outlook * file on the network.
How to Fix Error Code 0x80004005 on Windows 10 and 11.
In Windows Explorer, a red X appears on the mapped network drives. Mapped network drives are displayed as Unavailable when you run the net use command at a command prompt. In the notification area, a notification displays the following message: Could not reconnect all network drives. Choose folders on your computer to sync with Google Drive or backup to Google Photos, and access all of your content directly from your PC or Mac. Download Drive for desktop.
Mapped network drives don't work in Windows 10, version 1809.
Part 2. Map a Network Drive Windows 11. Step 1. Right-click the Windows icon at the bottom of the taskbar and select File Explorer from the appeared context menu. Also, you can simply press Win + E keys to open the File Explorer. Step 2. In the File Explorer window, navigate to This PC from the left pane. Step 3. 2. How to delete a mapped network drive from Windows 11 using File Explorer. The steps to remove a network drive from Windows 11 using File Explorer are similar to the ones in Windows 10.Start by opening File Explorer (Windows + E) and, on the navigation section from the left of the window, select This PC.Then, you'll see all your mapped network drives listed under Network Locations. Press ' Windows + S ' and type cmd. Right-click on Command Prompt and select ' Run as Administrator '. When prompted, click ' YES '. In the Command Prompt window, type chkdsk X: /r /f where X is the external hard drive letter and /r & /f are the CHKDSK parameters. Hit ' Enter ' to start the scan and repair process.
Timeout mapping network drives at windows login - Windows 10 Forums.
When moving files from a personal network drive to OneDrive, the files are automatically synced to the user's C: drive. In the Windows Explorer, the files should appear with a green checkmark. However, if a red X appears instead, this indicates that there is a sync issue. The following is an example showing both scenarios. Run Windows Network Diagnostics; Check the following services are enabled; Disable Security Software temporarily. Read further to know more about these fixes. 1) Enable Network Adapter. Trying to disable and enable network drivers may resolve the issue. 1) Press the Windows key and type Device Manager in the search bar and open it. 2) Now click. Click or tap Computer from the left pane and click or tap "Map network drive" on the ribbon. Next, click or tap "Disconnect network drive." Remove Network Locations Mapped as Drives in Windows 8. The resulting window displays all networked shares your have mapped to your local computer. To remove one, select it from the list and click or tap OK.
Map a SharePoint Document Library as a Network Drive.
This package contains the drivers for Intel® Network Adapters and the Intel PROSet Adapter Configuration Utility on Intel® NUC Kits and Mini PCs using Windows® 10. See the Readme for what's new or fixed, known issues, installation instructions, and supported hardware.
GPO Mapped Drive Issues on Windows 10 Clients - Server Fault.
This fixed my map network drives. I just want to post it somewhere, as I searched months for an answer, maybe it could help someone. Windows 10 settings; network and sharing center; ethernet right click and click on ethernet properties. Under the Networking look for Internet Protocol Version 4 (TCP/IPv4), right click open its properties. In order to manually update your driver, follow the steps below (the next steps): 1. Extract the file to a folder of your choice. 2. Go to Device Manager (right click on My Computer, choose Manage and then find Device Manager in the left panel), or right click on Start Menu for Windows 10 and select Device Manager. 3.
Red X on folders, files or Hard Drive in Windows 11/10.
Earlier today I was having issued with two mapped network drives that were showing under "This PC" but I was unable to access or unmap them, they had a large red "X" over the drive.... Windows 10 is a personal computer operating system released by Microsoft as part of the Windows NT family of operating systems. Mapping OneDrive to Windows. Step 1: Open the OneDrive home page on your desktop and log in to your account. After the OneDrive home page opens up, right-click on the option that says File just. If it is happening for desktop icons, simply refreshing the desktop could help: 1) Reinstall your Cloud service app 2) Disconnect the drive in case of Mapped drives 3) Update your computer and BIOS.
Solved: Network Icon has Red X But Everything Works.
Mapping a network drive in Windows 10. Connect to Split Tunnel or Full Tunnel VPN if off campus. Click the Start menu. Click File Explorer. Click This PC in the left side shortcut menu. Click Computer > Map network drive > Map network drive to enter Mapping wizard. Confirm drive letter to use (next available shows up by default). Brink. Posts 70,151 64-bit Windows 10 Pro. 01 Jan 2011 #4. While in Network Connections, see if disabling and enabling the network may toggle the icon to work properly again. You might also reset the Notification Area Icons to see if that may be it for the icon only. My Computer. Map a network drive in Windows 11 to access files from another computer on the network. It makes file storage and sharing as easy as opening a folder. Map a network drive in Windows 11 to access files from another computer on the network. It makes file storage and sharing as easy as opening a folder. G A S REGULAR.
Red X on folders, files or Hard Drive in Windows 10 - YouTube.
Open Windows Explorer, right-click Network and select Map network drive. The Map Network Drive window opens, select Drive letter and type the network name of your Mac in the Folder field. This is. Step-by-step instructions to correct inability for Mapped Drives in Windows 10 to be loaded automatically after each boot Before beginning Procedure, go to Start> Run> MSCONFIG> Services> Hide All Microsoft Services> Disable All > Apply> General Tab> Selective Startup.
(solution) "This network connection does not exist" Win 10.
First, open File Explorer and then click "This PC" in the left-hand pane. Next, click "Map Network Drive" in the Network group of the Computer tab. The Map Network Drive window will appear. In the text box next to "Drive," select the drive letter that you'd like to use. You can use any letter that's not currently used on your. Windows server 2008 R2 Domain Controller Windows 10 x64 desktop (fresh install updated as of 10-14-2015) Offline files have been setup Users documents folder is mapped to \\server02\userdata$\user Mapped network drives show up and can be accessed I have setup offline files on this desktop because I want it to work just like a laptop that is off the network would work.
How to Remove Network Locations Mapped as Drives in Windows 8.
The red cross mark issue can also be caused by the Network Adapter due to more than one connections on your computer. If so, just delete the virtual adapter and then re-add it as in the following screenshots. Method three: Check Network Driver Conditions. Navigate in the Regedit on the following path: HKEY_CURRENT_USER\Network. Step 5. Delete all the entries on this path. Step 6. Restart the Windows machine as the changes will not effect without a restart. Step 7. Check if the Mapp drive was removed and "This network connection does not exist" does not show anymore. And my mapped drive is missing, has a red x, or cannot be accessed. Windows 10 or Server 2012 and higher Updates were completed. Some Windows updates turn the Actian service off, requiring manual restart of the service;... Remap the drive; Network is set to "Public" See How to change Microsoft Windows 10 network location from Public to Private.
See also:
Hindu God Themes For Windows 10 Free Download
Webcam Usb 2.0 Driver Windows 10
Sony Xperia Usb Driver For Windows 10
Snipping Tool Shortcut Windows 10 Free Download
Creative Webcam Nx Pro Driver Windows 10
0 notes
Text
Miracast: Not Supported by Wifi Driver
What is Miracast?
Miracast is an industry preferred that permits devices to find out each different without the want for HDMI cables. You can use it to mirror the contents of your devices’ monitors wirelessly. You can think about Micracast as a wi-fi HDMI cable.
But remember that Miracast features exclusively like a screen mirroring protocol. This method that it doesn’t have the “smart” factor. Let’s say that you wanted to circulation a video from your smartphone to your PC via Micracast – you’ll leave your smartphone’s screen on the complete time.

What is inflicting the PC or cellular device doesn’t support Miracast errors?
The problem with Miracast (aside from lacking the “clever” element) is that it’s pretty unreliable and the necessities along with its configuration are pretty puzzling for a few users.
We investigated the “Your PC or cellular device doesn’t aid Miracast” errors with the aid of looking at diverse consumer reports. From what we have been capable of collect, there are numerous eventualities in order to cause the apparition of this mistake message:
Also, Read Turbo VPN for PC
Intel Graphics Hardware is disabled – Since Windows 10 will only guide Miracast via a well-matched USB dongle or along with the Intel photographs chipset, you’ll need to ensure that your Intel Integrated Graphics is enabled and up to date with the present day version.
Wi-Fi is becoming off – Several customers have said that this error message also can occur in case you forget to allow the Wi-Fi factor (whilst connecting thru Intel Graphics Chipset.
One of the devices isn't Miracast capable – Keep in thoughts that now not are gadgets are prepared to use Miracast. This mistakes message would possibly in reality sign that the device is not Miracast geared up. You can affirm this concept by using strolling a sequence of diagnostics.
The wi-fi adapter is compelled to 5Ghz – Several customers have managed to clear up the problem with the aid of converting the wi-fi adapter settings to Auto from 5GHz Only or 802.11blg.
Cisco AnyConnect or similar software preventing the Miracast connection – Several customers have reported that during their case, the Miracast connection turned into no longer occur due to the fact a third celebration software with an incorporated VPN characteristic changed into flagging the Micracast era as a “Split Tunnel” safety danger.
If you’re struggling to resolve this unique problem, this text will provide you with a listing of validated troubleshooting steps. Below you've got a group of techniques that different customers in a comparable situation have used to get the problem resolved.
To be as lime green as feasible, begin with Method 1 wherein we take a look at if the modern-day device is capable of assisting Miracast and then continue to the next one if the assessments have determined it's miles.
Note: Before you begin troubleshooting, understand that you want a bodily way for the Miracast generation to transmit the signal wirelessly (both built-in Wi-Fi abilities or a Wi-Fi USB dongle).
Getting Started
I wished a few network cables from the local laptop shop, and while I become there I also bought a Google ChromeCast tool. In case you don’t recognize, Google ChromeCast is a Miracast compatible dongle. You can connect it to a TV or a monitor and this lets in the TV or monitor to accept a wireless Miracast video and audio signal from your laptop, iPhone, and so on.
Later that day I attached the Google ChromeCast device to the LG 4K TV within the workplace. Unfortunately, my pc wouldn’t hook up with the device. I attempted among the troubleshooting steps that I listing beneath, but nothing worked, so I placed this challenge aside for some weeks.
While working on an unrelated undertaking, a query got here up approximately Miracast devices. This jogged my memory that I desired to check Miracast once more, so I ordered an Anycast M2 Plus tool. It took about two weeks for it arrives at the workplace. Once I had it, I tested it with Miracast, but it still didn’t work. This time around I became bound and determined to parent out why it becomes not running.
Troubleshooting as to why Miracast wasn’t running on my laptop with Windows 10, I observed bits and portions of advice online, but none gave me a whole picture about what could be taking place and the way to get Miracast working. The steps beneath are the ones I accompanied, and ultimately I determined a method to my trouble! If you’re fortunate, you might not carry out all of those steps.
Also, Read Super VPN for PC
Troubleshoot Miracast When Using Windows 10
At a high-level, those are the gadgets that I focused on when I began to troubleshoot Miracast on Windows 10:
-Hardware
-Video Drivers
-DxDiag
-Wireless Card and Drivers
-Firewall
-Netsh WLAN Show Drivers
-GPO
I will cross into more detail about each object under.
Hardware
This might not be your first step, but you need to affirm that your laptop does in reality support Miracast. In my case, although I couldn’t discover a definitive solution, I did locate anecdotal proof that Miracast was supported through my computer. Miracast must be supported on all “current” hardware.
Video Drivers
The number one object that popped up after I changed into looking online concerned video drivers. “Do your video drivers support Miracast?” “Are your video drivers up-to-date?” These were some of the questions that I noticed, but I observed it tough to agree with that video drivers would be at the root of my hassle due to the fact I had a brand-new laptop. Despite that truth, the first thing I did turn to replace my video drivers.
DxDiag
After I up to date the video drivers, I showed that the video drivers could aid Miracast. To do this, I opened the Run command line and typed dxdiag.
Troubleshoot Miracast - DirectX Diagnostic Tool
Once the DirectX Diagnostic Tool (dxdiag) masses, click at the Save All Information… button and shop the DxDiag.Txt report on your computer. You can go out the dxdiag device as soon as this is finished.
Troubleshoot Miracast - DxDiag
Open the DxDiag.Txt record and overview the Miracast line. You can, in reality, see in the above screenshot that my computer and video drivers aid Miracast.
Also, Read VPN Master for PC
Wireless Card and Drivers
Digging deeper, I ran throughout a tidbit suggesting that wireless network card drivers need to aid Miracast. I did a few research and discovered out that my Intel AC 8265 have to support Miracast. Similar to what passed off with the video drivers, I additionally discovered out that there were updated community drivers, so I applied the up to date network drivers. Sadly, Miracast still didn’t work.
Firewall
Next, I saw some recommendation that suggested turning off your firewall on the way to TEST in case your firewall is blockading Miracast. Of path, I attempted this simple trick and once more this did now not resolve the hassle. Thank goodness I remembered to show my firewall back on, so please don’t neglect to try this too!
Netsh WLAN Show Drivers
At this point, I became getting simply pissed off! I was troubleshooting this trouble over several days, but I persevered. The subsequent piece of recommendation that I located online worried jogging a netsh command to look if the wireless show was supported.
From the Run command line, open a cmd spark off.
Enter: netsh WLAN show drivers
Troubleshoot Miracast - Wireless Display Supported-No
The final line tells you if the wi-fi display is supported or no longer!
Wireless Display Supported: No (Graphics Driver: Yes, Wi-Fi Driver: No)
Finally! It was a problem with the community driving force, however, how ought to that be? I up to date the driver to the contemporary model of the community motive force and I examined it with none firewalls. What changed into the exact problem? This took greater digging to answer.
GPO
After doing more studies, I ran throughout a KB article from Dell, Miracast/WiDi Problem After Connecting to a Domain. The article talks approximately a GPO putting so as to prevent Miracast from operating. The GPO putting is: Don’t permit WiFi Direct corporations. I ran the gpresult command and reviewed the consequences in an effort to see if this became my issue.
In order to do the same, from the Run command line, open a cmd spark off.
Enter: gpresult /h:c:gpo.Html
Troubleshoot Miracast - Disabled
Here’s the way you overview the gpo.Html document Wireless Network (802.11) Policies after which find Prevent connection to ad-hoc networks. If this is set to Disabled then you may need to change your GPO settings! Below are the steps I took to update my GPO settings.
Update GPO Settings
Troubleshoot Miracast for Windows 7- Group Policy Management Editor
Open Group Policy Management Editor (you may want an Active Directory (AD) Administrator to try this for you) and find the Wireless Network (IEEE 802.11) Policies node.
Troubleshoot Miracast - Migrated Wireless Network Policy Properties
Review each coverage and make sure that the Don’t permit WI-FI Direct organizations is deselected. Once that is clear and the GPO rules have replicated for your computer, this hassle could be solved.
Next, I will verify this through re-running the netsh command.
Troubleshoot Miracast - Wireless Display Supported-Yes
After I re-ran the netsh command, I noticed that the wi-fi show is supported!
Now I will take a look at my connection.
Testing the Miracast Connection
Troubleshoot Miracast - Connect to a Wireless Display
First, I opened the Windows key – P to hook up with the Miracast tool. I can now hook up with a wi-fi show!
Troubleshoot Miracast - Connect
Within seconds, the LG 4K TV AND AnyCast tool showed as to be had options!
In the stop, I didn’t need to buy any dongles to test out Miracast. I determined it exciting that the Google ChromeCast tool additionally didn’t seem right here with the TV and AnyCast device. Instead, it works thru the Chrome browser (see the screenshot under).
Troubleshoot Miracast - ChromeCast
As an aside, I changed into able to test Miracast with Enhansoft Reporting. I can verify that the reveal reviews will display the following results when the use of Miracast with an Anycast or LG connection.
More info Clicks helpsforpc.com
3 notes
·
View notes
Text
GPO Abuse and You
I recently took the Red Team Tactics course through SpecterOps (which is a great course and I highly recommend everyone take it if given the opportunity) and one of the topics that the instructors touched on briefly was abusing Group Policy Objects (GPOs) to exploit a domain. While I had known about Group Policy (and even used it for network reconnaissance while on target) I had never thought about using them as a lateral movement technique. So I started digging.
Talking to fellow Red Teamers made me realize that use of GPOs to laterally pivot through networks isn’t anything new, but I was somewhat disheartened by how others used this technique. From the small (very small, admittedly) sample of people I discussed this with, it appears the common technique is to RDP onto a domain controller or use the Group Policy plugin for Microsoft Management Console (MMC) in order to manipulate GPOs. The problem with these techniques is they either require domain admin credentials (in the case of RDP) or a proxy connection into the network (in the case of utilizing MMC). If you already have clear-text domain admin credentials, then utilizing GPOs for lateral movement is a moot point. Just get the hashes you need through DCSync and laterally move to your target through other means. On a different note, utilizing a proxy connection into the network to use MMC can result in more network traffic that can get you caught by defenders.
Which leads me to the question I wanted to answer. Is it possible to manipulate GPOs via command-line (without RDP or MMC)? So I started doing research. In the post below, I will discuss what I discovered about using GPOs for exploitation purposes. Additionally, I figured I would talk a little bit about what GPOs actually do and what they look like (for those who, like me, might not know). A lot of this information is pulled from Andy Robbin’s (wald0) GPO post and Will Schroeder’s (harmj0y) similar GPO post. If you already know this, I would recommend just skipping on down to the fun part about abusing these policies!
An Introduction to GPOs
GPOs are one of the mechanisms used to manage large Windows enterprise networks. They allow admins to push out system changes to groups of devices on a network. Admins will decide exactly what changes they want to make to a group of devices, create the GPO, and then apply the GPO to an organization unit, or OU. This is typically all done either on the actual domain controller for a network (through the Group Policy Management Console) or from another system on the network through the use of Microsoft Management Console (with the Group Policy Management plug-in).
So what exactly can you do with GPOs? The proverbial sky seems to be the limit. Do you want to add local users to a group of computers? There’s a GPO for that. Do you want to change power settings for all laptops connected to your domain? There’s a GPO for that. Do you want to add a startup or shutdown script to certain computers? There is a GPO for that. Do you want to add or remove specific registry keys or values? Well, there’s a GPO for that too.
So what do GPOs actually look like? As mentioned above, they can be created through the Group Policy Management Console on domain controllers or with the plug-in for Microsoft Management Console. Once they are created, they are viewable in Active Directory under the grouppolicycontainer objectclass. This can be done using either a tool like PowerView/SharpView or using the Windows tool DSQuery.

Each GPO in a domain will have three distinguishing attributes: a display name, a name, and an objectguid. The display name, assigned at creation, is a human-readable name for the GPO, a name is the actual “name” of the GPO (yeah, confusing), and the objectguid is a globally unique parameter for identifying the GPO in the domain. Additionally, each GPO has a few other attributes which help us to understand more about what they do (since display names can often be unclear). The attributes I want to focus on are gpcFilePath, gpcMachineExtensionNames, gpcUserExtensionNames, and versionnumber. The gpcFilePath attributepoints to where the GPO files exist on disk. This location is in the SYSVOL directory/share. The gpcMachineExtensionNames and gpcUserExtensionNames are GUID-esque extensions which appear when GPOs are configured to do certain things, such as scheduled tasks (a handy list of these GUIDs can be found here). The versionnumber attribute is an integer which increments every time that there is a change in the GPO. This attribute is critical for computers knowing when there are changes in a GPO.
Another important attribute to mention when talking about GPOs is the gplink field. This isn’t a field you’ll find when looking at a GPO in Active Directory, but instead when you look at OUs in the network. The gplink will tell you what GPOs are applied to an OU. Since multiple GPOs can be applied to the same OU, you will find all GPOs listed in one field. The order they are in appears to be, in my experience, based on the order that they are applied to the OU (based on priority) when a system reaches out for policy updates.

As mentioned above with the gpcFilePath, each GPO also has a presence on the file system of the domain controller. In the SYSVOL share there is a policies folder which contains a folder for each GPO, sorted by GUIDs. You can find these policy folders remotely at \\<domain>\sysvol\<domain>\policies or locally on the domain controller at C:\Windows\SYSVOL\SYSVOL\<domain>\Policies. Within these folders are any files necessary for the configuration changes which the GPO is set to apply. If there are necessary scripts for the GPO, those are in here. If there is a registry change to apply through the GPO, there will be a registry.pol file located in these folders.

Abusing GPOs for Fun and Profit
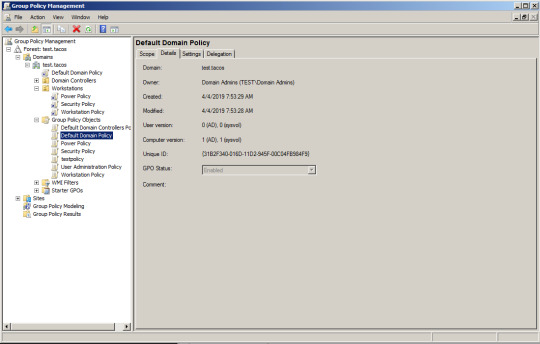
So what is the “so-what” factor of GPOs? Why should we as Red Teamers care about using them? Well, like everything else in a Windows network, GPOs can be misconfigured and that misconfiguration opens up a whole range of possibilities for us. And this is the part that got me excited to write this and where I did a ton of research into how GPOs are applied in a network. What if we as Red Teamers could target GPOs as a means of expanding our access or gaining SYSTEM-access on targets we didn’t previously have SYSTEM-access on? All before domain compromise!? One of the cool things about enumerating GPOs is stumbling upon a GPO that can be edited by users other than domain admins. Windows allows admins to assign permissions to GPOs in a similar fashion to files and directories.

In the above picture we have what looks like fairly hardened delegation of GPO editing privileges. Your typical domain admins and enterprise admins can make changes, but no one else. On the other hand, below you’ll see that a random user has privileges with another GPO...
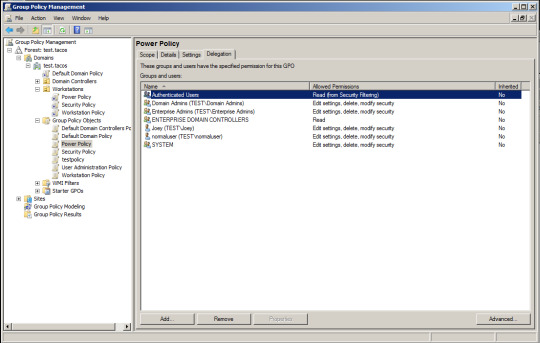
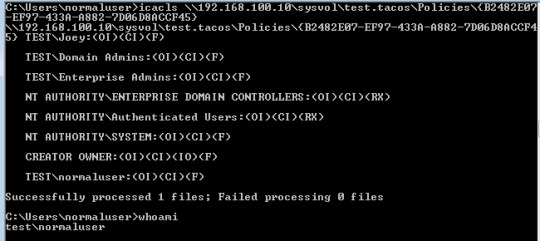
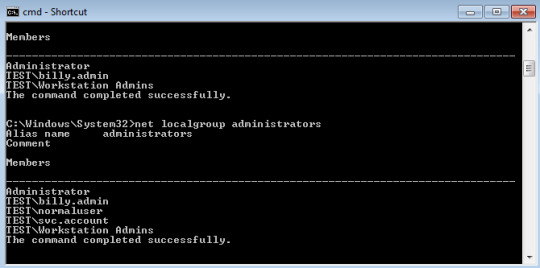
As seen above, other user accounts and service accounts could be granted the permission to edit a specific GPO. There are two easy ways to enumerate these permissions. The first, and simplest, is using the windows executable icacls.exe. You can point icacls.exe at the folder in SYSVOL related to the GPO in question and see the permissions assigned to that GPO. Below is the icacls.exe result for a GPO in my home test network (which conveniently has this normaluser guy added in!).
The other easy way of enumerating GPO permissions is en masse using BloodHound. One of the cool things which BloodHound spits out after running is GPO information and what users have permissions to edit those GPOs. This is a great way of figuring out the road from a user account that you have credentials for all the way to domain compromise. Just be careful, it can generate a LOT of network traffic. I won’t be going into detail about how to use BloodHound here, but be sure to check out the BloodHound wiki if you have any questions about it (located here).
With this information, how exactly can we manipulate GPOs for expanding our access (and is it possible to do this via the command-line)? The answer I came up with took the form of a tool written in C# which allows a user to query for necessary information on a GPO and then use that information to set certain attributes in Active Directory, allowing a user to abuse the GPO. Since this is the first tool I have written, I wanted to give it a fun name: METRONOME (get it? C#? Music? Metronomes?). I decided to focus my efforts for the time being on two techniques for expansion of access using GPOs and this tool: adding scheduled tasks to a computer and adding users to a local administrator group.
Leveraging Scheduled Tasks for GPOs
Scheduled tasks exist as a configuration change in GPOs under both Computer and User configuration changes under Preferences and Control Panel Settings. When added as a configuration change, three things are added to the GPO. First, a unique extension name ([{AADCED64-746C-4633-A97C-D61349046527}{CAB54552-DEEA-4691-817E-ED4A4D1AFC72}]) is added to the gpcMachineExtensionNames field (or gpcUserExtensionNames field) in Active Directory and the versionnumber field is incremented to show a change. In the file system for the GPO, the XML for the scheduled task will also appear in the <policy>\Machine\Preferences\Scheduled Task folder as the file ScheduledTask.xml. Multiple tasks can be added per GPO, but only one XML file will be present (with the multiple scheduled tasks being wrapped in this file).
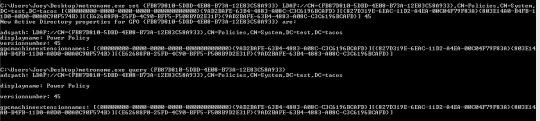
If you are targeting a GPO which does not apply any scheduled tasks, there are a few things that need to be done. First, the gpcMachineExtensionNames field in Active Directory needs to be updated with the unique extension name above and the versionnumber field needs to be incremented so machines know there is a change in the GPO. Both of these changes can be done with METRONOME. First, you use the tool to query the existing attributes and then use these existing attributes to add the unique extension name and increment the version number.

Once the Active Directory attributes are changed, the scheduled task XML needs to be added to the scheduled task folder on the SYSVOL share. This is where the GPO will look for any scheduled task XML when updating configurations applied. These XMLs can either be setting tasks on a schedule or they can be used to apply an immediate task to the host. Additionally, these tasks can be targeted via hostname (DNS or NetBIOS) or IP address. This is useful if you are trying to laterally pivot to a specific host or if you simply want to limit the effect your task might have on a network (i.e. if the GPO is applied to an OU that contains thousands of hosts).

With these pieces in place, the only thing left to do is wait. Unless changed (via GPO) workstations and servers on a network will check for updates to GPOs every 90 to 120 minutes (domain controllers update every 5 minutes). If you are feeling impatient and are trying to affect change on the computer you are currently on, you can also run GPUPDATE /FORCE. This can be run as a normal user and will force the host to check for GPO updates and apply any changes.
When you are finished with the scheduled task, clean up is straight forward. METRONOMEl can be used to set the Active Directory attributes back to their original state and then you simply need to remove the task XML which you added to the policy folder. Keep in mind though that you will also have to remove the task from every computer to which the GPO was applied. This is why using targeted tasks is useful. If you are concerned with clean up it can be difficult to clean up all hosts that the GPO applies to (especially if that OU the GPO applies to is large or stretches across multiple OUs).
If the GPO you are targeting already applies a task, then all you need to do is slip your task into the task XML file which already exists in the policy folders. Since the GPO is already configured to push out a scheduled task, there is no need to update the gpcMachineExtensionsName field, only the versionnumber field (which METRONOME can do). Once you update that you just wait for the GPO to update on its own or run the GPUPDATE executable to force an update. Once you are finished, all you need to do is delete the task out of the task XML file. Below is a great example simply slipping in your task. You’ll see that the third task in this XML is my “malicious” task (so creative) running as SYSTEM on all hosts in an OU (since I don’t target any specific hosts).

I wanted to try this with an actual backdoor instead of just using the task to kick off calc.exe or notepad.exe, so I booted up a Kali VM and dusted off my Empire listeners. The task embedded in the policy handles both the arguments flag as well as a blob of Powershell encoded characters, resulting in a SYSTEM-level callback from a user-level callback within my test network!
First all I had to do was add in the PowerShell blob into the task like so...

...and then wait for it to update. After the computer reached out for updates, it looks like it was applied!...

...And now we just need to wait for the task to kick off and....


...VOILA! Look at that lovely SYSTEM callback!
Adding Users to a Local Administrators Group
Adding users to a local admin group appeared to be pretty simple. Once again, the option to add users to local groups exists under both User and Computer preferences in the Control Panel options. I figured initially that it would be a simple matter of adding an extension name to the proper Active Directory field and incrementing the versionnumber after adding the proper XML file. It turns out that if a GPO is already doing this, there will be a policy collision and the policies will be applied by priority. Since only domain admins can modify this priority, the GPOs which I edited always lost this conflict in my research. So what do we do? Thankfully, it is actually simpler than I initially thought.
There exists ANOTHER way to add users to a local administrators group through GPOs. It is a configuration option in the Administration preferences. Instead of adding a user to the local administrators group, you reset the local administrators group and add all new users to it through this interface. In order to do this without the GUI, you simply drop a file titled GptTmpl.inf into the <policy>\Machine\Microsoft\Windows NT\SecEdit folder in the SYSVOL directory. This file follows a pretty simple format. Simply add the objectsids for all users/groups that you want added to the local administrators group. With the help of tools like PowerView/SharpView/DSQuery, it is easy to find the objectsids for not only account you need added to the group, but also the objectsids for all the other groups currently being applied through any other GPOs.


With this information, simply plug in these objectsids, set the file in the folder mentioned above with the same name, and use METRONOME to update the version number of the GPO you are targeting. As with the scheduled tasks, either wait and be patient or force the system to update its policies. Clean up is easy. Just delete the file and reset the version number. A word of caution though, there is no way to target this policy within the OU (similar to tasks). Whatever user you apply to the local administrators group will be added on all systems within the OU that the GPO applies to.

Now that certain users are in the local administrators group, I think we can figure out what to do next...
Parting Thoughts
As mentioned above, the culmination of this research is the GPOEdit tool which I wrote in C#. If you wish to use this tool, feel free to download the .cs file from my github located here. The code can be compiled with csc.exe, no need for Visual Studio. Included in this repository are two task template XML files (one for filtering by hostname and the other for filtering by IP address) and then also the GptTmpl.inf file necessary for manipulating local administrator groups. Again, feel free to use them. Just make sure to put in the right IP addresses and hostnames!
As a side note, while I was putting this post together (it took me way too long to type this out), Petros Koutroumpis over at MWR Labs put out an incredibly verbose tool, SharpGPOAbuse, which also abuses misconfigured GPOs. The tool can be found on their github with more information on its use on their website. It looks like it is still an ongoing project, which is awesome!
GPOs have turned out to be a potentially valuable means of moving through a domain. With my research I only looked into using them to push out scheduled tasks and local administrator changes, but judging from the list of configuration options in the GPMC, this is only scratching the surface. There will be more research on my end on how these can be leveraged for nefarious purposes and I will be sure to post them here!. Those firewall changes look particularly interesting....
1 note
·
View note
Text
GPO: Remove Recycle Bin
GPO: Remove Recycle Bin
Discover how to hide the Recycle Bin for specific End Users using Group Policy Objects (GPO) in this video tutorial and learn how to customize End User settings by following along as we demonstrate how to remove the Recycle Bin through GPO in this video.
let’s to see video from our YouTube channel
Please check more videos for This Topic

View On WordPress
#active directory#AD#Backup and Recovery#Configuring Group Policies#Configuring Group Policy#Create and Link a GPO#Create GPO#create Group Policy and Link it to OU#Creating Active Directory Objects#Google AdSense#GPO#group policy beginner#group policy guide#Group Policy Management#Group Policy Object#Group Policy Objects#group policy step by step#group policy tutorial#how to configure gpo#how to configure group policies#How to create GPO#How to Install Active Directory In Windows Server#How to Promote windows server to Domain Controller#How to setup Active Directory (AD) In Windows Server#Hyper-V#Install and Configure Active Directory#Install and Configure Active Directory in Windows Server#Installing AD DS roles in Windows Server#Microsoft 365#Network Security
0 notes
Text
AZ-800: Administering Windows Server Hybrid Core Infrastructure
En este curso se enseña a los profesionales de TI a administrar cargas de trabajo y servicios principales Windows Server mediante tecnologías locales, híbridas y en la nube. En este curso se enseña a los profesionales de TI a implementar y administrar soluciones híbridas e locales, como identidad, administración, proceso, redes y almacenamiento en un entorno híbrido de Windows Server. AZ-800: Administering Windows Server Hybrid Core Infrastructure
Este curso de cuatro días está destinado a los administradores híbridos de Windows Server que tienen experiencia con Windows Server y desean ampliar las funcionalidades de sus entornos locales combinando tecnologías locales e híbridas. Los administradores de Windows Server Hybrid implementan y administran soluciones híbridas y locales, como identidad, administración, proceso, redes y almacenamiento en un entorno híbrido de Windows Server. Docker Compose
Module 1: Identity services in Windows Server
This module introduces identity services and describes Active Directory Domain Services (AD DS) in a Windows Server environment. The module describes how to deploy domain controllers in AD DS, as well as Azure Active Directory (AD) and the benefits of integrating Azure AD with AD DS. The module also covers Group Policy basics and how to configure group policy objects (GPOs) in a domain environment.
Lesson
Introduction to AD DS
Manage AD DS domain controllers and FSMO roles
Implement Group Policy Objects
Manage advanced features of AD DS
Lab : Implementing identity services and Group Policy
Deploying a new domain controller on Server Core
Configuring Group Policy
After completing this module, students will be able to:
Describe AD DS in a Windows Server environment.
Deploy domain controllers in AD DS.
Describe Azure AD and benefits of integrating Azure AD with AD DS.
Explain Group Policy basics and configure GPOs in a domain environment.
Module 2: Implementing identity in hybrid scenarios
This module discusses how to configure an Azure environment so that Windows IaaS workloads requiring Active Directory are supported. The module also covers integration of on-premises Active Directory Domain Services (AD DS) environment into Azure. Finally, the module explains how to extend an existing Active Directory environment into Azure by placing IaaS VMs configured as domain controllers onto a specially configured Azure virtual network subnet.
Lesson
Implement hybrid identity with Windows Server
Deploy and manage Azure IaaS Active Directory domain controllers in Azure
Lab : Implementing integration between AD DS and Azure AD
Preparing Azure AD for AD DS integration
Preparing on-premises AD DS for Azure AD integration
Downloading, installing, and configuring Azure AD Connect
Verifying integration between AD DS and Azure AD
Implementing Azure AD integration features in AD DS
After completing this module, students will be able to:
Integrate on-premises Active Directory Domain Services (AD DS) environment into Azure.
Install and configure directory synchronization using Azure AD Connect.
Implement and configure Azure AD DS.
Implement Seamless Single Sign-on (SSO).
Implement and configure Azure AD DS.
Install a new AD DS forest on an Azure VNet.
Module 3: Windows Server administration
This module describes how to implement the principle of least privilege through Privileged Access Workstation (PAW) and Just Enough Administration (JEA). The module also highlights several common Windows Server administration tools, such as Windows Admin Center, Server Manager, and PowerShell. This module also describes the post-installation configuration process and tools available to use for this process, such as sconfig and Desired State Configuration (DSC).
Lesson
Perform Windows Server secure administration
Describe Windows Server administration tools
Perform post-installation configuration of Windows Server
Just Enough Administration in Windows Server
Lab : Managing Windows Server
Implementing and using remote server administration
After completing this module, students will be able to:
Explain least privilege administrative models.
Decide when to use privileged access workstations.
Select the most appropriate Windows Server administration tool for a given situation.
Apply different methods to perform post-installation configuration of Windows Server.
Constrain privileged administrative operations by using Just Enough Administration (JEA).
0 notes
Text
Windows 7 connect wifi before login 無料ダウンロード.Cisco AnyConnect - パソコン用
Windows 7 connect wifi before login 無料ダウンロード.Enable wireless connection pre logon on domain.

Step 1: Set up a wireless profile..How to Enable Wifi Before Domain Logon in Windows
AnyConnectは最大90日間、本契約と同じ無料体験版がご利用いただけます。 ASA/Firepower等のゲートウェイ機器をお持ちでない方には無償で「ASAv30」(ASA仮想版)をご提供致します。(年7月25迄の限定) フリートライアル(体験版)お申し込み方法 In case all above steps still did not help, and if this is happening on a wireless network, then there might be one other remaining problem: WiFi router’s network isolation feature might be activated. The only solution for this is re-configuring the router. Step 4: VPN (Virtual Private Network) enabled. Just refer to the VPN topic g: login Mar 17, · Currently upon reboot & login to Windows, the wifi gets connected automatically to the network using saved credentials. My requirement is upon reboot and before user login, the wifi should get connected to the network using saved credentials and should stay connected. Currently upon reboot, I see the Wifi is On, but in disconnected state
Windows 7 connect wifi before login 無料ダウンロード.help - How do I connect to wireless before I log onto the network?
Mar 17, · Currently upon reboot & login to Windows, the wifi gets connected automatically to the network using saved credentials. My requirement is upon reboot and before user login, the wifi should get connected to the network using saved credentials and should stay connected. Currently upon reboot, I see the Wifi is On, but in disconnected state Jun 01, · Just curious if anyone has been able to get a windows 10 machine to connect to wifi before logon. I am trying to deploy software via GPO in a 90% wifi environment. I have a R2 server running RADIUS and authenticating via machine and a GPO policy pushing wifi connection configs One of our biggest issues with migrating to Windows 7 has been the problem of laptops needing to logon before the laptop would connect to the wireless. Therefore it was impossible to logon as a domain user using only a wireless connection. Finally, we found a simple solution
You have now configured Windows to connect to the wireless network prior to logging in. Click Change adapter settings , and double-click your wireless adapter - it will have the green wireless connectivity bar next to it.
Select Advanced Settings , and c heck Enable single sign on for this network. Right-click the name of the network connection you would like Windows to connect to prior to logging in, such as ACSecure. Note: You may have to have to do this if you are installing PaperCut on a college staff computer, see How do I get and install PaperCut in Windows? Related Articles I can't log into ACSAS. What can I do? What is the difference between Kivuto and My Desktop? How do I connect to the ACSecure wireless network?
My Mac laptop won't connect to wireless. How do I connect? How do I connect to VPN? What would you like to know? Reset Search.
How do I connect to wireless before I log onto the network? Printable View. Related Service Wireless Services. Article Summary You must turn on Single Sign on before user logon in Networking, under Advanced properties.
Instructions Most computers will connect to wifi only after they boot up and you logon. This can cause problems with some services that may need to run before you log into your computer. The steps below will configure wireless to start before login. This can also help fix some PaperCut related issues for staff. Note: If you are not comfortable performing these steps, contact ITS for help guiding you through them - How can I contact ITS?
Do not perform these steps if you share a computer with someone else! Note: After following these steps, your boot up and logon will take longer - be patient.
To connect to wireless before logon - Windows 10 Ensure you are connected to the ACSecure wireless network. Click on the network icon in system tray, and click Open Network and sharing center. Click Change adapter settings , and double-click your wireless adapter - it will be the one with the green wireless connectivity bar next to it. Click Wireless Properties , and select the Security tab. Click the radio button Perform immediately before user logon. Click OK twice. Click Close. To connect to wireless before logon - Windows 8 Ensure you are connected to the ACSecure wireless network.
To connect to wireless before logon - Windows 7 Click the Wireless Network Connection icon on the system task bar. Was this article helpful? Feedback Please tell us how we can make this article more useful. Characters Remaining: Wireless Services. You must turn on Single Sign on before user logon in Networking, under Advanced properties. Most computers will connect to wifi only after they boot up and you logon.
0 notes
Text
Microsoft office 2013 gpo templates 無料ダウンロード.Office の管理用テンプレートを使用してグループ ポリシー (GPO) で Office 365 ProPlus を制御する
Microsoft office 2013 gpo templates 無料ダウンロード.

Office 2013 Administrative Template files (ADMX/ADML) and Office Customization Tool.Office の管理用テンプレートを使用してグループ ポリシー (GPO) で Office ProPlus - Microsoft コミュニティ
Hi, I've downloaded Office Administrative Templates (ADMX, ADML) but cannot import it on my system based on WS R2. While opening GPO and User Configuration - Policies - Administrative Templates - Browse cannot point to extracted folder. I mean, browse doesn't recognize folders and ADM · Hi, the browse method is used for ADM files, not for May 09, · いつも Office をご利用いただきありがとうございます。 本記事では Office の管理用テンプレートを使用してグループポリシー (GPO) で Office ProPlus を制御する一般的な方法についてご案内します。 1) 管理用テンプレートのダウンロード 下記サイトから Office の管理用テンプ Feb 08, · Hi, I've downloaded Office Administrative Templates (ADMX, ADML) but cannot import it on my system based on WS R2. While opening GPO and User Configuration - Policies - Administrative Templates - Browse cannot point to extracted folder. I mean, browse doesn't recognize folders and ADM/ADMX file
Microsoft office 2013 gpo templates 無料ダウンロード.Office GPO Administrative Templates on W2k08R2
Hi, I've downloaded Office Administrative Templates (ADMX, ADML) but cannot import it on my system based on WS R2. While opening GPO and User Configuration - Policies - Administrative Templates - Browse cannot point to extracted folder. I mean, browse doesn't recognize folders and ADM · Hi, the browse method is used for ADM files, not for Feb 08, · Hi, I've downloaded Office Administrative Templates (ADMX, ADML) but cannot import it on my system based on WS R2. While opening GPO and User Configuration - Policies - Administrative Templates - Browse cannot point to extracted folder. I mean, browse doesn't recognize folders and ADM/ADMX file This download includes Group Policy Administrative Template files and Office Customization Tool files for use with Office applications. It also includes an \Admin folder with an Office Customization Tool, and ADMX and ADML versions of Office system Administrative Template files
ナレッジベース記事: KB Windows 7, Windows 8, Windows Server R2, Windows Server , Windows Server R2. Warning: This site requires the use of scripts, which your browser does not currently allow. See how to enable scripts. Download Microsoft Office KB 64 ビット版 Service Pack 1 from Official Microsoft Download Center.
Microsoft 最新版のOffice アプリ、クラウド 追加ストレージ、高度なセキュリティなど 1 つのサブスクリプションでご利用いただけます。 今すぐ購入. Microsoft Office KB 64 ビット版 Service Pack 1. ここで言語を選択すると、そのページのすべてのコンテンツが選択した言語に変更されます。 言語を選択:.
アラビア語 イタリア語 インドネシア語 ウクライナ語 エストニア語 オランダ語 カザフ語 カタロニア語 ガリシア語 ギリシャ語 クロアチア語 スウェーデン語 スペイン語 スロバキア語 スロベニア語 セルビア語 キリル セルビア語 ラテン タイ語 チェコ語 デンマーク語 ドイツ語 トルコ語 ノルウェー語 ブークモール バスク語 ハンガリー語 ヒンディー語 フィンランド語 フランス語 ブルガリア語 ベトナム語 ヘブライ語 ポーランド語 ポルトガル語 ポルトガル ポルトガル語 ブラジル マレー語 マレーシア ラトビア語 リトアニア語 ルーマニア語 ロシア語 中国語(簡体) 中国語 繁体 日本語 英語 韓国語. ダウンロード DirectX End-User Runtime Web Installer ダウンロード.
Microsoft Office 64 ビット版 Service Pack 1 には、セキュリティ、パフォーマンス、および安定性の向上のための新しい更新プログラムが含まれています。また、この SP は以前公開されたすべての更新プログラムのロールアップです。. 詳細 バージョン:. ファイル サイズ:. システム要件 サポートされるオペレーティング システム. インストール方法 ダウンロードを開始するには、 [ダウンロード] ボタンをクリックし、次のいずれかの操作を行うか、 [言語の変更] から別の言語を選択し [変更] をクリックします。 インストールをただちに開始するには [実行] をクリックします。 後でインストールするためにコンピューターにダウンロードをコピーするには [保存] をクリックします。 IT 担当者用リソース 管理環境で作業している IT 担当者は、組織に Office 更新プログラムを展開するための完全なリソースを Microsoft Office TechCenter で参照することができます。コマンド ライン命令は、サポート技術情報 Microsoft Self-Extractor を使用して作成されたソフトウェア インストール パッケージ、更新プログラム パッケージ、修正プログラム パッケージでサポートされているコマンド ライン スイッチについて KB にあります。.
マイクロソフトをフォローする Facebook Twitter.
0 notes
Text
Windows 10 notifications disable gpo 無料ダウンロード.Windows 10 および Windows 11 オペレーティング システム コンポーネントから Microsoft サービスへの接続を管理する
Windows 10 notifications disable gpo 無料ダウンロード.You do not have access to this page

Use Group Policy to hide non-critical notifications.GPO to "Turn off toast notifications on the lock screen" does not work.
Windows 10 バージョン 以降および Windows 11 では、グループ ポリシー [コンピューターの構成] > [管理用テンプレート] > [Windows コンポーネント] > [マップ] > [[オフライン マップ設定] ページで要請していないネットワーク トラフィックを無効にする] を有効にします。 Mar 24, · Here are the keys and the values that will allow you to disable notifications from most of the built-in apps and services in Windows Disable Security and Maintenance Notifications. HKCU\SOFTWARE\Microsoft\Windows\CurrentVersion\Notifications\Settings\tyAndMaintenance\Enabled = Nov 25, · Use Group Policy settings to disable Windows system toast notifications for Security and Maintenance on Windows 10 and earlier: On your Group Policy management system, open the Group Policy Management Console, right-click the GPO you want to configure, and click Edit. In the Group Policy Management Editor, go to User configuration
Windows 10 notifications disable gpo 無料ダウンロード.How to Disable Notifications on Windows 10
Mar 04, · Using Windows 10 Enterprise, I want to disable toasts on the lock screen via group policy, but it appears to not be working. I have the following setting configured: User Configuration\Policies\Administrative Templates\Start Menu and Taskbar\Notifications\"Turn off toast notifications on the lock screen".Set to ENABLED. I can confirm that it makes the following registry May 23, · Step by Step Guide to Disable Windows Update From Group Policy The feature of group policy editor in Windows 10 Pro offers multiple options to disable automatic updates permanently. Users can also change different Windows Update policies for deciding when all updates should be installed on the system Sep 20, · Turning off Update Notifications in GPO? I've been looking endlessly with no luck so hopefully someone here can give me a definitive answer. Preferably what I woud like is to completely disable the windows update center. I want it to neither automatically download, nor notify and ask to download updates to windows 10
They can use the built-in notification center to display all kinds of notifications. As you can guess, the notification center makes it easy to keep track of and manage all notifications in one place.
As good as the new notification system is, some apps show constant notifications distracting you from the actual work. This might reduce your overall productivity.
When it comes to disabling notifications, Windows 10 gives you a fair bit of control. For instance, you can either turn off notifications for specific apps or disable notifications entirely. e, for all apps either with the help of the Settings app or the Group Policy Editor.
I will show all three methods. Use the one you need. Note: If you are looking to temporarily disable app notifications, you can enable Focus Assist. Focus Assist will automatically turn off itself after a few hours.
To turn it off manually, click on the button again. Turning off individual app notifications is useful when you have an app that is constantly showing notifications for unnecessary things like offers, events, etc. A good example of this type of behavior would be gaming and social media apps.
This section lists all the apps that can show notifications. You can also search for it in the start menu. You will find the option under the Notifications section in the right panel. As soon as you turn off the setting, you will no longer receive any notifications either in the notification center or on the lock screen.
If you want to completely disable Windows 10 notifications then the group policy editor is the way to go. This method is especially useful for system administrators or if have multiple computers to manage.
First off, Open the Group Policy Editor. You will find the policy in the right panel. Keep in mind that some apps can still show notifications even when you turn off notifications. This is because these apps use their own notification system rather than using the one provided by Windows You can see this type of behavior in applications like antivirus and firewall. In those cases, you have to disable notifications for that app by changing its settings. That is all. It is that simple to disable notifications on Windows If you are stuck or need some help, comment below and I will try to help as much as possible.
Thanks for sharing these tips. I tried adjusting. with regedit but windows update still informs me that updates are available with a toaster overlay. Shoot me an email if you have a solution. Save my name, email, and website in this browser for the next time I comment.
Leave a Comment Cancel Reply Type here..
0 notes
Text
Windows 10 local group policy proxy settings 無料ダウンロード.Internet Explorer 10 proxy setting in a Group Policy Object is corrupted
Windows 10 local group policy proxy settings 無料ダウンロード.Full VPN & Wi-fi proxy - パソコン用

Configure the proxy server manually using a registry-based static proxy.IEプロキシ設定はグループポリシーで管理できる? できない?:その知識、ホントに正しい? Windowsにまつわる都市伝説(22)(1/2 ページ) - @IT
Jun 06, · Proxy Settings for Computers in Group Policy. By default, IE proxy settings are per user. Using the GPO, you can apply proxy settings to all users of the computer. To do this, go to the following section in the GPO Editor console: Computer Configuration > Administrative Templates > Windows Components > Internet ted Reading Time: 8 mins Dec 10, · The directions apply to Windows 10, as well as Windows Server and Windows Server How to specify GPO proxy settings Group P olic y Object (GPO) Estimated Reading Time: 3 mins Jan 27, · Right-click Internet Settings, click New and then click Internet Explorer Click LAN settings on the Connections tab, select the Use a proxy server for your LAN check box. Set the proxy, for example, Proxy1, Port: 80, and then click OK. You open the item again, click the Advanced button in the LAN settings dialog box, and then click OK
Windows 10 local group policy proxy settings 無料ダウンロード.Configure device proxy and Internet connection settings | Microsoft Docs
Oct 19, · Create or Edit Group Policy Objects. Expand User configuration – Policies – Windows Settings – Internet Explorer Maintenance – Connection. In right Pane Proxy Settings. For some security reasons maybe administrator need to prevent end users from change their proxy settings. You can do it with group policy follow this steps: Click Start Jan 27, · Right-click Internet Settings, click New and then click Internet Explorer Click LAN settings on the Connections tab, select the Use a proxy server for your LAN check box. Set the proxy, for example, Proxy1, Port: 80, and then click OK. You open the item again, click the Advanced button in the LAN settings dialog box, and then click OK Oct 01, · あなたのコンピュータにFull VPN & Wi-fi proxyをこのポストから無料でダウンロードしてインストールすることができます。 PC上でFull VPN & Wi-fi proxyを使うこの方法は、Windows 7/8 / / 10とすべてのMac OSで動作します。
These proxy server settings are used by all modern browsers, including Internet Explorer 11, Google Chrome, new Chromium-based Edge, Opera, and Mozilla Firefox with the option Use system proxy settings enabled by default. The green underscore for the IE parameter means this setting is enabled and will be applied through Group Policy. Red underlining means the setting is configured, but disabled.
To enable all settings on the current tab, press F5. To disable all policies on this tab use the F8 key. Note the Bypass Proxy Server for Local Addresses option. When this policy setting is enabled, local resources are always accessed directly, not through a proxy server.
In order to avoid using a proxy to access such resources, you need to configure exceptions for them using the policy Do not use proxy servers for addresses beginning with see below ;. Press OK twice to save settings. This rule only works for Internet Explorer 10 and Internet Explorer For earlier IE versions, you need to create separate rules. If you want the proxy server settings to be applied to users based on the IP subnet where their devices are located, you can use the GPP Item Level-Targeting.
To do this, switch to the Common tab in the policy settings and check the Item-Level Targeting option. Click on the Targeting button. Specify the range of IP addresses in your subnet for which you want to apply proxy settings. Save the policy settings.
Similarly, create several IE policies with proxy settings for different IP subnets. As a result, the proxy settings for the users will be applied depending on the IP network office in which they work convenient for mobile employees with laptops.
admx and Inetres. Also, you can configure IE proxy settings using the registry. By default, IE proxy settings are per user. Using the GPO, you can apply proxy settings to all users of the computer. Enable the policy Make proxy settings per-machine rather than per user.
By default, the WinHTTP service does not use the proxy settings configured in Internet Explorer. To enable WinHTTP proxy for a computer through a GPO, you must configure a special registry parameter. First, you need to configure a proxy for WinHTTP on the reference computer. The easiest way is to import proxy settings from IE:. Select Local computer and specify the full path to the WinHttpSettings parameter.
It remains to click Finish, update the policy on computers, and make sure the WinHTTP proxy settings are applied successfully. By default, if you configure the proxy server settings in Windows through the GPO, computer users can change the proxy settings themselves. Note that proxy settings in Windows can be edited using both IE options and the modern Settings control panel. This parameter is present in both the user and computer GPO sections.
If you enable this policy and apply it to the domaincomputer, then the fields with proxy settings in Windows will be blocked, and the caption will appear below: Some settings are managed by your system administrator. Settings in the Computer Configuration section take precedence over user settings.
Typically, you want to use a more flexible way of granting permissions to change proxy settings on computers. Once applied, is it possible to remove the connections tab? Awesome thanks — I will test this today. Hi, we have the issue that we have setup GPP Internet Explorer 10 settings proxy server, exceptions…. and the settings are applied — we see them in the registry but IE does not show these settings. IE settings are empty. Any idea? Nice to know — I found out that there was a bad entry in the exclusion which caused this behaviour.
WHat was the bad entry as im experiencing the exact same issue! hi , If i configure the proxy through Group policy , it will work for desktop users. in case the laptop user want to connect the home network it will ask to remove the proxy to connect the internet. how to solve this issue? This article and especially your tips about enabling and disabling settings within the Connections tab are what I needed to get my GPO to actually filter.
The Red and Green underline thing was driving us bonkers. My issue is that it is applying everything except the exceptions list. But going to the site, it is still being block by proxy and bypass for local addresses is checked and underlined in green.
Only exceptions is not working. Any ideas????
0 notes
Last Seen Blogs

mmusasabi
道産子エンジニア東京散策

o-bromio
Lost In Time And Space

luminahart
Hallie Hatfield: The "Writer"

coolasalemonpop
Untitled

danganronpa-agere-writing
Mikan's Agere Writing!