#how to configure group policies
Text
GPO: Remove Recycle Bin
GPO: Remove Recycle Bin
Discover how to hide the Recycle Bin for specific End Users using Group Policy Objects (GPO) in this video tutorial and learn how to customize End User settings by following along as we demonstrate how to remove the Recycle Bin through GPO in this video.
let’s to see video from our YouTube channel
Please check more videos for This Topic

View On WordPress
#active directory#AD#Backup and Recovery#Configuring Group Policies#Configuring Group Policy#Create and Link a GPO#Create GPO#create Group Policy and Link it to OU#Creating Active Directory Objects#Google AdSense#GPO#group policy beginner#group policy guide#Group Policy Management#Group Policy Object#Group Policy Objects#group policy step by step#group policy tutorial#how to configure gpo#how to configure group policies#How to create GPO#How to Install Active Directory In Windows Server#How to Promote windows server to Domain Controller#How to setup Active Directory (AD) In Windows Server#Hyper-V#Install and Configure Active Directory#Install and Configure Active Directory in Windows Server#Installing AD DS roles in Windows Server#Microsoft 365#Network Security
0 notes
Text
The Environmental Protection Agency (EPA) didn't report a staggering $7 billion in award-level obligations and outlays during fiscal year 2022, according to an inspector general audit released this week.
The EPA Office of the Inspector General (OIG) determined that the agency underreported its award-level outlays by $5.8 billion, or 99.9%, and its award-level obligations by $1.2 billion, or 12.9% during FY22, the period between October 2021 and September 2022. The agency further failed to report any of its Infrastructure Investment and Jobs Act outlays and under-reported its coronavirus pandemic-related outlays.
"The lack of complete and accurate reporting also led to taxpayers being initially misinformed about the EPA’s spending, and policy-makers who relied on the data may not have been able to effectively track federal spending," the OIG report concluded.
In response to the audit, House Energy and Commerce Committee Chair Cathy McMorris Rodgers, R-Wash., blasted the EPA and called for increased transparency into its activities.
"It’s outrageous and unacceptable that the EPA cannot keep track of its spending or inform Congress — and the American people — of how it is using taxpayer dollars," McMorris Rodgers said in a statement Thursday. "This eye-opening report only further highlights the need for more transparency at the EPA."
"It also raises questions about whether the agency is incapable of managing its record-high budget or if the agency is attempting to hide the amount of taxpayer dollars it is spending to advance the administration’s radical rush-to-green agenda," she added. "The Energy and Commerce Committee will continue holding this administration accountable for its actions that are driving up costs across the board and hurting Americans."
MICHIGAN DEMOCRAT SIGNED NDA INVOLVING CCP-TIED COMPANY, DOCUMENTS SHOW, CONTRADICTING HER PAST CLAIMS
The EPA ultimately corrected its FY22 figures in May 2023 as a result of the OIG audit while making configuration changes a month later. Overall, the inspector general made five recommendations which it said the agency agreed to make.
The report, meanwhile, comes as the EPA both manages a massive green energy fund and continues to request a larger budget. The Inflation Reduction, Democrats' massive climate and tax bill passed in 2022, created the $27 billion Greenhouse Gas Reduction Fund, which in turn establishes a national green bank to fund green projects nationwide.
HOUSE REPUBLICANS OPEN PROBE INTO BIDEN ADMIN FOR OPENING PUBLIC LANDS TO FOREIGN OWNERSHIP
And the White House is requesting that Congress approve a FY24 EPA budget of more than $12 billion, a record level. Republicans have aimed to reduce the EPA budget to about $6 billion, which would be the agency's smallest budget since the early 1990s.
"The Biden administration is using EPA as a pass through for taxpayer dollars to fund left-wing groups that aim to get Democrats elected, not improve the environment," Mandy Gunasekara, a Heritage Foundation visiting fellow who served as the EPA's chief of staff during the Trump administration, told Fox News Digital.
"A failure to report $7 billion is absurd and unacceptable, but also symbolic of how Team Biden operates: prioritizing their political goals over the needs of the American people," she continued. "I’m glad Chair Rodgers is monitoring this and hope the committee brings forth the agency’s Chief Financial Officer to account for this serious oversight."
The EPA did not immediately respond to a request for comment.
17 notes
·
View notes
Text
Navigating AWS: A Comprehensive Guide for Beginners
In the ever-evolving landscape of cloud computing, Amazon Web Services (AWS) has emerged as a powerhouse, providing a wide array of services to businesses and individuals globally. Whether you're a seasoned IT professional or just starting your journey into the cloud, understanding the key aspects of AWS is crucial. With AWS Training in Hyderabad, professionals can gain the skills and knowledge needed to harness the capabilities of AWS for diverse applications and industries. This blog will serve as your comprehensive guide, covering the essential concepts and knowledge needed to navigate AWS effectively.

1. The Foundation: Cloud Computing Basics
Before delving into AWS specifics, it's essential to grasp the fundamentals of cloud computing. Cloud computing is a paradigm that offers on-demand access to a variety of computing resources, including servers, storage, databases, networking, analytics, and more. AWS, as a leading cloud service provider, allows users to leverage these resources seamlessly.
2. Setting Up Your AWS Account
The first step on your AWS journey is to create an AWS account. Navigate to the AWS website, provide the necessary information, and set up your payment method. This account will serve as your gateway to the vast array of AWS services.
3. Navigating the AWS Management Console
Once your account is set up, familiarize yourself with the AWS Management Console. This web-based interface is where you'll configure, manage, and monitor your AWS resources. It's the control center for your cloud environment.
4. AWS Global Infrastructure: Regions and Availability Zones
AWS operates globally, and its infrastructure is distributed across regions and availability zones. Understand the concept of regions (geographic locations) and availability zones (isolated data centers within a region). This distribution ensures redundancy and high availability.
5. Identity and Access Management (IAM)
Security is paramount in the cloud. AWS Identity and Access Management (IAM) enable you to manage user access securely. Learn how to control who can access your AWS resources and what actions they can perform.
6. Key AWS Services Overview
Explore fundamental AWS services:
Amazon EC2 (Elastic Compute Cloud): Virtual servers in the cloud.
Amazon S3 (Simple Storage Service): Scalable object storage.
Amazon RDS (Relational Database Service): Managed relational databases.
7. Compute Services in AWS
Understand the various compute services:
EC2 Instances: Virtual servers for computing capacity.
AWS Lambda: Serverless computing for executing code without managing servers.
Elastic Beanstalk: Platform as a Service (PaaS) for deploying and managing applications.
8. Storage Options in AWS
Explore storage services:
Amazon S3: Object storage for scalable and durable data.
EBS (Elastic Block Store): Block storage for EC2 instances.
Amazon Glacier: Low-cost storage for data archiving.
To master the intricacies of AWS and unlock its full potential, individuals can benefit from enrolling in the Top AWS Training Institute.

9. Database Services in AWS
Learn about managed database services:
Amazon RDS: Managed relational databases.
DynamoDB: NoSQL database for fast and predictable performance.
Amazon Redshift: Data warehousing for analytics.
10. Networking Concepts in AWS
Grasp networking concepts:
Virtual Private Cloud (VPC): Isolated cloud networks.
Route 53: Domain registration and DNS web service.
CloudFront: Content delivery network for faster and secure content delivery.
11. Security Best Practices in AWS
Implement security best practices:
Encryption: Ensure data security in transit and at rest.
IAM Policies: Control access to AWS resources.
Security Groups and Network ACLs: Manage traffic to and from instances.
12. Monitoring and Logging with AWS CloudWatch and CloudTrail
Set up monitoring and logging:
CloudWatch: Monitor AWS resources and applications.
CloudTrail: Log AWS API calls for audit and compliance.
13. Cost Management and Optimization
Understand AWS pricing models and manage costs effectively:
AWS Cost Explorer: Analyze and control spending.
14. Documentation and Continuous Learning
Refer to the extensive AWS documentation, tutorials, and online courses. Stay updated on new features and best practices through forums and communities.
15. Hands-On Practice
The best way to solidify your understanding is through hands-on practice. Create test environments, deploy sample applications, and experiment with different AWS services.
In conclusion, AWS is a dynamic and powerful ecosystem that continues to shape the future of cloud computing. By mastering the foundational concepts and key services outlined in this guide, you'll be well-equipped to navigate AWS confidently and leverage its capabilities for your projects and initiatives. As you embark on your AWS journey, remember that continuous learning and practical application are key to becoming proficient in this ever-evolving cloud environment.
2 notes
·
View notes
Text
How to Disable Copilot on Windows 11
Windows Copilot, Microsoft's new AI assistant, can assist you with a variety of tasks, such as answering questions, changing system settings, and creating AI images. However, if you're not a fan of Copilot or simply don't need it, you can remove its taskbar icon or disable it entirely on your Windows 11 PC. Here, we'll show you how.
How to Remove the Copilot Icon From the Windows 11 Taskbar
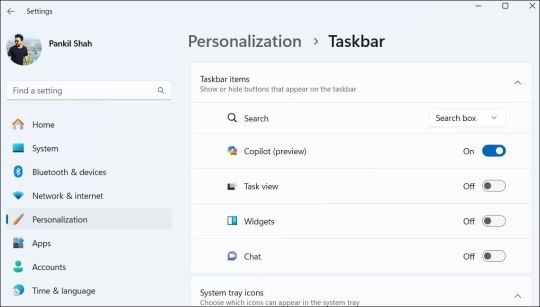
By default, the Copilot icon appears in the Windows 11 taskbar. However, if you prefer not to have it there but still want to use it occasionally, it's easy to hide the Copilot icon. Simply right-click anywhere on an empty spot on your taskbar and select Taskbar settings. In the Settings window that appears, turn off the toggle next to Copilot.
This should remove the Copilot icon from the taskbar. You can still access Copilot by pressing the Win + C keyboard shortcut in Windows 11.
How to Completely Disable Copilot via Group Policy Settings
Although hiding the Copilot is quite easy, it does not turn it off completely, and you might inadvertently access it. Fortunately, you can turn off Copilot completely via the Local Group Policy Editor on PCs running the Professional, Education, or Enterprise edition of Windows 11.
- Press Win + S to access the search menu.
- Type gpedit.msc in the search box and select the first result that appears.
- Select Yes when the User Account Control (UAC) prompt appears.
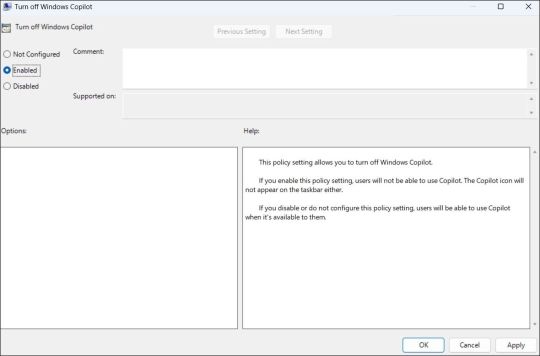
- Use the left pane to navigate to User Configuration > Administrative Templates > Windows Components > Windows Copilot.
- Double-click the Turn off Windows Copilot policy on your right.
- Select the Enabled option.
- Hit Apply followed by OK.
Once you complete the above steps, Copilot will be disabled on your Windows 11 PC and you won't be able to access it even with the keyboard shortcut. If you want to re-enable Copilot later, repeat the above steps and set the Turn off Windows Copilot policy to Not configured or Disabled.
How to Completely Disable Copilot by Modifying Registry Files
Another way to disable Copilot on Windows 11 involves modifying registry files. However, since editing the registry can be risky, you should follow the steps carefully. Also, be sure to back up all the registry files or create a restore point. This will allow you to restore the registry files in case something goes wrong.
Once you’ve done that, here’s what you need to do to disable Copilot via the Registry Editor:
- Press Win + R to open the Run dialog.
- Type regedit in the text box and press Enter to open the Registry Editor.
- Select Yes when the User Account Control (UAC) prompt appears.
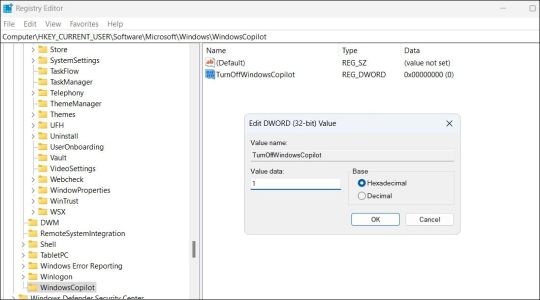
- Use the left pane to navigate to HKEY_CURRENT_USER > Software > Policies > Microsoft > Windows.
- Right-click the Windows key and select New > Key. Name it WindowsCopilot.
- Right-click on the WindowsCopilot DWORD, go to New, and select DWORD (32-bit) Value from the submenu. Name the DWORD TurnOffWindowsCopilot.
- Double-click the TurnOffWindowsCopilot DWORD, type 1 in the text field, and click OK.
- Restart your PC for the changes to take effect.
And that’s about it. Windows Copilot will be disabled on your PC. To re-enable it in the future, repeat the above steps and set the TurnOffWindowsCopilot DWORD value to 0. You can also delete the TurnOffWindowsCopilot DWORD instead.
Get Rid of Copilot on Windows 11
While Windows Copilot is a powerful tool, not everyone may want to use it. Fortunately, it’s possible to get rid of it. The above steps will help you achieve your goal, whether you want to keep Copilot out of sight or turn it off entirely.
source
Read the full article
2 notes
·
View notes
Text

Well, we of the yellow contingent love you too! Red comes first. Yes. Take care of yourself. Then green, then yellow. I want to hear what colors she talked about. Will add more if anything interesting pops up!


Rainbows, lightning (who could forget jinglei), and 88 has been firmly established as scarlet red (ok, and also lavender lol). I vow to start becoming a pure fan after Weibo night if these hints are nothing more than industrial sugar. We know they are friends; outside of that, all I know is I love them equally and will continue to support them in all their endeavors. I will continue to look at the candy as nothing more than a neat marketing tool and see how creative they can get.
Right now, 30 needs all the different CP's he can get to untie from that one who is really dropping so much sugar it seems too much at this point given the circumstances. If I were him I'd steer clear of the off-drama CP's with industrial candy outside of what he did with ZYT - I have heard rumors that he ZJM will go all in with the CP thing, but let's hope they just mean promotional stuff on screen like NBY.
I am nervous about too much CP stuff leaking these days, so no re-blogging for now. If you are a Bird Egg, feel free to roost here or in the private group. CP's are all about letting your imagination take you to places that are usually not true, but on occasion you might actually be right. Very few CPF ever discover if there pair is indeed BE. These days, there are contracts involving maintaining CP business too, so everyone be a rational egg.
I feel this Weibo night will be special though. Either way, we might get to see a tiny bit of interaction hopefully. They used to always be right after each other in the line up, so maybe they will be sitting near each other? The sitting configuration will be different now that the masking policy is different I think. Either way, we want to see them in the same frame in a film or drama again to live out an adult storyline that will make Bird Eggs happy.
2 notes
·
View notes
Text

Lockheed Martin and Northrop Grumman sign agreement to manufacture F-35 core fuselages in Germany
Fernando Valduga By Fernando Valduga 02/17/23 - 14:00 in Military
Lockheed Martin and Northrop Grumman signed a letter of intent with Rheinmetall AG as a promising strategic source of supply for the F-35 central fuselage in Germany.
This potential partnership would establish a second integrated assembly line of the central fuselage (IAL) of the F-35 in Germany, expanding the significant role that European industry plays in the F-35 program.
“Lockheed Martin has been a committed partner with Germany for more than 50 years. The F-35 program will continue to strengthen our strategic partnerships with key industry partners in the coming years," said Mike Shoemaker, Vice President of F-35 Customer Programs at Lockheed Martin. "The production of the central fuselage of the F-35 in Germany will be vital to meet the growing global demand for F-35s, which play a vital role in the security of the 21st century."

Northrop Grumman is the main partner of the Lockheed Martin F-35 program. In addition to manufacturing the central jet fuselage and wing coatings, the company is also responsible for the development, production and maintenance of sensor, avian and aircraft systems and training software.
"The central fuselage IAL is recognized as a state-of-the-art installation supported by Northrop Grumman's unique technologies, combining automation with our experience in aerospace tools," said Glenn Masukawa, vice president and manager of Northrop Grumman's F-35 program. "The involvement with Rheinmetall demonstrates our commitment to collaborate with international partners to manufacture advanced aircraft."
The F-35 program continues to develop these partnerships, using companies with the right technical capabilities. The German industry has contributed to the F-35 program since its inception in 2001. Lockheed Martin continues to actively explore additional opportunities for industrial participation that will allow partnerships throughout the German industry and create jobs in the manufacture, maintenance, training, research and development of 5th generation fighter aircraft.

Cooperation with Lockheed Martin and Northrop Grumman in the F-35 program highlights the importance of Rheinmetall for national security policy and will bring essential capabilities to Germany. Rheinmetall can contribute its experience as an integrated technology group in the production of complex components and as an aviation certified company for cooperation.
"The long-standing partnership between Lockheed Martin and Rheinmetall, as well as the very close ties that have existed for decades between the Bundeswehr (German Armed Forces) and our company, lead to a genuine transfer of know-how to Germany as a localized industry," said Armin Papperger, CEO of Rheinmetall AG. "In addition, this configuration contributes significantly to minimizing risk, bringing national partners who are involved in a proven way."
To date, the F-35 operates from 37 bases and ships around the world, with nine nations operating F-35s on its territory. There are more than 890 F-35s in service today, with more than 1,890 pilots and 13,570 maintainers trained in the aircraft.
Tags: Military AviationF-35 Lightning IILockheed MartinLuftwaffe - German Air ForceNorthrop GrummanRheinmetall
Fernando Valduga
Fernando Valduga
Aviation photographer and pilot since 1992, he participated in several events and air operations, such as Cruzex, AirVenture, Dayton Airshow and FIDAE. He has works published in specialized aviation magazines in Brazil and abroad. He uses Canon equipment during his photographic work in the world of aviation.
Related news
HELICOPTERS
Indian HAL will provide spare parts and repair Argentine Air Force helicopters
17/02/2023 - 11:00
EMBRAER
Embraer Defense & Security presents portfolio and innovative solutions at IDEX in Abu Dhabi
02/17/23 - 09:00
MILITARY
Autonomous C-130 and C-17? USAF invests in feasibility study
17/02/2023 - 08:28
INTERCEPTIONS
NORAD intercepts Russian warplanes for the second time in two days
16/02/2023 - 22:54
MILITARY
Biden: three objects slaughtered in the US were for research, not for Chinese surveillance
16/02/2023 - 22:29
Beechcraft King Air 260 Multi-Engine Training System (METS) T-54A for the U.S. Navy.
MILITARY
Textron's King Air 260 is chosen as the new U.S. Navy multi-engine coach
16/02/2023 - 21:58
Cavok Twitter
homeMain PageEditorialsINFORMATIONeventsCooperateSpecialitiesadvertiseabout
Cavok Brazil - Digital Tchê Web Creation
Commercial
Executive
Helicopters
HISTORY
Military
Brazilian Air Force
Space
Specialities
Cavok Brazil - Digital Tchê Web Creation
2 notes
·
View notes
Text

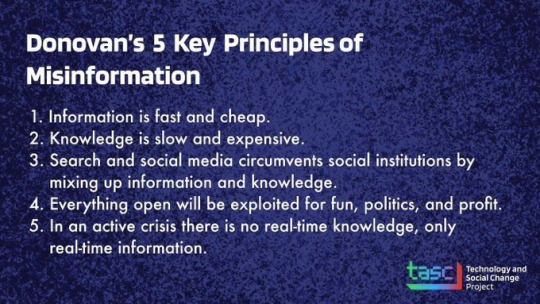
So, here’s a thread about how a group — of “free speech” enthusiasts, white supremacists, anti-Semites, etc Tried as hard as they could to Make Reddit Die by instigating breach of that Trust Thermocline (And how Reddit defied them) Hope you’ll share
This post was the most upvoted post, across all of Reddit, for 2019 - a “free speech protest” post. It was one of several attempts to push Reddit through that Trust Thermocline, By a group dedicated to Making Reddit Die
The author of that post is usernamed “FreeSpeechWarrior”. The speech he “championed” was, of course, free speech for racists, sexists, misogynists, and so forth and so on. He espoused the position that NO ONE on Reddit should remove *any* speech unless ordered by a court.
He pushed a narrative that the (volunteer) moderators of individual communities could *sued* or even *prosecuted* for removing content and / or banning users from their own communities (i.e. the intent of TXHB20 - but years & years before that bill was proposed)
For those that don’t know, Reddit Inc. is an infrastructure provider - they run the service & provide some value adds, & run adverts on content, & people set up their communities on the site & run them, for free.
Back when Ellen Pao was CEO of the site, the policy was set clearly that Reddit, Inc. is at arm’s-length from the communities it hosts & the moderators operating those communities.
So if you’re a horrible person, or someone who wants to make Reddit crash and burn (a competitor, or a political concern that’s threatened by actual free speech, or just a sociopath) How do you Make Reddit Die?
[spoiler: by weaponizing the abuse reporting system by undercutting its support and overloading it - sound familiar?]
(Graphic credit @BostonJoan)
One of these efforts was to claim, at every possible juncture, that Free Speech on Reddit was under attack. This began in a period of time when Reddit hosted the single largest Holocaust denial forum on the Internet.
Their tactics were manifold, from fearmongering about Ellen Pao (who, ironically, turns out to have been the one telling the board that they couldn’t close subreddits arbitrarily!) to fearmongering about Reddit’s Chinese TenCent investor (who didn’t have a board seat) —
They also set up to reverse engineer Reddit’s anti-abuse systems.
Reddit has “layers” of anti-abuse systems; one of those secret-sauce layers is in anti-spam (the vast majority of anti-abuse action that Reddit, Inc takes is to squash spambots) But The most EFFECTIVE anti-abuse system Reddit has is Volunteer Moderators & User Reports
So the question for those who want to Make Reddit Die is this: How do you chase off moderators, and how do you subvert User Reporting?
Of course, this bot needed to be able to see what actions all other moderators were taking in the subreddit, and of course, this bot is run by people attached to the Make Reddit Die group.
That includes AutoModerator - an automated system provided by Reddit, user configurable, which automatically reports or removes objectionable content. Automoderator is the equivalent of an Intrusion Detection System - it prevents floods of spam, abuse, and hate speech.
AutoModerator is pretty powerful, but it is limited, and needs skilled coders to bring out its full potential. Do you know what happens when you publish logs of what your Intrusion Detection System flags & interdicts? That IDS is then useless!
So Make Reddit Die, led by the Free Speech Warrior, spent a huge amount of effort in pressuring subreddits to install and run their moderator log publishing “transparency” bot
But their most subtle effort centered around Report Abuse.
On Reddit, all user reports are Anonymous. Period, end of sentence, no debate, no argument, no one except admins will ever know the username / identity of the account filing a report. Why? Because for reports, the Trust Thermocline is extremely shallow.
Let me restate that: THE TRUST THERMOCLINE FOR ANONYMOUS USER REPORTS IS EXTREMELY SHALLOW (For *all* anon. user reports systems - literature is full of these findings) And Reddit depends, heavily, on user reports.
So if you’re trying to Make Reddit Die, breaching that Anonymous User Reports Trust Thermocline - the one that’s central to Reddit’s AUP enforcement, and central to Reddit’s moderator trust & user trust - That’s a really, really attractive target.
At this time, Reddit moderators would have to approve every single reported post or comment, or remove it - those are the only two options. Mods could not snooze or ignore reports; every report would put an item back in the mod queue.
Step 1: Manufacture Demand Flood the ENTIRE SITE with garbage / false reports, using throwaway accounts - automate these to target both a breadth of posts & comments, & specific posts & comments. File these to get long text posts & comments into the modqueue regularly.
Step 2: Propose Solution: DE-ANONYMISE REPORTERS.
“Let us ban people filing false reports” - seems reasonable. “Let us see the identities of the user accounts filing false reports so we can ban them” - seems reasonable.
“At least give reporters pseudo-IDs so we can figure out who they are and code our mod bots to automatically approve the items these bad faith reporters are falsely reporting, so our human moderators can pay attention to authentic, human, good faith reports” Seems. Reasonable.
Here’s the problem: SEEMS. Seems reasonable. The problem is that if you give reporters in an anonymous user reports system a persistent, atomic, durable pseudonym It’s no longer anonymous And it’s possible to de-anonymize - identify - individual good faith reporters.
GUESS WHAT HAPPENS when even a FEW good faith anonymous reporters in an anonymous reporting system are unmasked? ALL user trust in reports fail. And that trust never gets won back.
Reddit, to their credit, solved the problem of the flood of false reports through a variety of countermeasures, and solved the problem of modqueues being flooded by letting mods ignore reports on posts & comments once approved, and other means.
The people operating the Make Reddit Die effort failed to breach Reddit’s User Trust Thermocline with that effort, and have “officially” closed up shop, “officially” because “Free Speech on Reddit is Dead” (because hate speech groups keep getting kicked off).
The Mod Logs bot plateaued in 2020 at the subreddits it’s operated on - mainly subreddits operated by misinformation & disingenuous “Free Speech” subreddits. But they’re still trying to target moderators for harassment, and Reddit is on the verge of squashing all such efforts.
The participants of the Make Reddit Die group collapsed into rDrama, due to heavy overlap of the audience & the subreddit operators & interests. They’re still trying to harass moderators & admins & breach the User Trust Thermocline of Reddit - but that’s a story for another time
So that’s how a group dedicated to Making Reddit Die tried - in many ways! In many incidents! to invert the Trust Thermocline on Reddit, to collapse the user base trust of the site - & how they repeatedly failed. Thanks for reading!
2 notes
·
View notes
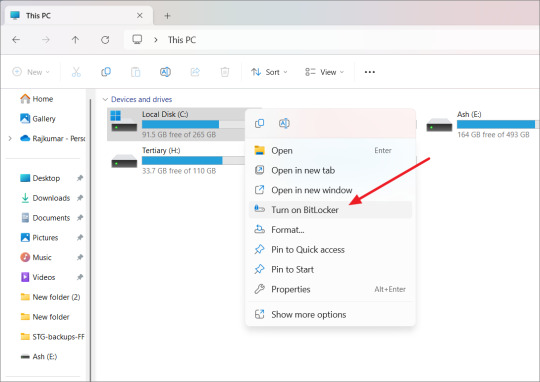
Text
How to enable and use 256-bit BitLocker in Windows 11
How to enable and use 256-bit BitLocker in Windows 11
How to enable 256-bit BitLocker in Windows 11
BitLocker is a built-in encryption tool in Windows 11 that helps protect your data by encrypting your whole operating system and files within it. In case you lose your computer, your data will be protected. However, the feature is exclusive to Pro and Enterprise editions of the Windows operating system.
We strongly recommend specifying the encryption method. By default, BitLocker uses XTS-AES-128. You can opt XTS-AES-256 for stronger security.
If you already have enabled BitLocker on your PC, you will need to unencrypt your drives, enable 256-bit encryption in Windows group policy, and then re-enable BitLocker. If you haven't enabled BitLocker on your PC yet, follow the steps below to enable 256-bit encryption:
Press Windows Key + R to open the Run dialog
Type gpedit.msc and press Enter
Go to Computer Configuration\Administrative Templates\Windows Components\BitLocker Drive Encryption. Look for the "Choose drive encryption method and cipher strength" option for the most recent operating version. For me it was Windows 10 (1511) and double click it.
Make sure you choose the correct options:
It is best to use XTS-AES-256 for operating system drives and fixed drives. Use AES-CBC 256-bit for removable drives so it is more compatible with other devices.
How to Use Bitlocker in Windows 11
Windows 11 allows you to enable BitLocker for operating system drives, fixed drives, as well as removable drives. To turn on Bitlocker on a drive, follow these steps:
Open File Explorer and right-click on the drive you want to encrypt, then select 'Turn on BitLocker' from the context menu.

When you open the BitLocker Drive Encryption wizard, choose how you want to unlock your drive and click 'Next'. You can pick either a password or a smart card to unlock the drive:
Password: Create a password using a mix of capital and lowercase letters, numbers, spaces, and symbols.
Smart Card: You can use a Smart card along with a PIN to unlock the encrypted drive. The card needs to be inserted into your computer every time you want to access the drive.
Select how you want to save your recovery key, which you can use to unlock your drive if you forget your password or lose your smart card. There are a few ways:
Save to Microsoft Account: If you're signed in with a Microsoft account, you can save the recovery key there.
Save to a file: Save the recovery key as a document on your computer.
Print the recovery key: Print the recovery key on paper.
After backing up the recovery key, click 'Next' to continue.
Select how much of the selected drive you want to encrypt and click 'Next'.
Encrypt used disk space only: This is quicker and good for new computers or drives. Only the space with data will be encrypted.
Encrypt the entire drive: This is slower but better if you want to encrypt everything, even unused space. It's best for drives you've been using for a while.
BitLocker will keep encrypting new data as you add it.
Select an encryption mode:
New encryption mode: This is advanced and better for fixed drives on Windows 10 or 11.
Compatible mode: Use this for portable drives you might use on older Windows versions.
If you would like to run a system check before encrypting the drive, check the 'Run BitLocker system check' option and click 'Continue'. This system check ensures whether BitLocker can read the recovery and encryption keys properly.
Click 'Restart now' to continue. After the restart, the system will automatically encrypt the drive.
By the way , if you need Windows 11 Product key to activate your Windows 11 PC, you can get it from the Microsoft Partner Keyingo.com with discounts !
0 notes
Text
SAP HR US Payroll Configuration Guide

SAP HR US Payroll Configuration: A Comprehensive Guide
Configuring SAP HR for US Payroll is a complex but crucial task. This intricate process ensures that employees are paid accurately and in compliance with the ever-changing web of federal, state, and local tax regulations. This guide will walk you through the fundamental steps, best practices, and critical considerations for configuring your SAP HR system to tackle the unique challenges of US payroll.
Prerequisites
Before we dive into configuration, let us ensure you have the basics:
Strong SAP HR Functional Knowledge: It is essential to have a solid grasp of SAP HR modules, particularly Personnel Administration, Time Management, and, of course, Payroll.
US Payroll Understanding: Familiarity with US payroll concepts like gross-to-net calculations, tax withholding (federal, state, local), deductions, and various reporting requirements.
Key Configuration Steps
US Payroll configuration in SAP HR is extensive. Here is a breakdown of significant areas:
Payroll Organizational Structure
Company Code: Represents a legal entity for which you run Payroll.
Payroll Area: A division within a company code where employees share similar payroll characteristics (e.g., pay frequency).
Personnel Area / Personnel Subarea: Logical groupings of employees, often aligned with geographical locations or departments, that can influence payroll rules.
Tax Configuration
Tax Authorities: Set up federal, state, and local tax authorities to which you must remit withheld taxes.
Tax Models and Tax Types: Configure tax calculation models and tax types for various levels of taxation (e.g., Federal Income Tax, State Withholding, Social Security, Medicare).
Tax Wage Types: Create wage types to hold the calculated tax amounts for reporting and remittance purposes.
Payroll Schemas and Rules
Payroll Schema: At the heart of payroll execution, a schema is a program outlining step-by-step processing instructions. SAP delivers standard US payroll schemas (e.g., X000), and you may need to customize or copy these for specific needs.
Personnel Calculation Rules (PCRs): Within the schema, PCRs contain the calculation logic (gross income, taxes, deductions, net pay). You must adjust or create PCRs to align with your company policies and benefit plans.
Wage Types
Creation: Define wage types to represent earnings (regular pay, overtime), deductions (pre-tax, post-tax), employer contributions, and the all-important net pay wage type.
Characteristics: Configure wage-type traits, such as how they impact taxation and whether they contribute to retirement plans.
Additional Considerations
Garnishments: Set up wage types and deduction rules to handle court-ordered garnishments, ensuring they are processed correctly.
Benefits: Integrate benefit plans and providers with Payroll so that deductions and employer contributions are calculated accurately.
Retroactive Pay: Ensure retroactive pay adjustments are handled per company policy and legal requirements.
Best Practices
Thorough Testing: Rigorously test your configuration in a development environment before deploying to production. Use real-world employee scenarios to validate results.
Regular Updates: US tax regulations change frequently. Stay on top of tax notices and legal updates; adjust your configuration accordingly.
Documentation: Keep detailed documentation of your configuration choices, customizations, and their reasoning. This aids in maintenance and troubleshooting.
Resources
SAP Help Portal: Connect with SAP experts and users.
Online Training and Tutorials: Many resources are available online.
Important Note: US Payroll is complex. It is often wise to consult an experienced SAP HR Payroll specialist to ensure your setup is compliant, efficient, and tailored to your company’s needs.
youtube
You can find more information about SAP HR in this SAP HR Link
Conclusion:
Unogeeks is the No.1 IT Training Institute for SAP HR Training. Anyone Disagree? Please drop in a comment
You can check out our other latest blogs on SAP HR here – SAP HR Blogs
You can check out our Best In Class SAP HR Details here – SAP HR Training
———————————-
For Training inquiries:
Call/Whatsapp: +91 73960 33555
Mail us at: [email protected]
Our Website ➜ https://unogeeks.com
Follow us:
Instagram: https://www.instagram.com/unogeeks
Facebook: https://www.facebook.com/UnogeeksSoftwareTrainingInstitute
Twitter: https://twitter.com/unogeeks
0 notes
Text
Quota Generation In SAP HR

Understanding Quota Generation in SAP HR
Effective employee time and attendance management is crucial in any organization. This includes processes such as leave entitlement, absence tracking, and vacation accruals. SAP HR’s Time Management module provides a robust system to handle these complexities through quota generation functionality. In this blog, we’ll explore quota generation, why it’s important, and how it’s configured within the SAP HR landscape.
What is Quota Generation?
In SAP HR, quotas represent the amount of time an employee is entitled to for various purposes, such as:
Vacation Leave: The annual or periodic allotment of days off for rest.
Sick Leave: Time allocated for absences due to illness or health issues.
Special-Purpose Leave: Leave designed for specific reasons like maternity, paternity, bereavement, or other company-defined circumstances.
Quota generation automatically calculates and assigns employee time-off entitlements based on predefined rules, policies, and individual employee data.
Why Quota Generation Matters
Compliance: Quota generation helps ensure adherence to company policies, labor laws, and collective agreements regarding leave entitlements.
Accuracy: Automated calculations reduce the risk of errors, which are common in manual time-off management.
Efficiency: Streamlines the overall leave management process, saving HR professionals valuable time and effort.
Transparency: Provides employees with clear visibility into their available time-off balances.
Configuring Quota Generation in SAP HR
The configuration of quota generation in SAP HR involves a series of steps within the IMG (Implementation Guide). Let’s outline the key elements:
Defining Absence/Attendance Types: Create and describe the various types of absences or attendances that will have quotas associated with them (e.g., vacation, sick, maternity).
Grouping Personnel Subareas (PSAs): Group employees based on criteria relevant to quota calculation, such as location, department, or employee type.
Employee Subgroup Groupings: Further segment employees within PSAs for specific time quota calculations.
Counting Rules: Establish the precise rules determining how quotas are generated, including accrual rates, carryover policies, deductions, and maximum limits.
Base Entitlements: Define the default quota values upon which time-dependent accruals or seniority-based increases might be applied.
Generation Rules: Connect the previously defined elements to create comprehensive rules controlling the quota calculation process.
Running the Quota Generation Process
In SAP HR, quota generation is typically executed using the report RPTQTA00. This report can be scheduled to run automatically at designated intervals (e.g., monthly, annually) or triggered manually as needed.
Important Considerations:
Customization: The configuration process often needs tailoring to align with an organization’s specific rules and regulations.
Integration: Quota generation often integrates with other SAP HR modules, such as Payroll, to ensure an accurate impact on compensation.
Employee Data: Accurate maintenance of master data (e.g., hire date, employment status) is essential for correct quota calculations.
In Conclusion
SAP HR’s quota generation functionality provides organizations with a powerful tool to manage employee time off in a structured and compliant way. Organizations can ensure seamless leave administration and greater efficiency for their HR function by understanding its core principles and the configuration involved.
youtube
You can find more information about SAP HR in this SAP HR Link
Conclusion:
Unogeeks is the No.1 IT Training Institute for SAP HR Training. Anyone Disagree? Please drop in a comment
You can check out our other latest blogs on SAP HR here – SAP HR Blogs
You can check out our Best In Class SAP HR Details here – SAP HR Training
———————————-
For Training inquiries:
Call/Whatsapp: +91 73960 33555
Mail us at: [email protected]
Our Website ➜ https://unogeeks.com
Follow us:
Instagram: https://www.instagram.com/unogeeks
Facebook: https://www.facebook.com/UnogeeksSoftwareTrainingInstitute
Twitter: https://twitter.com/unogeeks
0 notes
Text
What is the GPO? Include an example
What is the GPO?
Group Policy Object, which is a feature of Microsoft Active Directory that allows administrators to manage and enforce policies across a network of computers.
A GPO is a collection of settings and rules that define the behavior and configuration of a set of computers or users within an Active Directory domain.
These settings can include security policies, software installation…

View On WordPress
#active directory#AD#Backup and Recovery#Configuring Group Policies#Configuring Group Policy#Create and Link a GPO#Create GPO#create Group Policy and Link it to OU#Creating Active Directory Objects#Google AdSense#GPO#group policy beginner#group policy guide#Group Policy Management#Group Policy Object#Group Policy Objects#group policy step by step#group policy tutorial#how to configure gpo#how to configure group policies#How to create GPO#How to Install Active Directory In Windows Server#How to Promote windows server to Domain Controller#How to setup Active Directory (AD) In Windows Server#Hyper-V#Install and Configure Active Directory#Install and Configure Active Directory in Windows Server#Installing AD DS roles in Windows Server#Microsoft 365#Network Security
0 notes
Text
How can I pass the AWS DevOps engineer professional certification in 2024?
To pass the AWS DevOps Engineer Professional certification in 2024, you'll need to prepare diligently and thoroughly understand the concepts, services, and best practices relevant to AWS DevOps. Here's a step-by-step guide to help you succeed:
Understand the Exam Blueprint: Familiarize yourself with the AWS Certified DevOps Engineer - Professional exam guide and blueprint provided by AWS. This document outlines the topics covered in the exam and the percentage of questions allocated to each domain.
Gain Hands-on Experience: AWS certifications, including the DevOps Engineer Professional, require practical knowledge and experience. Work on real-world projects involving AWS DevOps services such as AWS CodePipeline, AWS CodeDeploy, AWS CodeBuild, AWS CloudFormation, AWS Elastic Beanstalk, AWS Lambda, AWS OpsWorks, AWS CloudWatch, AWS CloudTrail, and more.
Review Official AWS Documentation: AWS offers comprehensive documentation for all its services. Review the official AWS documentation related to DevOps services to understand their features, use cases, configurations, and best practices. This will help you build a solid foundation and deepen your understanding of AWS DevOps concepts.
Take AWS Training Courses: Enroll in AWS training courses specifically designed for the DevOps Engineer Professional certification. AWS provides instructor-led training, digital courses, and hands-on labs covering topics relevant to the exam. These courses often include practice exams and sample questions to assess your knowledge and readiness for the certification exam.
Use Practice Exams and Study Guides: Utilize practice exams and study guides to assess your understanding of the exam topics and identify areas where you need improvement. There are various online platforms and resources offering practice exams and study materials tailored to the AWS DevOps Engineer Professional certification.
Join AWS Community and Forums: Engage with the AWS community and participate in forums, discussion groups, and online communities dedicated to AWS certifications and DevOps practices. Interacting with peers and experts can provide valuable insights, tips, and support during your certification journey.
Hands-on Labs and Projects: Complete hands-on labs, tutorials, and projects to reinforce your understanding of AWS DevOps services and concepts. Experiment with different configurations, deployment strategies, and automation techniques to gain practical experience and confidence in using AWS tools and services.
Stay Updated with AWS Announcements: AWS regularly introduces new services, features, and updates. Stay informed about the latest developments in AWS DevOps by following AWS blogs, webinars, re:Invent conference sessions, and announcements. Make sure your knowledge aligns with current industry trends and best practices.
Review and Reinforce Weak Areas: Continuously review and reinforce your understanding of weak areas identified through practice exams and assessments. Focus on mastering challenging topics and concepts to ensure readiness for the certification exam.
Schedule and Take the Exam: Once you feel confident in your preparation, schedule your AWS DevOps Engineer Professional certification exam. Be sure to review the exam policies, guidelines, and requirements before the exam day. On the day of the exam, stay calm, focused, and manage your time effectively to answer all questions accurately.
By following these steps and dedicating sufficient time and effort to your preparation, you'll increase your chances of passing the AWS DevOps Engineer Professional certification exam in 2024
#pmp certification cost#pmp training#pmp certification#pmp exam#pmp certification price#online certification and training
0 notes
Text
computeritblog
Cloud services are used for many purposes in enterprise environments, from storing data in services like Box, accessing productivity tools through Microsoft 365, and deploying IT infrastructure on Amazon Web Services (AWS). With all these capabilities, cloud services enable organizations to move faster, accelerating their business with more flexible technologies, often at a lower cost. However, using any cloud service comes with cloud data security challenges and risks. The safety of data created in the cloud, sent to the cloud, and transferred from the cloud is always the responsibility of the cloud client. Protecting cloud data requires transparency and control. In the steps below, we’ve laid out a core set of cloud security best practices that can help companies transition to a secure cloud and overcome cloud security challenges.
Phase 1: Understand cloud usage and risk
The first step in cloud security is to consider your current state and assess the risks. Using cloud security solutions that enable cloud monitoring, you can take the following steps:
Step 1: Identify sensitive or controlled data.
The most significant risk area is data loss or theft, resulting in penalties or loss of intellectual property. Data classification engines can classify your data so you can fully measure this risk.
Step 2: Understand how subtle data is accessed and transferred.
Sensitive data can be stored in the cloud, but you must track who can access it and where it goes. View permissions for files and folders in your cloud environment, including access contexts such as user roles, location, and device type.
Step 3: Discover Shadow IT (unknown uses of the cloud).
Most people don’t ask their IT team before ratification up for a cloud storage account or changing a PDF online. Use your network proxy, firewall, or SIEM logs to find out what cloud services exist that you don’t know about, and then assess their risk profile.
Step 4: Audit infrastructure (IaaS) configurations like AWS before Azure.
Your IaaS settings cover many dangerous locations, several of which can create exploitable vulnerabilities if not configured correctly. Start by auditing your identity and access management configurations, network configuration, and encryption.
Step 5: Detect malicious user behavior.
Unwary employees and third-party attackers can exhibit behavior that indicates malicious use of cloud data. User behavior analytics (UBA) can monitor anomalies and reduce internal and external data loss.
Phase 2: Protect your cloud
Once you understand the level of cloud security risk, you can strategically apply security to your cloud services based on their risk level. Several cloud security skills can help you implement the following best practices:
Step 1: Apply data protection policies.
Because your data is now classified as sensitive or controlled, you can assign policies that switch what data can be stored in the cloud, seclude or remove subtle data found in the cloud, and inform users when they have made an error and violated one of your rules.
Step 2: Encrypt sensitive data with your keys.
The encryption in the cloud service will protect your data from unauthorized parties, but the worker will still have contact with your encryption keys. Instead, encode your data with your keys so you have complete access control. Users can still access data seamlessly.
Step 3: Set limits on data sharing.
From the moment data reaches the cloud, enforce access control policies on one or more services. Start with setting up users or groups in the viewer or editor and controlling what information can be shared externally through shared links.
Step 4: Stop transferring data to unmanaged devices you don’t know about.
Cloud services provide access from anywhere there is an Internet connection, but access from unmanaged plans such as a personal phone creates a blind spot for your security—block downloads on unmanaged devices by requiring a device security check before downloading.
Step 5: Apply advanced malware protection to an infrastructure through a service (IaaS) such as AWS or Azure.
In IaaS environments, you are accountable for the security of your working systems, applications, and network traffic. Anti-malware technology can be applied to the OS and virtual network to protect your infrastructure. Deploy applications allow listing and memory feat deterrence for single-purpose workloads and machine learning-based defense for general-purpose assignments and file stores.
Phase 3: Respond to cloud security issues
When accessing and using your cloud services, incidents that require an automated or managed response will regularly arise, just like in any other IT environment. Follow these best practices to get started with cloud security incident response:
Step 1: High-access risk situations will require additional verification.
For example, if a user accesses sensitive data in a cloud facility from a new device, two-factor authentication is automatically required to confirm their individuality.
Step 2: Adjust cloud access policies as novel services become available.
You can’t predict which cloud service will be accessed. Still, you can routinely update web access policies, such as those enforced by a safe web gateway, with info about the cloud service’s risk profile to block access or display a warning. Do this by integrating a cloud-based risk database with your secure web gateway or firewall.
Step 3: Remove malware from the cloud service.
Malware can compromise a shared folder that automatically syncs with cloud storage, copying the malware to the cloud without user action. Scan cloud storage files with antivirus software to stop ransomware attacks or data theft.
As cloud services evolve, so do the tests and pressures you face when using them. Always stay updated with updates to your cloud provider’s security-related features so you can adjust your policies accordingly. Security providers will also change their threat intellect and machine learning models to keep up. The steps and best practices outlined above can use several key technologies to complete each step, often working with native security features from cloud providers.
1. Cloud Access Security Broker (CASB):
Protects data in the cloud with data loss prevention, access control, and user behavior analytics. CASB is also used to monitor IaaS configurations and detect shadow IT infrastructures.
2. Protecting cloud workloads:
Discovers workloads and containers, applies malware defense, and simplifies security management in IaaS environments.
3. Virtual network security:
Scans network traffic moving between virtual instances hosted in IaaS environments, including their entry and exit points. READ MORE. computeritblog
1 note
·
View note
Text
Amazon Route 53 Advanced Features for Global Traffic

What is Amazon Route 53
A dependable and economical method of connecting end users to Internet applications
Sharing and then assigning numerous DNS resources to each Amazon Virtual Private Cloud (Amazon VPC) can be quite time-consuming if you are managing numerous accounts and Amazon VPC resources. You may have even gone so far as to create your own orchestration layers in order to distribute DNS configuration throughout your accounts and VPCs, but you frequently run into limitations with sharing and association.
Amazon Route 53 Resolver DNS firewall
With great pleasure, AWS now provide Amazon Route 53 Profiles, which enable you to centrally manage DNS for all accounts and VPCs in your company. Using Route 53 Profiles, you may apply a standard DNS configuration to several VPCs in the same AWS Region. This configuration includes Amazon Route 53 private hosted zone (PHZ) associations, Resolver forwarding rules, and Route 53 Resolver DNS Firewall rule groups. You can quickly and simply verify that all of your VPCs have the same DNS setup by using Profiles, saving you the trouble of managing different Route 53 resources. It is now as easy to manage DNS for several VPCs as it was for a single VPC.
Because Profiles and AWS Resource Access Manager (RAM) are naturally connected, you can exchange Profiles between accounts or with your AWS Organizations account. By enabling you to create and add pre-existing private hosted zones to your Profile, Profiles effortlessly interacts with Route 53 private hosted zones. This means that when the Profile is shared across accounts, your organizations will have access to the same settings. When accounts are initially provisioned, AWS CloudFormation enables you to utilize Profiles to define DNS settings for VPCs regularly. You may now more effectively manage DNS settings for your multi-account environments with today’s release.
Amazon Route 53 benefits
Automatic scaling and internationally distributed Domain Name System (DNS) servers ensure dependable user routing to your website
Amazon Route 53 uses globally dispersed Domain Name System (DNS) servers to provide dependable and effective end-user routing to your website. By dynamically adapting to changing workloads, automated scaling maximises efficiency and preserves a flawless user experience.
With simple visual traffic flow tools and domain name registration, set up your DNS routing in a matter of minutes
With simple visual traffic flow tools and a fast and easy domain name registration process, Amazon Route 53 simplifies DNS routing configuration. This makes it easier for consumers to manage and direct web traffic effectively by allowing them to modify their DNS settings in a matter of minutes.
To cut down on latency, increase application availability, and uphold compliance, modify your DNS routing policies
Users can customize DNS routing settings with Amazon Route 53 to meet unique requirements including assuring compliance, improving application availability, and lowering latency. With this customization, customers can optimize DNS configurations for resilience, performance, and legal compliance.
How it functions
A DNS (Domain Name System) online service that is both scalable and highly available is Amazon Route 53. Route 53 links user queries to on-premises or AWS internet applications.Image credit to AWS
Use cases
Control network traffic worldwide
Easy-to-use global DNS features let you create, visualize, and scale complicated routing interactions between records and policies.
Construct programmes that are extremely available
In the event of a failure, configure routing policies to predetermine and automate responses, such as rerouting traffic to different Availability Zones or Regions.
Configure a private DNS
In your Amazon Virtual Private Cloud, you can assign and access custom domain names (VPC). Utilise internal AWS servers and resources to prevent DNS data from being visible to the general public.
Which actions can you perform in Amazon Route 53
The operation of Route 53 Profiles
You go to the AWS Management Console for Route 53 to begin using the Route 53 Profiles. There, you can establish Profiles, furnish them with resources, and link them to their respective VPCs. Then use AWS RAM to share the profile you made with another account.
To set up my profile, you select Profiles from the Route 53 console’s navigation pane, and then you select Create profile.
You will optionally add tags to my Profile configuration and give it a pleasant name like MyFirstRoute53Profile.
The Profile console page allows me to add new Resolver rules, private hosted zones, and DNS Firewall rule groups to my account or modify the ones that are already there.
You select which VPCs to link to the Profile. In addition to configuring recursive DNSSEC validation the DNS Firewalls linked to my VPCs’ failure mode, you are also able to add tags. Additionally, you have the ability to decide which comes first when evaluating DNS: Profile DNS first, VPC DNS second, or VPC DNS first.
Up to 5,000 VPCs can be linked to a single Profile, and you can correlate one Profile with each VPC.
You can control VPC settings for different accounts in your organization by using profiles. Instead of setting them up per-VPC, you may disable reverse DNS rules for every VPC that the Profile is connected to. To make it simple for other services to resolve hostnames from IP addresses, the Route 53 Resolver automatically generates rules for reverse DNS lookups on my behalf. You can choose between failing open and failing closed when using DNS Firewall by going into the firewall’s settings. Additionally, you may indicate if you want to employ DNSSEC signing in Amazon Route 53 (or any other provider) in order to enable recursive DNSSEC validation for the VPCs linked to the Profile.
Assume you can link a Profile to a VPC. What occurs when a query precisely matches a PHZ or resolver rule that is linked to the VPC’s Profile as well as one that is related with the VPC directly? Which DNS settings, those from the local VPCs or the profiles, take priority? In the event that the Profile includes a PHZ for example.com and the VPC is linked to a PHZ for example.com, the VPC’s local DNS settings will be applied first. The most specific name prevails when a name query for a conflicting domain name is made (for instance, the VPC is linked to a PHZ with the name account1.infra.example.com, while the Profile has a PHZ for infra.example.com).
Using AWS RAM to share Route 53 Profiles between accounts
You can share the Profile you made in the previous part with my second account using AWS Resource Access Manager (RAM).
On the Profiles detail page, you select the Share profile option. Alternatively, you may access the AWS RAM console page and select Create resource share.
You give your resource share a name, and then you go to the Resources area and look for the “Route 53 Profiles.” You choose the Profile under the list of resources. You have the option to add tags. Next is what you select.
RAM controlled permissions are used by profiles, enabling me to assign distinct permissions to various resource types. The resources inside the Profile can only be changed by the Profile’s owner, the network administrator, by default. Only the contents of the Profile (in read-only mode) will be accessible to the recipients of the Profile, which are the VPC owners. The resource must have the required permissions attached to it in order for the Profile’s recipient to add PHZs or other resources to it. Any resources that the Profile owner adds to the shared resource cannot be edited or removed by recipients.
You choose to allow access to my second account by selecting Next, leaving the default settings.
You select Allow sharing with anyone on the following screen, type in the ID of my second account, and click Add. Next, You select that account ID under Selected Principals and click Next.
You select Create resource share on the Review and create page. The creation of the resource sharing is successful.
You, now navigate to the RAM console using your other account, which you share your profile with. You select the resource name you generated in the first account under the Resource sharing section of the navigation menu. You accept the offer by selecting Accept resource share.
And that’s it! now select the Profile that was shared with you on your Amazon Route 53Profiles page.
The private hosted zones, Resolver rules, and DNS Firewall rule groups of the shared profile are all accessible to you. You are able to link this Profile to the VPCs for this account. There are no resources that you can change or remove. As regional resources, profiles are not transferable between regions.
Amazon Route 53 availability
Using the AWS Management Console, Route 53 API, AWS CloudFormation, AWS Command Line Interface (AWS CLI), and AWS SDKs, you can quickly get started with Route 53 Profiles.
With the exception of Canada West (Calgary), the AWS GovCloud (US) Regions, and the Amazon Web Services China Regions, Route 53 Profiles will be accessible in every AWS Region.
Amazon Route 53 pricing
Please check the Route 53 price page for further information on the costs.
Read more on govindhtech.com
#amazonroute53#globaltraffic#awsregion#usecases#dnsdata#route53#vpc#awsram#ram#aws#awscli#technology#technews#news#govindhtech
0 notes
Text
can you make a vpn on windows server
🔒🌍✨ Get 3 Months FREE VPN - Secure & Private Internet Access Worldwide! Click Here ✨🌍🔒
can you make a vpn on windows server
VPN setup on Windows Server
Setting up a Virtual Private Network (VPN) on a Windows Server can provide a secure way for users to connect to the network remotely. This allows employees to access company resources securely while working from home or on the go. Here's a step-by-step guide on how to set up a VPN on a Windows Server:
Step 1: Install the Remote Access Role
Begin by opening the Server Manager on your Windows Server and selecting the 'Add Roles and Features' option. From there, choose the Remote Access role and install it on the server.
Step 2: Configure Remote Access
After installing the Remote Access role, open the Remote Access Management console. Follow the wizard to configure the VPN settings, such as selecting the VPN type (SSTP, L2TP, PPTP, or IKEv2) and setting up the IP address pool for VPN clients.
Step 3: Configure Network Policies
Next, set up network policies to control access to the VPN. You can define policies based on user groups, authentication methods, and connection properties to ensure secure access to the network.
Step 4: Enable Routing and Remote Access
Once the configuration is complete, enable the Routing and Remote Access service on the Windows Server. This will allow VPN connections to be established from remote clients securely.
Step 5: Test the VPN Connection
Finally, test the VPN connection by connecting remotely using a client device. Verify that the connection is secure and that users can access network resources as needed.
By following these steps, you can successfully set up a VPN on a Windows Server, providing a secure and reliable way for remote users to access company resources.
Windows Server VPN configuration
When it comes to setting up a VPN on a Windows Server, there are several steps you need to follow to ensure a secure and successful configuration. A VPN, or Virtual Private Network, allows for secure access to your server from remote locations over the internet. Here's a guide on how to configure a VPN on your Windows Server:
Installing the VPN Role: Start by opening the Server Manager on your Windows Server machine. Navigate to the Dashboard and select 'Add roles and features.' Choose the 'Remote Access' role and follow the steps to install the necessary features.
Configuring VPN Settings: Once the role is installed, open the Remote Access Management Console. Select 'DirectAccess and VPN' and then 'Run the Getting Started Wizard.' Follow the wizard to configure your VPN settings, including choosing the type of VPN (SSTP, L2TP, PPTP) and setting up IP addressing.
Setting up User Accounts: In order for users to access the VPN, you'll need to create user accounts with VPN access permissions. Go to the 'Users' tab in the Remote Access Management Console and add the necessary users.
Testing the Connection: Once everything is set up, it's important to test the VPN connection to ensure everything is working correctly. Try connecting to the VPN from a remote location using the credentials you've set up.
By following these steps, you can successfully configure a VPN on your Windows Server, providing secure remote access to your network and resources. Remember to regularly update and maintain your VPN configuration to ensure the security of your data and network.
Establishing VPN on Windows Server
To establish a VPN on Windows Server, you can follow a simple set of steps to ensure a secure and reliable connection. A VPN, or Virtual Private Network, allows users to securely access a private network from a remote location, ensuring data privacy and encryption. Setting up a VPN on Windows Server involves configuring the built-in Routing and Remote Access (RRAS) server role.
Firstly, ensure that your Windows Server is updated and has the latest security patches. Next, open the Server Manager and select the 'Add Roles and Features' option. Choose the 'Remote Access' role and install the necessary features such as DirectAccess and VPN.
Once the role is installed, open the Routing and Remote Access console from the Server Manager. Right-click on the server name and select 'Configure and Enable Routing and Remote Access.' Follow the wizard to set up the VPN connection, choosing 'Remote access' and 'VPN' options.
Configure the VPN settings such as IP address assignment, authentication methods, and protocols according to your network requirements. You can use PPTP, L2TP/IPSec, or SSTP protocols based on security and compatibility needs.
After configuring the VPN, create user accounts with appropriate permissions to access the network via VPN. Test the connection by connecting to the VPN server from a remote device using the provided login credentials.
By following these steps, you can establish a VPN on Windows Server efficiently, providing a secure and encrypted connection for remote users to access the network resources.
Windows Server VPN deployment
Title: Streamlining Your Network Security: Windows Server VPN Deployment
In the realm of network security, deploying a Virtual Private Network (VPN) is paramount for safeguarding sensitive data and ensuring secure remote access. Windows Server offers a robust solution for VPN deployment, providing a seamless integration within existing infrastructures.
Setting up a VPN on Windows Server begins with the installation of the Remote Access role through Server Manager. This role encompasses various functionalities, including DirectAccess, Routing, and VPN services. Once installed, administrators can configure the VPN settings tailored to their organization's requirements.
Windows Server offers two primary VPN protocols: Secure Socket Tunneling Protocol (SSTP) and Internet Key Exchange version 2 (IKEv2). SSTP operates over the HTTPS protocol, making it ideal for environments where strict firewall policies are enforced. On the other hand, IKEv2 boasts robust security features and seamless connectivity, making it suitable for mobile devices and remote access scenarios.
Deployment considerations extend beyond protocol selection. Administrators must configure authentication methods, such as Active Directory or RADIUS, to authenticate VPN users securely. Additionally, implementing encryption standards like Advanced Encryption Standard (AES) ensures data confidentiality during transit.
Centralized management is a hallmark of Windows Server VPN deployment. Administrators can utilize Group Policy Objects (GPOs) to enforce VPN settings across the network, ensuring consistency and compliance with security policies. Furthermore, integration with Windows PowerShell facilitates automation and streamlines administrative tasks.
Windows Server VPN deployment empowers organizations with a versatile and secure solution for remote access and network connectivity. By leveraging built-in features and adhering to best practices, businesses can fortify their network perimeter and mitigate security risks effectively.
Creating VPN on Windows Server
Setting up a VPN (Virtual Private Network) on a Windows Server can enhance security and provide remote access to your network resources. With the right configuration, you can ensure encrypted communication between connected devices, safeguarding sensitive data from unauthorized access. Here’s a step-by-step guide to creating a VPN on Windows Server:
Install the Remote Access Role: Begin by installing the Remote Access role via the Server Manager dashboard. Navigate to 'Manage' > 'Add Roles and Features' and select 'Remote Access' from the list of server roles.
Configure VPN: After installing the Remote Access role, open the Remote Access Management Console from the Tools menu in Server Manager. Select 'DirectAccess and VPN' and then click on 'Run the Getting Started Wizard.'
Choose Deployment Type: In the Getting Started Wizard, choose 'Deploy VPN only' to set up a VPN without DirectAccess. Alternatively, select 'Deploy both DirectAccess and VPN (recommended)' if you need both functionalities.
Specify VPN Server Details: Follow the wizard to specify details such as the network interface for VPN connections, authentication methods (like Active Directory or RADIUS), and IP address assignment (static or dynamic).
Configure Client Access: Once the wizard completes, configure client access by ensuring VPN ports (like TCP port 1723 and IP protocol 47 - GRE) are open on any firewall devices. Also, ensure clients have the necessary VPN connection settings, including server IP address and authentication credentials.
Test Connection: Test the VPN connection from a client device to ensure it can connect successfully. Troubleshoot any connectivity issues by checking firewall rules, server configuration, and client settings.
Monitor and Maintain: Regularly monitor the VPN connection status and server performance to ensure optimal operation. Perform routine maintenance tasks such as applying software updates and reviewing security logs for any suspicious activity.
By following these steps, you can create a VPN on Windows Server, providing secure remote access for your network users while maintaining control and confidentiality over your data. Remember to implement best practices for VPN security to mitigate potential risks and vulnerabilities.
0 notes
Text
Windows 10 to Windows 11 Migration for 1000+ users using Intune for Ramsay Health Care
Inventory
So the first thing I had to do was to do an inventory of how many Windows mobile devices we have in our environment that needed to be upgraded to Windows 11.
I exported all Windows mobile devices to a CSV and customised the fields so that it only shows the Hostname, Manufacturer and Serial number.
We had a mixed environment of HP and Dell laptops. The Dell machines were 5 years out of warranty and we decided to capex them and replace them with our new standard machine HP G17 machines. We also had machines that were Windows 7 and were of network, connected to X-ray, MRI, ultrasound and CT Scanners which could not be touched as the software on there that controlled the scanners was not compatible with Windows 11.
For the remaining HP machines on the list, I sent the CSV file to our account manager at HP who gave us a breakdown of how many machines are in warranty and how many machines are out of warranty. For the machines out of warranty which were G11,12 and 13, we decided to replace them with HP G17 machines. The machines G15, and 16s that are under warranty were a part of the Windows upgrade program.
Configuration
The first thing I did was create an autopilot for Windows 11 for the new HP 17 machines so that new hardware hashes for HP 17 machines could be enrolled in our intune company portal by HP. To do this I had to create a security group called RAM_WIN11 and configure the syntax so it would enroll into our Intune environment. I also added the Microsoft Office Suite (Word, Excel, Powerpoint, OneDrive, Teams), Google Chrome, Firefox and Microsoft Defender App to the group so that they install automatically on the new HP G17 mobile devices. I then added the RAM_WIN11 to the compliance policy and conditional policies so they would apply just like how they do with Windows 10 machines.
Once this was done I had to then create a Windows Deployment profile calling it WIN11 and configure the OOBE experience for the new HP G17 machines. I then added the security group RAM_WIN11 to the WIN11 deployment profile so that as soon as HP enrolls the hardware hash into our Intune company portal the laptop gets assigned the RAM_WIN11 group ready to be configured and the apps downloaded.
Testing
So we ordered a handful of HP machines to test the deployment. We setup a few users on the laptops and configured their profiles. Also, we work with NHS England who have an admin account used to set and configure their applications on the laptops for the nurses, doctors and consultants based at the hospitals.
Issues Faced
So some of the issues faced was there were a few issues with NHS apps that flagged up errors which NHS England resolved. Also, some of the Windows 11 machines would show non-compliance despite them being compliant. An example of this is some would show Windows Defender as non-compliant and Windows Defender was on the laptop as it was part of the autopilot enrollment process. To resolve this I had to escalate to Microsoft where an Intune SME fixed this by running a PowerShell script against our Intune tenant which resolved this issue.
Deployment
Front Office
So for consultants and nurses, we ordered a mass stock of HP G17 laptops and they were shipped to field engineers who would configure the laptop with our OOBE image and work with NHS to configure their apps on the laptop. They would then go to the hospital site to swap out the laptop and test and make sure all the apps and laptops were working with the user. Once that was done they would collect the old laptop unassign it from the Intune company portal and then wipe the laptop. Once this was done they would log it with HP and arrange collection as it was a part of a trade-in deal which reduced the cost.
Backoffice
So for Backoffice teams, the G17s were shipped to the users' addresses and instructions were sent to the users by email on how to configure their laptops. Once they were up and working on their new laptop the service desk would then do a remote wipe of the old laptop. Once this was wiped it would be unassigned from the Intune Company portal. The service desk would then arrange with HP to collect the old laptop from the user's house.
Windows 11 Upgrade Program
So we had a couple of hundreds of the G15 and G16 laptops that were under warranty and could be upgraded to Windows 11. To do this I had to first create a security group called RAM_WIN11_UG.
Once this was done I had to create a Windows 10 feature update policy and used Windows 11 update to deploy. I assigned the RAM_WIN11_UG to this policy so that the service desk just needed to remove the G15s and G16s from a group that is blocking the Windows 11 upgrade and add them to the RAM_WIN11_UG group which allows the user to upgrade to Windows 11. We sent users instructions on how to upgrade to Windows 11 and advised users that the upgrade should be done in the evenings after work or at weekends. If there were any issues with the upgrade we could have minimum downtime and they can contact the service desk for support.
Issues Faced
So one of the issues faced on some of the laptops was we were getting 0x801f0011 errors when doing the update. This could be due to corrupt system files on the machine.
To fix this the service desk had to run an sfc/scannow to repair the system files.
Some of the machines that worked on and if that did not work we had to do a remote wipe reinstall of the OS and re-run the update which fixed the issue.
Currently
We are going through the process of upgrading all machines to Windows 11 for the front-office and back-office users.
0 notes
Last Seen Blogs

brassringed
MY FRIENDS ARE STARS NOW

myowndesertplaces
My Own Desert Places

idealsewingmachine
Quality Sewing Machine

nazartday
Nazart

sticknthemud
Sticks