
Last Seen Blogs

verygardenerstrawberry
my creations -

bunnymcfoo
spinning in infinity

rdhadastroke
RD had a stroke

shinyswiftwind
Freedom, equality, and hay for all!

bet69vcom
Bet69vcom
Text
Azure storage design considerations
Introduction
When planning for the deployment or migration to any Azure storage type, there are a number of design factors to take into account. The current post lists Azure Storage design considerations and can be used as a design guide by Azure architects and pre-sales engineers when designing Azure storage solutions.
Azure storage account types
The first step of your Azure storage design considerations when choosing storage for your solution, is to review your infrastructure and application requirements and choose the proper storage types. Azure offers the following storage types as of late February 2023.
Azure storage account types
- Blob (using containers)
- Azure files (SMB file shares)
- Table
- Queue
For more details on the available relational and non-relational data types in Azure, refer to the Azure DP-900 certification exam curriculum at: https://stefanos.cloud/blog/microsoft-dp-900-certification-exam-study-guide/.
Performance options
When provisioning a new Azure storage account, the following general options are available for performance. This setting cannot be changed after storage account creation.
- Standard (general purpose V2)
- Premium (for low latency scenarios)
Security options
The following security options can be set for any Azure storage account.
- Require secure transfer for REST API operations
- Allow enabling public access on containers. Blob containers, by default, do not permit public access to their content. This setting allows authorized users to selectively enable public access on specific containers. You can use Azure policy to audit this setting or prevent this setting from being enabled.
- Enable storage account key access
- Default to Azure Active Directory authorization in the Azure portal
- Minimum TLS version
- Permitted scope for copy operations
Access tiers
The following access tiers are available and only applicable to blob data:
- Hot (online)
- Cool (online)
- Archive (offline). The archive access tier is not an available option during storage account resource creation. The archive tier is an offline tier for storing data that is rarely accessed. The archive access tier has the lowest storage cost. However, this tier has higher data retrieval costs with a higher latency as compared to the hot and cool tiers.
Region and zone placement
In some cases, a storage account can be provisioned at an Azure Edge zone.
More information about Azure public multi-access edge compute (MEC) can be found at https://azure.microsoft.com/en-us/solutions/public-multi-access-edge-compute-mec/#overview.
Redundancy options
Redundancy relates to the way each storage account is being synced to other Azure zones and regions to achieve high availability. The following Azure storage redundancy options are available.
- LRS. Locally-redundant storage. Suitable for non-critical scenarios.
- GRS. Geo-redundant storage. Recommended for backup scenarios.
- ZRS. Zone-redundant storage. Recommended for high availability scenarios.
- GZRS. Geo-zone redundant storage. Includes the offerings and benefits of both GRS and ZRS.
- RA-GRS. This option is a variation of the GRS option with the addition of the "Make read access to data available in the event of regional unavailability" option.
- RA-GZRS. This option is a variation of the GZRS option with the addition of the "Make read access to data available in the event of regional unavailability" option.
Depending on your chosen redundancy option, you shall have different options available under the Data Management --> Redundancy blade of the storage account in the Azure portal, as shown in the example below.
Network connectivity and network routing options
The following network connectivity and network routing options are available for Azure storage accounts.
- Network connectivity. You can connect to your storage account either publicly, via public IP addresses or service endpoints, or privately, using a private endpoint.
- Network routing. Determine how to route your traffic as it travels from the source to its Azure endpoint. Microsoft network routing is recommended for most customers.
Data protection
The following data protection options can be configured for an Azure storage account.
Recovery
Point-in-time restore and hierarchical namespace cannot be enabled simultaneously. Also versioning and hierarchical namespace cannot be enabled simultaneously. When point-in-time restore is enabled, versioning, blob change feed and blob soft delete are also enabled. The retention periods for each of these features must be greater than that of point-in-time restore, if applicable.
Tracking
Access control
Encryption options
The following encryption options can be used for any Azure account.
Other Azure storage configuration options
The following additional options can be set during Azure storage account creation. There are dependencies between various options, in that some options cannot be enabled if a combination of other options is selected.
- Enable hierarchical namespace. The Data Lake Storage Gen2 hierarchical namespace accelerates big data analytics workloads and enables file-level access control lists (ACLs).
- Enable SFTP. Requires hierarchical namespace.
- Enable network file system v3. Enables the Network File System Protocol for your storage account that allows users to share files across a network. This option must be set during storage account creation.
- Allow cross-tenant replication. Cross-tenant replication and hierarchical namespace cannot be enabled simultaneously. Allow object replication to copy blobs to a destination account on a different Azure Active Directory (Azure AD) tenant. Not enabling cross-tenant replication will limit object replication within the same Azure AD tenant.
- Enable large file shares. Provides file share support up to a maximum of 100 TiB. Large file share storage accounts do not have the ability to convert to geo-redundant storage offerings and upgrade is permanent. This option cannot be changed after storage account creation.
External access options
The "Networking" blade in the Azure portal provides the following options for connecting to an Azure storage account.
Public network access
This decides whether public access will be enabled or not and if yes, from which networks and IP addresses. If no, access to the storage account will only be available via private endpoint connections (maximum security).
Resource instances and network routing
This decides which Azure resource types will have access to the storage account and how traffic will be routed from the external endpoint to the Azure storage account.
The "Access Keys", "Shared Access Signature (SAS)" and "Lifecycle management" blades in the Azure portal dictate how external access will be provisioned and how Azure storage account data will be preserved or disposed of, as per predefined policy metrics.
Access keys and corresponding connection strings
A shared access signature (SAS) is a URI that grants restricted access rights to Azure Storage resources. You can provide a shared access signature to clients who should not be trusted with your storage account key but whom you wish to delegate access to certain storage account resources. By distributing a shared access signature URI to these clients, you grant them access to a resource for a specified period of time. An account-level SAS can delegate access to multiple storage services (i.e. blob, file, queue, table). Note that stored access policies are currently not supported for an account-level SAS.
Shared Access Signature (SAS) options include connection string, SAS token and SAS URL for each of the available storage types (blog, file, table, queue)
Data migration options
There are a variety of Azure data transfer solutions available for customers. In the Azure portal under the "Data Migration" blade, select the resource type and transfer scenario, based on which the Azure portal wizard will guide you to the solution that best fits your scenario. Please note that the data transfer rate you observe is impacted by the size and number of files in the transfer, as well as your infrastructure performance and network utilization by other applications. An example of the data migration wizard is shown below.
The most notable tools for migrating data to Azure storage accounts are the following:
- Azure AzCopy
- Azure Powershell
- Azure CLI
- Azure Data Factory
- Azure Storage in the Azure portal
- Azure Storage Explorer
- Azure Storage REST API/SDK
- Azure Data Box
- Azure Data Box Disk
- Azure File Sync
Read the full article
0 notes
Text
How to integrate Azure App Service with Azure Virtual Network
Case
While configuring Azure App Service, you need to integrate App Service with Azure Virtual Network (VNET). App Service VNET integration is one of the many networking features of Azure App Service, as shown in the table below.
Inbound networking featuresOutbound networking featuresApp-assigned addressHybrid ConnectionsAccess restrictionsGateway-required virtual network integrationService endpointsVirtual network (VNET) integrationPrivate endpoints
Solution
You can configure VNET integration for your App Service either during resource provisioning time or after the resource provisioning.
During App Service resource provisioning
You can configure VNET integration while provisioning the App Service resource in the Azure management portal, under the Networking tab. The default settings of the Networking tab are as follows.
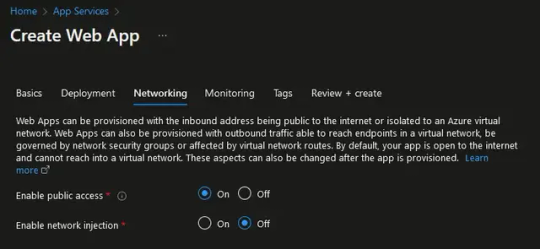
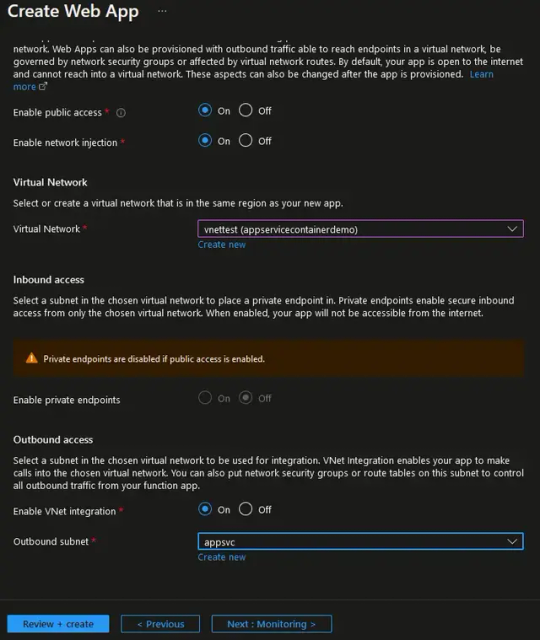
To enable VNET integration, set the "Enable network injection" option to "On" and then configure the virtual network to integrate with your App Service. Further down, se the "Enable VNET integration option" to "On" and choose the subnet of your VNET which will be used as the source for the outbound traffic of your App Service.
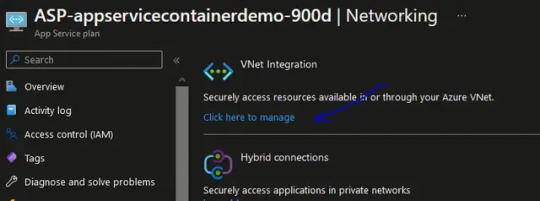
After App Service resource provisioning
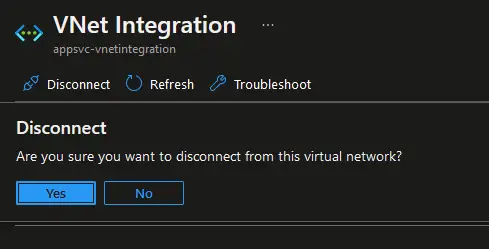
After the App Service resource has been provisioned, you can access the configuration of the VNET integration parameters from the Azure portal under the "Networking" blade of the App Service resource, as shown below.
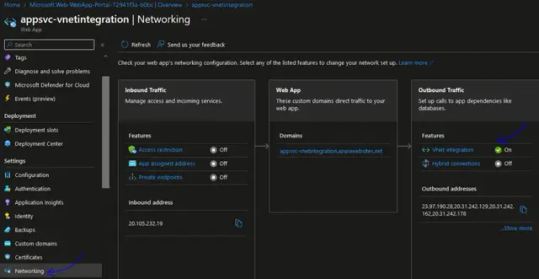
From this page you have the following VNET integration configuration options:
- Disconnect the VNET from the App Service.
- Enable or disable the "Route All" option.
- Change the integrated VNET.
- Change the integrated VNET subnet.
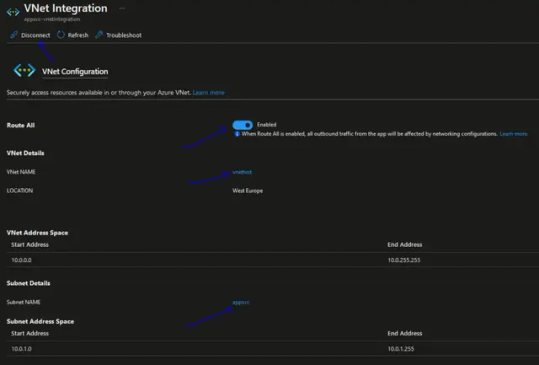
To setup a different VNET or VNET subnet, you first need to disconnect the existing VNET.
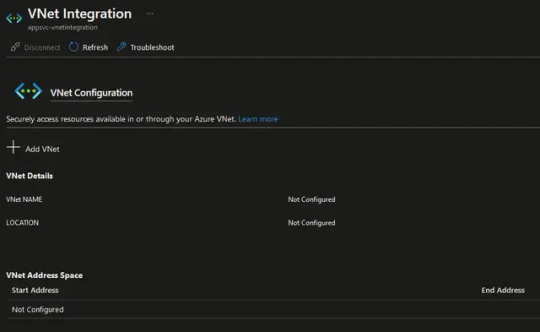
At this point you can click on "Add VNET" to configure VNET integration again with a different VNET and VNET subnet.
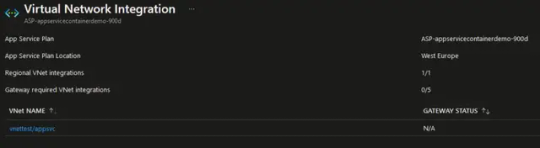
Connecting and disconnecting with a virtual network is at an app level. Operations that can affect virtual network integration across multiple apps are at the App Service plan level. You can see similar information at the App Service plan level in the App Service plan --> Networking --> VNet integration portal.
App Service VNET integration configuration properties
The following App Service Kudu console page provides a list of all environment variables configured for the App Service.
https://.scm.azurewebsites.net/Env.cshtml
In the example shown below, the WEBSITE_VNET_ROUTE_ALL = 1 variable is shown.

WEBSITE_VNET_ROUTE_ALL when set to 1 enforces all outbound traffic (including all public IP addresses) to pass via the VNET integration and not only RFC 1918 traffic (private IPv4 address spaces).
Sources
https://learn.microsoft.com/en-us/azure/app-service/overview-vnet-integration
https://learn.microsoft.com/en-us/training/modules/design-implement-private-access-to-azure-services/7-integrate-your-app-service-azure-virtual-networks
https://learn.microsoft.com/en-us/azure/app-service/configure-vnet-integration-routing
https://learn.microsoft.com/en-us/azure/app-service/configure-vnet-integration-enable
Read the full article
0 notes
Text
Azure cloud infrastructure and application testing

Introduction to quality assurance
Quality assurance (QA) is an umbrella term which encompasses all software and infrastructure quality tests that are performed to verify software application and infrastructure functional and non-functional attributes, including performance, scalability, availability and security. Azure cloud infrastructure and application testing is a major part of quality assurance.
There are QA frameworks to be used for both software application and cloud infrastructure testing. Whether you perform QA using testing frameworks or you manually perform a baseline of tests, you need to have test scripts available. Each test script describes the steps to be carried out to test a certain aspect of an application or infrastructure system, as well as the result of each test and subsequent action items, if needed.
This article provides a baseline reference of the steps to be included in each type of infrastructure or application test script alongside with a testing script template available for download.
Azure cloud infrastructure and application testing types
The following types of infrastructure and application test scripts are available:
- Application unit testing. A unit test is a test that exercises individual software components or methods, also known as a "unit of work." Unit tests should only test code within the developer's control. They don't test infrastructure concerns. Infrastructure concerns include interacting with databases, file systems, and network resources. xUnit.net is a free, open source, community-focused unit testing tool for the .NET Framework.
- Application integration testing. An integration test differs from a unit test in that it exercises two or more software components' ability to function together, also known as their "integration." These tests operate on a broader spectrum of the system under test, whereas unit tests focus on individual components. Often, integration tests do include infrastructure concerns.
- Application load (or stress) testing. A load test aims to determine whether or not a system can handle a specified load. For example, the number of concurrent users using an application and the app's ability to handle interactions responsively. Refer to my KB article on Azure App Service load testing (using JUnit) for an example of carrying out load testing for an Azure-based Web application.
- Infrastructure functional testing. This aims to test all operating systems, firmware and the functional attributes of on-prem or cloud infrastructure components involved in a solution.
- Performance and scalability testing. During performance and scalability testing, you measure the performance metrics of your infrastructure as your application workload increases. This is combined with application software stress/load testing. The performance and scale tests involve setting up and testing autoscale policies for scaling horizontally or vertically when the application load requires it.
- Availability testing. Availability tests mainly focus on testing the resiliency of your infrastructure in the event of hardware or software components failures and the associated potential downtime incurred during these failures. This should test your infrastructure and application code high availability, redundancy and resiliency. Resiliency can come in many forms, including load balancing, failover clustering (active-active or active-passive) and always on availability groups, virtual machine availability sets as well as cloud infrastructure fault domains, update domains, cloud zone and cloud region redundancy. The availability tests focus on creating deliberate failure simulation events, such as for example having an Azure VNET or subnet or storage account going down, to check the impact on the overall architecture.
- Security testing. Security testing aims to test the attack surface of your architecture, the resiliency against malicious attacks, including ransomware, malware and hacking attempts and to discover potential vulnerabilities and security weaknesses in your security configuration by employing techniques such as penetration testing to evaluate IDS/IPS, Web Application Firewall protection, SIEM/SOAR/XDR systems. Azure Advisor, Azure Security Center, Azure Advisor, Microsoft Defender for Cloud and Azure Sentinel are all good tools to employ for security testing.
Site Reliability Engineering (SRE)
The success of your cloud solution depends on its reliability. Reliability can be broadly defined as the probability that the system functions as expected, under the specified environmental conditions, within a specified time. Site reliability engineering (SRE) is a set of principles and practices for creating scalable and highly reliable software systems. Increasingly, SRE is used during the design of digital services to ensure greater reliability. The degree of reliability that's required for a solution depends on the business context.
Reliability is defined and measured using service level objectives (SLOs) that define the target level of reliability for a service. Achieving the target level assures that consumers are satisfied. The SLO goals can evolve or change depending on the demands of the business. Another important term to note is service level indicator (SLI), which is the metric that's used to calculate the SLO. SLIs are based on insights that are derived from data that's captured as the customer consumes the service. SLIs are always measured from a customer's point of view. SLOs and SLIs always go hand in hand, and are usually defined in an iterative manner. SLOs are driven by key business objectives, whereas SLIs are driven by what's possible to be measured while implementing the service. The relationship between the monitored metric, the SLI, and the SLO is depicted below:

Refer to the Reliability and Performance Efficiency pillars of Azure Well Architected Framework for guidance on building scalable and reliable applications.
Chaos Engineering and Azure Chaos Studio
Chaos engineering is a methodology that helps developers attain consistent reliability by hardening services against failures in production. Another way to think about chaos engineering is that it's about embracing the inherent chaos in complex systems and, through experimentation, growing confidence in your solution's ability to handle it. A common way to introduce chaos is to deliberately inject faults that cause system components to fail. The goal is to observe, monitor, respond to, and improve your system's reliability under adverse circumstances. For example, taking dependencies offline (stopping API apps, shutting down VMs, etc.), restricting access (enabling firewall rules, changing connection strings, etc.), or forcing failover (database level, Azure Front Door, etc.), is a good way to validate that the application is able to handle faults gracefully.
Azure Chaos Studio is a managed service that uses chaos engineering to help you measure, understand, and improve your cloud application and service resilience. Chaos engineering is a methodology by which you inject real-world faults into your application to run controlled fault injection experiments. Chaos Studio helps you avoid negative consequences by validating that your application responds effectively to disruptions and failures. You can use Chaos Studio to test resilience against real-world incidents, like outages or high CPU utilization on virtual machines (VMs).

In Azure Chaos Studio, you first select and enable your targets (either service-direct targets or agent-based targets, such as VMs and VM Scalability Sets).
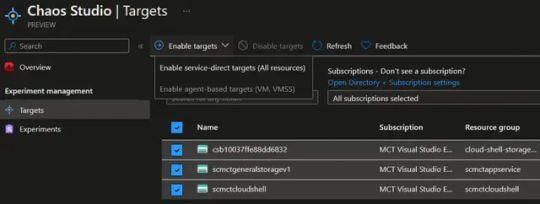
Then you create Chaos experiments on selected Azure resources, as shown in the example below. Each experiment can introduce either faults or delays, to test the resiliency of the overall infrastructure in relation to the tested Azure resources.

Infrastructure as Code (IaC) testing frameworks and tools
The most prominent Infrastructure As Code languages in Azure are Azure ARM (JSON), Bicep and Terraform. Each of them has its own methods and tools for testing the IaC configuration.
- Terratest is a tool to be used for testing Terraform modules. Terratest is implemented as a Go library. Terratest provides a collection of helper functions and patterns for common infrastructure testing tasks, like making HTTP requests and using SSH to access a specific virtual machine.
- Bicep code can be tested by using Azure Pipelines or Powershell PSRule or even combine PSRule in Azure Pipelines.
- ARM templates can be tested by employing the ARM template test toolkit. The Azure Resource Manager template (ARM template) test toolkit checks whether your template uses recommended practices. When your template isn't compliant with recommended practices, it returns a list of warnings with the suggested changes. By using the test toolkit, you can learn how to avoid common problems in template development. You can also test ARM Templates by using Pester and Azure DevOps.
- Use Pester for Powershell or Powershell DSC scripts.
-
- Azure Policy Test Framework is a command line tool to test Azure Policy relying on Terraform + Golang.
Testing script template
You can find a free testing script template in the "Free Downloads" section.
References
https://learn.microsoft.com/en-us/azure/architecture/example-scenario/apps/scalable-apps-performance-modeling-site-reliability
https://learn.microsoft.com/en-us/azure/chaos-studio/chaos-studio-overview
https://learn.microsoft.com/en-us/azure/architecture/framework/resiliency/chaos-engineering
https://learn.microsoft.com/en-us/dotnet/core/testing/
https://learn.microsoft.com/en-us/azure/developer/terraform/test-modules-using-terratest
Read the full article
0 notes
Text
Top 10 sites with Azure news and updates

Top 10 sites with Azure news and updates
This article contains a quick compilation of the top 10 sites I have found to be extremely useful and informational about all things Azure. I am using an RSS/Atom feed reader to have a single pane view of the content provided by these sites.
- Azure Blog
- Azure Updates
- Azure Friday
- Azure Architecture Center in Microsoft Learn
- Azure Github repos
- Azure WAF and CAF documentation
- Azure Tips and Tricks
- Azure Charts
- M365 Maps
- Endjin Azure weekly newsletter and Build5Nines newsletter
Read the full article
0 notes
Text
Inside Azure Datacenter Architecture with Mark Russinovich
To offer a Microsoft Azure technical overview from the subject matter expert and CTO, Mark Russinovich, I am re-publishing in this post a highly educational and informative session of Mark during Microsoft Ignite 2021 event. Many things may have changed since then but this video definitely is a very concise introduction to all things Azure, from an infrastructure architecture perspective.
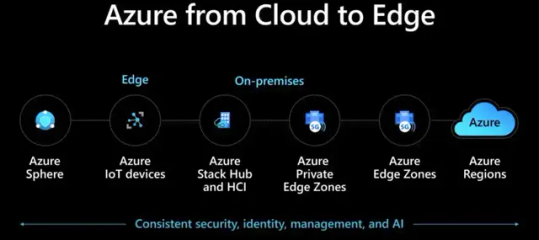
Azure end-to-end infrastructure layer architecture
In this video, Mark Russinovich covers the following areas:
- Inside datacenter infrastructure and regions
- Inside intelligent infrastructure and machine learning and AI ops
- Inside networking, physical and virtual
- Inside compute services and servers
- Inside Azure Resource Manager
- Inside Azure storage and data
Enjoy!
https://www.youtube.com/watch?v=69PrhWQorEM
Inside Azure Datacenter Architecture with Mark Russinovich
Source
https://learn.microsoft.com/en-us/events/ignite-mar-2021/azure/sessions/od343/
Read the full article
0 notes
Text
How to install KVM in Ubuntu Linux
Case
You need to install the KVM hypervisor in Ubuntu Linux. For the purpose of this demo I will be deploying KVM in Ubuntu Linux LTS server, as shown below.

However you can follow the same procedure on any Linux platform, making any adjustments related to the package management system used by your distribution (e.g. deb vs rpm). This article offers step-by-step instructions on how to install KVM in Ubuntu Linux.
Solution
First check if your Ubuntu server or desktop installation supports virtualization by running the below command. You need to get a result which is greater than 0, to ensure that your system supports virtualization.
egrep -c '(vmx|svm)' /proc/cpuinfo

Run the following command to ensure that kvm can be supported and installed on your machine. If the kvm-ok command is not available it should be installed as part of the cpu-checker deb package.
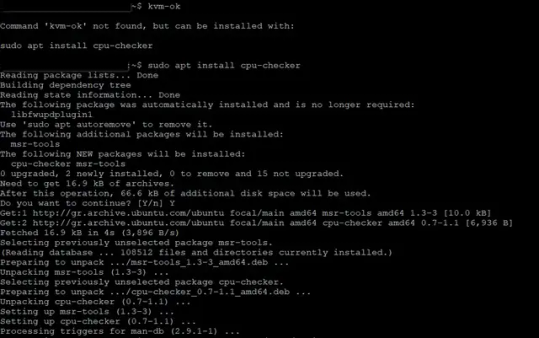

You are now ready to install the KVM-related packages to enable KVM virtualization in your Ubuntu system. Run the command below.
sudo apt install -y qemu qemu-kvm libvirt-daemon libvirt-clients bridge-utils virt-manager

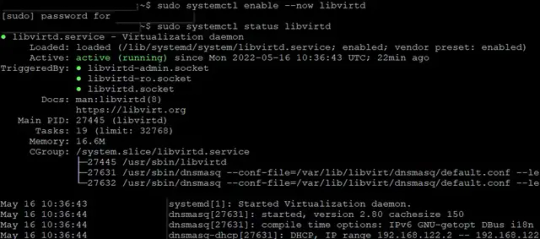
After successful installation of the KVM packages and dependencies, ensure that the libvirt deamon is configured to start automatically at system boot and that it is running, before moving on with remaining configuration steps.
sudo systemctl enable --now libvirtd
sudo systemctl status libvirtd
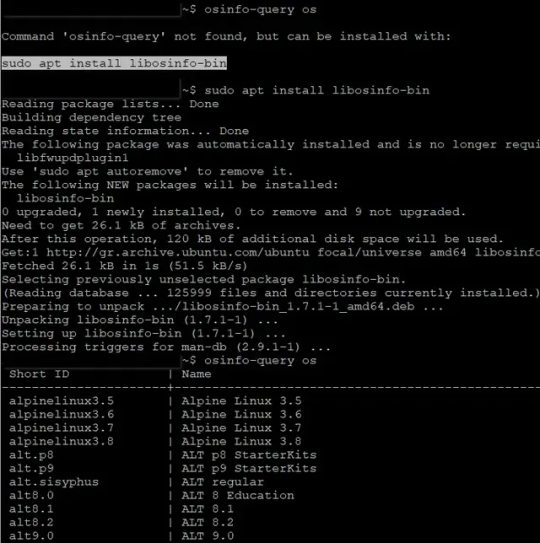
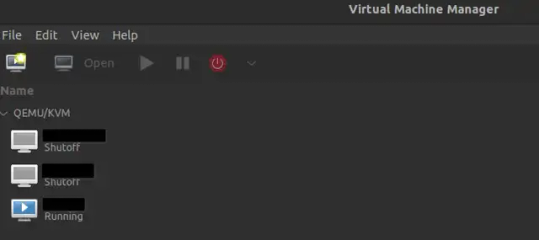
After confirming that the KVM modules are loaded in your system and getting information about the available guest operating systems, you can run virt-manager to start creating your KVM virtual machines.
lsmod | grep -i kvm
osinfo-query os

If you don't have a graphical environment in your Linux system, you can alternatively run the virt-install command to deploy virtual machines under KVM.
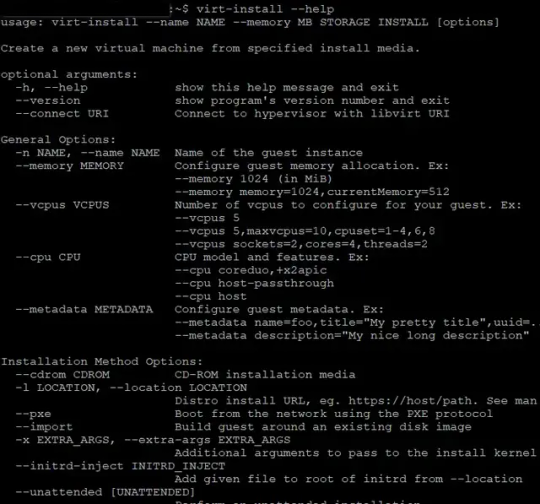
Read the full article
0 notes
Text
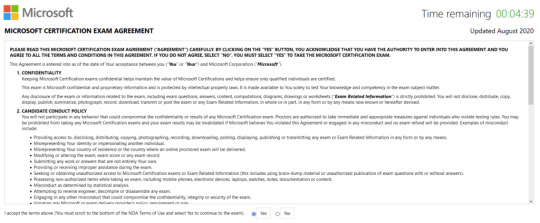
How to run the Microsoft certification exam sandbox

As part of the revamped Microsoft Learn website, Microsoft offers the Exam Sandbox application, so that new Microsoft certification exam taker can demo the actual exam experience.
Follow the steps below to run the Microsoft certification exam sandbox.
- In your Web browser navigate to https://aka.ms/examdemo.
- Click Yes to accept the terms on the first page and click Next to continue. You have 5 minutes to evaluate the Microsoft certification exam experience.
- Click Next again to continue with the sandbox.
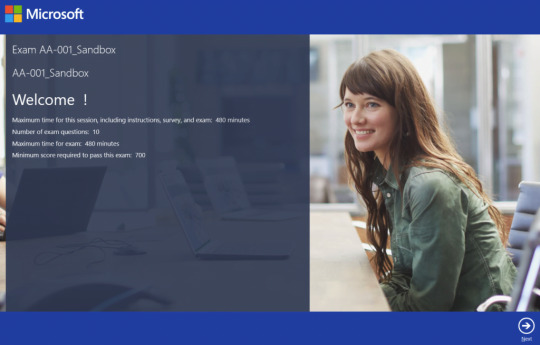
- You find sample information about the exam format and structure. Click Next to continue.
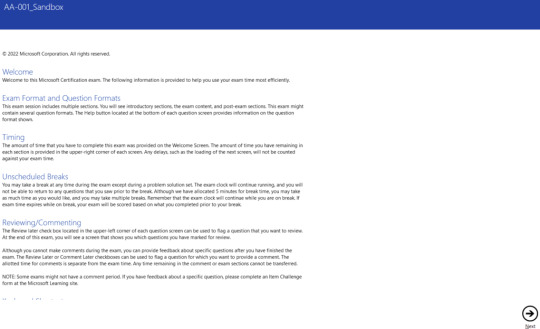
- On the "Ready to start the exam?" page, click Next to continue.

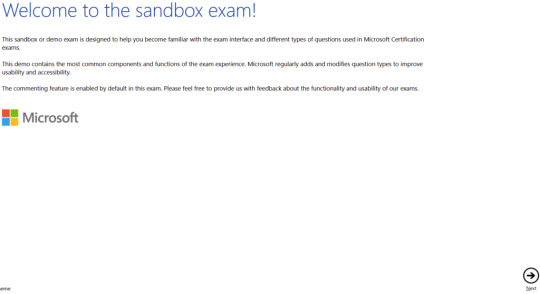
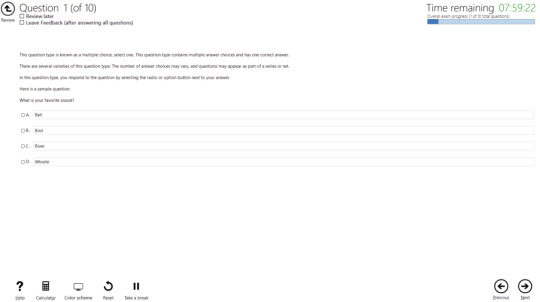
- On the "Welcome to the sandbox exam!" page, click Next to continue.
- Complete each question type and click Next or Previous.
- On the "Review your answers" page, review all provided answers before hitting "Finished".
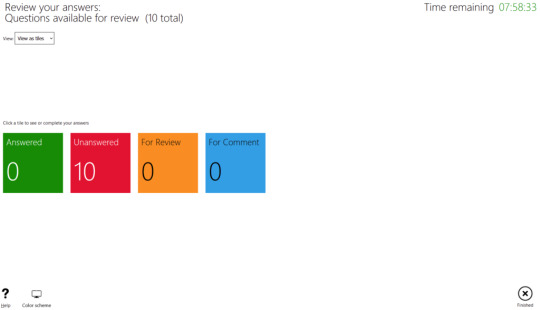
- Click "Finished" to end your sandbox exam.

Read the full article
0 notes
Text
How to resolve Windows search and indexing issues
Case
You are facing issues with Windows search not working with mapped network drives. You may also face issues related to Windows Search or Windows indexing functions.
Solution
Carry out the below steps to resolve any issues with Windows Search not working with mapped network drives. These steps are useful when you are troubleshooting Windows Search and Windows indexing issues in general.
- Check the Windows Search service to be running and set to automatic mode in all Windows search endpoints as well as on any Windows-based file server which hosts the actual files and SMB shares which the Windows clients try to search.
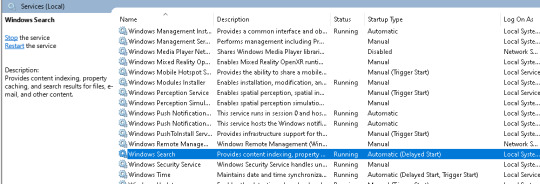
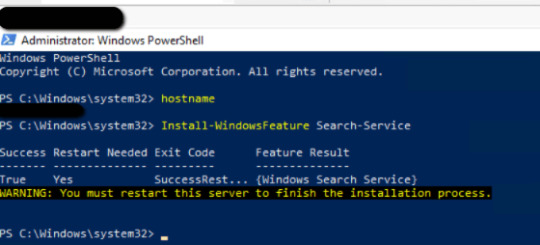
On the file server(s) in particular, you need to ensure that the Search Service Windows Server feature is also installed. If not, you need to install it via Powershell and reboot the file server(s).
Install-WindowsFeature Search-Service
# Ensure the feature has been installed
Get-WindowsFeature
# Reboot server(s)
- Check if network discovery is turned off on the Windows machine you are troubleshooting. To check this, search for "manage advanced sharing settings" in start menu and then ensure that "network discovery and "file and printer sharing" options are turned on in the affected network profiles (private, public, all networks).

- Check the NTFS and SMB share permissions on the target file server share. Ensure that all desired source machines have full SMB share permissions on the shares you wish to index.
- If the issue lies in a mapped network drive, try adding the drive as a network location (shared folder) instead of a mapped network drive. An alternative approach is to type the UNC path of the mapped network drive instead. Finally, in case you have provisioned the mapped drives by using the hostname or FQDN of the file server, try to recreate the mapped drives but this time by using the server's IP address. This can be helpful in cases where you are accessing the mapped drives via a workgroup (non-domain) machine via VPN and the DNS resolution does not work as expected.
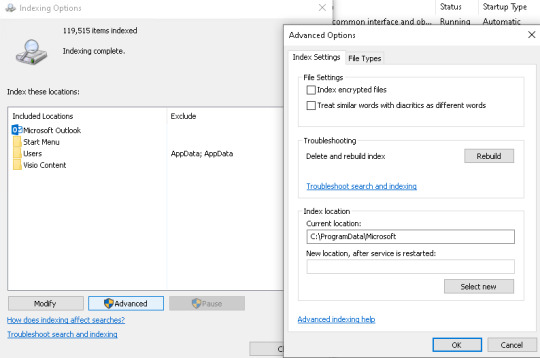
- Reset the Indexing database on the local computer. Navigate in Windows start menu to "indexing options" then click the "Advanced" button and click the "Rebuild" option. This will force Windows to re-build the search index. This can take a long time (hours, depending on the size of your file data). You may also need to rebuild the search index also in your file server.
- If you are troubleshooting search of a network drive file contents, right-click on the network drive and click on Properties. Check Allow files on this drive to have contents indexed in addition to file properties.

- Configure search options for the disk you are troubleshooting. To do this, double-click on the drive in File Explorer. Next, select the explorer.exe View tab, click on the Options icon and configure the available options on the "Search" tab.

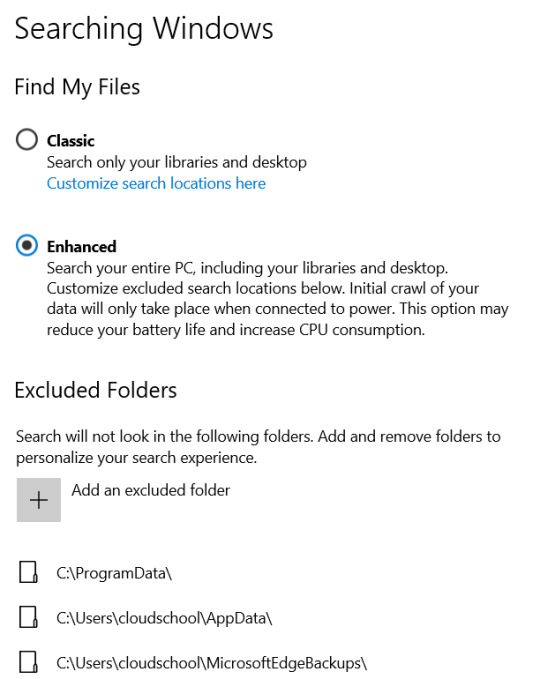
- Go to Settings on the Windows 10 desktop, then click on Search, followed by Searching Windows. As you can see in the screenshot below, this screen shows you how many items have been indexed and what indexing model is being used. Check the indexing status and any potentially excluded folders. You should also run the Windows indexing troubleshooter.

- If the issue you are having is with Excel .xlsx or .xls files, then you need to review the following articles and ensure that you have installed the MS Office Filter Pack 2.0 and the latest Windows updates on the affected file server, then run a re-built of the Windows indexing database.- https://community.spiceworks.com/topic/2201614-unable-to-search-content-within-excel-documents-stored-on-server-2016
- https://www.mcbsys.com/blog/2012/12/index-microsoft-office-files-for-windows-search-on-server-2012/
- https://support.microsoft.com/en-us/topic/july-2-2019-update-for-office-2010-filter-pack-kb3114879-5e29d31d-7c34-d861-63ab-659a707619cb
- https://social.technet.microsoft.com/Forums/en-US/d792b518-ae53-44f0-81b9-3250a3538f96/server-is-not-indexing-excel-xlsx-files-but-is-indexing-older-excel-xls-files?forum=winserveressentials
- Review the following KB article which includes additional suggestions on how to fix Windows Search issues: https://docs.microsoft.com/en-us/troubleshoot/windows-client/shell-experience/fix-problems-in-windows-search. This articles advises you to run the Windows search and indexing troubleshooter as well restart and reset the Windows Search service by using the following Powershell script (ResetWindowsSearchBox.ps1): https://www.microsoft.com/en-us/download/100295.
Read the full article
#Fileserver#indexing#mappeddrive#search#SMB#Troubleshooting#UNC#Windows10#windowssearch#WindowsServer
0 notes
Text
How to clone a memory card in Linux
Case
You have a memory card, for example a CF card which is corrupt or which needs to be cloned to another memory card. This article provides instructions on how to clone a memory card in Linux. To implement this solution you need to have a memory card reader. In most cases a reader comes in the form of a memory card to USB converter, which plugs into a USB port of your computer and allows for reading of any type of memory card.

Solution
Boot your computer from a Linux bootable image. In this example we will be using Linux Ubuntu 22.04 LTS. After booting into the Linux environment, either on an installed Ubuntu system or from the Ubuntu desktop .iso (USB drive), open a terminal by hitting the combination of Ctrl-Alt-T keys on your keyboard and run the following commands.
#Check first the device structure of your Linux system and pinpoint the source memory card you need to clone. In this example we assume that the card is /dev/sbc.
lsblk
#Clone the entire disk corresponding to the bootable memory card to an output file.
sudo dd if=/dev/sdc of=mycfcard.img
#Copy back the generated .img file to the target memory card, ensure first that the new memory card has been inserted.
sudo dd if=mycfcard.img of=/dev/sdc
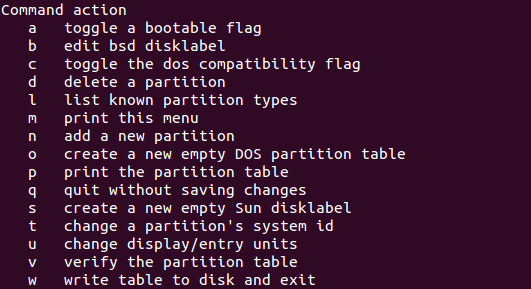
If the target memory card has multiple partitions, you can erase all partitions by using fdisk. You should leave only one partition in the target memory card by running the following commands.
sudo fdisk /dev/sdc
#View partition table
p
#Delete a partition, run this command as many times as needed to delete all partitions
d
#Write changes to memory card partition table
w
You can also use the Windows disk manager MMC console or the command line diskpart utility to fdisk and format the target memory card.
Note that the above solution can be used when trying to restore a malfunctioning or dead hard drive. To streamline your recovery process, you can make use of a disk drive cloning and docking station, which essentially takes a full image copy (sector by sector) of the source (faulty) disk into a new target (functional) disk. In this way, the disk data is preserved and cloned into a functional disk. You can find plenty of options when considering purchase of a cloning station, such as the following examples:
https://www.amazon.com/cloning-station/s?k=cloning+station
Also you can use third party software such as GParted, EaseUS, Acronis Cyber Protect Home Office, Steven Gibson's Spinrite (DOS-based app written in Assembly) and Clonezilla, which can greatly reduce your time when troubleshooting disk issues.
Read the full article
0 notes
Text
How to manage Microsoft 365 contacts
This article is also available on my podcast and Youtube channel.
View this article as a how-to video on Youtube.
https://youtu.be/Ey3HpBbiaxE?list=PLYbmn4csggdE9qNg7iIOwLJf1EUHUBvCw
Case
You need to manage Microsoft 365 contacts. The following operations can be performed on a Microsoft 365 contact:
- Create single contact
- Create multiple contacts via CSV file upload
- Edit or delete an existing contact
- Export contacts to CSV file
Solution
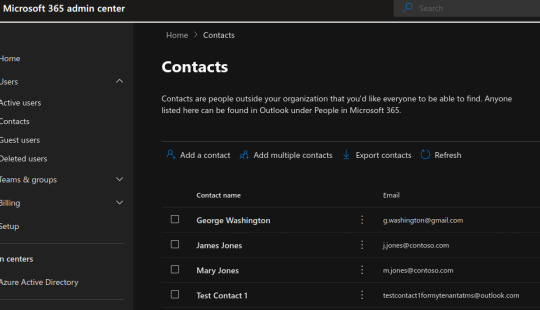
In this how-to article, we will show you how to manage Microsoft 365 contacts via the Admin Center portal. Contacts are people outside your organization who you would like everyone to be able to find. Anyone listed in the Contacts section can be found in Outlook under People in Microsoft 365.
To manage contacts of a Microsoft 365 tenant via the Admin Center portal, go through the following steps.
- Navigate with your Web browser to https://admin.microsoft.com.
- On the left pane, click on "Users", then click "Contacts".
- To create a new contact, click on "Add a contact". Provide the First and last name, display name and email. Optionally you can choose to hide the contact from the organization's global address list. You can also provide additional profile information about the contact and add a mail tip. Click "Add" when finished. Your contact has now been created. You should allow up to 30 minutes for the changes to be effective. Now everyone in your organization should be able to find this contact in Outlook.
- If you need to edit or delete an existing contact, tick the contact you wish to edit or delete and click "Edit contact information" or "Delete contact" respectively.
- To create multiple new contacts in bulk, click on the "Add multiple contacts" button. In the "Add multiple contacts" screen, download a template CSV file with headers and sample contact info and review the "Avoid common errors" section so as to format the CSV file as per the contact formatting rules. When you have finished editing the CSV file, click on the "Browse" button to upload your contact CSV file. You can upload up to 40 contacts per CSV file. Click "Add contacts" to complete the contact import process.

- To export existing contacts, click on the "Export contacts" button, then click Continue. When the export process is completed, a csv file will be generated with all your Microsoft 365 contacts.
Read the full article
0 notes
Text
How to manage Microsoft 365 shared mailboxes
This article is also available in my podcast and Youtube channel.
View this article as a how-to video on Youtube.
https://youtu.be/pMaerd58ZYc?list=PLYbmn4csggdE9qNg7iIOwLJf1EUHUBvCw
Case
You need to created, edit and delete shared mailboxes in Microsoft 365. In this how-to article, we will show you how to manage Microsoft 365 shared mailboxes via the Admin Center portal. A shared mailbox is an initially unlicensed mailbox which includes an email address and calendar that multiple people can use.
Solution
Before proceeding it is important to lay out the pre-requisites for using shared mailboxes in Microsoft 365. In order to use shared mailboxes you first need to:
- Have at least one licensed Microsoft 365 user with a licensed Exchange Online mailbox. You can create an unlimited number of shared mailboxes but remember that each shared mailbox must have at least one licensed mailbox in its list of members.
To manage shared mailboxes of a Microsoft 365 tenant via the Admin Center portal, go through the following steps.
- Navigate with your Web browser to https,admin,dot,microsoft,dot,com.
- On the left pane, click on "Teams and Groups", then click "Shared mailboxes".
- On the "Shared mailboxes" page, click on "Add a shared mailbox" to create a new shared mailbox.
- Provide a name and email address for the shared mailbox and click "Save changes".
- To edit the configuration options of a shared mailbox, click the shared mailbox name and on the popup form on the right, you can configure all available shared mailbox options.
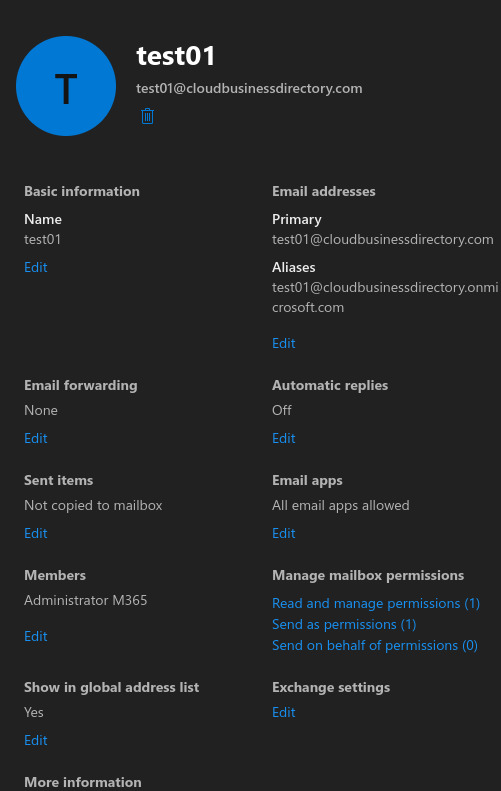
- Under the "Basic information" section, you can edit the shared mailbox name.
- Under the "Email addresses" section, you can edit the primary email address and the corresponding aliases.
- Under the "Email forwarding" section, you can choose an email address as destination forwarding email.
- Under the "Automatic replies" section, you can edit the Out of office configuration for the shared mailbox.
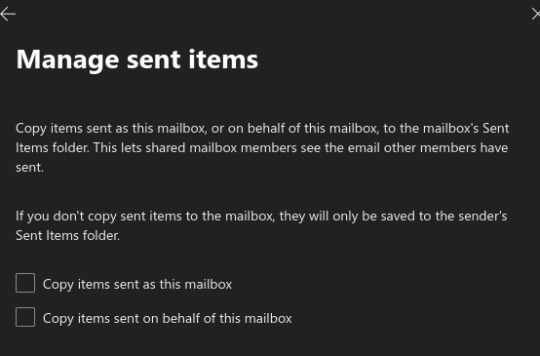
- Under the "Sent items" section, you can choose whether the shared mailbox sent items, which are sent from or on behalf of the shared mailbox, will be saved also in the shared mailboxes Sent items folder or not.
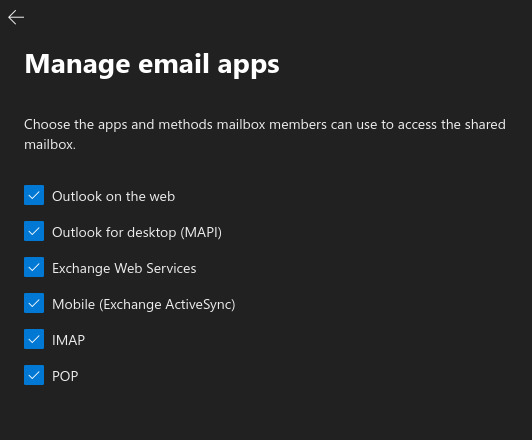
- Under the "email apps" section, you can choose which email apps can access the shared mailbox.
- Under the "members" section, you can add or remove members from the shared mailbox.
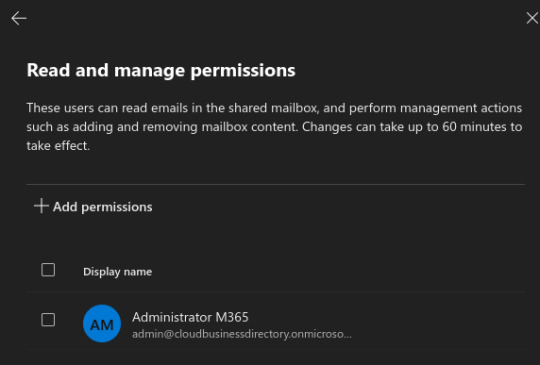
- Under the "Manage mailbox permissions" section, you can set the Read and manage permissions, the send as permissions and the send on behalf permissions on the shared mailbox.
- Under the "Show in global address list" section, you can choose whether to include the shared mailbox in the global address list or not.
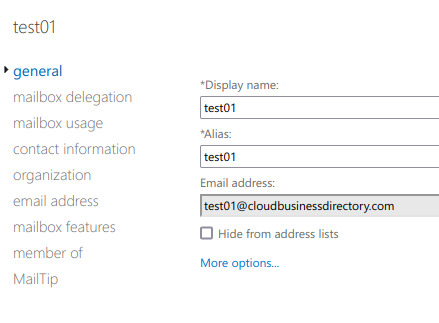
- Under the "Exchange settings" section, you can configure further shared mailbox settings in the Exchange Online admin center. These settings include general settings, mailbox delegation, mailbox usage, contact information, organization settings, email address, mailbox features, member of and Mailtip settings.
Now that you have setup the shared mailbox, you can access it via any of the available email apps, namely Outlook on the Web, Outlook for Desktop, Exchange Web Services, Exchange Active Sync, IMAP and POP. For example, to access the shared mailbox from the Outlook on the Web account of any member of the shared mailbox, carry out the steps below.
- Navigate to Outlook on the Web at https,outlook,dot,office,dot,com, and authenticate with the user credentials of a shared mailbox member.
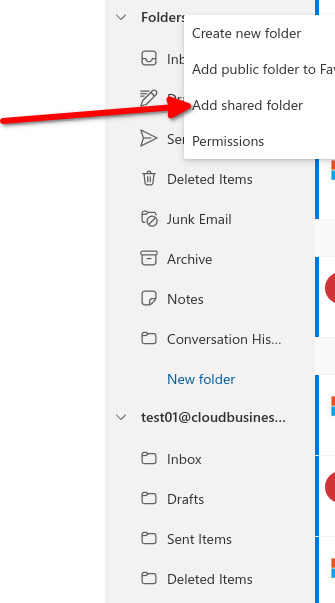
- On the left pane, right click on the "Folders" row and choose "Add shared folder". Then provide the email address of the shared mailbox in question. Choose to "use this address" and click "Add".
Read the full article
0 notes
Text
How to manage Microsoft 365 groups
This article is also available in my podcast and Youtube channel.
View this article as a how-to video on Youtube.
https://youtu.be/WDR3IRJPeJo?list=PLYbmn4csggdE9qNg7iIOwLJf1EUHUBvCw
Case
You need to create, edit or delete a Microsoft 365 group. The following group types are available:
- Microsoft 365 groups, also known as Unified groups
- Distribution lists
- Mail-enabled security groups
- Security groups.
In this how-to article, we will show you how to manage Microsoft 365 groups via the Admin Center portal.
Solution
To manage groups of a Microsoft 365 tenant via the Admin Center portal, go through the following steps.
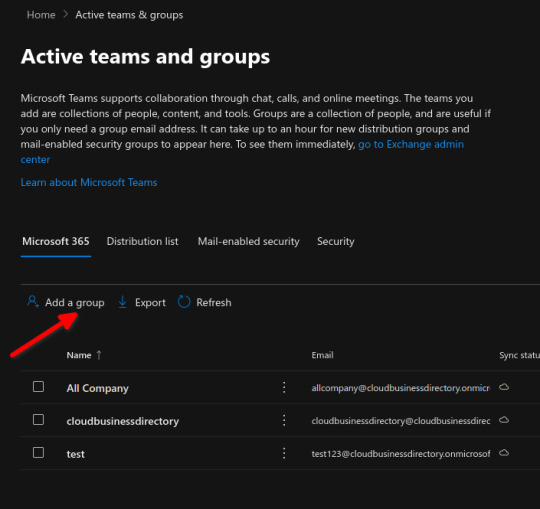
- Navigate with your Web browser to https://admin.microsoft.com.
- On the left pane, click on "Teams and groups" and choose "Active Teams and Groups".
- On the "Active teams and groups" page, you can see that there are four types of groups available: Microsoft 365 groups, also known as Unified groups, distribution lists, mail enabled security groups and security groups.
- To create a new group, click on the "Add a group" button.
- Choose the type of group you wish to create. A Microsoft 365 group creates a group email as well as a Sharepoint Online Team site and a Microsoft Teams team for collaboration. A distribution list creates an email address for a group of people. A mail-enabled security group creates a distribution list which can also be used to control access to OneDrive and Sharepoint Online. A security group controls access to OneDrive and Sharepoint Online and can also be used for Mobile Device Management, (MDM), in Microsoft 365. The list of available parameters to set for each group depend on the group type. For the purposes of this demonstration, we will choose the Microsoft 365 group option, which has the most parameters to set up. Click on "Next" to Continue.

- On the "Set up the basics" page, provide a name and description for the Microsoft 365 group and click Next.
- On the "assign owners" page, click "Assign owners" and choose the user identities to be set as the owners of the group. You must set at least one owners but it is recommended to add a minimum of two owners. After having chosen the designated owners, click Next to continue.

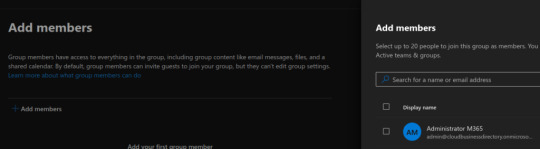
- On the "add members" screen, click on "Add members" to add members. Group members can be either organization users or guest users. All group members will hve access to everything int he group. Only group members can invite guests to join the group but they cannot edit group settings.
- On the "edit settings page" provide a group email address. Also provide the privacy level of the group, which can be either public or private. A private group delegates access control to the group owners for them to allow who can join the group and who cannot. Public groups are open for everyone to join. If the group is set to private, you can also enable role assignment for the group. Assigning roles to groups can simplify the management of role assignments in Azure AD with minimal effort from your Global Administrators and Privileged Role Administrators. You can also optionally choose to create a Microsoft Teams team for this Microsoft 365 group.
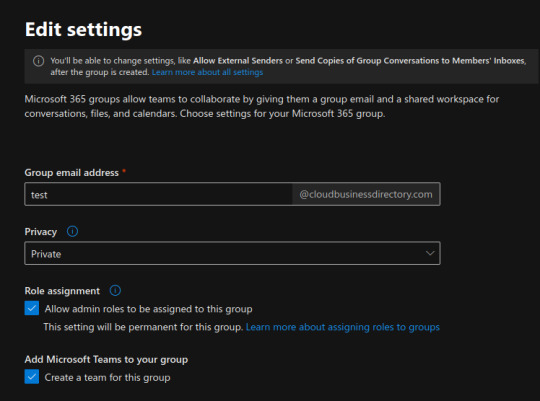
- When you have finished configuring the group settings, click "Next" to continue.
- On the "Review and finish adding group" page, review all your configuration options and click "Create group" to finish creating the group. This can take up to one minute to complete. Adding a Microsoft Teams team to the group, if you have chosen this option during group creation, may take longer time to complete. You will receive a confirmation that your new group has been created. Click close to return to the Microsoft 365 groups page.
- If you need to edit an existing Microsoft 365 group, on the Microsoft 365 group page, click on the group name. On the popup form on the right, you can edit group settings under the General, Members and Settings tabs.
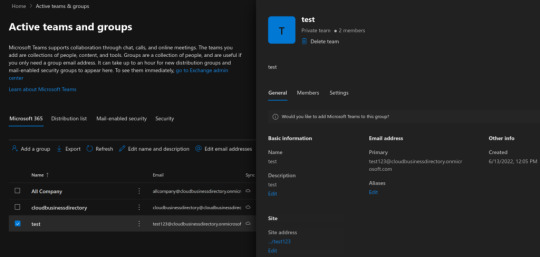
- Under the General tab, you can edit the group name, description, primary email address, alias and corresponding Sharepoint Online site address.
- Under the Members tab, you can edit the list of group owners and members.
- Under the Settings tab, you can edit the group privacy level, change the external file sharing level and even delete this groups's Teams team if you wish to. You can also let people outside the organization email this group or not. You can choose to send copies of team emails and events to group member's inboxes. Finally you can choose to not show the group's email address in Outlook, by excluding the group email from the Global Address List (GAL).
Read the full article
0 notes
Text
How to access all Microsoft 365 online apps
This article is also available on my podcast and Youtube channel.
View this article as a how-to video on Youtube.
https://youtu.be/sk_G_kGDUdc?list=PLYbmn4csggdE9qNg7iIOwLJf1EUHUBvCw
Case
In this how-to article, we will show you how to navigate to all Microsoft 365 online apps. We will also provide an overview of the functionality offered by each online app.
The Microsoft 365 user portal is the main end-user facing portal and is accessible from https://office.com, or alternatively from https://portal.office.com.
Solution
To navigate to the available Microsoft 365 online apps, go through the following steps.
- Navigate with your Web browser to https://admin.microsoft.com.
- Click on the dotted square icon on the top left corner, then at the bottom click on "All Apps". This will expand the list of available Microsoft 365 online apps. Click on the three dots next to the desired app to open it in a new tab, pin it to the Office 365 launcher or learn more about the app.
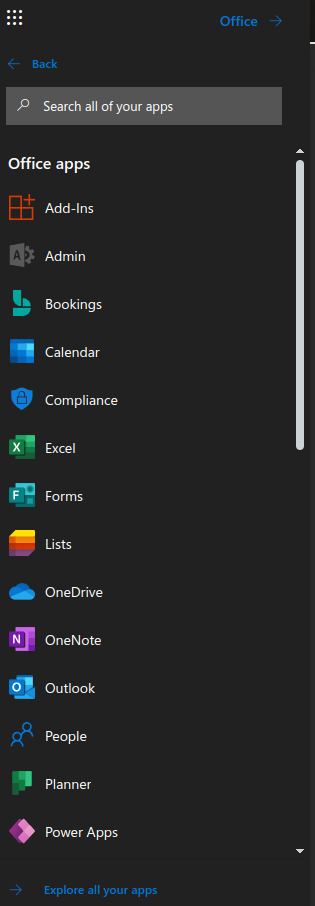
- Alternatively, you can directly navigate to a page which lists all Microsoft 365 online apps by browsing to https://office.com/apps.
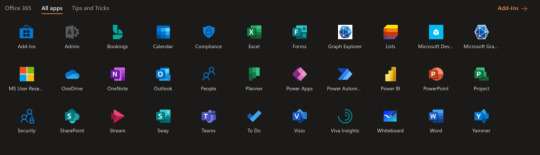
Microsoft 365 provides the following online apps:
- Office Delve: https://delve.office.com/. Use Delve to manage your Microsoft 365 profile, and to discover and organize the information that's likely to be most interesting to you right now - across Microsoft 365.
- MyApps: https://myapps.microsoft.com/. Use the MyApps portal to manage all native and registered Azure AD apps.
- MyAccount: https://myaccount.microsoft.com/. Use the MyAccount portal to manage and edit your Microsoft 365 user account.
- Add-ins. Add-ins are Microsoft 365 certified apps which are listed in the Microsoft AppSource portal, available at https://appsource.microsoft.com. The Add-Ins integrate with Microsoft 365 apps to extend the native functionality with more granular and specialized features.
- Microsoft 365 Admin Center. The Admin Center is the familiar Web-based application which allows Microsoft 365 administrators to manage virtually all aspects of their Microsoft 365 tenant and subscription.
- Bookings. Microsoft Bookings allows you to create bookings calendars and manage bookings inside the calendars by utilizing booking pages, scheduling policies, customer and staff objects.
- Calendar. The Microsoft 365 calendar is the primary service for managing calendar events in Microsoft 365.
- Compliance. The Microsoft Purview Compliance Portal allows you to manage compliance needs using integrated solutions to help protect sensitive information, manage data lifecycles, reduce insider risks and safeguard personal data.
- Excel. The Exchange Online app provides a considerable subset of the Microsoft Excel desktop app features.
- Forms. Microsoft Forms allows you to create different types of online quizzes. Questions can be organized in groups and answers can be collected and shared with quiz participants. This is a great tool for training and education but has unlimited possibilities in virtually any area.
- Lists. Microsoft List allows you to import an existing Excel list or create a new blank list or a list based on a template. Known templates include the issue tracker, employee onboarding, event itinerary, asset manager, recruitment tracker, travel requests, work progress tracker, content scheduler, gift ideas and expense tracker. The lists app has a tight integration with Excel and Power Platform.
- OneDrive. Onedrive for Business is the commercial version of the free OneDrive and comes with most licensing plans of Microsoft 365. Onedrive for Business files can also be accessed via a Web browser, since the OneDrive for Business account of each user is part of the Sharepoint Online service.
- OneNote. The Onenote Online app provides a considerable subset of the Microsoft Onenote desktop app features.
- Outlook on the Web. The Outlook on the Web app provides a considerable subset of the Microsoft Outlook desktop app features.
- People. The People app is essentially the Microsoft Outlook Contacts section. This corresponds to the Exchange Online Global Address List contacts as well as each user's local contacts and contact lists.
- Planner. Microsoft Planner is a task and collaboration management tool with a basic interface. It allows you to create plans and add buckets and tasks inside each plan. One possible scenario in which this app can be used is internal task management by a company's department.
- Power Apps. Power Apps allows you to build mobile and Web apps by utilizing data already available inside your organization. Power Apps applies the low code principle to allow you to design your apps almost entirely visually, without the need with big chunks of code.
- Power Automate. Power Automate allows you to create workflows between your apps, services and data to automate parts of the tasks which would be carried out manually under normal circumstances.
- Power BI. Power BI allows you to analyze and visualize data and create meaningful business reports.
- PowerPoint. The Powerpoint Online app provides a considerable subset of the Microsoft Powerpoint desktop app features.
- Project. Allows you to develop project plans, manage tasks and collaboration and control budgets. This is the Web based version of the Microsoft project app.
- Security. The Microsoft 365 Defender portal is the central point of management for all things security in Microsoft 365.
- Sharepoint Online. This is the Sharepoint Online home site administration site. Administrators and end users can navigate to this site to manage, edit and work with Sharepoint Online sites.
- Stream. Share videos with members of the Microsoft 365 organization for streaming view.
- Sway. Microsoft Sway allows you to create and share interactive reports, presentations, personal stories and many more template documents.
- Teams. Microsoft Teams is Microsoft's de facto unified communications client, covering presence, instant messaging, audio and video conferencing and the Microsoft Phone System (PSTN calling).
- To Do. Microsoft To Do allows you to keep track of your tasks in one place.
- Visio. Microsoft Visio Online work similarly to the Microsoft Visio desktop app. It can be used to design any diagram and further edit it in the Microsoft Visio desktop app.
- Viva Insights. Microsoft Viva insights includes various mini apps which aim to improve your daily productivity and well being. Viva uses integrated artificial intelligence. For example it can recognize your working habits and suggest actions based on things you have mentioned in a call or in an email.
- Whiteboard. Microsoft Whiteboard allows you to collaborate on a free form canvas via either touch, pen or keyboard.
- Word. The Word Online app provides a considerable subset of the Microsoft Word desktop app features.
- Yammer. Microsoft Yammer is Microsoft's closed social network and allows you to collaborate with coworkers and classmates at https,web,dot,yammer,dot,com.
- Graph Explorer. The Microsoft Graph Explorer is a very useful Web-based tool which allows you to either simulate or run Microsoft Graph REST API requests. Authentication is required before you can issue the REST requests.
- Microsoft Developer Sample Data Packs. The Microsoft Developer Sample Data Packs are only available in some specific Microsoft 365 developer plans.
- Microsoft Graph Powershell. Given the big shift of Microsoft to the Microsoft Graph REST API for all Microsoft 365 features, a special icon has been included in the list of Microsoft 365 apps, just to link to the official "Getting started with the Microsoft Graph Powershell SDK" Web page.
- MS User Research. This is an optional application for those Microsoft 365 users who wish to offer assistance to Microsoft User Research.
Read the full article
0 notes
Text
How to access all Microsoft 365 admin centers
This article is also available in my podcast and Youtube channel.
View this article as a how-to video on Youtube.
https://youtu.be/p0z1CeEUJsM?list=PLYbmn4csggdE9qNg7iIOwLJf1EUHUBvCw
Case
You need to familiarize yourself with all the available Microsoft 365 Web-based admin centers and keep a list of URLs from which to access these admin centers. In this how-to article, we will show you how to navigate to all Microsoft 365 admin centers. We will also provide a brief overview of the functionality available in each admin center.
Solution
Microsoft 365 provides the following admin centers:
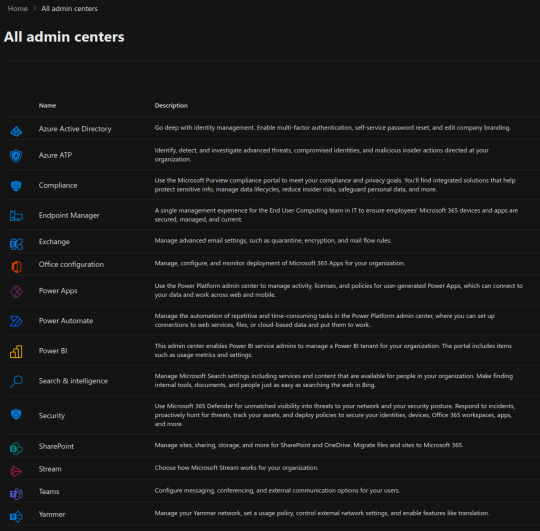
- Microsoft 365 main admin center. The main admin center allows you to manage most aspects of Microsoft 365 administration, including users, teams and groups, roles, resources, billing, support, reports and health monitoring. The main admin center can be reached at https,admin,dot,microsoft,dot,com.
- Azure Active Directory. Azure Active Directory allows you to control Identity and Access Management, IAM, in Microsoft 365. You can enable multi-factor authentication, self-service password reset, and edit company branding, among other available functions. The Azure Active Directory admin center can be reached at https,aad,dot,portal,azure,dot,com.
- Azure Defender for Identity. With Azure Defender you can identify, detect, and investigate advanced threats, compromised identities, and malicious insider actions directed at your organization. The Azure Defender for Identity admin center can be reached at https,tenantname,dot,atp,dot,azure,dot,com.
- Microsoft Purview compliance portal. Use the Microsoft Purview compliance portal to meet your compliance and privacy goals. You will find integrated solutions which assist you in protecting sensitive information, manage data lifecycles, reduce insider risks, safeguard personal data, among other features. The Microsoft Purview admin center can be reached at https,compliance,dot,microsoft,dot,com.
- Endpoint Manager is a a single management experience for the End User Computing team in IT to ensure employees' Microsoft 365 devices and apps are secured, managed, and current. The endpoint manager admin center can be reached at https,endpoint,dot,microsoft,dot,com.
- Exchange Online. The Exchange Online admin portal allows SMTP administrators to manage advanced email settings, such as quarantine, encryption, and mail flow rules, among other available features. The Exchange Online admin center can be reached at https,admin,dot,exchange,dot,microsoft,dot,com.
- Office configuration. This admin center allows you to manage, configure, and monitor deployment of Microsoft 365 Apps for your organization. The Office configuration portal allows you to graphically create Office 365 app configuration files, xml, to be used as input in the Office deployment tool, which can automate Office 365 deployments and upgrades. The Office configuration admin center can be reached at https,admin,dot,microsoft,dot,com.
- Power Apps. Use the Power Platform admin center to manage activity, licenses, and policies for user-generated Power Apps, which can connect to your data and work across web and mobile. The Power Apps admin center can be reached at https,admin,dot,microsoft,dot,com.
- Power Automate. Manage the automation of repetitive and time-consuming tasks in the Power Platform admin center, where you can set up connections to web services, files, or cloud-based data and put them to work.
- Power BI. This admin center enables Power BI service admins to manage a Power BI tenant for your organization. The portal includes items such as usage metrics and settings. The Power Automate admin center can be reached at https,admin,dot,microsoft,dot,com. The Power BI admin center can be reached at https,admin,dot,microsoft,dot,com.
- Search and intelligence. Manage Microsoft Search settings including services and content that are available for people in your organization. Make finding internal tools, documents, and people just as easy as searching the web in Bing. The Search and Intelligence admin center can be reached at https,admin,dot,microsoft,dot,com.
- Security. The security portal is now renamed to Microsoft 365 Defender admin center. Use the Microsoft 365 Defender admin center for visibility into threats to your network and your security posture. Respond to incidents, proactively hunt for threats, track your assets, and deploy policies to secure your identities, devices, Office 365 workspaces, apps, among other features. The Microsoft 365 Defender admin center can be reached at https,admin,dot,microsoft,dot,com.
- SharePoint Online. The Sharepoint Online admin center allows you to manage sites, sharing policies, storage, and all other available features of SharePoint Online and OneDrive for Business. You can also use this admin center to streamline your data migration to Sharepoint Online sites and OneDrive for Business. The Sharepoint Online admin center can be reached at https,admin,dot,microsoft,dot,com.
- Stream. Use the Microsoft Stream Admin Center to manage video upload settings and organize your corporate video portal. The Stream admin center can be reached at https,admin,dot,microsoft,dot,com.
- Teams. Use the Microsoft Teams admin center to configure presence, messaging, conferencing, and external communication options for your users, as well as any kind of Microsoft Teams policy which can be applied to your organization and to your Teams and groups. The Teams admin center can be reached at https,admin,dot,microsoft,dot,com.
- Yammer. This admin center allows you to manage your Yammer social network, set a usage policy, control external network settings, and enable features like translation. The Yammer admin center can be reached at https,admin,dot,microsoft,dot,com.
Read the full article
#admincenter#administration#AzureAD#ExchangeOnline#M365#microsoft365#office#office365#portal#powerapps#powerautomate#PowerPlatform#sharepointonline#Teams#Web
0 notes
Text
How to monitor Microsoft 365 service health status
This article is also available in my podcast and in my Youtube channel.
You can view the full Youtube video below.
https://youtu.be/q4BHDGaH59M
Case
You need to monitor and manage the health status of all Microsoft 365 services in your tenant as well as manage Microsoft 365 performance monitoring and email alerts on Microsoft 365 health issues and new service features.
Solution
In this how-to article, we will show you how to monitor Microsoft 365 service health status in the admin center. This includes service health, message center, product feedback and network connectivity. To access the Microsoft 365 admin center portal, browse to https://admin.microsoft.com and login with your global administrator credentials.
Service Health
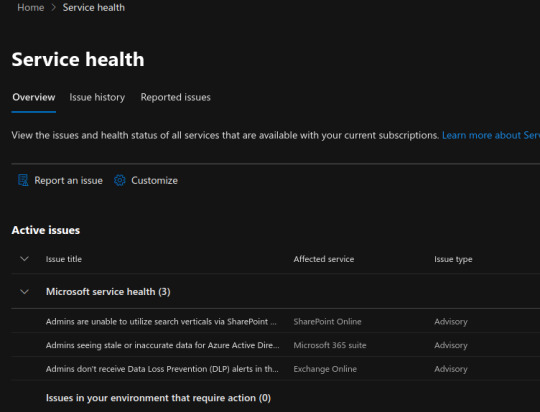
The service health page has three available tabs, namely the Overview, Issue History and Reported Issues tabs.
Overview
On this page you can view the active issues in all Microsoft 365 services and also review the status of all Services (healthy or advisory or incident). By clicking the "Customize" button, you can customize the service health view and configure email alerts to be sent to your administrator users with all service health advisories and incidents. You can define the email recipients of the alerts as well as the type of emails to be send as part of the alerts. It is important to configure the appropriate email addresses as recipients for these email alerts, so that your organization is aware of all Microsoft 365 service service health issues.
You can also click on the "Report an issue" button, to report an incident which occurs in your Microsoft 365 tenant. At a minimum you should provide an issue criticality level, the affected service, a general categorization of the issue and a brief description of the issue along with instructions to reproduce the issue. Click Submit when finished.
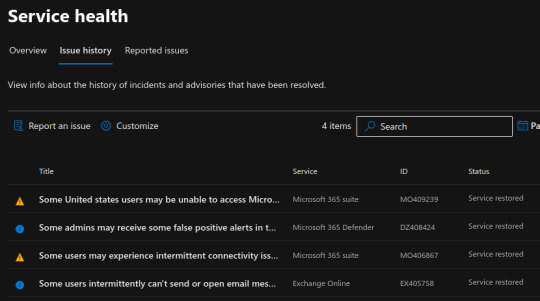
Issue history
In the issue history tab, you can view info about the history of incidents and advisories that have been resolved.
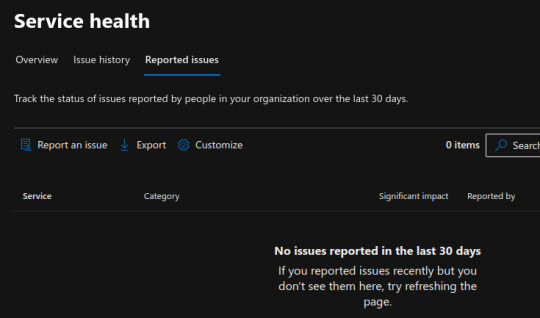
Reported issues
In the Reported Issues tab, you can track the status of issues which have been reported by people in your organization over the last 30 days.
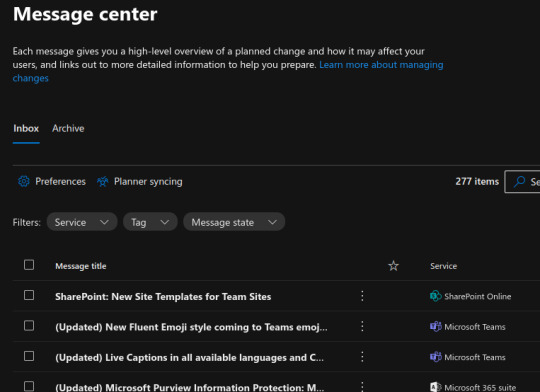
Message Center
Each message gives you a high-level overview of a planned change and how it may affect your users, and links out to more detailed information to help you prepare. You can check older messages in the "Archive" tab.
You can also create custom views of the message center and configure email alerting properties by clicking the "Preferences" button. You can define the email recipients of the alerts as well as the type of emails to be send as part of the alerts. It is important to configure the appropriate email addresses as recipients for these email alerts, so that your organization is aware of all Microsoft 365 service and feature announcements.
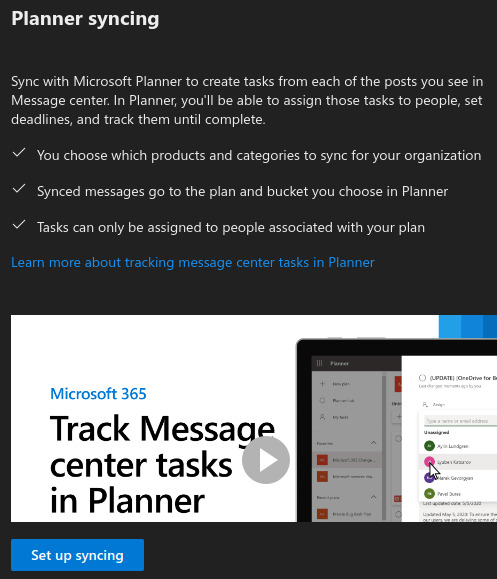
Finally you can synchronize the message center alerts with the Microsoft Planner application, in order to automatically assign tasks to your organization users, to match the action items listed in the Message Center alerts. Click on the "Setup Syncing" button to carry out the synchronization with Microsoft Planner. Microsoft Planner allows you to distribute tasks among your company employees and have them respond to events from the message center with appropriate action items.
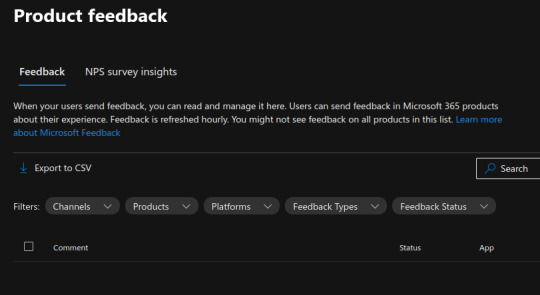
Product Feedback
When your users send feedback, you can read and manage it here. Users can send feedback in Microsoft 365 products about their experience. Feedback is refreshed hourly. You might not see feedback on all products in this list.
You can also view the NPS Survey Insights tab. Before you can view insights from Microsoft surveys, you first need to enable surveys. Net Promoter Score or NPS surveys gather customer feedback and measure how likely customers say they are to recommend products and services to friends and colleagues. This data can be used at the organizational level to determine strategies for adoption and rollout.
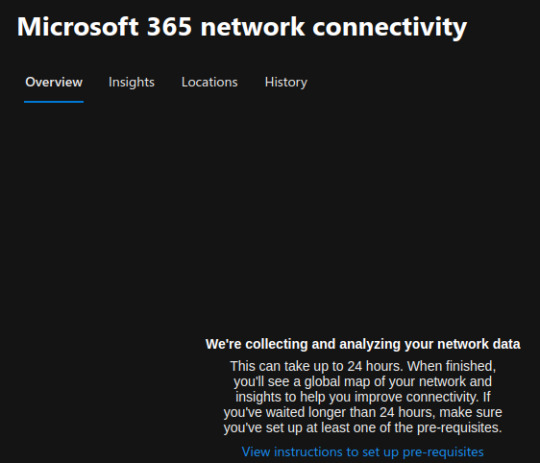
Network Connectivity
Many organizations have network perimeter configurations for increased security. The purpose of a network perimeter is to accommodate employee Internet web site access to untrusted sites. This is helpful for security purposes but can also lead to degradation of Microsoft 365 user performance and user experience. This is what the network connectivity page is for. It helps administrators to measure key performance metrics of the Microsoft 365 apps in real time across all Microsoft 365 physical locations of end users.
You need certain permissions and Microsoft 365 roles to access the network connectivity features. To access the network connectivity page, you must be an administrator for the organization within Microsoft 365. The Report Reader administrative role will have read access to this information. To configure locations and other elements of network connectivity an administrator must have the Service Support Administrator role.
To get started, turn on your location opt-in setting to automatically collect data from devices using Windows Location Services, go to your Locations list to add or upload location data, or run the Microsoft 365 network connectivity test from your office locations. These three options for office location information are detailed below. Whilst network connectivity can be evaluated across the organization, any network design improvements will need to be done for specific office locations. Network connectivity information is provided for each office location once those locations can be determined. There are three options for getting network assessments from your office locations:
- Enable Windows Location Services. For this option, you must have at least two computers running at each office location that support the pre-requisites. OneDrive for Windows version must be up-to-date and installed on each computer. Network tests are only run no more than once a day at a random time. Network measurements are planned to be added to other Office 365 client applications soon.Windows Location Service must be consented on the machines.
- Add locations and provide LAN subnet information. For this option, neither Windows Location Services nor Wi-Fi is required. Your OneDrive for Windows version must be up-to-date and installed on at least one computer at the location and you must know your LAN subnet information for each of your offices. This option allows multiple office locations per city and you can name your office locations. You can also upload them from other sources.
- Manually gather test reports with the Microsoft 365 network connectivity test tool. For this option, you need to identify a person at each location. Ask them to browse to Microsoft 365 network connectivity test on a Windows machine on which they have administrative permissions. On the web site, they need to sign in to their Office 365 account for the same organization that you want to see the results. Then they should click Run test. During the test there's a downloaded Connectivity test EXE. They need to open and execute that. Once the tests are completed, the test result is uploaded to the Admin Center.
Read the full article
#admincenter#advisories#how-to#how-tovideos#incidents#M365#Microsoft#microsoft365#networkconnectivity#NPSsurveys#productfeedback#servicehealth
0 notes
Text
Citrix Virtual Apps and Desktops high DPI resolution issues
Case
You have one or more Ultra High Definition (UHD) screens (4K resolution) and you need to use these screens in a Citrix Virtual Apps and Desktops (VAD) session. When you launch a hosted app or desktop by using the Citrix Workspace App (CWA) client version CR 2206, you notice that the Citrix session screen rendering show very small fonts which make the session elements unreadable.
Full High Definition (FHD) is a resolution of 1920x1080P. Ultra High Definition (UHD) is a resolution of 3840x2160P. This means that there are more pixels per inch (PPI) - or Dots Per Inch (DPI) in a UHD monitor and this in turn provides a higher screen resolution.
This issue is by design and needs a configuration change when your Citrix VAD server infrastructure is version LTSR 1912. The following article provides more details: https://support.citrix.com/article/CTX460068/dpi-support-changes-with-citrix-workspace-app-for-windows-2206.
The current KB article provides guidance on how to resolve Citrix Virtual Apps and Desktops high DPI resolution issues.
Solution
Option 1: Reduce local screen resolution from 4K to 2K and set it below 1920x1080 pixels
This is only a workaround. By changing your screens' resolution from 4K (UHD) to 2K (FHD) resolves the small font issue in the Citrix VAD session.
Option 2: Uninstall the latest CWA CR 2206 version and use latest CWA LTSR 1912
By uninstalling the latest Citrix CWA client CR 2206 version and installing the latest CWA LTSR 1912 client, you override the changed behavior of the CR 2206 client and thus avoid having the small font issue in high DPI screens.
Option 3: Edit the CWA .ini local file and configure domain GPO
The high DPI setting provided by previous versions of the CWA client is no longer present from CWA CR 2206 onwards. According to Citrix the high DPI setting/policy is turned to on by default. To check the relevant setting in the CWA client configuration files in your local machine, navigate to %AppData%ICAClient and check the APPSRV.INI and WFCLIENT.INI configuration files, as shown below.
The same files can be found at $HOME/.ICAClient/ on a Linux local machine.

CWA on WINDOWS

CWA on LINUX
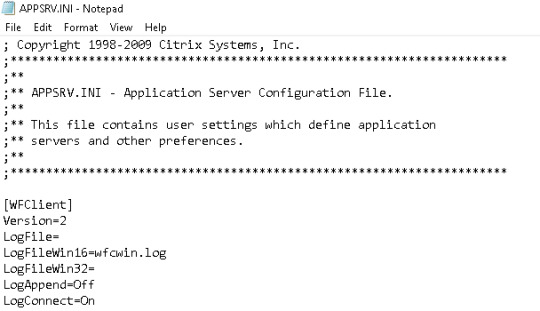
APPSRV.INI

WFCLIENT.INI
In the WFCLIENT.INI file set the following parameter. For the Linux CWA, refer to the following Citrix article for proper guidance on options and limitations: https://docs.citrix.com/en-us/citrix-workspace-app-for-linux/configure-xenapp.html.
DPIMatchingEnabled=TRUE
To complete the above client-side configuration, a server-side configuration is also needed which requires an AD Group Policy Object (GPO) to be configured for the DPI settings, as shown in the below screenshot from Citrix. GPO path is Computer Configuration --> Administrative Templates --> Citrix Components --> Citrix Workspace --> DPI.

As per https://support.citrix.com/article/CTX460068/dpi-support-changes-with-citrix-workspace-app-for-windows-2206, for best compatibility with CWA for Windows 2206, DPI matching must be enabled on 1912 LTSR Multi-session OS VDAs via the Windows registry using the key below.
Name: EnableDpiSupport
Type: DWORD
Value: 1
Location:
“HKLMSOFTWARECitrixGraphics”
Instead of manually changing the above registry key on all your VDAs, it is highly recommended to setup a GPO instead (see above description for details).
Also note that DPI matching is not supported with XenApp/XenDesktop 7.15 LTSR. Citrix recommends customers use CWA for Windows LTSR with these VDAs (see solution option 2 above). As an alternative, DPI matching can be disabled for CWA for Windows 2206 using a group policy.
Sources
https://support.citrix.com/article/CTX230017/configuration-of-dpi-matching-and-clientside-scaling-with-citrix-workspace-app-for-windows
https://support.citrix.com/article/CTX460068/dpi-support-changes-with-citrix-workspace-app-for-windows-2206
https://www.citrix.com/blogs/2018/01/09/making-sense-of-high-resolution-displays-and-dpi-with-citrix-graphics-remoting/
https://www.citrix.com/downloads/workspace-app/workspace-app-for-windows-long-term-service-release/workspace-app-for-windows-1912ltsr.html
https://docs.citrix.com/en-us/citrix-workspace-app-for-windows/1912-ltsr/whats-new/known-issues.html
https://docs.citrix.com/en-us/citrix-workspace-app-for-windows/1912-ltsr/whats-new/fixed-issues.html
Read the full article
#2206#2K#4K#Citrix#CitrixVirtualAppsandDesktops#CitrixWorkspaceApp#DPI#highDPI#LTSR#LTSR1912#smallfonts
0 notes
Text
How to create resource mailboxes and Sharepoint sites in Microsoft 365 admin center
This article is also available on my podcast and the Youtube channel.
View this article as a how-to video on Youtube.
https://youtu.be/LHkJ18-JTVs?list=PLYbmn4csggdE9qNg7iIOwLJf1EUHUBvCw
Case
You need to provision Exchange Online resource mailboxes and Sharepoint Online sites from the Microsoft 365 Admin Center portal.
Solution
In this how-to article, we will show you how to create resource mailboxes and Sharepoint sites from the Microsoft 365 Admin Center portal. By creating a resource mailbox in Exchange Online via the Microsoft 365 Admin Center portal, you can use it for things like a conference room, company car, or equipment which everyone in the organization needs to use, so that those resources are reservable.
Carry out the following steps.
- Navigate to https://admin.microsoft.com and login with a global administrator account.
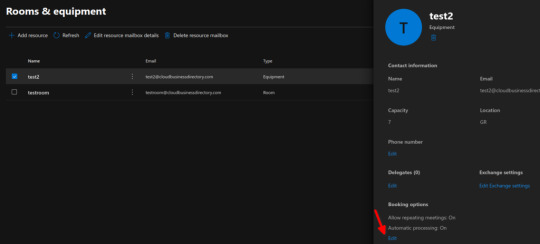
- To create an Exchange Online resource mailbox, on the left pane extract the "Resources" section and click on "Rooms and equipment".
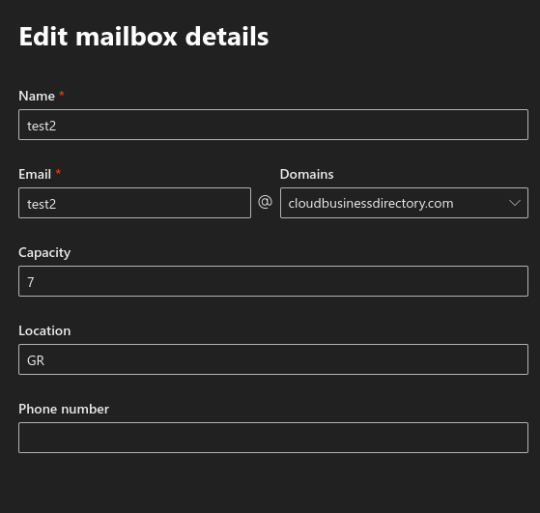
- In the main section click on "Add resource". On the popup window on the right, fill-in all required information.
- First choose the resource type, (room or equipment), then provide a name and email for the resource mailbox.
- Also provide a capacity, (The number of people who can fit in the room or use the equipment at the same time), as well as the location and phone number linked to the resource mailbox.

- Click "Save" to continue. Wait while the new resource mailbox is being created. This might take a few minutes.
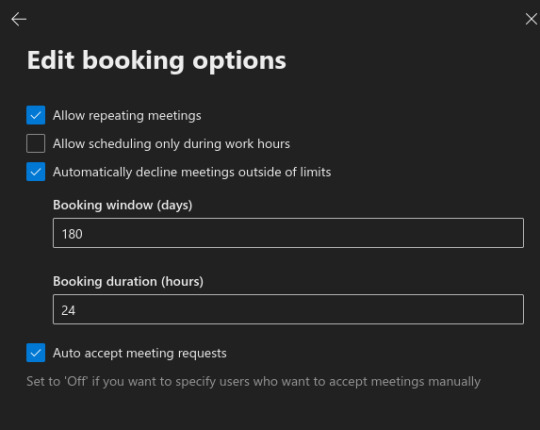
- To edit booking options for the newly created resource mailbox, click on "Edit booking options". This will allow you to setup the following options:
a. Allow repeating meetings
b. Allow scheduling only during work hours
c. Automatically decline meetings outside of limits
d. Set booking windows in days
e. Set booking duration in hours
f. Auto accept meeting requests. Click "Save" when you have finished making changes.
- If you need to edit the properties of an existing resource mailbox, tick next to the mailbox name and click "Edit resource mailbox details".
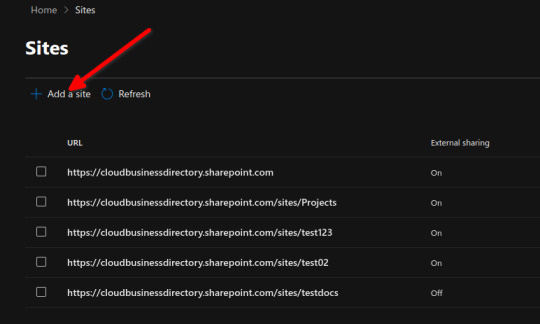
- To add a new Sharepoint Online site, under the resources section on the left, click on "Sites".
- In the main section, click on "Add a site". This will redirect you to the Sharepoint Online Admin Center.
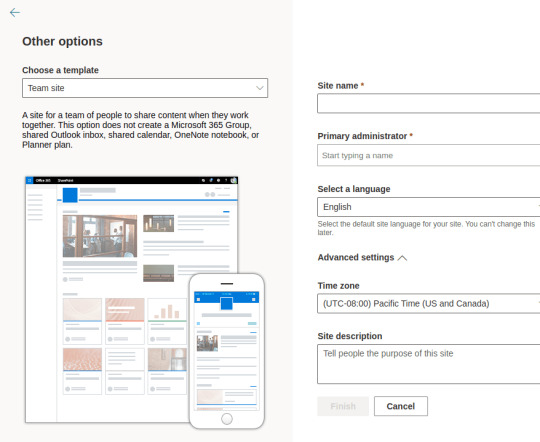
- You must choose a Sharepoint Online site template to use. You can use the team site template, the communication site template or click on "Other options" if you need to use another site template. For the purpose of this demonstration, we will use the "Document Center" site template.

- Provide a site name, the primary administrator, the site language and under "Advanced settings", provide the site time zone and a site description. Click on "Finish" when ready and wait for the new Sharepoint Online site to be provisioned. You can afterwards use the administration options of the newly created site to manage document libraries, user permissions and other configuration options.
Read the full article
0 notes